


HD-TVI Camera Manual
XHD-TVI-02-1For more tips and information visit www.tvision.technology
Handbook &
Instructions
2
Manual Ref: XHD-TVI-02
Introduction
The TVision range of CCTV cameras utilise HD-TVI
technology to transmit full 1080p HD video signals
over Co-ax cable.
HD-TVI o ers many bene ts and provides great value
for money. 1080p TVI images are a staggering 20x the
quality of basic CIF analogue. What’s more the TVI signal
has a high resistance to electro magnetic interference
(EMI), allowing for cable runs of up to 500m without the
need for ampli ers or repeaters.
There are also no complicated skills or techniques to learn
as TVI installations use the same Co-ax cable and BNC
connectors as analogue installs. As TVI still uses 75 ohm
Co-ax cable it is easy to upgrade older systems without
having to rewire.
HD-TVI is a great choice as it is fast becoming the global
standard for HD CCTV. Unlike proprietary technologies
such as HD-CVI which are only supported by a single
manufacturer, HD-TVI is supported by many.
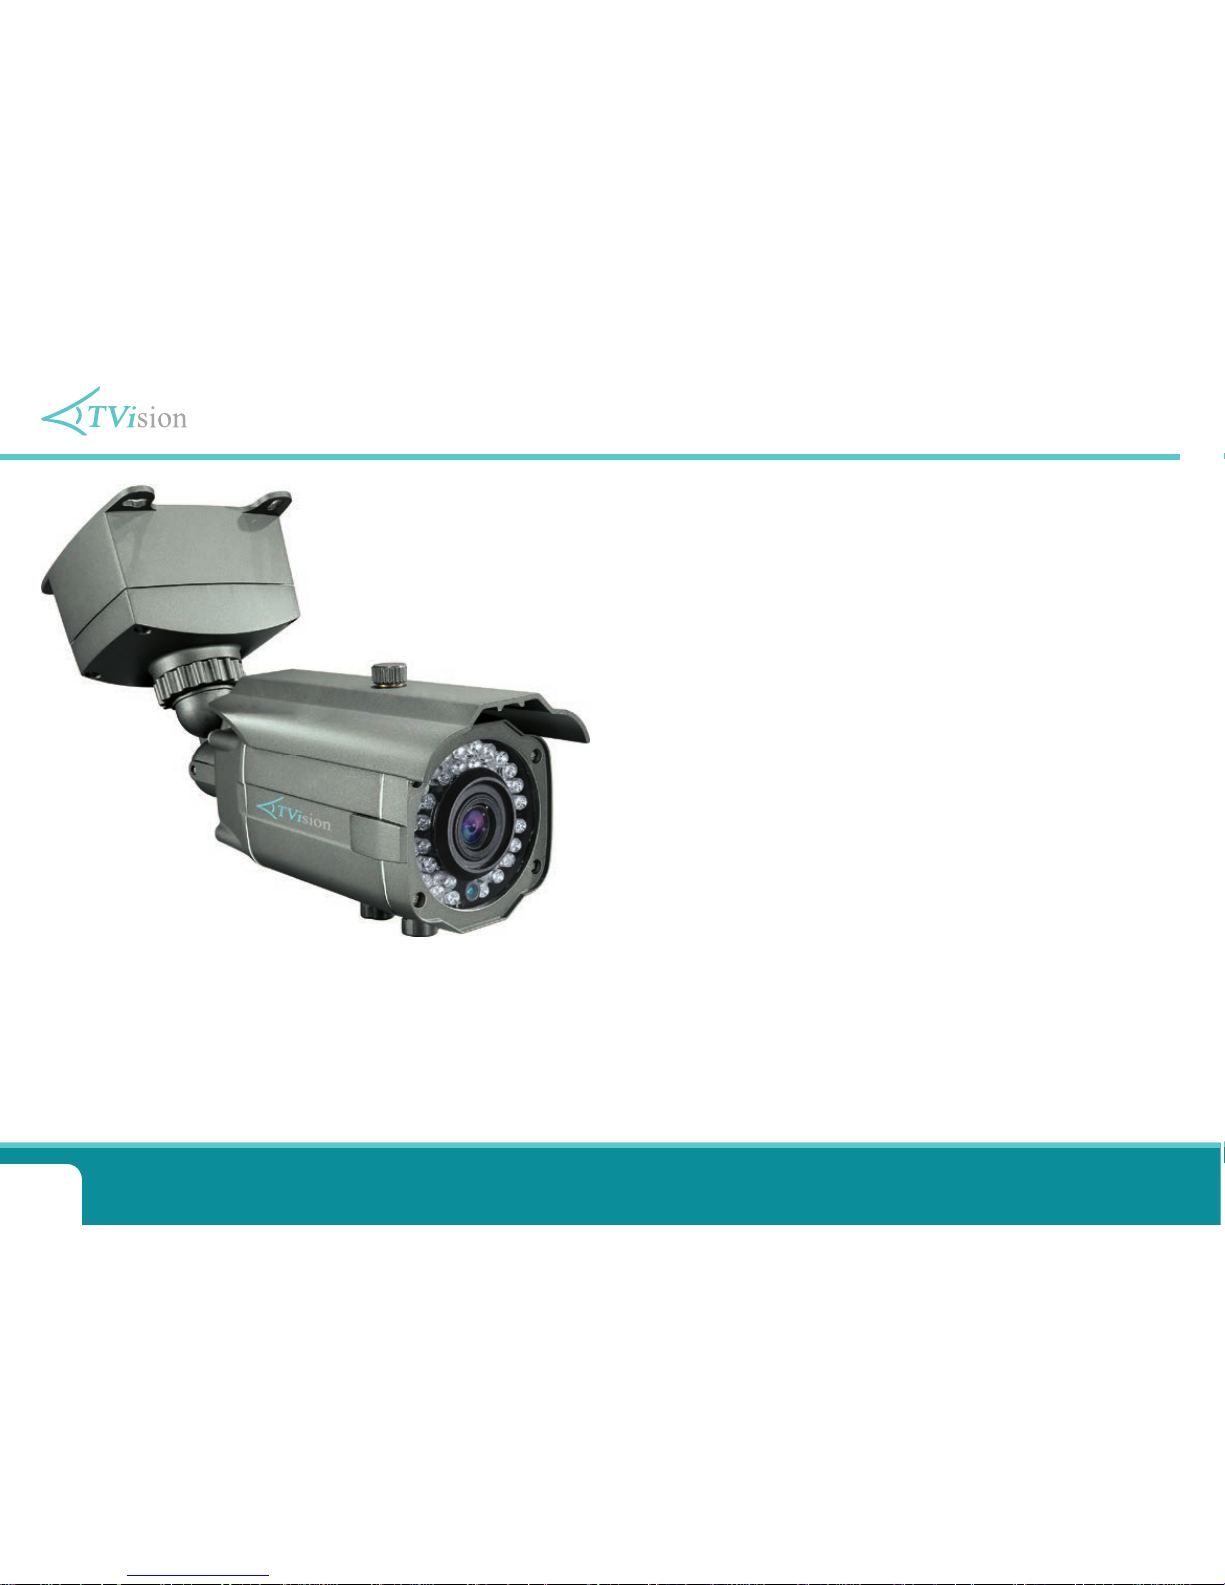
All-In-One HD-TVI Camera Code: SEE835G
3
For more information, tips and advice visit www.tvision.technology
Contents
Introduction 2
Traditional HD-TVI Camera (Code: SEE250/250L) 4
IR External HD-TVI Dome Camera (Code: SEE350W) 8
Fixed Internal HD-TVI Dome Camera (Code: SEE520W) 10
IR Varifocal Internal HD-TVI Dome (Code: SEE550W) 12
IR Fixed Lens HD-TVI Eyeball Cameras (Code: SEE800) 14
IR Varifocal HD-TVI Eyeball Cameras (Code: SEE810) 16
Motorised Zoom IR Varifocal HD-TVI Eyeball Camera (Code: SEE860) 18
External All-In-One IR Camera (Code: SEE835) 20
External Auto Focus All-In-One IR Camera (Code: SEE844) 22
Covert HD-TVI Modules (Code: SEE905/915) 24
Covert HD-TVI Ceiling Camera (Code: SEE990S) 26
Accessing The OSD & Camera Adjustments 28
OSD Menu System 29
Getting The Most Out Of The TVision Range 32
Fault Finding 35
Other Products To Consider 37

4
Manual Ref: XHD-TVI-02
Traditional Camera (Code: SEE250/250L)
Lens 2.8-12mm Varifocal Lens (SEE250L)
Resolution 1920 x 1080P
Video Outputs HD & Analogue
Day/Night True Day/Night Mechanical IR Cut Filter
Minimum Illumination 0.01 Lux
OSD Control Rear Buttons & Up The Co-ax Control
WDR True WDR
Digital Zoom 8x
Power/Consumption 12V DC, 150mA
Build Metal Case
Dimensions 115 x 65 x 80mm
Speci cation
HD & Analogue Outputs
2.8-12mm Lens Option
Hi-Def Colour 1080p
True Day/Night
CS Mount Design
Wide Dynamic Range
8x Digital Zoom
16 Zone Privacy Masking
Motion Detection
Mirror Function
Features
A traditional style of camera to o er a reassuring CCTV
presence in any retail environment. This camera o ers great
exibility as the lens is not pre- tted and can be changed to
suit the installation. Available with a popular 2.8-12mm lens
option or you can choose from our wide range of lenses up
to 50mm for great potential to zoom in on a gate or doorway.
Description
SEE250/250L
SEE250 No Lens
SEE250L 2.8-12mm
5
For more information, tips and advice visit www.tvision.technology
Traditional Camera (Code: SEE250/250L)
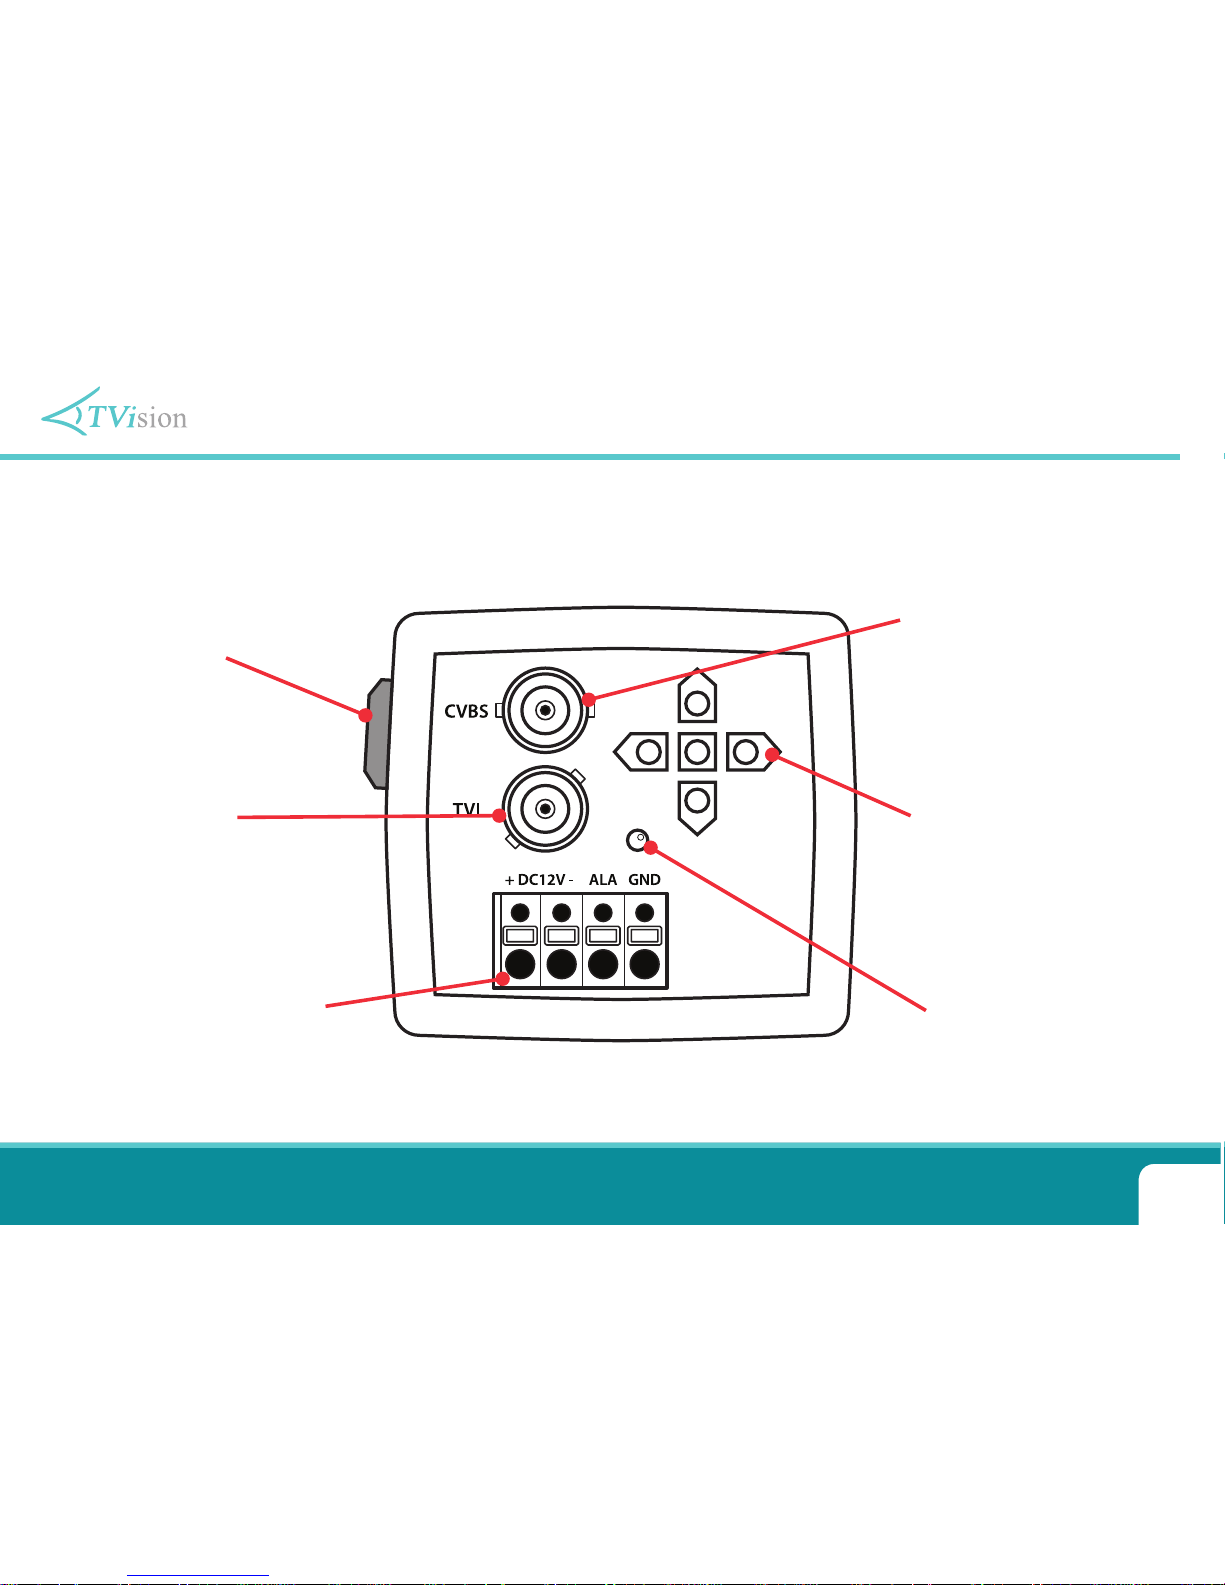
Power LED
BNC Socket for
TVI Output
Standard Analogue
Video out for easy
set up
Auto Iris for Direct
Video Drive
(Side of camera)
Easy Terminal strip
Connections for
Powering up
Easy to use
menu controls
Connecting The Camera
6
Manual Ref: XHD-TVI-02
Traditional Camera (Code: SEE250/250L)
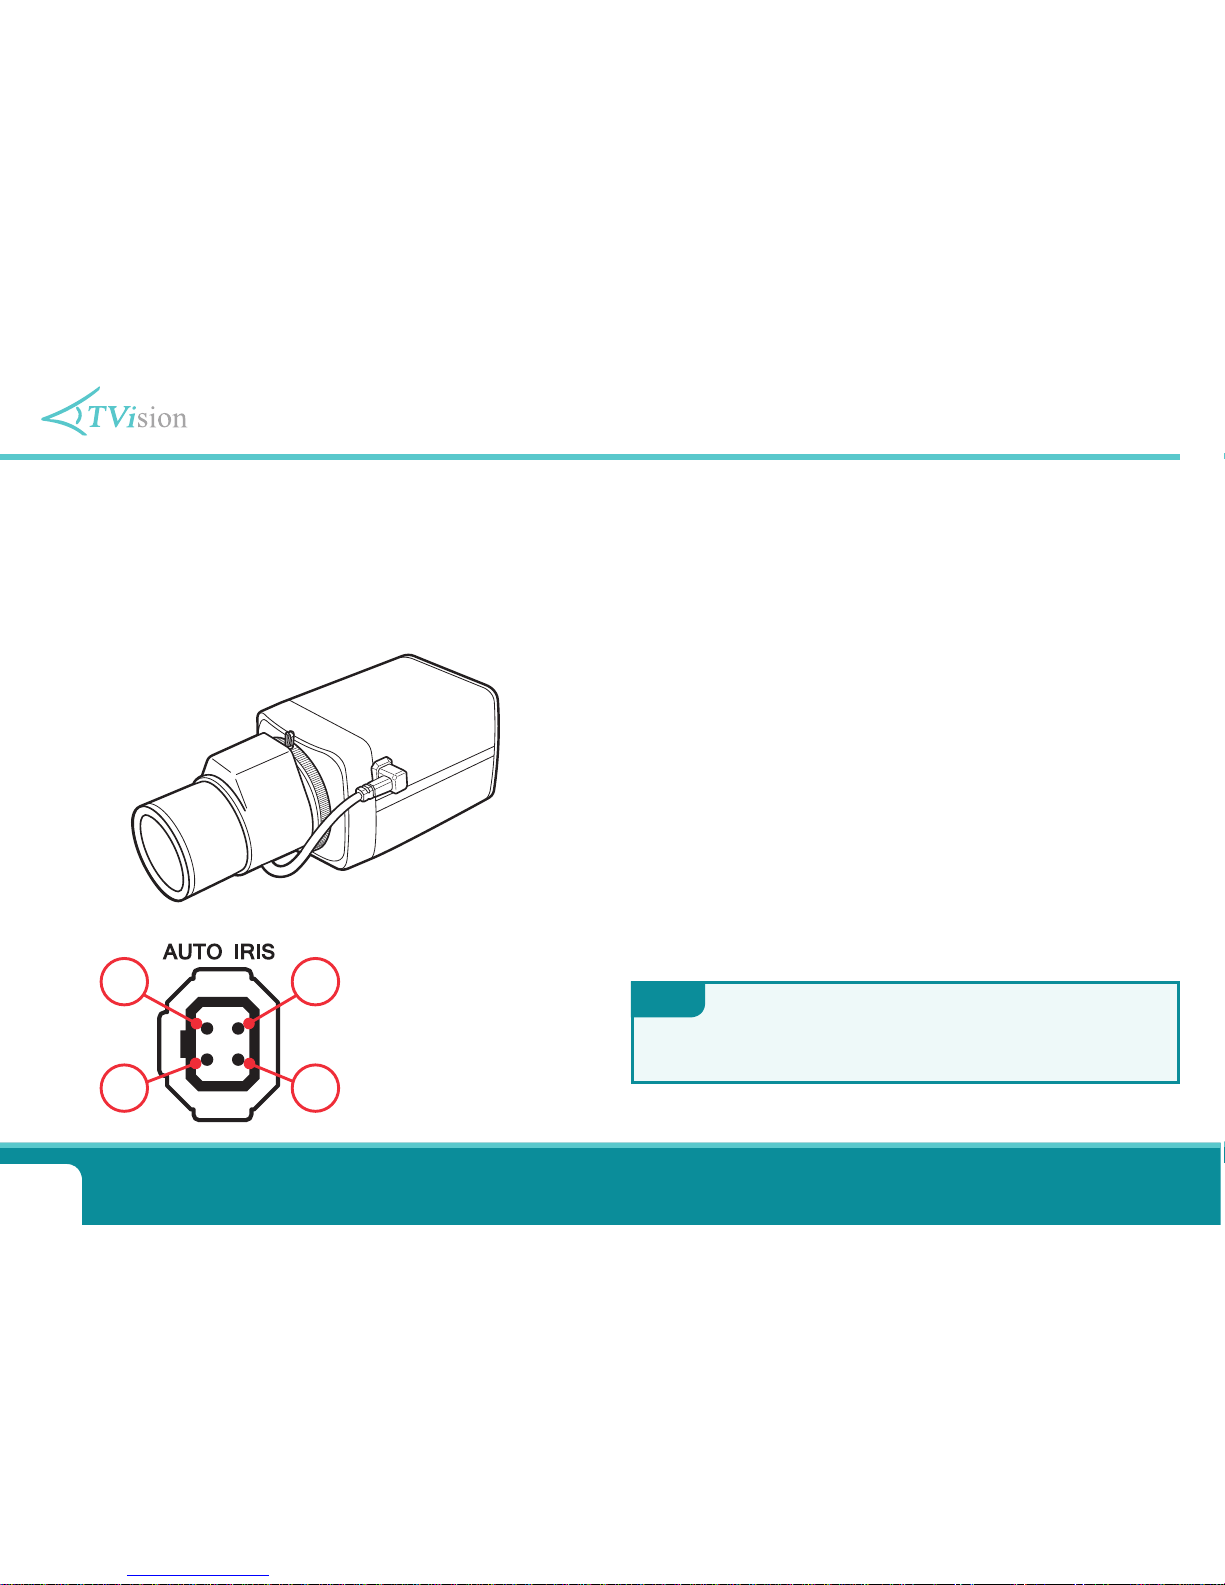
1 3
2 4
1. DAMPING-
2. DAMPING+
3. DRIVE
4. GND
Auto-Iris Direct Drive Connections
Auto Iris type lenses require the 4-pin connector to be attached
to the camera. In most instances your lens will be pre-wired with
this plug, but if needed on-line
Tip 322
which includes a full wiring
diagram can be found at
www.tvision.technology
.
C Or CS Mount Lenses
Most lenses are available in 2 di erent mounting options - C mount
and CS mount.
CS mount lenses are now the most popular size as they are shorter
and more compact than C mount lenses. Most cameras are now
manufactured to accept CS mount lenses. Before tting the lens you
need to verify that you are using a CS mount lens with the camera.
You can con rm this with your lens supplier or the literature that
came with your lens, check the instructions or packaging to see if
your lens is a C or a CS mount version.
If your lens is a C mount type you can still t it to the camera using a
C to CS adapter. See the on-line Tip 323 at www.tvision.technology.
Using A CS Mount Lens
If you are using a standard CS mount lens you can screw the lens
straight into the camera without the need for C-CS adapter ring.
To produce a true HD image TVI cameras require a Mega Pixel
lens. Standard lenses are not produced to a high enough quality.
Note
7
For more information, tips and advice visit www.tvision.technology
Traditional Camera (Code: SEE250/250L)
CCT297 - C-mount to CS-
mount adapter ring
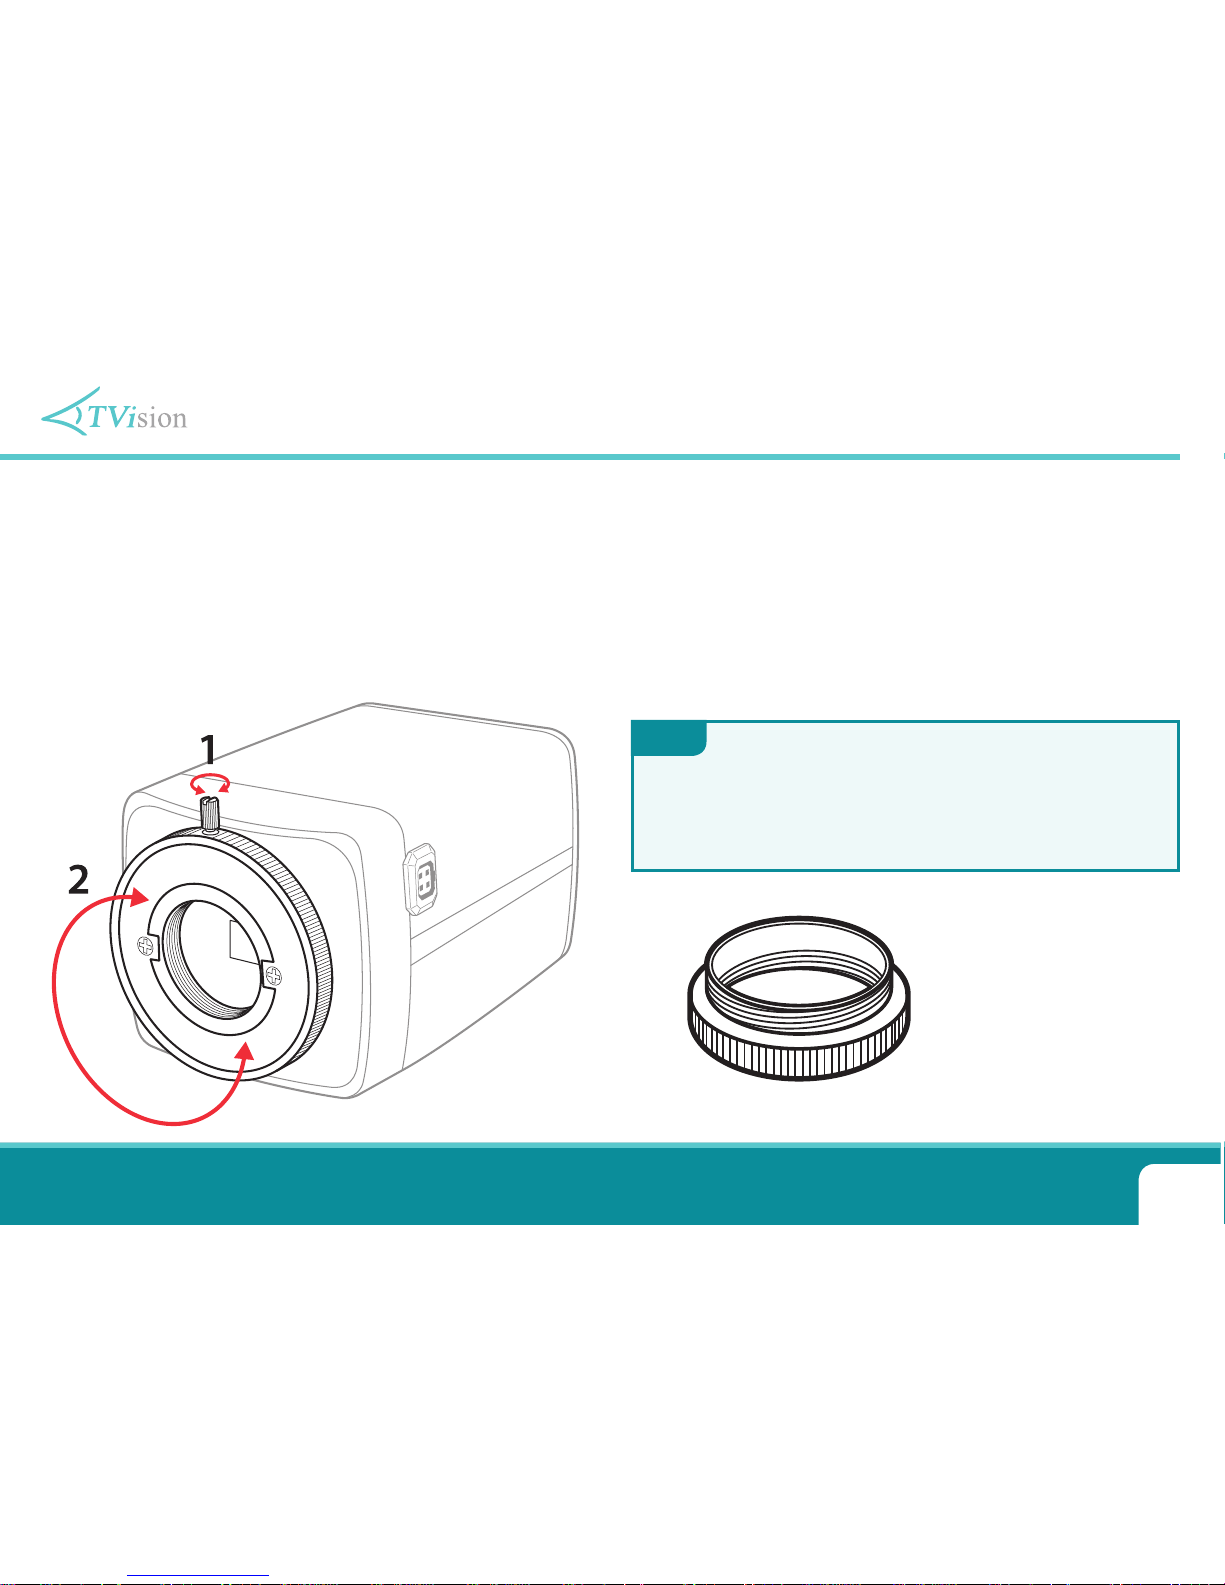
Adjusting The Back Focus
Once you have tted the lens and have an image on the monitor,
you may nd that you can not properly focus the picture using the
ne focal adjustment on the lens itself. In this case you would need
to manually adjust the back focusing on the camera. Adjusting the
back focusing moves the CCD slightly closer to or further away from
the lens.
To adjust the back focusing you will rst need to loosen the crosshead locking screw on the back focusing ring. This will release the
ring allowing it to rotate as shown. Rotating the back focusing ring
moves the CCD forwards and backwards.
This is a trial and error process. Slowly rotate the ring clockwise or
anti-clockwise whilst watching for improvements to the image. Once
satised it is important to re-tighten the locking screw to prevent the
back focusing ring from being adjusted by accident.
If it appears that the lens will never focus correctly then it is
possible that you are trying to t a C-mount lens on the camera,
not a CS-mount lens. If this is the case you will have to use a
CCT297 adapter ring as shown below.
Note

8
Manual Ref: XHD-TVI-02
SEE350W
The SEE350W captures stunning images any time of day
thanks to its True Day/Night capabilities and 30m IR range.
This external IR dome is tted with a 2.8-12mm Varifocal 2.1
Mega Pixel Lens and features 30x IR LEDs, Wide Dynamic
Range, 3D Digital Noise Reduction and a True Day-Night
Mechanical IR lter for clear night time viewing.
Description
HD & Analogue Outputs
2.8-12mm Lens
Hi-Def Colour 1080p
True Day/Night
30x IR With 30m Range
Wide Dynamic Range
8x Digital Zoom
16 Zone Privacy Masking
Motion Detection
Mirror Function
Features
Lens 2.1 Mega Pixel 2.8-12mm Varifocal Lens
Resolution 1920 x 1080P
Video Outputs HD & Analogue
Day/Night True Day/Night Mechanical IR Cut Filter
IR LEDs 30
IR Range 30m
OSD Control In-line Joystick & Up The Co-ax Control
WDR True WDR
Power/Consumption 12V DC, 330mA (IR On)
Build IP66 Rated Metal Case
Dimensions Ø150mm x 128mm (H)
Speci cation
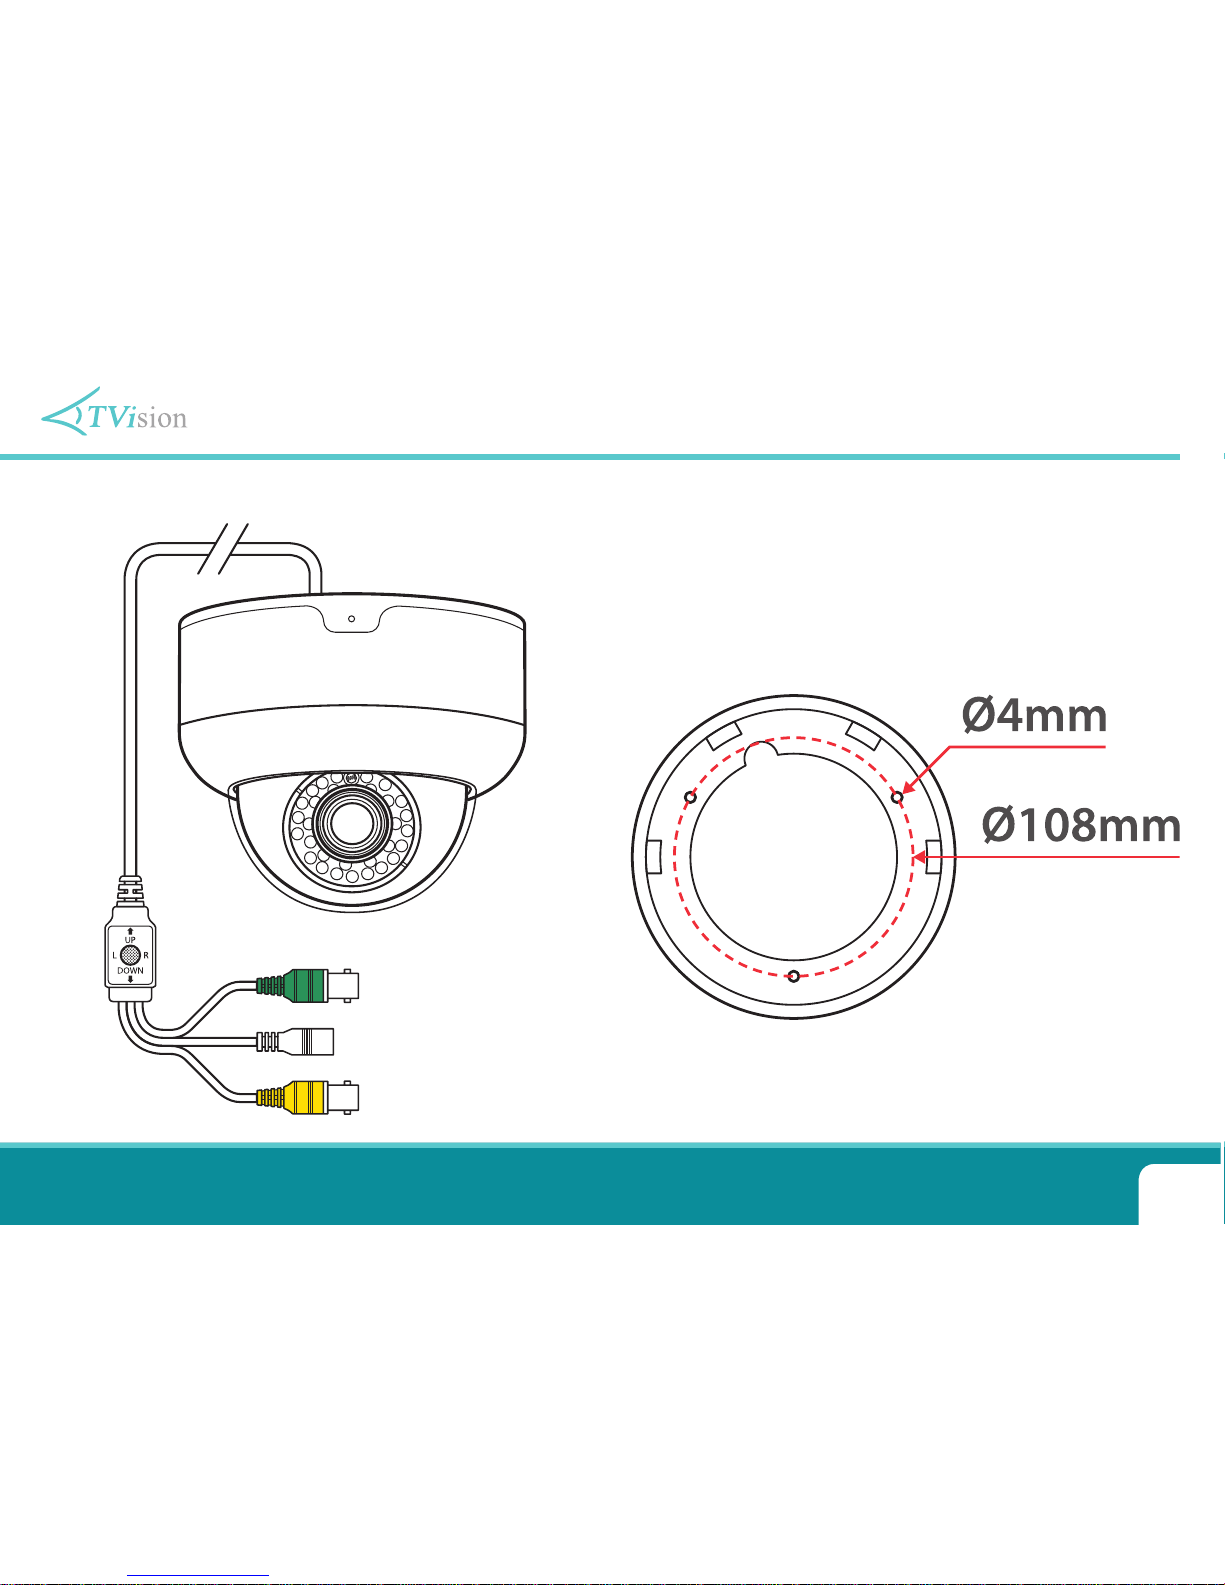
IR External Dome Camera (Code: SEE350W)
9
For more information, tips and advice visit www.tvision.technology
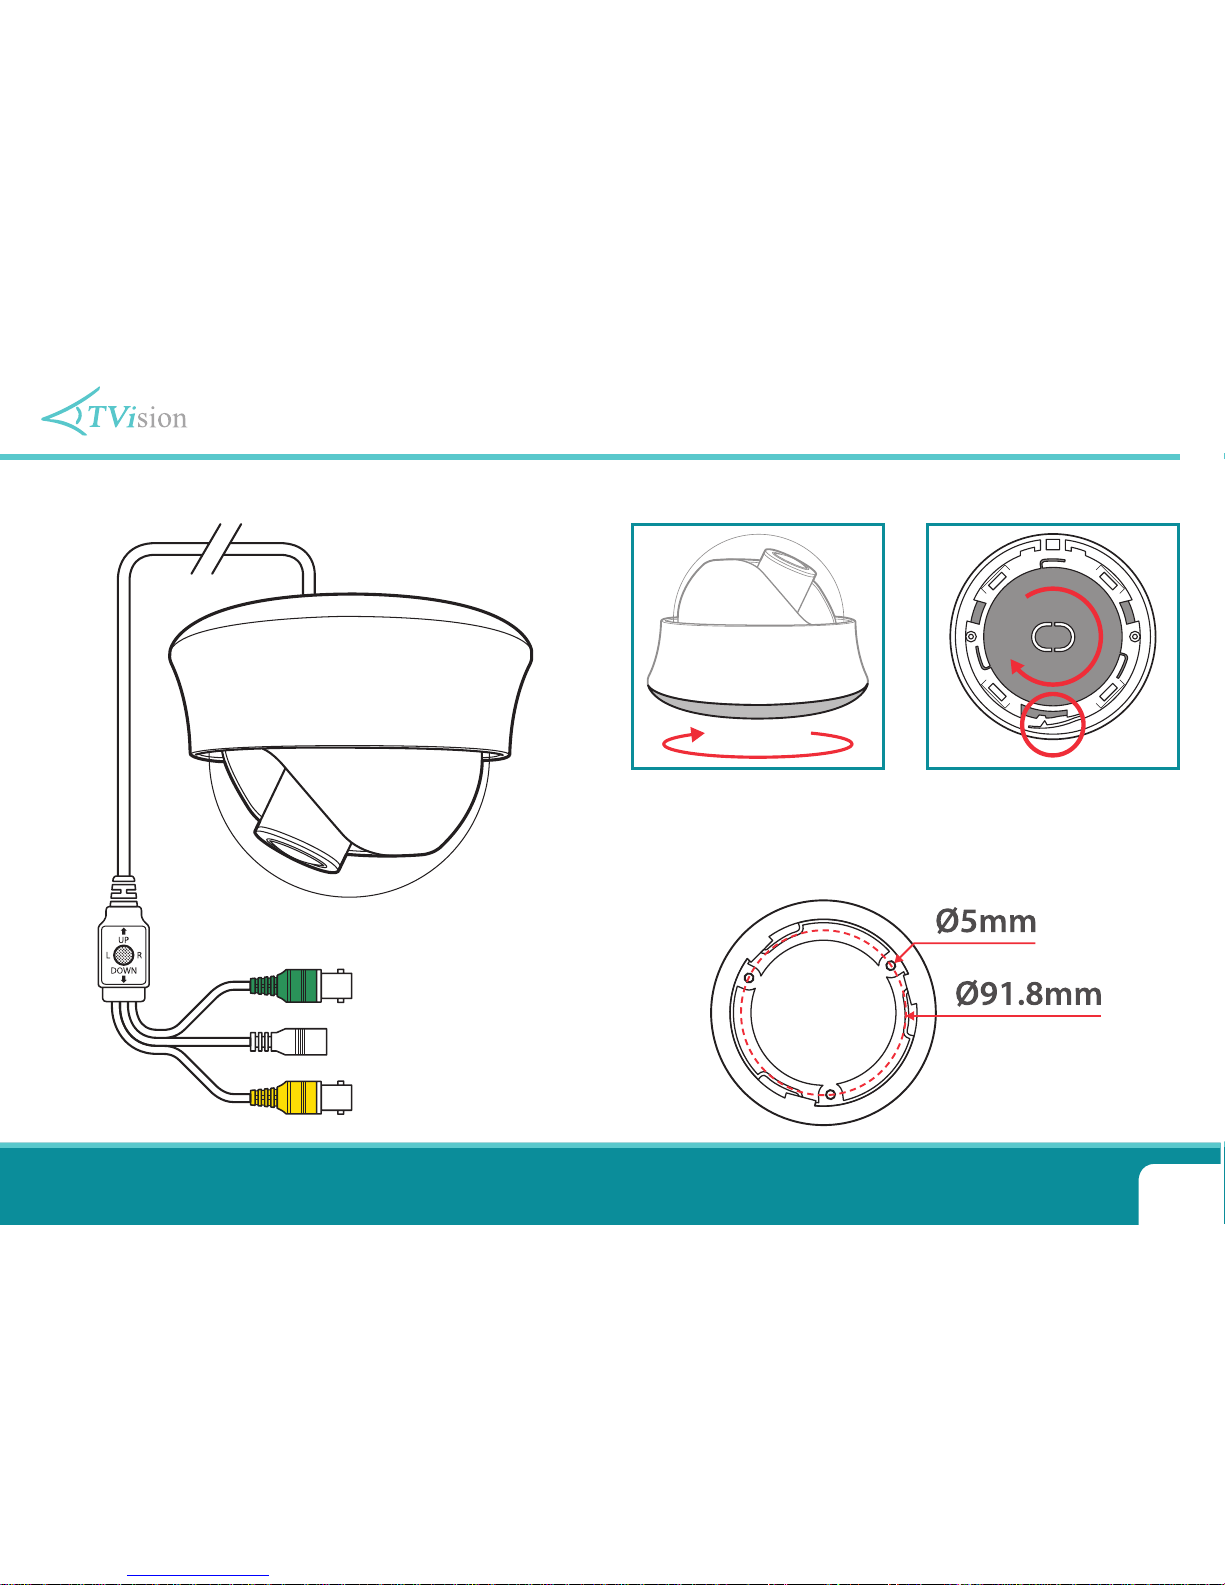
IR External Dome Camera (Code: SEE350W)
HD-TVI Output
2.1mm DC Socket
Analogue Output
Connecting The Camera Mounting The Camera
To mount the camera you will rst need to remove the mounting
plate. To do this loosen the hex screw at the front of the plate,
slide the plate back and lift o. Once the plate has been xed
to the mounting surface the camera can b re-attached to the
mounting plate.
10
Manual Ref: XHD-TVI-02
HD & Analogue Outputs
Wide Angle 3.6mm Lens
Hi-Def Colour 1080p
True Day/Night
0.01 Lux
Wide Dynamic Range
8x Digital Zoom
16 Zone Privacy Masking
Motion Detection
Mirror Function
Features
Fixed Internal Dome Camera (Code: SEE520W)
SEE520W
This internal dome is feature packed and great value for
indoor use.
The dual output of HD-TVI and analogue allows a high
de nition image to be recorded on to the DVR whilst a local
feed can be sent to a basic monitor on a shop counter or
reception desk.
Description
Lens 2.1 Mega Pixel 3.6mm Fixed Lens
Resolution 1920 x 1080P
Video Outputs HD & Analogue
Day/Night True Day/Night Mechanical IR Cut Filter
Minimum Illumination 0.01 Lux
OSD Control Up The Co-ax Control
WDR True WDR
Digital Zoom 8x
Power/Consumption 12V DC, 110mA
Build Plastic Case
Dimensions Ø100mm x 70mm (H)
Speci cation
11
For more information, tips and advice visit www.tvision.technology
Fixed Internal Dome Camera (Code: SEE520W)
HD-TVI Output
2.1mm DC Socket
Analogue Output
Connecting The Camera Mounting The Camera
When mounting the SEE520W you will rst need to remove
the upper housing. Hold the base of the camera, twist the clear
dome counter clockwise, remove, and lift out the black inner
dome. To secure the camera screw through the two larger holes
in the base and into the mounting surface.

12
Manual Ref: XHD-TVI-02
An attractive dome to suit indoor use in offi ces or retail outlets.
The dome’s built-in IR LED array, motion detection and digital
zoom features make it a great choice for installation where the
lighting levels are set to a minimum at night. This allows the
user to get the best out of their surveillance system even during
closing hours.
Description
SEE550W
IR Varifocal Internal Dome (Code: SEE550W)
HD & Analogue Outputs
2.8-12mm Lens
Hi-Def Colour 1080p
True Day/Night
22x IR With 15m Range
Wide Dynamic Range
8x Digital Zoom
16 Zone Privacy Masking
Motion Detection
Mirror Function
Features
Lens 2.1 Mega Pixel 2.8-12mm Varifocal Lens
Resolution 1920 x 1080P
Video Outputs HD & Analogue
Day/Night True Day/Night Mechanical IR Cut Filter
IR LEDs 22
IR Range 15m
OSD Control In-line Joystick & Up The Co-ax Control
WDR True WDR
Power/Consumption 12V DC, 350mA (IR On)
Build Plastic Case
Dimensions Ø130mm x 95mm (H)
Speci cation
13
For more information, tips and advice visit www.tvision.technology
IR Varifocal Internal Dome (Code: SEE550W)
HD-TVI Output
2.1mm DC Socket
Analogue Output
Mounting The CameraConnecting The Camera
1. Rotate the bottom part of
the case and remove.
2. Pull down the locking clip
and rotate the mounting
plate to release.
14
Manual Ref: XHD-TVI-02
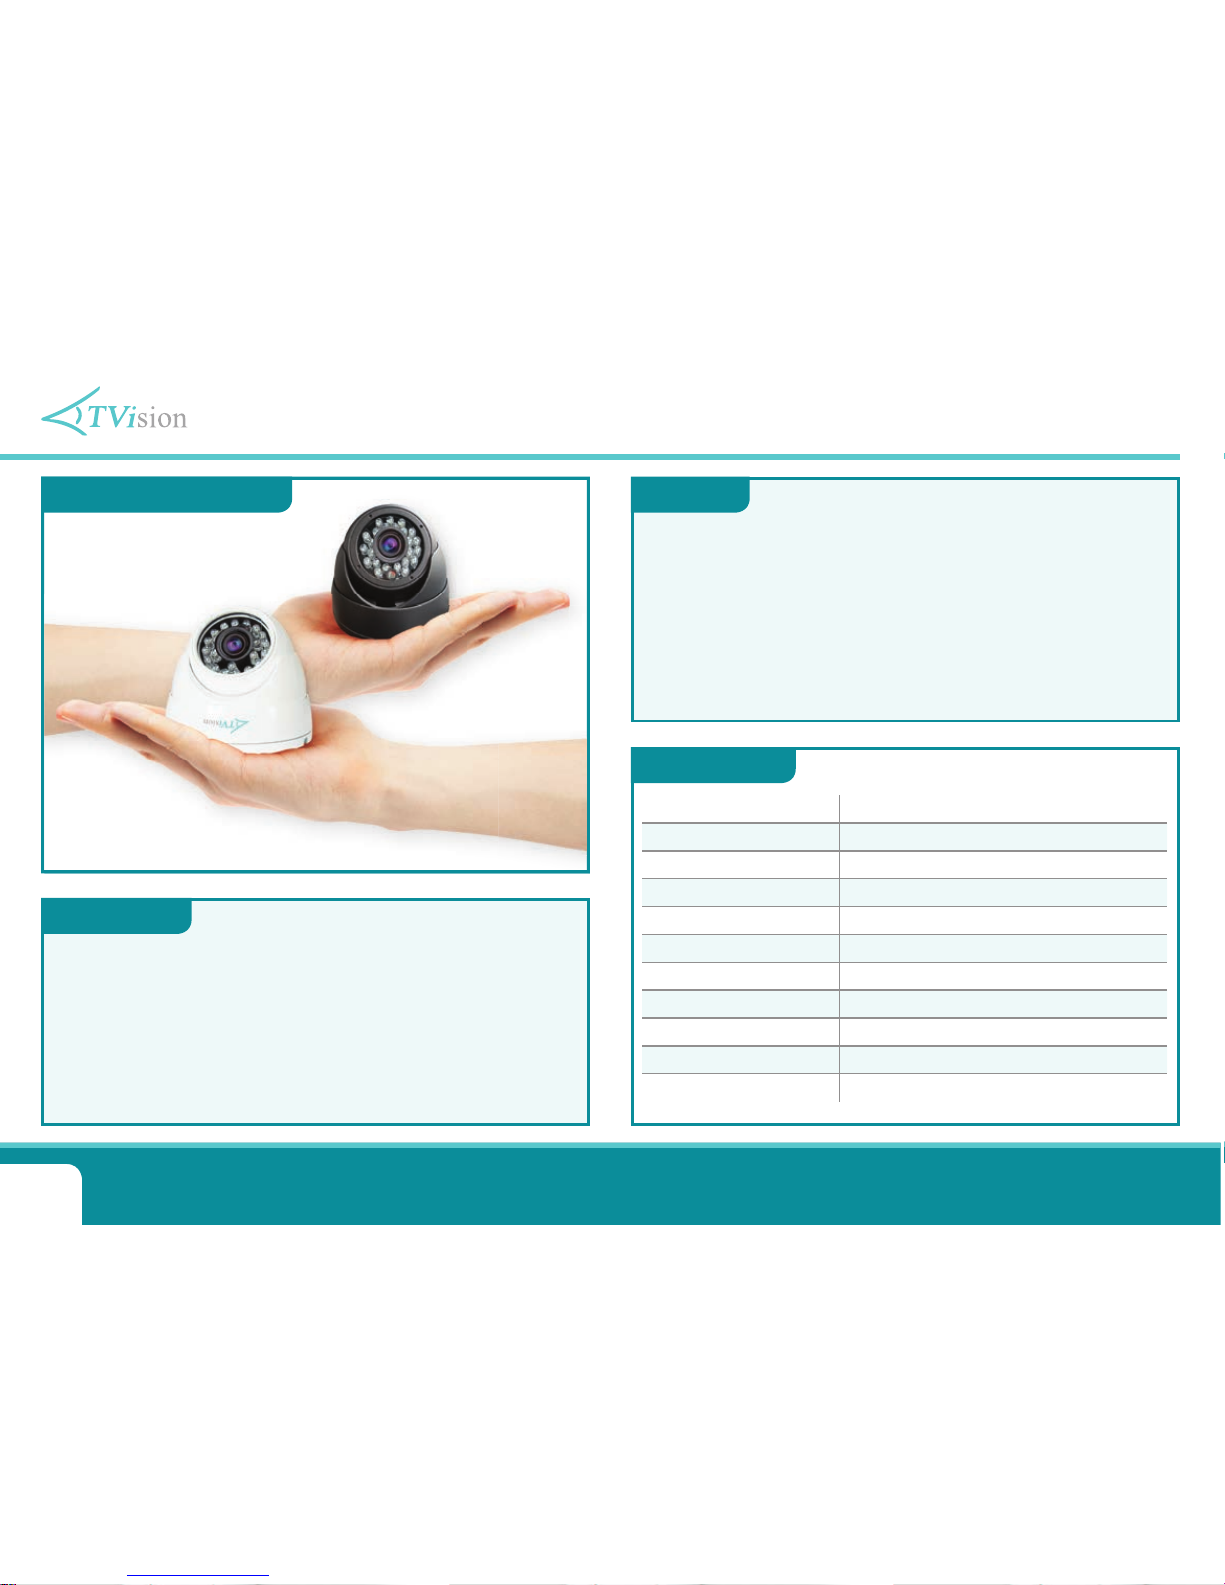
Our popular Eyeball cameras are now in HD! (1080P TVI)
The mini 3.6mm xed models come in both polar white and
graphite grey.
We know it is a rm favourite with installers it’s easy to see why
as it looks just as good indoors as out.
Description
SEE800W & SEE800G
IR Fixed Lens Eyeball Cameras (Code: SEE800)
HD & Analogue Outputs
Wide Angle 3.6mm Lens
Hi-Def Colour 1080p
True Day/Night
IP66 Rated Metal Case
24x IR With 15m Range
8x Digital Zoom
16 Zone Privacy Masking
Motion Detection
Mirror Function
Features
Lens 2.1 Mega Pixel 3.6mm Fixed Lens
Resolution 1920 x 1080P
Video Outputs HD & Analogue
Day/Night True Day/Night Mechanical IR Cut Filter
IR LEDs 24
IR Range 15m
OSD Control In-line Joystick & Up The Co-ax Control
WDR True WDR
Power/Consumption 12V DC, 330mA (IR On)
Build IP66 Rated Metal Case
Dimensions Ø93mm x 68mm (H)
Speci cation

15
For more information, tips and advice visit www.tvision.technology
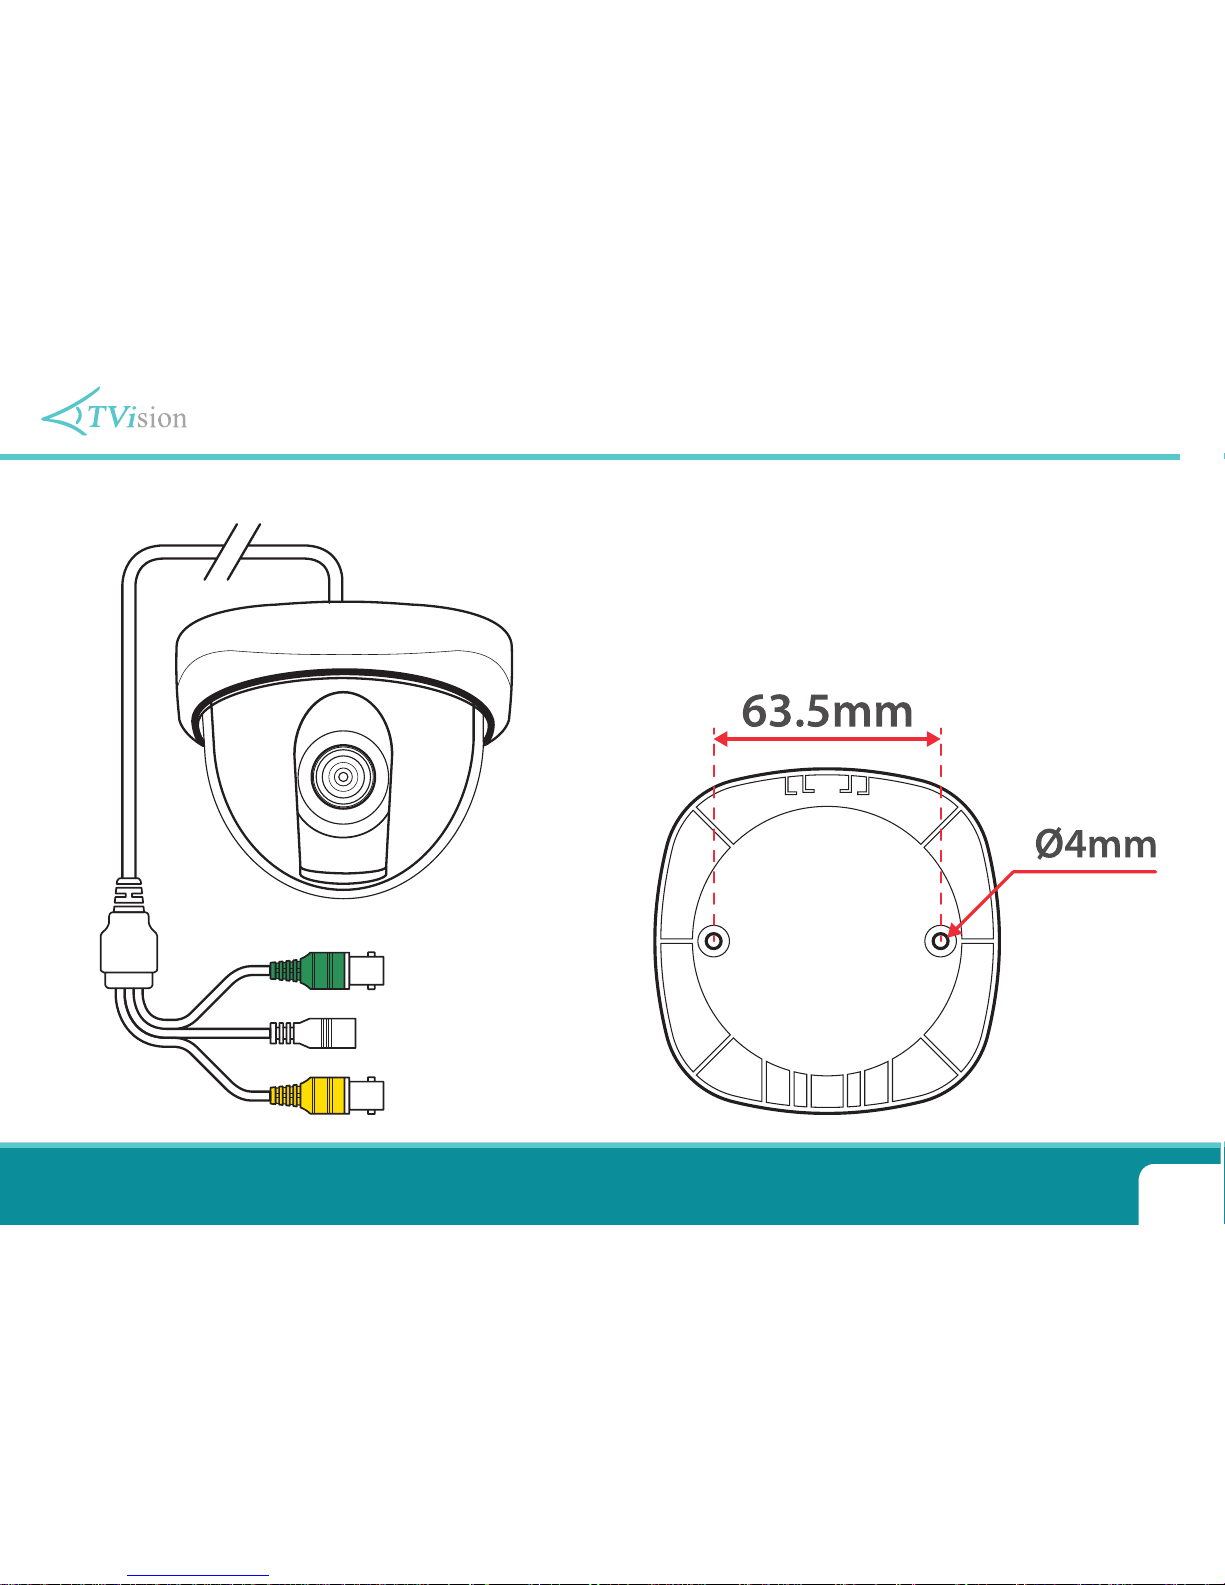
IR Fixed Lens Eyeball Cameras (Code: SEE800)
Mounting The Camera
To mount the camera you will rst need to remove the xing
plate from the base of the camera and attach it to the mounting
surface. To remove the xing plate simply twist to unscrew.
Once securely mounted the camera can be screwed back on to
the xing plate.
A xing hole guide is shown below.
HD-TVI Output
2.1mm DC Socket
Analogue Output
Connecting The Camera

16
Manual Ref: XHD-TVI-02
A great all-rounder, this varifocal eyeball design CCTV camera will
suit 90% of your surveillance requirements. It has a mechanical IR
lter to allow maximum performance of its 30 on board IR LEDs at
night and lters out unwanted IR light during the day.
An extra deep base is available for easy cabling to the camera and
the exible eyeball design allows for wall or ceiling mounting.
Description
IR Varifocal Eyeball Cameras (Code: SEE810)
SEE810G & SEE810W
HD & Analogue Outputs
2.8-12mm Lens
Hi-Def Colour 1080p
True Day/Night
IP66 Rated Metal Case
36x IR With 25m Range
8x Digital Zoom
16 Zone Privacy Masking
Motion Detection
Mirror Function
Features
Lens 2.1 Mega Pixel 2.8-12mm Varifocal Lens
Resolution 1920 x 1080P
Video Outputs HD & Analogue
Day/Night True Day/Night Mechanical IR Cut Filter
IR LEDs 36
IR Range 25m
OSD Control In-line Joystick & Up The Co-ax Control
WDR True WDR
Power/Consumption 12V DC, 350mA (IR On)
Build IP66 Rated Metal Case
Dimensions Ø118mm x 80mm (H)
Speci cation

17
For more information, tips and advice visit www.tvision.technology
IR Varifocal Eyeball Cameras (Code: SEE810)
We also o er extra deep bases
which attach to the xing plate
and provide more room to
make cabling even easier. The
deep bases are available in Grey
(SEE811G) and White (SEE811W)
to match the cameras.
Extra Deep Bases
Mounting The Camera
Easy Cabling!
HD-TVI Output
2.1mm DC Socket
Analogue Output
Connecting The Camera

18
Manual Ref: XHD-TVI-02
SEE860G
IR Eyeball With Motorised Zoom (Code: SEE860)
HD & Analogue Outputs
2.8-12mm Lens
Hi-Def Colour 1080p
True Day/Night
IP66 Rated Metal Case
36x IR With 25m Range
Motorised Zoom & Focus
16 Zone Privacy Masking
Motion Detection
Mirror Function
Features
Lens 2.1 Mega Pixel 2.8-12mm Varifocal Lens
Resolution 1920 x 1080P
Video Outputs HD & Analogue
Day/Night True Day/Night Mechanical IR Cut Filter
IR LEDs 36
IR Range 25m
OSD Control In-line Joystick & Up The Co-ax Control
WDR True WDR
Power/Consumption 12V DC, 500mA (IR On & Zooming)
Build IP66 Rated Metal Case
Dimensions Ø118mm x 80mm (H)
Speci cation
All the same great features of the SEE810 with the added bene t
of motorised zoom and focus. This o ers great exibility as it lets
you adjust the camera at a later date from the DVR so no need for
climbing ladders.
You can manually focus from the DVR too or just let the helpful
autofocus do the work for you.
Description

19
For more information, tips and advice visit www.tvision.technology
IR Eyeball With Motorised Zoom (Code: SEE860)
We also o er an extra deep
base which attaches to the
xing plate and provides more
room to make cabling even
easier. The deep bases are
available in Grey (SEE811G) to
match the camera exactly.
Extra Deep Base
Mounting The Camera
Easy Cabling!
HD-TVI Output
2.1mm DC Socket
Connecting The Camera
Analogue Output

20
Manual Ref: XHD-TVI-02
A tough but attractive camera, great for industrial and outdoor
commercial use. A cable managed bracket and extra deep
base make this an installer’s dream to t. Up the co-ax control
will even allow remote set up so you won’t need to do it up
the ladder. Not only does the camera have a high powered IR
range of 35 metres, it also features motion detection, privacy
masking, mirror and digital zoom functions.
Description
External All-In-One IR Camera (Code: SEE835)
SEE835G & SEE835W
HD & Analogue Outputs
2.8-12mm Lens
Hi-Def Colour 1080p
True Day/Night
Cable Managed Bracket
42x IR With 35m Range
8x Digital Zoom
16 Zone Privacy Masking
Motion Detection
Mirror Function
Features
Lens 2.1 Mega Pixel 2.8-12mm Varifocal Lens
Resolution 1920 x 1080P
Video Outputs HD & Analogue
Day/Night True Day/Night Mechanical IR Cut Filter
IR LEDs 42
IR Range 35m
OSD Control In-line Joystick & Up The Co-ax Control
WDR True WDR
Power/Consumption 12V DC, 350mA (IR On)
Build IP66 Rated Metal Case
Dimensions 308 x 85 x 85mm
Speci cation

21
For more information, tips and advice visit www.tvision.technology
Mounting The Camera
There are four lugs on the base
of the SEE835 used for mounting
the camera.
The two top lugs have keyhole
type xing holes. By securing
these two rst you can then
mark the positions of the bottom
two holes. The camera can then
be lifted o enabling you to drill
the bottom two holes.
Manually Adjusting
The Zoom & Focus
There are two knobs on the
underside of the camera for
adjusting the zoom and focus.
The knob towards the front of
the camera adjusts the focus.
The knob furthest from the
front is used for controlling
manual zoom.
External All-In-One IR Camera (Code: SEE835)
Connecting The Camera
HD-TVI Output
2.1mm DC Socket
Analogue Output
Focus
Lens
Zoom

22
Manual Ref: XHD-TVI-02
Auto Focus All-In-One IR Camera (Code: SEE844)
SEE844
A superb external All-In-One camera with 2 adjustable high
power IR LEDs for a range of up to 40m. Combine the IRs with
the true day/night IR cut lter and the SEE844 captures quality
images any time of day. The motorised zoom and focus can
be con gured via the DVR making setup a breeze. Installation
is made easy thanks to the cable managed bracket and the
included extra deep base.
Description
HD & Analogue Outputs
2.8-12mm Lens
Hi-Def Colour 1080p
True Day/Night
Motorised Zoom & Focus
2x IR With 40m Range
8x Digital Zoom
16 Zone Privacy Masking
Motion Detection
Mirror Function
Features
Lens 2.1 Mega Pixel 2.8-12mm Varifocal Lens
Resolution 1920 x 1080P
Video Outputs HD (Analogue Test Output Only)
Day/Night True Day/Night Mechanical IR Cut Filter
IR LEDs 2 High Power (Adjustable)
IR Range 40m
OSD Control Side Buttons & Up The Co-ax Control
WDR True WDR
Power/Consumption 12V DC, 600mA (IR On)
Build IP66 Rated Metal Case
Dimensions 205 x 98 x 98mm (Exc Bracket)
Speci cation

23
For more information, tips and advice visit www.tvision.technology
Auto Focus All-In-One IR Camera (Code: SEE844)
Connecting The Camera
HD-TVI Output
2.1mm DC Socket
Mounting The Camera
When mounting the camera,
the deep base is xed to the
mounting surface and the
camera is then attached to
the base.
Controls & Testing
The SEE844’s controls and analogue test output are hidden
behind the door on the side of the camera.
Navigation and setup of the menu. Up and Down
controls zoom. Left and Right controls focus.
LED Brightness
control
Analogue test output
(BNC ylead supplied)
Not used on
this model

24
Manual Ref: XHD-TVI-02
Lens 2.1 Mega Pixel Fixed Lens
Resolution 1920 x 1080P
Video Outputs HD & Analogue
Minimum Illumination 0.01 Lux
OSD Control Up The Co-ax Control
WDR True WDR
Power/Consumption 12V DC, 110mA
Bracket Supplied
Build Metal Case
Dimensions SEE905 30 x 30 x 29mm
Dimensions SEE915 30 x 30 x 20mm
Speci cation
HD & Analogue Outputs
Mini Size 30x30mm
Hi-Def Colour 1080p
Free Fixing Bracket
Choice of Lenses
Wide Dynamic Range
8x Digital Zoom
16 Zone Privacy Masking
Motion Detection
Mirror Function
Features
When you are looking for a covert camera, it pays to go HD! The
chances are you are trying to capture criminal activity red-handed
on video so getting a great picture of the perpetrator is essential.
The SEE905 & SEE915 covert modules o er a great alternative to
the ready made smoke or PIR case style as they can be hidden
almost anywhere to suit the environment.
Description
SEE905 & SEE915
Covert HD-TVI Modules (Code: SEE905/915)
SEE905
3.6mm Board Lens
SEE915
3.7mm Pinhole Lens

25
For more information, tips and advice visit www.tvision.technology
Covert HD-TVI Modules (Code: SEE905/915)
Connecting The Camera
HD-TVI Output
2.1mm DC Socket
Analogue Output
Mounting The Camera
The SEE905/915 is supplied with a free mounting bracket that can
be easily xed to virtually any surface.
30mm
30mm

26
Manual Ref: XHD-TVI-02
Lens 2.1 Mega Pixel Fixed 3.6mm Pinhole Lens
Resolution 1920 x 1080P
Video Outputs HD & Analogue
Minimum Illumination 0.01 Lux
OSD Control Up The Co-ax Control
Digital Zoom 8x
Privacy Masking 8 Zone
Power/Consumption 12V DC, 110mA
Build Metal Case
Dimensions Ø85mm x 80mm (H)
Speci cation
HD & Analogue Outputs
3.6mm Pinhole Lens
Hi-Def Colour 1080p
2.1 Mega Pixel Lens
Flush mount
Great For Retail
8x Digital Zoom
8 Zone Privacy Masking
Motion Detection
Mirror Function
Features
This futuristic mini dome is a great choice for retail use. The
ush mount case allows for easy installation into ceiling tiles
for an understated CCTV presence in any high-end shopping
outlet. A wide angle 3.6m lens gives general surveillance of
most areas whilst built-in privacy masking allows you to block
out any unwanted areas such as approaches to changing
room areas.
Description
SEE990S
Covert Ceiling Camera (Code: SEE990S)

27
For more information, tips and advice visit www.tvision.technology
Covert Ceiling Camera (Code: SEE990S)
Connecting The Camera
HD-TVI Output
2.1mm DC Socket
Analogue Output
Mounting The Camera
The SEE990S was designed to be installed in suspended ceilings
like those commonly found in offi ces and retail environments.
To mount the camera you will need to create a Ø60mm hole in the
mounting surface. To secure the camera, screw through the three
fixing holes and into the ceiling.

28
Manual Ref: XHD-TVI-02
Accessing The OSD & Camera Adjustments
There are two ways in which to enter the camera’s OSD menu as explained below:
In-line Joystick & Menu Buttons
A lot of the cameras in the TVision range
have either an in-line joystick or menu
control buttons on the camera itself.
The menu is displayed by pressing the
joystick in or by pressing the centre button
on the camera. Navigate through the menus
and change parameters using the joystick
or by pressing the direction buttons. To
con rm your selection either press the
joystick in or press the centre button.
Up The Co-ax Control
Every camera in the TVision range features
up the Co-ax telemetry. This allows you to
con gure the camera by sending signals
down the video Co-ax cable from the DVR.
This method has the huge bene t of being
able to setup the camera whilst next to the
DVR. This eliminates the time consuming
process of climbing up and down ladders setting up cameras one
at a time. It also enables you to instantly see on-screen the e ects
of any changes made.
This feature is only supported by newer DVRs such the AlienDVR
TVI range.
To access the OSD menu via a DVR you will rst need to view the
camera you wish to con gure. You then need to display the PTZ
controls and press the “Iris +” button to enter the OSD menu. The
direction buttons are then used for navigation and changing
parameters. To con rm selections use the “Iris +” button. You can
also adjust the Zoom and Focus on motorised zoom cameras
using the zoom and focus buttons.

29
For more information, tips and advice visit www.tvision.technology
OSD Menu System - Main Menu
MENU ITEM FEATURE
FOCUS ADJ ON / OFF
2MOTOR
MOTORISED ZOOM
CAMERAS ONLY
AF MODE: AUTO / MANUAL
SCANNING: HALF / FULL
ONEPUSHAF: ON PRESS ‘OK’ TO FOCUS
SYNC TDN: ON / OFF
INITIAL: ON PRESS TO RESET ZOOM
LENS
ELC / ALC
ELC: MODE: NORMAL / DEBLUR
ALC: MODE: INDOOR / OUTDOOR / DEBLUR
EXPOSURE
BRIGHTNESS: 0 ~ 20 10
SHUTTER: AUTO / MANUAL / FLICKER
MANUAL: SPEED: 1/25 ~ 1/16000 1/25
SENSUP: X2 ~ X8 / OFF X2
AGC: 0 ~ 20 (16)
BACKLIGHT
OFF / HLC / BLC / WDR
HLC: LEVEL: 0 ~20 (10) MODE: ALL DAY / NIGHT ONLY
BLC: H POS: 0 ~ 20 (6)
V POS: 0 ~ 20 (4)
HSIZE: 0 ~ 20 5
VSIZE: 0 ~ 20 (3)
WDR: WEIGHT: LOW / MIDDLE / HIGH
DAY&NIGHT MODE: EXTERN / AUTO / COLOR / B&W
Continued on the next page Default settings are highlighted in turquoise.

30
Manual Ref: XHD-TVI-02
OSD Menu System - Main Menu Continued
MENU ITEM FEATURE
DAY&NIGHT
CONTINUED
ANTISAT: 0 ~ 20 (7)
EXTERN S/W: LOW / HIGH
AGC THRES: 0 ~ 20 (11)
AGC MARGIN: 0 ~ 20 (8)
DELAY: LOW / MIDDLE / HIGH
WHITE BAL
AUTO / AUTOext / PRESET / MANUAL
PRESET: PUSHING
MANUAL: KELVIN: LOW / MIDDLE / HIGH
RGAIN: 0 ~ 20 10
BGAIN: 0 ~ 20 10
DNR OFF / LOW / MIDDLE / HIGH
IMAGE
SHARPNESS: 0 ~ 10 5
GAMMA: 0.45 ~ 0.65 0.55
COLOR GAIN: 0 ~ 20 12
MIRROR: OFF / ON
FLIP: OFF / ON
DZOOM: 1.0X ~ 8.0X 1.0X
ACE: OFF / LOW / MIDDLE / HIGH
DEFOG: OFF / ON
ON: MODE: AUTO / MANUAL LEVEL: LOW / MIDDLE / HIGH
SHADING: OFF / ON
ON: WEIGHT: 0 ~ 100% 100%

31
For more information, tips and advice visit www.tvision.technology
OSD Menu System - Main Menu Continued
MENU ITEM FEATURE
IMAGE CONTINUED
PRIVACY: OFF / ON
ON: ZONE NUM: 0 ~ 15 0
ZONE DISP: ON / OFF
HPOS: 0 ~ 60
VPOS: 0 ~ 40
HSIZE: 0 ~ 40
VSIZE: 0 ~ 40
Y LEVEL: 0 ~ 20 10
CR LEVEL: 0 ~ 20 10
CB LEVEL: 0 ~ 20 10
MOTION
OFF / ON
ON: SENSITIVITY: 0 ~ 20 0
WINDOW: 0 ~ 6 6
DET HPOS: 0 ~ 60 0
DET VPOS: 0 ~ 40 0
DET HSIZE: 0 ~ 60 60
DET VSIZE: 0 ~ 40 34
MOTION OSD: OFF / ON
ALARM: OFF / ON
SYSTEM
COM: CAM ID: 0 ~ 255 1 BAUDRATE: 2400 ~ 115200 115200
IMAGE RANGE:
USER / FULL / COMP
USER: OFFSET: 0 ~20 8
OUTPUT MODE: 1080P / 720P / 720P CROP
MONITOR: 0 / 1 / 2 / 3
FRAME RATE: 25 FPS / 30 FPS
CVBS: PAL / NTSC
LANGUAGE: ENG / CHN / CHNS / KOR / JPN / DEU / FRA / NLD / ESP / ITA
COLOR BAR: OFF / ON
RESET: PUSH TO RESET CAMERA BACK TO FACTORY DEFAULTS
Default settings are highlighted in turquoise.

32
Manual Ref: XHD-TVI-02
Getting The Most Out Of The TVision Range
The TVision range has a comprehensive menu system that allows
you to set up the camera to get the most out of it in di erent
demanding situations, below is a guide to some of the key functions:
Exposure
In the exposure settings you are able to adjust the shutter speed and
sensitivity of the CCD to control how much light is collected by the
camera. This allows you to con gure the camera to achieve the best
image possible based on the environment in which it is situated.
Shutter
Controls how long the CCD is exposed to light. A slow shutter
(opened for longer periods of time) makes the image brighter but
any movement may appear blurred.
The shutter speed can be set to auto so that it automatically
adjusts to changes in light levels producing bright images all
the time. You can also manually set the shutter speed so that it is
tailored to the environment in which it is installed.
Sens-Up
Sens-up technology makes the camera more sensitive to light
giving better quality images in low light situations. You can set by
how much the camera’s sensitivity to light is intensi ed.
AGC (Automatic Gain Control)
AGC automatically adjusts the Video amplitude under various
lighting conditions to maintain a bright image. You can choose
the level of amplitude however setting it too high could produce
a noisy image in low light conditions.
Backlight
The cameras feature three di erent backlight modes, HLC
(Highlight Compensation), BLC (Backlight Compensation) and
WDR (Wide Dynamic Range). All 3 modes are included on all
camera models featured in this book. Each mode is designed to
correct the brightness of the image in di erent environments as
described below:
HLC
Masks areas of intense light to properly expose other areas of the
image. For example a car’s headlights would be masked reducing
glare making the number plate visible.
When HLC is enabled the camera will automatically mask bright
areas of the camera’s image. Additionally you can choose between
All Day or Night Only modes.

33
For more information, tips and advice visit www.tvision.technology
Getting The Most Out Of The TVision Range
BLC
Adjusts the exposure of the entire image to properly expose a
subject in the foreground when a bright light source, such as a
window, is situated behind it.
When selected you then set the general area of the camera’s
image you wish to mask.
WDR
Digitally adjusts the exposure in dierent parts of the image to
maintain optimum levels in both the dark and the bright areas.
The strength (Weight) of the WDR lter can be set to Low, Middle
or High depending on the dierence between the bright and dark
areas of the image.
Day & Night
In the Day & Night settings you can control if or when the camera
switches between a colour and a black & white image.
The gain Threshold and Margin can be set telling the camera to
increase or decrease the video amplitude when switching from
day to night and night to day.
A delay can also be set which will instruct the camera to wait for
a set length of time before switching. This accommodates for any
temporary drops in light.
Extern (External)
The switch between colour and black & white is controlled by an
external trigger such as a photocell.
Auto
Auto is the most commonly used option. The camera will
automatically switch to a black & white image when it detects
light levels have dropped below a usable level.
Colour
The camera is forced to permanently produce a colour image. This
is great in environments where there is constant light but could
result in poor quality images in low light situations. As long as the
camera is in colour mode the IR LEDs will not turn on.
B & W (Black & White)
The camera will permanently produce a black & white image. This
is only recommended in areas where the light levels are always
extremely low.

34
Manual Ref: XHD-TVI-02
Getting The Most Out Of The TVision Range
White Balance
White balance is con gured so that objects appear a natural colour.
There are various ways this can be achieved as explained below.
Auto
The white balance is continuously adjusted according to the
colour temperature of the image.
Autoext
Makes allowances for natural light sources and adjusts the image’s
colour accordingly.
Preset
Automatically sets the white balance by holding a white object
such as a piece of paper or card in-front of the camera and
pressing set.
Manual
Allows you to manually ne tune the white balance of the image.
DNR (Digital Noise Reduction)
Digital noise reduction is the process of applying a lter to the
image to reduce noise from the video signal. You can choose the
strength of the lter from Low, Middle and High.
Privacy
Allows the user to “block out” up to 16 areas in the picture so that
the installation complies with the Data Protection Act and avoids
infringing other people’s privacy rights. This could be used to
block out windows on a neighbouring property or screens and
signs that display sensitive information.
D-Zoom
Enables the user to digitally zoom in on an area of the image if
the optical lens is not quite enough. PIP (Picture In Picture) can be
enabled so that a small window showing the original size image
is overlaid onto the screen when zoomed in. It detects movement
in a certain area. This can be used to get a closer view of faces or
number plates.

35
For more information, tips and advice visit www.tvision.technology
Fault Finding
Every TVision camera is built to the highest standards and fully
tested prior to packing. If you experience an problems you need to
investigate your cabling, connections, power supply and monitor.
No Picture From The HD-TVI
There are a number of potential problems that could cause this.
1. Power Supply
The camera can not function without the correct power supply.
A. Test that the camera has the correct voltage supplying it,
you must do this with the camera connected so that there
is load on the PSU. A 12V DC camera should have at least
10.5V DC connected to it. 24V AC cameras should have at
least 21.5V AC connected to them.
B.
For 12V DC cameras only ever use regulated power supplies so
that you can be sure that the camera is always receiving the
correct voltage.
See online
Tip 259
for the ‘Dos And Don’ts Of Power Supplies’
at
www.tvision.technology
.
Tip
2. Cabling
Check there is a picture coming out of the CVBS test output at
the camera. If there is a picture here but not at the DVR it could
be one of the following:
A. Video loss in composite cable as the run is too long. Usually
you would get a picture up to around 500m with HD-TVI.
B. Check the quality of the cable used. For best results,
especially with HD-TVI, use a cable with a solid copper core
such as our antihum branded cable on page 40. Cable with
a solid copper core suers far less signal loss than cheaper,
inferior cable which only has a copper coated core.
C. Ensure that the BNC - BNC lead that you connect between
the camera and monitor has no shorts or open circuits. If
you are making your own lead, don’t forget the lead
must have two wires connected to complete the circuit,
Video and Ground.
D. Ensure all connections to both the camera and DVR are rm
and secure.
Continued on the next page

36
Manual Ref: XHD-TVI-02
Fault Finding
E.
Make sure that there are no tight bends or loops in the cable.
The minimum bend radius for RG59 co-ax cable is 60mm.
Test Monitor Does Not Display An Image
Make sure the test monitor is connected to the camera’s CVBS
(analogue) output and not the HD-TVI output. Most test monitors do
not accept HD-TVI signals.
Up The Co-ax Control Does Not Work
To setup the camera using up the Co-ax control you need to
display the PTZ controls during live view mode on the DVR (
See
page 28
).
If you can not access the camera’s menu using the PTZ controls,
the PTZ protocol may be set incorrectly on the DVR.
See online
Tip 300
for our ‘Top Tips When Installing Cable’
and
Tip 281
for the ‘Dos And Don’ts For Running Co-ax’ at
www.tvision.technology
.
Tip
From the DVR’s menu system enter the PTZ settings and change
the protocol of the channel(s) required to ‘TVI Coaxitron’.
For example on an alienDVR enter the ‘Video’ menu, select the
‘PTZ’ tab and click ‘PTZ Settings’. Click the protocol dropdown list
and select ‘AlienTVI Coaxitron’.

37
For more information go online to www.aliendvr.com
Other Products To Consider
1. An Easy Upgrade Path - HD-TVI uses standard RG59 75 ohm CO-AX cable so no need to re-cable for an upgrade.
2. No Network Con guration or Modi cation is Required - less call backs to a network that you didn’t install.
3. Standalone so Immune to Network Interruptions - only needs connection to the customer’s router.
4. Near Zero Latency (Video Delay) - so no dreaded bu ering e ect on your recordings.
5. High Resolution Images - HD-TVI o ers 20x the picture quality of a basic analogue (CIF quality) recorder.
6. Global Non-proprietary System - so more equipment choice and the prices aren’t held arti cially.
7. Reliable - by choosing good quality RG59 cable, the camera’s HD signal does not need compressing like an IP camera.
8. TVI has a High Resistance to EM Interference - so much longer cabling runs (up to 500m).
9. Plug and Play - Co-ax cable and BNCs make installation simple for installers, no network knowledge is required.
10. Future-proof Triple Technology - triple technology allows analogue, IP and HD-TVI to be used in the same unit.
11. TVI 2.0 Technology - makes HD cameras and DVRs even more a ordable & reliable.
11 Reasons the is great value for money

38
Manual Ref: XHD-TVI-02
Other Products To Consider
Transmit Up To 200m
Over CAT5
No Power Required
Screw Terminals For Easy
Connection
Just 31 x 25 x 15mm
Order Code: BAL702
Mini 1ch HD-TVI Passive Baluns (Pair)
Tiny Size
Snap Together Design To
Form Single Block
Transmit Up To 200m
Over CAT5
No Power Required
Spring Clamp Terminals
For Easy Connection
36MHz Video Bandwidth
Transmit Up To 200m
Over CAT5
No Power Required
Screw Terminals & RJ45
Sockets For Easy
Connection
Send Video, Power & Data
Or Audio
Transmit Up To 200m
Over CAT5
No Power Required
Spring Clamp Terminals
For Easy Connection
1ch HD-TVI Passive Pigtail Baluns (Pair) 8ch Wall-mount HD-TVI Passive Balun
1ch HD-TVI Baluns - Video, Power & Data (Pair)
Snap Together
Order Code: BAL806 Order Code: BAL908
Order Code: BAL810
39
For more information, tips and advice visit www.tvision.technology
Other Products To Consider
HD-TVI & Analogue CCTV Test Monitor
7” TFT LCD Display
TVI Coaxitron Support
BNC, VGA & HDMI Inputs
12.6V DC Li-ion Battery
Get the best of both worlds with this 7” test monitor which tests
standard analogue and the latest HD-TVI cameras.
Order Code: LCD380
1 HDMI Input
Up To 8 Outputs
12V DC PSU Supplied
Wall-mount Design
Quality HDMI splitters for viewing the same image on multiple
monitors. The HDM302 even has a built-in IR extender.
1 In / 2 Out With IR Extender: HDM302
1 In / 4 Out: HDM304
1 In / 8 Out: HDM308
HDMI Distributors - 2, 4 & 8 Way

40
For more information visit www.voiceo .com
Other Products To Consider
Programmable Audio Alarm Unit
The VoiceO is an alarm activated voice or sound warning unit that
has 20 separate alarm inputs, to trigger up to 20 di erent recorded
sound les. RS232 inputs trigger up to 9999 sounds! Over 1000
pre-recorded sounds and messages are available for use at
voiceo .com
.
Warning messages can be downloaded or recorded in MP3 format
and stored on the removable SD card. These sounds can be used to
welcome visitors, deter intruders, warn or inform people as they enter
certain areas.
Order Code: VOX200
Trigger Up To 9999
Sounds
20 Alarm Inputs Trigger
20 Recordable Warnings
Removable SD Card
Talkback Function
RS232 Connection
Weatherproof
Activate Remotely Over
The Internet
Additional Sound Files
Can Be Downloaded at
www.voiceoff.com

41
Other Products To Consider
For more information, tips and advice visit www.tvision.technology
Pre-Printed CCTV Warning Signs
Unique sign ID & QR Code
Anti Glare Plastic
AntiFade Ink
Data Compliant Ready
Pre-drilled Mounting Holes
Rounded Corners
Weatherproof
A3
size
A4
size
The Who Is Watching Me signage provides an
o -the-shelf solution for CCTV scheme operators.
The unique serial numbered signage and website registration
process allows CCTV system operators to supply their contact details
to members of the general public without the need for expensive
personalised signage. This is essential in helping ensure you comply
with the Data Protection Act! The scheme operators can amend their
contact personnel details when sta leave the company, update
contact telephone numbers or e-mail addresses at no extra cost to
themselves. Members of the general public can enter the unique
serial code on the sign on
www.whoiswatchingme.org
to nd out
the scheme operators details. This avoids having to have individual
signs made for each client meaning a lower cost for you!
A4 Sign: SIG550 A3 Sign: SIG650

42
Manual Ref: XHD-TVI-02
Other Products To Consider
HD-TVI, CVBS, HDMI
& VGA Inputs
Full HD 1920 x 1080
(21.5” & 24”)
LED Backlight
Anti-glare
Popular Connectors
3 Piece Design
Order Code: LCD921 (21.5”)
Black 100m Order Code: CAB054
White 100m Order Code: CAB040
AlienCCTV HDMI & TVI Monitor
Black or white PVC
0.15mm x 24 Copper power
cores for powering the camera
Cables can be separated for fast,
easy installation
Glued foil sheath provides maximum
protection against interference and prevents
“loose” foil shorting to the centre pin
0.7mm centre core for maximum
performance and long runs.
Antihum RG59+2
These traditional 3-piece
BNC crimp-on plugs are the
popular choice for CCTV
Installers.
100pk Order Code: CON430
Crimps 2pc, 3pc & Mini
Essential For Installers
Essential kit when making your
own cables. The crimp tool is
designed to crimp 2pc, 3pc and
mini 3pc BNCs.
Order Code: TOO980
3pc BNC Crimps
Ratchet Crimp Tool
See online
Tip 259
on ‘How
To Crimp 3pc BNCs’
Tip
Use with the Crimp
Tool below!

43
For more information, tips and advice visit www.tvision.technology
Mega Pixel Lens
Choice Of Lens Size
Heated Housing & Bracket
Unique Warning Signs
Fixings Included
5-Amp 12V DC PSU With 9 Outputs
5A Overall Output 9x 12V DC Outputs
Regulated 12V DC 5 Amp PSU with multiple outputs for use with up
to 9 suitable CCTV cameras. Each output produces up to 1 Amp (Max
5A overall outputs) to suit most cameras and housings.
Order Code: POW400
Megapixel direct drive lenses
o er the lens quality needed to
capture stunning HD images.
3.5-8mm DC Iris 1/3”: MPL300
2.8-12mm DC Iris 1/3”: MPL312
5-50mm DC Iris 1/3”: MPL350
Megapixel Direct Drive Lenses
Attractive housing, dual
voltage, low current heater,
strong cable managed bracket,
accessories and xings tub,
3x A4 CCTV warning signs
with free registration onto
the Who Is Watching Me data
compliance scheme.
Order Code: CCT470
Interceptor CCTV Housing Kit
All speci cations are approximate. We reserve the right to change any product
speci cations or features without notice. Whilst every e ort is made to ensure
that these instructions are complete and accurate, TVision cannot be held
responsible in any way for any losses, no matter how they arise, from errors or
omissions in these instructions, or the performance or non-performance of the
equipment that these instructions refer to.
WEE/CG0783SS
This symbol on the products and/or accompanying documents
means that used electronic equipment must not be mixed
with general household waste. For treatment, recovery and
recycling please return this unit to your trade supplier or local
designated collection point as de ned by your local council.
© Copyright TVision 2016
Installer details:
 Loading...