

Page 1
FLIP DOWN DVD PLAYER
USER`S MANUAL
www.tview.us
MADE IN CHINA
T20DVFD
COMPATIBLE WITH
DVD/SVCD/DVCD/VCD/CD/MP3/MP4/JPEG/DIVX
Befo re operat ing the monit or, please r ead this ma nual thorou ghly
and re tain it for f uture refer ence.
Page 2

Specifications
Cont ents
Caut ion.............. . . . . . . . . . . . . . . . . . . . . . . . . .
Chec k Point...... . . . . . . . . . . . . . . . . . . . . . . . . . . . . . .
Name a nd Functi on of Each Part
Unit. . . . .. . . .. . . . .. . . .. . . .. . . . .. . . .. . . .. . . . .. . .
Remo te Contro l.......................... . . . . . . .
Remo te Contro l.......................... . . . . . . .
Pict ure contr ol
Pict ure Selec tions......... . . . . . . . . . . . . . . . . . . . . . .
Play ing a Disc
Play D VD Player. . . . . . . .. . . .. . . . .. . . .. . . .. . . . .. . .
Basi c Operati on
FM Cha nnel. . . . . . . . . . . . . . . .. . . . .. . . .. . . . .. . . .. . .
DVD Se tup
Syst em seting . . . . . . . . . . . . . . . . . . . . . . . . . . . . . . . . . .
Lang uage Sett ing................. . . . . . . . . . . . . . .
DVD Fu nction
Play back Func tion.................. . . . . . . . . . . . . .
Adva nced Func tion. . . . . . . . . . . . . . . . . . . .. . . .. . . .. . .
Inst allatio n........................... . . . . . . . . . .
Conn ect Diagr am. . . . . . . . . . . . . . . . . . . . . . . . . . . .. . . .
Disc I nformat ion................... . . . . . . . . . . . . .
Caut ions of Use . . . . . . . . . . . . . . . . . . . . . . . . . . . . . . . .
Troub le Shooti ng. . . . . . . . . . . . . . . . . . . . . . . . . . . . .. .
Spec ificati ons.................. . . . . . . . . . . . . . . . .
1
2
3
4
5
6
6
6
7
8- 9
10-11
12
13
13
14
15
16
17
Powe r
Curr ent Consu mption
Scre en Format
Reso lution
Syst em
Video In put
Video Ou tput
Audi o Input
Audi o Output
Disc F ormat
IR Tr ansmitt er Yes
FM Tr ansmitt er Yes
Dome L ight
Remo te Contro l
DC12 V
40W Ma x
16:10
1680 * 1050 pixe l
NTSC / PAL
1EA
1EA
2EA
2EA
MP3/ VCD/DVD/ CD / CD - R
CD-RW/ D VD - R/ DVD-RW
Yes
Yes
Dime nsions( i n c h )
Note:
(W) 21.46*(D) 17 .1 3*( H )2.56
This equipment h as been tested and has been fo und to comply with the limit s
for a Class A digital de vice, pursuant to part 15 of t he FCC Rules. These limits
are designed to pr ovide reasonable prote ction against harmful in terference
when the equipme nt is operated in a commerci al environment. This equip ment
generates, use s, and can radiate radio fre quency energy and, if not in stall ed
and used in accord ance with the instructio ns. Operation of this equi pment i n
a residential ar ea is likely to cause harmfu l interference. In some ca ses, th e user
will be required t o correct the interferen ce at his own expense.
17
Page 3
Touble Shooting
Caution
Plea se read and o bserve all wa rnings an d instruc tions in this o wner's ma nual
and th ose marke d on the unit. Re tain this b ooklet fo r future refe rence.
TROUBLE
No powe r
No pict ure
Sto pp ed pi cture
The pla yba ck pict ure i s poor
No colo r
Disto red s iund
The rem ote c ontro l doe sn`t w ork
prope rly
ACTION
Check a nd se e if the po wer c able
is conn ect ed prop efl y.
Make su re th at the eq uip ment is
conne cte d prope rly .C he ck an d see i f
the con nec ted mon ito r is turn ed on
Check a nd se e if the vi deo c able is
conne cte d, if the m oni tor is tu rne d on.
Clean t he di sc
The col or sy stem of t his u nit doe s
not mat ch th e color s yst em of the m oni tor.
Check t he co lor sys tem o f the uni t.
Ajust t he vi deo sys tem b y press ing
the TV sy ste m butto n. (PA L, NTS C)
Remov e any o bstac les b etwee n the
remot e con trol un it an d the rem ote c on tro l
senso r. Ope ra te th e rem ot e con tro l
at a shor ter d istan ce.
Ther e are two kin ds of alarm sym bols as fol Iows:
WARNI NG
The li ghtning f lash with arr owhead sy mbol with in an equilat eral
tria ngle is int ended to aler t the user to t he presen ce of
“dan gerous vo ltage"wit hin the pro duct's en closure tha t may be
of suffi cient magni tude to con stitute a risk of electr ic shock to
pers ons.
CAUT ION
The ex clamati on point with in an equil ateral tr iangle is int ended
to ale rt the user t o the presenc e of import ant opera ting and
main tenance ( servicing ) i nstruct ions in the l iterature
acco mpanyin g the product .
WARNIN G
The dr iver shou ld never oper ate these p roducts w hile the vehi cle is in mot ion!
Inst allatio n of all TV monitor s must be out of th e driver' s field of vi sion!
Do not t ry and serv ice these pro ducts you rself,s eek only a qual ified ser vice cent er
or fac tory serv ice center.
Be car eful not to d rop or apply un due press ure to the fr ont panel of yo ur video
moni tor.If the s creen crack s due to misu se your war rantly will b e void!
Make s ure to keep p roducts awa y from heat er ducts or v ents and out of d irect
sunl ight. Do no t mount forwa rd of the dri ver's sho ulders.
Set the p owe r butto n to OF F and the n
"D IS K ERR OR" i s di spl ay on
the scr een
back to O N alt ernat ive ly,Tu rn of f the
power ,d isc on nec t the p ow er pl ug, and
then re con nect it .
Chec k point
When a d isc is brou ght from a cold e nvironm ent to a warm o ne, there may be
mois ture on the d isc,or conde nsation w ill appea r on the pick up lens.It wil l
affect t he disc playb ack.
1. Rem ove the dis c from the DVD player.
2. Turn on the pow er and leav e it on for an ho ur to vaporiz e the conde nsation .
3. You can operat e the DVD pla yer witho ut any proble m.
16
Be car eful not to o verload you r cigaret te lighte r plug by addin g more than o ne
devi ce at a time.
Be car eful with a ny liquids in y our car. If yo u or your chi ld spill any li quid on
thes e product s, park your ve hicle at th e roadsid e and trun the ke y off to disconne ct
or wip e the produ cts with a towe l.Do not ope rate the eq uipment unt il all liqu ids
have e vaporat ed or you have ha d the monit or inspec ted by a qualif ied Technicia n.
Seve re harm or de ath can occur !
Just u se a wet clot h to clean the sc reen, onl y use purif ied water on th e cloth,
wrin g out all exc ess water bef ore wipin g the scree n. Do not use any
clea ners or che micals to cle an the scre en. In most c ases a dry clot h will do!
Do not m ount the pr oduct where i t will obst ruct the de ployment of t he airbag o r
in an ar ea where it w ould affect the v ehicula r control. Als o be carefu l to avoid
moun ting the pr oduct where i t can becom e hazardo us during sud den stops
or in th e event of an a ccident.
1
Page 4
Caution
Cautions on Use
Qual ity insta llations ar e perform ed by quali fied and cert ified ins tallers .
Wat ching the m onitor fo r an extended p eriod of ti me withou t the engine ru nning
may de plete the v ehicle's ba ttery cha rge
This p roduct is d esigned for o peratio n with a 12 Volt D C, negative g round veh icle.
It is no t suitabl e for operati on under ot her condi tions or volt ages.
Check Point
1 The operati ng temperature of this pro duct is limited to -4 F + 176 F.
Your vehicle can r each temperatur es up to 212 F in the summertim e.
°
° ~ °
2 If your vehicle is e xtremely hot or col d you must allow time for your a ir
conditioner or h eater to cool or heat t he vehicle until operati ng
temperatures h ave returned to the n ormal operating ranges .
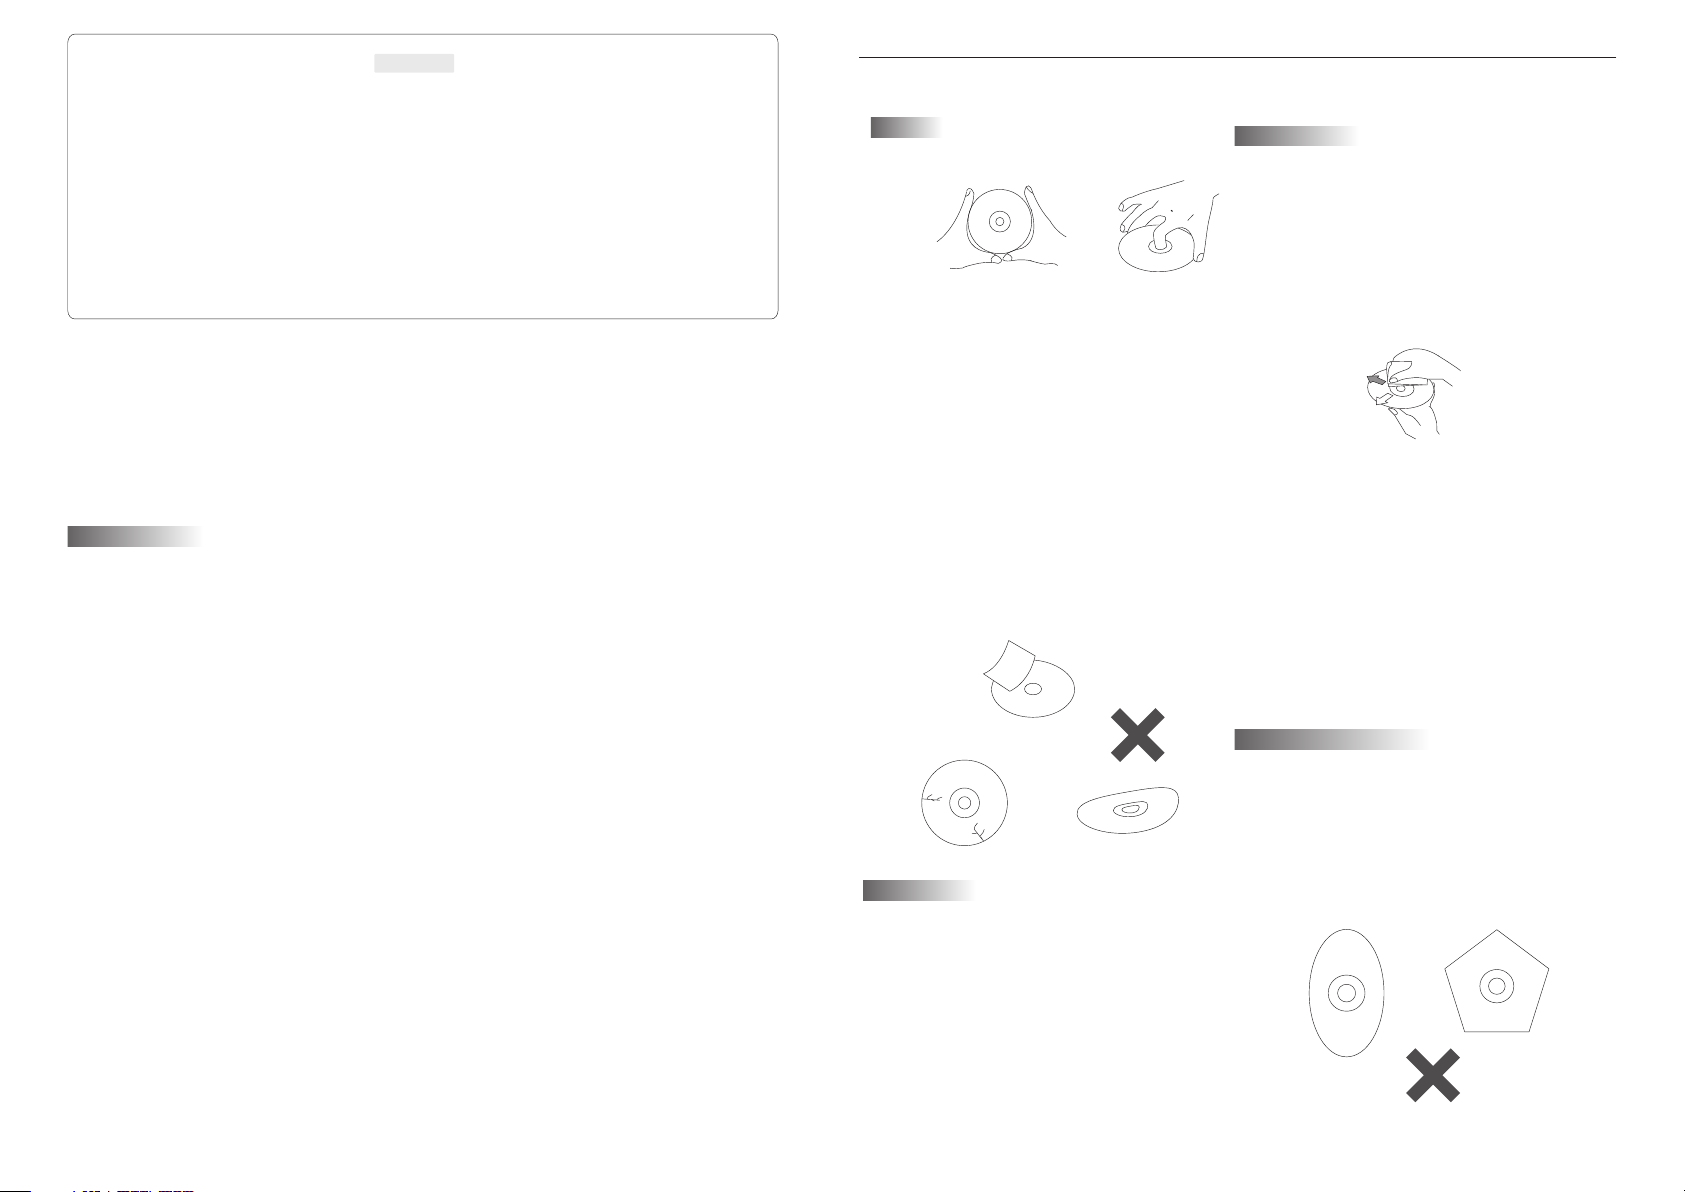
Handing
When holding with both hands
. Do not use damaged ( cracked or werped ) disc.
. Do not scratch signal surface or let it dirty.
. Do not stick a label or a glue-based note on
either side of the disc.
. Do not use discs that have glue or damaged
label with exposed adhesive residu e, i t mi gh t
result in damage to your DVD player.
Do not put discs in the sunshine.
Park your car in the shade
Cleaning discs
Fingerprints or dust on discs may
reduce sound or picture quality.
remove them by soft cloth wiping
the disc from the center toward the
edges gently.
For tough dirt, wipe softly with a wet cloth and then
with a dry one.
Do not use any type of solvent such as thinner,
benzene.
Do not use antistatic spray.
3 Optimum pictur e quality will be ach ieved when viewed from dir ectly front
of the monitor ( +/- 30 degrees).
4 Do not open the hous ing and attempt to ma ke any repair yourself. Re fer
servicing to qua lified personne l.
5 DVD Players use an i nvisible laser be am which can cause ha zardous radiation
exposur e. Be sur e to operate the unit c orrectly as instructed .
6 Do not cut the car pow er supply off while a dis c is palying. It can ca use
damage to the DVD Pl ayer.
2
Irregularly shaped dies
Irregularly shaped dics( heart-sha pe d di sc s,
hexagonal discs, etc. ) cannot be played on
this player.
May cause damage to the player.
Only use round discs.
Storing discs
Always put discs in their place and store
them vertically.
Do not put discs in hot or humid place,
places exposed to direct sunlight and pl ac es
in which the temperature is extremely low or
high.
. Read any cautions included with the disc
carefully
15
Page 5
Disc Information
DVD fe atures
DVD di sc provid e high-reso lution im ages with h igh- qualit y sound and s urround
soun d effects. This DVD p layer can pla y not only DV D discs of va rious versi ons,
but al so S-VCD ,V CD , audio CD and M P3 discs.
Each d isc only pl ays the infor mation sa ved in it, an d some functi ons canno t be
util ized.
Disc s that cann ot be played
DVD- RW, D VD- REM, CD-R OM, CD- EXT RA di scs canno t be played on th is unit. Als o,
a CD or a CD -RW which was rec orded on sp ecial sof tware canno t be played .
Regi on code
Your DVD player i s designe d and manuf actured to re gion mana gement information
that i s recorde d on a DVD disc. The re gion numb er of this DVD Pl ayer is 1 . This DVD
play er plays fr ee code also.
Copy right pro tection.
This p roduct in corporate s copyrig ht protec tion techno logy that i s protected by methods
clai ms of certa in U.S. paten ts and othe r intelle ctual prope rty right s owned by the
Macr ovision C orporatio n and other r ights.O wner's use of t his copyr ight protection
tech nology mu st be authori zed by the Ma crovisi on Corporat ion, and is i ntended f or
home a nd other li mited viewi ng uses onl y unless ot herwise aut horized b y the
Macr ovision C orportati on.
How to h andle the disc
Don' t touch the s hiny side of th e disc ( the si de with the e mbedded inf ormatio n ).
Don' t stick a lab le or a glue - base d note on eit her side of t he disc. Don' t use discs
that h ave glue or a d amaged glue y label- it m ight resu lt in damage to y our DVD pla yer,
Don' t put discs i n the sunshin e. Park you r car in the sh ade.
Caut ion
Wipe s oftly wit h a wet cloth and t hen with a tr y one.
Befo re playba ck, wipe the di sc outwar d from the ce nter with a cle an cloth.
Do not u se any type o f solvent suc h as thinne r, benzene , coommerci ally - avai lable
clea nners or an tistatic sp ray.
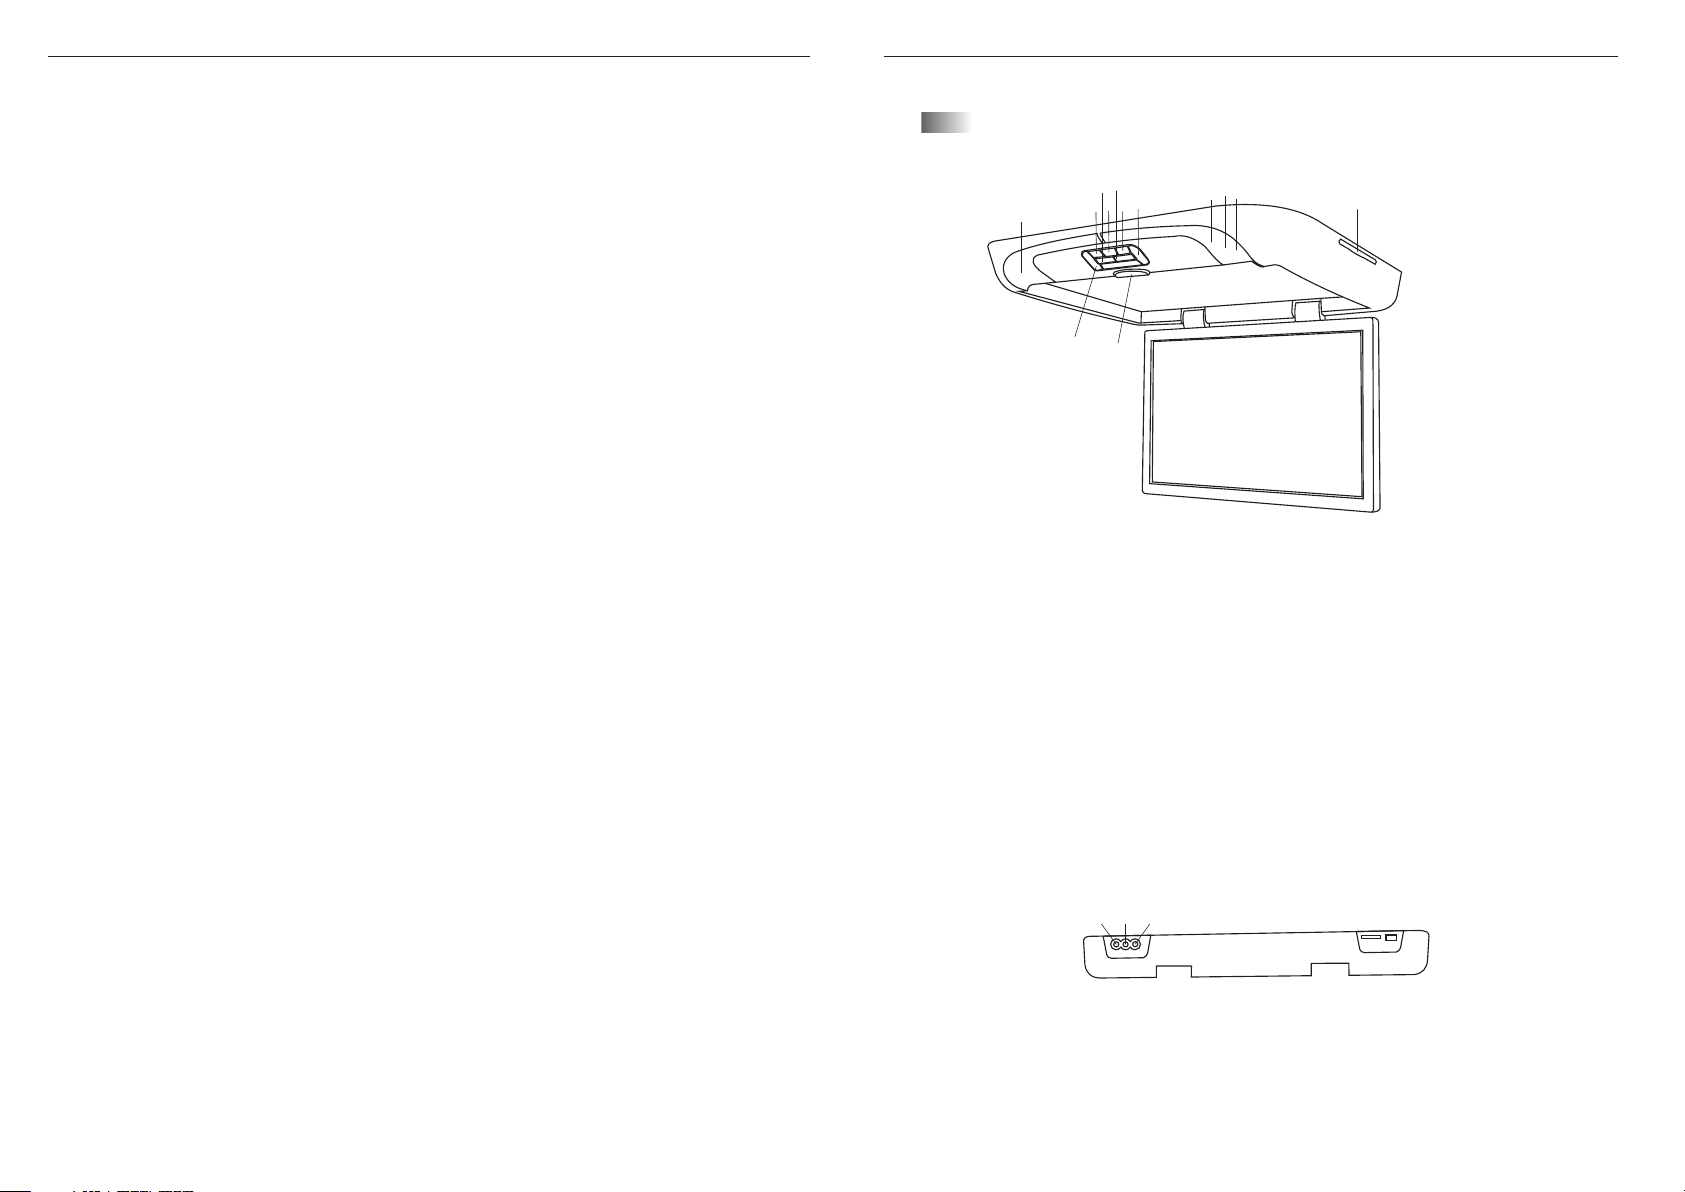
Name and function of each part
UNIT
5
3
7
6
4
1
IR tra nsmitte r/Dome light
1.
2
10
11
3. PLAY/PAUSE bu tton
5. EJE CT button
7. Dom e light swi tch
9. Rem ote contr ol
11. Monit or release bu tton
9
1
8
12
2. Up bu tton
4. Men u button
6. Dow n button
8. Pow er led
10.Po wer butto n
12.Di sc tray
To avoid d amaging y our DVD playe r, don't use a s cratche d disc.
14
13
14
THE BA CK PANEL
15
13.R ight audi o output 14.L eft audio o utput 15.vi deo outpu t
3
Page 6
Name and function of each part
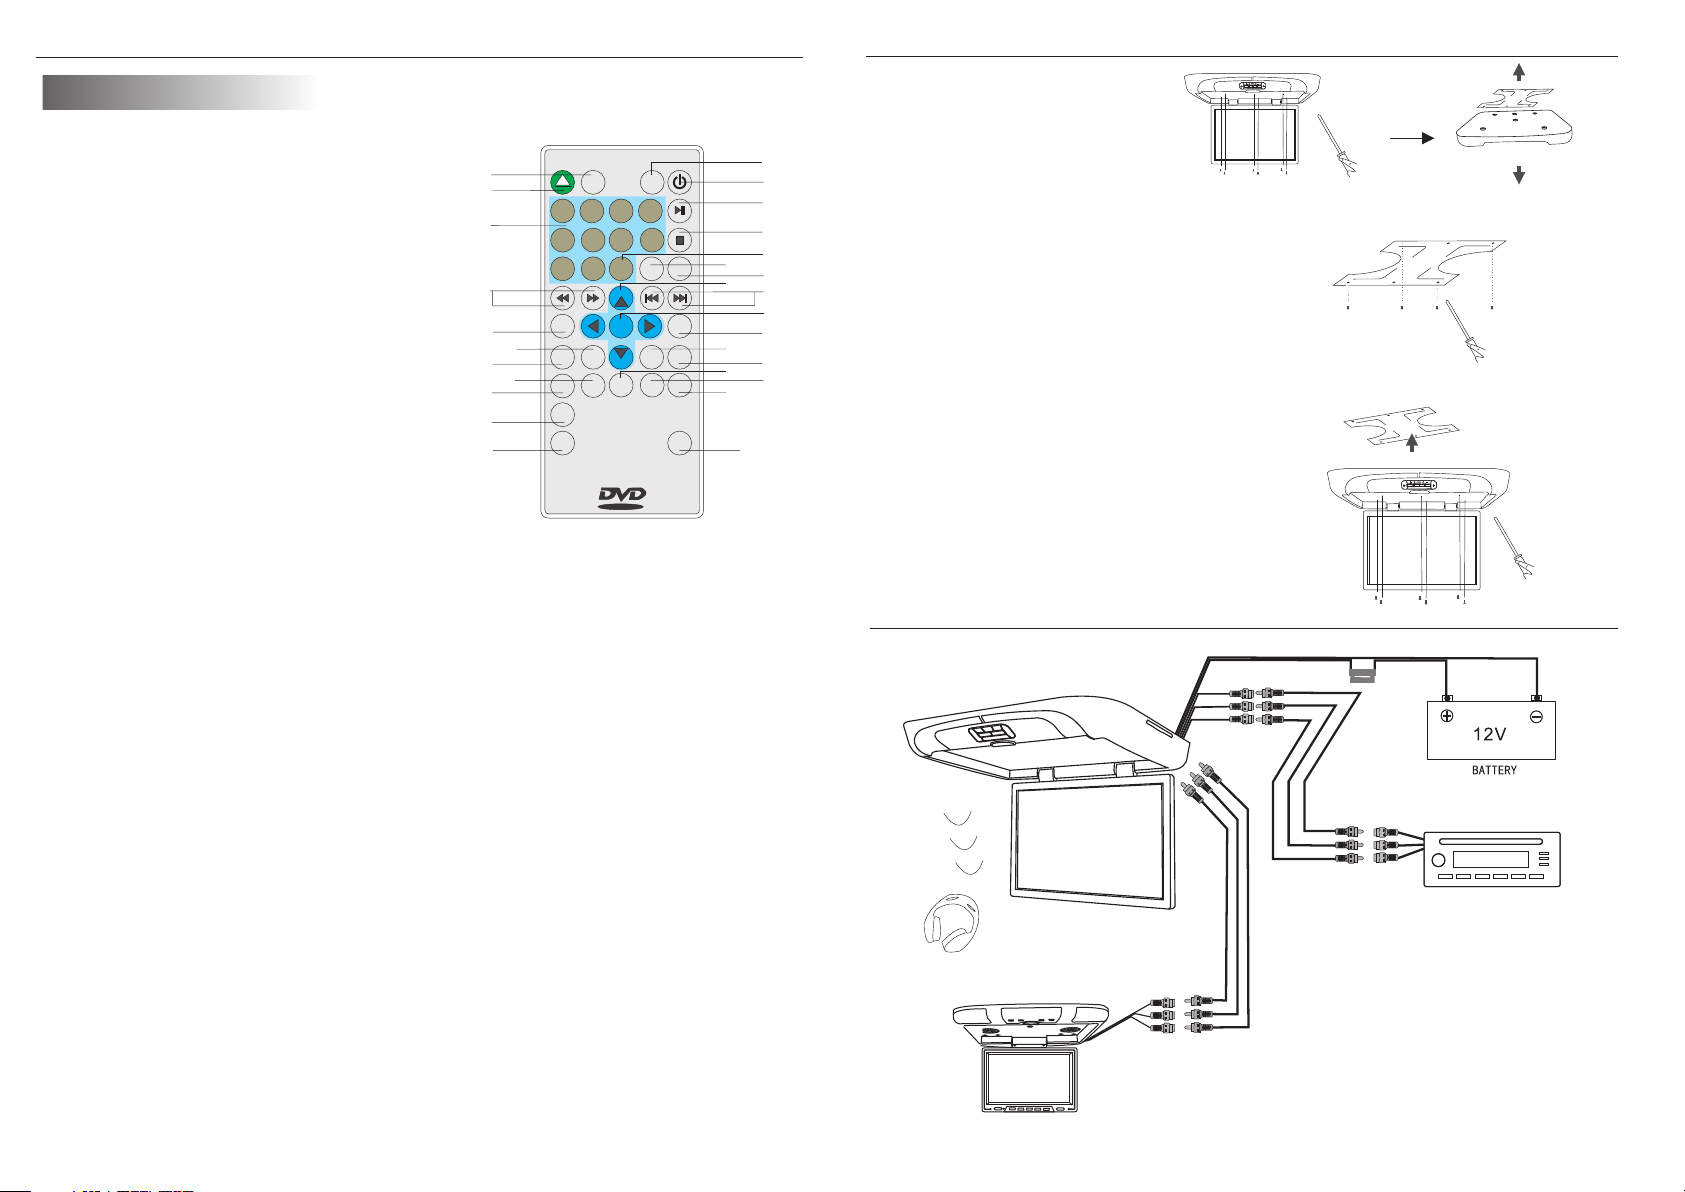
Remote Control Unit
1. MEN U button
Pres s this butt on to display t he
LCD’s me nu screen.
2. EJE CT button
Pres s this butt on to slide the d isc out and i n.
1
2
3
3. NUM BER butto ns
Pres s these but tons to input n umbers.
4
4. REV /FWD-Sc an buttons
Use th ese butto ns to scan forw ard and
back ward thro ugh picture s or sound.
5. TITLE b utton
Pres s this butt on to display t he DVD's ti tle.
6. MEN U button
Pres s this butt on to display t he DVD' s
5
7
9
10
11
menu s creen.
7. ZOO M button
Zoom i n or zoom out t he picture on s creen.
8. ANGL E button
Pres s it to switc h the picture 's angle.
9. FM bu tton
Pres s this butt on switch diffe rent audio FM transmit ting freq uency.
EJECT
1
5
9
TITLE
6
ZOOM
8
FM
PROGRA M
VOL+ VOL-
MENU
DVD
MENU
ANGLE
Installation( Professional installation recommended)
Unpack and check the
1.
contents.Disassemble the
meral support bracket from
the unit as shown in the
illustration,by unscr ewing
the six screws on the unit
body.
2. Ti gh te n th e me ta l su pp or t br ac ke t
to the ceilling support beam(s) ,
using the supplied screws. Take
extra care to not penetr ate the
roof of your car.
3. Connect the wiring harness,
17
19
23
25
27
12
13
14
15
16
18
20
21
22
24
26
ENTER
CH-
GOTO
POWER
PBC
4
3
7
8
A-B
MUTE
MODE
10+
CH+
SUBTIT LE
REPEAT
SETUP
DISP
AUDIO
TFT
2
6
0
according to the diagram under
"Connection Diagram"on the following
28
V I D E O
diagram .to the wires located in the
dome light of your vehicle.
4. Flip the monitor screen down and
tighten the monitor to the support
bracket, using the supplied screws .
Connection Diagram
10. Pr ogram but ton
Use th is button t o program ind ividual ly.
11. VOL+ bu tton
Pres s this butt on to volume up .
12. PB C button
Play back cont rol.
13. PO WER butto n
The po wer turns o n and off when
this b utton is pr essed.
14. Pl ay/Paus e button
Use th is button t o play pictur e or
soun d or stop tem porarily.
15. STOP butto n
Pres s this butt on to stop play back of the p icture or sound
16.1 0+ button
Pres s this butt on to select a pr ogram of
whic h the seque nce number on t he disc is mo re than 10.
17 . DVD /AV buttons
Pres s these but tons to DVD/AV fun ctions
swit ch screen .
4
IR/FM wireless headphone(optional)
othe r monitor
OUT PU T
13
INP UT
FUSE
CAR VIDEO(DVD OR VCD)
Wire color marking function:
1.Yell ow R CA -- vi de o
2.Red RCA--right audio
3.White RCA--left audio
Page 7

Advanced Functions
Sear ch for a spea cific scene
1.Pr ess the SEA RCH button.
2.Pr ess the num ber button to s elect spe cific
time o r title cha pter.
3.Pr ess the ENT ER button and p layback s tarts
from t he nomina ted chapter.
Repe at play DVD s, Vid eo CDs and CD s
. Repe at a TITLE, C HAPTER, or TR ACK
Pres s the REPEAT button.
Sele ct the titl e, chapter, or t rack you wa nt to repea t.
. Repe at a sectio n between Poi nt A and B.
Duri ng playba ck, press A-B bu tton on the r emote con trol at the sta rting poi nt of the
Sect ion you wan t to repeat. ( Po int A)
Pres s A-B button a gain at the end ing point o f the secti on you want to re peat. ( Poi nt B )
Pres s A-B button t hird time to ca ncel the A-B r epeat fun ction.
18. MU TE button (In IR/FM mod e, no effect)
Pres s the butto n during play back to sto p the
audi o output. P ress it again t o resume.
19. CU RSOR / , / [LCD menu
adjustmen butt on
1
2
3
Use th ese butto ns when selec t setting i tems to
move t he cursor u p,down, left a nd right. P ress
up , and d own butto ns to change TV cha nnels.
20. PR E/ NEXT buttons
Use th ese butto ns to search fo r the
begi nnings of t racks or chap ters.
21. EN TER butto n
Pres s it to confi rm setting.
22. SU BTITLE bu tton
10
11
4
5
6
7
8
9
Pres s it to switc h the DVD's
subt itle lang uages.
23. SE TUP button
Pres s it to enter o r quit the SETU P
Menu .
24. RE PEAT butt on
For DV Ds use it to pl ay title or cha pters rep eatedly.
For CD s, use it to pl ay tracks or th e entire di sc repeatedly.
EJECT
TFT
MENU
1
5
9
TITLE
DVD
ZOOM
MENU
ANGLE
FM
PROGRA M
VOL+ VOL-
PBC
4
3
2
7
6
8
A-B
0
MODE
10+
CH+
ENTER
SETUP
CH-
AUDIO
GOTO
V I D E O
POWER
MUTE
SUBTIT LE
REPEAT
DISP
17
19
23
25
27
12
13
14
15
16
18
20
21
22
24
26
28
. Sele cting the D VD's angle ( mu lti-ang le)
Pres s the ANGLE bu tton while pl aying bac k a scene rec ord with mult iple ange ls.
If you r DVD disc is n ot recorded w ith multi ple angle s. AN GLE button is n ot effect.
12
25.G OTO button
Pres s this butt on , Select tim e or chapte r to goto and play when disc i s playing .
26 . AUDI O button
Pres s it to switc h the audio Lan uages.
27. DI SPLAY button
Pres s it to displ ay the disc
info rmation .
28. VO L-. butto n
Pres s this butt on to volume do wn.
5
Page 8

Picture control
Play back Func tions
Pict ure selec tions:
use to a chieve th e desired set tings.
1. Pre ss the MENU ( Unit or Rem ote)button t o
brin g up the on-sc reen picture control m enu.
2. Sel ect the des ired menu by pressing th e UP( Unit, R emote)
butt ons to chan ge PICTURE, A UDIO, FUN CTION,OS D.
3. Adj ust the cur rent settin gs with the D OWN(Unit , Remote) b uttons,
pres s UP button s,then press U P or DOWN on th e unit to ach ieve the
desi red setti ngs.
Playing a disc
Play ing DVD pla yer
1. Pre ss the POWE R(Unit,Re mote)
butt ons.
2. Loa d a disc in the d isc loadi ng
slot w ith the lab le on the top sid e.
Inse rt a disc in th e dics loadin g slot
and it w ill be play ed automati cally.
Stop ping the di sc
Pres s the STOP button.
Resu me functi on (DVDs and Vide o CDs)
Pres s STOP but ton to stop p layback, th en press th e play butt on to resume pl ayback.
Play back star ts from the pos ition at wh ich it was stopped. When t he disc is
remo ved or the STOP but ton is pres sed again , the resume fu nction is c ancelled.
Hint :
For so me discs, p layback may n ot start fr om the positi on at which w as stoppe d.
When p ress STOP button th en press the pr evious bu tton, pla yback start s from the
begi nning fo th e title.
. Paus ing the dis c
Pres s the play/ pause butto n.
Pres s the butto n again to resu me playba ck.
. Scan ning forw ard and backw ard
Duri ng playba ck, press the p revious o r next butt on.
Reve rse direc tion
Forw ard direc tion
Retu rning to th e previous ch apter or tr ack DVDs ,Video C Ds and CDs
Pres s the previ ous button du ring play back.
When p ressed, p layback ret urns to the b eginnin g of the previo us chapte r or track.
Basic operation
FM cha nnel:
pane l or remote
Pres s MENU b utton to br ing up the menu , press pan el up or remo te
left /right bu tton to selec t the AUDIO di rectory, press p anel down o r remote up/d own
butt on to enter t he lower-le vel optio n, and then p anel up or remo te left/r ight button
to sel ect FM item s, press pane l down or rem ote up/do wn button to se lect FM
freq uencies a nd press pane l up or remot e left/ri ght button to e nter the FM
freq uencies m enu, press pa nel down or r emote up/ down button t o select on e that
will b e set the fre quency, accord ing to the panel up or remot e left/ri ght button to
conf irm.
FM rem ote contr ol shortcut s
Pres s FM but ton to brin g up the FM frequ encies me nu, press r emote
remo te
up/d own butto n to select one t hat will be s et the freq uency, accordi ng to the
remo te left/r ight button t o confirm .
This u nit has mul tiple frequ encies
6
Movi ng ahead to t he next chapt er or track D VDs, Video CDs an d CDs
.
Pres s the next bu tton during p layback .
When p ressed on ce, playbac k moves for ward to the n ext chapter o r track.
. Remo ving disc s
1.Pr ess the STOP button .
2.Pr ess the EJE CT but ton to open t he disc.
.
3.Re move the di sc.
.
Note :
For CD s or one-si ded DVDs, you d o not worry a bout touc hing the labe l ( printed ) side
or the d isc with yo u finger. But fo r two-sid ed DVDs, wi th signals re corded in b oth
side s, so be care ful not to scra tch them wh en removi ng them from th e player.
11
Page 9

DVD Functions
Playback Functions
Play ing disc
1. Loa ding the disc
. One of t he follow ing message s appears o n the LCD: DV D , VCD , CD.
. For so me discs, p layback sta rts autom aticall y when the disc i s close.
. But fo r some disc s which progr am memori es are set, p layback sta rts autom atically
in the o rder.
2. Pre ss the PLAY/ PAU SE button
. Play back star ts.
For so me discs, a m enu screen ap pears. Fo r video CDs , playing the d isc accor ding
to the i nstruct ions on the dis c's menu sc reens I cal led PBC ( playb ack contr ol)
play back.
3.Hi nt:
. For vi deo CDs, it i s also possib le to play a di sc withou t displayin g the menu sc reen.
For ex ample, to p lay from trac k 1 , press the 1 n umber butto n while in th e stop mode .
*Whe n play CD dis c or MP3 discs, y ou are reco mmended t o turn off the TFT LCD
scre en to save po wer. ( Please ma ke refere nce of" TFT ON/ OFF Fun ction" on Pag e
10 and P age 12.)
If a men u screen ap pears
For DV Ds with men u screen or vid eo CDs with p layback c ontrol ( PBC) , a m enu
scre en appear s.
How To Setup Me nu
You can easily mo dify setu p informati on on the set up menu.
System Setting
SYSTE M SE TUP
TV SYST EM
AUDIO P LAY
PASS WO RD
RATI NG
DEFAULT
Plea se press se tup buttor, t hen
pres s to select [ SYSTEM] ite ms.
/
Still Mode Setting
DVD Setup
DVD
Use th e cursor bu ttons to sele ct the item , then press th e ENTER but ton.
Pres s the numbe r button on the r emote con trol unit t o select item .
Exam ple: For DV Ds with menu sc reen.
TITLE MENU
1 POP
2 JAZZ
3 COUNTRY
4R&B
5 CLASSICAL
Video CD
Press the number button on the remote control un it t o se le ct i te m.
To display the menu screen
The way in which the menu screen is displaye d di ffers from disc to disc .Press the MENU,
TITLE button during playback or DVDs , the RETURN bu tt on d ur in g PB C pl ay ba ck o f vi de o
CDs. For details, refer to documentation inclu de d wi th t he d is c.
1 POP
2 JAZZ
3 COUNTRY
4R&B
5 CLASSICAL
10
SYSTE M SE TUP
TV SYST EM
AUDIO P LAY
PASS WO RD
RATI NG
DEFAULT
Auto Play Setting
SYSTE M SE TUP
TV SYST EM
AUTO PL AY
PASS WO RD
RATI NG
DEFAULT
PAL
NTSC
AUTO
ON
OFF
2. STI LL MODE
To setup d isplay mo de of
stil l picture s. The re are
thre e options [AUTO]
[FIE LD] and [FR AME].
3. AUTO PLAY
To setup D ISC auto pl ay
mode .
7
Page 10

DVD Setup
DVD Setup
Parental Lock Password Setting
SYSTE M SE TUP
TV SYST EM
AUDIO P LAY
PASS WO RD
RATI NG
DEFAULT
Parental Lock Setting
SYSTE M SE TUP
TV SYST EM
AUDIO P LAY
PASS WO RD
RATI NG
DEFAULT
1 KID SAF E
2 G
3 PG
4 PG 13
5 PG-R
6 R
7 NC-1 7
8 ADULT
DEFAULTS Setting
5. PASSWORD
Setu p parenta l lock
pass word. It is a cceptable
to inp ut new pass word
with 4 n umeral to r e-setup
the pa rental lo ck.
4. RATING S
Acco rding to di ffer ent grade ,
setu p the paren tal lock.
Hint :
Norm ally, the grade is s et as
[0 LOC K ALL]
OSD Language Setting
LANGU AG E SETUP
OSD LAN GU AG E
AUDIO L AN G
SUBTI TL E LA NG
MENU LA NG
ENGLI SH
GERMA N
SPAN IS H
FRENC H
PORTU GUESE
ITAL IA N
Audio Language Setting
LANGU AG E SETUP
OSD LAN GU AG E
AUDIO L AN G
SUBTI TL E LA NG
MENU LA NG
CHINE SE
ENGLI SH
JAPAN
FRENC H
SPAN IS H
PORTU GUESE
LATI N
GERMA N
Subtitle Language Setting
LANG UAGE
To setup O SD langua ges
1. AUDI O
To setup d isc outpu t languages .
SYSTE M SE TUP
TV SYST EM
AUDIO P LAY
PASS WO RD
RATI NG
DEFAULT
Language Setting
LANGU AG E SETUP
OSD LAN GU AG E
AUDIO L AN G
SUBTI TL E LA NG
MENU LANG
RESTO RE
2. DEFA ULTS
Setu p all menus t o the
init ial setti ng of factory.
Plea se press se tup buttor, t hen
pres s to select [ LANGUAGE]
item s.press t o select lang uage
/
/
menu .
8
LANGU AG E SETUP
OSD LAN GU AG E
AUDIO L AN G
SUBTI TL E LA NG
MENU LA NG
CHINE SE
ENGLI SH
JAPAN
FRENC H
SPAN IS H
PORTU GUESE
GERMA N
OFF
MENUS Language Setting
LANGU AG E SETUP
OSD LAN GU AG E
AUDIO L AN G
SUBTI TL E LA NG
MENU LA NG
CHINE SE
ENGLI SH
JAPAN
FRENC H
SPAN IS H
PORTU GUESE
GERMA N
LATI N
2. SUB TITLE
To setup d isc subti tle Ianguag es.
3. MEN US
To setup D ISC MENU
lang uages
9
 Loading...