

Page 1

Instruction Manual
10.4 Inch Roof Top LCD with
Multimedia Player
DVD/MP4/DIVX/VCD/WMA/
JPEG/MP3/CD/CDR/CD-RW
P
OW
E
R
P
OW
E
R
E
J
E
C
T
E
J
E
C
T
N
E
X
T
N
E
X
T
F
F
F
F
S
T
O
P
S
T
O
P
P
L
A
Y
/
P
L
A
Y
/
P
A
U
S
E
P
A
U
S
E
S
E
T
U
P
S
E
T
U
P
B
A
CK
B
A
CK
T
F
T
M
E
N
U
T
F
T
M
E
N
U
T
I
T
L
E
T
I
T
L
E
F
R
F
R
Z
O
O
M
Z
O
O
M
S
L
O
W
S
L
O
W
D
IS
P
D
IS
P
M
O
D
E
M
O
D
E
1
0
+
1
0
+
1
1
2
2
3
3
4
4
5
5
6
6
7
7
8
8
9
9
0
0
S
U
B
T
I
T
L
E
S
U
B
T
I
T
L
E
R
E
T
U
R
N
R
E
T
U
R
N
D
V
D
ME
N
U
D
V
D
ME
N
U
P
R
O
G
R
A
M
P
R
O
G
R
A
M
A
U
D
I
O
A
U
D
I
O
R
E
P
E
A
T
R
E
P
E
A
T
G
O
T
O
G
O
T
O
E
N
T
E
R
E
N
T
E
R
A
NG
L
E
A
NG
L
E
M
UT
E
M
UT
E
C
H
+
C
H
+
C
H-
C
H-
A
-
B
A
-
B
-
-
+
+
T1048DVFD
T1048DVFD
Page 2

CONTENTS
Cautions ------------------------------------------------------- 1
Care of Discs -------------------------------------------------- 2
Front Panel ---------------------------------------------------- 3
Wiring Configuration ----------------------------------------- 4
Remote Control ----------------------------------------------- 5
Remote Control Description -------------------------------- 6
Basic Operation -----------------------------------------------8-15
Specifications ------------------------------------------------- 16
Troubleshooting ---------------------------------------------- 17-18
Page 3

Keep lower volumes to concentrate on
traffic and road conditions for safety
driving.
When washing car keep Car DVD AV
System (including speaker and disc) from
water or damp in order to avoid electric
shorts or other damages.
Maintenance consisting of delicate
components, please avoid random
disassembling or adjusting any parts.
If requiring repair, please go to nearby
Professional Maintenance Center for an
inquiry.
This unit is for car with a 12-voit battery
and negative grounding.
Laser Disc System
Do not put little objects like coins into the
product.
Do not place screwdrivers or other metals
near disc or laser Disc Player.
Car ventilation
Parking in direct sunlight for several hours
will cause higher temperature in the car, So
start the car first to cool down the internal
temp, and then open the AV system.
Preset Memory
After cut off power supply, preset
memory will disappear and the whole
system will return to the prescribed state
when delivering from the factory.
Installation
The unit should be installed horizontal with
front side up less than 15 .
Video system of a connected component
This product is NTSC/PAL system
compatible. When connecting other
components to this product, be sure
components are compatible with the same
video systems. If it is not, images will not
be correctly reproduced.
Region numbers:
DVD players and DVD discs feature region
numbers indicating the area in which they
were purchased. Playback of DVD is not
possible unless it features the same region
number as the DVD player. This product's
region number is displayed on the bottom of
this product.
Cautions:
1
18
Page 4

2
How to hold disc
Do not touch the face of the information
side.
Do not scratch the disc.
Do not bend the disc.
When not in use, put away the disc.
Do not use irregular and deformed discs.
Do not leave the disc in following places:
Direct sunlight
Near car heaters
Dirty, dust and damp areas
Seats and dashboards
Disc cleaning
Use a dry and soft cloth to wipe from
center to outward.
Cautions on new discs
Remove the inner and outer rough edges
on new discs with a pencil, which may
cause malfunctions.
Care of discs
COARSE EDGE
COARSE EDGE
DON'T USED ABNORMITY DISC
17
Page 5

3
PANEL
16
1
1 . POWER ON / OFF
Press once to turn on power, press again to turn offf.
2. MODE
Press MODE button to switch between Av1 and AV2 mode.
3. VOL +
Press VOL+ button to increase volume.
4. MENU
Press MENU button to enter into TFT screen menu, User could adjust
BRIGHTNESS , COLOR , CONTRAST , LANGUAGE.
5. VOL -
Press VOL- button to reduce volume.
6. REMOTE SENSOR
Remote signal reception.
7. CH+/CH-
Press CH+ or CH- to change channels during TV mode (optional).
8. PLAY/PAUSE
9. / BACK/NEXT
10. EJECT
Press this button once to start playing disc, press again to pause play.
Press |<< to jump back to the previous chapter.
Press >>| to skip to the next chapter.
Press this button to eject the disc.
2
3
4
5
6
7
8
9
10
DVD
P
O
W
E
R
P
O
W
E
R
E
J
E
C
T
E
J
E
C
T
N
E
X
T
N
E
X
T
F
F
F
F
S
T
O
P
S
T
O
P
P
L
A
Y
/
P
L
A
Y
/
P
A
U
S
E
P
A
U
S
E
S
E
T
U
P
S
E
T
U
P
B
A
C
K
B
A
C
K
T
F
T
M
E
N
U
T
F
T
M
E
N
U
T
IT
L
E
T
IT
L
E
F
R
F
R
Z
OO
M
Z
OO
M
S
L
O
W
S
L
O
W
D
I
S
P
D
I
S
P
M
OD
E
M
OD
E
1
0
+
1
0
+
1
1
2
2
3
3
4
4
5
5
6
6
7
7
8
8
9
9
0
0
S
U
BTI
T
L
E
S
U
BTI
T
L
E
R
E
T
U
R
N
R
E
T
U
R
N
D
V
D
M
E
N
U
D
V
D
M
E
N
U
P
R
O
G
R
A
M
P
R
O
G
R
A
M
A
UD
I
OA
UD
I
O
R
E
P
E
A
T
R
E
P
E
A
T
G
O
T
O
G
O
T
O
E
N
T
E
R
E
N
T
E
R
A
N
G
L
E
A
N
G
L
E
M
U
T
E
M
U
T
E
C
H
+
C
H
+
C
H
-
C
H
-
A
-
BA
-
B
-
-
+
+
T1048DVFD
Page 6
4
LCD Specificatons
Screen Size: 10.4inch 4:3TFT
System: PAL/NTSC
Power source/Consumption: DC 12V +/-10%,<700mA
Video Input: Composition Video signal
Operating Temperature: 0 ~+45
Storage Temperature: -10 ~+60
Display Method: Color LCD
Resolution(HXV): 640 x 840
Back light: Cold Cathode Filament Tube
Monitor dimension: 345 x 355 x 45
Installation Diagram
15
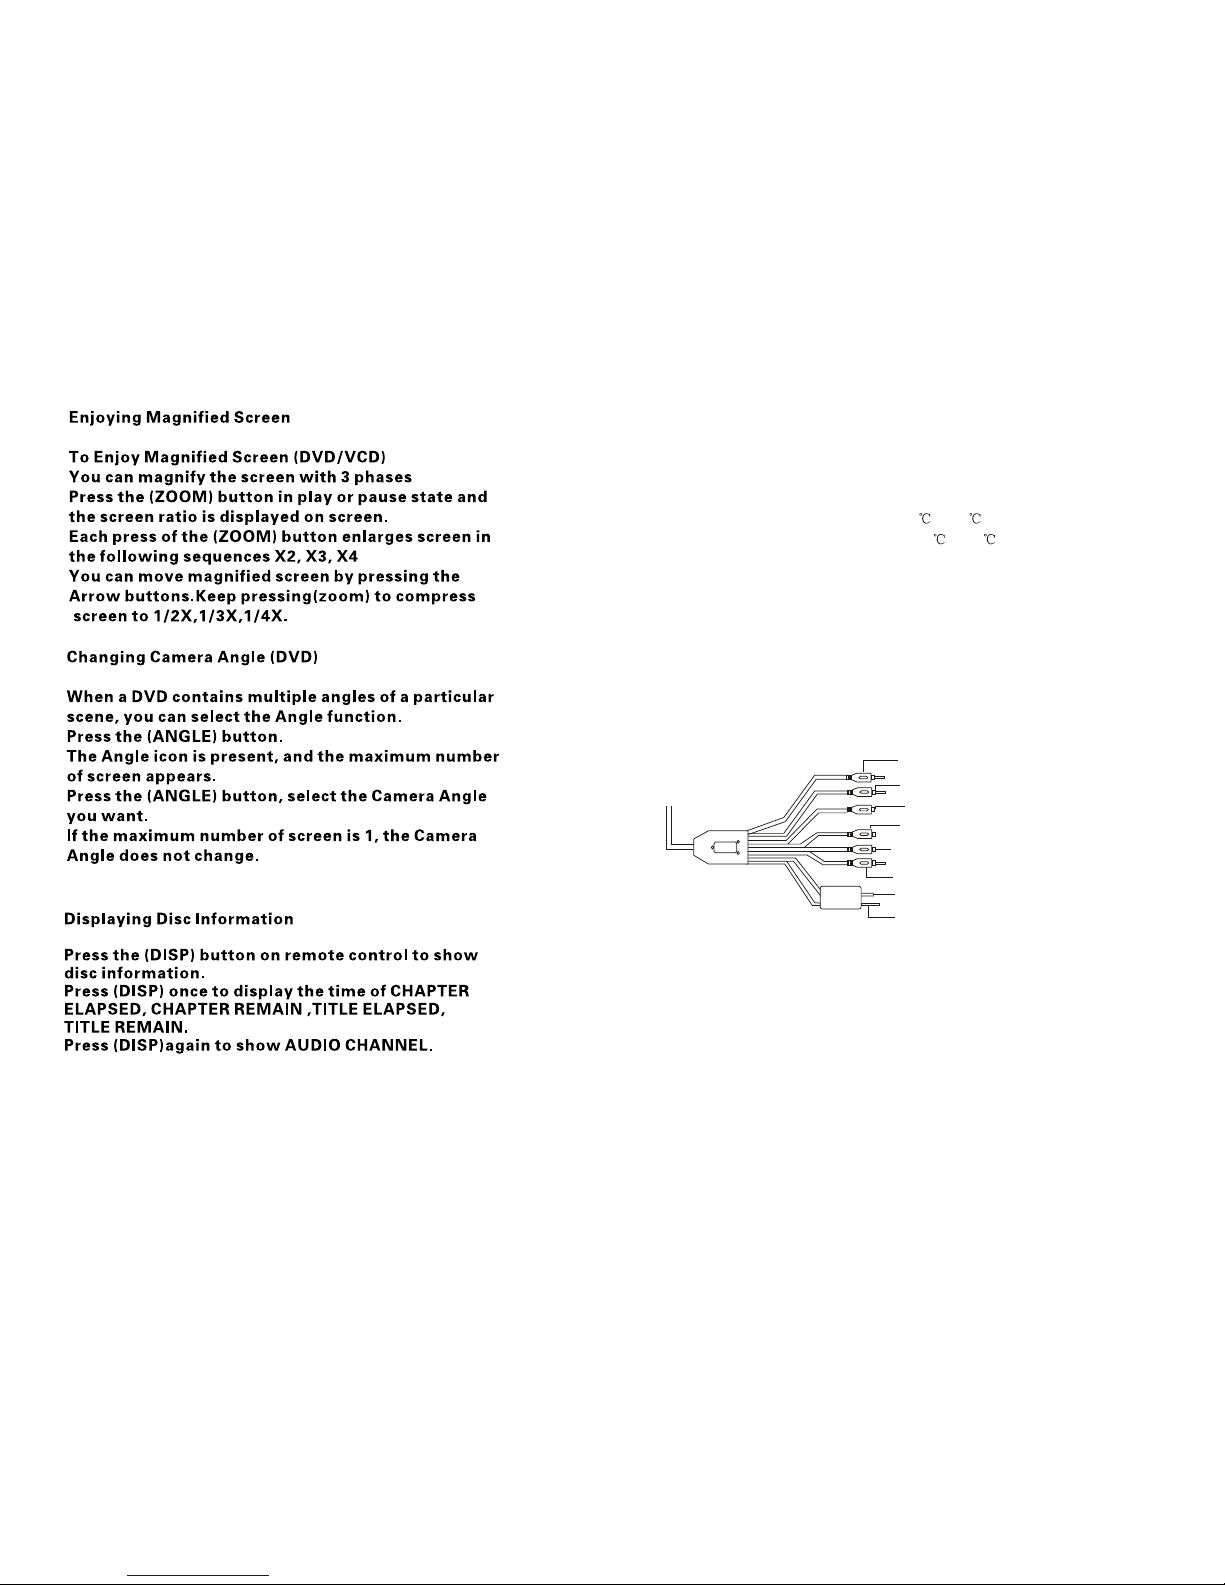
Red to right audio input of source unit
White to left audio input of source unit
Yellow video input from source unit
Black wire to electrical ground
Red wire to +12V DC battery
BOX
Red to right audio output of source unit
White to left audio output of source unit
Yellow video output from source unit
Page 7

1
3
5
7
9
11
13
2
4
6
8
10
12
20
28
15
17
19
21
23
25
27
14
16
18
22
24
26
29
30
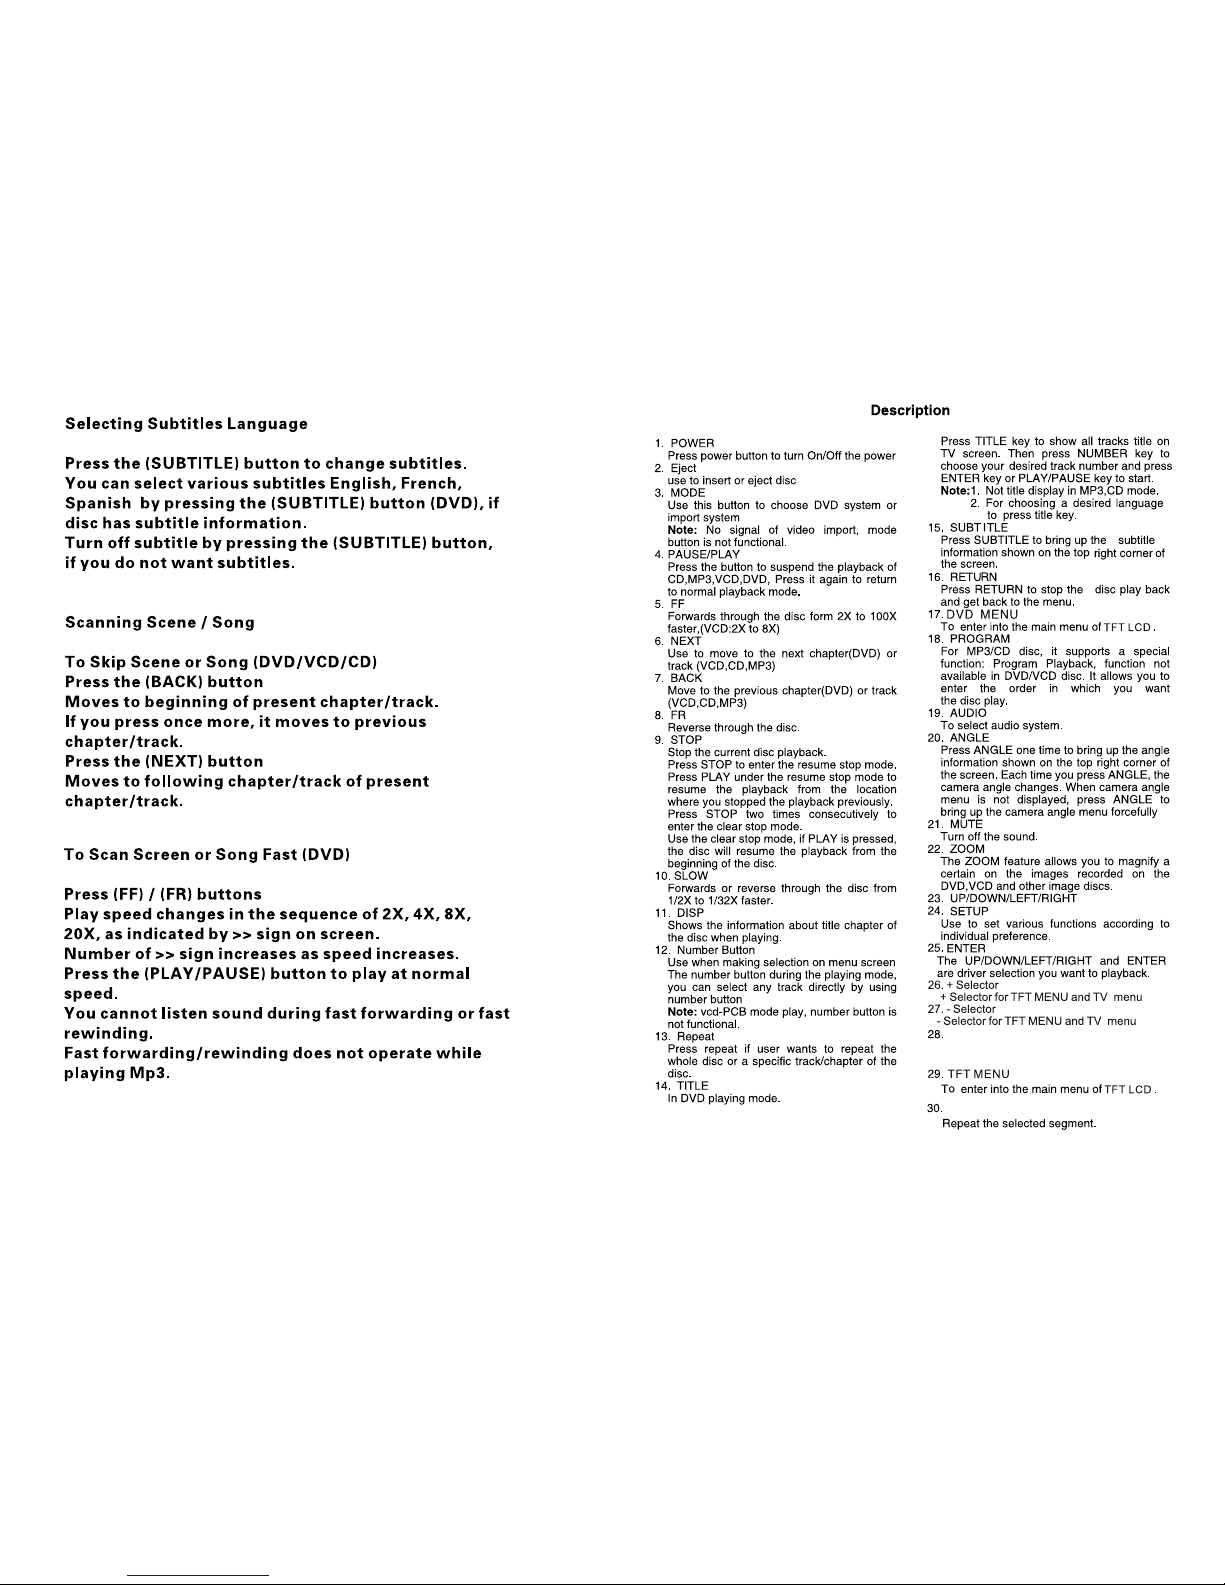
POWER
EJECT
NEXT
FF
STOP
PLAY/PAUSE
SETUP
BACK
TFT
MENU
TITLE
FR
ZOOM
SLOW
DISP
MODE
10+
1 2
3
4
5
6
7
8 9
0
SUBTITLE
RETURN
DVD
MENU
PROGRAM
AUDIO
REPEAT
GOTO
ENTER
ANGLE
MUTE
DVD LCD Remote Control
CH+
CH-
14
A-B
5
++
- -
Page 8
6
13
GOTO
A-B
Press this button to jump to the desired
location of the disc
Page 9

7
SETUP
g.DEFAULT
Select restore to become factory
initial setting
B. LANGUAGE SETUP
Select the preferred OSD Language, Audio
Language, Subtitle Language and Menu
Language by using the cursor buttons
a.OSD LANGUAGE
b.AUDIO LANGUAGE
c.SUBTITLE LANGUAGE
LANGUAGE SETUP
RESTORE
SYSTEM SETUP
AUTO PLAY
TV SYSTEM
SPIDIF OUT
PASSWORD
EXIT SETUP
DEFAULT
TV TYPE
RATING
LANGUAGE SETUP
SYSTEM SETUP
AUTO PLAY
TV SYSTEM
SPIDIF OUT
PASSWORD
EXIT SETUP
DEFAULT
TV TYPE
RATING
h.EXIT SETUP
OSD LANGUAGE
AUDO LANG
SUBTITLE LANG
MENU LANG
EXIT SETUP
LANGUAGE SETUP
SYSTEM SETUP
LANGUAGE SETUP
OSD LANGUAGE
AUDO LANG
SUBTITLE LANG
MENU LANG
EXIT SETUP
SYSTEM SETUP
ENGLISH
GERMAN
SPANISH
FRENCH
PORTUGUESE
LANGUAGE SETUP
OSD LANGUAGE
AUDO LANG
SUBTITLE LANG
MENU LANG
EXIT SETUP
SYSTEM SETUP
CHINESE
ENGLISH
JAPAN
FRENCH
SPANISH
PORTUGUESE
LATIN
GERMAN
SYSTEM SETUP
PORTUGUESE
CHINESE
ENGLISH
FRENCH
SPANISH
GERMAN
JAPAN
OFF
LANGUAGE SETUP
OSD LANGUAGE
SUBTITLE LANG
AUDO LANG
MENU LANG
EXIT SETUP
SYSTEM SETUP
PORTUGUESE
CHINESE
ENGLISH
FRENCH
SPANISH
GERMAN
JAPAN
LATIN
LANGUAGE SETUP
OSD LANGUAGE
SUBTITLE LANG
AUDO LANG
MENU LANG
EXIT SETUP
d.MENU LANGUAGE
e.EXIT SETUP
SYSTEM SETUP
LANGUAGE SETUP
OSD LANGUAGE
SUBTITLE LANG
AUDO LANG
MENU LANG
EXIT SETUP
12
Page 10

8
BASIC OPERATION
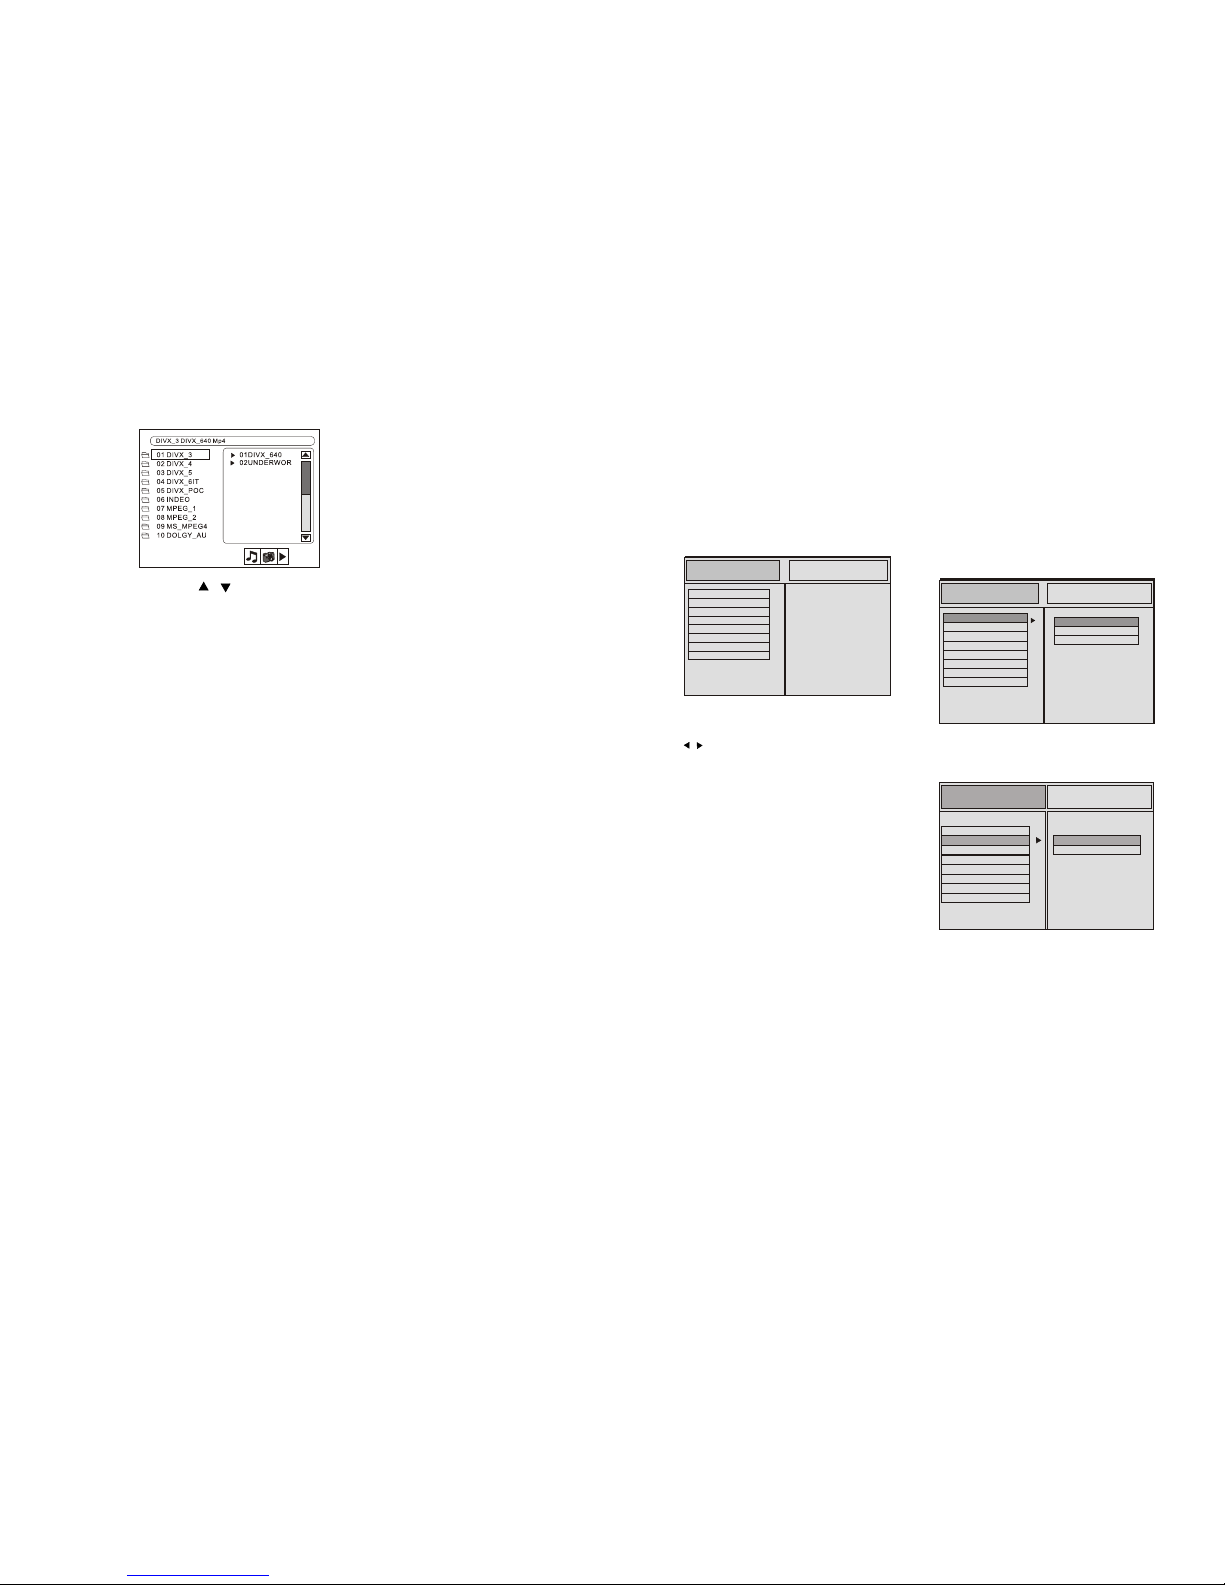
1)Playing music format files (shown as picture )
In the right menu, to select tracks on the right menu, please move
the arrow or on that track then press ENTER button or direct
press NUMBER BUTTONS to enter what you do.
Note: This time, if you press the right key, you can enter the status
of selecting playing music, picture or video format files. Move the
left/right key on your desired and press ENTER button. If you
press the left key, you will return to directory. Continually press
the left key again, you can also enter the referred status just now.
2)Playing picture format files (shown as picture)
You can press NUMBER BUTTONS directly to select your enjoyed picture files or move the
arrow or on that file and press ENTER button. Then the picture will display on the whole
TV screen. By pressing ANGLE, you can adjust to different angle to enjoy your picture. Press
STOP button to return to last status.
Note: If you continually press right key, you can enter the status of selecting playing music,
picture or video files. Move the left/right key on your desired and press ENTER button.
SETUP
c.TV TYPE
This is to select the appropriate TV aspect
(4:3 or 16:9) according to the connected TV set.
1) 4:3 PS
Played back in the PAN & SCAN style.
(If connected to wide-screen TV, the
left and
right edges are cut off.)
2) 4:3 LB
Played back in LETTERBOX style.
(If connected to wide-screen TV, black
bands
appear at top and bottom of the screen.)
3) 16:9
Select when a wide-screen TV set is
connected
TV Screen
4:3 Wide (16:9)
Video Material
Normal Pan Scan Letter-box
4:3
16:9
e.PASSWORD
Select the change and press ENTER button.
Type the old password (The initial factory
code is 0000) and key in 4 characters
password now you want to use, and
type again to confirm key in correctly.
Select suitable guidance rating by the
cursor button and confirmed by pressing
ENTER button.
Rating 1: [ Kid Safe ]
Select following when the programs are
safe to all kids view.
Rating 2: [ G ]
Select following that allows admission
to person of all ages.
Rating 3: [ PG ]Select following that
needs to parents guide their children.
Rating 4: [ PG_13 ]
Select following when children under
13 are forbidden to view.
Rating 5: [ PG_R ]
Select following when the [ PG_R ]
was printed on the DVD disc.
Rating 6: [ R ]
Select following when children under 17
must be guide to view by their parents.
Rating 7: [NC-17]
Select following when children under 17
are forbidden to view
Rating 8: [ Adult ]
Select following, which only allows
admission to all adults.
d.SPDIF OUT
This is to activate the audio output from
ANALOG/OPTICAL mode to SPDIF
ON/OFF mode.
LANGUAGE SETUP
4:3PS
4:3LB
16:9
SYSTEM SETUP
AUTO PLAY
SPIDIF OUT
PASSWORD
EXIT SETUP
TV SYSTEM
DEFAULT
TV TYPE
RATING
TV SYSTEM
AUTO PLAY
TV TYPE
SPIDIF OUT
PASSWORD
SYSTEM SETUP
LANGUAGE SETUP
RATING
DEFAULT
EXIT SETUP
--------
LANGUAGE SETUP
KID SAFE
Pg13
PG-R
NC-17
ADULT
PG
G
R
SYSTEM SETUP
AUTO PLAY
PASSWORD
TV SYSTEM
SPIDIF OUT
EXIT SETUP
TV TYPE
RATING
DEFAULT
f.RATING
11
TV SYSTEM
AUTO PLAY
TV TYPE
SPIDF OUT
PASSWORD
RATING
DEFAULT
EXIT SETUP
LANGUAGE SETUPSYSTEM SETUP
ON
OFF
Page 11
9
3)Playing video format files (shown as picture)
You can move the arrow or on the video file that you would like to watch,
then press ENTER button to confirm. Or press the left key to return to
directory to choose other video files at different directory.
REGION SETUP
SETUP
SETUP MENU
1. Press SETUP in the stop mode. (Press the
STOP button twice to ensure the player
under
STOP mode.)
2. The main page of setup menu is displayed.
3. Select the preferred item by using the
/ buttons.
4. Press ENTER buttons,
A. SYSTEM SETUP
This setup page includes all the items of
TV system, Screen saver, TV type, Password,
Rating & Default features. The details please
refer to SYSTEM SETUP MENU.
B.LANGUAGE SETUP
This setup page includes all the items of OSD
Language, Audio Language, Subtitle Language
and Menu Language features. The details
please refer to LANGUAGE SETUP MENU.
A. SYSTEM SETUP
a.TV SYSTEM
This player can play discs
recorded in either PAL or
NTSC format. Select NTSC
format When you connected
to NTSC TV.Select PAL form
at when you connected to PAL
TV.If you select AUTO, the unit
will auto select the format(PAL
/NTSC) according to your TV
System.
Select the AUTO PLAY ON/OFF.
TV SYSTEM
AUTO PLAY
TV TYPE
SPIDIF OUT
PASSWORD
SYSTEM SETUP
RATING
DEFAULT
EXIT SETUP
LANGUAGE SETUP
TV SYSTEM
AUTO PLAY
TV TYPE
SPIDIF OUT
PASSWORD
SYSTEM SETUP
LANGUAGE SETUP
RATING
DEFAULT
EXIT SETUP
NTSC
PAL
AUTO
10
b. AUTO PLAY
This unit is set at region 0(all region).When playing other region disc,change
the region setting.With disc ejected,press 5 5 6 8 onre mote to enterinto region
setting and change region.After finish reading otherregion disc,unit will be
restored to region 0 automatically.
LANGUAGE SETUPLANGUAGE SETUPSYSTEM SETUPSYSTEM SETUP
TV SYSTEM
AUTO PLAY
TV TYPE
SPIDF OUT
PASSWORD
RATING
DEFAULT
EXIT SETUP
TV SYSTEM
AUTO PLAY
TV TYPE
SPIDF OUT
PASSWORD
RATING
DEFAULT
EXIT SETUP
ON
OFF
ON
OFF
 Loading...