

Page 1
Printing Color: White/Black.
Material QUALITY: 100g wood-free printed paper.
Size: A6
D76TSB
7" Widescreen Color LCD Monitor With DVD Player
Ple ase rea d the man ual in de tail be fore us ing thi s produ ct.
Thi s produ ct is mad e of prec ision c ompon ents, k eep it aw ay from m oistu re.
Page 2

Table of contents
Safety Precautions. ... .. ... .. ... ... .. ... .. ... .. ... ... .. ... .. ... .. ... ... .. ... .. ... ... .. .1
Main Features... .. ... ... .. ... .. ... .. ... ... .. ... .. ... .. ... ... .. ... .. ... ... .. ... .. ... .. ... 2
Uuit Installation........ .. ... ... .. ... .. ... .. ... ... .. ... .. ... .. ... ... .. ... .. ... .. ... ... .. ..3
Installation Method............... .. ... ... .. ... .. ... .. ... ... .. ... .. ... .. ... ... .. ... .. ... .. 4
Instruction for install and uninstall face panel . 5
User Introduction 6
Wiring Diagram 7
Unit Rear Side Connection 8
.. ... .. ... .. ... ... .. ... .. ... .. ... ... .. ... .. ... .. ... ... .. ... .. ... .. ... ..
.. ... .. ... .. ... ... .. ... .. ... .. ... ... .. ... .. ... .. ... ... .. ... .. ... .. ... ... ..
.. ... .. ... .. ... ... .. ... .. ... .. ... ... .. ... .. ... .. ... ... .. ... .
Connect To Stor age Ac ces sor ies .. ... .. ... ... .. ... .. ... .. ... ... .. ... .. ... .. ... ... .. .9
Remote Control Operation 10
.. ... .. ... .. ... ... .. ... .. ... .. ... ... .. ... .. ... .. ... ... .. ...
Touch Screen Menu And Operation... .. ... ... .. ... .. ... .. ... ... .. ... .. ... .. ... ... .13
Bluetooth system settings 13
.. ... .. ... .. ... ... .. ... .. ... .. ... ... .. ... .. ... .. ... ... .. ...
DVD Mode Menu Interface... .. ... ... .. ... .. ... .. ... ... .. ... .. ... .. ... ... .. ... .. ... ..
USB/SD Operation 15
.. ... .. ... .. ... ... .. ... .. ... .. ... ... .. ... .. ... .. ... ... .. ... .. ... .. ..
Radio Function Interface . ... .. ... .. ... ... .. ... .. ... .. ... ... .. ... .. ... .. ... ... .. ... ..
Audio/Vid eo Me nu Se tup 16
SYS System Settings ..17
System Settings 17
.. ... .. ... .. ... ... .. ... .. ... .. ... ... .. ... .. ... .. ... ... .. ... ..
.. ... .. ... .. ... ... .. ... .. ... .. ... ... .. ... .. ... .. ... ... .. ... .. ..
.. ... .. ... .. ... ... .. ... .. ... .. ... ... .. ... .. ... .. ... ... .. ... .. ... .. ... ..
Function Index Sign.. ... .. ... .. ... .. ... ... .. ... .. ... .. ... ... .. ... .. ... .. ... ... .. ... .. .
Warning 19
.. ... .. ... .. ... ... .. ... .. ... .. ... ... .. ... .. ... .. ... ... .. ... .. ... .. ... ... .. ... .. ..
Trouble Shooting 20
.. ... .. ... .. ... ... .. ... .. ... .. ... ... .. ... .. ... .. ... ... .. ... .. ... .. ...
.. ... .. ... .. ... ... .. ... .. ... .. . .. .. .
14
15
19
.
Page 3

Safety Precautions
This product wit hout waterproof function. To avoid the risk of fire breakout or electric
shock, please do n ot expose this unit in the rain or moist environment. Do not open
the cabinet. Such operation will absolve relative maintenance guarantee. Only the
legally author ized professionals are allowed to conduct such operation.
LASER: This unit installs a laser system. To ensure proper use of this product,
please read this o wner's manual carefully before operating this unit and keep it for
future reference. If the unit requires maintenance, please contact an authorized
professional . Please operate according to correct process in order not to hurt by
laser beam.
Please use this un it at normal temperature. Do not put the unit under -10 degree or
higher than +60 degree environment. Otherwise it will distort the plastic shell,
debase the displ ay quality and products quality.
Installation s hould be very tight and secured to prevent the fallen unit hurt people
!!
and damage the unit when moving on or a sudden brake.
Please install c arefully to avoid damaging working platform. Please clean the
internal worki ng platform, and ensure sufficient spa ce for installation. Inner shell will
be installed on th e working platform. Then install the mainframe, connecting the
power and video si gnals jack, then put mainframe into the shell. Then assemble the
shell with the mai nframe device.
Please do not try to repair display device by yourself. It is made up of many precisi on
electronic ele ments, and any dismantlement or refit will make it damaged or b roken.
If any problem on the unit, please switch off the power immedi ately, and consult your
nearest seller o r distributor.
Please keep the mo nitor away from the pollution of moisture, dust, water soot etc.
!!
Please switch off t he power immediately if any moisture or other objects pollute,
please contact t he seller or distributor.
If you drive with the sound at a level preventing you from hearing sounds outside the
!!
car please keep th e unit at an appropriate sound level, otherwise this may affect
your driving and c ause an accident.
For your safety, please do not watch or operate the monitor when you are driving.
!!
The apparatus shall not be exposed to dripping or splashing and that no objects
!!
filled with liqu ids, such as vases, shall be placed on the apparatus.
Preface
Thank you for your support of th e company’s products and options. This unit is crystallization
of the modern high-tech. It is a cr oss-functional player mode and adjustable true colo r LCD
automatic retractable screen LCD touch screen. Allows you to be ar bitrary choice To
appreciate the program. Here, we wish you to personally experience this high-tech products
can be Perfect fun and enjoyment. To ensure proper use of this product, please read this
owner’s manual carefully before operating this unit and keep it for future reference.
Note: The graphics of this manual are for your reference only, please in-kind products prevail.
Main Features
1.7” Wide screen TFT LCD high-definition media player monitor.
2. This unit is with touch icon interface and touch button icon.
3. Built-in AV / DVD / USB / SD / FM/AM /Bluetooth function.
4. DVD/VCD/MP3/CD/MPEG compatible.
5. FM/AM digital synthesizer tuner with 30 memory presets.
6.Intelligentize bluetooth function, for you to make and answer the phone comfortably.
7. Built-in 4X25W power amplifier, 4.1 soundtrack audio output, can connect to external
audio device.
8. Signal: 2 video output, 1 video input.
9. Under car reverse mode, can auto switch to the reversing mode, if connect to the camera,
can observe the back side of car to ensure the safety.
10. Menu function: all function is operated by OSD menu.
11. Display system: AUTO/PAL/NTSC.
12. Auto memory: all the feature or position adjustment can be auto memoried and will auto
resume.
13. Support USB/SD card to play MP3/MP4/WMA/AVI/JPEG media format.
14. Remote control: full function remote control operation.
15. Picture pixel:800*480
16. Power: DC 12V ±10%; Low power consumption: ~25W.
17. Working Temp: -10℃ ~60℃.
18. Max Current: 7 A.
19. This unit has anti shock function.
1 2
Page 4
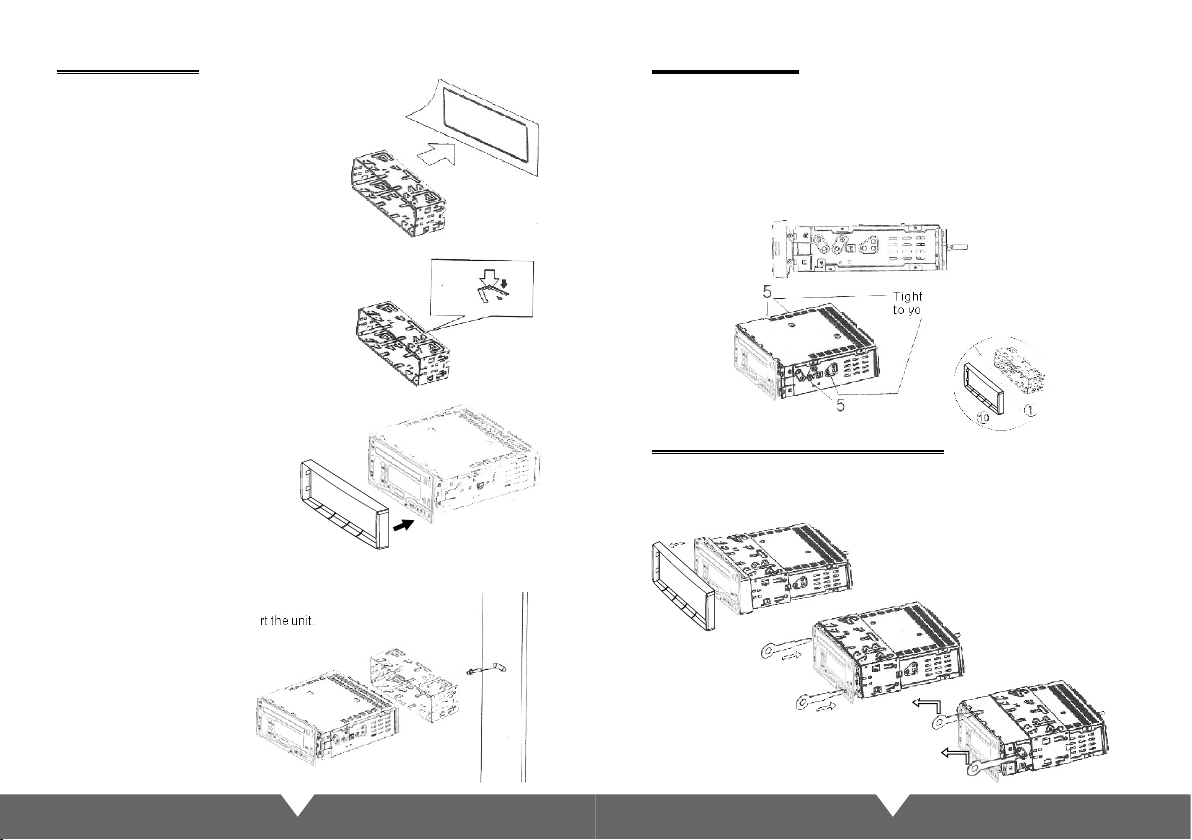
UNIT INSTALL ATION
Ins talla tion Me thod 1: D in Fron t-Mou nt
Ins tall th e Mount ing sle eve int o the das hboar d.
Ben d as many c laws ou tward f or tigh t fit,
to lo ck the sl eeve in to plac e.
Install the trim bezel to the unit.
(Arched surface toward the bottom).
Use t he Rear M ounti ng Bolt t o suppo rt the un it.
Installation Method 2:
Usi ng the sc rew hol es at the s ides of t he unit (ISO Mo unt).
1. Re move th e hooks o n both si des.
2. Se lect a po sitio n where t he scre w holes o f the mou nting b racke t suppl ied wit h the
car a nd the sc rew hol es of the m ain uni t becom e align ed, tig hten th e screw s on each
sid e, and re -moun t the bra ckets w ith the f actor y hardw are in th e origi nal loc ation .
NOT E:
1 and 1 0 are not u sed for i nstal latio n metho d2.
Tig hte n the sc rew s
to your ca r
UNI T REMOVA L(when in stalled u sing th e sleev e)
1. De tach th e trim be zel.
2. In sert th e keys su pplie d with th e unit on b oth sid es(as i llust rated ) as this w ill
rel ease th e inter nal loc ks so you c an slid e the uni t out.
3 4
Page 5

Ins truct ion for i nstal l and uni nstal l face pa nel
The f ace pan el is for s ecuri ty desi gn, the f ace pan el avai lable d etach able, p ress th e
but ton, th e face pa nel wil l be move o ut, rai se up the m oved ou r side, t he take o ut the
fac e panel . Pleas e refer ence th e fig. 1, 2,3,4 , as belo w:
1.Pre ss the bu tton
4.Carry out the face panel
Not e: plea se proc ess the s tep as th e instr uct, if f orce to t ake out t he face p anel wi ll be
eas y to brok en the ma teria l and can n ot catc h the hea d unit.
2:The left side of face panel will move out
3: Ra ise lef t the fac e panel
5 6
User Introduction
1. Please connect the signal cable with power cable according to “Unit rear side connection” to
connect to power and signal.
2.After connect to power, Press the power button to switch on, press again the power button,
the screen enter into the main interface
3. When display DVD or VCD disc, the unit is automatically identify the video system PAL and
NTSC.
4. Can through the button on panel to adjust the function. And can use the remote control or
touch screen to adjust the function.
Page 6

Wire connection
Unit Rear Side Connection
WHI TE(BL ACK)/ FL-
GRE EN/FR +
GRE Y/RR+
7 6
5
432
PUR PLE(B LACK) /RL-
PINK/BRAKE-CON
RED /ACC
1
8 9 1 0 11 12 1 3 14
GRE Y(BLA CK)/R R-
GRE EN(BL ACK)/ FR-
WHI TE/FL +
BLU E/ANT -CON
BRO WN/BA CK-C ON
PUR PLE/R L+
1. (Y ELLOW ) BATT(M emory bac kup): Pow er cabl e
2. (R ED) ACC: C onnec t to batt ery pos itive p ole
3. (P INK) BR AKE-C ON: Han d brake c onnec tion ca ble
4. (P URPLE /BLAC K) RL-: R ear lef t audio o utput ( catho de)
5.( WHITE /BLAC K) FL-: F ront le ft audi o outpu t (cath ode)
(GR EEN) FR +: Fron t right a udio ou tput (p ositi ve pole )
6.
(GR EY) RR+ : Rear ri ght aud io outp ut (pos itive p ole)
7.
(GR EY/BL ACK) RR -: Rear r ight au dio out put (ca thode )
8.
(GR EEN/B LACK) F R-: Fro nt righ t audio o utput ( catho de)
9.
10. (WHIT E ) FL+: Fr ont lef t audio o utput ( posit ive pol e)
11. (P URPLE) RL +: Rear lef t audio o utput ( posit ive pol e)
12. ( BROWN ) BACK- CON: Ca r rever sing ca ble
13. ( BLUE) AN T-CON: An tenna a mplif ier out put con trol
14. ( BLACK )GND: c onnec t to grou nd.
YEL LOW / BATT( Memor y backu p)
BLA CK / GND
FUSE
Ca mer a
IN
A
FM NT
ER
T
ADA P
NNA
NTE
A
O
D
RA I
Di spl ay
Di spl ay
REAR RIGHTREAR RIGHT
FRONT RIGHTFRONT RIGHT
YELLOW/VI DEO-OUT1
YELLOW/VI DEO-OUT2
YELLOW/BACK- VIDEO-I N
YELLOW/AUX- VIDEO-I N
WHITE/ AUX-L -IN
RED/A UX-R- IN
BATTERYBATTERY
(YELLOW)BATT(Memory backup)(YELLOW)BATT(Memory backup)
(PINK)BRAKE-CON (PINK)BRAKE-CON
Reve rse mir ror con trol ca ble, co nnect ed to
the ca r backi ng lamp .
FRONT LEFTFRONT LEFT
(BROWN)BACK-CON(BROWN)BACK-CON
REAR LEFTREAR LEFT
(GRAY)(GRAY)
(PURPLE)(PURPLE)
(WHITE)(WHITE)
(GREEN)(GREEN)
WHITE/ RL- OUT
WHITE/ FL- OUT
RED/RR- OUT
RED/F R-OUT
SUBWO OFER
(RED)ACC(RED)ACC
(BLACK)GND(BLACK)GND
(BLUE)ANT-CON(BLUE)ANT-CON
Ante nna con trol ca ble
Manu al brak e switc h
(GRAY/BLACK)(GRAY/BLACK)
(PURPLE/BLACK)(PURPLE/BLACK)
(WHITE/BLACK)(WHITE/BLACK)
(GREEN/BLACK)(GREEN/BLACK)
7 8
Page 7

Appearance and Function Introduction
13
14
1
2
3
4
5
6
12
7
8
9
9
9
9
9
1.P WR: Pow er on/o ff, pre ss for long t ime to turn o ff, sho rt-pres s it for pane l slip in a nd
out .
2.MIC:Mi crophon e
3.SRC: S ignal mod e selec t.
In FM m ode, it f or auto s earch .
4.AMS:
5.MUTE
6.pres s down this b utton ,the pa nel is de tacha ble
BAN D: the ra dio BAN D selec tion, o ther st ate is in valid .
7.
On FM m ode to se lect br and of ra dio: FM 1/FM2 /FM3. AM 1/AM2 ;
8.Cloc kwise rot ation i s Contr ol for th e volum e incre ase, an d can use f or MENU
adj ustme nt.
Cou nterc lockw ise-r otati on is Con trol fo r the vol ume red uce, an d can use f or MENU
adj ustme nt.
Pre ss it for c hoose " VOL” “T RE” “BA S” “FAD” “ BAL” to a djust t hat you n eed.
9.In FM mo de these ar e numbe r butto ns, pre ss it to di splay s elect t he chan nel,
lon g-pre ss can re serve t he curr ent fre quenc y to corr espon ding nu mber ch annel ;
In DV D/USB /SD mod e these a re play /paus e, repe at, seq uence p lay and s top.
10. Rem ote contr ol wind ow.
11.M ini USB con nector
12. AUX : audio inp ut jack .
13.
pre ss this b utton t o eject o r slot -i n the dis c
14. Eje ct/Ente r the dis c.
9
11
9
10
Remote Control Operation
1. : Power
Press this button to turn on/off the unit.
2. : Play/Pause
3. : MUTE
4. Press the left and right arrow keys is to
fast forward / rewind, Up / Down mobile the
cursor is select the file
In radio state is band switch, other
5.
channel is invalid.
6. Enter
7. Volume: VOL+/VOL-
8. SEEK- /SEEK+ : Previous/next
9. DVD Programming
10. OSD
Press it to display the disc information.
5
4
6
20
9
12
7
13
16
10
14
11. SEL: Sound adjustment function
12. AMS/RPT
DVD mode is Loop broadcast,
The radio
26
model is automatically search radio station.
13. Under DVD mode, press it for shuffle
14. Number: Pilih lagu
15. AUDIO memilih mode.
16. Switching sub menu
17. Subtitle on/off
18.Anycast title, chapter, audio, subtitle
19. MODE: Change modes
20. : Stop playing
21. DVD display disc there are more
angle select (need the disc support)
22. SLOW: slow forward/slow playing
23. SETUP: DVD system setup
24. TITLE
25. ZOOM
Press it can zoom or shrink picture
displayed
26. : Eject button.
press this button to eject or slot -in
the disc
27. : Display panel slip out.
28. : Display panel retract.
29. CLOSE: press it, the monitor will
auto-extend or return.
Return to the menu title
Not e:Rad io stat us,pr ess ST,LO C butto ns on R/C n o funct ion
1
19
27 28 29
3
2
Precautions Before Using Remote Control Unit
1. Please pull out the PVC when the remote control unit is first using.
2. Don’t drop or step in remote control unit or subject it to shocks.
3. Note that it maybe impossible to operate the main unit if there are obstacles between it
and the remote sensor.
4. Using the remote control unit within the specified operating range.
10
17
24
23
22
21
25
11
8
15
18
Page 8

Rem ote Con trol Un it Oper ating R ange
Horizontal: ±30 degree
Vertical: ±30 degree
Distance: 6M
Rep lacin g The Bat tery
1. Insert your finger nails into A and B on the diagram
below, press A according to the direction, then pull
out the battery holder.
3. Fit the battery holder back to its place.
2. Remove the old battery, then insert the new
battery into the battery holder with the + side
facing upwards.
Lit hium ba ttery (Cr20 25)
Not e:
To prevent leakage of fluid from the lithium
battery, remove the battery when not using
the remote control unit for long periods of
time(one month or more), If the battery leaks
fluid, carefully wipe it out of the battery case,
then change to a new lithium battery.
Basic Operation
1. Power on /off
Press the “ ” button on remote control, enter into power on condition, press this button
again to turn off the unit.
2. PLAY/PAUSE
On normal play disc mode, press this “ ” button to pause. Press this button again to
continue playing.
3. STOP
In play mode, press it to stop playing, press “PLAY” button to resume playing.
4. DISC IN /OUT
Press to eject the disc. The disc into the disc slot, will inhale automatically.
5. Adjust panel angle
Press “ ” “ ” button on remote control, can adjust the panel angle.
6. MUTE control
Press “ ” button on remote control to turn off the sound. Press it again will resume the
previous volume level.
Note: there are some functions no work when mute.
7. Function mode switch
Press “MODE” button on remote control to switch the mode. But if the unit without disc/SD/
USB inside, can’t enter to DVD/SD/USB mode.
8. “ ” “ ”
In DVD mode, short-press for previous/next item, long-press for fast forward/fast back;
In FM mode, short-press for adjust radio frequency, long-press for manual search forward
up/down; In TV mode, short-press for previous / next channel, long-press for fine-tuned.
2626
11 12
9. ODD:
Press the OSD remote control key, the screen will display elapsed time, remaining time,
title,chapter, time, section time, time remaining chapters, show off
10.Select the subtitle
11. Press “Sub-T” to select different subtitles inherent in DVD disc.
12. Press ZOOM key for times, the picture will change in order of 2X, 3X 4X,1/2,1/3 and 1/4 of
normal size. (Note: When playing MP3/USB/SD, this button is invalid.)
13. Press SLOW on the remote control to slow playing. Change the playing speed to 1/2, 1/4,
1/8, and 1/16 through pressing SLOW button.
14.During playback press the "AUDIO" voice key, can be included on the DVD disc in a variety
of audio languages to choose.
15. “GOTO” chooses play button, Press it, the play information will show on screen, use cursor
button on the remote control to choose disctitle, chapter or time and then press “enter” button
to play.
16. Press ANGLE to select the play angle when the main unit is in play mode for DVD disc,
there is no function for other disc. It will be no working if the disc not have this function.
17. The main unit may auto play the list according to the order of title, chapter or set list;
Press ST/PROG, the menu will shown on the screen.
TT: CH:
Hint: TT is for Title, CH is for Chapter of DVD disc. DVD disc
is divided into several parts called Title. Then title is divided
into chapter; Normally one movie only corresponding to one
title. CD disc is divided into several items. For KARAOKE disc
one music corresponding to one title.
Use the and number button, to input the corresponding title, chapter, same as
the picture showing:
Use move cursors to “play”, press “enter” button,
the unit starts playing on the program list. Press “Play/Pause”
button or choose "Exit" button, press “enter” to exit.
NOTE:
(1). The program list will be cancel when the main unit is power off or eject the disc.
(2). There is no program function for some disc.
(3). The unit can not play the list if you select the item that does not exist in the disc.
1
2
3
4
5
11
12
13
14
15
Prev ious
TT: CH:
TT: CH:
TT: CH:
TT: CH:
TT: CH:
TT: CH:
TT: CH:
TT: CH:
TT: CH:
TT: CH:
6
7
TT: CH:
8
TT: CH:
9
TT: CH:
10
TT: CH:
EXIT
EXIT
Next
TT: CH:
16
17
TT: CH:
18
TT: CH:
19
TT: CH:
20
TT: CH:
Page 9

Touc h Scr een M enu And Operation
Main Interface
Once opening the unit, it can automatically enter into the main interface, As shown
4
3
2
1
B : B function.
1. TPHONE luetooth
2. DVD mode
3. TV function mode.(Invalid Function keys)
4. RADIO: radio mode
5/7. USB/SD: Memory signal input mode,
(Connect the usb/sd can be to enter)
6.POWER: Off key
8.Close the screen display, and then click on
the scree nback to normal.
9/11. /
6
5 7
8
11
9
10
13
12
Adjust panel angle upward/down
AUX AUX
10. : signal input mode.
.
12 : press this button can slip in/out disc
13. SETUP: setup menu.
Touch screen “1,2,4,5,7,10,13” the center of the corresponding function, the screen immediately
enter to interface of your chosen functions mode. If have connected signal source, there are
clear picture for you to enjoy. Touch the screen "6" off; touch "13" point can enter the setup menu
to set product function and display; specific instructions, please refer to the corresponding menu
interface. Touch screen "9,11" points to adjust the panel angle up or down to meet your visual
requirements.
Touch c orrespo nding cen ter ico n on the sc reen, t hen can e nter in to the in terfa ce what
fun ction y ou choo se
Bluetooth system settings
Pre ss the re mote co ntrol " mode" , selec t displ ay pict ure, or i con on th e touch s creen t o
ent er the BT B luetoot h mode: see t he pict ure bel ow.
1
4
5
6
1. Back to the main interface.
Status Information shows column.2.
3
2
Delete button: touch the button can
3.
delete the already input number.
Dialing button: answer and make the
4.
phone.
Press the call state, phone call mode
5.
8
conversion mode with the external call
6
Hang up button: end the call or refuse the
.
call.
Number buttons
7
7.
8
.When play songs by bluetooth, they act
as respectively pause/play, previous song,
stop playing and next song
13
Operating instructions
1. Starting up and enter into the bluetooth system picture.
2. Open up the bluetooth equipment of the mobile phone can search this unit's bluetooth
equipment “CAR KIT”.Then match the bluetooth by presentation.
3. Input 4 figures pass code“0000”,this unit's bluetooth will be set up to the authorized
equipment of the mobile phone. If the match is successful the status of the bluetooth
picture will sho w “LINK OK”
Tips: If it unable to match please starting up again. After setting up the unit to authorized
equipment, the bluetooth will connect or enter into mobile phone bluetooth system
automaticall y. Select “CAT KIT”to connect it.
4. After you match successfully you can make and answer the phone comfortably.
Within the effective limits, this unit can also transmit the music which is playing in the
mobile phone. And can adjust the voice through mobile phone.
(Within the effective limits of 10 meters).
Cautions: This unit can only match with one mobile phone equipment which has bluetooth
function. The bluetooth function of this unit can only receive audio frequency information.
DVD Mode Menu Interface
Panel or by remote control "MODE" ; Or on main menu to touch MEDIA icon enter to DVD
mode(touch screen the menu toolbar appears when the menu toolbar Hide):
Back to the main interface
1.
2/3.VOL-/VOL+:
4/6. /
5/7: /
8. :
9. :
Volume control button
previous /Next
:
Fast forward / Fast back
:
Stop
Play/Pause
10.MUTE
AUDIO: n DVD playback, press
11. I
this button, Press it to select the
channel when the main unit is in play
mode for DVD disc
12.RPT
13.TITLE
14.MENU
15.SUB:Subtitle selection(need the disc support)
Tools, Touch it enter to AUDIO/VIDEO menu Please refer to audio / video menu
16.SET: (
description
)
17. :
Disc out of the warehouse
Not e:
In an y mode, o nce pla ced the D VD disc , it will a utoma tical ly swit ch back t o DVD mod e.
1
5
4
3
2
12
111013
16
14
15
17
14
9
8
7
6
Page 10

USB/SD Operation
When the unit connect USB/SD, touch the “USB” or “SD” icon in main interface, will auto
read .As shown:
Close the screen display, and then click
1.
on the screenback to normal.
2 3 Volume control button
/ .
.PRT
4
/ . / Previous/Next
5 6
. Play/Pause
7
. Stop
8
When playing USB or SD card, Touch the DVD menu arrow keys to move the cursor to the file
bag, file, MP3 or JPEG icon icon you want, and then press to confirm the selection, the selected
file will automatically play . Play JPEG photo files, touch to confirm the current picture to exit
picture playback, press the stop button to exit.
While the USB/SD is playing, and if you Insert the disc, will go to DVD playing. Pull out
the USB/SD when you want to stop playing. Click the file directly can play the selected file.
Note: Click the bottom half of the screen can appear "Actions" menu, then click the "
disappeared.
1
00:12 02 :27
002/01 3
MP3
Mp3
Mp3
Mp3
2
3
5 678
4
Radio Function Interface
After opening the machine, Select main screen or select on the remote control "mode" to
switch to the RADIO,As shown:
9
8
1
9/10.Receiving frequency tuning
11. Status Information shows column.
12.FM/AM band shows
87. 75
87. 75
89. 45
2
11
1.2Close the screen display, and then click on
the screenback to normal.
88. 65
91. 15
Mhz
Fm1
89. 00
92. 35
10
12
Touch MUTE to turn off the sound,
. MUTE:
press again to resume to previous volume
level.
3/4. Volume adjustment buttons
5. SCAN: Touch "Scan" Department, will
automatically search for and select "SGAN"
4
3
5
7
6
will automatically save
8
6. BAND: Select FM/AM wave band.。
Click the Search radio channel up / down
7/8.
Audio/Vid eo Me nu Se tup
Under DVD mode, touch “SET” button enter to “AUDIO/VIDEO”menu setting interface.
(Picture 1) Audio setting interface
3
4
5
6
2
1
8
9
7
AUDIO mode: Touch this icon, the icon is
1.
10
concave, then will enter to audio setting mode.
VIDEO mode: Touch this icon, the icon is
2.
concave, then will enter to video setting
mode.
TRE: Alt volume adjustment, Touch the
3.
“ ” “ ” icon, on the screen, the alt
volume will change.
BAS: Bourdon volume adjust.
4. BAS:
Touch the “ ” “ ” icon on the screen, the
bourdon volume will change.
FAD: Front and Rear volume adjustment,
5.
Touch the “ ” “ ” icon on the screen, the
front and Rear volume will change.
BAL: Left and right track adjustment,
6.
Touch the “ ” “ ” icon on the screen, the
left right track volume will change.
7.CLASS
8.ROCK
(Picture 2) Video setting interface
11
12
13
14
15
18
17
16
9.JAZZ
10.POP
BRI: Brightness
11.
Touch the“ ” “ ” icon on the screen,
to adjust the picture brightness.
CON: Contrast,
12.
Touch the“ ” “ ” icon on the screen,
to adjust the picture contrast.
13.COL: Color,
Touch the “ ” “ ” icon on the screen,
to adjust the picture color.
HUE: Hue,
14.
Touch the “ ” “ ” icon on the screen,
to adjust the picture hue.
STDY: Standard mode.
15.
BRIG: Brightness.
16.
SOFT: Soft.
17.
18.VIVID
15
16
Page 11

SYS System Settings
After opening the machine, Under the main menu screen on the touch screen "SYS" key to enter
"SYS" system setting interface,Interface shows 、
、Touch prospective
developed)
effect、 ,As shown:
Language settings
pro mpt Set the au dio / video an d DVD menu wh en audio video m ode ope ratio n the sam e: /
AUDIO/VIDEO Steering(this function hasn't
Touc h-effic iency adj ustme nt
Touch -effi ciency ad justmen t (foll ow the pr ompts t o click o n the cen ter of "+ " sign, i f
suc cessf ully ad just, i t will au to-ex it)
1
2
Lan guage s ettin gs
1.2Bac k to the ma in inte rface
.Engli sh / Portug uese
System Settings
Under the DVD display mode, press the “SETUP”button on remote control ress " "
, P
to move the cursor and "ENTER"Confirmation option Conduct Audio
Setup Psage
、Video Setup Page and Preference Page。below is for the details menu for
your reference
1. General Setup Page
Gene ral Ser up Page
Tv Dis play Wi de 4:3 Pa nscan
Angl e Mark Off
Osd La ng Eng
Capt ions Off
Scre en Save r Off
Last M emory
Set Tv Di splay M ode
Gene ral Ser up Page
Tv Dis play Wi de
Angl e Mark O ff
Osd La ng Eng
Capt ions Of f
Scre en Save r Off
Last M emory
Clos ed Capt ion
4:3 Le tterb ox
16:9
Off
Off
On
Off
-- General Setup Page - -
Tv Dis play
Angl e Mark
Osd La ng
Capt ions
Scre en Save r
Last M emory
Go To Gene ral Set up Page
Gene ral Ser up Page
Tv Dis play Wi de
Angl e Mark O ff On
Osd La ng Eng
Capt ions Of f
Scre en Save r Off
Last M emory
Set Ang le Mark
Gene ral Ser up Page
Tv Dis play Wi de
Angl e Mark O ff
Osd La ng Eng
Capt ions Of f
Scre en Save r Off
Last M emory
Scre en Save r
General Setup Page、
PS
Off
Eng
Off
Off
Off
Gene ral Ser up Page
Tv Dis play W ide
Angl e Mark Off
Off
Off
On
Off
Off
Osd La ng Eng
Capt ions O ff
Scre en Save r Off
Last M emory
Set Os d Langu age
Go To Gene ral Set up Page
Gene ral Ser up Page
Tv Dis play Wi de
Angl e Mark O ff
Osd La ng Eng
Capt ions Of f
Scre en Save r Off
Last M emory
Set La st Memo ru Stat e
17
Engl ish
Chin ese
Fren ch
Germ an
Ital ian
Port ugues e
Off
Spen ish
On
Off
Off
2.Audio Setup Psage
-- Audio Setup Page - -
Anal og Audi o Setup
Goto S peake r Setup P age
In th e Aud io setup me nu,it has s ubmenu ch oice-“l t/Rt” “Ster eo”tw o submenu c hoice s.
3. Setup Psage Video
-- Video Setup Page - -
Pane l Quali ty
Go To Video P anel Qu ality S etup Pa ge
In the video settings menu,The quality of the LCD screen to set a plan“Sharpness”“
Brightness”“Contrast”“Hue”“Saturation”Sub-menu to choose from,Press the
remote control arrow keys on the LCD screen can be set to adjust picture quality
4. Preference Page
-- Preference Page - -
Tv Type
PAL
Eng
Audi o
Subt itle
Eng
Disc M enu
Pare ntal
Off
Pass word
Off
Defa ult
Set Tv S tanda rd
Preference Page
Tv Type PAL PA L
Audi o Eng
Subt itle
Disc M enu Eng
Pare ntal
Pass word
Defa ult
Set Tv St andar d
Preference Page
Tv Type PAL
Audi o Eng
Subt itle
Disc M enu Eng
Pare ntal
Pass word
Defa ult
Pref erred M enu Lan guage
ATUO
NTSC
Engl ish
Fren ch
Spen ish
Chin ese
Japa nese
Kore an
Russ ian
Preference Page
Tv Type PAL
Audi o Eng
Subt itle
Disc M enu Eng
Pare ntal
Pass word
Defa ult
Pref erred A udio La nguag e
Preference Page
Tv Type PAL
Audi o Eng
Subt itle
Disc M enu Eng
Pare ntal
Pass word
Defa ult
Pref erred M enu Lan guage
18
Engl ish
Fren ch
Spen ish
Chin ese
Japa nese
Kore an
Russ ian
1 Kid Sa fe
2 G
3 Pg
4 Pg 13
5 Pgr
6 R
7 Nc 17
Preference Page
Tv Type PAL
Audi o Eng
Subt itle
Disc M enu Eng
Pare ntal
Pass word
Defa ult
Set Pr efere nce To Engl ish
Engl ish
Fren ch
Spen ish
Chin ese
Japa nese
Kore an
Russ ian
Page 12

Function Index Sign
FM
AM
AUDIO
VIDEO
FM Frequ enc y range
Noise li mit s ensitivity
S/N Rati o
Antenn a resistance
MW Fr equen cy rang e
S/ N 30d b
S/ N Rat io
Ant enna re sista nce
S/N Rati o
Max outp ut power
Vid eo output scope
Vid eo Hor izont al Reso lutio n
87.5~1 08.0MHZ
15dBu
50dBu
75Ω
530~1 730KH Z
35d Bu
40d Bu
75Ω
80dBu
25W*4CH
1+ /- 0.2 V
≥600
Warning
1. To ensure the accurate of touch function, please touch the center point of relative function.
2. There are build in anti-jamming system in touch screen, to prevent the wrong position touch,
please keep to touch this function for 0.5 second, then the product will get respond for your
instruction.
3. Please do not use the object, which is bigger than the function icon to touch the screen.
Otherwise the touch function will failure or give the wrong operation to other function.
4. To ensure the panel safety, please don't press or use the sharp object to touch the panel.
5. Don't play the severity scratch disc, otherwise will damage the DVD play capability.
6. Be sure to distinguish the anode and the cathode when connecting the power. If connect
wrong, the fuse in filter box will melt immediately to protect unit. Then please replace the
same parameter fuse.
7. DC 12V should be best to connect with the power adapter to prevent from the over-voltage
drop the may influence the normal work of the monitor.
8. Keep this machine away from too hot, or under effect of moisture, dust or oil smoke, avoid
this machine from dropping or impacting, never extrude or chafe this machine with sharp
objects.
9. Dangerous high voltages are present inside the enclosure. Do not open the cabinet, non professionals can not disassemble unit.
10. Installation should be very tight and secure. Preventing the fallen unit hurt people when
moving on or a sudden brake.
Trouble Shooting
PROBLEM
Cannot power on
After ignition switch off,
setting information all lose
Remote control no function
Poor performance of radio
station
Cannot play disk
Cannot switch language/
subtitle
No image
CAUSE
Check whether power fuse melt or not
Some factor cause MCU wrong operation
Wrong connection between ignition line
ACC and power line anode pole
No enough power supply from battery
Improper set of length of antenna, poor
connection of antenna grounding
Disk is scratched.
Put wrong side of disk into unit.
Disk has dirty.
There is only one language/subtitle in
dish
Video line between unit and TV is not
properly connected.
SOLUTION
Change fuse same as the old one.
Press RES button on the panel by
penpoint, then power on
Reconnect line
Change battery of remote control
Check whether antenna is connected
or not, or poor connection.
Change new disk
Slot in the disk with sign side up
Clean disk
If disk is not with multi-language/subtitle,
it cannot switch language/subtitle
Reconnect lines
2019
 Loading...