

Page 1
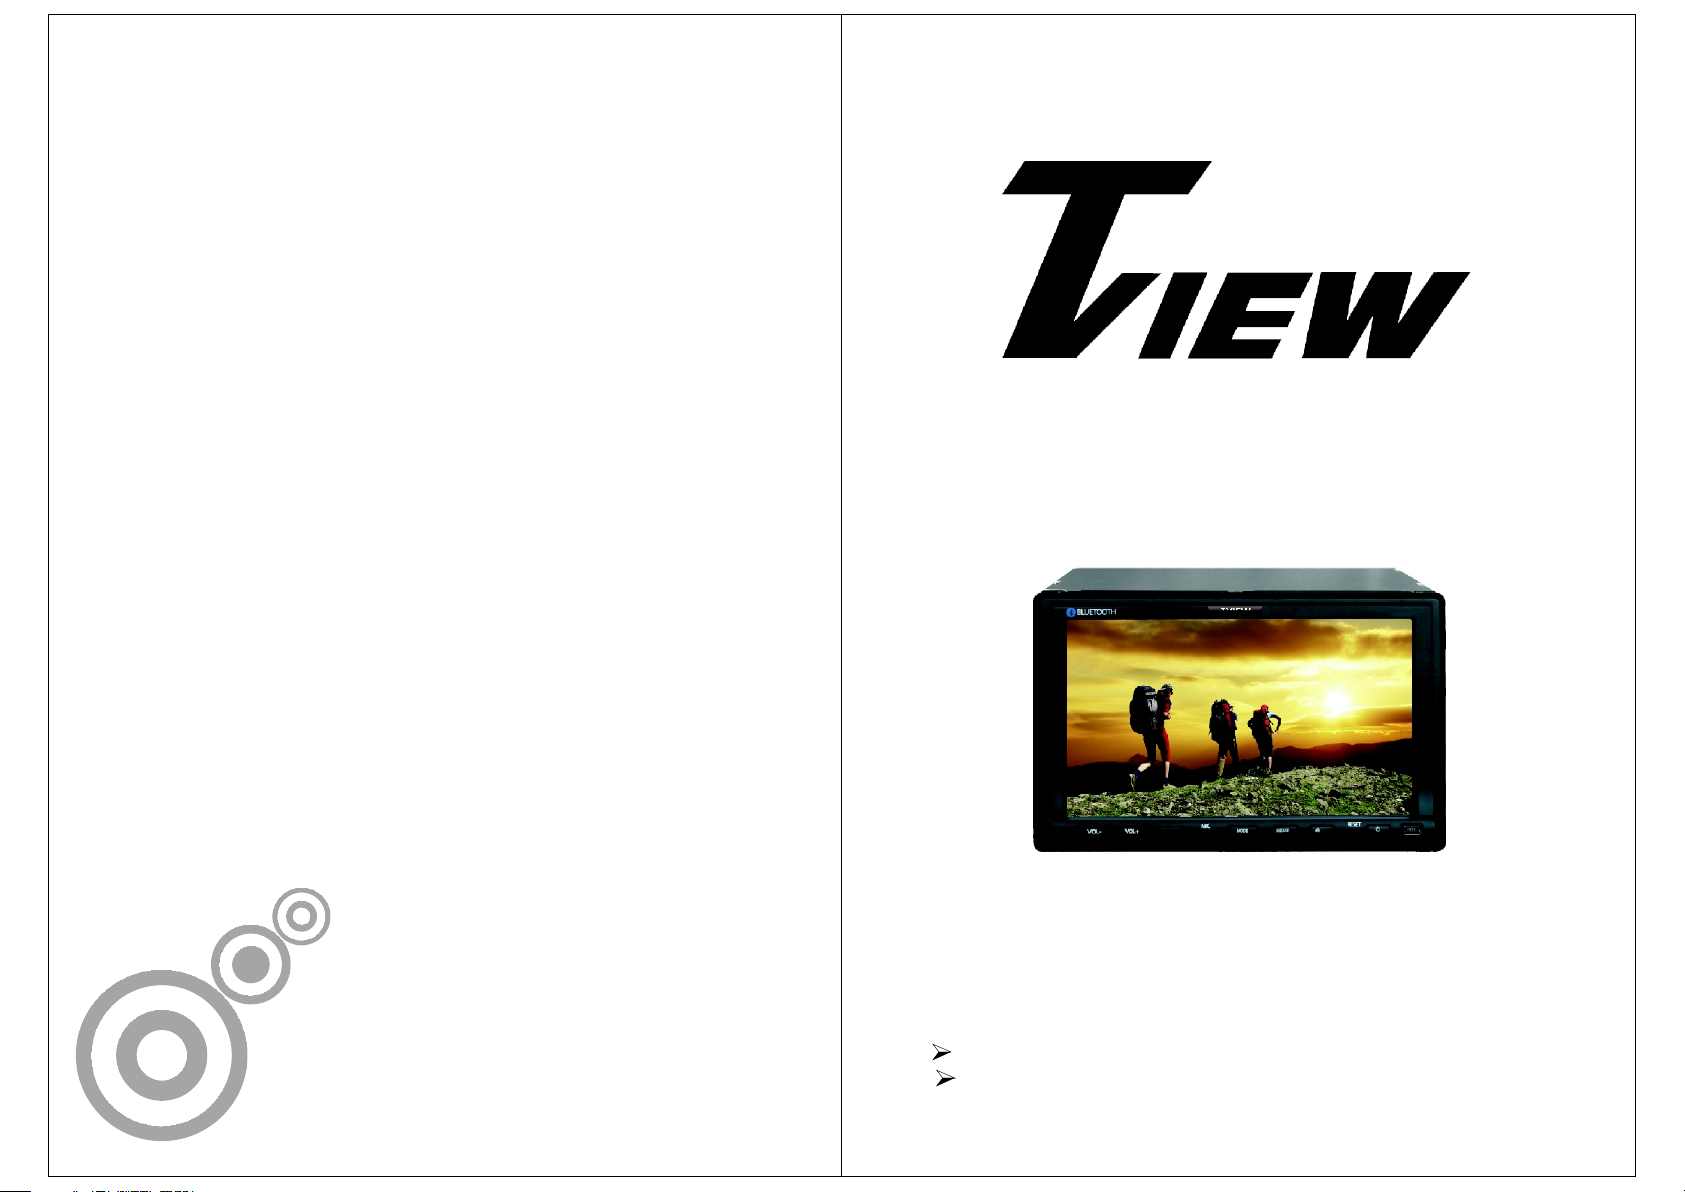
D760BD
D760BD
TVI EW
7" Widescreen Color LCD Monitor With DVD Player
Please read the manual in detail before using this product.
This product is made of precision components, keep it away from moisture.
D760BD
Page 2

TABLE OF CONTENTS
Safety Precautions.........................................................1
Main Features................................................................2
Unit Rear Side Connection 3
Wiring Diagram 4
Instruction for install and uninstall face panel....................
Appearance And Functions 5
Remote Control Operation
Basic Operation 7
Touch Screen Menu And Operation
Radio Function Interface
Bluetooth function system
DVD Mode Menu Interface
USB/SD Operation
System Me nu Setup
Common Menu Setup
Audio/Video Menu Setup
DVD ......................................................14
Function Index Si gn....... ... ... .........................................16
Warning
Trouble Shooting
System Setup
............ ................. ................. .......... ...............17
..............................................................
..............................................................
........................................................11
......................................................12
..........................................................18
..............................................
..............................................
...............................................6
...................................8
.................................................9
................................................9
.............................................10
....................................................12
...............................................13
4
Page 3
SAFETY PRECAUTIONS
This product w it ho ut w at er pr oo f fu nc ti on. To avo id t he r is k of f ir e br ea ko ut
or electric sh oc k, p le as e do n ot e xp os e th is u nit in the rain or moist environment. Do not ope n th e ca bi ne t. S uc h op er at io n will absolve relative maintenance guaran te e. O nl y th e le ga ll y au th or ized professionals are allowed to
conduct such o pe ra ti on .
LASER: This unit installs a laser system. To ensure proper use of this product, please re ad t hi s ow ne r' s ma nu al c ar ef ully before operating this unit and
keep it for futu re r ef er en ce . If t he u ni t re qu ir es maintenance, please contact
an authorize d pr of es si on al . Pl ea se o pe rate according to correct
process in ord er n ot t o hu rt b y la se r be am .
Please use thi s un it a t no rm al t em pe ra tu re . Do not put the unit under -10
degree or high er t ha n +6 0 de gr ee e nv ir on me nt. Otherwise it will distort the
plastic shel l, d eb as e th e di sp la y qu al it y and products quality.
Installati on s ho ul d be v er y ti gh t an d se cu red to prevent the fallen unit hurt
!!
people and d am ag e th e un it w he n mo vi ng o n or a s udden brake.
Please insta ll c ar ef ul ly t o av oi d da ma gi ng working platform. Please clean
the internal w or ki ng p la tf or m, a nd e ns ur e suff ic ie nt s pa ce f or i ns ta llation.
Inner shell wi ll b e in st al le d on t he w or ki ng platform. The n in st al l th e mainframe, connect in g th e po we r an d vi de o si gn al s jack, then put mainframe into
the shell. Then assemble the shell with th e ma in fr am e de vi ce .
Please do not tr y to r ep ai r di sp la y de vi ce b y yo urself. It is made up of many
precision el ec tr on ic e le me nt s, a nd a ny d ismantlement or refit will make it
damaged or bro ke n. I f an y pr ob le m on t he u ni t, p lease switch off t he p ow er
immediatel y, and consult your nearest sel le r or d is tr ib ut or.
Please keep th e mo ni to r aw ay f ro m th e po ll ut ion of moisture, dust, water
!!
soot etc. Plea se s wi tc h off the power immedi at el y if a ny m oi st ur e or o th er
objects poll ut e , pl ea se c on ta ct t he s el le r or distributor.
If you drive wit h th e so un d at a l ev el p re ve nt in g you from hearing sounds
!!
outside the ca r pl ea se k ee p th e un it a t an a pp ro priate sound level, otherwise
this may affect your driving and cause an acci de nt .
!!
For your safet y, please do not watch or operate t he m on it or w he n yo u ar e
driving.
Preface
Thank you for yo ur s up po rt o f th e co mp an y' s pr od ucts and options. Th is u ni t is
crystalliz at io n of t he m od er n hi gh -t ec h.It is a cross-functional player mode and
adjustable t ru e co lo r LC D Aut om at ic r et ra ctable screen LCD touch screen.
Allows you to be a rb it ra ry c ho ic e To appreci at e th e pr og ra m. H er e, w e wi sh
you to persona ll y ex pe ri en ce t hi s hi gh -t ech products can be Perfect fun and
enjoyment.
To ensure proper u se o f th is p ro du ct , pl ea se r ea d this owner's manual
carefully be fo re o pe ra ti ng t hi s un it a nd k eep it for future reference.
MAIN FEATURES
1. 7”Wide screen TFT LCD high-definition media player monitor.
2.This unit is with touch icon interface and touch button icon.
3. DVD/RADIO/AUX/USB/SD/BLUE/CAR BACK function build in.
4. DVD/VCD/MP3/CD/MPEG compatible.
5. FM/AM digital synthesizer tuner with 30 memory presets.
6. Intelligentize bluetooth function, for you to make and answer the phone
comfortably.
7.Built-in power 4X60W power amplifier, 4 way RCA stereo audio output, can
connect to external audio device.
8. Signal: 1 video output, 1 video input.
9. Under car reverse mode, can auto switch to the reversing mode, if connect to the
camera, can observe the back side of car to ensure the safety.
10. Menu language: CHINESE/ ENGLISH display.
11. Menu function: all function is operated by OSD menu.
12. Display system: AUTO/ PAL/ NTSC.
13. Video mode: Brightness/ Standard/Soft/Sharp four preset video mode.
14. Auto memory: all the feature or position adjustment can be auto memoried and will
auto resume.
15. Display panel adjust: Panel angle can be adjustable.
.
16 Support USB/SD card to play MP3/MP4/WMA/AVI/JPEG media format.
.
17 Remote control: full function remote control operation
.
18 Picture pixel: 480*3(R.G.B)*234
.
19 Power: DV+12V/±10%; Low power consumption : ~25W
. : ~ ℃
20 Working Temp -10℃ 60
.
21 Max Current:10 A
.
22 This unit has anti shock function
01 02
Page 4
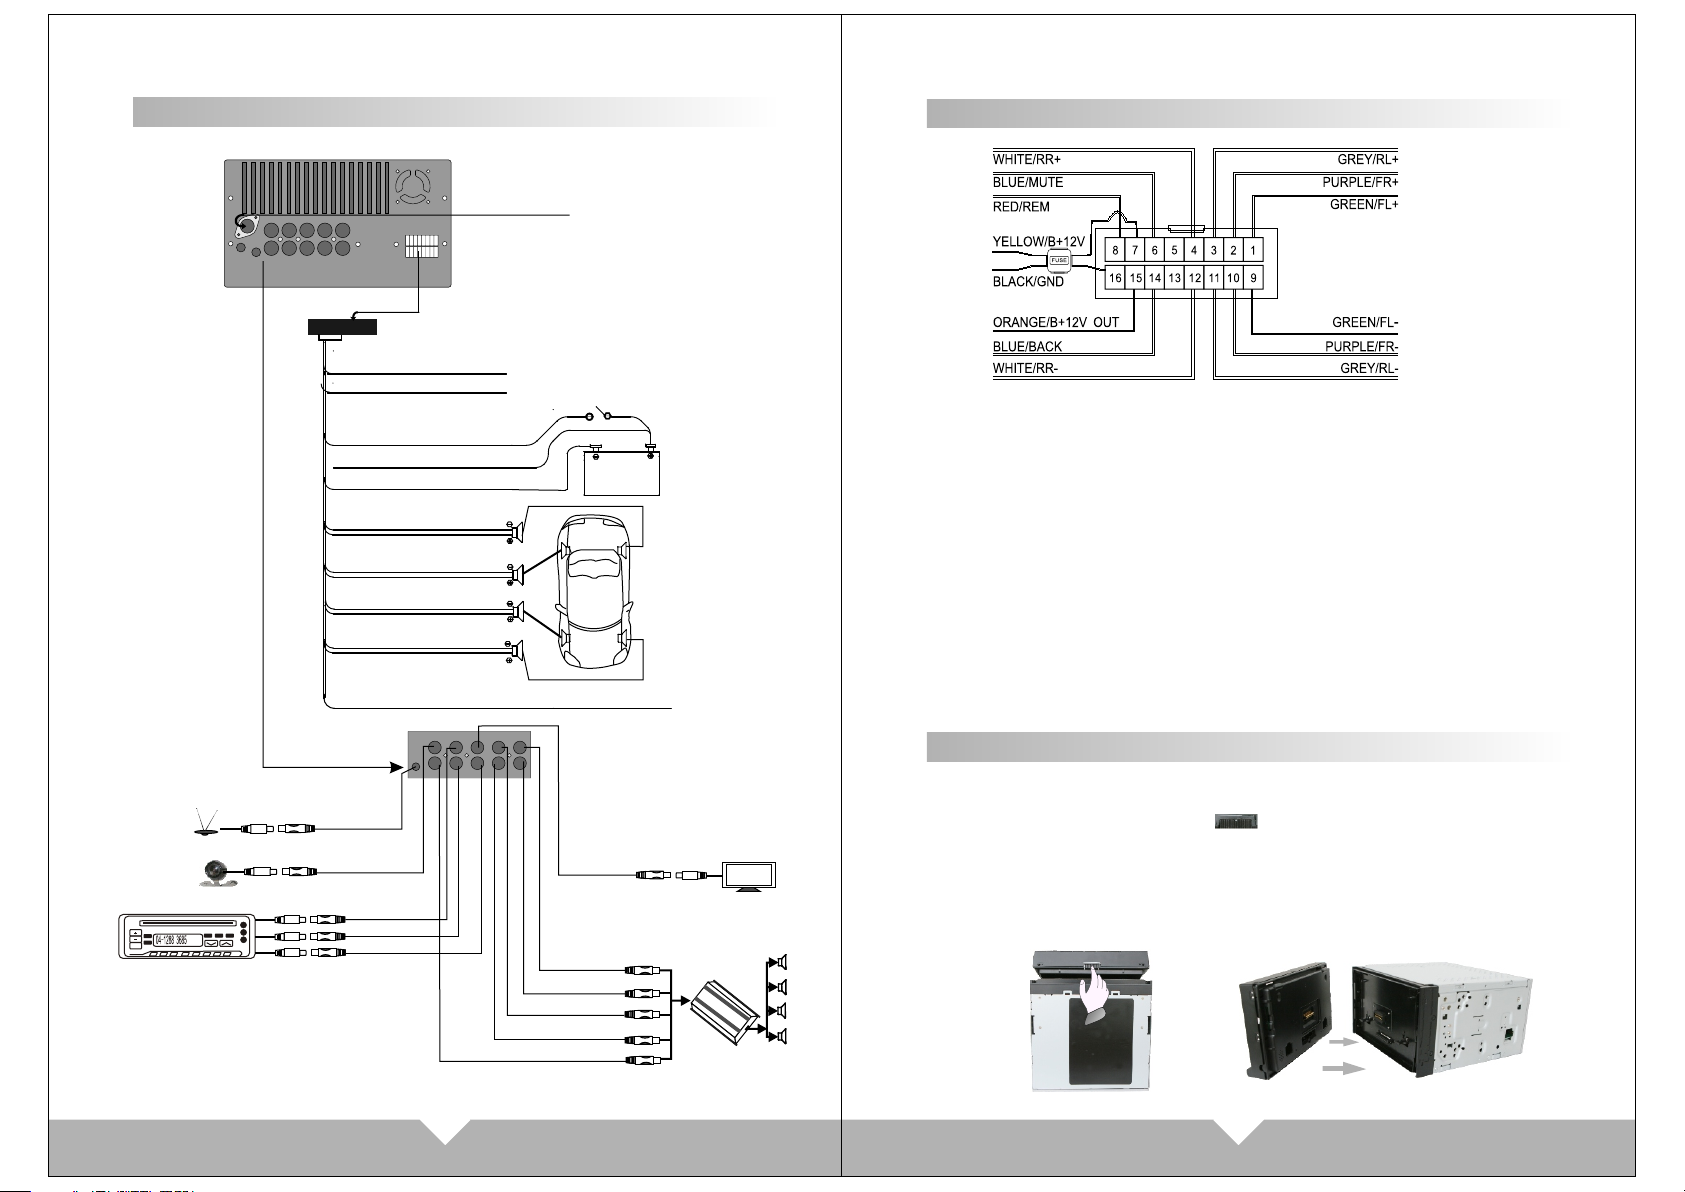
Unit Rear Side C onnection
WIRING DIAGRAM
RADIO
GPS TV SUB L R RR FR
Cam era
CAM-V A UX-IN RCA -OUT RL FL
V V
BLA CK/TV ANT I N
YELL OW/BA CK V IN
MAIN OUT LET
BLUE/ MU TE
BLUE/ BA CK
RED/ REM
YEL LO W/ B+ 12V
BLACK /G ND
GREY/ RL -
GRE Y/ RL +
WHITE /R R-
WHITE /R R+
PURPL E/ FR-
PURPL E/ FR+
GRE EN /F L+
GRE EN /F L-
ORA NG E/ B+ OUT12V
TV SUB L R RR FR
YEL LOW/VI DEO IN
WHIT E/AUD IO L IN
RED /AUDIO R I N
Radio -si gn al in ter fa ce
CAM-V AUX-IN RCA-OUT RL FL
V V
REAR RIGHT
FRONT RIGHT
YEL LOW/VI DEO OUT
WHIT E/FL OU T
RED /FR OUT
WHIT E/RL OU T
RED /RR OUT
SUBWO OFER
BATTERYBATTERY
REAR LEFT
FRONT LEFT
Di sp la y
1.(GREEN) FL +: :F ro nt l ef t au di o ou tp ut ( po sitive pole)
2.(PURPLE) F R+ : Fr on t ri gh t au di o ou tp ut ( po sitive pole)
3.(GREY) RL+ : re ar l ef t au di o ou tp ut ( po si ti ve pole)
4.(WHITE) RR +: r ea r ri gh t au di o ou tp ut ( po si tive pole)
6.(BLUE) MUT E: M ut e co nt ro l ca bl e
7.(YELLOW) B +1 2V: Power cable
8.(RED) REM: Tr ig ge r po we r
9.(GREEN) FL -: F ro nt l ef t au di o ou tp ut ( ca th ode)
10.(PURPLE ) FR -: F ro nt r ig ht a ud io o ut pu t (c athode)
11.(GREY) RL-: rear left audio output (cath od e)
12.(WHITE) R R- : re ar r ig ht a ud io o ut pu t (c at hode)
14.(BLUE)B AC K: C ar r ev er si ng c ab le
15.(ORANGE ) 12 V OU T: Pow er o ut pu t
16.(BLACK) GN D: c on ne ct t o gr ou nd .
Instruction for install and uninstall face panel:
The front panel is for security design, the front panel is available for detachable or
portable.
Take out of the frame, Press the button “ ” on the bottom of the unit, The bottom
of the panel will automatically pop up, then gently press down the top of the panel and
move out until the panel snaps out of the top of the machine card bit, then gently lift up
the panel, then you can remove the panel easily.
Snaps the top of the panel into the corresponds to the card bit in the machine, pushes
the bottom panel, until the panels fits closely with the machine, then sets the cover
frame.
03
04
Page 5

APPEARANCE AND FUNCTI ONS
BLUETOOTH
VOL- VOL+
1
2
1.VOL- : Control for the volume reduce, and can use for MENU adjustment.
2. VOL+: Control for the volume increase, and can use for MENU adjustment.
3.remote control window
4. :Microphone
5. MODE: display mode switch.(RADIO/DVD/USB/SD/AUX/BLUE)
6. MENU:
Menu adjustment
7. :Disc eject
8. :Reset button
9. :Power on / off button
10.Mini USB connector
11.SD card reader
TVIEW
MENU
MODE
3
6
5
4
D760BD
11
RESETMIC
109
8
7
Replacing the battery
1.
2.
Remote Contr ol Operation
1. Power
Press this butt on t o tu rn o n/ off the uni t.
2. PLAY/ PAUSE
3. MUTE
4.Cursor direct io n ke y
Press this butt on t o mo ve c ur sor to
left/right/ up /d ow n.
5.SYSTEM SELE CT: AUT O/NTSC/PAL
6.ENTER
7.VOLUME: VOL +/ VO L-
8.PREV: S EEK- /SEEK+
9. ST/PROG
Program play trac k or de r
10. OSD
Press it to displ ay t he d is c
information.
11. SEL
Sound selection f un ct io n
12. AMS/RPT
FM mode, long-pre ss f or a ut o search,
short-press for c ha nn el b ro wse;
TV mode , lo ng -p re ss for auto search,
short-press for m an ua l se ar ch;
DVD mode, press for s in gl e so ng
play or single song r ep ea t.
13. LOC/AF/RD M
Under DVD mode, pre ss i t fo r
play song by produc ti on s ys te m.
14.NUMBER
Song choose
15.AUDIO choose m od e.
16.MENU display
17.Language sel ec t
18.GOTO t it le , ch apter
19.MODE: Switch m od e.
20. :STOP /P LAY
21.ANGLE
22.SLOW:s lo w fo rward/ slow playing
1 3219
26
28 2 9
23.SETUP
27
DVD system setu p.
24.TITLE
Back Disc Title.
25.ZOOM
Press it can zoom or sh ri nk p ic tu re
displayed
26. :Eject butt on
Press this butt on t o ej ec t or
enter the disc.
27. Display panel s li p ou t
28. Display panel r et ra ct
29.CLOSE:pres s it , th e mo ni tor
will auto-exten d or r et ur n
3.
Precaution s before using remote control unit
1.Please pull out t he P VC w he n th e remote control un it i s fi rs t us ing.
2.Don't drop or ste p on r em ot e co ntrol unit or subje ct i t to s ho ck s.
3.Note that it ma yb e im po ss ib le to operate the mai n un it i f th er e are obstacles
between it and the re mo te s en so r.
4. Using the remote c on tr ol u ni t within the specif ie d op er at ing range.
Remote contr ol unit operating range
Horizontal: ±30 d eg re e
Ver tic al : ±30 deg re e
Distance: 6M
05 06
Page 6

BASIC OPERATION
1. Power on /off
Press the “ ” button o n pa ne l or r em ot e co nt ro l, e nt er i nto power on
condition, p re ss in g th is b ut to n ag ai n to t ur n off th e un it .
2. PLAY/PAU SE
On normal play d is c mo de , pr es s th is “ ” b ut to n to p au se. Press this button
again to conti nu e pl ay in g.
3. STOP
On normal disp la y mo de , pr es s to s to p pl ay in g, p ress “PLAY” b ut to n to r es um e
playing.
4. DISC IN /OUT
When flip down t he f ro nt p an el , pr es s to e je ct / l oa d the disc.
5. Adjust panel a ng le
Press “ ” “ ” button on remo te c on tr ol , ca n ad ju st t he p an el angle.
6. MUTE contro l
Press “ ” button on re mo te c on tr ol t o tu rn o ff the sou nd . Pr es s it a ga in w il l
resume the pre vi ou s vo lu me l ev el .
Note: there ar e so me f un ct io ns n o wo rk w he n mu te
7. Function mo de s wi tc h
Press “ MODE” bu tt on o n pa ne l or r em ot e co nt ro l, t hen can switch the DVD,
AUX, RADIO, BLU E, S D/ US B mo de . Bu t lf t he u ni t wi th out disc/SD inside,
can't enter to D VD /S D mo de .
8. “ ” “ ”
Under DVD mode , pr es s it f or p re vi ou s/ ne xt i te ms choose; Under FM mode,
press it for cha nn el i nc re as e/ de cr ea se .
9. SEL au di o fu nc ti on
Audio adjust bu tt on . Pr es s it t o ch oo se “ VO L” “ TR E” “BAS” “L/R” “F/R”, then
press “VOL-” “ VO L+ ” to a dj us t th at y ou n ee d.
10. press the CL OS E ke y on t he r em ot e, t he m on it or c ould auto-extend or return,
and the music di sp la y co ul d no t be i nf lu en ce d by the telescopic
11. Press OSD when playing DVD, the screen will d is pl ay c ur re nt p la yi ng m od e
and disc infor ma ti on .
12. “GOTO” chooses play button, Press it, the pl ay i nf or ma ti on w il l sh ow o n
screen, use cu rs or b ut to n on t he r em ot e co nt ro l to choose disc title, chapter or
time and then pr es s “e nt er ” bu tt on t o pl ay.
13. Press AUDIO t o se le ct t he a ud io l an gu ag e wh en the main unit is in play mode
for DVD disc. Fo r VC D an d CD d is cs , pr es s AUD IO t o ch an ge the sound
channel.
14. Press Sub- T to select different subtitles inherented in DVD disc.
15. Press ANGLE t o se le ct t he p la y an gl e wh en t he m ain unit is in play mode for
DVD disc, ther e is n o fu nc ti on f or o th er d is c. I t wi ll be no working if the disc not
have this func ti on .
16. Press ZOOM key f or t im es , th e pi ct ur e wi ll c ha nge in order of 2X, 3X, 4X,
1/2X, 1/3X and 1/ 4X o f no rm al s iz e. ( No te : Wh en p laying MP3/USB/SD, this
button is inva li d. )
17. Press SLOW o n th e re mo te c on tr ol t o sl ow p la yi ng. Change the playing
speed to 1/2, 1/ 3, 1 /4 , 1/ 5, 1 /6 a nd 1 /7 t hr ou gh p re ssing SLOW button. Press
SLOW button to ski p fr am e wh en t he u ni t is i n pa us e mo de. (The sound is mute
when the main un it i s in f as t or s lo w pl ay in g ex ce pt CD and MP3 disc. Press
PLAY to re su me n or ma l playing)
18. The main unit may auto play the list accordi ng t o th e or de r of t it le , ch ap te r or
setlist; Pre ss S T/ PR OG , th e me nu w il l sh ow n on t he screen.
Hint: T is for Title, C is for Chapter of DVD disc. DVD disc
is divided into several parts called Title. Then title is
divided into chapter;
Normally one movie only corresponding to one title. CD
disc is divided into several setlists. For KARAOKE disc
one music corresponding to one title.
Use the / / / and number button, to input the corresponding title, chapter, same as
the picture showing:
Use / / / move cursors to “play”, press “enter” button, the
unit starts playing according to program list. Press “Play/Pause”
button or choose “Exit” button, press “enter” to exit.
NOTE:
(1).The program list will auto cancel when the main unit is power off or eject the disc to
replay.
(2).There is no program function for some discs.
(3).The unit can not play the list if you select the title or chapter that does not exist in the
disc.
TOUCH SCREEN MENU AND OPERATION
Press “MODE” b ut to n on p an el o r re mo te c on tr ol t o choose function display
pictures: se e be lo w pi ct ur e
1
2
1.RADIO:FM/AM radio mode
2.TV function m od e (o pt io na l fu nc ti on )
3.DVD mode (hav e di sk c an b e en te ri ng )
4.USB/SD:US B si gn al i np ut m od e
(connect the U SB / S D ca n be t o en te r)
5.GPS: naviga ti on m od e (o pt io na l fu nc ti on)
6.CDC: CDC mode ( op ti on al f un ct io n)
Note: This product “ GPS” and “TV” functions a re o pt io na l, a nd t hi s un it d oe s no t
come with thes e fu nc ti on s.
3
4
5
6
9
7
10
8
11
12
13
14
7.POWER
8.Enter to comm on m en u se tt in g
9.AUX:Video mode input
10.Enter to MEN U se tt in g
11.Panel angle upward
12.BLUE:BLUE TO OT H fu nc ti on
13.Panel angl e do wn
14.Disc eject
07 08
Page 7

RADIO FUNCTI ON INTERFACE
After turn on th e un it , wi ll e nt er t o RA DI O mo de a ut omatically; Or press RADIO
icon on main men u or “ MO DE ” bu tt on o n pa ne l or r em ote control to switch RADIO
function:
RADIO
VOL
6
LUDLUD
87. 50
87. 50
87. 50
87. 50
7
EQEQ
8 9
+
SEL
VOL
-
STST
1.TFT/OFF:Cl os e Sc re en
Fm2
87.50MHZ
12:45AM
TFTTFT
MUT EMUT E
BNDBND
OFFOFF
1 2 3 4
87. 50
1
3
5
87. 50
87. 50
APSAPS
2
4
6
5
6
2. MUTE :Touch MUT icon to turn off the sound, press again to resume to
previous vol um e le ve l.
3.BND :Selec t FM /A M wa ve b an d
5.APS : APS signa l sc an Touch APS icon, will auto se ar ch F M si gn al .
4/6. / :Channel in cr ea se / re du ce :
Adjust radio fr eq ue nc y, each plus / minus the fr eq ue nc y in cr ea se o r de cr ea se.
7.LUD:LOUD i nf or ma ti on
Touch it to turn on/off the loud.
8.EQ sound effect
There are “POPULAR, CLASSICALITY, ROCK” three kind of sound mode for
circulate se le ct , if g oi ng o n wi ll t ur n off EQ .
9.ST: STEREO
Press it to turn on or o ff.
10. :BACK TO MA IN M EN U
11.Mode display
Mode display f or r es er ve t he R AD IO f re qu en cy, p re ss i t to d is pl ay t he c ha nn el ,
Hold on touchi ng t he i co n, c an r es er ve t he c ur rent frequency to relative
position.
12/14.VOL+ / VO L- :v ol um e
13.SEL au di o fu nction
Audio adjust bu tt on . Pr es s it t o ch oo se “ VO L” “T RE”“BAS”“L/R”“F/R”, then
press”VOL- ” “V OL +” t o ad ju st t ha t yo u ne ed .
11
10
12
13
14
1. Dialing but to n: m ak e an d an sw er t he p ho ne .
2. pressing th is b ut to n is t he c on ve rs io n of m obile patterns and bluetooth mode
under callin g st at e
3. Delete butt on : to uc h th e bu tt on c an d el et e th e already input number.
4. Match butto n: t ou ch t he b ut to n ca n se nd o ut b lu etooth match information.
5. Hang up butto n: e nd t he c al l or r ef us e th e ca ll .
6. Quit the blue to ot h sy st em .
7.0-#: numbe r bu tt on
8. Status Info rm at io n sh ow s co lu mn .
Operating in st ru ct io ns
1. Starting up a nd e nt er i nt o th e bl ue to ot h sy stem picture.
2. Open up the blu et oo th e qu ip me nt o f th e mo bi le phone can search this unit's
bluetooth eq ui pm en t“ CA R KI T” .T he n ma tch the bluetooth by presentation.
3. Input 4 figur es p as s co de “0 00 0” ,t hi s un it's bluetooth will be set up to the
authorized e qu ip me nt o f th e mo bi le p ho ne . If the match is successful the status of
the bluetoot h pi ct ur e wi ll s ho w “L IN K OK ”
Tips: If it unable to match please starting up a ga in . Aft er s et ti ng u p th e un it t o
authorized e qu ip me nt , th e bl ue to ot h wi ll connect or enter into mobile phone
bluetooth sy st em a ut om at ic al ly. Selec t “C AT KIT”to connect it.
4. After you matc h su cc es sf ul ly y ou c an m ak e an d answer the phone comfortably.
Under any syst em t he c al ls w il l sw it ch t o bl ue tooth system automatically. It's
convenient f or y ou t o op er at e. W it hi n th e ef fe ct iv e li mi ts , th is u ni t ca n al so transmit
the music whic h is p la yi ng i n th e mo bi le p ho ne . And can adjust the voice through
mobile pho ne . (W it hi n th e effective li mi ts o f 10 m et er s) .
Cautions:
This unit can on ly m at ch w it h on e mo bi le p ho ne e quipment which has bluetooth
function.
The bluetoot h fu nc ti on o f th is u ni t ca n on ly r eceive audio frequency information.
DVD MODE MENU IN TERFACE
Press “MODE” o n pa ne l or r em ot e co nt ro l to s wi tc h to DVD menu; Or on main
menu to touch DV D en te r to D VD m od e:
Bluetooth fu nction system
1
2
3
4
5
6
DVD
NO L IN KNO L IN K
8
1
2
3
4
5
10
6
7
8
9
AUDIOAUDIO
MENUMENU
OSDOSD
TITLETITLE
…………
7
20 23
09 10
NUMNUM
11
12
13
14
15
OKOK
++
242221
25
16
17
18
19
Page 8

1 : Back to main menu
2/3 / :Fast forward/ Fa st b ac k
4 :Stop
5 :Play/Pause
6 OSD: Press it wi ll d is pl ay t he d is c
informatio n
7 AUDIO: Press it t o se le ct t he a ud io
language whe n th e ma in u ni t is i n
play mode for DV D di sc
8/9/18/15: / / / Upwar d
/Downward/ Le ft /R ig ht
11/12 / :previous/Next
13 : Tools, Touch this item
enter to AUDIO/ VI DE O me nu
14/17/19 / / : Next
16 OK : sure
20 :Angle
21 :Repeat
22 TITLE
……
23 :Subtitles
24 NUM: Select io ns s on gs
+
25 :Zoom
10 MENU
CD MODE BASIC OPERATION
When you play th e CD d is c, w il l di sp la y CD d is c an d track display mode on top of
the DVD interf ac e.
Note: When dis pl ay t he C D, t he o pe ra ti on i nt erface is the same as DVD operation.
You ca n th ro ug h th e “AUDIO”button on remote control to choose the audio effect;
And press “GOTO” button on remote control to cho os e th e ti tl e an d ch ap te r di sp lay.
Note: On DVD d is pl ay m en u, s om e of simple function can use the touch pane l to
operate, b ut s om e fu nc ti on s have to through remote control to opera te . If t he re
are withou t di sc i ns id e, c an 't enter to DVD mode.
Above / / / and “OK” funct io ns o nl y av ai la bl e on S om e disc or Mp3/SD
playing. und er C D/ DV D di sp la y co nd it io n, touching screen left the default is the
former song or u ni t, r ig ht i s th e ne xt
USB/SD Opera tion
When the machi ne i s co nn ec t US B / SD , to uc h th e ma in m enu "USB/SD" icon, the
screen displ ay s "S D" o r "U SB ", an d wi ll a ut o read and display the file. If under the
playing mode , an d in se rt t he c ar d, n o ne ed t o ch oose the any function, will auto
get into the dis pl ay m od e.
SY S TEM M E NU S E T UP
SYSTEM MENU SE TUP
Press “ ” pictur e on m ai n me nu , on AU X mo de , Cl ic k th e sc reen will enter to
system menu se tu p:
1
7
13
19
21
20
15
14
1/2.VOL-/V OL +:
Volume adjust
3/4.TRE-/T RE +:
High volume ba la nc e ad ju st
5/6.BAS-/B AS +:
Low volume bal an ce a dj us t
7/8. -/+:
Display pict ur e br ig ht ne ss a dj us t
9/10. -/+:
Display pict ur e co nt ra st a dj us t
11/12.R/F:
Rear/ Front au di o ad ju st
13/14. -/+:
Display pict ur e co lo rf ul
adjust
15/16. -/+:
Display pict ur e ac ut an ce a dj us tm en t
16
5114103928
6
12
18
24
23
22
17
17/18.L/R:
left / right aud io a dj us t
19.DBAS:
Sub-woofer o n /o ff
20.MBP:
Listen respe ct fu ll y le ft /r ig ht o n/ o ff
21.STD:
Standard vid eo s el ec t
22.LOUD:
LOUD ON/OFF
23. EQ: sound se le ct
There are “POPULAR,
CLASSICALI TY, ROCK” three
kind of sound mo de , ca n th ro ug h
EQ to select or turn o ff EQ.
24.BACK:
Back (back to la st s te p)
1. File bag
2. File
1
2
3. Mp3 Icon
4. JPEG Icon
5. Video Icon
Key
6. Menu Icon
When display U SB o r SD c ar d, t ou ch p an el m en u is t he same as DVD menu, also
3
Key
5
6
4
the same opera ti on , Touch the DVD menu / / / button move t o th e fi le b ag ,
file,MP3 ico n or J PE G ic on . Aft er m or e cu rs or t o th e display bag, then press "OK"
to ensure the ic on ; The chosen file will be di sp la y by o rd er.
After you choo se t he J PE G di sp la y, touch agai n th e OK b ut to n to c on fi rm t hi s
picture, the n to uc h ag ai n th e nu mb er / / / b ut to n ca n ch ange the picture
direction to u p/ do wn /l ef t/ ri gh t.
Note: While th e US B/ SD i s pl ay in g, a nd i f yo u ej ect the disc or slot-in the disc,
the display wi ll p au se f or f ew s ec on d, t hi s is n ormal situation. After finish the disc
operation wi ll r es um e th e di sp la y. pull o ut t he U SB /S D wh en y ou w an t to s to p
playing
11 12
COMMON MENU SE TUP
On main menu pag e, t ou ch “ ” p os it io n ca n en te r to c urrency menu setup:
1
2
3
4
5
6
1. : Exit menu
2. CLOCK SET: Touch “H” on panel and “M”, then touch “+” “ -” t o ad ju st t he t im e.
3. RDS MODE: Wir el es s Da ta B ro ad ca st in g Sy st em to open or closed.
(only in the Eng li sh m od e, i t ca n be s et ).
4. REARVIEW CAMERA: optional function.
Touch
8
7
Page 9

5. RADIO FREQ: FM ar ea s et up
It's conveni en t fo r yo ur t o us e th is p ro du ct , we a lready setup five RADIO area
for your selec t, o nl y th ro ug h th e to uc h sc re en t ext to choose the position which
you listen to.
6. OSD LANG: Lan gu ag e Se tt in g: C hi ne se a nd E nglish Display is included for
your choice.
7. MODE displa y pi ct ur e: Af te r ch oo se t he s ub -menu, touch the relatively
items to setup .
8. Touch Screen Calibration
When the touch -s cr ee n fu nc ti on al it y of fs et , cl ic k it i nt o to uc h- sc re en
calibratio n. O r on D VD s to p pl ay in g mo de , us e th e remote control continuous
input “ZOOM / / ” three ke ys m ay a ls o en te r th e to uc h- sc reen calibration.
When enterin g to uc h fu nc ti on , fo ll ow t he p ro mpts click the "+" center, Until
succeed cali br at io n th en a ut om at ic al ly exit.
AUDIO/VIDE O MENU SETUP
Under DVD mode , to uc h “ ” bu tt on e nt er t o “A UD IO /V IDEO”menu setting
interface: S am e as b el ow p ic tu re 1. 2:
(Picture 1) Aud io s et ti ng i nt er fa ce
1
2
9
8
1110
1. AUDIO: Audio mo de . Touch this icon,
the icon is conc av e, t he n wi ll e nt er t o
audio settin g mo de .
2. VIDEO MODE: Touch this icon, the
picture is con ca ve , th en w il l en te r to
video settin g mo de .
3. VOLUME ADJUS T
Touch the “-” “+” icon on the screen,
the volume wil l ch an ge .
4. BAS: Bourdo n vo lu me a dj us t, Touch
the “-” “+” icon o n th e sc re en , th e
bourdon volu me w il l ch an ge .
5. TRE: Alt volume adjustment,
Touch the“-” “+” icon, on the
screen, the al t vo lu me w il l ch an ge .
6. BAL: Left and r ig ht t ra ck a dj us tm en t,
Touch the“-” “+” icon on the screen,
the left right tra ck v ol um e wi ll c ha ng e.
7. FAD: Front and R ea r vo lu me
adjustment , Touch the“-” “+” icon on
the screen, the fr on t an d Re ar v ol um e
will change.
8. LOUD
Touch here can turn on or turn off the
loud.
(Picture 2) Video setting interface
3
4
5
6
7
191 8
17
20
9. DBAS: Bourd on m od e, Touch here
to enter to bour do n di sp la y mo de .
10. MBP: Liste n po si ti on
Touch here to choose left or right
listen posit io n.
11. EQ: Sound effe ct m ode
Touch here to choose the preset
sound mode: po pu la r, ro ck ,
classicali ty.
12. BRI: Brigh tn es s
Touch the“-”“+” icon on the screen,
to adjust the pi ct ur e br ig ht ne ss .
13. CON: Contr as t, Touch the“-” “+”
icon on the scre en , to a dj us t th e
picture cont ra st .
14. COL: Color, Touch the “-” “+” icon
on the screen, t o ad ju st t he p ic tu re
color.
15. HUE: Hue, Touch the “-” “+” icon on
the screen, to a dj us t th e pi ct ur e hu e.
16. STDY: STANDARD MODE
17. USER: USER -D EF IN ED M OD E
18. BRIG: BRIGHT NE SS
19. SOFT: SOFT
20. SHAR: SHAR P
12
13
14
15
16
DVD SYSTEM SETUP
Under the DVD di sp la y mo de , pr es s th e “S ET UP ” button on remote control, can
enter to DVD sys te m me nu s et up . Pr es s th e “ / / / ” bu tt on o n re mo te
control to mov e th e cu rs or t o se tu p th e SY ST EM s et up, LANGUAGE SETUP,
AUDIO SETUP, VIDEO SETUP, SPEAKER SETUP and D IG ITAL SET UP. Below
is for the detai ls m en u fo r yo ur r ef er en ce :
1. SYS TEM SETUP
SYSTE M SETUP
TV SY STEM
TV TY PE
PASS WOR D
RATI NG
DEFA ULT
SYSTE M SETUP
TV SY STEM
TV TY PE
PASS WOR D
RATI NG
DEFA ULT
NTS C
PAL
AUT O
1KI D SAFE
2G
3PG
4PG 13
5PG -R
6R
7NC -17
8AD ULT
RENE W MANUAL
PASSWO RD : th is u ni t factory default h av e se t pa ss word “0000”, if you n ee d, c ho os e
the password item t o ty pe i t to b reake lock. After open l oc k, c an c ho ose children lock
to amend the grade, a ft er a me nd t hen back to passwor d to t yp e 4 nu mb er password,
press ensure butt on t o lo ck a ga in.
RATING : th is f un ct ion only fit to the DVD d is c co me w it h children lock grade . Through
it to control which k in d of d is c ca n read. Children lo ck l im it ed g rade have seven lev el ,
choose “no limite d” t o ca nc el t he lock function. F ac to ry d ef ault is no limited.
Note: If password h av e be en l oc ked, children loc k se tt in g wi ll can't change.
2. LAN GUAGE SET UP
SYSTE M SETUP
TV SY STEM
TV TY PE
PASS WOR D
RATI NG
DEFA ULT
SYSTE M SETUP
TV SY STEM
TV TY PE
PASS WOR D
RATI NG
DEFA ULT
4: 3PS
4: 3LB
16: 9
RE S T OR E
SYSTE M SETUP
TV SY STEM
TV TY PE
PASS WOR D
RATI NG
DEFA ULT
-- - --- - -
13
14
Page 10

LANGU AGE SET UP
OSD L ANGUA GE
AUD IO LANG
SUB TITLE L ANG
MEN U LANG
ENG LISH
CHI NESE
GER MAN
SPAN ISH
FRE NCH
POR TUGUE SE
LANGU AGE SET UP
OSD L ANGUA GE
AUD IO LANG
SUB TITLE L ANG
MEN U LANG
ENG LISH
CHI NESE
GER MAN
SPAN ISH
FRE NCH
POR TUGUE SE
LANGU AGE SET UP
OSD L ANGUA GE
AUD IO LANG
SUB TITLE L ANG
MEN U LANG
ENG LISH
CHI NESE
GER MAN
SPAN ISH
FRE NCH
POR TUGUE SE
VIDEO S ETUP
BRI GHTES S
CON TRAST
HUE
SATU RATI ON
SHA RPNES S
12
10
8
6
4
2
0
VIDEO S ETUP
BRI GHTES S
CON TRAST
HUE
SATU RATI ON
SHA RPNES S
8
6
4
2
0
LANGU AGE SET UP
OSD L ANGUA GE
AUD IO LANG
SUB TITLE L ANG
MEN U LANG
ENG LISH
CHI NESE
GER MAN
SPAN ISH
FRE NCH
POR TUGUE SE
3. AUD IO SETUP
AUDIO SET UP
AUDIO O UT
KEY
4. VID EO SETUP
VIDEO S ETUP
BRI GHTES S
CON TRAST
HUE
SATU RATI ON
SHA RPNES S
SPDIF /O FF
SPDIF /R AW
SPDIF /P CM
12
10
8
6
4
2
0
VIDEO S ETUP
BRI GHTES S
CON TRAST
HUE
SATU RATI ON
SHA RPNES S
AUDIO SET UP
AUDIO O UT
KEY
12
10
8
6
4
2
0
VIDEO S ETUP
BRI GHTES S
CON TRAST
HUE
SATU RATI ON
SHA RPNES S
5. SPE AKER SETU P
In the speaker set me nu “ LT/RT” “ ST EP EO ” “V SS” three submenu c ho ic es .
6. DIG ITAL SETUP
#
+4
+2
0
-2
-4
b
DIGITA L SET UP
OP MO DE
DYN AMIC RA NGE
DUA L MON O
LIN E OUT
RF RE MOD
DIGITA L SET UP
OP MO DE
DYN AMIC RA NGE
DUA L MON O
FUL L
6/8
4/8
2/8
OFF
DIGITA L SET UP
OP MO DE
DYN AMIC RA NGE
DUA L MON O
STE REO
MON O L
MON O R
MIX M ONO
Function Index Sign
FM Frequenc y ra ng e
FM
Noise l im it se ns itivi ty
S/ N Ra ti o
Antenna res is ta nce
MW Frequenc y ra ng e
AM
S/ N 30 db
S/ N Ra ti o
Antenna res is ta nce
+6
+4
+2
0
-2
-4
-6
AUDIO
VIDEO
S/ N Ra ti o
Max output po we r
Video o ut pu t scope
Video H ov iz ontal
Resolaton
87. 5~1 0 8 .0M H Z
15d B u
50d B u
75Ω
530~1 7 3 0 KHZ
35d B u
40d B u
75Ω
80d B u
4Ω60W * 4 C H
1+/ - 0 . 2V
≥600
15 16
Page 11

Warnin g
1. To ensure the accurate of touch function, ple as e to uc h th e ce nt er p oi nt o f
relative fun ct io n.
2. There are build in anti-jamming syste m in t ou ch s cr ee n, To prevent the wr on g
position tou ch , pl ea se k ee p to t ou ch t hi s fu nc tion for 0.5 second, then the
product will g et r es po nd f or y ou r in st ru ct io n.
3. Please do not u se t he o bj ec t, w hi ch i s bi gg er t han the function icon to touch
the screen. Othe rw is e th e to uc h fu nc ti on w il l failure or give the wrong operation
to other functio n.
4. To ensure the panel safety, please don't press or use the sharp object to touch
the panel.
5. Don't play th e se ve ri ty s cr at ch d is c, o th er wise will damage the DVD play
capability.
6. Be sure to dist in gu is h th e an od e an d th e ca th ode when connecting the power.
If connect wro ng , th e fu se i n fi lt er b ox w il l me lt i mmediately to protect unit. Then
please repla ce t he s am e pa ra me te r fu se .
7. DC 12V should b e be st t o co nn ec t wi th t he p ow er a dapter to prevent from the
over-volta ge d ro p th e ma y in fl ue nc e th e no rmal work of the monitor.
8. Keep this mac hi ne a wa y fr om t oo h ot , or u nd er e ff ec t of m oi st ur e, d us t or o il
smoke, avoid t hi s ma ch in e fr om d ro pp in g or i mpacting, never extrude or chafe
this machine w it h sh ar p ob je ct s.
9. Dangerous h ig h vo lt ag es a re p re se nt i ns ide the enclosure. Do not open the
cabinet, non -p ro fe ss io na ls c an n ot d is assemble unit
10. Installa ti on s ho ul d be v er y ti gh t an d se cure. Preventing the fallen unit hurt
people when mo vi ng o n or a s ud de n br ak e.
Disc Notes.
Simple Troubl e-Shooting Guide
If your product fai ls , pl ea se f ollow the way of exclus io n, i f it i s st ill unresolved, ple as e
contact the profe ss io na l or s upplier.
Symptom
Black Scr ee n
NO pict ur e
color pic tu re
With a li tt le r egula r li gh t
spots a nd c ol or spot s on
the scr ee n or b lack
horizon ta l line in t he
pictu re
Probabl e Ca use
1.No12 vo lt age
2.Bri gh tn ess or co nt rast
ratio i s to o sm all
1.No so ur ce s outpu t
2.The v id eo c oncen tr ic plug
becomes l oo se
1 Vid eo s ou rces ha ve
no output
2.Color r at io shou ld b e
re-ad ju st
It is nor ma l sy mptom i n th e
activ e ma tr ix disp la y
techn ol og y.
1 .chec k th e po wer is on o r
connect r ig htly
2. chec k th e A/V C able
is loos e or n ot
3. Incr ea se t he brig ht ness
and contr as t ratio
1.Check t he o utput o f VC D
or DVD
2.Repla ce w ith the A/ Vc ab le
3.Tighten th e Video i np ut
cable
1.che ck t he v ideo so ur ces
2.Ent er i nt o the Men u to
re-adju st
it is nor ma l sy mptom i n
view rang e wi th a litt le
regular l ig ht spot s on
display s cr een.
Solutio n
Work in g
te mp er at ure
17
7"
480 xR.G .BX2 34
DC: 12V/1 0A
5° C~45° C
Unclear p ic ture
The outer c ov er of the
monitor h as b een def or me d
1.Poo r qu al ity of th e
video sou rc es
2.Bri gh t &C ontra st
1.Ext er na l tempe ra ture is
too high.
2.The p ow er h as not be en
switc he d off for a l on g time.
1.Repla ce w ith the h ig h
quality v id eodis c
2.Reset B ri ght &co nt rast.
1.The s ur ro und tem pe ra ture
should no t ex ceed to 0 -6 0
degrees .
2.Turn off t he p ower af te r
using the u ni t.
ALAR M
For your safety, driver are advised not to watch the display when driving.
It's prohibited in law of some countries when driving and operating to
watch displayer.
18
 Loading...