

Page 1
D72TSB
D72TSB
BLUETOOTH
MODE
TVI EWTVI EW
VOL- VOL+
D72T SB
7" Widescreen Color LCD Monitor With DVD Player
Please read the manual in detail before using this product.
This product is made of precision components, keep it away from moisture.
Page 2

TABLE OF CONTENTS
Safety Precautions......................... ...............................1
Main Features... ........................................ ....................2
Unit Rear Side Connection 3
Wi ring Diagram 4
Appearance And Functions 5
Remote Control Operation
Ba sic Operation 7
Touch Screen Menu And Operation 9
Radio Function Interface 1
Bluetooth function system
DVD Mode Menu Interface
USB/SD Operation
System Menu Setup 4
Common Menu Setup 5
Audio/Video Menu Setup 5
DVD .......................................................1
Function Index Sign.......................................................2
Warning 1
Trouble Shooting 2
System Setup 7
........................................................................2
.. ........................................... .... ............
.. ..........................................................
........................................................13
.......................................................1
.....................................................1
...........................................................2
.............................................
.............................................
..............................................6
.................................
................................................ 0
..............................................11
.............................................12
.............................................1
1
Page 3
SAFETY PRECAUTIONS
This product w it ho ut w at er pr oo f fu nc ti on. To avo id t he r is k of f ir e br ea ko ut
or electric sh oc k, p le as e do n ot e xp os e th is u nit in the rain or moist environment. Do not ope n th e ca bi ne t. S uc h op er at io n will absolve relative maintenance guaran te e. O nl y th e le ga ll y au th or ized professionals are allowed to
conduct such o pe ra ti on .
LASER: This unit installs a laser system. To ensure proper use of this product, please re ad t hi s ow ne r' s ma nu al c ar ef ully before operating this unit and
keep it for futu re r ef er en ce . If t he u ni t re qu ir es maintenance, please contact
an authorize d pr of es si on al . Pl ea se o pe rate according to correct
process in ord er n ot t o hu rt b y la se r be am .
Please use thi s un it a t no rm al t em pe ra tu re . Do not put the unit under -10
degree or high er t ha n +6 0 de gr ee e nv ir on me nt. Otherwise it will distort the
plastic shel l, d eb as e th e di sp la y qu al it y and products quality.
Installati on s ho ul d be v er y ti gh t an d se cu red to prevent the fallen unit hurt
!!
people and d am ag e th e un it w he n mo vi ng o n or a s udden brake.
Please insta ll c ar ef ul ly t o av oi d da ma gi ng working platform. Please clean
the internal w or ki ng p la tf or m, a nd e ns ur e suff ic ie nt s pa ce f or i ns ta llation.
Inner shell wi ll b e in st al le d on t he w or ki ng platform. The n in st al l th e mainframe, connect in g th e po we r an d vi de o si gn al s jack, then put mainframe into
the shell. Then assemble the shell with th e ma in fr am e de vi ce .
Please do not tr y to r ep ai r di sp la y de vi ce b y yo urself. It is made up of many
precision el ec tr on ic e le me nt s, a nd a ny d ismantlement or refit will make it
damaged or bro ke n. I f an y pr ob le m on t he u ni t, p lease switch off t he p ow er
immediatel y, and consult your nearest sel le r or d is tr ib ut or.
Please keep th e mo ni to r aw ay f ro m th e po ll ut ion of moisture, dust, water
!!
soot etc. Plea se s wi tc h off the power immedi at el y if a ny m oi st ur e or o th er
objects poll ut e , pl ea se c on ta ct t he s el le r or distributor.
If you drive wit h th e so un d at a l ev el p re ve nt in g you from hearing sounds
!!
outside the ca r pl ea se k ee p th e un it a t an a pp ro priate sound level, otherwise
this may affect your driving and cause an acci de nt .
!!
For your safet y, please do not watch or operate t he m on it or w he n yo u ar e
driving.
Preface
Thank you for yo ur s up po rt o f th e co mp an y' s pr od ucts and options. Th is u ni t is
crystalliz at io n of t he m od er n hi gh -t ec h.It is a cross-functional player mode and
adjustable t ru e co lo r LC D Aut om at ic r et ra ctable screen LCD touch screen.
Allows you to be a rb it ra ry c ho ic e To appreci at e th e pr og ra m. H er e, w e wi sh
you to persona ll y ex pe ri en ce t hi s hi gh -t ech products can be Perfect fun and
enjoyment.
To ensure proper u se o f th is p ro du ct , pl ea se r ea d this owner's manual
carefully be fo re o pe ra ti ng t hi s un it a nd k eep it for future reference.
MAIN FEATURES
1. 7”Wide screen TFT LCD high-definition media player monitor.
2.This unit is with touch icon interface and touch button icon.
3. DVD/RADIO/AUX/USB/SD/BLUE/CAR BACK function build in.
4. DVD/VCD/MP3/CD/MPEG compatible.
5. FM/AM digital synthesizer tuner with 30 memory presets.
6. Intelligentize bluetooth function, for you to make and answer the phone
comfortably.
7.Built-in power 4X60W power amplifier, 4 way RCA stereo audio output, can
connect to external audio device.
8. Signal : 1 video output, 1 video input.
9. Under car reverse mode, can auto switch to the reversing mode, if connect to the
camera, can observe the back side of car to ensure the safety.
10. Menu language: CHINESE/ ENGLISH display.
11. Menu function: all function is operated by OSD menu.
12. Display system: AUTO/ PAL/ NTSC.
13. Video mode: Brightness/ Standard/Soft/Sharp four preset video mode.
14. Auto memory: all the feature or position adjustment can be auto memoried and will
auto resume.
15. Display panel adjust: Panel angle can be adjustable.
16..Support USB/SD card to play MP3/MP4/WMA/AVI/JPEG media format.
17. Remote control: full function remote control operation
18.Picture pixel: 480*3(R.G.B)*234
19. Power: DV+12V/±10%; Low power consumption : ~25W
20. Working Temp:-10℃~60℃
21.Max Current:10 A
22.This unit has anti shock function
01 02
Page 4
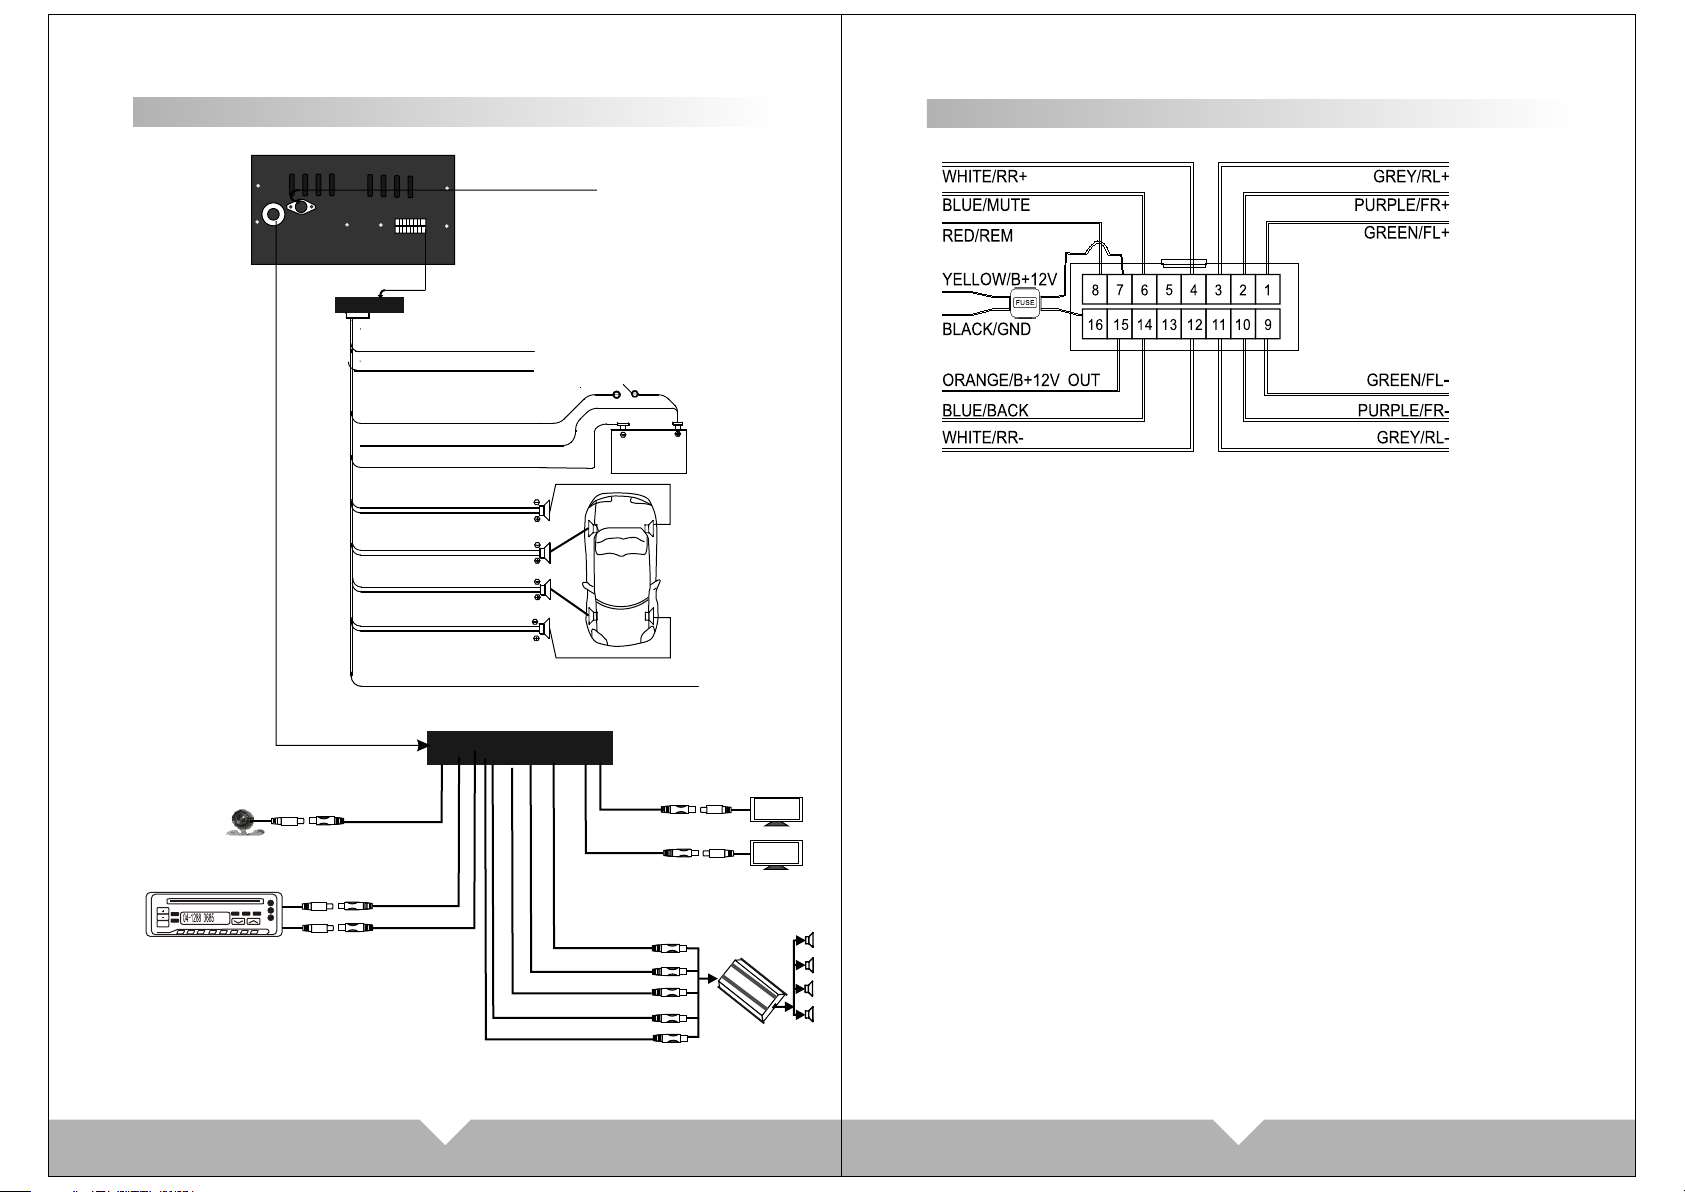
Unit Rear Side C onnection
BLUE/ BA CK
RED/ REM
YEL LO W/ B+ 12V
BLACK /G ND
WIRING DIAGRAM
Radio -si gn al in ter fa ce
BLUE/ MU TE
BATTERYBATTERY
Cam era
GREY/ RL -
GRE Y/ RL +
WHITE /R R-
WHITE /R R+
PURPL E/ FR-
PURPL E/ FR+
GRE EN /F L+
GRE EN /F L-
ORA NG E/ B+ OUT12V
(YE LLOW/ BACK V IN)
WHIT E/AU DIO LIN
RED/ AUD IO RIN
REAR RIGHT
FRONT RIGHT
YEL LOW/ VI DEO IN
YEL LOW/ VIDE O OUT
WHI TE/F L OUT
WHI TE/R L OUT
RED /RR OU T
RED /FR OU T
SUBWO OFER
REAR LEFT
FRONT LEFT
Di sp la y
Di sp la y
1.(GREEN) FL+::Front left audio output (positive pole)
2.(PURPLE) FR+: Front right audio output (positive pole)
3.(GREY) RL+: rear left audio output (positive pole)
4.(WHITE) RR+: rear right audio output (positive pole)
6.(BLUE) MUTE: Mute control cable
7.(YELLOW) B+12V: Power cable
8.(RED) REM: Trigger power
9.(GREEN) FL-: Front left audio output (cathode)
10.(PURPLE) FR-: Front right audio output (cathode)
11.(GREY) RL-: rear left audio output (cathode)
12.(WHITE) RR-: rear right audio output (cathode)
14.(BLUE)BACK: Car reversing cable
15.(ORANGE) 12V OUT: Power output
16.(BLACK)GND: connect to ground.
03
04
Page 5

APPEARANCE AND FUNCTI ONS
Remote Contr ol Operation
BLUETOOTH
MIC
1
TVIEWTVIEW
MODE
VOL- VOL+
3
2
5 8
4
6
7
D72TSB
RESET
10
9
11
12
1. :Micropho ne
2. remote cont ro l wi nd ow
3. :Power on / off button
4. :Disc eject
5. MODE: displ ay m od e sw it ch .( RA DI O/ DV D/ USB/SD/AUX/BLUE)
6. VOL- : Contro l fo r th e vo lu me r ed uc e, a nd c an u se f or MENU adjustment.
7. VOL+: Contr ol f or t he v ol um e in cr ea se , an d ca n use for MENU adjustment.
8. :Display pa ne l sl ip o ut
9. :Display pa ne l re tr ac t
10. :Reset butto n
11. Mini USB connector
12. SD/MMC car d re ad er
Replacing the battery
1.
3.
2.
1. Power
Press this but to n to t ur n on /o ff the unit.
2. PLAY/PAU SE
3. MUTE
Press this but to n to t ur n off speaker, press
again to resum e.
4.Cursor dir ec ti on k ey
Press this but to n to m ov e cu rs or t o
left/right /u p/ do wn .
5.SYSTEM SEL EC T: AUTO/NTSC/PAL
6.ENTER
7.VOLUME :VO L+ /V OL -
8.PREV: S EE K- / SE EK +
Under DVD mode , pr es s it f or n ex t or
previous ite m. U nd er F M mo de ,
to adjust radi o fr eq ue nc y
9.ST/PROG
the display ra nk o f mu si c
10.OSD
Press it will di sp la y th e di sc
informatio n.
11.SEL
Sound functi on s el ec t
12.AMS/RPT
Under FM mode, p re ss f or
searching fu nc ti on .
Under DVD mode , pr es s fo r
single song pl ay o r si ng le s on g re pe at .
13.LOC/AF/ RD M
On DVD mode , pres s it f or p la y so ng b y
production s ys te m.
14.NUMBER
Song choose
15.AUDIO cho os e mo de .
16.MENU disp la y
17.Languag e se le ct
18.GOTO title, chapter
19.MODE: Swi tc h mo de
RADIO-DVD- US B- SD -A UX -B LU E
20. :STOP/PLAY
21.ANGLE
DVD display di sc t he re a re m or e
angle select ( ne ed t he d is c su pp or t)
1 321 9
26
29
28
27
22.SLOW:slow forward/ slow playing
23.SETUP
DVD system set up .
24.TITLE
DVD disc chara ct er s ho wi ng
25.ZOOM
Press it can ZOO M or s hr in k pi ct ur e
displayed
26. :Display p ic tu re .
Eject button
Press this but to n to e je ct o r
slot-in the di sc .
27. Display pa ne l sl ip o ut
28. Display pa ne l re tr ac t
29.CLOSE:p re ss i t th e mo ni to r
could auto-e xt en d or r et ur n
05 06
Page 6

BASIC OPERATION
1. Pow er on /off
Pres s the “ ” butto n on panel or r emote con trol, ent er into pow er
on con dition, p ressing t his butto n again to tu rn off the unit .
2. PLAY/PAUSE
On nor mal play di sc mode, pr ess this “ ” bu tton to pau se. Press
this b utton aga in to conti nue playi ng.
3. STOP
On nor mal displ ay mode, pr ess to stop p laying, p ress “PLAY” bu tton to
resu me playin g.
4. DIS C IN /OUT
When f lip down th e front pan el, press t o eject / loa d the disc.
5. Adju st panel an gle
Pres s “ ” “ ” button on r emote con trol, can a djust the p anel angl e.
6. MUT E control
Pres s “ ” button on r emote con trol to tur n off the sound .
Pres s it again wi ll resume t he previo us volume l evel.
Note : there are s ome funct ions no wor k when mute
7. Fun ction mod e switch
Pres s “ MODE” but ton on pane l or remote c ontrol, t hen can swi tch the
DVD, AU X, RADIO, B LUE, SD/U SB mode. Bu t lf the unit w ithout
disc /SD insid e, can't en ter to DVD/ SD mode.
8. “ ” “ ”
Unde r DVD mode, p ress it for p revious /next ite ms choose ; Under FM
mode , press it fo r channel i ncrease /decrea se.
9. SEL audio function
Audio a djust but ton. Pres s it to choos e “VOL” “TR E” “BAS” “L /R” “F/R” ,
then p ress “VOL -” “VOL+” t o adjust th at you need .
10. pr ess the CLO SE key on the r emote, th e monitor c ould auto -extend o r
retu rn, and the m usic disp lay could n ot be influ enced by th e telesco pic
11. Press O SD when pla ying DVD, t he screen w ill displ ay curren t playing
mode a nd disc inf ormatio n.
12. “G OTO” choose s play butt on, Press i t, the play i nformat ion will sh ow
on scr een, use cu rsor butt on on the rem ote contr ol to choos e disc
titl e, chapte r or time and t hen press “ enter” bu tton to pla y.
13. Pr ess AUDIO to s elect the a udio lang uage when t he main uni t is in
play m ode for DVD d isc. For VC D and CD disc s, press AUD IO to
chan ge the soun d channel .
14. Pr ess Sub-T to se lect different subti tles inhe rented in D VD disc.
15. Pr ess ANGLE to s elect the p lay angle w hen the mai n unit is in pl ay
mode f or DVD disc , there is no f unction f or other di sc. It will b e no
work ing if the di sc not have t his funct ion.
16. Pr ess ZOOM ke y for times , the pictu re will cha nge in orde r of
2X, 3X , 4X, 1/2X, 1 /3X and1/ 4X of norma l size. (No te: When pl aying
MP3/ USB/SD, t his butto n is invali d.)
17. Pr ess SLOW on t he remote c ontrol to s low playi ng. Chang e the
play ing speed t o 1/2, 1/3, 1 /4, 1/5, 1/ 6 and 1/7 thr ough pres sing
SLOW b utton. Pr ess SLOW bu tton to ski p frame whe n the unit is i n
paus e mode. (Th e sound is mu te when the m ain unit is i n fast or slo w
play ing excep t CD and MP3 di sc. Press P LAY to re sume norm al
play ing)
18. The ma in unit may a uto play th e list acco rding to th e order of ti tle,
chap ter or setl ist; Pres s ST/PROG , the menu wi ll shown on t he screen .
Hint: T is for Title, C is for Chapter of DVD disc.
DVD disc is divided into several parts called
Title. Then title is divided into chapter;
Normally one movie only corresponding to one
title. CD disc is divided into several setlists. For
KARAOKE disc one music corresponding to one
title.
Use the / / / and number button, to input the
corresponding title, chapter, same as the picture
showing:
Use / / / move cursors to "play", press "enter" button, the unit starts
playing according to program list. Press "Play/Pause" button or choose "Exit"
button, press “enter" to exit.
NOTE:
(1).The program list will auto cancel when the main unit is power off or eject
the disc to replay.
(2).There is no program function for some discs.
(3).The unit can not play the list if you select the title or chapter that does
not exist in the disc.
07 08
Page 7

TOUCH SCREEN MENU AND OPERATION
Pres s “MODE” bu tton on pan el or remot e control t o choose fu nction
disp lay pictu res: see be low pictu re
3
4
RADIO FUNCTI ON INTERFACE
Afte r turn on the u nit, will e nter to RAD IO mode aut omatica lly; Or pre ss
RADI O icon on mai n menu or “MO DE” butto n on panel or r emote con trol
to swi tch RADIO f unction :
1 1
1
2
9
7
10
8
11
12
13
14
5
6
1.RAD IO: FM/AM r adio mode
2.TV fu nction mo de (optio nal funct ion)
3.DVD m ode (have d isk can be en tering)
4.USB /SD:USB s ignal inp ut mode
(con nect the US B / SD can be to en ter)
5.GPS : navigat ion mode (o ptional f unction )
6.CDC : CDC mode
(opt ional fun ction)
7.POW ER
8.Ent er to commo n menu sett ing
9.AUX : Vi deo mode in put
10.En ter to MENU s etting
11.Panel a ngle upwa rd
12.BL UE: BLUE TOOTH fu nction
13.Pa nel angle d own
14.Di sc eject
Note : Th is produc t “ GPS” and “T V” functi ons are opt ional, an d
“ CDC”
this u nit does no t come with t hese func tions.
RADIO
Fm2
87.50MHZ
12:45AM
TFTTFT
MUT EMUTE
OFFOFF
BNDBND
1 2 3 4
VOL
87. 50
1
87. 50
3
87. 50
5
APSAPS
2
4
6
6
LUDLUD
5
7
6
87. 50
87. 50
87. 50
87. 50
EQEQ
8 9
SEL
VOL
+
-
STST
1 0
1 2
1 3
1 4
1.TF T/ OFF:Close Scr ee n
2. MUT E :Tou ch MUT ico n to turn off the sound , pr ess again to
resu me t o previous volu me l evel.
3.BN D :S elect FM/AM wav e ba nd
5.AP S : APS s ignal scan Touch APS icon, w il l auto search FM
sign al .
4/6. / :Ch annel increas e/ r educe:
Adjus t ra dio frequency, each pl us / m inus the freque nc y increase
or dec re ase.
7.LU D: LOUD informat io n
Touch it to turn on/ off th e lo ud.
8.EQ s ou nd eff ect
There are “POP UL AR, CLASSIC AL ITY, ROC K” three kind of so un d
mode f or c irculate sele ct , if going on will tu rn o ff E Q.
9.ST: ST ER EO
Pres s it t o turn on or off.
10. :B AC K TO MAIN MENU
11.Mode dis pl ay
Mode d is play for reserv e th e RADIO frequen cy, pre ss i t to display
the ch an nel, Hold on touc hi ng the icon, can re se rve the curre nt
freq ue ncy to relative p os ition.
12/1 4. VOL+ /VOL-:vo lu me
13.S EL audio funct io n
Audio a dj ust button. Pre ss i t to choose “VOL” “T RE”“BAS”“ L/ R”“F/R”,
then p re ss”VOL-” “VOL +” t o adjust that you n ee d.
09 10
Page 8

Bluetooth functio n system
8
1
NO L INKNO L INK
2
3
4
7
5
6
1. Dialing but to n: m ak e an d an sw er t he p ho ne .
2. pressing th is b ut to n is t he c on ve rs io n of m obile patterns and bluetooth mode
under callin g st at e
3. Delete butt on : to uc h th e bu tt on c an d el et e th e already input number.
4. Match butto n: t ou ch t he b ut to n ca n se nd o ut b lu etooth match information.
5. Hang up butto n: e nd t he c al l or r ef us e th e ca ll .
6. Quit the blue to ot h sy st em .
7.0-#: numbe r bu tt on
8. Status Info rm at io n sh ow s co lu mn .
Operating inst ru ct io ns
1. Starting up a nd e nt er i nt o th e bl ue to ot h sy stem picture.
2. Open up the blu et oo th e qu ip me nt o f th e mo bi le phone can search this unit's
bluetooth eq ui pm en t“ CA R KI T” .T he n ma tch the bluetooth by presentation.
3. Input 4 figur es p as s co de “0 00 0” ,t hi s un it's bluetooth will be set up to the
authorized e qu ip me nt o f th e mo bi le p ho ne . If the match is successful the status of
the bluetoot h pi ct ur e wi ll s ho w “L IN K OK ”
Tips: If it unable to match please starting up a ga in . Aft er s et ti ng u p th e un it t o
authorized e qu ip me nt , th e bl ue to ot h wi ll connect or enter into mobile phone
bluetooth sy st em a ut om at ic al ly. Selec t “C AT KIT”to connect it.
4. After you matc h su cc es sf ul ly y ou c an m ak e an d answer the phone comfortably.
Under any syst em t he c al ls w il l sw it ch t o bl ue tooth system automatically. It's
convenient f or y ou t o op er at e. W it hi n th e ef fe ct iv e li mi ts , th is u ni t ca n al so transmit
the music whic h is p la yi ng i n th e mo bi le p ho ne . And can adjust the voice through
mobile pho ne . (W it hi n th e effective li mi ts o f 10 m et er s) .
Cautions:
This unit can on ly m at ch w it h on e mo bi le p ho ne e quipment which has bluetooth
function.
The bluetoot h fu nc ti on o f th is u ni t ca n on ly r eceive audio frequency information.
DVD MODE MENU IN TERFACE
Pres s “MODE” on p anel or rem ote contr ol to switc h to DVD menu ;
Or on ma in menu to to uch DVD ent er to DV mode :
DVD
1
2
3
4
5
6
7
8
9
10
1 : Back t o main menu
2/3 / :F ast forwa rd/Fast b ack
4 :Sto p
5 :Pla y/Pause
6 OSD: P ress it wil l display t he disc
info rmation
7 AUDIO : Press it to s elect the a udio
lang uage when t he main uni t is in
play m ode for DVD d isc
8/9/ 18/15: / / / Up ward
/Dow nward/L eft/Rig ht
OSDOSD
AUDIOAUDIO
MENUMENU
20 23
TITLETITLE
OKOK
NUMNUM
242221
++
25
…………
11/12 / :pr evious/ Next
13 : Tools, Touch this item
ente r to AUDIO/V IDEO menu
14/1 7/19 / / : Next
16 OK : su re
20 :An gle
21 :Re peat
22 TITLE
……
23 :Su btitles
24 NUM : Selecti ons songs
+
25 :Zo om
10 MEN U
CD MODE BASIC OPERATION
When y ou p lay the CD disc, wi ll d isplay CD disc an d tr ack display m od e on top
of the D VD i nterface.
Note: When dis pl ay t he C D, t he o pe ra ti on i nt erface is the same as DVD operation.
You ca n th ro ug h th e “AUDIO”button on remote control to choose the audio e ffect;
And press “GOTO” button on remote control to c ho os e th e ti tl e an d ch ap te r di sp lay.
Note: On DVD d is pl ay m en u, s om e of simple function can use the touch pane l to
operate, b ut s om e fu nc ti on s have to through remote control to opera te . If t he re
are withou t di sc i ns id e, c an 't enter to DVD mode.
Above / / / and “OK” fun ct io ns o nl y av ai la bl e on S om e disc or Mp3/SD
playing. und er C D/ DV D di sp la y co nd it io n, touching screen left the default is the
former song or u ni t, r ig ht i s th e ne xt
11
12
13
14
15
16
17
18
19
11 12
Page 9

USB/SD Opera tion
When t he machin e is connec t USB / SD, tou ch the main m enu "USB/ SD"
icon , the scree n display s "SD" or "US B",and wi ll auto rea d and displ ay
the fi le. If unde r the playi ng mode, an d insert th e card, no ne ed to choos e
the an y functio n, will aut o get into th e display m ode.
SY S TEM M E NU S E T UP
SYSTEM MENU SE TUP
Pres s “ “ picture o n main menu , o n AUX mode ,Cl ick the scr een will
ente r to system m enu setup :
5114103928
Key
6
5
1. File bag
4. JPEG Icon
2. File
5. Video Icon
3. Mp3 Icon
Key
6. Menu Icon
When d isplay US B or SD card, t ouch pane l menu is the s ame as
DVD me nu, also th e same oper ation, Touch th e DVD menu / / /
butt on move to th e file bag, f ile,MP3 i con or JPEG i con.
Afte r more curs or to the dis play bag, t hen press " OK " to ensure t he
icon ; Th e chosen fi le will be di splay by or der.
Afte r you choos e the JPEG di splay, touch a gain the OK b utton to co nfirm
this p icture, t hen touch a gain the nu mber / / / butt on can chan ge
the pi cture dir ection to u p/down/ left/ri ght.
Note : While the U SB/SD is pl aying, an d if you ejec t the disc or s lot-in th e
disc , the displ ay will pau se for few se cond, thi s is normal s ituatio n.
Afte r finish th e disc oper ation wil l resume th e display. pul l out the USB /
SD whe n you want to s top playi ng
1
7
13
19
20
14
1/2. VOL-/VOL+ :
Volum e adjust
3/4. TRE-/TRE+ :
High v olume balan ce adjust
5/6. BAS-/BAS+ :
Low vo lume balanc e adjust
7/8. - /+:
Disp lay picture b rightne ss
adju st
9/10 . -/+:
Disp lay picture c ontrast
adju st
11/12.R/F :
Rear / Front audio a djust
13/1 4. -/+:
Disp lay picture c olorful
adju st
15/1 6. -/+:
Disp lay picture a cutance
adju stment
21
15
16
17
23
22
17/1 8.L/R:
left / r ight audio ad just
19.D BAS:
Sub- woofer on /off
20.M BP:
List en respectf ully left/r ight on/ off
21.S TD:
Stan dard video se lect
22.L OUD:
LOUD O N/OFF
23. EQ : sound selec t
There are “P OPULAR,
CLAS SICALITY, ROCK” t hr ee
kind o f sound mode, c an throug h
EQ to se lect or turn off EQ .
24.B ACK:
Back ( back to last st ep)
6
12
18
24
13
You can operate above fu nction fo llow the in structi on. When yo u choose
abov e point 1 to 16 i tems, thr ough “SEL ” button ca n adjust it d irectly .
14
Page 10

COMMON MENU SE TUP
On mai n me nu page, touch “ posi ti on can enter to cur re ncy menu setup:”
1
2
3
4
5
6
1. : Exit menu
2. CLOCK SET: Touch “H” on panel and “ M”, then touch “+” “- “ to a dj us t th e ti me .
3. RDS MODE: Wir el es s Da ta B ro ad ca st in g Sy st em to open or closed.
(only in the Eng li sh m od e, i t ca n be s et ).
4. REARVIEW CAMERA: Touch “left “ or “right” to set the position of your
rearview cam er a.
5. RADIO FREQ: FM ar ea s et up
It's conveni en t fo r yo ur t o us e th is p ro du ct , we a lready setup five
RADIO area for you r se le ct , on ly t hr ou gh t he t ou ch screen text to choose the
position whi ch y ou l is te n to .
6. OSD LANG: Lan gu ag e Se tt in g: C hi ne se a nd E nglish Display is included for
your choice.
7. MODE displa y pi ct ur e: Af te r ch oo se t he s ub -menu, touch the relatively
items to setup .
8. Touch Screen Calibration
When the touch -s cr ee n fu nc ti on al it y of fs et , cl ic k it i nt o to uc h- sc re en
calibratio n. O r on D VD s to p pl ay in g mo de , us e th e remote control continuous
input "ZOOM / / " three ke ys m ay a ls o en te r th e to uc h- sc reen calibration.
When enterin g to uc h fu nc ti on , fo ll ow t he p ro mpts click the "+" center, Until
succeed cali br at io n th en a ut om at ic al ly exit.
Touch
8
7
AUDIO/VIDE O MENU SETUP
Unde r DVD mode, t ouch “ ” butt on enter to “ AUDIO/V IDEO”me nu
sett ing inter face:
Same as below pi cture1.2:
(Picture 1) Aud io setting inte rface
1
2
3
4
5
6
7
(Pic ture 2) Video s etting in terface
17
1. AUDI O: Au dio mode. Touch this
func ti on, the icon is con ca ve, then
will e nt er to audio setti ng m ode.
2. VID EO M ODE:Touch this fu nc tion,
the pi ct ure is concave, t he n will
ente r to v ideo setting mo de .
3. VOL UM E ADJUST
Touch the“-” “+ ”f unction on
the sc re en, the volume wi ll c hange.
4. BAS : Bo urdon volume ad ju st
Touch the“-” “+ ”f unction on
the sc re en, the bourdon v ol ume
will c ha nge.
5. TRE: Alt vol um e adjustment
Touch the“-” “+ ”f unction
on the s cr een, the alt volu me w ill
chan ge .
6. BAL : Le ft and right trac k
adju st ment Touch the “- ”“+”
func ti on on the screen, t he l eft
righ t tr ack volume will c ha nge.
7. FAD: F ro nt and Rear volum e
adju st ment Touch the “- ”“+”
func ti on on the screen, t he f ront
and Re ar v olume will chan ge .
8. LOU D
Touch here can t ur n on or turn
off the loud.
12
13
14
15
16
191 8
20
9. DBA S: B ourdon mode, Touch
here t o en ter to bourdon di sp lay
mode .
10. MB P: L isten positio n
Touch here to ch oo se left or
righ t li sten position .
11. EQ: Sound effect mo de
Touch here to ch oo se the
pres et s ound mode: popu la r,
rock , cl assicality.
12. BR I: B rightness
Touch the“-”“+ ”f unction
on the s cr een, to adjust th e
pict ur e brightness.
13. CO N: C ontrast, Touch the“-”
“+”f un ction on the scre en , to
adju st t he picture cont ra st.
14. CO L: C olor, Touch the “- ”“+”
func ti on on the screen, t o ad just
the pi ct ure color.
15. HU E: H ue, Touc h the“-”“+”
func ti on on the screen, t o ad just
the pi ct ure hue.
16. ST DY: S TANDA RD M ODE
17. US ER : USER-DEFINE D MO DE
18. BR IG : BRIGHTNESS
19. SO FT: SO FT
20. SH AR : SHARP
9
8
15 16
1110
Page 11

DVD SYSTEM SETUP
Unde r th e DVD display mod e, p ress the “SETUP ” bu tton on remot e co ntrol
,can e nt er to DVD system me nu s etup. Press the “ / / / ” b ut ton on
remo te c ontrol to move th e cu rsor to setup the S YS TEM setup, LANG UAGE
SETU P, AUDIO SETUP, VIDEO SETUP, SPEAKE R SE TUP an d DIGITAL
SETU P. Below i s fo r the details men u fo r your referenc e:
1. SYSTEM SETU P
RENEW MANUAL
PASSWORD: this unit factory default have set pa ss wo rd “ 00 00 ”, i f yo u ne ed
,choose the pa ss wo rd i te m to t yp e it t o br ea ke l oc k. After open lock ,can choose
children loc k to a me nd t he g ra de , af te r am en d then back to password to type 4
number passw or d , pr es s en su re b ut to n to l oc k again.
RATING: this function only fit to the DVD disc come w it h ch il dr en l oc k gr ad e.
Through it to co nt ro l wh ic h ki nd o f di sc c an r ea d. Children lock limited grade
have seven lev el ,
choose “no lim it ed ” to c an ce l th e lo ck f un ct ion. Factory default is no limited.
Note: If passw or d ha ve b ee n lo ck ed , ch il dr en lock setting will can't change.
2. LANGUAGE SE TUP
SYSTEM SE T U P
TV SYS T E M
TV TYP E
PASS W O R D
RATI N G
DEFA U L T
SYSTEM SE T U P
TV SYS T E M
TV TYP E
PASS W O R D
RATI N G
DEFA U L T
SYSTEM SE T U P
TV SYS T E M
TV TYP E
PASS W O R D
RATI N G
DEFA U L T
NTSC
PAL
AUTO
------ - -
REST O R E
SYSTEM SE T U P
TV SYS T E M
TV TYP E
PASS W O R D
RATI N G
DEFA U L T
SYSTEM SE T U P
TV SYS T E M
TV TYP E
PASS W O R D
RATI N G
DEFA U L T
4:3P S
4:3L B
16:9
1KID S A F E
2G
3PG
4PG1 3
5PG- R
6R
7NC- 1 7
8ADU L T
L A N G U A G E S E T U P
OSD L A N GUA G E
AUD I O L ANG
SUB T I TLE L A N G
MEN U L A NG
LANGUAG E S E T U P
OSD L A N GUA G E
AUD I O L ANG
SUB T I TLE L A N G
MEN U L A NG
ENGL I S H
CHIN E S E
GERM A N
SPAN I S H
FREN C H
PORT U G U E S E
ENGL I S H
CHIN E S E
GERM A N
SPAN I S H
FREN C H
PORT U G U E S E
LANGUAG E S E T U P
OSD L A N GUA G E
AUD I O L ANG
SUB T I TLE L A N G
MEN U L A NG
LANGUAG E S E T U P
OSD L A N GUA G E
AUD I O L ANG
SUB T I TLE L A N G
MEN U L A NG
ENGL I S H
CHIN E S E
GERM A N
SPAN I S H
FREN C H
PORT U G U E S E
ENGL I S H
CHIN E S E
GERM A N
SPAN I S H
FREN C H
PORT U G U E S E
17
18
Page 12

3. AUDIO S ETUP
B R IG H T E S S
CONT R A S T
HUE
SATU R A T I O N
SHAR P N E S S
5. SPEAKER SET UP
VIDEO SET U P
8
6
4
2
0
AUDIO SET U P
AUDI O O U T
KEY
SPDI F / O F F
SPDI F / R A W
SPDI F / P C M
4. VIDEO SETUP
VIDEO SET U P
B R IG H T E S S
CONT R A S T
HUE
SATU R A T I O N
SHAR P N E S S
AUDIO SET U P
AUDI O O U T
KEY
#
+4
+2
0
-2
-4
b
In the speaker s et m en u “LT/RT” “STEPEO” “VSS” three submenu choices.
6. DIGITAL SETUP
VIDEO SET U P
12
10
8
6
4
2
0
B R IG H T E S S
CONT R A S T
HUE
SATU R A T I O N
SHAR P N E S S
12
10
8
6
4
2
0
DIGITAL S E T U P
OP MOD E
DYN A M IC RA N G E
DUAL M O N O
LINE O U T
RF REM O D
DIGITAL S E T U P
OP MOD E
DYN A M IC RA N G E
DUAL M O N O
FU L L
6/ 8
4/ 8
2/ 8
OF F
VIDEO SET U P
B R IG H T E S S
CONT R A S T
HUE
SATU R A T I O N
SHAR P N E S S
VIDEO SET U P
+6
+4
+2
0
-2
-4
-6
B R IG H T E S S
CONT R A S T
HUE
SATU R A T I O N
SHAR P N E S S
12
10
8
6
4
2
0
19 20
DIGITAL S E T U P
OP MOD E
DYN A M IC RA N G E
DUAL M O N O
STER E O
MONO L
MONO R
MIX MO N O
Page 13

FUNCTION INDEX SIGN
FM
AM
AUDIO
VIDEO
FM Fre quency ra nge
Noise limi t se ns it iv it y
S/ N Rat io
Ante nna resis tance
MW Fre quency ra nge
S/ N 30d b
S/ N Rat io
Ante nna resis tance
S/ N Rat io
Max ou tput powe r
Video ou tput scop e
Video Ho vizonta l
Reso laton
8 7 . 5~1 0 8 . 0 M H Z
1 5 d B u
5 0 d B u
7 5Ω
5 2 2~1 6 2 0 K H Z
3 5 d B u
4 0 d B u
7 5Ω
8 0 d B u
4Ω6 0 W * 4 C H
1 + / - 0 . 2 V
≥6 0 0
WARNING:
1. To ensure the a cc urate of touch fu nc tion, please to uc h the center poin t
of rel at ive function.
2. There are b ui ld in anti-jamm in g system in touch s cr een, To prev en t the
wron g po sition touch, p le ase keep to touch t hi s function fo r 0. 5 second,
then t he p roduct will get r es pond for your ins tr uction.
3. Ple as e do not use the obje ct , which is bigger t ha n the functio n ic on to
touc h th e screen. Other wi se the touch func ti on will failu re o r give the
wron g op eration to othe r fu nction.
4. To ensure the p an el safety, please don' t pr ess or use the shar p ob ject to
touc h th e panel.
5. Don 't p lay the severit y sc ratch disc, oth er wise will dam ag e the DVD play
capa bi lity.
6. Be su re t o distinguish t he a node and the cath od e when connec ti ng the
powe r. If c onnect wrong, t he f use in filter box w il l melt immedi at ely to
prot ec t unit. Th en please rep la ce the same param et er fuse.
7. DC 12 V should be bes t to connec t wi th the powe r adapter to pr event from
the ov er-voltag e drop the ma y in fluence t he normal wor k of the moni to r.
8. Kee p this machin e away from t oo h ot, or unde r effe ct of moist ur e, dust
or oil s moke, avoid t his machi ne f rom dropp ing or impact ing, neve r
extr ude or chafe th is machin e wi th sharp ob jects.
9. Dan gerous high v oltages a re p resent in side the encl osure. Do n ot o pen
the ca binet, non- profess io nals can no t disassemb le unit
10. In stallatio n should be v er y tight and s ecure. Prev enting th e fa llen unit
hurt p eople when mo ving on or a su dden brake.
TROUBLE SHOO TING
21
22
 Loading...