

Page 1
LOUD
D51TSB
SEL
D51TSB
TVI EW
D51 TSB
OPERATION INSTRUCTIONS
Please re ad t he manual i n detail be fo re using th is produc t.
This prod uc t is made of pr ecision c om ponents , keep it awa y fr om moistu re.
Page 2

TABLE OF CONTENTS
Safety Precautions.......................................................................1
Main F ea tures.............. .. ................... .. .. ................... .. .. ...............2
Ac ce ssories ....... .. ............. .. ............. .. ............. .. ............. .. ..........3
Appearance and function introduction ..........................................4
Unit I ns tallation.......... .. .. ................. .. .. ................... .. .. .................5
Instruction for install and uninstall face pan el................................9
User introduction .......................................................................11
Wire co nn ec ti on .........................................................................11
Unit Rear Side Connection...........................................................12
Remote Control Operation...........................................................13
Basic operation..........................................................................14
Connect To Storage Accessories..................................................16
Touch Screen Menu And Operation ..............................................17
RADIO Function Interface ..........................................................18
Bluetooth function system...........................................................19
DVD Mode Menu Interface...........................................................20
CD Mo de Basic Operation............................................................20
USB/SD Operation......................................................................21
System Menu Setup....................................................................22
Common Menu Setup..................................................................23
AUDIO/VIDEO Menu Setup..........................................................23
DVD System Setup......................................................................25
Function Index Sign.....................................................................29
Warning... .. ........... ........... .. ........... .. ......... .. ........... .. ......... .. ........29
Disc Notes.................................................................................30
Simple Trouble-Shooting Guide...................................................31
Page 3
SAFETY PRECAUTION S
This produc t without wat erproof fun ction. To avo id the risk of fi re breakout
or electric s hock, pleas e do not expose t his unit in the r ai n or moist en vi ronment. Do not op en the cabine t. Such opera tion will abs ol ve relati ve m aintenance guara ntee. Only th e legally aut ho rized pro fe ssional s ar e allowed t o
conduct suc h operation .
LASER: Th is unit ins ta lls a laser s ys tem. To ens ur e proper us e of t his product, please r ead this owne r's manual ca refully bef or e operati ng t his unit an d
keep it for fut ure referen ce. If the unit r equires mai ntenance, p le ase conta ct
an authoriz ed professi onal. Pleas e op erate acc or ding to cor re ct
process in or der not to hurt b y laser beam.
Please use th is unit at norm al temperat ure. Do not put t he u nit under - 10
degree or hig her than +60 de gree enviro nm ent. Othe rw ise it will d is tort the
plastic she ll, debase th e display qua li ty and prod uc ts qualit y.
Installat ion should be v ery tight and s ecured to pre ve nt the fall en u nit hurt
!!
people and da mage the unit w hen moving on o r a su dden brak e.
Please inst all careful ly to avoid dam ag ing worki ng p latform . Pl ease clea n
the interna l working pla tform, and en sure suff icient spac e for install at ion.
Inner shell w ill be instal led on the work in g platfor m. Then ins tall the main fr ame, connec ting the powe r and video sig na ls jack, th en p ut mainfr am e into
the shell. Then asse mb le the shell wi th the mainfr ame device.
Please do not t ry to repair di splay devic e by yourself . It i s made up of ma ny
precision e lectronic e lements, an d an y dismant le ment or ref it w ill make it
damaged or br oken. If any pr oblem on the un it, please sw it ch off th e power
immediate ly, and co ns ult your ne ar est seller or d istributo r.
Please keep t he monitor aw ay from the pol lution of moi st ure, dust , wa ter
!!
soot etc. Ple ase switch off the pow er i mmediatel y if any moistu re or other
objects pol lute , please c ontact the se ller or distr ib utor.
If you drive wi th the sound at a l evel preven ting you from h ea ring soun ds
!!
outside the c ar please kee p the unit at an ap propriate s ou nd level, o th erwise
this may affect your d ri ving and ca us e an accident .
!!
For your safe ty, plea se d o not watch o r op erate the mon itor when you a re
driving.
Preface
Thank you for y our support o f the company 's products a nd o ptions. This unit is
crystalli zation of the m odern high- tech.It is a cr os s-funct io nal playe r mo de and
adjustabl e true color LC D Automatic re tractable s cr een LCD tou ch s creen.
Allows you to b e arbitrary c hoice To appreciat e the program . Here, we wish y ou to
personall y experienc e this high-t ec h product s ca n be Perfec t fu n and enjoy me nt.
To ensure prope r use of this pro duct, pleas e read this own er 's manual c ar efully
before oper ating this un it and keep it fo r future refe re nce.
Note: The gra phics of this m anual are for y our referen ce o nly, ple ase in-kind
products pr evail,
MAIN FEATURES
1. 5”Wide screen TF T LCD monitor.
2.This unit is with tou ch i co n interface.
3. DVD/RADIO/AUX/ US B/SD/BLUE/CAR REVER SI NG function build in.
4. DVD/VCD/MP3/CD /M PEG compatible.
5. FM/AM digital synt he sizer tuner with 30 memor y pr es ets.
6. Intelligentize b lu et ooth function, for yo u to m ak e and answer the phone
comfortably.
7.Hi power 45Wx4, 4 RCA st er eo a udio output, can conn ec t to p ower amplifier.
8. Signal : 1 video outpu t, 1 v id eo input.
9. Under car reverse mo de , ca n auto switch to the reve rs in g mode, if connect
to the camera, can obse rv e the back side of car to ensur e th e safety.
10. Menu language: CH IN ES E/ ENGLISH display.
11. Menu funct io n: a ll function is operat ed b y OS D menu.
12. Display system: a ut o PAL/NTSC.
13. Video mod e: B ri ghtness/ Standard /S of t three preset video mo de .
14. Display panel adj us t: P anel angle can be adjus ta bl e.
15..Support SD card t o pl ay M P3/MP4/WMA/AVI/JPEG media format.
16. USB connector can s up po rt removable disc, an d wi th M P3/WMA audio
display and picture b ro ws e function.
17. Clock display: 12 /2 4 ho urs clock display
18. Remote control: f ul l fu nction remote contr ol o pe ration
19. Picture pixel: 80 0* 3( R.G.B)*480
20. Power: DV+12V/± 10 %
01 02
Page 4
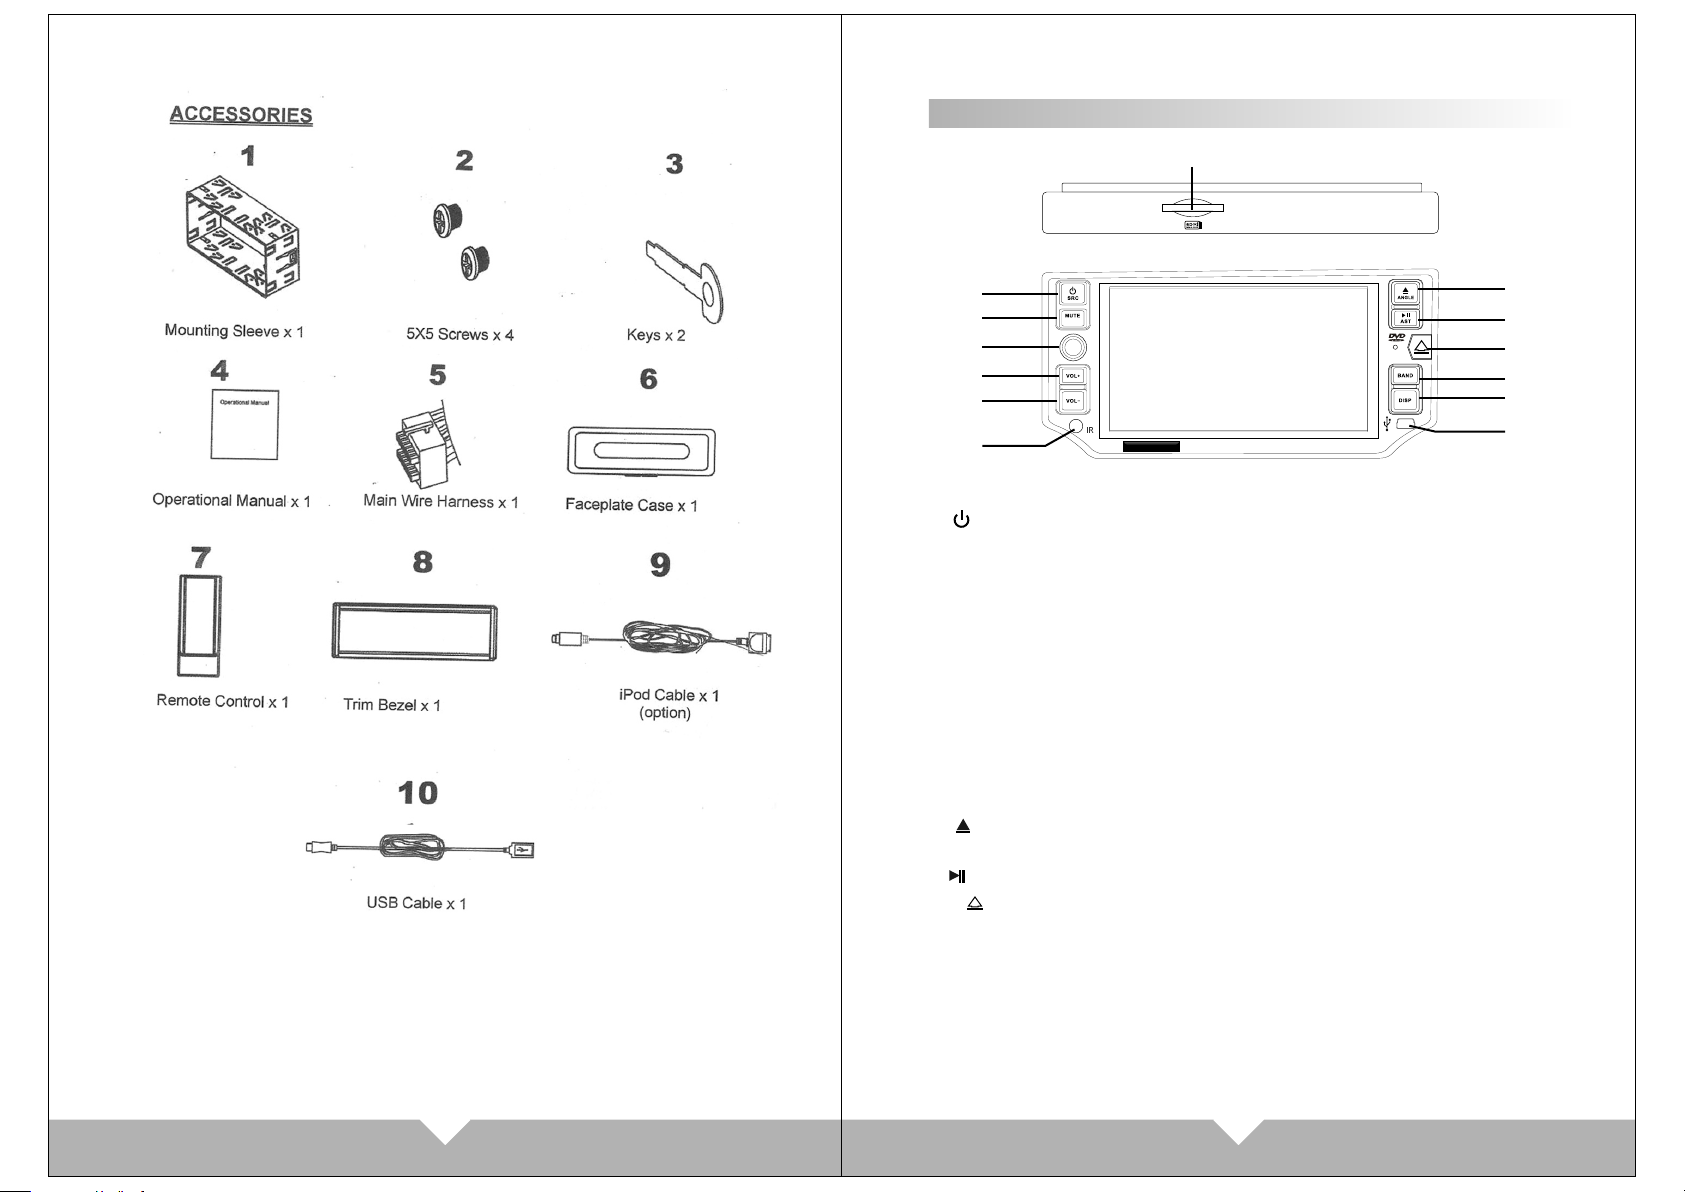
Appearance and function introductio n
7
1
2
6
3
4
5
LOUD
SEL
TVI EW
D51T SB
8
9
10
11
12
13
1. /SRC: Power on / off , Un de r po wer on mode, press this button to
switch RADIO/DVD/TV/AUX mod e; P re ss f or long time to turn off.
2. MUTE/LOUD: For mute function , pr es s fo r long second to turn on/off
the LOUD.
3. VOL+: Control for the volume incre as e, a nd c an use for MENU
adjustment.
4. VOL–: Control for the volume reduc e, a nd c an u se for MENU
adjustment.
5. Remote Control window.
6. SEL: Sound function select, choo se “ VO L” “BAS”“TRE”“BAL”“FAD”
to adjust that you need.
7. SD card jack.
8. / ANGLE: Panel angle adjustment, pr es s fo r lo ng second to eject
the disc.
9. /AST: PLAY/PAU SE.
10. : Detachable panel button.
11.BAND: PAL/ NTSC/AUTO system sw it ch . Ra di o band selection.
On RADIO mode to select brand of radi o: F M1 /F M2 /FM3. AM1/AM2
On DVD-USB/SD-BT-AUX mode to selec t th e sy st em: NTSC/PAL/AUTO
12.DISP: Display Time on/off , press this button to display the time o n th e
left top of panel. Long press by scre en b la ck , lo ng press again or touch
the screen, screen br ig ht
13.USB JACK
03
04
5
Page 5
05 06
Page 6

07 08
Page 7

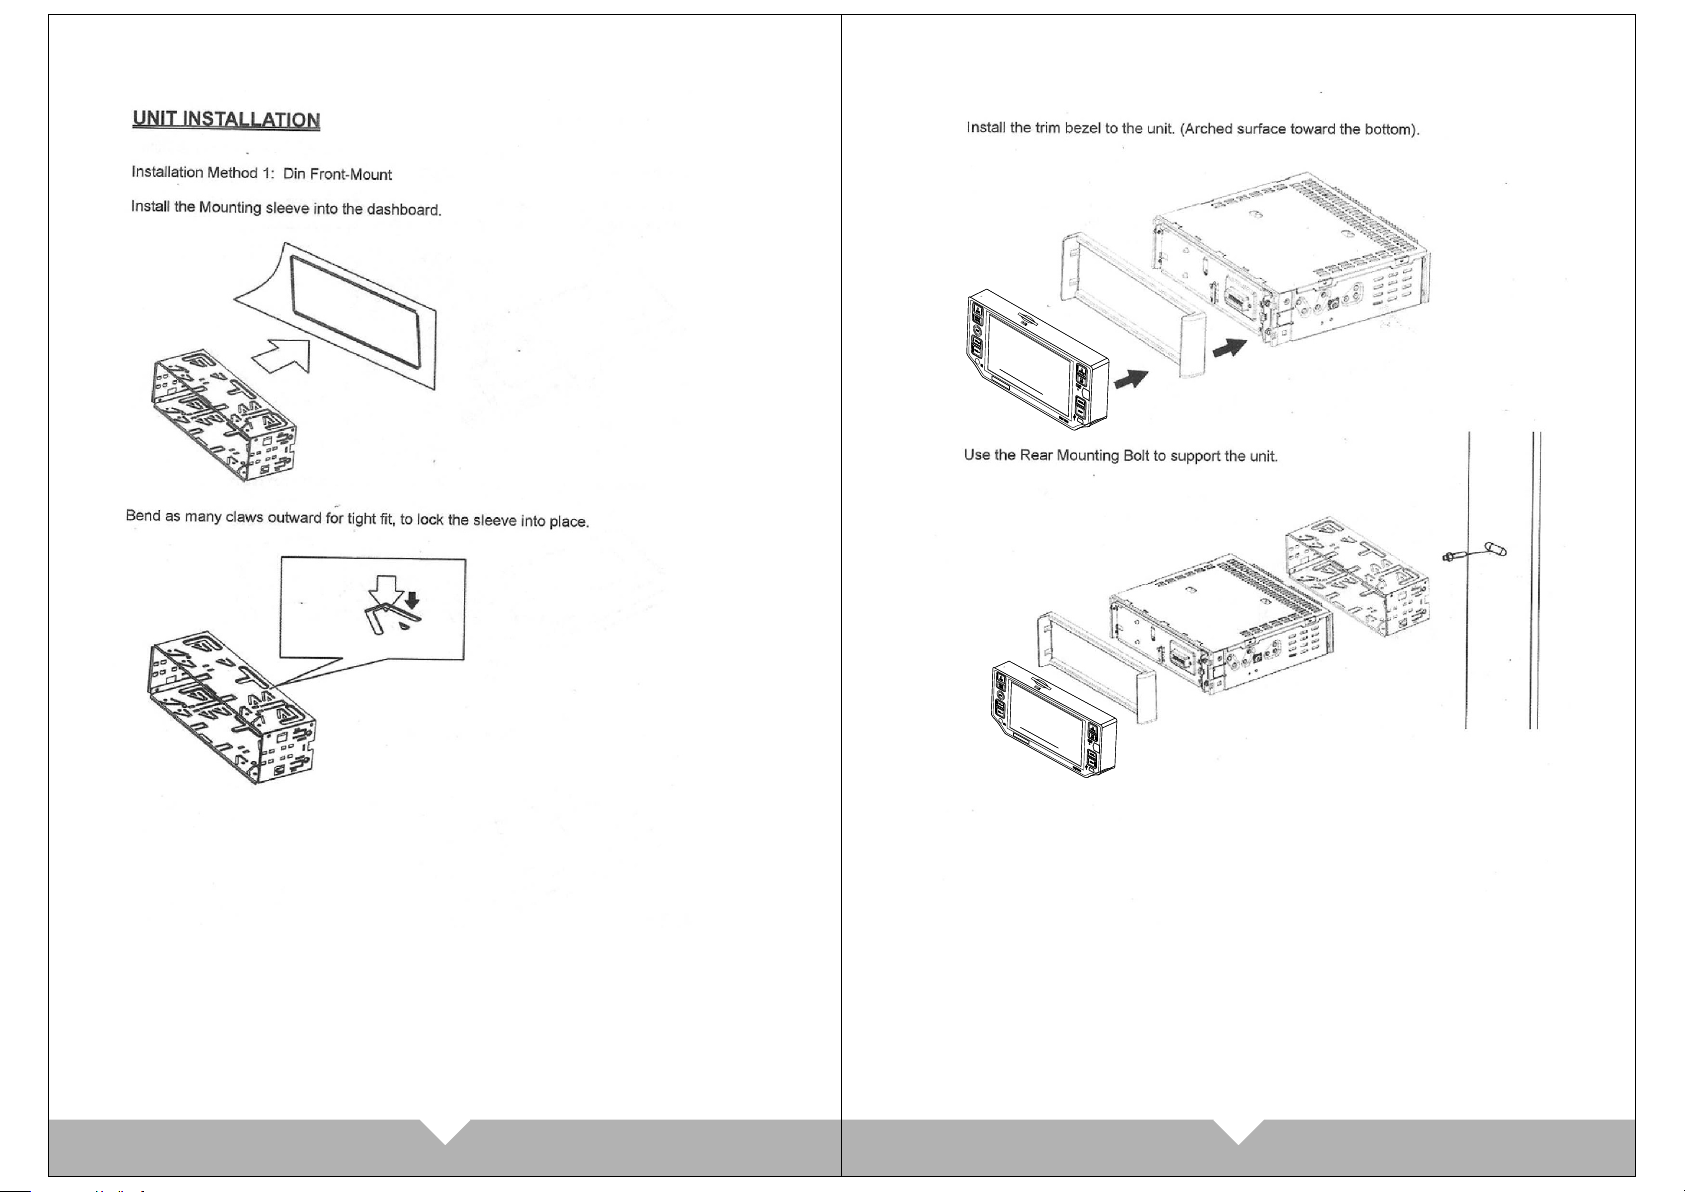
Instruction for install and uninstall face panel:
The face panel is for s ec ur ity design, t he f ac e pa nel availab le d etachable , pr ess
the button, t he face panel w ill be move out , raise up the mo ve d our side, t he t ake
out the face pa nel. Please r eference th e fig. 1,2,3, 4, a s below:
1: Press the button
3.Raise up the face panel
4.Carry out the face panel
2.The left side of face panel will move out
09 10
Note: please process the step as the instruct, if force to take
out the face panel will be easy to broken the material and can
not catch the head unit.
Page 8

User instroduction
1.Please co nnect the sig nal cable wit h po wer cable a cc ording to “ Un it rear sid e
connectio n” to connect t o power and sig nal.
2.After con nect to power, p ress the powe r button, the n th e picture w il l show the
RADIO mode.
3.When disp lay DVD or VCD di sc, the unit is a utomatica ll y identif y th e video
system PAL and NT SC.
4.Can throu gh the button o n panel to adju st the functi on . And can use th e re mote
control or to uch screen to a djust the fun ction.
5.FM mode wil l be factory de fault when wi thout any sig na l input. If p ut t he disc or
USB/SD, the p icture will a uto read the fi le and enter to p la y picture .
Wire connection
PUR P LE / RR +
GRE Y /F R +
GRE E N/ R L+
WHI T E/ F L+
WHI T E( B LA C K)/ F LGRE E N( B LA C K)/ R L-
GRE Y (B L AC K )/F R -
PUR P LE ( BL A CK) / RR -
7 6
8
9
10 11 1 2 13 1 4 1 5 1 6
3
4
5
ORA N GE / RE V ERS E -C O N
BRO W N/ M UT E -CO N
BLU E (W H IT E )/A N T- C ON
BL A CK /G N D
2
1
YE L LO W/ B AT T( M em or y b ac ku p )
RED /AC C
BLUE/AMP-CON
PINK/BRAKE-CON
BLU E/ AM P-CON
FUSE
Unit Rear Sid e Connectio n
AN T
O
DI
RA
RA
E
T
A
D P
A
T
N EN N A
IO
AD
R
NU T O H M
I
C
I
T
O
E
BL
REAR RIGHT
FRONT RIGHT
(RED)
BATTERYBATTERY
Ex t er na l p ow er a mp l if ie r c on tr o l ca bl e
Re v er se m i rr or c on t ro l ca b le ,c o nn e
ct e d to t he c a r ba ck in g l am p.
REAR LEFT
(YELLOW)BATT(Memory backup)
(BROWN)
(BLUE/WHITE)
An t en na c o nt ro l ca b le
(ORANGE)
Ma n ua l br a ke s wi tc h
(PINK)
(PURPLE)
(GREEN)
(WHITE)
(GRAY)
(BLACK)
MUTE-CON
AMP-CON
(BLUE)
ANT-CON
REVERSE-CON
BRAKE-CON
(PURPLE/BLACK)
(GREEN/BLACK)
(WHITE/BLACK)
(GRAY/BLACK)
ACC
GND
1. (BLACK)G ND: connect t o ground.
2. (BLUE/WH ITE) ANT-CON: An tenna ampli fier output c on trol
3. (BROWN) MU TE-CON: Mut e control cab le
(posit ive pole)
4. (ORANGE) REVERSE-C ON: Car rever sing cable
5. (PURPLE) R R+: Rear righ t audio outpu t (positive p ol e)
6.(GREY) FR +: Front righ t audio outpu t (positive p ol e)
7. (GREEN ) RL+ : Rear left aud io output (po sitive pole )
8.(WHITE ) FL +: Front left a udio output ( positive po le)
9.(WHITE/ BLACK) FL-: F ront left aud io output (ca thode)
10.(GREEN /BLACK) RL- : Rear left aud io output (ca th ode)
11.(GR EY /BLACK) F R- : Front rig ht a udio output ( cathode)
12.(PURPL E/BLACK) RR -: Rear right a udio output ( ca thode)
13. (PINK) BR AKE-CON: Ha nd brake conn ection cabl e
(Catho de)
14. (BLUE) AMP -CON: Amplif ier output co ntrol
15. (RED) ACC: Connec t to battery po sitive pole
16. (YELLOW ) BATT(M em ory backu p) : Power cable
11
Di sp la y
Di sp la y
Ca me ra
YE LL OW /V ID EO O UT 1
YE LL OW /V ID EO O UT 2
YE LL OW /B AC K - VI DE O- I N
YE LL OW /V ID EO I N
WH IT E/ AU TI O LI N
RE D/ AU TI O RI N
FRONT LEFT
WH IT E/ RL O UT
WH IT E/ FL O UT
RE D/ RR O UT
RE D/ FR O UT
SU BW OO FE R
SU BW OO FE R
LI NE -O UT -L
LI NE -O UT -R
12
Page 9

Remote Control Operation
1. Power
Press this bu tton to turn on /off th e un it.
2. PLAY/ PAUSE
3. MUTE
Press this bu tton to turn off speak er, p ress
again to resu me.
4.Cu rsor direct ion key
Press this bu tton to move cu rsor to
left/righ t/up/down .
5. SYST EM SELECT:AUTO/NTSC/ PAL
6.ENTER
7.VOLUME :V OL+/VOL-
8.PREV: SEEK- / SEEK+
Under DVD mod e, short-pr ess it for next
or previous i tem. Long-p ress it for fas t
forward/f ast back. Und er FM mode,
adjust radi o frequency, each plu s / mi nus
the frequen cy increase o r decrease.
9.ST/PROG
the display r ank of music
10.OSD
Press it will d isplay the di sc
informati on.
11.SEL
Sound funct ion select.
12.AMS/RP T
Under FM mode , press for
searching f unction.
Under DVD mod e, press for
single song p lay or single s ong repeat.
13.LOC/AF /RDM
On DVD mode , pre ss it for play so ng by
productio n system.
14.NUMBER
Song choose
15.AUDIO ch oose mode.
16.MENU dis play
17.Langua ge select
18.GOTO t itle, cha pt er
19.MODE: Sw itch mode
RADIO-AUX -DVD-BLUE -SD/USB
20. / : STO P/ PLAY
1 3219
26
28
21.ANGLE
DVD display d isc there are m ore
angle selec t (need the dis c support)
22.SLOW:slow for wa rd/slow p la ying
23.SETUP
DVD system se tup.
24.TITLE
DVD disc char acter showi ng
25.ZOOM
Press it can ZO OM or shrink di splay
picture.
26. Eject but ton
Press this bu tton to eject o r slot-in
the disc.
27. Display p anel slip out
28. Display p anel retrac t
29.CLOSE: Display scr een slip out/
retract
27
29
Precautions before using remote control unit
1.Please pu ll out the PVC wh en the remote c ontrol unit i s fi rst using .
2.Don't dro p or step on remo te control un it or subject i t to s hocks.
3.Note that i t maybe impos sible to oper ate the main un it i f there are o bs tacles
between it an d the remote se nsor.
4. Using the re mote contro l unit within t he specifie d op erating r an ge.
Remote control unit operating range
Horizonta l: ±30 degree
Ver tical : ± 30 de gree
Distance: 6 M
Replacing the battery
1.
3.
2.
Basic operation
1.Power on /o ff
Press the “ ” but ton on panel or r emote contr ol, enter to po wer on mode,
re-pressi ng the button t o turn off.
2.Press OSD t o show the play a nd disc infor mation in the L CD w hen the mai n
unit is in play m ode. Press “G OTO”, th e screen sh ow t he same eff ect as“OS D”
button, pre ss it, the disc i nformatio n title or chap ter choice co ul d be displa ye d
vid up, down, l eft and right c ursor of remo te control an d co nfirmat io n button.
3.Press AUDIO to sele ct the audio la nguage when t he m ain unit is i n pl ay mode
for DVD disc. P ress AUDIO to se lect the audi o channel whe n th e main unit i s in
play mode for V CD, CD disc.
4.Press SUB TITLE to sele ct the sub-ti tle when the ma in unit is in pla y mo de.
5. Press ANGLE t o select the pl ay angle when t he main unit is i n pl ay mode for
DVD disc, the re is no functi on for other di sc. It will be no w orking if the d is c not
have this fun ction.
13
14
Page 10

6. Press ZOOM e very times, The pict ur e will change t o 2X 3X 4X 1/2X 1/3 X, 1/4X
and normal. ( Note: When pl aying MP3/U SB/SD, this b ut ton is non- fu nction. )
7. Press SLOW i n the remote co ntrol unit to s low playing . Ch ange the pl ay ing
speed to 1/2, 1 /3, 1/4, 1/5, 1 /6 and 1/7 thro ugh pressin g SLOW button . Pr ess
SLOW butt on t o skip frame wh en the unit is in p ause mode.( The sound is mu te
when the main u nit is in fast or s low playing e xcept CD and MP 3 di sc. Press
PLAY to resume norm al p laying. )
8. The ma in u nit may pla y th e list acco rd ing to the foll owing progr am list:
Press ST/ PR OG, the menu wi ll shown in the L CD.
Hint: T is for Title, C i s fo r Chapter f or D VD disc.
PR O G
DVD disc will b e divided int o several par ts i s call
Tit le. Then ti tle will be div ide into chap te r;
Normally on e movie only co rrespondi ng t o one
title. CD dis c will divide i nto several i te m. For
KARAOKE dis c one music cor respondin g to one
Pl a y
Cl e ar
Ex i t
title.
PR O G
Connect To Storage Acces sories.
SD car d
SD
LOUD
SEL
Use the / / / and num ber button, t o input the
correspon ding title, c hapter, same a s the picture
showing:
Pl a y
Cl e ar
Ex i t
NOTE:
(1) .The progra m li st will be ca nc el when the m ai n unit is power o ff or eje ct
the disc.
(2) .There is no pr og ram funct io n for some di sc .
(3) .The unit can n ot p lay the lis t if y ou select t he i tem that do es n ot exit in
the disc.
9. Adjust the di splay angle
Press “ANGL E” button on pa nel. Screen a ngle will acc or ding to AD J 1/ ADJ 2/ADJ 3 /
ADJ4/ADJ0 t o retract or sl ip out.
10. Wor ki ng mode.
When the unit u nder power on m ode, short- press “SRC” b ut ton on pane l or p ress
“MODE” on rem ote control t o switch the ma in unit displ ay m ode as belo w:
RADIO-DVD -AUX
11. Deta ch able pane l
This produc t is designed f or guard agai nst theft saf et y, the pan el can be
detached, p ress the " " butt on can take dow n the panel.
TVI EW
Moveable memory
B
US
D51 TSB
USB mini jack
CONNECTTI NG WITH USB
1.Under pow er on mode,conn ector the USB , it will be play t he U SB.
2.It will dis play “USB REA D ”, then play th e file.
3.Pull out th e USB when you wa nt to stop play ing.
If there are so me file in the me mory card tha t can't to play, please for mat the
external me mory first ,t hen connect t o the unit to rea d the file.
CONNECTTI NG WITH SD CARD
1.Under pow er on mode,conn ector the SD ca rd, it will be pl ay t he SD card
2.It will dis play “USB REA D ”, then play th e file.
3.Pull out th e SD card when yo u want to stop pl aying.
Note: Pleas e take attent ion for the SD ca rd using dire ct ion, the SD c ar d
arrowhead w ill forward t o the unit disp la y side, the n in sert the ca rd .
15 16
Page 11

TOUCH SCREEN MENU AND OPERATION
Press “SRC” button on panel or “ MODE” on remote control to
choose function display pictures, the touch screen t o enter the
main menu screen: see below picture
3 4
1
2
5
6
RADIO FUNCTION INTERFACE
After turn on the unit, will enter to RADIO mode automatic al ly ; Or p re ss
RADIO icon on main menu or “SRC” on panel or “MODE” bu tt on o n
remote control to switch RADIO function:
11
RADIO
Fm2
87.50MHZ
12:45AM
VOL
87. 50
1
87. 50
3
87. 50
5
2
4
6
6
87. 50
87. 50
87. 50
87. 50
SEL
VOL
+
-
10
12
13
14
9
7
10
8
1.RADIO:FM/AM radio mode
2.TV function mode
(optional function)
3.DVD mode
(have disk can be entering)
4.USB/SD:USB signal input mode,
on any mode inserted the USB/SD,
the system will automatically read
play. (Connect the USB/SD can be
to enter)
5.GPS: navigation mode
(optional function)
12
13 1411
6.BLUE:BLUE TOOTH function
7. :POWER
8. :Enter to common menu
setting
9.AUX1:Video signal input mode
10. :Enter to MENU setting
11. :Panel angle upward
12. AUX2:Rear View Parking
Video Input
13. :Panel angle down
14. :Disc eject
Touch screen "1,2,3,4 ,5 ,6 ,9,12" the center of th e co rr esponding functio n,
the screen immediat el y en ter to interface of you r ch os en functions mode. If
have connected sign al s ou rce, there are clear pi ct ur e for you to enjoy. Touch
the screen "7" point tu rn o ff the power; tou ch " 8, 10" point can enter the s et up
menu to set product fun ct io n and display; specif ic i ns tructions, please r ef er
to the correspondin g me nu i nterface. Touch screen "11, 13" point to adjust
the panel angle up or dow n to m ee t your visual require me nt s. Touch the "14"
point to eject the disc w it hi n disc storage.
Note: This pr od uc t “ GPS” and “TV” functio ns a re optional, and this uni t do es
not come with these fun ct io ns. In this manual do not e xp la in.
TFTTFT
MUT EMUT E
OFFOFF
BNDBND
1 2 3 4
11
1. TFT/OFF: Close Screen
APSAPS
5
6
LUDLUD
EQEQ
STST
7
8 9
2. MUTE: Touch MUT icon to turn off the sound, press agai n to
resume to previous volume level.
3. BND: Select FM/AM wave band
5. APS: APS signal scan Touch APS icon, will auto search FM signal.
4/6. / : Channel increase/ reduce:
Adjust radio frequency, each plus / minus the frequency increase
or decrease.
7. LUD: LOUD information
Tou ch i t to t ur n on /o ff the loud.
8. EQ sound effect
There are “POPULAR, CLASSICALITY, ROCK” three kind of sound
mode for circulate select, if going on will turn off EQ.
9. ST: STEREO
Press it to turn on or off.
10. : BACK TO M AI N ME NU
11. Mode display
Mode display for reserve the RADIO frequency, press it to display
the channel, Hold on touching the icon, can rese rv e th e cu rr en t
frequency to relative position.
12/14. VOL+ /VOL-: volume button
13. SEL audio function
Audio adjust button. Press it to choose “VOL”“TRE”“BAS” “L /R ”“ F/ R” ,
then press”VOL-” “VOL+” to adjust that you need.
17
18
Page 12

Bluetooth func tion system
8
1
NO L INKNO L INK
2
3
4
7
5
6
1. Dialing bu tton: make an d answer the ph one.
2. pressing t his button is t he conversi on of mobile pa tt erns and bl ue tooth mod e
under calli ng state
3. Delete but ton: touch th e button can de lete the alre ad y input num be r.
4. Match butt on: touch the b utton can sen d out bluetoo th m atch info rm ation.
5. Hang up butt on: end the cal l or refuse the c all.
6. Quit the blu etooth syst em.
7.0-#: numb er button
8. Status Inf ormation sh ows column.
Operating i nstructio ns
1. Starting u p and enter int o the bluetoo th system pic tu re.
2. Open up the bl uetooth equ ipment of the m obile phone c an s earch thi s un it's
bluetooth e quipment“ CAR KIT”.Th en match the bl ue tooth by pr es entatio n.
3. Input 4 figu res pass code “0000”,th is unit's blu et ooth will b e se t up to the
authorize d equipment o f the mobile ph on e. If the mat ch i s success fu l the
status
Tips: I f it u nable to ma tc h please st ar ting up again . After settin g up the unit to
4. After you mat ch successf ully you can ma ke and answer t he p hone comf or tably.
Cautions:
This unit can o nly match wit h one mobile ph on e equipme nt w hich has bl ue tooth
function.
The bluetoo th function o f this unit can o nly receive a ud io freque nc y informa ti on.
of the blueto oth picture w ill show “LIN K OK”
authorize d equipment , the bluetoo th will conne ct o r enter int o mo bile phon e
bluetooth s ystem autom atically. Select “CAT KIT”t o co nnect it.
Under any sys tem the calls w ill switch to b luetooth sy st em automa ti cally. It's
convenien t for you to oper ate. Within t he effect ive limits, t his unit can al so
transmit th e music which i s playing in th e mobile phon e. An d can adjus t th e
voice throu gh mobile pho ne. (Within t he effect ive limits of 1 0 meters).
DVD MODE MENU INTERFACE
Press “SRC” on panel or “MODE” on remote control to sw it ch t o DV D
menu; Or on main menu to touch DVD enter to DV mode:
DVD
1
2
3
4
5
6
7
8
9
10
1 : Back to main menu
2/3 / :Fast forward/Fast back
4 :Stop
5 :Play/Pause
6 OSD: Press it will display the disc
information
7 AUDIO: Press it to select the audio
language when the main unit is in
play mode for DVD disc
8/9/18/15: / / / Upward
/Downward/Left/Right
OSDOSD
AUDIOAUDIO
MENUMENU
20 23
TITLETITLE
OKOK
NUMNUM
242221
++
25
…………
11/12 / :previous/Next
13 : Tools, Touch this item
enter to AUDIO/VIDEO menu
14/17/19 / / : Next
16 OK : sure
20 :Angle
21 :Repeat
22 TITLE
……
23 :Subtitles
24 NUM: Selections songs
+
25 :Zoom
10 MENU
CD MODE BASIC OPERATION
When you play the CD disc, will display CD dis c an d tr ac k di sp la y mo de o n
top of the DVD interface.
Note: When di splay the CD, t he operatio n interface i s th e same as DVD o pe ration.
You ca n through the “ AU DIO”but to n on remote c on trol to cho os e the audio effect;
And press “GO TO” but to n on remote c on trol to choos e the title and c hapter disp lay.
Note: On DVD di splay menu, s ome of simple f unction can u se t he touch pa ne l to
operate, bu t some functi ons have to thr ough remote c on trol to ope ra te. If ther e
are without d isc inside, c an't enter to D VD mode.
Above / / / and " OK " functio ns o nly availab le on Some disc o r Mp3/SD
playing. un der CD/DVD di splay condi ti on, touch in g screen le ft t he defaul t is t he
former song o r unit, right i s the next
11
12
13
14
15
16
17
18
19
19 20
Page 13

USB/SD Operation
When the machine is connect USB / SD, touch the main menu "U SB /S D"
icon, the screen displays "SD" or "USB",and wi ll a ut o re ad a nd d is pl ay
the file. If under the playing mode, and insert the ca rd , no n ee d to c ho os e
the any function, will auto get into the display mod e.
SYS T E M M E NU SE T U P
SYSTEM MENU SETUP
Press “ “ picture on main menu, on AUX mode, Click the scre en w il l
enter to system menu setup:
51141 03928
Key
6
5
1. File bag
4. JPEG Icon
2. File
5. Video Icon
3. M p 3 Icon
Key
6. Menu Icon
When display USB or SD card, touch panel menu is the sam e as
DVD menu, also the same operation, Touch the DVD menu / / /
button move to the file bag, file,MP3 icon or JPEG icon.
After more cursor to the display bag, then press " OK" to ensure the
icon; The chosen file will be display by order.
After you choose the JPEG display, touch again the OK button to confirm
this picture, then touch again the number / / / button can change
the picture direction to up/down/left/righ t.
Note: While the USB/SD is playing, and if you eject the di sc o r sl ot -i n th e
disc, the display will pause for few second, thi s is n or ma l si tu at io n.
After finish the disc operation will resume th e di sp la y. pull out the USB/
SD when you want to stop playing
1
7
13
19
20
14
1/2、VOL-/VOL+:
Volume adjust
3/4、TRE-/TRE+:
High volume balance
adjust
5/6、BAS-/BAS+:
Low volume balance adjust
7/8、 -/+:
Display picture brightness
adjust
9/10、 -/+:
Display picture contrast
adjust
11/12、R/F:
Rear/ Front audio
adjust
13/14、 -/+:
Display picture colorful
adjust
15/16、 -/+:
Display picture acutance
adjustment
6
12
18
24
23
22
21
15
16
17
17/18、L/R:
left / right audio adjust
19、DBAS:
Sub-woofer on /off
20、MBP:
Listen respectfully left/right on /
off
21、STD:
Standard video select
22、LOUD:
LOUD ON/OFF
23、 EQ: sound select
There are “POPULAR,
CLASSICALITY, ROCK” three
kind of sound mode, can through
EQto select or turn off EQ.
24、BACK:
Back (back to last step)
You can operate above function follow the instruction. When you choose
above “VOL” “TRE” “BAS” “R/F” “L/R”, through “SEL” button ca n ad ju st
it directly .
21 22
Page 14

COMMON MENU SETUP
On main menu page, touch “ position can enter to currency menu setup:”
1
2
3
4
5
6
1、 : Exit menu
2、CLOCK SET: Touch “H” o n pa nel and “ M”, t he n touch “+” “-“ t o adjust the ti me.
3、RDS MODE: Wir eless Data Br oadcastin g System to ope n or c losed
(only in the En glish mode, i t can be set).
4、REARV IE W CAMERA: Touc h “left “ or “r ig ht” to set th e po sition of y ou r
rearview ca mera.
5、RADIO FREQ: F M area setup
It's conv en ient for your t o use this prod uct, we alrea dy setup five
RADIO are a fo r your select , only throug h the touch scr een text to cho os e the
position wh ich you liste n to.
6、OSD LANG: Lan guage Setti ng: Chinese a nd English Di sp lay is incl ud ed for
your choice .
7、MODE displa y picture: Aft er choose the s ub-menu, to uc h the relat iv ely
items to se tu p.
8.Tou ch S creen Cal ib ration
When the to uc h-screen fu nctionali ty offset , click it into t ouch-scre en
calibrati on. Or on DVD sto p playing mod e, use the remo te c ontrol co nt inuous
input "ZO OM / / " t hree keys m ay a lso enter the t ouch-scre en calibrat ion.
When enteri ng touch func tion, follo w the prompts c li ck the "+" ce nt er, Until
succeed cal ibration th en automati cally exit
Touch
8
7
AUDIO/VIDEO MENU SETUP
Under DVD mode, touch “ ” button enter to “AUDIO/VIDEO”menu
setting interface:
Same as below picture1.2:
(Picture 1) Audio setting interface
1
2
3
4
5
6
7
(Picture 2) Video setting interface
1. AUDIO: Audio mode. Touc h th is
function, the icon is concave, then
will enter to audio setting mode.
2. VIDEO MODE: Touch this funct io n,
the picture is concave, then will
enter to video setting mode.
3. VOLUME ADJUST
Touch the “-” “+” function on the
screen, the volume will change.
4 BAS: Bourdon volume adjust
Touch the“-”“+”function on
the screen, the bourdon volume
will change.
5. TRE: Al t vo lume adjustment
Touch the“-”“+”function
on the screen, the alt volume will
change.
6. BAL: Left and right track
adjustment Touch the“-”“+”
function on the screen, the left
right track volume will change.
7. FAD: Front and Rear volume
adjustment Touch the“-”“+”
function on the screen, the front
and Rear volume will change.
8. LOUD
Touch here can turn on or turn
off the loud.
12
13
14
15
16
20
191 817
9. DBAS: Bourdon mode. Touch
here to enter to bourdon
display mode.
10. MBP: Listen position
Touch here to choose left or
right listen position.
11. EQ: Sound effe ct m ode
Touch here to choose the
preset sound mode: popular,
rock, classicality.
12. BRI: Brightness
Touch the“-”“+”function
on the screen, to adjust the
picture brightness.
13. CON: Contrast. Touch the “-”
“+”function on the screen, to
adjust the picture contrast.
14. COL: Color. Touch the “-” “+”
function on the screen, to adjust
the picture color.
15. HUE: Hue. Touch the “-” “+”
function on the screen, to adjust
the picture hue.
16. STDY: STANDARD MODE
17. USER: USER-DEFINED MODE
18. BRIG: BRIGHTNESS
19. SOFT: SOFT
20. SHAR: SHARP
9
8
23
1110
24
Page 15

DVD SYSTEM SETUP
Under the DVD display m od e, p ress the “SETUP” butt on o n re mote control,
can enter to DVD system m en u se tup. Press the “ / / / ” butt on o n
remote control to mov e th e cu rsor to setup the SYSTE M se tup, LANGUAGE
SETUP, AUDIO SETUP, VIDEO S ET UP, SPEAKER SETUP and DITIGAL
SETUP. Below is for the details me nu f or your reference:
1. SYSTEM SETUP
RENEW MANUAL
PASSWO RD : this unit f ac tory defa ul t have set pa ss word “0000” , if you need
,choose the p assword ite m to type it to bre ake lock. After open lo ck , can choos e
children lo ck to amend the g rade, after a mend then bac k to p assword t o ty pe 4
number pass word , press en sure button t o lock again.
RATING : th is functi on o nly fit to th e DV D disc come w it h children lo ck grade.
Through it to c ontrol whic h kind of disc ca n read. Child re n lock limi te d grade
have seven le vel,
choose “no li mited” to can cel the lock fu nction. Fac to ry defaul t is n o limited .
Note: If pass word have bee n locked, chi ldren lock se tt ing will ca n' t change.
2. LANGUAGE SETUP
SYSTE M S E T U P
TV SY S T EM
TV TY P E
PAS S W ORD
RAT I N G
DEF A U LT
SYSTE M S E T U P
TV SY S T EM
TV TY P E
PAS S W ORD
RAT I N G
DEF A U LT
SYSTE M S E T U P
TV SY S T EM
TV TY P E
PAS S W ORD
RAT I N G
DEF A U LT
NTS C
PAL
AUT O
--- ---- -
RES T O RE
SYSTE M S E T U P
TV SY S T EM
TV TY P E
PAS S W ORD
RAT I N G
DEF A U LT
SYSTE M S E T U P
TV SY S T EM
TV TY P E
PAS S W ORD
RAT I N G
DEF A U LT
4:3 P S
4:3 L B
16: 9
1KI D S A FE
2G
3PG
4PG 1 3
5PG - R
6R
7NC - 1 7
8AD U L T
LANGU A G E S E T UP
OSD L ANG U AG E
AUD IO LA N G
SUB TIT L E LA N G
MEN U LAN G
LANGU A G E S E TUP
OSD L ANG U AG E
AUD IO LA N G
SUB TIT L E LA N G
MEN U LAN G
ENG L I SH
CHI N E SE
GER M A N
SPA N I SH
FRE N C H
POR T U GUE S E
ENG L I SH
CHI N E SE
GER M A N
SPA N I SH
FRE N C H
POR T U GUE S E
LANGU A G E S E TUP
OSD L ANG U AG E
AUD IO LA N G
SUB TIT L E LA N G
MEN U LAN G
LANGU A G E S E TUP
OSD L ANG U AG E
AUD IO LA N G
SUB TIT L E LA N G
MEN U LAN G
ENG L I SH
CHI N E SE
GER M A N
SPA N I SH
FRE N C H
POR T U GUE S E
ENG L I SH
CHI N E SE
GER M A N
SPA N I SH
FRE N C H
POR T U GUE S E
25
26
Page 16

3. AUDIO SETUP
VIDEO S E T U P
BRI G H TES S
CON T R AST
HUE
SAT U R ATI O N
SHA R P NES S
5. SPEAKER SETUP
8
6
4
2
0
AUDIO S E T U P
AUD I O O UT
KEY
SPD I F /OF F
SPD I F /RA W
SPD I F /PC M
4. VIDEO SETUP
VIDEO S E T U P
BRI G H TES S
CON T R AST
HUE
SAT U R ATI O N
SHA R P NES S
AUDIO S E T U P
AUD I O O UT
KEY
#
+4
+2
0
-2
-4
b
In the speake r set menu “LT/RT” “S TE PEO” “VSS ” th ree subme nu c hoices.
6. DIGITAL SETUP
VIDEO S E T U P
12
10
8
6
4
2
0
BRI G H TES S
CON T R AST
HUE
SAT U R ATI O N
SHA R P NES S
12
10
8
6
4
2
0
DIGIT A L S E T UP
OP MO D E
DYN AMI C R AN G E
DUA L M O NO
LIN E O U T
RF RE M O D
DIGIT A L S E T UP
OP MO D E
DYN AMI C R AN G E
DUA L M O NO
FU L L
6/ 8
4/ 8
2/ 8
OF F
VIDEO S E T U P
BRI G H TES S
CON T R AST
HUE
SAT U R ATI O N
SHA R P NES S
VIDEO S E T U P
+6
+4
+2
0
-2
-4
-6
BRI G H TES S
CON T R AST
HUE
SAT U R ATI O N
SHA R P NES S
12
10
8
6
4
2
0
27
DIGIT A L S E T UP
OP MO D E
DYN AMI C R AN G E
DUA L M O NO
STE R E O
MON O L
MON O R
MIX M O N O
28
Page 17

FUNCTION INDEX SIGN
FM
AM
AUDIO
VIDEO
FM Frequency range
Noise limit s ensitivit y
S/ N Ratio
Antenna resistance
MW Frequency range
S/ N 30db
S/ N Ratio
Antenna resistance
S/ N Ratio
Max output power
Video output scope
Video Hovizontal
Resolaton
87.5~10 8 . 0 M HZ
15dBu
50dBu
75Ω
522~162 0 K H Z
35dBu
40dBu
75Ω
80dBu
4Ω60W*4 C H
1+/-0 . 2 V
≥600
WARNING:
1. In order to en sure the safe o peration of t he machine in t he r emoving p an el,
please wait f or five secon ds and then fas ten panel.
2. To ensure the accurate of touch fu nc ti on , pl ea se touch the center point
of relative function.
3. There are build in anti-jamm in g sy st em i n to uc h screen, To prevent the
wrong position touch, please keep to touch this funct io n fo r 0. 5 se co nd ,
then the product will get respond for your instructio n.
4. Please do not use the object, which is bigger than the funct io n ic on t o
touch the screen. Otherwise the touch function will f ai lu re o r gi ve t he
wrong operation to other function.
5. To ensure the panel safety, please don't press or use the sharp object
to touch the panel.
6. Don't play the severity scratch disc, otherwise wi ll d am ag e th e DV D
play capability.
7. Be sure to distinguish the anode and the cathode when conn ec ti ng t he
power. If connect wrong, the fuse in filter box will melt im me di at el y to
protect unit. Then please r ep la ce t he s am e pa rameter fuse.
8. DC 12V should be best to connect with the power adapter to pre ve nt
from the over-voltage drop the may influence the norm al w or k of t he
monitor.
9. Keep this machine away from too hot, or under effect of moisture, dust
or oil smoke, avoid this machine from dropping or impacti ng , ne ve r
extrude or chafe this machine with sharp objects.
10. Dangerous high voltages are present inside the encl os ur e. D o no t
open the cabinet, non-professionals can not disasse mb le u ni t.
11. Installation should be ver y ti gh t an d se cu re . Preventing the fallen unit
hurt people when moving on or a sudden brake.
Disc Notes.
5. 3"
480 xR.G .BX2 34
Work in g
te mp er ature
5°C~45°C
29
30
Page 18

SIMPLE TROUBLE-SHOOTING GUIDE
If your product fails, please follow the way of exclus io n, i f it i s st il l
unresolved, please contact the professio na l or s up pl ie r.
Sympt om
Black S creen
NO pict ure
color p ictur e
With a li ttle re gul ar ligh t
spots a nd colo r spo ts on
the scr een or bl ack
horiz ontal l ine i n the
pictu re
Uncle ar pict ure
Proba ble Cau se
1.No1 2 volta ge
2.Bri ghtne ss or c ontra st
ratio i s too sma ll
3.no hi gh-vo lta ge
1.No so urces o utp ut
2.The v ideo co nce ntric p lug
becom es loos e
1 Vid eo sour ces hav e
no outp ut
2.Col or rati o sho uld be
re-ad just
It is nor mal sym pto m in the
activ e matri x dis play
techn ology.
1.Poo r quali ty of t he
video s ource s
2.Bri ght &Co ntr ast
Solut ion
1 .chec k the pow er is o n or
conne ct righ tly
2. chec k the A/ V Cab le
is loos e or not
3. Incr ease th e bri ghtne ss
and con trast r ati o
1.Che ck the ou tpu t of VCD
or DVD
2.Rep lace wi th th e A/Vcab le
3.Tighte n the V ide o input
cable
1.che ck the vi deo s ource s
2.Ent er into t he Me nu to
re-ad just
it is nor mal sym pto m in
view ra nge wit h a lit tle
regul ar ligh t spo ts on
displ ay scre en.
1.Rep lace wi th th e high
quali ty vide odi sc
2.Res et Brig ht &c ontra st.
1.The s urrou nd te mpera ture
shoul d not exc eed t o 0-60
degre es.
2.Turn off the po wer a fter
using t he unit .
The out er cove r of th e
monit or has be en de forme d
1.Ext ernal t emp eratu re is
too hig h.
2.The p ower ha s not b een
switc hed off for a lo ng ti me .
ALARM
For your sa fe ty, driv er are advi se d not to watc h the displ ay w hen drivi ng.
It's proh ib ited in law o f some coun tr ies when dr iving and o pe rating to
watch dis pl ayer.
31
32
 Loading...