

Page 1

TV Ears 5.0 Digital
User Manual
Voice Clarifying Circuitry
®
Page 2

v1.3.2013.5.0D
TV Ears logos, pictures, design, and content ©2013 TV Ears, Inc. All rights reserved.
Keep these instructions in a safe place for future reference.
Page 3

Important Safety Information
Introduction
Product Diagram
What’s Included
Ideal TV Ears Placement
Installation
Step 1 - Place & Power the Transmitter
Step 2 - Optical Digital Installation
Step 2.1 - RCA Analog Installation
Step 2.2 - 3.5mm Cord Analog Installation
Step 2.3 - Coaxial Digital Installation
Step 3 - Charge the Headset
Using the System & Features
Caring for your Product
Troubleshooting
Appendix
Warranty Information
Manufacturer Declarations
Technical Specications
Contact Information
2
3
4
5
6
8
9
10
11
12
13
14-15
16
17-18
19
20
21
Rear Cover
Table of Contents
Page 4

TV Ears, Inc. asks that you read all instructions completely and heed all
warnings to insure proper handling and prevent any injuries. Failure to
act in accordance with TV Ears, Inc.’s instructions can lead to physical
harm or injury.
For safety purposes, do not deface the prongs on the AC adapters. If the
provided plug does not t into your outlet, purchase the correct adapter
or consult an electrician for further assistance.
Only use attachments and accessories specied by TV Ears, Inc. with
your TV Ears system.
Warning: To prevent possible hearing loss, do not listen at high volume
levels for long periods of time.
Warning: To reduce the risk of re or electric shock, do not expose the
TV Ears product to rain or moisture. The TV Ears product should not be
exposed to dripping or splashing liquids. Do not place objects lled with
liquid such as vases on or near the TV Ears product.
Warning: Keep batteries out of reach of children. Discard the batteries
appropriately and carefully. If swallowed, call The National Button
Battery Ingestion Hotline at 1-202-625-3333.
Warning: The magnetic eld emitted by the TV Ears speakers is minimal.
When used as indicated, TV Ears headsets should not cause magnetic
interference with pacemakers or internal debrillators. The magnetic
eld strength of the speakers is less than 1 Gauss when within 1 inch (3
cm) of the pacemaker or internal debrillator. It is recommended that
the user keep the ear tips at least 1 inch away from any pacemaker or
internal debrillator. If you have concerns, we recommend you contact
your physician.
! Important Safety Information
2
Page 5

3
Introduction
Thank you for purchasing from TV Ears and welcome to the family!
This User Manual is designed to give you the most information
possible and answer all the questions you might have when
installing and using your new product.
In this manual, we will demonstrate the ideal set up as well as
show you how to successfully install your product with illustrated
step-by-step instructions. You will learn what each piece is used
for, how to use all of the features available to you, and how to
troubleshoot the issues most commonly experienced by other
users. We aim to cover any pitfalls you might experience, and
give you tips for best practices.
Towards the back of the manual, you will nd information on our
warranty, technical specications of your product, and support
contact information just in case you have any questions.
Again, we welcome you to the TV Ears family and wish you happy
TV listening!
Page 6
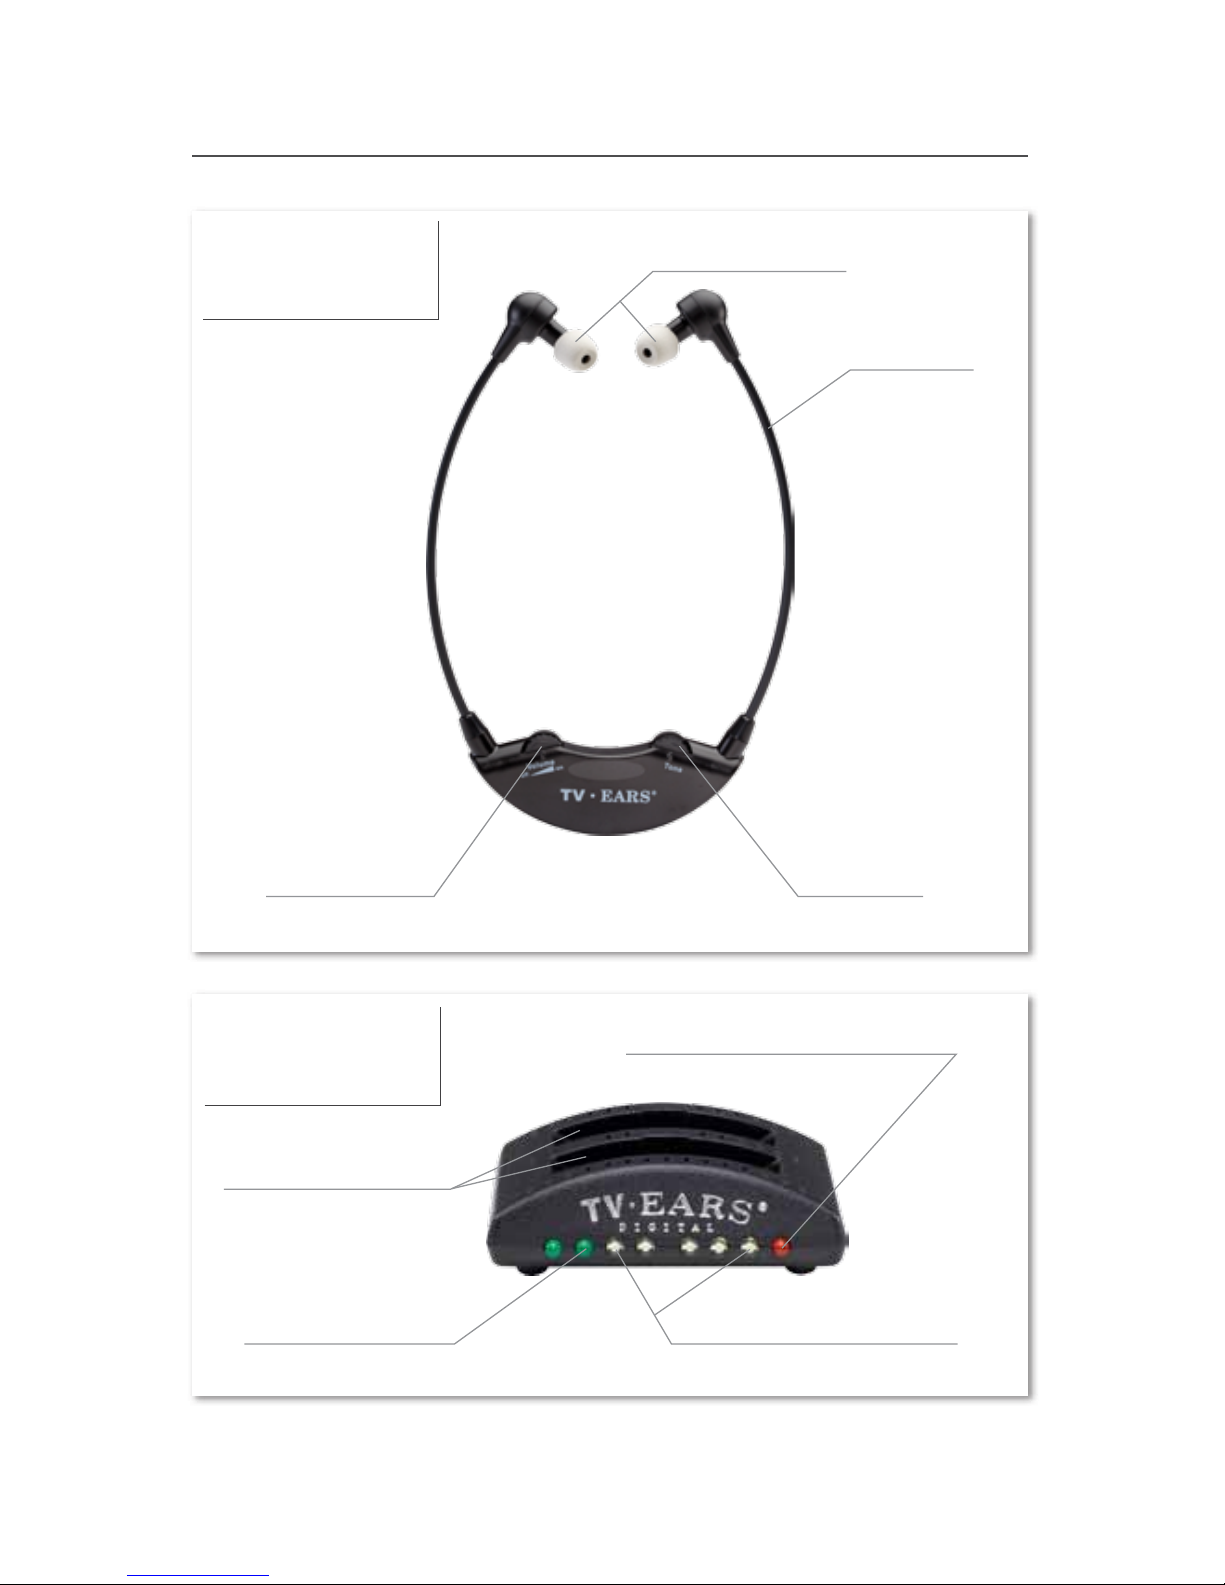
Product Diagram
4
Tone Dial
Headset
Bow Arm
Transmitter
On/Off &
Volume Dial
Foam Ear Tips
Infrared Signal Lights
Digital Connectivity Light
Charging Lights
Charging Cradles
Page 7
5
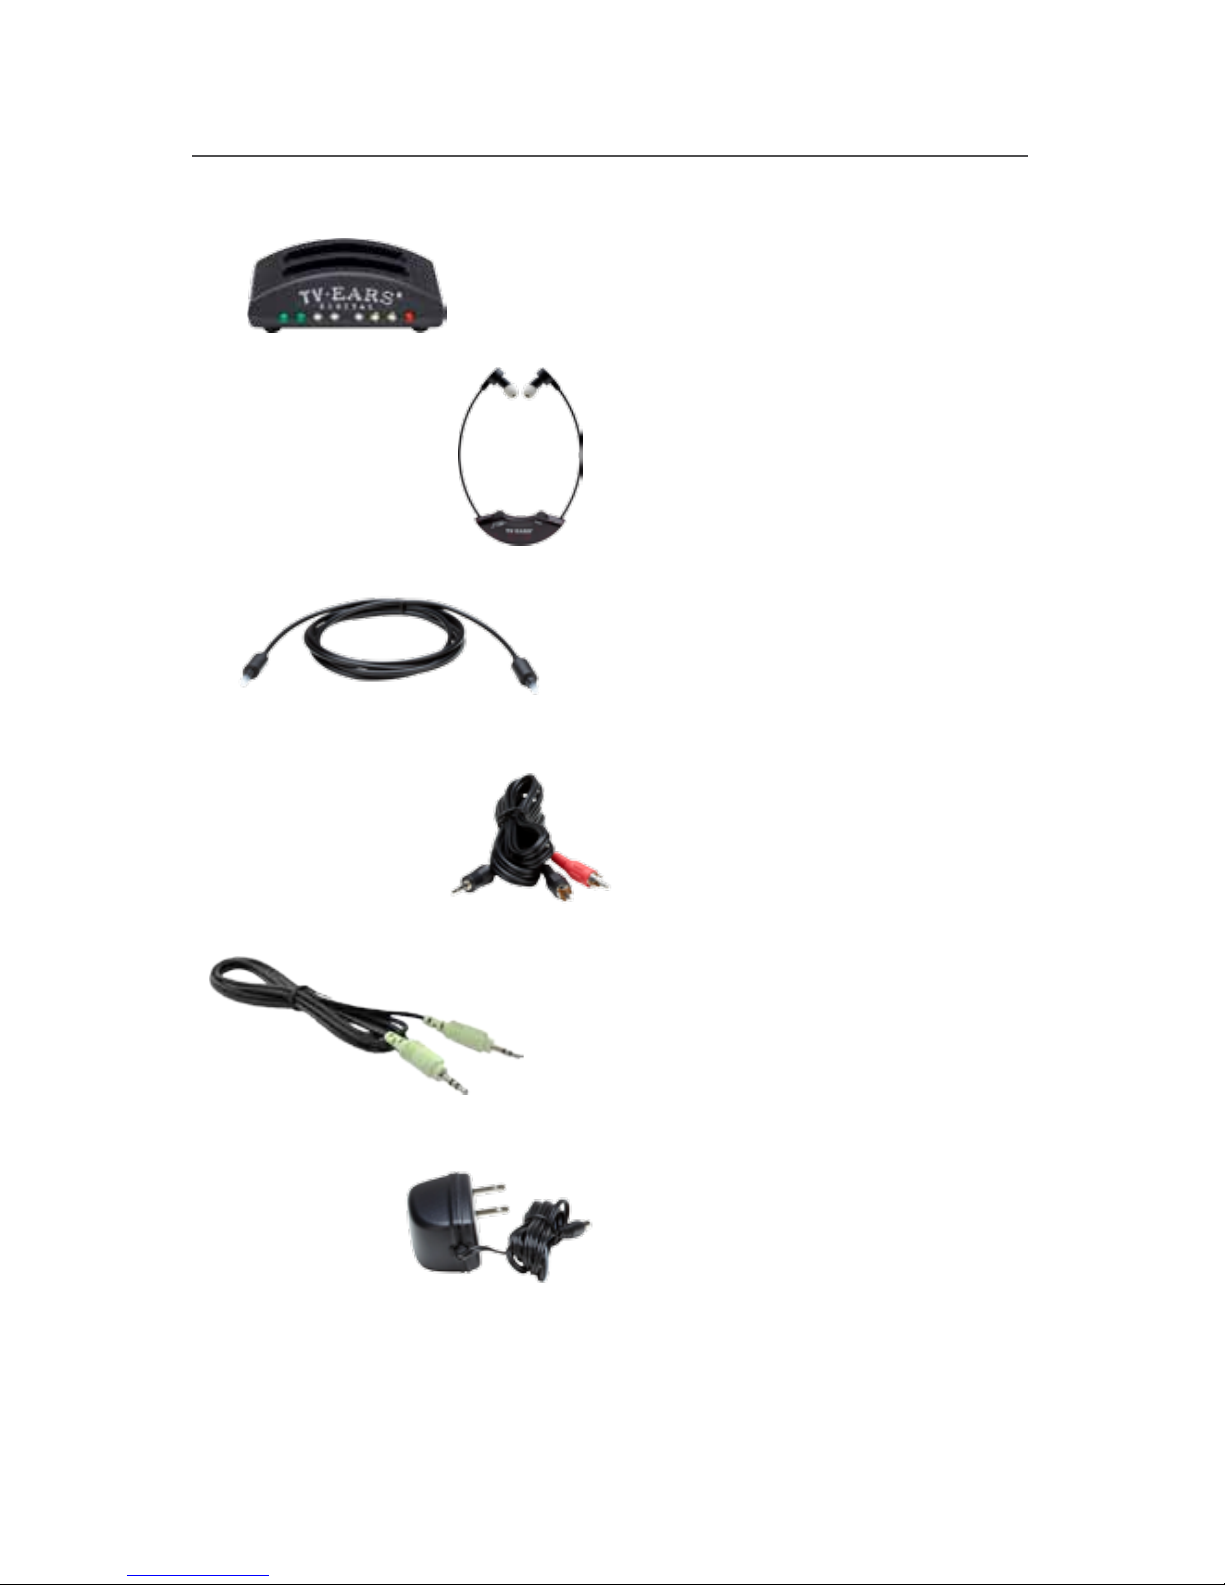
What’s Included
5.0 Digital Transmitter
5.0 Wireless Headset
Optical Digital Audio Cord
RCA Analog Audio Cord
3.5mm Analog Audio Cord
AC Power Adapter
Page 8
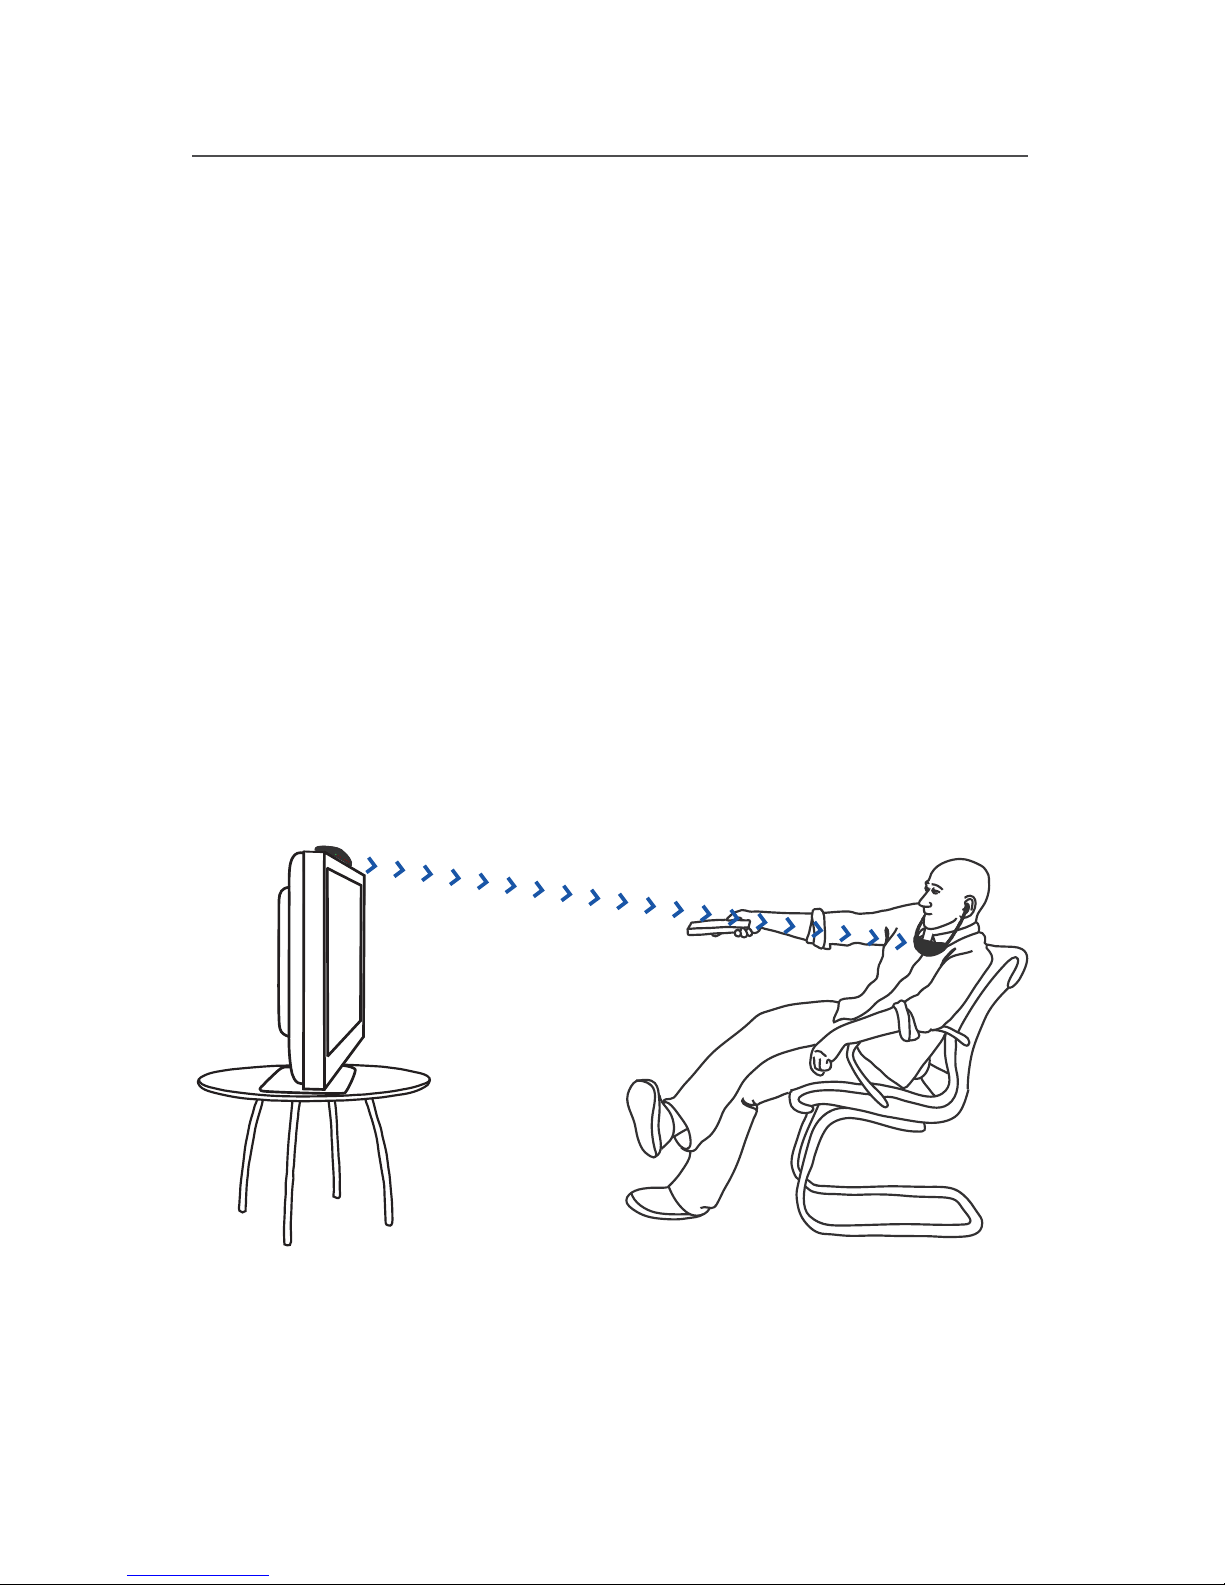
Ideal TV Ears Placement
6
Every wireless TV Ears system utilizes infrared technology to
send audio signals from the transmitter to the headset.
Infrared technology requires a direct line-of-sight from the
transmitter to the receiver (or headset) to successfully transmit
audio signals. Therefore, when installing any wireless TV Ears
system, you will have to be sure the transmitter has a direct lineof-sight with the headset when the headset is in use.
For the best results, the transmitter should be placed on a at
surface that is three to ve feet from the ground and should be
facing directly towards the seating area where the headset will
be used. Make sure that nothing is blocking the signal between
the transmitter and headset (ie. books, newspapers, etc.).
Page 9

Installation
pgs. 8-13
Page 10
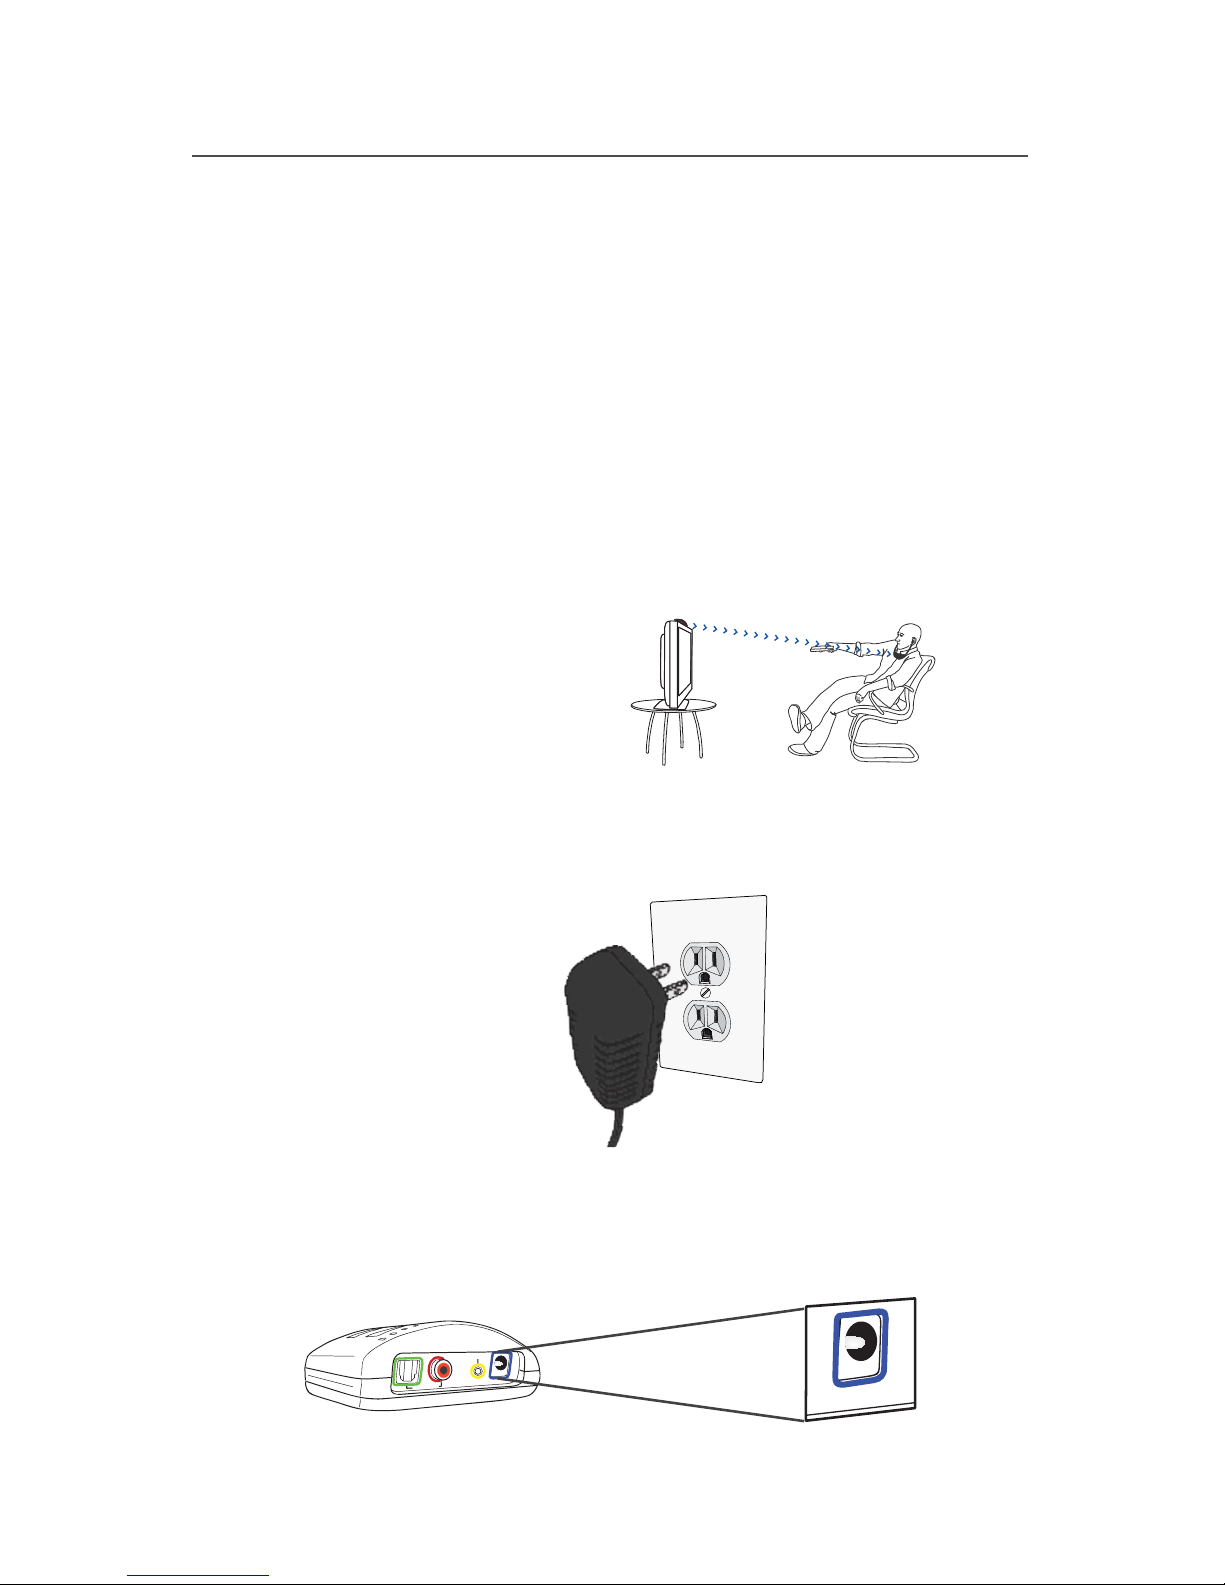
Step 1 - Place & Power the Transmitter
8
This step explains where to place the transmitter for the best
performance as well as how to power the transmitter.
The infrared diodes on the transmitter must be in direct line-ofsight with the headset when using the system for best performance.
There cannot be anything blocking the direct signal, otherwise there
will be no audio received and no sound heard.
Place the transmitter on a at surface that is 3 to 5 feet
above the ground. Be sure it is pointed to the seating area
where the headset will be used.
Plug the AC adapter into a standard electrical outlet or surge
protector.
Plug the end of the AC adapter into the port labeled “12V”
on the back of the transmitter. The correct port has a blue
border around it.
1
2
3
Digital Audio In
Analog Audio In
12
V
12v
Power Port
For assistance, call us at 800-263-4864
Page 11
9
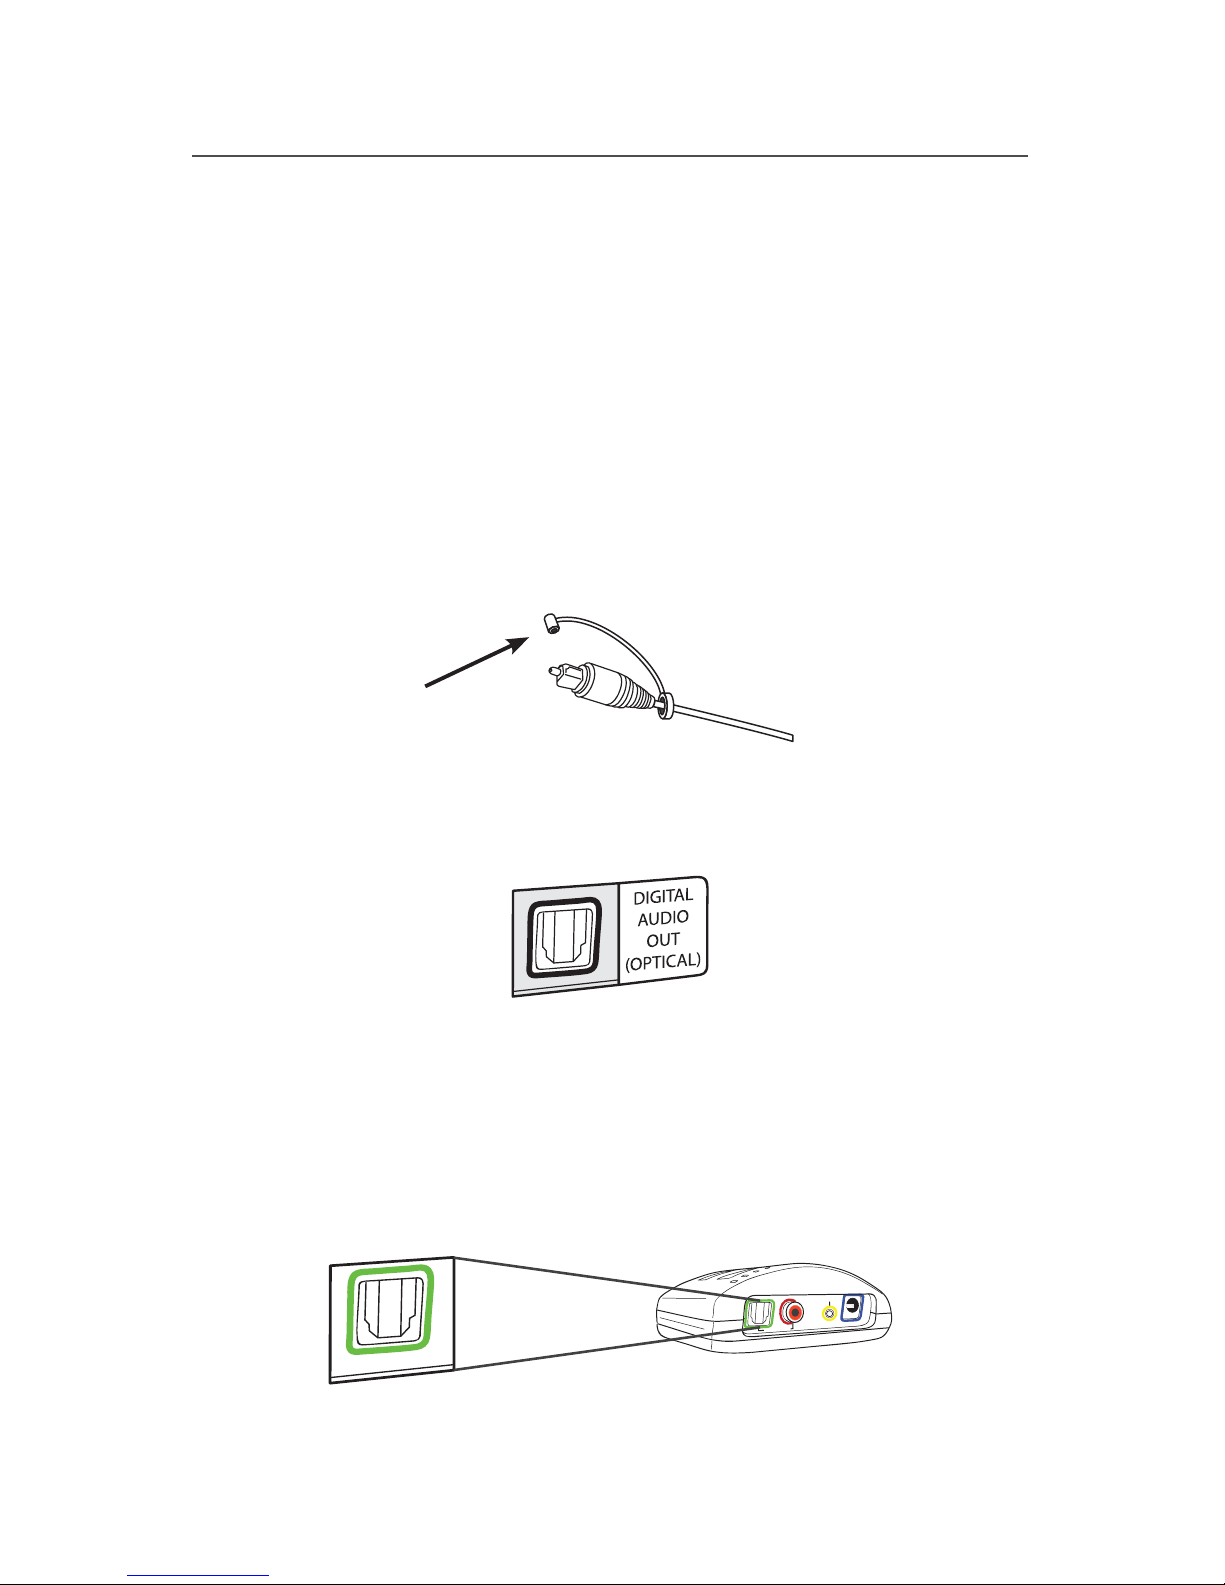
Step 2 - Optical Digital Installation
This step will instruct you on how to connect the TV Ears
transmitter to your television, satellite, or cable box using an
optical digital audio cord.
• If you cannot get to the back of your TV, you can also use these
instructions to install the system to your cable or satellite box.
• Be aware that the “Audio” ports on the front of your television are
typically “Audio In” ports and will not send audio to your headset.
Remove the plastic caps from both ends of the optical digital
audio cord.
Plug either end of the optical audio cord into the “Digital
Audio Out (Optical)” port on the back of the TV.
Plug the other end of the optical digital audio cord into the
port on the back of the transmitter labeled “Digital Audio
In”. The correct port has a green border around it. You should
hear and feel a ‘click’ when it has been pushed in all the way.
Optical
Digital Audio
Digital Audio In
Analog Audio In
12
V
1
2
3
For assistance, call us at 800-263-4864
Page 12
Step 2.1
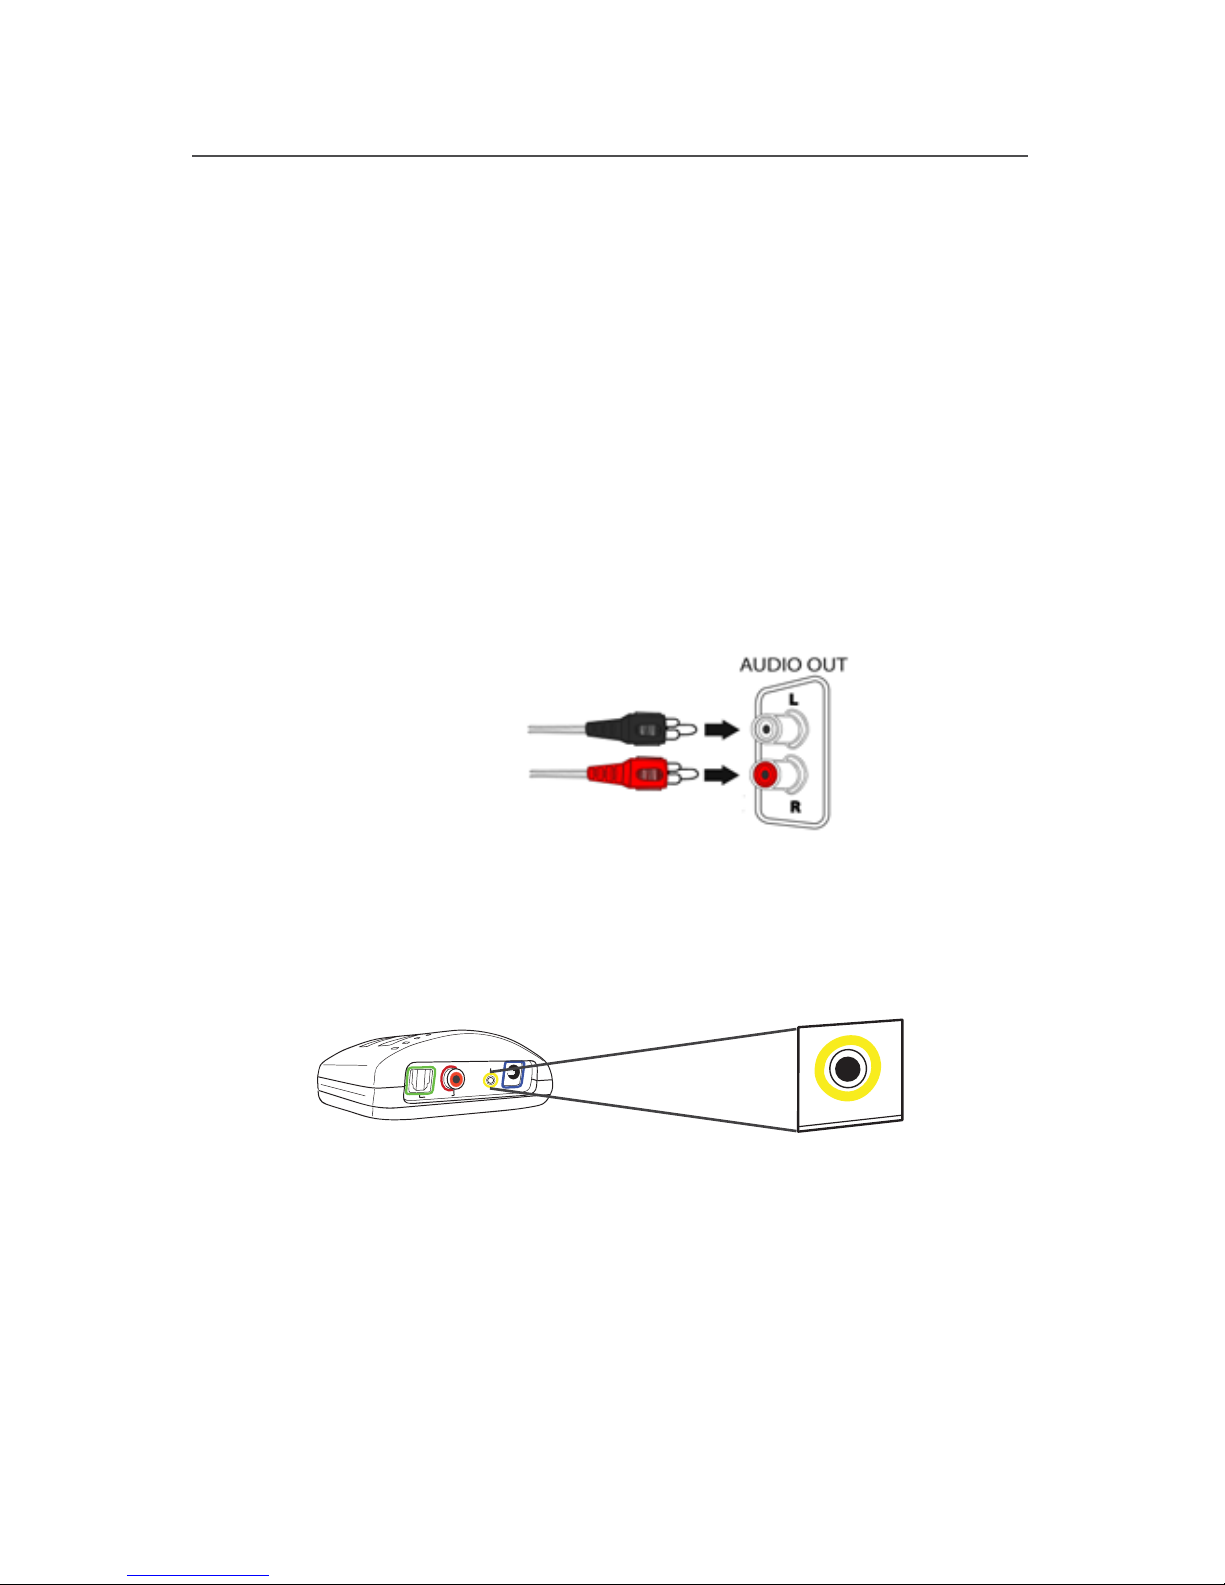
RCA Analog Installation
This step is an alternative to Step 2 on page 9. This step will
explain how to connect the TV Ears transmitter to your television,
satellite, or cable box using an RCA analog audio cord.
• If you cannot get to the back of your TV, you can also use these
instructions to install the system to your cable or satellite box.
• Be aware that the “Audio” ports on the front of your television are
typically “Audio In” ports and will not send audio to your headset.
Plug the dual end of the audio cord (red and black ends) into
the analog “Audio Out” ports on the back of the television,
satellite, or cable box.
Plug the single end of the audio cord into the port labeled
“Analog Audio In” on the back of the transmitter. The correct
port has a yellow border around it.
• TV Ears systems are mono systems. This means that you will still
hear sound through both the left and right earpieces even if you
only have the left or right audio connected.
• Your TV’s audio settings may be set to “variable” or “xed”. If you
want to be able to control your TV volume level separate from your
TV Ears volume level, you will need to make sure your TV is set to
“xed”. Contact your TV manufacturer for assistance.
1
2
10
Digital Audio In
Analog Audio In
12
V
3.5mm
Analog Audio
For assistance, call us at 800-263-4864
Page 13
Step 2.2
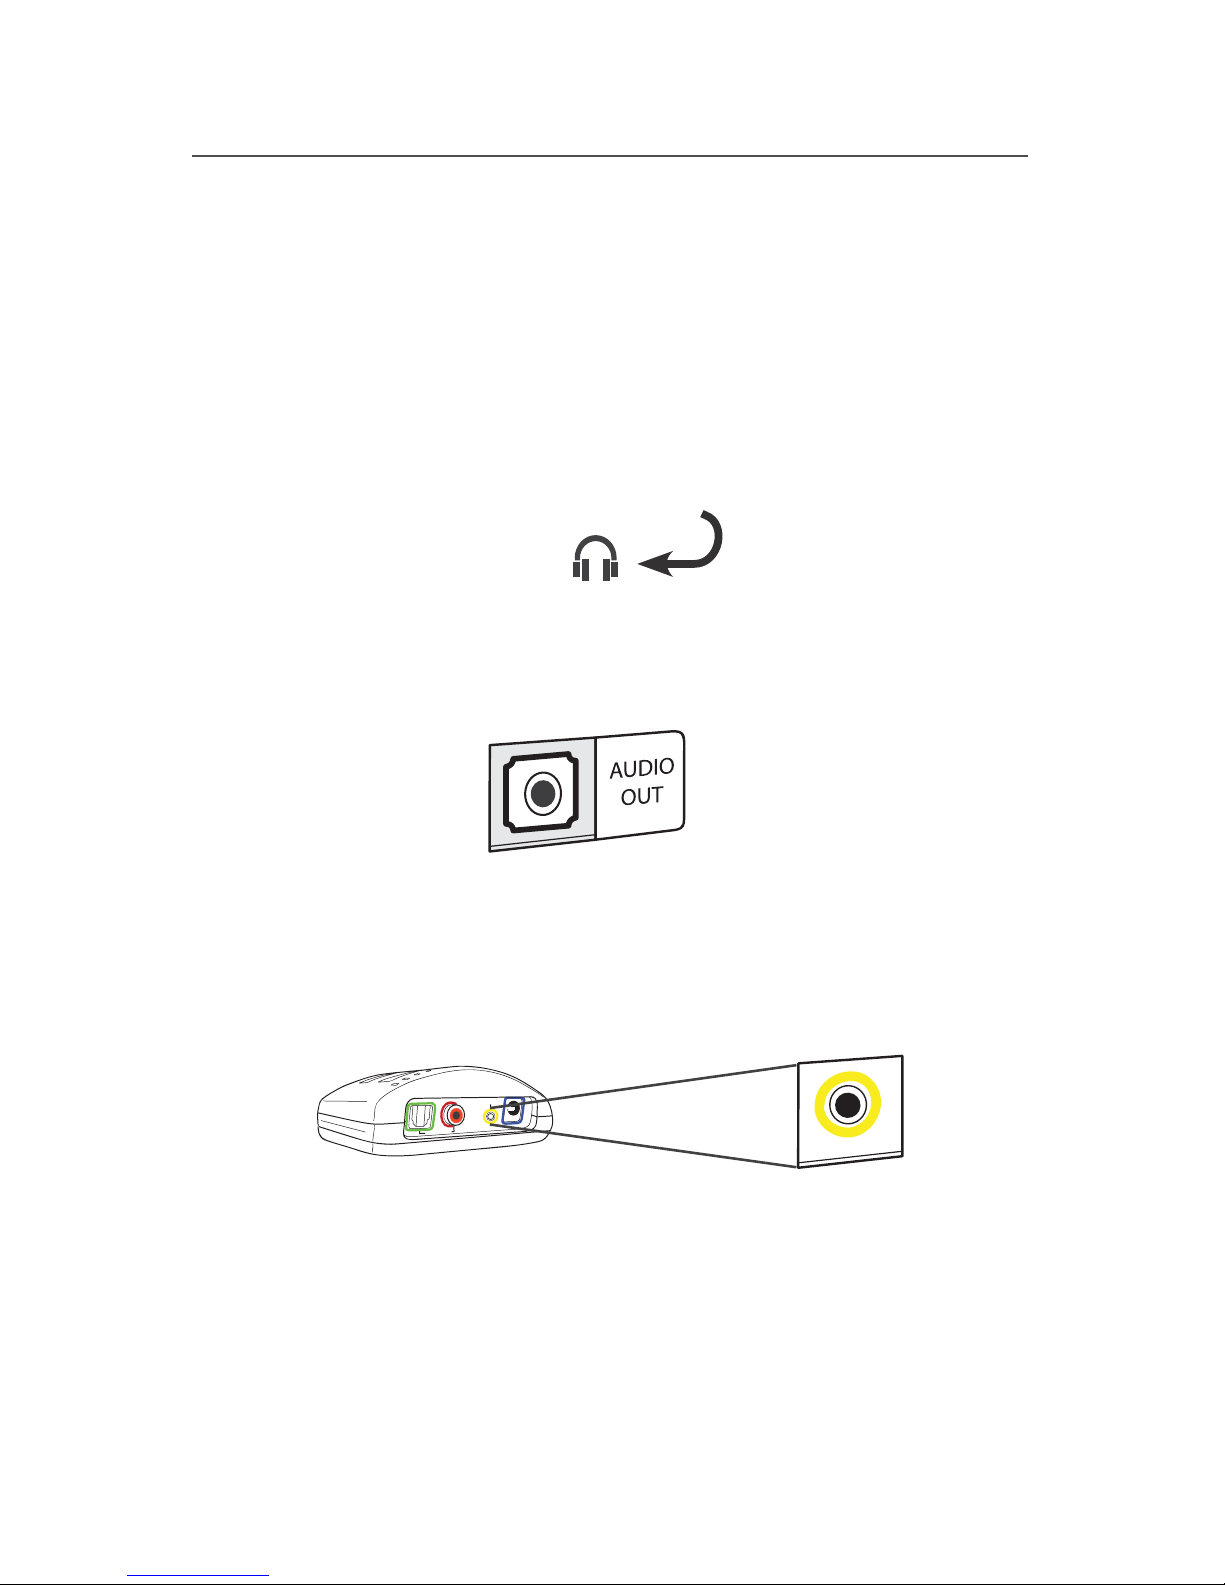
3.5mm Cord Analog Installation
11
This step is an alternative to Step 2 on page 9. This step will
explain how to connect the TV Ears transmitter to your television,
satellite, or cable box using a 3.5mm analog audio cord.
• If you cannot get to the back of your TV, you can also use these
instructions to install the system to your cable or satellite box.
• If you connect the 3.5mm audio cord to the Headphone port on
your TV, your TV Ears will still function properly, but the sound to
your television speakers will be muted. The port is usually labeled
with an icon that looks like the following:
Plug one end of the 3.5mm audio cord into the “Audio Out”
port on the back of the television, satellite box, or cable
box.
Plug the other end of the audio cord into the port labeled
“Analog Audio In” on the back of the transmitter. The correct
port has a yellow border around it.
• Your TV’s audio settings may be set to “variable” or “xed”. We
recommend that you set your audio settings to “xed” for better
audio quality when using this installation option. If you want to be
able to control your TV volume level separate from your TV Ears
volume level, you will need to make sure your TV is set to “xed”.
Contact your TV manufacturer for assistance.
1
2
For assistance, call us at 800-263-4864
Digital Audio In
Analog Audio In
12
V
3.5mm
Analog Audio
Page 14
12
Step 2.3
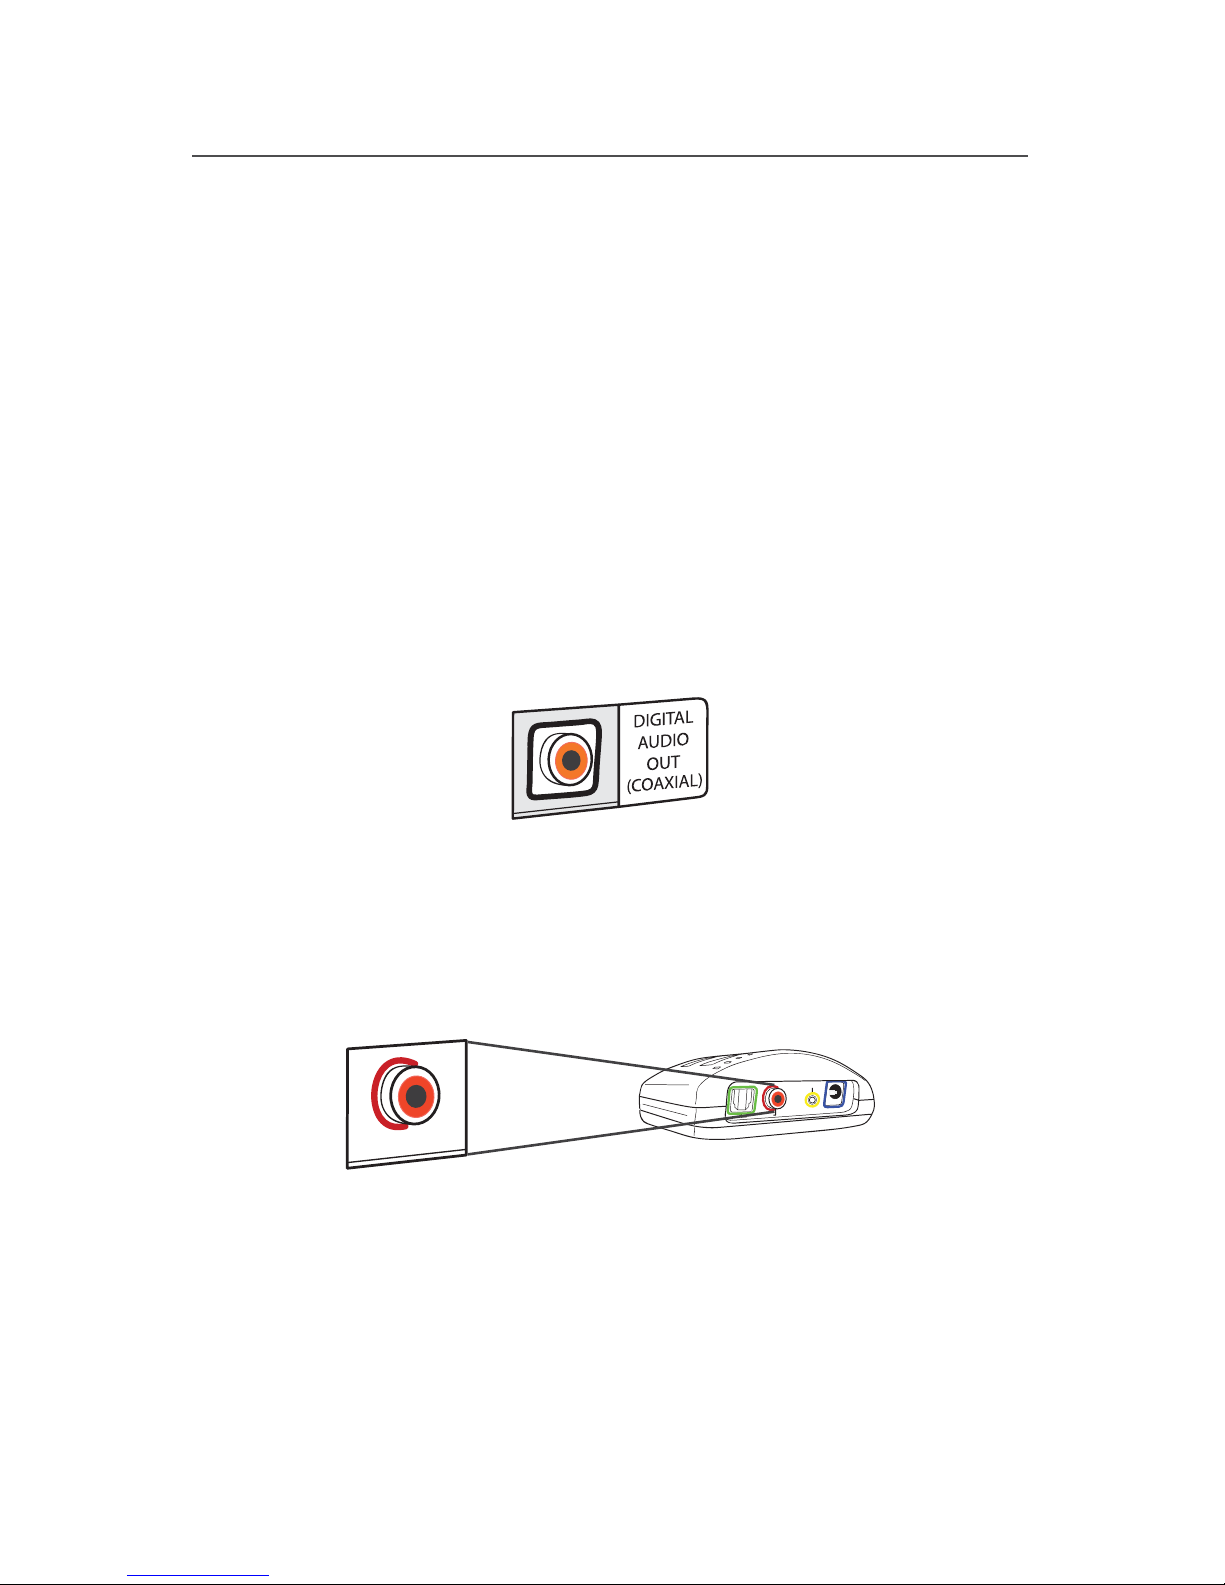
Coaxial Digital Installation
This step is an alternative to Step 2 on page 9. This step will
explain how to connect the TV Ears transmitter to your television,
satellite, or cable box using an coaxial digital audio cord (not
included).
• If you cannot get to the back of your TV, you can also use these
instructions to install the system to your cable or satellite box.
• Be aware that the “Audio” ports on the front of your television are
typically “Audio In” ports and will not send audio to your headset.
Plug one end of the coaxial digital audio cord into the “Digital
Audio Out (Coaxial)” port on the back of the TV.
Plug the other end of the coaxial digital audio cord into the
port on the back of the transmitter labeled “Digital Audio
In”. The correct port has a red border around it.
• Your TV’s audio settings may be set to “variable” or “xed”. If you
want to be able to control your TV volume level separate from your
TV Ears volume level, you will need to make sure your TV is set to
“xed”. Contact your TV manufacturer for assistance.
Digital Audio In
Analog Audio In
12
V
Coaxial
Digital Audio
1
2
For assistance, call us at 800-263-4864
Page 15
Step 3 - Charge the Headset
This step will instruct you on how to appropriately charge the
headset to make sure you’re getting the best use possible.
• Although every TV Ears headset comes with enough of a battery
charge to perfom an initial test the system upon installation, a
FULL CHARGE OF AT LEAST 14 HOURS BEFORE FIRST USE is
recommended to help prolong the lifespan of the battery.
• The TV Ears headset will last around 6 hours on a full charge,
but will last a lesser or greater amount of time depending on the
average volume level of the headset.
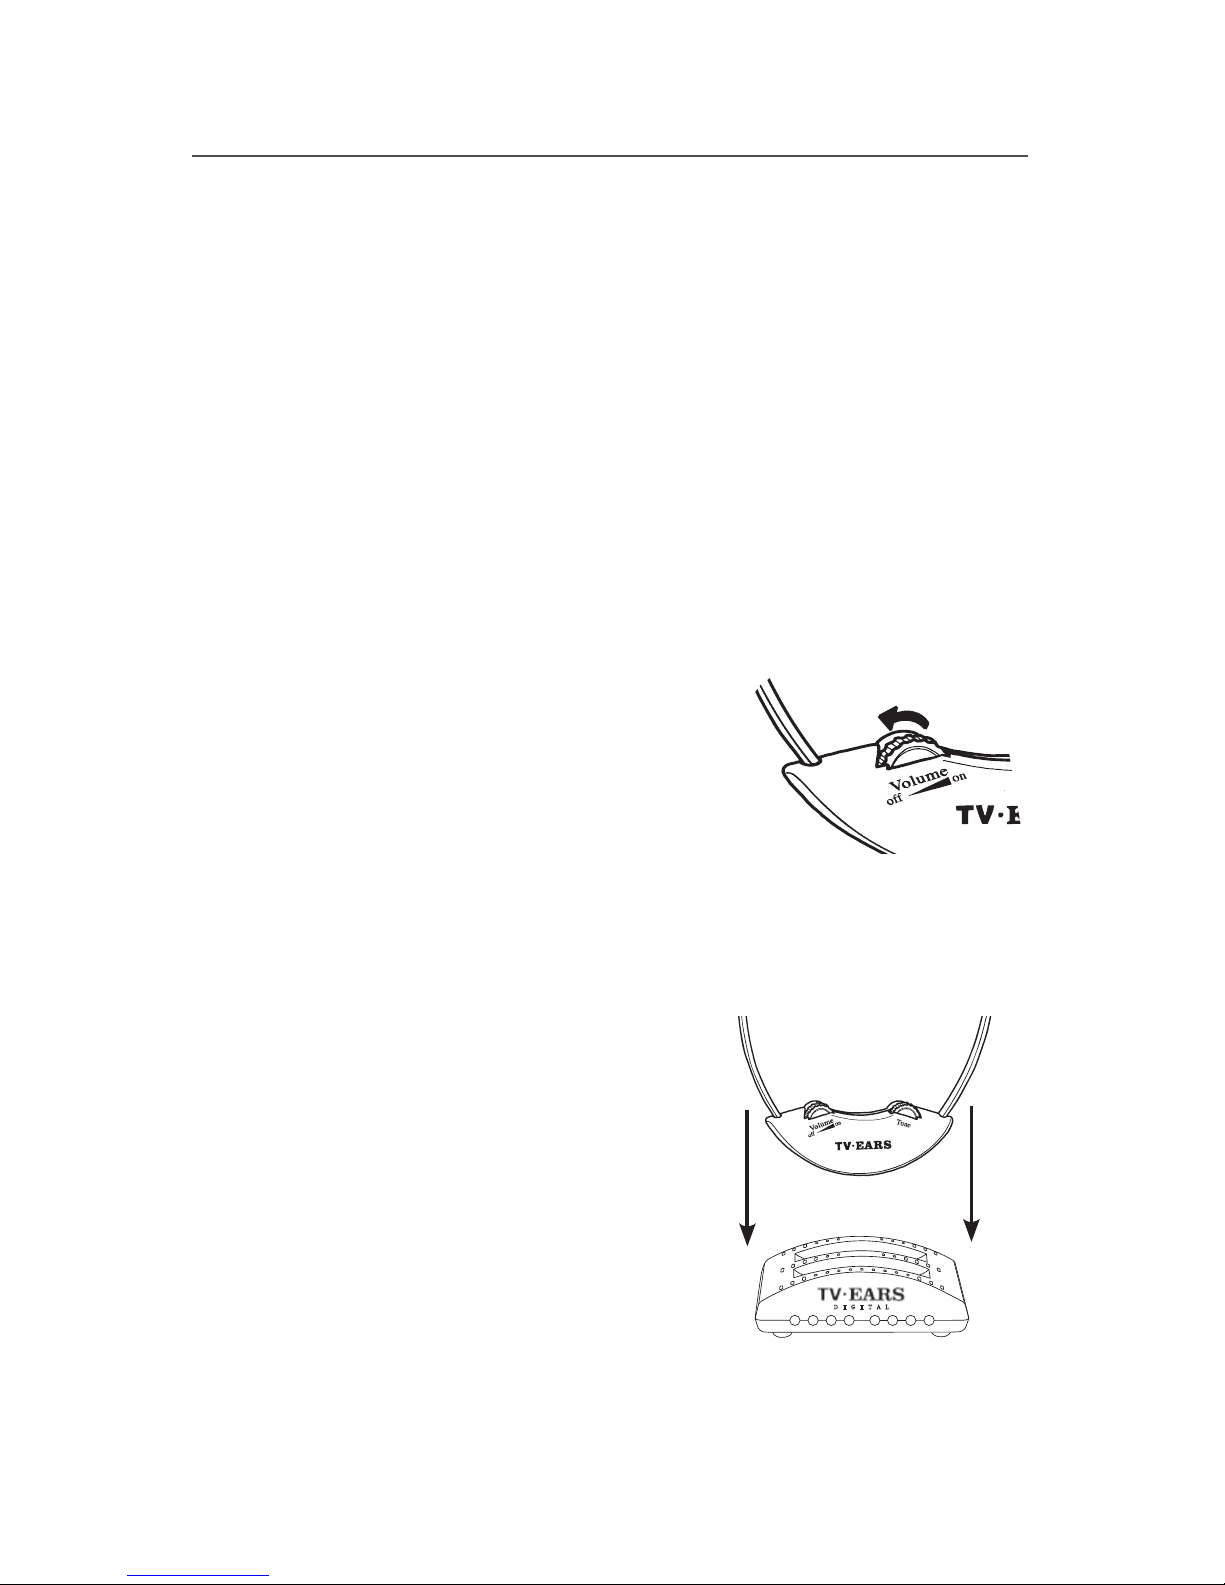
Turn the volume knob of the headset to the “off” position.
You should hear and feel a ‘click’ when the knob has been
turned all the way to the “off” position.
Place the headset into the transmitter’s charging cradle and
be sure the front of the headset is facing towards the front
of the transmitter.
Firmly press down on the headset
when it is in the cradle until it is
secure. The headset should slightly stick
in the cradle when you try to remove it.
The charging light will illuminate when
it is in the correct position.
1
2
3
DIGITAL
13
For assistance, call us at 800-263-4864
Page 16

Using the System & Features
The Headset
Putting the Headset On
Using both hands, gently separate the arms at the top by the ear
tips and place the earpieces into each ear.
Removing the Headset
Make sure the headset is completely turned off. Using both hands,
gently separate the arms at the top by the ear tips removing the
earpieces from your ears.
On/Off and Volume Control
To turn the headset on, rotate the volume dial towards the “on”
position and set the volume to your comfort level. To turn the
headset off, rotate the volume dial towards the “off” position
until you feel and hear a ‘click’. When you feel the ‘click’, this
means the headset is completely turned off and is ready to be
charged.
Tone Control
The tone dial allows you to control the amount of bass and treble
that is output by the headset. To adjust the tone, simply turn
the dial back and forth until you nd the balance that suits your
preference.
Adjust Headset Pressure
The TV Ears headset is made to t the average adult head, but
can be adjusted to improve the comfort and t. If the headset is
too tight or there is too much pressure on your ears after long
periods of use, hug the headset around a medium sized pillow or
book, preferably a little wider than the width of your head, and
let it sit for about 24 hours. Repeat the process if necessary.
14
Page 17

Using the System & Features
The Transmitter
Charging Lights
There are two charging lights on the transmitter. They are the
two leftmost green lights on the front of the transmitter. When
a headset is charging in the front cradle, the left of the two
charging lights will illuminate. When charging a headset in the
back cradle, the right of the two charging lights will illuminate.
Digital Connectivity Light
The Digital Connectivity light is the rightmost light on the front
of the transmitter. This light will illuminate an amber color when
the transmitter is correctly connected using the digital optical or
digital coaxial cords.
Infrared Lights
There are ve infrared lights located on the front of the transmitter
between the charging lights and the Digital Connectivity light.
These lights provide the transmission of the audio signal from the
transmitter to the headset. When the transmitter is connected to
power, these ve lights will illuminate a dim red color. If one or
more of these lights is not illuminated, the bulbs may be burnt
out and may cause decreased transmission power, which can
affect the range and the quality of the audio signal. If one or
more of these lights are not illuminated, call our support line for
assistance.
Refer to page 4 for a diagram of the product.
15
Page 18

Caring for your Product
Do not use or submerge TV Ears products near water, moisture,
or other liquids.
Clean with a dry cloth.
Do not install near any heat sources such as radiators, heat
registers, stoves, or any other apparatus (including ampliers)
that produce heat.
Protect the power cord from being walked on or pinched
particularly at plugs, convenience receptacles, and the point
where the cord exits from the transmitter.
TV Ears recommends using a surge protector to protect your
product from power surges.
Refer all servicing to qualied service personnel. Servicing is
required when the TV Ears product has been damaged in any way,
such as when the power-supply cord is damaged, liquid has been
spilled on the product, objects have fallen into the product, the
product has been exposed to rain or moisture, does not operate
normally, has been dropped, cracked, or has been broken.
16
Page 19

Troubleshooting
Why do my TV Ears mute when I mute the TV?
Fixed audio out will allow the television volume and TV Ears volume
to work independently from one another. Some televisions have
to be manually switched from the “Variable” audio setting to the
“Fixed” audio setting by using your TV menu. Not all TVs have
the ability to switch from a variable to a xed audio out (consult
your television manual or manufacturer). When the TV is set to
a “Variable” audio out setting, the volume of the TV Ears headset
will be the same volume as the TV.
Why do I hear a television station when I’m watching a DVD/
video?
When the audio cord is plugged into the analog (RCA) audio out
port of a cable or satellite box AND an analog (RCA) audio out
port of a DVD player or VCR, you must turn off whichever device
is not in use. Turn off the cable/satellite box when watching a
DVD or video. Turn off the DVD/VCR player when watching TV.
How do I charge the headset?
Turn the headset off and gently place into the charging cradle
of the transmitter. Be sure the charging light on the front of the
transmitter illuminates. See Step 3 of Installation.
How do I know the headset is charging?
The leftmost light on the front of the transmitter will illuminate
green if there is a headset in the front cradle. The light right
next to it (the second leftmost light) will illuminate green if a
headset is in the rear charging cradle. If you own two headsets
and both are charging at the same time, both charging lights
should illuminate a green color.
17
Page 20

Troubleshooting
Will the lights change colors once the headset is fully charged?
No, the charging light will remain a constant color as long as a
headset is placed in the charging cradle. We recommend keeping
the headset in the charging cradle when not in use. The headset
cannot be overcharged, so leaving it in the charging cradle when
you are not using it will not damage the headset.
What is the lifetime of the batteries?
The rechargeable battery is designed to last between 1 - 2 years
depending on usage.
What does 2.3MHz mean?
2.3MHz is the frequency of the infrared signal that is sent by the
transmitter to the headset. Infrared signals are invisible light
signals and are not disturbed by electrical storms.
18
Page 21

Warranty Information
5 Year Limited Warranty
This 5 year limited warranty will cover defects in manufacturing
and product failure for a period of ve years after the original
purchase date. If your product fails or breaks for any reason
within 180 days of the original purchase it will be replaced with
a new product of the same model at no charge. If your product
fails or breaks after 180 days of the original purchase date and
up to ve years after original purchase date it will be replaced
for 50% off manufacturers suggested retail price (MSRP) with a
new product of the same model. If the model you purchased is
discontinued you will receive a new or similar model. Perishable
items such as ear tips and batteries are not covered under this
warranty. Shipping charges are also not covered under this
warranty.
Repairs or alterations performed by non-authorized TV Ears
representatives will void the warranty and may damage the
equipment. Also, if the TV Ears product is taken outside of the
US the warranty becomes void.
This warranty is provided at the discretion of TV Ears, Inc. and
does not cover cosmetic damage or damage due to acts of
nature, accident, misuse, abuse, negligence, commercial use, or
modication of or to any part of the product.
19
Page 22
20
Manufacturer Declarations
TV Ears Declaration
All content, marks, and brand logos are property of TV Ears, Inc.
TV Ears, Inc. reserves the right to change product content and
product specications without notice.
CE Declaration of Conformity
TV Ears is in compliance with the essential safety requirements
and other relevant provisions of Standard IEC 60065:2001 +
Ammd 1:2005 / EN 60065:2002 and Directive 2004/108/EC;
2006/95/EC, 89/336/EEC, 92/31/ EC, 93/68/
EEC. Before putting the device into operation,
please observe the respective country specic
regulations.
Rechargeable Batteries
The supplied rechargeable batteries can be recycled. In order to
protect the environment, only dispose of exhausted rechargeable
batteries at a proper recycling facility. Do not dispose of batteries
in trash.
WEEE Declaration
TV Ears products are developed and manufactured with high
quality materials and components that can be recycled and/or
reused. This symbol indicates that electrical
and electronic equipment must be disposed
of separately from normal waste at the end of
its operational lifetime. Please dispose of this
product by bringing it to your local collection
point or recycling center for such equipment.
This will help protect the environment.
Page 23

21
Technical Specifications
Headset Specications
Operating Time - Up to 6 hours on a full charge
Power Supply - NiMH (Nickel Metal Hydride) rechargeable
Max SPL - 125 dB
Weight - 2 oz (57g)
Height - 8 in (20.32 cm)
Transmitter Specications
Audio Microphone Connection - Optical Digital/Coaxial
Digital/RCA Analog/Mini Headphone Analog
Dimensions (H x W x D) - 1.4” x 4.12” x 3.625” (3.6cm x
10.5cm x 9.2cm)
Power Supply - DC Switching Power Supply 12v, 400mA
Weight - 3.25 oz (93g)
Overall System Specications
Audio Frequency Response - 20-20,000 Hz
Digital Connectivity - Dolby, SRS, and PCM product
compatibility
Carrier Frequencies - 2.3 MHz
Modulation - Infrared Mono
THD - <1%
Page 24
22
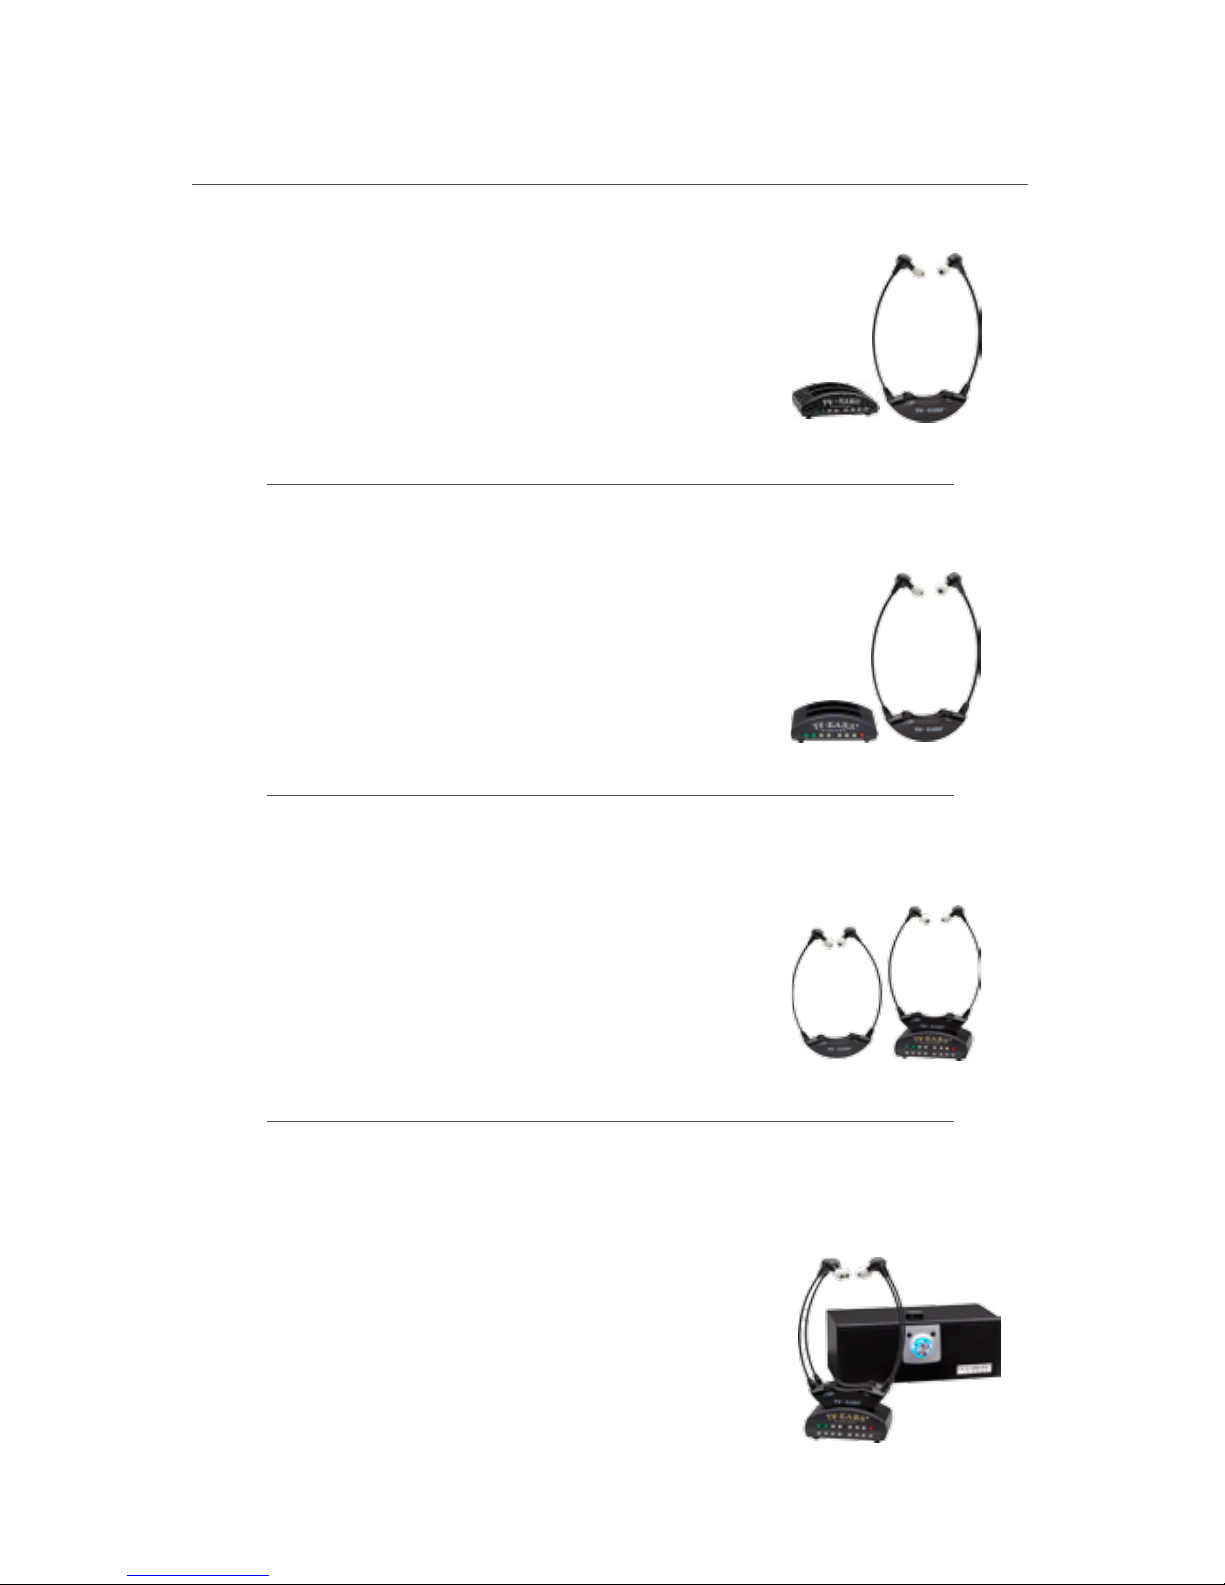
TV Ears 5.0 Product Line
TV Ears 5.0 Analog
Item Number - 11641 | MSRP $129.95
This is our basic television listening system
with analog connectivity. Includes one 5.0
Headset and one Analog Transmitter.
TV Ears 5.0 Digital
Item Number - 11741 | MSRP 229.95
This is our mid-level television listening
system with analog and digital connectivity.
Includes one 5.0 Headset, one Digital
Transmitter, and accessories.
TV Ears 5.0 Dual Digital
Item Number - 11841 | MSRP $299.95
This is our advanced television listening
system with analog and digital connectivity.
Includes two 5.0 Headsets, one Dual Digital
Transmitter, and accessories.
TV Ears 5.0 Dual Digital with Speaker
Item Number - 11941 | MSRP $399.95
This is our advanced wireless speaker system
with analog and digital connectivity. Includes
one 5.0 Headset, one Wireless Speaker, one
Dual Digital Transmitter, and accessories.
Page 25

Contact Information
Central and Eastern Canada
TV Ears Canada
1221 Barton Street
Stoney Creek, ON L8E 5G9
800-263-4864 - Sales and Service
905-643-0001 - Fax
[email protected] - Email
www.tvears.ca - Website
Western Canada
AuraTech Canada Inc.
968 Milner Avenue
Victoria, B.C. V8X 3N4
800-239-6690 - Sales and Service
250-479-3982 - Fax
[email protected] - Email
www.auratech.ca - Website
Register Your Product Online at
http://www.tvears.ca/Warranty_Registration.php
 Loading...