

TUV FirstBIKE Instruction Manual
Instruction manual
1. Assembly
FirstBIKE must be assembled carefully and correctly,
if necessary by a trained person or by a bicycle dealer.
Detailed assembly instructions are on pages 2 and 3.
2. Information about the vehicle
This vehicle for children from 2 - 5 years has been approved by TÜV Product Service (Germany)
on the basis of the European Safety Standard 71-1 2006. ”FirstBIKE“ complies with the strict
requirements of this toy standard, in that minimal risk is associated with the correct use of this toy.
The height of the seat is easily adjustable, without tools, to the siz
e of the rider. The adjustment
range of the seat is as follows:
- without lowering-kit: 335 mm to 435 mm
- with lowering-kit (optional accessory): 295 mm to 395 mm
After each adjustment of the height of the seat, the black star knob for fastening the seat post must
be tightened securely, so that the seatpost cannot slip when in use. Use both hands if necessary. The
seat height must always be adjusted precisely to the size of the rider: when the child is seated, both
feet must be flat on the ground.
Because the FirstBIKE frame is made of lightweight polyamide with 30% fibreglass, the bike is very
light - without brake only 3.5 kg and with brake 3.9 kg.
FirstBIKE is constructed with an ”anti-jackknife“ steering stop, which prevents the handlebar from
making a full turn. This safety feature reduces the possibility of falling, but can not entirely prevent
it. However, it must be noted that children‘s temperament and urge for physical activity may create
unforeseen situations and riding behaviour, for which the manufacturer can not be held responsible.
3. Maintenance
All parts must be checked regularly, although FirstBIKE will not require much maintenance under
normal circumstances. After extensive outdoor use, special attention should be paid to cleaning
the following parts:
- contact area between frame and seatpost
- contact area between frame and front fork.
FirstBIKE can be cleaned with an ordinary water-soluble detergent. Never use any kind of solvent
or similar aggressive cleaning product. Tyre pressure must be checked regularly. See tyre for
recommended/max. tyre inflation pressure: max. 2.5 bar (35 psi)!
4. FirstBIKE rear wheel drum-brake system - ”Safety-Stop“
The models with brake are suitable for children from the age of about 3 years. Please note that your
child, depending on their stage of development, will not be able to operate the brake effectively and
consciously until the age of about 3 years.
Mastering the use of the brake in any given hazardous situation is necessary for the brake to be
efficient. Parents should teach their child how to use the brake, until the child has acquired the
appropriate braking skills.
Different surfaces and traction, and varying hazardous situations require the controlled application of
braking power. The early mastering of braking techniques will be a great advantage when progressing
to a pedal cycle.
The brake should be checked regularly and adjusted as necessary (steps D & E).
Do not apply oil to the brake cable, as it has Teflon housing.
www.firstbike.com
3
2
1
4
6
7
10
A
B
C
D
E
9
5.
Assembly Instructions
FirstBIKE ”STREET“ or FirstBIKE ”CROSS“
These models have no reflective stripe on the tyre.
Contents of assembly kit bag:
No. Qty. Description
(3) 1 pc. Axle for headset D = 12 mm
(4) 1 pc. Plastic cover for headset
(5) 1 pc. Adhesive sticker for handlebar
(6) 1 pc. Wheel bolt (front) M 8 x 120 mm
(7) 1 pc. Self-locking nut M 8
(8) 1 pc. 6 mm Allen wrench (for the wheel bolt)
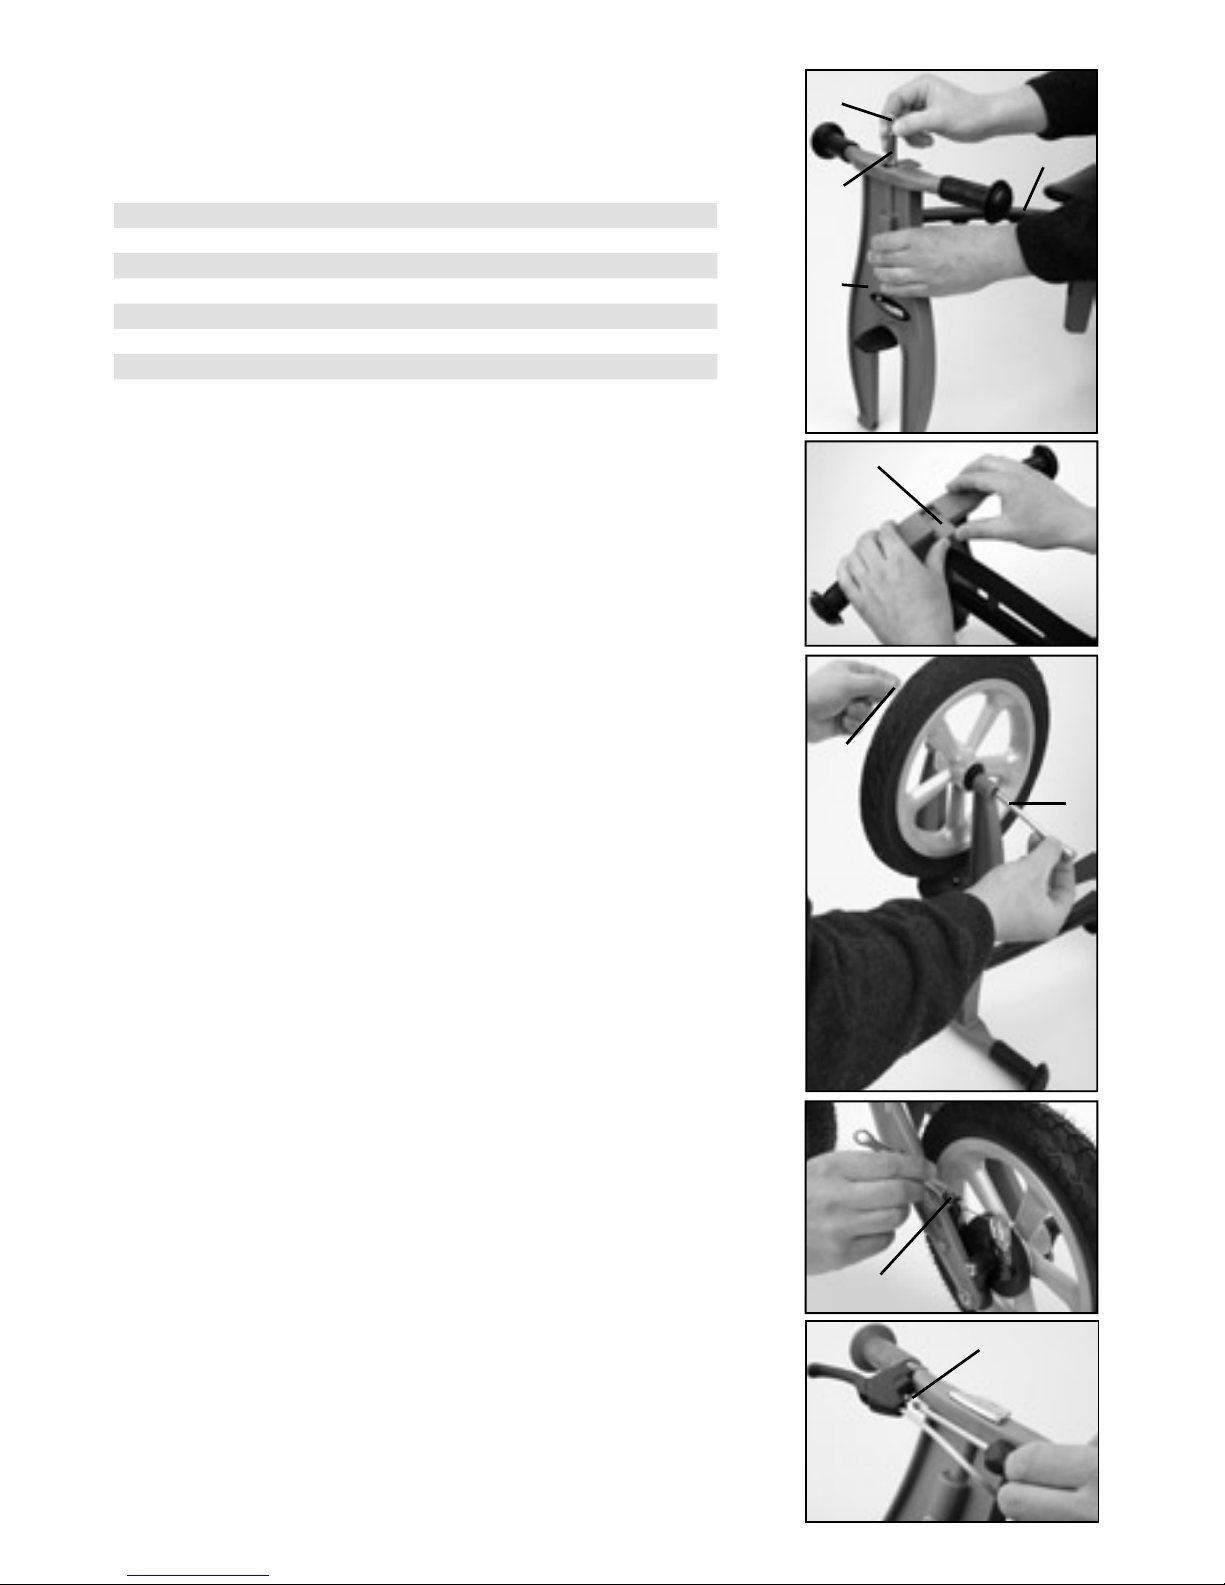
Assembly procedure:
A First, hold the front fork (1) and the frame (2) together
at the headset.
Insert the axle (3) into the headset from the top. It must
be inserted completely. It may help to put the wheel
bolt (6) in the axle and to tap gently with a hammer.
B The plastic cover (4) for the headset is used to close
the opening at the top of the headset. Insert and press
into the opening - if necessary, tap gently with a hammer.
Center and place the adhesive sticker (5) on the centre
of the handlebar.
Tip: When fitting the front wheel, turn the FirstBIKE
upside down so that it rests on the seat and handlebar.
C The bolt M 8 x 120 mm. (6) and the nut M 8 (7), are used
for securing the front wheel. The nut fits in the hexagonal
hole on the left side of the fork. Tighten the bolt securely,
using the 6 mm Allen wrench (8)!
The brake adjustment for models with safety-stop
drum-brake system must be checked.
D
Adjust the brake cable tension with the adjustment
screw (9) so that the brake does not rub or engage
when the brake is off.
E By adjusting the brake lever screw (10), the distance
between the handlebar and the brake lever can be reduced
(for small hands).
Recommended tyre pressure
for FirstBIKE ”STREET“ or ”CROSS“
front wheel: 1.5 bar rear wheel: 2.0 bar
6
 Loading...