

Tuuci Equinox INSA6000, equinox Assembly Instructions Manual
Equinox MANUAL
BLACK & WHITE 1 COLOR
BLACK
single unit assembly instructions
INSA6000
ASSEMBLY & OPERATING INSTRUCTIONS EQUINOX
GENERAL INSTRUCTIONS FOR SINGLE UNITS
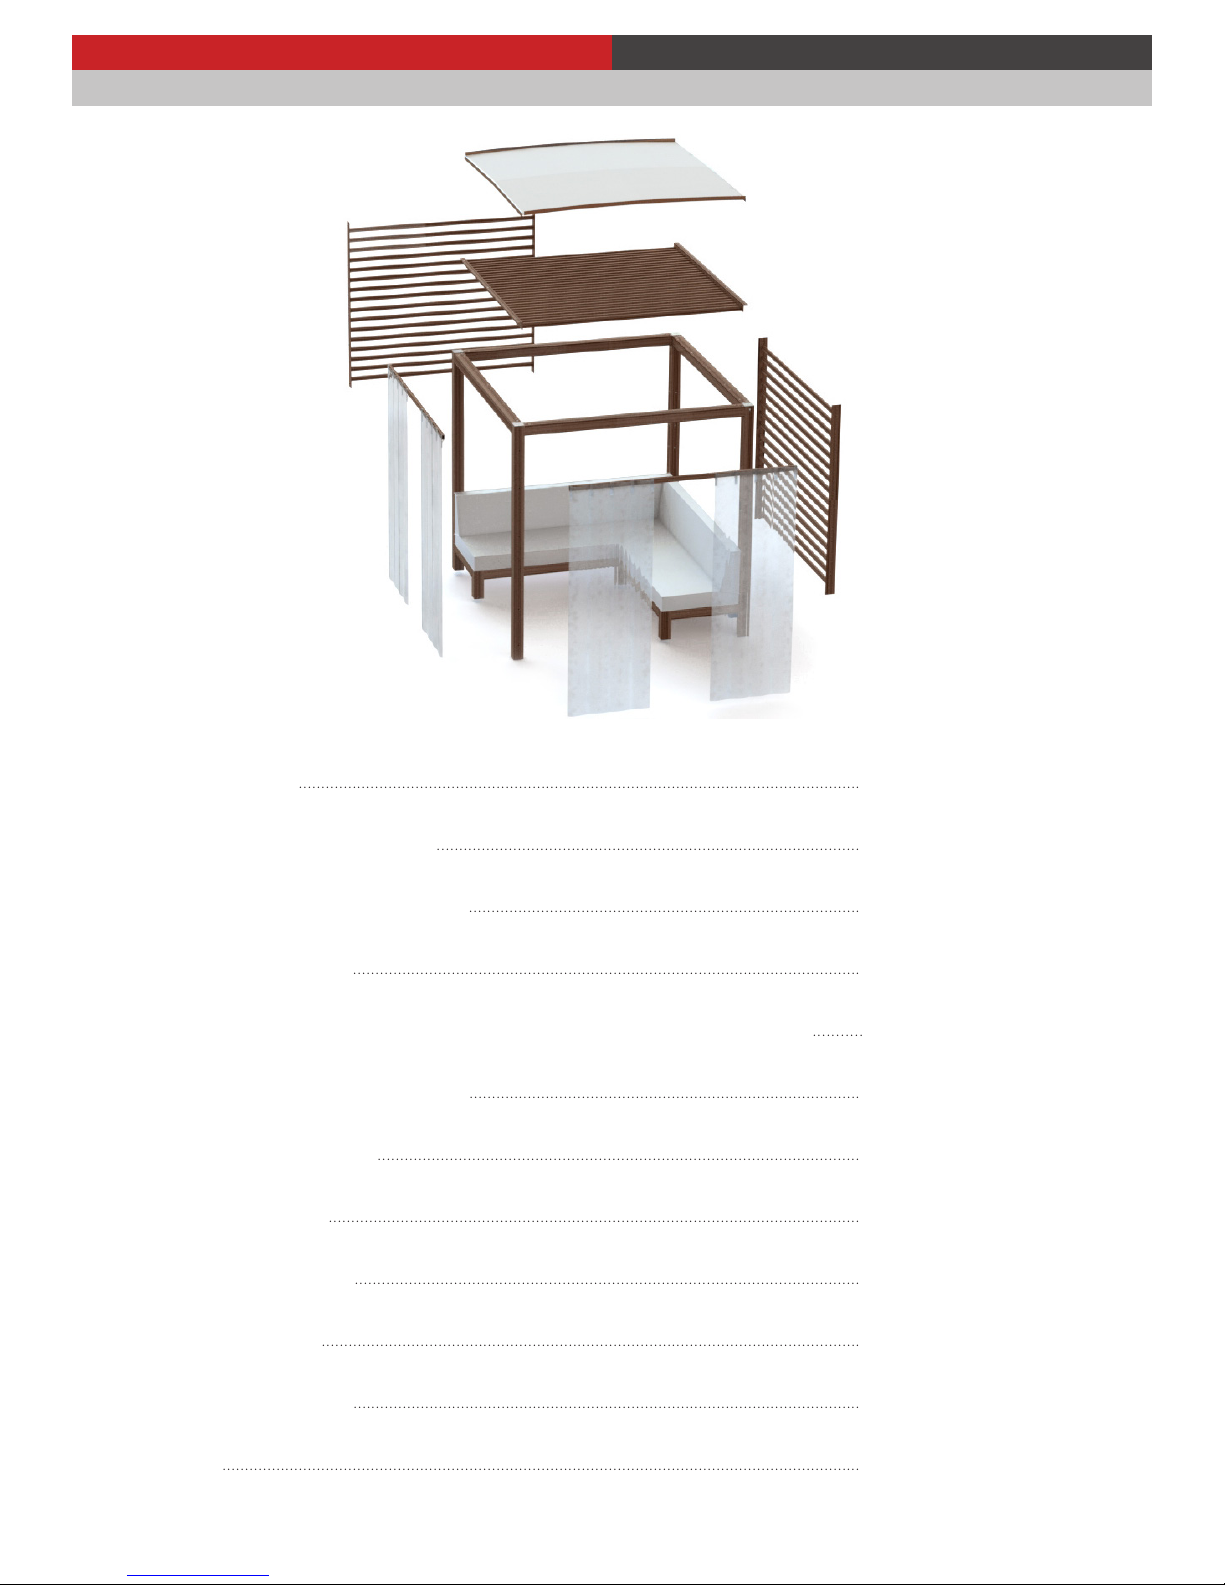
Contents
Base installation page 3
Columns and beams structure pages 12-14
End cap bracket and beauty cover pages 14-15
Trellis roof installation pages 17-18
Hard top fabric roof for square and rectangle (excluding 12’ square) pages 19-21
Hard top fabric roof for 12’ square pages 22-24
Single Bench installation pages 25-28
L-Bench installation pages 29-33
Trellis wall installation pages 33-34
Curtain installation pages 35-36
Care and Maintenance page 37
Warranty page 38
INSA6000
|
2
tuuci
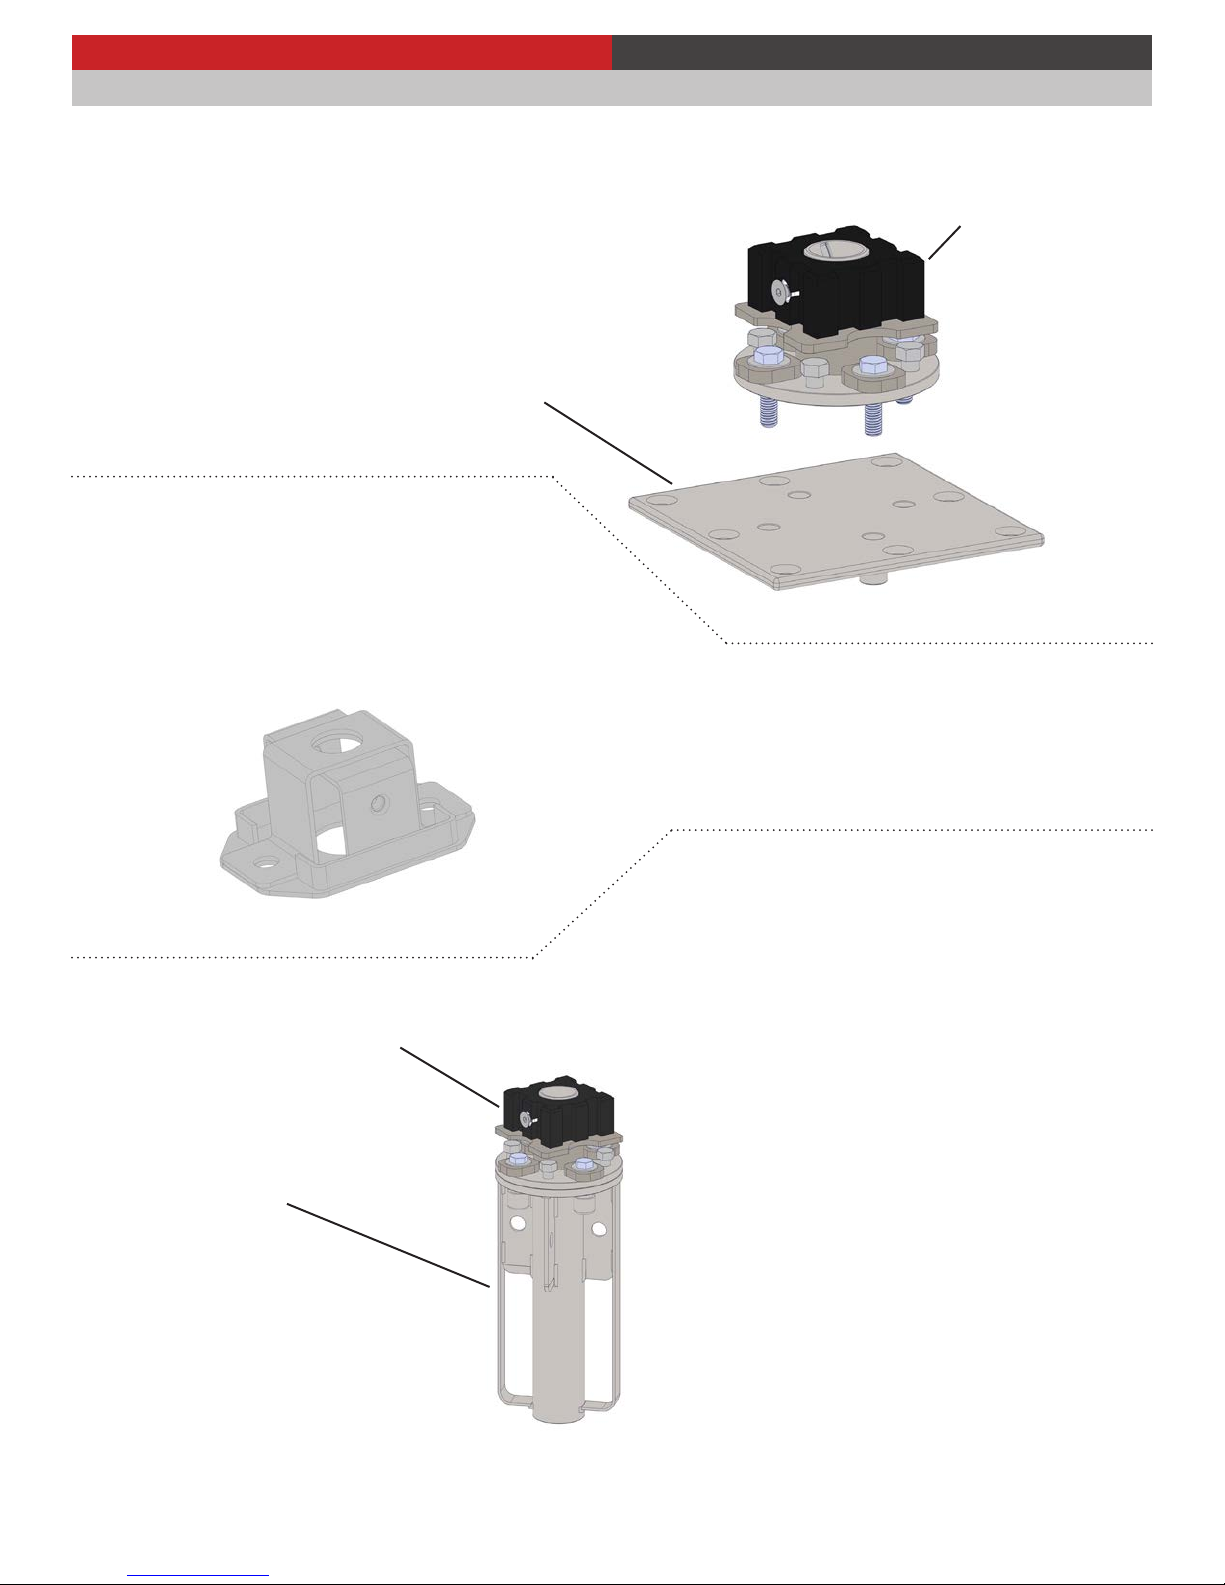
ASSEMBLY & OPERATING INSTRUCTIONS BASE OPTIONS
LEVELING BASE & END CAP INSTALLATIONS
FOR CABANAS WITH 9x9 PLATES
AND LEVELING BASE OPTIONS
BASE MUST BE INSTALLED PRIOR
TO ASSEMBLING THE CABANA
SEE PAGE 4
9x9 Plate
Leveling Base
FOR END CAP BRACKETS - SEE PAGE 15
Leveling Base
IGSM
FOR CABANAS WITH IGSM
AND LEVELING BASE OPTIONS
BASE MUST BE INSTALLED PRIOR
TO ASSEMBLING THE CABANA
SEE PAGE 9
INSA6000
|
tuuci
3
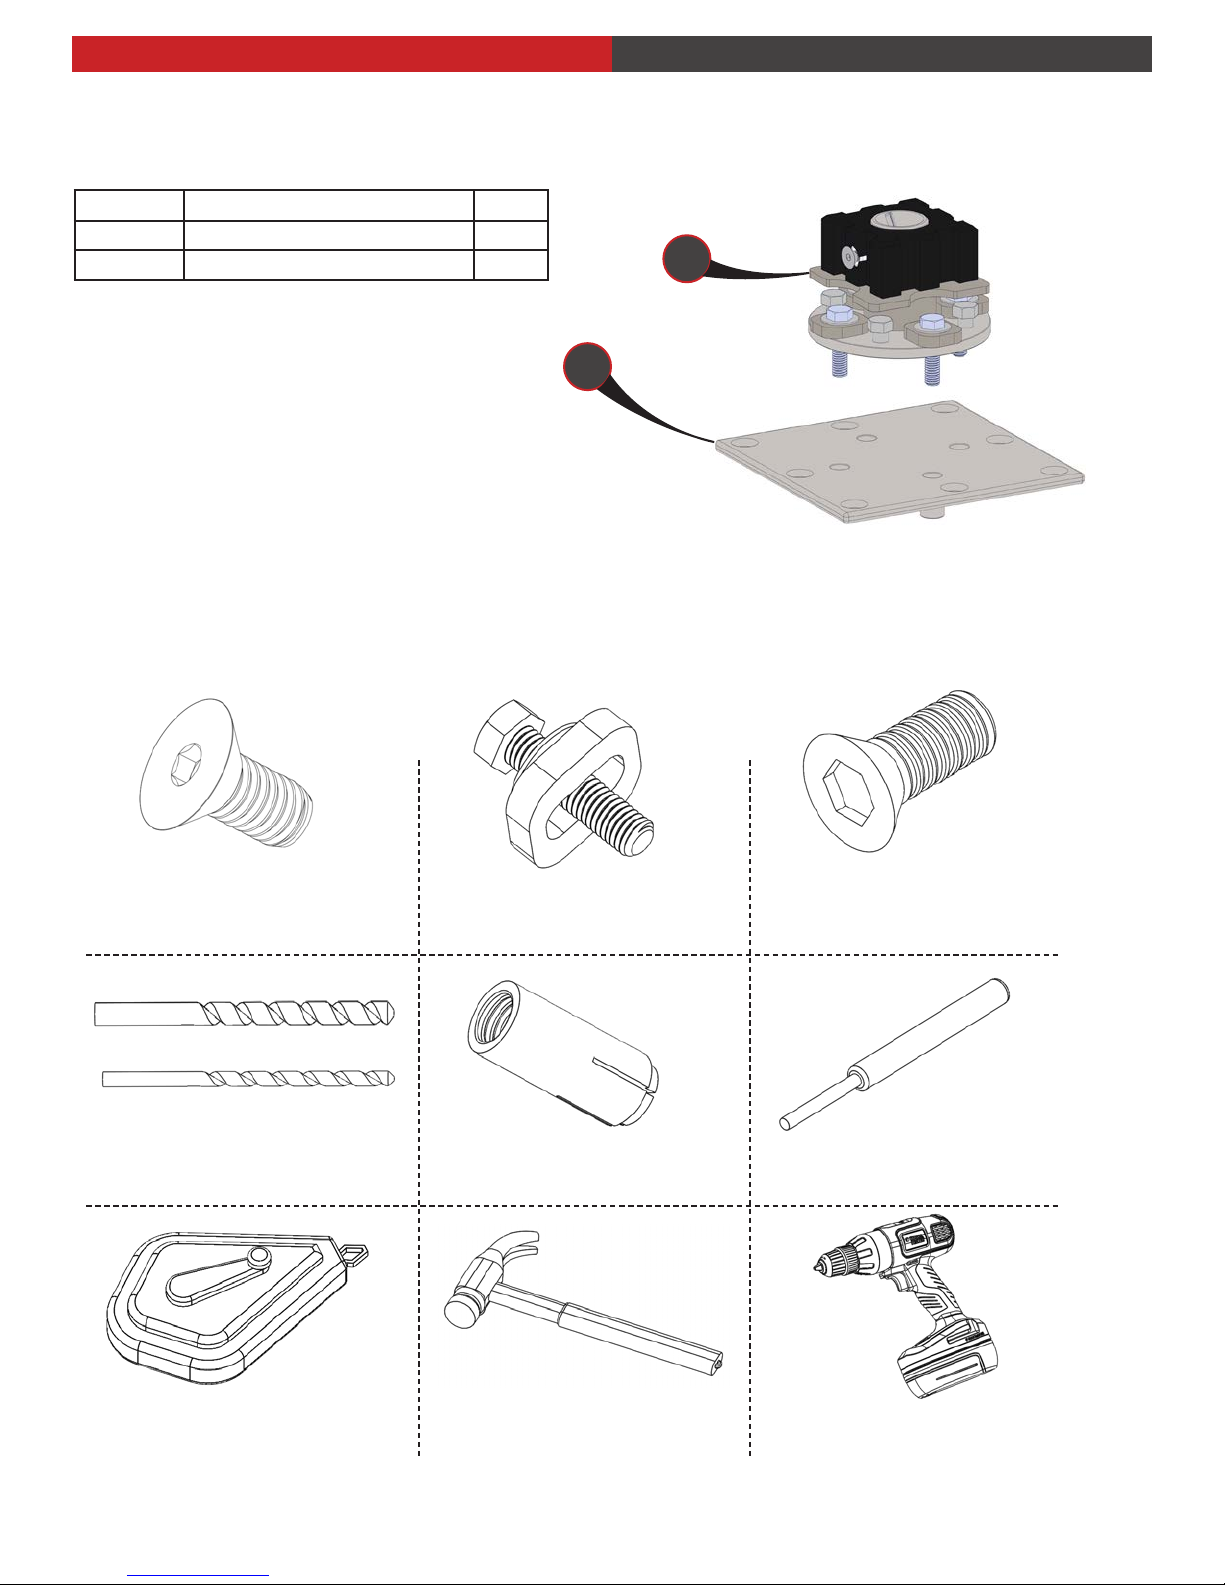
ASSEMBLY & OPERATING INSTRUCTIONS STEM w/9”x9” PLATE
ITEM NO DESCRIPTION QTY
1 9”X9” Stainless steel base plate 4
2 Leveling base 4
2
1
Hardware and tools required [images are not to scale]
3/8-16” x 3/4” Flat socket
Qty: 2 pieces (per column)
Drill bits 5/8” & 1”
Not included
Recommended: Chalk line reel
Not included
1/2”-13 x 2” Hex tap bolt
washer / lock washer
Qty: 4 pieces (per base)
Expansion anchor
Qty: 8 pieces (per base)
Recommended: Hammer
Not included
Counter-sunk bolt
1/2” x 1-1/4”
Qty: 8 pieces (per plate)
Anchor punch 1/4”
Qty: 1 piece
Recommended: Drilling Gun
Not included
INSA6000
|
4
tuuci
continued on next page

INSTALLATION INSTRUCTIONS STEM w/9”x9” PLATE
Step 1
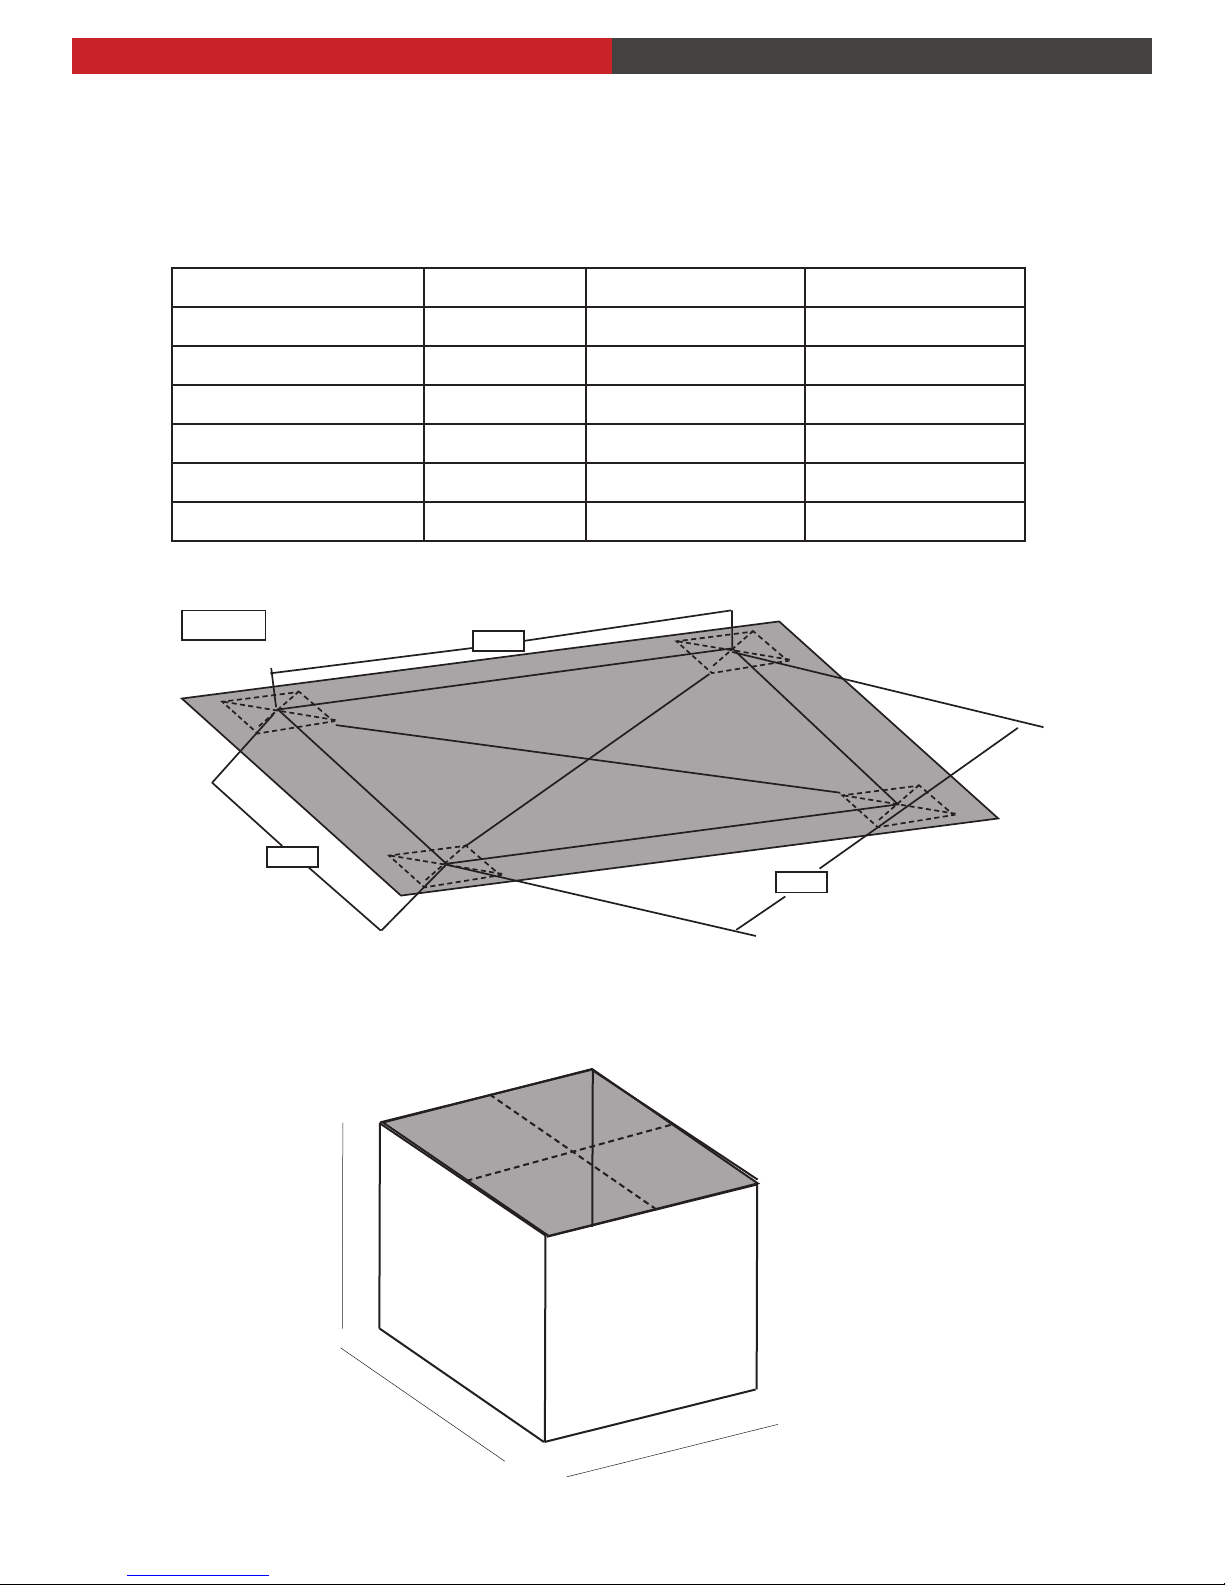
Once you have located the correct dimension from the table below, mark the CENTER locations
for each column and their diagonal dimensions. Using the chalk line (not included), trace the line
from center of each mark.
Attention: accuracy in diagonal dimensions are crucial to ensure proper aligment of cabana.
EQUINOX CABANA SIZE DIM A DIM B DIM C
8’ SQUARE 92” / 233.7cm 92” / 233.7cm 130” / 330 cm
10’ SQUARE 116” / 294.6 cm 116” / 294.6 cm 164” / 416 cm
12’ SQUARE 140” / 355.6 cm 140” / 355.6 cm 198” / 503 cm
8’ X 10’ RECTANGLE 92” / 233.7 cm 116” / 294.6 cm 148” / 376 cm
8’ X12’ RECTANGLE 92” / 233.7 cm 140” / 355.6 cm 167.5” / 425 cm
10’ X 12’ RECTANGLE 116” / 294.6 cm 140” / 355.6 cm 181” / 460 cm
FIG A
DIM A
DIM B
DIM C
Step 2
Turn 9”x9” plate over and place on the oor aligning the holes perpendicular to the chalk lines,
as shown in Figure A. Using the 9”x9” plate as a template mark each hole. Reference Figure B.
9”x9” SS base plate
FIG B
continued on next page
INSA6000
|
tuuci
5

INSTALLATION INSTRUCTIONS STEM w/9”x 9” PLATE
Step 3:
Use a 5/8” diameter drill bit and drill 2-1/4”
deep for the 8 parameter holes.
Step 5:
Clean holes from debris and place anchors in
each hole making sure anchor is below the
surface. Use the anchor spike to set the
anchors in place.
Step 4:
Use a 1” diameter drill bit and drill 1-1/2”
deep for the 4 inner holes.
anchor spike
INSA6000
|
6
tuuci
continued on next page
INSTALLATION INSTRUCTIONS STEM w/9”x9” PLATE
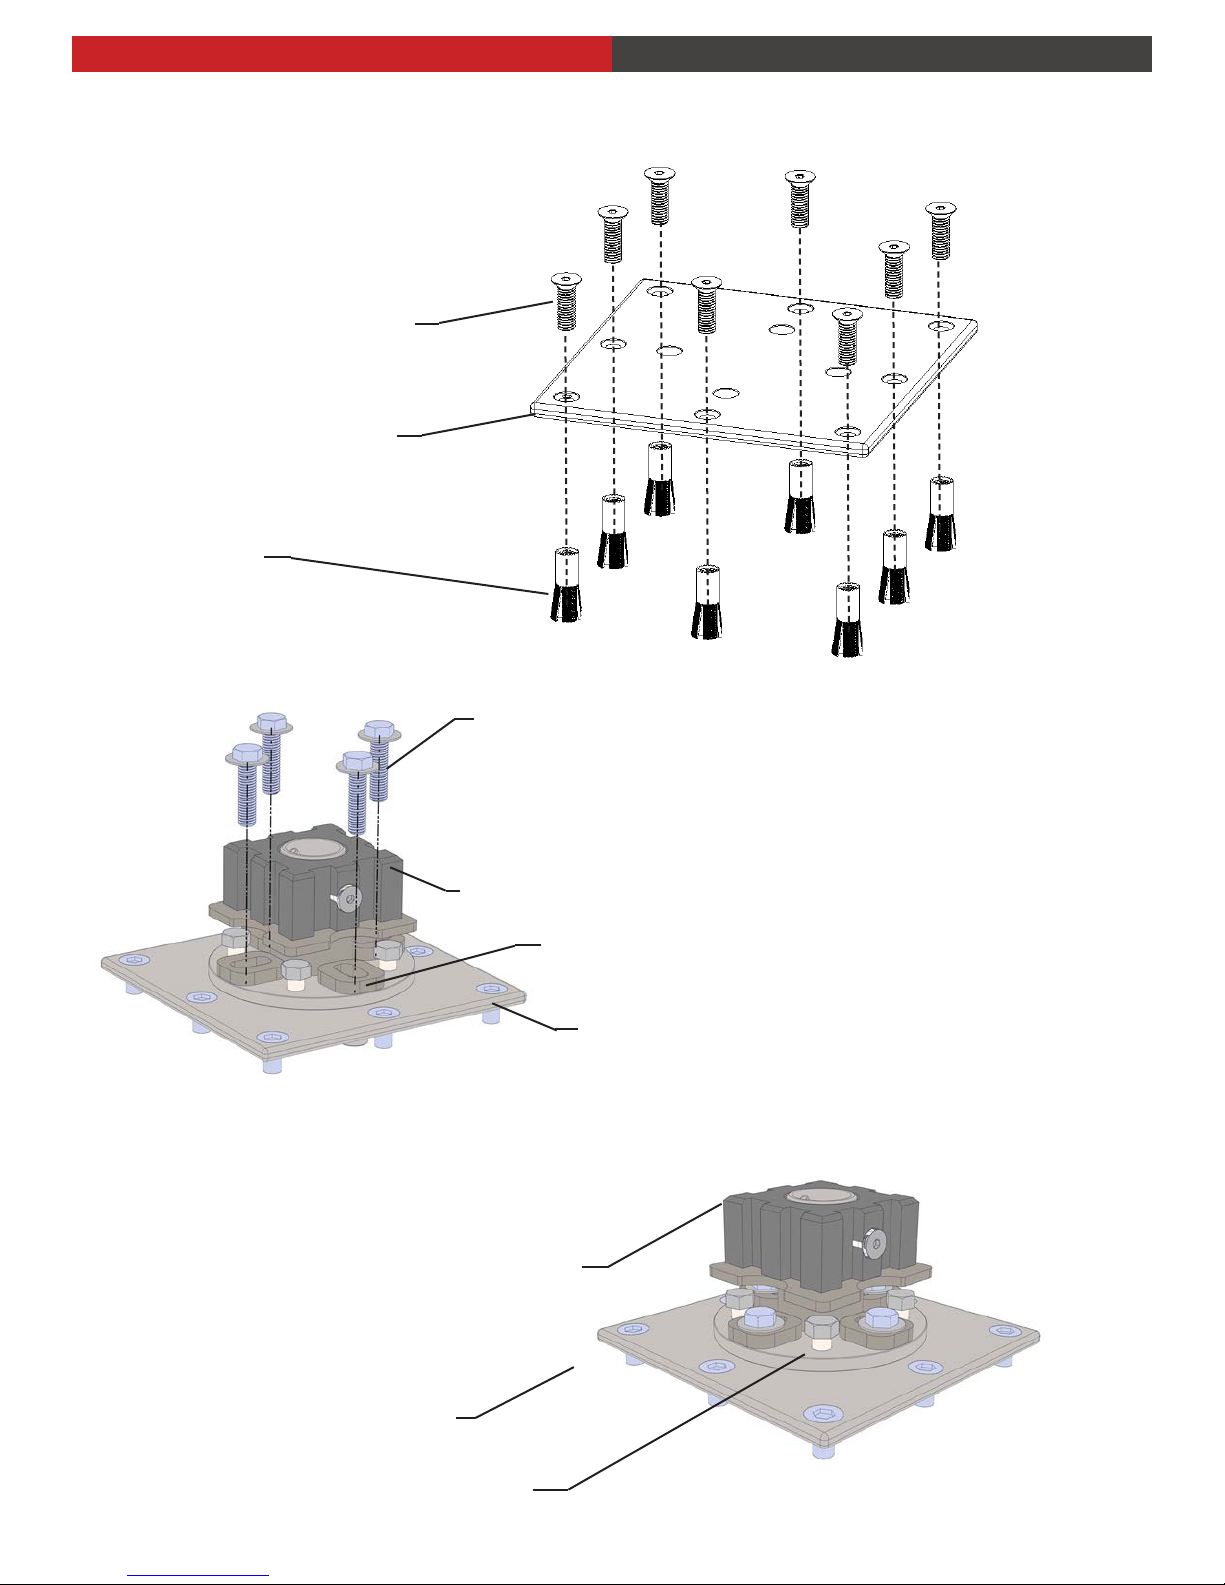
Step 6:
Install 9”x9” base plate by using 1/2” x 1-1/4”
counter sunk bolt and tighten securely.
1/2”x1-1/4”
counter-sunk bolt
9”x9” base plate
anchors
ss 1/2”-13x2” hex tap bolt
Step 7:
Place the security base stem on the 9”x9” base
plate and insert the 4 hex bolts 1/2” into the
9”x9” base plate through the oval washers.
security base stem
ss oval washer
9”x9” base plate
Step 8:
Using the level tool (not included), adjust security
base stem with the leveling bolts.
security base stem
9”x9” base plate
leveling bolt
continued on next page
INSA6000
|
tuuci
7

INSTALLATION INSTRUCTIONS STEM w/9”x9” PLATE
Step 9:
Install columns as illustrated.
column
beauty cover
security leveling base
orient stem through hole with
column through hole mount
INSA6000
|
8
tuuci
3/8-16” x 3/4” at-head socket
cap screw
INSTALLATION INSTRUCTIONS STEM w/IGSM BASE
Step 1
Once you have located the correct dimension from the table below, mark the CENTER locations
for each column and their diagonal dimensions. Using the chalk line (not included), trace the line
from center of each mark.
Attention: accuracy in diagonal dimensions are crucial to ensure proper aligment of cabana.
EQUINOX CABANA SIZE DIM A DIM B DIM C
8’ SQUARE 92” / 233.7cm 92” / 233.7cm 130” / 330 cm
10’ SQUARE 116” / 294.6 cm 116” / 294.6 cm 164” / 416 cm
12’ SQUARE 140” / 355.6 cm 140” / 355.6 cm 198” / 503 cm
8’ X 10’ RECTANGLE 92” / 233.7 cm 116” / 294.6 cm 148” / 376 cm
8’ X12’ RECTANGLE 92” / 233.7 cm 140” / 355.6 cm 167.5” / 425 cm
10’ X 12’ RECTANGLE 116” / 294.6 cm 140” / 355.6 cm 181” / 460 cm
FIG A
DIM A
DIM B
DIM C
Step 2
Design concrete slab with dimensions of 31.5” (80cm) x 27.6” (70cm) for each center marked
from step 1.
27.6” (70cm)
31.5” (80cm)
continued on next page
31.5” (80cm)
INSA6000
|
tuuci
9
ASSEMBLY & OPERATING INSTRUCTIONS STEM w/IGSM BASE
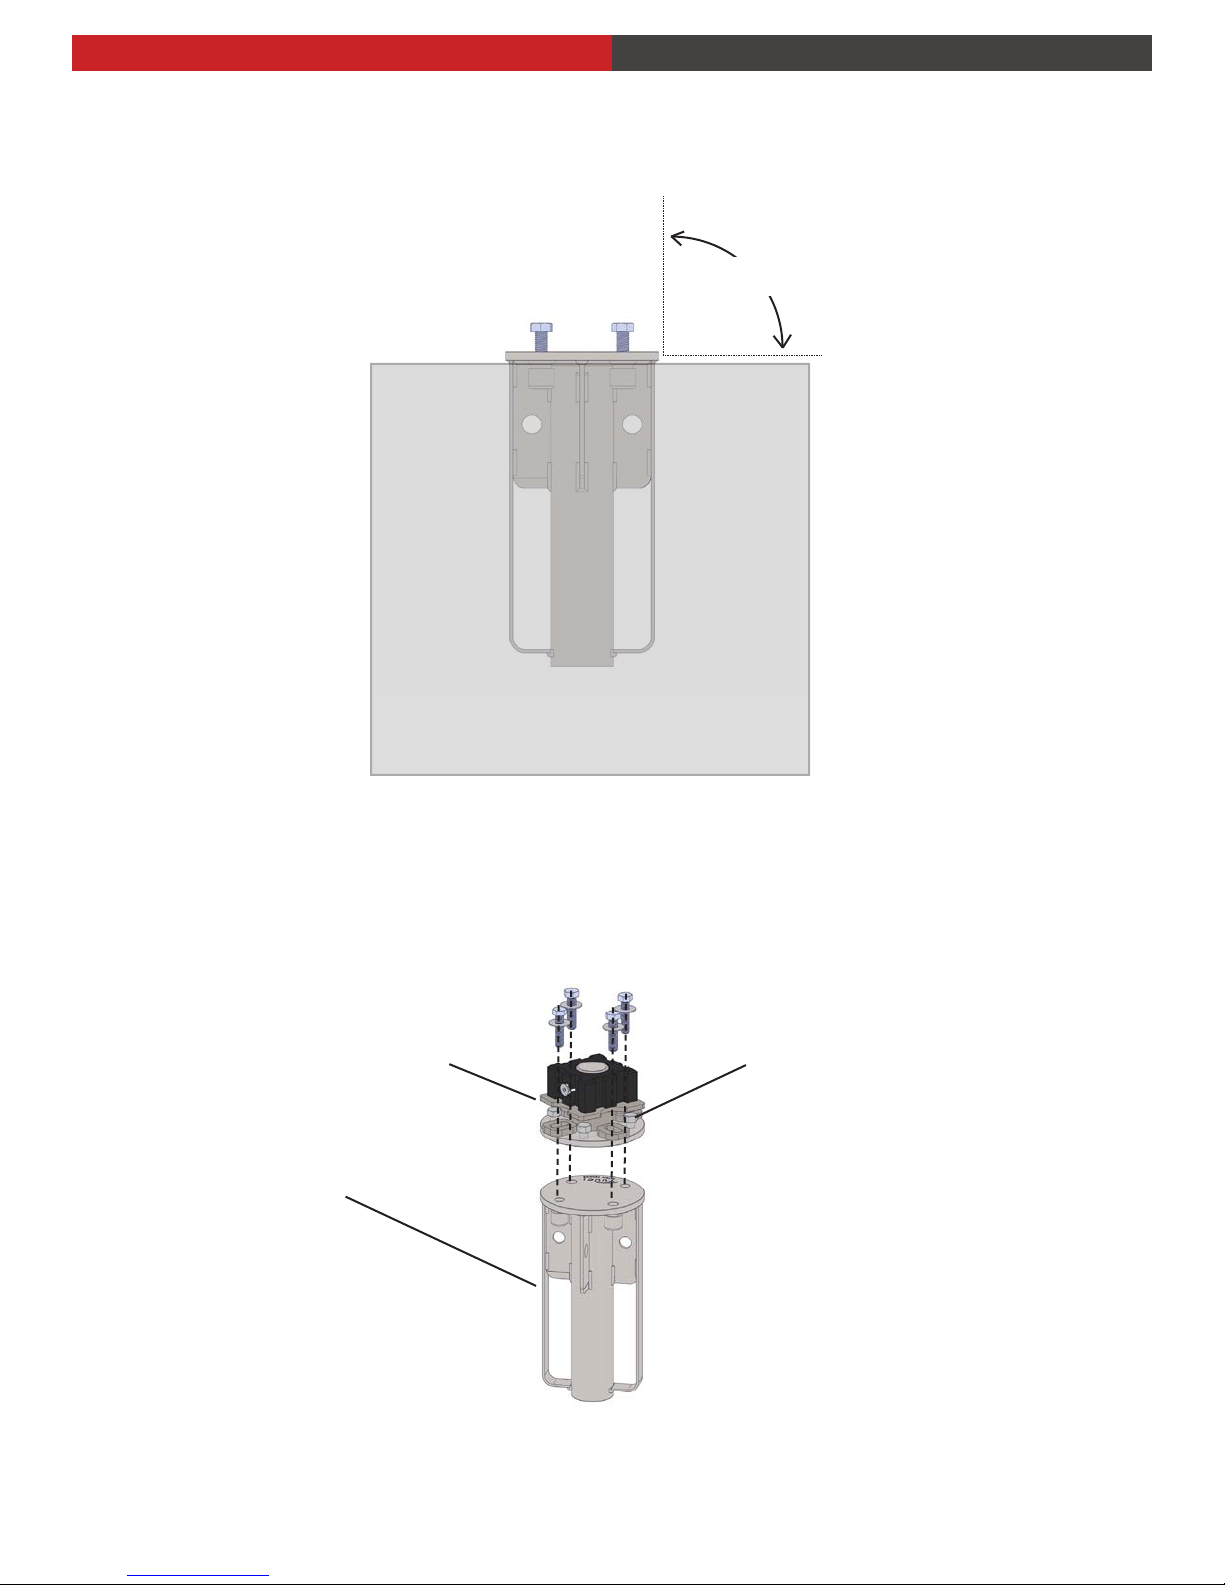
Step 3
After pouring concrete, insert in-ground base (IGSM) into the center of the concrete slab.
Make sure the top of the in-ground is flush and leveled with the top of the concrete.
90 degree
Step 4
Place the leveling base on the IGSM and mount with 1/2 inch bolts.
Adjust leviling base with the leveling bolts.
Leveling Base
Leveling Bolts
IGSM
INSA6000
|
10
tuuci
continued on next page
INSTALLATION INSTRUCTIONS STEM w/IGSM BASE
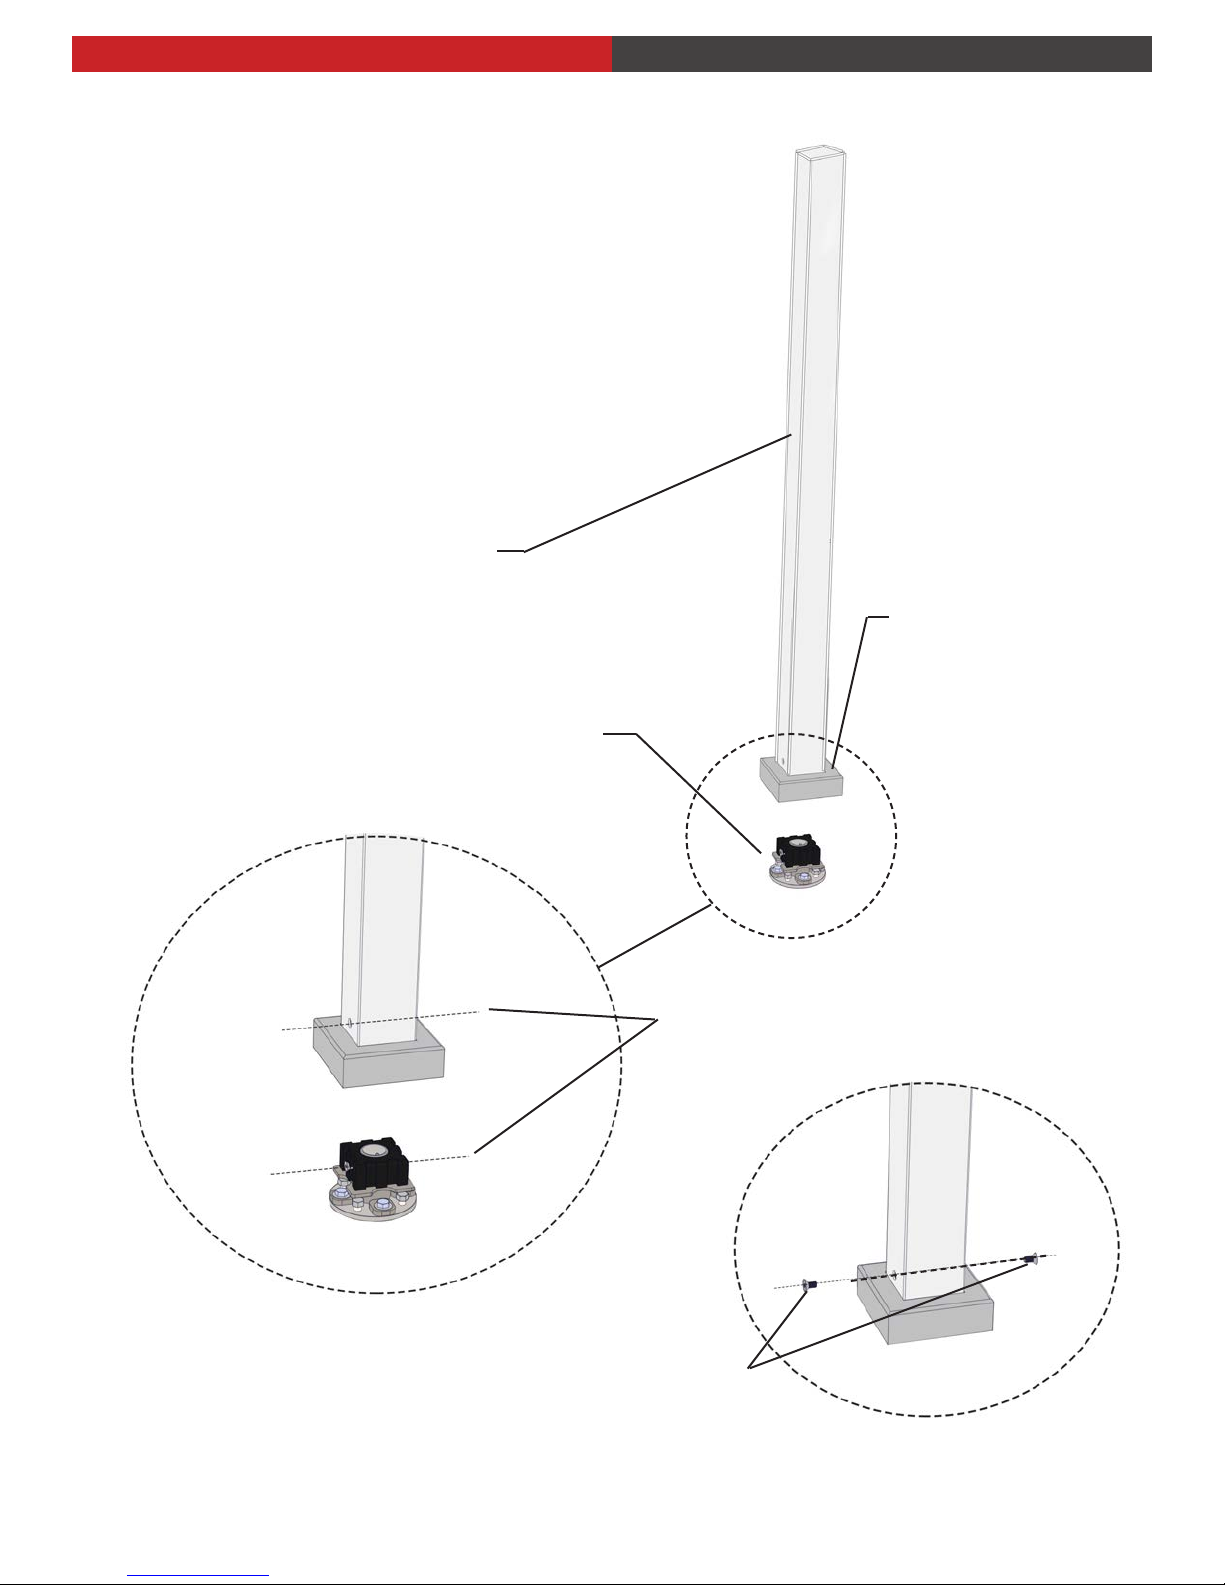
Step 5:
Install columns as illustrated.
column
beauty cover
security leveling base
orient stem through hole with
column through hole mount
3/8-16” x 3/4” at-head socket
cap screw
INSA6000
|
tuuci
11
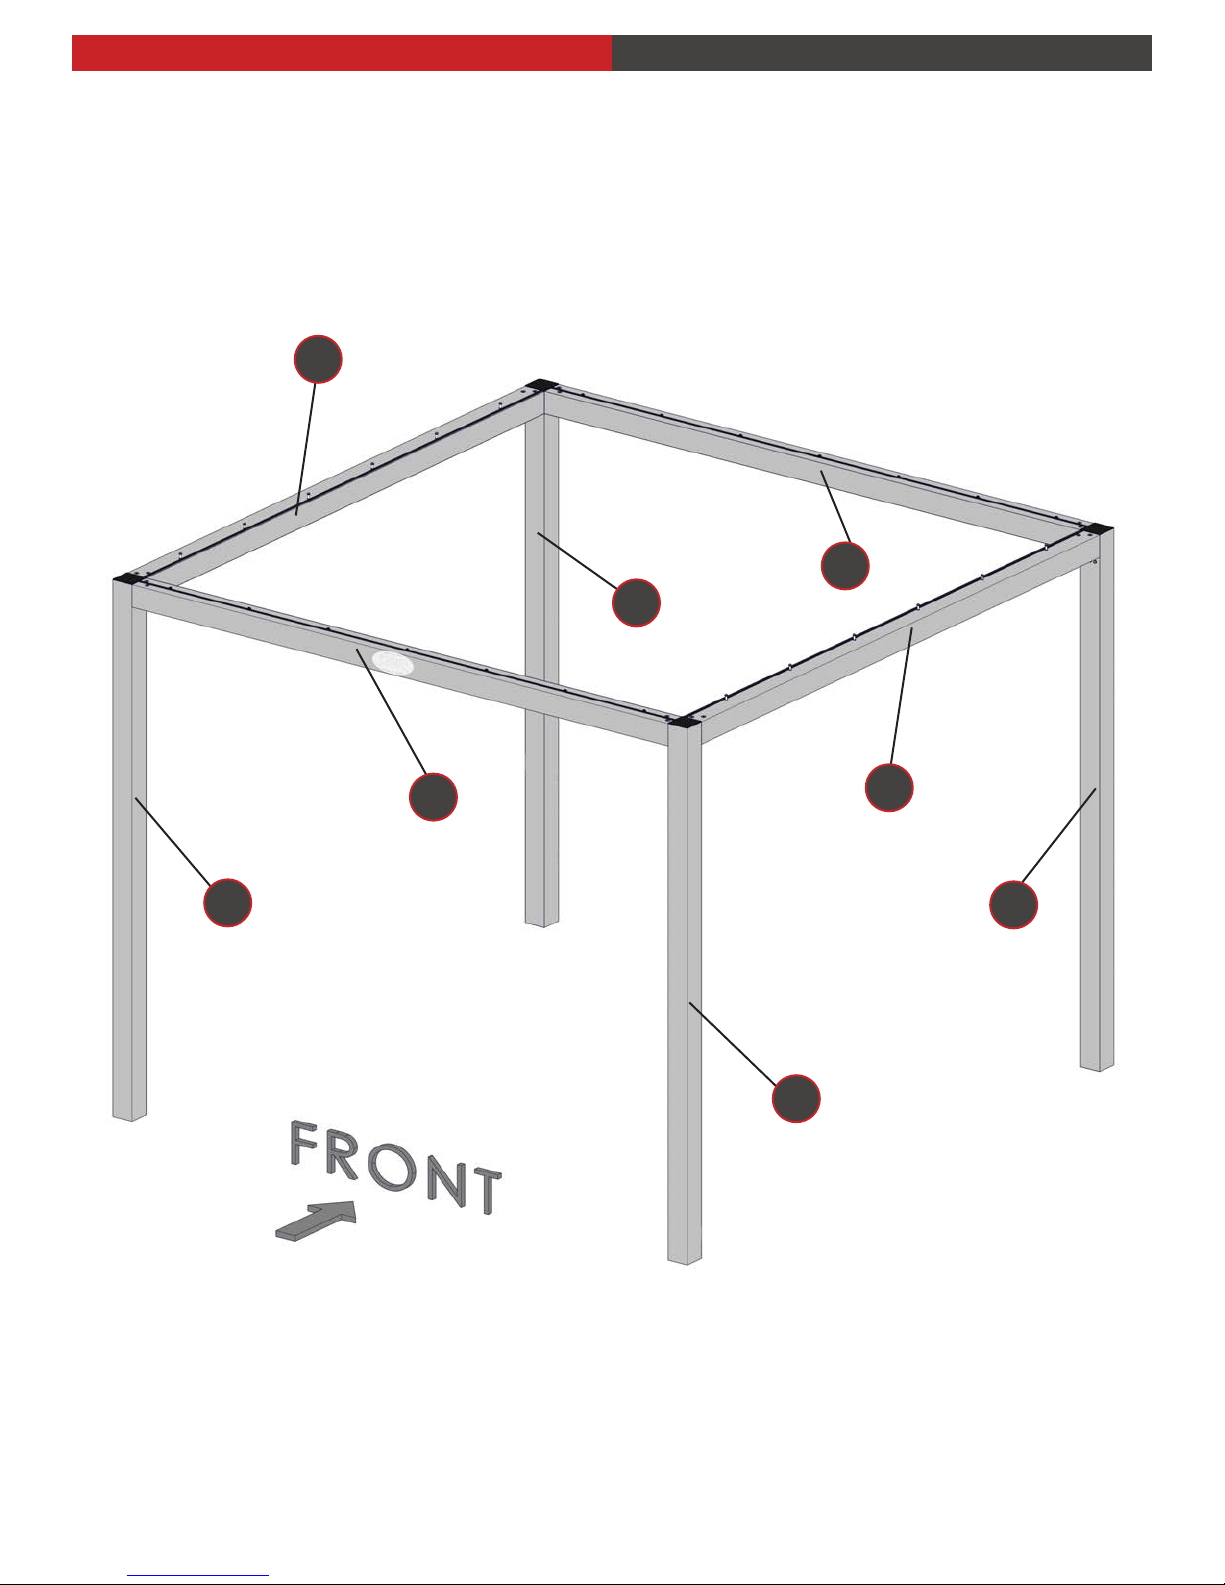
ASSEMBLY & OPERATING INSTRUCTIONS COLUMNS & BEAMS FRAME STRUCTURE
Note: columns and beams are labeled as followed
“B” - indicates Beam
“C” - indicates Column
B4
B1
C1
C4
B3
B2
C2
C3
INSA6000
|
12
tuuci
 Loading...