

Page 1
Edition 11/2001
21040 ORIGGIO (VA) - ITALY - Tel. +39.02.96.73.06.00 - Fax +39.02.96.73.18.56 - www.T-club.com
INSTRUCTION MANUAL
Page 2
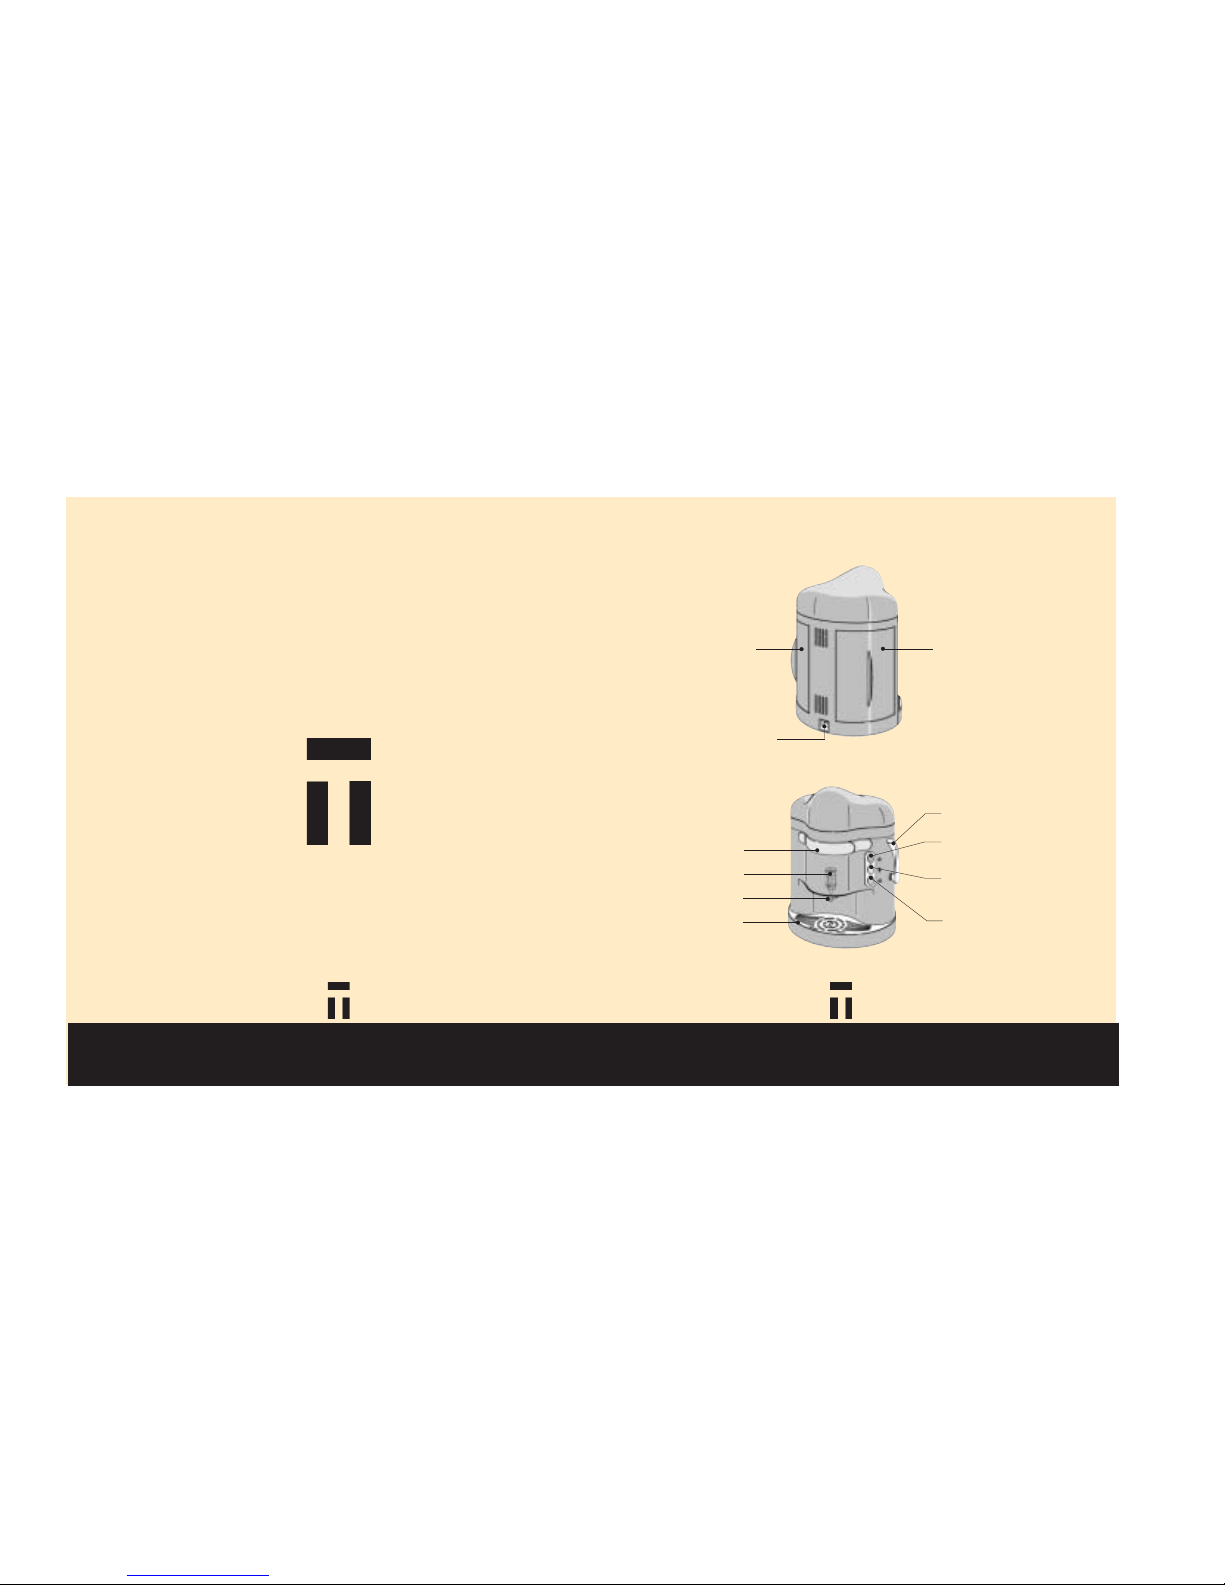
WATER RESERVOIR
USED CAPSULE RESERVOIR
POWER CORD INLET
START/STOP DISPENSING
BUTTON (GREEN LIGHT)
BREWING COMPARTMENT DOOR
OUTER SLEEVE
SPOUT DELIVERY
DRIP TRAY
BREWING CHAMBER CLOSING
LEVER
ON/OFF SWITCH (RED
LIGHT)
WATER HEATING INDICATOR
(ORANGE LIGHT)
Page 3
'
! "
#
$
%
"#
$% &
!
Page 4
% $
& '
'
!
# "
&
Page 5

6
TECHNICAL SPECIFICATIONS
Power supply 230V 50Hz
Power absorbed 900W
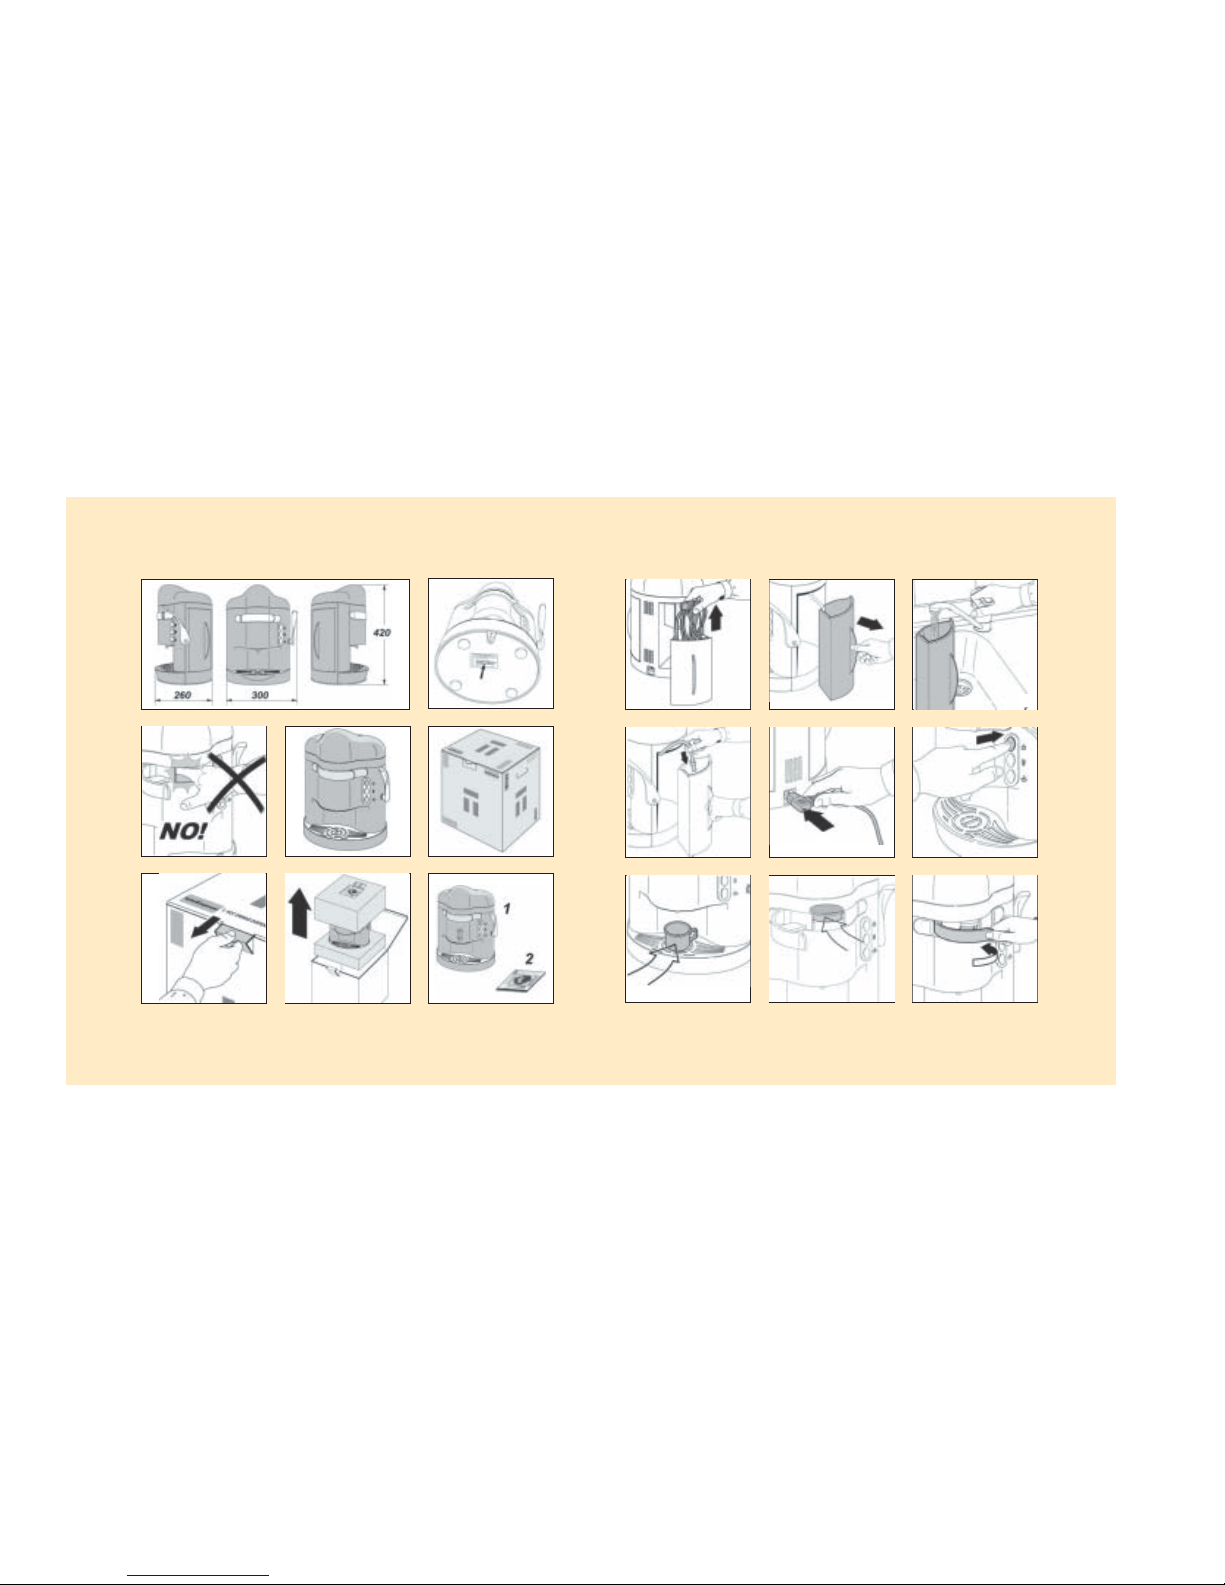
Dimensions (Fig. 1) Height 420 mm
Width 300 mm
Depth 260 mm
Net weight 12 Kg.
Water reservoir capacity 1.5 lt.
Used capsule res. capacity 10 mixed capsules (15 coffee capsules)
Drip tray capacity 750 ml
COPYRIGHT
© Tuttoespresso S.p.A. - All rights reserved.
This document contains confidential information, property of Tuttoespresso S.p.A.
The contents of this document may not be divulged to third parties, nor may be copied or
reproduced in any form, either entirely or in part, without prior written permission of
Tuttoespresso S.p.A.
Editor / Manufacturer: Tuttoespresso S.p.A.
Legal Office:
Via Trieste, 49 1 21042 Caronno P.lla (VA) Italy
Operative Office:
Via per Caronno, 23/25 - 21040 Origgio (VA) - Italy
Tel. +39 02 967.30.600 r.a.
Fax +39 02 967.31.856
TECHNICAL SPECIFICATIONS
23
WARRANTY
WARRANTY
Conditions de garantie de bon fonctionnement
1 T-machine is under warranty for one year from the date of purchase, according to the fiscal
document the retailer must provide indicating name of the reseller and date of the sale.
2 This warranty consists in replacement or repair free of charge of all the spareparts which are
faulty, due to default in the manufacturing process.
3 This warranty does not cover or accept liability for damage to the machine or its parts due to
the negligence of its operator(s), such as lack of the following the instructions for its use, the
environment in which it is placed, lack of carrying out the maintenance as this manual describes,
unauthorised persons carrying out maintenance and repairs on the machine, damage that results
from transport, or otherwise due to circumstances that cannot be associated with the
manufacturers manufacturing process. The aesthetic or generally removable parts are not covered
by this warranty except it can be proven that there was a defect in its manufacturing. Also
excluded are interventions concerning installing and connections to the power supply.
4 Excluded from this warranty are damages that come as a result of any improper use of the
machine. Non-domestic use of the machine (installing it in a bar, restaurant, community area
etc.) immediately voids this warranty.
5 The manufacturer declines all responsibility for eventual damages to the machine which could
be caused by, directly or indirectly, persons, objects, domestic animals, and specifically further
lack of following the instructions given in this manual for Installation and Maintenance
6 Cost and liability of transporting defective parts are the senders responsibility to bear.
Attention
Repairs may only be performed by qualified technicians, trained or approved by the manufacturer.
Its dangerous for unskilled or persons unapproved by the manufacturer to attempt repairing the
machine.
Page 6

22
STORING THE MACHINE
INDEX
TECHNICAL SPECIFICATIONS............................................................................................................................. 6
INTRODUCTION ................................................................................................................................................... 8
SAFETY STANDARD ............................................................................................................................................10
SAFETY WARNINGS ................................................................................................................................... 10
NOISE LEVELS ..............................................................................................................................................12
EXPECTED USE .................................................................................................................................................... 13
PRODUCT ...................................................................................................................................................... 13
HANDLING ........................................................................................................................................................... 14
UNPACKING .........................................................................................................................................................15
INSTALLATION AND USE .................................................................................................................................. 16
MAINTENANCE (ORDINARY AND PREVENTIVE) .........................................................................................19
MAINTENANCE OPERATIONS .................................................................................................................. 20
TROUBLE SHOOTING ......................................................................................................................................... 21
STORING THE MACHINE................................................................................................................................... 22
WARRANTY ..........................................................................................................................................................23
INDEX
7
STORING THE MACHINE
If the machine is not being used for long periods of time, it should be prepared for storage and
cleaned thoroughly.
Attention
These operations must be carried out without any power supplied to the machine.
Press the on/off switch button to OFF (without the red light lit) and remove the plug from the
wall socket.
Carry out all the Maintenance operations described in this manual.
Remove the plug from the wall socket.
Clean all the internal and external surfaces using a damp cloth.
If the original packaging is still available, it should be used to protect the machine from dust.
Alternatively, the machine can be covered with a suitable cloth.
Store the machine in a protected place with a temperature of no less than 5°C.
Lower temperatures can lead to the formation of ice in the heating block which can damage it.
Attention
When the machine is used again, repeat the instructions in chapter Installation and use.
Page 7

TROUBLE SHOOTING
21
TROUBLE SHOOTING
8
INTRODUCTION
INTRODUCTION
We would like to thank you for giving us your preference by buying T.
The Tuttoespresso model T is the machine for espresso coffee and soluble drinks designed by
Massimo Iosa Ghini that guarantees quality, flavour and reliability.
This publication will help you understand your machine; read it carefully and follow the advice
given.
This instruction manual gives all the details and instructions for operation and maintenance of
your machine.
All the information contained in this manual is for the purpose of obtaining the maximum performance from your machine in accordance with the intended use of the manufacturer.
This manual forms an integral part of your machine and must be kept close until it is dismantled.
To receive a new manual, should this one be lost or damaged, the manufacturer must be informed
of the machine identification details stated on the serial number label.
In light of the care taken by the manufacturer to improve its products whenever possible,
Tuttoespresso reserves the right to alter its future production (and the contents of the relevant
manuals) without giving prior notice and without any obligation to update existing products already
on the market.
The manufacturer does not accept any responsibility for any incorrect interpretation of the details
given in this instruction manual.
PROBLEM SOLUTION
Difficult to insert capsule into
brewing compartm ent
Check the "used capsule reservoir" as it may be full.
Be sure the "brewing chamber closing lever is all the way up.
Check that there are no objects preventing passage.
Water present und er the drip tray
Be sure that the drip tray is properly positioned. To do so, remove the drip tray and replace it,
making sure the bayonet-clip on the bottom of the drip tray is snug into its applicable position
at the front base of the machine.
The m achine will not dispense any
liquid
Check for the presence of water in the "water reservoir".
Check that the top and red button is illuminated.
Check that the machine is plugged into the wall socket.
Capsule j ammed in brewing
compar tment
Check that the "outer sleeve" is properly installed.
Check that the "outer sleeve" is not dirty or obstructed.
Dripping in the "spou t delivery" a rea
Check that the "outer sleeve" is properly installed.
Check that the "spout delivery" is not obstructed.
Check that the "outer sleeve" is not obstructed.
Non-uni formed flow when
dispensing
Check that the "spout delivery" is properly installed.
Wet the "sp out delivery" with clean water.
The " on/off" b utton does no t light
Check that the machine is correctly connected to the socket for the electrical network.
Check that current is arriving to the socket of the electrical network.
The bulb w ithin the button may be burnt-out, but the machine still dispenses.
Dispensing temperature is too low
Be sure the orange "water he ating" button lig ht is not on when dispensing .
Heat the porcelain cups (if using them).
Page 8

MAINTENANCE OPERATIONS
20 9
INTRODUCTION
The Tuttoespresso technical service department is available to provide assistance that may be
required. Contact us by telephone or fax at the following numbers or by e-mail:
Tel. + 39 02 96730600
Fax + 39 02 96731856
e-mail tuttoespresso@rheavendors.com
To make it easier for the manufacturer to understand any enquiries the customers may have, the
details given on the serial number label (under the base of the machine) must be provided.
Attention
Tuttoespresso declines all responsibility for any damage that may be caused whether directly or
indirectly to persons or property as a result of:
- an improper use of the model T machine;
- incorrect installation;
- unsuitable electric power or water supply;
- failure to carry out the maintenance operations;
- unauthorised interventions or modifications;
- failure to use original spare parts.
In the event of a fault, Tuttoespresso is not liable in any way to compensate financial loss due to
the machine being out of operation, nor is the company liable to extend the warranty.
MAINTENANCE OPERATIONS
MACHINE
PARTS
INTERVENTION OPERATION
FREQUENCY
Daily Weekly
Outer
machine
Cleaning
Wipe with a clean wet clo th and then dry with a clean dry cloth.
Don't use solvents.
O
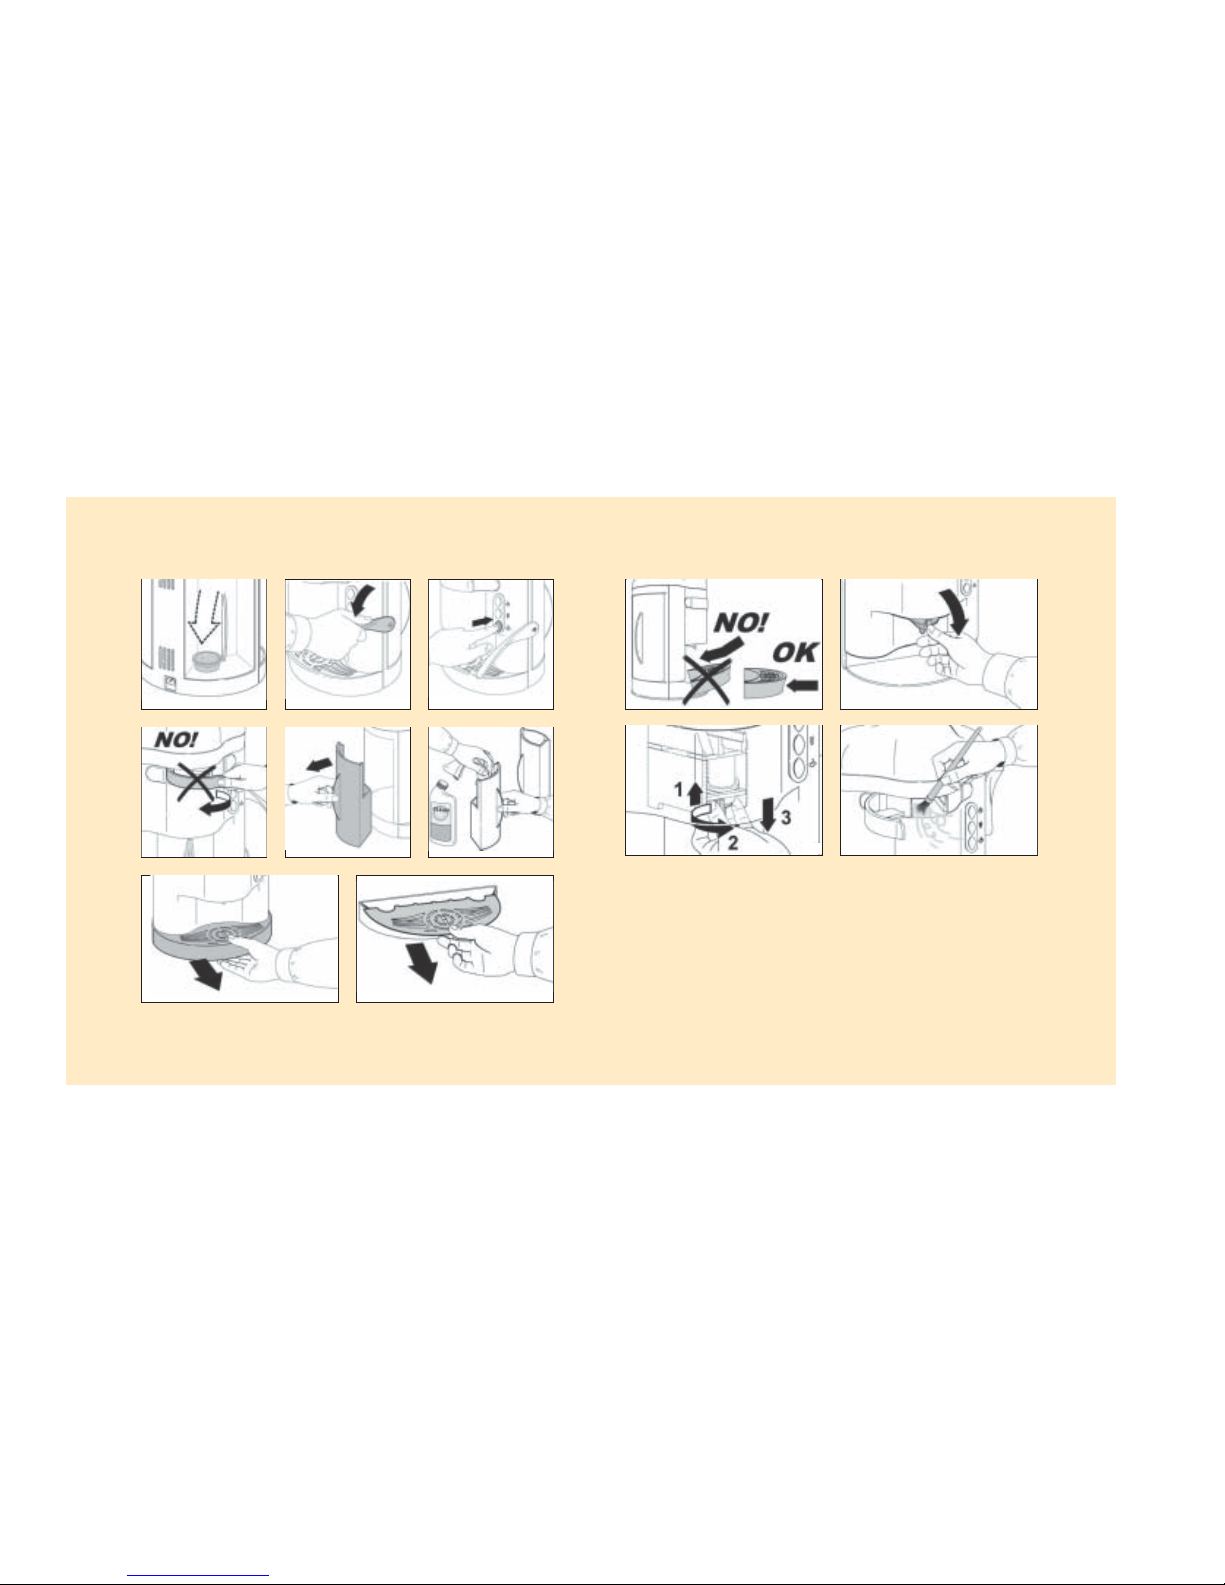
Drip tray Cleaning
Pull the drip tray away from the machine (Fig. 24), remove the
grill (Fig. 25), rinse the drip tray and grill thoroughly with water
of a mild temperature. Dry with a clean dry cloth.
Attention
When returning the drip tray to the machine, be sure to position
it with the bayonet-joint meeting its apparent space at the base
of the machine, in paral lel to the table surface (Fig. 26).
O
Used capsule
reservoir
Cleaning
Take the used capsule reservoir from its compartment (Fig. 22),
empty the used capsules within and clean it with a mild
disinfectant (Fig. 23) . Rinse out thoroughly with clean water of
a mild temperature.
O
Water
reservoir
Cleaning
Take the water reservoir from it's compartment (Fig. 10), clean
it with a mixture of water and non-toxic detergent (Fig. 23) and
then rinse thoroughly with clean water of a mild temperature.
O
Spout
delivery
Cleaning
Push the bayonet-tongue to release the spout delivery from its
position above the d rip tray and below the capsule brewing
compartment door (Fig. 27). Clean it with a mixture of water and
non-toxic detergent, then rinse thoroughly with clean water of a
mild temperature.
O
Outer sleeve Cleaning
While the spout delivery is removed, reach up into the machine
(after it has cooled and has no power supplied to it) through the
open for the spout delivery and feel the outer sleeve inside the
brewing infusion. Apply slight upward pressure and turn the outer
sleeve cl ockwise (Fig. 28). Clean it with a mixture of water and
non-toxic detergent, then rinse thoroughly with clean water of a
mild temperature.
O
Capsule entry
compartment
Cleaning
Remove any incrustations or remaining product fro m the
capsule entryway compartment (Fi g. 29). Even tually extend
cleaning to the "brewing compartment door".
O
Page 9

19
ORDINARY AND PREVENTIVE MAINTENANCE
ORDINARY AND PREVENTIVE MAINTENANCE
Attention
These operations must be carried out without any power supplied to the machine.
Press the on/off switch button to OFF (red light not lighted) and remove the plug from the
wall socket.
Attention
Never use flammable liquids or alcohol to clean the outside of the machine; use only ordinary
liquid detergent.
SAFETY STANDARD
10
SAFETY STANDARD
The machine has been conceived and manufactured in accordance with the following European
safety standard:
EN 603351:
Safety regarding electrical equipment for household or similar use.
EN 60335215:
Special regulations for equipment designed to heat liquids.
SAFETY WARNINGS
READ ALL THE MANUAL BEFORE USE.
SAVE THIS MANUAL.
When using this machine, certain fundamental rules must be observed:
- the machine may not be installed or used in explosive environments (e.g. in the presence of
gases, flammable substances or explosive liquids);
- avoid installing the machine in places where it could be sprayed with water (e.g. next to sinks)
or exposed to sources of intense heat (e.g. ovens) or atmospheric agents (rain, sun, etc.);
- do not install the machine outdoors;
- do not use extension cords or adapters;
- the machine must be installed on a firm, flat surface that can withstand the weight of the
equipment and will not cause the machine to tip up or fall;
- a sufficient space must be left at the back of the machine (about 10 cm.) to allow air to circulate
and to permit the heat to disperse from the slots provided for this purpose;
- do not allow children to use the machine and / or anyone who does not know how to operate it.
Page 10

- before plugging the machine into the wall socket, check that the voltage is the same as that
shown on the machine rating plate and that the socket is ground (Fig. 2);
- never immerse the machine in water;
- never touch the machine with wet hands or bare feet;
- the accessories and removable parts of the casing are NOT suitable for washing in dishwater;
- do not pull on the power cord when the machine is plugged into the wall socket;
- make sure the that the power cord is unwound to its entire length and is not crushed at any
point;
Attention
- NEVER use your fingers (Fig. 3) to insert a capsule into the brewing compartment;
- the capsule must be inserted according to the instructions given in this manual;
- the lever is connected to a safety microswitch; T does not start with the lever up. If the lever
should be lifted purposely during dispensing , the machine stops, but this is not recommended;
- do not lower the lever when the start/stop dispensing button is depressed (green light on);
- remove the plug from the wall socket before carrying out any maintenance;
- if any faults should be encountered during operation, the machine should not be used but
returned to Tuttoespresso or an Authorised T Centre to be checked;
- use of accessories, other than originals or ones made especially for this equipment, is not
recommended as they are unable to guarantee the level of quality required.
In the event a new power cord should be required, please contact Tuttoespresso.
18
Empty the used capsule reservoir after dispensing approximately 10 drinks.
Refill the water reservoir after dispensing approximately 10 drinks.
Do not depress the start/stop dispensing button if there is no water in the reservoir as the pump
could burn itself out.
Follow the Ordinary and Preventive maintenance/cleaning routines every day and once a week.
INSTALLATION AND USE
11
SAFETY STANDARD
Page 11

Lower the brewing chamber closing lever (Fig. 19) and the light inside the green start/stop
dispensing button comes on.
Depress the green button to start dispensing the drink. Once the required amount of liquid has
been dispensed, press the button again to stop dispensing (Fig. 20).
Lift the brewing chamber lever to prepare the machine for insertion of the next capsule.
Attention
NEVER lift the brewing chamber closing lever when a drink is being dispensed, as this will stop the
dispensing, nor leave the green start/stop dispensing button depressed with the lever in up
position.
Attention
Never open the brewing compartment door (Fig. 21) during dispensing. Never force it open.
USEFUL ADVICE
1) To obtain a good drink, it is advisable to always leave the machine switched ON.
2) Carry out a dispensing cycle with warm water before the first use or when you change the type
of drink, taking care in this case to first remove the used capsule present in the machine with
a proper tool ( never your fingers).
3) If several drinks are dispensed one after the other, check that the orange water heating
button does not light. If it does, wait until it goes out to enable the boiler to sufficiently heat
up the water.
4) Heat the porcelain cups into which the drink will be dispensed. The froth on the drinks is not as
good when dispensed into cold porcelain.
5) It is advisable to use higher quality water (purified mineral water) to prevent scale incrustations
in the machines heating element.
6) Lift the lever before removing the cup/glass after dispensing so that the remaining liquid in
mixing compartment can descend into the cup/glass.
17
INSTALLATION AND USE
12
NOISE LEVELS
This sound test, referring to a Sample Model with the same design and construction characteristics
as your machine, was carried out in compliance with the Decree Law 277/91 (in accordance with
CEE Directives n. 80/1107 82/605 83/447 86/188 and 88/642) calculating personal exposure,
starting with the acoustic pressure and adding the time of exposure.
The phonometer used complies with the prescriptions of standard IEC 651 Group 1 and was calibrated
before use according to a sample source of sound.
The reading was taken from the users position, the continuous level of acoustic pressure was less
than 70 dB(A) and the continuous level of acoustic power emitted by the machine at the users
position was less than 85 dB(A).
SAFETY STANDARD
Page 12

EXPECTED USE
This machine (Fig. 4) is designated for household (non-professional) use only.
This machine is designated to dispense hot drinks in conjunction with capsules and designed for
use only with Tuttoespresso capsules.
For proper operation, the machine has been designed to operate in closed environment at room
temperature, above 5°C and under normal environmental conditions.
NOTE: for the best results, allow one minute between dispensing drinks proportioned to the expected
domestic use (e.g. 10-20 dispenses per day).
Attention
As some capsule ingredients are particularly susceptible to excessive heat and humidity, the machine
may not work properly at temperatures above 30°C or at level of relative humidity above 80%.
Attention
The drinks dispensed by the machine are considered to be at a high temperature and therefore
could be dangerous if used improperly.
PRODUCT
The capsules must be stored in a cool, dry place in order not to alter their ingredients; levels of
relative humidity over 80% may cause the powder ingredients to clump.
If this condition is not complied with, Tuttoespresso cannot guarantee the correct operation of the
machine nor the quality of the drinks dispensed.
16
INSTALLATION AND USE
13
EXPECTED USE
INSTALLATION AND USE
Having removed the machine from its packaging, locate the power cord inside the used capsule
reservoir (Fig. 9).
Clean the specified parts thoroughly (see topic Maintenance Operations in this manual).
Place the machine on a firm, flat surface.
Remove the water reservoir (Fig. 10) and fill it by ¾ (about 1 litre) with drinking water from the
tap (Fig. 11) (it is advisable to use purified water to avoid build-up of scale in the operating parts
of the machine).
Position the water take-up tube into the water reservoir (Fig. 12) and insert the reservoir into the
relevant compartment.
Plug the power cord into the apparent inlet located on the backside of the machine (Fig. 13) and
then into the wall socket.
Depress the on/off switch located on the front of the machine (top button of three).
The red light of this button will light to indicate that the machine is on.
Wait approx. 3 minutes for the machine to warm up, until the orange water heating light goes
off.
Place a glass or a coffee cup on the drip tray under the dispensing nozzle (Fig. 15).
Lower the brewing chamber closing lever (Fig. 19) and the light inside the green start/stop
dispensing button comes on.
Push the green button to start dispensing; when water exits the spout, press the button again to
stop dispensing (phase of priming the pump) (Fig. 20).
Open the brewing compartment door and insert a capsule of the preferred drink in the apparent
slot (Fig. 16).
Close the brewing compartment door applying slight pressure (Fig. 17); the previous capsule is
automatically ejected into the used capsule reservoir (Fig. 18).
Page 13

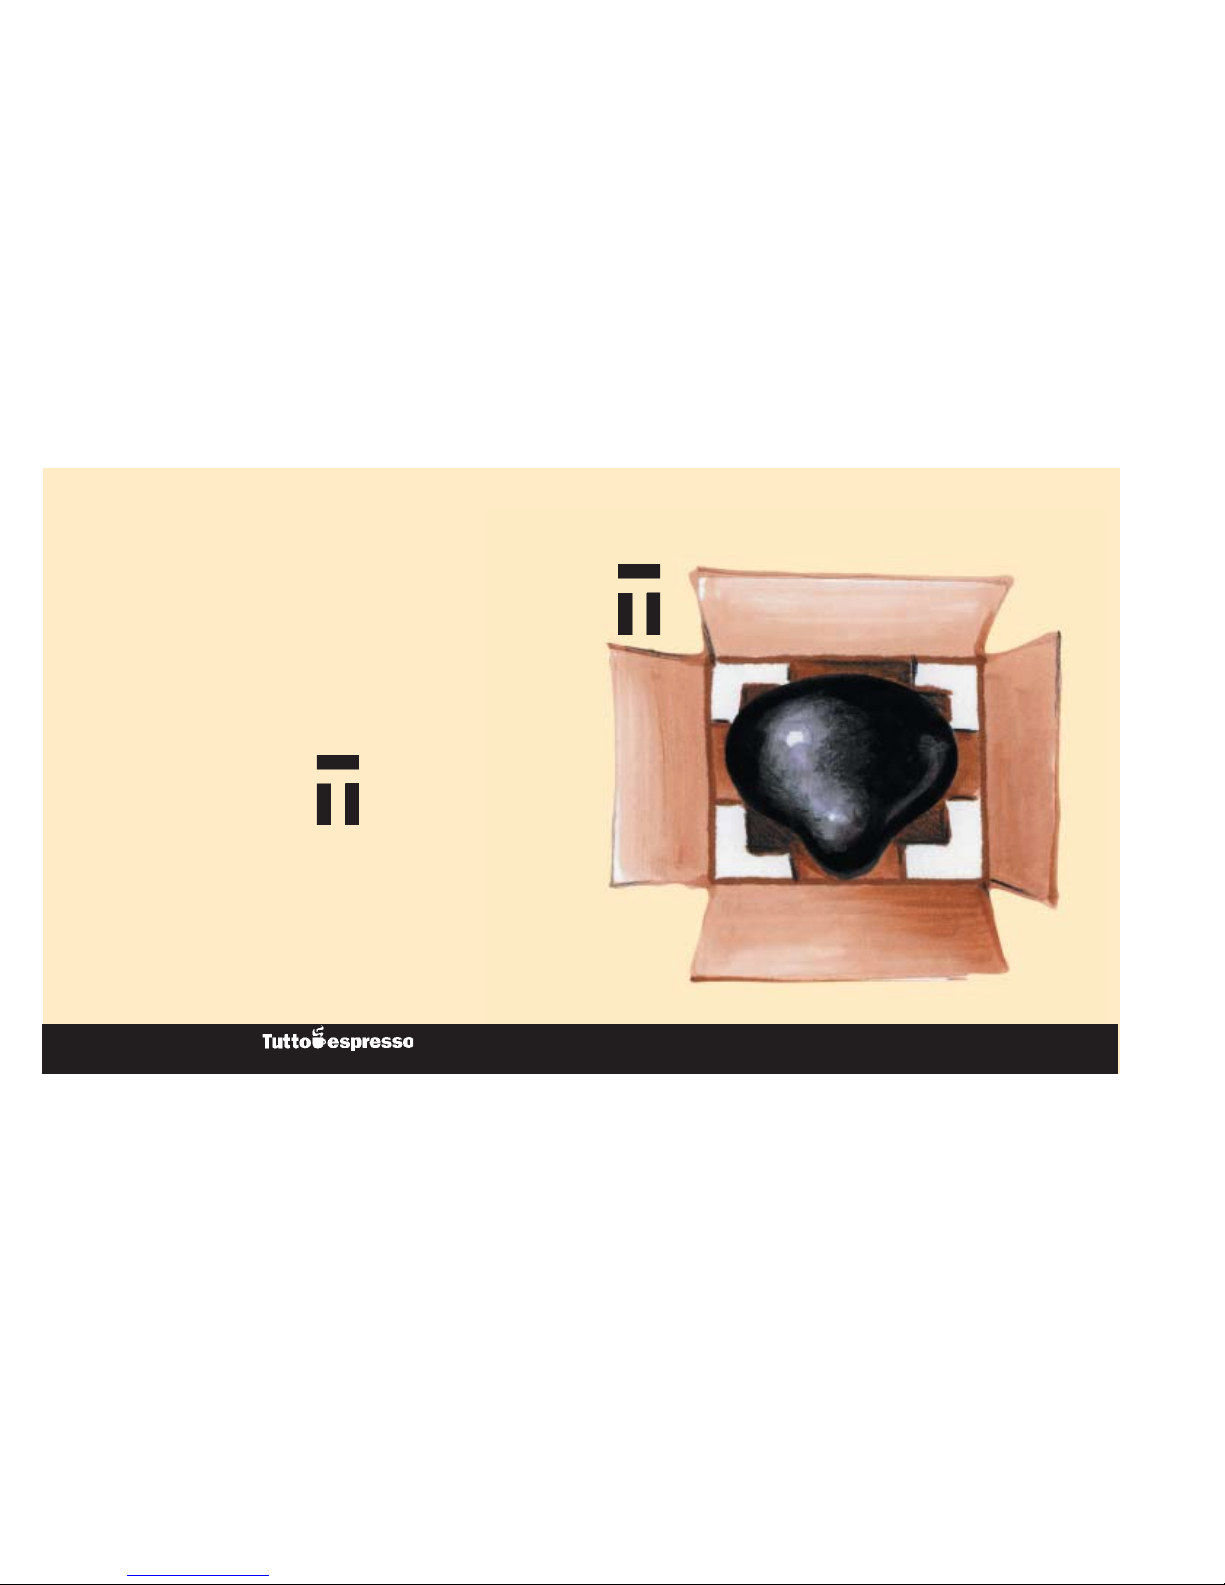
HANDLING
The machine is packed in a cardboard box to gu arantee protection from slight k nocks ( Fig. 5).
The machine can be moved by hand, taking h old of the handles on the sides of the box , take care
to avoid accidental falls or sudden knocks wh ich wou ld damage it.
Keep the machine vertical (upright) when moving it.
Do not place th e machine over w et surfaces and only store the packed machine in dry places .
Attention
Never leave the pac king material at the reach of chil dren or animals as its potentially hazardous.
14
HANDLING
15
UNPACKING
UNPACKING
Bring the box containi ng your new mach ine near the place where you will install it.
The machine mu st be removed from its pac kaging in the fol lowing w ay:
- pull the cardboard tab of the box so th at the cardboard lid may be opened ( Fig. 6);
- remove the machine from the cardboard box (Fig. 7).
Inside the cardboard box containing the machine you wi ll find (Fig. 8):
1 - T machine (1);
1 - instruction manual (2).
NOTE
Keep the pac king for future us e (e.g. for taking the machine to the Serv ice Centre or storing or
moving it from house to house).
 Loading...