

Tutek Tambero Instruction Manual
INSTRUCTION
MANUAL
Oce 1D 238-246 King Street London W6 0RF
www.aquariusprams.co.uk, mob. 07453160588, tel. 01724 840190
MAINTENANCE:
- After each use, clean the stroller with a dry cloth.
- Upholstery can be washed with a soft sponge and warm water (30-40 degrees Celsius)
using the washing liquid or soap, the upholstery elements must not be washed
in the washing machine.
- When washing do not allow the upholstery absorb too much water,
- Do not expose the stroller for excessive sunlight for long periodof time,
- Keep out the stroller from getting soak with rain covers,
- Every 2-3 months clean out the axles from the dirt accumulated during use (mud, sand)
and lubricate them with silicon or oil-based lubricant,
- When transporting the stroller be careful not to damage the chassis and particularly
the upholstery,
- After using the stroller during snowy or rainy weather, wipe the frame, wheels
and axle with a dry cloth.
- Do not store the pram in cold or damp places.
WHEELS MAINTENANCE:
Air pumped wheels:
The slow decrease of the air pressure in
air pumped tires is not a defect, as this kind
of tire require periodic pumping up.
Maximum air pressure must not exceed
0.6 BAR! The manufacturer takes not
responsibility for any damage caused
by too strong air pumping of the tires.
WHEELS: ATTACHMENT AND DETACHMENT:
To attach the wheels to the axles :
Push down the lock pin on the wheel.
Insert the wheel to the end of the axis and release
the lock pin. Pull the wheel gently o, the safety pin
should lock into the axle groove with the click, which
indicates the correct attachment of the wheel.
WARNING: Check by pulling the correct installation of the wheel.
PLEASE READ THESE INSTRUCTIONS AND WARRANTY BEFORE USE
THE PRAM AND KEEP THEM FOR FUTURE REFERENCE.
DISREGARD OF WARNINGS IN THIS MANUAL MAY AFFECT YOUR
CHILD SAFETY AS WELL AS THE LOSS OF PRODUCT WARRANTY.
SAFETY INFORMATIONS AND WARNINGS:
- WARNING: Leaving your child unattended could result in danger.
- WARNING: Do not use a mattress thicker than 30 mm.
- WARNING: Use a harness as soon as your child can sit unaided.
- WARNING: This seat unit is not suitable for children under of 6 months.
- WARNING: This product is not suitable for running or skating.
- Never leave the pram on a slope or an uneven surface , even with the brakes engaged,
it may cause the danger of slip.
- Avoid the stairs and other slopes when the child is in the stroller – it creates danger
of the child falling out as well as chassis damage for which the manufacturer takes not responsibility.
- This stroller is intended for only one child. The maximum carrying capacity should not exceed 15 kg
of the child weight and 5 kg of shopping basket load.
- Use the harness as soon as your child begin to sit unaided.
- Maximum load of stroller bag is 2 kg.
- Cross rocking of the pram is unacceptable - it creates risk of the child falling out as well as suspension
damage for which the manufacturer takes not responsibility.
- Do not attach any extra bags on the stroller. Any additional load aects the stability of
the stroller. For small luggage use only original stroller bags and do not exceed maximum
allowed weight of 2 kg.
- Do not carry the stroller down or up the stairs holding the chassis or the handle,
it creates risk of the child
falling out as well as suspension damage for which the manufacturer takes not responsibility.
- Always remove the child before you fold the pram.
- Do not use any additional equipment not listed by the manufacturer.
- Any additional burden on the chassis violate its stability.
- The pram should be carried out safely, the speed of the stroller should be adjusted to the speed of step.
- Do not drive the stroller while skating or roller skating.
- Do not use escalators. Be careful when using a lift when the child is inside the stroller.
IMPORTANT! Before rst use of the pram lubricate the wheel axles with a silicon
or oil based lubricant
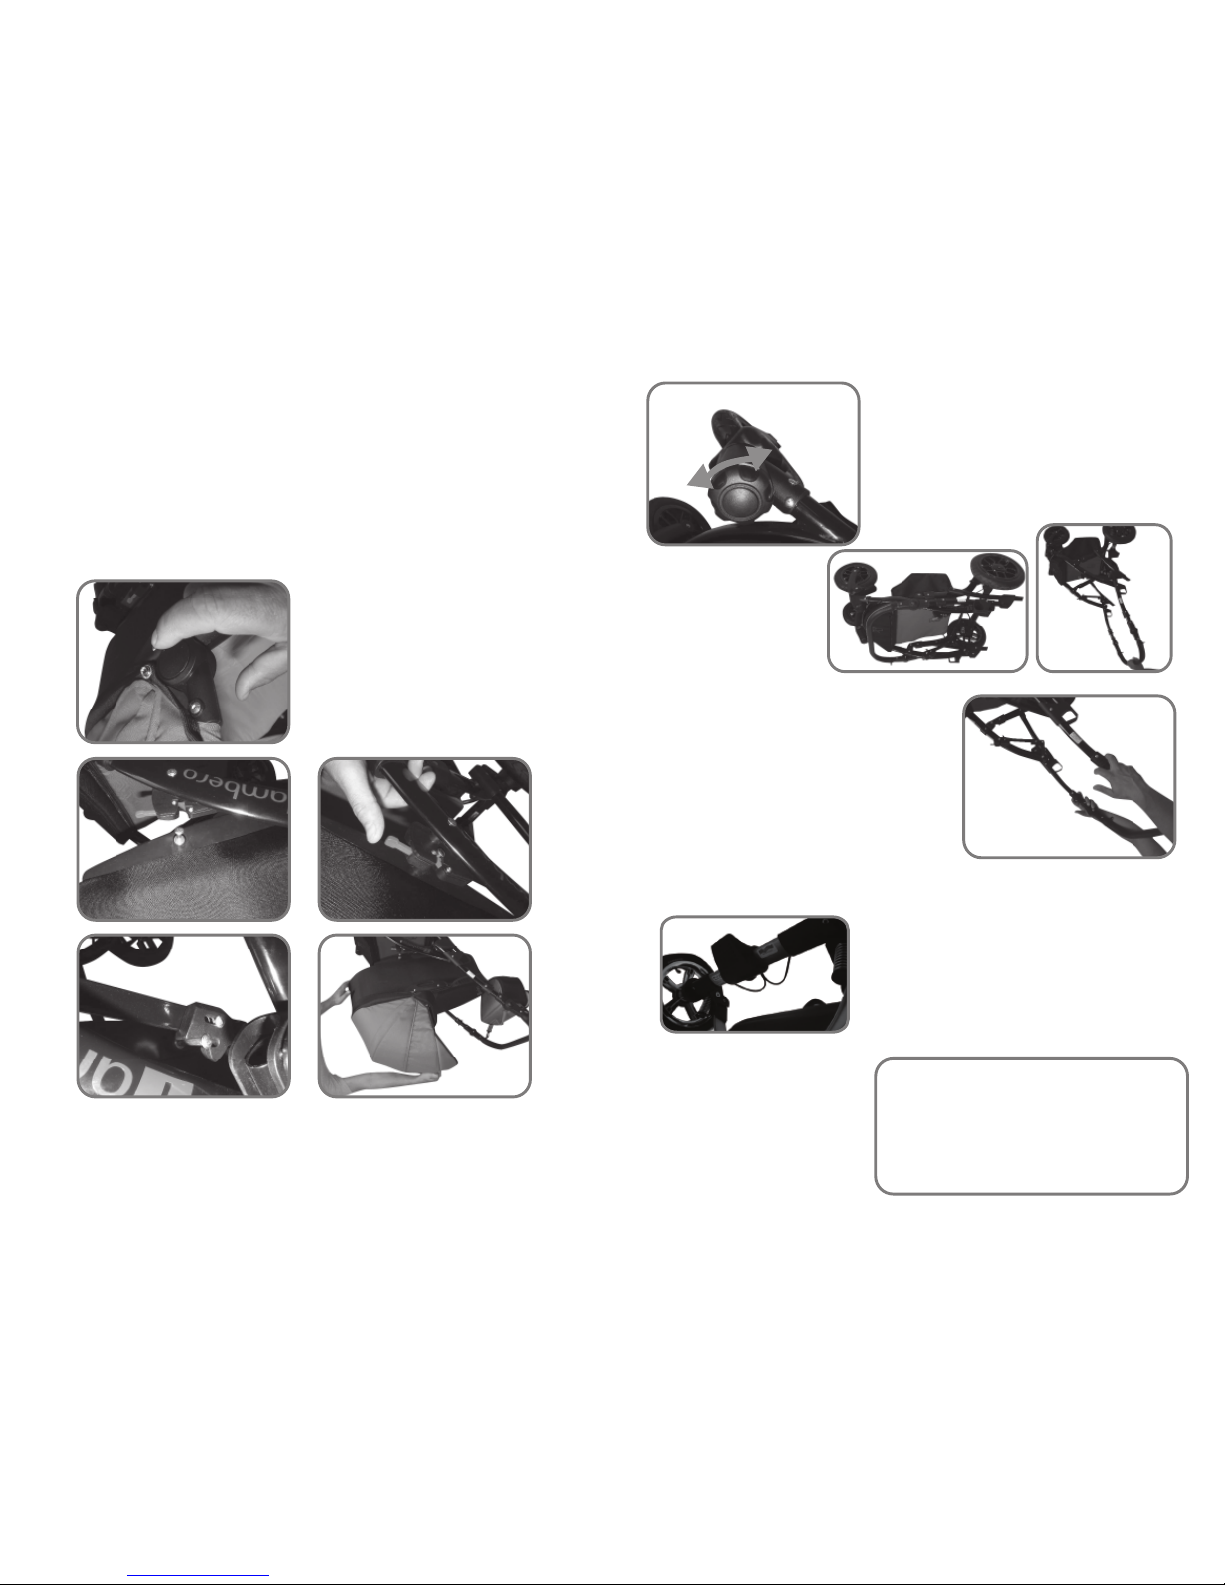
Fig. 4
Fig. 8
Fig. 5
Fig. 6
5-POINT HARNESS
The stroller is equipped with a 5-point safety
harness. Straps are adjustable individual sections
it means: waist strap crutch strap and shoulder
strap. Each of these strips can be adjusted separa-
tely moving the sliders located near the main
lock.
BRAKE
To engage the brake push down
the brake lever with the foot in a
way to lock the gear wheel which is
the part of the stroller rear axle.
In order to disengage the brake
pull the brake lever up with the
foot. (Fig. 7)
CARRYCOT AND SEAT UNIT ASSEMBLING
Insert carrycot at an angle (Fig. 1) in the hooks on the front of the chassis then push the
carrycot down to the locking fastener.
To release the carrycot unlock the fastener by pulling red locker (Fig. 2) on the both sides of
the chassis.
WARNING!
Before moving the stroller
make sure the brake is disengaged
(released). The manufacturer do not
takes responsibility for damages of gear
wheels and other brake system compo-
nents resulting of disregard instructions
above.
Folding the chassis To fold the stroller pull the
locking devices along the both sides of the chassis
up to release the lock and move the handles
(Fig. 4,5,6)
FRONT SWIVEL WHEEL LOCK
To lock the front swivel wheels
turn right the knob over the front wheel of the
stroller. To unlock, turn the knob left.
To fold the carrycot hood:
press the buttons on the both sides of the
hood at the same time.
Handle in the hood is designed only for
take the carrycot from out of the stroller.
Unfolding the chassis
Raise the handle to hear the
CLICK of locking elements.
(Fig. 6,5,4)
REMEMBER!
USE A HARNESS AS SOON AS
YOUR CHILD CAN SIT UNAIDED.
Make sure the
connectors are locked.
WARNING! Before use the the stroller make sure the seat unit is properly
locked in fasteners.
Fig. 1
Fig. 2
Fig. 3
Fig. 7
 Loading...