

Page 1
Page 2

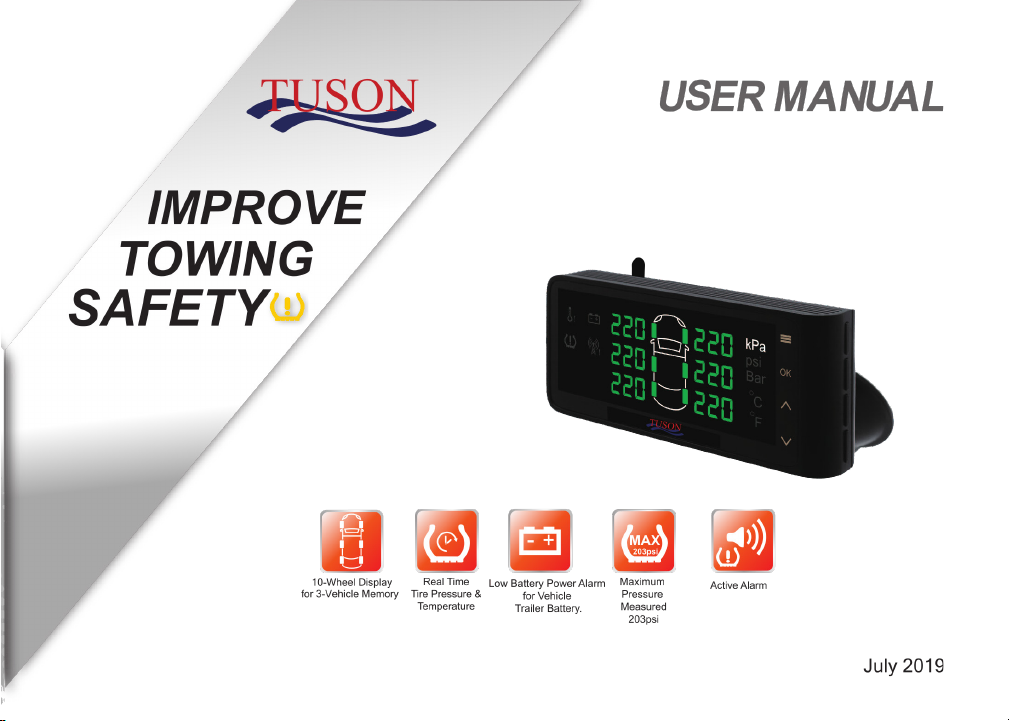
Tuson TPMS Retrofit Kit User Manual
Contents
For TPMS4W & TPMS6W Models
1. Warning .............................................................................................................................................. 3
2. Product Parts List & Description ......................................................................................................... 5
3. Product Specifications ...................................................................................................................... 10
4. TPMS Sensor Installation ................................................................................................................. 12
5. TPMS Repeater Installation ............................................................................................................. 19
6. TPMS Receiver Installation .............................................................................................................. 23
7. Driving Mode Menu .......................................................................................................................... 27
8. Settings Mode Menu: ....................................................................................................................... 39
9. Alarm Warning and Display Symbols ............................................................................................... 59
10. Troubleshooting ................................................................................................................................ 62
11. Customer Service ............................................................................................................................. 64
12. Notes ................................................................................................................................................ 65
13. Limited Warranty .............................................................................................................................. 68
Page 3
1. Warning
1.1 Federal Communication Commission Interference Statement:
This equipment has been tested and found to comply with the limits for a Class B digital device, pursuant
to Part 15 of the FCC Rules. These limits are designed to provide reasonable protection against harmful
interference in a residential installation. This equipment generates, uses and can radiate radio frequency
energy and, if not installed and used in accordance with the instructions, may cause harmful interference
to radio communications. However, there is no guarantee that interference will not occur. If this equipment
does cause harmful interference to radio or television reception, which can be determined by turning the
equipment off and on, the user is encouraged to try to correct the interference by one of the following
measures:
• Reorient or relocate the receiving antenna.
• Increase the separation between the equipment and receiver.
• Connect the equipment into an outlet on a circuit different from that to which the receiver is
connected.
• Consult the dealer or an experienced radio/TV technician for help.
FCC Caution: Any changes or modifications not expressly approved by the party responsible for
compliance could void the user's authority to operate this equipment.
This device complies with Part 15 of the FCC Rules. Operation is subject to the following two conditions:
(1) This device may not cause harmful interference, and (2) this device must accept any interference
received, including interference that may cause undesired operation.
3
Page 4
1.2 Product Warning:
1.2.1 Do not adjust the TPMS receiver while driving. The company is exempt from all consequences
because of driver’s careless and improper operation.
1.2.2 The system uses wireless RF transmission signals. In some special circumstances, interference or
erroneous methods of operation or installation may cause weaker signal or its inability to receive
signals. If the insulation adhesive sticker of the windshield contains metal material, it may affect
signal reception. If the tire pressure and temperature readings on the TPMS receiver are displayed
as “---”, this indicates that the receiver is not receiving the signals emitted by the sensors. Drive the
vehicle away from the current location (where there may be some signal interference) or drive the
vehicle to a tire shop to check.
1.2.3 If the battery status of the TPMS sensors inside the tire is low, “---” will be shown on the receiver
display (if abnormal conditions continue to occur, the TPMS sensors will continuously emit signals
to warn the driver, resulting in shorter sensor battery life). Please go as soon as possible to a
service station to confirm whether the TPMS Sensors need to be replaced.
1.2.4 Temporary resealing or re-inflation products containing internal sealants or propellants in any tire
assembly may adversely affect the operation of the sensor/transmitter. The product manufacturer
does not assume any liability as to the customer’s use of internal sealants or propellants with the
tire sensors used with this TPMS.
1.2.5 Do not leave the sensors in contact with chemicals, it may cause the sensors to fail.
4
Page 5

Part No.
TPMS4W
TPMS6W
Sensor 4 6
Interchangeable Valve
Stem (0.625” / 0.453”)
4
6
TPMS Receiver (Monitor)
1
1
Repeater 1 1
1.2.6 The TPMS needs to be installed by qualified technicians in accordance with the installation manual
for the TPMS warranty to be valid. If the TPMS sensor is improperly installed or disassembled
causing damage to the sensors, the warranty will not cover this type of damage.
2. Product Parts List & Description
Accessories in the box:
• Cigarette Lighter Cable (Vin=12~24V) x 1
• Suction Cup Holder x 1
• Wheel Orientation Mark Sticker Sheet x 1
• Cable Tie x 5
• User Manual x 1
• Registration Card x 1
5
Page 6
2.2 Sensor Description
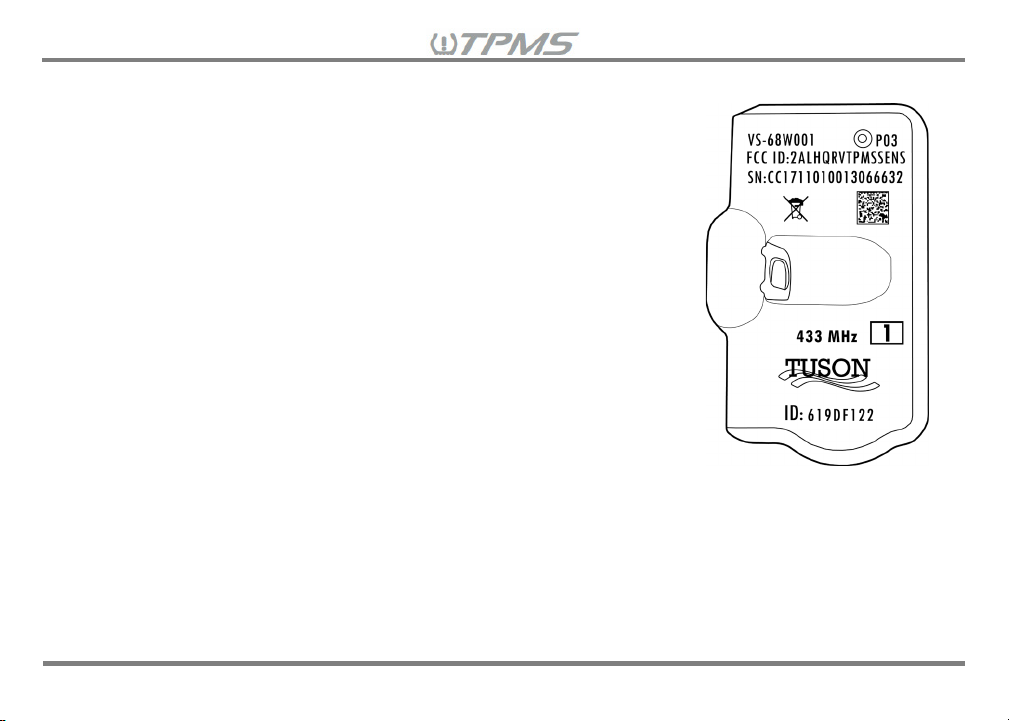
The Tuson TPMS Retrofit Kit sensors are automotive-grade sensors
designed to monitor tire pressure and temperature consistently and
wirelessly transmit data to the receiver. Each sensor has a unique ID# to
identify the sensor to the receiver. These are internal sensors that are
securely mounted to the valve stem or using a band and bracket kit (not
included) inside the tire to prevent damage and/or theft. Internal sensors
provide more accurate pressure and temperature readings than external
sensors. The sensors are motion-activated and will go into sleep mode
when the wheels stop moving to preserve sensor battery life. Sensors
may take a few minutes to wake-up. Once the wheel speed is over 12
mph/20 kph, then the sensor will wake-up and will continue transmitting
messages to the receiver every minute while moving. As a general
reference, the sensor battery life is about 5 years when driven 4 hours
per day. See section “4. TPMS Sensors Installation” on how to install
the sensors.
6
Page 7
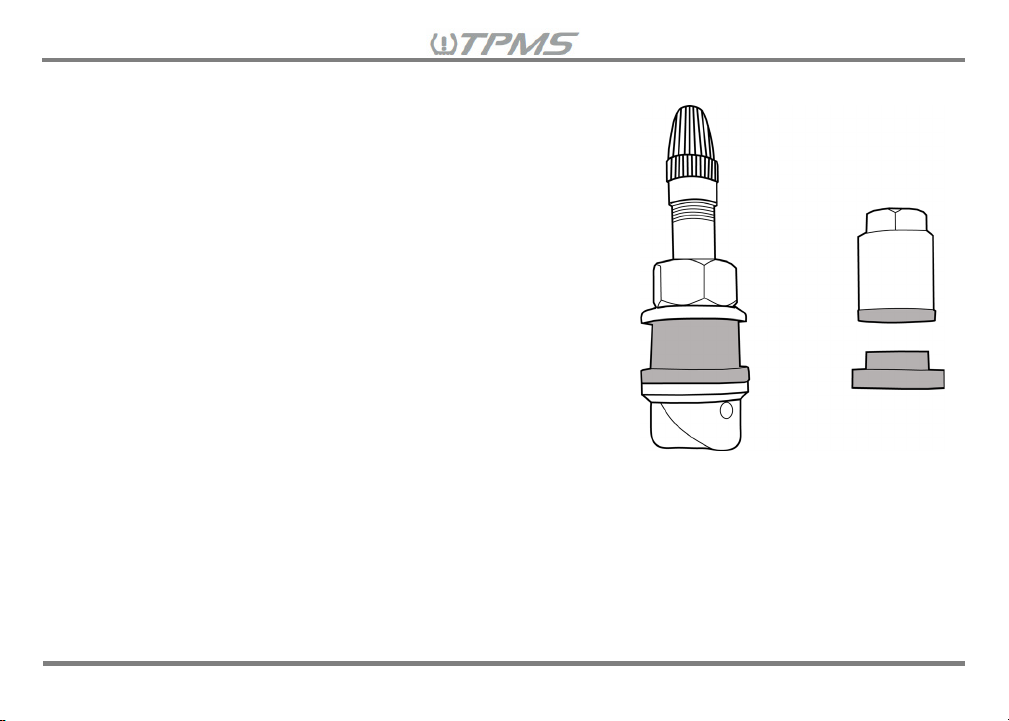
2.3 Interchangeable Valve Stem (IVS) Description
The Tuson TPMS’ tire sensors use a metal interchangeable valve
stem (IVS) that is designed to fit through either 0.453" or 0.625"
diameter wheel valve holes for your convenience. The IVS is
compatible with both steel and aluminum wheels. The valve stem
and nut portion of the IVS are made of brass and the washer is
made of nickel-plated steel. A polybag containing the IVS comes
pre-assembled with the 0.625” diameter rubber grommet; metal
washer; 0.625” diameter nut and valve cap on the valve stem. A
0.453” diameter rubber grommet and nut are also included in the
polybag for each IVS. The IVS should be installed in the wheel
using a single rubber grommet only. WARNING! – Do not use
both sizes of the included grommets to install the valve stem. See
Section “4. TPMS Sensors Installation” on how to install the
sensors.
7
Page 8
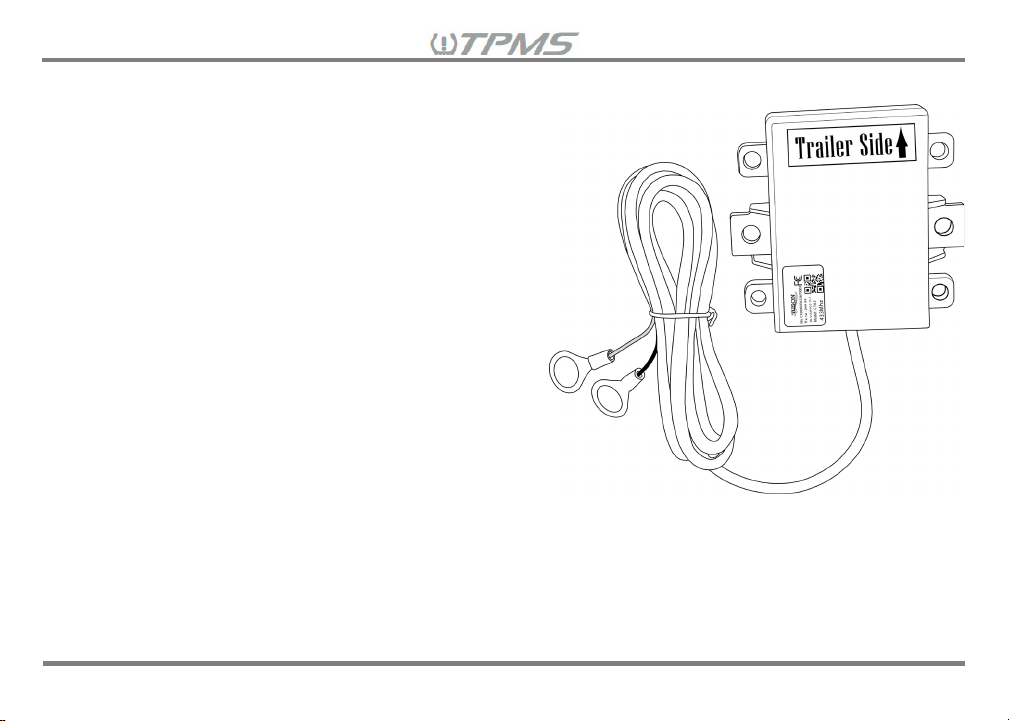
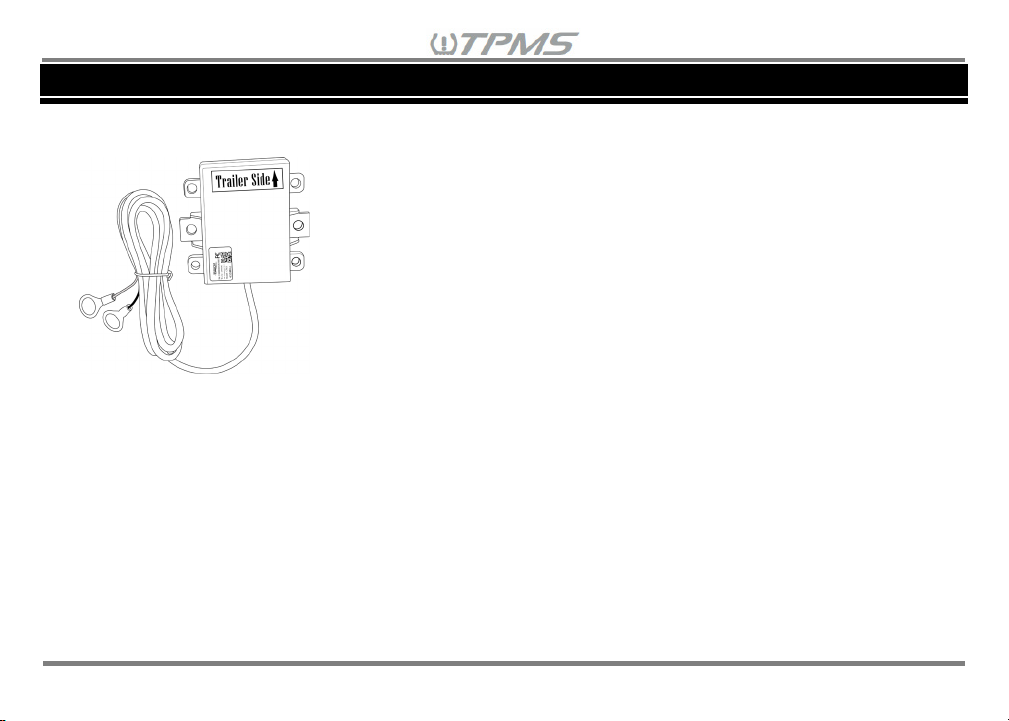
2.4 Repeater Description
The Tuson TPMS Retrofit Kit includes a repeater. The
repeater features power (red) and ground (black) wires
to connect to the trailer battery or any power source
that provides a constant 12/24V power. The repeater
is designed to boost the signal strength from the tire
sensors to the receiver (monitor) in the tow vehicle.
The repeater is waterproof and can be exposed to the
outside elements without being damaged. On trailers
greater than 20 feet long, the repeater must be
installed to provide the receiver enough signal strength
from the sensors. For small trailers, the receiver may
pick up the sensors without the repeater installed
however, we highly recommend you install the
repeater. In addition to boosting signal strength, the
repeater is also designed to transmit the trailer battery
voltage to the receiver. The repeater does not need to
be disconnected from the power source, because it is
motion activated and will go into sleep mode when the trailer is not moving. Therefore, the repeater may
take a few minutes while driving to wake-up and start transmitting messages to the receiver. See section
“5. TPMS Repeater Installation” on how to install the repeater.
8
Page 9
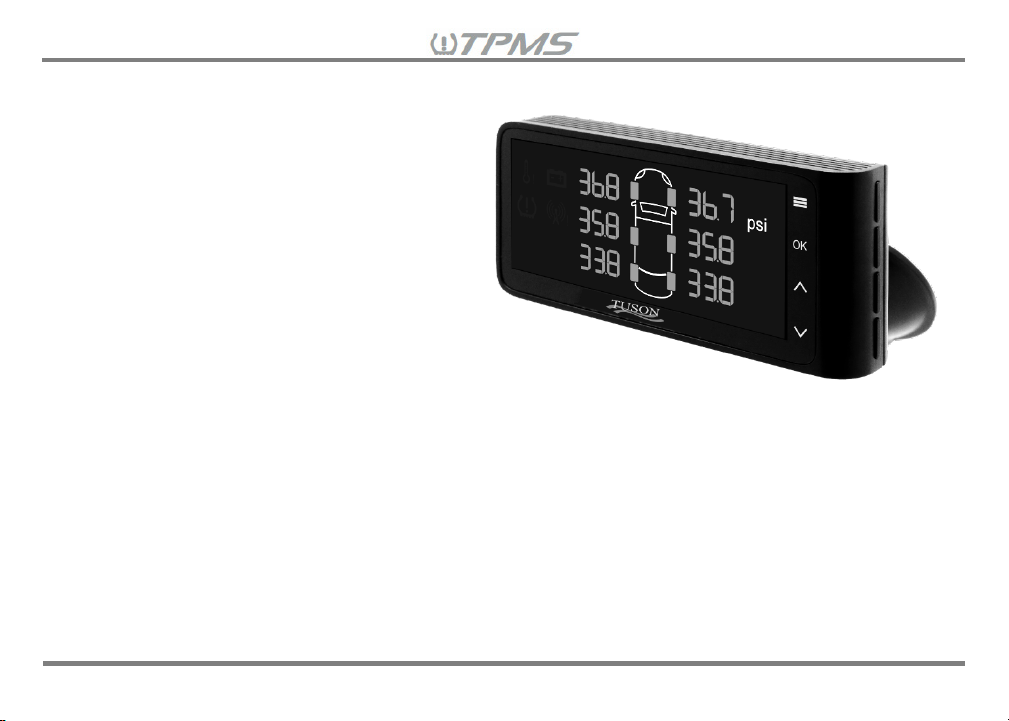
2.5 Receiver Description
The receiver (monitor) allows the driver to
monitor the tire pressure and temperature of up
to 10-wheels for up to 3-vehicle memory
selections. The receiver will also monitor trailer
battery voltage when the repeater is connected
to a trailer battery. A 12~24V cigarette lighter
cable is included to power the receiver in the
tow vehicle. The Tuson Display Power Cable
(sold separately) can also be used to power the
receiver with a 9V battery to make the “Tire
Sensor ID Pairing” in section 9.5 easier. The
receiver has two menus: Driving Mode and
Setting Mode. When in Driving Mode, the
receiver will automatically cycle between pressure, temperature, and trailer battery for that selected vehicle
memory. When in Settings Mode, you can select the vehicle memory to customize and monitor when in
Driving Mode. When monitoring more than 6-wheels on a vehicle memory, the Driving Mode will display
the pressure and then temperature for the first 6-wheels and then the pressure and temperature for the
additional wheels in the next screen before moving to the trailer battery voltage screen. Alerts on the
receiver will continue to appear until the issue with the sensor or repeater has been addressed/cleared.
See section “6. TPMS Receiver Installation” on how to install the receiver and button functions.
9
Page 10
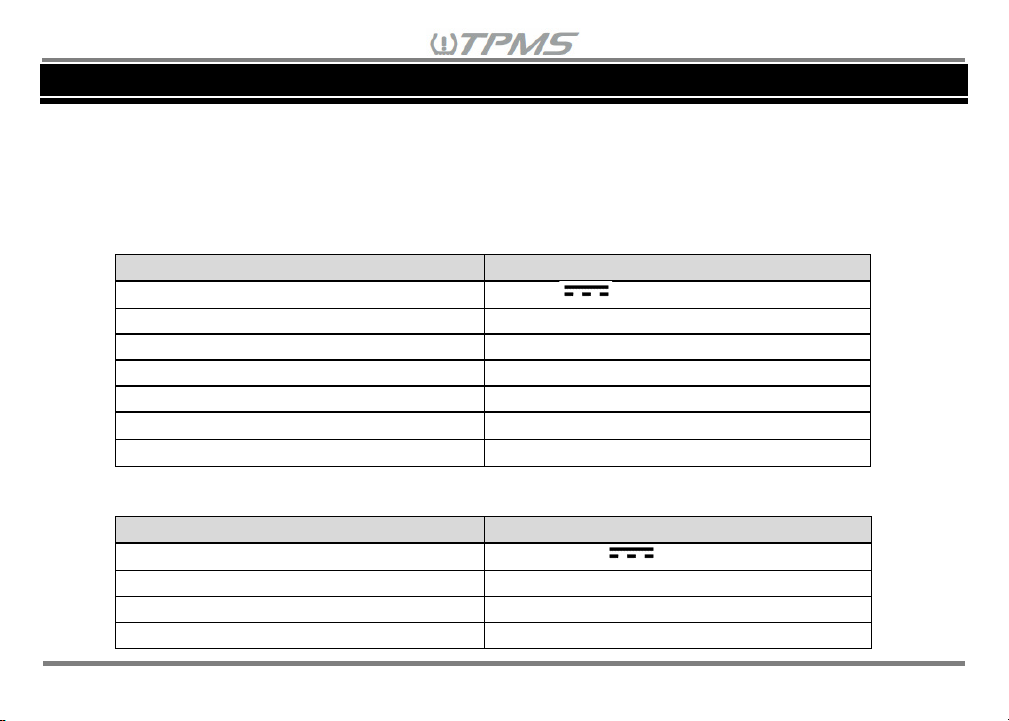
ITEM
SPECIFICATION
Operating Voltage
3V DC
Operating Frequency
433 MHz
Operating Temperature
-22°F~257°F (-30°C~125°C)
Storage Temperature
-40°F~257°F (-40°C~125°C)
Tire Pressure Monitoring Range
0~203 ±1.5 psi (0~1400 ±10 kPa)
Tire Temperature Monitoring Range
-40°F~257°F±5.4°F (-40°C~125°C±3℃)
Weight
30 g (1 Oz)
ITEM
SPECIFICATION
Operating Voltage
12~24V DC
Operating Current
11.2 mA
Operating Frequency
433 MHz
Operating Temperature
-4°F~185°F (-20°C~85°C)
3. Product Specifications
Vehicle Types for TPMS use (Maximum 10-wheels):
Tuson TPMS is designed for all types of RV, commercial and livestock trailers. Great for commercial and
passenger vehicles as well!
3.1 Sensor Specifications
3.2 Repeater Specifications
10
Page 11
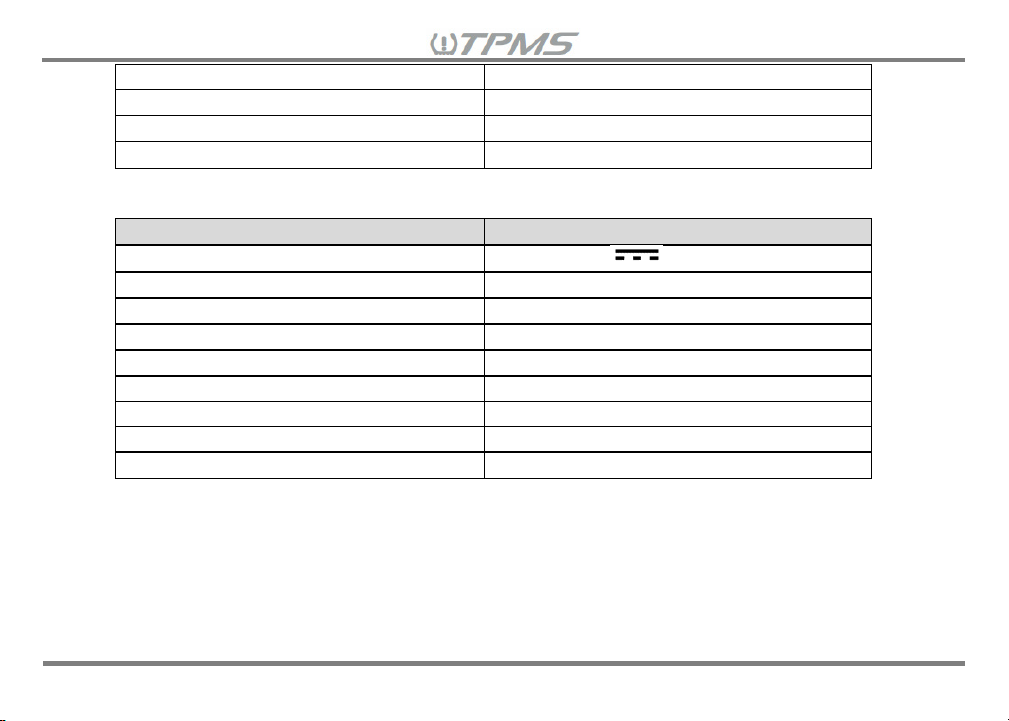
Storage Temperature
-40°F~185°F (-40°C~85°C)
Cable Length
90 inches (2300 mm)
Size
3.5”x3.8”x0.9” (88 x 96 x 23 mm)
Weight
6 Oz (170 g)
ITEM
SPECIFICATION
Operating Voltage
12~24V DC
Operating Current
120 mA
Operating Frequency
433 MHz
Operating Temperature
-4°F~185°F (-20°C~85°C)
Storage Temperature
-40°F~185°F (-40°C~85°C)
Monitored Pressure Range
0~203 ±1.5 psi (0~1400 ±10 kPa)
Monitored Temperature Range
-40oF~257oF ±5.4oF (-40oC~125oC ±3oC)
Size
4.5”x2.1”x1” (116.5 x 53 x 25 mm)
Weight
3.4 Oz (95 g)
3.3 Receiver Specifications
Note: When using kPa as the unit of air pressure, the monitor will display “Hi” if the air pressure is over
999kPa. The actual air pressure values will be displayed numerically when the unit of measure selected is
in psi or Bar.
11
Page 12
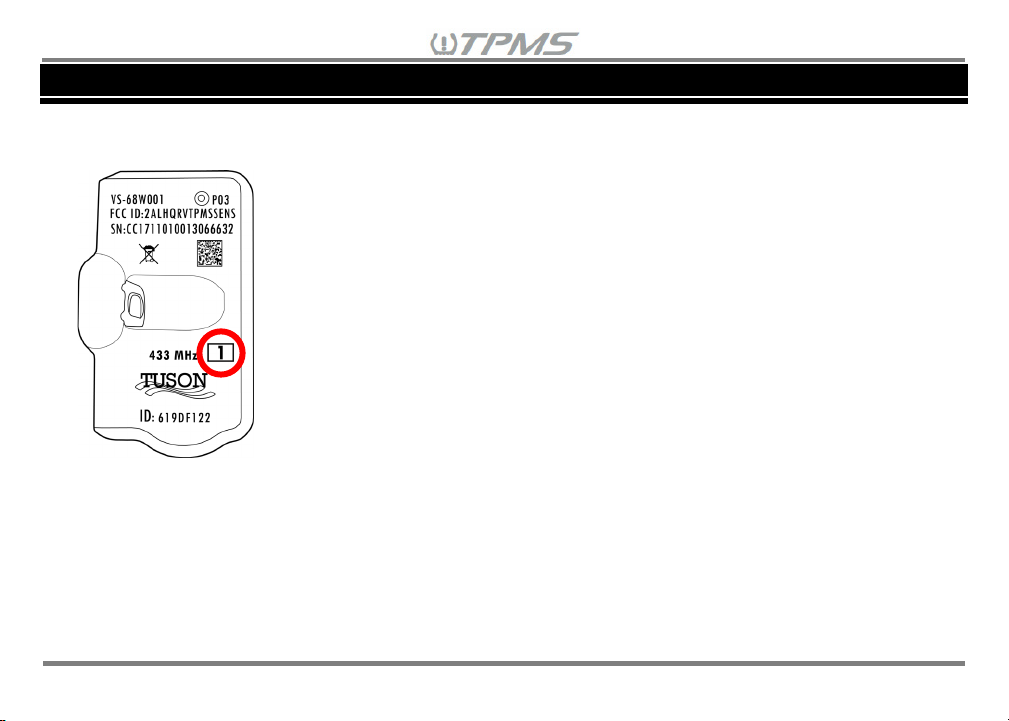
Figure 4.1 Wheel
4. TPMS Sensor Installation
<IMPORTANT 1>
Each sensor has a unique Sensor ID# to identify the sensor to the receiver. The
sensors included in the kit are already paired to the receiver from the factory for
ease of installation and have a designated wheel orientation mark (□
the sensor (see Figure 4.1). The wheel orientation mark on each kit sensor
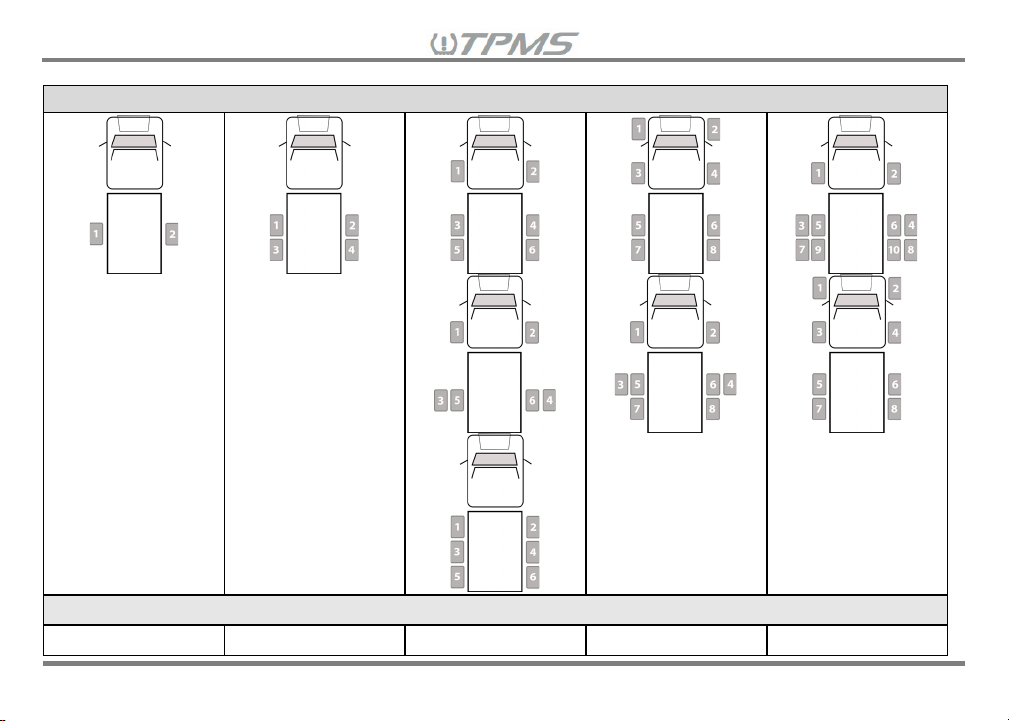
corresponds to a tire location on the vehicle and/or trailer. It is important to install
the kit sensors to the corresponding wheels on the vehicle and/or trailer (see
Table 4.1 for reference). If the sensors are installed in the correct corresponding
wheel locations in Table 4.1 for up to six (6) sensors, then you can skip Setting
“8.5 Tire Sensor ID Pairing to the Receiver” from Section “8. Settings Mode
Menu” (Note: If installing additional sensors not included in the kit, the “8.5 Tire
Sensor ID Pairing to Receiver” must be performed for the additional sensors only.)
Orientation Mark
1,□2
,…□6) on
12
Page 13
Vehicle Tire Location
Sensor Wheel Orientation Mark Numbers for CAR 1*
1-2
1-4
1-6
1-8
1-10
Table 4.1 Sensor Wheel Orientation Mark Numbers and Vehicle Tire Location for CAR 1*
13
Page 14
For Other Custom Vehicle Configurations, please see note below:
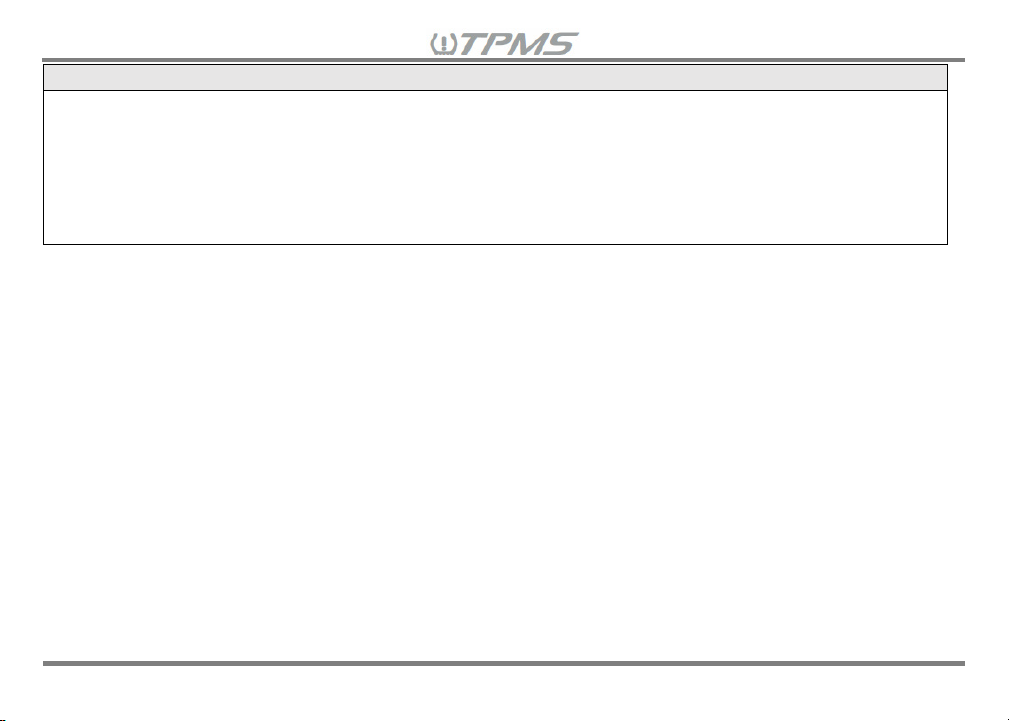
Note: For initial installation, the sensor orientation mark should be installed in the following order:
*Wheel orientation marks used per vehicle selection: CAR 1 ~ 1-10, CAR 2 ~ 11-20, CAR 3 ~ 21-30
1. Sensors on the LEFT side are ODD numbered
2. Sensors on the RIGHT side are EVEN numbered
3. Each vehicle side will have sensors increase in odd or even consecutive order from front to back
4. For vehicles with dually axles, the outside tires should have the lower numbered marking and
the inside tires should have the higher numbered marking.
<IMPORTANT 2>
The sensors’ ID# and wheel orientation mark included in the kit are listed in Section “12.3 Sensor ID#s
List for Each Vehicle Memory Selection” of each user manual. BEFORE installing additional sensors
not included in the kit, it is highly recommended that the sensor ID#s be recorded in Section 12.3 next to
the corresponding wheel orientation mark for easy identification when pairing.
The Interchangeable Valve Stem (IVS) Service Kit
The Tuson TPMS tire sensors use a metal interchangeable valve stem (IVS) that fits through 0.453" and
0.625" diameter wheel valve holes. (Note: If neither grommet size fits the wheel valve hole, a TPMS band
and cradle kit can be purchased separately without replacing the existing valve stem.)
Please circle the grommet size that was used for your tire application for easy identification and
replacement: 0.453” or 0.625”.
14
Page 15
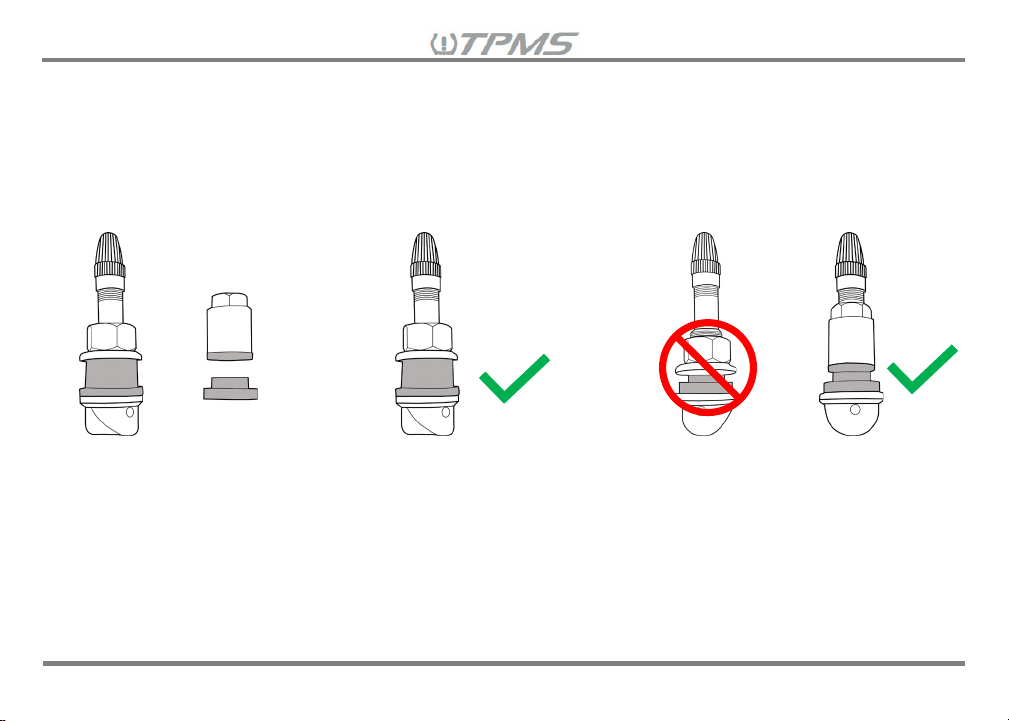
<IMPORTANT 3>
Each IVS service kit comes with two (2) rubber grommet sizes: one (1) fits 0.453” diameter wheel valve
holes and one (1) fits 0.625” diameter wheel valve holes. The IVS should be installed using a single
grommet only. WARNING! – Do NOT use both sizes of the included rubber grommets to install a single
valve stem. Please check and make sure that the correct grommet size is used for the valve stem and fits
the wheel’s valve hole diameter prior to TPMS sensor installation.
The IVS service kit comes
pre-assembled with the
0.625” diameter rubber
grommet; metal washer;
0.625” diameter nut and valve
cap on the valve stem and
includes a separate 0.453”
diameter grommet and nut in
the polybag.
Please use the preassembled 0.625” diameter
grommet on the valve stem if
the wheel valve hole is 0.625”
diameter.
When the valve hole of the wheel is
0.453” diameter, disassemble the
pre-assembled IVS valve stem.
Remove the 0.625” diameter rubber
grommet, metal washer, nut from
the valve stem. Assemble the
0.453” diameter grommet, nut and
cap in order.
15
Page 16
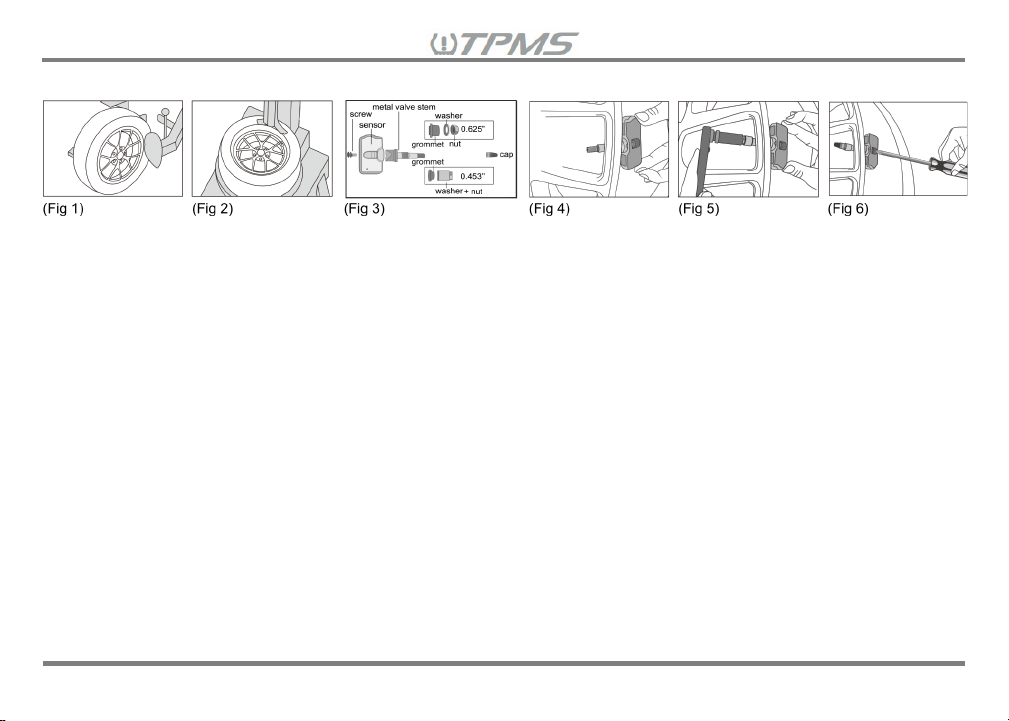
4.1 TPMS Sensor Installation:
(Fig 1) & (Fig 2) Deflate and remove the tire from the wheel using a tire mounting machine.
(Fig 3) Assemble the sensor to the metal valve stem using the mounting screw (make sure to use the
correct grommet size is on the metal valve stem), then remove the cap, 0.625" washer and nut (OR 0.453"
nut) from the metal valve stem.
(Fig 4) Insert the metal valve stem through the wheel’s valve hole, making sure to properly seat the rubber
grommet in the valve hole. Then place the back of the sensor body to face the inner surface of the rim, so
that the sensor is parallel to the rim.
(Fig 5) Holding the sensor in place, guide the washer (for 0.625" ONLY) onto the metal valve stem on the
outside of the valve hole. Then secure the 0.625" OR 0.453" nut on the metal valve stem and torque to
2.95 Ft-lbs (4 N-m). Once secured, affix the cap to the metal valve stem.
(Fig 6) Secure the sensor to the metal valve stem and torque the screw to 1.48 Ft-lbs (2N-m).
16
Page 17
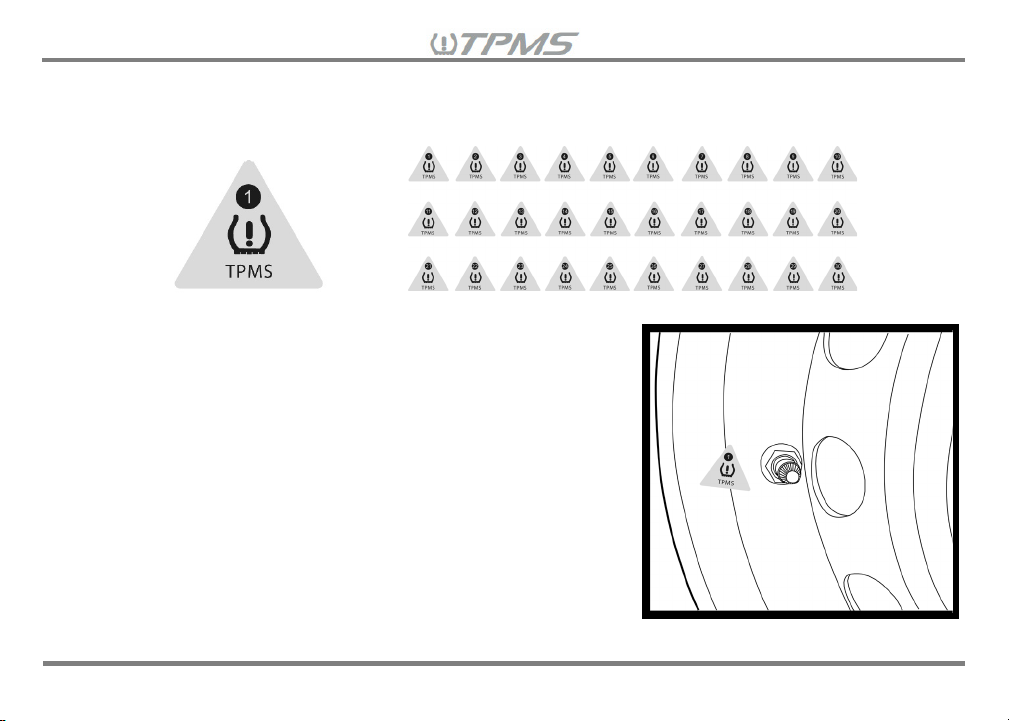
Now remount the tire back onto the wheel, being careful not to damage the tire pressure sensor during
mounting of the tire. Each TPMS retrofit kit comes with a wheel orientation mark sticker sheet to easily
identify wheel location on the receiver display and for which vehicle selection.
To apply the sticker to the wheel, clean the surface of the wheel
near the valve stem with isopropyl alcohol and allow to dry
completely. Do not use brake cleaner or other harsh chemical
solvents to prepare the wheel surface for sticker application.
Make sure the wheel surface is clean and dry then adhere the
corresponding wheel ID sticker to the clean surface near the valve
stem. This will help remind technicians to install the wheel back
to the correct location according to your defined wheel position.
Lastly, balance the wheel as you would normally, adding weights
if necessary, to achieve rotational balance.
17
Page 18
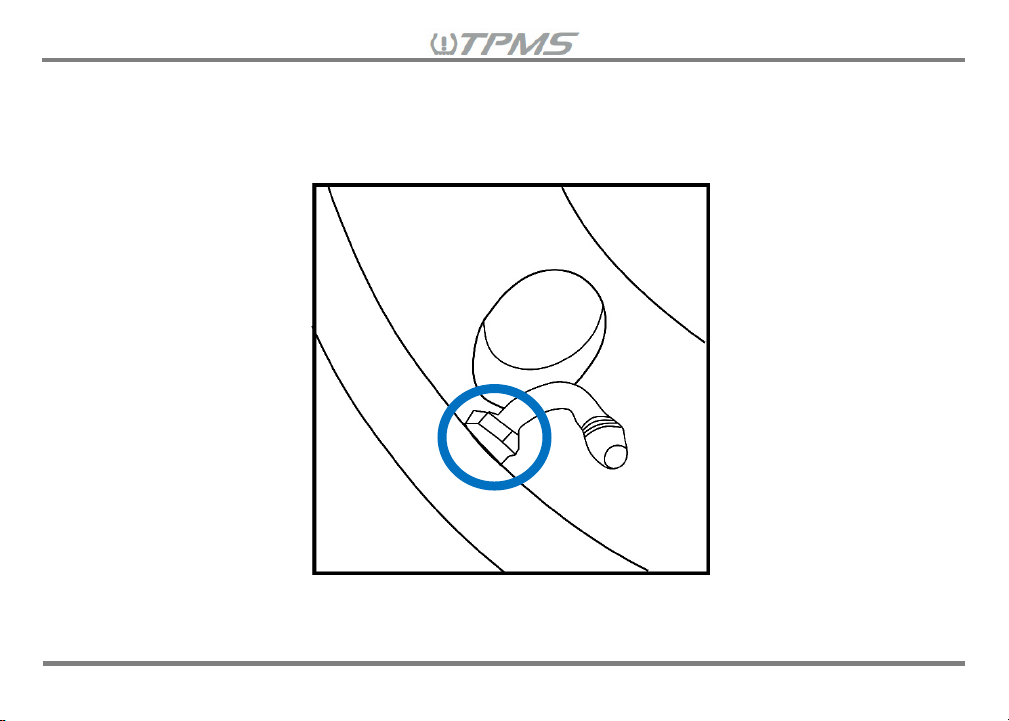
<IMPORTANT 4>
When removing the tire from the wheel rim to install our Tuson TPMS Retrofit Kit, be aware that if the valve
stem is secured by a nut, there might be a sensor already installed, be careful not to damage the sensor
during the tire removal process.
18
Page 19
5. TPMS Repeater Installation
5.1 Repeater Image
5.2 Installation Steps
The repeater is designed to boost the sensors’ RF signals to the receiver in the tow vehicle. The mounting
location of the repeater will depend on the type of trailer (bumper pull trailer, 5
the TPMS will be installed on. Select a horizontal surface location to mount the repeater on the front section
of the trailer, keeping in mind that the cable ends of the power cord will need to connect to the trailer battery.
For optimal signal performance, the key is to have the least obstructed transmission path between the
sensors, repeater and receiver. Ideally, to get the best RF transmission between repeater and tire pressure
sensors, the repeater should be in an open space with no barriers between the tire pressure sensors and
the receiver. Do NOT locate the repeater in an enclosed metal space that will block the RF signals.
19
th
wheel or gooseneck trailer)
Page 20
The repeater is waterproof and can be exposed to the outside elements without being damaged. To review
the repeater specification, please refer to the Section 3.2.
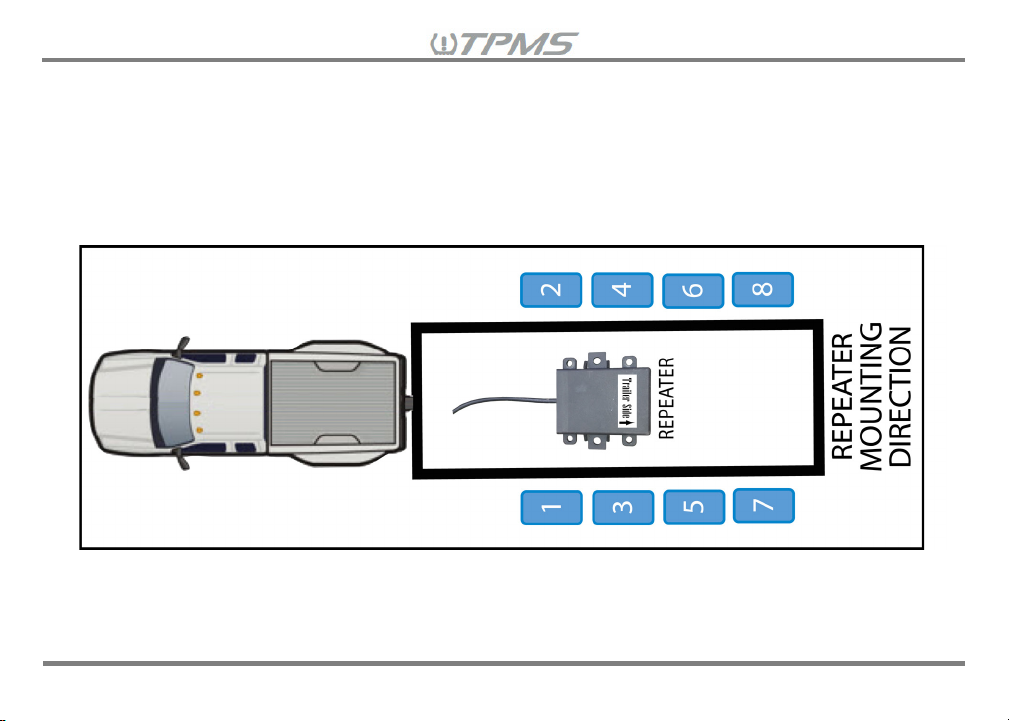
<IMPORTANT 5>
When mounting the repeater, the power cord side of the repeater must be facing the tow vehicle and the
arrow on the “Trailer Side↑” sticker must be pointing toward the trailer wheels in order to work properly as
shown in FIGURE 5.2
Figure 5.2 Repeater Mounting Direction
5.2.1 For travel, cargo or equipment trailers with a bumper pull A-frame hitch, see Figure 5.2.1
locations “A” and “B” for recommend repeater mounting locations. Location “A” is on an exposed
20
Page 21
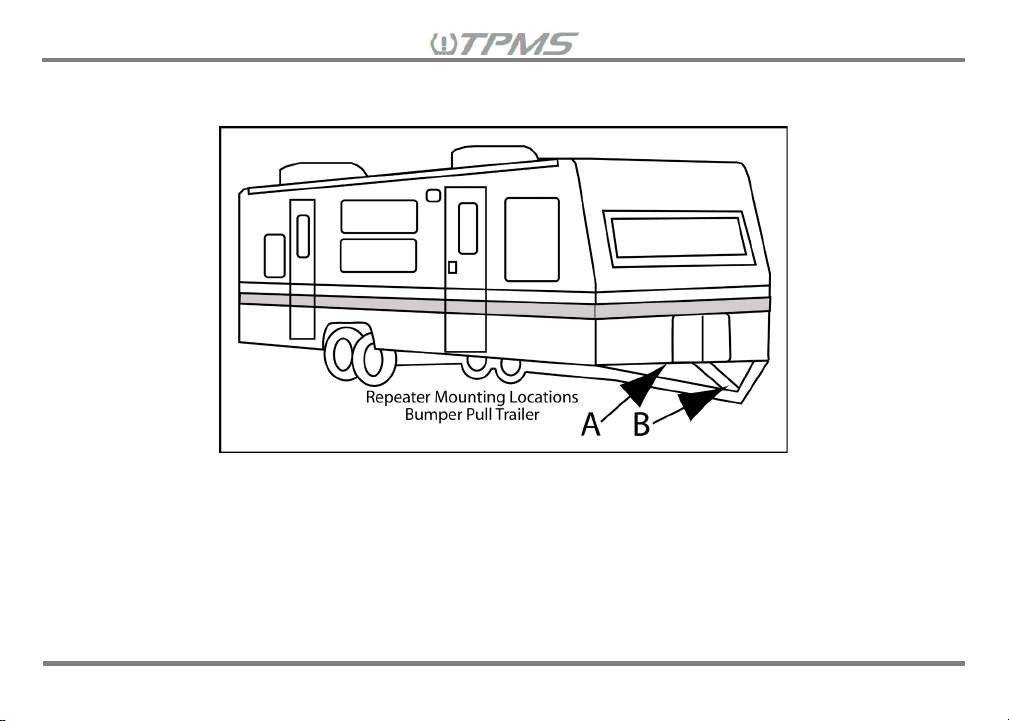
frame member on the underside of the trailer and location “B” is on the A-frame of the bumper pull
trailer.
Figure 5.2.1 Repeater Mounting Locations Bumper Pull Trailer
For 5th Wheels and gooseneck trailers select a location for the repeater near the house battery
5.2.2
but NOT inside a metal enclosure. See Figure 5.2.2 locations “A” and “B” for recommend repeater
mounting locations. Location “A” is on an exposed frame member on the underside of the trailer
and location “B” is inside the storage compartment of your fifth wheel or gooseneck trailer.
21
Page 22
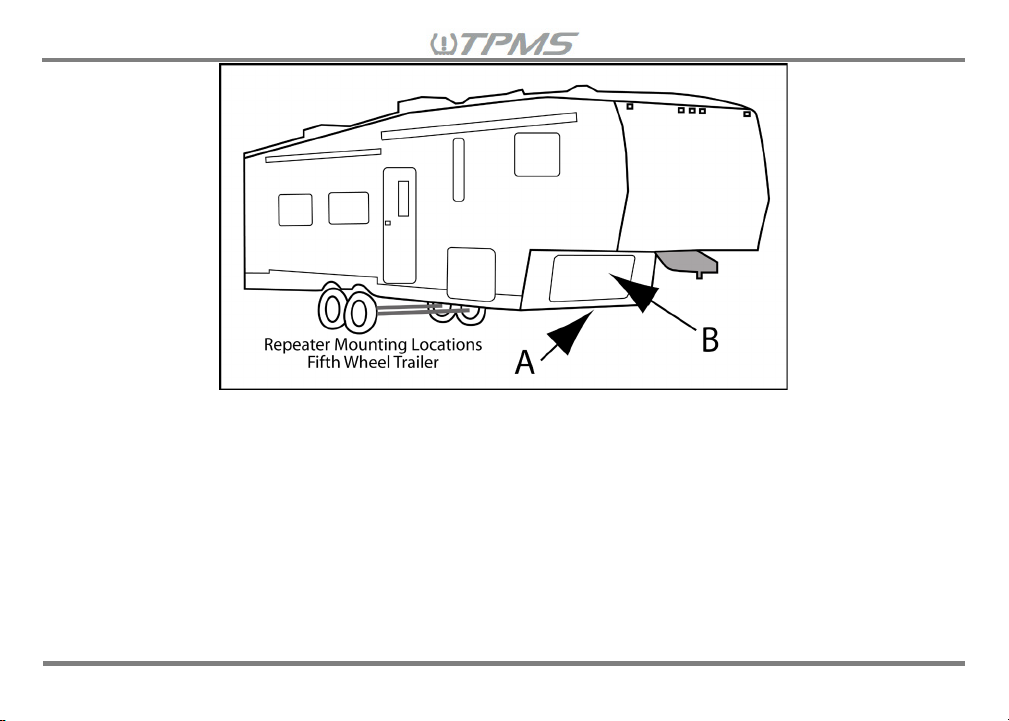
Figure 5.2.2 Repeater Mounting Locations Fifth Wheel Trailer
5.2.3
The repeater comes with a peel off adhesive foam pad and self-tapping screws that go through the
mounting holes on the edge of the housing to securely mount the repeater. Before permanently
mounting the repeater with the screws, temporarily mount the repeater to the desired location and
confirm that the sensor(s) and trailer battery data is being received and displayed by the receiver.
The sensors are activated by either driving for a short distance or adding/removing air pressure
from the tires. Once the readings appear for all of the installed sensors and the trailer battery
voltage is showing, the repeater mounting location has been confirmed. Make sure the repeater is
mounted in the correct orientation, use the adhesive foam pad and/or the self-tapping screws to
22
Page 23
secure the repeater. If using the foam adhesive pad to mount the repeater on a trailer frame
member, we recommend using at least two screws to fasten the repeater to act as a backup in
case the adhesive loses its grip over time.
5.2.4 After securely mounting the repeater to the trailer, route the power wires to the trailer battery.
Mount the O-ring connectors on the repeater’s power wires to the proper trailer battery terminals.
Connect the RED O-ring terminal to the POSITIVE (+) battery terminal and the BLACK (-) O-ring
terminal to the NEGATIVE (-) battery terminal.
5.2.5 Use the cable ties to avoid a loose repeater power cable by fastening the repeater power cable to
the frame of the trailer or 5
th
wheel. Avoid overtightening cable ties to prevent cutting into the cable.
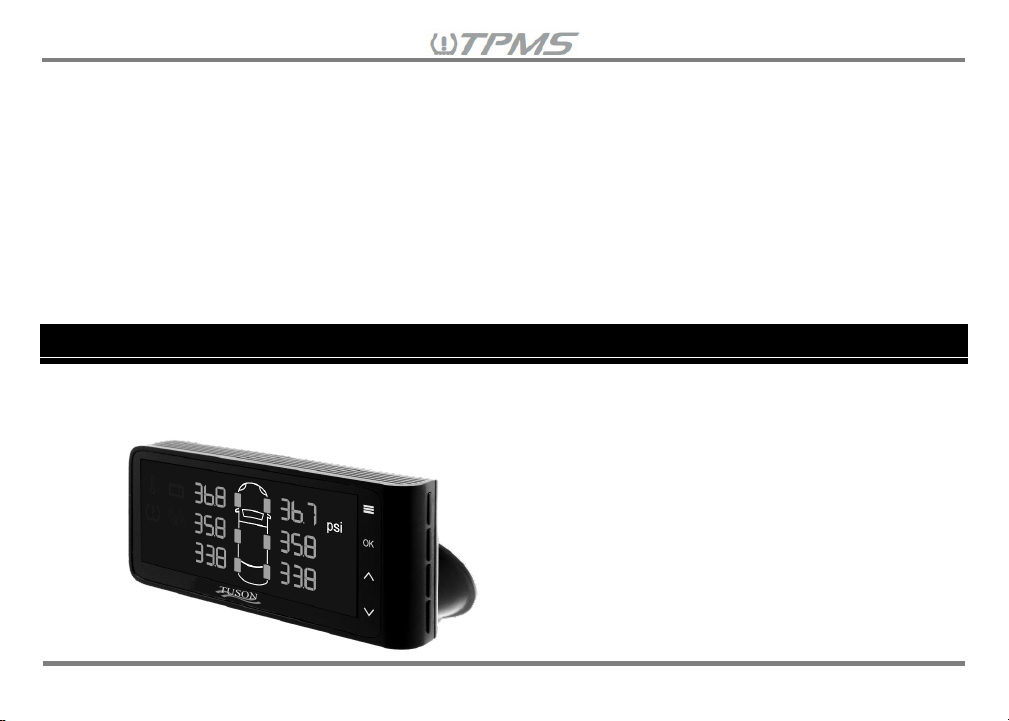
6. TPMS Receiver Installation
6.1 Receiver Image
23
Page 24
(Fig 4)
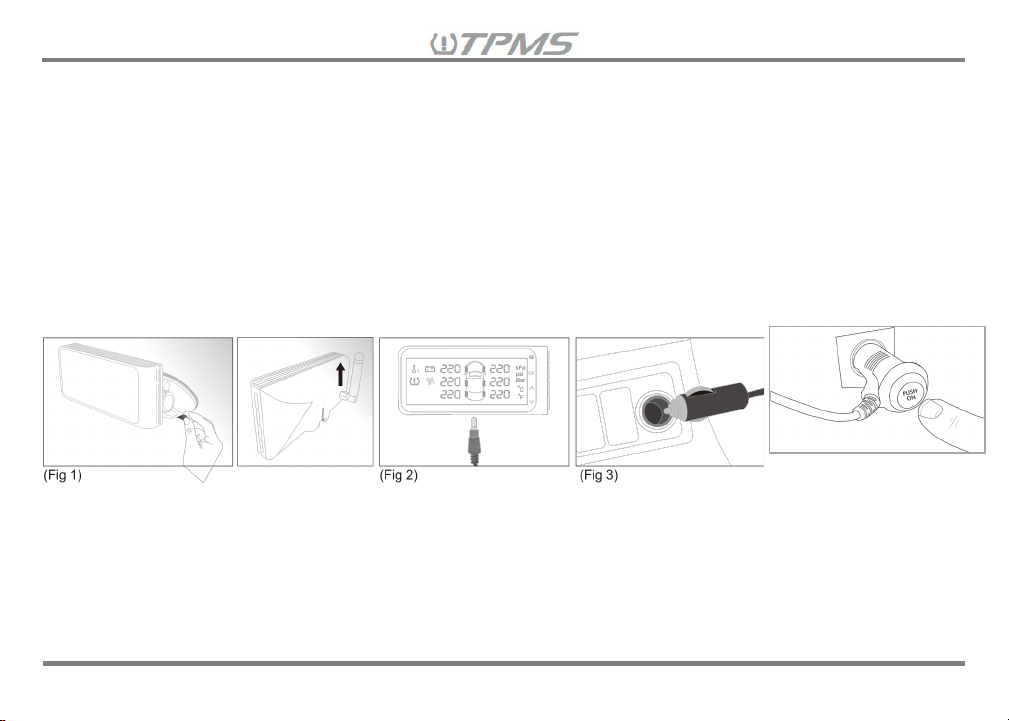
6.2 TPMS Receiver Installation
(Fig 1) Clean the windshield where the receiver will be adhered to and allow to dry. Attach the TPMS
receiver to the suction cup holder and adjust the receiver to the proper angle. Press the suction cup holder
against the desired location on the windshield. Make sure that the antenna is not bent or damaged during
the installation.
(Fig 2) Insert the power cable into the bottom of the receiver.
(Fig 3) Insert the cigarette lighter side of the power cable into the cigarette lighter socket to supply power
to the receiver.
(Fig 4) Press the red “PUSH ON” button on the cigarette lighter power cable to power the Receiver.
24
Page 25
Display Button Icon
Button Functions
• Review paired sensor ID#s to each vehicle selection & wheel location –
display mode – Press again
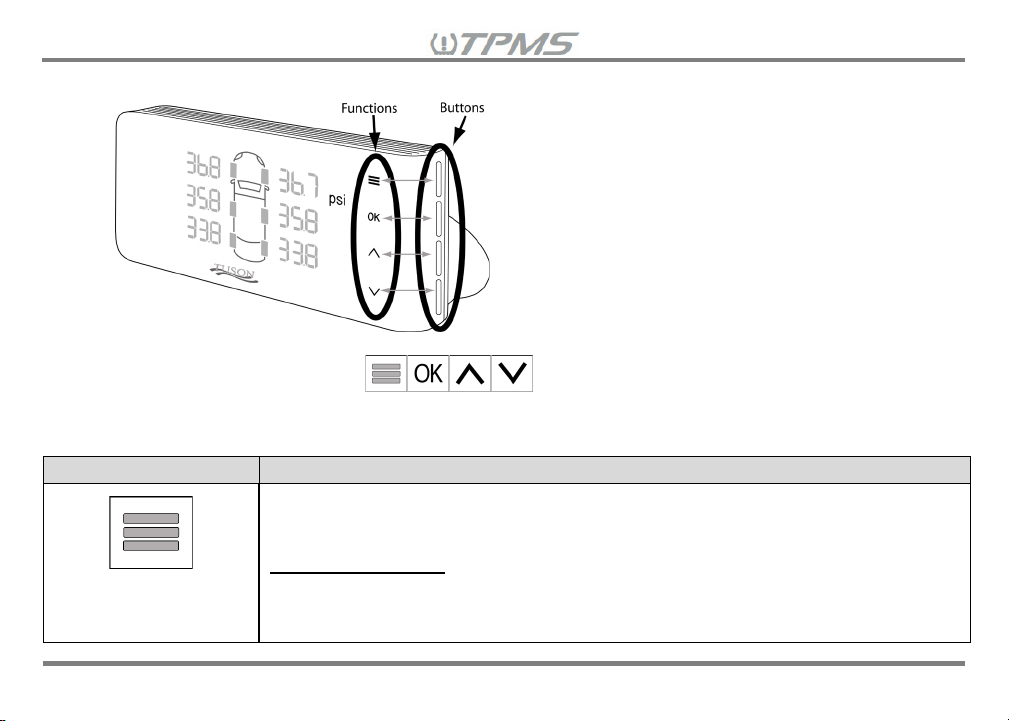
6.3 TPMS Receiver Display Button Functions
There are four buttons, from top to bottom, on the right side of the receiver. Once the receiver is powered
on, the display button functions will appear on the right side of the display and
corresponds with each of the four buttons on the right side of the receiver. The next page is a list of the
button functions.
Hold down and add power to the receiver
• Switch between Mode Menus – Hold for 3 seconds
MENU
Driving Mode Menu
• View one parameter only (pressure/temperature/trailer battery) – Press
• Return to view all parameter values of a vehicle selection on rotational
25
Page 26
Driving Mode Menu
value you would like to program (a short beep will sound if program is saved)
Driving Mode Menu
pressure or temperature value
Driving Mode Menu
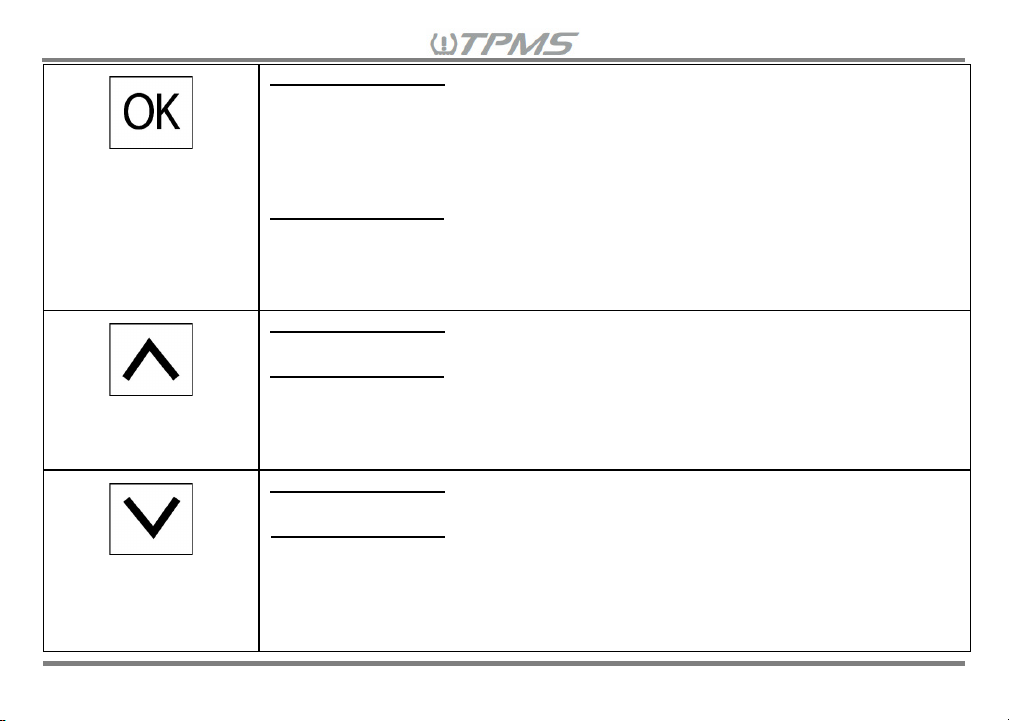
pressure or temperature value
UP ARROW
SELECT
• Mute Alarm – Press when alarm sounds (Alarm will sound again if receiver
power is reset and issue is not addressed, or another alarm occurs in the
same wheel or in other wheels)
• Turn OFF Screen – Hold for 3 seconds (receiver is working in the background
and will turn on if alarm occurs. Press any button to turn ON screen)
Setting Mode Menu
• Select Setting to View/Modify – Press to view/modify the specific setting and
the parameter/value will start blinking
• Program Setting Selection/Values – Press for each blinking selection or
• Increase Alarm Volume – Press
Setting Mode Menu
• Navigate Setting Screens – Press to scroll through different setting screens
• Modify Setting Selection/Values – Press when selection/value is blinking
• Rapid Increase in Value – Press and hold to quickly reach the desired
DOWN ARROW
• Decrease Alarm Volume – Press
Setting Mode Menu
• Navigate Setting Screens – Press to scroll through the different setting
screens
• Modify Setting Selection/Values – Press when selection/value is blinking
• Rapid Decrease in Value – Press and hold to quickly reach the desired
26
Page 27
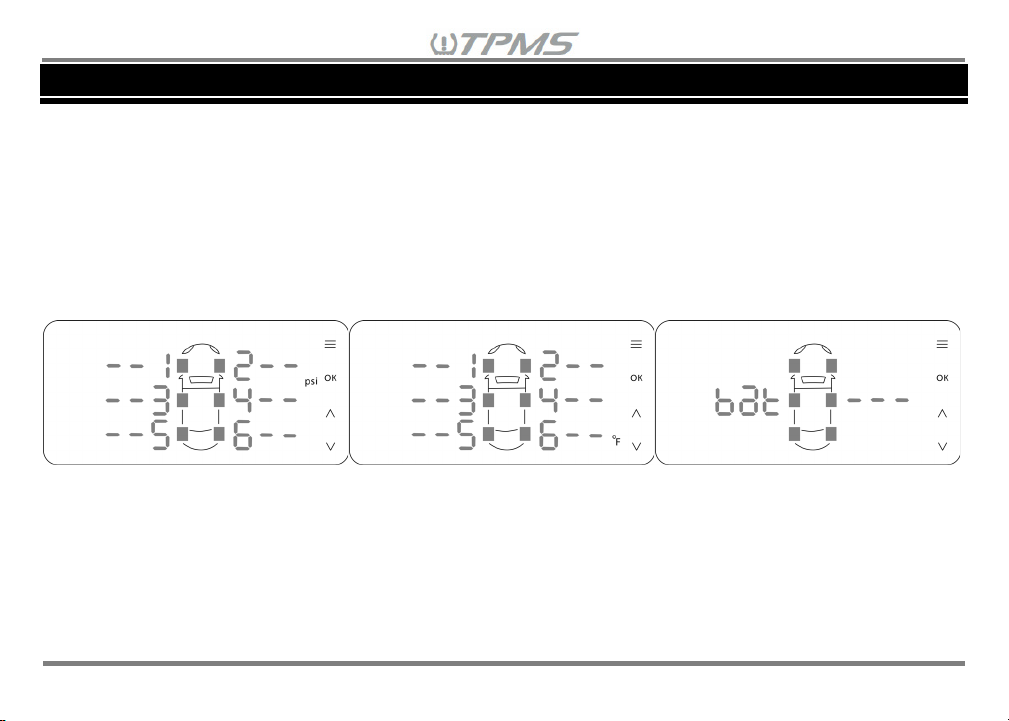
7. Driving Mode Menu
Once all TPMS hardware installation is complete and the receiver is turned on, the receiver will
automatically display in Driving Mode for the default vehicle selection: CAR 1. The Driving Mode cycles
between tire pressure, tire temperature and vehicle/trailer battery voltage display screens in a rotating
sequence and will show green dash lines “- -“ and corresponding wheel number or “---” for battery voltage
(See Figure 7.1). The green dash lines will remain until the sensor senses that the wheel speed is over
12 mph/20 kph or pressure is being added/released from the tire. Sensors may take a few minutes to
wake-up. Once the sensors wake-up, the sensor will continue to transmit data to the receiver every
minute while moving.
Figure 7.1 Tire Pressure / Tire Temperature / Vehicle/Trailer Battery Voltage Display Screens
There are different display modes with different vehicle configurations, see the Table 7.1 below. Please
pay attention to the white number on the actual vehicle tire location and how it refers to the red number
tire location on the display on Table 7.1. There may be other custom vehicle configurations in which
Table 7.1 does not cover, but the table can be used as a reference on how the tire location on the display
will correlate with the actual tire location on a vehicle.
27
Page 28
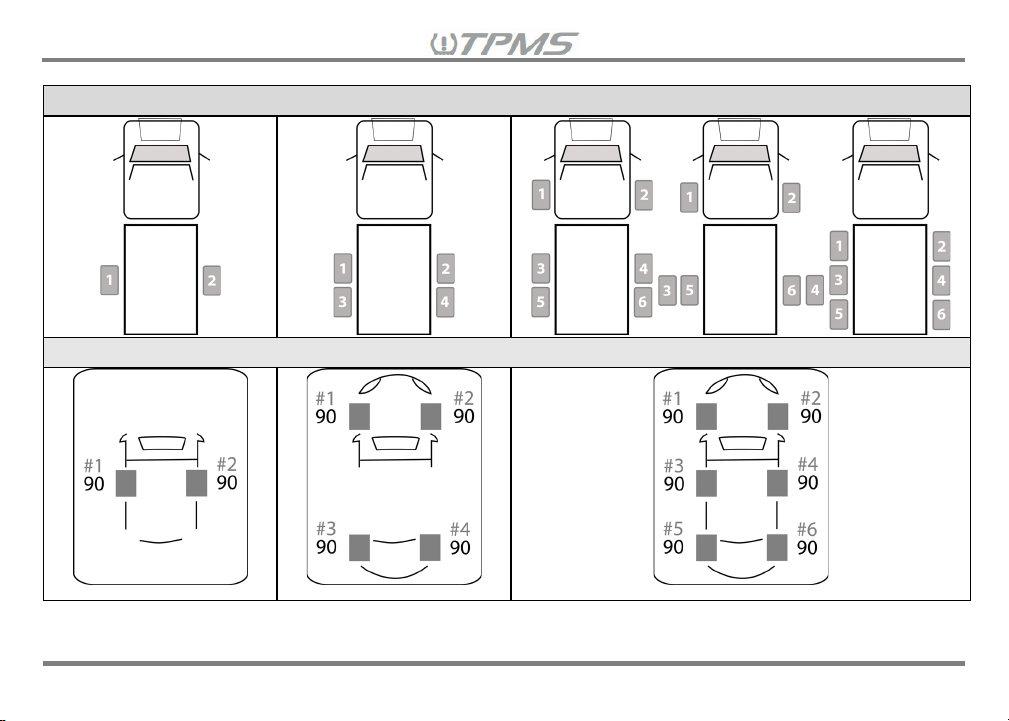
Vehicle Tire Location
Display Mode
Table 7.1 Vehicle Tire Location on Receiver Display Mode
28
Page 29
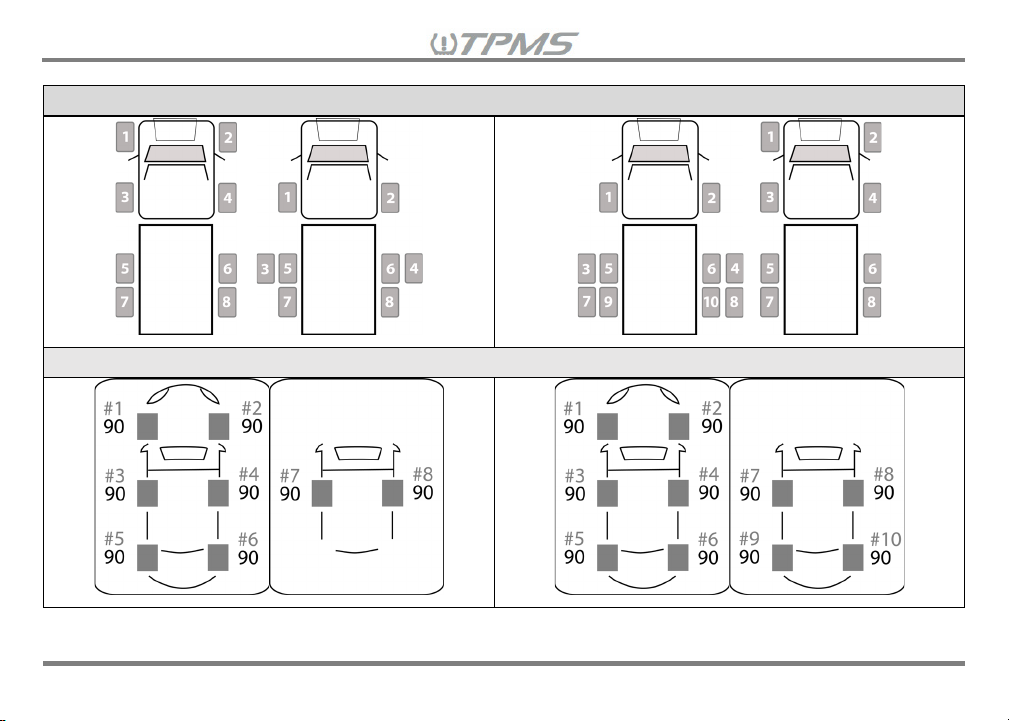
Vehicle Tire Location
Display Mode
Table 7.1 Vehicle Tire Location on Receiver Display Mode (continued)
29
Page 30
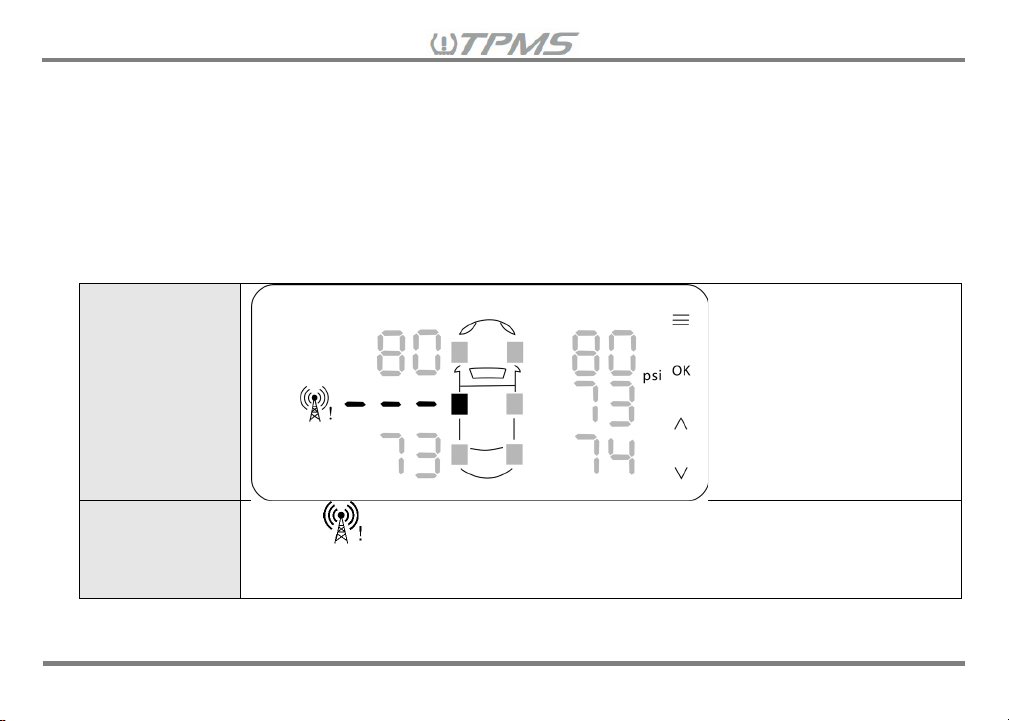
TPMS
Alarm
• Sensor pressure/temperature value become “---” and will turn red
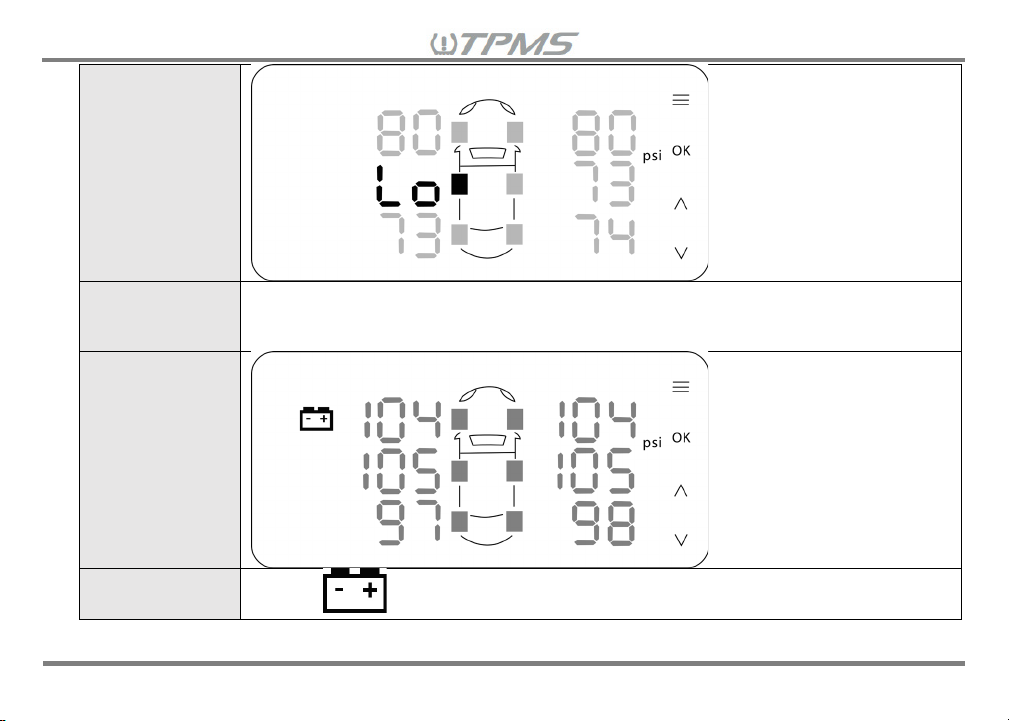
During Driving Mode, the receiver will monitor all the installed sensors and the tow vehicle battery
voltage. The receiver will alert the user of the following sensor and tow vehicle battery issues:
• TPMS System Alarm: indicates that the sensor signal was lost since the receiver has not
received a sensor signal from a specific wheel for at least 10 minutes. (Note: This does not
activate when the vehicle is stopped.)
• Sensor Low Battery Power: indicates that the sensor’s battery power status is low.
• Low Battery Power on the tow Vehicle (12V): indicates tow vehicle battery voltage≦11.5V.
System
Alarm Image
Indicators
• alarm symbol will appear on the left side of the display in red
• Tire/wheel location will turn red and blink
30
Page 31
Sensor Low
Alarm
• Sensor pressure/temperature value become “Lo” and will turn red
• One beep per second will sound
Low Battery
Alarm
Indicators
alarm symbol will appear on the left side of the display in red
Battery
Power Image
Indicators
• Tire/wheel location will turn red and blink
Power on the
Tow Vehicle
(12V) Image
•
The alarm indicators will continue until the issue is resolved and the condition has returned to normal.
31
Page 32
Pressure units
Default tire pressure value
kPa
552 kPa
Psi
80 psi
Bar
5.5 Bar
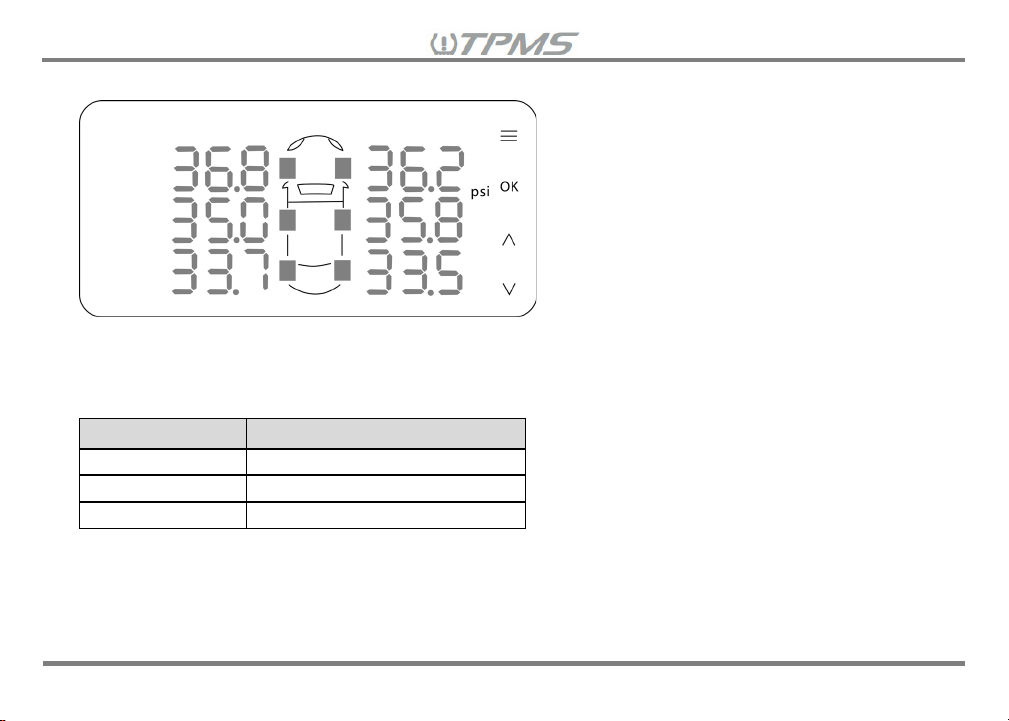
7.1 Tire pressure Display: psi, kPa & Bar (Pressure units)
In the Driving Mode, the default value for tire pressure is set to 80 psi (See Section 8.3 Setting Tire
Pressure to change the default pressure unit and/or value). Below is the default value for each unit of
pressure selected:
Note: When using kPa as the unit of air pressure, the monitor will display “Hi” if the air pressure is over
999kPa. The actual air pressure values will be displayed numerically when the unit of measure selected is
in psi or Bar.
32
Page 33
Tire Pressure
Alarm
• One beep per second will sound
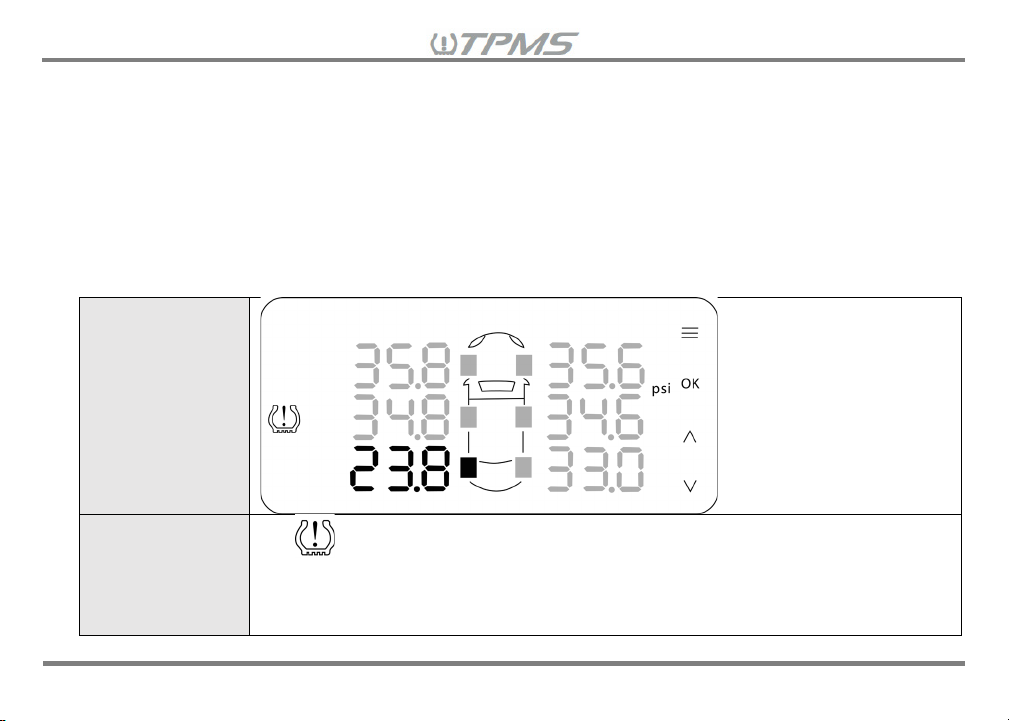
During Driving Mode, the receiver will monitor for low and high pressure. The low- and high-pressure alarms
are structured by the following parameters:
• Warning of excessive high tire pressure indicates tire pressure has been risen to 50% or more
• Warning of excessive low tire pressure indicates that the tire pressure has decreased by 20%
When these alarm parameters are met, the following alarm indicators will alert the user of a tire pressure
issue:
Alarm Image
Indicators
of the standard tire pressure value set by the user [P≧ (1.5*standard Pressure value)].
or more of the standard tire pressure value set by the user [P≦ (0.8*standard Pressure value)].
• alarm symbol will appear on the left side of the display in red
• Tire/wheel location will turn red and blink
• Pressure value will turn red
33
Page 34
The alarm indicators will continue until the issue has been resolved and the pressure value(s) have returned
to normal range.
The default setting for the display in Driving Mode is to cycle between the tire pressure, tire temperature
and vehicle/trailer battery voltage screens. If the user would like to monitor the tire pressure values only on
the display screen, press when the tire pressure screen is displayed. Press again to return to
cycling between screens.
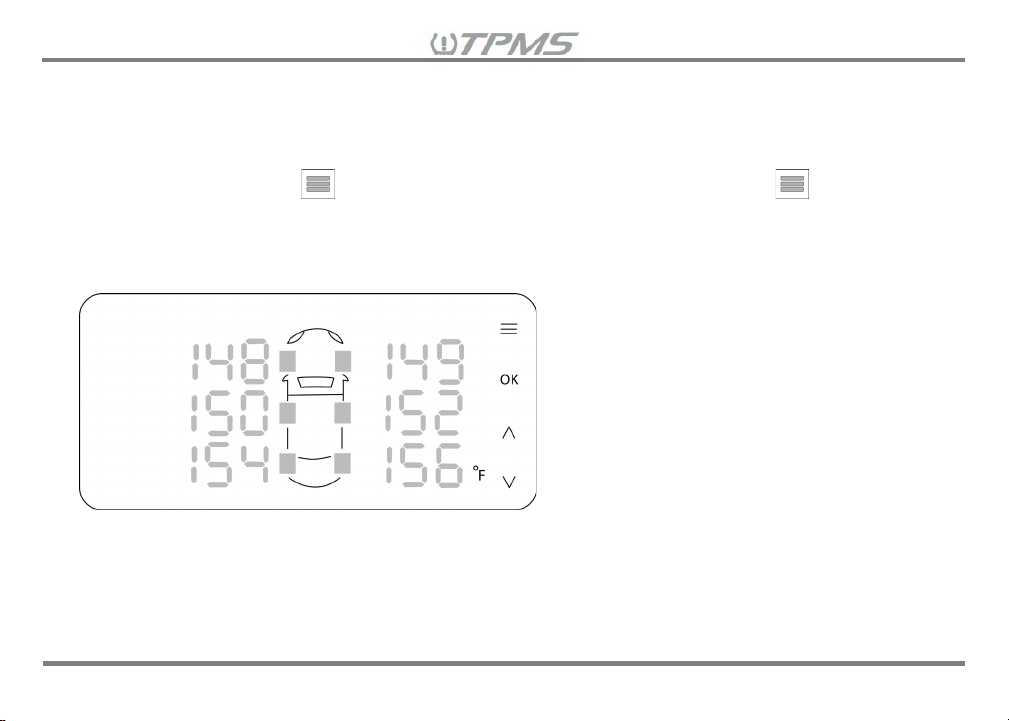
7.2 Tire Temperature Display: °F & °C (Temperature units)
In Driving Mode, the default value for tire temperature is set to 176 °F (See Section 8.4 Setting Tire
Temperature to change the default temperature unit and/or value).
34
Page 35
Temperature
units
Default tire
temperature value
ᵒC
80 ᵒC
°F
176 °F
Tire
Alarm
• One beep per second will sound
Below is the default value for each unit of temperature selected:
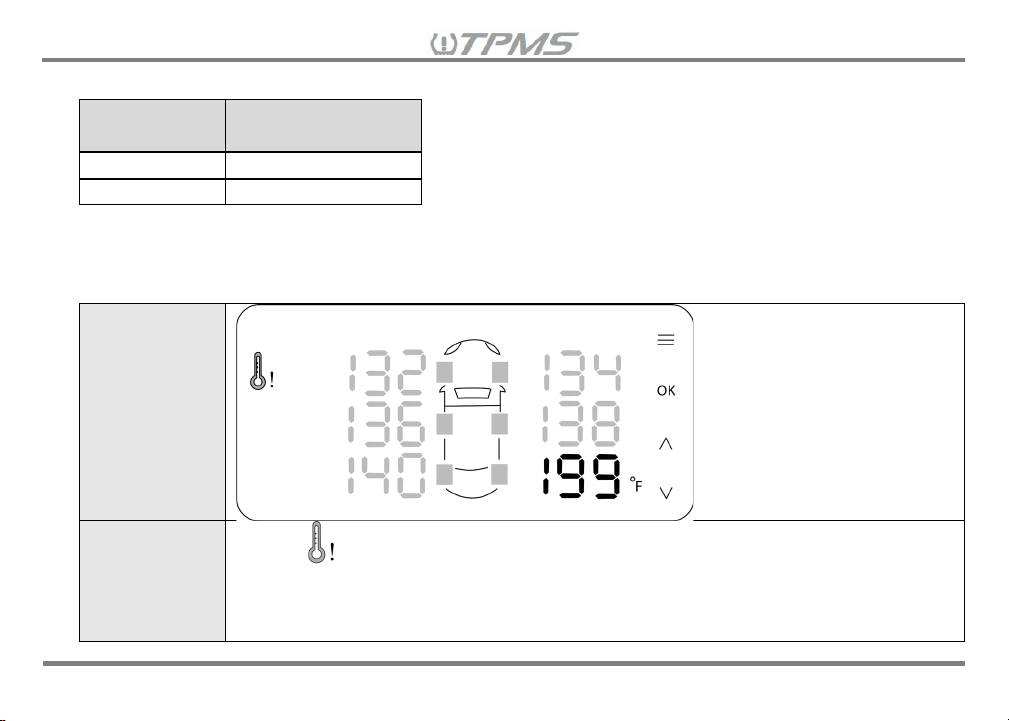
During Driving Mode, the receiver will monitor for high temperature. If the tire temperature rises above the
standard tire temperature value set by the user [T≧ (standard temperature value)], then the following alarm
indicators will alert the user of a high tire temperature issue:
Temperature
Alarm
Image
Indicators
• alarm symbol will appear on the left side of the display in red
• Tire/wheel location will turn red and blink
• Temperature value will turn red
35
Page 36
The alarm indicators will continue until the issue has been resolved and the temperature value(s) have
returned to normal range.
<IMPORTANT 6>
Typically, low tire pressure will generate high temperature. If you are seeing a high temperature warning
but no low tire pressure warning, then the sensor is detecting high temperature from metal components
that transfer heat faster than rubber. This indicates that the tire/wheel location may have a bearing or brake
issue and should be checked as soon as possible.
The default setting for the display in Driving Mode is to cycle between the tire pressure, tire temperature
and vehicle/trailer battery voltage screens. If the user would like to monitor the tire temperature values only
on the display screen, press when the tire temperature screen is displayed. Press again to
return to cycling between screens.
7.3 Vehicle/Trailer Battery Voltage
36
Page 37
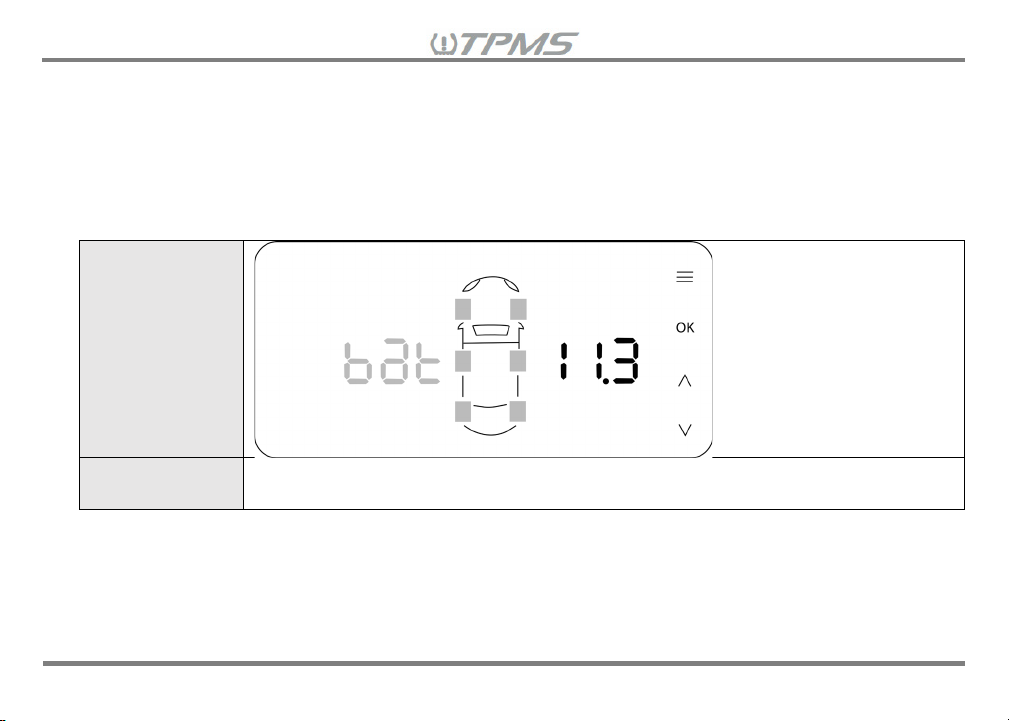
Low Battery
Alarm
Indicators
• The battery voltage value will display in red text
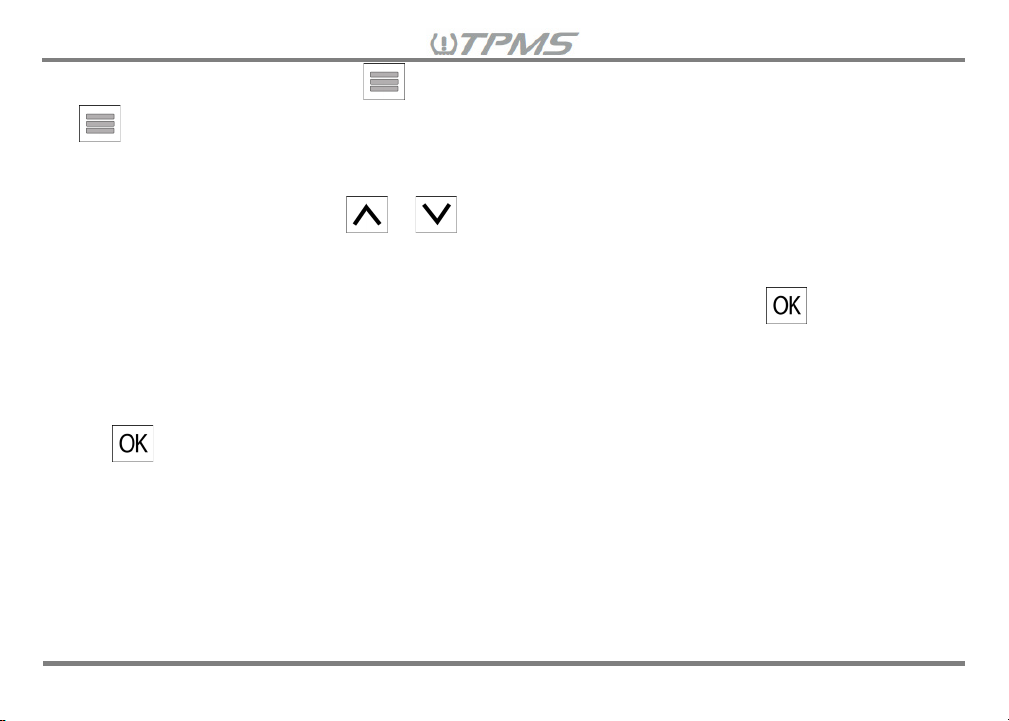
In Driving Mode, the user can monitor the vehicle/trailer battery voltage of the battery that the repeater is
installed and connected to. On the battery voltage display screen, the “
diagram stands for battery and the battery voltage value is displayed to the right side of the vehicle diagram.
The repeater requires 12/24V battery for proper operation.
If the vehicle/trailer battery voltage drops below 11.5 or 23V, the following alarm indicators will alert the
user of a low battery voltage issue:
bat” to the left of the vehicle
Power in the
Vehicle/Trailer
Battery
(12/24V)
Image
The alarm indicator will continue until the issue has been resolved and the vehicle/trailer battery voltage
has returned to normal range.
The default setting for the display in Driving Mode is to cycle between the tire pressure, tire temperature
and vehicle/trailer battery voltage screens. If the user would like to monitor the vehicle/trailer battery voltage
37
Page 38
only on the display screen, press when the vehicle/trailer battery voltage screen is displayed. Press
again to return to cycling between screens.
7.4 Alarm Volume Adjustment
During the Driving Mode, press or to adjust the alarm volume.
7.5 Mute Alarm
When an alarm sound goes off, the user has the option of muting the alarm. Press to mute the alarm.
The alarm will sound again if the receiver power is reset, another alarm occurs on the same wheel or an
alarm occurs on other wheels.
7.6 Screen OFF
Hold for 3 seconds to turn off the screen, the receiver is still working in the background.
7.7 Screen ON
Press any button to turn on the screen, the screen will also turn on when a tire alarm occurs.
38
Page 39
8. Settings Mode Menu:
To enter the Settings Mode menu from Driving Mode, press and hold the for 3 seconds. At any time,
press and hold for another 3 seconds to switch back to Driving Mode. User will have 60 seconds to
make any changes for each TPMS parameter setting. If no change is made within that period, a long tone
beep will sound from the receiver to warn the user that the setting was not programmed, and receiver
display will return to Driving Mode.
The receiver supports TPMS parameter settings for up to three (3) vehicle and/or trailer combinations.
Follow the settings list below to configure the relative parameters for each vehicle and/or trailer
combination. Fig 8 Settings Mode Menu Screen Chart shows the sequence of Setting Mode screens.
8.1 Vehicle Selection
8.2 Setting the Number of Wheels to Display
8.3 Setting Tire Pressure
8.4 Setting Tire Temperature
8.5 Tire Sensor ID Pairing to the Receiver
8.6 Setting Tire Position on the Receiver
39
Page 40
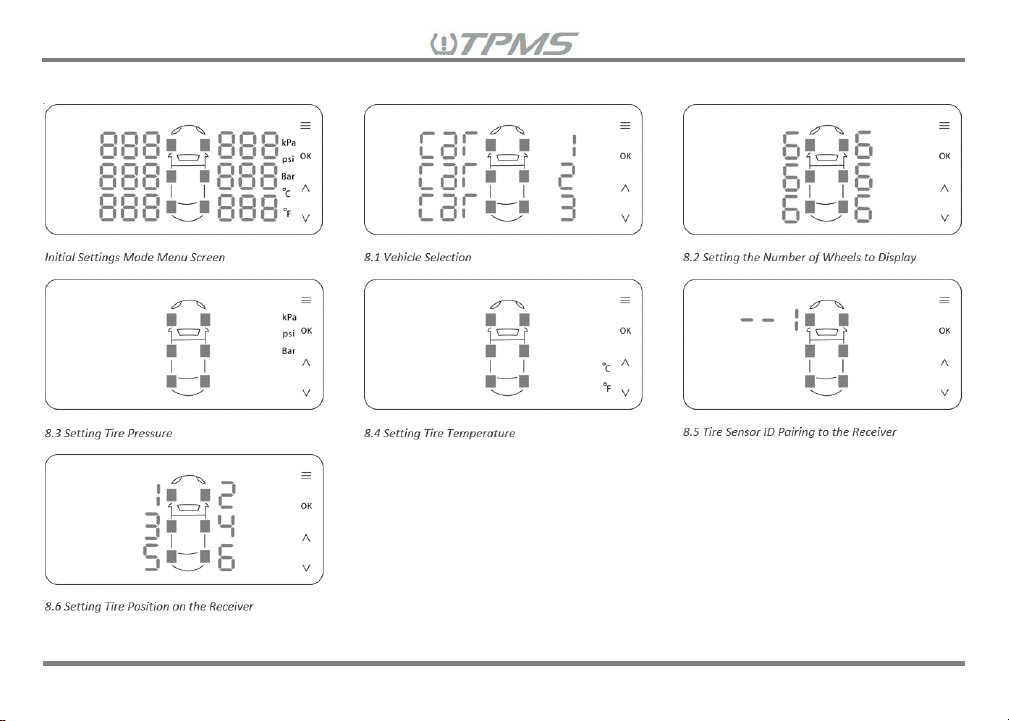
Figure 8 Settings Mode Menu Screen Chart
40
Page 41
8.1 Vehicle Selection
The receiver can store the ID sensors for up to three (3) vehicle and/or trailer combinations. The Vehicle
Selection allows you to view, set, or modify the TPMS parameter settings of a specific vehicle and/or trailer
combination. The receiver defaults to monitor Vehicle Selection “CAR 1”. The first step is to select the
vehicle and/or trailer combination that you would like to program.
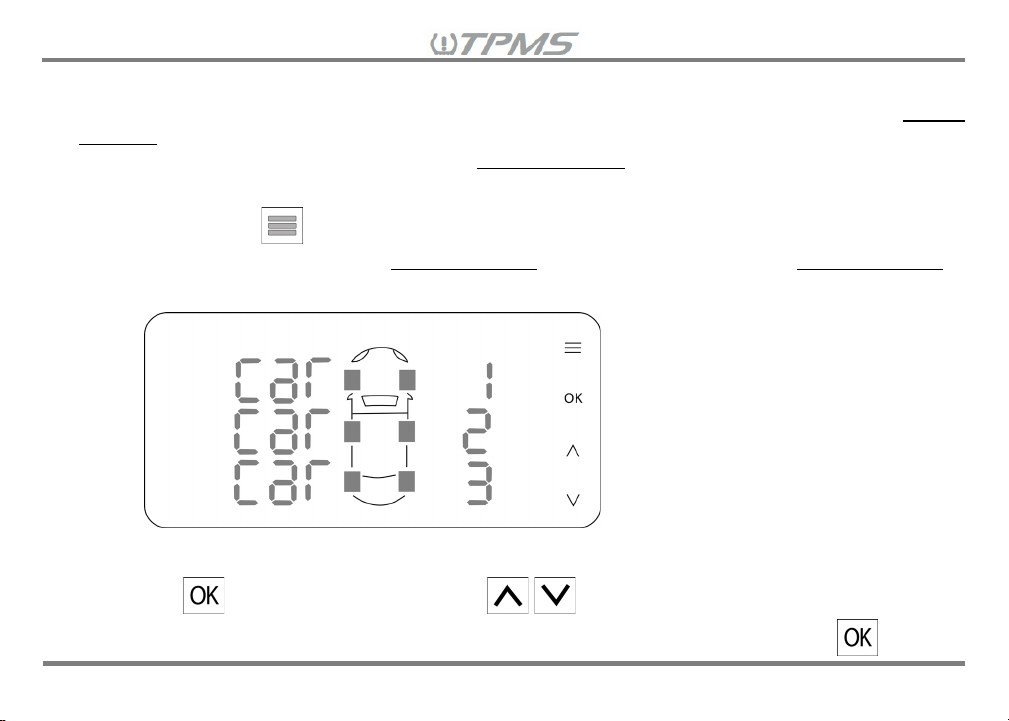
8.1.1 Press and hold for 3 seconds to enter the Settings Mode Menu. The first screen to display in
the Settings Mode Menu is the Vehicle Selection TPMS parameter setting. The Vehicle Selection
will display as shown below list “CAR 1”, “CAR 2” and “CAR 3”.
8.1.2 Press , then “CAR 1” will blink. Press to select the vehicle and/or trailer
combination you would like to program or select to view in Driving Mode, then press to
41
Page 42
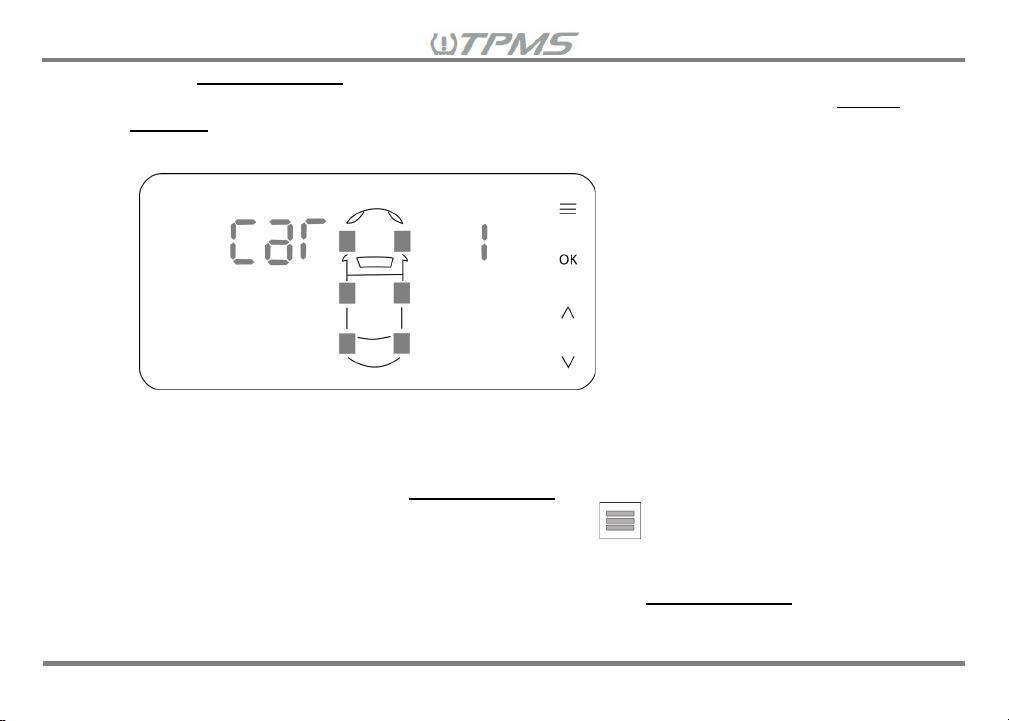
confirm Vehicle Selection and a short beep will sound. The receiver will automatically go to the next
TPMS parameter setting “9.2 Setting the Number of Wheels to Display”. (Note: If no Vehicle
Selection is made within 60 seconds, the receiver will beep for a long tone to warn that the last
setting was not stored in the receiver and the display will return to Driving Mode.)
8.1.3 If this is your first time setting up the TPMS Retrofit kit, you will need to set the TPMS parameter
settings for “CAR 1”, starting with Step 9.2 through 9.4. (Note: Step 9.5 is necessary only when
adding additional sensors NOT included in this TPMS kit or replacing sensors and step 9.6 is for a
tire rotation). If only selecting the Vehicle Selection to monitor in Driving Mode and no other TPMS
parameter settings need to be modified, press and hold for 3 seconds to return to the Driving
Mode Menu.
8.1.4 When “CAR 1” settings are complete, you can go back to the Vehicle Selection to repeat setting
procedures 9.1.2 and 9.1.3 for “CAR 2” and “CAR 3”.
42
Page 43
8.1.5 After TPMS parameter settings have all been programmed for each Vehicle Selection, repeat step
9.1.2 to select the vehicle and/or trailer combination you would like to monitor and then press and
hold for 3 seconds to switch back to Driving Mode. Once the receiver has returned to Driving
Mode the TPMS parameter settings programmed for the selected Vehicle Selection will be
monitored.
8.1.6 For more than one programmed Vehicle Selection in the receiver, the user will need to go to the
Settings Mode Menu to manually select the programmed Vehicle Selection (CAR 1, CAR 2, CAR 3)
they would like to monitor on the receiver. In Driving Mode, the receiver will only display the paired
sensors’ data of the selected Vehicle Selection set by the user. If user switches to
another vehicle/trailer that has different sensor data programmed on another Vehicle Selection in
the same receiver, the user will need to return to the Vehicle Selection setting to select
the correct vehicle/trailer to monitor on the receiver.
8.1.7 If you would like to skip the Vehicle Selection setting to go to other parameter settings in the
Setting Mode Menu, you can press to move to the next TPMS parameter setting.
8.2 Setting the Number of Wheels to Display
The receiver can monitor up to ten (10) tires for each programmed vehicle selection. The Setting the
Number of Wheels to Display setting allows you to view, set, or modify the number of wheels monitored on
the receiver for the selected vehicle selection. The receiver will be preset to either four (4) or six (6) wheels
to display based on the number of TPMS sensors included in the TPMS Retrofit Kit for “CAR 1”. The default
wheel number to display is six (6) wheels for “CAR 2” and “CAR 3”. If the default Number of Wheels to
Display for “CAR 1” is correct and you will NOT be installing additional TPMS sensors to “CAR 1”, then you
43
Page 44
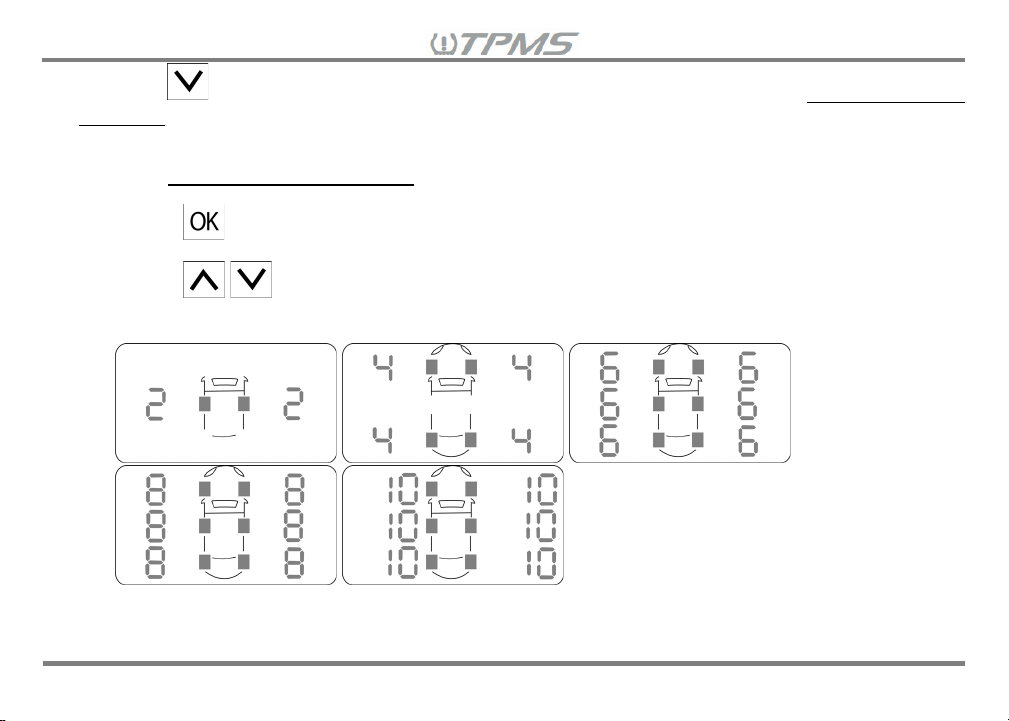
can press to move to the next TPMS parameter setting. If you are setting up the Number of Wheels
to Display for “CAR 2” or “CAR 3” for the first time, or installing additional TPMS sensors to any of the
vehicle selections, follow the instructions below:
8.2.1 The Number of Wheels to Display setting screen will show the default wheel number.
8.2.2 Press and the wheel number will blink.
8.2.3 Press to increase/decrease the number of wheels to display. The number of wheels to
display increase/decrease in increments of two.
44
Page 45
8.2.4 Press to confirm your selection and a short beep will sound, indicating that the setting has
been saved. The receiver will automatically go to the next TPMS parameter setting: “9.3 Setting
Tire Pressure” for that vehicle selection. If no further parameter settings are required, you can hold
the for 3 seconds to switch back to Driving Mode. (Note: If the Number of Wheels to Display
is NOT made within 60 seconds, the receiver will beep for a long tone to warn that the last setting
was not stored to the receiver and the display will return to Driving Mode.)
8.3 Setting Tire Pressure Units
The receiver can monitor and display tire pressure in three (3) different units of pressure: kPa, psi, and Bar.
The Setting Tire Pressure Units setting allows the user to view, set, or modify the unit of pressure and
standard pressure value for each set of tires monitored on the receiver for the selected vehicle selection.
If the Tire Pressure Units setting is skipped, the default tire pressure values listed in step 8.3.3 will be used.
Depending on the type of tires that are being monitored the standard tire pressure value will vary. Below is
a general tire pressure inflation guideline to help determine the standard tire pressure value to be set based
on tire type:
• For Trailer Tires, which will have an “ST” in front of the tire size, tire industry experts recommend
• For Passenger Vehicle Tires, the tire pressure should be inflated to the vehicle’s recommended
using the maximum inflation pressure indicated on the sidewall of the tire to provide the full load
carrying capacity. You can also reference the tire inflation pressure guidelines on the chassis plate.
tire pressure located on the vehicle door edge or in the owner’s manual.
45
Page 46
Type of Tire
Recommended
Tire Pressure
Low Pressure
Warning
Standard Tire
Pressure Value
High Pressure
Warning
Trailer Tire
80 psi (MAX)
80*0.8= 64 psi
80 psi
80*1.5= 120 psi
Passenger Vehicle Tire
32 psi
32*0.8= 25.6 psi
32 psi
32*1.5= 48 psi
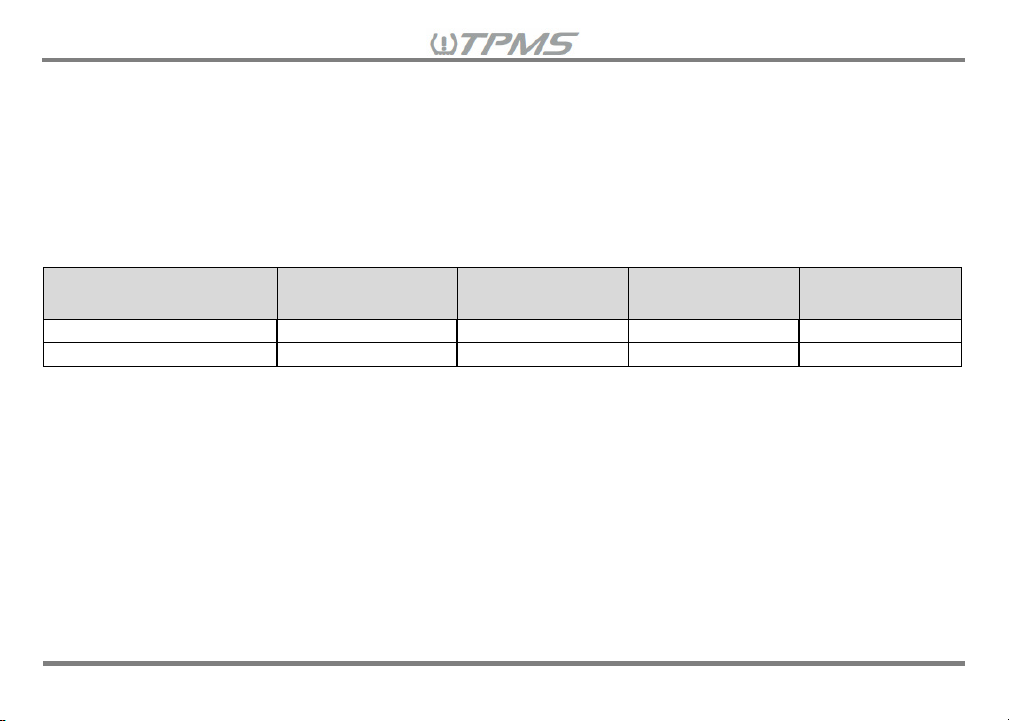
The Tuson TPMS monitors the following two tire pressure alerts:
• High Pressure – indicates tire pressure has risen 50% or more above the standard tire pressure
value set by the user.
• Low Pressure – indicates tire pressure has fallen 20% or more below the standard tire pressure
value set by the user.
Based on the general tire pressure inflation guideline and the system’s pressure alert parameters, you can
determine the standard tire pressure value to set for each set of tires using the following formula:
<IMPORTANT 7>
The standard tire pressure value is the "cold" inflation pressure that the tire is designed to hold. It is also
important to remember that the vehicle/trailer's recommended tire inflation pressure is always to be
measured and set when the tire is "cold". Cold conditions are defined as early in the morning before the
day's ambient temperature, sun's radiant heat or the heat generated while driving causes the tire pressure
to increase.
46
Page 47
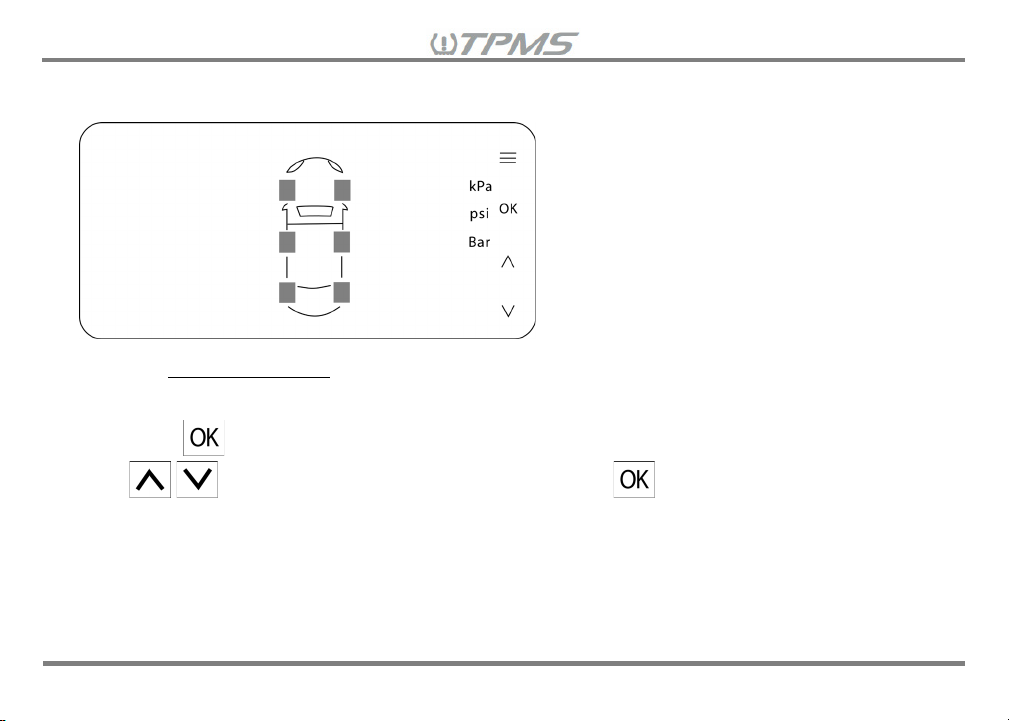
Once you have determined the standard tire pressure values that you would like to set, follow the
instructions below:
8.3.1 The Tire Pressure Units setting screen will list “kPa” “psi” and “Bar” pressure units on the upper-
right hand corner of the display screen.
8.3.2 Press and the pressure units will blink. Pressure unit “psi” will be selected by default. Press
to select the desired pressure unit, then press to confirm and a short beep will
sound.
47
Page 48
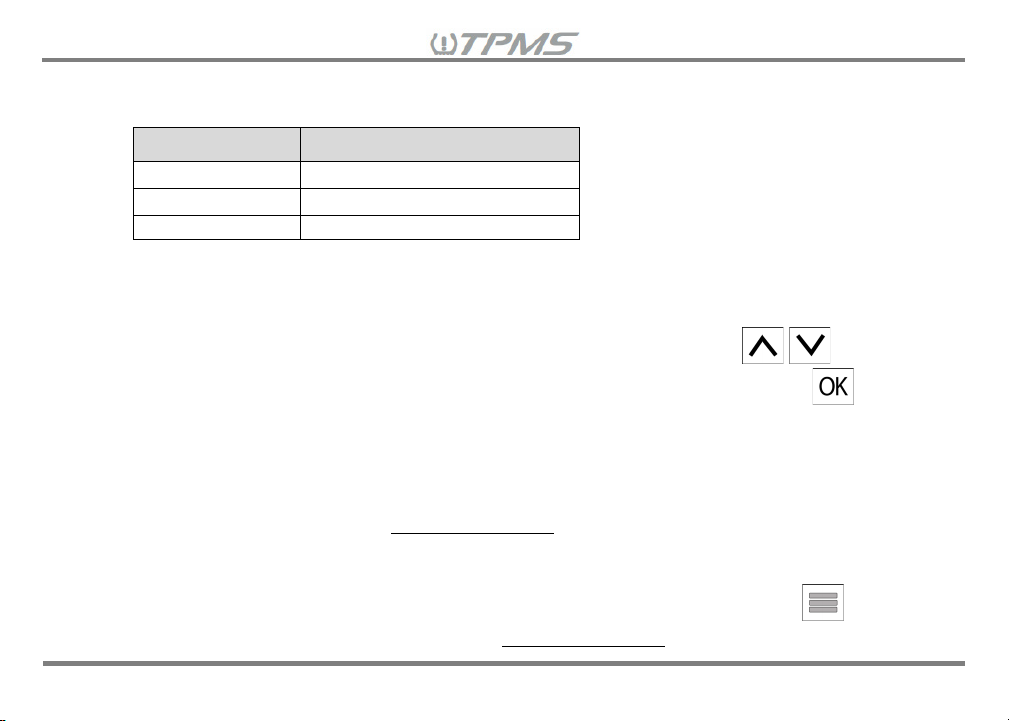
kPa
552 kPa
Psi
80 psi
Bar
5.5 Bar
8.3.3 Once the desired pressure unit is selected, the standard tire pressure value can be programmed
for each set of wheels. Below is chart of the default tire pressure values per pressure unit:
Pressure units Default tire pressure value
Note: When using kPa as the unit of air pressure, the monitor will display “Hi” if the air pressure is
over 999kPa. The actual air pressure values will be displayed numerically when the unit of
measure selected is in psi or Bar.
8.3.4 The tire pressure value of the first set of wheels will begin to blink. Press to
increase/decrease pressure value to the standard tire pressure value, then press to set the
pressure value.
8.3.5 The tire pressure value of the next pair of wheels will begin to blink. Repeat step 8.3.4 until each
pair of wheels has been programmed to the standard tire pressure value.
8.3.6 When you have completed the Tire Pressure Units settings for all tires, you will hear a short beep,
indicating that the set tire pressure values have been saved successfully. The receiver will
automatically go to the next TPMS parameter setting: “9.4 Setting Tire Temperature Units” for that
vehicle selection. If no further parameter settings are required, you can hold the for 3 seconds
to switch back to Driving Mode. (Note: If the Tire Pressure Units is NOT programmed within 60
48
Page 49
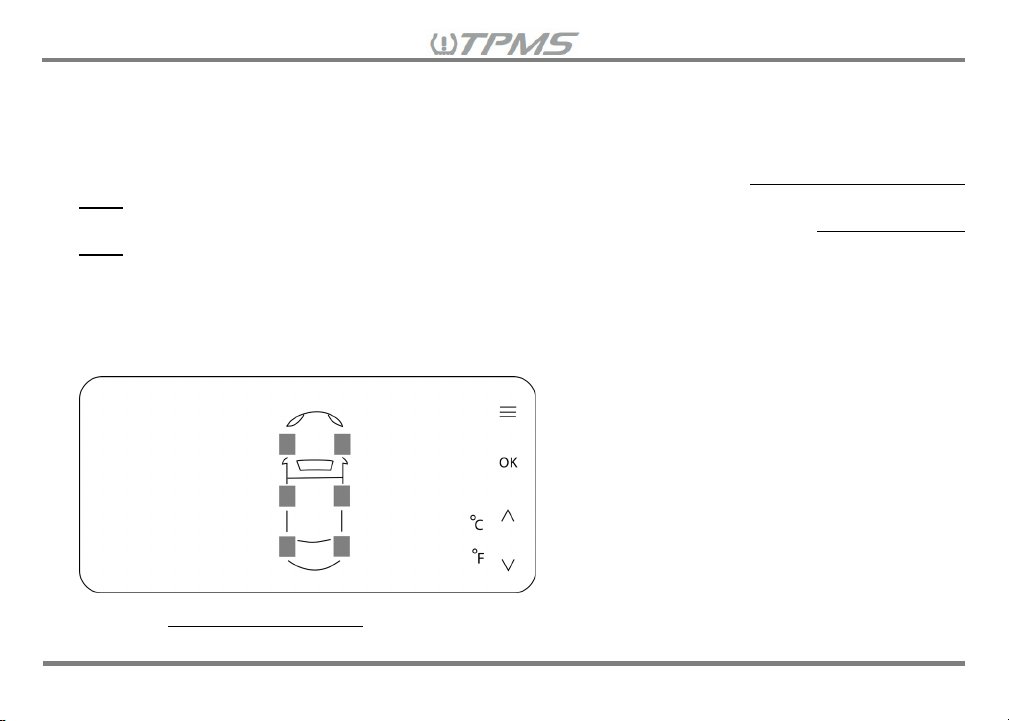
seconds, the receiver will beep for a long tone to warn that the last setting was not stored to the
receiver and the display will return to Driving Mode.)
8.4 Setting Tire Temperature Units
The receiver can monitor and display tire temperature in either ᵒF or ᵒC. The Setting Tire Temperature
Units setting allows the user to view, set, or modify the unit of temperature and standard temperature value
for each set of tires monitored on the receiver for the selected vehicle selection. If the Tire Temperature
Units setting is skipped, the default tire temperature values listed in step 8.4.3 will be used. Generally, the
default temperature setting is sufficient, but depending on your circumstances you may want to reduce
standard temperature value to common tire temperature settings of 158ᵒF or 167ᵒF (70ᵒC or 75ᵒC).
Once you have determined the standard tire temperature values that you would like to set, follow the
instructions below:
8.4.1 The Tire Temperature Units setting screen will list “ °C ” and “ °F ” temperature units on the lower-
right hand corner of the display screen.
49
Page 50
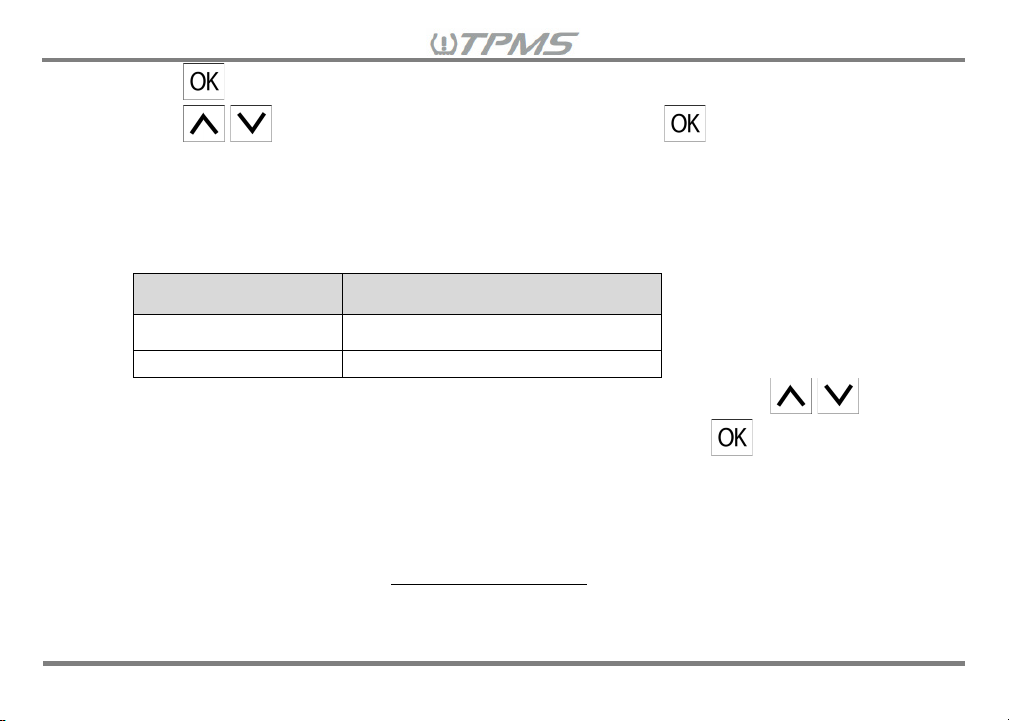
°F
176 °F
8.4.2 Press and the temperature units will blink. Temperature unit “ °F ” will be selected by default.
Press to select desired temperature unit, then press to confirm and a short beep
will sound.
8.4.3 Once the desired temperature unit is selected, the standard tire temperature value can be
programmed for each set of wheels. Below is chart of the default tire temperature values per
temperature unit:
Temperature units Default tire temperature value
℃ 80 ℃
8.4.4 The tire temperature value of the first set of wheels will begin to blink. Press to
increase/decrease to the standard tire temperature value, then press to set the temperature
value.
8.4.5 The tire temperature value of the next pair of wheels will begin to blink. Repeat step 8.4.4 until
each pair of wheels has been programmed to the desired standard tire temperature value.
8.4.6 When you have completed the Tire Temperature Units settings for all tires, you will hear a short
beep, indicating that the set tire temperature values have been saved successfully. The receiver
will automatically go to the next TPMS parameter setting: “8.5 Tire Sensor ID Pairing to the
Receiver” for that vehicle selection. If no further parameter settings are required, you can hold the
50
Page 51
for 3 seconds to switch back to Driving Mode. (Note: If the Tire Temperature Units is NOT
programmed within 60 seconds, the receiver will beep for a long tone to warn that the last setting
was not stored to the receiver and the display will return to Driving Mode.)
8.5 Tire Sensor ID Pairing to the Receiver
<IMPORTANT 8>
If the Tuson TPMS Retrofit Kit sensors were installed according to Section 4. TPMS Sensor Installation
and NO additional sensors will be installed for CAR 1, then Setting 8.5 can be SKIPPED for CAR 1. (Note:
If installing additional sensors not included in the kit, the “8.5 Tire Sensor ID Pairing to Receiver” MUST be
performed to install the additional sensors only.)
To pair the additional tire sensor IDs to the receiver:
8.5.1 The receiver will need to be placed close to each tire with a sensor that you would like to pair to the
receiver. If the included 12V cigarette lighter cable is not long enough to reach the tire sensors that
you would like to pair, you can use the following alternatives to reach the tire sensors:
• 12V extension cord with cigarette plug
• Tuson Display Power Cable (sold separately) to power the receiver with a 9V battery,
• 12-Volt AC/DC Power Converter
• Move the tow vehicle close to the trailer
8.5.2 If moving the tow vehicle close to the trailer, disconnect the tow vehicle from the trailer electrically
and physically if it is connected. Move the tow vehicle with the receiver unit installed close enough
to the trailer or vehicle wheels that receiver can be placed near the sensors installed in the tires.
51
Page 52
8.5.3 Move the receiver close to the wheel of the vehicle/trailer wheel to be paired
<IMPORTANT 9>
You do NOT have to pair the sensors that were included in the Tuson TPMS Retrofit Kit if you followed
Section 4. For example, if you purchased a 6-wheel TPMS Retrofit Kit and 2 additional sensors to monitor
8-wheels total on CAR 1, you will need to pair wheel location 7 and 8 ONLY since 1-6 will already be paired
to the receiver.
8.5.4 If the Setting Mode Menu timed out and returned to Driving Mode Menu, then hold for 3
seconds and press until you reach the Tire Sensor ID Pairing setting screen. (Note: The
last selected vehicle selection will be the one that you are pairing. If it is not the vehicle selection
that you would like to perform the Tire Sensor ID Pairing, then you will need to perform Setting 8.1
again.)
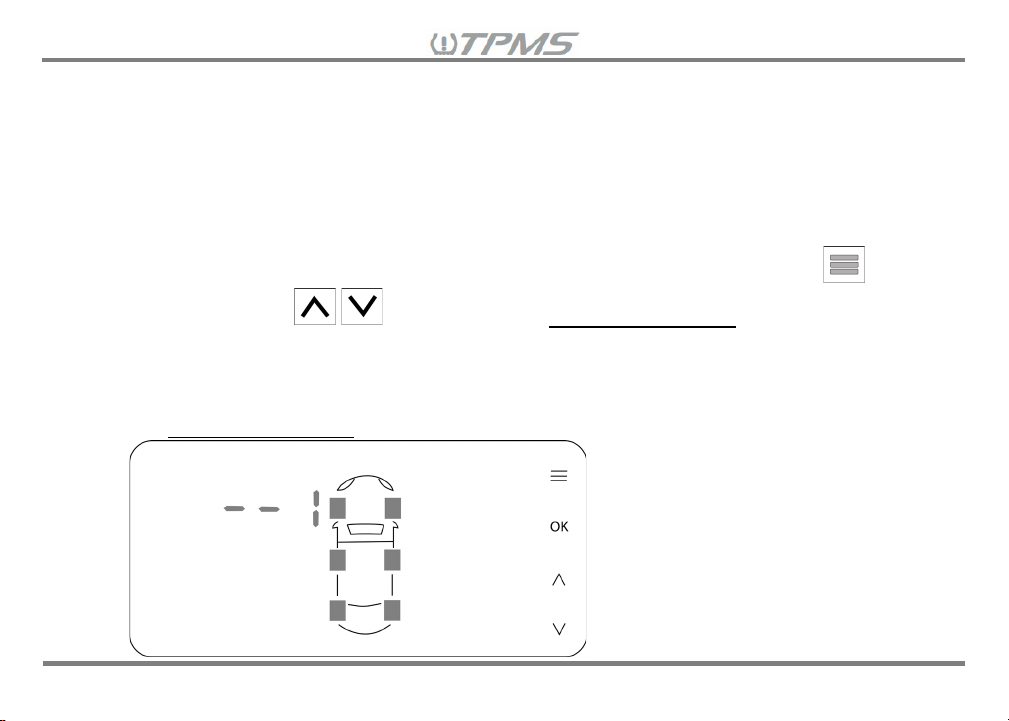
8.5.5 The Tire Sensor ID Pairing screen will show “--1” at the left-front tire sensor by default.
52
Page 53
8.5.6 Press and the “--1” will blink. Press to navigate to tire location number that you would
like to pair. (Note: One or two red dashes “-” and a number (1-10) are used to indicate the tire
location on a Vehicle Selection. Tire location numbers 1-10 on the Tire Sensor ID Pairing
will be the same regardless of the Vehicle Selection.)
8.5.7 Once you are on the selected tire location to pair and while the tire location is blinking, begin
deflating or inflating the corresponding tire. Each tire will have 120 seconds to complete the Tire
Sensor ID Pairing after the blinking starts. (Note: The receiver will emit a long beep and go back to
the Tire Sensor ID Pairing if it DOES NOT receive any signal from tire deflation within 120 seconds.
8.5.8 A short beep will sound and the sensor’s ID number will appear on the receiver indicating that the
sensor signal was received and properly paired to the receiver.
8.5.9 Inflate tire back to standard pressure level.
8.5.10 Press to move to the next tire location you would like to pair.
8.5.11 After completing the Tire Sensor ID Pairing for the vehicle selection, press and the receiver
will automatically go to the next TPMS parameter setting: “8.6 Setting the Tire Position on the
Receiver”
screen
53
Page 54
<IMPORTANT 10>
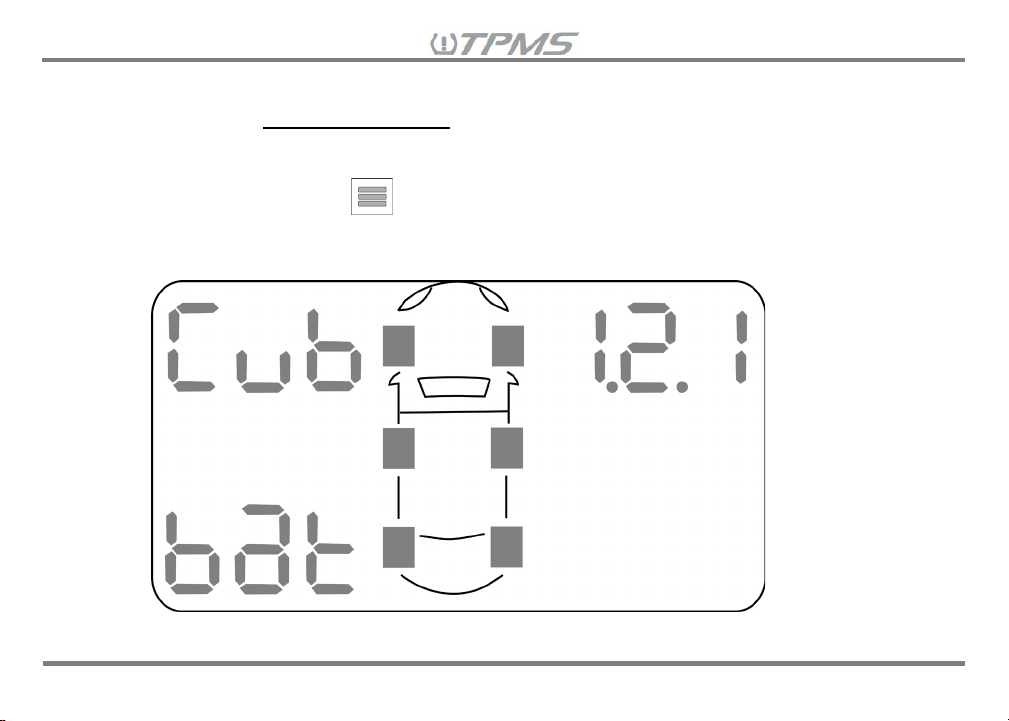
After you finished the Tire Sensor ID Pairing for a vehicle selection. You can review paired sensor ID#s to
each vehicle selection & wheel location to confirm whether each sensor ID and tire location was properly
paired to the vehicle selection and matches the sensor ID#s that listed in Section 13.3. Turn the receiver
power off, then press and hold button while powering on the receiver. The following sequence of
screens will appear:
• Firmware version
54
Page 55
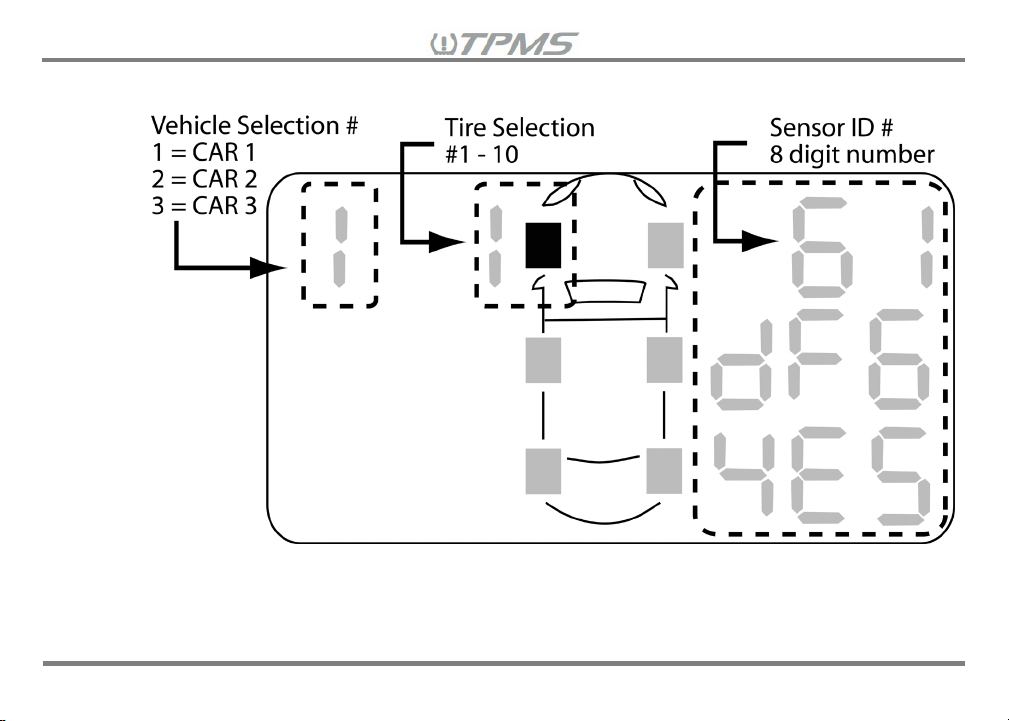
• Vehicle Selection/Tire Location/Sensor ID# Screen Cycle
55
Page 56
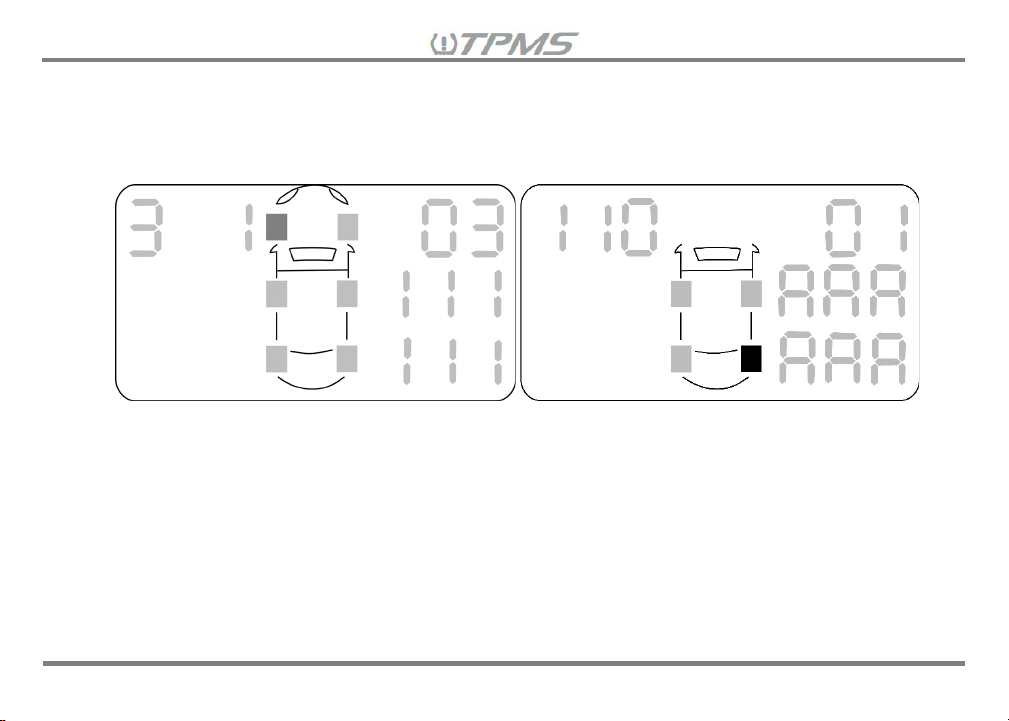
If a sensor did not properly pair to the receiver, then instead of seeing the sensor ID# on the right
side of the screen, you will see a “
repeated on both the second and third row (Note: For tire location 10, “
second and third row).
0” followed by the vehicle selection# and the tire location#
A” will be repeated in
If after performing the sensor ID# review, you noticed that some sensor ID#s were reversed and
5
in the incorrect tire location (i.e. paired sensor ID with wheel orientation mark □
on receiver, but sensor is actually installed in tire location 5 and vice versa), then return to the
Settings Mode Menu and go to Setting 8.6 Setting the Tire Position on the Receiver to swap the
tire position to show the correct sensor ID in the right tire location on the receiver.
After you finish reviewing and confirming the paired sensor ID#s to each vehicle selection &
wheel location and everything is correct, you are all set and ready to use the Tuson TPMS
Retrofit Kit. Congratulations!
in tire location 6
56
Page 57
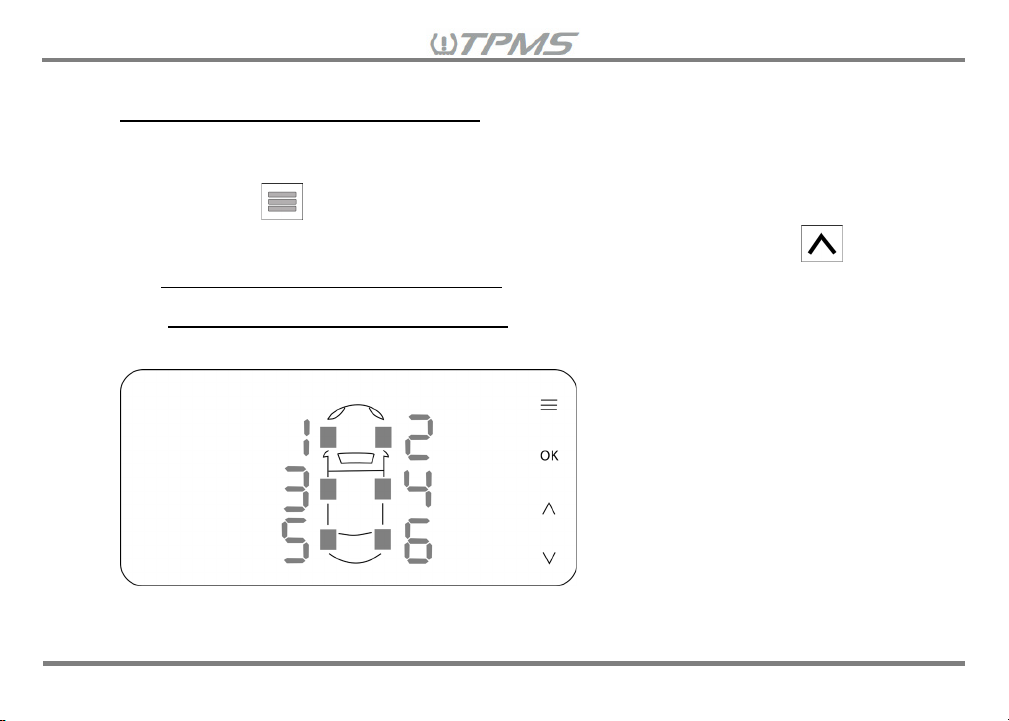
8.6 Setting the Tire Position on the Receiver
The Setting the Tire Position on the Receiver TPMS parameter setting is available to the user when
performing a tire rotation or when sensors are incorrectly paired to the receiver and need to be swapped.
Once you have determined the tire locations that you would like to swap, follow the instructions below:
8.6.1 Press and hold for 3 seconds to enter the Settings Mode Menu. Follow Setting 8.1 to select
the vehicle selection that you need to perform the tire position swap, then press twice to go to
the Setting the Tire Position on the Receiver screen.
8.6.2 The Setting the Tire Position on the Receiver screen shows the numbered tire positions for each
tire sensor on the receiver for the vehicle selection as pictured below.
57
Page 58
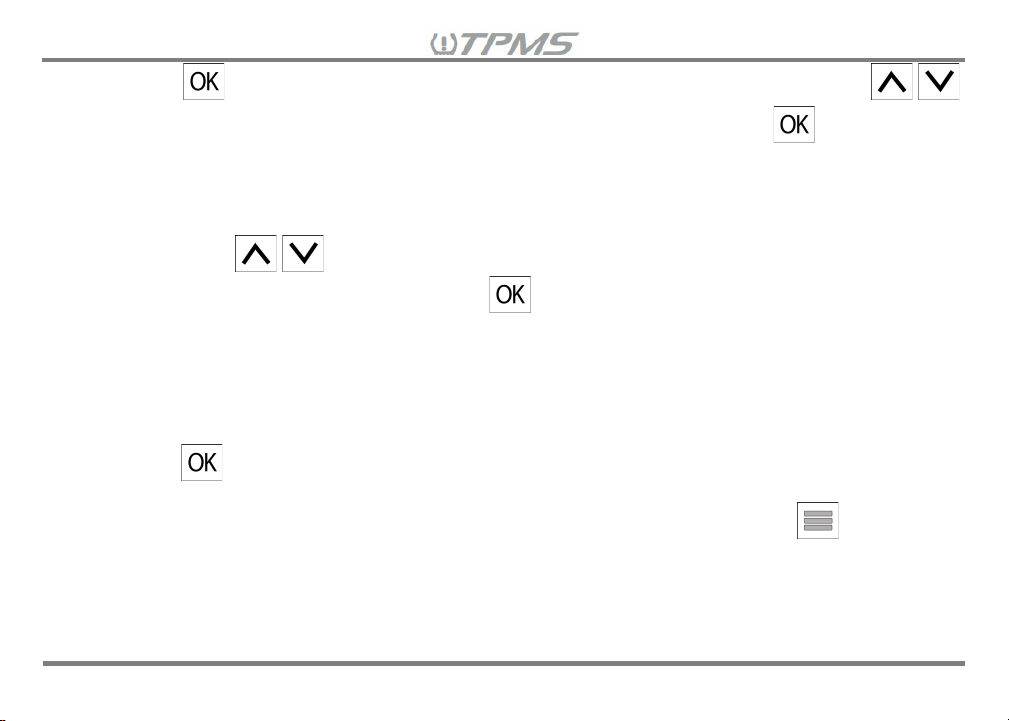
8.6.3 Press to enter tire position rotation mode, digit “1” will blink by default. Then press
to select the original tire position which needs to be changed and then press again, and the
selected digit at that selected position will turn green and the consecutive digit will begin to blink.
(Note: If no change is made in this mode for 60 seconds, the receiver will beep a long tone to warn
that setting has not been completed successfully and default back to Driving Mode automatically.)
8.6.4 Then press to select digit of the new tire position to which you want to move the
selected original tire position to, and press to confirm, the digit at the new position will also
turn green.
8.6.5 The digits at both exchanged positions will remain displayed in green for 3 seconds to show which
2 tires are exchanged. Then the chosen digits will automatically turn back to red.
8.6.6 Then the screen will show the new positions. If you need to exchange more than one pair of tires,
press to repeat the procedure.
8.6.7 Once you have completed rotating tire positions on the receiver press and hold for three
seconds and the receiver will go to Driving Mode.
58
Page 59
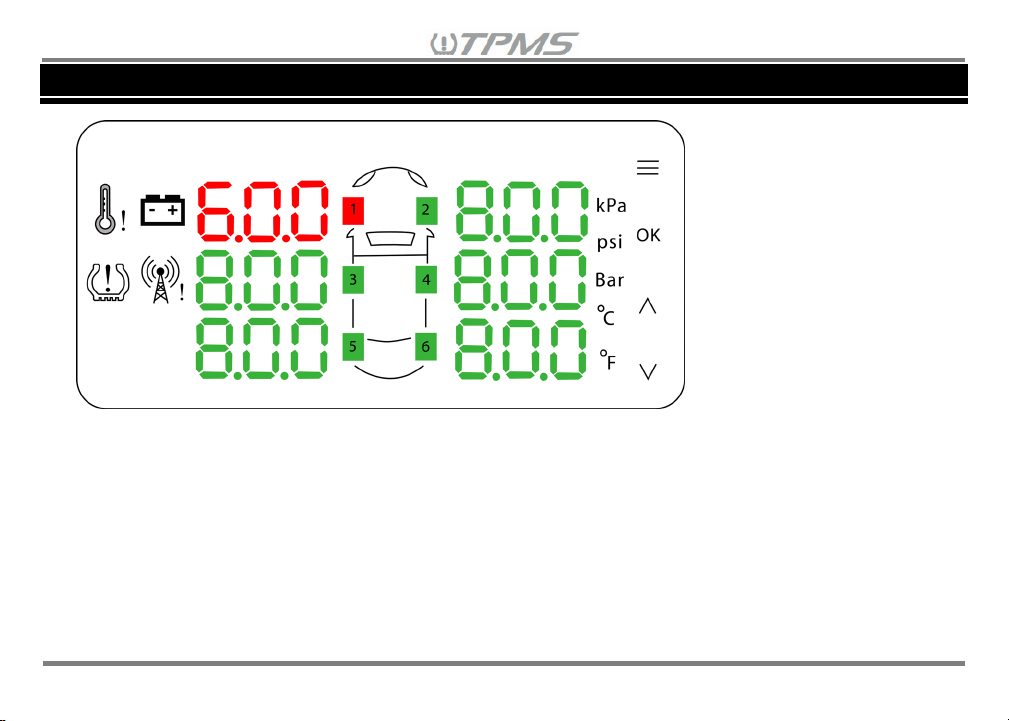
9. Alarm Warning and Display Symbols
The Tuson TPMS system is designed to detect any pressure, temperature or trailer battery values that
are above or below the set limits, those values that are outside the set limit will change from green to red
values and an alarm display symbol will appear (some alarms are accompanied by a sound alert) to
indicate an issue has been detected. These alarm indicators will continue until issue has been addressed
and the values return to an acceptable range. For a detailed chart of the all the alarm messages please
see Section 9.1 Alarm Display Symbols Key.
Below is a list of the Tire Sensor Alarm Warnings:
• Warning of excessive high tire pressure indicates tire pressure has been risen to 50% or more of the
standard tire pressure value set by the user.
59
Page 60
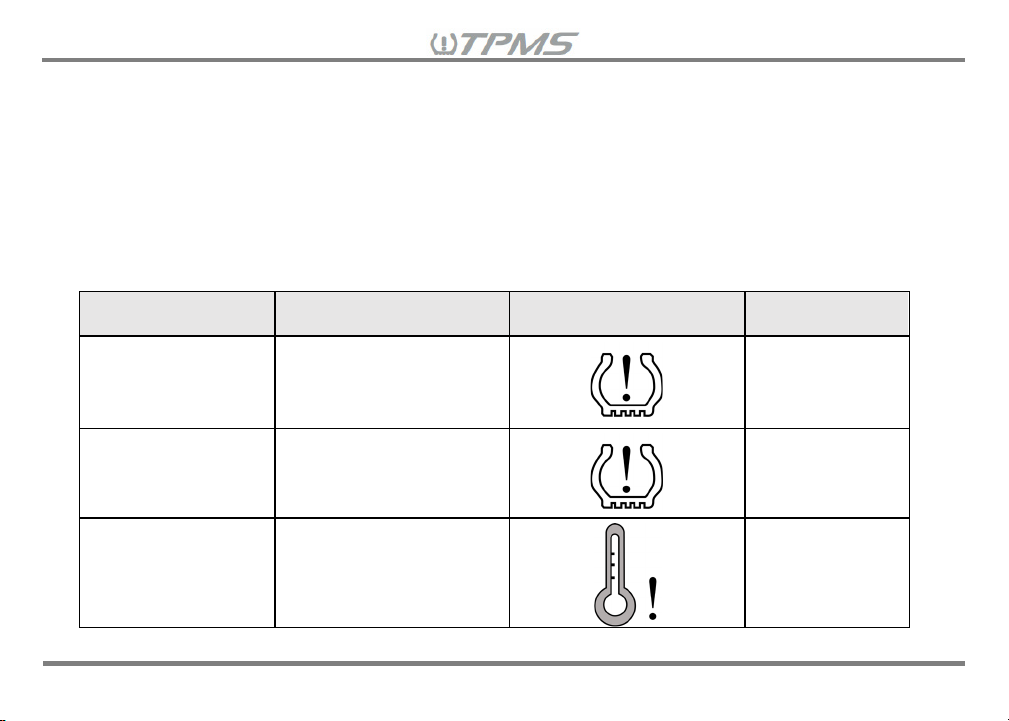
Alarm
Definition
Symbol
Alarm Sound
Low Pressure
P ≦ (0.8*standard
value
One Beep
High Pressure
P ≧ (1.5*standard
One Beep
High Temperature
T ≧ (standard
One Beep
• Warning of excessive low tire pressure indicates that the tire pressure has decreased by 20% or more
of the standard tire pressure value set by the user.
• Warning of excessive tire temperature indicates that the tire temperature has risen over the standard
tire temperature value set by the user.
• Environmental driving conditions could be a factor for tire pressure changes, please go to a service shop
to perform tire pressure adjustments to avoid the occurrence of false alarms. Be sure to maintain proper
tire pressure in all of your tires for the safest and most cost-effective performance of for your tires.
9.1 Alarm Display Symbols Key
Pressure value) or ≦ 150
(per second)
kPa, take the bigger
Pressure value)
temperature value)
60
(per second)
(per second)
Page 61
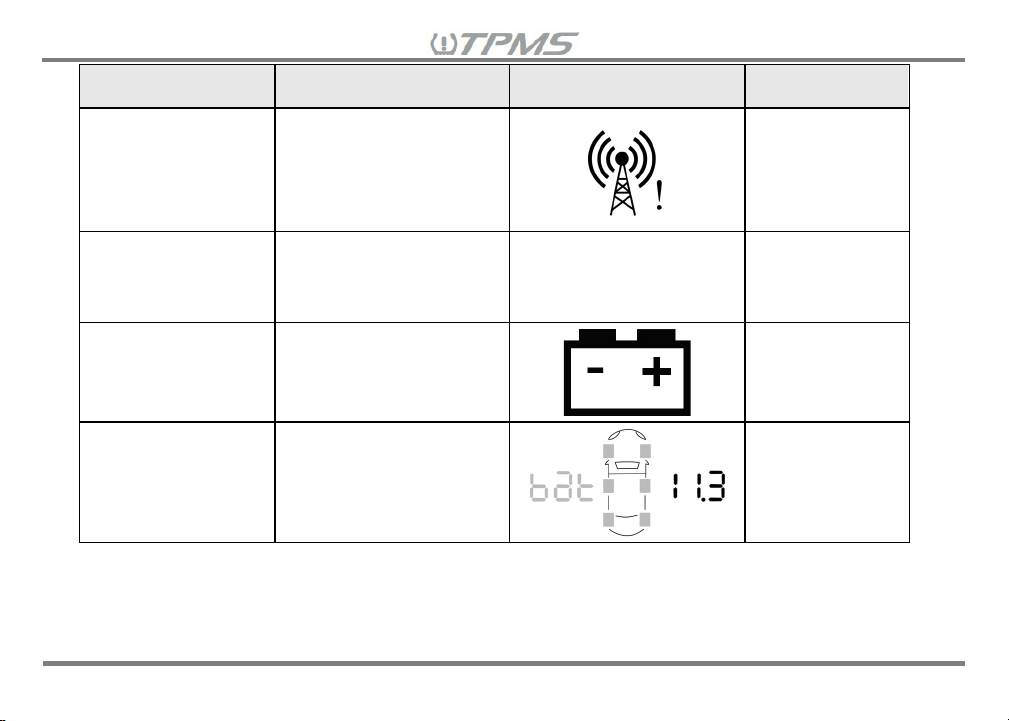
Alarm
Definition
Symbol
Alarm Sound
TPMS System
Sensor signal lost. A
None
TPMS Sensor Low
Sensor battery is in low
Lo
One Beep
Low Battery Power
Battery voltage at the
None
Low Battery Power
Battery voltage at the
None
Alarm
Battery Power
on the tow Vehicle
(12V)
on the Trailer
(12/24V)
sensor’s signal was not
received for at least 10
minutes. Not activated
when vehicle is stopped.
battery power status
tow vehicle ≦ 11.5V
trailer ≦11.5V or ≦23V
(per second)
61
Page 62
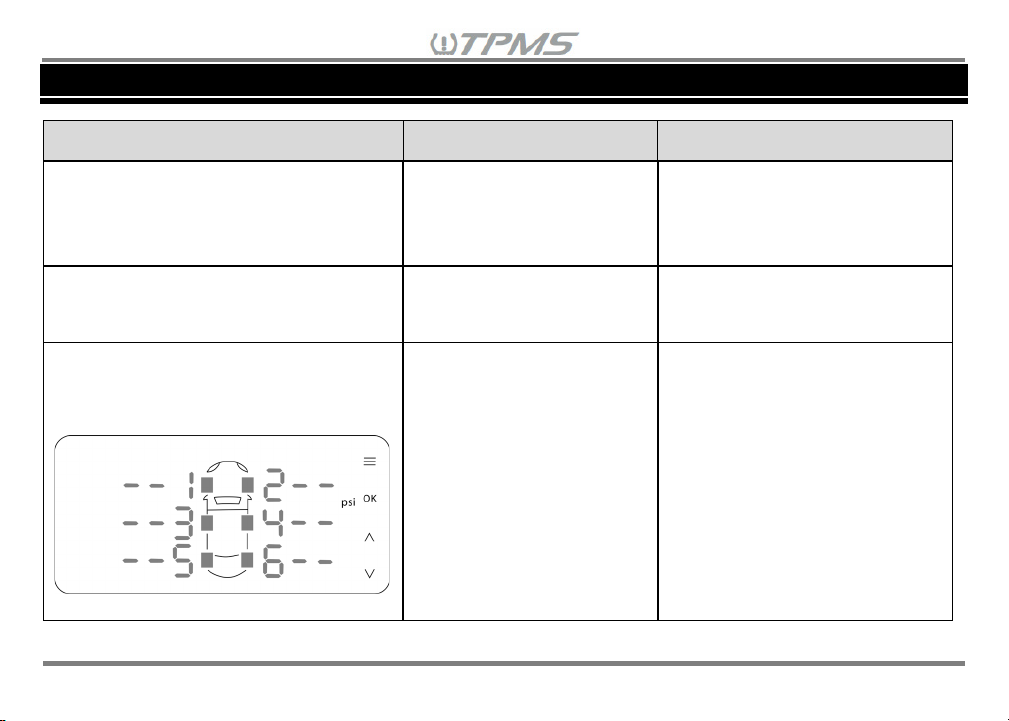
Issue
Probable Causes
Solution
Tire Sensor ID Paring failed
Wireless signal
Move receiver to another
Pressure anomaly warning
Low tire pressure
Please inflate the tires to
No signal received
Signal interference.
Move the tow vehicle away
10. Troubleshooting
(TPMS alarm with a long beep in
rapid deflation learning setting)
(TPMS alarm with short beeps)
(Screen shows pressure and
temperature as green dash lines “- “ and corresponding wheel number)
interference
Tire air pressure is not
deflated enough
Vehicle has stopped or
is moving too slow
Sensor is damaged or
low battery power
Repeater could be
damaged
62
area
Keep deflating the tires for
20~30 seconds
the correct pressure to
prevent an erroneous alarm
from the current area
Pick up speed of over 12
mph/20 kph to “wake up”
sensor and continue driving
for a few minutes
Go to a qualified service
shop for installation of a new
sensor on your wheel
Check that the repeater is
powered
Page 63
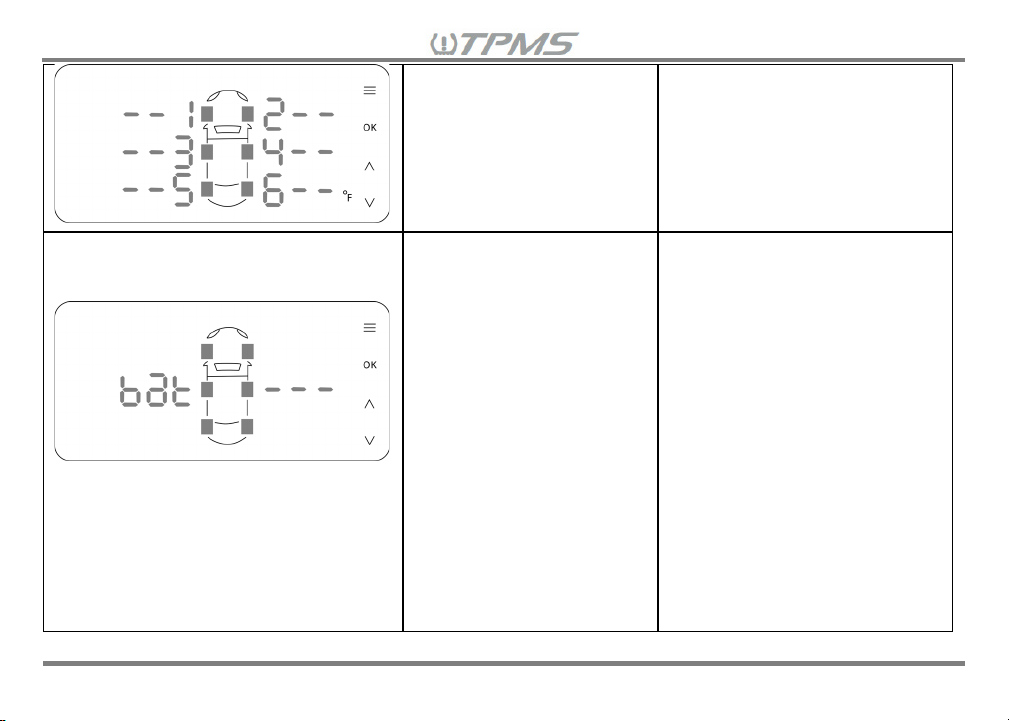
No trailer battery voltage
Repeater is not
Install the repeater to
(Screen shows trailer battery voltage
as “---“)
installed
The repeater is
installed in a location
that prevents the signal
from reaching the
monitor
The repeater is not
connected to the trailer
battery
The trailer battery is
dead
The tow vehicle is not
charging the trailer
battery
63
receive trailer battery voltage
Relocate the repeater to a
more open location for
sending signal to the
receiver
Check to see if the repeater
is properly connected to the
trailer battery
Use a voltmeter to check
the trailer battery voltage,
charge or replace the dead
trailer battery
Check for a blown tow
vehicle fuse or bad wiring
connection
Page 64
11. Customer Service
All product support and warranty coverage are provided by the vendor or distributor from which your
product was purchased. Please contact your distributor who originally sold you the Tuson RV Brakes
product.
Or contact us:
US Number: +1-847-816-8800
Toll Free: +1-800-968-8766
Email: [email protected]
Tuson RV Brakes, LLC
475 Bunker Court
Vernon Hills, IL 60061
www.TusonRVBrakes.com
64
Page 65
12. Notes
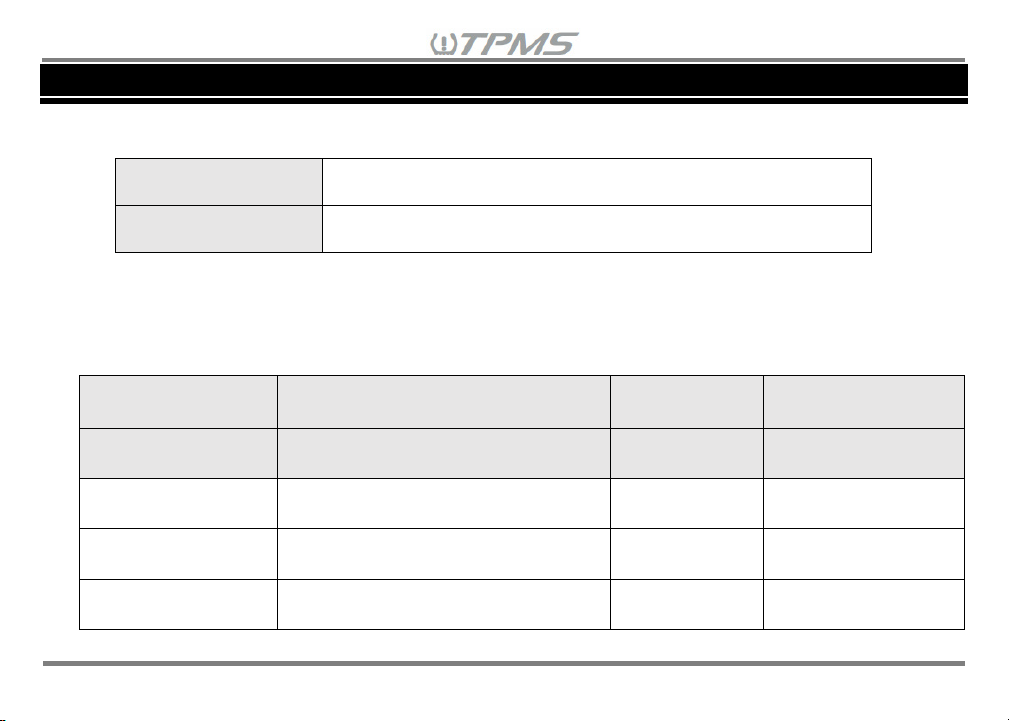
12.1 Tuson TPMS Retrofit Kit Information
Serial Number:
Model Number:
12.2 Vehicle Memory Selection Type
Here you can list each vehicle memory selection stored on the receiver for your reference.
Vehicle Selection Setup # of tires Size 0.453/0.625”
Example CAR Pickup + Trailer 4 + 6 = 10 0.453”
CAR 1
CAR 2
CAR 3
65
Page 66
CAR 1
CAR 2
CAR 3
□1
□11
□21
□2
□12
□22
□3
□13
□23
□4
□14
□24
□5
□15
□25
□6
□16
□26
□7
□17
□27
□8
□18
□28
□9
□19
□29
□10
□20
□30
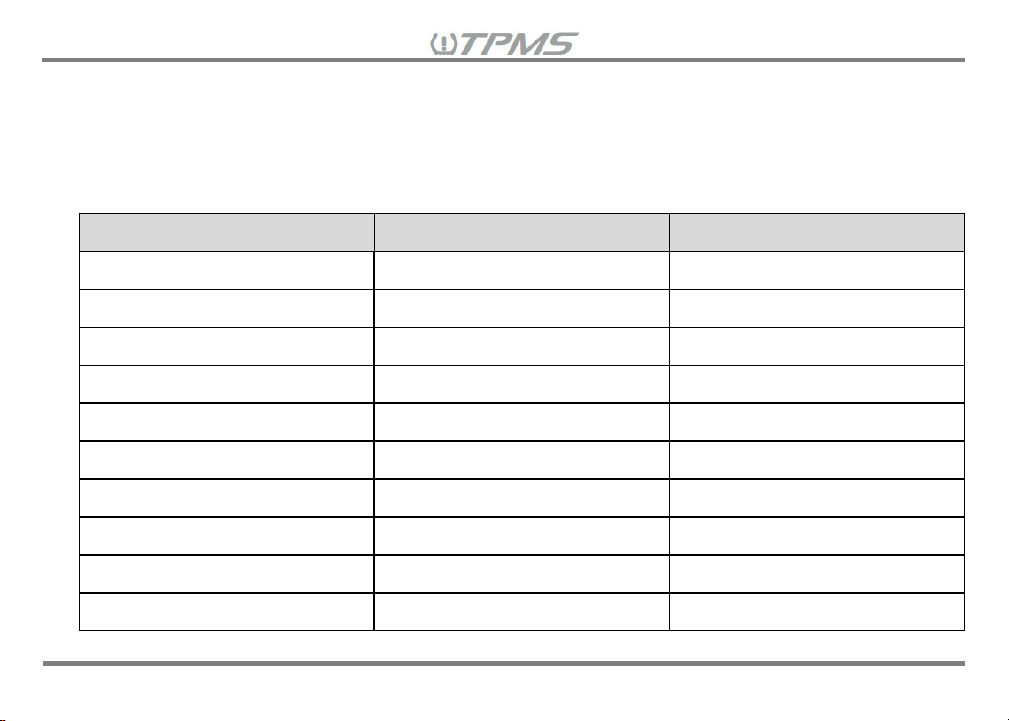
12.3 Sensor ID#s List for Each Vehicle Memory Selection
Each sensor has a unique sensor ID# to identify the sensor to the receiver. The sensor ID#s included in
the kit are written under CAR 1 and the numbered list corresponds with the wheel orientation mark (□
,…□6). Any additional purchased sensor ID#s used with the same receiver will not have a wheel orientation
mark on sensor but can be referenced using the wheel orientation mark sticker sheet.
1,□2
66
Page 67
12.4 General Notes
67
Page 68
13. Limited Warranty
Tuson RV Brakes, LLC (Tuson) warrants the Tuson Tire Pressure Monitoring System (TPMS) to be free
of defects in material and workmanship for a period not to exceed TWO (2) years from the date of sale to
the original consumer, or to the first retail purchaser of a trailer on which the TPMS is installed. Original
receipt(s) or other acceptable proof of purchase should be retained by the customer for verification of
warranty date. THIS WARRANTY IS NOT TRANSFERABLE.
Tuson’s obligations under this warranty shall be limited to crediting the account of a direct buying
distributor or OEM trailer manufacturer, replacing or repairing the TPMS products which are determined
by Tuson to be defective in material or workmanship, within 60 days of receipt of such product by Tuson.
Tuson reserves the right to request the product be returned intact, freight prepaid, PRIOR to processing
any claim for warranty.
Warranty claim must be received by Tuson within 30 days of the discovery of the alleged defect, or within
30 days of the expiration of the warranty, whichever is earlier. Covered repairs or replacements will be
made at Tuson’s expense. Shipment of replacement product or repaired product by Tuson will be via
best available ground shipment carrier. Shipments other than by best available ground shipment carrier,
must be requested in writing and must be paid for in advance by the customer. Returned product that is
found not to be defective, will be returned at sender’s expense.
This Warranty shall not include any products which have been improperly installed, installed contrary to
installation instructions provided with the product, altered, tampered with or changed in any way, or
utilized in a manner not approved by Tuson. This Warranty shall not extend to any defects arising from
abuse, misuse, accident, improper wiring, or negligence of the installer or the consumer.
68
Page 69
EXCEPT AS EXPRESSLY SET FORTH ABOVE, NO OTHER WARRANTY, EXPRESS OR IMPLIED, AT
LAW OR IN EQUITY, IS MADE BY TUSON CORPORATION IN RESPECT OF THE PRODUCT,
INCLUDING WITHOUT LIMITATION ANY IMPLIED WARRANTY OF MERCHANTABILITY, FITNESS
FOR A PARTICULAR PURPOSE OR ANY OTHER WARRANTY, AND ANY SUCH WARRANTIES ARE
EXPRESSLY DISCLAIMED.
IN NO EVENT SHALL TUSON BE LIABLE TO PURCHASER OR ANY THIRD PARTY FOR ANY LOST
PROFITS, CONSEQUENTIAL, EXEMPLARY, INDIRECT, PUNITIVE, INCIDENTAL, OR SPECIAL
DAMAGES OR COSTS (INCLUDING ATTORNEY FEES), OR LOSS OF GOOD WILL RESULTING
FROM ANY CLAIM (INCLUDING BUT NOT LIMITED TO ANY CAUSE OF ACTION SOUNDING IN
CONTRACT, TORT, NEGLIGENCE, STRICT LIABILITY OR PRODUCT LIABILITY) REGARDING THIS
AGREEMENT, EVEN IF THE COMPANY HAS BEEN ADVISED OF THE POSSIBILITY OF SUCH
DAMAGES.
Some states do not allow the exclusion or limitation of implied warranties, incidental or consequential
damages, so the above limitations or exclusions may not apply to you. This Warranty gives you specific
rights. You may have other rights, which vary from state to state.
69
Page 70

 Loading...