

Page 1

Page 2

LIMITED WARRANTY
For details, refer to the Product Warranty Registration information provided.
COPYRIGHT NOTICE
This manual is copyrighted, all rights are reserved. It may not, in whole or in part, be copied, photocopied, reproduced, translated, or reduced to any electronic medium or machine readable form without prior consent in writing from
Tabata USA, Inc. and Tabata Corp. Ltd. / 2002 Design.
TRADEMARK NOTICE
TUSA, the TUSA logo, Element, and the Element logo are all registered and unregistered trademarks of Tabata USA,
Inc. and Tabata Corp. Ltd. All rights are reserved.
PATENT NOTICE
U.S. Patents have been issued to protect the following design features:
Dive Time Remaining (U.S. Patent no. 4,586,136), Data Sensing and Processing Device (U.S. Patent no. 4,882,678),
and Variable Ascent Rate Indicator (U.S. Patent no. 5,156,055).
CE
The CE mark is used to mark conformity with the European Union EMC directive 89/336/EEC. TUSA dive instruments
fulfill the required EU directives.
EN 13319 "Diving accessories - Depth gauges and combined depth and time measuring devices - Functional and
safety requirements, test methods" is a European diving depth gauge standard. The Element is designed to comply
with this standard.
DECOMPRESSION MODEL
The program within the Element simulates the absorption of nitrogen into the body by using a mathematical model. This
model is merely a way to apply a limited set of data to a large range of experiences. The Element dive computer model
is based upon the latest research and experiments in decompression theory. Still, using the Element, just as
using the Navy (or other) No Decompression Tables, is no guarantee of avoiding decompression
sickness, i.e. “the bends.” Every diver’s physiology is different, and can even vary from day to day. No machine
can predict how your body will react to a particular dive profile.
Element User's Manual, Doc. No. 12-2917
© 2002 Design, 2008
San Leandro, CA USA 94577
2
Page 3

CONTENTS
NOTICES ..................................................................................................................................................................... 2
FULL LCD .................................................................................................................................................................... 6
FEATURES AND DISPLA YS............................................................................................. 7
INTRODUCTION .......................................................................................................................................................... 8
CONTROL BUTTON ................................................................................................................................................... 8
BAR GRAPHS ............................................................................................................................................................. 9
Nitrogen Loading Bar Graph (NiBG) ...................................................................................................................... 9
Oxygen Bar Graph (O2BG) .................................................................................................................................. 10
Ascent Rate Indicator (ASC) ................................................................................................................................10
ALPHA / NUMERIC DISPLAYS................................................................................................................................. 11
Depth Displays...................................................................................................................................................... 11
Time Displays .......................................................................................................................................................12
Temperature Display............................................................................................................................................. 12
POWER SUPPLY ......................................................................................................................................................13
Battery Indicator ................................................................................................................................................... 13
Low Battery Condition .......................................................................................................................................... 13
FO2 MODE ................................................................................................................................................................ 15
FO2 50% Default .................................................................................................................................................. 16
ACTIVA TION AND SETUP .............................................................................................. 17
ACTIVATION .............................................................................................................................................................. 18
Wet Contact Activation .........................................................................................................................................19
SURFACE SEQUENCE ............................................................................................................................................. 19
SURFACE MODE ......................................................................................................................................................19
3
Page 4

CONTENTS (continued)
SET MODE ................................................................................................................................................................ 20
TO SET FO2.........................................................................................................................................................20
TO SET WET ACTIVATION ................................................................................................................................. 21
TO SET UNITS OF MEASURE ............................................................................................................................ 22
TO SET HOUR FORMAT.....................................................................................................................................23
TO SET TIME ....................................................................................................................................................... 24
TO SET PO2 ALARM ........................................................................................................................................... 25
TO SET FO2 50% DEFAULT ............................................................................................................................... 26
SUMMARY OF PRE DIVE SETUP ............................................................................................................................ 27
PLAN AND DIVE MODES............................................................................................... 29
PRE DIVE PLANNER ................................................................................................................................................ 30
NIBG (NITROGEN LOADING BAR GRAPH) ........................................................................................................... 32
O2BG (OXYGEN ACCUMULATION BAR GRAPH) ................................................................................................. 32
ASC (ASCENT RATE INDICATOR) .......................................................................................................................... 32
CONTROL OF DISPLAYS.........................................................................................................................................33
NO DECOMPRESSION DIVE MODE ....................................................................................................................... 33
No Deco Dive Deep Stop ..................................................................................................................................... 34
No Deco Dive Safety Stop .................................................................................................................................... 36
DECOMPRESSION DIVE MODE .............................................................................................................................. 37
CONDITIONAL VIOLATION MODE .......................................................................................................................... 38
DELAYED VIOLATION MODE # 1 ............................................................................................................................ 39
DELAYED VIOLATION MODE # 2 ............................................................................................................................ 39
DELAYED VIOLATION MODE # 3 ............................................................................................................................ 40
VIOLATION GAUGE MODE......................................................................................................................................40
HIGH PO2 .................................................................................................................................................................. 42
HIGH OXYGEN ACCUMULATION............................................................................................................................ 42
4
Page 5
CONTENTS (continued)
POST DIVE MODES ....................................................................................................... 45
POST DIVE SURFACE MODE .................................................................................................................................. 46
TRANSITION PERIOD .............................................................................................................................................. 46
AFTER THE TRANSITION PERIOD (THE FIRST 2 HOURS) .................................................................................. 47
Time to Fly/Desaturate ......................................................................................................................................... 47
Pre Dive Planner .................................................................................................................................................. 48
Log Mode .............................................................................................................................................................. 48
AFTER THE FIRST 2 HOURS .................................................................................................................................. 50
WET CONTACTS.......................................................................................................................................................51
RESET (CLEAR) FEATURE......................................................................................................................................51
GENERAL ....................................................................................................................... 53
CARE AND CLEANING ............................................................................................................................................. 54
INSPECTIONS AND SERVICE ................................................................................................................................. 54
MODULE REMOVAL FROM BOOT .......................................................................................................................... 55
BATTERY REPLACEMENT ...................................................................................................................................... 55
RETURNING THE MODULE TO BOOT ................................................................................................................... 59
ALTITUDE COMPENSATION .................................................................................................................................... 60
SPECIFICATIONS ..................................................................................................................................................... 61
TUSA INTERNATIONAL ............................................................................................................................................ 66
SERVICE RECORD ................................................................................................................................................... 67
Pay special attention to items marked
with this Warning symbol.
5
Page 6
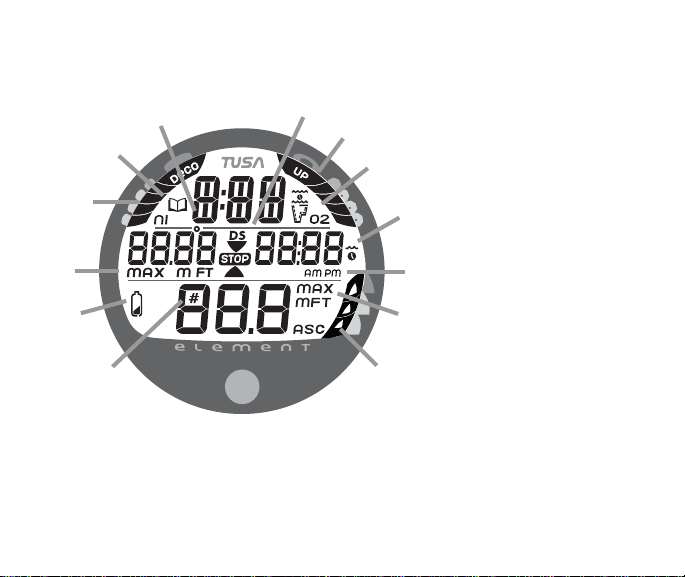
Components:
a. Icon - DS (Deep Stop)
Icon - Descend Arrow
Icon - Stop Bar
m
l
k
j
i
a
b
c
d
e
f
Icon - Ascend Arrow
b. O2 Bar Graph
c. Icons - Operating Modes
d. Icons - Times
e. Icons - Am/Pm
f. Icons - Depths
g. ASC - Ascent Rate Indicator
h. Icon - Dive No.
i. Icon - Low Battery
i. O2 Bar Graph
j. Icons - Max Depth
k. Nitrogen Bar Graph
l. Icon - Log Mode
m. Icon - Temperature
gh
LCD DISPLAY
6
Page 7
NOTE: The Element will enter Dive Mode upon descent to 5 FT (1.5 M) if
first activated by push button or if Wet Activation was previously set ON.
FEATURES and DISPLAYS
7
Page 8

INTRODUCTION
Welcome to TUSA and thank you for choosing the Element !
It is extremely important that you read this manual in sequence
and understand it completely before attempting to use the
Element.
Remember that technology is no substitute for common sense,
and a dive computer only provides the person using it with
data, not the knowledge to use it.
R
R
E
E
S
V
P
I
O
D
N
E
S
L
I
B
Be a - RESPONSIBLE DIVER at all times.
8
Page 9
CONTROL BUTTON
The Control Button allows you to select display options and access specific information
when you want to see it. It is also used to enter settings.
BAR GRAPHS
Nitrogen Loading Bar Graph (NiBG)
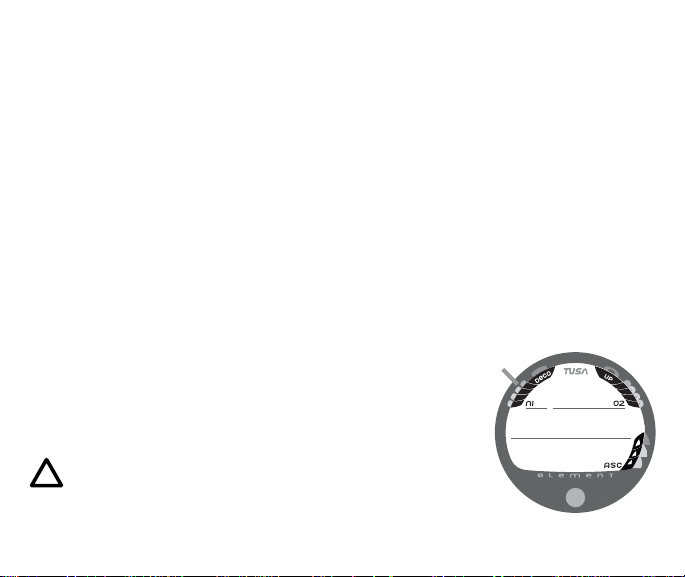
The NiBG (Fig. 1a) represents tissue loading of nitrogen, showing your relative no decompression or decompression status. As your depth and elapsed dive time increase, segments will add to the NiBG, and as you ascend to shallower depths, the segments will
recede, indicating that additional no decompression time is allowed for multilevel diving.
The Nitrogen Loading Bar Graph monitors 12 different nitrogen compartments simultaneously and displays the one that is in control of your dive. It is divided into a No Decompression (normal) zone, a Caution zone (also No Decompression), and a Decompression
(danger) zone.
While you cannot provide a guarantee against the occurrence
a
of decompression sickness, you may choose your own personal
zone of caution based upon age, physique, excessive weight,
etc., to reduce the statistical risk.
NOTE: Displays associated with oxygen and the O2
Bar Graph will only appear if FO2 has been set at a
value other than 'Air' (e.g., a numerical value).
Fig. 1 - NiBG
9
Page 10
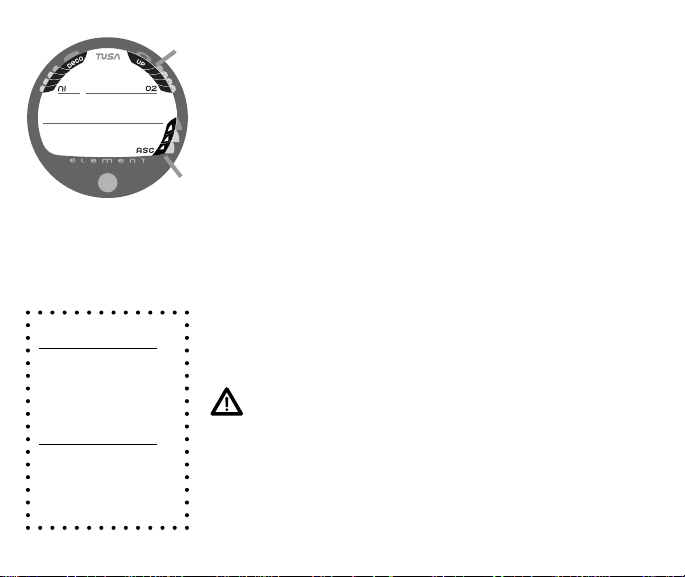
Fig. 2 - O2BG and ASC
Oxygen Accumulation Bar Graph (O2BG)
a
The O2BG (Fig. 2a) represents oxygen accumulation, showing
the maximum of either per dive accumulated oxygen, or 24 hour
period accumulated oxygen.
As your oxygen exposure (accumulation) increases during the
dive, segments will add to the O2BG, and as loading decreases, it will begin to recede, indicating that additional
b
exposure is allowed for that dive and 24 hour period.
Ascent Rate Indicator (ASC)
The ASC (Fig. 2b) provides a visual representation of ascent
speed (i.e., an ascent speedometer).
ASC values
Deeper than 60 FT (18 M)
Segments Ascent Rate =
Displayed FPM MPM
0 0 - 20 0 - 6
1 21-50 6.5-15
2 51-60 15.5-18
3 >60 >18
60 FT (18 M) & Shallower
Segments Ascent Rate =
Displayed FPM MPM
0 0 - 10 0 - 3
1 11-25 3.5-7.5
2 26-30 8-9
3 >30 >9
10
The segments of the ASC represent two sets of speeds which
change at a reference Depth of 60 FT (18 M). Refer to the chart
for segment values.
WARNING: At depths greater than 60 FT (18 M),
ascent rates should not exceed 60 feet per minute
(18 meters per minute). At depths of 60 FT (18 M)
and shallower, ascent rates should not exceed 30
feet per minute (9 meters per minute).
Page 11
ALPHA / NUMERIC DISPLAYS
Each numeric and graphic display represents a
unique piece of information. It is imperative that you
understand the formats, ranges, and values of the
information represented to avoid any possible misunderstanding that could result in error.
Depth Displays
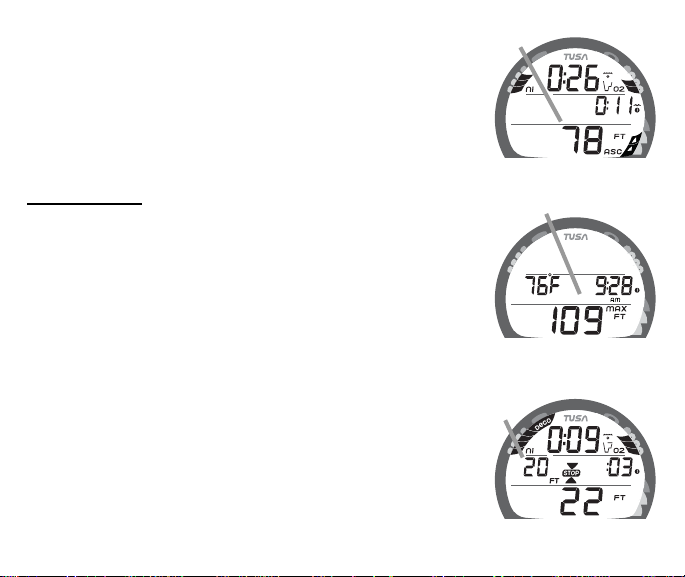
During a dive, the Current Depth display (Fig. 3Aa), indicates
depths from 0 to 330 FT (99.9 M) in 1 FT (0.1 M) increments.
The Maximum Depth reached during that dive is displayed
on an Alternate screen by pressing the button (Fig. 3Ba).
During a No Deco Dive Deep and Safety Stops and while in
Decompression, the required Stop Depth is displayed on the
Main (Fig. 4a).
a
Fig. 3A - CURRENT DEPTH
a
Fig. 3B - MAX DEPTH
a
Fig. 4 - STOP DEPTH
11
Page 12
a
Time Displays
b
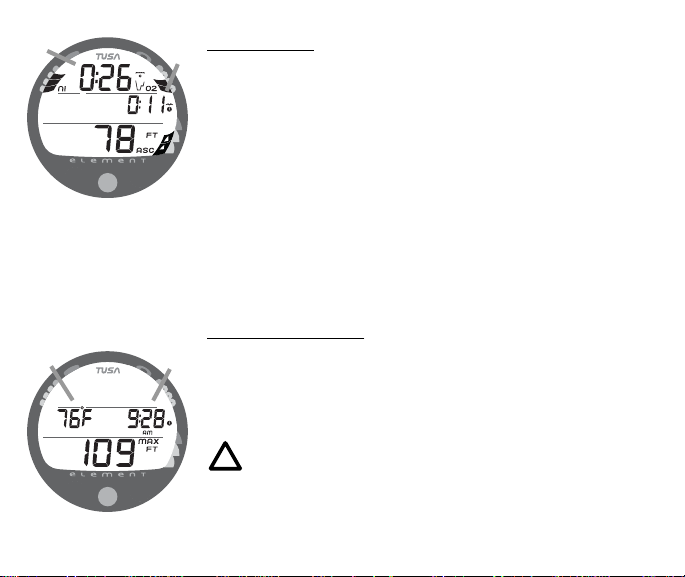
Time displays are shown in hour:minute format (i.e., 1:16
represents 1 hour and 16 minutes, not 116 minutes). The colon
that separates hours and minutes blinks once per second when
the display is indicating real time (e.g., Elapsed Dive Time), and
is solid (not blinking) when times are calculated projections (e.g.,
Time to Fly).
Fig. 5 - TIME
b
Fig. 6 - TEMPERATURE
12
The Main Time display is located at the top of the display (Fig.
5a) and a second time display (Fig. 5b) is located in the
center/right. Both displays are identified by a clock icon.
• Time of Day (Fig. 6a) can be set for 12 hour format (Am/Pm)
or 24 hour format.
Temperature Display
Ambient Temperature is displayed in the center/left portion
a
of the screen (Fig. 6b) while in the Surface Mode and Log
Mode, and can be viewed as part of an Alternate Display when
the button is pressed while in a dive mode.
NOTE: The informational displays are described in
detail as the various operating modes they appear in
are presented throughout this manual.
Page 13
POWER SUPPLY
The Element utilizes one (1) type CR 2450 Lithium 3 volt cell style
Battery that should provide 300 hours of continuous, or 50
activation periods, of operation.
• If you conduct 1 dive each time the unit is activated, you
should obtain approximately 50 dives.
• If you conduct 3 dives each time the unit is activated, you
should obtain approximately 150 dives.
Battery Indicator
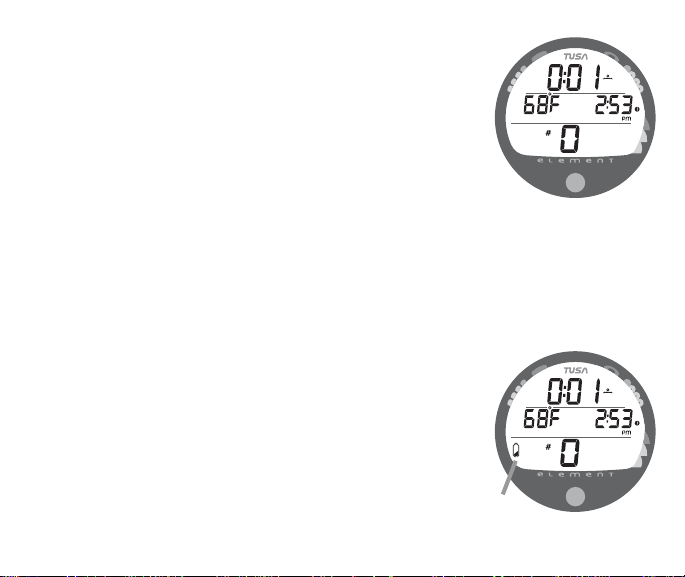
A Battery Indicator (icon) provides an indication of Low Battery
condition. When power is sufficient for normal unit operation,
the icon will not be displayed upon activation or during Surface
Mode (Fig. 7). The icon is not displayed during any Dive
Mode(s).
Low Battery Condition
Voltage level is checked upon activation and every (1) minute
during operation on the surface.
• When voltage decreases to < 2.75 v and is > 2.50 v, the
Battery icon will be displayed solid (Fig. 8a) as a warning
that the Battery is to be replaced prior to conducting any
further dives.
Fig. 7 - ACTIVATION
(no Battery icon = normal)
a
Fig. 8 - LOW BATTERY
13
Page 14

14
• Upon decreasing to a voltage level that will no longer sustain
proper operation (<= 2.50 v), the icon will flash 5 times
followed by shutdown of the unit.
• If a Low Battery Condition exists when the unit is activated
(by pressing the button), the graphic bAT and the Battery
Indicator will appear flashing for 5 seconds followed by
shutdown of the unit.
• If the button is not pressed to activate the unit prior to a dive,
and a Low Battery Condition exists, the Battery Indicator will
appear flashing as a warning upon descent to 5 FT (1.5 M).
No other information will be displayed.
• If the unit did not display a Low Battery Condition 'prior to'
entering the Dive Mode, and a Low Battery Condition occurs
during the dive, there will be sufficient battery power to
maintain unit operation for the remainder of 'that dive'. The
Battery icon will then appear after the dive upon entry into
Surface Mode.
R
R
E
E
S
V
P
I
O
D
N
E
S
L
I
B
Page 15
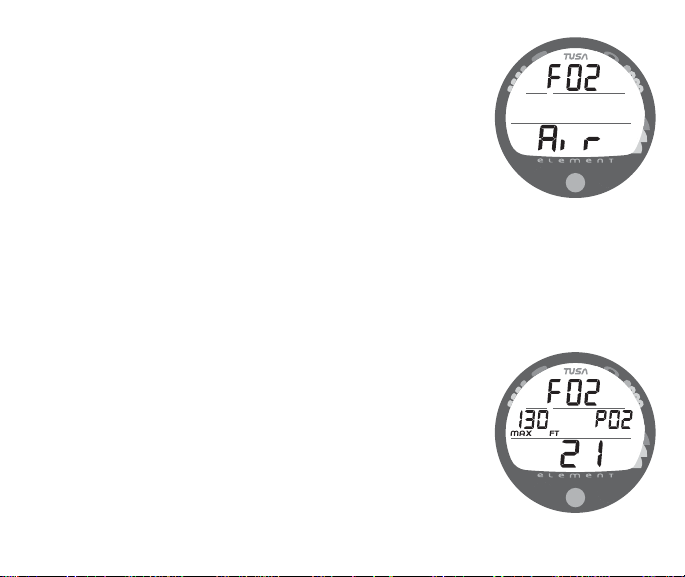
FO2 MODE
After Activation, the Element will operate as an AIR computer
without displaying information associated with oxygen calculations, unless it is set for Nitrox which is a percentage of O2
(FO2) other than AIR (a numerical value between 21 and 50 %).
When set for an FO2 value of AIR (Fig. 9), the Element will
perform calculations the same as if FO2 were set for 21% O2,
internally accounting for O2 accumulation for any subsequent
Nitrox dives. However, O2 related displays, warnings, and the
O2BG will not appear on the display for that dive, or subsequent dives, unless FO2 is set for Nitrox (a numerical value of
21 to 50 %).
Once a dive is made with the unit set as a Nitrox computer (FO2
set for a numerical value), it cannot be programmed to operate
as an AIR computer until 24 hours after the last dive. AIR will
not be displayed as an option in the FO2 Mode. However, you
can set FO2 for 21% for use with AIR.
When FO2 is set at a value of 21% (Fig. 10), the unit will
remain set at 21% for subsequent Nitrox dives until FO2 is set to
a higher value, or until it automatically turns Off 24 hours after
the last dive and is reactivated.
Fig. 9 - FO2 Set for AIR
Setting FO2 is described on Page 21.
Fig. 10 - FO2 Set for 21%
15
Page 16
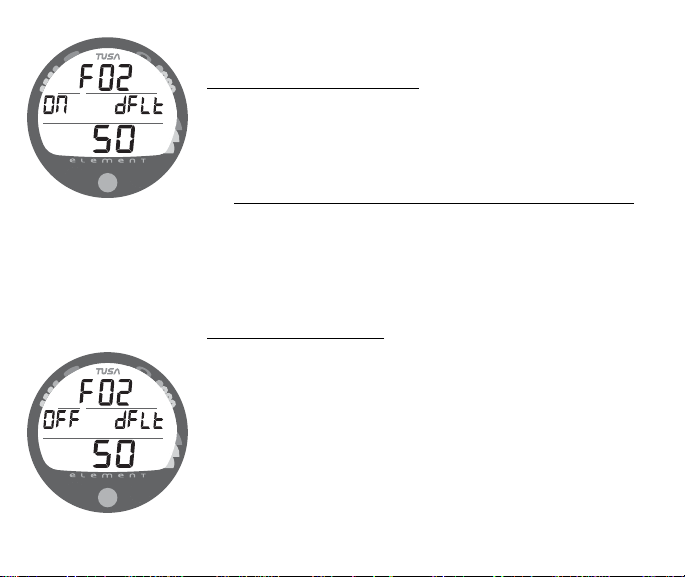
FO2 50% DEFAULT
If the FO2 Default is set to ON (Fig. 11) and FO2 is set to a
value greater than 21%, the FO2 set point value will automatically revert to 50% 10 minutes after that dive. The Maximum
Depth that can be achieved with a PO2 of 1.60 ATA will also
be displayed.
Fig. 11 - FO2 DEFAULT ON
Fig. 12 - FO2 DEFAULT OFF
16
• FO2 must therefore be reset for each repetitive nitrox dive,
or the value will automatically Default to 50(%) and the dives
will be calculated based on 50% O2 (50% nitrogen) for
oxygen calculations and 21% O2 (79% nitrogen) for nitrogen calculations.
If the Default is set to OFF (Fig. 12), the FO2 value for repetitive
dives remains the same as previously set until the Set Point is
manually changed.
Page 17
WARNING: During Activation and Diagnostics, if any display or function
varies from the information presented here, return the Element to your
Authorized TUSA Dealer for inspection.
ACTIVATION and SETUP
17
Page 18
ACTIVATION
WARNING: If the unit is activated at elevations
higher than 14,000 feet (4,270 meters), it will perform a diagnostic check and immediately shutdown.
To Activate the Element, press and release the Button.
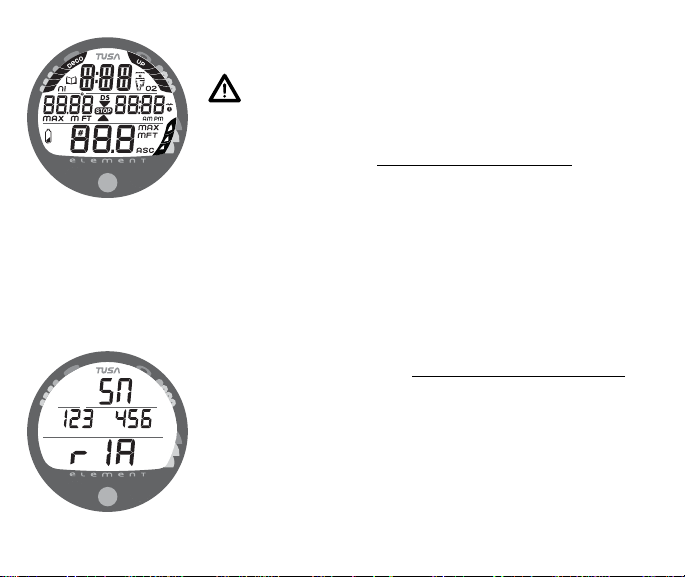
Fig. 13 - DIAGNOSTIC MODE
Fig. 14 - SERIAL NUMBER
18
• Upon manual activation, the unit will enter Diagnostic
Mode (Fig. 13), displaying all segments of the LCD as 8's,
followed by dashes ( - - ), then a countdown from 9 to 0.
Diagnostic Mode checks the display and Battery voltage to
ensure that everything is within tolerance and functioning
properly.
• When the button is held depressed and the Diagnostic
countdown reaches 00, a Serial Number screen appears
displaying the unit’s Serial Number and firmware code
Revision Number as long as the button is held depressed
(Fig. 14). Upon releasing the button, the unit shuts Off.
• After manual activation, it will also check the ambient
barometric pressure, and calibrate its present depth as
zero. At elevations of 3,000 feet (915 meters) or higher, it
will recalibrate itself to measure depth at that higher Altitude.
Page 19
Wet Contact Activation (only if set ON)
The Element will also automatically activate by Wet Contact.
This is accomplished by bridging the gap between contacts
located on the Button's stem and back of the case.
If no dive is made within 2 hours after initial activation, the unit
will automatically deactivate. If the wet contacts are still
bridged, the unit will reactivate and display the H2O graphic.
SURFACE SEQUENCE
While on the surface, the unit will automatically scroll through a
Sequence of displays including -
• Surface Mode
• Fly Mode
• DeSat Mode
• Plan Mode
As the Surface Sequence is scrolling, you can use the button to
access Log Mode and Set Mode.
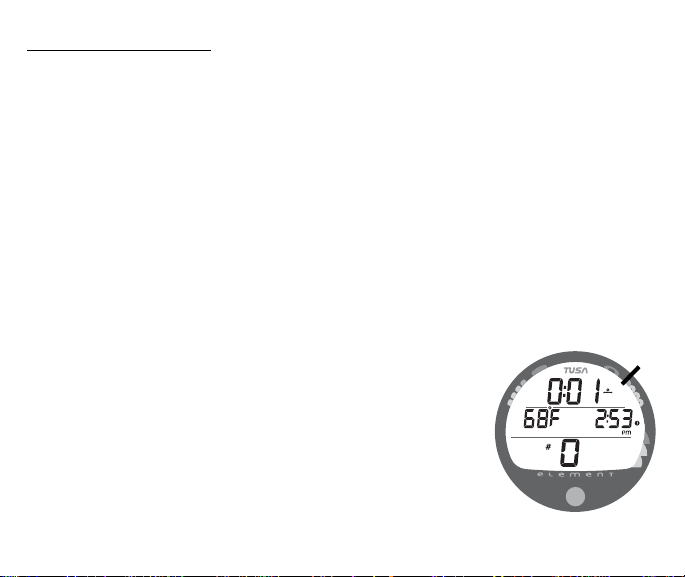
SURFACE MODE
Surface Mode, identified by the Surface Time icon (Fig. 15a),
follows Diagnostic Mode after Activation. Information includes
Surface Time with flashing colon (and clock/wave icon, Temperature (with icon and graphic C or F), Time of Day (with clock
icon), and Dive Number with # icon (0 if no dive made yet).
a
Fig. 15 - SURFACE MODE
19
Page 20
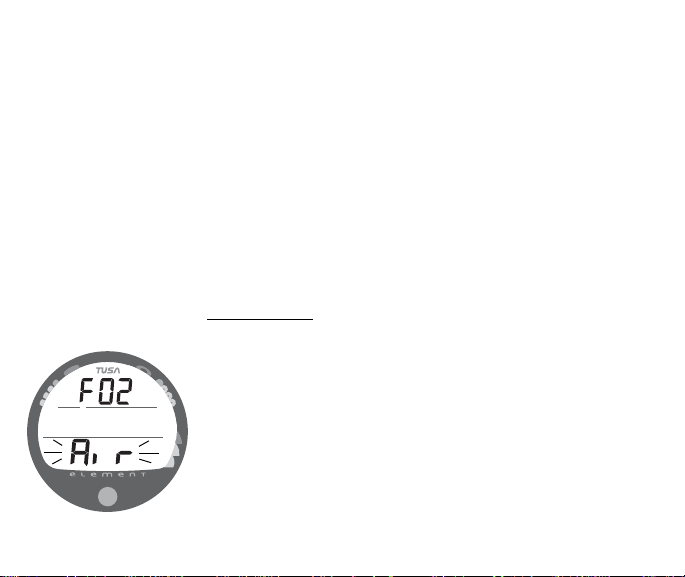
Fig. 16 - SET MODE ENTRY
20
SET MODE
After gaining access to Set Mode, settings can be made in
sequence one after the other, or you can access a specific item
that you want to set, bypassing others.
To access Set Mode while the Surface Sequence is scrolling,
press the button for 2 seconds.
• Upon entry into Set Mode, the Set FO2 screen will be
displayed with the Set Point flashing (Fig. 16).
• If the button is not pressed during a 2 minute period while in
the Set Mode, the unit will revert to Surface Mode and
resume the Surface Sequence scroll.
TO SET - FO2
Each time the unit is activated (if Off), FO2 will be automatically
set for a default value of AIR which can then be changed to
values between 21 and 50% in increments of 1%.
• While the Surface Sequence is scrolling, depress the button
for 2 seconds.
• Release the button when the FO2 screen appears with the
Set Point flashing.
• Press/release the button repeatedly to increase the FO2
value from 21 to 50% in increments of 1%, then display AIR
again.
Page 21
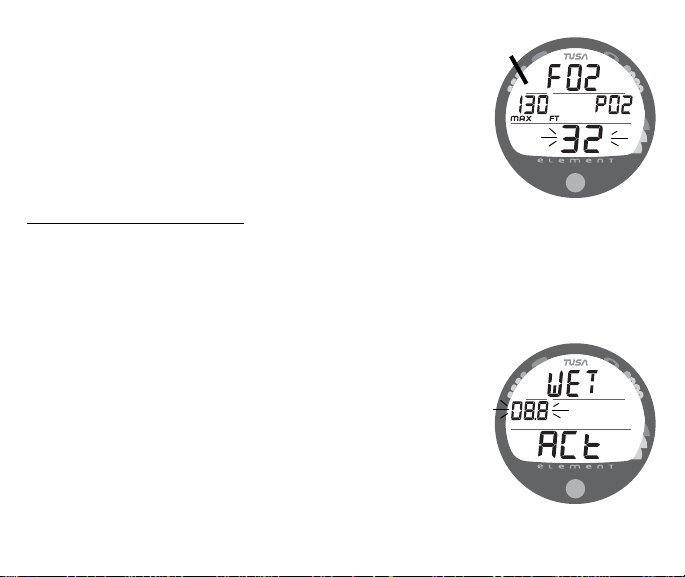
• For each FO2 value that appears, the Maximum Depth that
can be achieved for the PO2 Alarm Set Point will be displayed (Fig. 17a) with the graphic PO2. If FO2 is set for
AIR, no Depth value will be displayed.
• Depress the button for 2 seconds to accept the FO2 Set Point
displayed and advance to the Set Wet Activation screen.
a
TO SET - WET ACTIVATION
Factory set for ON, Wet Activation can also be set OFF (disabled) to prevent inadvertent activation during travel or storage.
When set ON, the Element will automatically Activate and enter
Dive Mode upon immersion in water.
• After having set and accepted the FO2 setting, the Set Wet
Activation screen appears displaying the graphics ACt and
WET with the Set Point flashing (Fig. 18).
- - or - -
• While the Surface Sequence is scrolling, depress the button
for 4 seconds to bypass Set FO2 to access the screen, then
release the button.
Fig. 17 - FO2 set for 32%
(130 feet allowed)
Fig. 18 - SET WET
ACTIVATION
21
Page 22
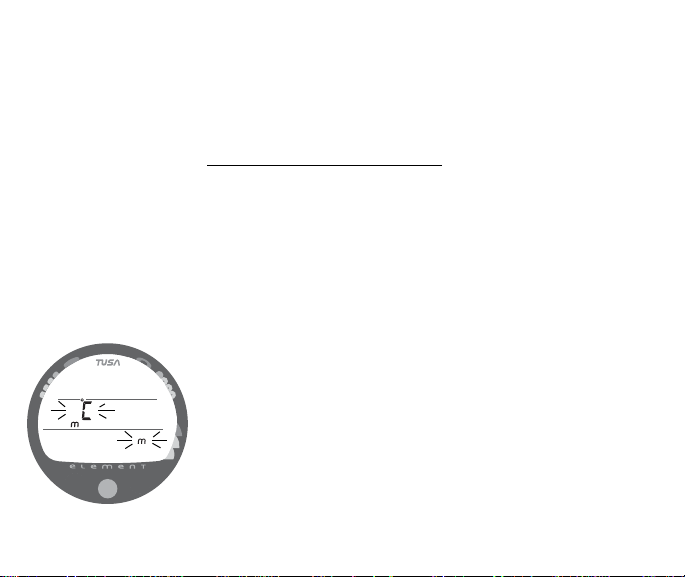
Fig. 19 - SET UNITS OF
MEASURE
22
• Press/release the button (less than 2 seconds) to toggle
between ON and OFF.
• Depress the button for 2 seconds to accept the Set Point and
advance to Set Units Of Measure.
TO SET - UNITS OF MEASURE
Factory set for Imperial, Units of can also be set for Metric.
• After having set and accepted Wet Activation, the Set Units
screen appears with the Set Point flashing (Fig. 19).
- - or - -
• While the Surface Sequence is scrolling, depress the button
for 6 seconds to bypass Set FO2 and Set Wet Activation,
then release the button.
• Press/release the button (less than 2 seconds) to toggle
between Metric (M and C) and Imperial (FT and F) units.
• Depress the button for 2 seconds to accept the Units Set Point
and advance to Set Hour Format.
Page 23
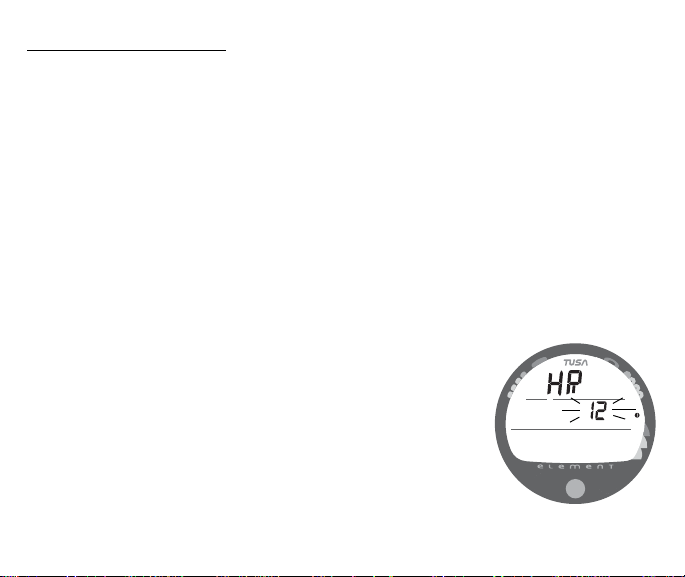
TO SET - HOUR FORMAT
Factory set for 12 Hour (12: AM to 11: PM), the Hour Format
can also be set for 24 Hour (0: to 23: hours).
• After having set and accepted Units, the Set Hour Format
screen appears with the Set Point flashing (Fig. 20).
- - or - -
• While the Surface Sequence is scrolling, depress the button
for 8 seconds to bypass Set FO2, Wet Activation, and Units,
then release the button.
• Press/release the button (less than 2 seconds) to toggle
between 12 and 24.
• Depress the button for 2 seconds to accept the Set Point and
advance to Set Time.
Fig. 20 - SET HOUR
FORMAT
23
Page 24
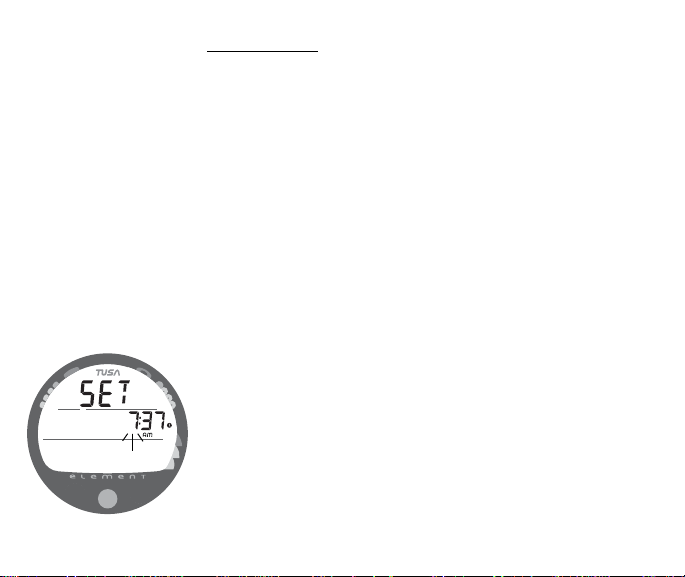
Fig. 21 - SET TIME
24
TO SET - TIME
Set for factory local time, the Time can be set to values between
1:00 and 12:59 (AM/PM) or 0:00 and 23:59.
• After having set and accepted Hour Format, the Set Time
screen appears with the Hour Set Point flashing (Fig. 21).
- - or - -
• While the Surface Sequence is scrolling, press the button for
10 seconds to bypass Set FO2, Wet Activation, Units, and
Hour Format, then release the button.
• Press/release the button repeatedly (less than 2 seconds
each time) to advance the Hour Set Point in increments of 1
Hour per press of the button.
• Depress the button for 2 seconds to accept the Hour Set
Point, the Minutes Set Point flashes.
• Press/release the button repeatedly (less than 2 seconds
each time) to advance the Minute Set Point in increments of 1
Minute per press of the button.
• Depress the button for 2 seconds to accept the Minute Set
Point and advance to Set PO2 Alarm.
Page 25
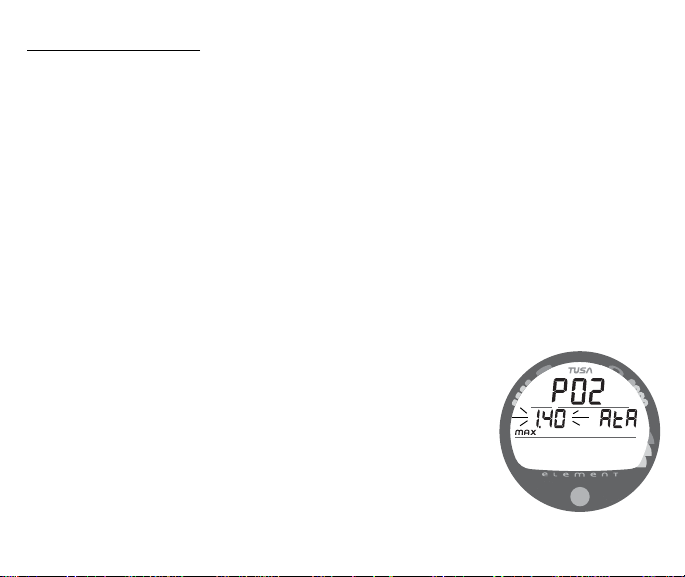
TO SET - PO2 ALARM
Factory set for 1.60 (ATA), the PO2 Alarm can be set to values
between 1.20 and 1.60 (ATA) in increments of .10 (ATA).
• After having set and accepted the Time, the Set PO2 Alarm
screen appears with the Set Point flashing (Fig. 22).
- - or - -
• While the Surface Sequence is scrolling, press the button for
14 seconds to bypass Set FO2, Wet Activation, Units, Hour
Format, and Time, then release the button.
• Press/release the button repeatedly (less than 2 seconds
each time) to advance the PO2 Alarm setting in increments
of .10 (ATA) per press of the button.
• Depress the button for 2 seconds to accept the PO2 Alarm
Set Point and advance to Set FO2 Default.
Fig. 22 - SET PO2 ALARM
25
Page 26
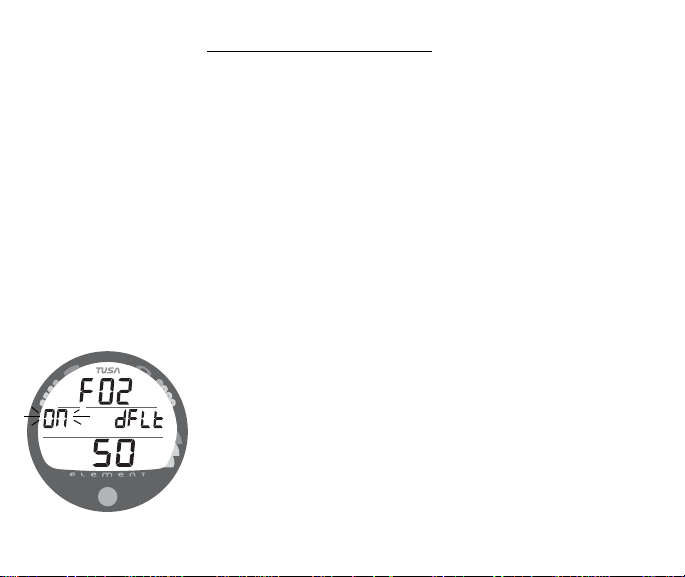
Fig. 23 - SET FO2 DEFAULT
26
TO SET - FO2 50% DEFAULT
Factory set ON, the FO2 50% Default feature can be set to
OFF. The effects of this feature being ON or OFF are described
on page 16.
• After having set and accepted the PO2 Alarm Set Point, the
Set FO2 50% Default screen appears with the Set Point
flashing (Fig. 23).
- - or - -
• While the Surface Sequence is scrolling, depress the button
for 16 seconds, then release it when the Set FO2 50 screen
appears with the Set Point flashing.
• Press/release the button (less than 2 seconds) to toggle
between ON and OFF.
• Depress the button for 2 seconds to accept the Set Point and
advance to Set No Deco Deep Stop.
Page 27
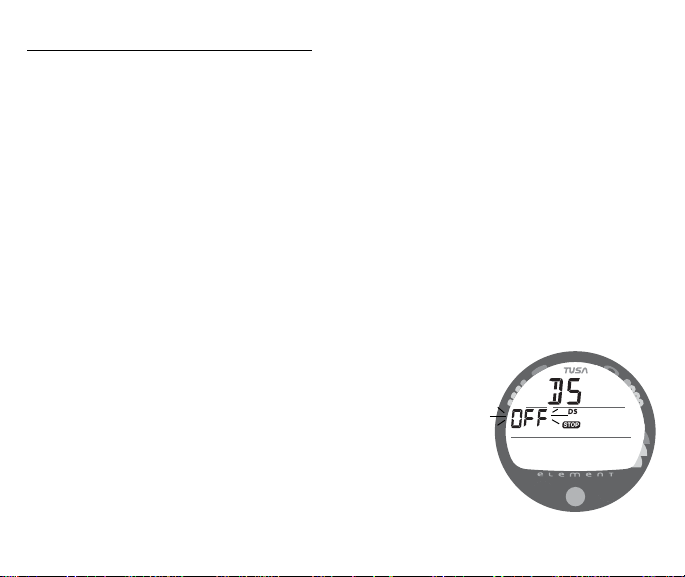
TO SET - NO DECO DEEP STOP (DS)
Factory set OFF, the No Deco Deep Stop feature can be set to
ON. The effects of this feature being ON or OFF are described
on page 34.
• After having set and accepted the FO2 50% Default Set
Point, the Set DS screen appears with the Set Point flashing
(Fig. 24).
- - or - -
• While the Surface Sequence is scrolling, depress the button
for 18 seconds, then release it when the Set DS screen
appears with the Set Point flashing.
• Press/release the button (less than 2 seconds) to toggle
between ON and OFF.
• Depress the button for 2 seconds to accept the Set Point and
revert to the Surface Sequence.
Fig. 24 - SET DEEP STOP
27
Page 28

WARNINGS AND SAFETY RECOMMENDATIONS
• It should not be considered that the capabilities built into the Element provide
an implied approval or consent from TUSA for individuals to exceed the defined
limits for recreational diving, as agreed on by all internationally recognized
training agencies.
• The oxygen features of the Element are intended for use by recreational divers
trained for nitrox diving by an instructor certified by a recognized training
agency to teach diving with nitrox.
• Conducting repetitive dives using enriched nitrogen-oxygen mixtures can lead
to oxygen buildup, reducing oxygen tolerance while increasing the risk of
pulmonary oxygen toxicity.
• The Element provides information based upon a personal dive profile, and
therefore must not be shared between divers. It is impossible for two divers to
stay precisely together underwater, and your computer's dive profile tracking
of previous dives will be pertinent to you only. Nitrogen and oxygen loading of
a second user may be significantly different and swapping dive computers
could lead to inaccurate and dangerous predictions of decompression and
oxygen accumulation status.
28
Page 29
WARNINGS:
Making decompression dives without the proper preparation and training will place you in an unnecessarily dangerous situation.
Existing data for making planned decompression dives is extremely
limited, and virtually non-existent for repetitive decompression diving.
Decompression diving greatly increases your risk of decompression
sickness.
Special training, equipment, and support are necessary for diving
deeper than the maximum recommended sport diving depth limit(s).
PLAN and DIVE MODES
29
Page 30
Depth NDL
FT (M) hours:mins
30 (9) 3:17 (3:37)
40 (12) 1:49 (1:55)
50 (15) 1:05 (1:08)
60 (18) :48 (:50)
70 (21) :35 (:36)
80 (24) :26 (:27)
90 (27) :19 (:20)
100 (30) :16 (:16)
110 (33) :12 (:13)
120 (36) :10 (:10)
130 (39) :08 (:09)
140 (42) :07 (:08)
150 (45) :06 (:06)
160 (48) :06 (:06)
170 (51) :05 (:05)
180 (54) :05 (:05)
190 (57) :04 (:05)
NDLs at Sea Level
for an Air Dive
(no dive made yet)
30
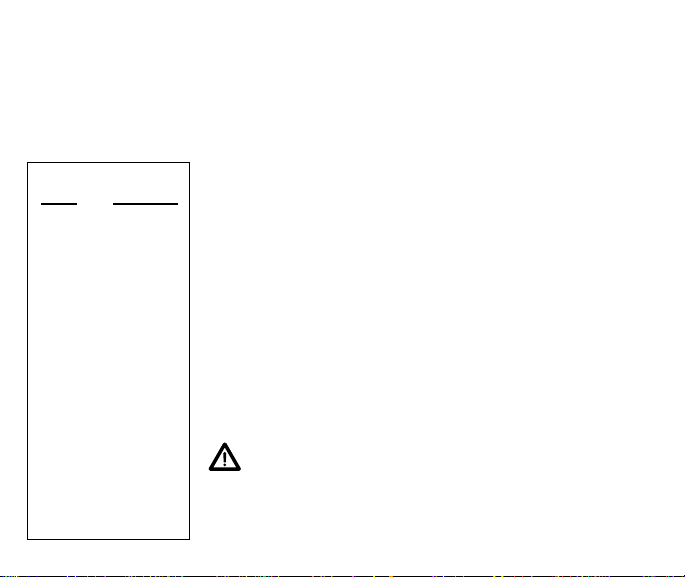
PRE DIVE PLANNER
The Pre Dive Planner, which appears after Surface Mode prior to
the first dive of a new activation period, provides a sequence of
theoretical dive times available for depths ranging from 30 FT (9
M) to 190 FT (57 M) in 10 FT (3 M) increments.
No decompression times (limits), or NDLs, are only displayed
for depths where there is at least 1 minute of theoretical dive
time available at the depth, taking into account a descent rate of
60 feet (18 meters) per minute.
The Planner should be reviewed prior to every dive to help you
plan your dive as required to avoid exceeding no decompression or oxygen exposure limits.
For repetitive dives, the Planner indicates adjusted dive times
that are available for the next dive, based on residual nitrogen
or oxygen accumulation (whichever is in control) following the
last dive and surface interval. It appears after the SAT screen in
the scrolling Surface Sequence (SURF > FLY > SAT > PLAN).
WARNING: The available dive times provided are
only predictions, depending on cylinder size and air
consumption rate, you may have less time available
than indicated because of those and other factors.
Page 31
• With each Depth displayed by the Planner, you will see
either predicted no decompression limits (NDLs) based upon
your previous dive profiles (if calculated to be nitrogen
controlled), or predicted O2 limits based upon either a single
dive exposure or your 24 hour accumulation of oxygen (if
calculations are controlled by O2).
• The Maximum Depth allowed for a PO2 level of 1.60 (ATA)
for the FO2 setting will also be displayed.
• Depths greater than the Maximum Depth that can be
achieved with a PO2 of 1.60 ATA will not be displayed.
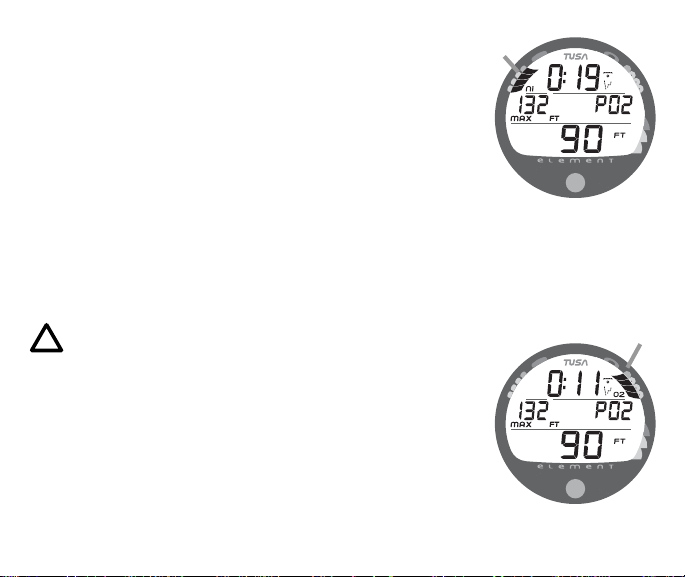
• If the Nitrogen Bar Graph is displayed (Fig. 25Aa), that next
dive is calculated to be controlled by nitrogen loading.
• If the O2 Bar Graph is displayed (Fig. 25Ba), it is calculated
to be controlled by O2 saturation.
a
Fig. 25A - PLANNER
NITROGEN CONTROL
NOTE: The Element will store O2 accumulation data
for up to 10 dives conducted during a 24 hour period.
If the maximum limit for O2 saturation has been
exceeded for that day (24 hour period), all segments
of the O2BG will flash.
Depth/Time values will not appear until the O2BG
recedes into the normal zone (i.e., your daily O2
dosage decreases an amount equal to the amount
accumulated during the latest dive completed).
Fig. 25B - PLANNER
O2 CONTROL
a
31
Page 32
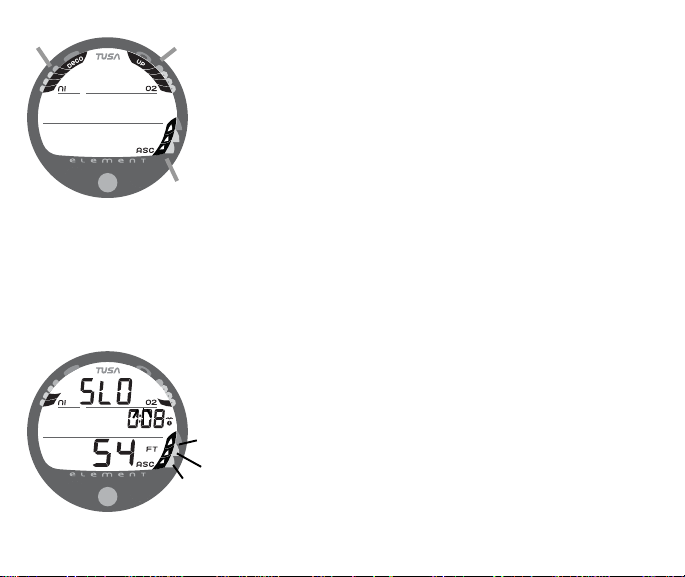
a
Fig. 26 - BAR GRAPHS
Fig. 27 - ASCENT TOO FAST
32
b
NIBG (NITROGEN LOADING BAR GRAPH) (Fig. 26a)
As your Depth and Elapsed Dive Time (EDT) increase, the NiBG
will add segments to represent the absorption of nitrogen.
While ascending to shallower depths, the number of segments
displayed will begin to recede, offering a graphic representation
of your multilevel diving capability.
c
O2BG (OXYGEN ACCUMULATION BAR GRAPH) (Fig. 26b)
If FO2 was set for a numerical value (Nitrox), the O2BG will
add segments to represent oxygen accumulation for that dive, or
24 hour period, whichever amount is greater.
ASC (ASCENT RATE INDICATOR) (Fig. 26c)
The Ascent Rate Indicator (ASC) shows how fast you are ascending. When you exceed the maximum recommended ascent rate
for the depth you are at (see chart on page 10), all segments of
the ASC will flash (Fig. 27). The flashing will stop when your
Ascent Rate is slowed below the alarm value.
Page 33
CONTROL OF DISPLAYS
During dives, there is a Main (default) Display with Alternate
screens of information that can be accessed temporarily by
pressing the button.
NO DECOMPRESSION DIVE MODE
The Element will enter the No Decompression Dive Mode when
you descend to 5 FT (1.5 M) for 5 seconds.
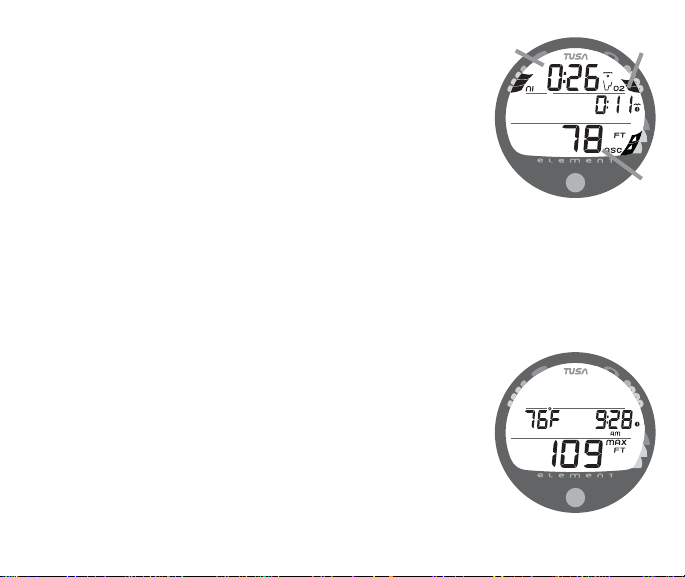
No Deco Dive Main Display (Fig. 28)
Information includes Dive Time Remaining with Mode icon (Fig.
28a), Elapsed Dive Time (Fig. 28b), Current Depth (Fig. 28c),
and applicable bar graphs.
• Press/release the button 1 time (< 2 seconds) to view No
Deco Dive Alternate 1 Display.
• If set for Nitrox, press/release the button while viewing
Alternate 1 to view Alternate 2.
• The Alternate Displays will revert to the Main after 5 seconds
unless the button is pressed.
• Depress the button for 2 seconds to view a No Deco Deep
Stop Preview screen for 5 seconds.
No Deco Alternate 1 Display (Fig. 29)
Information includes Temperature, Time of Day, and Max Depth
with icons.
a
Fig. 28 - NO DECO MAIN
Fig. 29 - NO DECO ALT 1
b
c
33
Page 34
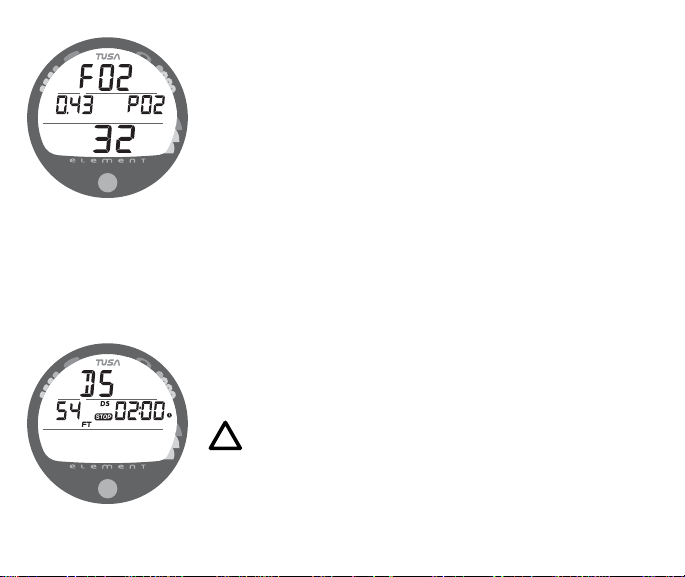
Fig. 30 - NO DECO ALT 2
Fig. 31 - NO DECO DEEP
STOP PREVIEW
34
No Deco Alternate 2 Display (Fig. 30)
The ALT 2 display will not appear when FO2 is set for AIR.
Information includes the graphic FO2, current value of PO2 with
graphic PO2, and the FO2 value set (21 to 50).
No Deco Dive DEEP STOP
On any No Deco dive in which Depth exceeds 80 FT (24 M), a
Deep Stop Preview screen (Fig. 31) can be accessed that will
display the graphic DS (meaning Deep Stop) and a recommended Stop Depth of 1/2 the Max Depth and Stop Time of
02:00 (2 minutes) with DS and STOP bar icons. It will revert to
the Main after 5 seconds.
• To access the Preview screen, depress the button for 2
seconds while viewing the No Deco Main screen.
• The intent of this screen is to suggest that a stop should be
made to help reduce tissue loading prior to final ascent.
• The Preview screen will not be available for display once
you ascend above the calculated Stop Depth.
NOTE: The Deep Stop is not required and although
recommended, it does not have to be taken. There
will be no penalty if the Stop is ignored and ascent
(or other activity) is continued.
Page 35
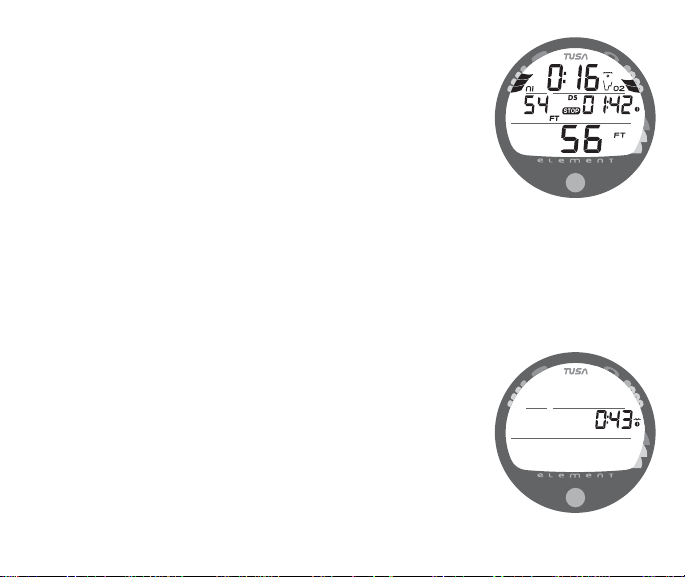
Upon ascending to within10 FT (3 M) below the Stop Depth, the
Deep Stop Main screen (Fig. 32) will automatically appear
displaying the Stop Depth (1/2 Max Depth) with the 2 minute
Countdown Timer that counts down from 02:00 to 0:00
(min:sec). Also displayed will be Dive Time Remaining, current
Depth and applicable bar graphs.
Press and release the button (< 2 seconds) to access the ALT 1
screen that displays Elapsed Dive Time (Fig. 33), press it again
to view the ALT 2 screen displaying Temperature, Time, and
Max Depth (similar to figure 29), then if a Nitrox dive press it
again to view ALT 3 displaying FO2 and PO2 (similar to figure
30).
> If you descend 10 FT (3 M) below, or ascend 10 FT (3 M)
above, the calculated Stop Depth for 10 seconds during the
countdown, the No Deco Main will replace the DS Main
display and the DS feature will be disabled for the
remainder of that dive.
> In the event that you enter Deco, exceed 190 FT (57 M), or
a High O2 condition (=> 80%) occurs, the DS will be
disabled for the remainder of that dive.
> The DS is disabled during a High PO2 Alarm condition
(when => Set Point).
Fig. 32 - DEEP STOP MAIN
Fig. 33 - DEEP STOP ALT 1
35
Page 36
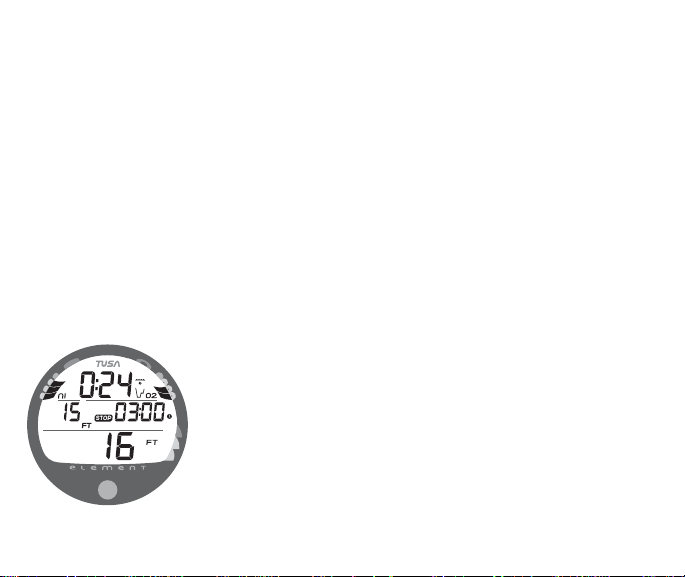
Fig. 34 - NO DECO SAFETY
STOP MAIN
36
No Deco Dive SAFETY STOP (Fig. 34)
Upon ascending to 20 FT (6 M) on any No Decompression dive
in which Depth exceeded 30 FT (9 M), a Safety Stop screen will
appear displaying a recommended Stop at 15 FT (4.5 M) with a
3 minute Countdown Timer that counts down from 03:00 to
0:00 (min:sec).
The Safety Stop will be displayed until the countdown times out,
or you descend below 30 FT (9 M) during the countdown, or
you surface during the countdown.
• Like the Deep Stop, there is no Penalty for surfacing prior to
completing the Safety Stop.
• There is no Preview screen associated with the Safety Stop.
Safety Stop Main display information includes Dive Time Remaining with Mode icon, Stop Depth (15 FT or 4.5 M), STOP bar
icon, Countdown Timer, Current Depth, and applicable bar
graphs.
• Alternate displays are similar to those previously described
for the Deep Stop.
Page 37
DECOMPRESSION DIVE MODE
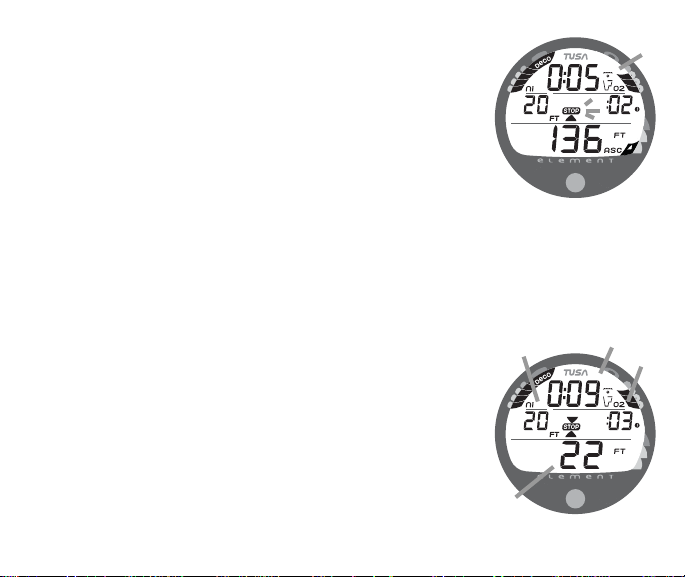
The Element is designed to help you by providing a representation of how close you are to entering decompression. Decompression Dive Mode activates when theoretical No Decompression time/depth limits are exceeded.
Upon entering Decompression Mode, the Mode icon will change
from No Deco to Deco (Fig. 35a).
a
• The UP Arrow and Deco STOP bar icons will flash until you
are within 10 FT (3 M) of, and below, the required Stop
Depth, then both arrow icons and the bar icon appear solid.
To fulfill your decompression obligation, you should make a safe
controlled ascent to a depth (Fig. 36a) slightly deeper than, or
equal to, the required Stop Depth indicated (Fig. 36b) and
decompress for the Stop Time indicated (Fig. 36c).
Total Ascent Time (Fig. 36d) includes Stop Times for all required
decompression ceilings and vertical Ascent Time calculated at
60 FPM (18 MPM) for depths deeper than 60 FT (18 M), and
30 FPM (9 MPM) for depths of 60 FT (18 M) and shallower.
Fig. 35 - ENTRY into DECO
b
d
a
Fig. 36 - DECO STOP MAIN
c
37
Page 38
The amount of decompression Credit Time that you receive is dependent on Depth, with
slightly less Credit given the deeper you are. You should stay slightly deeper than the Stop
Depth indicated until the next shallower Stop Depth appears. Then, slowly ascend to, but
not shallower than that Stop Depth.
• While in Decompression Mode, button operation and Alternate Displays are similar to
those described for No Deco Stops.
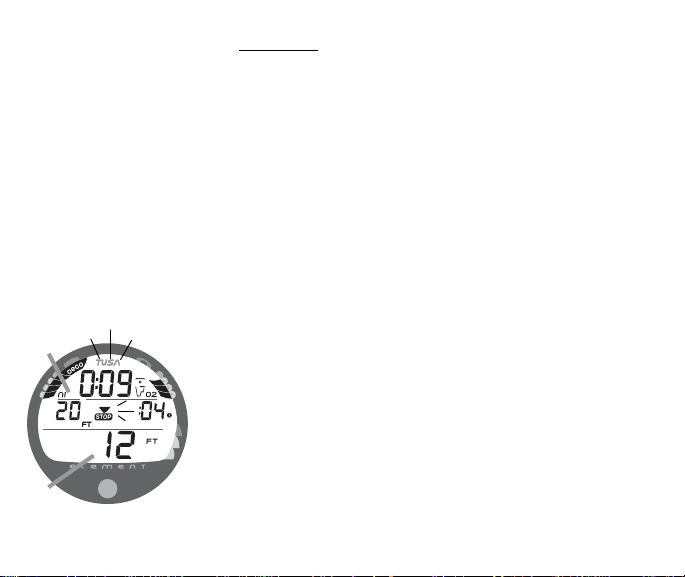
CONDITIONAL VIOLATION MODE
If you ascend shallower (Fig. 37a) than the required Decompression Stop Depth displayed
(Fig. 37b), the Down Arrow and STOP bar icons, and Total Ascent Time value will flash
until you descend below the required Stop Depth. Current Depth and applicable bar
graphs will be displayed.
If you descend below the required Deco Stop before 5 minutes
b
have elapsed, operation will continue to function in Decompression Dive Mode.
No off gassing credit will be given during time above the Stop.
Once descent is made to below the Stop Depth, off gassing
credit begins, required Deco Stop Depths and Time will decrease toward zero, then operation will revert to the No Deco
a
Fig. 37 - CONDITIONAL
VIOLATION MAIN
Dive Mode.
ALT displays are similar to those for Deco.
38
Page 39
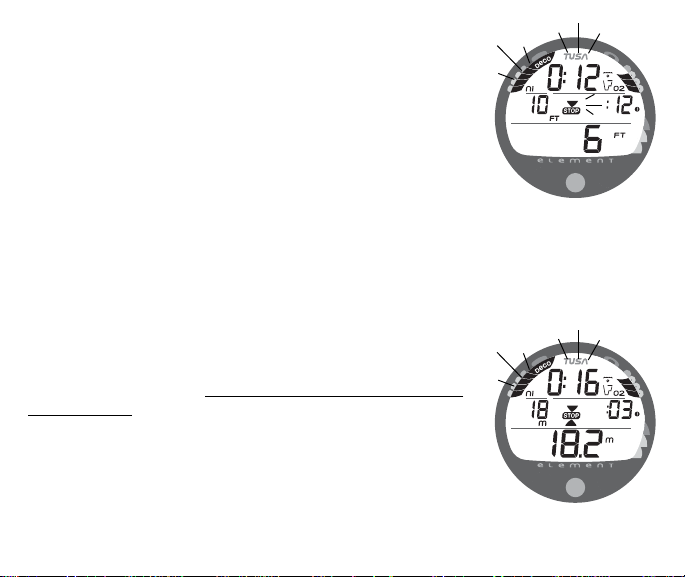
DELAYED VIOLATION MODE #1 (Fig. 38)
If you remain above a required Deco Stop Depth for more than
5 minutes, the full NiBG as well as Total Ascent Time and the
Down Arrow and STOP bar icons will flash until you descend
below the Required Stop Depth. This is a continuation of a
Conditional Violation.
DELAYED VIOLATION MODE #2 (Fig. 39)
The Element cannot calculate decompression times for Stop
Depths much greater than 60 FT (18 M) and offers no indication
of how much time spent underwater would result in the need for
a greater Stop Depth.
If your Decompression obligation requires a Stop Depth between
60 FT (18 M) and 70 FT (21 M), the all segments of the NiBG
will flash. Total Ascent Time will still be displayed.
You must ascend to just deeper than, and stay as close as
possible to 60 FT (18 M) without causing the Total Ascent Time
display to flash.
When the Required Stop Depth indicates 50 FT (15 M), etc., you
can ascend to those depths and continue decompressing.
Fig. 38 - DELAYED
VIOLATION #1 MAIN
Fig. 39 - DELAYED
VIOLATION #2 MAIN
39
Page 40
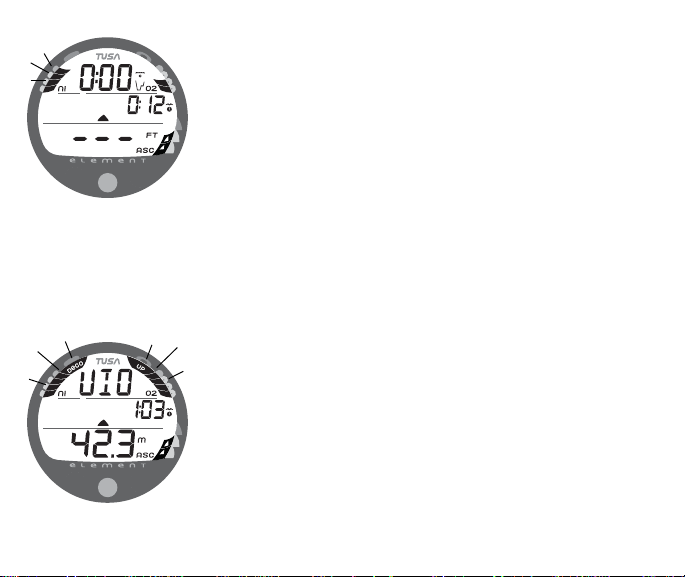
Fig. 40 - DELAYED
VIOLATION #3
Fig. 41 - VIOLATION GAUGE
MODE
40
• While in Conditional Violation Mode and Delayed Violation
Modes # 1 and # 2, button operation and Alternate Displays
are similar to those for Deco (or No Deco Stops).
DELAYED VIOLATION MODE #3 (Fig. 40)
If you descend deeper than 330 FT (99.9 M), the loaded NiBG
segments will flash, and the Current Depth and Max Depth
displays will only indicate 3 dashes ( - - - ).
Upon ascending above 330 FT (99.9 M), the real Current Depth
value will be restored, however, Max Depth will only display 3
dashes for the remainder of that dive. Also, the Log for that dive
will only display 3 dashes as the Max Depth achieved.
VIOLATION GAUGE MODE
During a Dive, if a Deco Stop much greater than 60 FT (18 M) is
required, the Element would then operate with limited functions
in Violation Gauge Mode during the remainder of that dive and
for 24 hours after surfacing.
Violation Gauge Mode turns the Element into a digital instrument
without any Nitrogen or O2 monitoring functions. Only Current
Depth, Max Depth, Elapsed Dive Time, and the Ascent Rate
Indicator will be displayed. All segments of the NiBG and
O2BG will flash as a warning of this condition (Fig. 41).
Page 41
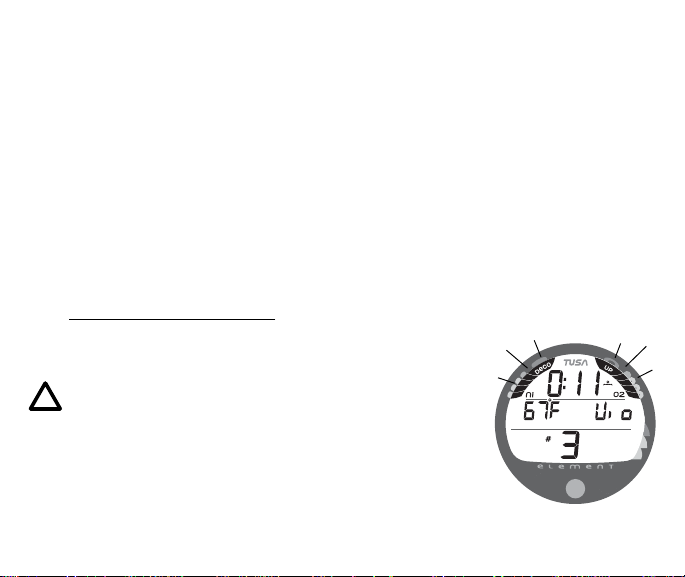
Violation Gauge Mode would be preceded by entering Delayed
Violation Mode #2, or if High O2 occurs while in Deco.
The Element will also enter Violation Gauge Mode 5 minutes
after reaching the surface from a dive in which a Delayed
Violation occurred.
On the surface, Violation Gauge Mode displays the Surface
Interval, Temperature, the graphic Vio alternating with Time of
Day, Dive Number, and NiBG and O2BG with all segments of
both flashing (Fig. 46). It does not provide the FO2, Plan, or
Time to Fly and Desaturate features.
The countdown timer that appears when you try to access Time
to Fly does not represent Time to Fly. It is only provided to
inform you of the time remaining before normal operation can
resume with full features and functions.
NOTE: In the event that a dive is made during the 24
hour period after surfacing, a full 24 hour surface
interval must then be served after that dive before all
functions are restored.
Fig. 46 - VIOLATION
GAUGE MODE (Surface)
41
Page 42
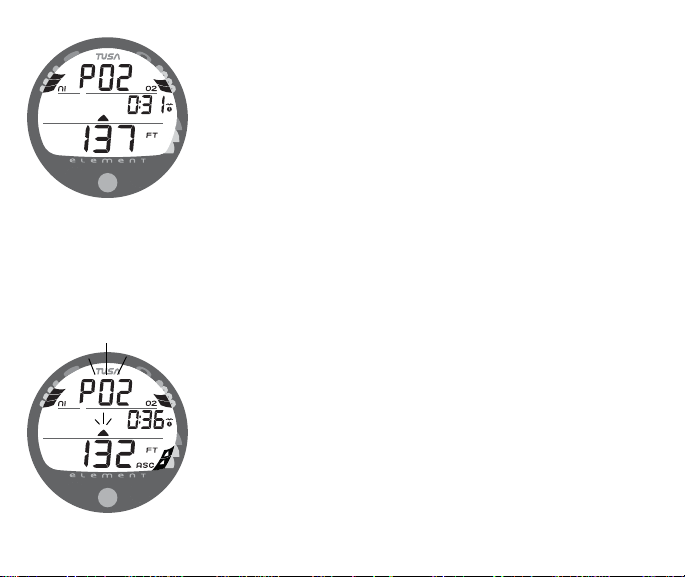
Fig. 47 - HIGH PO2
WARNING
Fig. 48 - HIGH PO2 ALARM
42
HIGH PO2
When partial pressure of oxygen (PO2) increases to 0.20 ATA
less than the PO2 Alarm Set Point, the graphic PO2 (in place of
DTR), and UP Arrow icon will appear on the Main Display (Fig.
47) until PO2 decreases. Elapsed Dive Time, Current Depth,
and bar graphs will continue to be displayed.
If PO2 continues to increase and reaches the Alarm Set Point,
the graphic PO2 and UP Arrow icon will flash until PO2 decreases (Fig. 48).
• Press/release the button momentarily (< 2 seconds) to view
the Alternate Displays (similar to No Deco Stop screens).
Page 43
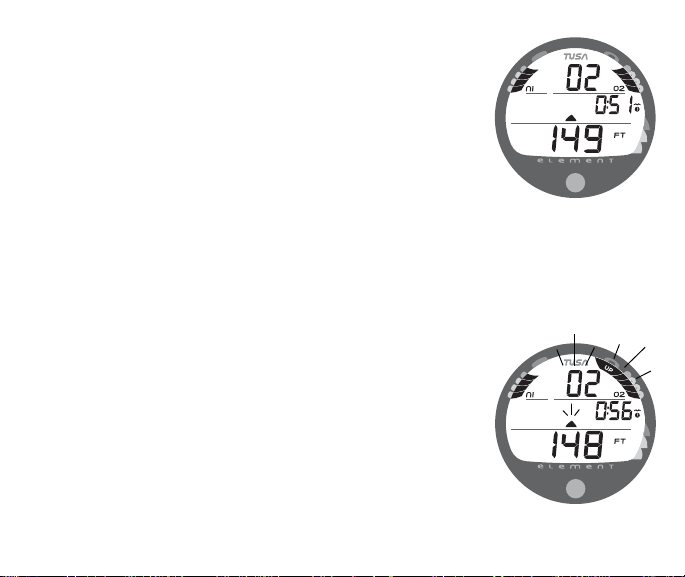
HIGH OXYGEN ACCUMULATION
The O2BG displays either O2 accumulated during that Nitrox
dive, or during the repetitive Nitrox dives you conduct during
that 24 hour period, whichever of the two is greater at that time.
The O2BG offers you a convenient way to consistently monitor
how close you are coming to the limits of O2 exposure. Use it
as a visual reference to place a wider margin of protection
between you and the Limits.
• Warning >> at 80% (240 OTU)
• Alarm >> at 100% (300 OTU)
When O2 accumulation increases to 80%, the Up Arrow icon
will appear and the graphic O2 will replace DTR (Fig. 49A)
If O2 reaches 100%, the full O2BG, graphic O2, and Up Arrow
icon will flash (Fig. 49B) until on the surface.
• Press/release the button momentarily (< 2 seconds) to view
the Alternate Displays (which are similar to those for No
Deco Stops).
Fig. 49A - O2 WARNING
(80%)
Fig. 49B - HIGH O2 ALARM
(100%)
43
Page 44

WARNINGS AND SAFETY RECOMMENDATIONS
• The percentage of oxygen (FO2) in the nitrox mix being used must be 'set
before each nitrox dive', unless the FO2 50% Default feature is set OFF (a user
setting).
• The Dive Planner provides predicted times for subsequent dives. Depending on
cylinder size, breathing gas consumption, and oxygen accumulation, you may
have less time available than indicated because of breathing gas quantity or
other limitations.
• Until it has shut itself off, you must not use the Element at a different Altitude
than the Altitude at which it was activated. Doing so will result in an error
equal to the difference in barometric pressure, and possibly a false dive mode
with erroneous data.
• To provide proper Altitude compensation, the Element must be manually activated at the new altitude. Dive computers, such as the Element cannot sense
changes in barometric pressure if activated by immersion in water at higher
Altitudes.
• Use the Caution Zone of the Nitrogen Bar Graph as a visual reference to provide
a greater margin of protection between you and the No Decompression Limits.
• Every effort should be made to keep each of the Bar Graphs in the normal zone
throughout your dives to reduce your risk of exposure to decompression
sickness, oxygen toxicity, and the effects of excessive ascent rates.
44
Page 45

RESPONSIBLE COMPUTER DIVING
• Plan each dive, and dive your plan - Your computer was not designed to make decisions for you,
only to provide you with the information you need to make responsible decisions for yourself. This
begins with a dive plan that will help you avoid a low air or decompression situation.
• Do not plan any dive that exceeds your training or experience level.
• Inspect your computer before every dive - If it shows any signs of damage or abnormal function,
DO NOT dive with it until it has received factory service.
• Make a safety stop at 15 to 20 FT (4.5 to 6 M) at the end of every dive. It's important, Don't forget it.
• You should make every effort to complete all of your ascents with the Nitrogen Bar Graph inside
the normal No Decompression zone.
• If you inadvertently entered Decompression Mode, you must not complete your ascent until the
Nitrogen Bar Graph is at least inside the No Decompression Caution Zone.
• While you cannot provide a guarantee against the occurrence of decompression sickness, you
may choose your own personal zone of caution based upon your individual age, physique,
excessive weight, training, experience, etc. to reduce the statistical risk. By not pushing the
limits, you can establish and adjust your personal level of conservatism and margin of safety.
POST DIVE MODES
45
Page 46
POST DIVE SURFACE MODE
When you ascend to 2 FT (0.6 M) for 1 second, the Element will
enter Surface Mode and begin counting Surface Interval.
TRANSITION PERIOD
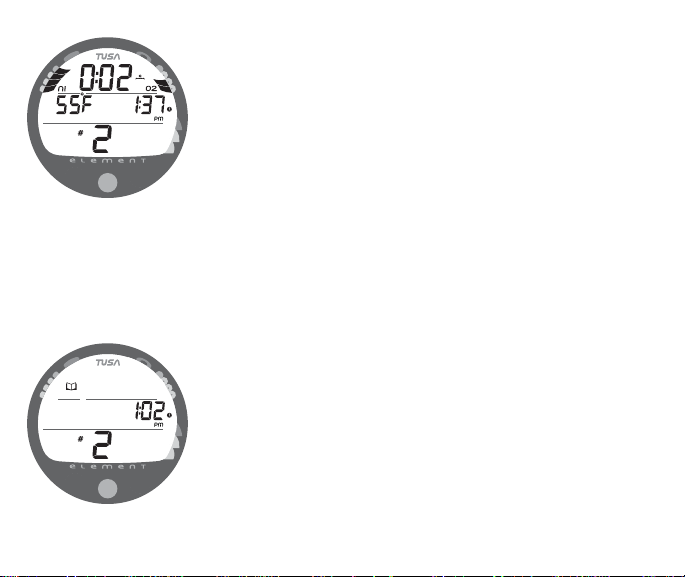
The first 10 minutes is, in affect, a Transition Period during which
time the following information is displayed (Fig. 50):
Fig. 50 - TRANSITION
PERIOD
Fig. 51 - LOG MODE
(during Transition Period)
46
• Surface Interval time (colon flashing) with mode icon
• Temperature (ambient) with icon and graphic C (or F)
• Time of Day with clock icon
• Number of that dive (during that activation period) with icon
• Battery icon, if a Low Battery condition exists
• NiBG, and O2BG (if a Nitrox dive)
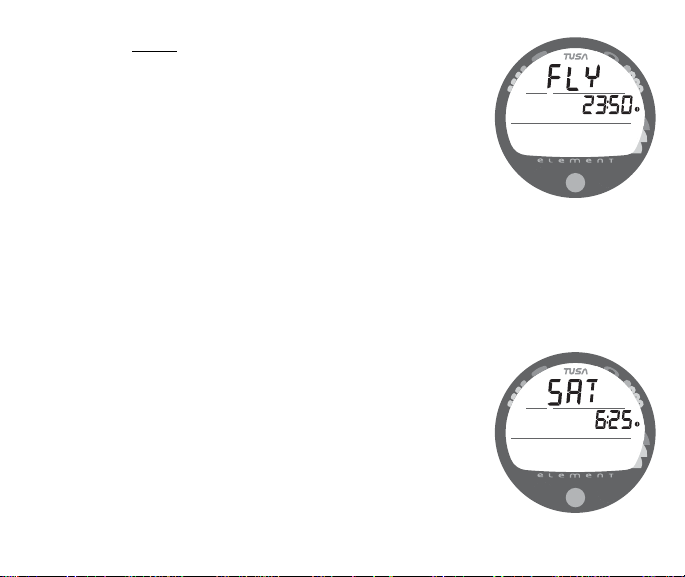
During the Transition Period, the Log for that dive can be viewed.
No other modes (e.g., Fly, Desat, Plan, Set) are accessible.
To view the Log (Fig. 51), press/release the button (less than 2
seconds).
Log Data will not be stored in the unit's memory until the 10
minute Transition Period on the surface is completed.
Page 47
If you descend during the 10 minute Transition Period, time
underwater will be considered a continuation of that dive. The
time at the surface (if less than 10 minutes) will not be added as
Elapsed Dive Time.
AFTER THE TRANSITION PERIOD (THE FIRST 2 HOURS)
Once 10 minutes have elapsed, the Surface Interval time display
colon stops flashing indicating that the Dive and Transition
Period are completed, and a subsequent descent will be considered a new dive.
For the remainder of the first 2 hours after surfacing, information
will continue to be displayed as the Surface Sequence, scrolling
through the Surface Mode >> Fly >> Sat >> Plan screens. You
will also have full access to Log and Set modes.
Time to Fly/Desaturate
The Time to Fly and Desat Timers begin counting down 10
minutes after surfacing from a dive (after the Transition Period).
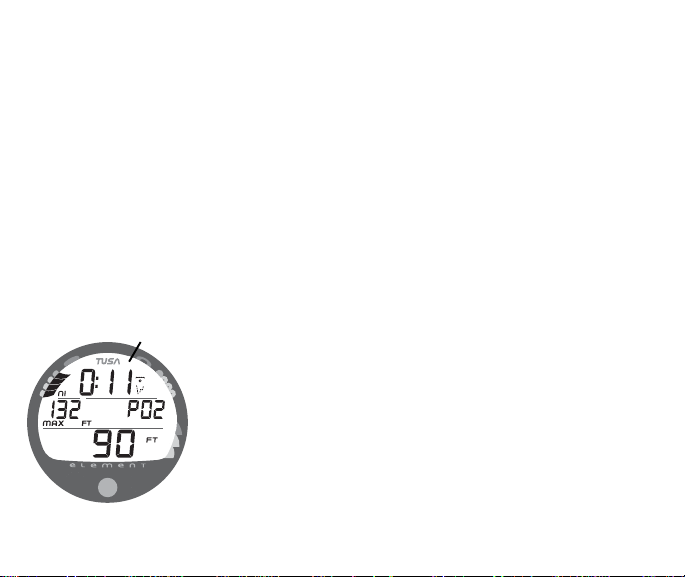
The FLY countdown (Fig. 52) always begins at 23:50 (hr:min)
and the Desat countdown (Fig. 53) at 23:50 (maximum).
If a Violation occurred during the dive a single dash ( - ) will
appear instead of the letters FLY. DeSat time will not be displayed.
Fig. 52 - TIME TO FLY
Fig. 53 - DESAT TIME
47
Page 48
The Time to Fly counter is provided to assist you with deciding when enough surface time
has elapsed to fly (or travel to higher elevations).
• After a Surface Interval of 12 hours, you may choose to fly (or travel to higher elevations), provided that your dive profile(s) did not enter decompression.
• If your diving involved decompression or a repetitive multi day profile, it is strongly
recommended that you wait a full 24 hours after your last dive to add a greater degree
of protection.
Pre Dive Planner
After a dive, the Planner displays adjusted No Decompression Limits (Fig. 54) based on
residual nitrogen calculated to be remaining from that and previous dives in the same
series.
0:19 if no
previous dive
Log Mode
The Element will store up to 12 dives in its Log for viewing.
Once the Log is full (12 dives), each subsequent dive will then
overwrite the oldest dive stored in the Log. It is therefore suggested that you transfer the Log's data to your log book at the
end of each day of diving.
Log data will not be lost when the battery is removed/replaced,
however, factory service and calibration will delete the data.
Fig. 54 - PLANNER
(adjusted NDLs)
48
The first dive conducted each time the unit is Activated will be
#1, therefore there may be multiple #1 dives in the Log.
Page 49
Each dive has up to 3 Log screens >> Dive Identifier (Preview),
Dive Data, and O2 Data (if a Nitrox dive). Dives are displayed
in a reverse sequence that starts with the dive most recently
recorded, back to the oldest one stored. The most recent dive
will always be the first shown in the sequence.
To access Log Mode -
> Press/release the button momentarily (< 2 seconds) while the
unit is scrolling through the Surface Sequence.
> The first screen (Dive Preview/Identifier) of the most recent
dive conducted will appear displaying (Fig. 55) -
• Log Mode (book) icon
• Time of Day, that the dive started with clock icon
• Dive Number (for that activation period) with icon
> While viewing the Preview screen, press/release the button
momentarily (< 2 seconds) to view the second screen.
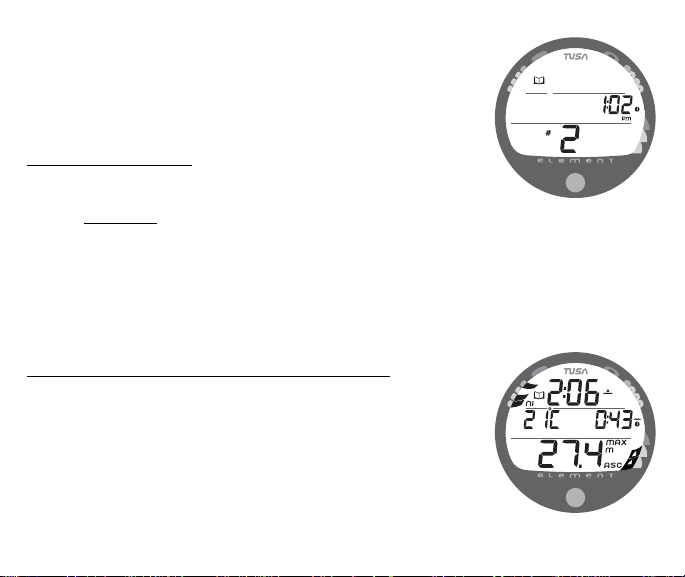
Dive Data (the second screen) information includes (Fig. 56) -
• Log Mode icon
• Surface Interval - prior to that dive with clock/wave icon
• Temperature - minimum during the dive with icon
• Elapsed Dive Time (hr:min) with Dive mode icon
• Maximum Depth - reached during the dive with icon
• ASC - max ascent rate maintained for 4 consecutive seconds
• NiBG - nitrogen loading at the end of the dive, segment
reflecting max loading during the dive will appear flashing.
Fig. 55 - LOG PREVIEW
Fig. 56 - LOG DIVE DATA
49
Page 50
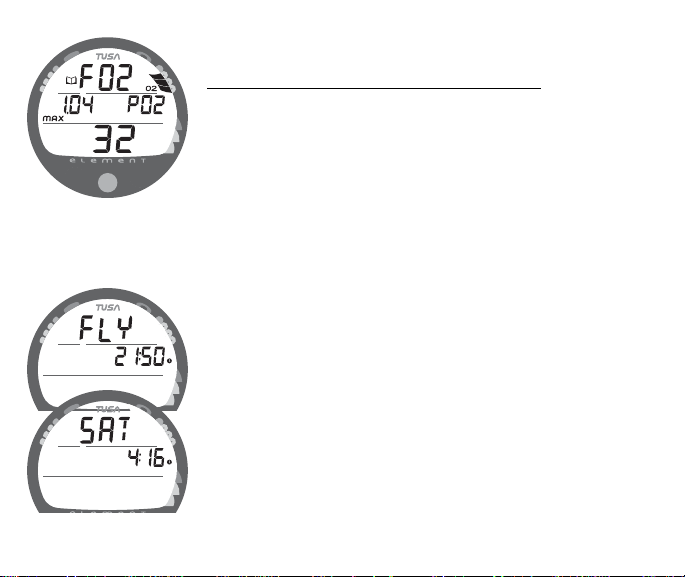
Fig. 57 - LOG O2 DATA
Fig. 58 - FLY/SAT
50
> Press/release the Button to view the third screen.
O2 Data (the third screen) information includes (Fig. 57) -
• Log Mode icon
• Graphic FO2 with FO2 Set Point (at bottom)
• Maximum PO2 level reached during the dive with the MAX
icon and graphic PO2.
• O2BG - showing oxygen accumulated at the time you
surfaced at the end of the dive.
> To access the first screen of the previous dive's Log, press/
release the button momentarily (< 2 seconds).
> To return to the Surface Sequence at any time while in Log
Mode, depress the button for 6 seconds, releasing it when
Surface Mode appears.
The unit will automatically revert to the Surface Sequence after 2
minutes if the button is not pressed to view another Log Screen.
AFTER THE FIRST 2 HOURS
Two hours after the last dive, the Surface Sequence will no
longer be displayed. The Time to Fly and Desat countdown
screens (Fig. 58) will be displayed alternately for 3 seconds
each until they count down to 0:00 or another dive is made.
Page 51
To access other modes or enter settings -
• Press/release the button to reactivate the Surface Sequence.
• The unit will again revert to the Time to Fly and Desaturation
countdowns after 2 hours, if the button is not pressed.
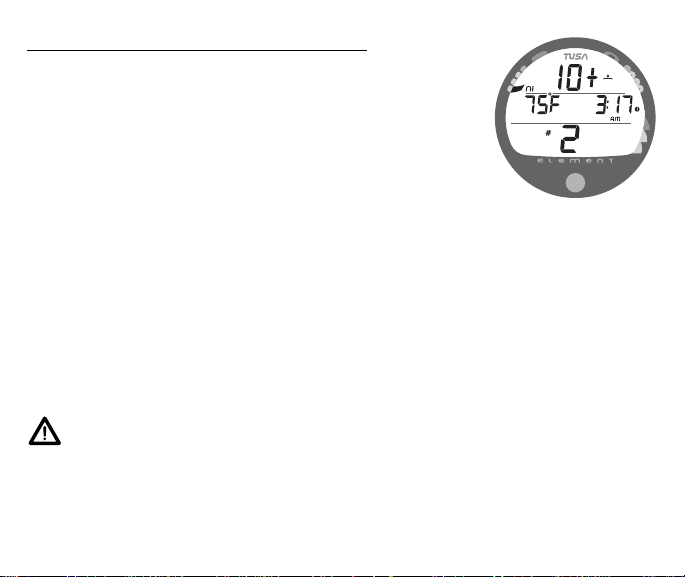
• Surface Interval Times greater than 9:59 (hr:min) will be
displayed only as Hours 10+, 11+, 12+, etc. (Fig. 59)
Wet Contacts
• If the unit is not cleaned and dried prior to the Fly countdown reaching 0:00 (hr:min), or making another dive, it will
shut off then automatically reactivate.
• If no dive is made after activation, the unit would shut off
after 2 hours, then automatically reactivate again if wet,
repeating the action until cleaned and dried.
RESET (CLEAR) FEATURE
The Element is configured with a RESET feature that allows data to be
cleared, including Nitrogen and Oxygen calculations and Log Mode
entries.
WARNING: Reset after a dive and subsequent use
for a repetitive dive conducted by the same diver
could result in serious injury or death.
Fig. 59 - SURFACE MODE
(greater than 9:59)
51
Page 52
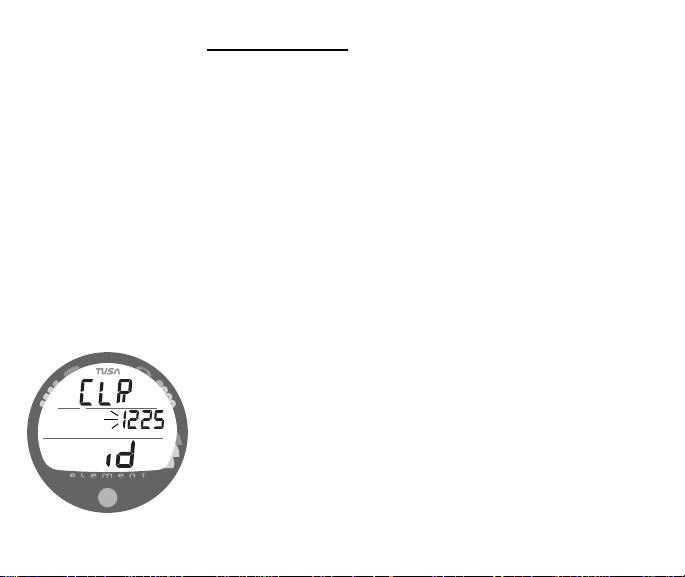
Fig. 60 - RESET (Clear)
52
RESET PROCEDURE
• While the Surface Sequence is scrolling, press/release the button
(< 2 seconds) to access the Log Mode displaying the first screen of
the most recent dive (Dive Preview/Identifier).
• Press/release the button again (< 2 seconds) to access the second
Log screen (Dive Data) of the most recent dive.
• Depress/hold the button while the second Log screen of the most
recent dive is being displayed to access the Reset screen. The
graphics CLR and id will appear with the Key Code XXXX, the first 2
digits flashing (Fig. 60). Release the button.
• If necessary to change the first 2 digits, press/release the button
repeatedly (< 2 seconds each time) to select the correct number.
• Depress the button for 2 seconds to save the first 2 digit number and
advance to the second 2 digits, flashing.
• If necessary to change the second 2 digits, press/release the button
repeatedly (< 2 seconds each time) to select the correct number.
• Once the proper Key Code has been entered, depress the button for
2 seconds to accept the Key Code, complete the Reset operation, and
turn the unit Off (i.e., Clearing it).
• If an incorrect Key Code number has been entered, the unit will revert
to the Surface Sequence when the button is depressed, resuming
previous operation(s).
Page 53

GENERAL
53
Page 54
a
Fig. 61 - BACK OF CASE
54
CARE AND CLEANING
Protect your Element from shock, excessive temperatures, chemical attack, and tampering. Protect the lens against scratches
with a transparent Instrument Lens Protector. Small scratches will
naturally disappear underwater.
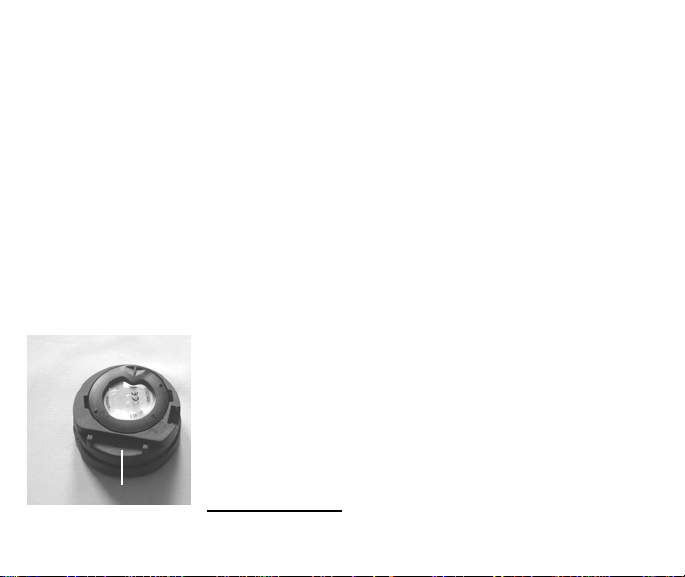
• Soak and rinse the Element in fresh water at the end of each
day of diving, and check to ensure that the areas around the
low pressure (depth) sensor (Fig. 61a) and button are free of
debris or obstructions.
• To dissolve salt crystals, use lukewarm water or a 50% white
vinegar/50% fresh water bath. After removal from the bath,
place the unit under gently running water and towel dry
before storing.
• Transport your unit cool, dry, and protected.
INSPECTIONS AND SERVICE
Your Element should be inspected annually by an Autho-
rized TUSA Dealer who will perform a factory prescribed function check and inspection for damage or wear. To keep the
product's warranty in effect, this inspection must be completed
one year after purchase (+/- 30 days). TUSA recommends that
you continue to have this inspection performed every year to
ensure it is working properly.
To Obtain Service
Take your Element to an Authorized TUSA Dealer.
Page 55

NOTE: The procedures that follow must be closely adhered to. Damage due
to improper battery replacement is not covered by the unit's warranty.
MODULE REMOVAL FROM BOOT
If the Module is in a Console, bend the rubber Console Boot back to expose the edge of
the Module. If the Boot is flexible enough to permit, you may bend it back far enough to
scoop the Module out with your finger. Otherwise, it may be necessary to insert a blunt
screwdriver until the tip rests just underneath the Module. DO NOT pry the Module from
the Console! Slowly increase the pressure under the Module by releasing the tension on
the rubber Boot. The Module will slide up the screwdriver and exit the Console.
If the Module is in a Wrist Boot, it will be necessary to peel the lips of the Boot downward
off the Module while applying pressure from underneath, working it out slowly.
BATTERY REPLACEMENT
The Battery Compartment should only be opened in a dry and clean environment with
extreme care taken to prevent the entrance of moisture or dust.
To prevent formation of moisture in the Battery Compartment, it is recommended that the
Battery be changed in an environment equivalent to the local outdoor temperature and
humidity (e.g., do not change the Battery in an air conditioned environment, then take it
outside during a hot sunny day).
NOTE: If the old Battery can be removed and the new one inserted within 8
seconds, nitrogen and oxygen calculations and settings, will be retained for
repetitive dives.
55
Page 56
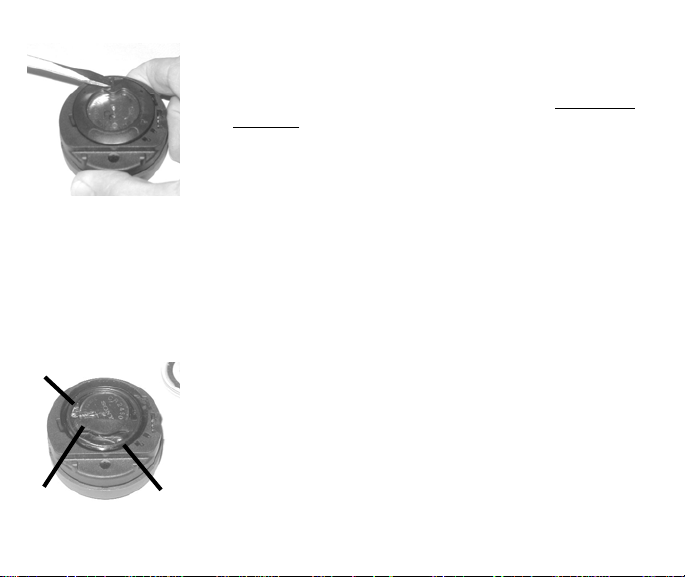
Fig. 62 - RING REMOVAL
Battery Hatch Removal
• Locate the Battery Compartment on the back of the Module.
• While applying steady inward pressure on the center of the
Battery Hatch, rotate the Hatch Retaining Ring 10 degrees
clockwise using a flat blade screwdriver (Fig. 62) or a
Battery Hatch Tool.
• Lift the Hatch Ring up and away from the Housing, or turn
the Module over to allow it to drop out into your hand.
• Remove the Battery Hatch.
Battery Removal
• Remove the Retaining Bar located across the lower portion of
the Battery (Fig. 63a).
• Remove the Hatch O-ring. DO NOT use tools
• Using care not to damage the Battery Contacts (Fig. 63b/c),
slide the Battery up and out of the Battery Compartment.
b
a
Fig. 63 - HATCH REMOVAL
56
Inspection
• Closely check all of the sealing surfaces for any signs of
damage that might impair proper sealing.
• Inspect the Button, Lens, and Housing to ensure they are not
cracked or damaged.
• If it is necessary to clean the Battery Compartment, flush it
c
and all components with a solution of 50% white vinegar
and 50% fresh water. Rinse with fresh water, and allow to
dry overnight, or blow dry with a hair dryer (set at 'no heat').
Page 57
WARNING: If damage or corrosion is found, return
your Element to an Authorized TUSA Dealer, and DO
NOT attempt to use it until it has received factory
prescribed service.
Battery Installation
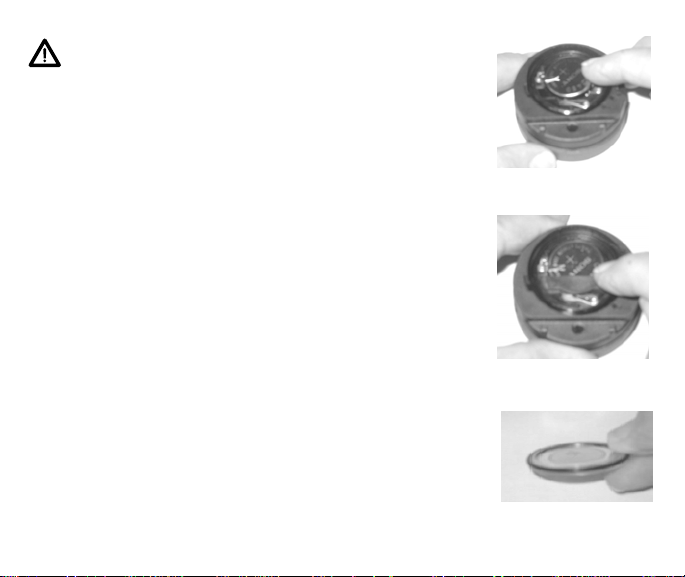
• Slide a new 3 volt type CR2450 Lithium Battery, negative
( - ) side down into the Battery Cavity. Slide it in from the
right side and ensure that it slides under the contact clip on
the left rim of the cavity (Fig. 64).
• Orient the Retaining Bar across the lower portion of the
Battery and carefully push it down into position (Fig. 65).
Battery Hatch and Hatch Retaining Ring Installation
• Replace the Hatch O-ring with a new one which must be a
genuine TUSA part.
• Lightly lubricate the new Hatch O-ring with silicone grease
and place it on the inner rim of the Battery Hatch (Fig. 66).
Ensure that it is evenly seated.
• Slide the Hatch Retaining Ring, top portion first (small opening), onto your thumb.
• Carefully place the Battery Hatch (with O-ring) into position
on the rim of the Battery Compartment, then press it evenly
and completely down into place with your same thumb.
Fig. 64 -INSERTING
BATTERY
Fig. 65 - INSERTING
RETAINING BAR
Fig. 66 - O-RING ON RIM OF
HATCH
57
Page 58
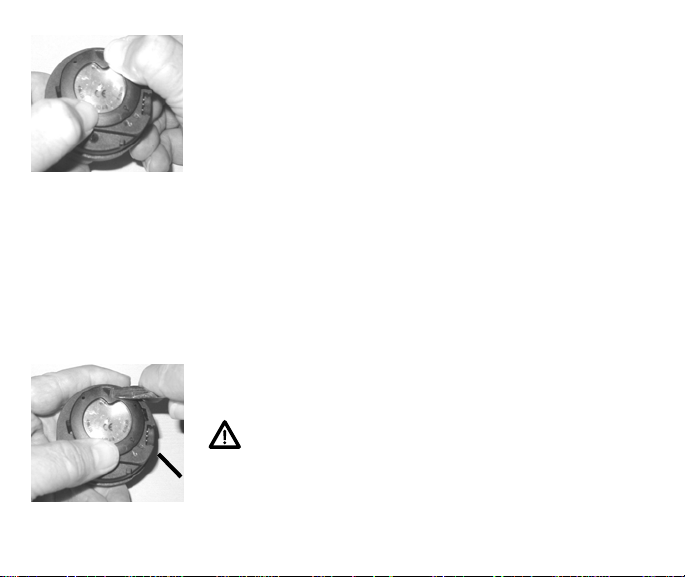
Fig. 67 -ENGAGING the
RETAINING RING TABS
Fig. 68 -TIGHTENING the
RETAINING RING
58
• Maintain the Battery Hatch securely in place and, using your
other hand, slide the Retaining Ring down off your thumb
and into position around the Battery Compartment.
• The tabs on the Retaining Ring fit down into the two slots
located at the 2 and 8 o'clock positions.
• Using your fingers, turn the Ring counter clockwise 5 degrees until the tabs engage (Fig. 67), then tighten it 5 more
degrees by turning it counter clockwise using the Battery
Hatch Tool (Fig. 68).
• While tightening the Retaining Ring, exert continuous inward
pressure on it until it is secured in the proper position. A
small symbol located on the Ring should be aligned with the
Locked symbol located on the Housing (Fig. 68a)
Inspection
• Activate the unit and watch carefully as it performs a full
diagnostic and battery check, and enters Surface Mode.
• Observe the LCD display to ensure it is consistently clear and
sharp in contrast throughout the screen.
WARNING: If there are any portions of the display
missing or appearing dim, or if a Low Battery condition is indicated, return the Element to an Authorized
a
TUSA Dealer for a complete evaluation before attempting to use it.
Page 59

RETURNING THE MODULE TO BOOT
Responsible
• If the Boot was fitted with a Spacer and it was previously removed, replace the
Spacer into the Boot.
• Orient the Module over the opening in the Boot, and dip the bottom edge into it while
pressing the top edge with the palm of your hand. Stop pressing when the bottom
edge of the Module has just entered the Boot.
• Correct the alignment of the Module as needed so that it is straight.
• Press the Module completely into place with your thumbs, watching the alignment,
until it snaps into place.
UNEXPECTED LOSS OF DISPLAYED INFORMATION
If your Element stops working for any reason, it is important that you have anticipated this
possibility and are prepared for it. This is an important reason for not pushing
the No Decompression and Oxygen Limits, and a critical reason to avoid
entering Decompression.
If you dive in situations where your trip would be ruined or your safety would be jeopardized by losing the use of your Element, a backup instrument system is highly recommended.
59
Page 60

ALTITUDE COMPENSATION
Atmospheric pressure decreases as Altitude increases above sea level. Weather systems
and ambient temperature also affect barometric pressures. Consequently, depth reading
instruments that do not compensate for the decrease in ambient pressure indicate depth
readings shallower than the depth they are actually at.
The Element automatically compensates for decreased ambient pressures for Altitudes
between 3,001 feet (916 meters) and 14,000 feet (4,270 meters). Its program contains a
high altitude algorithm that reduces no decompression and oxygen exposure limits to add
a larger zone of caution.
The Element senses ambient pressure when it is activated, every 15 minutes while it is
activated, or every 30 minutes when it is not activated. At an Altitude of 3,001 feet (916
meters ), it will automatically recalibrate itself to measure depth in meters (feet) of fresh
water rather than feet (meters) of sea water. It will then readjust the no decompression
and oxygen limits at additional intervals of 1,000 feet (305 meters). When returning to
lower Altitudes, diving should not be conducted until the unit automatically clears of any
residual nitrogen and oxygen loading and resets to operate at the new lower Altitude.
WARNING: The Element will not sense ambient pressures or provide Altitude
compensation when it is wet. DO NOT dive at any different Altitude until the
unit shuts off and is reactivated at the new Altitude.
If the unit is activated at elevations higher than 14,000 feet (4,270 meters), it
will perform a diagnostic check followed by immediate shutdown.
60
Page 61

SPECIFICATIONS
CAN BE USED AS
• Air Computer
• Nitrox Computer
DIVE COMPUTER PERFORMANCE
• Buhlmann ZHL-16c based Pelagic Z+ algorithm
• No Deco limits closely follow PADI RDP
• Decompression in agreement with Buhlmann
ZHL-16c and French MN90
• No Deco Deep Stops - Morroni, Bennett
• Deco Stops (not recommended) - Blatteau,
Gerth, Gutvik
• Altitude - Buhlmann, IANTD, RDP (Cross)
• Altitude corrections and O2 limits based on
NOAA tables
OPERATIONAL MODES
• Activation/Diagnostic
• Serial Number
• Surface
• Time to Fly Countdown
• Desaturation Countdown
• Pre Dive Planner
30 to 190 FT (9 to 57 M)
• Dive Log (Preview, Dive Data, O2 Data)
• Reset
• Set FO2 (Air, 21 to 50%)
• Set Wet Activation (On / Off)
• Set Units of Measure (Imperial / Metric)
• Set Hour Format (12 / 24)
• Set Time (Hour, Minute)
• Set PO2 Alarm (1.20 to 1.60 ATA)
• Set FO2 50% Default (On/Off)
• No Decompression Dive:
• Main
• Alt # 1
• Alt # 2 -only if nitrox dive
• Deep Stop - for dives deeper than 80 FT (24 M)
• Safety Stop - for dives deeper than 30 FT (9 M)
• Decompression Stop:
• Main
• Alt # 1
• Alt # 2
• Alt # 3 - only if a nitrox dive
• Violation - Conditional, Delayed # 1, # 2, and # 3
• High PO2
• High O2
61
Page 62

SPECIFICATIONS (CONTINUED)
DISPLAY RANGE/RESOLUTION
Numeric Displays: Range: Resolution:
• Dive Number 0 - 12 1
• Depth 0 - 330 FT (99.9 M) 1 FT (0.1 M)
• Maximum Depth 0 - 330 FT (99.9 M) 1 FT (0.1 M)
• FO2 Set Point Air, 21 - 50 % 1 %
• PO2 Value 0.00 - 5.50 ATA .01 ATA
• Dive Time Remaining 0:00 - 9:59 hr:min 1 minute
• Total Ascent Time 0:00 - 9:59 hr:min 1 minute
• Decompression Stop Time 0:00 - 9:59 hr:min 1 minute
• Elapsed Dive Time 0:00 - 9:59 hr:min 1 minute
• Surface Time 0:00 - 9:59 hr:min 1 minute
• Dive Log Surface Interval 0:00 - 25:59 hr:min 1 minute
• Time to Fly 23:50 - 0:00 hr:min* 1 minute
• Time to Desaturate 23:50 (maximum) - 0:00 hr:min* 1 minute
• Temperature 0 to 99°F (- 9 to 60°C) 1°
Special Displays: Occurrence
• Diagnostic Display After Manual Activation
• Serial Number Display After Diagnostics (if the Button is held depressed until screen appears)
• Out of Range (- - -) > 330 FT (> 99.9 M)
• Gauge Mode Countdown Timer 23:50 to 0:00 hr:min (after Violation)
( > 9:59 hr:min SI is displayed as Hours only 10-, 11-, 12-, etc.)
(* starting 10 min after the dive)
(* starting 10 min. after the dive)
62
Page 63

SPECIFICATIONS (CONTINUED)
BAR GRAPHS
Nitrogen Bar Graph segments Oxygen (O2) Bar Graph: segments
• No Deco Normal zone 3 • Normal zone 3
• No Deco Caution zone 1 • Caution zone 1
• Decompression Warning zone 1 • Danger zone 1
Variable Ascent Rate Indicator: 60 FT (18 M) & Shallower Deeper than 60 FT (18 M)
segments FPM MPM segments FPM MPM
• Normal Zone 1 11 - 25 3.5 - 7.5 1 21 - 50 6.5 - 15
• Caution Zone 2 26 - 30 8 - 9 2 51 - 60 15.5 - 18
• Too Fast Zone (flashing) 3 (all) > 30 > 9 3 (all) > 60 > 18
OPERATIONAL PERFORMANCE
Function: Accuracy:
• Depth ±1% of full scale
• Timers 1 second per day
Dive Counter:
• Displays Dives #1 to 12, 0 if no dive made yet.
• Resets to Dive #1, upon reactivation after having shut off.
0 0 - 10 0 - 3 0 0 - 20 0 - 6
63
Page 64

SPECIFICATIONS (CONTINUED)
OPERATIONAL PERFORMANCE (continued)
Dive Log Mode:
• Stores 12 most recent dives in memory for viewing
• After 12 dives, adds 13th dive in memory and deletes the first dive
Altitude:
• Operational from sea level to 14,000 feet (4,270 meters) elevation
• Samples Ambient Pressure every 30 minutes when not activated, when manually activated, and every 30 minutes
while activated. Does not sample Ambient Pressure while it is wet.
• Adjusted No Decompression and O2 Limits and recalibration of depth readings at elevations between 3,001 feet
(916 meters) and 14,000 feet (4,270 meters) at intervals of 1,000 feet (305 meters).
Power:
• Battery 1 - 3 vdc, type CR2450 Lithium battery
• Shelf life Up to 5 years
• Replacement User replaceable (annual recommended)
• Life expectancy 100 dive hours (if 1 - 1 hour dive per dive day) to over
Activation:
• Manual - push button (recommended)
• Automatic - by immersion in water (if set ON)
• WET graphic indicates Wet Contacts are bridged (unit must be dried prior to transport or storage)
• Cannot be manually activated deeper than 4 FT (1.2 M), if the Water Activation feature is set OFF.
• Cannot be activated at elevations higher than 14,000 feet (4,270 meters)
Shut Off:
• Automatically shuts Off if no dive is made within 2 hours after initial activation. Reactivation required.
• Automatically shuts Off 24 hours after last dive (will reactivate if wet).
• Cannot be shut Off manually.
300 dive hours (if 3 - 1 hour dives per dive day)
64
Page 65

SPECIFICATIONS (CONTINUED)
OPERATIONAL PERFORMANCE (continued)
Setting FO2:
• Automatically set for AIR' upon activation
• Remains set for AIR unless an FO2 numerical value is set
• Nitrox Set Points from 21 to 50 %
• If set for 21%, remains set for 21% until changed
• If set for >21%, it reverts to 50% 10 minutes after the dive, if the FO2 Default is ON. If the FO2 Default is OFF, the
value will remain at the value set for that activation period.
Operating Temperature:
• The Element will operate in waters having temperatures between 32°F and 140°F (0 and 60°C).
At extremely low temperatures, the LCD may become sluggish, but this will not affect it's accuracy. If stored or
transported in extremely low temperature areas (below freezing), you should warm the module and its battery with
body heat before diving.
65
Page 66

TUSA INTERNATIONAL CONTACTS
Tabata USA, Inc
2380 Mira Mar Avenue
Long Beach, CA 90815
Tel: 562-498-3708
Fax: 562-498-0415
www.tusa.com
[email protected]
Tabata Australia PTY Ltd.
Unit 11, 86 Falconer St.
West Ryde, N.S.W. 2114 Australia
Tel: 61-(0)2-9807-4177
Fax: 61-(0)2-9808-1638
www.tusa.com.au
[email protected]
Tabata Taiwan Co. Ltd.
54-8 Hsutsogang, Nankang Vil.
Tayuan Hsiang, Tao Yuan Hsien
Taiwan R.O.C.
Tel: 886-(0)3-386-5100
Fax: 886-(0)3-386-5103
[email protected]
66
Tabata Europe Corporation B.V.
Den Brielstraat 2 B, 1055 RV
Amsterdam, The Netherlands
Tel: 31-(0)20 68 15 955
Fax: 31-(0)20 68 24 527
www.tusa.nl
[email protected]
Tabata Co. Ltd. Japan
1-3-17 Higashikomagata, Sumida-ku
Tokyo, Japan 130-0005
Tel: 81-(0)3-3624-2816
Fax: 81-(0)3-3623-9902
www.tusa.net
[email protected]
Page 67
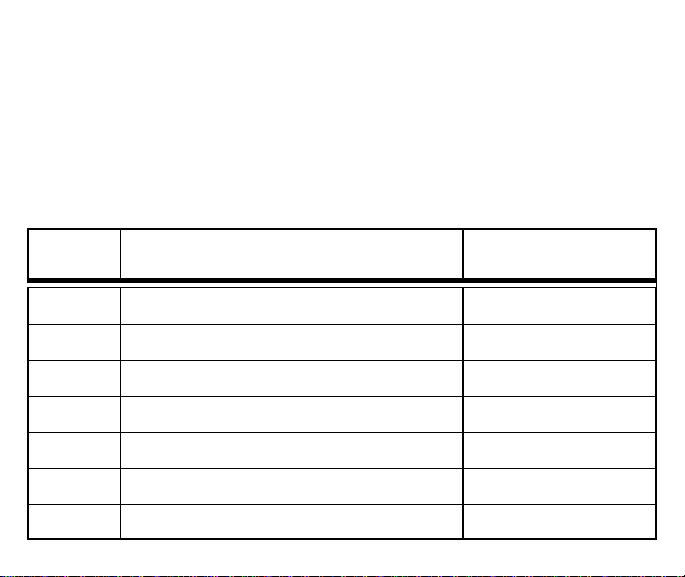
SERVICE RECORD
Serial No. & Rev. No.__________________
Date of Purchase _____________________
Purchased From _____________________
Below to be filled in by an Authorized TUSA Dealer:
Date Service Performed Dealer / Technician
67
Page 68

 Loading...