

Page 1

XP500 Advanced Sound Editor
XP500 Advanced Sound Editor Users Guide - Table of Contents
Introducing the XP500 Advanced Sound Editor ........................................................................ 3
Downloading the XP500 Advanced Sound Editor Software .................................................................................................. 3
Installing the Software .......................................................................................................................................................... 3
Setting up the Software ........................................................................................................................................................ 3
Using the Software with a XP500 ......................................................................................................................................... 4
Basic and Advanced Modes of Operation ............................................................................................................................ 4
About the XP500 Presets .......................................................................................................... 5
PS3 and XBOX Modes ......................................................................................................................................................... 5
Presets Architecture ................................................................................................................................................. 6
Software Controls – Presets Tab .............................................................................................. 8
Advanced Mode Presets Tab ................................................................................................................................... 8
Volume (Master Volume Section) ......................................................................................................................................... 8
Basic mode Presets Tab .......................................................................................................................................... 9
Mic Section .......................................................................................................................................................................... 9
Mix Section ........................................................................................................................................................................ 10
Master Volume Section ...................................................................................................................................................... 10
Presets Section ...................................................................................................................................................... 10
Creating Master Presets .................................................................................................................................................... 11
Presets Buttons ................................................................................................................................................................. 11
Saving a Preset ................................................................................................................................................................. 11
Deleting a Preset ............................................................................................................................................................... 11
“Upload to Headset” Button ................................................................................................................................................ 11
“Save Presets to File” Button ............................................................................................................................................. 12
“Restore Presets from Files” Button ................................................................................................................................... 12
Battery Voltage .................................................................................................................................................................. 12
Headset Mode ................................................................................................................................................................... 12
Software Tutorial......................................................................................................................13
Listening to the Factory Presets ............................................................................................................................. 13
Downloading New Presets ..................................................................................................................................... 14
Managing Presets .................................................................................................................................................. 14
Creating Master Presets .................................................................................................................................................... 14
Deleting Presets................................................................................................................................................................. 14
Uploading Single Presets to the Headset ........................................................................................................................... 14
Uploading all Presets to the Headset ................................................................................................................................. 15
Editing Presets ................................................................................................................................................................... 15
Software Controls - Configuration Tab .....................................................................................17
Update Section ....................................................................................................................................................... 17
Update Firmware ............................................................................................................................................................... 17
Update Voice Prompts ....................................................................................................................................................... 17
Update EEPROM Settings ................................................................................................................................................. 18
“Restore All Defaults” Button .............................................................................................................................................. 18
Headset Info Section .............................................................................................................................................. 19
“Refresh” Button................................................................................................................................................................. 19
Software Controls – Chat Preset Tab (Advanced Mode Only) .................................................20
Silencer .............................................................................................................................................................................. 20
Chat Boost™ ..................................................................................................................................................................... 20
Equalizer ............................................................................................................................................................................ 21
Chat Volume ...................................................................................................................................................................... 21
Software Controls – Mic Preset Tab (Advanced Mode Only) ...................................................22
Silencer .............................................................................................................................................................................. 22
Limiter ................................................................................................ ................................................................................ 22
Voice Morph ....................................................................................................................................................................... 23
Mic Monitor ........................................................................................................................................................................ 23
Software Controls – Game Preset Tab (Advanced Mode Only) ...............................................24
Silencer .............................................................................................................................................................................. 24
Sonic Lens™ ..................................................................................................................................................................... 24
Multi-Band Equalizer .......................................................................................................................................................... 26
Sound Field Expander........................................................................................................................................................ 26
Blast Limiter ....................................................................................................................................................................... 28
Game Volume .................................................................................................................................................................... 28
Dolby on/off Button ............................................................................................................................................................ 28
Page 1
Page 2

www.TurtleBeach.com
XP500 Advanced Sound Editor - Users Guide Revision 1.0
Documentation copyright © 2011 Voyetra Turtle Beach, Inc. All rights reserved. No part of this publication may be
reproduced or transmitted by any means or in any form, without prior written consent from Voyetra Turtle Beach, Inc.
(“VTB”). Use of VTB software is subject to the terms and conditions of the End-User Software License Agreement.
In no event will VTB be liable for direct, indirect, special, exemplary, incidental or consequential damages resulting from
any defect or omission in this manual, even if advised of the possibility of such damages. In the interest of continued
product development, VTB reserves the right to make improvements to this manual and the products it describes at any
time, without notices or obligation.
Turtle Beach, the Turtle Beach Logo, Ear Force, Chat Boost, Ear Guard and Sonic Lens are trademarks of VTB. Voyetra
is a registered trademark of VTB. Dolby and the Double D symbol are registered trademarks of Dolby Labs. Windows is a
registered trademarks of Microsoft Corporation. PlayStation is a trademark of Sony Corporation. All other trademarks are
the properties of their respective companies and are hereby acknowledged.
The Ear Force XP500 is a product of Voyetra Turtle Beach, Inc. 150 Clearbrook Road, Elmsford, NY 10523
www.turtlebeach.com
Page 2
Page 3
XP500 Advanced Sound Editor
Introducing the XP500 Advanced Sound Editor
The XP500 Advanced Sound Editor lets you view and edit all of the parameters in a XP500
preset. Once installed on your Windows PC or laptop, you can connect the XP500 headset
via the USB port on the left ear cup and manage the presets using the software.
Downloading the XP500 Advanced Sound Editor Software
The XP500 Advanced Sound Editor software is available as a download from our website,
www.TurtleBeach.com.
1. Navigate to the XP500 section of our website at www.turtlebeach.com/customize.aspx.
2. Click on “Download XP500 Advanced Sound Editor”.
3. Select a location to save the .exe file to and press OK.
The software is compatible with Windows 7 (32/64 bit), Vista and XP.
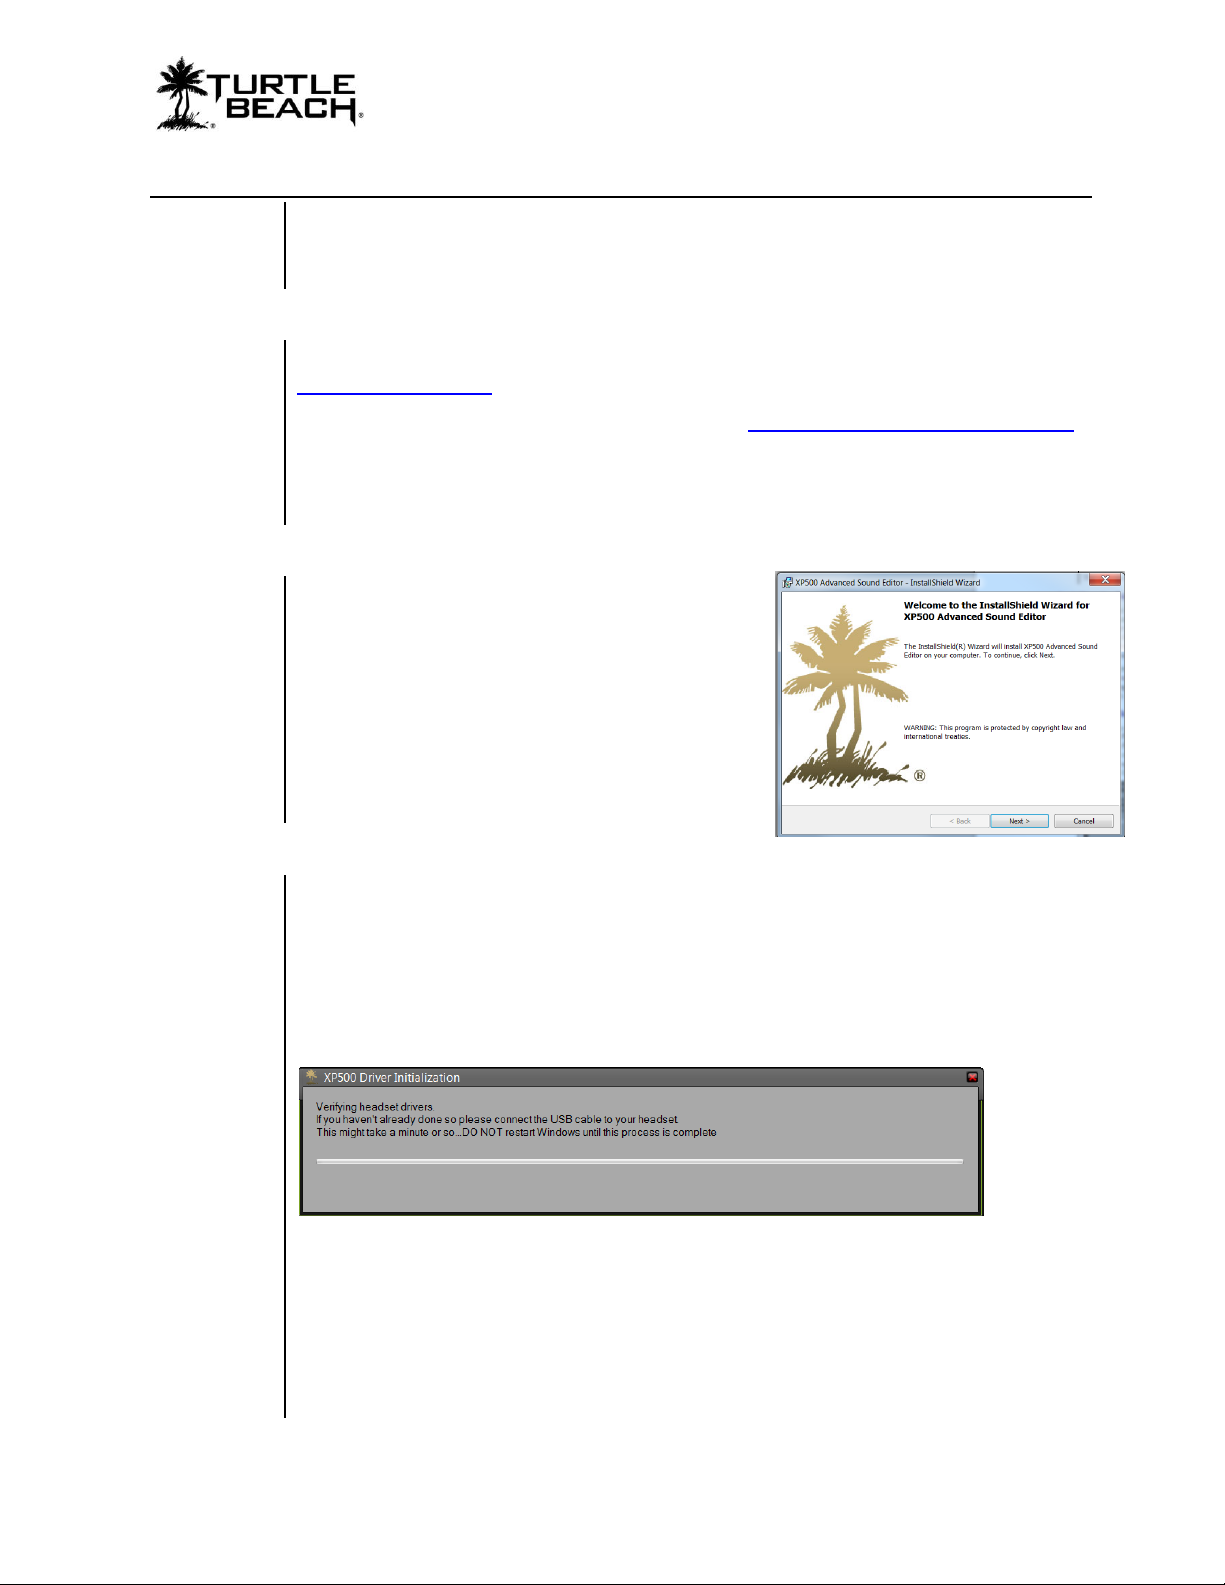
Installing the Software
Once the file has finished downloading, navigate to
its location and double click it. (Note: You must be
administrator to install the tool) Before running the
installation, close any programs (including anti-virus
programs) that are running so they will not interfere
with the installation process.
Follow the prompts to complete the installation. The
install may require you download the latest .Net 4
package. If so, it will take care of this automatically.
Setting up the Software
Connect one side of the USB cable (included with your XP500) to the USB port on the left
ear cup of your XP500 and the other side to a free USB port on your PC or laptop. After
you’ve installed the XP500 Advanced Sound Editor software, double click the XP500
Advanced Sound Editor icon on your desktop to launch the software. When first
launching the software, the XP500 Driver screen will appear. If the XP500 is not connected,
you’ll be prompted to connect the headset. Once the headset is detected, the XP500 driver
installation process will begin.
CAUTION: Do not disconnect the headset during this procedure!
If Windows prompts you to restart your computer because it installed a new
device, choose “restart later”.
After the software installs the XP500 drivers and the presets are downloaded from the
headset to your PC, the message “XP500 Headset Attached” will appear in the lower left
corner of the software screen. At this point, you’re ready to use the XP500 Advanced Sound
Editor with the XP500.
Page 3
Page 4
www.TurtleBeach.com
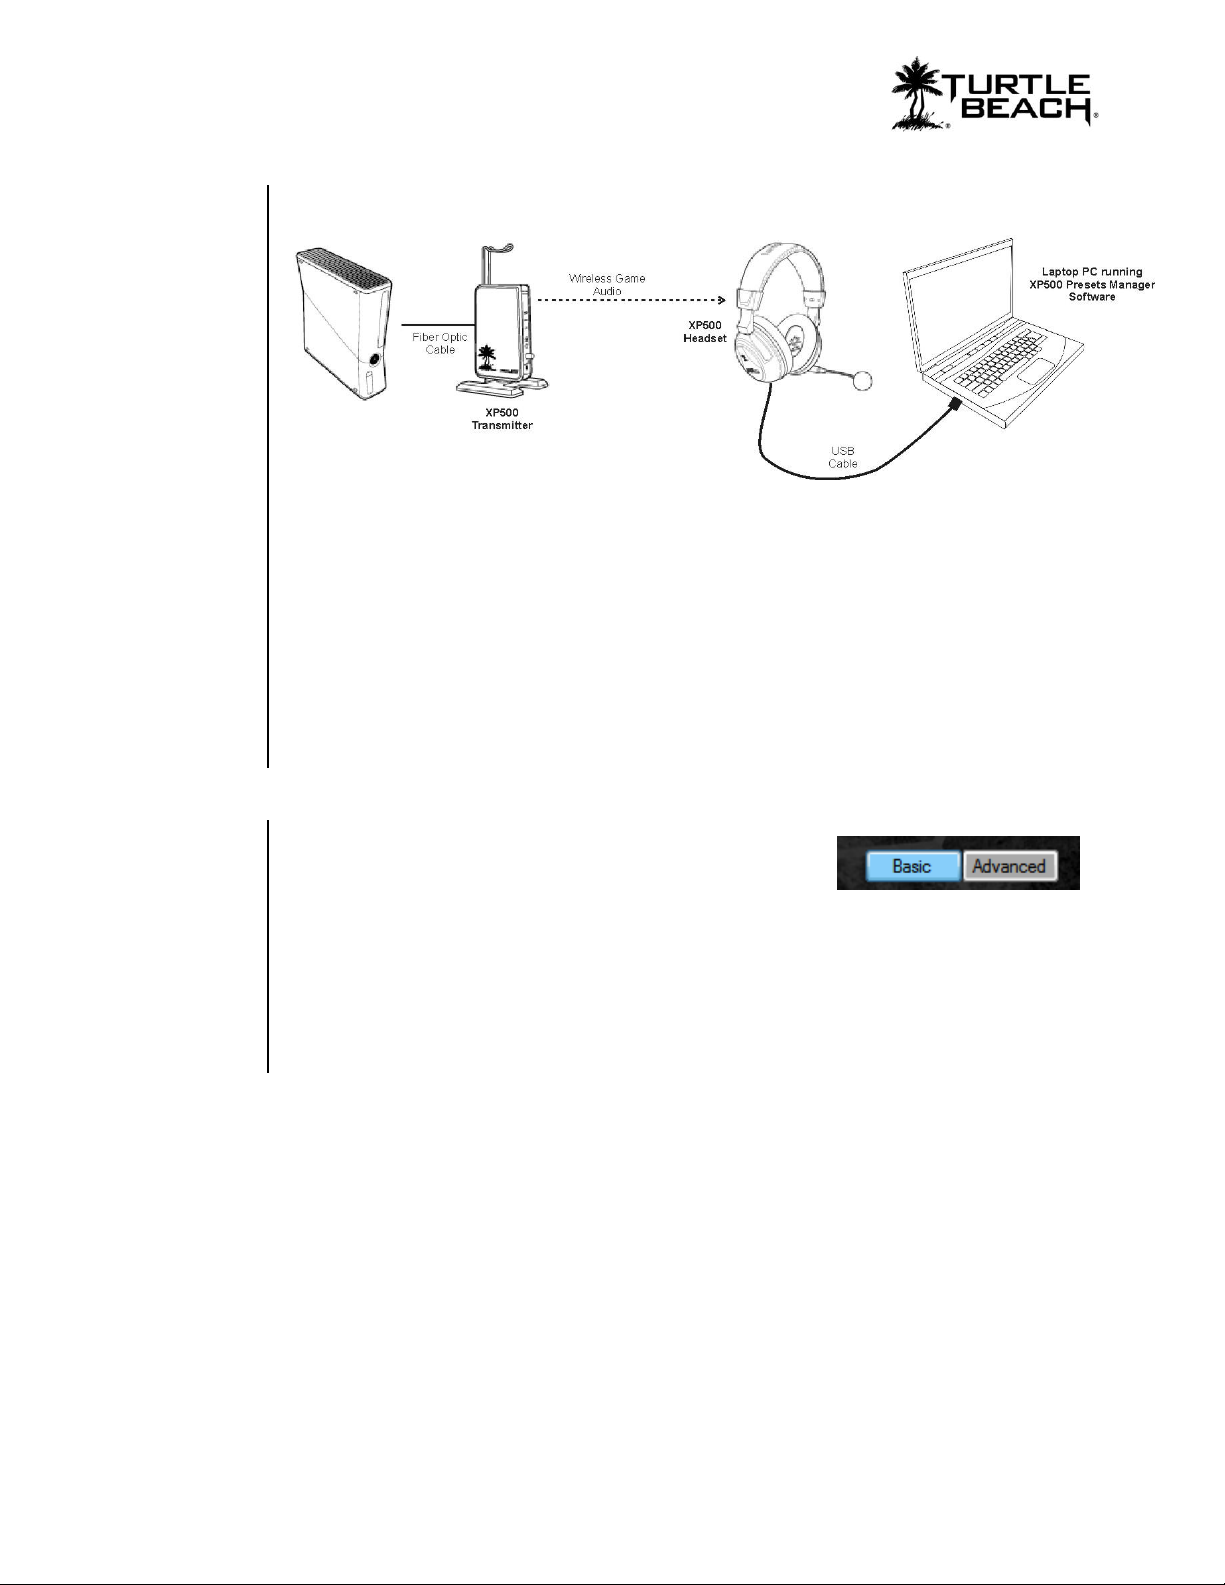
Using the Software with a XP500
The best way to use the XP500 Advanced Sound Editor is with a laptop located near your
game console. This way you can hear the effects of changing parameter settings in the
presets as you’re playing the game.
Connect the XP500 headset to your laptop with the included USB cable. Place the laptop
and XP500 near your game console so you can hear the game with the headset. With the
laptop next to you, start the game and try editing presets to hear the effects.
After you’re done using the software, be sure to unplug the USB cable from the
headset so the power will shut off. The headset power will remain on for as long
as the USB cable is inserted into the headset. This will eventually drain the
batteries even if the headset is not being used.
Basic and Advanced Modes of Operation
The XP500 Advanced Sound Editor operates in either
Advanced or Basic mode. The modes are selected by clicking
on the appropriate button at the bottom of the program
screen. The primary difference between these two modes is the tabs that appear, which are
explained later in this manual.
Basic Mode presents a simplified version of the editing tool. The Chat, Mic and Game
Preset tabs are disabled and additional controls appear on the Preset Tab.
In Advanced Mode, the Preset Tab controls are simplified and the Chat, Mic and
Game preset tabs allow the individual presets to be edited.
Page 4
Page 5

About the XP500 Presets
The XP500 headset uses a Digital Signal Processor (DSP) to independently modify the
game, chat and microphone audio paths in the headset. The DSP settings are saved as
presets, which can be saved to the hard drive on your PC or laptop using the XP500
Advanced Sound Editor software.
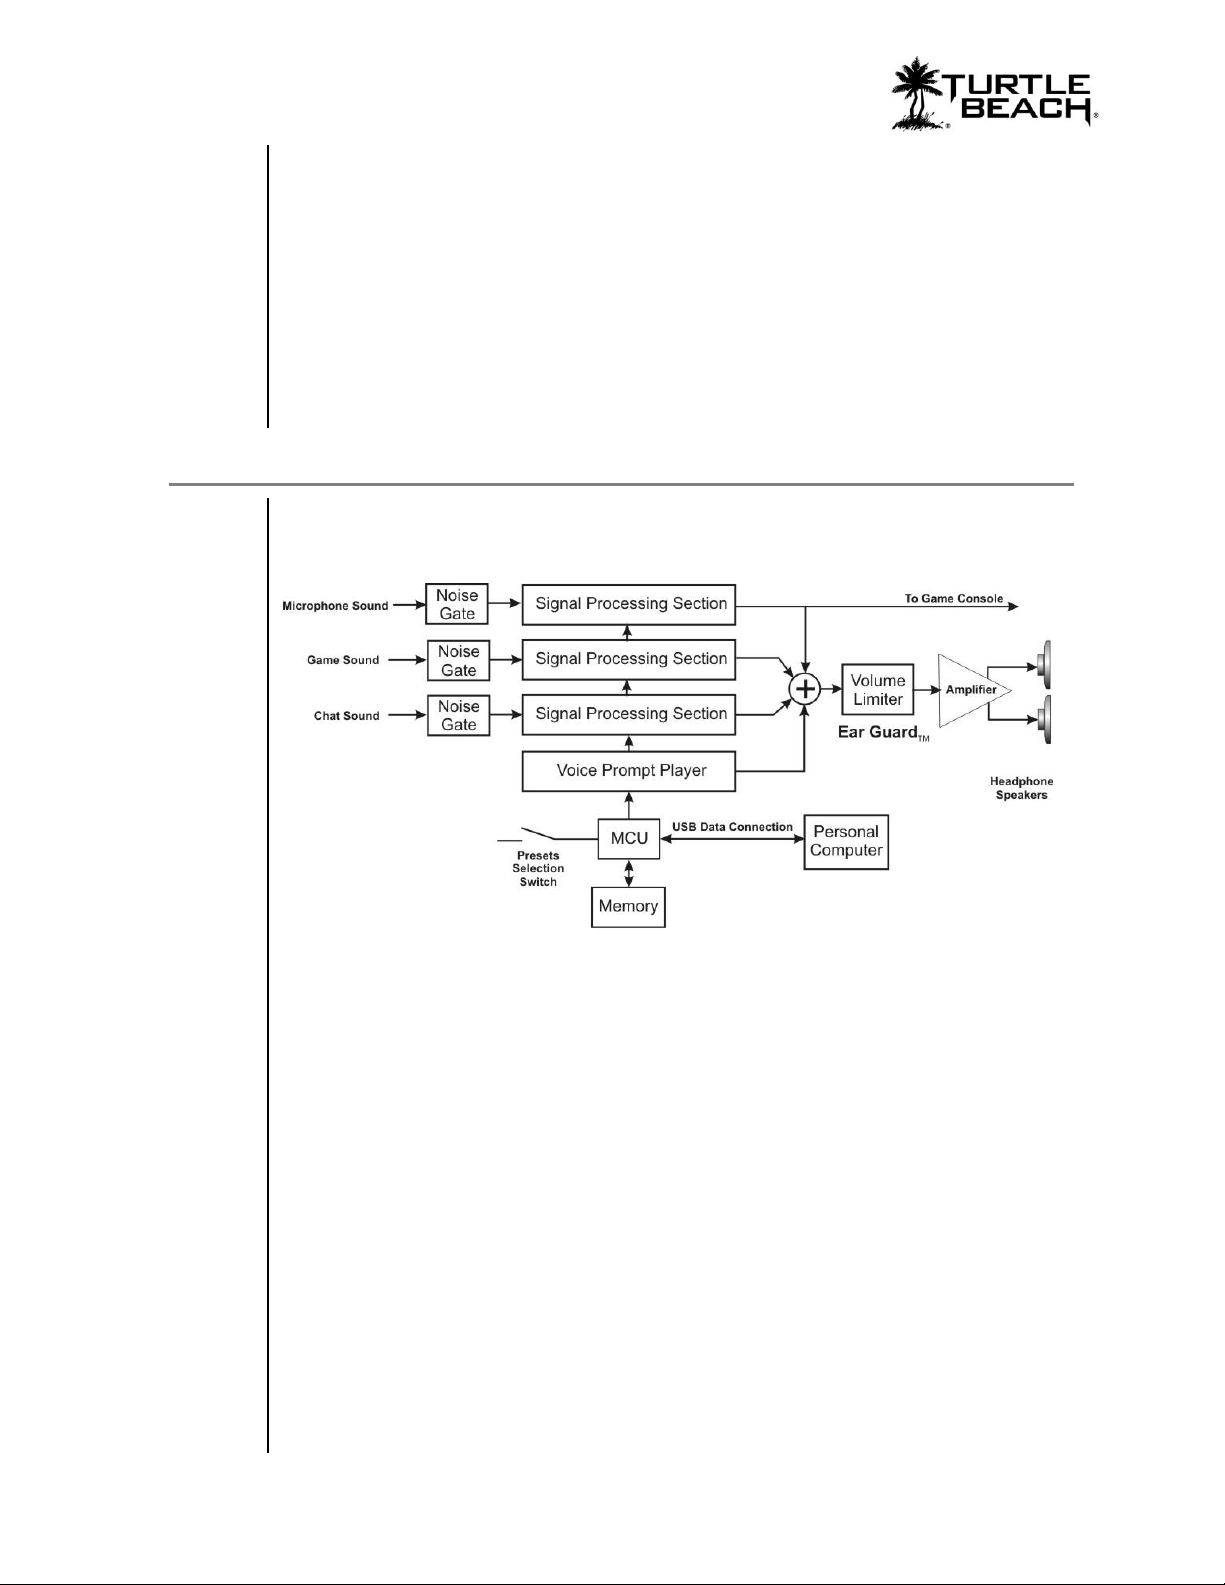
The presets are grouped into four categories: master, chat, game and mic. The Master preset
is comprised of chat, game and mic presets as well as other global parameters, such as master
volume and Ear Guard settings. The signal flow is illustrated in the diagram below, which
shows the game, chat and mic sound channels being modified by the DSP processor, then
mixed down to the sound that you hear in the headset.
XP500 Advanced Sound Editor
PS3 and XBOX Modes
The headset operates in either XBOX or PS3 mode. This is selected by quickly pressing on
the headset power button twice and listening for the announcement of which mode is active.
Each mode stores 9 presets, comprised of one Main preset and 8 Alternate presets. The
preset button on the headset toggles through the 8 Alternate Presets. The main preset
button on the headset toggles between the Main preset and the selected Alternate preset.
This allows toggling between the Main and Alternate by pressing the Main button.
Page 5
Page 6
www.TurtleBeach.com
The difference between PS3 and XBOX modes is in the settings of chat and mic presets and
chat signal routing.
In PS3 mode, the mic signal is connected to the Bluetooth signal while in XBOX mode it is
connected to the Xbox live jack. Therefore, if the XP500 is in PS3 mode and connected to
an Xbox, the chat signal will not work, and vice versa for XBOX mode connected to a PS3.
In addition to this hardware difference, the chat and mic presets have different filtering and
noise gate thresholds for PS3 and XBOX modes. For this reason, the names of chat and
game presets are preceded by [XBOX] or [PS3] to identify the platform they should be used
with. The game presets will operate in either XBOX or PS3 mode, so they do not use
[XBOX] and [PS3] in the game preset names as do the chat and mic presets.
Presets Architecture
There are four categories of presets (main, game, chat and mic) each corresponding to the
signal paths in the headset. The illustration below shows the DSP signal flow and other
system processing.
Noise Gates
A noise gate on each input of the three channels (mic, game and chat) allows background
noise to be removed from that channel. For example, on the mic channel, the noise gate
threshold may be set to just above the room noise, so the microphone channel will only pass
sound that is above the room noise (such as the sound of your voice speaking into the mic).
On the chat channel, the noise gate may be set to just above the noise level of the Xbox
controller, keeping the chat channel quiet unless voices are detected from online players.
Signal Processing Sections
The noise gates in each channel are followed by a signal processing section with audio
modifiers that are specific to the channel. The parameters within these signal processing
sections comprise a “preset”. These parameters can be edited using the XP500 Advanced
Sound Editor software as described in this user guide. The game, chat and mic tabs sections
of this manual describe these signal processing sections in more detail.
Voice Prompt Player
A voice prompt is triggered when certain events occur, such as pressing buttons, low battery
conditions, power on, power off, and so on. The voice prompt player output is mixed with
the channel outputs to create the master signal heard on the headset. The voice prompts may
be changed by downloading a new voice prompt file from the Turtle Beach web site. Thus,
Page 6
Page 7

XP500 Advanced Sound Editor
for example, the factory-installed English voice prompts can be replaced with different
foreign language versions.
Ear Guard™ Volume Limiter
A volume limiter precedes the headset amplifier to set the maximum level of sounds sent to
the speakers. This feature is referred to as “Ear Guard” since it reduces excessive sound
levels during loud sections of the game to help protect the ears.
MCU and Personal Computer
The MCU controls the programmable system functions and connects to a Windows PC via
the USB port. This USB connection allows the MCU firmware to be updated with new
versions downloaded from the Turtle Beach web site, and also allows editing of presets with
the XP500 Advanced Sound Editor software.
Page 7
Page 8

www.TurtleBeach.com
Software Controls – Presets Tab
The Presets Tab is the main section of the XP500 Advanced Sound Editor. This is where
you’ll transfer presets between your XP500 headset and PC. This tab will look different,
depending on whether you’ve selected Basic or Advanced mode by clicking on the
appropriate button at the bottom of the program screen.
Advanced Mode Presets Tab
Clicking the Advanced button places the software in Advanced mode, with the Presets Tab
configuration illustrated below. The Presets section on the left is identical in Advanced and
Basic modes, so it is described at the end of this section.
Volume (Master Volume Section)
The chat, game and mic signals are mixed together and routed to the master output, whose
signal flow is illustrated below:
The game, chat and mic levels are located in the game, chat and mic tabs. These volume
controls allow you to balance the levels of game, chat and mic signals heard in the headset.
Ear Guard™
The mixer is followed by a volume limiter, referred to as “Ear Guard”. This
slider lets you limit the level of the overall sound to help protect your ears
from sudden boosts in volume. Pushing the slider all the way up will let all of
the sound come through, no matter how loud it is. Moving it down sets a
ceiling above which the sound won’t increase. To limit the sound of gun shots
and blasts, turn this down to about 75% or less.
Volume
This slider controls the master volume and determines the overall loudness of
the headset. We suggest setting this to about 80% of maximum.
Page 8
Page 9
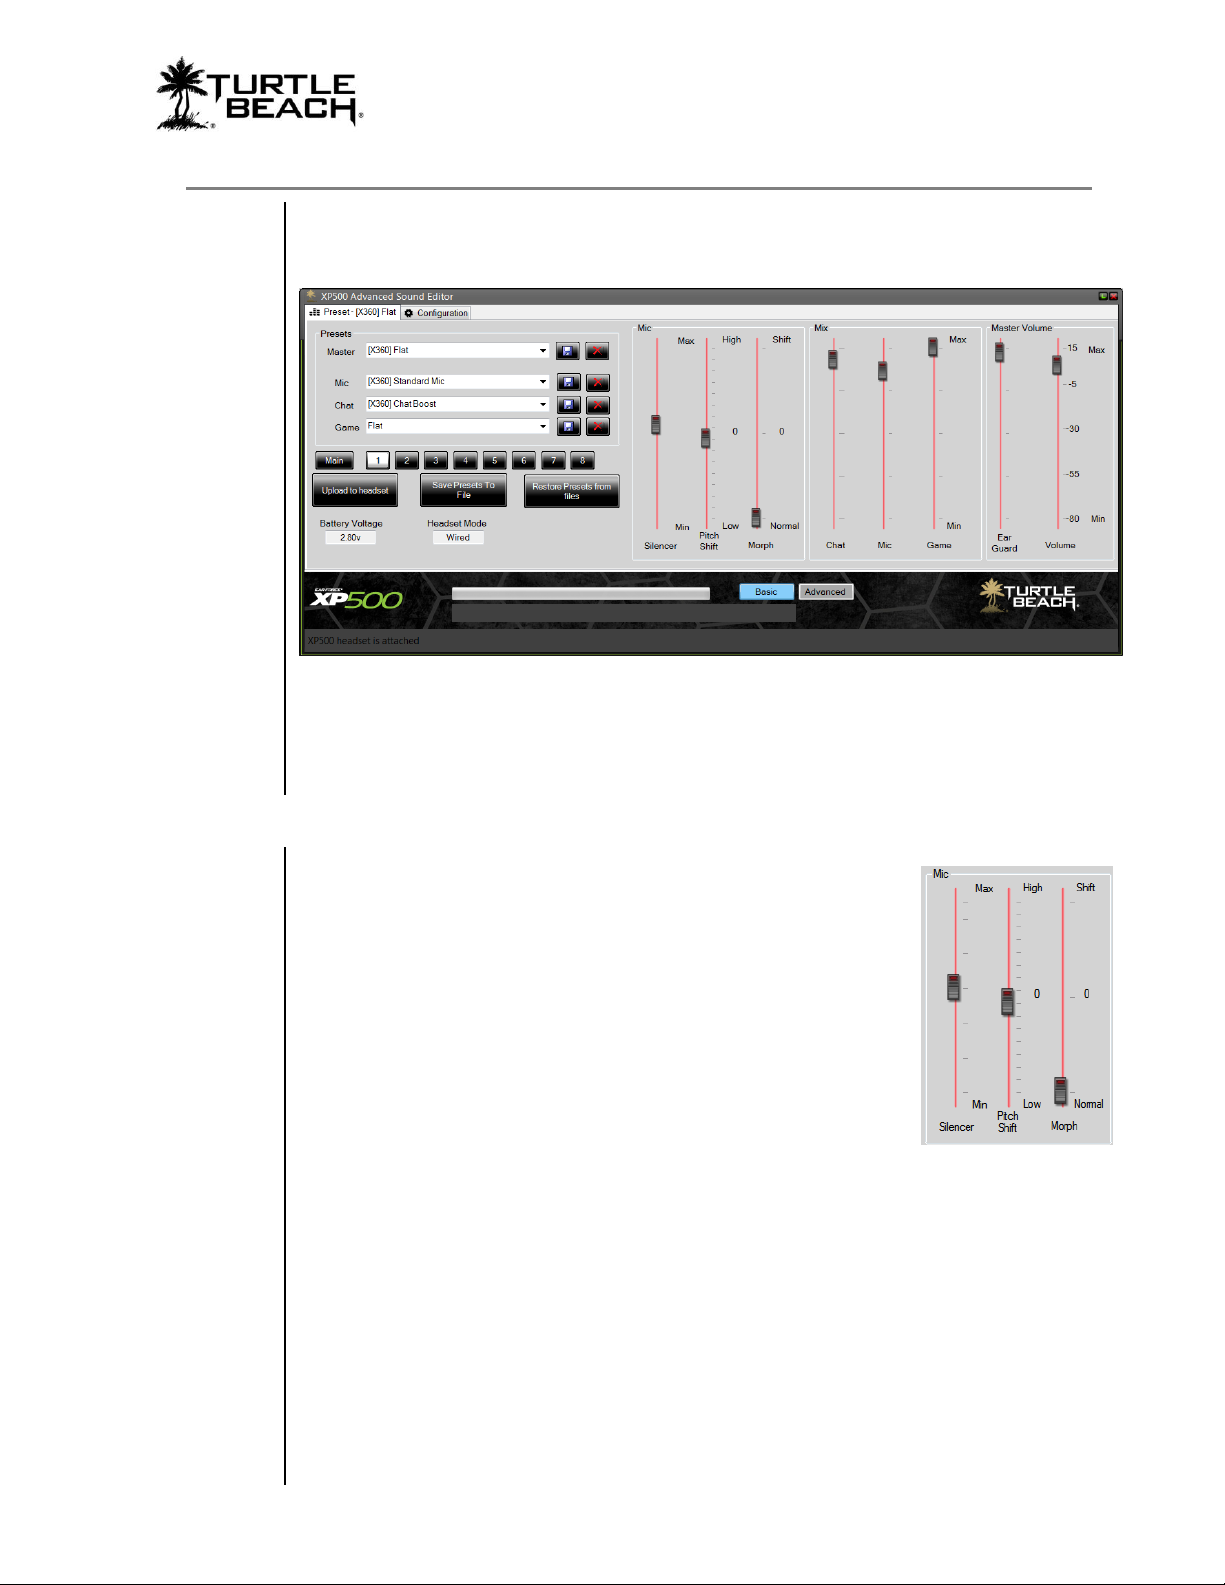
Basic mode Presets Tab
Clicking the Basic button places the software in Basic mode, with the Presets Tab
configuration illustrated below. The Presets section on the left is identical in Advanced and
Basic modes, so it is described at the end of this section.
The right side of the Presets tab has three sections, Mic, Mix and Master Volume, used for
editing certain key parameters on the presets. If you change any of the Mic controls, be sure
to press the Save button next to the Mic presets field so it will be saved with the new values.
If you change the Mix or Master volume settings, press the Save button next to the Master
preset field. Otherwise, you’ll lose the settings you’ve edited when you select a new preset.
XP500 Advanced Sound Editor
Mic Section
The mic section has three controls that affect the way your voice will
sound when you speak into the mic.
Silencer (Noise Gate)
The Silencer noise gate keeps background noise from being picked up
by the mic. To set the noise gate threshold, listen to the mic while not
speaking and bring up the threshold until you no longer hear the room
noise. Then speak into the mic at a comfortable level and make sure
the noise gate turns on, passing your voice. If it seems that you have
to speak too loudly, turn down the threshold a bit so that you can
eliminate room noise while still using a comfortable speaking tone.
For instance, if you’re in a room with a blasting air conditioner, you
can prevent the mic from picking up the air conditioner sound by setting the noise gate just
above the air conditioner sound. That way, when you speak, the mic will pick up your voice,
but when you’re not speaking, it will shut out the air conditioner.
Pitch Shift
This slider lets you change the pitch of your voice either up and down. Moving the slider
higher will make your voice sound higher-pitched, while moving it lower will make it sound
deeper. Double click the slider to make it jump to the middle, where the pitch is not shifted.
The pitch shift effect is selected with the Morph slider, described in the next section.
Morph
This slider sets the balance between your normal voice and pitch shifted voice. Moving the
slider down passes more of your normal voice and moving it up adds the pitch shift you’ve
Page 9
Page 10

www.TurtleBeach.com
Mix Section
Master Volume Section
selected. If you place it in the middle, you’ll get a 50/50 balance between normal and pitch
shifted voice.
This section controls what you hear in the headset. Use it to balance the
game, chat and mic levels as described below.
Chat
This slider adjusts the amount of chat level you’ll hear.
Mic
This slider adjusts the mic monitor level to determine how much of your
voice will be heard in the headset. Turn it down if you don’t want to hear
your voice.
Game
This slider adjusts the game volume level.
The mixer output is routed to the master output, which is controlled by this
section.
Ear Guard™ Limiter
The mixer is followed by a volume limiter, referred to as “Ear Guard”. This
slider lets you limit the level of the overall sound to help protect your ears from
sudden boosts in volume. Pushing the slider all the way up will pass all of the
sound, no matter how loud it is. Moving it down sets a ceiling above which the
sound won’t increase. To limit the sound of gun shots and blasts, turn this
down to about 75% or less.
Master Volume
This slider controls the master volume and determines the overall loudness of the headset.
We suggest setting this to about 80% of maximum.
Presets Section
This section is identical in Advanced and Basic
modes. From here, you can transfer presets
between your PC and the XP500 headset.
The XP500 headset has two presets buttons;
one that selects the Main preset and another
that toggles through the 8 Alternate presets.
These two buttons are represented on the
software screen by the row of 8 preset buttons
and one Main preset button.
Above these buttons are fields for the four
Preset types; Master, Mic, Chat and Game. The Master preset is the one that’s uploaded to
the headset and it’s a combination of game, chat and mic presets listed right below it.
Clicking the down arrow in any of the four Presets fields will activate a drop-down box that
lists all of the presets on your PC hard drive.
Page 10
Page 11

When the presets are uploaded to the headset, they can be stored in either the PS3 or XBOX
section, as determined by the mode setting on the headset. So, for instance, if the headset is
in XBOX mode, the presets will be uploaded into the XBOX section. If the headset is in
PS3 mode, the presets will be uploaded into the PS3 section.
Creating Master Presets
You can create a new master preset by combining different mic, chat and voice presets and
saving the master preset. You can rename the master, chat, mic and game presets by clicking
in the name field. typing in a new name and clicking the save button to the right.
To select different mic, chat and game presets that make up a master preset, click on the
down arrow in one of the three fields and select a preset from the list. Once you’ve selected
three that you like, you can save them as a master preset by clicking the save button to the
right of the master presets field. If you don’t rename the master preset before saving, you’ll
be prompted as to whether or not you want to overwrite the existing one.
Presets that begin with [X360] are designed for the XBOX 360.
Presets that begin with [PS3] are designed for the PS3.
Game presets that begin with [DH] means they’re using Dolby surround sound.
Stereo game presets don’t start with a [DH] in the name.
You can download more presets from the Turtle Beach web site, www.TurtleBeach.com.
XP500 Advanced Sound Editor
Presets files are located in the directory SavedPresets, under the XP500 Advanced
Sound Editor directory. If you installed the software using the default settings,
this would be: C:\Turtle Beach\XP500 Advanced Sound Editor\SavedPresets.
Presets Buttons
Pressing any of the 9 presets buttons (Main & 1 – 8) will select the preset on the headset.
This can be used instead of toggling through the presets with the buttons on the headset.
Saving a Preset
To save a preset to the PC hard drive, press the Save button (the one with the disk symbol)
just to the right of the preset name. Pressing Save on the Master preset will save the Master
preset along with the settings from the mic, chat and game presets associated with that
Master preset. However, it will not save the individual Mic, Chat and Game presets. Pressing
the Save button on the Mic, Chat or Game presets saves each one independently.
Saving a preset on the hard drive in this manner will add the Preset to the drop down list. It
will not save it to the headset.
Deleting a Preset
To delete a preset from the hard drive (not the headset), press the delete button just to the
right of the preset name (the one with the X.) The preset file will be permanently deleted
from the hard drive, so before doing this, make sure you really no longer want it!
“Upload to Headset” Button
Pressing this button followed by pressing one of the nine preset buttons (Main or 1 – 8) will
transfer the Master preset from the hard drive to the selected preset location on the headset.
For example, if you wanted to upload the Master preset to the headset preset location 4,
press Upload to Headset, then press the preset button labeled 4. The headset mode
determines what section the preset will be saved in. If the headset is in PS3 mode, it will be
saved in the PS3 section, and if it’s in XBOX mode it will save it in the XBOX section.
Page 11
Page 12

www.TurtleBeach.com
“Save Presets to File” Button
“Restore Presets from Files” Button
Battery Voltage
Headset Mode
Clicking this button saves all of the presets from the headset to a file on your PC and creates
a manifest that allows you to restore the presets back to the headset later on.
Pressing this button uploads the group of presets listed in the manifest from the hard drive
to the headset.
The XP500 battery voltage is monitored in the bottom left section of the screen, so you can
check if the battery is low. Note that the software will not allow the headset to be
programmed if the battery is too low, to ensure it won’t shut off while headset data is being
edited.
The XP500 headset operates in either XBOX or PS3 mode and this section indicated which
mode is active.
Page 12
Page 13

Software Tutorial
This section provides an overview of how to use the Presets tab on the XP500 Advanced
Sound Editor software.
Note that if the battery voltage (shown in the bottom left) drops down too low, the software
won’t transfer files to and from the headset. This is to prevent a file error caused by the
battery failing during a file transfer.
XP500 Advanced Sound Editor
The Headset Mode indicator, next to the battery voltage, indicates whether the headset is in
XBOX or PS3 mode.
Listening to the Factory Presets
1. Connect the XP500 transmitter to your XBOX or PS3 so you can hear sound on the
headset. Or, connect it to your PC if it has a digital optical output.
2. Run the XP500 Advanced Sound Editor and connect the XP500 to your PC using the
USB cable included in the XP500 package.
3. After the bottom left of the screen indicates “XP500 Headset is attached”, the XP500
Advanced Sound Editor will download the presets from the headset to the PC hard
drive.
4. After the presets have been transferred from the headset to the PC, play some music or
a game so you can hear it in the headset. While you’re listening, press the Main and
Presets 1 – 8 buttons so you can hear their effect on the sound. The preset names will
be displayed in the Presets section of the software as you click the presets buttons. This
is the same as selecting presets using the buttons on the headset.
5. Try changing the Master preset by clicking on the small arrow to the right of the name
and selecting one of the names from the drop down box. The Master Preset is made up
of the three sub-presets below (Mic, Chat and Game). Each time you change the Master
preset, the sub-presets also change.
Page 13
Page 14

www.TurtleBeach.com
Downloading New Presets
1. Go to www.turtlebeach.com/customize.aspx and download some presets. Scroll down
and Click on the Game Sub-presets tab and click on “Download Now” for the first
game sub-preset. Save the zip file to a temporary directory on your hard drive.
2. Open the zip file and copy the xml preset file to the SavedPresets folder in the
directory where you installed the XP500 Advanced Sound Editor. If you used the
default settings when installing the program, this would be C:\Turtle Beach\XP500
Advanced Sound Editor\SavedPresets.
3. On the XP500 Advanced Sound Editor, click on the pull-down box for the Game sub-
preset and you should see the file name you just downloaded. Select it to change the
game sound based on that preset.
4. Go back to the web site and download more game, chat and mic presets. Save them all
to the SavedPresets directory and you should see them appear in the drop down boxes
on the XP500 Advanced Sound Editor software. Then listen to how each one changes
the sound of the headset.
Managing Presets
Creating Master Presets
To create new Master presets from the sub-presets downloaded from our web site:
1. Select the game, chat and mic sub-presets you’d like to use.
2. Click the mouse in the Master Preset name box and type in a new name.
3. Press the “Save” button (the one with the disc symbol) located just to the right of the
Master preset name. This will add the new Master preset to the drop down list. You now
have a new Master preset that contains the chat, game and mic sub-presets selected.
Deleting Presets
To delete a preset from the drop down list, select the preset from the drop-down list, then
click on the button labeled “X” just to the right of the preset name. This will remove it from
the list and delete it from the hard drive.
Uploading Single Presets to the Headset
To load the current Master preset into the headset:
Page 14
Page 15

1. Click on “Upload to Headset” and the Presets buttons will start flashing.
2. Click on one of the preset buttons to load the Master preset into that location on the
headset.
3. After you’ve unplugged the USB cable from the headset, the preset will remain in the
headset so you can select it with the headset presets button without the need for the
software.
Uploading all Presets to the Headset
If you’ve changed all of the presets using the XP500 Advanced Sound Editor software, you
can upload all of them into the headset by clicking the “Restore Presets from Files”
button. This uploads all 18 presets listed in the manifest file of the SavedPresets directory
into the headset and is faster than transferring them one at a time using the “Upload to
Headset” button.
Editing Presets
Complete editing of presets requires that you run the XP500 Advanced Sound Editor
software in Advanced Mode by clicking on the Advanced button at the bottom of the
program screen.
Any changes made with the chat, game and Mic tabs in Advanced Mode, or with
the Mic, Mix and Master Volume controls in Basic Mode, will be lost unless you
save them as part of the Master Preset.
XP500 Advanced Sound Editor
So if you change any of the settings, be sure to click on the Save button next to the Master
preset name. Note that this will not save the changes into the individual sub-presets. For
example, if you changed the Pitch Shift setting on the mic and you want to save it as part of
the Mic sub-preset so you can use it with a different Master preset, you’ll have to click on the
save button next to the Mic sub-preset name.
Changing Mic Preset Settings
1. While talking into the mic, move the Mic slider in the Mix section up and down so you
can hear how it changes the loudness of your voice in the headset. This feature is called
“mic monitoring” and you can set the level to your preference. For now, turn it up all
the way so you can hear your voice as you speak into the mic.
2. Move the Morph slider from Normal to Shift. Then change the Pitch Shift slider up
and down and listen to how it changes the pitch of your voice. These two sliders let you
control the voice morph feature. Moving the Morph slider towards the middle will mix
your normal voice with the pitch-shifted voice, so you can balance between the two.
3. Lightly blow into the microphone as you move the Silencer (Noise Gate) slider up and
down. Notice that the mic will shut off at a certain point, so the blowing sound is
blocked. If you blow harder the mic will turn on, softer and it turns off. The higher you
move the slider, the louder you’ll have to speak in order to turn on the mic. By adjusting
this slider, you can eliminate room noise so the mic will only pick up your voice when
you speak and not the sounds around you.
Changing the Chat Setting
Adjust the Chat slider in the Mix section to change the level of the chat voices from other
players. The more you turn this up, the louder the other players will be.
Changing the Master Volume Settings
The Volume slider sets the maximum volume level you’ll hear in the headset. Don’t turn
this up all the way to Max, or the headset might distort. A comfortable setting is between 5
and 15.
Page 15
Page 16

www.TurtleBeach.com
The Ear Guard slider helps to keep loud sounds under control. If you push it up to the top,
it won’t do anything to the headset sound. As you start turning it down, you’ll start to block
out loud blasts without affecting the lower level sounds. Try adjusting this so you can
protect your ears from very loud sounds while still maintaining the excitement of the game
experience. A good position for this slider is about 75% of maximum
Page 16
Page 17

Software Controls - Configuration Tab
The Configuration Tab displays information about the XP500 headset and lets you update
the headset firmware, voice prompts and EEPROM settings.
Update Section
XP500 Advanced Sound Editor
Update Firmware
The headset operates with internal “firmware”, which is
the software that makes the processor run. At times, we’ll
release updates to the firmware to fix bugs or add features,
so this section makes it easy to update it when it’s available
on our web site.
To check if a firmware update is available, click the
“Check for Firmware Updates” button. The XP500
Advanced Sound Editor software will check the Turtle
Beach web site for the latest firmware release and compare
it to what’s in your headset. If it’s newer, it will prompt
you to download it.
After you download the firmware, you can load it into the
Update Firmware field by pressing the “…” button next
to the field. This will open Windows Explorer where you
can navigate to the location where you saved the firmware download. Load the firmware
into the display area and then click on the “Update” button to upload the firmware to the
headset.
It is important that you do not turn off the headset or remove the USB cable
while the firmware is being uploaded to the headset. Disrupting the data transfer
can cause your headset to become inoperable.
Update Voice Prompts
The voice prompts in the headset can be replaced with different ones that you can download
from our web site. For instance, you can change the English version to French, German,
Italian or Spanish. To do this, go to www.Turtlebeach.com and click on “Customize” at the
top of the screen. Then navigate to the voice prompts section and download the language of
your choice.
Page 17
Page 18

www.TurtleBeach.com
Update EEPROM Settings
“Restore All Defaults” Button
After you’ve downloaded the new voice prompts, load them into the display area by clicking
on the “…” button, navigating to the location of the download, and clicking on the name.
Once the voice prompt file is in the display area, click on the “Update” button to upload
them into the headset.
The EEPROM is memory in the XP500 that holds special values in addition to Presets. This
includes settings such as the volume level of the microphone, the volume of the voice
prompts, etc.. Sometimes, we may change these values and if we do, you can update them
with this section of the tool.
Check our web site to see if the EEPROM settings have been updated. If they have, you can
download them to your PC, then click the “…” button to find the file, click on the name
and it will appear in the display area. Then click the “Update” button to upload the new
values into the headset.
The “Restore All Defaults” button returns the XP500 back to its factory settings. Clicking
this button connects to our online servers, downloads the latest files and uploads them to
the headset. This includes factory presets, voice prompts, firmware and EEPROM settings
so you can undo any changes you’ve made to the headset.
During the update process, the system status will be displayed at the bottom of the screen, as
illustrated below. If the battery level is too low, the process might not complete, so it is
suggested you replace the batteries with a fresh pair before attempting this procedure.
In some cases, while the software is downloading files from the server, it may
seem that it is no longer responding. If this happens, please do not shut down
the software and instead allow the procedure to complete. The process may take
a few minutes.
It is important that you do not turn off the headset or remove the USB cable
while the files are being uploaded to the headset. Disrupting the data transfer
can cause your headset to become inoperable.
Page 18
Page 19

Headset Info Section
Firmware Version
This field shows the version number of the
firmware loaded into the headset. You can
check our website to see if it’s the latest one,
or simply click the “Check for Firmware
Update” button in the Update section.
Serial Number
This field shows the serial number of the
headset, used for tracking purposes.
Date Code
This field shows an internal code used by the factory for tracking purposes.
Version
This field shows the version number of the XP500 Advanced Sound Editor software.
“Refresh” Button
Click this button to refresh all of the above data.
XP500 Advanced Sound Editor
Page 19
Page 20

www.TurtleBeach.com
Software Controls – Chat Preset Tab (Advanced Mode Only)
The following diagram illustrates the audio processing sections in the chat channel:
The parameters in each processing secton are represented in the Chat Preset tab.
NOTE: Any edits made in this tab are not saved unless you press the Chat Preset
“Save” button in the Presets Tab.
TIP: Rather than click on the slider knob with the mouse and dragging it to the
desired position, click on the point you want it to go and the slider knob will
automatically jump there. Also, you can double click on the Equalizer sliders to
center them midway between the top and bottom position.
Silencer
The Silencer is a noise gate that eliminates background noise on the chat channel. To set the
noise gate threshold, listen to the chat channel while no one is speaking on the online chat
and bring up the threshold until you no longer hear background noise. Then, when someone
speaks on the chat channel, check if their voice comes through. If it seems that you’re losing
some chat voices, turn down the threshold a bit so that they come through while still
eliminating the background noise.
The Noise Gate is very useful when using the Xbox Live because the Xbox controller is
notorious for having excessive background noise. You can prevent the chat channel from
passing the background noise from the Xbox controller by setting the noise gate just above
the background noise level. That way, the chat channel will remain quiet while letting the
chat voices pass when someone speaks on Xbox live.
Chat Boost™
Gain Boost
The Chat Boost stage is a dynamics processor that maintains the chat signal at a specified
level in relation to the game level. As the game sound gets louder, the chat gain is increased
to keep the chat voices above the game sound. The Gain Boost sets the amount of chat
boost and ranges from 0dB (no boost) to 12dB (about a 4 times boost).
Page 20
Page 21

Attack
The attack time adds a lag to the gain boost so the gain does not jump erratically in response
to fast transient envelope changes. With a fast attack, the gain will jump to the higher level
every time a loud game sound occurs. Adding some attack will keep the chat boost off unless
the game sound is consistently loud. A setting of 3 – 4 seconds is typical. Note that the 1 –
11 intervals on the Attack and Release sliders refers to seconds.
Release
The release time determines how long the gain boost will remain after the game sound
returns to a normal level. A typical setting is 9 seconds, meaning that if the game returns to
normal sound for longer than 9 seconds, the chat gain will return to 0dB.
Equalizer
The equalizer modifies the tone of the chat signal. The sliders will boost or cut the
designated frequencies by +/-12dB. The frequencies for each slider are:
Low: 100Hz shelving filter
Mid 1: 250Hz band-pass filter
Mid 2: 1kHz band-pass filter
Mid 3: 4kHz band-pass filter
XP500 Advanced Sound Editor
High: 8kHz shelving filter
The Low and High shelving filters provide a bass and treble boost respectively. The Mid 1, 2
and 3 band pass filters provide a resonant boost or cut at the specified frequency.
TIP: Double clicking a slider sets it to the center position (zero boost and cut))
Chat Volume
This slider adjusts the amount of chat level heard in the headset.
Page 21
Page 22

www.TurtleBeach.com
Software Controls – Mic Preset Tab (Advanced Mode Only)
The following diagram illustrates the audio processing sections in the mic channel:
The parameters in each processing secton are represented in the Mic Preset tab.
NOTE: Any edits made in this tab are not saved unless you press the Mic Preset
“Save” button in the Presets Tab.
TIP: Rather than click on the slider knob with the mouse and dragging it to the
Silencer
The Silencer noise gate eliminates background noise from being picked up by the mic. To set
the noise gate threshold, listen to the mic and turn up the threshold until you no longer hear
the room noise. Then speak into the mic at a comfortable level and make sure the noise gate
turns on, passing your voice. If it seems that you have to speak too loudly, turn down the
threshold a bit so that you can eliminate room noise while still using a comfortable speaking
tone.
For instance, if you’re in a room with a blasting air conditioner, you can prevent the mic
from picking up the sound of the air conditioner by setting the noise gate just above the air
conditioner sound. That way, when you speak, the mic will pick up your voice, but when
you’re not speaking it will shut out the sound of the air conditioner.
Limiter
The limiter makes sure your voice level won’t go above the threshold setting, so it won’t get
too loud if you speak too close to the mic. Speak into the mic and set the threshold to a
comfortable level that doesn’t make the voice sound unnatural, but keeps it from getting too
loud.
desired position, click on the point you want it to go and the slider knob will
automatically jump there. Also, on some sliders, such as the Equalizer, you can
double click to center them midway between the top and bottom position.
Page 22
Page 23

Voice Morph
Pitch Shift
This slider lets you change the pitch of your voice either up and down. Moving the slider
higher will make your voice sound higher-pitched, while moving it lower will make it sound
deeper. Double click the slider to make it jump to the middle, where the pitch is not shifted.
Morph
This slider sets the balance between your normal voice and pitch shifted voice. Moving the
slider down passes more of your normal voice and moving it up adds the pitch shift you’ve
selected. If you place it in the middle, you’ll get a 50/50 balance between normal and pitch
shifted voice.
Multi-Band Equalizer
The band equalizer lets you change the tone settings of the voice signal. The sliders will
boost or cut the designated frequencies by +/-12dB at the following frequencies.
Mid 1: 250Hz band-pass filter
Mid 2: 1kHz band-pass filter
Mid 3: 4kHz band-pass filter
High: 8kHz shelving filter
XP500 Advanced Sound Editor
The High shelving filter provides a treble boost. The Mid 1, 2 and 3 band pass filters provide
a resonant boost or cut at the specified frequency..
TIP: Double clicking a slider sets it to the center.
Mic Monitor
The mic monitor signal is routed to the headset speakers so you can hear your voice as you
speak into the mic. This slider adjusts the level of the mic so you can determine just how
much you want to hear.
Page 23
Page 24

www.TurtleBeach.com
Software Controls – Game Preset Tab (Advanced Mode Only)
The following diagram illustrates the audio processing sections in the game channel:
The parameters in each processing secton are represented in the Game Presets tab.
NOTE: Any edits made in this tab are not saved unless you press the Game
Preset “Save” button in the Presets Tab.
TIP: Rather than click on the slider knob with the mouse and dragging it to the
desired position, click on the point you want it to go and the slider knob will
automatically jump there. Also, on some sliders, such as the Equalizer, you can
double click to center them midway between the top and bottom position.
Silencer
The Silencer noise gate eliminates background noise from the game sound input. When the
game level is below the threshold setting, the noise gate blocks the game sound from
passing, thereby creating silence. This helps eliminate the background noise from the game
input signal, thereby improving the signal-to-noise ratio of the game audio path.
The threshold level should be set as low as possible to assure none of the soft game sounds
will be cut off by the silencer. To set the optimum threshold, listen to quiet parts of the
game and turn up the threshold until the sound shuts off.
Sonic Lens™
The Sonic Lens is a combination of a high-pass and low pass filter followed by an expander.
By setting the cutoff frequencies of these filters, the expansion can be limited to affect
sounds that are in a specific frequency range defined by the low and high pass filters. This
allows softer sounds in the frequency range to be boosted in volume while not affecting
louder sounds.
Page 24
Page 25

XP500 Advanced Sound Editor
For example, to boost the sound of a grenade pin being pulled, it is better to boost higher
frequency sounds by adjusting the low and high pass filters. The Sonic Lens is also useful for
boosting quiet sounds like footsteps without also boosting the level of louder sounds like
explosions.
A mixer stage at the output of the Expander output allows the adjustment of the pre and
post expander signal so that the unprocessed game sound can be balanced with the
processed game sound.
Low
This slider sets the cutoff
frequency for the low pass filter.
Frequencies above the cutoff
will not pass through.
High
This slider sets the cutoff
frequency for the high pass
filter. Frequencies below the
cutoff will not pass through.
Slope
These buttons set the filter rolloff from -6dB/Octave to -24
db/Octave. The -6dB slope will
pass more of the frequencies
than will the -24 db slope.
Active/ Pass Thru Button
When Active is enabled, the
high and low pass filters are
activated. When Pass Thru is
enabled, the filters are disabled.
Threshold
Sounds below the threshold
setting will be boosted by the
amount of gain set by the gain
slider. Sounds above the
threshold will not be affected.
Gain
The gain setting determines how
much the sounds below the
threshold will be boosted.
Balance
This slider sets the balance between the expander output and the normal output. When set
to Normal (bottom), the game sound will be unaffected by the Sonic Lens. When set to
Expand (top), the game sound is fully processed by the Sonic Lens. When set to the middle,
a mix of 50/50 normal and Sonic Lens game sound will be heard.
Page 25
Page 26

www.TurtleBeach.com
Multi-Band Equalizer
Sound Field Expander
The multi-band equalizer lets you change the tone of the game sound. The sliders will boost
or cut the designated frequencies by +/-12dB. The frequencies for each slider are:
Low: 100Hz shelving filter
Mid 1: 250Hz band-pass filter
Mid 2: 1kHz band-pass filter
Mid 3: 4kHz band-pass filter
High: 8kHz shelving filter
The Low and High shelving filters provide a bass and treble boost. The Mid 1, 2 and 3 band
pass filters provide a resonant boost or cut at the specified frequency.
TIP: Double clicking a slider sets it to the center position (zero boost and cut)
The sound field expander can be used for widening a stereo sound field, boosting center
sounds and accentuating sounds from the left and right sides. The signal flow of the
expander is shown below. The left and right channels are processed independently and split
into four paths.
The “Through” path (T) is the direct unmodified sound. The level of this path is
controlled by the TGain slider.
The Low Pass Filter path (L) filters out frequencies above 200Hz. The level of this path
is controlled by the LGain slider.
The High Pass Filter path (H) filters out frequencies below 200Hz. The level of this path
is controlled by the HGain slider.
The left and right High Pass Filter paths are added or subtracted from each other to
form a mono signal that is added to the original high-pass filter signals. The
add/subtract amount is set by the MGain slider.
Page 26
Page 27

XP500 Advanced Sound Editor
These paths are mixed together to form the left and right outputs and the levels of each path
determines the final effect achieved.
Initial Gain (I Gain)
This sets the overall gain into the Sound Field Expander and should be set to a level that
does not produce distortion, yet achieves adequate signal gain.
Through Gain (T Gain)
This gain setting determines the amount of unprocessed signal that is mixed into the final
output. When combined with the H Gain and M Gain signals, various expander effects are
achieved.
Low Frequency Gain (L Gain)
This gain setting determines the amount of bass signal that is passed through the processing
stage. The cutoff is about 200 Hz. When the LGain is set low, the bass is cut and when it is
set high the bass is boosted. The result is similar to a “sub-woofer” effect.
High Frequency Gain (H Gain)
This gain setting determines the amount of high frequency signal that is passed through the
processing stage. The cutoff frequency is the same as bass cutoff frequency (200 Hz), but it
filters out frequencies below the cutoff rather than above. The expander is most effective on
high frequency signals, so this gain setting is critical to get the most effective expander effect.
Mono Gain (M Gain)
The H Gain signal is affected by the position of the M Gain control. The high frequency
signals from the H Gain left and right channels are mixed together into a mono signal which
is controlled by the M Gain slider.
When positioned in the center, the M Gain slider does nothing, so the H Gain is a
stereo signal.
When positioned at the bottom, the M Gain slider adds the left and right channels
together and routes them to the H Gain slider. So the H Gain controls a mono signal
that is the sum of left and right signals.
When positioned at the top, the M Gain slider subtracts the left and right channels and
routes them to the H Gain slider. So any signals that are panned to the center (i.e. same
level on left and right sides) are canceled.
The H Gain, M Gain and T Gain sliders work together to provide the Sound Field effects.
For example, with the H Gain and T Gain both turned up, if the M Gain is also turned up, it
will remove the center channel signals and the stereo field will widen.
As another example, if the H Gain and T Gain sliders are both turned up and the M Gain
slider is turned all the way down, the center channel will be boosted as the left and right
channels are added together and summed to the stereo signal.
Adjusting the ratios of the H and M Gain settings will result in different effect depths. The L
Gain setting will control the level of bass in the final sound and will not affect the directional
effects.
When using the Sound Field Expander, the Dolby effect should be turned off so
that it doesn’t affect the stereo separation of the game sound.
Page 27
Page 28

www.TurtleBeach.com
Blast Limiter
The Blast Limiter lets you turn up the
volume to hear soft sounds while limiting
the volume of louder sounds, like gun shots
and explosions. The Blast Limiter is a
variable gain stage with a threshold used for
limiting the signal levels above the
threshold setting. The amount of gain
reduction is set by the Ratio slider. The
higher the Ratio slider is turned up, the
more the sounds above the threshold are
attenuated. This effect is placed at the end
of the game sound chain so that the sound
level caused by processing in all preceding
stages can be limited in amplitude.
Threshold
The volume of any game sounds below the threshold setting is not changed. The volume of
game sounds above the threshold setting are reduced an amount set by the ratio slider.
Ratio
The gain above the threshold is reduced by this ratio setting. For example, a setting of 25
reduces the gain by 25%.
Game Volume
This slider adjusts the volume level of the game channel heard in the headset.
Dolby on/off Button
When using the Sound Field Expander, some settings might compromise the Dolby
processing. In these cases, you can instruct the game preset to turn off Dolby processing by
clicking on the Dolby button and shutting it off. If Dolby is turned off in a preset, the
Bypass LED on the transmitter will turn on to indicate that Dolby processing is inactive.
Page 28
 Loading...