

Page 1
User Manual
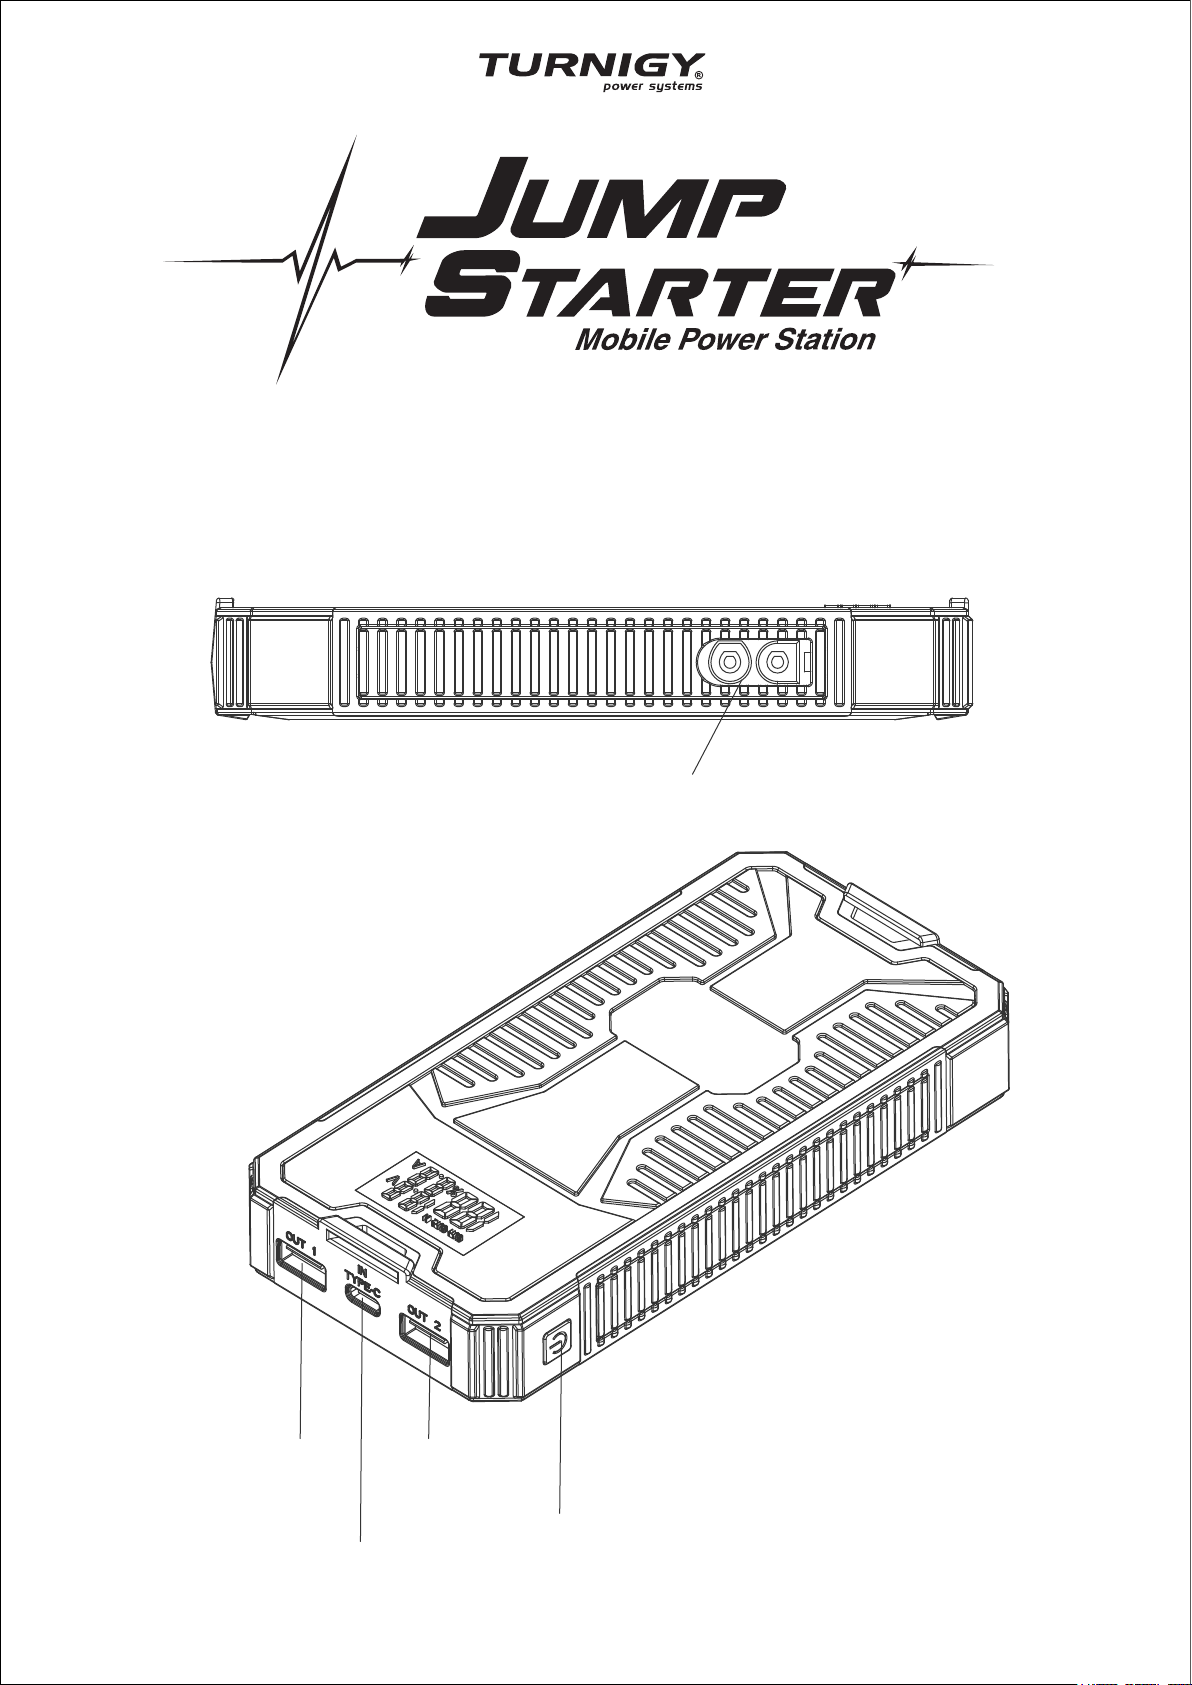
TURNIGY JUMP STARTER T27
Jump Start Socket
USB1 Output
5V/2A
Type-C 9V/2A Input
USB2 Output
5V/3A
9V/2A
Switch
1
Page 2
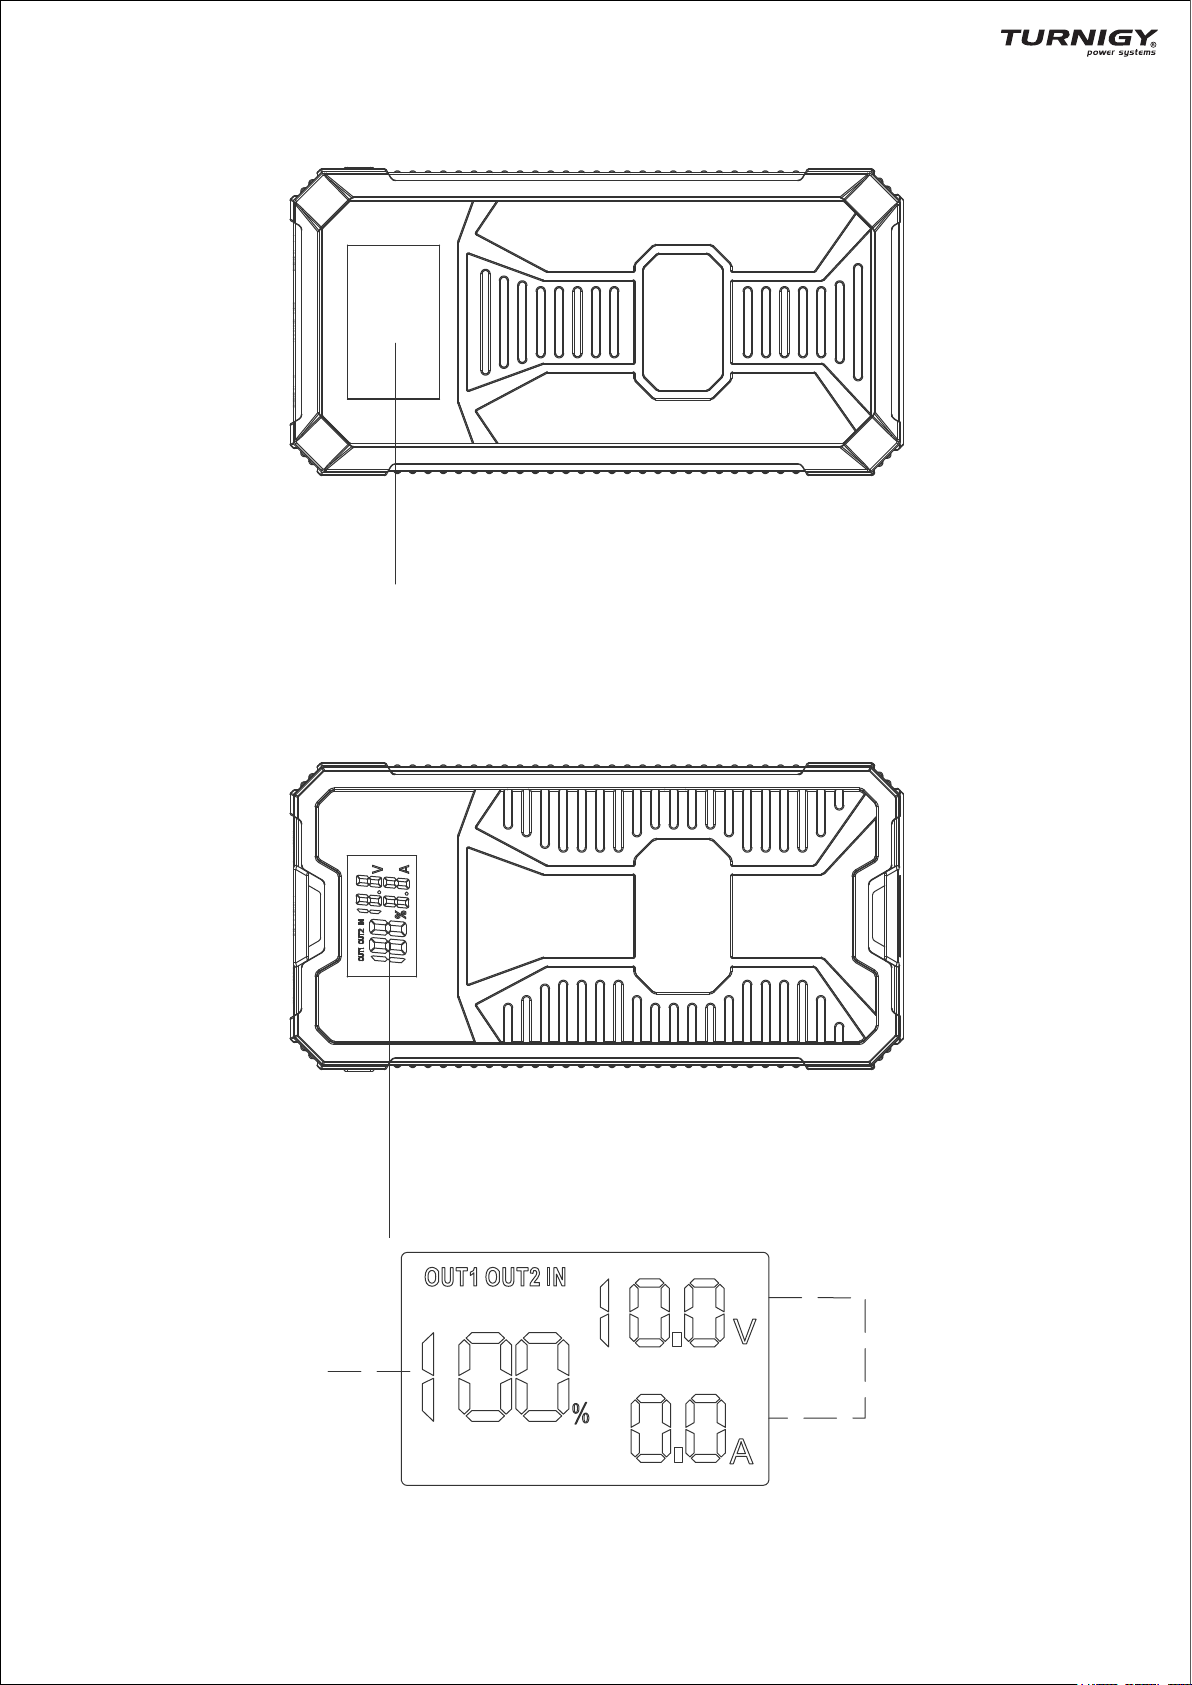
LED Flashlight
Power Level
USB Output
5V/2A
5V/3A
9V/2A
2
Page 3
Operating Instructions:
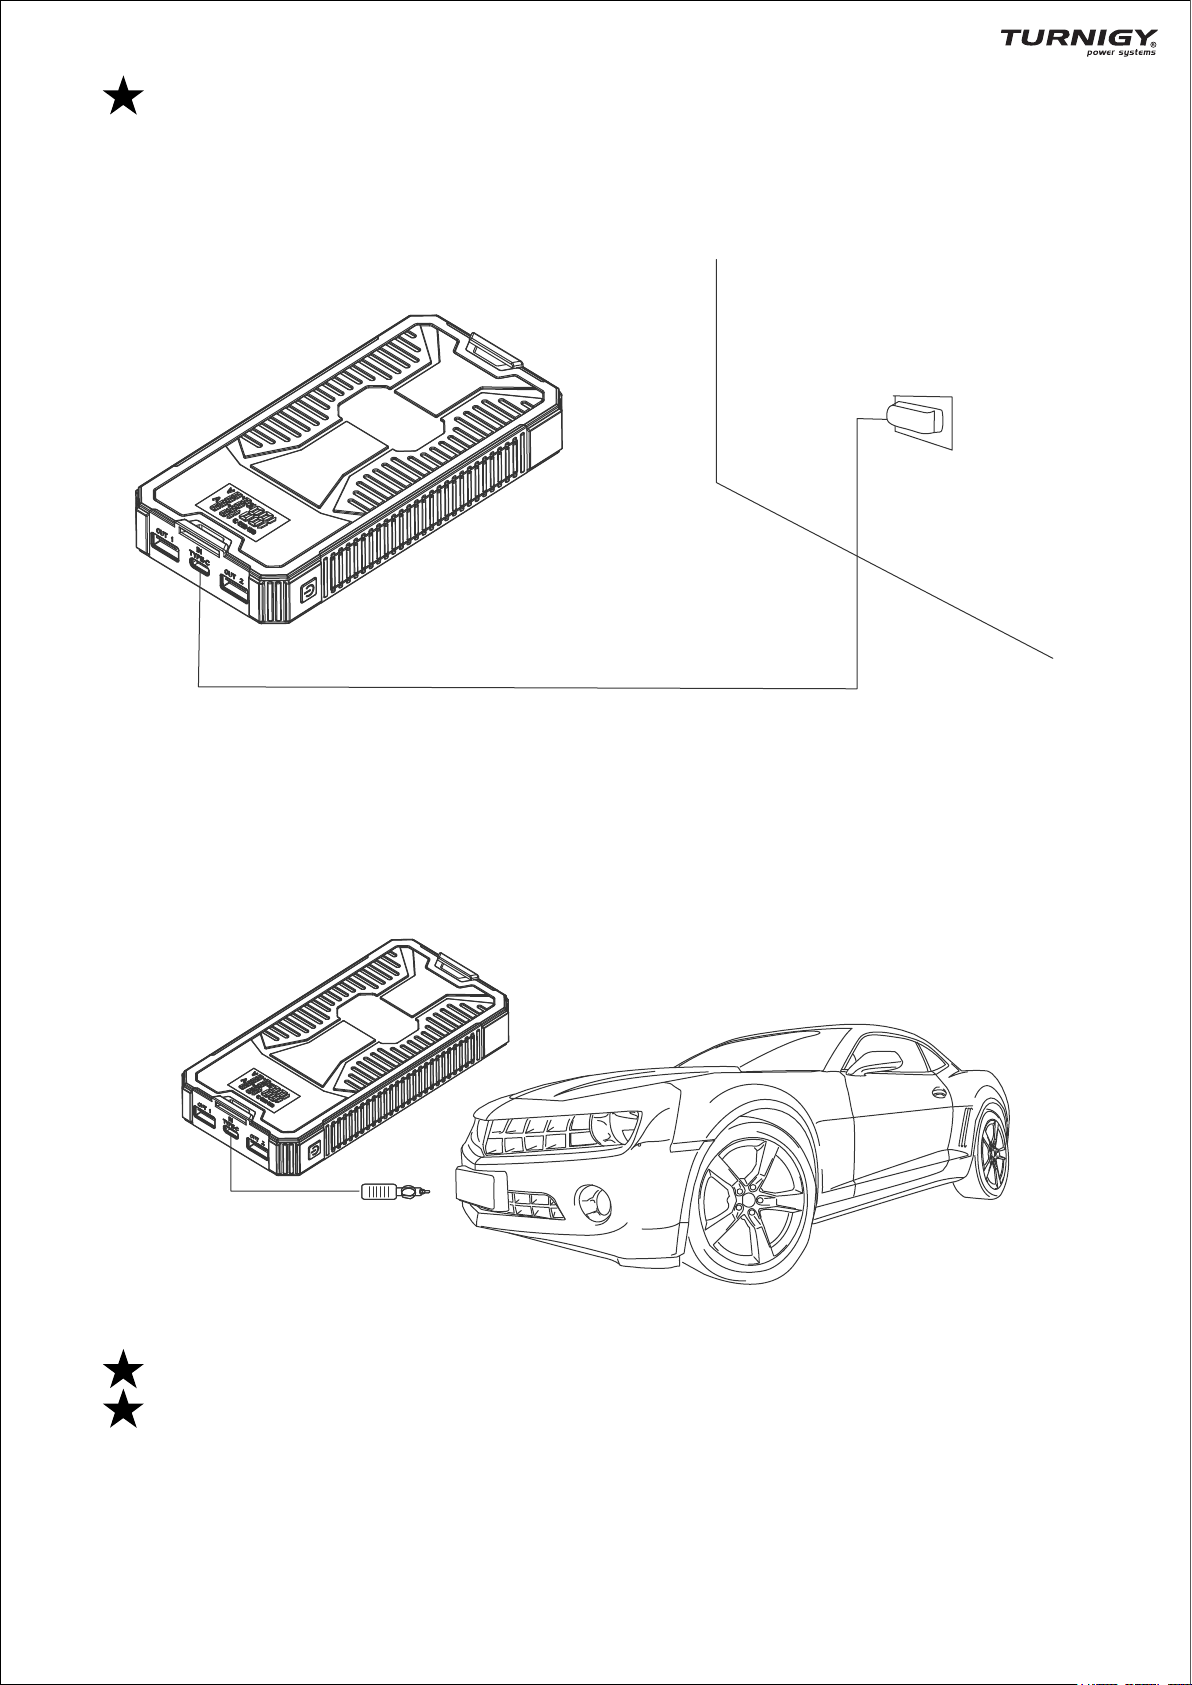
Charging Your T27
You can charge your T27 one of Two ways:
1. Using the supplied 220 Volt main charger.
OR
1. Inserting the one end of QC 3.0 car charger into the jack of cigar lighter.
2. Inserting the other end of QC 3.0 car charger into the devices.
Charging takes 2 hours using either charging option.
If adaptors support QC 3.0 charging, jump starter will
be charged at 9V/2A OR 5V/3A, otherwise, jump starter
will be charged at 5V/2A.
3
Page 4

Starting Your Vehicle:
Please ensure that your T27 is no less than 50% charged.
If it is below 50%, you may not be able to jumpstart your
vehicle.
1. Connect the jumper lead to your T27.
2. Connect the +(red clip) to the + on your car battery.
3. Connect the -(black clip) to the - on your car battery.
4. Turn your key to start your vehicle.
5. Once your vehicle is started, disconnect the alligator clip as soon as
possible.
Note:
1. After starting your vehicle, Remove the T27 as soon as possible.
2. DO NOT connect the 2 alligator clip together.
3. DO NOT disassemble the T27.
4
Page 5

Turning On Your T27
Follow 2-step process as below to turn on your T27 jump starter:
1. Press the round power button.
2. Your T27 is now ready to use.
Charging Digital Devices via USB
1. You can either use the provided USB Break out lead or your own USB
cable suitable for your digital device.
2. Connect either cable to the T27.
3. If using the provided USB Break out lead, Select the correct connection
for your device.
Example Below:
5
Page 6

How to use the LED Torch
1. Press and hold the round power button for 3 seconds.
The LED torch will turn on.
2. Press the round button again to activate the strobe function.
3. Press the round button again to activate the SOS function.
Pressing this button for 3 seconds
can turn on the LED lighting system
Charging Indicator
1. Press the round power button to see the charge status of the T27 LCD
Screen.
2. When charging, The LCD Screen will show the specific number range
from 0 to 100%.
3. The input function will stop once the T27 is fully charged.
6
Page 7

Trouble Shooting:
If the following operations are unable to troubleshoot, please stop using the
jump starter and contact with the stores which you bought the jump starter
from
Trouble Cause Solution
The power capacity
of the device is
shown in 100%, but
did not fully charged
in charging precoess
Nothing happens
when pressing the
switch button
The battery shown 100% in the
LCD Screen of T27 on means
stop charging, and this situation
means it is semi-state of charge,
which is conductive to long-term
storage when the device is not
in use for long time.
Low voltage protection of the
device is started and the device
can not be turned on.
Pull out the charge
plug, then reinsert.
Insert the charger
plug into the 9V2A
input port to activate.
Warning:
1. After starting your vehicle, Remove the T27 as soon as possible.
2. DO NOT connect the 2 alligator clip together.
3. DO NOT disassemble the T27
Do not use the product in bathroom or other damp places or places
near the water.
Do not remodel or dismantle the device.
Keep the product away from the children.
Do not reverse the connections of output or input.
Do not throw the product into fire.
Please don’t use the charger whose charging voltage is more than the
product to charge.
The temperature should be kept between 0°C to 40°C when the device
is being charged.
Do not hit or throw the product.
If there is problem with charging, please contact your dealer.
Keep the product away from the flammable objects (bed or carpet)
If the liquid of the device is splashed into eyes, do not wipe the eyes
but wash them with clean water immediately.
If the product is heating and discolouring please stop using, as it may
lead to liquid, smoke and burn.
After long term storage or not in use, please ensure that devices will
be charged and discharged in every three months.
7
Page 8

Frequently Asked Questions (FAQ):
1. Q:
A:
2. Q:
A:
3. Q:
A:
4. Q:
A:
5. Q:
A:
How long does a full charge take?
The devices have smart detection, in the case there is no load or
charging is finished, the T27 will turn itself off.
How long does a full charge take?
A full charge will take 2 hours using either the 220V or 9V charging
option.
How many times i can jump start my vehicle?
This depends on the different displacements and vehicle engine. The
T27 item can start a vehicle up to 15 times.
If not being used, how long can the T27 be stored?
It is recommended to charge the T27 every 3 - 6 months. Once the
unit drops below 50% we recommend you charge it to ensure you can
jump start your vehicle.
The T27 won’t start my car, Why?
a) Please ensure the unit is charged above 50%.
b) Ensure the clamps are securely and correctly connected.
c) Ensure the battery termainals are clean and free from corrosion.
If corroded, clean them and reconnect the T27 as per the instruction
in this manuals.
8
Page 9

Current return
charging protection
Voltage
stabilization
protection
Wide
temperature
ignition
Short
circuit
protection
Overload
protection
Balanced
charge
Over
dischange
protection
Quality commitment
12 million RMB sum insured
Our product’s quality is underwritten
by Hobbyking
9
Page 10

Warranty Card
We offer 12-month warrantly
service for the product from tha date of purchasing.
Warranty conditions:
Please show this warranty card and fill in the details to obtain warranty
service. We offer 12-month warranty for the product from the date of
purchase.
Warranty range:
Quality problems in the state of normal use can be guaranteed.
Damages to the product caused by the operational errors, Warranty
can’t be provided.
The device is dismantled, no warranty.
Product’s sticker is torn off, no warranty.
We can provide maintenance service to the product that is beyond
the scope of warranty, but the demander need to pay maintenance.
Model No.
Purchase
Customer Name
Customer Address
Sales Unit
Series No.
Repair Date
Tel.
Description of Malfunctions
10
 Loading...