

Page 1

T240T240
AC/DC 10A Touch Charger
Page 2

TABLE OF CONTENTS
INTRODUCTION
SPECIFICATION
CAUTION and NOTES
BATTERIES INFO and MAX CHARGE CURRENT
MAIN MENU INFO
PROGRAM OF LiPo/Lilo/LiFe/LiHV
PROGRAM OF NiMH/NiCd
PROGRAM of PB (lead-Acid)
PROGRAM OF SMART
PROGRAM OF SETTINGS
PROGRAM OF MONITOR/CALIBRATION
PROGRAM OF MEMORY
ERROR INFORMATION
SUPPORT AND SERVICES
1
02
03
04
05
06
07
10
12
14
15
16
17
18
19
Page 3
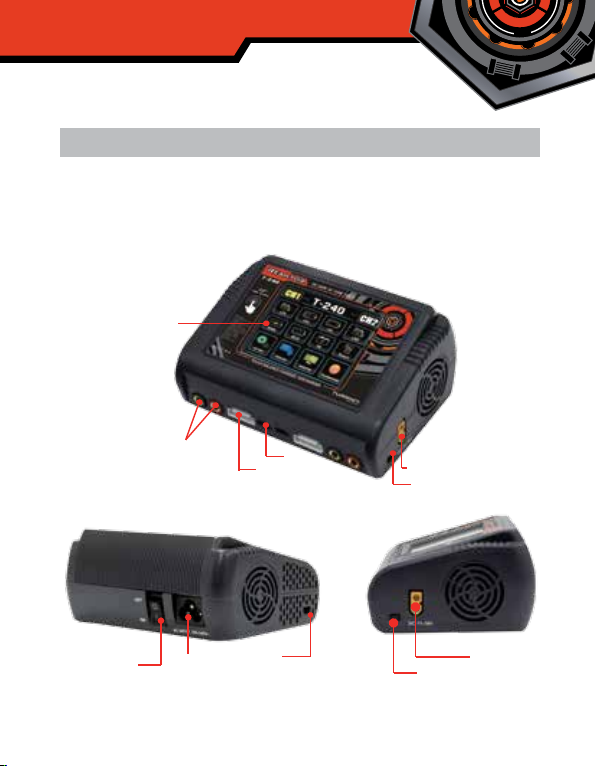
INTRODUCTION
Thank you for purchasing the Reaktor T240 charger. Designed for both rookies and professional,
this system is extremely versatile for the safety and the best use of your system, please read this
manual carefully.
3.2in
TOUCH
COLOR SCREEN
Power Switch
Output port
AC 100-240V
Balance port
PC Link
Temp.
DC 11-18V
PC Link
DC 11-18V
PC Link
2
Page 4
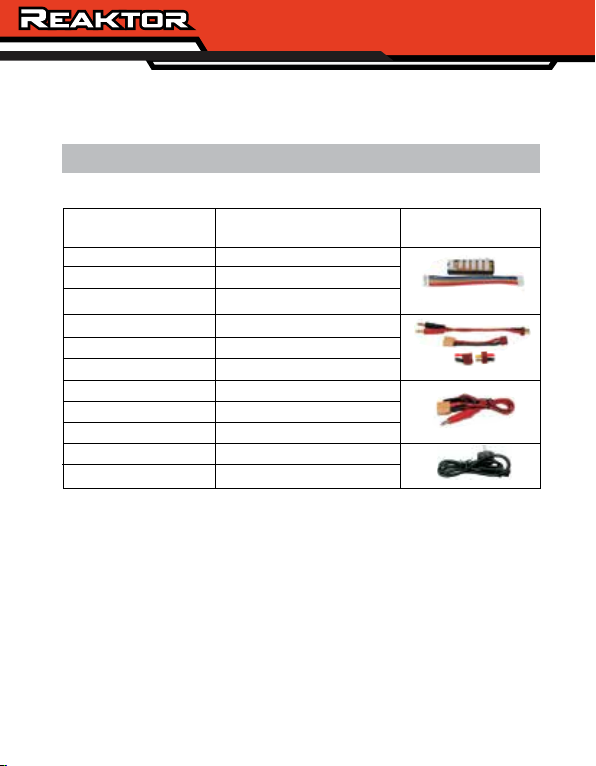
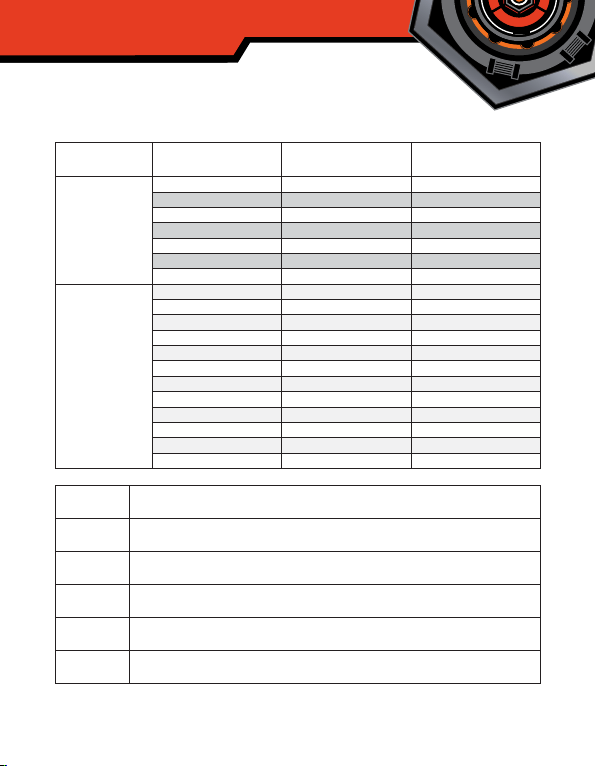
SPECIFICATION
Product Model: Accessories
AC Input Voltage
DC Input Voltage
Charge Power
Charge Current
Discharge Current
LiIon/LiPo/Lilo/LiFe/LiHV
NiCd/NiMH
PB
Smart Battery
Net Weight
Dimension
T240 Reaktor AC/DC 10A
Touch Charger
100-240V
11-18V
AC INPUT (CH1+CH2=150W)
DC INPUT (120W*2)
0.1-10A*2
0.1-2A*2
1-6cells*2
1-15cells*2
2-20V*2
I/II/III*2
0.48kg
145x105x64mm
Adapter Board 2 set
Extra Cable x2 pcs
Extra Cable x1pc
AC Cord x1pc
3
Page 5
CAUTION and NOTES
This charger is ONLY suitable for charge rechargeable LiPo, LiFe, LiHV, NiCd, NiMH, Smart
and Pb batteries. Do not attempt to charge dry cells, charge other types of batteries may
cause fire or explosion.
Set up the Input Power Limit/Low Input VOLT Cutoff correctly in the USER SETTING of the
DC power supply.
Pay attention to the charger during use. Do not leave the charger unattended.
Never charge the dead or damaged batteries.
Do not attempt to charge a battery pack containing different types of batteries.
Do not use damaged cables.
Do not use the charger close by a flammable object. Use only in well-ventilated areas.
Only charge the rechargeable batteries that meet the product specifications of this charger.
DO NOT allow water, moisture or foreign objects into the charger.
DO NOT use in humid locations. Do not operate with wet hands.
DO NOT attempt to disassemble the charger.
DO NOT use the charger on fleecy materials, such as carpets, blankets, beds and cushions.
DO NOT block the cooling fan and the air inlet.
Strongly recommend balancing Lithium packs. An unbalanced pack may damage during
discharging.
General default charging current is preset at 1C. Please read manual carefully of the battery
and setup the suitable current to charge the battery. Higher C charging/ discharge current may
damage the battery, even cause fire.
4
Page 6
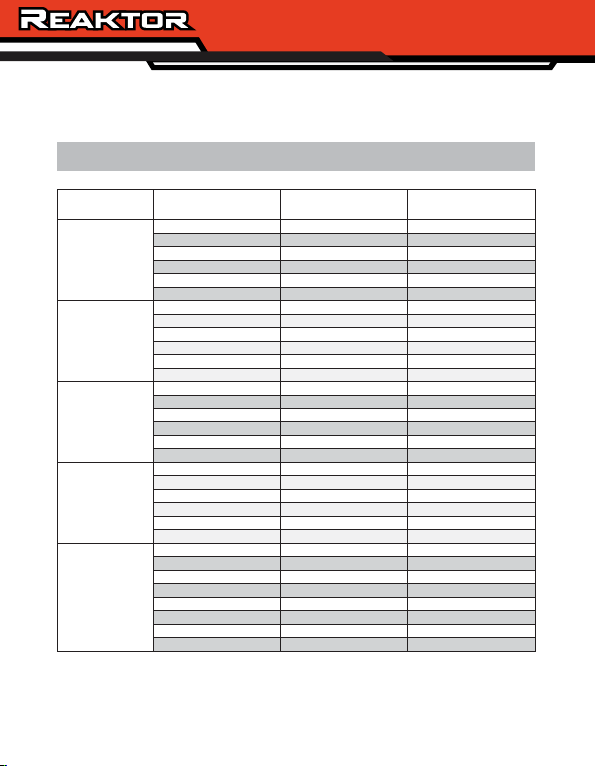
BATTERIES INFO and MAX CHARGE CURRENT
Battery Type
LiHV
LiPo
LiIo
LiFe
NiMH / NiCd
No. of Cells Rated Voltage (V)
1 3.8 0.1 - 10.0A
2
3
4
5
6
1
2
3
4
5
6
1
2
3
4
5
6
1
2
3
4
5
6
1
2
3
4
5
6
7
8
7.6 0.1 - 10.0A
11.4 0.1 - 10.0A
15.2 0.1 - 10.0A
19.0 0.1 - 10.0A
22.8 0.1 - 10.0A
3.7 0.1 - 10.0A
7.4 0.1 - 10.0A
11.1 0.1 - 10.0A
14.8 0.1 - 10.0A
18.5 0.1 - 10.0A
22.2 0.1 - 10.0A
3.6 0.1 - 10.0A
7.2 0.1 - 10.0A
10.8 0.1 - 10.0A
14.4 0.1 - 10.0A
18 0.1 - 10.0A
21.6 0.1 - 10.0A
3.3 0.1 - 10.0A
6.6 0.1 - 10.0A
9.9 0.1 - 10.0A
13.2 0.1 - 10.0A
16.5 0.1 - 10.0A
19.8 0.1 - 10.0A
1.2 0.1 - 10.0A
2.4 0.1 - 10.0A
3.6 0.1 - 10.0A
4.8 0.1 - 10.0A
6 0.1 - 10.0A
7.2 0.1 - 10.0A
8.4 0.1 - 10.0A
9.6 0.1 - 10.0A
Charging Current (A)
5
Page 7
Battery Type
NiMH / NiCd
Pb
LiPo
LiIo
LiFe
LiHV
NiMH
NiCd
Pb
No. of Cells Rated Voltage (V)
9
10
11
12
13
14
15
1
2
3
4
5
6
7
8
9
10
11
12
Voltage Level : 4.2V/Cell Max Charge Voltage : 3.7V/Cell Discharge Voltage Cut
off Level : 3.0V/Cell or Higher
Voltage Level : 4.1V/Cell Max Charge Voltage : 3.6V/Cell Discharge Voltage Cut
off level : 3.0V/Cell or Higher
Voltage Level : 3.8V/Cell Max Charge Voltage : 3.3V/Cell Discharge Voltage Cut
off Level : 2.0V/Cell or Higher
Voltage Level : 4.35V/Cell Max Charge Voltage : 3.8V/Cell Discharge Voltage Cut
off Level : 3.2V/Cell or Higher
Voltage Level : 1.6V/Cell Max Charge Voltage : 1.2V/Cell Discharge Voltage Cut
off Level : 0.80V/Cell or Higher
Voltage Level : 2.45V/Cell Max Charge Voltage : 2.0V/Cell Discharge Voltage Cut
off Level : 1.50V/Cell or Higher
10.8
12
13.2
14.4
15.6
16.8
18
10
12
14
16
18
20
22.0
24.0
2
4
6
8
Charging Current (A)
0.1 - 10.0A
0.1 - 10.0A
0.1 - 10.0A
0.1 - 10.0A
0.1 - 10.0A
0.1 - 10.0A
0.1 - 10.0A
0.1 - 10.0A
0.1 - 10.0A
0.1 - 10.0A
0.1 - 10.0A
0.1 - 10.0A
0.1 - 10.0A
0.1 - 10.0A
0.1 - 10.0A
0.1 - 10.0A
0.1 - 10.0A
0.1 - 10.0A
0.1 - 10.0A
6
Page 8

MAIN MENU INFO
LiFe
MEMORY
T240
Lilo
MONITOR
CH1CH1
LiPo
NiMH NiCD PB Smart
SETTING
CH2CH2
LiHV
CALIBRATION
Main Menu
Touch Sys tem
Contr oller
3.2 Inch
Touch Screen
Memory : Save Six
operation data
means CH-2 or CH-1 Swift image.
CH1CH1 CH2CH2
Note:
1. Two Channel are independent, and you can use different mode to operate .
2. If Channels has been not used, CH1 or CH2 press image, will automatically return
to main menu for operations
3. If Channels Has been used, CH1 or CH2 press image, will automatically return.
Security
Settings
NOTE: Please read carefully before doing anything!!
CH1CH1
CH1CH1
7
Battery Management, Checking
Battery Capacity, Voltage,
Calibrate Charger
CH2CH2
CH2CH2
Balancer
Page 9

PROGRAM OF LiPo/Lilo/LiFe/LiHV
Please replace this instruction as below:
Instruction for charging LiPo, Lilo, LiFe, LiHV, please follow the below steps:
Step 1: Select Channel and Select Battery Type on the menu (Image 1)
Step 2: Select and adjust you desire battery related parameters (image 2)
Step 3: Select “ Start” operation will begin (image 3)
T240
CH1CH1
LiPo
LiFe
Lilo
1
NiMH NiCD PB Smart
MEMORY
SETTING
MONITOR
CH2CH2
CALIBRATION
STORAGE
LiHV
Battery Cell
Charge Current Discharge Current
BALANCE
CHARGE
CHARGE
End voltage
6S
5.0A Invalid
3200mV/S
DISCHARGE
CH1CH1
Ext.Temp:
Int.Temp:
Input Vol:
Voltage:
Current:
Capacity:
2
No Sensor
25 CC
14.73V
23.12V
0.60A
5mAh
LiPo(6S) BAL Charge
00:20:09
CH2CH2
3
LiPo(6S) BAL Charge
MODE 1 : STORAGE
MODE 2 : CHARGE
MODE 3 : BAL CHARGE
MODE 4 : DISCHARGE
CH1CH1
4.05V
4.05V 4.05V 4.05V 4.05V 4.05V
80% 80% 80% 80% 80% 80%
Warning! Next Step will be an example during operation. (T240 DUO)
WORKING INTERFACE
Step 3: If you often use the same battery, please touch Save icon ( Image2 ) to enter into Save
interface. Touch Unused icon to save the data and it will be easy for you to charge next time.
Note: 8 groups data can be saved
T240
CH1CH1
LiPo
LiFe
1
NiMH NiCD PB Smart
MEMORY
SETTING
Step 4. Select previous date to START (Image 5) to balance charging (Image 3), or touch BACK
icon into previous step (Image 2), and touch START to balance charge, (Image 6)
CH2CH2
Lilo
CALIBRATION
MONITOR
LiHV
STORAGE
Battery Cell
Charge Current Discharge Current
BALANCE
CHARGE
CHARGE
End voltage
6S
5.0A Invalid
2
DISCHARGE
3200mV/S
8
LiHv Auto
BAL Charge
Curr: 5.0A
TVC:4.36V/S
LiPo Auto
BAL Charge
Curr: 5.0A
TVC:4.20V/S
NiCd Auto
BAL Charge
Curr: 1.5A
Delta:7mv/s
LiPo Auto
BAL Charge
Curr: 5.0A
TVC:4.20V/S
CH2CH2
3
Page 10

WORKING INTERFACE
LiPo(6S) BAL Charge
CH1CH1
Ext.Temp:
Int.Temp:
Input Vol:
Voltage:
Current:
Capacity:
NOTE:
2. Image 4 show each cell voltage and percent during LiPo charging.
3. Image 3 show all setting data for LiPo Charging.
means CH-2 or CH-1 Swift image
CH1CH1
Note: 1. If CH-2 has been not used, press image, return back to main menu, and use
2. If CH-2 has been used, press image, enter into CH-2 operation directly.
3. Two Channels are independent, and you can use different mode to operate.
00:20:09
No Sensor
25 CC
14.73V
23.12V
0.60A
5mAh
1. Image 3 show the graphic photo for LiPo Charging current and voltage.
CH2CH2
CH-2 operation.
CH2CH2
3
CH2CH2
CH1CH1
LiPo(6S) BAL Charge
CH1CH1
4.05V
4.05V 4.05V 4.05V 4.05V 4.05V
80% 80% 80% 80% 80% 80%
9
CH2CH2
Page 11

PROGRAM OF NiMH/NiCd
Instruction for charging NiMH please follow the below steps:
Step 1. Enter to Menu, Select Battery Type (Image 8)
Such as: NiMH, Enter into “SET PARAMETER FOR NiMH BETTERY” (Image 9)
Step 2. Select “CHARGE” MODE, And set the related parameters (Image 9)
CH1CH1
LiPo
NiMH NiCD PB Smart
T240
LiFe
1
CH2CH2
LiHV
Lilo
DISCHARGE
CHARGE CYCLE MORE...
Battery Cell
15S
Charge Current Discharge Current
1.5A
Delta v
2
Invalid
4mV/S
SETTING
MEMORY
MONITOR
CALIBRATION
3
MODE 1 : CYCLE
MODE 2 : CHARGE
MODE 3 : DISCHARGE
Step 3: If you often use the same batterys, We Highly suggest you to save the feature by selecting
“Save icon” in the parameter menu. Click unused icon to save the data and it will be easy
for you to charge next time. (Image 10-11)
LiHv Auto
BAL Charge
Curr: 5.0A
TVC:4.36V/S
LiPo Auto
BAL Charge
Curr: 5.0A
TVC:4.20V/S
Next step will be an example at “MODE 2” (T240 DUO)
Note: 8 groups data can be saved.
NiMH Auto
BAL Charge
Curr: 1.5A
Delta:7mv/s
LiPo Auto
BAL Charge
Curr: 5.0A
TVC:4.20V/S
LiHv Auto
BAL Charge
Curr: 5.0A
TVC:4.36V/S
LiPo Auto
BAL Charge
Curr: 5.0A
TVC:4.20V/S
NiMH Auto
BAL Charge
Curr: 1.5A
Delta:7mv/s
LiPo Auto
BAL Charge
Curr: 5.0A
TVC:4.20V/S
2
10
1
Page 12

WORKING INTERFACE
Step 4. Select previous data to START (Image 11) to Discharge (Image 12), or touch BACK icon
into previous step (Image 9), and touch START to charge. (Image 12)
WORKING INTERFACE
NiMH(15S) Charge
CH1CH1
Ext.Temp:
No Sensor
Int.Temp:
Input Vol:
Voltage:
Current:
Capacity:
means CH-2 or CH-1 Swift image
CH1CH1
CH2CH2
Note:
1. If CH-2 has been not used, press image, return back to main menu, and use
CH-2 operation.
2. If CH-2 has been used, press image, enter into CH-2 operation directly.
3. Two Channels are independent, and you can use different modes to operate.
00:00:09
25 CC
14.73V
22.2V
0.60A
5mAh
CH2CH2
CH1CH1
CH2CH2
11
Page 13

PROGRAM of PB(lead-Acid)
Instruction for charging Pb please follow the below steps:
Step 1: Select Channel and Select Battery Type on the menu (Image 13)
Step 2: Select and adjust you desire battery related parameters (image 14)
Step 3: Select “ Start” operation will begin (image 13)
CH1CH1
LiPo
NiMH NiCD PB Smart
SETTING
MODE 1 : TRICKLE
MODE 2 : CHARGE
MODE 3 : DISCHARGE
Step 3. If you often use the same battery, please touch Save icon (Image 14) to enter into Save
Pb 6S
Charge
Curr: 5.0A
TVC:4.36V/S
LiPo Auto
BAL Charge
Curr: 5.0A
TVC:4.20V/S
T240
LiFe
MEMORY
interface. Touch Unused icon to save the data and it will be easy for you to charge next
time. (Image 15-16)
CH2CH2
LiHV
Lilo
1
CALIBRATION
MONITOR
Next step will be example at “MODE 2” (T240 DUO)
Note: 8 groups data can be saved
NiCd Auto
BAL Charge
Curr: 1.5A
Delta:7mv/s
LiPo Auto
BAL Charge
Curr: 5.0A
TVC:4.20V/S
6S
5A
1
CHARGE DISCHARGE
2
Delta v
2.40V/S
Invalid
NiCd Auto
BAL Charge
Curr: 1.5A
Delta:7mv/s
LiPo Auto
BAL Charge
Curr: 5.0A
TVC:4.20V/S
TRICKLE
Battery Cell
Charge Current Discharge Current
Pb 6S
Charge
Curr: 5.0A
TVC:4.36V/S
LiPo Auto
BAL Charge
Curr: 5.0A
TVC:4.20V/S
3
2
12
Page 14

WORKING INTERFACE
Step 4. Select previous data to START (Image 16) to balance charging (Image 17), or touch BACK
icon into previous step (Image 16), and touch START to balance charge (Image 17)
WORKING INTERFACE
PB(6S) Charge
CH1CH1
Ext.Temp:
No Sensor
Int.Temp:
Input Vol:
Voltage:
Current:
Capacity:
Note: 1. Image 17 show the graphic photo for LiPo Charging current and voltage.
2. Image 17 show each cell voltage and percent during LiPo charging.
3. Image 17 show all setting data for NiMh Charging.
means CH-2 or CH-1 Swift image.
CH1CH1
CH2CH2
Note:
1. If CH-2 has been not used, press image, return back to main menu, and use
CH-2 operation.
2. If CH-2 has been used, press image, enter into CH-2 operation directly.
3. Two Channel are independent, and you can use different mode to operate.
00:20:09
25 CC
14.73V
23.12V
0.60A
5mAh
CH2CH2
CH1CH1
CH2CH2
13
Page 15

PROGRAM OF SMART
Instruction for charging Smart Battery please follow the below steps:
Step 1: Select Channel and Select Battery Type on the menu (Image 1)
Step 2: Select and adjust you desire battery related parameters (image 2)
Step 3: Select “ Start” operation will begin (image 3)
CH1CH1
LiPo
NiMH NiCD PB Smart
SETTING
T240
LiFe
MEMORY
MODE1 : SMART I
MODE2 : SMART II
MODE3 : SMART III
MODE4 : User set
MONITOR
CH2CH2
LiHV
Lilo
1
CALIBRATION
Smart I
(11.1V/3S)
Smart II/IV
(15.2V/4S)
Smart III
(22.8V/6S)
Digital power
(5-28v)
Next step will be example at “MODE 4”
Step 2. Select START (Image 19) to charging (Image 20)
Smart Battery power supply
CH1CH1
Ext.Temp:
Int.Temp:
Input Vol:
Voltage:
Current:
Capacity:
means CH-2 or CH-1 Swift image.
CH1CH1
Note: 1. If CH-2 has been not used, press image, return back to main menu, and use
2. If CH-2 has been used, press image, enter into CH-2 operation directly.
3. Two Channel are independent, and you can use different mode to operate.
00:20:09
No Sensor
25 CC
14.73V
23.12V
0.60A
CH2CH2
CH-2 operation.
CH2CH2
Note: Image 20 show the graphic photo for the current
and voltage for the smart charge.
CH2CH2
CH1CH1
13
CH1 SMART BATTERY
Max voltage
26.1V
Max current
4.0A
2
3
Page 16

PROGRAM OF SETTINGS
Step 1. Enter to Menu, Select Setting (Image 21), into set interface. (Image 22-24)
T240
CH1CH1
LiPo
LiFe
NiMH NiCD PB Smart
MEMORY
SETTING
1
PUBLIC
SETTINGS
Buzzer volume
middle
Balance Speed AC Power CH1/CH2
normal
EXIT
PUBLIC
SETTINGS
INt.Temp Cut-off
80 C
Capacity Cut-off Safety Time Cut-off
10A.0Ah
EXIT
PUBLIC
SETTINGS
INt.Temp Cut-off
80 C
Capacity Cut-off Safety Time Cut-off
10A.0Ah
EXIT
CH1
SETTINGS
CH1
SETTINGS
CH1
SETTINGS
Lilo
MONITOR
Low input voltage
10.0V
60W/60W
Ext.Temp Cut-off
60 C
240min
Ext.Temp Cut-off
60 C
240min
CH2
SETTINGS
CH2
SETTINGS
CH2
SETTINGS
CH2CH2
LiHV
CALIBRATION
Set the volume of the buzzer. Keep Beep default: Middle, Low/
Middle/High/Off optional
In this menu, you can set the cutoff input voltage of the power supply
of the charger to protect your power supply. The charger will cutoff
working when input voltage lower than the setting value, Range from
11.0-18.0V, Default: 10.0V
In this menu, you can set the charge power limit to meet your power
supply. The charge will work under the setting value.
Balance control of LiPo/Lilo/LiFe/LiHV, you can set the balance control
to meet your demand. Normal/Fast/Slow optional. Default: Normal
* Fast: Balance speed fastest, less accurate. *Slow: Balance Speed
lowest, more accurate.
*Normal: Balance speed and accurateness between Fast and Slow
In this menu, you can set the cutoff internal temperature to protect
your battery. The charger will cutoff working when the internal
temperature is higher than the setting value range from 30°-85°C,
Default: 80°C
In this menu, you can set the cutoff capacity to protect your battery.
The charger will cutoff working when the capacity is more than the
setting value. Range from off - 65.0Ah, Default: 10.0Ah
In this menu, you can set the cutoff external temperature to protect
your battery. The charger will cutoff working when the external
temperature is higher than the setting value (an External temperature
sensor is needed). Range from 30-85°C, Default: 60°C
In this menu, you can set a safety time to protect your charger and
battery. The charger will cutoff working when the safety time is up to
the setting value. On/Off optional, range from 1-600 minutes,
Default: 240 minutes
15
Page 17

PROGRAM OF MONITOR/CALIBRATION
ONE:
Enter into Menu, select Monitor (Image 25) and into BATTERY MONITOR (Image 26)
BATTERY MONITOR
T240
CH1CH1
LiPo
LiFe
NiMH NiCD PB Smart
MEMORY
SETTING
1) Meter LiXx (LiPo/Lilo/LiFe/LiHV) battery status. (Image 27)
2) Meter LiXx (LiPo/Lilo/LiFe/LiHV) battery internal resistance. (Image 27)
3) LiXx (LiPo/Lilo/LiFe/LiHV) battery balancer. (Image 28)
means CH-2 or CH-1 Swift image
CH1CH1 CH2CH2
Note:
1. If CH-2 has been not used, press image, return back to main menu, and use
2. If CH-2 has been used, press image, enter into CH-2 operation directly
3. Two Channel are independent, and you can use different mode to operate
TWO:
Step 1. Enter to Menu, select Calibration (Image 29), into “CHARGER CALIBRATION” (Image 30)
Step 2. Select “RESET” (Image 30) recover original setting (Image 30)
CH2CH2
LiHV
Lilo
CALIBRATION
MONITOR
1
CH-2 operation.
CH1CH1
4.05V
4.05V 4.05V 4.05V 4.05V 4.05V
8m
8m
CH2CH2
CH1CH1
8m
CH2CH2
8m8m8m
BALANCE
1
BATTERY MONITOR
CH1CH1
4.05V
4.05V 4.05V 4.05V 4.05V 4.05V
80% 80% 80% 80% 80% 80%
CH2CH2
MEMORY
T240
LiFe
Lilo
MONITOR
CH1CH1
LiPo
NiMH NiCD PB Smart
SETTING
CH2CH2
LiHV
CALIBRATION
C1 voltage
4.20V 4.20V
C2 voltage
4.20V
C3 voltage
4.20V
C4 voltage
C5 voltage
C6 voltage
4.20V
4.20V
1
16
Page 18

PROGRAM OF MEMORY
Step 1. Enter into Menu, select Memory (Image 31)
Step 2. Select correct icon as exact battery typeimage 32, and select “Modify” icon, (Image 33)
T240
1
T240
1
CH2CH2
LiHV
Lilo
Smart
CALIBRATION
MONITOR
CH2CH2
LiHV
Lilo
CALIBRATION
MONITOR
CH1CH1
LiPo
LiFe
NiMH NiCD PB
MEMORY
SETTING
Step 1. Enter into Menu, select Memory (Image 31)
Step 2. Select “START” icon (Image 32), and select “CELL” Icon (Image 34) (Image 35)
CH1CH1
LiPo
LiFe
NiMH NiCD PB Smart
MEMORY
SETTING
Pb 6S
Charge
Curr: 5.0A
TVC:4.36V/S
LiPo Auto
BAL Charge
Curr: 5.0A
TVC:4.20V/S
Pb 6S
Charge
Curr: 5.0A
TVC:4.36V/S
LiPo Auto
BAL Charge
Curr: 5.0A
TVC:4.20V/S
MODIFY
MODIFY
NiCd Auto
BAL Charge
Curr: 1.5A
Delta:7mv/s
LiPo Auto
BAL Charge
Curr: 5.0A
TVC:4.20V/S
CHARGE DISCHARGE
TRICKLE
Battery Cell
Charge Current Discharge Current
End voltage
6S
5.0A
4.20V/S
Invalid
DELETE
2
LiPo(6S) BAL Charge
CH1CH1
00:20:09
Ext.Temp:
No Sensor
Int.Temp:
25 CC
Input Vol:
7.28V
Voltage:
23.8V
Current:
1.70A
Capacity:
2
Image 34
CH1CH1
0mAh
LiPo(6S) BAL Charge
DELETE
NiCd Auto
BAL Charge
Curr: 1.5A
Delta:7mv/s
LiPo Auto
BAL Charge
Curr: 5.0A
TVC:4.20V/S
CH2CH2
3
CH2CH2
17
Image 35
4.05V
4.05V 4.05V 4.05V 4.05V 4.05V
80% 80% 80% 80% 80% 80%
Page 19

ERROR INFORMATION
Input voltage is higher than 30V, check the power supply, then restart the charger
Input voltage is lower than the value of LOW INPUT VOLTAGE CUT-OFF, check
the power supply, then restart the charger.
Reverse polarity, check the connection between the charger and the battery,
correct the connection, then restart the work.
Battery disconnect, check the connection between the charger and the battery, then
restart the work.
Total voltage of the battery is over the termination voltage control (TVC), check the
battery and the TVC setting, then restart.
Total voltage of the battery is lower than the termination voltage control (TVC),
check the battery and the TVC setting, then restart.
Cell count detected by the charge is different from the setting, check the battery cell
count and reset the cell count of the work.
Cell voltage of the battery pack is over the termination voltage control (TAC), check
the battery and the TVC setting, then restart.
Cell voltage of the battery pack is lower the termination voltage control (TVC),
check the battery and the TVC setting, then restart.
Full battery, no need to charge.
External temperature is higher than the setting value, cutoff. Capacity is over than
the setting value, cutoff.
Capacity is over than the setting value, cutoff.
Time is up to the setting value of Saftey Timer, cutoff.
<NOTE>
The charger will send out an alert and
pop-up window if the battery packs
setting is incorrect (Image 38).
18
Page 20

SUPPORT AND SERVICES
WARRANTY
Hobbyking provide a period of one year product warranty from the date of purchase. The warranty
only applies to material or operational defects, which are present at the time of purchase. During
that period we will repair or replace free of service, charge for products deemed defective due to
those causes. This warranty is not valid for any damage or subsequent damage arising as a result
of misuse, modification or as a result of failure to observe the use guideline in this manual.
LIABILITY EXCLUSION
This charger is designed and approved exclusively for charge the types of battery stated in this
manual. HobbyKing do not accept any liability if the charger is used for any purpose other than
that stated. We are unable to ensure you follow the instructions come with the charger, and we
have no control over the methods you employ for using, operating and maintaining this device. For
this reason we are obliged to deny the liability for loss, damage or costs which are incurred due to
the incompetent or incorrect use and operation of this product, or which are connected with such
operation in any way. Unless otherwise prescibed by law, our obligation to pay compensation,
regardless of the legal argument employed, is limited to the invoice value of those products which
were immediately and directly involved in the event in which the damage occurred
www.hobbyking.com
19
Page 21

 Loading...