

Page 1

TU.B6
Turnigy Accucel-6 50W 6A Balancer/Charger
Page 2

Contents
1. Specifications:
2. Features:
3. Charger’s exterior appearance
4. Warning and security tips
5. Program flow chart
6. How to set charge current
7. Lilo/LiPo/LiFe/LiHv battery program
8. NiMH/NiCd battery program
9. Pb battery program
10. Cell meter test program
11. IR test program
12. Memory program
13. User settings
14. Warning and error information
15. Warranty and service
Page 3

-1-
1.Specifications:
Input Voltage DC.10-18V
Charge Current 0.1-6A
Discharge Current 0.1-2A
Charge Power max.50W
Discharge Power max.5W
Balance Current max.200mA
Balance Tolerance ±0.01V
Charging Capabililty
LiXX:1-16cells
NiXX:1-6series
Pb Battery Voltage 2-20V
Discharge Battery 3.0-4.2V/cell
Weight
Dimensions
Page 4

2. Features:
-2-
Advanced Operate software
The charger can set current automatically when charging/discharging. Especially for the
Li-xx battery, it can avoid the explosion due to the wrong operation by user. All of them can
set according to the user’s choice. The charger provide balance port for Li-xx battery,
including 2, 3 ,4,5,6-cell five balance port.
High power and high performance circuit
The charger maximum output power is 50W, max. charging current is 6A, max. discharging
current is 2A. The high power cooling system ensures the CPU and operating system
normal work under the high power condition.
Li-xx Battery pack Voltage Balance
It has the balance function for the Li-xx battery, so, it don’t need extra balancer to balance
the voltage when charge li-xx battery.
Monitor and Balance the Li-xx battery
It can monitor the single cell when discharge. The discharging will stop and show the error
message when the battery voltage is abnormal.
Suit for various batteries
It can compatible with various batteries: Lilo, Lipo, Life, LiHv, Nicd, Nimh and Pb. Users
can charge/discharge different batteries by selecting the corresponding programs .
Fast charging and storage mode
The charging time can be effectively reduced when charging by setting the fast charging
mode; Storage mode can keep the rated voltage of the battery for a long time
Delta-peak sensitivity
(NiCd/NiMH) Delta-peak Sensitivity: It is the the program to turn-off charge current
automatically. The principle of operation is that the charge current will turn off and finish
charge when the battery voltage increased to the highest point and start to decreasing.
Capacity Limit: Charge capacity calculated according to charge current multiply charge
time. You can set a highest charging capacity value ,when charging capacity over the set
value, the program will forced to stop charging with an alarm.
Temperature Limit: The temperature of battery will increase when charging, if users set
the temperature limit value, then the charger will forced to stop charging with an alarm
when the temperature of battery reached to the set value(This function need to connect
Page 5

-3-
external temperature sensing line).
Charge time Limit: It can prevent over charge and discharge by setting a charge time.
Input current checking: In order to protect the battery it can check the voltage of the
battery during charging process. The charger will turn off charge current with an alarm
automatically when the voltage decreased to the lowest.
Cooling Automatically: The cooling system will work automatically when the internal
temperature is too high.
Cyclic charge/Discharge
The Nicd/NiMH battery continuously work 1-4 circle can make the battery updated and
balanced.
Page 6
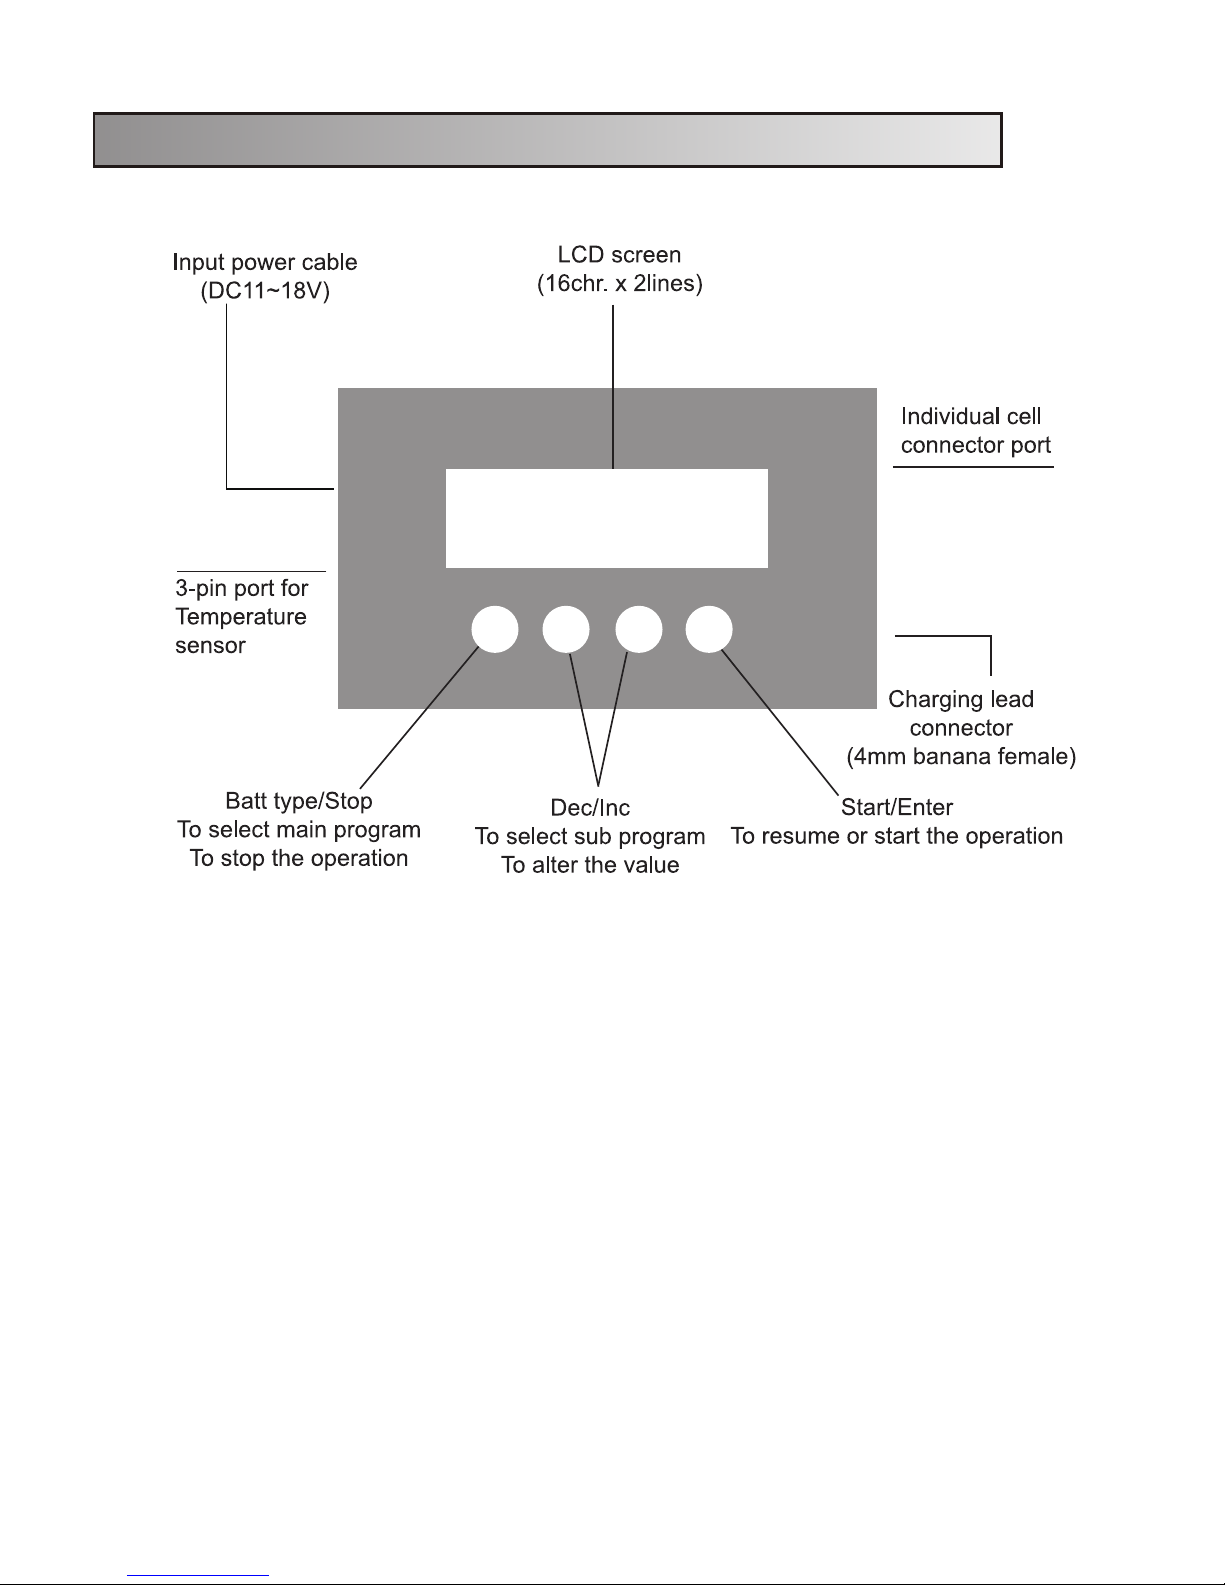
3. Exterior appearance:
-4-
Page 7

4. Warning and security tips
-5-
Never leave the charger unsupervised when charging, if any mal-function is observed
please terminate the process immediately and refer to the manual.
•Never put the charger into the place which dust/damp/vibrate.
•The input power is only for DC 10-18V.
•Please put it onto the surface which it is firm/Anti flammable. Never put it onto the carpet
or others similar objects. Make sure it is far away from the Anti flammable area.
•Never cover the fan, keep the cooling fan well ventilated .
•Make sure the correct setting data, if the program was setting wrong, it will damage the
battery. Especially for the Li-xx battery, it will explode due to the over charge/discharge.
•It should be connect the cable to the charger first then connect the battery. When
disconnecting, the opposite operation
•User must check the voltage and capacity of the Li-xx battery pack before using. The
battery can be Series connection or Parallel connection. When it is paralleled, the capacity
of the battery pack is the total capacity of each single battery and the voltage of battery
pack will not change. It is suggested to choose the Series connection for the li-xx battery
because it possible to lead the explosion if the voltage is un-balance when charging.
Page 8

-6-
NiCd/NiMH
Lilo
LiPo
Life
Pb
LiHv
Voltage grade: 1.2v/cell
llowed fast charge current: 1C~2C rely on the running of the battery.
Discharger voltage cut off grade: 0.85v/cell (Nicd battery)
1.0v/cell (Nimh battery)
Voltage grade: 3.6V/c
Max charge voltage: 4.1V/cell
Allowed fast charge current: 1C or less
Min discharge voltage cut off grade: 2.5V/cell or More
Voltage grade: 3.7V/cell
Max charge voltage: 4.2V/cell
Allowed fast charge current:1c or less
Discharger voltage cut off grade: 3.0v/cell or more
Voltage grade: 3.3V/cell
Max charge voltage: 3.6 V/cell
Allowed fast charge current: 4c or less (For example: A123M1)
Discharger voltage cut off grade: 2.0v/cell or more
Voltage grade: 3.8V/c
Max charge voltage: 4.35V/cel
Allowed fast charge current: 1c or less
Min discharge voltage cut off grade: 3.0V/cell or More
Voltage grade: 2.0V/cell (Lead-acid)
Max charge voltage: 2.46V/cell
Allowed fast charge current: 0.4C or less
Discharger voltage cut off grade: 1.50v/cell or more
Page 9

-7-
Discharge
•The discharge parameter should be set according to the rest of battery capacity or
decreased battery voltage. When discharging, it should be pay more attention to the
discharge process. It must set the correct discharge voltage, in order to avoid the over
discharging. Li-xx battery cannot lower than the lowest voltage, because it is easy to
damage the battery. Normally, it do not need to discharge for the Li-xx battery.
• Some batteries have memory function. If the capacity is partly used, they will remember it
and use that part of capacity only next time. This is called memory function. NiCd /NiMH
batteries also have memory function, but they prefer fully charged and then completely
used. NiMH battery's memory function is inferior when compared with NiCd battery.
• The Lithium battery prefers a partial rather than a full discharge. Frequent full discharge
should be avoided if possible. Instead, charge the battery more often or keep a normal
input power
•It should finish 3-5times circle charging and discharging for the new NiCd battery pack. In
this way, the capacity of this battery pack will be to the best status.
The above warnings and safety notes are particularly important. Please follow the
instructions for a maximum safety, otherwise the charger and battery can be badly
damaged. Also it can cause a fire, lead to human injury or property loss.
Page 10

5、Program flow chart
6、How to set charge current
-8-
Each battery has its permitted maximum charging current. Charging current over the
battery permitted maximum charging current will shorten the battery life and even damage
the battery. Too much charging current may also cause battery heating or even explosion.
The capacity of battery charging and discharging is generally identified by C value
Multiplied by battery capacity is the battery accepted maximum charging current. For
example, the battery of 1000mAh, the charging capacity is 5C, so the maximum charging
current is 1000*5=5000mA, that is, the battery maximum support 5A charging.
For lithium batteries, if don’t know its C value, please set the charging current value not
more than 1C.
Li XX DISCHARGE
BATT/PROGRAM
NiXX BATT
BATT/PROGRAM
Pb BATT
BATT/PROGRAM
LiXX BATT
LiX X CHARGE Li XX BALANCE
Li XX FAST CHG Li XX STORAGE
Start
Enter
Batt type
Stop
NiMH
Sensitivity
D. Peak
Default
Nicd Sensitivity
D. Peak
Default
Load Factory Set
Enter
NiXX CHARGE
Pb CHARGE
NiXX DISCHARGE
NiXX RE-REAK
NiXX CYCLE
NiXX Auto
Pb DISCHARGE
BATT/PROGRAM
BATT METER
BATT/PROGRAM
BATT RESISTANCE
BATT/PROGRAM
SYSTEM SETTING->
Safety Timer
ON 181min
Temp Cut-off
ON 80℃ 176℉
Temperature Unit
Fahrenheit
3.86 3.86 3.86 V
3.86 3.86 3.86 V
002 002 002 mΩ
002 002 002 mΩ
TOTAL:12mΩ
H: 2mΩ L: 2mΩ
BATT/PROGRAM
BATT MEMORY
[ BATT MEMORY ]
LiPo 7.4V(2S)
MAIN 23.16V
H3.86V L3.86V
Capacity Cut-Off
ON 10000mAh
Rest Time
CHG>DCHG
10min
Key Be ep
Buzzer
ON
ON
STATUS
-
+
STATUS
STATUS
STATUS
STATUS
STATUS
STATUS
STATUS
STATUS
Start
Enter
Batt type
Stop
STATUS
STATUS
STATUS
STATUS
STATUS
STATUS
STATUS
STATUS
Start
Enter
Batt type
Stop
STATUS
STATUS
Start
Enter
Batt type
Stop
STATUS
STATUS
Start
Enter
Batt type
Stop
STATUS
STATUS
Start
Enter
Batt type
Stop
STATUS
STATUS
STATUS
STATUS
STATUS
STATUS
STATUS
STATUS
STATUS
STATUS
STATUS
STATUS
STATUS
STATUS
STATUS
STATUS
Start
Enter
Batt type
Stop
STATUS
STATUS
STATUS
-
+
STATUS
-
+
STATUS
-
+
STATUS
-
+
STATUS
-
+
[ BATT MEMORY ]
ENTER SET->
Page 11

-9-
7. Lithium battery(Lilo/LiPo/LiFe/LiHV)program
When you are willing to alter the parameter value in the program, press Start/
Enter key to make it blink then change the value with INC or DEC key. The value will
be stored by pressing Start/Enter key once.
7.1 Charging Lithium Battery
The left side of the first line shows the type of battery
you select at the users setting. The value on the left
side of second line sets a charge current and the value
on the right side of second line sets the voltage of the
battery pack.
After setting the current and voltage press Start/Enter
key for more than 3 seconds to start the process.
(Charge current:0.1~6.0A,Voltage:1~6 series)
Use these programs only when charging a lithium battery ( Lilo/LiPo/LiHV/LiFe) with
a nominal voltage of 3.6V, 3.7V, 3.8V or 3.3V per cell, respectively. The charge current
going into the battery will vary depending on the chemistry type so it is VERY
IMPORTANT that you select the correct type for your battery. The ending voltage
of the charge is also important as it varies for all four types:4.1V for Lilo, 4.2V for LiPo,
4.35V for LiHV and 3.6V for LiFe. The charge current (how many Amps you are
putting into the pack) and nominal voltage(Proper voltage for the cell count of the
battery you are charging) must be correct for the battery to be charged. To change these
settings, press the START/ENTER key to make the selected value blink. Using the
increase and decrease buttons, set you desired amperage, then press START/ENTER
to save the setting. You will then be asked to select your nominal voltage/cell
count. Again, use the increase/decrease buttons to reach your desired setting and
press the START/ENTER button to confirm and save.
The relationship between the C value and the charging time: charging time≥
60min/charging c value(for example, it need 60-70 minutes to complete 1C charging ).Due
to battery differences in energy efficiency conversion, this time may be extended.
Page 12

-10-
Balance
This shows the number of cells you set up and the
processor detects. ' R: ' shows the number of cells
found by the charger and ' S:' is the number of
cells selected by you at the previous screen. If both
numbers are identical you can start charging by press
Start/Enter button. If not, press Batt Type/Stop button
to go back to previous screen. Then carefully check
the number of cells of the battery pack to charge again.
The screen shows the present situation during charge
process. To stop charging press Batt Type/Stop key
once.
7.2 Charging Lithium battery at balance mode
This is for balancing the voltages of Lithium batteries of the battery park to be
charged. The battery pack to be charged should be connected to the suitable balance
port at the right side of the charger. And also, you need to connect the battery output
plug to the output of charger.
In this mode, the charging process will be different from ordinary charging mode.
The internal processor of t
he charger will monitor the voltages of each cell of the
battery pack and controls charging current that is feeding to each cell to normalise
the voltage.
The value on the left side of second line sets a charge
current and the value on the right side of second line
sets the voltage of the battery pack.
After setting the current and voltage press Start/ Enter
key for more than 3 seconds to start the process.
(Charge current:0.1~6.0A, Volatge:1~6 series)
This shows the number of cells you set up and the
processor detects.' R: ' shows the number of cells found
by the charger and ' S:' is the number of cells selected
by you at the previous screen. If both numbers are
identical you can start charging by press Start /Enter
button. If not, press Batt type/Stop button to go back
to previous screen. Then carefully check the number of
cells of the battery pack to charge again.
The screen
shows the present situation during charge
process. To stop charging press Batt type/Stop key
once.
Page 13

-11-
7.3 'FAST' charging Lithium battery
The charging current is getting smaller as the process goes to the near end term
of Lithium battery chaging. To finish charging process earlier, this program eliminate
certain term of CV process. Actually, the charging current will goes to 1/5 from the
initial value to end the process while the normal chaging goes to 1/10 during CV term.
The charging capacity may be a bit smaller than normal charging but the process
time will be reduced.
You can set up the charging current and the voltage
of the battery pack being charged. As you press Start/
Enter button the voltage confirmation will be displayed.
And then, if you confirm the voltage and current, press
Start/ Enter button again to start charging.
This shows the present state of 'FAST' charging. To
stop charging arbitrary, press Batt type/Stop key
once.
7.4 'STORAGE' control Lithium battery
This is for charging or discharging Lithium battery not to be used for the time
being. The program will determine to charge or discharge the battery to the certain
voltage depending on the voltage of the battery at its initial stage. They are different
from the type of the battery, 3.70V for Lilo, 3.80V for LiPo ,3.85V for LiHv and 3.3V for
LiFe per cell.
If the voltage of battery at its initial stage is over the voltage level to
storage, the program will start to discharge.
You can set up the current and the voltage of the
battery pack to be charged. The current will be used for
charge or discharge the battery to reach the ' storage '
level of voltage.
The screen shows the present situation during charge
process. To stop charging press Batt type/Stop key
once.
Page 14

-12-
7.5 Discharging Lithium battery
The value of discharge current on the left side of
screen may not exceed 1C for a maximum safety
and the final voltage on the right should not be under
the voltage level that is recommended by the battery
manufacturer to avoid deep discharging.
To start to discharge, press Start/ Enter key for more
than 3 seconds.
This shows the present state of discharge. To stop
discharging press Batt type/Stop key once.
7.6 Voltage balancing and monitoring during the discharge
The processor monitors the voltage of individual cells during 'storage-mode' and
'discharge' of Lithium battery pack. It tries to normalise the voltages to be equal.
For this feature, the individual plug of the battry pack should be connected to the
individual port of the charger.
If the voltage of any one or more cells varies abnormally during the procedure, It
terminates the process forcibly with the error massage. If this happens, the battery
pack contains the bad cell, or the bad connection of the cable plug.
You can easily
know which one cell is bad by pressing INC button at time of showing the error
message.
The processor found that the voltage of one of the cell
in the Lithium battery pack is too low.
In this case, the 4th cell is bad. If there happens the
connection-break of th cable or plug, the voltage value
may show zero.
Page 15

-13-
8. NiMH/NiCd batter y program
These programs are for charging or discharging NiMH (Nickel-Metal-Hydride) or
NiCd (Nickel-Cadmium) battery commonly used for R/C model aplications. To alter
the value at the display, press Start/Enter key to make it blink then change the value
using INC or DEC key.The value will be stored by pressing Start/Enter key once.
To start the process, press Start/ Enter button for more than 3 seconds.
8.1 Charging NiCd/NiMH battery
This program simply charge the battery using the
current you set. In 'Aut' mode, you need to set the
upper limit of charge current to avoid from higher
feeding current that may damage the battery. Because
some batteries of low impedance and small capacity
can lead to the higher charge current by the processor
at automatic charge mode. But in 'Man' mode, it will
charge the battery with the charge current you set at
the display. Each mode can be switched by pressing
INC and DEC button simultaneously when the current
field is blinking.
The screen displays the current state of charging . To
stop the process, press Batt type/Stop key once.
The audible sound indicates you the end of process.
8.2 Discharging NiCd/NiMH battery
Set discharge current on the left and final voltage on
the right. The discharge current ranges from 0.1 to 1.0A
and the final voltage ranges from 0.1 to 25.0V). To
start the process, press Start /Enter key more than 3
seconds.
The screen displays the current state of discharge. You
can alter the discharge current
by pressing Start/Enter
key during the process. Once you change the current
value, store it by pressing Start/Enter button again.
To stop discharging press Batt type/Stop key once.
The audible sound indicated you at the end of process.
Page 16

-14-
8.3 Charge-to-discharge & discharge-to-charge cycle NiMH/NiCd battery
8.4 NiMH RE-PEAK
Set the sequence on the left and the number of cycle
on the right. You can use this function for balancing,
refreshing and break-in the battery. To avoid rising
temperture of the battery, there will a brief cool-off
period that already fixed at 'User setting' after each
charge and discharge process. The cycling number
ranges from 1 to 5.
To stop the process, press Batt type/Stop key once.
You can change the discharge or charge current by
pressing Start/Enter key once during the process. The
audible sound indicates you the end of process.
At the end of the process, you can see charged or
discharged electric capacities of the battery at each
cyclic process.
By pressing INC or DEC button, the screen shows the
result of each cycle in order.
NiMH RE-PEAK
1
NiMH 2.0A 7.42V
RPC 022:45 00890
The charger has the new program which can charge
the battery for second time. (The battery which do not
using for a long time or the old battery or the battery
which can not arrive the Max voltage after the first
charge). In this way, this mode can make the battery’s
capacity to the standard value and make the battery’s
life for longer time.
Long press Enter key into charging program, the
charging current is the defaulted previous NIMH
battery charging current, and press STOP key back.
(1-3)
Page 17

-15-
9. Pb( lead-sulphuric acid) battery program
This is programmed for charging Pb( lead-sulphuric acid) battery with nominal
voltage from 2 to 20V. Pb batteries are totally different from NiCd or NiMH batteries.
They can only deliver relatievely lower current compare to their capacity, and similar
restrictions definitely apply to charge. So the optimal charge current will be 1/10 of
the capacity. Pb batteries must not be charged rapidly. Always follow the instruction is
supplied by the manufacturer of battery.
When you are willing to alter the parameter value in the program, press Start/
Enter key to make it blink then change the value with INC or DEC key. The value will
be stored by pressing Start/Enter key once.
9.1 Charging Pb battery
Set up the charge current on the left and the nominal
voltage of the battery on the right. The charge current
ranges from 0.1 to 6.0A and the voltage should be
matched with the battery being charged.
Start the charge process by pressing Start/Enter key
for more than 3 seconds.
9.2 Discharging Pb battery
Set discharge current on the left and final voltage on
the right. The discharge current ranges from 0.1 to
1.0A.
To start the process, press Start/Enter key for more
than 3 seconds.
The screen displays the current state of discharge. You
can alter the discharge current by pressing Start/Enter
key during the process. Once you change the current
value, store it by pressing Start/Enter button again.
To stop discharging press Batt Type/Stop key once.
The audible sound indicates you at the end of process.
The screen displays the state of charging process. To
stop charging forcibly, press Batt type/Stop key once.
The audible sound indicates you at the end of process.
Page 18

10、Cell meter test
-16-
This charger also can be used as a cell meter. It can
show the average voltage and the highest/lowest
voltage of each cells.
Choose the cell meter program interface, press Start to
see the individual 1-6cell’s voltage.
Press Start to show the highest/lowest voltage of the
single cell and the voltage of each cell.
11、IR test program
It will know the performance of the battery from the IR
value. The value of the IR which tested by this charger
is the relative value (it is not the absolute value). If you
want to compare with several more batteries, it is better
test in the same voltage. If the test data is close, then
the performance of the battery is better.
Choose the IR test program, press Start to enter to
show 1-6battery’s IR.
Press Start to show the highest/lowest IR of the single
cell and the total IR of the battery pack.
BATT/PROGRAM
BATT METER
BATT/PROGRAM
BATT RESISTANCE
4.16 4.18 4.17 V
4.18 4.16 4.17 V
010 002 002 mΩ
003 004 003 mΩ
TOTAL: 24mΩ
H: 10mΩ L: 2mΩ
MAIN 25.01V
H4.178V L4.155V
Start
Enter
Batt type
Stop
STATUS
-
+
Start
Enter
Batt type
Stop
STATUS
-
+
Page 19

-17-
B6 Charger can save setting data of each programs, it can save 10 groups data for each
kind of battery, including the cells of the battery, setting charge current and so on. Users do
not need to set the data again when they use the batteries which have been memory. Easy
and convenient to use.
12、Memory Mode
Select memory mode, press start to continue setting.
Press status to select the numbers you need to store.
Press start enter into battery type select interface, short
press start, After the battery symbol flashes, select the
battery type through press status key.
After batter type confirmed, short press Status to set
the number of battery nodes.
Short press Status to set charging current /discharging
current.
Short press Status to set discharge cut-off voltage, the
maximum charging power.
Finally finished, short press Start to save settings.
BATT/PROGRAM
BATT MEMORY
BATT TYPE
LiPo
BATT VOLTS
7.4V( 2s)
CHARGE CURRENT
1.0A
DSCH CURRENT
1.0A
DSCH VOLTAGE
3.2V/CELL
TVC=YOUR RISK!
4.20V
SAVE PROGRAM
Enter
[
BATT MEMORY 1
]
ENTER SET-
>
Start
Enter
Batt type
Stop
STATUS
-
+
STATUS
-
+
STATUS
-
+
STATUS
-
+
STATUS
-
+
STATUS
-
+
STATUS
-
+
Page 20

-18-
13、User settings
In the open state, when the charger starts to work, the
safety timer automatically starts the timer at the same
time. If the system is wrong or the system can't check
the battery capacity is full, this setting can prevent the
battery from overcharging. Safe time should meet the
time required for battery charging saturation.
The program sets up the maximum charge capacity and
will be provided to the battery at the time of charging. If
the peak voltage is not being detected, or the safety
timer stops, the program will terminate the charging
process automatically if capacity value already selected.
There is a 3 row needle socket on charger left side for
temperature sensing, the pin in middle row is for
temperature sensing port, you can select this function
on the screen, then insert temperature sensor into this
socket, and put the temperature sensor fitted to the
surface of the battery to monitor the temperature of the
battery. When the monitoring temperature exceeds the
set value, the charger will stop charging / discharging to
prevent the battery from overheating damage or other
serious consequences.
Temperature unit choose F or C.
Battery cycle charging and discharging. After
charging/discharging, the battery get warmer. You can
set a time delay program after each charging and
discharging process to leave the charger enough time to
cool the battery before start the next program. Time
range can be 1~60 minutes. You can set the trickle
charging mode to turn on or off. When turn on, after the
fast charging is finished, the charger will automatically
turn down the charging current until fully charged, and
the battery will not overheat.
Temperature Unit
Fahrenheit
Rest Time
CHG>DCHG 5min
Safety Timer
ON 240min
Capacity Cut-Off
ON 10000mAh
Temp Cut-Off
ON 80℃ 176℉
Start
Enter
Batt type
Stop
STATUS
-
+
STATUS
-
+
STATUS
-
+
STATUS
-
+
Page 21

-19-
The automatic charging trigger voltage is an automatic
charging current closing program. The principle is that
when the battery voltage rises to the highest point and
starts to back down, it closes the charging current
automatically to complete the charge process. If the
trigger voltage is set too high, easy to cause
overcharging. If the trigger voltage setting too low, the
system may terminate the charge process too early.
(NiMH default value is 7 MV; NiCd default value is 12
MV)
You will heard a beep sound when changing charging
mode. Beep sound can be turn on or turn off.
Iput AC voltage is 10-18V, this program used to detect
of battery input voltage. If voltage lower than the set
value, program cut-off to protect input power.
Resume factory standard setting.
NiCd Sensitivity
D.Peak Default
Key Beep ON
Buzzer ON
Input Power Low
Cut-Off 10.0V
Load Factory Set
Enter
STATUS
-
+
STATUS
-
+
STATUS
-
+
Page 22

It will show the Error information with an alarm when use the wrong operation.
1.{" REVERSE POLARITY "}
Battery output Polarity connection wrong;
2.{" CONNECTION BREAK "}
Interruption between battery and output end, or the charger wire was not been connected
well when charging/discharging.
3.{" OUTPUT SHORT CIRCUIT "}
Short-circuit of the output terminal. Please check the charger wire
4.{" INPUT VOLTAGE ERROR "}
The voltage of the input terminal is lower or higher than the setting limit
5.{" BATTERY LOW VOLTAGE "}
The voltage is lower than which is set. Please check the number of cells in the battery
pack.
6.{" BATTERY HIGH VOLTAGE "}
The voltage is higher than which is set. Please check the number of cells in the battery
pack.
7.{" CELL LOW VOLTAGE "}
Voltage of one cell in the battery pack is too low, please check the voltage of each cell.
8.{" CELL HIGH VOLTAGE "}
Voltage of one cell in the battery pack is too high; please check the voltage of each cell
9.{" CELL CONNECT ERROR "}
Wrong connection of the connector detected; please check the connector and cable
10.{" CHARGER OVERHEATING "}
The internal temperature of the unit goes too high. Cool down the unit
14、Warning and Error information
Page 23

We warrant this product for a period of one year(12 months) from the date of purchase.
The guarantee applies only to such material or operational defects, which are present at
the time of purchasing the product. During that period, we will replace without service
charge any product deemed defective due to those causes. You will be required to present
proof of purchase (invoice or receipt). This warranty does not cover the damage due to
wear, overloading, improper handling or using of incorrect accessories.
15、Warranty and service
Page 24

 Loading...