

Page 1
Trilogy Laboratory Fluorometer
User’s Manual
Version 1.2
September 15, 2010
P/N 998-7210
Turner Designs
845 W. Maude Ave.
Sunnyvale, CA 94085
Phone: (408) 749-0994
FAX: (408) 749-0998
www.turnerdesigns.com
Page 2

This Page Intentionally Left Blank
Trilogy Fluorometer User’s Manual P/N 998-7210 Page 2 of 38
Page 3
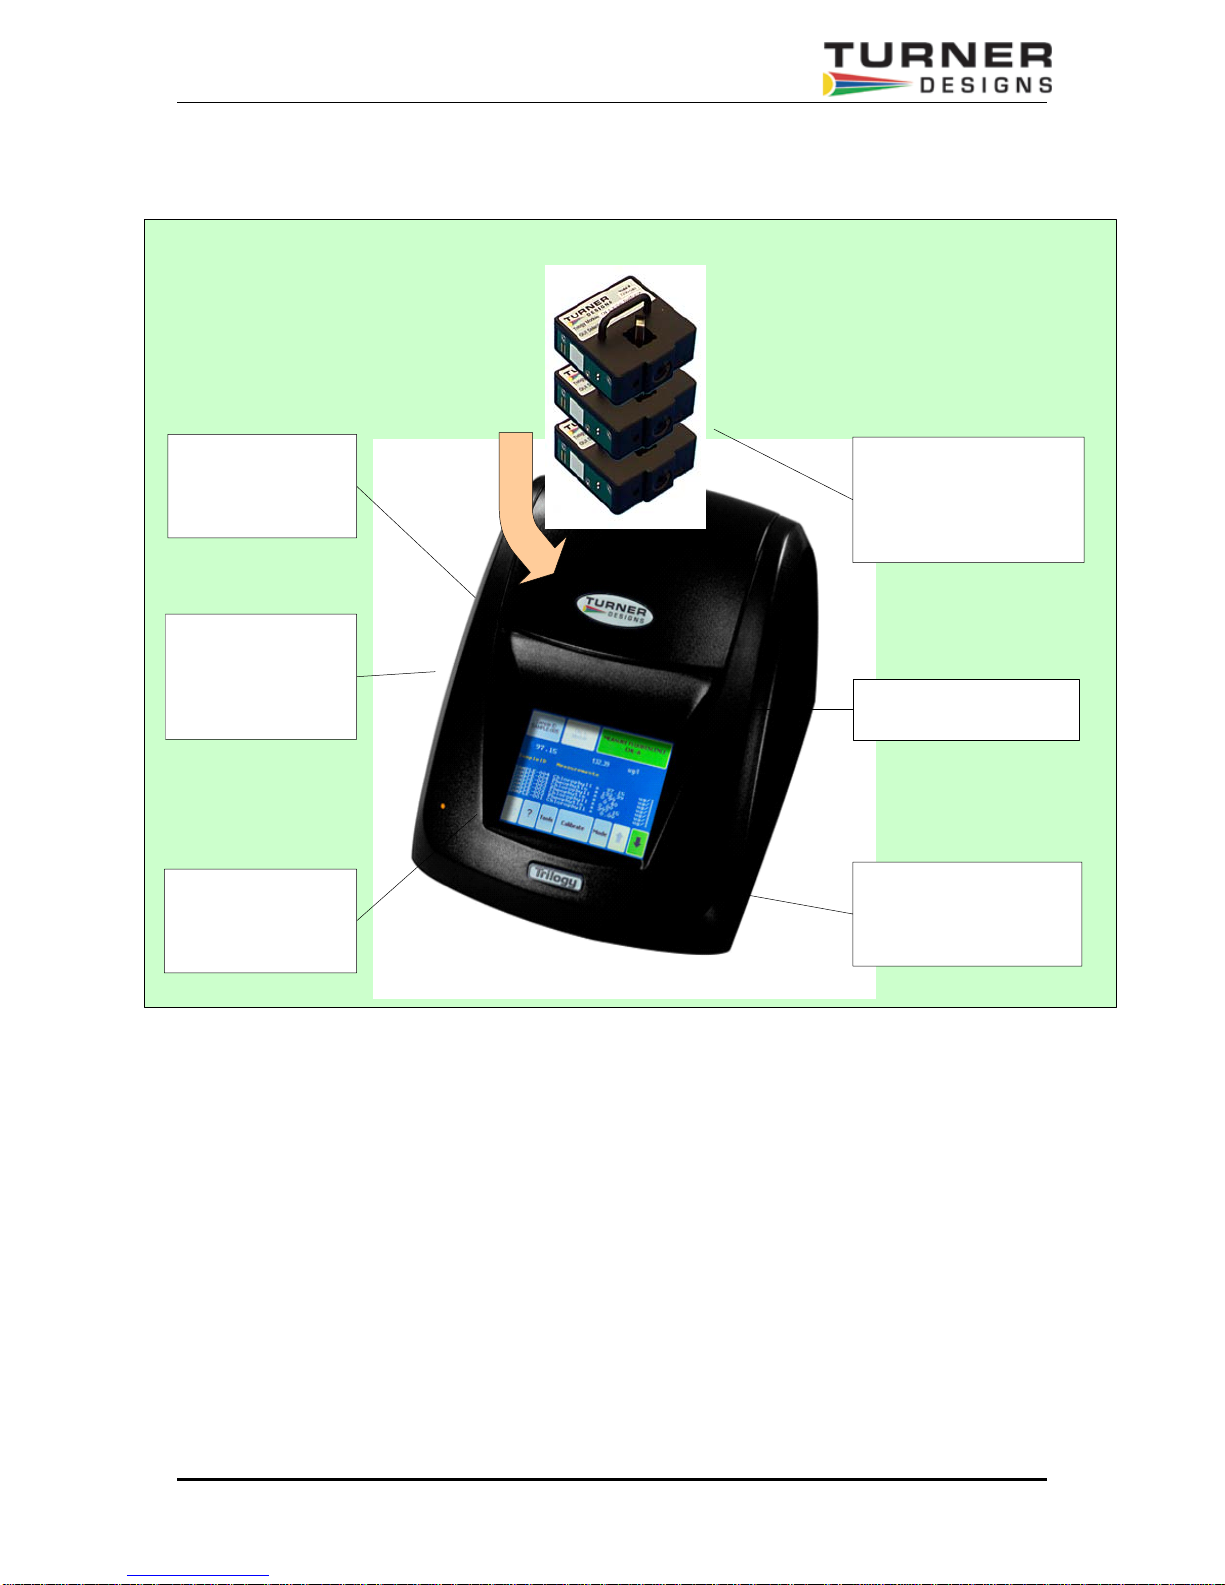
Highlights of the Trilogy Fluorometer
Multifunctional,
Compact and Modern
Design provides
flexibility and precision
Spreadsheet Interface
Software provides real
time display and
logging of data to Excel
Spreadsheet
Color Touch-Panel
Graphics User Interface
provides intuitive ease
of use
Sample Chamber accepts
snap-in Application Modules
for Fluorescence,
Absorbance and Turbidity
measurements
Trilogy saves time by storing
up to 18 named calibrations
Automatically calculates and
displays Extracted Chl a
concentrations using filtered
and solvent volumes
Trilogy Fluorometer User’s Manual P/N 998-7210 Page 3 of 38
Page 4

Table of Contents
CHAPTER DESCRIPTION PAGE
Highlights of the Trilogy Fluorometer 3
I. Getting Started 5
Description 5
Unpacking and Inspection 5
Setup 6
Getting to the Home Screen 6
Precautions 7
II. Fluorometer Operation 8
Touch screen Basics (Fluorescence) 8
Measuring Samples 9
III. Absorbance Operation 11
Touch Screen Basics (Absorbance) 11
Measuring Samples 12
IV. Turbidity Operation 14
Touch Screen Basics (Turbidity ) 15
Measuring Samples 15
V. Calibration Overview 16
V. Calibration Overview 17
A. Why Calibrate 17
B. When to Calibrate 17
C. Trilogy Calibration Options, (Fluorescence and Turbidity) 17
D. Trilogy Calibration Procedures 17
E. “Direct Calibration” Procedure – a) Fluorescence and Turbidity Modules, Single Point and Multi Point Cal 18
F. Extracted Chlorophyll Measurements with the Chl a – Acidification Fluorescent Module 20
G. Calibrating and Displaying Corrected Readings for the Chl a Acidification and Non-Acidification Modules 20
H. “Direct Calibration” Procedure – b) Extraction, Acidification, Single Point and Multi Point 20
J. “Direct Calibration” Procedure – c) Extraction, Non-Acidification, Single Point and Multi Point 23
K. Using the Secondary Standard 23
L. Using the Solid Secondary Standard for in vivo Chlorophyll Applications 23
M. Use of the Solid Secondary Standard for Dye Applications: 24
N. Trilogy Calibration Procedure, (Absorbance Module) 24
VI. Touch Screen Basics 26
Touch Screen 26
VII. Systems Connections 27
Serial Output Functional Check 27
VIII. Spreadsheet Interface Software Installation 28
Excel Spreadsheet Example 28
Appendix A - Troubleshooting 29
Fluorescence Troubleshooting 29
Absorbance Troubleshooting 29
Turbidity Troubleshooting 30
Spreadsheet Interface Software Troubleshooting 30
Appendix B - Warranty and Obtaining Service 32
Warranty 32
Out-of-Warranty Service 32
Appendix C – Specifications 33
Appendix D – Principles of Fluorescence 34
Principles of Fluorescence 34
Appendix E – Recommended Measurement Practices 35
Linear Range and Quenching 35
Temperature Considerations 35
Appendix F - Chlorophyll a Acidification and Non-Acidification calculations 36
Appendix G - In vivo fluorescence measurements using Trilogy 37
Trilogy Fluorometer User’s Manual P/N 998-7210 Page 4 of 38
Page 5

I. Getting Started
Description
The Trilogy Laboratory Fluorometer is a compact, multifunctional laboratory instrument that can
be used for making fluorescence, absorbance, and turbidity measurements using the appropriate
snap-in Optical Module. A color touch screen with simple menus makes for an intuitive user
interface.
Fluorescence Modules are available for discrete sample measurement of various fluorescent
materials including chlorophyll (in vivo and extracted), rhodamine, fluorescein, cyanobacteria
pigments, ammonium, CDOM, optical brighteners and other fluorescent compounds.
The Absorbance Module accepts interchangeable filter paddles so measuremen ts can be made
at different wavelengths in order to identify or place a sample in a particular class of compounds.
The standard filter paddle wavelengths/bandwidths are: 560/10; 600/10 and 750/10 nm.
The Turbidity Module uses an Infrared (IR) LED with a wavelength of 850 nm as required for
reference method: ISO 7027/DIN EN 27027, “Water Quality – Determination of Turbidity”. Using
Infrared allows Turbidity to be measured at wavelengths that are not normally absorbed by
organic matter thereby reducing susceptibility to interference by sample color.
When properly calibrated, the Trilogy Fluorometer will read out the actual concentration of the
solution. Optical Modules contain the necessary light source and filters for the relevant
application
Unpacking and Inspection
Upon receiving the Trilogy, please inspect it carefully and make certain all accessories are
present. Refer to the checklist shipped with the instrument for order-specific items.
A typical Trilogy shipment includes:
- Checklist
- Trilogy Laboratory Fluorometer
- CD – Trilogy, includes files for: User’s Manual (pdf); Quick Start Guide (pdf);
Spreadsheet Interface Software (pdf)
- Solid Secondary Standard, (not intended for use with UV or Turbidity optical modules)
- Power Supply Kit
- RS-232 Cable
- Quick Start Guide, (hardcopy)
- 10 x 10 mm Methacrylate Cuvettes, (quantity of 10)
- 12 x 35 mm Glass Round Vial, (quantity of 5)
- 12 mm Round Adaptor
- 50-Well Microtube Storage Box
- Optical Module(s) as ordered
Fluorescence Module
Absorbance Module
Turbidity Module
Trilogy Fluorometer User’s Manual P/N 998-7210 Page 5 of 38
Page 6
Setup
Place the Trilogy Fluorometer on a flat, level surface. Allow at least 6 inches (16 cm) of clearance
above the instrument to open and close the lid. Position the instrument so that the touch screen
faces you .
Power Supply
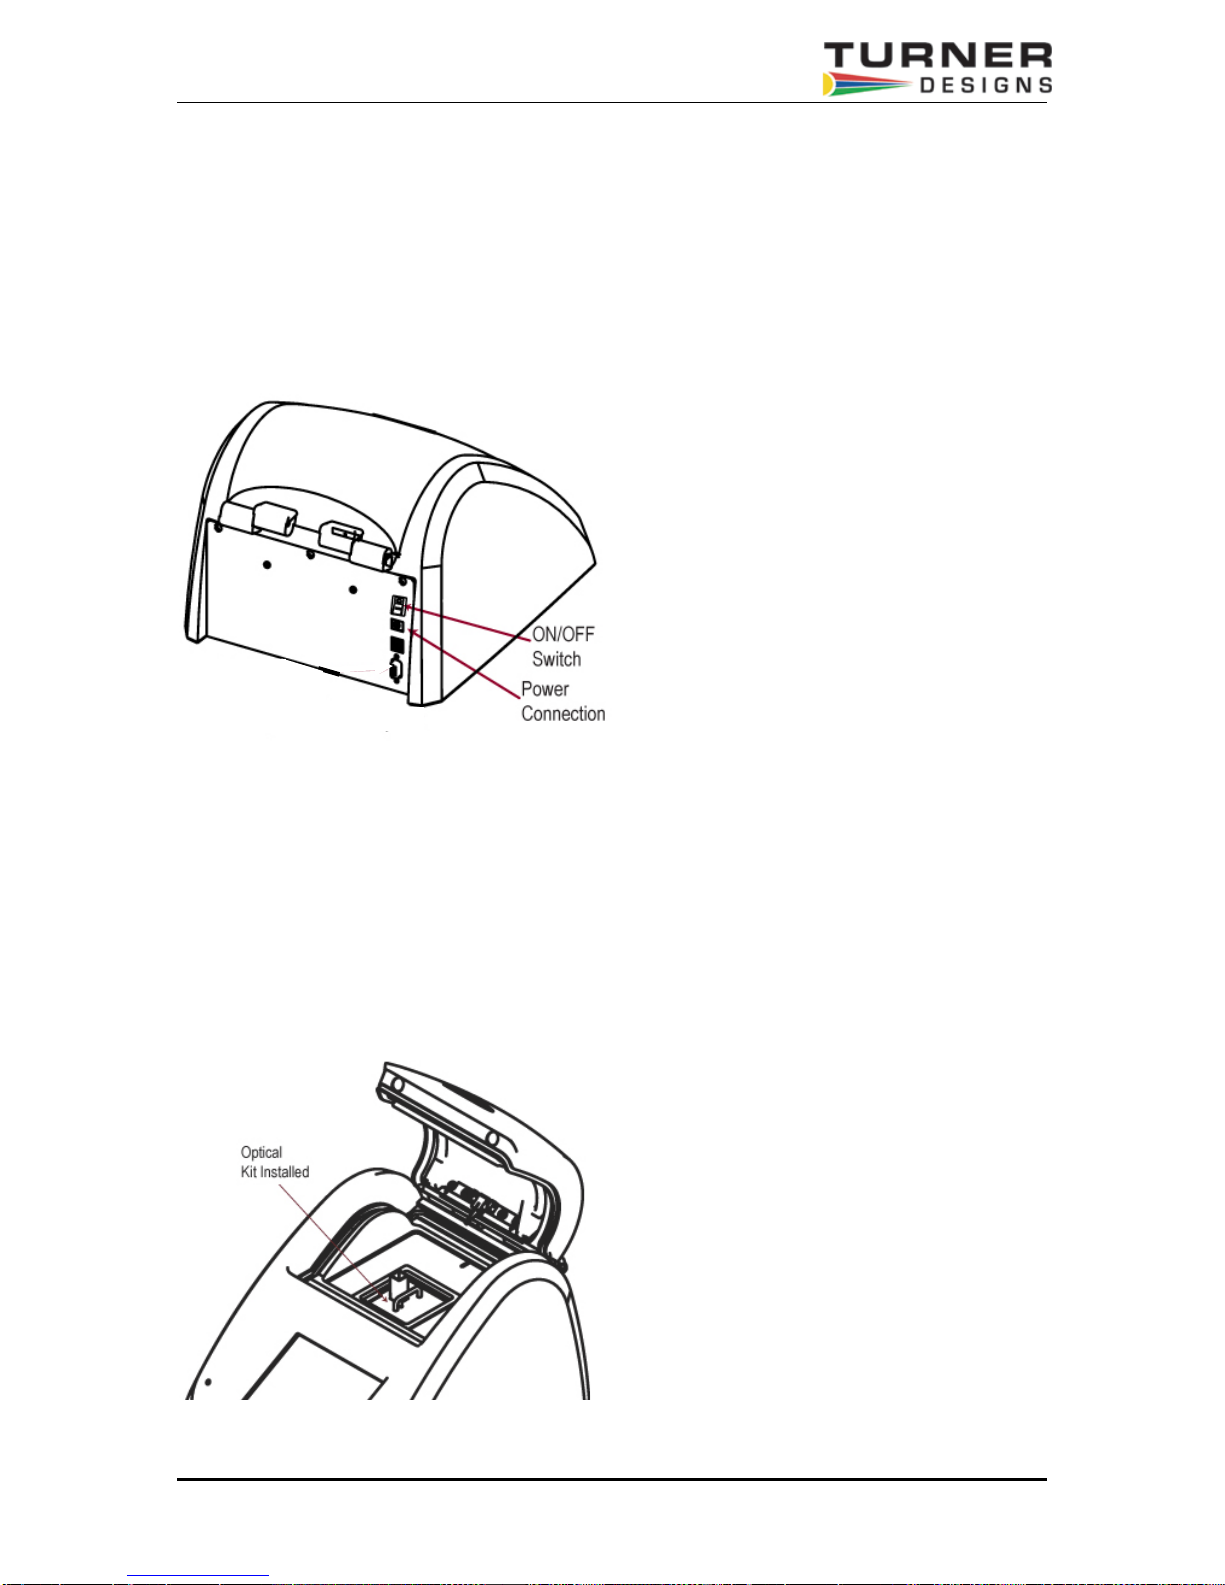
Connect the power supply into the power connection of the instrument, see Figure 1, and plug it
into a wall outlet. See Specifications for power requirements.
Figure 1.
Getting to the Home Screen
1. With the unit turned off, lift the lid and insert an optical module into position, (see Fig 2).
Then press down on the module until you hear it snap into place. Be sure to close the
fluorometer lid so that the Trilogy power on step will complete successfully.
2. Turn on the On/Off switch located on the back of the Trilogy, see Figure 1. Verify the display
becomes active, and shows the module selection screen, see Figure 3 – Module Selection.
Figure 2 showing Optical Kit
installed in preparation for getting to
the Home Screen.
Trilogy Fluorometer User’s Manual P/N 998-7210 Page 6 of 38
Page 7
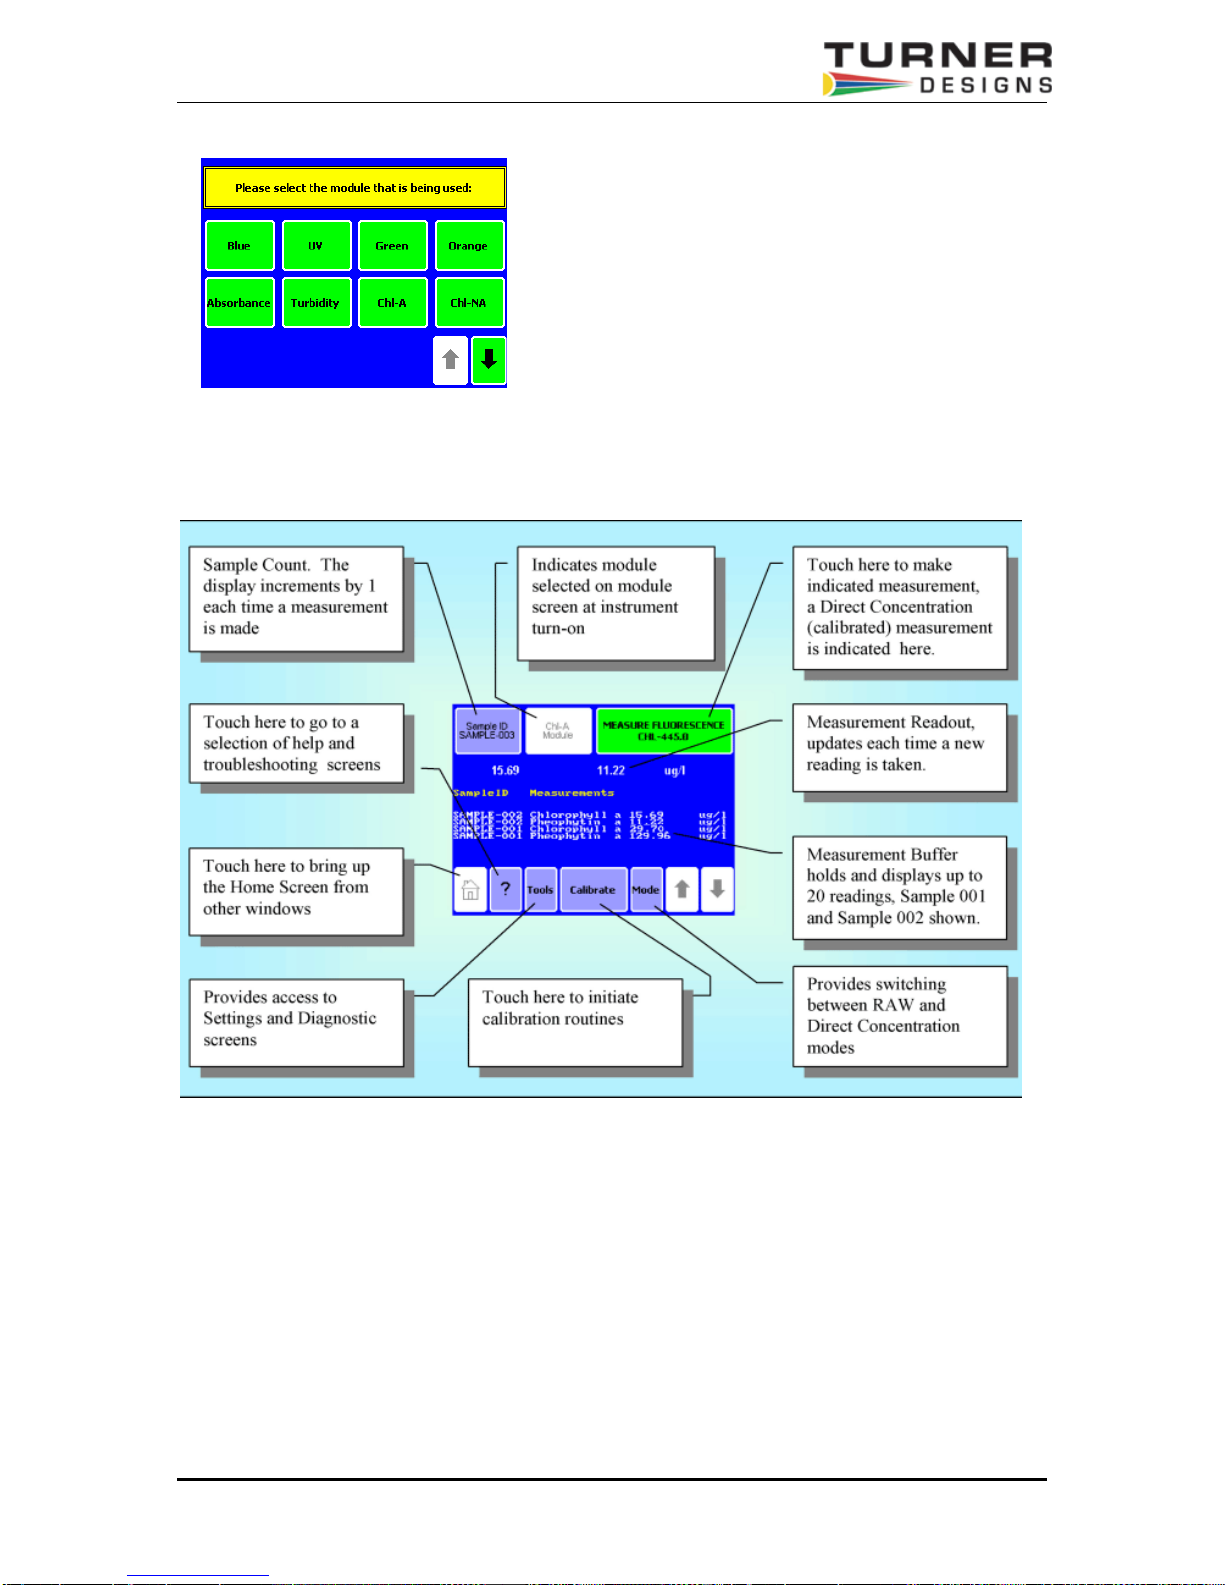
Figure 3 Module Selection Screen
3. Select the module inserted, and touch “OK” on the confirming screen.
4. When the Home Screen is displayed (Fig. 4), you are now ready to use Trilogy in its Raw
Mode (measurements are relative) or calibrate the Trilogy and the snapped-in Optical
Application Module to make quantitative measurements.
Figure 4: Trilogy Home Screen Display for Fluorescence Module Configuration.
Precautions
The Trilogy is intended for indoor use only. Wipe up spills immediately. The Trilogy contains
sensitive optical components and precision-aligned mechanical assemblies. Avoid rough
handling. Do not leave the lid open for extended periods of time. Turn OFF the Trilogy to change
or install Optical Application Modules.
Note: After 20 minutes without activity or user stimulation, the Touch Screen hibernates. Lightly
touch the screen to activate.
Trilogy Fluorometer User’s Manual P/N 998-7210 Page 7 of 38
Page 8
II. Fluorometer Operation
Fluorescence Optical Module
Installation
1. Power the Trilogy OFF
2. Grasp the handle of the Optical Application Module and align the kit with the sample
compartment.
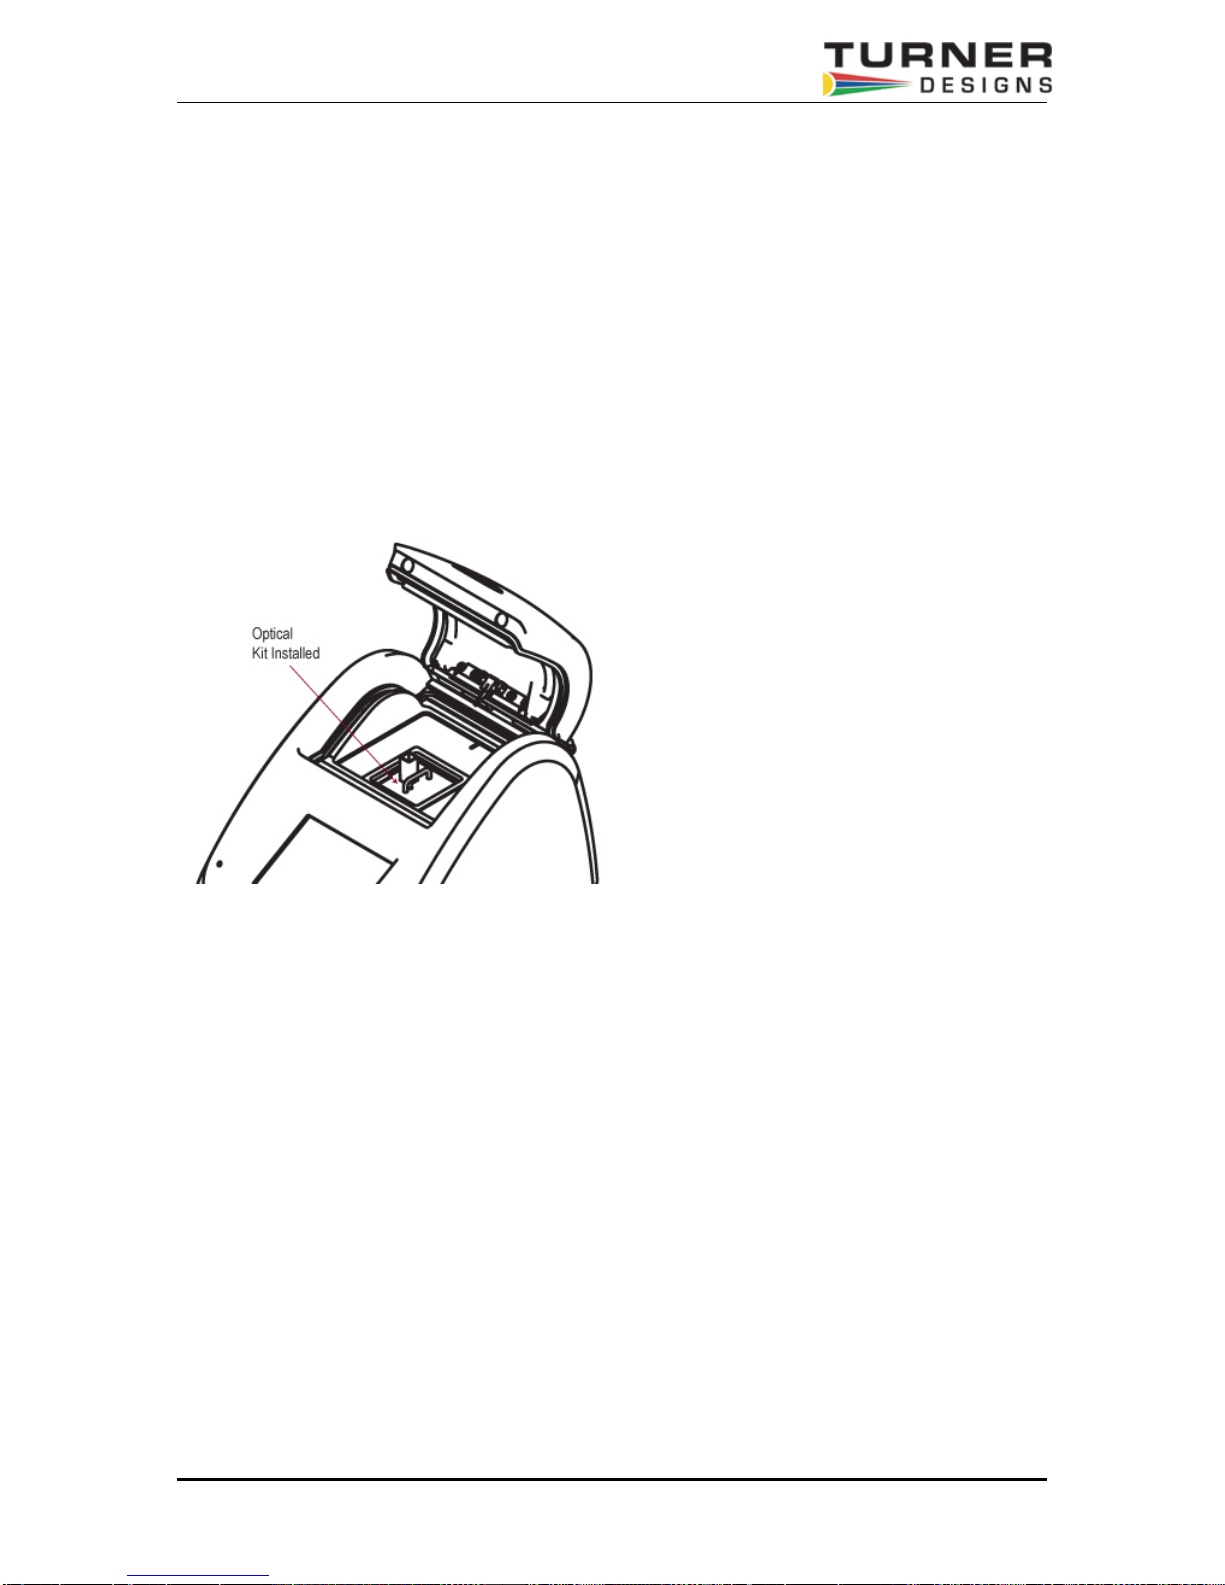
3. Press do wn firmly to lock the Optical Application Module in place. You should hear or
feel a click indicating the module has snapped into place. (See Figure 5.)
4. Close the lid and power ON the Trilogy. Use the touch screen to identify the type of
Optical Application Module installed.
Figure 5.
Removal
1. Power OFF the Trilogy before removing the Optical Application Module
2. Gra sp the ha ndle and gently pull up to release the kit from the sample compartment.
Touch screen Basics (Fluorescence)
Home Screen
The "Home" screen appears after confirmation of the Optical Application Module. The "Home"
screen provides orientation for the multiple functions of the Trilogy. From the "Home" screen,
select "Calibrate," "Tools," "Mode," or "Help." The "Home" screen is also the measurement
screen. (See over for Figure 6 showing Home Screen with callouts).
Trilogy Fluorometer User’s Manual P/N 998-7210 Page 8 of 38
Page 9
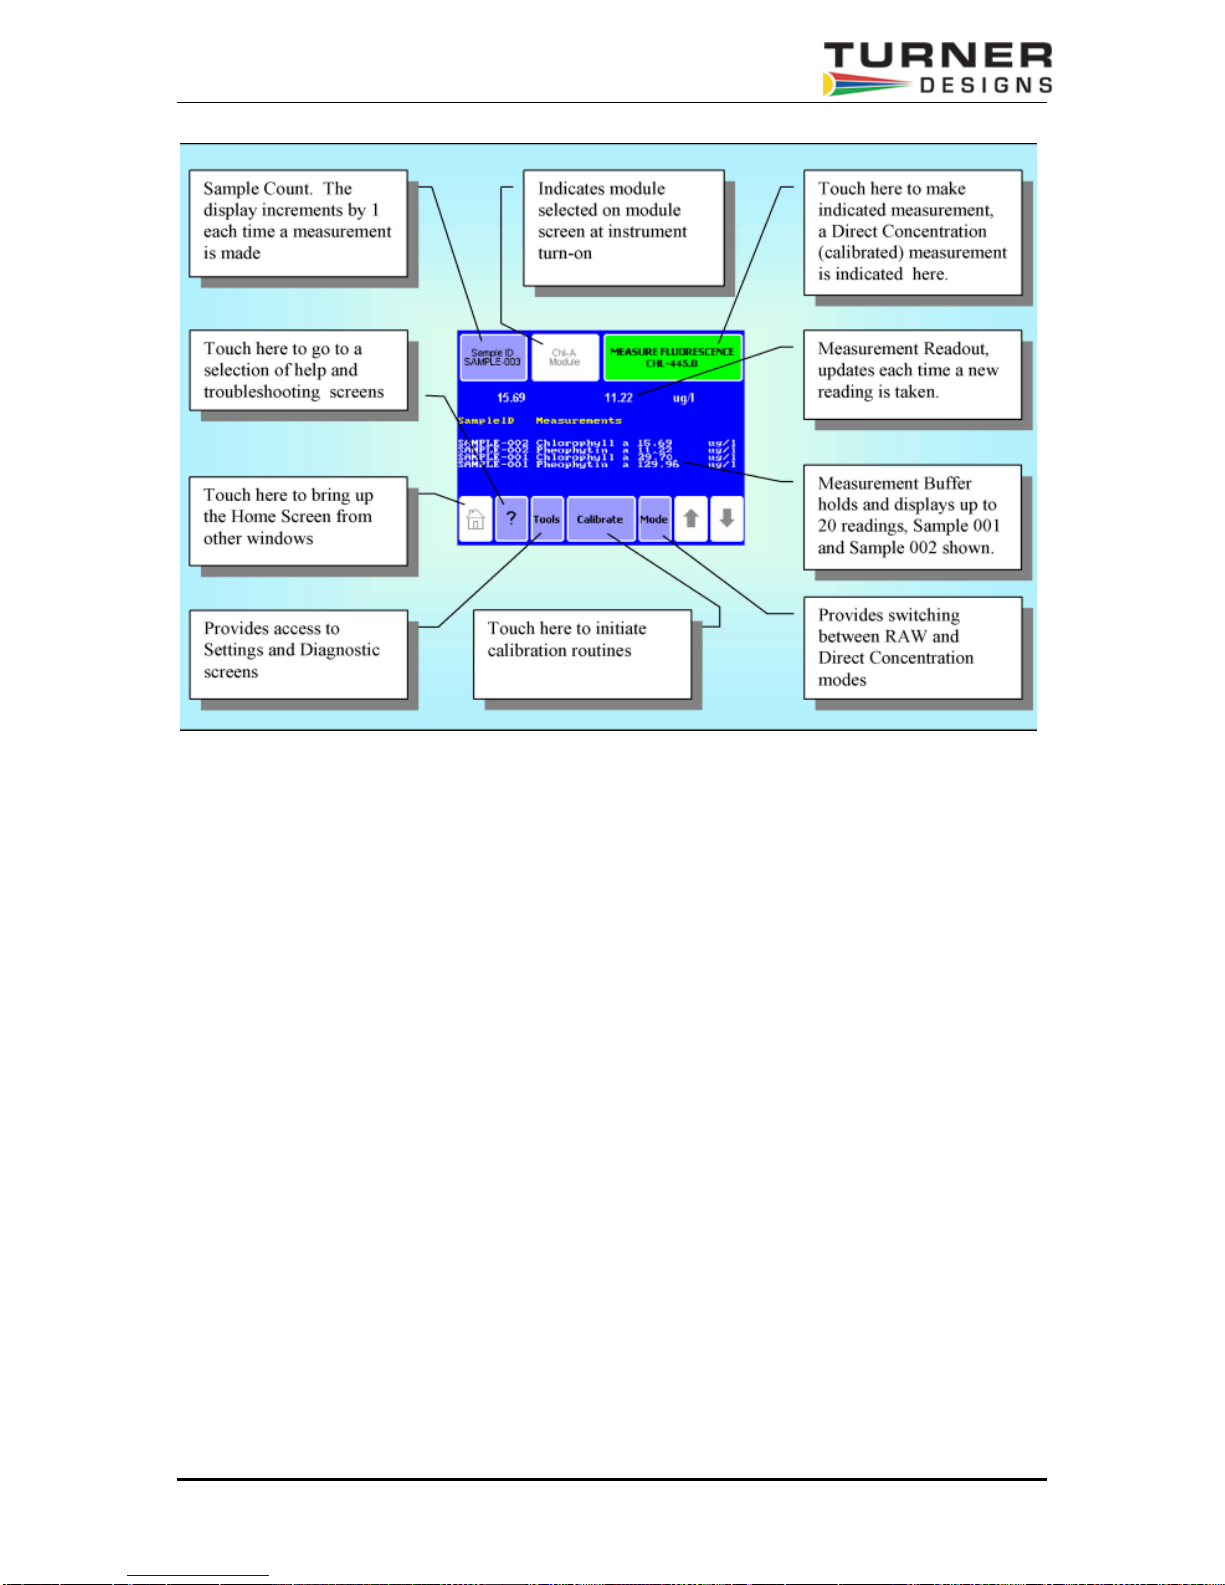
Figure 6 – Trilogy Home Screen for Fluorescence Module Configuration.
Calibration
Refer to Section V.
Measuring Samples
There are two measurement modes available on the Trilogy when using the Fluorescence
Module:
Touch “Mode” on the Home Screen to select the measurement mode.
1. Raw Fluorescence Mode: The Raw Fluorescence Mode should be used for qualitative
measurement, relative changes in fluorescence rather than absolute concentration values.
Readings are displayed in Relative Fluorescence Units (RFU).
2. Direct Concentration Mode: The Direct Concentration mode makes absolute measurements
based on a calibration; see Section V for the Calibration Procedure.
The Trilogy accommodates 10 x 10 mm methacrylate and polystyrene cuvettes (minimum 2 mL
volume). Use 12 x 35 mm or 12 x 75 mm glass test tubes for measuring solvent applications,
such as extracted chlorophyll, and use methacrylate cuvettes for UV water applications.
Raw Fluorescence Mode – No calibration required
Direct Concentration Mode – Calibration required (see Section V)
1. Open the lid of the Trilogy and insert the cuvette. Close the lid.
Trilogy Fluorometer User’s Manual P/N 998-7210 Page 9 of 38
Page 10

2. Touch "Samp le ID" to name your sample (optional).
3. Using the keypad, enter the sample name into the name field and touch "Save" to
save the sample ID.
Touch "Measure Fluorescence" to make a measurement. The Trilogy will measure
4.
the sample for 6 seconds and report the average reading for the sample
The Trilogy reports data on the "Home" screen and displays the results for the most recent 20
measurements. Use the arrow keys to scroll through the most recent measurements. The data
automatically exports to a printer or PC when properly connected, (see Section VII). Please note
the Trilogy does not store more than 20 measurements at one time. If more than 20 readings are
taken, the oldest reading will be overwritten. Measurements are not stored between power
cycles.
Tools (Fluorescence)
Touch the “Tools” key to access "Settings."
Tools - Settings
View Cal Details
Touch "View Cal Details" to see information on the current calibration for Direct Concentratio n
Mode. "View Cal Details" specifically provides information on the raw fluorescence for each
standard and the blank as well as the unit of measure and the Optical Application Module.
Continuous Sampling
The Continuous Sampling feature enables repeat measurements at user-defined intervals.
.
1. Touch "Continuous Sampling" and turn the feature ON. Highlight the frequency of
measurement and the number of total measurements. The maximum number of total
measurements is 9999.
2. Touch "OK" to return to the "Home" screen.
3. Connect the Trilogy to a printer or a PC to collect the data. Touching the screen
repeatedly causes an early-abort of Continuous Sampling measure m ents.
Measurement Tip:
On the Home Screen, touch Settings then touch the
Lid Start key to turn the feature ON. When the Lid
Start feature is ON, measurement begins as soon as
the lid closes. The lid start feature allows for immediate
measurement and eliminates the need to touch the
"Measure" key. Also, the touch screen does not
hibernate when Lid Start is ON.
Return to the Lid Start key under the Settings menu
to turn the feature OFF.
Trilogy Fluorometer User’s Manual P/N 998-7210 Page 10 of 38
Page 11
III. Absorbance Operation
Absorbance Module
Installation
1. Power OFF the Trilogy.
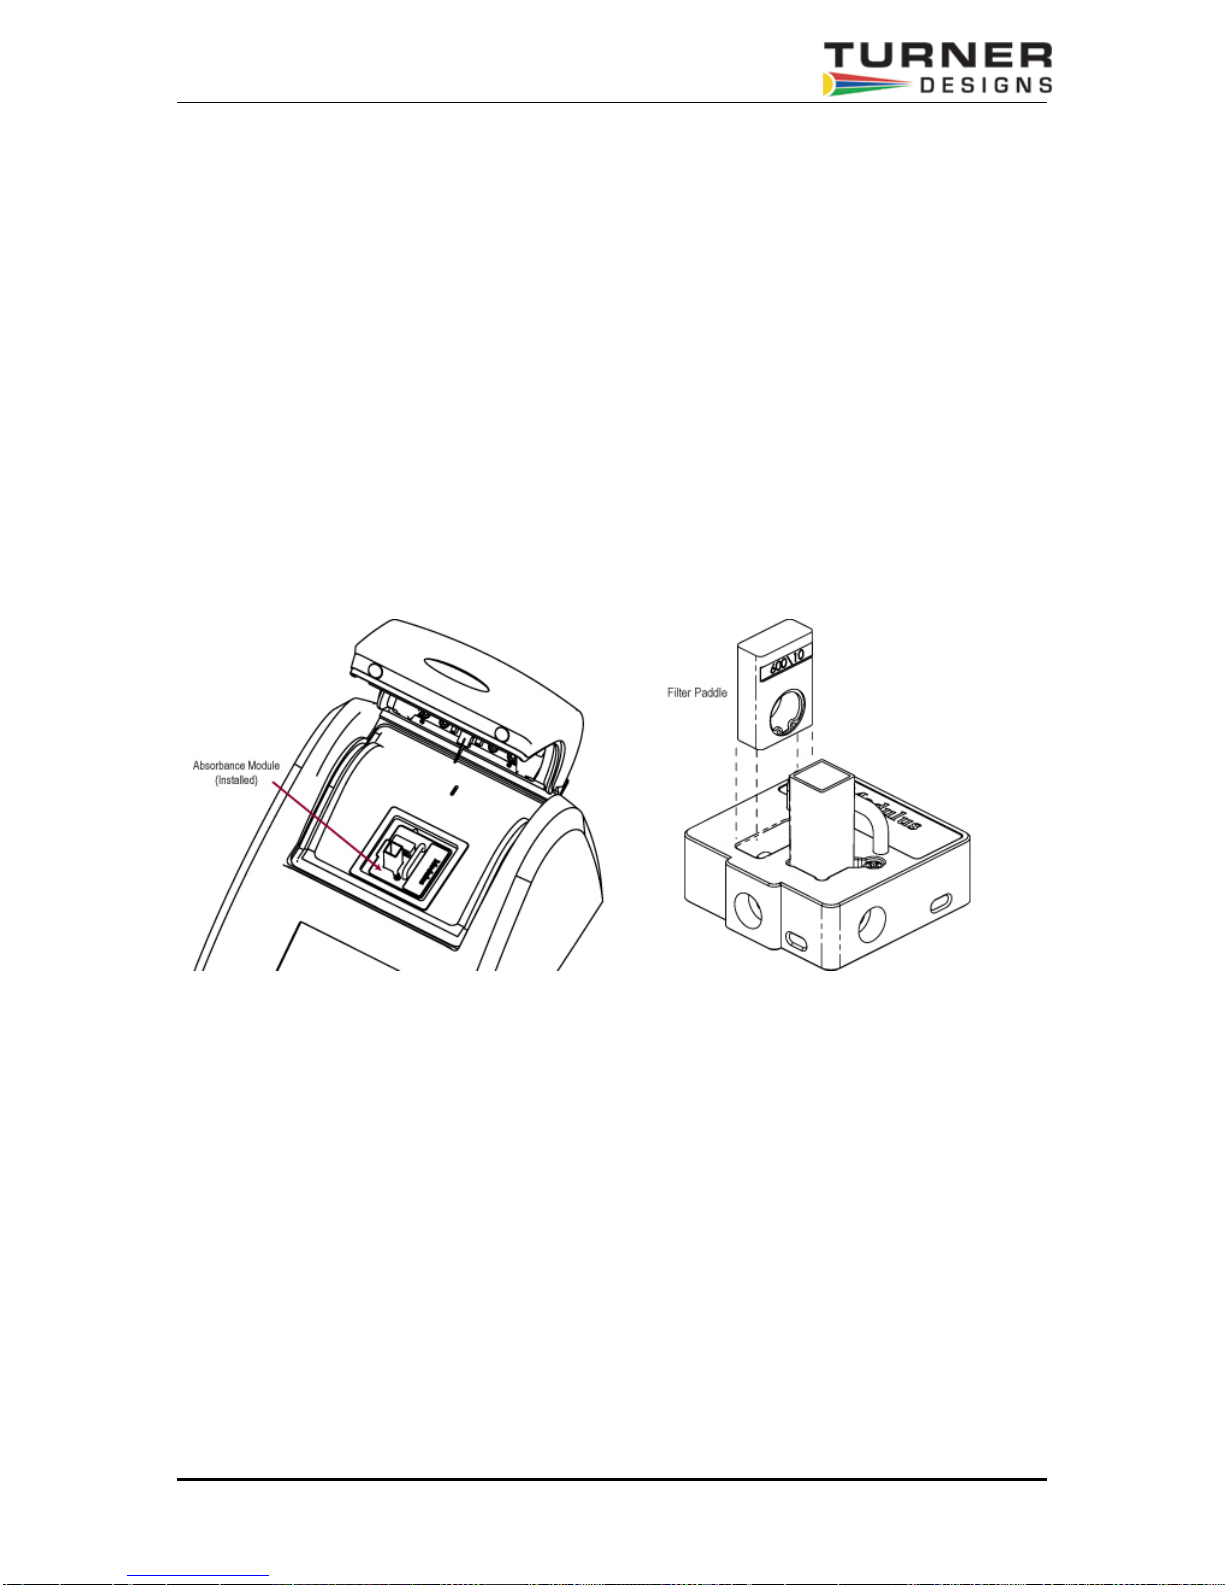
2. Align the Absorbance Module with the sample compartment.
3. Press down to lock the Absorbance Module in place. You should hear or feel a click
indicating the module has snapped into place.
4. Close the lid and power ON the Trilogy. Select "Absorbance" from the list of options
on the touch screen.
5. Install the filter paddle that corresponds to the wavelength of absorbance for the
assay. (See Figure 7.)
Figure 7.
Removal
1. Power OFF the Trilogy before removing the Absorbance Module.
2. Grasp the handle and gently pull up to release it from the sample compartment.
3. Close the lid to protect the light detector from exposure to ambient light. Alternatively,
install an Optical Application Module.
Touch Screen Basics (Absorbance)
Home Screen
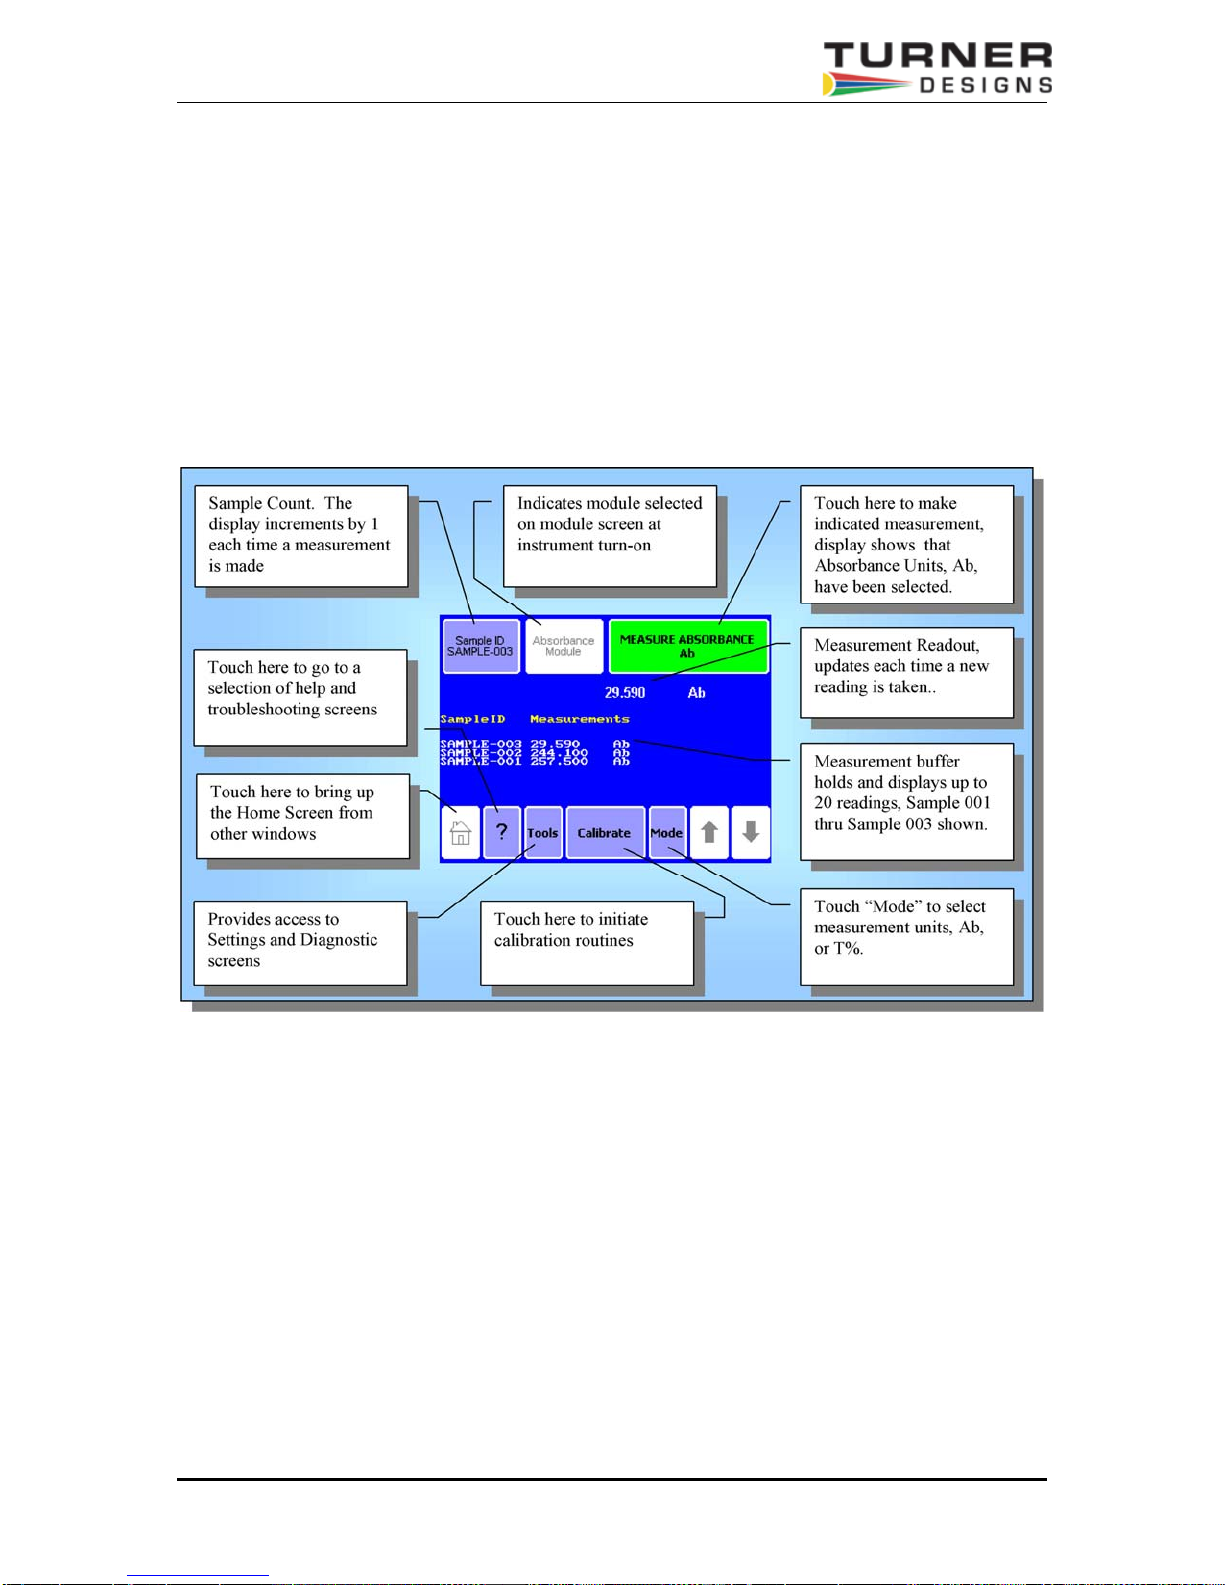
The "Home" screen appears after confirming the photometer operation by installing the
Absorbance Module. From the "Home" screen, select "Calibrate," "Tools," "Mode" or "Help." The
"Home" screen is also the measurement screen. (see Figure 8 on next page)
Trilogy Fluorometer User’s Manual P/N 998-7210 Page 11 of 38
Page 12
Mode
Touch "Mode" to select the unit of measure for absorbance. The available options include
Absorbance units (Ab) and Transmittance (%T).
The following formulas describe the method of the Trilogy Absorbance Module for measuring %
transmittance and absorbance:
%T = [(s-z) / (b-z)] * 100
Ab = 2 - Log
* (%T)
10
Where,
z = zero
b = baseline
s = signal
Figure 8: Home Screen When Using Absorbance Module
Calibration
See Section V.
Measuring Samples
The Absorbance Module accommodates 10 x 10 mm methacrylate and polystyrene cuvettes as
well as glass cuvettes (minimum 2 mL volume).
1. Open the lid and insert the cuvette. Close the lid.
2. Touch "Sample ID" to name your sample (optional). Using the keypad, enter the
sample name into the name field and touch "Save" to save the sample ID.
3. Touch "Measure Absorbance" to make a measurement. The Trilogy will measure the
sample for 6 seconds and report the average reading for the sam ple.
Trilogy Fluorometer User’s Manual P/N 998-7210 Page 12 of 38
Page 13

The Trilogy reports data on the "Home" screen and displays the results for the most recent 20
measurements. Use the arrow keys to scroll through the most recent measurements. The data
exports to a printer or PC if properly connected, (see Section VII).
Please note the Trilogy does not store more than 20 measurements at one time. If more than 20
readings are taken, the oldest reading will be overwritten. Measurements are not stored betwe en
power cycles.
Tools - Settings
Touch the "Tools" key to access "Settings."
View Cal Details
Touch "View Cal Details" to see information on the current calibration for the baseline and the
zero.
Continuous Sampling
The Continuous Sampling feature enables repeat measurements at user-defined intervals.
1. Touch "Continuous Sampling" and turn the feature ON.
2. Highlight the frequency of measurement and the number of total measurements. The maximum
number of total measurements is 9999.
3. Touch "OK" to return to the "Home" screen.
4. Connect the Trilogy to a printer or a PC to collect the data obtained during Continuous
Sampling. Touching the screen repeatedly causes an early-abort of Continuous Sampling
measurements.
Measurement Tip:
On the Home Screen, touch Settings then touch
the Lid Start key to turn the feature ON. When
the Lid Start feature is ON, measurement begins
as soon as the lid closes. The lid start feature
allows for immediate measurement and eliminates
the need to touch the "Measure" key. Also, the
touch screen does not hibernate when Lid Start is
ON.
Return to the Lid Start key under the Settings
menu to turn the feature OFF.
Trilogy Fluorometer User’s Manual P/N 998-7210 Page 13 of 38
Page 14
IV. Turbidity Operation
Turbidity Optical Module
Installation
1. Power the Trilogy OFF
2. Grasp the handle of the Optical Application Module and align the kit with the sample
compartment.
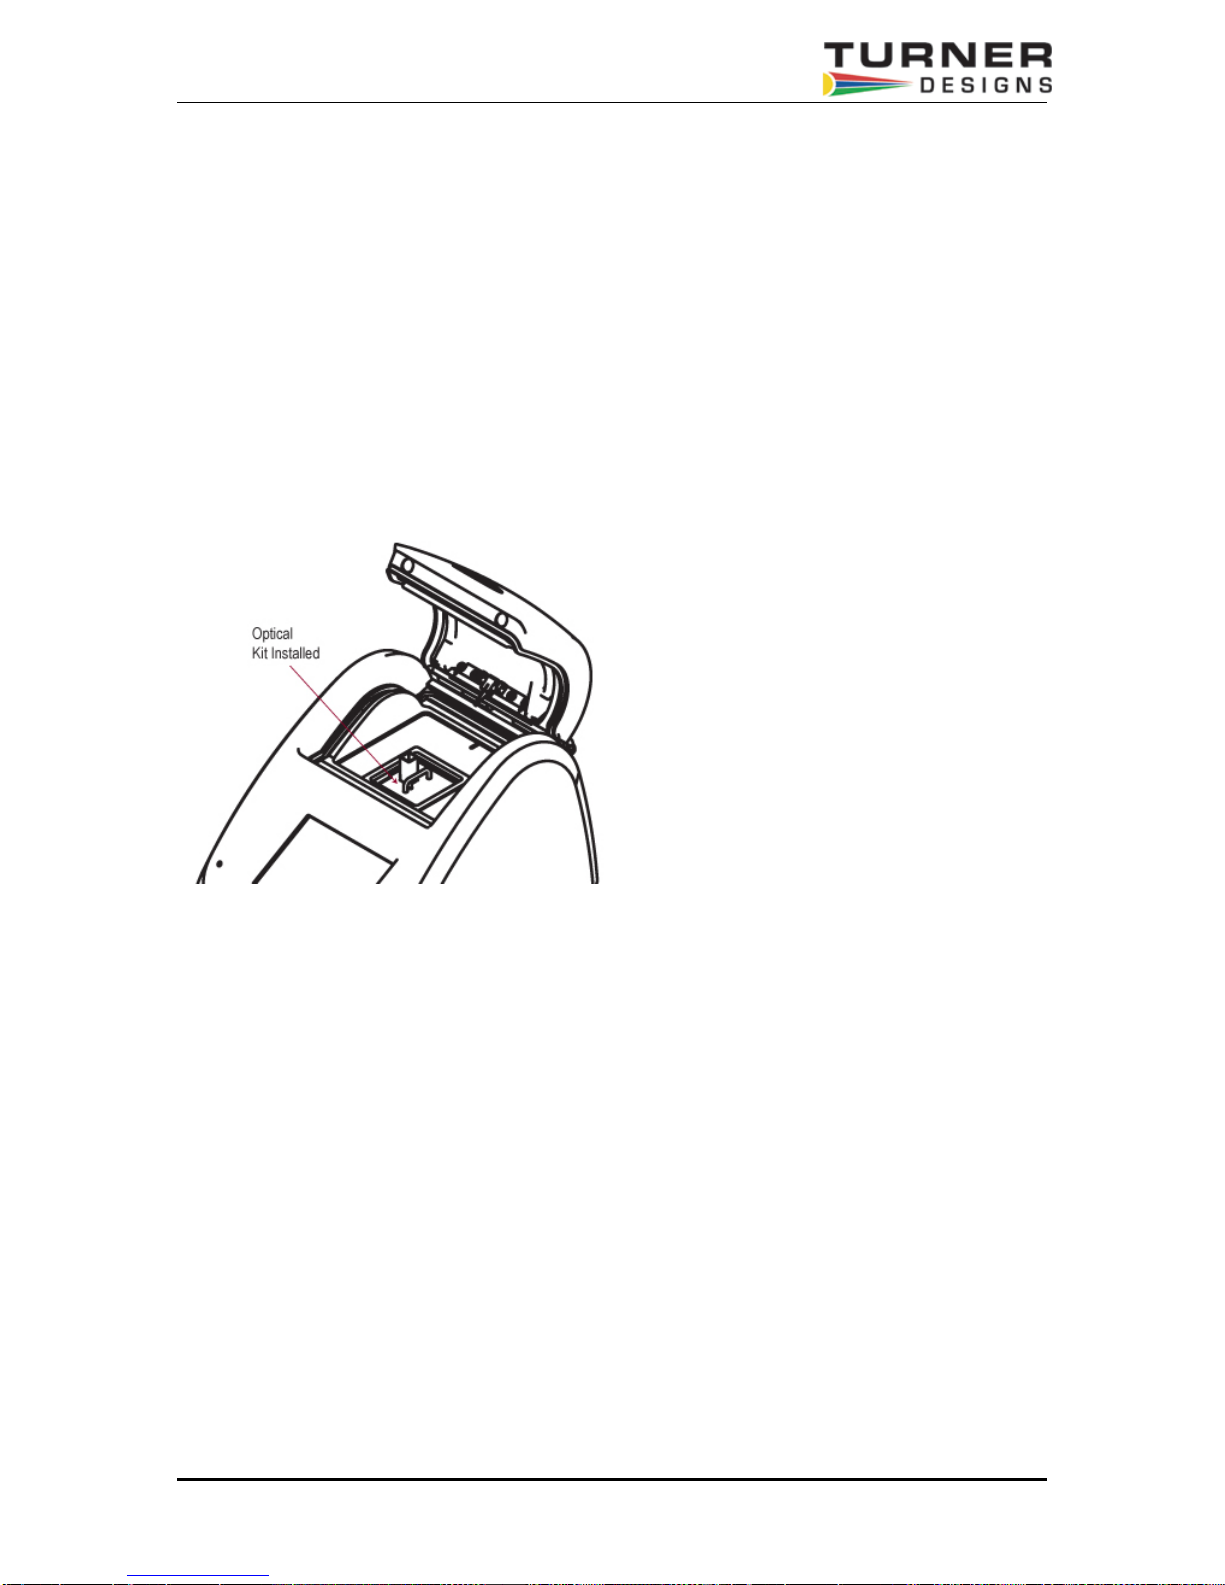
3. Press down firmly to lock the Optical Application Module in place. You will hear or
feel a click indicating the module has snapped into place. (See Figure 9.)
4. Close the lid and power ON the Trilogy. Use the touch screen to identify the type of
Optical Application Module installed.
Figure 9.
Removal
1. Power OFF the Trilogy before removing the Optical Application Module
2. Gra sp the ha ndle and gently pull up to release the kit from the sample compartment.
Touch Screen Basics
See next page
Trilogy Fluorometer User’s Manual P/N 998-7210 Page 14 of 38
Page 15
Touch Screen Basics (Turbidity )
Home Screen
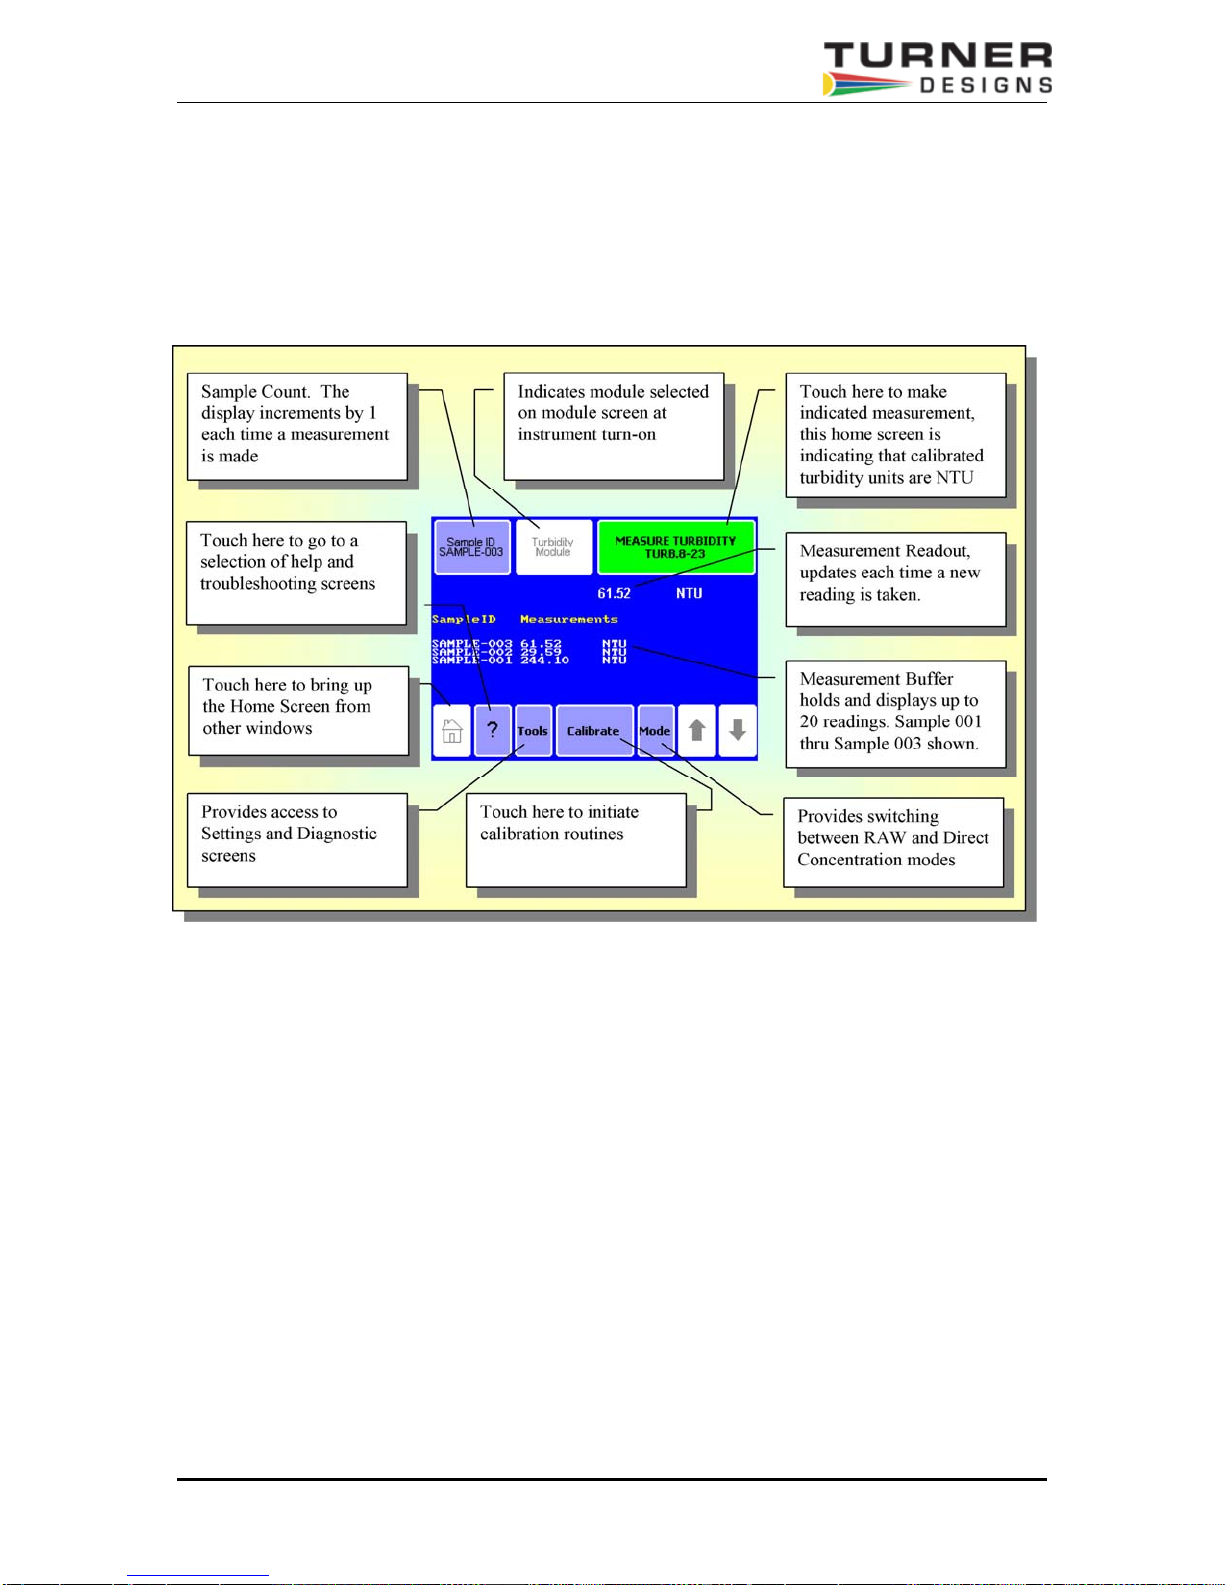
The "Home" screen appears after confirmation of the Optical Application Module. The "Home"
screen provides orientation for the multiple functions of the Trilogy. From the "Home" screen,
select "Calibrate," "Tools," "Mode," or "Help." The "Home" screen is also the measurement
screen.
Figure 10: Home Screen When Using Turbidity Module
Calibration
Refer to Section V.
Measuring Samples
There are two measurement modes available on the Trilogy when using the Turbidity Module:
Touch “Mode” on the Home Screen to select the measurement mode.
1. Raw Mode: The Raw Mode should be used for qualitative measurement, relative changes in
fluorescence rather than absolute concentration values. Readings are displayed in Relative
Fluorescence Units (RFU).
Trilogy Fluorometer User’s Manual P/N 998-7210 Page 15 of 38
Raw Mode – No calibration required
Direct Concentration Mode – Calibration required – See Section V
Page 16
2. Direct Concentration Mode: The Direct Concentration mode makes absolute measurements
based on a calibration. Readings are displayed in Nephelometric Turbidity Units (NTU). (see
Section V for the Calibration Procedure)
Use polystyrene cuvettes for measuring turbidity.
1. Open the lid of the Trilogy and insert the cuvette. Close the lid.
2. Touch "Samp le ID" to name your sample (optional).
Using the keypad, enter the sample name into the name field and touch "Save" to
3.
save the sample ID.
Touch "Measure Turbidity" to make a measurement. The Trilogy will measure the
4.
sample for 6 seconds and report the average reading for the sam ple
The Trilogy reports data on the "Home" screen and displays the results for the most recent 20
measurements. Use the arrow keys to scroll through the most recent measurements. The data
automatically exports to a printer or PC when properly connected, (see Section VII). Please note
the Trilogy does not store more than 20 measurements at one time. If more than 20 readings are
taken, the oldest reading will be overwritten. Measurements are not stored between power
cycles.
Tools (Turbidity)
Touch the “Tools” key to access "Settings."
Tools - Settings
View Cal Details
Touch "View Cal Details" to see information on the current calibration for Direct Concentratio n
Mode. "View Cal Details" specifically provides information on the raw fluorescence for each
standard and the blank as well as the unit of measure and the Optical Application Module.
.
Continuous Sampling
The Continuous Sampling feature enables repeat measurements at user-defined intervals.
1. Touch "Continuous Sampling" and turn the feature ON. Highlight the frequency of
measurement and the number of total measurements. The maximum number of total
measurements is 9999.
2. Touch "OK" to return to the "Home" screen.
3. Connect the Trilogy to a printer or a PC to collect the data. Touching the screen
repeatedly causes an early-abort of Continuous Sampling measure m ents.
Measurement Tip:
On the Home Screen, touch Settings then touch
the Lid Start key to turn the feature ON. When the
Lid Start feature is ON, measurement begins as
soon as the lid closes. The lid start feature allows
for immediate measurement and eliminates the
need to touch the "Measure" key. Also, the touch
screen does not hibernate when Lid Start is ON.
Return to the Lid Start key under the Settings
menu to turn the feature OFF.
Trilogy Fluorometer User’s Manual P/N 998-7210 Page 16 of 38
Page 17

V. Calibration Overview
A. Why Calibrate
When calibrated, the Trilogy converts the fluorescence signal to concentration units based o n the
standard(s) used for the calibration. This saves you from having to perform any calculations.
B. When to Calibrate
- For greatest accuracy, calibrate or check the calibration using a secondary solid
standard before running a new batch of samples.
- Recalibrate if the ambient temperature changes by +/- 10°C.
- Recalibrate after changing Optical Application Modules or if you make measurements
on a new analyte.
- Verify the need to calibrate by reading a stable, known concentration standard
immediately after calibration and again every few hours to see if readings have
changed significantly. Recalibrate when the accuracy becomes u nacceptable for your
study.
C. Trilogy Calibration Options, (Fluorescence and Turbidity)
There are two measurement modes available on the Trilogy when using either the Fluorescence
or Turbidity Modules, (see section K for Absorbance Module Calibration Procedure):
1. Raw Fluorescence Mode: The Raw Fluorescence Mode should be used for qualitative
measurement, relative changes in fluorescence rather than absolute concentration values.
Readings are displayed in Relative Fluorescence Units (RFU).
2. Direct Concentration Calibration: Direct Concentrations can be calibrated by using single or
multi-point calibrations. In multi-point calibrations, up to five standards and a blank can be read
generating a calibration curve for increased accuracy. The software uses these points to
calculate direct concentrations. The Trilogy will display the actual concentration of your samples
in units that were chosen during calibration.
Raw Fluorescence Mode – No calibration required
Direct Concentration Mode – Calibration required
D. Trilogy Calibration Procedures
1. Raw Fluorescence Mode: A calibration is not necessary to measure fluorescence with the
Trilogy. Simply use the Raw Fluorescence Mode to obtain the fluorescence value of a sample
in Relative Fluorescence Units (RFU). Use a standard curve to determine the concentration
of the analyte in the samples. The Trilogy does not manipulate data while operating in the
Raw Fluorescence Mode. It is not necessary to zero the Trilogy for use in the Raw
Fluorescence Mode; however a blank sample should be run to determine background
fluorescence. A solid secondary standard may be used to verify instrument stability and
function (see section J).
2. Direct Calibration Mode: The Direct Concentration Mode requires a calibration with one
blank solution and at least one standard solution. The following procedure applies to all the
fluorescence modules with the exception of the Chl Acidification and Non-Acidification
modules. (There are separate procedures for these two exceptions). The procedure requires
the use of at least one calibration standard, (Fluorescein, Rhodamine WT, etc.). Up to 5
standard solutions can be used for a Multi Point Calibration. Calibrations can be given a
name and stored for future use.
Trilogy Fluorometer User’s Manual P/N 998-7210 Page 17 of 38
Page 18
E. “Direct Calibration” Procedure – a) Fluorescence and Turbidity
Modules, Single Point and Multi Point Cal
The following procedure applies to Trilogy and the Fluorescence or Turbidity Modules. See page
20 for procedures to calibrate the Chl Acidification and Non-Acidification Modules.
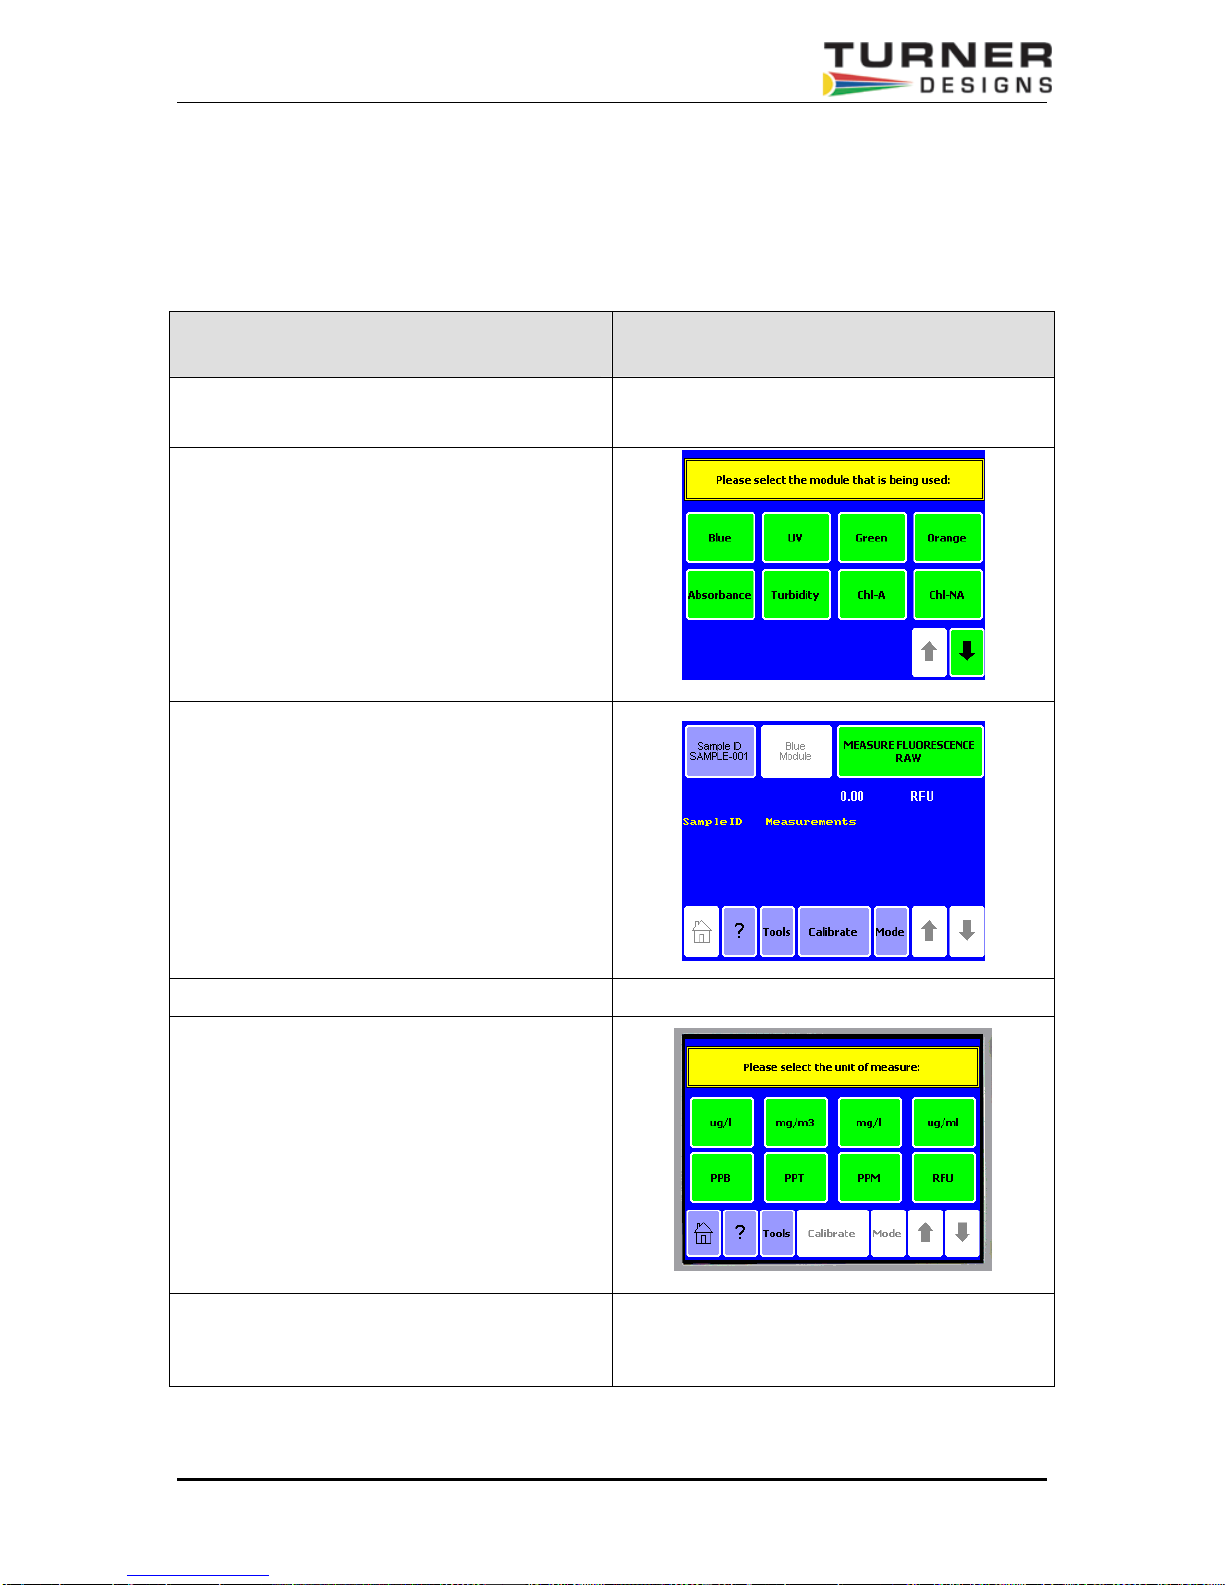
Instructions
a) Turn on the Trilogy
b) Select the module/application to be
calibrated and confirm by touching “OK”.
Note: Refer to the module label to confirm
which module is in use.
c) On the home screen, touch "Calibrate" to
begin a calibration sequence
d) Select “Run New Calibration”
e) Select the unit of measurement
f) Insert the calibration “blank” and touch
“OK”
Sample Screen
Trilogy Fluorometer User’s Manual P/N 998-7210 Page 18 of 38
Page 19
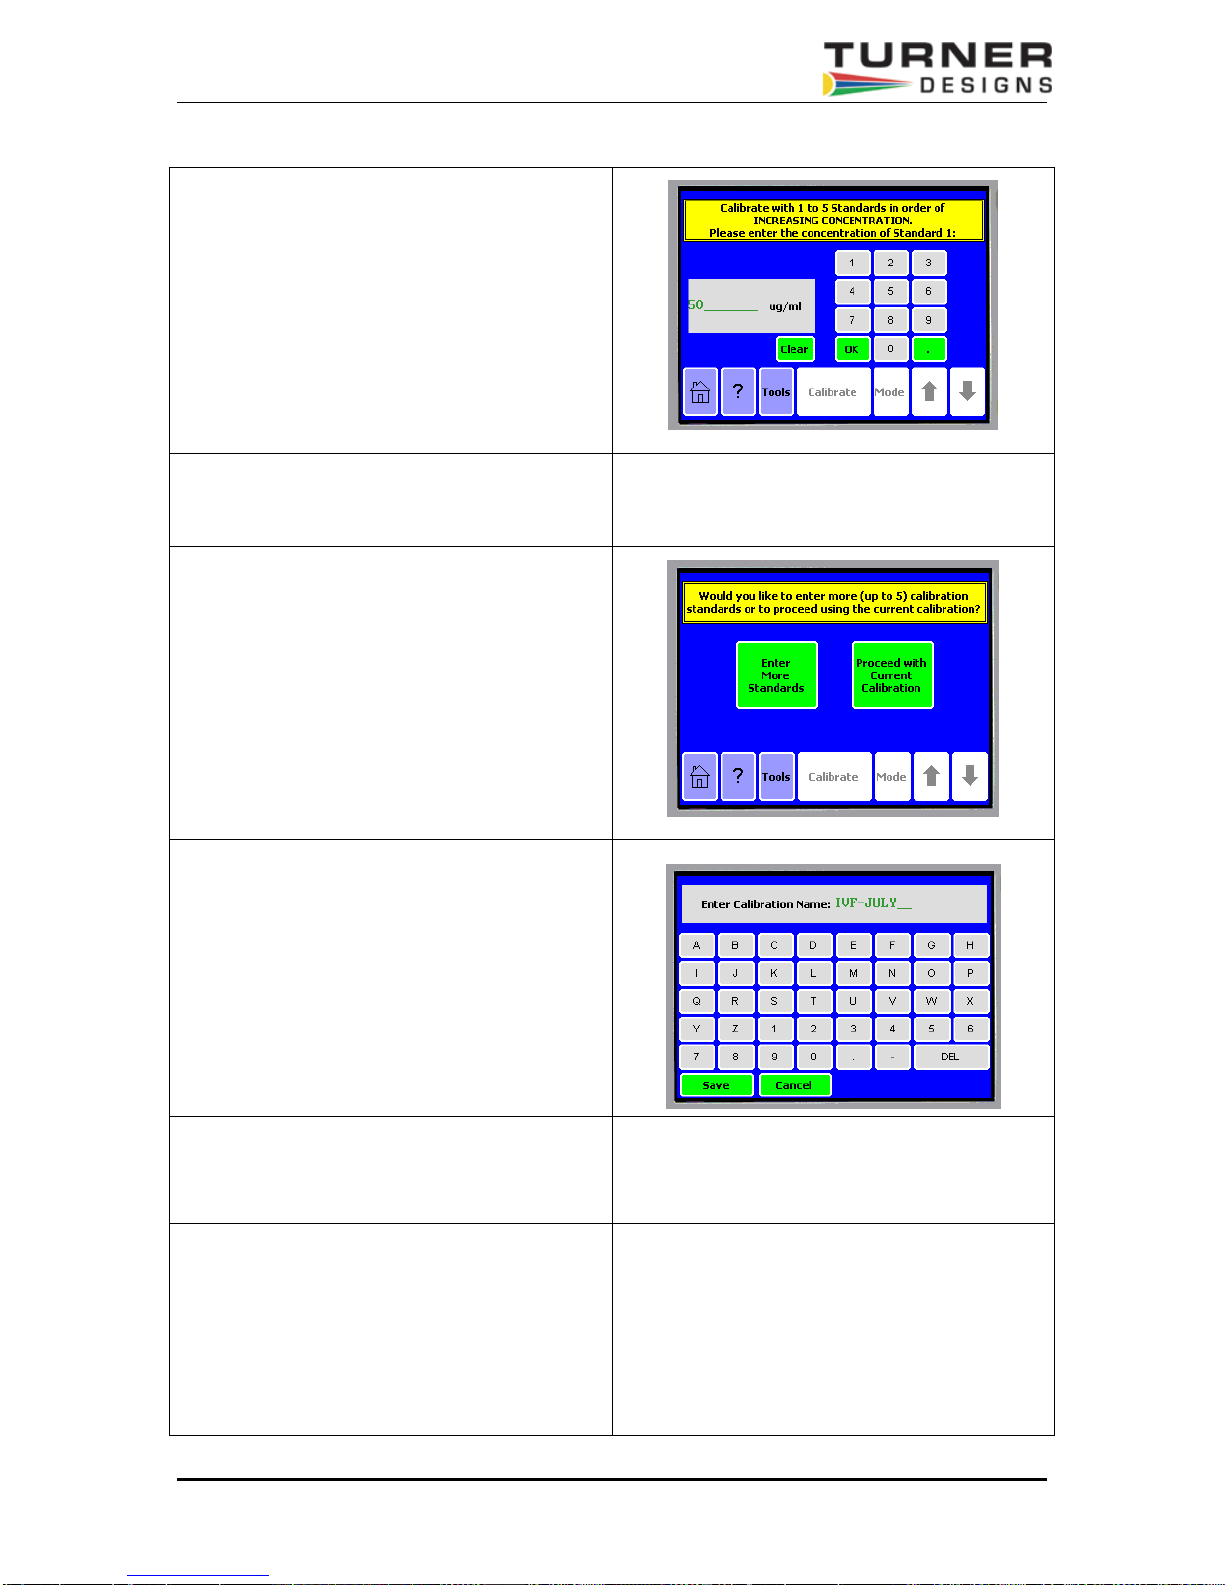
g) Enter the concentration for the first
Standard. If using the Turner Designs
Chlorophyll a Standard, this will be the
concentration data supplied with the
Standard. If doing multi point calibrations,
be sure to use Standards in order of
increasing concentration.
h) Follow the screen prompt indicating that
the standard should be inserted, touch OK
i) After the calibration is complete, either
select “Proceed with Current
Calibration” or select “Enter More
Standards”, in which case, return to “g”
above.
j) Name and Save the calibration for future
use (optional).
k) Subsequent readings in the Direct
Concentration mode should reflect the
actual concentration of the analyte.
l) Confirm successful completion of the
calibration by measuring the same
Standard. The displayed concentration
should equal the value used in step “g”
above. Optionally, the Solid Secondary
Standard could now be adjusted to give the
This completes the “Direct Calibration”
Procedure for the Fluorescence and Turbidity
Modules.
same reading for future calibrations, see
Section K.
Trilogy Fluorometer User’s Manual P/N 998-7210 Page 19 of 38
Page 20
F. Extracted Chlorophyll Measurements with the Chl a – Acidification
Fluorescent Module
EPA Method 445.0 is a standard method for measuring extracted chlorophyll a and pheophytin a
in marine and fresh water algae by fluorescence. It requires extraction with 90% acetone,
measurements before and after acidification and some fairly simple calculations to arrive at the
chlorophyll a and pheophytin concentrations (see appendix F). Method 445.0 is detailed and
straightforward. (If high concentrations of pure chlorophyll b are present, see the next paragraph).
A known concentration of pure chlorophyll a (as a standard) is required at least the first time you
calibrate Trilogy. For greatest accuracy however, we recommend that you periodically (once
every few months) use a known concentration of pure chlorophyll a in 90% acetone to recalibrate
your instrument. (Liquid Primary and Solid Secondary Chlorophyll a standards are available from
Turner Designs).
G. Calibrating and Displaying Corrected Readings for the Chl a
Acidification and Non-Acidification Modules
The Trilogy software can correct displayed chlorophyll readings for filtered and solvent volumes
used during the calibration and measurement cycles. Be sure to touch either “Chl A” or “Chl
NA” selections in the module selection screen so that the appropriate correction s are applied to
measured data. This results in displayed readings that correspond to the actual sample
concentration.
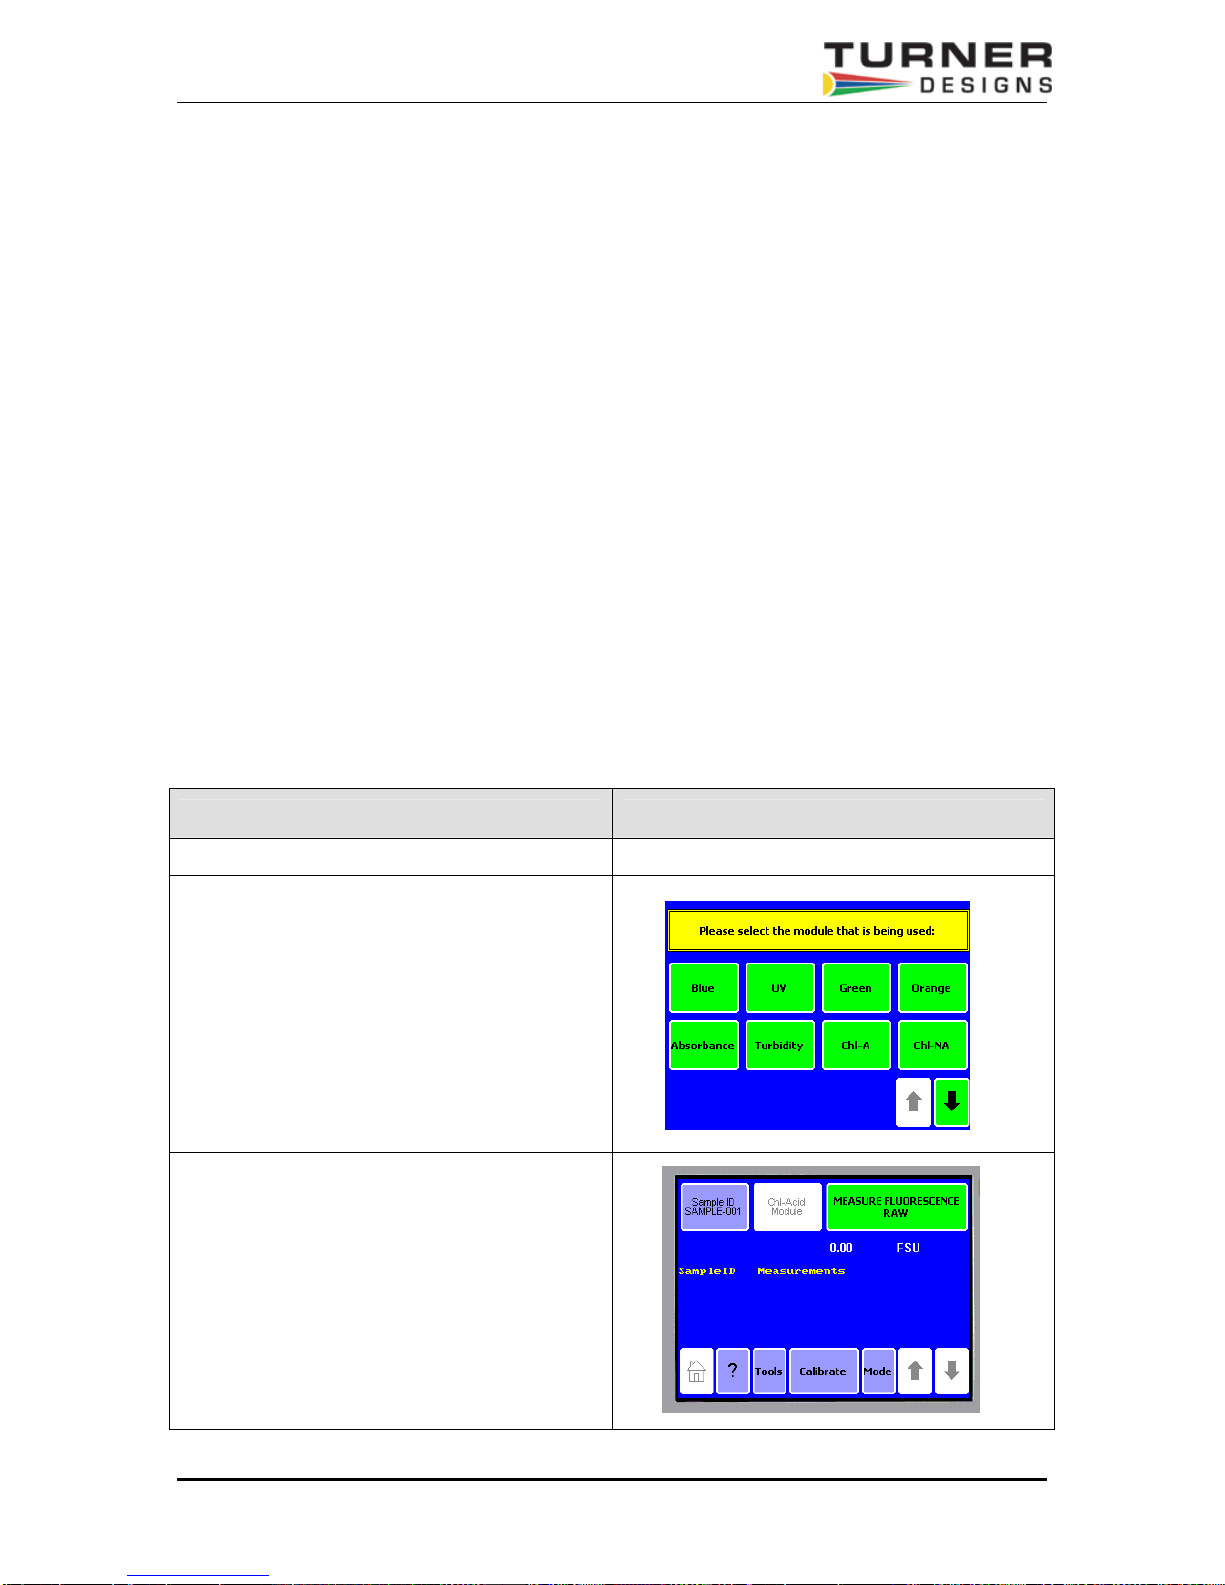
H. “Direct Calibration” Procedure – b) Extraction, Acidification, Single
Point and Multi Point
Instructions Sample Screen
a) Turn on the Trilogy
b) Touch “Chl – A” to select the Chlorophyll a
Acidification module and confirm by
touching “OK”
c) On the home screen, touch "Calibrate" to
begin a calibration sequence
Trilogy Fluorometer User’s Manual P/N 998-7210 Page 20 of 38
Page 21
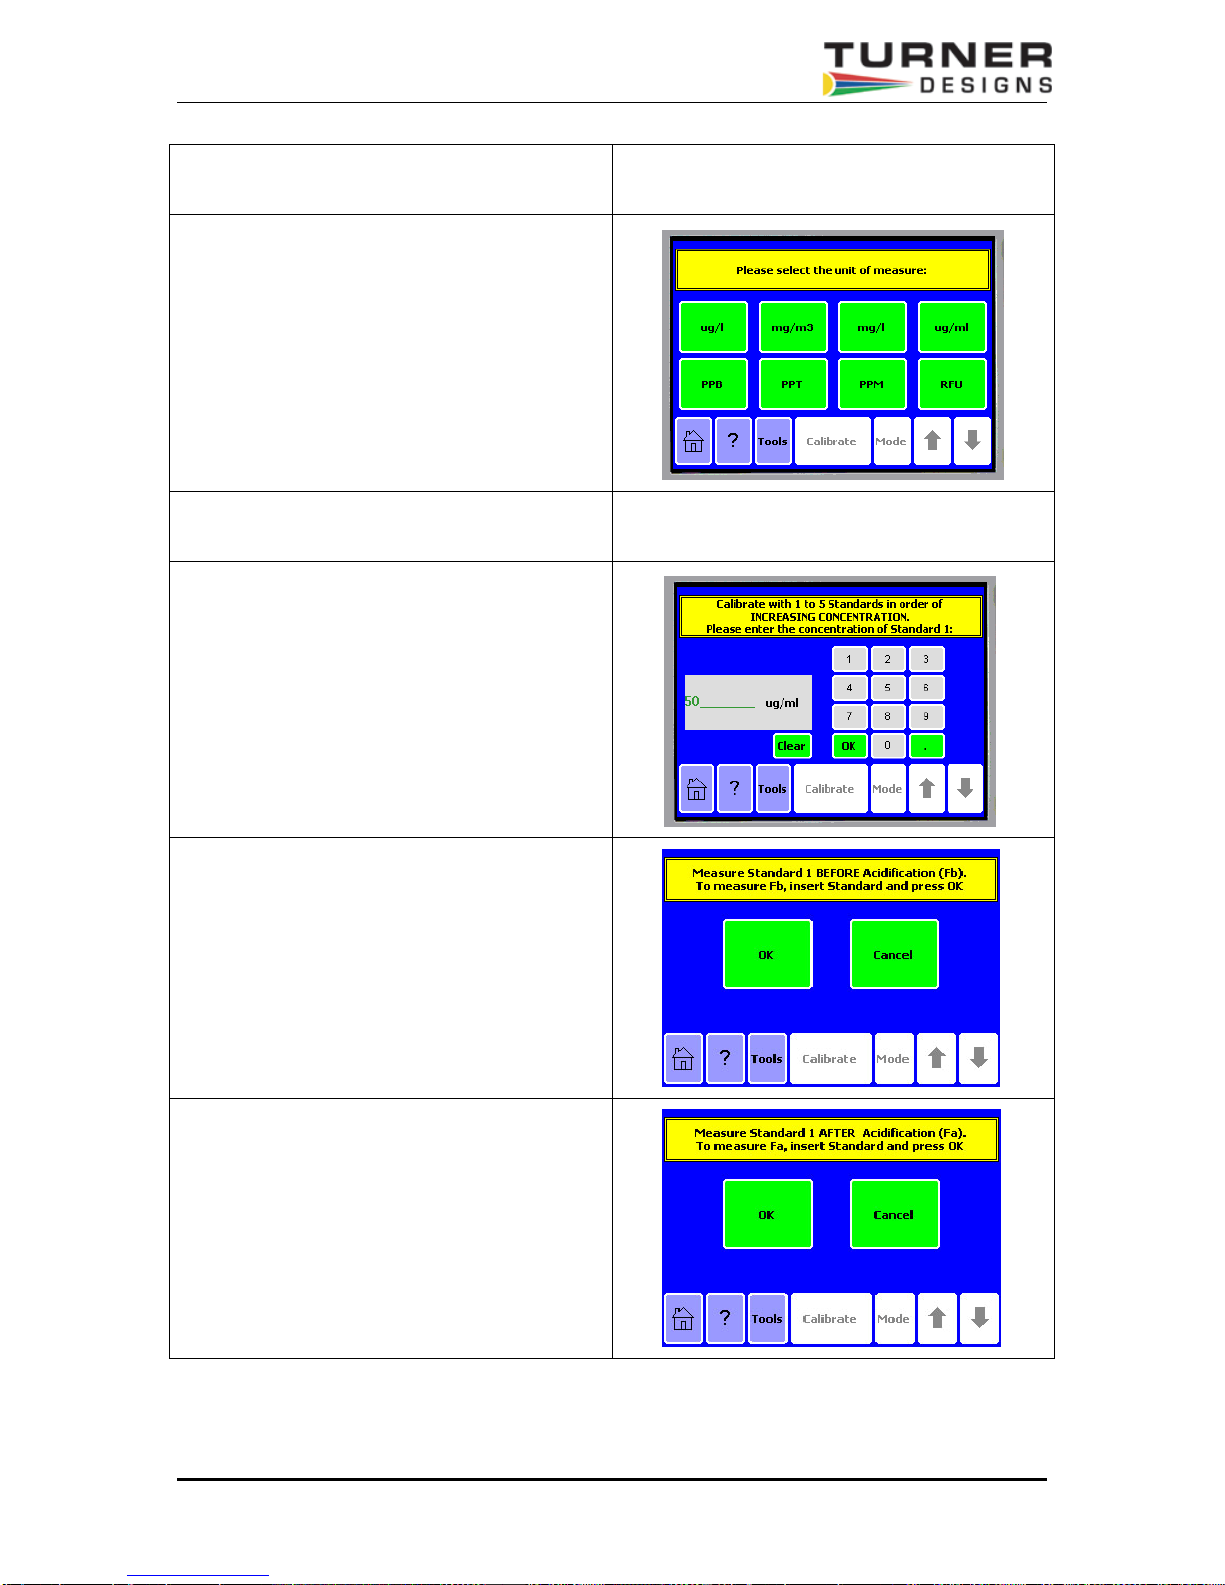
d) Select “Run New Calibration”
e) Select the unit of measurement
f) Insert calibration “blank” and touch “OK”
g) Enter the concentration for the first
Standard. If using the Turner Designs
Chlorophyll a Standard, this will be the
concentration data supplied with the
Standard. If doing multi point calibrations,
be sure to use Standards in order of
increasing concentration.
h) Follow the screen prompt indicating that
the Standard before Acidification (Fb)
should be inserted. Insert sample and
touch “OK”.
i) Now insert the Standard after Acidification
and touch “OK”. The (Fa) value will be
measured and the ratio of the two readings
will be displayed as seen in the next step.
Trilogy Fluorometer User’s Manual P/N 998-7210 Page 21 of 38
Page 22
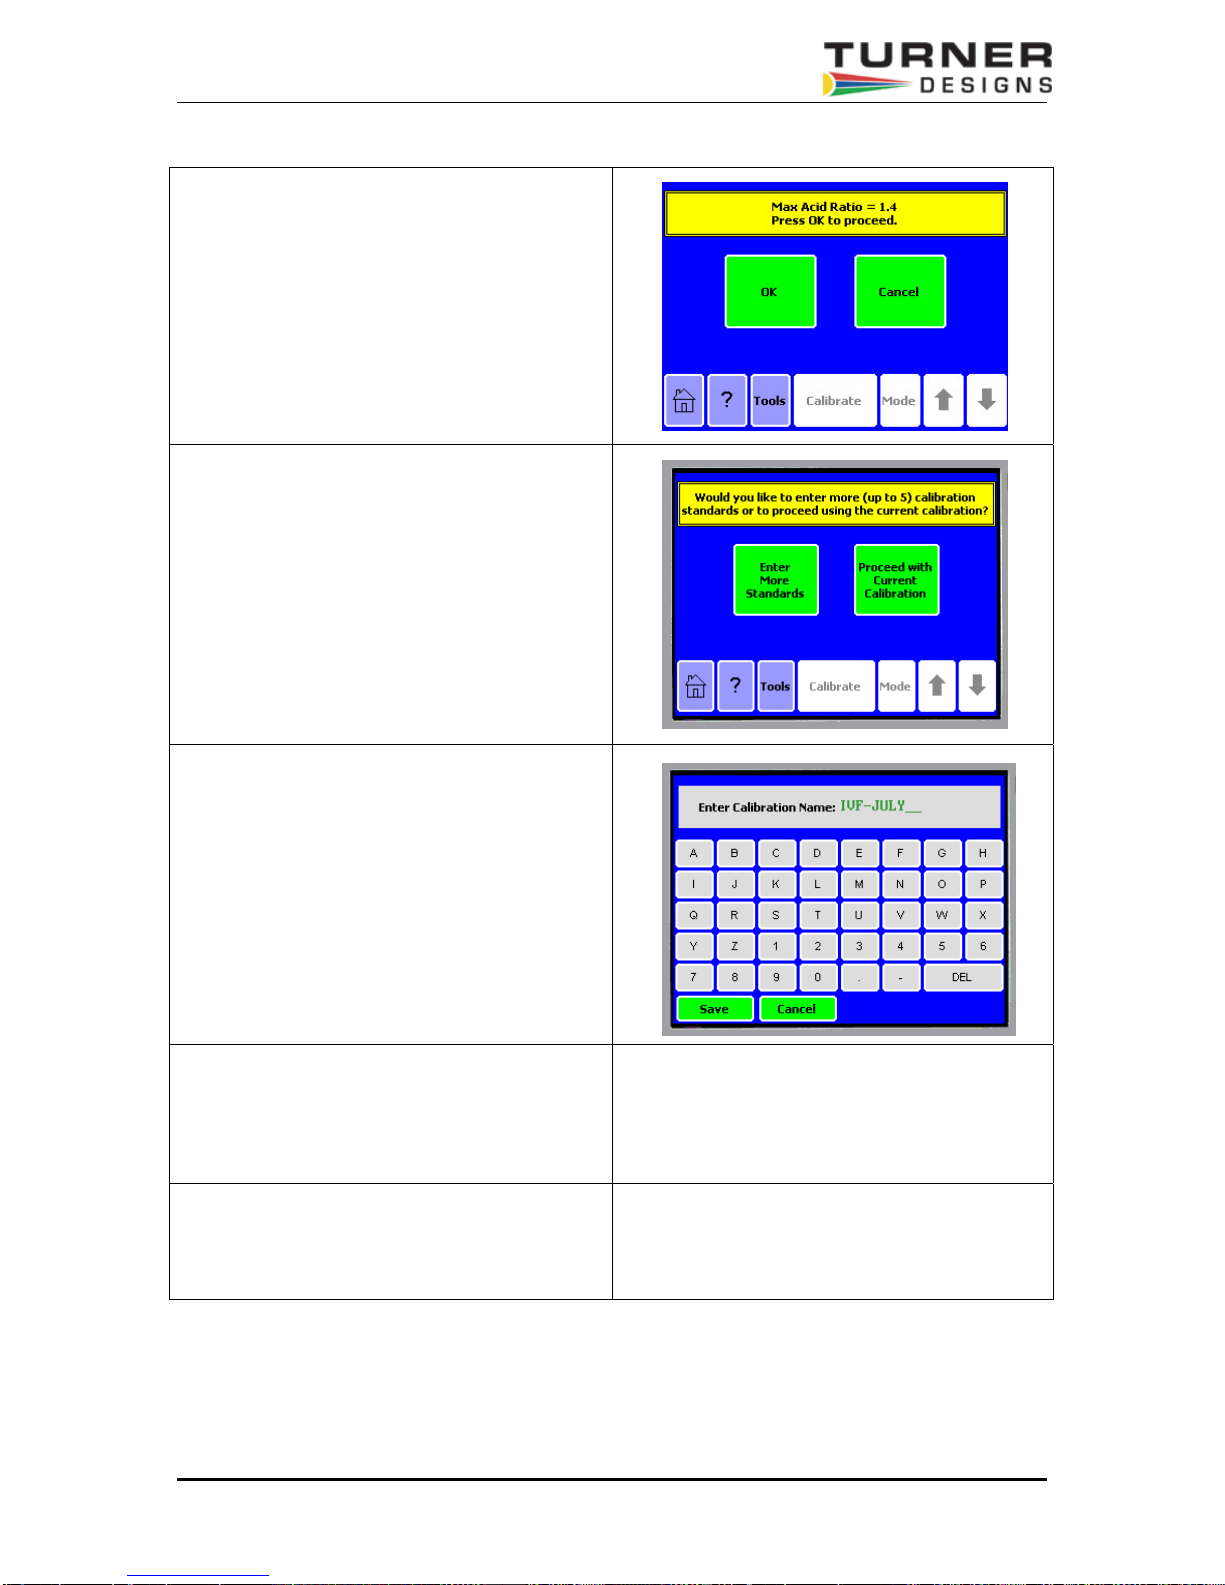
j) If the ratio is within the required range,
touch “OK”. The ratio will be stored in the
Trilogy for use in the EPA Method 445.0 for
measurement of chlorophyll a and
pheophytin a in water.
k) After the calibration is complete, either
select “Proceed with Current
Calibration” or select “Enter More
Standards”, in which case, return to “g”
above.
l) Name and Save the calibration for future
use (optional).
m) It is recommended that the Solid Standard
is now measured and the displayed value
noted to enable a quick calibration check
prior to later use.
This completes the “Direct Calibration”
Procedure – b) Extraction, Acidification, Single
Point and Multi Point
Trilogy Fluorometer User’s Manual P/N 998-7210 Page 22 of 38
Page 23
I.
J. “Direct Calibration” Procedure – c) Extraction, Non-Acidification, Single
Point and Multi Point
The Welschmeyer method is a simplified way to measure chlorophyll a without the need for
acidification. It accurately measures chlorophyll a even in the presence of chlorophyll b and
pheophytin. However, you cannot obtain a pheophytin a measurement with this procedure.
Using this method, you extract your samples according to EPA Method 445.0, but skip the
acidification step.
You still need to calibrate the instrument the first time using a known concentration of pure
chlorophyll a in 90% acetone.
The calibration procedure for the Chlorophyll Non-Acidification follows the same steps as for the
“Direct Calibration” mode, see Section E, however the measurement procedure will prompt for the
filtered and solvent volumes.
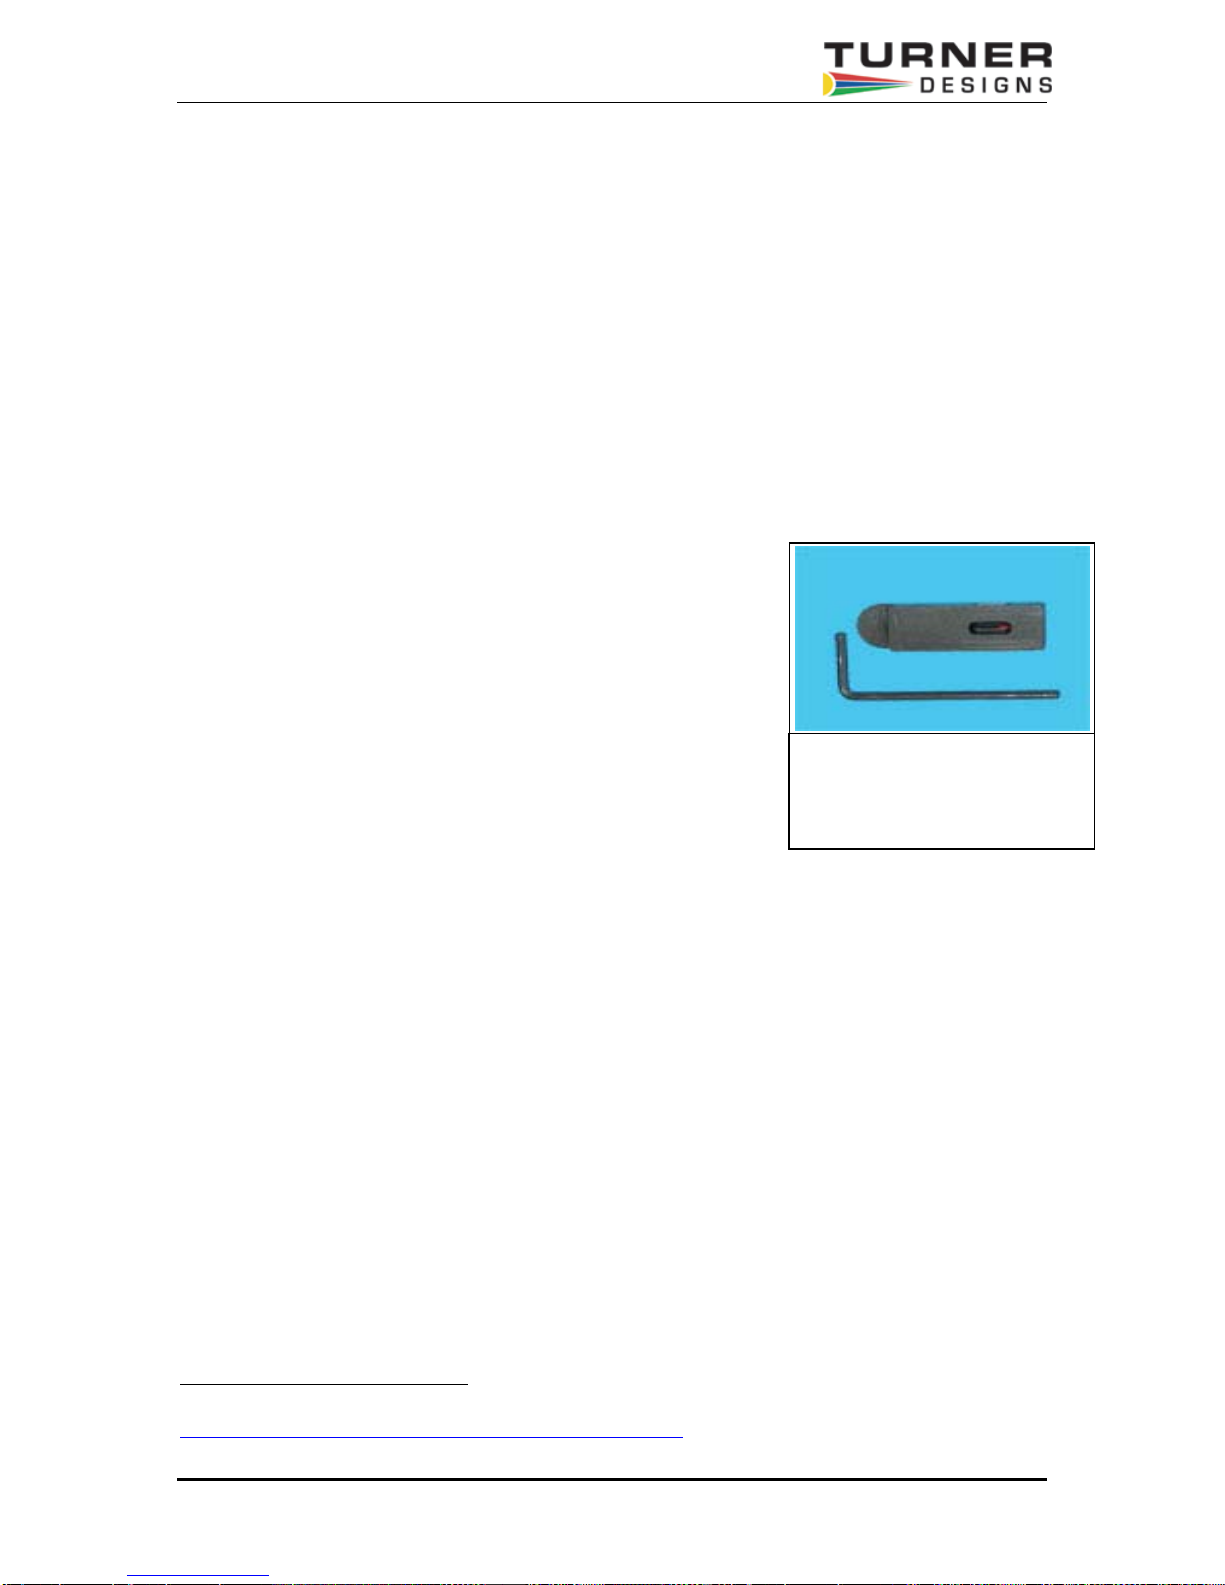
K. Using the Secondary Standard
The following section will describe how to use the Solid Secondary
Standard, P/No. 8000-952, with most of the Trilogy fluorescence
modules, (Chlorophyll a, Rhodamine WT, etc., but not UV or
Turbidity modules). The two main benefits of using the Solid
Secondary Standard are:
1) It can be used in place of a primary liquid standard once a
correlation between a primary standard and the solid standard
has been established.
2) It can be used to check the fluorometer stability, and/or check
for loss in sensitivity resulting from instrument/optical module
problems.
The Solid Secondary Standard provides a very stable fluorescent signal. It has an adjustment
screw so that you can tune the Solid Standard to provide a signal to match a specific sample. It
should be noted that each Solid Standard/Fluorometer relationship is unique. This means that a
given Solid Standard can not be used to calibrate multiple fluorometers or modules for identical
readings of a given solution.
Figure 11. The Adjustable
Secondary Standard includes
a fluorescent rod that provides
an extremely stable signal.
L. Using the Solid Secondary Standard for in vivo Chlorophyll
Applications
1. To establish a correlation between a known chlorophyll concentration and the fluorometer
reading, measure a sample containing algae and note the fluorometer readin g.
2. Insert the Solid Standard in the Optical Module, and adjust the Solid Standard to produce
the same reading on the fluorometer as in step 1, (turning the Secondary Standard
adjustment screw clockwise produces a lower signal).
3. Next, perform a chlorophyll extraction using the Trilogy Laboratory Fluorometer,
Spectrophotometer or HPLC to determine the actual chlorophyll a concentration in the
sample
chlorophyll a concentration.
1
Information on doing a chlorophyll extraction can be found on the Turner Designs web site at this URL:
http://www.turnerdesigns.com/t2/doc/appnotes/998_9000.html
Trilogy Fluorometer User’s Manual P/N 998-7210 Page 23 of 38
1
. This will provide the correlation between the solid standard and the actual
Page 24
4. Now, at any time, the Solid Standard can be used to check/establish a new correlation
between a known equivalent concentration and the current Trilogy reading.
M. Use of the Solid Secondary Standard for Dye Applications:
The Solid Secondary Standard accessory can also be used to check the fluorometer’s
stability for dye tracing applications. If necessary, the Solid Standard can be used to
establish a new correlation factor without the need to use a calibration solution each time.
1. To use the Solid Standard to establish a correlation between a known dye
concentration and the fluorometer reading, measure a dye solution of known
concentration, say 50 ppb, and note the Trilogy reading.
2. Place the Solid Standard in the Optical Module, and turn the adjustment screw to
produce the same displayed concentration as in step 1, (turning the secondary
standard adjustment screw clockwise reduces the displayed concentration).
Comprehensive information on dye trace measurements can be found at the following
Turner Designs URL:
http://www.turnerdesigns.com/t2/doc/appnotes/main.html#fluorescent
N. Trilogy Calibration Procedure, (Absorbance Module)
Calibrate the Trilogy after powering up, and after changing filters. For best results, calibrate the
Trilogy and Absorbance Optical Module immediately before reading a series of samples.
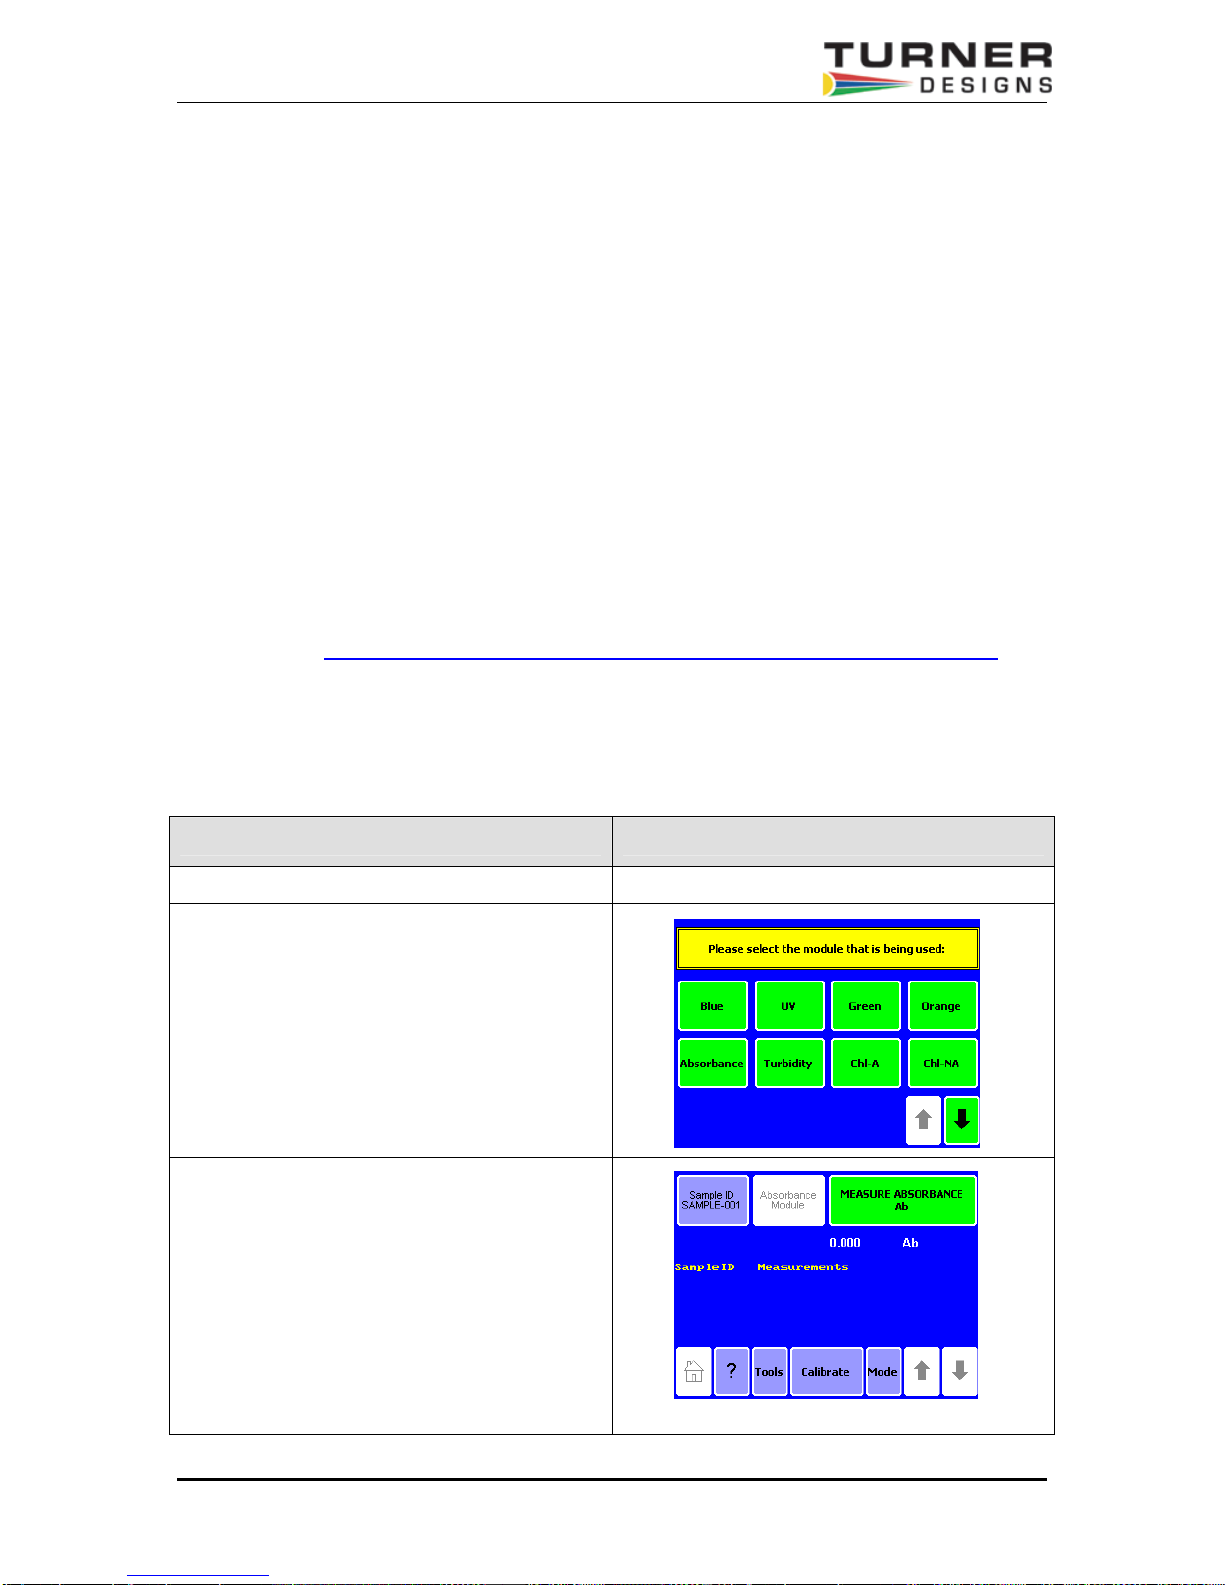
Instructions Sample Screen
a) Turn on the Trilogy
b) Touch “Absorbance” to select the
Absorbance Application Module and
calibration firmware, and confirm by
touching “OK”
c) On the home screen, touch "Calibrate" to
update the blank
Trilogy Fluorometer User’s Manual P/N 998-7210 Page 24 of 38
Page 25
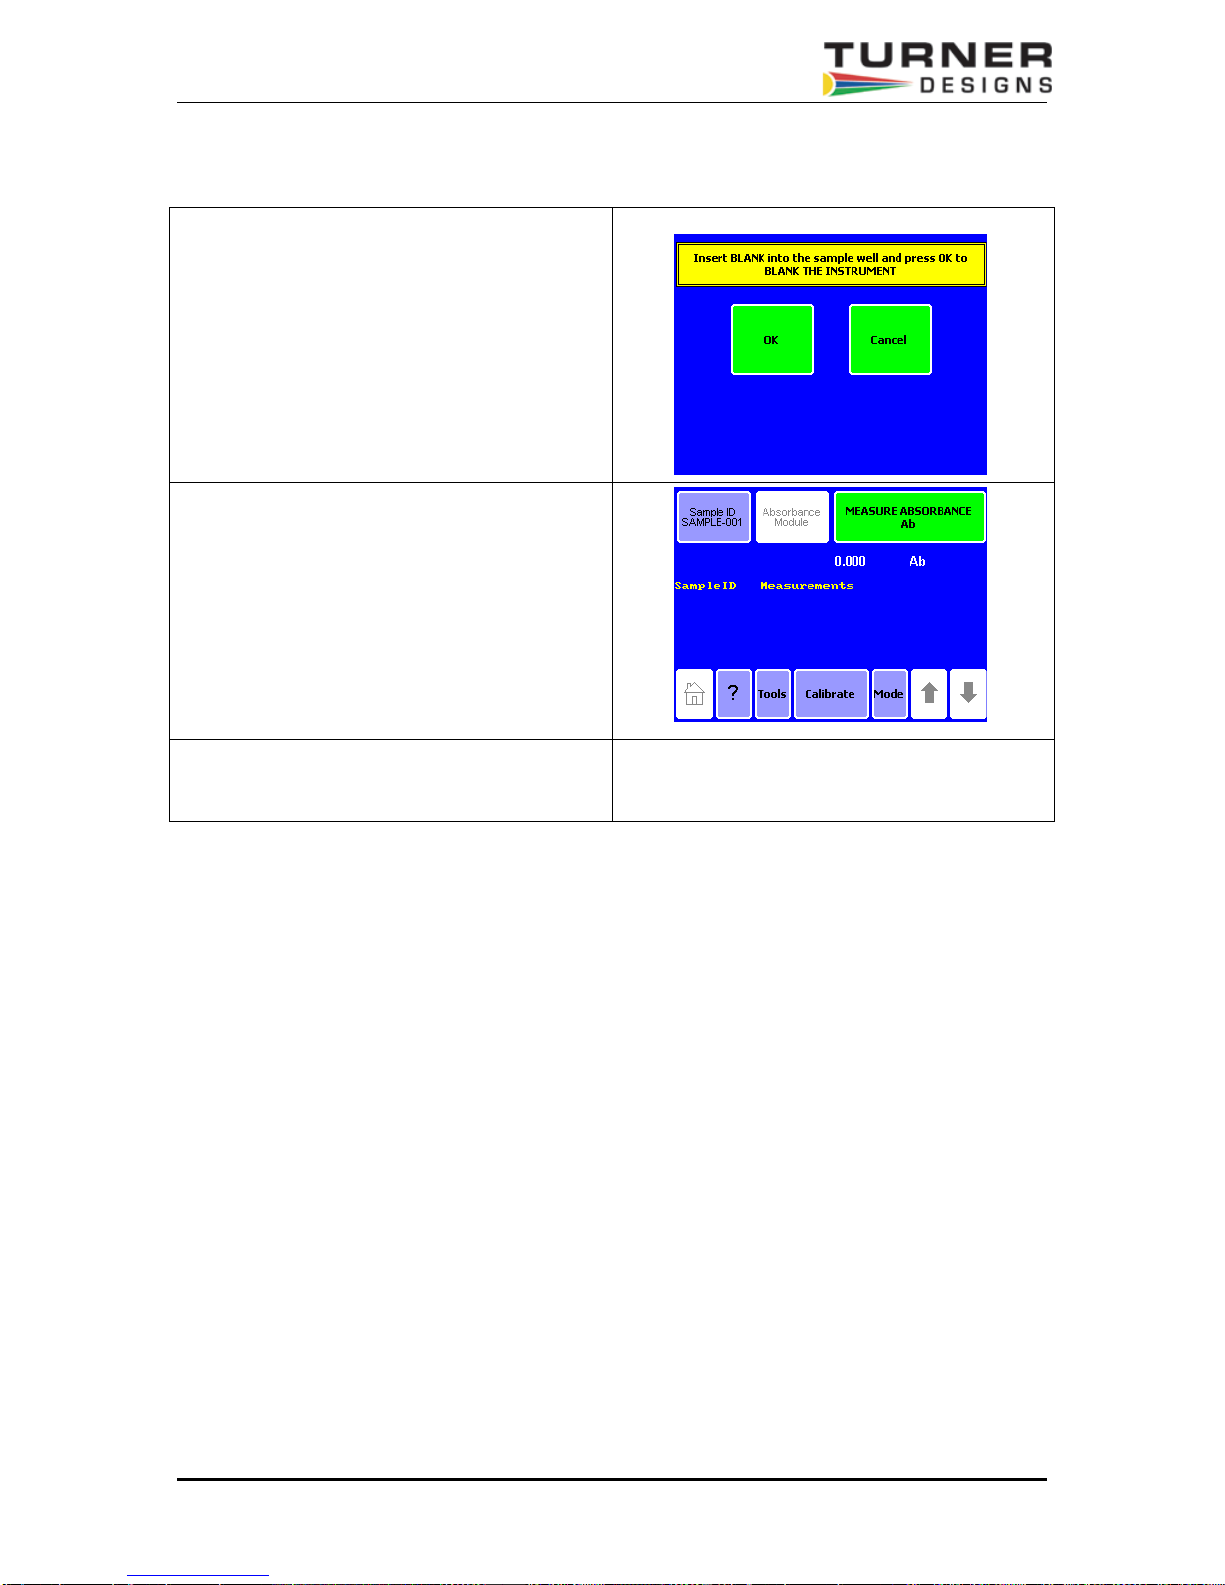
d) Insert a sample cuvette containing your
blank sample and touch “OK” to complete
the calibration update.
e) When the blanking is complete, the display
will revert to the Absorbance Home/
Measurement Screen.
f) This completes the Absorbance calibration
procedure, and the Trilogy is now ready to
make Absorbance measurements.
Trilogy Fluorometer User’s Manual P/N 998-7210 Page 25 of 38
Page 26

VI. Touch Screen Basics
Touch Screen
The touch screen provides a user-friendly method to operate the Trilogy. The touch screen is
sensitive to the light pressure of a fingertip. It is not necessary to use a stylus. After 20 minutes
without activity or user stimulation, the touch screen hibernates. Lightly touch the screen once to
reactivate. To select a function, touch the button corresponding to the function once.
Tools
Touch the "Tools" key to access "Settings" and "Diagnostics."
Settings
Contrast
Touch the "Contrast" key to increase or decrease the brightness of the touch screen and
enhance visibility. The arrows increase or decrease contrast. Touch the "Home" key to
save the adjustment and return to the "Home" screen.
Reset
The "Reset" button restarts the Trilogy. Normal operation does not require this feature.
The Reset feature erases data displayed on the "Home" screen.
Lid Start
Touch the "Lid Start" key to turn the feature ON. While the Lid Start feature is ON,
measurement begins as soon as the lid closes and the touch screen does not hibernate.
The Lid Start feature allows for immediate measurement and eliminates the need to
touch the "Measure" key. Return to the Lid Start key under the "Settings" menu to turn
the feature OFF.
Diagnostics
Touch Screen Calibration
The "Diagnostics" menu contains a method for screen calibration. Although the touch
screen is calibrated at the factory, it may need re-calibration over time.
Device Configuration
The "Device Configuration" key contains useful information on firmware revisions and
instrument setup.
General
Please note the Trilogy does not store more than 20 measurements at one time.
Measurements are not stored between power cycles.
Trilogy Fluorometer User’s Manual P/N 998-7210 Page 26 of 38
Page 27
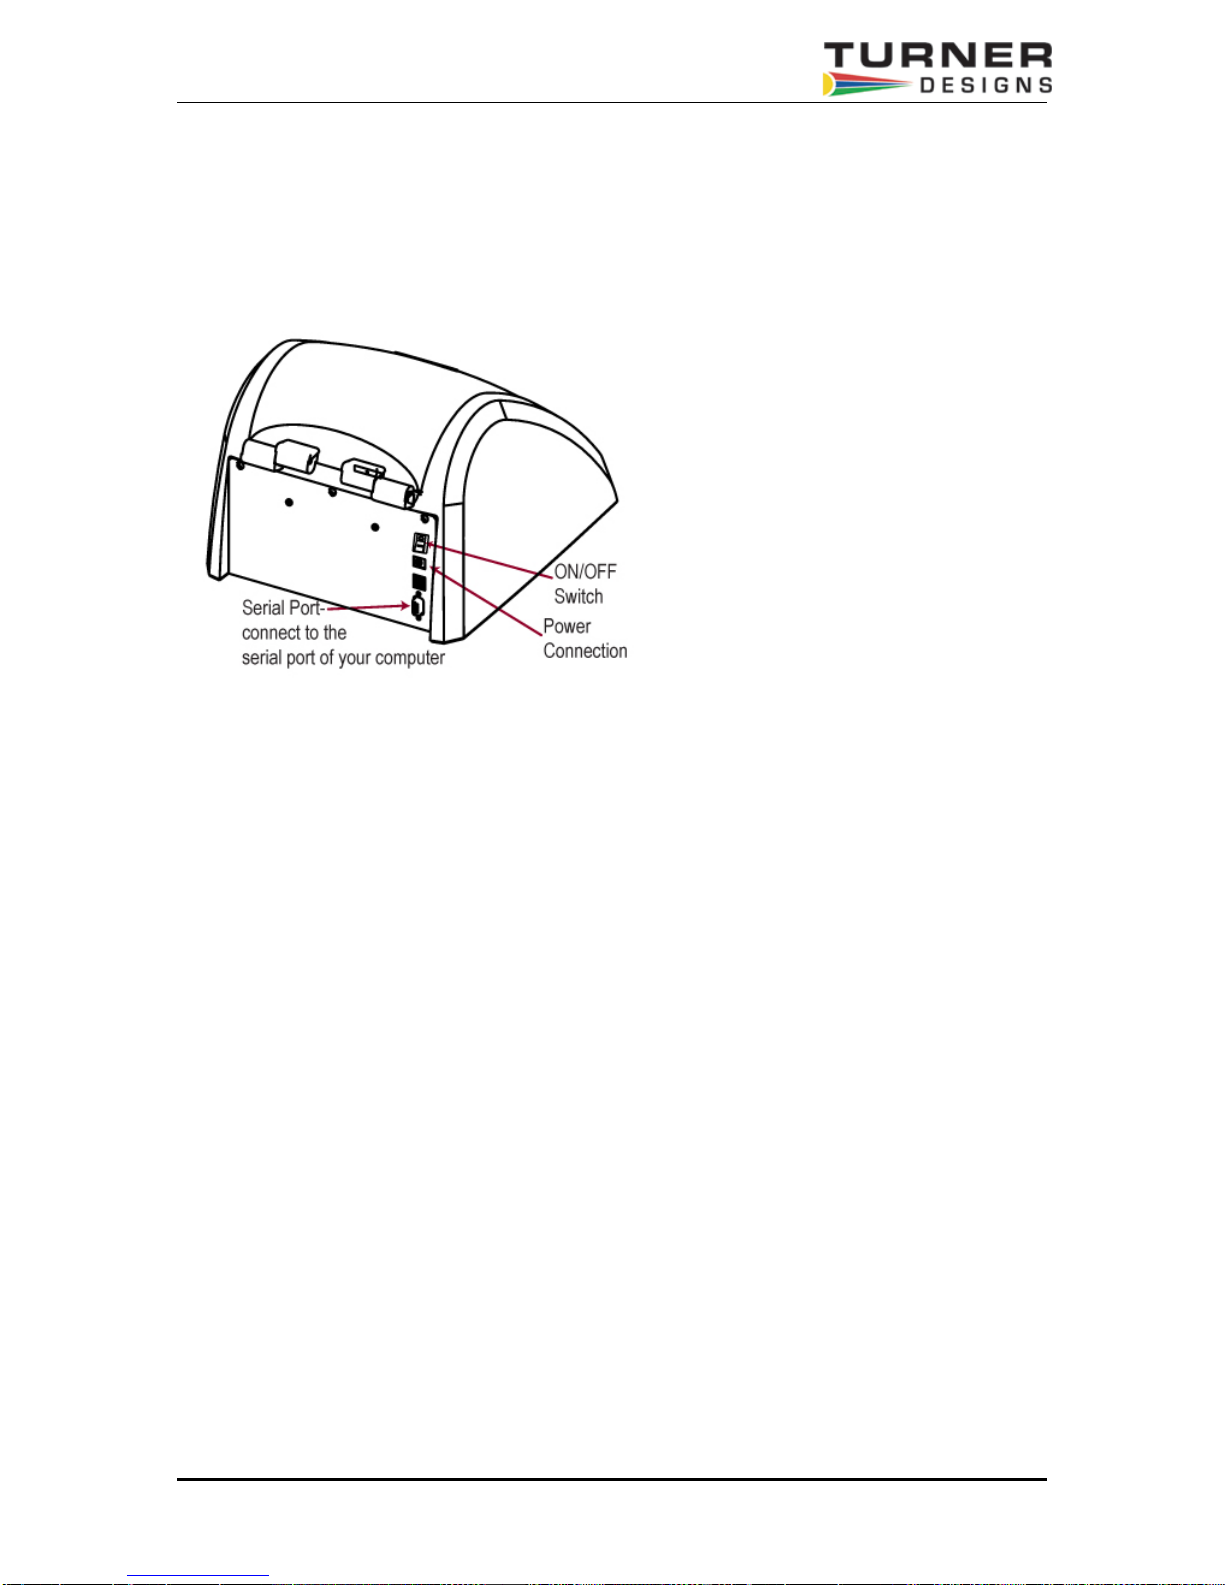
VII. Systems Connections
Establish a connection between the Trilogy and a PC or a printer to export data. Connect the 9pin RS-232 serial cable between the Trilogy and the PC or printer. The male 9-pin connector
attaches to the Trilogy and the female connector attaches to the PC.
Serial Output Functional Check
To perform a functional check on the Trilogy Serial Output, complete the above for the Trilogy,
and then complete the following steps (note that the Serial Interface Software is not required):
1. Connect the Trilogy Serial Port to the PC Serial Port.
2. To receive ASCII data from the Trilogy, open a HyperTerminal program or some other
appropriate data logging software on the PC.
3. Open a connection in HyperTerminal with the following COM Port settings:
Baud Rate: 9600
Data Bits: 8
Parity: None
Stop Bits: 1
Flow Control: None
4. Make a measurement with the Trilogy
5. At the completion of the measurement, the concentration value will be displayed on the
Trilogy display window, and also displayed in the HyperTerminal window.
This completes the Functional Check of the Trilogy Serial output. If you successfully completed
these steps, the Trilogy Serial Output is functioning. If you were not able to complete these
steps, refer to the troubleshooting section of this manual.
Trilogy Fluorometer User’s Manual P/N 998-7210 Page 27 of 38
Page 28
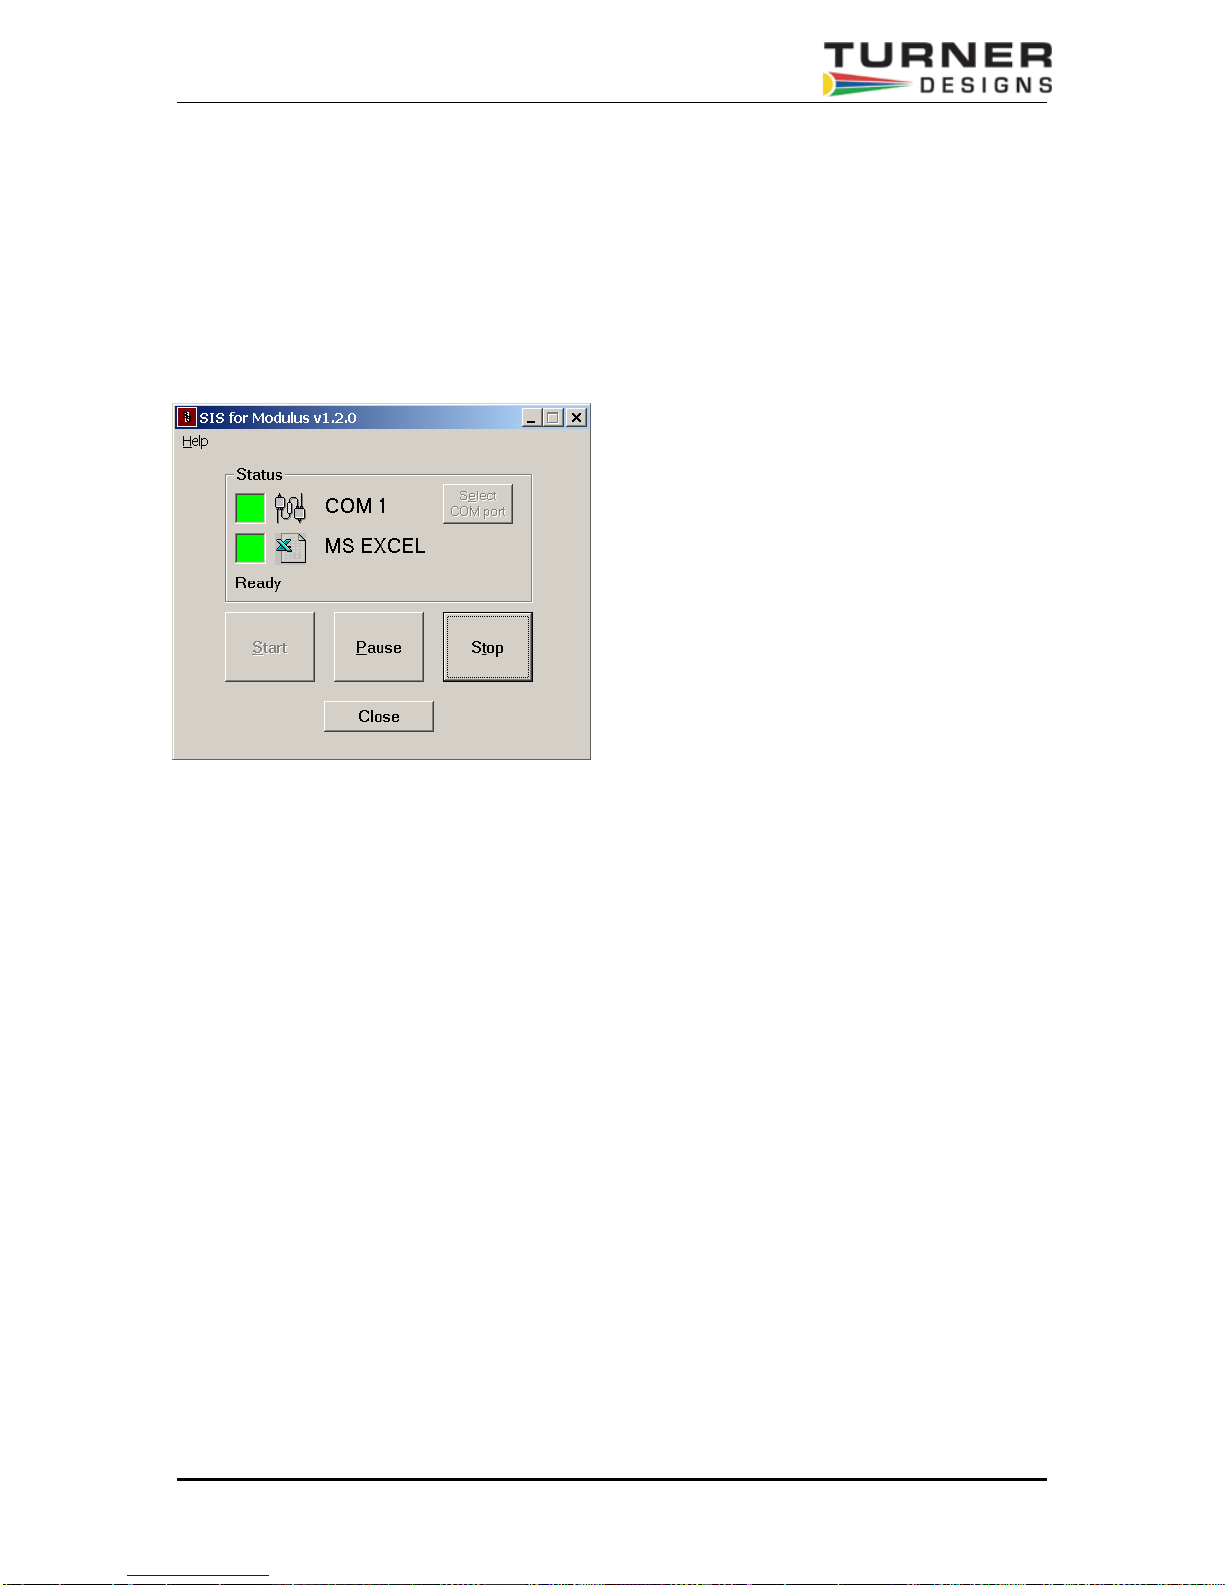
VIII. Spreadsheet Interface Software Installation
Install the Spreadsheet Interface Software (SIS) to send data to an Excel spreadsheet. The
Spreadsheet Interface Software requires a PC loaded with Windows '98 or higher, an available
serial port, and Excel. Insert the software CD-ROM into the CD-ROM drive of the PC to initiate
the installation program. After the installation is complete, an icon for the SIS appears on the PC
desktop and in the "Programs" menu.
(Make sure no other program on the PC is already using COM 1).
Figure12:
Spreadsheet Interface Software status
window showing communications are
set up on COM 1, and that the data will
be displayed in an EXCEL spreadsheet
Excel Spreadsheet Example
Turner Designs
SAMPLE-001 426.73 RFU
SAMPLE-002 24.57 RFU
SAMPLE-003 35.49 RFU
SAMPLE-004 2.56 RFU
Trilogy Fluorometer User’s Manual P/N 998-7210 Page 28 of 38
Page 29
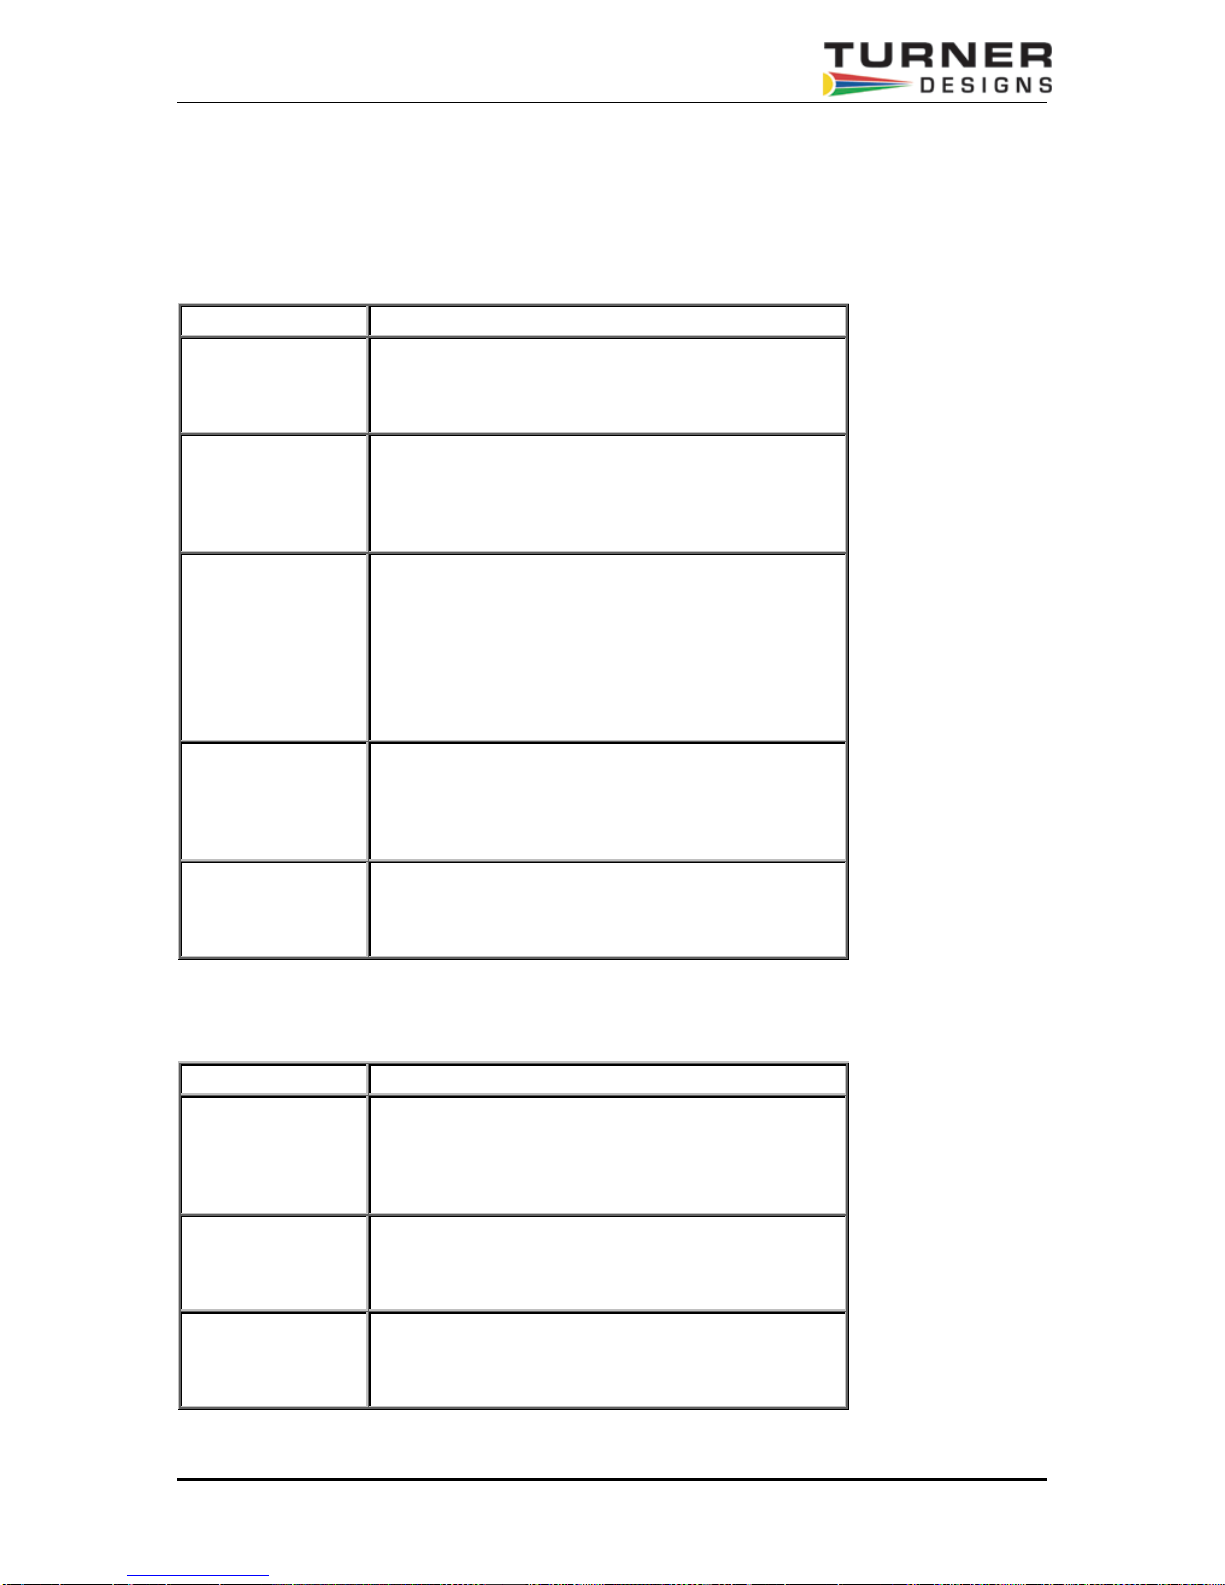
Appendix A - Troubleshooting
Fluorescence Troubleshooting
Symptom Possible Solution
Bad calibration
error message
Erratic reading
Negative values
Low readings
High
background
Absorbance Troubleshooting
Symptom Possible Solution
Non-linear
response
Low readings
Bad Calibration
Error Message
A bad calibration error message may occur if the
blank is brighter than the standard. Compare the
reading of the standard and the blank in the Raw
mode.
When direct fluorescence readings do not
produce expected values, review the standard
value entered during the calibration. The number
of the standard value should correspond to the
actual concentration of the standard.
After calibration, the blank value is automatically
subtracted from subsequent readings. A
negative reading can occur if a sample reading
is less than the blank. This may also indicate
that the module is not properly snapped into
place. Press down on the module and listen for
a click indicating the module has properly been
installed.
Check the excitation and emission wavelengths
of the analyte against the specifications of the
Fluorescence Optical Application Module in use.
Different analytes require different Optical
Application Modules.
A wet cuvette or spill could contaminate the
cuvette holder and increase the background
signal. Carefully clean the cuvette holder with
70% ethanol
Many absorbance assays do not produce a
linear response but instead produce a sigmoidal
or pseudo-sigmoidal response. Refer to the
Application Note for the assay for more
information.
Check the filter installed in the Absorbance
Module and make sure it is the correct filter for
the assay. View the Calibration details from the
Tools menu
Install the proper filter and use the ultrapure
water in a clean cuvette to update the zero.
Check the Calibration details from the Tools
menu.
Trilogy Fluorometer User’s Manual P/N 998-7210 Page 29 of 38
Page 30
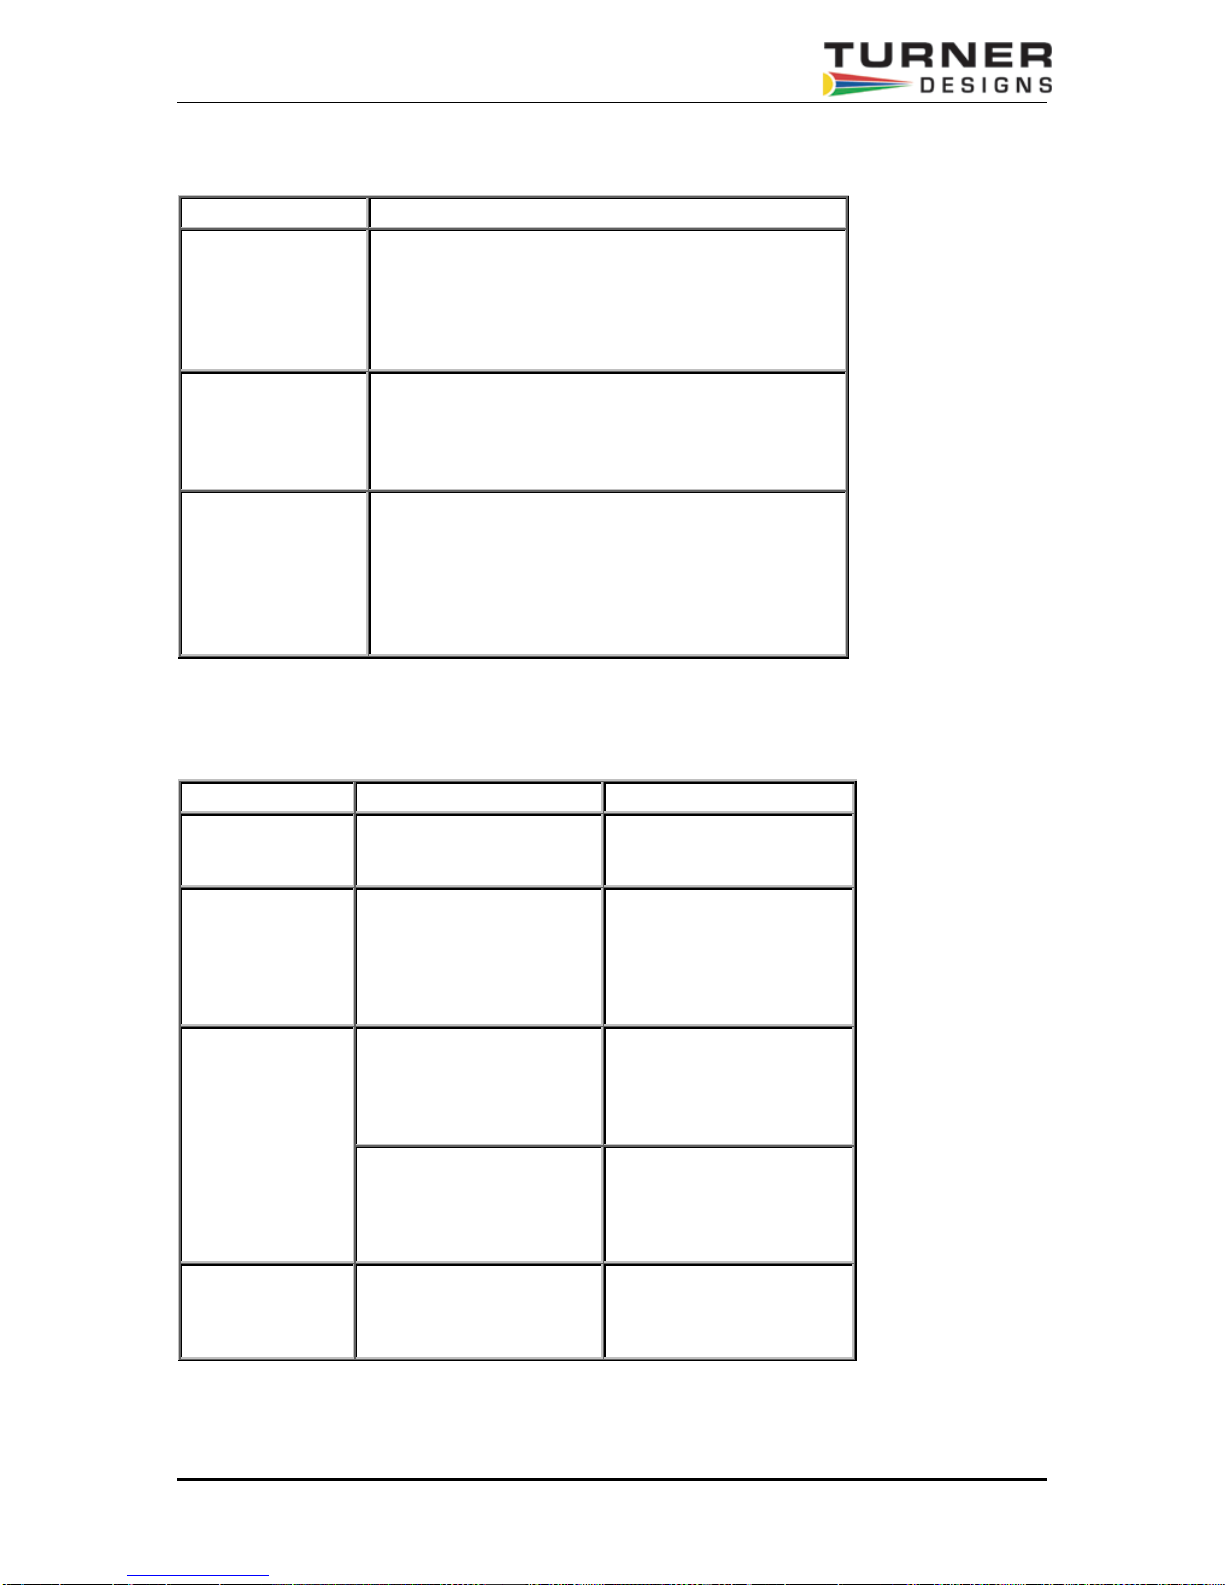
Turbidity Troubleshooting
Symptom Possible Solution
Trilogy readings
do not agree
with other
Turbidity meters
Calibrate both meters with the same calibration
standard solution. If meters still display
significantly different readings, it may be that the
second turbidity meter does not make an IR
measurement, and the sample contains
interference colors.
The turbidity
readings
change each
time a reading
This is normal. Particles in a liquid sample do
not remain in the same position, and these
position changes affect the scattering of the light,
and therefore the turbidity reading.
is taken
My turbidity
readings seem
to be different
when I recalibrated with
a new primary
Formazine standards form the basis of all
turbidity measurements and they are very
susceptible to aging. ISO 7027 recommendation
specifies that the 4,000 NTU Formazine solution
can be kept for only 4 weeks. For consistent
readings calibrate with current standards.
standard.
Spreadsheet Interface Software Troubleshooting
Symptom
Excel does
not open
Excel does
not open.
Both green
lights are on,
but data does
not appear in
Excel
New data
does not
report to Excel
Possible Cause Possible Solution
Excel is not installed
on the PC.
The software cannot
find Excel.
Make sure Excel is
installed on your PC.
Open Excel from the
Programs Menu on the
PC then open the
spreadsheet interface
software.
Wrong COM port
selected.
Click "STOP" then
click on the "COM"
button to change the
COM port.
Fluorometer not
connected to PC.
There is an editing
process occurring
within an Excel cell.
Check the RS-232
connection between
the Trilogy and the PC.
Wait until all the data is
collected before editing
the Excel spreadsheet.
Trilogy Fluorometer User’s Manual P/N 998-7210 Page 30 of 38
Page 31
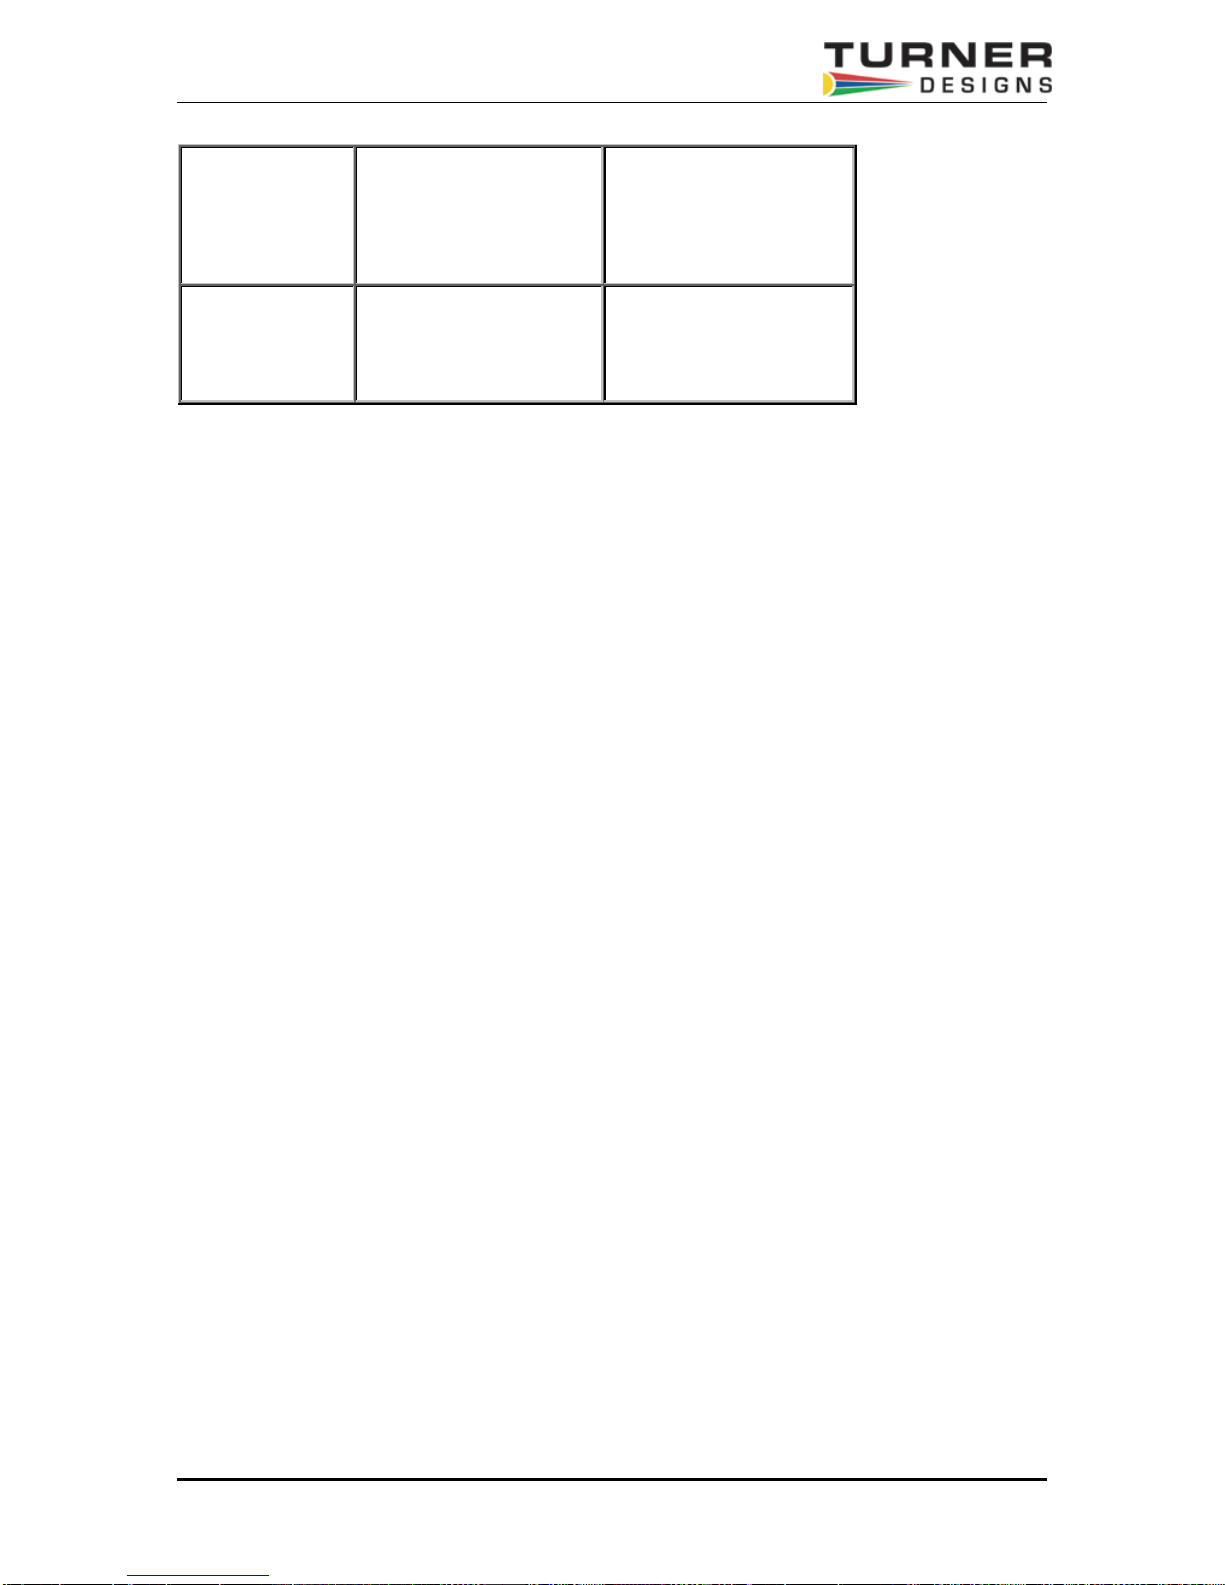
The software
does not
install
The software
does not open
The PC allows only
administrators to
install new software.
The software was not
installed properly.
Log in as Administrator
for the PC, then install
the software or contact
your IT support desk.
Log in as Administrator
and Remove the
software and re-install.
Trilogy Fluorometer User’s Manual P/N 998-7210 Page 31 of 38
Page 32

Appendix B - Warranty and Obtaining Service
Warranty
Turner Designs warrants the Trilogy and accessories to be free from defects in material s and
workmanship under normal use and service for a period of 12 months from the date of shipment
from Turner Designs with the following restrictions:
• Turner Designs is not responsible for replacing parts damaged by accident or
neglect. Your instrument must be installed according to instructions in the User’s
Manual. Damage from corrosion is not covered. Damage caused by customer
modification of the instrument is not covered.
• This warranty covers only Turner Designs products and is not extended to equipment
used with our products. We are not responsible for accidental or consequential
damages, except in those states where this limitation is not allowed. This warranty
gives you specific legal rights and you may have other rights which vary from state to
state.
• Damage incurred in shipping is not covered.
Warranty Service
To obtain service during the warranty period, the owner shall take the following steps:
1. Write, email or call the Turner Designs Technical Support depart ment and describe as
precisely as possible the nature of the problem.
Phone: 1 (877) 316-8049
Email:
2. Carry out any adjustments or tests as suggested by the Technical Support Department.
3. If proper performance is not obtained you will be issued a Return Materials Authorization
number (RMA) to reference. Package the unit, write the RMA number on the outside of the
shipping carton, and ship the instrument, prepaid, to Turner Designs. If the failure is covered
under the warranty terms, the instrument will be repaired and returned free of charge, for all
customers in the contiguous continental United States.
For customers outside of the contiguous continental United States who purchased equipment
from one of our authorized distributors, contact the distributor. If you purchased directly, contact
us. We will repair the instrument at no charge. Customer pays for shipping duties and
documentation to Turner Designs. Turner Designs pays for return shipment (custom duties, taxes
and fees are the responsibility of the customer).
Out-of-Warranty Service
Follow steps for Warranty Service as listed above. If our Technical Support department can
assist you by phone or correspondence, we will be glad to, at no charge. Repair service will
be billed on a fixed price basis, plus any applicable duties and/or taxes. Shipment to Turner
Designs should be prepaid. Your bill will include return shipment freight charges.
Trilogy Fluorometer User’s Manual P/N 998-7210 Page 32 of 38
Address for Shipment:
Turner Designs, Inc.
845 W. Maude Ave.
Sunnyvale, CA 94085
Page 33
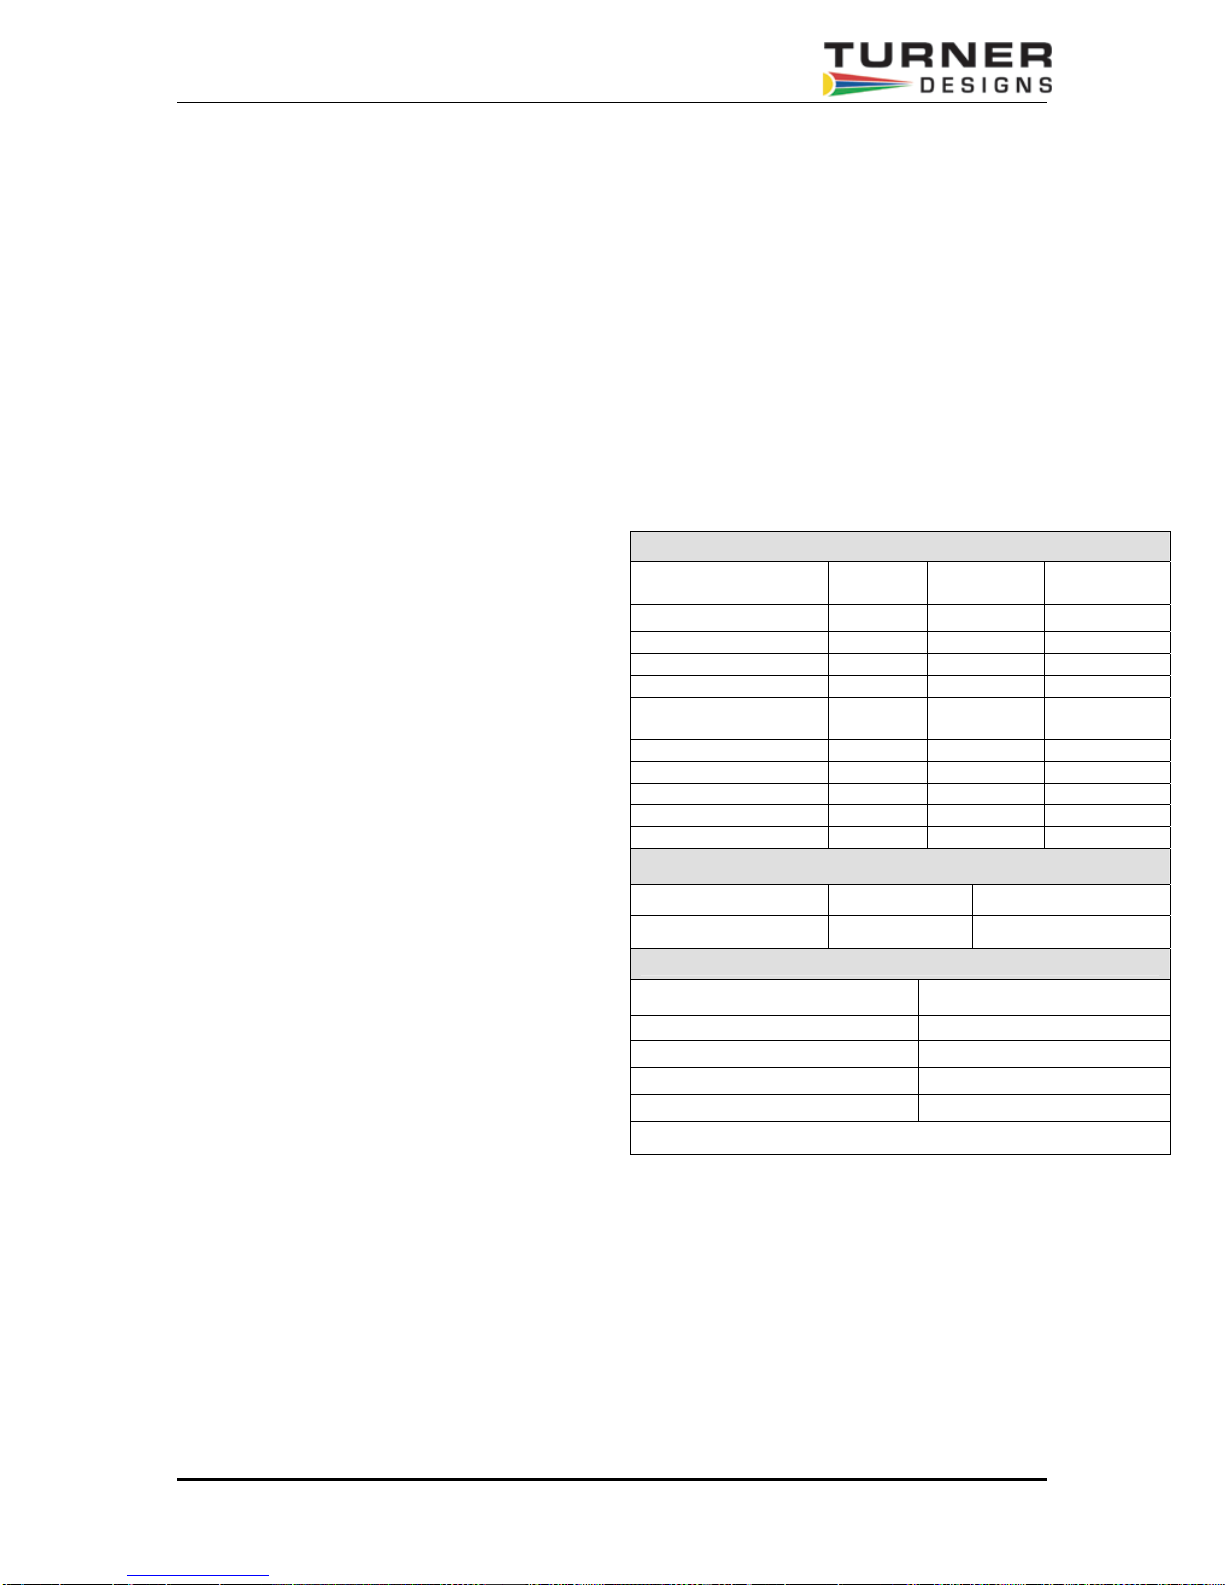
Appendix C – Specifications
Fluorescence Module Performance
Minimum Detection Limit:
Chlorophyll a, 0.025 ug/L
Rhodamine WT 0.01 ppb
Linear Range:
0-300 ug/L Chl a
0-500 ppb RWT
Linearity:
0.99R
2
Turbidity Module Performance
Minimum Detection Limit:
0.05 NTU
Linear Range:
0 – 1,000 NTU
Linearity:
0.99R
2
Absorbance Module Performance
Photometric Measuring Range:
0.0 – 4.0 Ab
Photometric Accuracy:
+/- 0.7%
Photometric Precision:
<0.5% at 1 Ab
General Specifications
Sample Adaptors
Accommodates 10 x 10 mm square
plastic cuvettes, 12 x 75 mm round
tubes, and 12 x 35 mm round vials.
Readout:
Direct Concentration (ug/L, ppb,
etc.) or Raw Fluorescence (RFU)
Calibration:
One to Five point calibration with up
to 18 calibrations stored
Light Source & Detector:
LED and Photodiode
Blank:
Reads and subtracts blank
Data Output:
100% ASCII format through a 9 pin
RS-232 serial cable at 9600 baud
PC Operating System (optional if
connected to PC):
Windows 98® or later
Power:
100 to 240VAC Universal Power
Supply included, Output 12VDC
0.84A Max
Dimensions:
12.92”D x 10.44”W x 8.42”H
(32.82 cm D x 26.52 cm W x 21.39
cm H)
Operating Temperature:
60 – 105
o
F (15 - 40 oC)
Weight:
8.1 lbs (3.65 kg)
Humidity:
75% RH maximum
Warranty:
One year
Application Module Filter Wavelengths
Fluorescence Modules
Application
Chl a (Acid) 7200-040 485 nm 685/50 nm
Chl a (Non-Acid) 7200-046 485 nm 685/10 nm
Chl a (in vivo) 7200-043 485 nm 685/50 nm
Phycocyanin 7200-044 600 nm 640 nm
Rhodamine WT &
Phycoerythrin
Optical Brighteners 7200-047 365 nm 445/15 nm
Fluorescein 7200-048 485 nm 540 nm
Crude Oil 7200-06 3 365 nm 410-600 nm
Histamine 7200-049 365 nm 450/80 nm
CDOM & Ammonium 7200-041 365 nm 430 nm
Part
Number
7200-042 550 nm 610 nm
Excitation
Wavelength
Turbidity Module
Application Part Number Wavelength
Turbidity 7200-060 850 nm
Absorbance Module & Filter Kits
Description Part Number
Absorbance Module 7200-050
560/10 nm Filter Paddle 7200-051
600/10 nm Filter Paddle 7200-052
750/10 nm Filter Paddle 7200-053
Contact us for other applications or wavelengths
Specifications subject to change without notice
Included Accessories
10 each 10 x 10 mm Methacrylate Cuvettes
5 each 12 x 35 mm Screw Top Glass Vials
50-Well Storage Box
Solid Secondary Standard
Power Supply
12 mm Round Vial Adaptor
CD with User’s Guide and Spreadsheet
Interface Software
Trilogy Fluorometer User’s Manual P/N 998-7210 Page 33 of 38
Emission
Wavelength
Page 34
Appendix D – Principles of Fluorescence
Principles of Fluorescence
Fluorescence is a physical property of certain atoms and molecules. It is a molecule's ability to
absorb light energy at one wavelength, then instantaneously re-emit light energy of another,
usually longer, wavelength. Each compound that fluoresces has a characteristic excitation
wavelength, (the wavelength of light that it absorbs) and a characteristic emission wavelength,
(the wavelength of light that it emits when the molecules relax and return to their ground state).
These excitation and emission wavelengths, (or spectra), are often referred to as the compou nd's
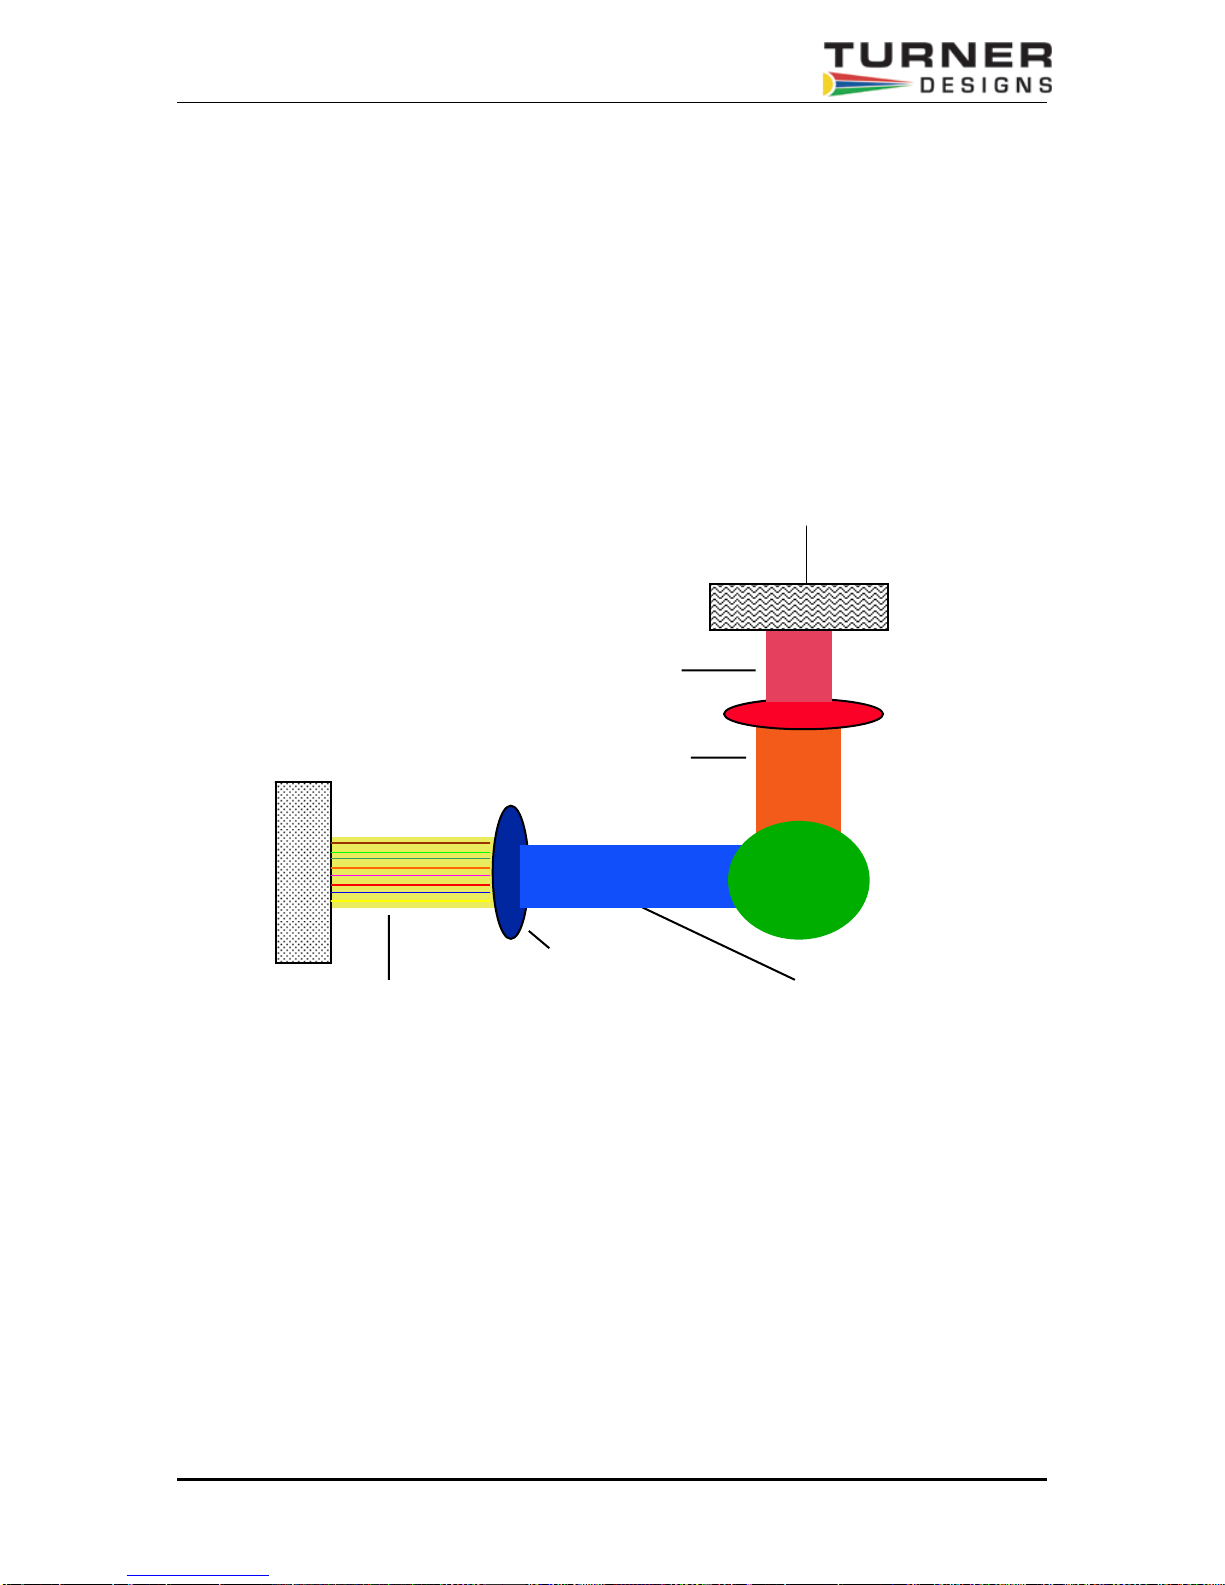
fluorescence signature. Figure 13 shows the key components of a filter fluorometer.
ompound Wavelengths specific to c
Digital Readout
Light Detector
Lamp
Figure 13
Lamp: The lamp or light emitting diode provides the light energy that "excites" the compound of
interest. The lamp actually provides a broader range of light than that which excites the
compound. This broad light range is illustrated by the "many wavelengths of light" shown in
Figure 13.
Many wavelengths of light
Wavelengths created by compound,
plus stray light
Excitation Filter
Specific wavelengths of light
Emission Filter
Cuvette or
Sample Cell
Trilogy Fluorometer User’s Manual P/N 998-7210 Page 34 of 38
Page 35
g
Appendix E – Recommended Measurement
Practices
Linear Range and Quenching
The linear range is the concentration range in which the Trilogy output is directly proportional to
the concentration of the fluorophore. The linear range begins with the smallest detectable
concentration, and spans to an upper limit (concentration) that is dependent up on: the properties
of the fluorescent material; the filters used; and the path length.
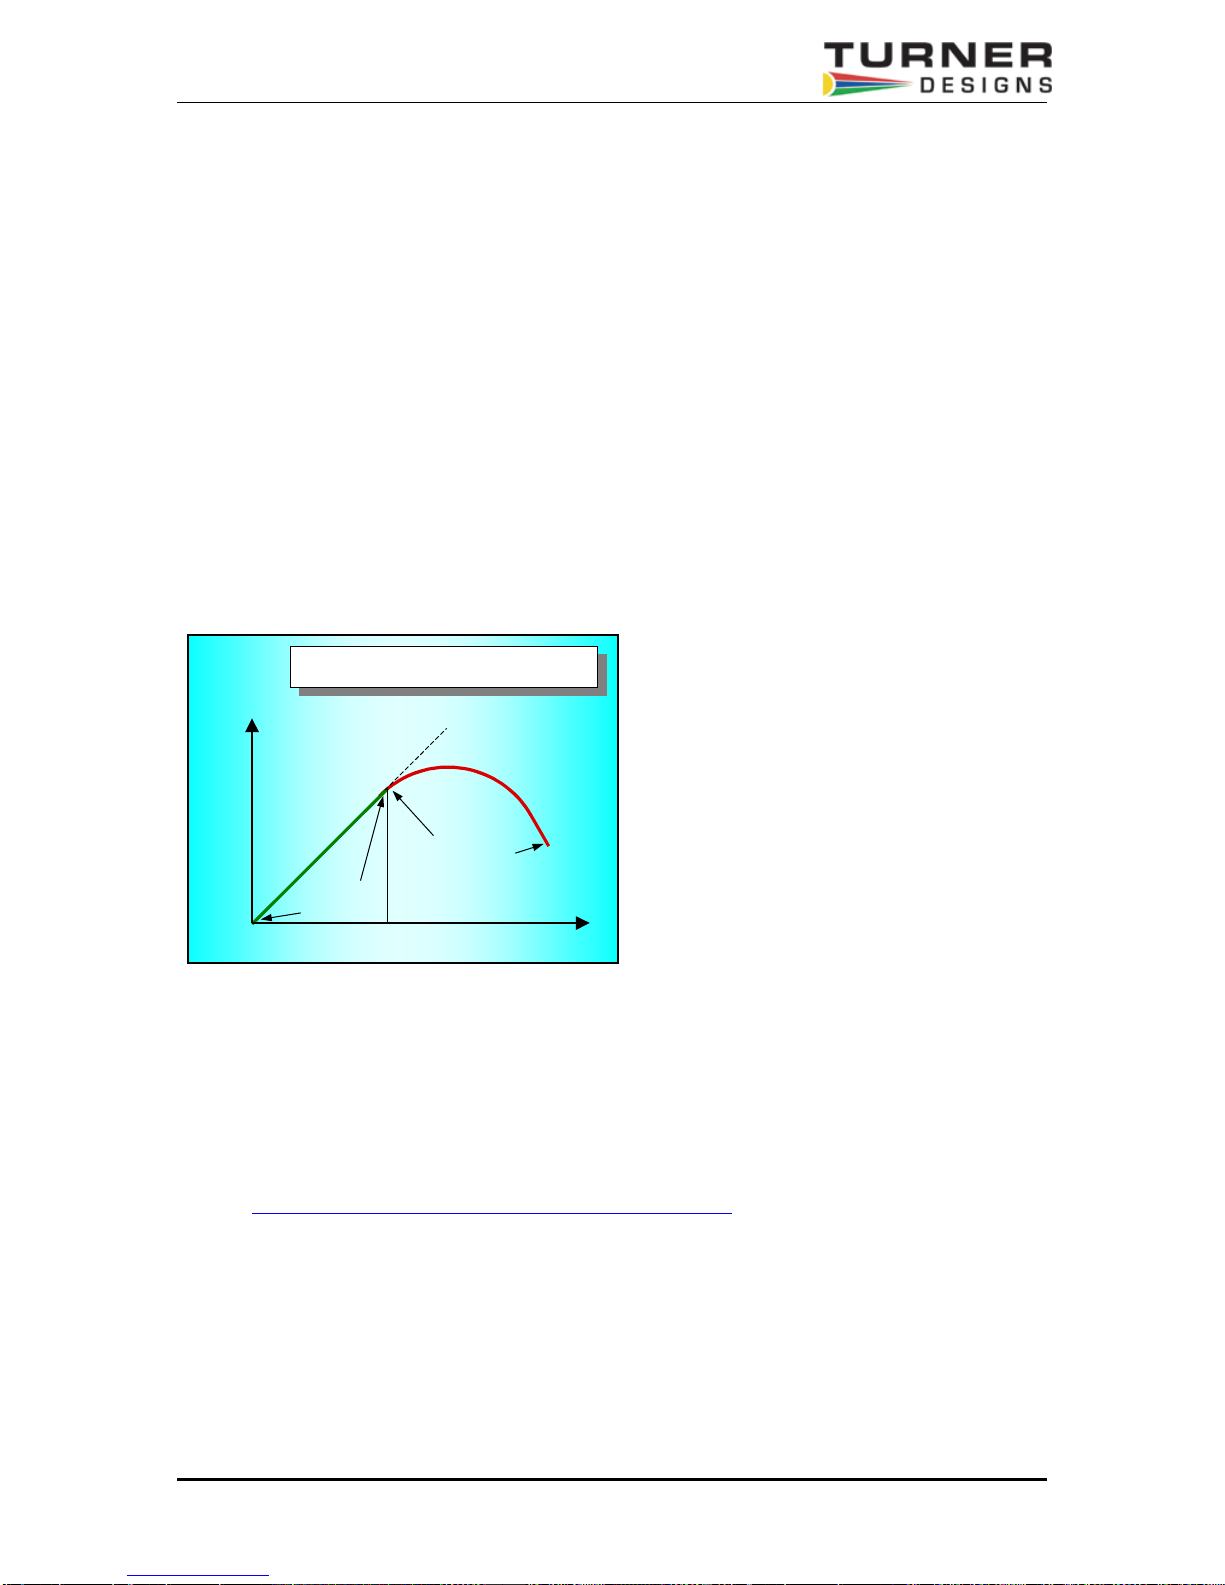
A non-linear relationship is seen at very high concentrations where the fluorescence signal does
not increase at a constant rate in comparison to the change in concentration, see Figure 4 below.
At even higher concentrations, the fluorescence signal will decrease even though the sample
concentrations are continuing to increase. This effect is known as “signal quenching”.
Linearity may be checked by diluting a sample 1:1, or some other convenient ratio. If the sample
is still in the linear range, the reading will decrease in direct proportion to the dilution. If the
reading does not decrease in direct proportion to the dilution, or if the reading increases, the
sample is beyond the linear range of the fluorophore.
Fluorometer Response Curve
Readin
Fluorometer
Sample
Linear Region
Sample
Quenching Region
Sample Concentration
Figure 14
Graph showing Linear and
Quenching Regions of the
sample’s response
Temperature Considerations
Fluorescence is temperature sensitive. As the temperature of the sample increases, the
fluorescence decreases. For greatest accuracy, record the sample temperature and correct the
sensor output for changes in temperature.
For further information on how temperature, light, water quality and the physiological state of the
algal cells can all affect the measurement of chlorophyll a, please refer to the application section
of Turner Designs’ web site at the following URL:
http://www.turnerdesigns.com/esupport/understanding.html
Trilogy Fluorometer User’s Manual P/N 998-7210 Page 35 of 38
Page 36

Appendix F - Chlorophyll a Acidification and NonAcidification calculations
When in direct concentration mode the following calculations will be use to calculate corrected
chlorophyll a and pheophytin values for the acidification method and the corrected chlorophyll
values for the non-acidification method.
Acidification Method
I. Variables stored during calibration phase of fluorometer
C
F
F
F
F
II. Variables required from the sample analysis phase
F
F
V
V
III. Interpolation equation used in end calculation of chlorophyll a and pheophytin
concentrations
Interp,
Interp,
IV. End calculation for corrected chlorophyll and pheophytin a
Chlorophyll a concentration = [F
Pheophytin a concentration = [F
Non Acidification Method
I. End calculation for corrected chlorophyll a
Chlorophyll a concentration = C
= Concentration of standard 1
stand[1]
= Fluorescence of Blank value
blank
= Fluorescence of standard 1 before acidification
stand[1],B
= Fluorescence of standard 1 after acidification
stand[1],A
= Acidification Ratio = (F
m
= Fluorescence of sample before acidification
samp,B
samp,A
solvent
water
= C
B
A
= Fluorescence of sample after acidification
= Volume of solvent used to extract sample
= Volume of water filtered
= C
stand[1]
stand[1]
* (F
samp,B - Fblank
* (F
samp,A - Fblank
stand[1]
/(Fm-1)] * (Interp,B - Interp,A) * (V
m
/(Fm-1)] * [(Fm * Interp,A) - Interp,B] * (V
m
) / (F
) / (F
* [(F
stand[1],B
stand[1],B - Fblank
stand[1],B - Fblank
- F
samp
– F
blank
blank
)/ (F
) / (F
stand[1],A
)
)
solvent
stand[1] - Fblank
– F
)] * (V
blank
/ V
)
water
solvent
solvent
)
/ V
/ V
water
water
)
)
Trilogy Fluorometer User’s Manual P/N 998-7210 Page 36 of 38
Page 37

Appendix G - In vivo fluorescence measurements
using Trilogy
In vivo chlorophyll a analysis is the measurement of chlorophyll a fluorescence within a living cell. The advantage
of this type of analysis is that it is quick and simple and does not require special sample preparation or extraction.
It allows the user to measure a large number of samples in the field. However, without comparisons to extractive
analysis, in vivo readings are qualitative in nature.
There are two modes for making in vivo measurements. The first utilizes the RAW fluorescence mode; the second
requires calibrating to a secondary standard. No calibration is necessary for making in vivo measurements in the
raw mode.
In-vivo measurements using the RAW mode:
1) Insert the in vivo chlorophyll a Trilogy module Turner Part Number 7200-043
2) Turn on the Trilogy fluorometer using the switch located on the back panel
3) Select the “Blue” module. This is indicated on the module label under GUI selection.
4) Press “OK” after verifying that the module loaded matches your selection. The default mode loaded is “Raw
Fluorescence”.
5) Before measurements are made, it is advisable to filter a sample and measure the filtrate to obtain a bla nk or
“Background” fluorescence reading for a given location
6) Thoroughly mix the sample by inverting or shaking to prevent settlement of algal cells and quickly insert
sample
7) Close the lid and press the “Measure Fluorescence” button.
8) Subsequent readings will indicate relative changes in concentration levels. These readings will be presented
in Relative Fluorescence Units of measure (RFU).
In-vivo Calibration Using Direct Concentration and a Secondary Standard:
1) Insert the in vivo chlorophyll a Trilogy module Turner Part Number 7200-043
2) Turn on the Trilogy fluorometer using the switch located on the back panel
3) Select the “Blue” module. This is indicated on the module label under GUI selection.
4) Press “OK” after verifying that the module loaded matches your selection. The default mode loaded is “Raw
Fluorescence”.
5) Press “Calibrate”
6) Choose “Run New Calibration”
7) Choose the units to be display ed during measurement
8) Insert blank sample and press “OK”
9) When prompted enter a number, which will be correlated, to the sample’s response. Y ou may enter 1 to 5
standards of various concentration levels or calibration values.
• If concentration of sample is known, enter the known value. This will set the f luorescence r esponse
equal to the concentration entered and will give semi-quantitative results in subsequent measurements
(example, 5(ug/L) = 137.4(RFU))
• If an arbitrary calibration value is entered, the fluorescence response of the sample will be correlated to
the new calibration value and subsequent measurements will be scaled proportionally. These
10) Thoroughly mix sample by inverting or shaking to prevent settlement of algal cells and quickly insert sample
11) After inserting sample immediately press “OK” to measure
12) If running a multi-point calibration repeat step 9 through 11 for each calibrant
Blank Subtracting:
Blanks provide background fluorescence values of samples excluding the fluorophore of interest. Subtracting a
blank sample from subsequent samples increases accuracy of fluorophore estimates. An accurate “blank” is
typically a water sample that has been filtered through a GF/F or membrane filter in order to remove the algal cells
but to still retain additional dissolved components.
Using the Solid Secondary Standard:
1. To establish a correlation between a known chlorophyll a concentration and the fluorometer reading, measure
2. Insert the solid standard in the optical module and adjust the solid standard to produce the same reading on
3. Next perform a chlorophyll a extraction using the Trilogy Laboratory Fluorometer to determine the actual
4. The solid secondary standard can now be used to recalibrate and/or check the stability of the Trilogy
measurements will only give qualitative results (example, 500(RFU) = 137.4(RFU))
a sample containing algae and note the fluorometer reading
the fluorometer as in step 1, (Turning the solid standard screw clockwise produces a lower signal)
chlorophyll a concentration in the sample. This will provide the correlation between the solid standard and the
actual chlorophyll a concentration
fluorometer.
Trilogy Fluorometer User’s Manual P/N 998-7210 Page 37 of 38
Page 38

Turner Designs
845 W. Maude Ave.
Sunnyvale, CA 94085
Phone: (408) 749-0994
FAX: (408) 749-0998
www.turnerdesigns.com
Trilogy Fluorometer User’s Manual P/N 998-7210 Page 38 of 38
 Loading...