

Turf Tick Products Turf Tick Original Instructions Manual
TURF - TICK
Original instructions
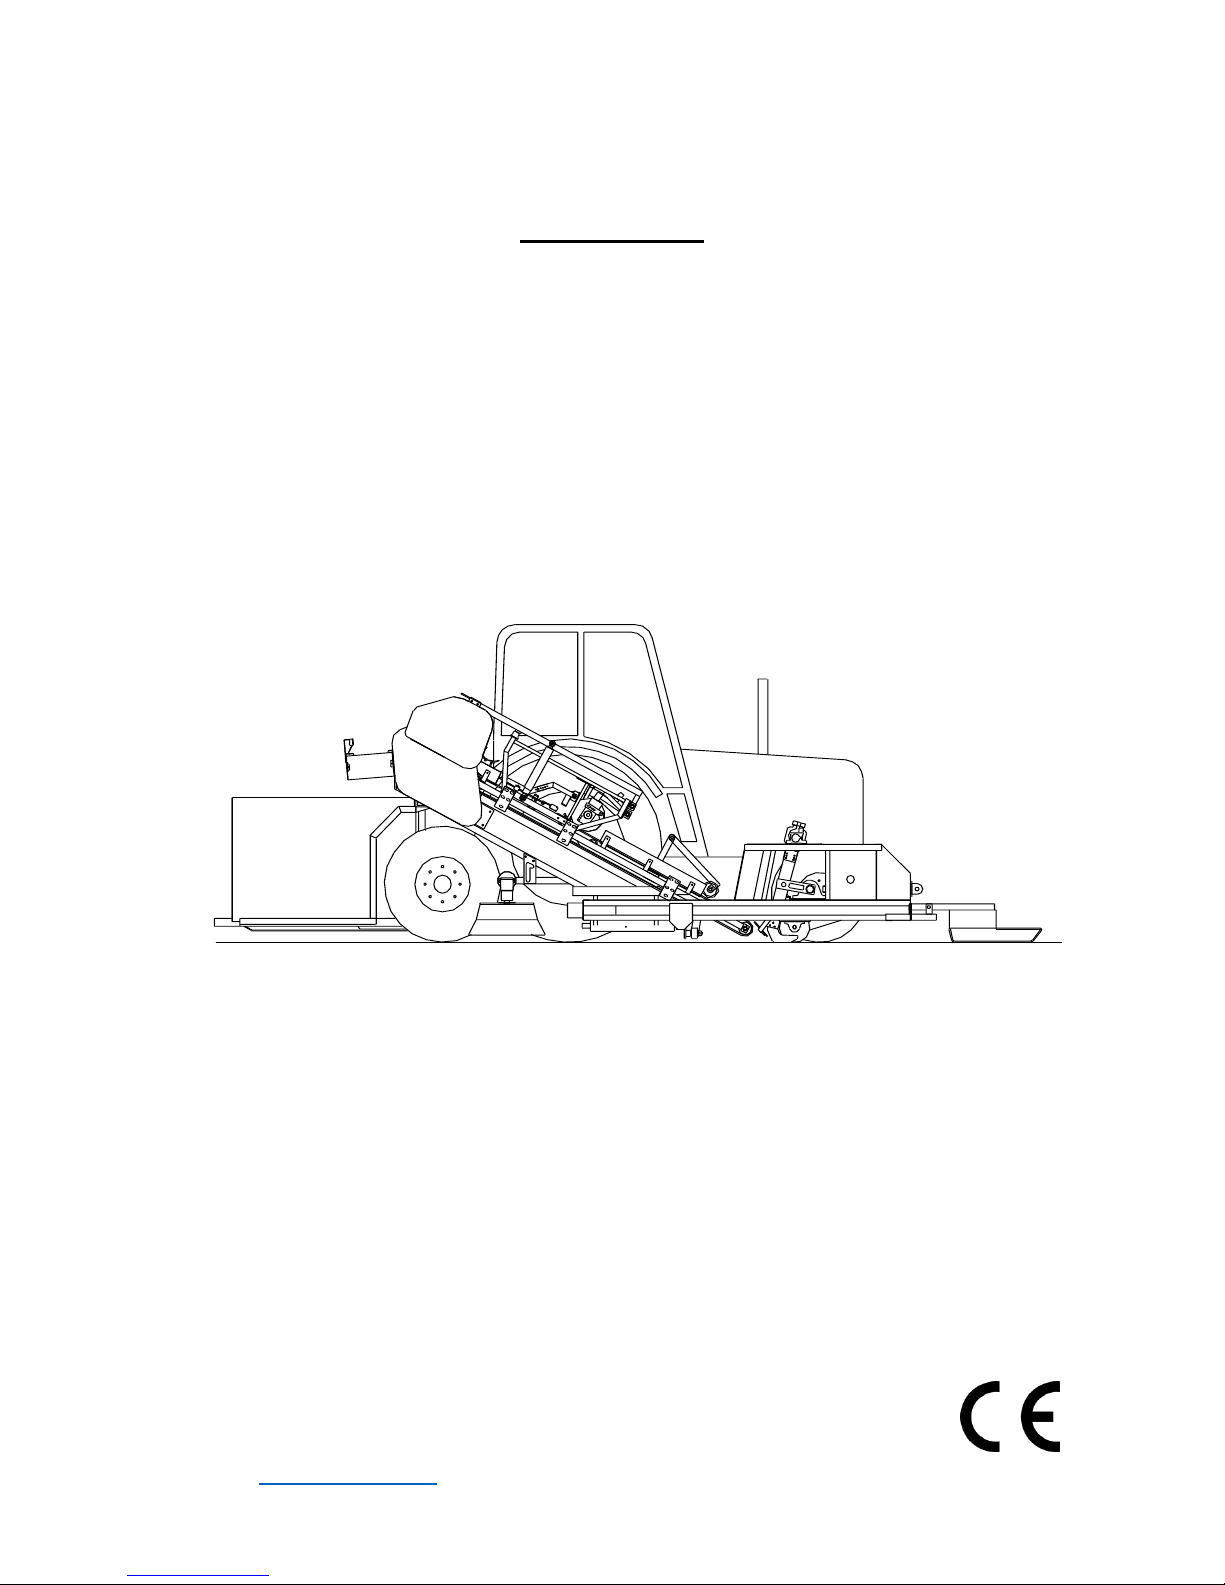
Turf Tick sod harvester
Version 2.3
March 2016
Turf Tick Products B.V.
Harmelerwaard 21
3481 LC Harmelen
Tel. +31 (0)30 666 13 48
Fax. +31 (0)30 666 13 40
E-mail info@turftick.com

1
According to NEN5509 – 1993
1. Introduction .................................................................................................................................... 2
2. Operation ........................................................................................................................................ 3
3. Composition of the machine.......................................................................................................... 4
3.1. Basic machine ............................................................................................................... 4
3.2. Cross conveyor .............................................................................................................. 4
3.3. Rotary brush .................................................................................................................. 4
3.4 Auto steer ......................................................................................................................................... 6
4. Use of the harvester ....................................................................................................................... 6
5. General Safety prescriptions......................................................................................................... 7
5.1. Safety prescriptions basis machine ............................................................................... 7
5.2. Safety instructions cross conveyor .............................................................................. 10
5.3. Safety instructions auto steer ...................................................................................... 10
6. Set-up preparation before starting ............................................................................................. 11
6.1. Basic Machine ............................................................................................................. 11
7. Use ................................................................................................................................................. 12
7.1. Controls....................................................................................................................... 12
7.1.1. Cutting the sod ..................................................................................................... 14
7.1.2. Adjusting the cutting thickness ............................................................................ 14
7.1.3. Speed main conveyor belts ................................................................................... 15
7.1.4. Speed cutting knife ............................................................................................... 15
7.1.5. Cross conveyor ..................................................................................................... 15
7.1.6. Rotary brush ......................................................................................................... 15
7.1.7. Auto steer ............................................................................................................. 16
7.2. Clipping machine on and off from the tractor ............................................................ 17
7.3. Change cutting blade .................................................................................................. 19
7.4. Settings and adjustments ............................................................................................. 20
7.4.1. Main conveyor belt speed ..................................................................................... 20
7.4.2. Cutter head ........................................................................................................... 23
7.4.3. Main frame ........................................................................................................... 27
7.4.4. Rollup system ....................................................................................................... 29
7.4.5. Trailer ................................................................................................................... 36
8. Maintenance ................................................................................................................................. 37
8.1. Maintenance schedule ................................................................................................. 37
8.2. Grease points survey ................................................................................................... 42
9. Diagrams ....................................................................................................................................... 52
9.1. Hydraulic system ......................................................................................................... 52
9.2. Electrical drawings ..................................................................................................... 53

2
1. Introduction
The Turf Tick Sod Harvester is an excellent machine that is produced with the utmost care.
This investment will bring to you the greatest benefits if you carefully read and follow the
instructions regarding safety, usage and maintenance as presented is this manual.
It is our urgent advice to read and study and follow the instructions in this manual.
The Turf Tick Harvester may not be operated by any person that has not
fully read and understood the instructions in this manual.
The Turf Tick Harvester is intended to be used by professional operators
only.
In case of any questions about the content or this manual, please inform us at the shortest
possible notice. We will react immediately in order to explain or otherwise contribute to safe
and proper operation or the machine.
Disclaimer!!
Turf Tick Products B.V. cannot be held responsible for damage, direct or indirect, resulting
partly or whole from operation errors, lack or proper maintenance or unskilled use or any
other use of the machine than as described in this manual.
3
2. Operation
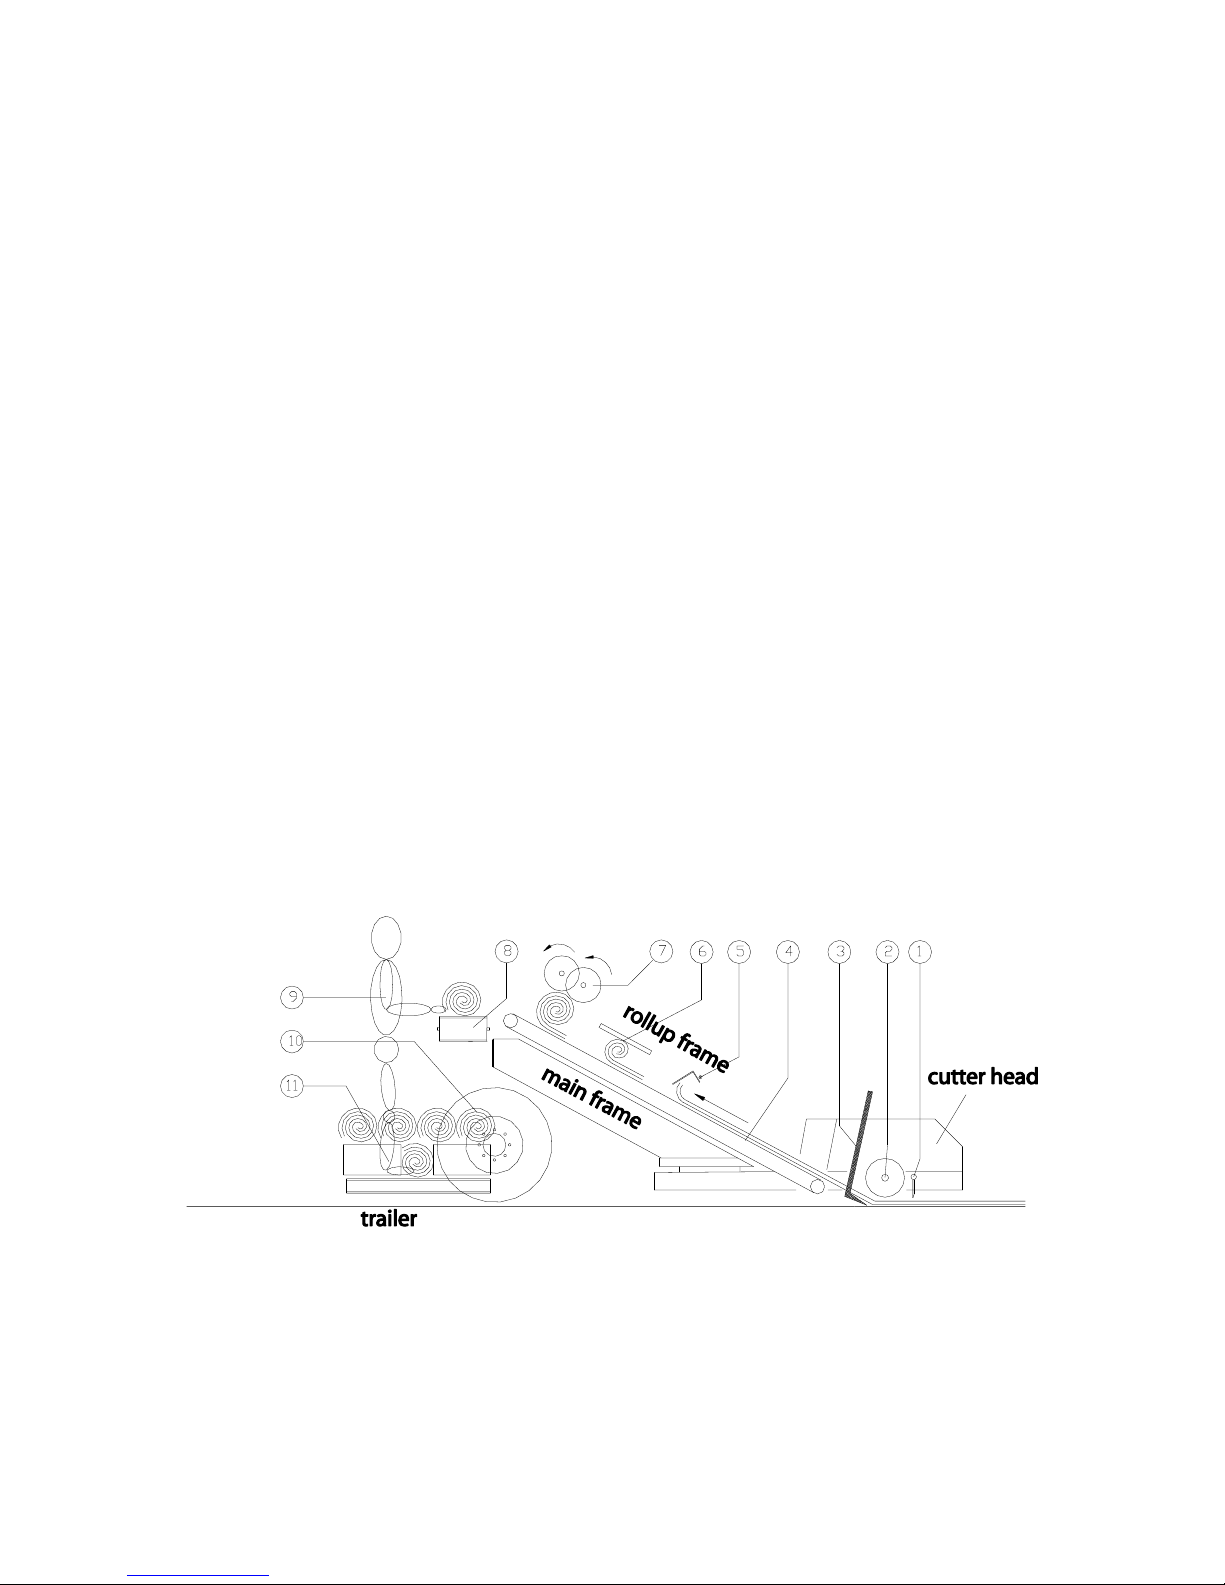
The Turf Tick machine cuts and rolls turf grass sods automatically. The machine needs to be
connected with a tractor. See for information on this subject the chapter “Usage”. In Figure 1
is schematically shown the operation of the machine (the tractor is left out). The cutting blade
(3) cuts the sod off the ground. A pressure roller (2) provides the necessary pressure on the
soil and it drives through a rotary chain drive the length chop off blade (1) that cuts the turf
vertically at the desired length.
The conveyor belt (4) transports the sod upwards, while the sod is being rolled. For rolling the
sod, a rollup system is placed on the conveyor frame. This rollup system consists of a starter
finger tray (5) that makes the first turn in a flat peace of turf that is fed up on the conveyor.
Through the rollup tray (6) the turf is rolled further while moving towards the end of the
conveyor. The rollup wheels (7) roll the last part of the turf piece and make sure the turf piece
is entirely rolled in e nice tight roll with square sides.
Depending on which options are purchased with the machine, the roll is fed on a plastic
plateau or on a cross conveyor (8), where after the sod can be stacked manually on the pallet
(11). The person who stands on the platform besides the pallet does the stacking. The pallet
can easily be dropped on the ground by lowering the cart with the three-point hitch operation
lever on the tractor.
Independent of the three-point hitch can the cutting head together with the conveyor frame is
lifted hydraulically, such that the machine can be transported without cutting the turf.
Schematic view of operation of the Turf Tick sod harvester.
1. Chop off blade 6. Rollup tray
2. Pressure roller 7. Rollup wheels
3. Cutting 8. Cross conveyor
4. Conveyor belt 9. Stacker
5. Starting finger tray 10. Support wheel
11. Pallet

4
3. Composition of the machine
The Turf Tick basic machine can be equipped with further options. The options can be
supplied directly with the original purchase of the machine or they can be purchased
separately in a later stage. The options are:
Auto steer
Cross conveyor
Rotary brush
Figure 1 shows a number of these components.
3.1. Basic machine
The following major components of the Turf Tick basis machine can be distinguished:
Cutting head:
- Cutting blade, driven by crankshaft
- Length chop off blade, driven by bottom roll using a chain and sprockets.
- Lifting arm mount, for lifting the machine for transport.
Basic frame:
- Conveyor belts, driven by a hydraulic motor using a chain and sprockets.
Rollup frame:
- Starter finger tray.
- Rollup tray.
- Rollup rubber wheels, driven by a chain drive.
Trailer:
- Platform for a person who is stacking the sods on the pallet.
- Pallet-forks with pallet
- Wheels
- 3-point hitch for tractor
3.2. Cross conveyor
It is possible to mount a cross conveyor near the end of the main conveyor frame, to
automatically transport the sods in a cross direction when they leave the main conveyor. The
cross conveyor is hydraulically driven.
3.3. Rotary brush
The rotary brush cleans during the cutting the next pass of the turf. It an inward position for
transportation and a working position where it is swung sideways out so that it is in the

5
position to sweep the edge of the turf field that is to be cut during the next pass of the
harvester.

6
3.4 Auto steer
With the optional auto steer unit it is possible to steer the tractor automatically alongside the
edge of the field, following the perfect line. The Autosteer is an electro-hydraulic system. It
consists of:
A steering shoe with sensor, which follows the edge of the turf.
A sensor mounted to the existing steering wheels of the tractor, to measure the steering
angle.
A control unit which controls the steering direction for the wheels, based on the
signals from both the steering shoe and wheels. This control unit consists of:
-an electrical part
-a hydraulic part.
A more extended description of the auto steer system can be found in the separate user manual
that comes with the auto steer system. See for further details this separate auto steer manual.
4. Use of the harvester
The Turf Tick sod harvester is specially developed for:
- The cutting and automatic rolling of turf on levelled area at a speed of max 5 kilometers in
1 hour.
- In use the machine needs to be connected with a tractor that is suitable and fit for that
purpose. Read for information on this subject also the chapter “Setting up for use”
- For taking with it in the field only one pallet with turf stacked on it. The absolute
maximum weight of the pallet with turf is 1500 kg.
- The Turf Tick sod harvester is not approved and designed for driving on the public
roads When transportation over public roads is necessary, the machine needs to adapted
and checked to make sure that that it fulfils to all specific national or local prescriptions.
The machine is not developed for transport of people. Only on the platform (see chapter
“operation “) it is permitted for one experienced person to stand and work.
During transportation it is not permitted for a person to be transported with the machine,
beside the tractor driver, who is to be seated on the tractor seat
Use the Turf Tick only for the purpose it is developed.
7
5. General Safety prescriptions
Read following Safety prescriptions entirely before starting
operation of the machine.
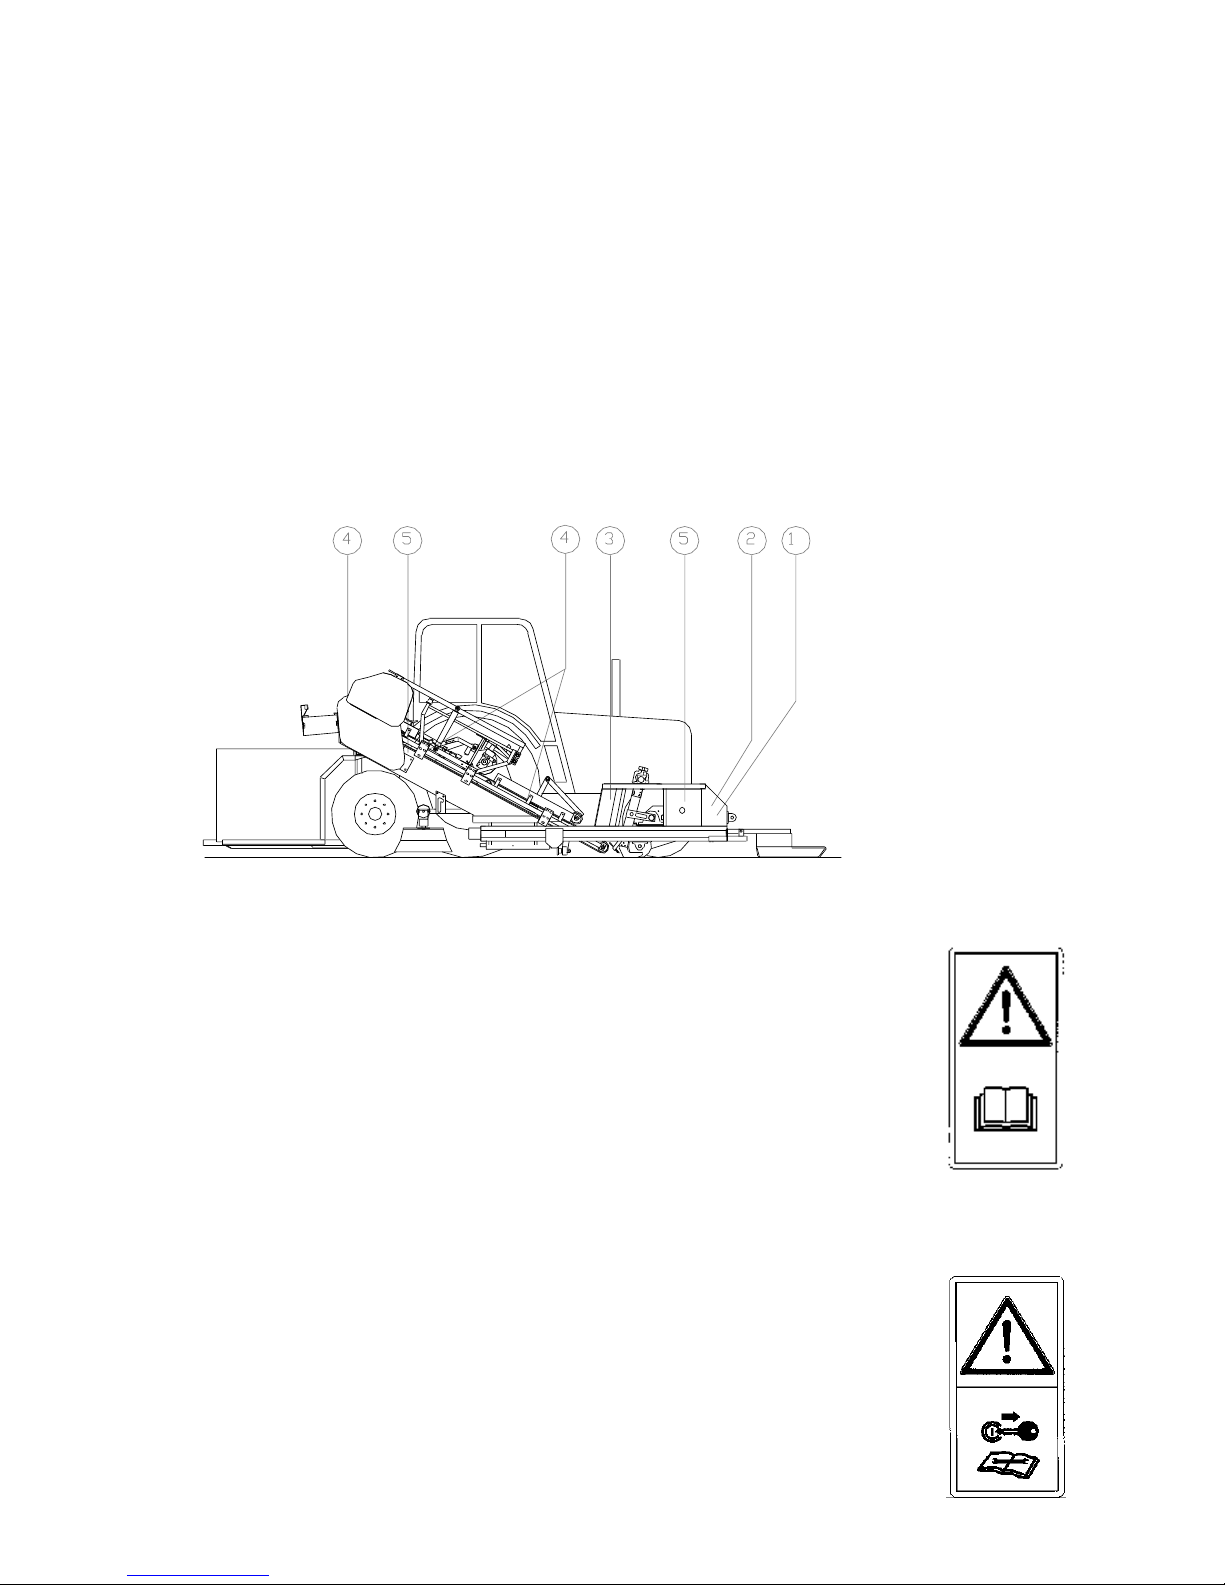
On the machine are placed a number of pictograms, which are in this chapter further
explained. On drawing below is pointed out where the different pictograms are located.
Learn the meaning of the pictograms; be sure to know the meaning of all of
each of them!
5.1. Safety prescriptions basis machine
1.
Beware: Risk of serious injury or death if the machine is operated without
having fully read and understood the content of this manual. This does not
only apply for the operator but also for the people working with/ around this
machine.
Read the user manual of the Turf Tick sod harvester carefully
before operating/ servicing the machine, to avoid potential dangerous
situations associated or created by the machine.
2.
Careful! Risk of serious injury during maintenance.
Before starting any maintenance or adjustment activities to the machine:
Lower the machine entirely to the ground, switch off the
electrical system, stop the engine of the tractor and take key out
of contact. Pull handbrake. If insecure about any technical or

8
safety matter associated with the machine, read the appropriate section of
the user manual or contact local experts or contact our factory and call +31
(0)30 666 1348.
It is of the utmost importance to make sure that no unexpected motion can occur during
maintenance or adjustment activities associated with the machine. Lowering the
machine entirely to the ground, stopping the engine and taking key out help preventing
unexpected motion induced by the maintenance or adjustment activities or by another
person who may induce unintended motion or who may be unaware of the ongoing
maintenance or adjustment activities.
3.
Careful! Risk of entrapment and injury between moving and rotating
parts (of the cutting head).
When cleaning, adjusting or all other activities in close
proximity of the cutting head:
STOP the machine.
Do not approach the machine when not entirely come to a total stop.
Stay away with hands from moving parts.
Keep a distance of at least 5 meters from a working or moving machine.
4.
Careful! Danger for injury caused by moving parts in and on the
conveyor frame.
When cleaning, adjusting or all other activities
associated with the conveyor belts, STOP the machine.
Do not approach the machine until the machine is entirely shut off.
Stay away with hands from any moving parts.
Keep at least 5 meters distance from a working or running machine.
5.
Careful! When lifting or lowering of the machine, danger for (serious)
injury.
Stay at least 5 meter away from a working machine
Approach only when sure that machine is entirely lowered on the ground
and is fully switched off.
6.

9
Take care! Danger for injury when trapped if covers are removed
Make sure that all covers and shields in all instances are mounted
100% correctly when during use of the machine.
Only in case of maintenance it is allowed to remove the any covers or shields. See for this
chapter maintenance.
Check on replacement of all covers and shields after maintenance.
7.
Careful! Danger for injury, because of hydraulic system.
The hydraulic system operates with high pressure.
Before working at the system make sure that de system is no pressure at all. Highly
pressurized oil (up to 160 bar) passes easily through clothing and infringes the skin. This can
result in very serious injury to the skin. Highly pressurized oil can easily cause blood
poisoning.
8.
Careful! Danger during connecting and disconnecting the machine to the tractor.
Take care that during connecting and disconnecting the machine not a person is entirely or
with any limb between the tractor and the machine.
For correctly connecting and disconnecting the machine to the tractor, read carefully the
chapter “Use” of this user manual.
9.
Careful! Danger while standing and working on the stacking platform besides the pallet.
In order to work safely on the stacker platform, following safety rules need be practiced.
- Drive while cutting the turf never faster than walking speed.
- Avoid sudden movement of the harvester. Do not start driving abruptly and avoid abrupt
stop operations. Before starting movement of the tractor, always make sure that the
“stacker” is stable at his position and is aware that movement will start.
- When driving the machine while not cutting it is strongly advised that the stacker is not on
the platform. In case of necessity for the stacker to be on the platform during transport of
the machine, make sure that the stacker holds with his hands a stable support at the
machine. Make sure that the stacker will not approach with his hands or limb any part of
the machine that can start moving unexpectedly by any action or possible operator error.
The stacker can stabilize his position by holding the end bar of the rollup frame. See also
chapter “Operation”. Remember that being on the platform during transport will remain a
possibly hazardous activity that is to be handled with utmost care and may not be a regular
activity. For inexperienced persons or with an inexperienced tractor driver it is absolutely
forbidden.
- Do not drive backward with the stacker standing on the platform. Make it a 100% habit of
waiting with driving backwards until the stacker has a safe distance from the path of travel
of the machine.

10
10.
Watch out! Danger if not passing through safety instructions to any new operator or
stacker.
People can seriously hurt themselves if people do not pass through the information about
safety instructions. Make sure new users of the machine are fully informed about the
instructions and dangers of the machine.
5.2. Safety instructions cross conveyor
11.
Watch out!
People can seriously hurt themselves if the protection covers of the cross conveyor are not
mounted. Make sure the protection covers are always mounted before using the machine.
5.3. Safety instructions auto steer
12.
Watch out! Danger if disturbance auto steer.
People can seriously hurt themselves when the auto steer system steers the tractor not
properly. Therefore, never drive faster than 5 km/h with auto steer switched on and stop the
tractor immediately if failure happens.
13.
Watch out! Danger if unintentionally switching on auto steer.
People can seriously hurt themselves when you unintentionally switch on the auto steer.
For instance if you drive on a public road. Therefore only switch on the auto steer if you start
cutting grass. Before lifting the machine you have to switch off the auto steer.
14.
Watch out! Danger using automatic clutch by insufficient sight.
People can seriously hurt themselves when you can’t see the person on the back of the
machine and still want to use the automatic clutch. If the sight is insufficient, don’t drive the
machine.

11
6. Set-up preparation before starting
6.1. Basic Machine
The Turf Tick machine is assembled in three main parts.
The trailer (parts book 101-52). This one is mounted on the 3-point hitch at the back
of the tractor.
The sod harvester, existing off cutter head, mainframe and rolling up frame. This one
is connected to the trailer and on the bottom side of the tractor with a special mounting
frame.
Mounting frame, (parts book 100-50). This one needs to be made at size and mounted
at the “belly” of the tractor. The mainframe of the cutting machine is mounted on this.
An employee of Turf Tick Products B.V is making the sod harvester at size in six steps.
These steps are:
1. Connection of the trailer to the three-point hitch of the tractor.
2. Connection of the sod harvester to the trailer with a special connecting frame (parts
book 101-52-17 en 101-52-16).
3. Lengthen the mounting frame, such that the sod harvester is at the right distance of the
tractor.
4. Connection of the hydraulic tubes.
5. Connection of the electric parts.
6. Adjustment of the sod harvester to your specific needs en circumstances (referred in
chapter “Settings and adjustments”.

12
7. Use
Before using the machine, it needs to be set upped (referred in chapter Set up preparation for
starting), safety prescriptions completely read and the machine set upped and adjusted
(referred in chapter “Settings and adjustments”)
7.1. Controls
There are several control functions distinguished for the control of the Turf Tick sod
harvester. Some of them are related to the tractor it is mounted on. The controls of the tractor
can be found in the manual of the specific tractor.
Overview of the control functions Turf Tick.

13
Pos. Nr.
Description
User manual
Basic machine
1 (lever)
Switching on or off hydro pump through p.t.o-shaft.
Tractor
2 (switch)
Switching on or off hydraulic system
Turf Tick
3 (lever)
Lifting up and down sod harvester
Tractor
4 (lever)
Lifting up and down trailer.
Tractor
5 (adjustment
button)
Manual depth adjustment cutting knife.
Turf Tick
6 (switch)
Electrical depth adjustment cutting knife.
Turf Tick
7 (turning
button)
Fine-tuning speed main conveyor belts
Turf Tick
8 (turning
button)
Setting speed-cutting knife.
Turf Tick
9 (turning
button)
Settings speed conveyor belt.
Turf Tick
10 (turning
button)
Settings speed rotary brush.
Turf Tick
Auto steer
11 (switch)
Auto steer system on/off
Turf Tick
12 (turning
button)
Auto steer offset left/right
Turf Tick
13 (lever)
Hydraulic lifting up/down auto steer shoe
Tractor
14
Manually lifting up/down auto steer construction
Turf Tick
Rotary brush
Turf Tick
15
Manually shifting in/out rotary brush
Turf Tick

14
7.1.1. Cutting the sod
To be able to cut the sod (with the basic machine) is required to execute the next handlings.
1. Make sure the sod harvester is lifted up (lever 3) and that the trailer is lifted up as far
(lever 4) that the pallet forks are off the ground. The lifting arms from the trailer (parts
book 101-52-02+03) are allowed to touch the rubber stops (parts book 101-52-20)
slightly.
2. Drive to the starting point of cutting. Don’t drive faster than 5 km/hr. if the stack
person is on the back.
3. Put an empty pallet on the pallet forks of the trailer.
4. Maneuver the machine in the right position.
5. Choose the right gear of the tractor to cut the sod (chapter settings and adjustments).
6. Lower the machine (lever 3). Make sure the lifting chain is completely without
tension).
7. Switch on the hydraulic pump by turning on the p.t.o.-shaft (lever 1).
8. Switch on the hydraulic circuit with the switch (switch 2). The cutting knife and the
main conveyor belt are starting to move.
9. Start driving and cutting the sod.
If pallet is full, then:
10. Drive as far till the last sod is just cut and stop the tractor.
11. Turn the last sod through) the main conveyor belt out of the machine.
12. Turn off the sod harvester (switch 2).
13. Turn off the hydraulic pump (lever 1).
14. Lift up the sod harvester (lever 3)
15. Drive to the location the pallet needs to be put down.
16. Lower the trailer as far (lever 4), that the pallet is on the ground.
17. Drive straight out of the pallet.
18. Lift up the trailer a little bit (lever 4), that the pallet forks are off the ground
7.1.2. Adjusting the cutting thickness
The depth off cutting in the ground specifies the thickness of the sod. This depth is easily
changed with the next two methods:
1. Manually by turning the depth adjustment pipe (adjustment button 5). Before doing
this stop the machine, Loosen the nuts from the depth adjustment pipe (parts book
100-56-109) a little bit. Watch out: Don’t tighten this nut too much!
2. Fine-tuning with electrical depth adjustment (switch 6). This adjustment is possible
while the machine is standing still or turning.
It is also possible to adjust the side plates (parts book 100-56-59) referring to the adjustment
clamp (parts book 100-56-03). This allows an even greater adjustment limits (chapter settings
and adjustments).

15
7.1.3. Speed main conveyor belts
The speed of the main conveyor belts is dependent to the driving speed. When the tractor is
driving with a higher speed in the same gear, the speed of the main conveyor belt is
simultaneously speeding up. It is important to drive in the right gear (chapter settings and
adjustments).
The fine-tuning of the speed from the main conveyor belts is possible by turning a hydraulic
valve (turning button 7).
7.1.4. Speed cutting knife
By turning the hydraulic valve (nr. 8). The maximum speed of the knife engine is adjusted, so
the speed of the cutting knife. This means that if the speed of the p.t.o.-shaft is increasing due
to speeding up the engine, the cutting knife speed is limited till the maximum adjusted speed.
When the number of revolutions of the p.t.o.-shaft is increasing even more the speed of the
cutting knife still remains limited at the maximum adjusted speed. Though the speed of the
main conveyor belt is increasing at a higher number of revolutions of the p.t.o.-shaft.
Turning of the hydraulic valve:
- First loosen the lock washer a little bit. This is the lower one of the two rings on the
valve. Before doing this loosen the hexagon socket head cap screws in the lock
washer.
- Turn the hydraulic valve with the upper ring in the desired position.
- Tighten the lock washer and hexagon socket head cap screws.
7.1.5. Cross conveyor
The speed of the cross conveyor can be adjusted by turning the hydraulic valve (nr. 9). The
cross conveyor is speeding up when the main conveyor belt is speeding up (higher number of
revolutions) the p.t.o.-shaft).
Turning of the hydraulic valve:
- First loosen the lock washer a little bit. This is the lower one of the two rings on the
valve. Before doing this loosen the hexagon socket head cap screws in the lock
washer.
- Turn the hydraulic valve with the upper ring in the desired position.
- Tighten the lock washer and hexagon socket head cap screws.
7.1.6. Rotary brush
The rotary brush has a transport setting and a working setting. With button (nr. 15) the rotary
brush can be set from the transport setting to the working setting and the other way around.
The rotary brush starts turning when the hydraulic circuit is switched on (switch 2).

16
The speed of the rotary brush can be adjusted by turning the hydraulic valve (nr. 10). The
rotary brush starts turning faster when the main conveyor belt is speeding up (higher number
of revolutions of the p.t.o.-shaft)
Turning of the hydraulic valve:
- First loosen the lock washer a little bit. This is the lower one of the two rings on the
valve. Before doing this loosen the hexagon socket head cap screws in the lock
washer.
- Turn the hydraulic valve with the upper ring in the desired position.
- Tighten the lock washer and hexagon socket head cap screws.
7.1.7. Auto steer
Before working with the auto steer, it needs to be correctly adjusted (chapter settings and
adjustments). The fine-tuning is possible with the turning button (nr.12). This button lets the
tractor steer a little bit more to the left or the right, allowing keeping no more grass border.
You can put on or off the auto steer system with switch 11. From the moment the auto steer
system is on, you can’t steer manually any more. The auto steer system takes over the steering
of the tractor. Therefore, the auto steer system can only switched on if you want to start
cutting! If the cutting process stops, the auto steer system has to be switched off with
switch 11.
The auto steer shoe, which is in front of the sod harvester, can be lifted hydraulic (lever 13).
For transportation the auto steer frame can be lifted manually (nr. 14).
 Loading...