

Turfmech Buffalo Series, Buffalo 20, Buffalo 24, Buffalo 27 Operator's & Parts Manual

A member of the Turfmech group
Buffalo 20, 24 & 27”
OPERATOR & PARTS MANUAL
For Serial number:
BU20/4-XX-XXX onwards
BU24/4-XX-XXX onwards
BU27/4-XX-XXX onwards
(AM81589 Issue B March 2013)
English version
Turfmech Machinery Limited
Hangar 5, New Road, Hixon, Stafford, ST18 0PJ, United Kingdom
Tel: +44 (0) 1889 271503
Fax: +44 (0) 1889 271321
Sales@turfmech.co.uk
www.turfmech.co.uk
For Allett spare parts
Tel: +44 (0) 1889 272095
Fax: +44 (0) 1889 271321
Sales@allett.co.uk
www.allett.co.uk

2
READ THIS MANUAL BEFORE USING AN ALLETT BUFFALO CYLINDER
MOWER.
YOUR SAFETY IS INVOLVED
IT IS ESSENTIAL THAT OPERATORS STUDY THIS DOCUMENT FOR THEIR
OWN SAFETY.

3
Contents
1.0 Introduction
1.1 Model type and serial number
2.0 Pictograms and Decals
3.0 Safety notes
4.0 Assembly
5.0 Operating controls
6.0 Using your mower
6.1 Starting
6.2 Stopping
6.3 Adjusting the bottom blade - setting “on cut”
6.4 Height of cut adjustment
6.5 Engaging drive to the cylinder
6.6 Engaging drive to the land roll
6.7 Park brake
6.8 Mowing
7.0 Maintenance
7.1 Adjusting land drive and cylinder cables
7.2 Checking the engine oil
7.3 General engine maintenance
7.4 Fuel
7.5 Grease points
7.6 Bottom blade grinding angles
7.7 Inspection of safety critical components
7.8 Maintenance schedule
8.0 Making adjustments to your mower
8.1 Floating handle bars
8.2 Delivery plate and fins
9.0 Vibration reduction
10.0 Noise reduction
11.0 EC Declaration of conformity
12.0 Fault finding when mowing
13.0 Specification
14.0 Guarantee
15.0 Parts Section

4
1.0 Introduction
The Buffalo lawn mower range is designed as a professional lawn and sports turf
mower.
The lawn mower is powered by a petrol engine, it is self propelled via a belt and
chain drive to the land roll. The land roll has an internal geared differential. Power is
transferred to the cutting cylinder via toothed belt drive.
The Buffalo mowers are designed for the management of high quality turf. Use in any
way other than that stated is considered contrary to the intended use. Compliance
and strict adherence to the conditions of operation, service and repair as specified in
this manual also constitute essential elements of the intended use.
The way in which the Buffalo mower is operated and maintained will have a profound
effect on its performance and reliability.
A Buffalo mower should be operated, serviced and repaired only by persons who are
familiar with its particular characteristics and who are familiar with the relevant safety
procedures.
The safety precautions outlined in this manual and all other generally recognised
regulations on safety must be observed at all times.
Any modifications carried out to a Buffalo mower will relieve Turfmech Machinery
Limited of liability for any resulting damage or injury.
This manual is based on information available at the time of publication.
Turfmech Machinery Limited reserves the right to amend product specifications
without prior notification.
1.1 Model type and serial number
The model can be found in two places:
1. On the top cover of the mower.
2. On the serial number plate located on the right side of the mower chassis.
The serial number can be found on the serial plate.
Please enter your information below
Model:
Serial Number:
5
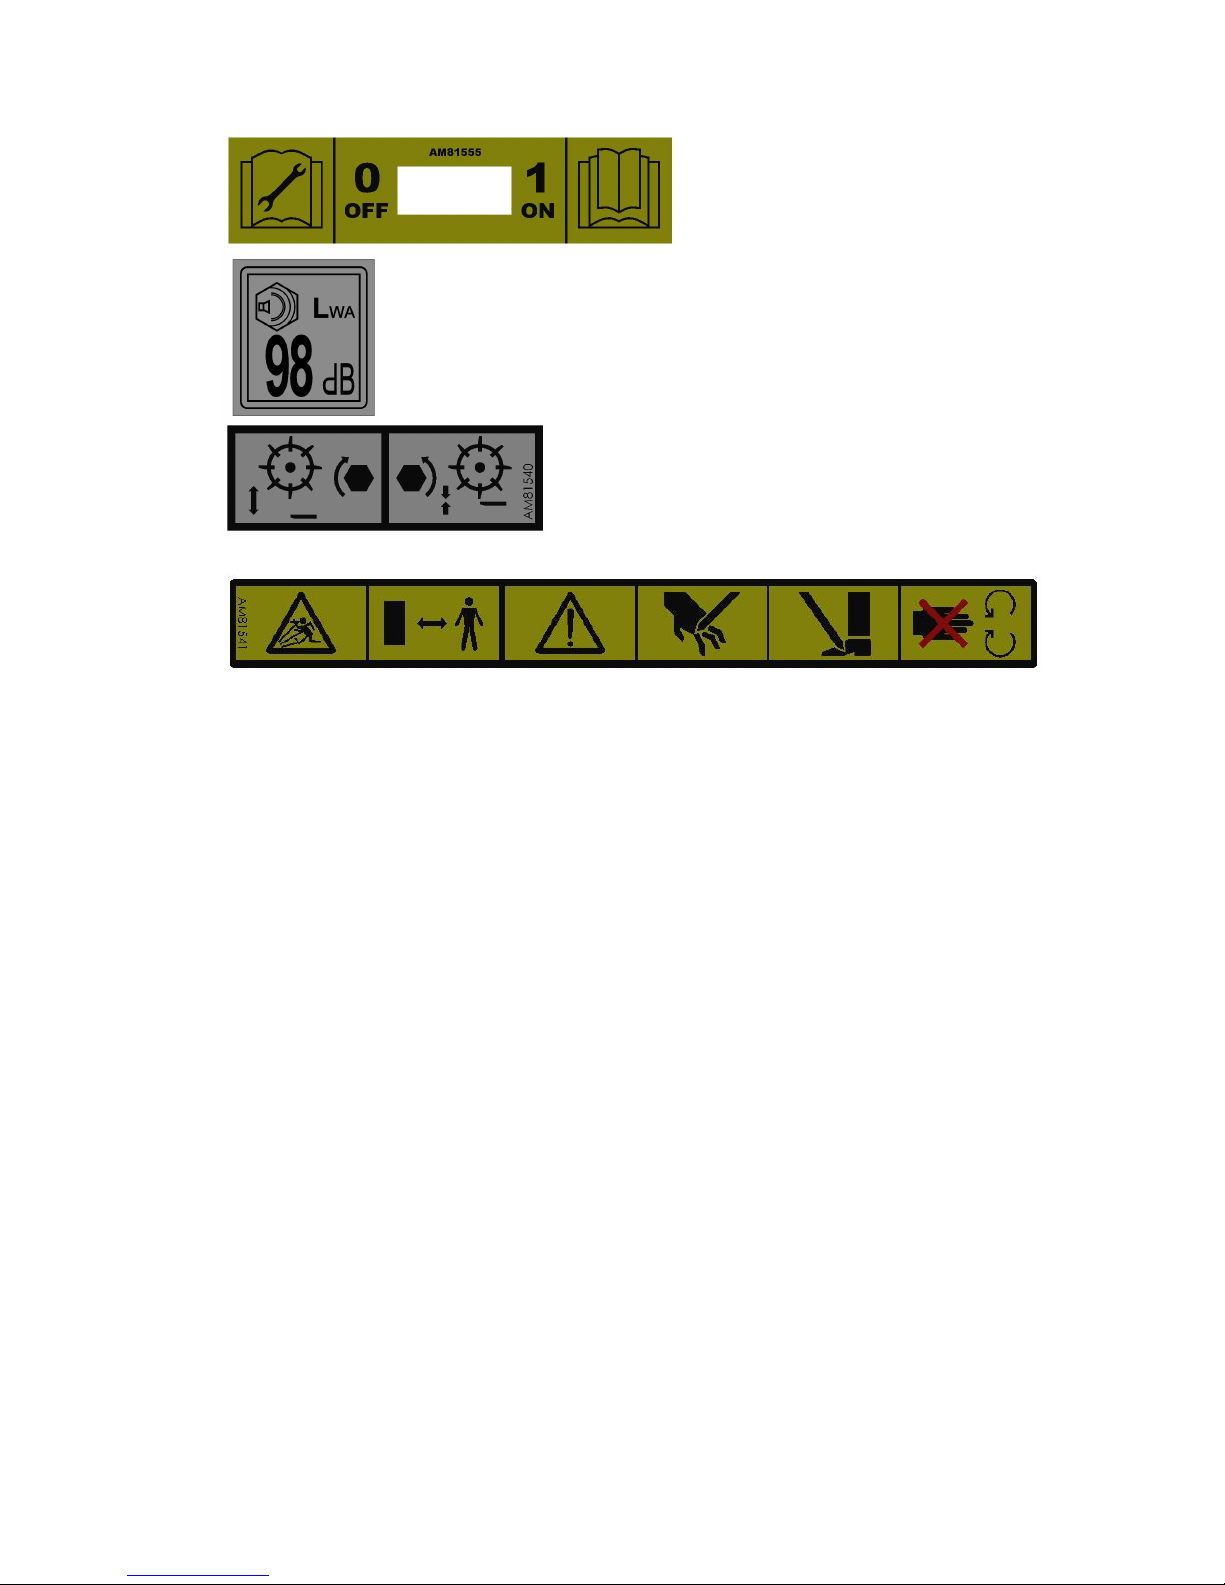
2.0 Pictograms and Decals
3.0 Safety notes
Read these instructions carefully, be familiar with the controls and the proper use of
the lawnmower.
Learn how to stop the lawnmower quickly in an emergency.
Never allow children or people unfamiliar with these instructions to use the
lawnmower. Local regulations may restrict the age of the operator.
Never mow while people, especially children or pets are nearby
Never pick up or carry the lawnmower while the motor is running.
Keep in mind that the operator or user is responsible for accidents or hazards
occurring to other people or their property.
Whilst mowing, always wear substantial footwear and long trousers. Do not operate
the equipment when barefoot or wearing open sandals.
Wear appropriate protective clothing and equipment when you are operating the
lawnmower, such as safety glasses, long trousers, substantial footwear and ear
protection. Long hair, loose clothing or jewellery can get tangled in moving parts.
Thoroughly inspect the area where the lawn mower is to be used and remove all
objects that may be thrown by the machine.
WARNING - petrol is highly flammable.
- Store fuel in containers especially designed for this purpose
- Refuel outdoors only and do not smoke while refuelling
- Add fuel before starting the engine. Never remove the cap of the fuel tank or add
petrol whilst the engine is running or the engine is hot.
- If petrol is spilt, do not attempt to start the engine, move the machine away from the
area of spillage and avoid creating any source of ignition until petrol vapours have
dissipated.
- Replace the fuel tank and container caps securely
Refer to manual before carrying out
maintenance,
Engine On/Off switch, Read manual
before starting
Guaranteed Sound power level
emitted by the mower
Bottom blade to cylinder adjustment
Flying debris, keep bystanders away. Warning, sharp blades, do not touch rotating blades.
The blades continue to rotate after the mower is switched off

6
- Replace faulty silencers
- Do not operate the engine in a confined space where dangerous carbon monoxide
fumes can collect.
- Before using, always visually inspect to see that the cutting cylinder is not worn or
damaged.
Mow only in daylight or in good artificial light.
Avoid operating the lawnmower in wet grass, where feasible.
Always be sure of your footing on slopes.
Walk, never run.
Mowing on banks can be dangerous:
- Mow across the face of sloes – never up and down.
- Be particularly careful of your footing on slopes or wet grass.
Exercise extreme caution when changing direction on slopes.
Do not mow excessively steep slopes.
- Use extreme caution when stepping back or pulling the lawnmower towards you.
Stop the blades if the lawnmower has to be tilted for transportation when crossing
surfaces other than grass and when transporting the lawnmower to and from the area
to be mowed.
Do not tilt the lawnmower when engaging the blades, except if the lawnmower has to
be tilted for starting in long grass. In this case, do not tilt it more than absolutely
necessary and lift only the part which is away from the operator. Always ensure that
both hands are in the operating position when returning the mower to the ground.
Never operate the lawnmower with defective guards or without the safety devices, for
example deflectors and grass catchers in place.
Do not change the engine governor settings or overspeed the engine. Operating an
engine at excessive speed may increase the hazard of personal injury.
Disengage all blade drive clutches before starting the engine
Start the engine carefully according to instructions and with feet well away from the
blades. Do not tilt the mower when starting. Keep clear of the discharge opening at
all times. Never pick up or carry a lawnmower while the engine is running.
Do not put hands or feet near or under rotating parts while the lawnmower is being
operated.
Stop the engine and disconnect the spark plug lead:
- Before checking, cleaning or working on the lawnmower
- After striking a foreign object, inspect the lawnmower for damage and make repairs
before restarting and operating the lawnmower.
- If the lawn mower starts to vibrate abnormally (check immediately).
- Before making height of cut adjustment
Stop the engine:
- Whenever you leave the machine
- Before refuelling
- Before checking blockages
- Before making a height of cut adjustment
Reduce the throttle setting during engine shut-down and turn the fuel off at the
conclusion of mowing.
Keep all nuts, bolts and screws tight to be sure that the lawnmower is in safe working
condition.
Never store the lawnmower with petrol in the tank inside a building where fumes may
reach an open flame or spark.
Allow the engine to cool before storing in any enclosure.
To reduce the fire hazard, keep the engine, silencer and fuel storage area free of
grass, leaves or excessive grease.
Check the grassbox frequently for wear or deterioration.
Replace worn or damaged parts for safety.
Go slow when using a trailing seat, especially when cornering.
If the fuel tank has to be drained, this should be done outdoors.
Be careful during the adjustment of the lawnmower to prevent entrapment of the feet
and hands between moving blades and fixed parts of the lawnmower.
7
Ensure replacement parts fitted are manufacturer’s original or approved by the
manufacturer.
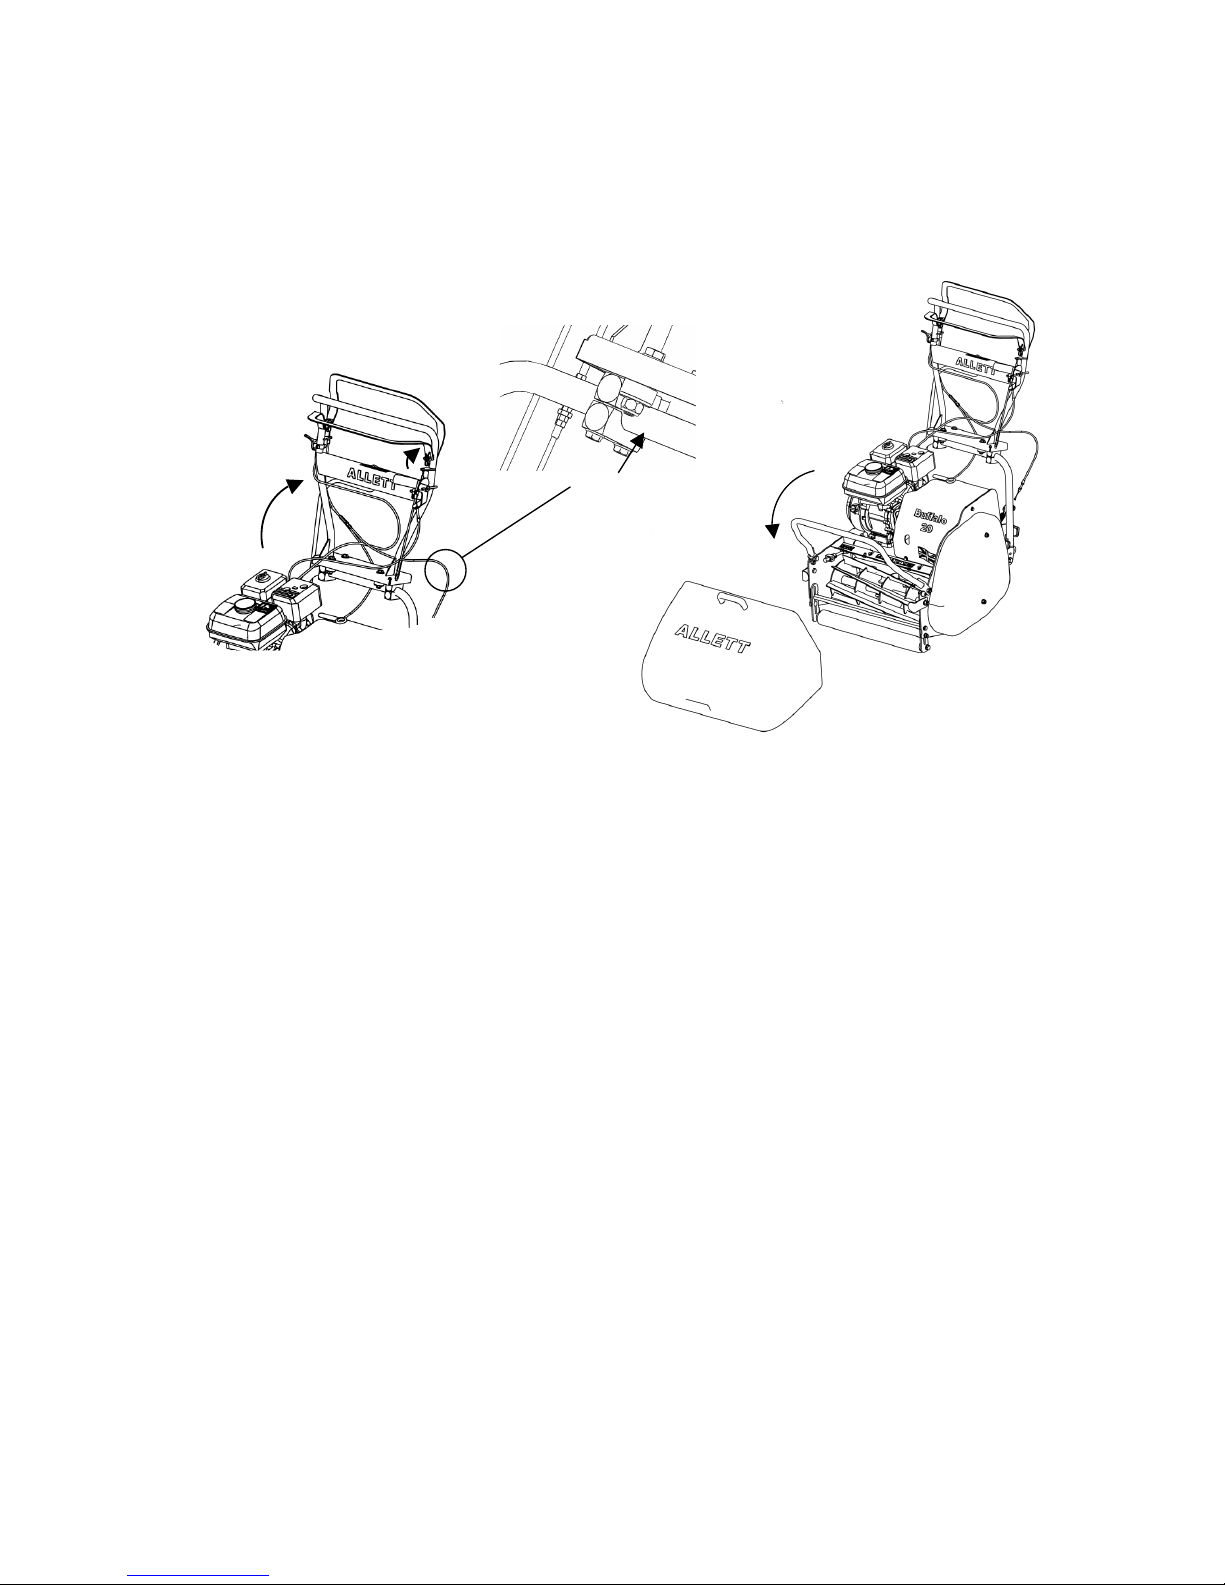
4.0 Assembly
1) Fold handles back to a comfortable operator height and tighten 4 bolts
2) Fold down grass box cradle and fit grass box
3) Release the handbrake
1
x4
3
2
8
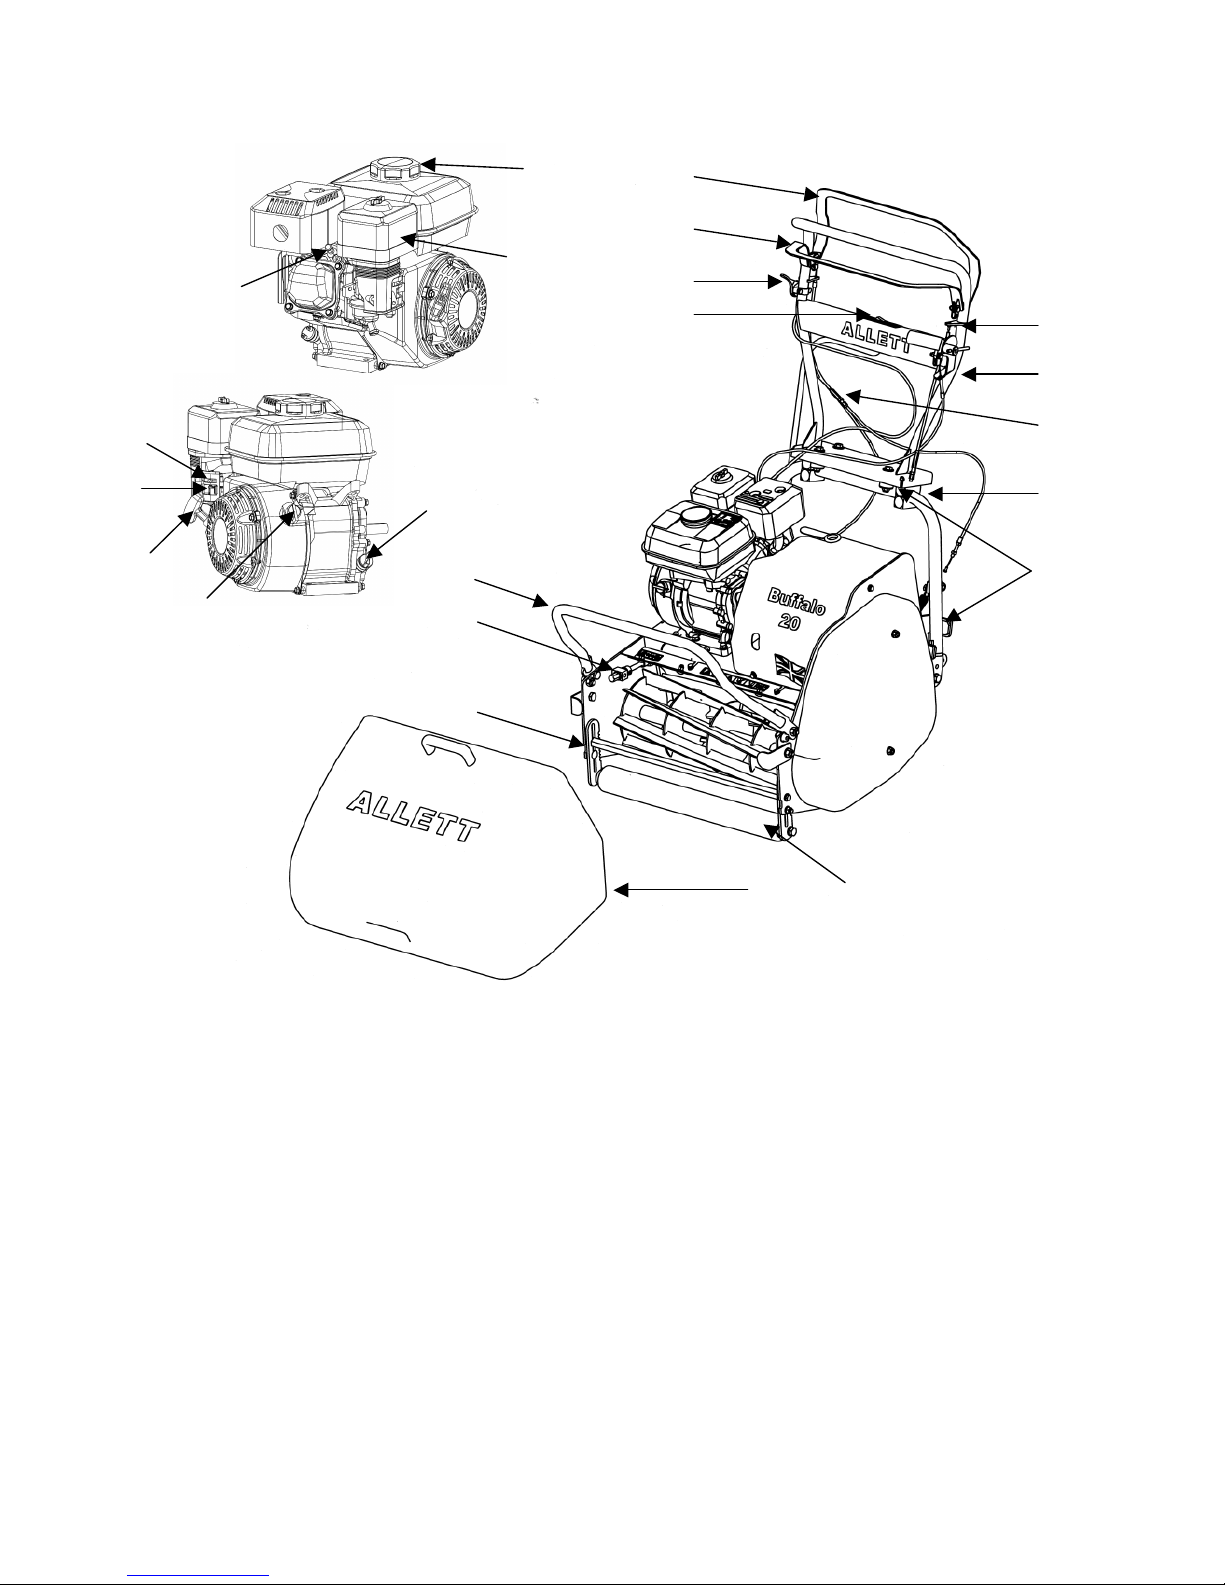
5.0 Operating controls
1) Handle bar ON/OFF switch
12) Starter grip
2) Throttle
13) Fuel valve lever
3) Cutting cylinder engagement
14) Choke lever
4) Land roll engagement
15) Oil dipstick
5) Park brake
16) Spark plug
6) Top handle bar
17) Air filter
7) Cable adjuster
18) Fuel filler cap
8) Bottom handle bar
19) Bottom blade adjuster
9) Grass box hoop
20) Front roller adjuster
10) Grass box
21) Front roller
11) Engine ON/OFF switch
22) Vibration mounts
2 1 3
4 5 6 7 8 9 10
16
18
17
14
13
12
11
15
20
19
22
21

9
6.0 Using your mower
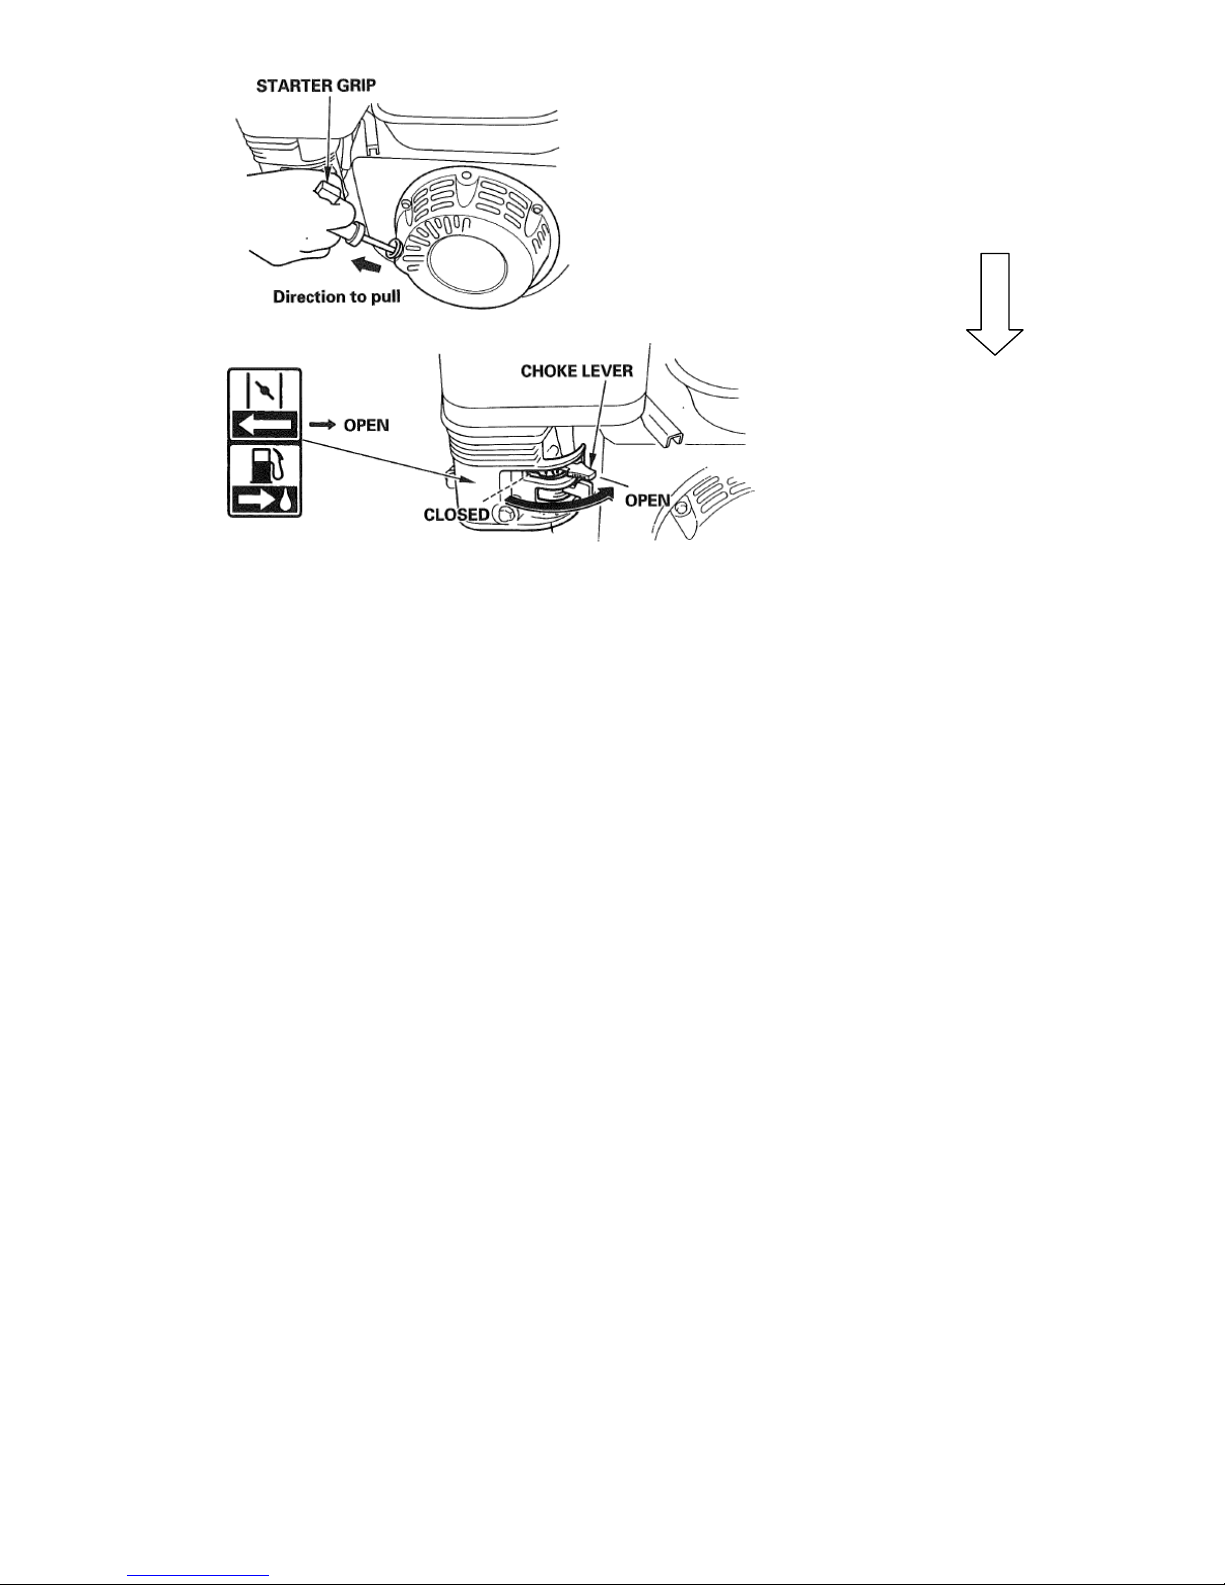
6.1 Starting
1) Move the fuel valve lever to the
ON position
2) For a cold T start move the
choke lever to the CLOSED
position |\|
To restart a warm R engine
leave the choke lever in the
OPEN position
MAX
MIN
1/3 position
3) Set the throttle to 1/3 position
between MIN and MAX
4) Turn the engine switch to the ON
position
5) Move the handle bar mounted engine
switch to the ON position
10
6.2 Stopping
1) Move the throttle lever to MIN position
2) Move the handle bar mounted stop switch to OFF
3) Turn the petrol tap OFF
To stop in an emergency move the handle bar mounted stop switch to OFF
6.3 Adjusting the bottom blade - setting “on cut”
The bottom blade is correctly adjusted when the cutting cylinder lightly brushes the
bottom blade as the cylinder is turned. Contact should be made across the full width
of the bottom blade.
The blades act like a pair of scissors, as a test correctly adjusted blades will cleanly
cut a piece of good quality writing paper across the width of the blade. The bottom
blade should be adjusted if the grass is not cut cleanly and evenly.
WARNING – Blades are sharp always wear gloves
6) Pull the starter grip lightly until
you feel resistance, then pull
briskly. Return the starter grip
gently
7) If the choke lever was moved to
the CLOSED position |\| to start
the engine, gradually move it to
the OPEN position |||as the
engine warms up
11
1 & 3
2
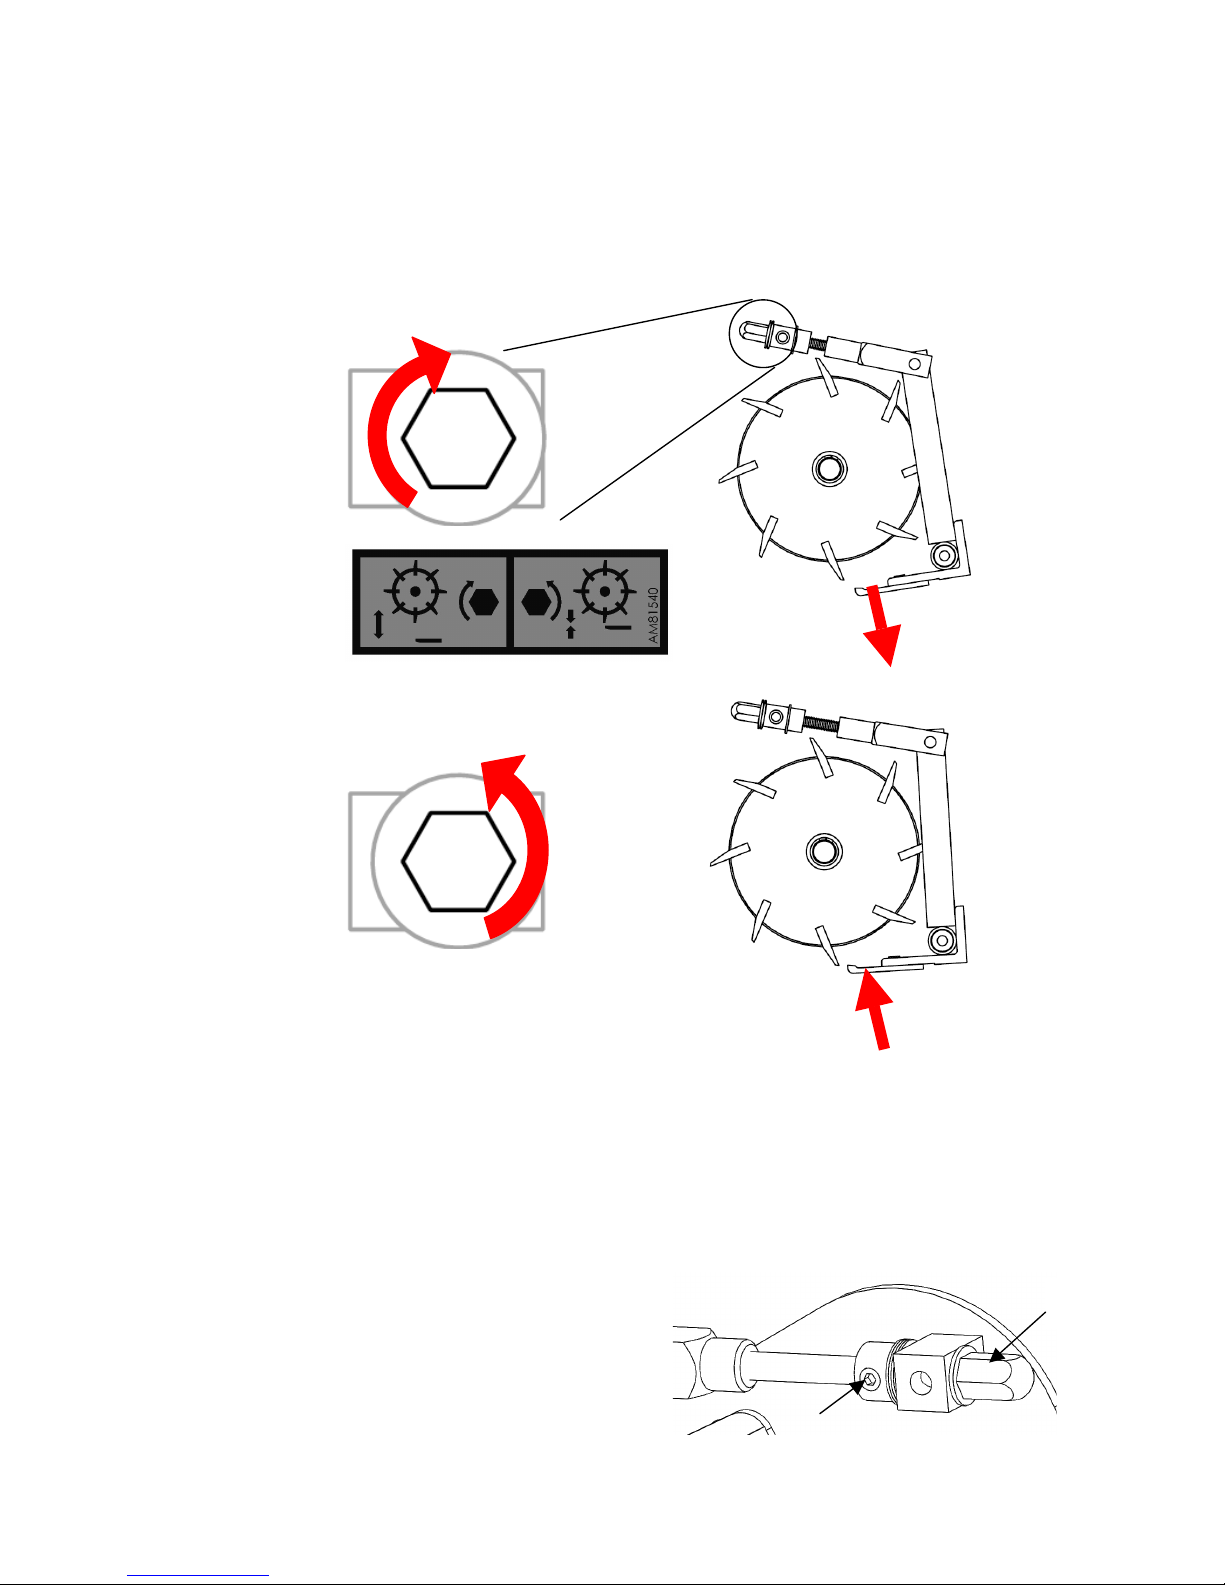
To set the cutting cylinder on cut:
1) Tilt the mower back and wedge securely
2) Turn the adjuster screws anti clockwise to move the bottom blade closer to the
cylinder
Turn the adjuster screws clockwise to move the bottom blade further from the
cylinder
3) When making adjustments to the bottom blade frequently check progress by
cutting a piece of paper
Do not over tighten the bottom blade – the cylinder should be able to spin with
little resistance
If you are still unable to cleanly cut paper, inspect the bottom blade and cylinder. If
they appear, rounded, damaged or excessively worn they may need to be reground
or replaced. New bottom blades should always be reground attached to the bottom
blade carrier. For bottom blade grinding angles see the section 7.6
The bottom blade adjusters can sometimes become very tight and may be hard to
turn. If this is the case:
1) Slacken off the grub screw on the collar
2) Rotate the adjuster anti-clockwise 1/8th of a turn
3) Tighten the grub screw
Bottom blade
adjustment decal
12
6.4 Height of cut adjustment
The height of cut is set by altering the position of the front roller.
WARNING - blades are sharp, always wear gloves
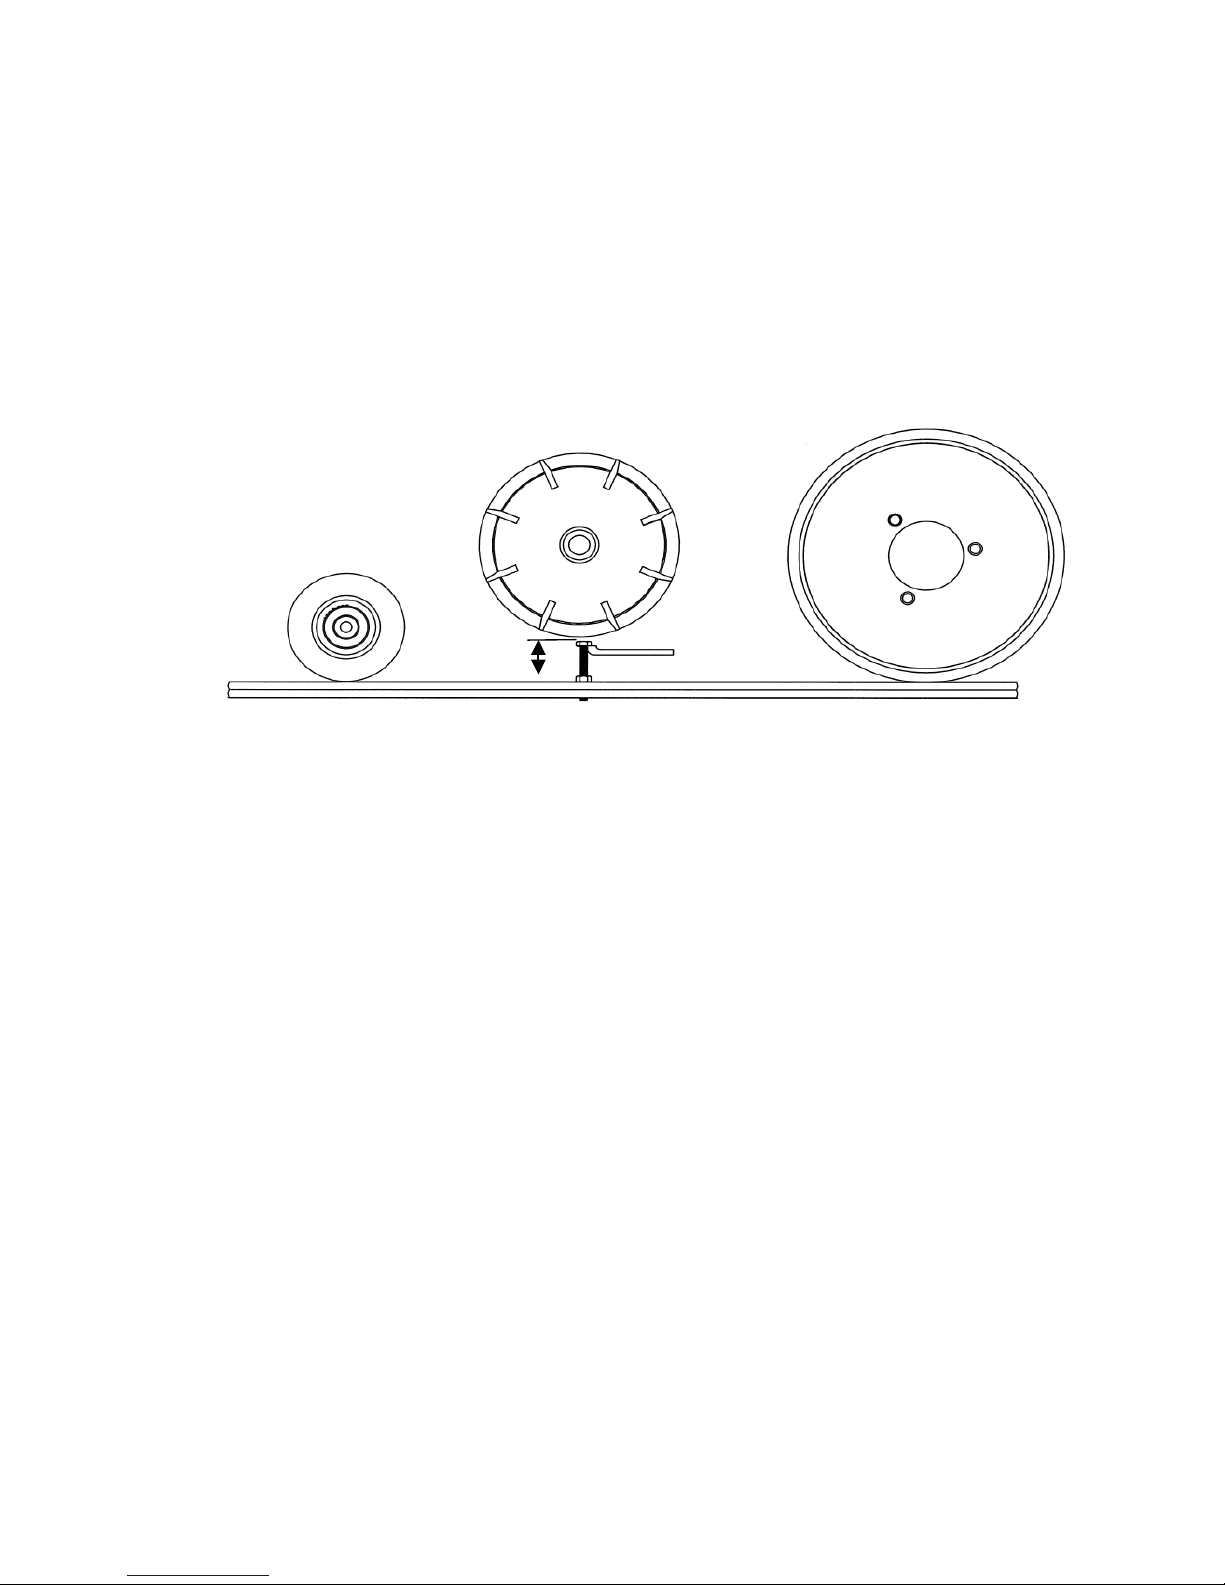
1) Set “on cut” first, refer to section 6.3
2) Adjust and lock the bolt on the height setting bar to your desired height of cut
3) Slacken the four front roller fasteners
4) Tilt the mower back and wedge securely
5) With the height setting bar near one end of the bottom blade, locate the bolt head
on top of the bottom blade and under the rear roller
6) Adjust the front roller so it makes contact with the height setting bar
7) Tighten the front roller fasteners on the side you have adjusted
8) Move the height setting bar to the other end of the bottom blade and repeat steps
5-8
6.5 Engaging drive to the cylinder
1) Gradually squeeze the cylinder bail bar towards the top handle – see section 5.0)
2) Release the bail bar to stop the cylinder
6.6 Engaging drive to the land roll
1) Gradually squeeze the drive bail bar towards the top handle – see section 5.0
2) Release the bail bar to stop forward movement
6.7 Park brake
To engage the park brake:
1) Pull and hold the red lever on the top handle bar
2) Tighten the lock handle
6.8 Mowing
1) Before mowing check the engine oil level and fill the petrol tank (see maintenance
section)
2) Start the engine – see section 6.1
3) Engage drive to the cylinder
4) Release the park brake
5) Engage drive to the land roll
Front roller
Cutting cylinder
Rear roller
Bottom
blade
Height of
cut
Height bar
 Loading...