

TurfEx ts25 Owner's Manual

Owner’s Manual/Parts List/Assembly Instructions
This Manual Must Be Read Before Operating The Equipment
Madison Heights, Michigan 48071
866-5-TURFEX
www.turfexproducts.com
© TrynEx International 2014
F51507A REV-A141701
TS25
CUSTOMER COPY
1

Table of Contents
OWNER’S MANUAL
Introduction .................................................................................................................................................................................................... 3
Safety ............................................................................................................................................................................................................. 4
Operating Instructions ..................................................................................................................................................................................5-6
Component Vocabulary .............................................................................................................................................................................. 5
Preparation /Spreading .............................................................................................................................................................................. 6
Calibration Instructions ................................................................................................................................................................................... 7
Calibration Chart ..........................................................................................................................................................................................8-9
Maintenance ................................................................................................................................................................................................. 10
PARTS LIST
Hardware Kits ............................................................................................................................................................................................... 12
Parts Kits ...................................................................................................................................................................................................... 13
Parts Breakdown .....................................................................................................................................................................................14-15
ASSEMBLY INSTRUCTIONS
Introduction .................................................................................................................................................................................................. 17
Assembly Instructions ..............................................................................................................................................................................18-22
WARRANTY ..................................................................................................................................................................................................23
NOTES .....................................................................................................................................................................................................24-27
2 © TrynEx International 2014 F51507A REV-A141701

Introduction
This Owner’s Manual is intended to acquaint you with your TurfEx TS25 Push Spreader and how to operate it safely and correctly. Read this
manual and observe the instructions contained to ensure safety and performance.
This manual must be read by each person that will be involved in its assembly, operation, care, maintenance, repair, or transport. In addition
to this manual, observe all workplace safety practices and take precautionary measures to ensure your own safety and the safety of those
around you.
Should you lose this Owner’s Manual, you can purchase additional copies through your local TurfEx Dealer.
SAFETY ALERT DEFINITION
This Safety Alert Symbol is used to pinpoint characteristics that, if not carefully followed, can create a safety hazard. When you
see this symbol in this manual or on the machine itself, BE ALERT – your safety and the safety of others is involved.
An accident will occur, resulting in Serious Injury or Death if the instructions are not followed.
An accident may occur, resulting in Serious Injury, perhaps Death, if the instructions are not followed.
An accident may occur, resulting in Minor or Moderate Injury if the instructions are not followed.
Important Information; Property or Equipment Damage may result if not followed.
3© TrynEx International 2014 F51507A REV-A141701

Safety
Before attempting any procedure in this book, the safety information in this manual must be read and understood by all personnel who have
any part in the installation, operation, care, maintenance, repair, or transport of this equipment. Supplement this safety information with
workplace regulations, material safety information, best working practices, and common sense.
Never attempt to remove the spreader from a vehicle with material in it.
Never operate equipment when under the inuence of alcohol, drugs, or medications. These substances alter
your judgment and slow your reactions.
Always keep hands, feet, clothing, jewelry, and hair away from moving parts. These items will catch and be
pulled in by moving parts, causing serious personal injury.
Always shut off vehicle before attempting to attach, detach, or service the spreader. Be sure vehicle is properly
braked, chocked, and on level ground.
Use caution when driving and drive at a sensible speed, where braking distances are safe and safe handling
characteristics are maintained.
Avoid large holes and ditches when transporting loads. Do not push close to creeks, ditches and public highways.
Never tow the spreader with a motorized vehicle.
Always clear and keep work area clean when operating.
Always wear safety gear, eye protection, gloves and work boots when operating the spreader.
Do not at any time carry passengers sit or stand on the spreader.
Do not allow children to play on, stand upon or climb in the spreader.
Before working with the spreader, secure all loose clothing and hair. Clothing and hair could get caught in
moving parts.
Keep hands and ngers free of moving parts.
Always wear safety glasses with side protection when servicing spreader or near where material is being
spread.
Never allow children to operate or climb/play on or around equipment.
Always make sure people are clear of where you will be using equipment. Always check areas to be spread to
ensure no hazardous conditions or substances are in the area.
Inspect the spreader before and after operating for defects. Parts that are broken, missing or worn out must be
replaced before operating.
Be careful when operating on steep grades (hill) the spreader may tip over.
The safety information and the instructions outlined in this document cannot cover all possible conditions or
situations that may occur. It must be understood by the operator that common sense and caution are factors
which cannot be built into this product and must be supplied by the operator. Exercise care and observe precautions to prevent injury to yourself and others.
Never use wet materials or materials with foreign debris with the spreader. The spreader is designed to spread
dry, clean, free-owing material.
Never leave material in hopper between uses, or when storing. Turf-care materials are hygroscopic and will
attract moisture and harden up.
Empty the spreader and clean it after each use to prevent material from building up and covering metal parts,
causing corrosion.
Do not use salt. Using salt in this spreader will damage the mechanism and shorten the life of the machine
4 © TrynEx International 2014 F51507A REV-A141701

Operating Instructions
Component Vocabulary
1
2
3
5
4
6
9
8
7
8
ID # COMPONENT NOTES
1 Handle Pushes and moves the Spreader
2 Gate Stop Adjust the open position of the gate. See Calibration Instructions.
3 Gate Lever Opens and Closes the Gate. Pull back to open Gate; Push forward to close.
4 Gate Regulates material ow from the hopper.
5 Hopper Maximum Capacity – 50 lbs.
6 Spinner Evenly distributes material. Clean after each use.
7 Gearbox Do not open the gear box; the gears are lubricated at the factory.
8 Wheels Do not over-inate! Max 25 PSI (1.72 bar)
9 Support Leg Stabilizes Load and Spreader
5© TrynEx International 2014 F51507A REV-A141701
Operating Instructions
Preparation/Spreading
PREPARATION
Inspect your spreader before each use. Make sure the Wheels turn easily, and the Spinner rotates clockwise when the spreader is pushed.
The Hopper should be clean and free from cracks. The Gate should open and close smoothly.
Before lling the hopper, make sure that the Gate Lever is in the“0”position (fully forward) and the Gate is closed.
Make sure the R-pin Agitator is installed on the spinner shaft before lling the spreader.
Make sure the Hopper Screen is installed in the hopper before lling and using.
Please refer to fertilizer manufacturer’s recommendation. Break up any lumps of fertilizer as you ll the hopper.
Set the Gate Stop with the ow control lever always in the“0”position.
SPREADING
Do not use spreader on windy days when spreading light materials or where the material must only be spread in specic areas; for example:
grass seed, herbicides, etc.
Always start walking prior to opening the Gate.
When spreading material, make sure the spread pattern does not hit landscaping plants, shrubs, owers, etc.
Do not over apply spreading material. Follow the recommended application rate for each turf-care product according to the manufacturers
suggest (usually on the product package). Over application will lead to lawn damage and contamination.
Always close the Gate (using the Gate Lever) before turning or stopping the spreader.
Keep the impeller plate horizontal when operating the spreader. Tilting the spreader will result in uneven coverage.
To maintain the same application rate when walking at a different speeds, adjust the ow rate. Reduce the ow setting for slower speeds
and increase the ow setting for higher speeds. Use your calibration chart.
Every time you are ready to stop or turn around, close the gate to stop dispersing the material and continue one more stride. This reduces
waste and avoids damaging the lawn with over-application
If spreading material is accidentally deposited too heavily in a small area, soak the area thoroughly with a garden hose or sprinkler to prevent
burning of the lawn.
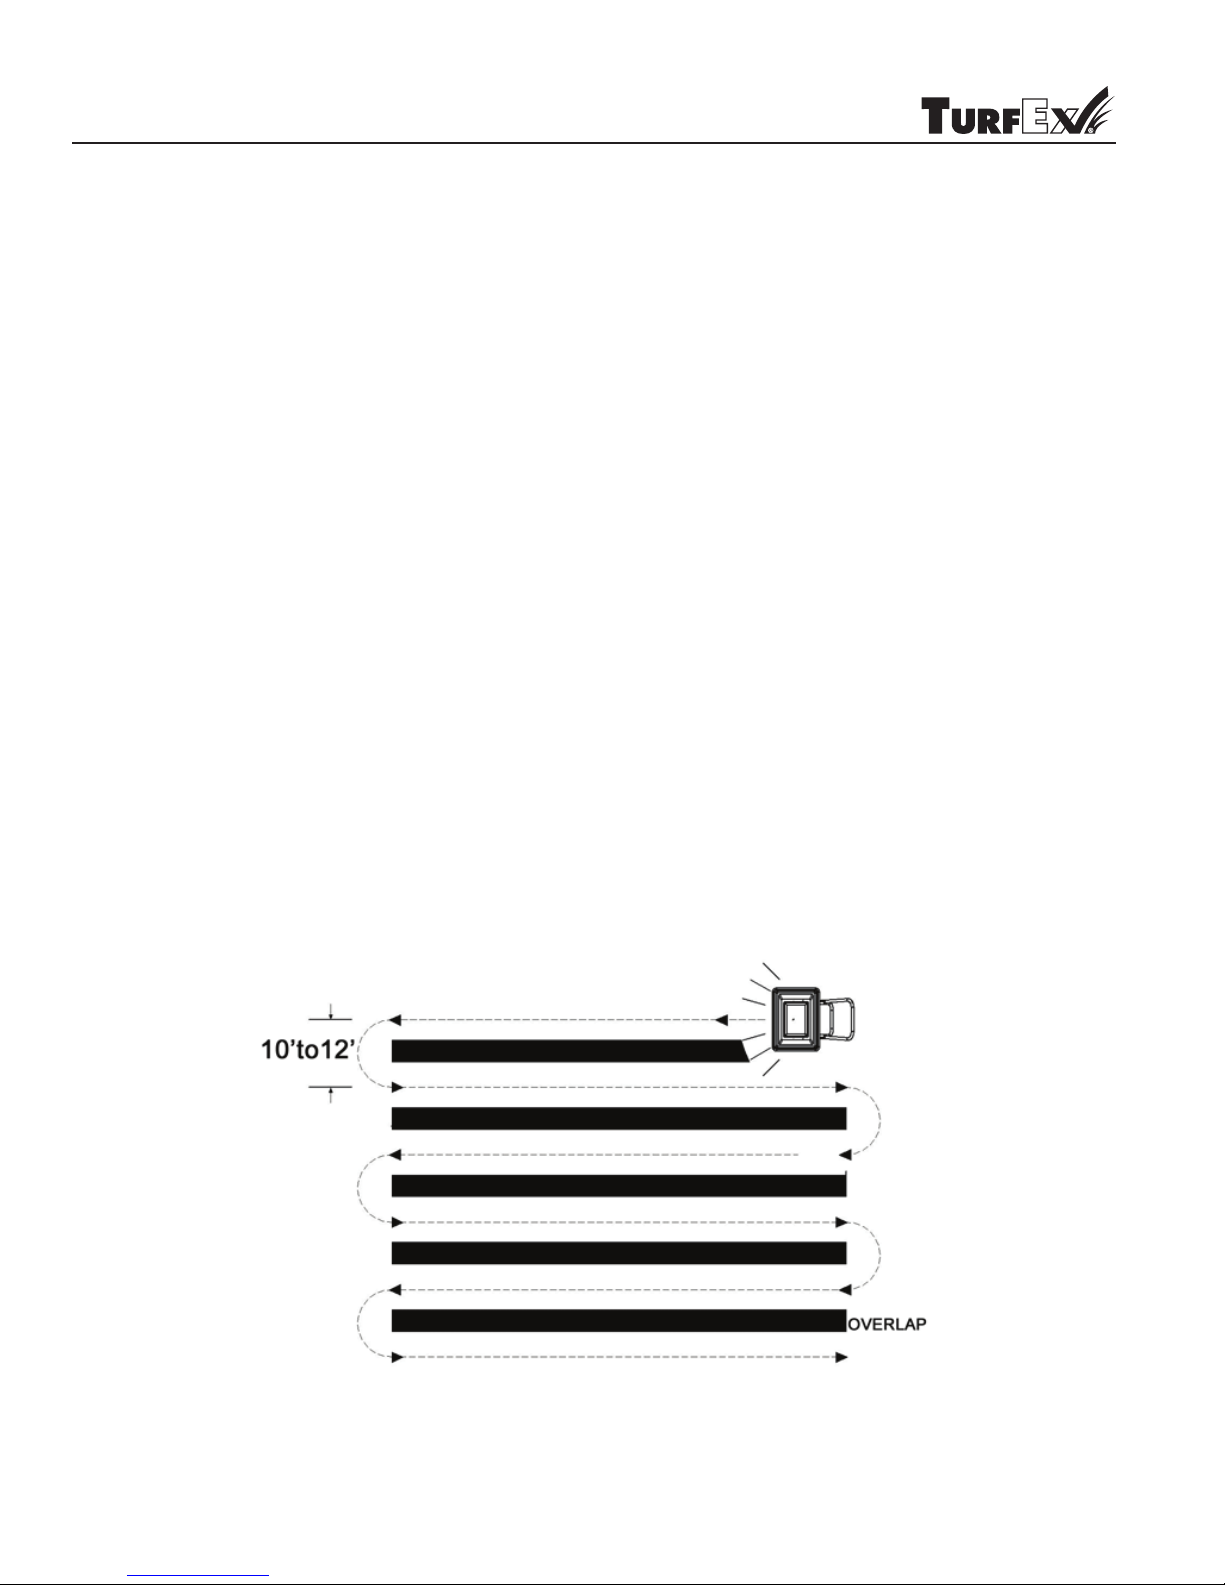
To ensure consistent coverage, make sure each broadcast pattern slightly overlaps the previous broadcast pattern. (See Diagram below.)
6 © TrynEx International 2014 F51507A REV-A141701
Overlapping For Consistent Coverage.

Calibration Instructions
All seed and fertilizer mixtures, regardless of physical similarities, ow and spread differently. Therefore, your spreader should be calibrated
specically for each material you are spreading. Use the charts in this manual to record calibration data for your spreader for materials you
commonly use.
MATERIALS NEEDED
To calibrate your spreader, you will need: Notepad, Stopwatch, Tape Measure, Scale, Plastic Tub, and an area for measuring spread width
MATH
Here is the equation used:
Desired Application Rate = Output ÷ (Walking Speed x Spread Width)
lbs/ft
When calculating, the desired application rate needs to be converted to pounds-per-square-foot.
To Convert...
Pounds-per-Acre, multiply by 43,600
Pounds-per-Thousand-Square-Feet, multiply by 1000
Output is measured in pounds per minute. This is found by putting a known amount of material (ve pounds) into the hopper (after setting the
gate with the gate stop) and measuring how long it takes for the material to ow out of the hopper. To convert this time into pounds-per-min-
ute, divide the pounds by the time (minutes). Seconds should be converted to minutes (the result is a decimal fraction).
The speed is required in feet-per-minute. 1 mile per hour is equal to 88 feet per minute. To maintain a consistent application rate, you will
need to walk at a speed that you can maintain across the whole spreading area.
COLLECTING AND RECORDING DATA
Set the open position of the gate with the Gate Stop. With the gate closed, pour ve pounds of material into the hopper. Make sure the plastic
tub is below the spreader where it can catch material owing from the gate. Open the gate and measure how much time it takes for all the
material to come out of the Spreader. Record this. Repeat this procedure until you have a reading for each of the gate settings on the chart:
3, 6, 9, 12, 15, 18, 21, 24, 27, and 30.
Using the times obtained, calculate the pounds-per-minute – record the result in the Calibration Chart.
Measure the spread width by walking a short distance at approximately each speed (220 ft/min). When measuring, exclude the thin edges
where the coverage thins out, this will be your ‘effective spread width’. Record the resulting width in the chart.
2
lbs/min ft/min ft
CONFIGURING SPREADER
Find the required application rate from the product label. Decide the speed you will maintain and your spread width (use the chart below as a
guide). Set the Spreader Speed based on the data you have collected and recorded in the chart to obtain the spread width.
Use the equation below to nd the output and the values in the chart to nd the gate setting.
Required Output = Application Rate x Walking Speed x Spread Width
2
lbs/min lbs/ft
ft/min ft
Find the gate setting that matches the required output using the values you recorded in the chart. You may need to adjust your walking speed
slightly.
Gate Stop @ 20
Gate Lever closed
7© TrynEx International 2014 F51507A REV-A141701

Calibration Chart
Material
Gate Setting 3 6 9 12 15 18 21 24 27 30
Output (lbs/min)
Speed (mph) 1.5 2 2.5 3
Spread Width (ft)
Material
Gate Setting 3 6 9 12 15 18 21 24 27 30
Output (lbs/min)
Speed (mph) 1.5 2 2.5 3
Spread Width (ft)
Material
Gate Setting 3 6 9 12 15 18 21 24 27 30
Output (lbs/min)
Speed (mph) 1.5 2 2.5 3
Spread Width (ft)
Material
Gate Setting 3 6 9 12 15 18 21 24 27 30
Output (lbs/min)
Speed (mph) 1.5 2 2.5 3
Spread Width (ft)
Material
Gate Setting 3 6 9 12 15 18 21 24 27 30
Output (lbs/min)
Speed (mph) 1.5 2 2.5 3
Spread Width (ft)
Material
Gate Setting 3 6 9 12 15 18 21 24 27 30
Output (lbs/min)
Speed (mph) 1.5 2 2.5 3
Spread Width (ft)
Material
Gate Setting 3 6 9 12 15 18 21 24 27 30
Output (lbs/min)
Speed (mph) 1.5 2 2.5 3
Spread Width (ft)
8 © TrynEx International 2014 F51507A REV-A141701

Calibration Chart
Material
Gate Setting 3 6 9 12 15 18 21 24 27 30
Output (lbs/min)
Speed (mph) 1.5 2 2.5 3
Spread Width (ft)
Material
Gate Setting 3 6 9 12 15 18 21 24 27 30
Output (lbs/min)
Speed (mph) 1.5 2 2.5 3
Spread Width (ft)
Material
Gate Setting 3 6 9 12 15 18 21 24 27 30
Output (lbs/min)
Speed (mph) 1.5 2 2.5 3
Spread Width (ft)
Material
Gate Setting 3 6 9 12 15 18 21 24 27 30
Output (lbs/min)
Speed (mph) 1.5 2 2.5 3
Spread Width (ft)
Material
Gate Setting 3 6 9 12 15 18 21 24 27 30
Output (lbs/min)
Speed (mph) 1.5 2 2.5 3
Spread Width (ft)
Material
Gate Setting 3 6 9 12 15 18 21 24 27 30
Output (lbs/min)
Speed (mph) 1.5 2 2.5 3
Spread Width (ft)
Material
Gate Setting 3 6 9 12 15 18 21 24 27 30
Output (lbs/min)
Speed (mph) 1.5 2 2.5 3
Spread Width (ft)
9© TrynEx International 2014 F51507A REV-A141701
 Loading...