


0 | P a g e
OVERVIEW .................................................................................................................................................... 1
Front of your camera ............................................................................................................................ 1
Back of your camera ............................................................................................................................. 2
ACCESSORIES ................................................................................................................................................ 3
CHAPTER 1: Navigating the Mobile Application .......................................................................................... 4
Device List: How to Use this Page ......................................................................................................... 4
My Messages: How to Use this Page .................................................................................................... 5
About: How to Use this Page ................................................................................................................ 6
CHAPTER 2: USING THE CAMERA WITH THE APP ........................................................................................ 7
Operating Your Camera Via Your Mobile Phone .................................................................................. 8
Icons and What They Do ....................................................................................................................... 8
Icons and What They Do Continued ................................................................................... 9
CHAPTER 3: CHANGING THE CAMERA SETTINGS ...................................................................................... 10
How to Get to the Settings Page ......................................................................................................... 10
Device Information ............................................................................................................................. 11
WI-FI Setting ....................................................................................................................................... 11
User Setting ......................................................................................................................................... 12
Device Time Setting ............................................................................................................................ 12
User Setting ......................................................................................................................................... 12
Alarm Setting ...................................................................................................................................... 13
Alarm Trigger Event ............................................................................................................................ 14
FTP Setting .......................................................................................................................................... 15
Email Setting ....................................................................................................................................... 15
SD Card Setting ................................................................................................................................... 16
ONVIF Setting ...................................................................................................................................... 16
DDNS Setting ....................................................................................................................................... 17
AP Parameter Setting .......................................................................................................................... 17
Alias Setting ........................................................................................................................................ 18
Speech Language Setting .................................................................................................................... 18
Push Certification Update ................................................................................................................... 18
CHAPTER 4: CHANGING THE CAMERA SETTINGS ...................................................................................... 19
Navigating the Main Menu ................................................................................................................. 19
Adding a Device to Your Device List .................................................................................................... 20
Settings ............................................................................................................................................... 20
TABLE OF CONTENTS
1 | P a g e
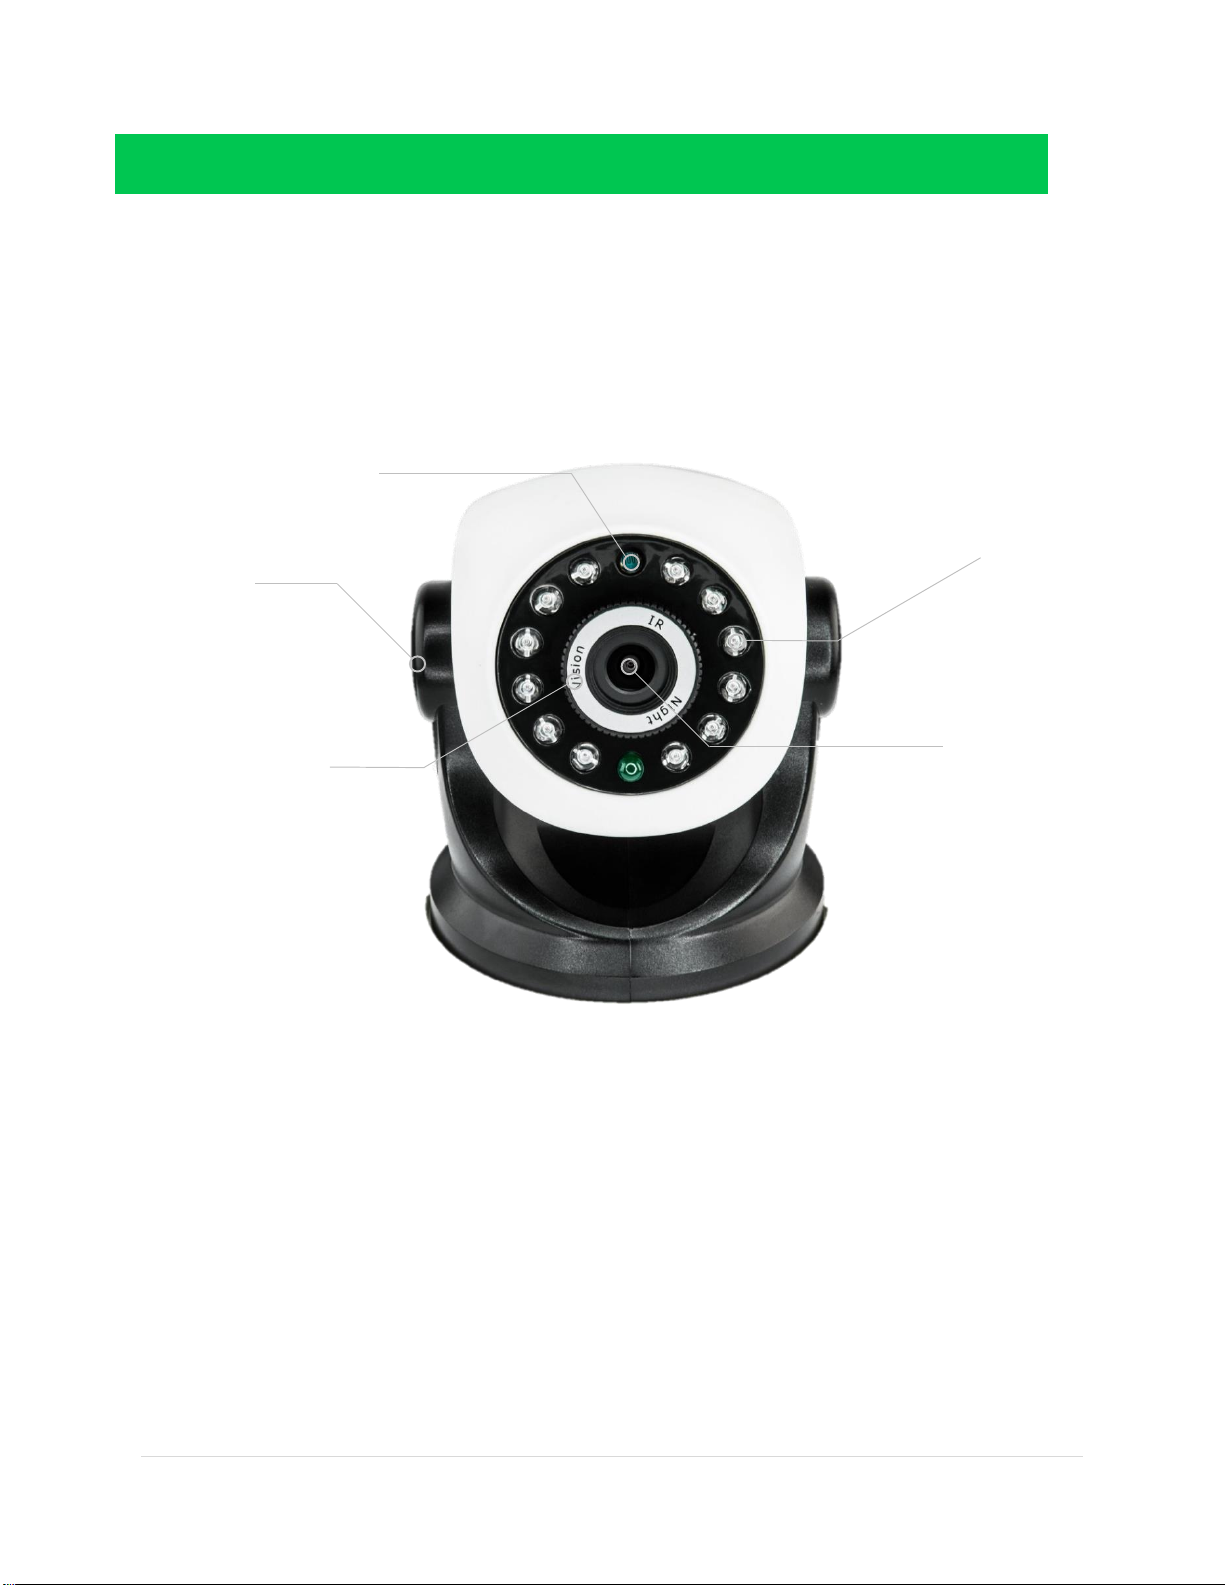
FRONT OF YOUR SECURITY CAMERA
CAMERA LENS
NIGHT VISION
ROTATING ARMS
IR SENSORS
OVERVIEW
MANUAL FOCUS ADJUST (twist)
2 | P a g e
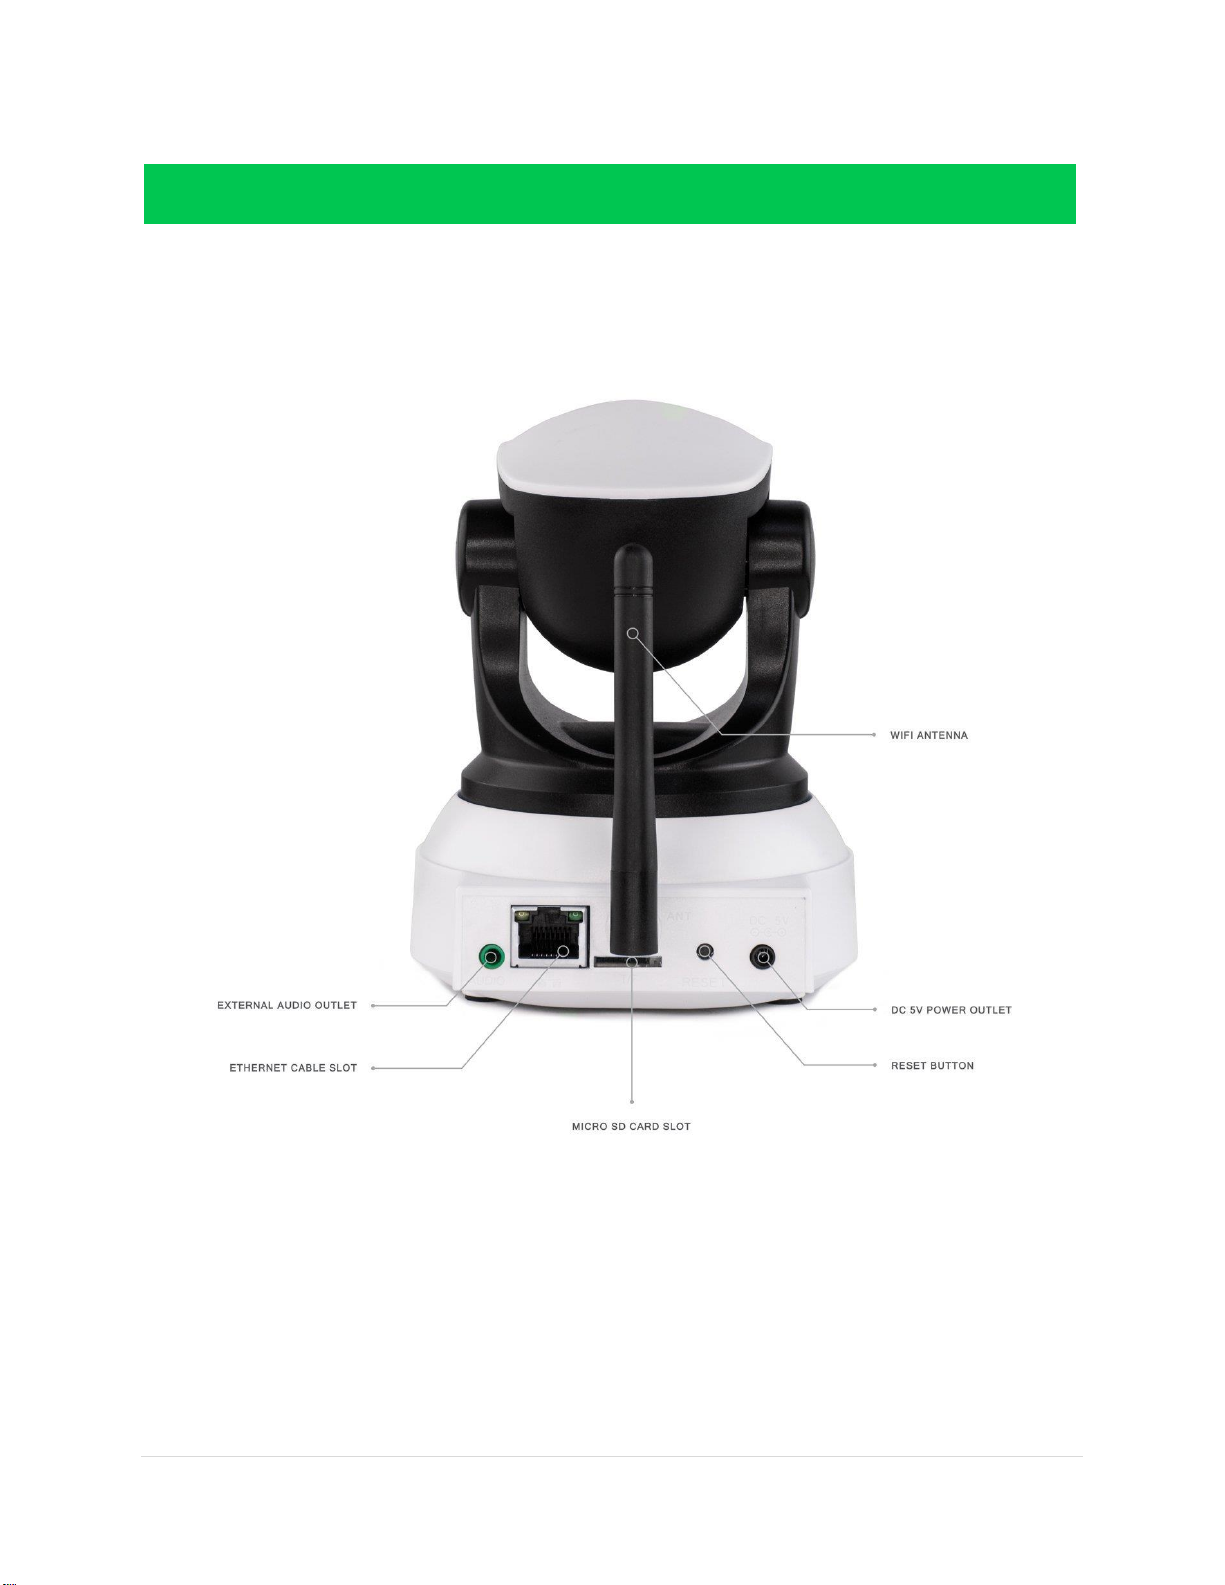
BACK OF YOUR SECURITY CAMERA
OVERVIEW

3 | P a g e
The following accessories are included with your cyberView Camera
cyberView camera (x1)
Ethernet cord (x1)
DC power adapter (x1)
Mounting gear for wall or ceiling applications
o Screws (x2)
o Drywall anchor (x2)
All necessary hardware for installation
ACCESSORIES

4 | P a g e
Navigating the App
The photo on the left is the main page that will
appear when you open up “NetCam” on your mobile
phone
You have four icons on the bottom:
o Device List
o My messages
o Scene mode
o About
We will go into detail on each icon from left to right.
DEVICE LIST: HOW TO USE THIS PAGE
Device list will show every camera currently connected to your application
o NOTE: if no cameras are connected, no camera will appear.
ADDING A DEVICE:
o To add a device to your device list page, click “Add device” which is at the top of the main
page
o Then you will need to:
OPTION 1: enter the camera ID located on the bottom of your camera
OPTION 2: click > SCAN the QR Code with your phone’s camera and it will
automatically enter in the information for your camera
OPTION 3: click > LAN search which will search your connected WI-FI for devices
available
OPTION 4: click > Acoustically connect your phone to your camera (NOT
AVAILABLE YET)
o Then click DONE
This symbol will search for devices.
o NOTE: it will NOT find your device unless it has been added manually first
This symbol will let you EDIT and DELETE devices that are connected
o EDIT will let you enter Device name, type, ID, user name, password, etc.
CHAPTER 1: Navigating the Mobile Application
5 | P a g e
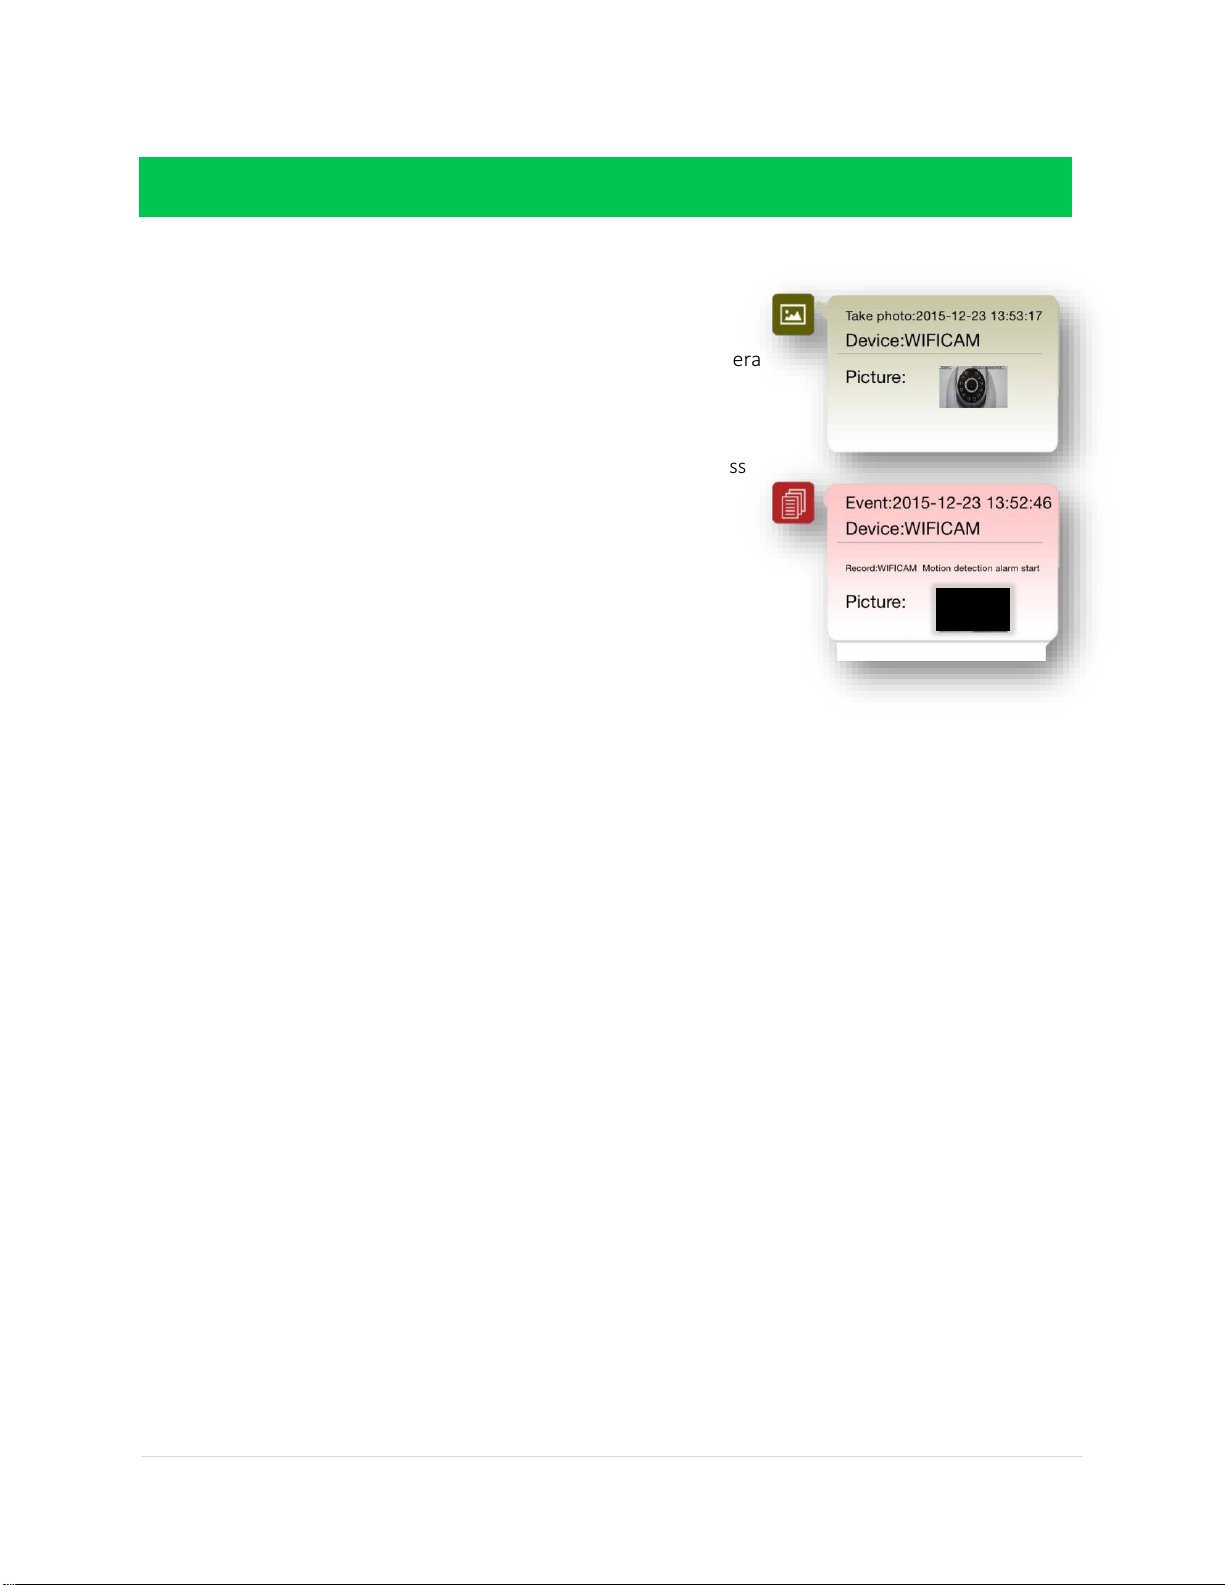
MY MESSAGES: HOW TO USE THIS PAGE
Click on a connected camera
o A list of every photo or video taken from your camera
will appear
NOTE: Each camera will have separate
messages
NOTE: You will not see any messages unless
you have already taken photos or videos
before going to this page
SCENE MODE: HOW TO USE THIS PAGE
NOT AVAILABLE AT THIS TIME
example of messages
CHAPTER 1: Navigating the Mobile Application
6 | P a g e
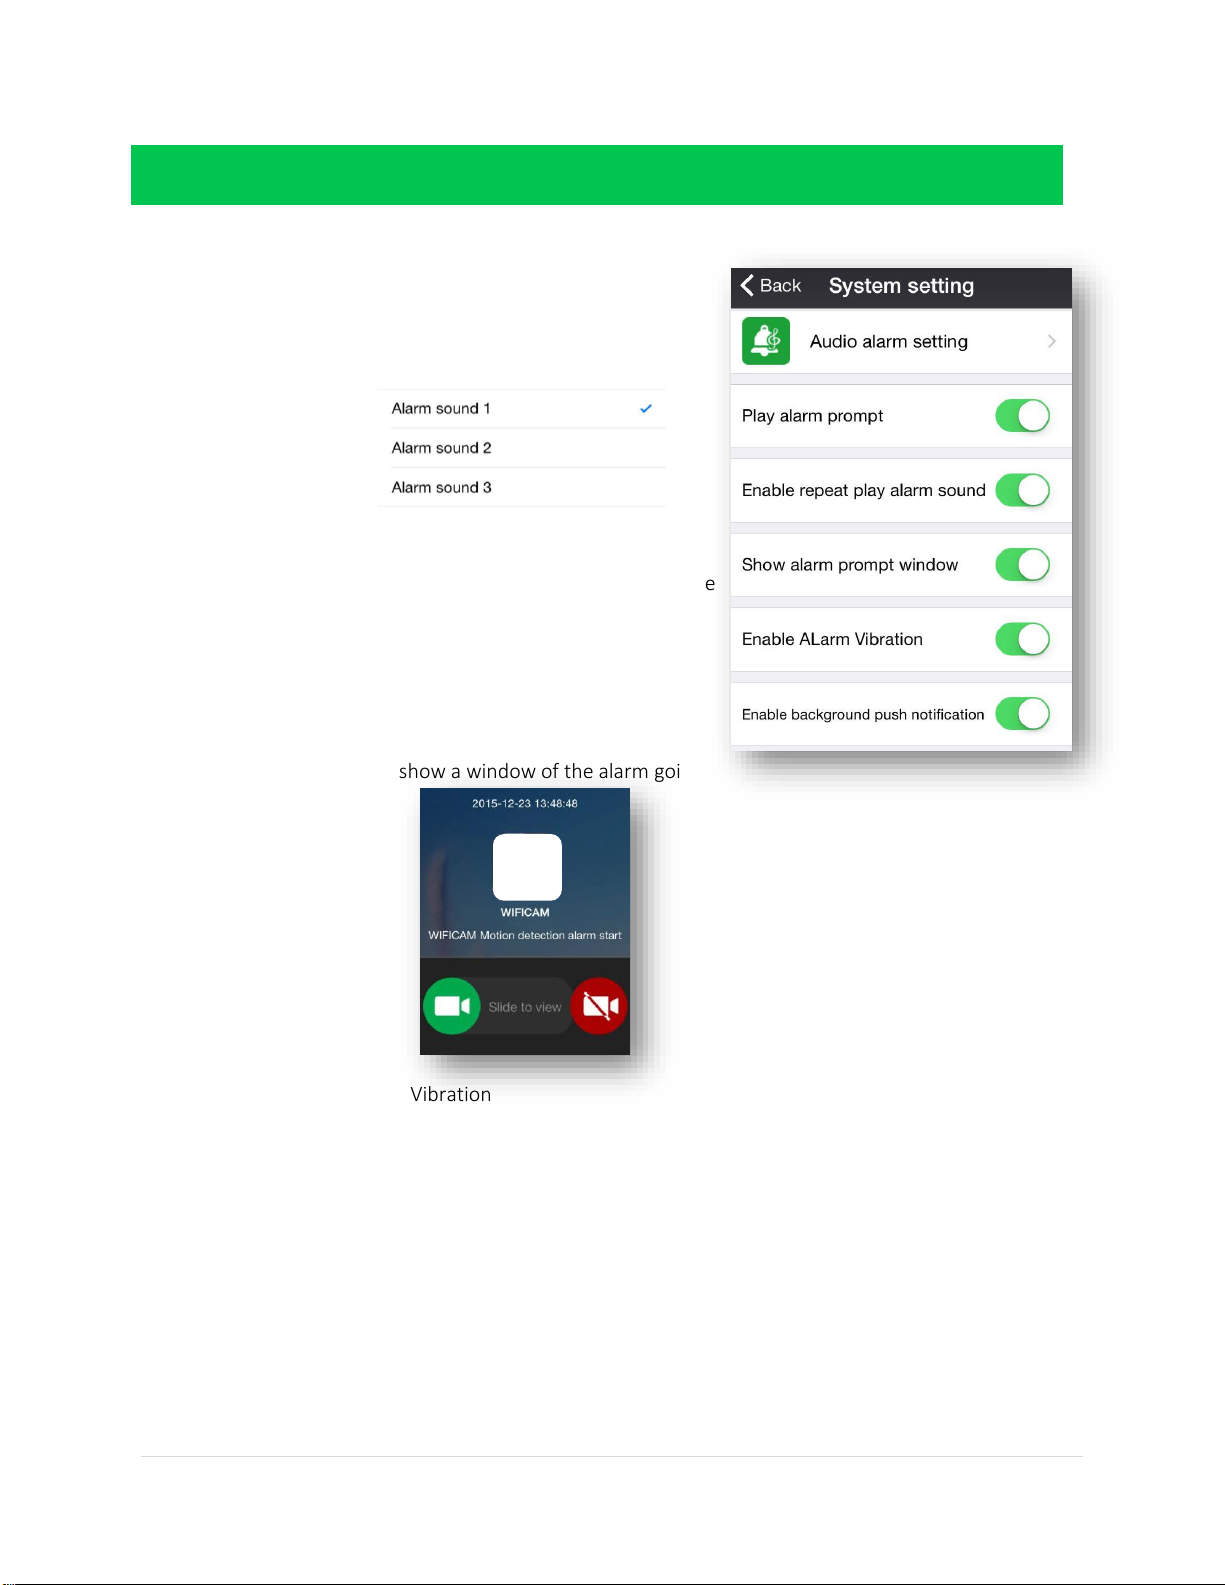
ABOUT: HOW TO USE THIS PAGE
System setting
o Audio alarm setting
Choose 3 different alarm settings
o Play alarm prompt
Turns on the alarm prompt which will
alert you depending on your settings we
will discuss later on (motion detection,
noise, etc.)
o Enable repeat alarm sound
Will continue to repeat the alarm until
you shut it off and view the notification
o Show alarm prompt window
Will show a window of the alarm going
off
o Enable Alarm Vibration
Will vibrate your phone when it gives
you an alert
o Enable background push notification
Alerts will occur even when the app is
not open
Alerts will show up when on a drop
down on your phone if you’re in another
application
YOUR
CAMERA
IMAGE
CHAPTER 1: Navigating the Mobile Application

7 | P a g e
Back to the Device List page or the ‘Main page’
In order to operate your camera, you must have
already added your device to the application. See
Chapter 1 for details on adding a camera
Our example shows “WIFICAM”
o WIFICAM is the name of the camera
o “On line” means it is connected to the
application
o The gear icon is the camera settings
NOTE: For more information on settings
please go to Chapter 3
0
CHAPTER 2: USING THE CAMERA WITH THE APP

8 | P a g e
OPERATING YOUR CAMERA VIA YOUR MOBILE PHONE:
This is the main page when you click on your camera on the Device List page
ICONS on the BOTTOM FROM LEFT TO RIGHT:
Sound
You can hear sound coming from your security camera location and you can output sound from
your camera
o Presents a microphone so you can speak into your phone and it will be output onto the
camera
o It will also output any sound the camera picks up onto your phone
Snapshot
o Take a snapshot or photo of exactly what your camera is pointed towards
NOTE: It will be stored ON a micro SD card if you have one stored and it will be
TEMPORARILY stored in your ‘My Messages’ Menu
Video
o Take a video as long as your finger is holding down the button
NOTE: It will be stored ON a micro SD card if you have one stored and it will be
TEMPORARILY stored in your ‘My Messages’ Menu
Watch Mode
o HD: Highest quality video feed possible
Most memory required to store video or photos
o Standard definition: An average quality video feed
o Fluency: Lowest quality video feed
Least memory requires to store video or photos
Flag (Position Mode)
o Preset position setting
16 open settings
Move your camera into a position you desire
Click one of the 16 buttons to SET that
position to that number
CHAPTER 2: USING THE CAMERA WITH THE APP

9 | P a g e
o Preset position call
16 potential settings
Click on one of your preset buttons from
before and your camera will automatically
move into the preset position you created
Contrast
o Set the contrast up or down
Brightness
o Set the brightness up or down
Recover Mode
o Resets your settings such as brightness or contrast back to
DEFAULT settings
IR Setting
o Open
Your camera will operate in IR mode (night vision
mode) when the camera senses no light
o Close
Your camera will continue to operate normally even if
it is covered or in the dark
ICONS on the TOP FROM LEFT TO RIGHT:
Moves your camera directly left or right as long as you hold onto the button
Moves your camera directly up or down as long as you hold onto the button
Mirrors the image over the y-axis
Mirrors the image over the x-axis
CHAPTER 2: USING THE CAMERA WITH THE APP

10 | P a g e
Go back to > Device list page > click on the gear icon >
On the next pages, we will go into
each button to great detail
CHAPTER 3: CHANGING THE CAMERA SETTINGS

11 | P a g e
Devi ce Inf orm ati on:
General overview of your security camera’s information including:
software version, MAC address, WI-FI connectivity, and device ID/name
System Firmware Version
o Hardware firmware version #
Application Firmware Version
o Firmware version #
Device name
o the name of your device
Device ID
o ID of your device (unique number)
MAC Address
o address is a unique 12-character identifier
(e.g. 00:00:00:00:00:0X)
WI-FI MAC
WI-FI Status
o Connected
o Not Connected
WI-FI Se tti ng:
Thi s men u is im po rt ant f or con ne ct ing t o WI -F I. It i s v er y
eas y to us e. Go t o Ma nag e WI -F I ne two rk > Co nn ec t t o yo ur
WI-FI s ig nal t hat a pp ea rs b elo w > enter in y ou r pa ss wor d
Device Status:
o Tells you if you’re connected to WI-FI
o Security level of your connection
(WPA, TKIP, AES, etc)
o Current channel number (only adjust
for advanced users)
o Enter password for WI-FI network
Manage WI-FI network:
o Shows a list of available WI-FI networks below

12 | P a g e
Us er Set ting :
Logging into the camera as administrator or operator. Administrators have
full access to camera functionality and settings. Operators have limited
access to the camera and its features
Administrator Logon (Complete access to camera)
o User Name
o Password
Operator Logon (Limited access to camera)
o User Name
o Password
De vic e Ti me Set tin g:
On this menu, you can set the device time through a Time Zone, a NTP
server, or sync your time to your mobile phone’s time.
Device time – displays current time
Time zone – choose a time zone
Use NTP Server Auto Correct – alternative method for
synchronizing clock (advanced users).
o What is an NTP server? It is a server dedicated to
providing people a National Standard Time. It is often
used to synchronize computer clocks
o NTP Server – choose from four approved options
for NTP connection
Mobile phone time calibration – synchronizes clock to
your phone’s time

13 | P a g e
Alar m S ett ing :
Motion Detection – On (detects motion)
Off (does not detect motion)
o Motion detection sensitivity – 10 settings
0 is the lowest setting and that has NO
detection capabilities. 10 is the highest
setting and is extremely sensitive to
movement
GPIO alarm armed
o NOTE: GPIO is usually reserved to connect a
third party security system to your camera. It
would begin a recording when your GPIO alarm
goes off. It is NOT available for the TS-620
o Trigger level
Low: responds only to your third party
alarm system when it detects heavy
activity
High: responds to your third party alarm
system when it detects ANY activity
Audio Detection – On (detects audio)
Off (does not detect audio)
o Sensitivity – High or Middle or Low

14 | P a g e
Alar m T rig ger Ev ent :
Alarm Preset position linkage IS NOT AVAILABLE FOR
THIS CAMERA YET
IO and Output Level ARE NOT AVAILABLE FOR THIS
CAMERA YET
Alarm Mail Notifications
o Sends you an alert E-mail to your phone
Upload Pictures Count
o Will take from 1 to 11 photos when the alarm
goes off
Alarm video
o Will take a video when the alarm goes off
Temperature alarm sensitivity
o High: extremely sensitive to temperature
o Middle: average sensitivity to temperature
o Low: sensitivity to temperature
o Forbid: not sensitive to temperature at all

15 | P a g e
FT P S ett ing (a dvan ced use rs):
Syn cs w ith a se rv er fo r yo u to ac ce ss and up loa d video s.
NOT E: It i s no t n ec ess ar y fo r y ou to d o th is!
FTP server – name of your server
Port – port ID number
User name
Password
Upload interval
Emai l S ett ing :
This page sets up your e-mail if you decide you want e-mail notifications
for your alarms. Please use smtp.qq.com and port 25 before attempting
any advanced port/email forwarding
Sender – your address
SMTP server – smtp.qq.com
SMTP port – 25
Verifying – On or Off
SSL or TSL
Receiver
o 1 to 4 different available receivers

16 | P a g e
SD ca rd set ting :
IMPORTANT: the first time you use your SD card you must FORMAT it by
plugging it into your camera, going to this SD card setting menu and
scrolling to the bottom where you see “SD card formatting” Click that and
wait until you see the status of your SD card to go from “formatting” to
“SD card already inserted”. You may have to click “Done” and then go back
to the page to check the status
SD card status
o Memory capacity (# of MB or GB)
o SD card inserted or not inserted
Video setting
o Record coverage
Will record your video stream constantly
o Audio recording
Will record your audio stream constantly
o Timer recording
Will record the time constantly
SD card formatting
o This will only appear if you have an SD card already
plugged in.
ON VIF Set tin g:
ONVIF specification is the standard for exchange of information between video devices including video
streaming and intelligence data. It is the standard method of exchanging information over networks (WiFi
for example) safely and efficiently.
Allow open ONVIF (Open Network Video Interface Forum) – On or Off
Allow open RTSP (Real Time Streaming Protocol) – On or Off
o Advanced video streaming for faster frame rate and
higher quality. It is recommended that this stays ON
RTSP port – 10554 (only advanced users should
alter this value)

17 | P a g e
DDN S S ett ing : (Adv ance d U ser s O nly)
This requires that a user first create an account at the DDNS server website and then configure their device
to send updates to the DDNS server.
Select from list of trusted DDNS services
User name (created on server website)
Password (created on server website)
DDNS domain name
Proxy server address
Proxy server port
AP Pa rame ter Setti ng (Advan ced U sers On ly) :
Advanced settings for your WI-FI/Network. Setup your WI-FI connection
manually
Authentication Mode
SSID – basic identifier for your device
Password
IP Address
Subnet mask
Start Address
End Address

18 | P a g e
Al ias Se tti ng:
Alias – Identifier for your camera
Sp eec h La ngu age Set tin g:
This is designed for future updates. Altering these will not change anything
on your security camera
Mute
Chinese
English
Push Ce rti fic ati on Upda te:
Click update if you are prompted with an update option
o NOTE: if you are not prompted for an update, then
your camera is up-to-date

19 | P a g e
CHAPTER 4: PC-CLIENT SOFTWARE
Choose the number of screens you want open for the number of cameras you are using. Above is an example
of 4 screens being open with only 1 camera in use
Manage your devices (security cameras). You can add, delete, and search for cameras on the same network as
your PC
Snapshot images, video files, or send alarm messages on specific days or weeks of the year (WORK IN
PROGRESS)
Gives you basic information on your PC-Client model and version codes
Lock or Unlock your camera
Sign in as an administrative user or as an operator (operators have limited usage)
Control important features like storage places for images and video files, picture display mode, recordings
(lengths, reserved disk space, etc.), system language, and default start up.
NAVIGATING THE MAIN MENU

20 | P a g e
ADDING A DEVICE TO YOUR DEVICE LIST:
Click the + symbol on the top right to add a camera to your list
o Then click the + symbol on the top
left of the menu that pops up (as is
shown in the figure)
Enter your device name,
user name, password, and
device ID
NOTE: video type
does not need to
be altered unless
you are an
advanced user
SETTINGS ON THE PC CLIENT SOFTWARE:
All of the settings mirror the settings on the
application. They should have similar to or
exactly the same functionality.
Please refer to Chapter 3 when trying to
navigate the software settings of your
camera device
 Loading...