

Page 1

PD-IDENT-UHF
User Guide
555T
0617 Rev.A
Page 2

2
1 General Information 3
1.1 About these instructions 3
1.2 Explanation of symbols used 3
1.2.1 Warnings 3
1.3 Contents 4
1.4 Feedback about these instructions 4
2 Notes on the product 5
2.1 Included parts: 5
2.2 RFID Communication 5
3 Charging the Turck PD-IDENT handheld reader 6
4 Connecting to Smartphone device 7
5 App description 8
5.1 Obtaining the app: Android 8
5.2 Obtaining the app: iOS 8
6 Home Screen 9
7 Scan Screen 10
8 Read/Write Screen 11
8.1 More Read/Write 11
9 Settings Screen 12
10 Basic Troubleshooting/Tips 13
10.1 Issues Reading/Writing 13
10.1.1 Multiple tags in the environment 13
10.2 Issues with Android device connection 13
10.3 Technical Support 13
11 Screen Appendix 14
Page 3
3
1 General Information
1.1 About these instructions
The following user manual describes the setup, functions, and use of the system. It helps you to plan,
design, and implement the system for its intended purpose.
Note*: Please read this manual carefully before using the system. This will prevent the risk of personal
injury or damage to property or equipment. Keep this manual safe during the service life of the system. If
the system is passed on, be sure to transfer this manual to the new owner as well.
1.2 Explanation of symbols used
1.2.1 Warnings
Action-related warnings are placed next to potentially dangerous work steps and are marked by graphic
symbols. Each warning is initiated by a warning sign and a signal word that expresses the gravity of the
danger. The warnings have absolutely to be observed:
DANGER!
DANGER indicates an immediately dangerous situation, with high risk, the death or severe injury,
if not avoided.
WARNING!
WARNING indicates a potentially dangerous situation with medium risk, the death or severe
injury, if not avoided.
ATTENTION!
ATTENTION indicates a situation that may lead to property damage, if it is not avoid-ed.
NOTE
In NOTES you find tips, recommendations and important information. The notes facilitate work,
provide more information on specific actions and help to avoid overtime by not following the
correct procedure.
CALL TO ACTION
This symbol identifies steps that the user has to perform.
RESULTS OF ACTION
This symbol identifies relevant results of steps
Page 4

4
1.3 Contents
The contents of this manual/guide cover the following:
Ex. The Turck PD-IDENT handheld RFID reader
Ex. An Android or iOS device (supplied by the user)
Ex. The Turck RFID app
1.4 Feedback about these instructions
We make every effort to ensure that these instructions are as informative and as clear as possible. If you
have any suggestions for improving the design or if some information is missing in the document, please
send your suggestions to techdoc@turck.com.
Page 5
5
2 Notes on the product
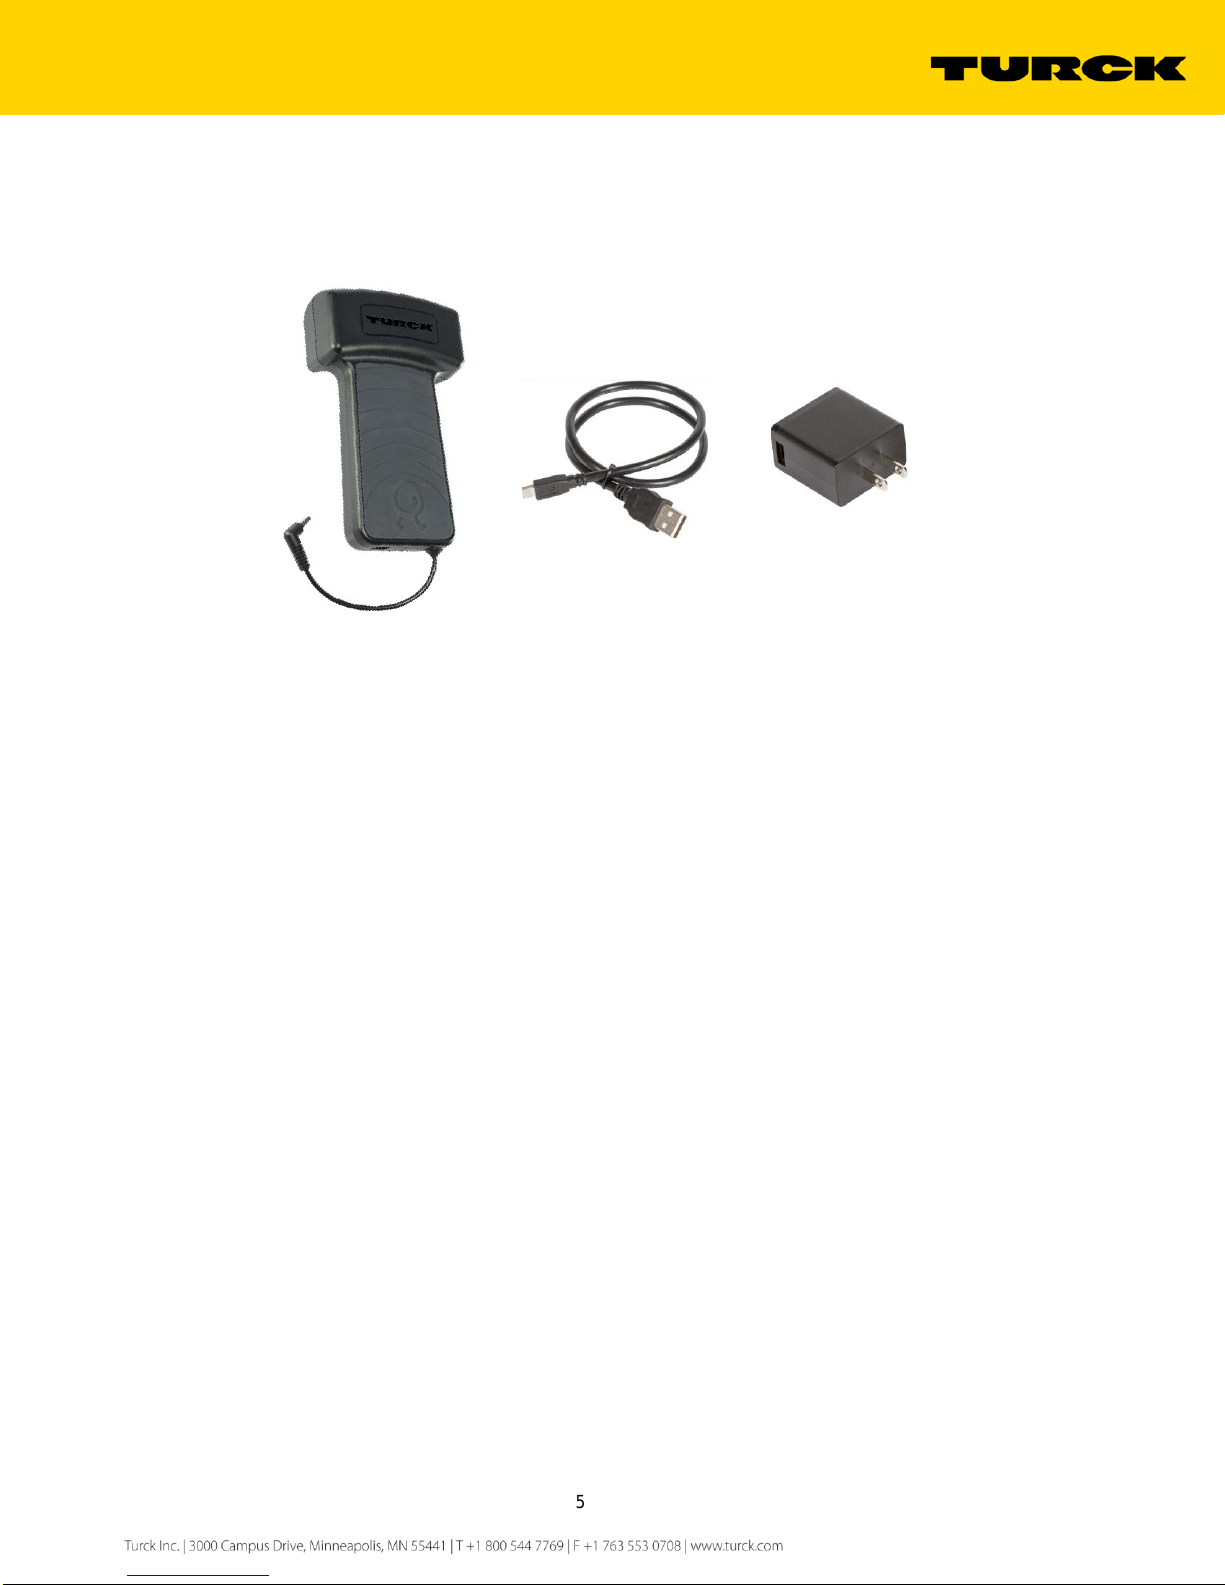
2.1 Included parts:
Handheld reader (1x)
Micro-USB cable (1x)
2A USB charger (1x)
2.2 RFID Communication
US
The Turck PD-IDENT handheld RFID reader complies with Part 15 of the FCC rules.
Canada
The Turck PD-IDENT handheld RFID reader complies with RSS-210 of Industry Canada.
EU
The Turck PD-IDENT handheld RFID reader complies with applicable ETSI standards and carries the CE
marking on the product signifies that Turck holds the reference technical files available to European Union
authorities
Page 6
6
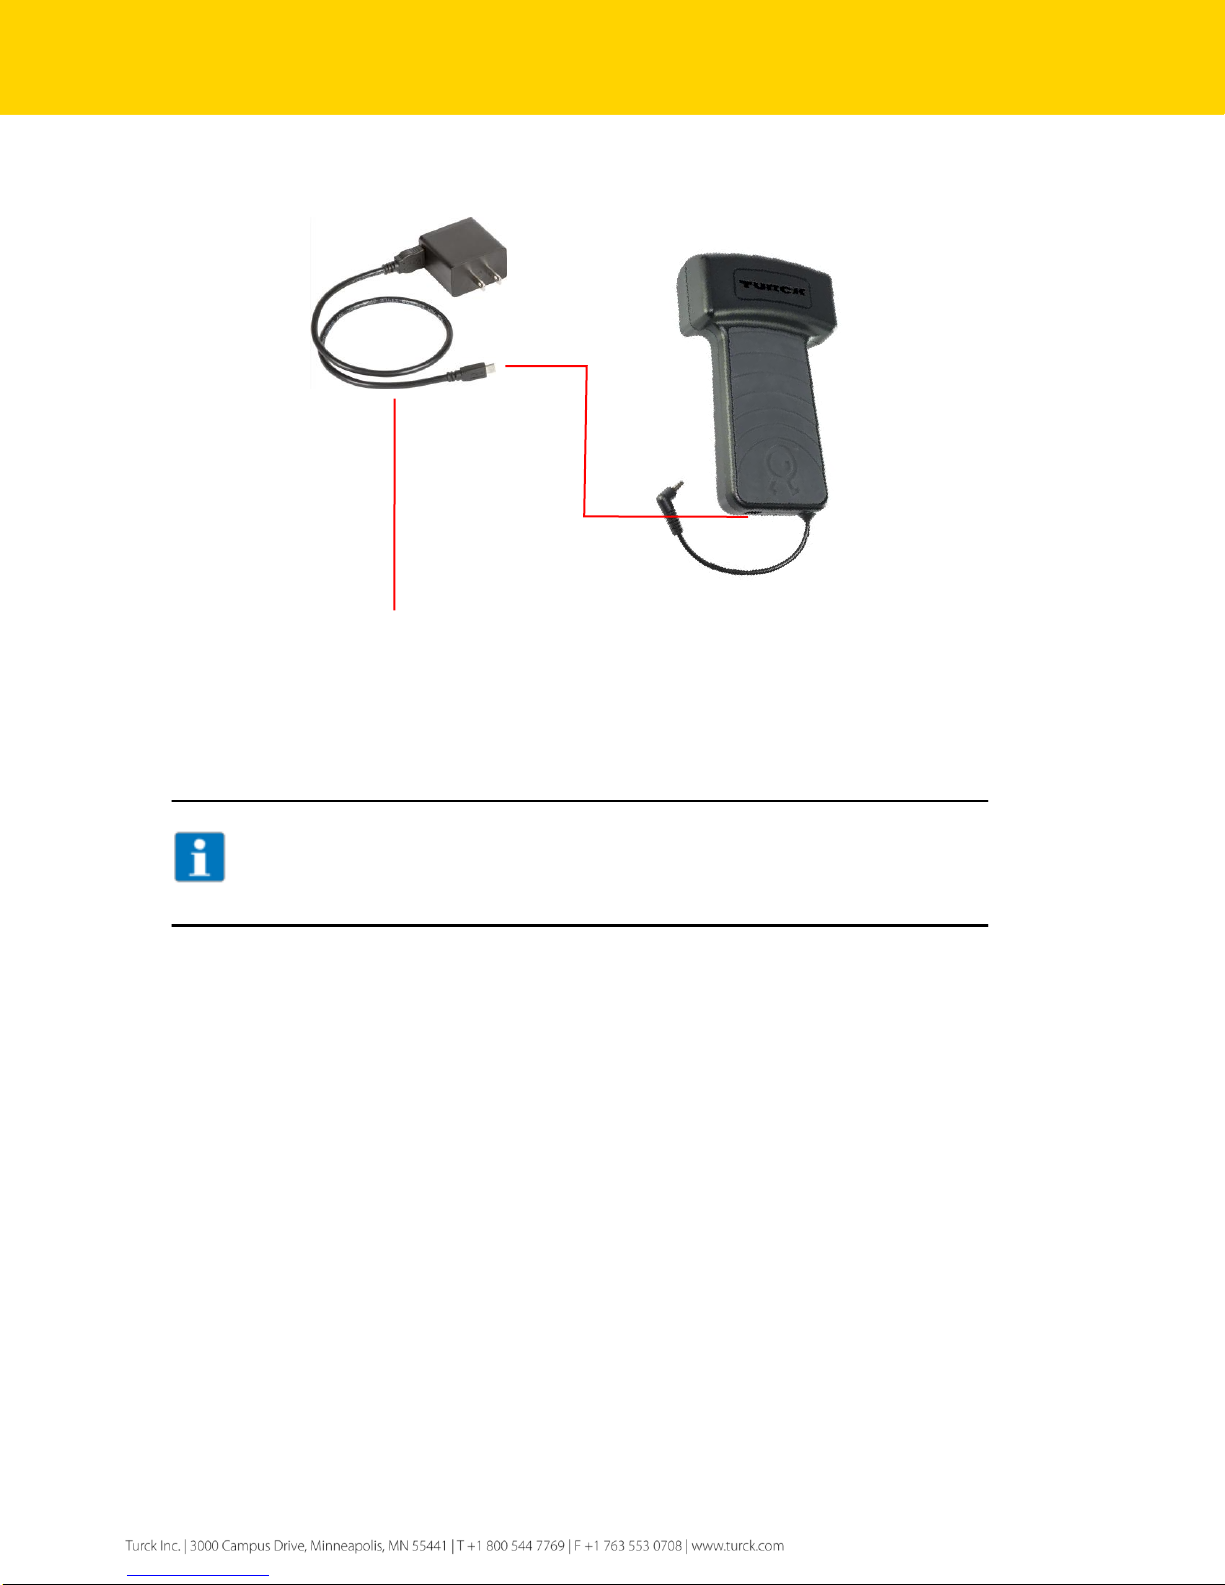
3 Charging the Turck PD-IDENT handheld reader
1. Using the included 2A micro/USB charger, plug the micro USB connector into the bottom of
the handheld reader.
2. Connect the charger into a 120V outlet, or
3. Disconnect the USB connector from the micro/USB charger, and plug the USB connector
into a USB port (such as one found on your laptop or desktop computer).
NOTE
Charging speeds will vary depending on which method is used. It is recommended to charge the
handheld reader for a minimum of 2 hours to ensure proper operation.
Page 7

7
4 Connecting to Smartphone device
1. Plug the stereo connector into your iPhone or Android smartphone
NOTE
To ensure proper operation, a smartphone device must be physically connected, and TURCK
RFID App must be installed.
Page 8

8
5 App description
The Turck RFID app is available for both Android and iOS devices. The app looks and functions the same
on Android and on iOS with a couple of minor exceptions, which are noted.
5.1 Obtaining the app: Android
1. Open the Play Store by touching on the “Play Store” icon on the Android device.
2. Search for “Turck RFID”. Then download and install it.
5.2 Obtaining the app: iOS
1. Open the iTunes App Store by touching on the “App Store” icon on the iOS device.
2. Search for “Turck RFID”. Then download and install it.
Page 9

9
Moves to the
Scan screen and
starts scanning
for UHF RFID
tags
Move to the
Settings
screen, which
is used to
configure the
app and the
RFID reader
Icon
Description
Reader not connected to
Android/iOS device
Reader and Android/iOS
device in connection process
Reader and Android/iOS
device is connected, and the
battery state is as indicated
(empty on the top, full on the
bottom)
Reader and Android/iOS
device is connected, and the
battery is charging
Reader and Android/iOS
device is connected, and the
battery is full
The yellow thermometer
above the battery indicates
that the RFID reader is warm
The red thermometer above
the battery indicates that the
RFID reader is too hot to
scan.
*Note: Allow the RFID reader
to cool down
Moves to the
Read/Write
screen, which is
used to read and
write data to an
individual UHF
RFID tag
6 Home Screen
Page 10

10
When a tag is
found, its EPC is
displayed.
Touching a tag
reads/writes this
tag, then moves to
the read/write
screen.
Image
Description
Changes the
volume/power. By
default, it is set to
the maximum level
The volume/power is
set to less than the
maximum level
While
scanning:
pause/resume
Pauses scanning
and changes this
button to
“resume”.
Pausing and
resuming
scanning
preserves the list
of tags found.
After scanning
is stopped:
email
Emails the
scanned EPC’s to
specified address.
If an email
address has not
been entered, you
will be prompted
to enter an email
address.
If the “prompt for
email note”
setting is on (in
the “settings”
screen), you will
be prompted to
enter a note to
send in the email.
Starts/stop
scanning
While in Geiger mode:
Geiger
In his mode the RFID reader will make
a very short beep each time a tag is
scanned, so even with one tag in
range, you will hear continuous
beeping if he tag is close to the reader.
*Note: This mode is useful for finding
tags.
Additionally, a small graph appears to
the right of the EPC, showing how
frequently the tag has been found,
which roughly corresponds to how
close it is to the reader
While in Once mode:
Once
In this mode the RFID reader will beep
once for each tag found.
*Note: This mode is useful for taking
inventory of tags, especially when
many tags are present
7 Scan Screen
NOTE
Entering the scan screen automatically causes the RFID reader to start scanning for tags.
Page 11
11
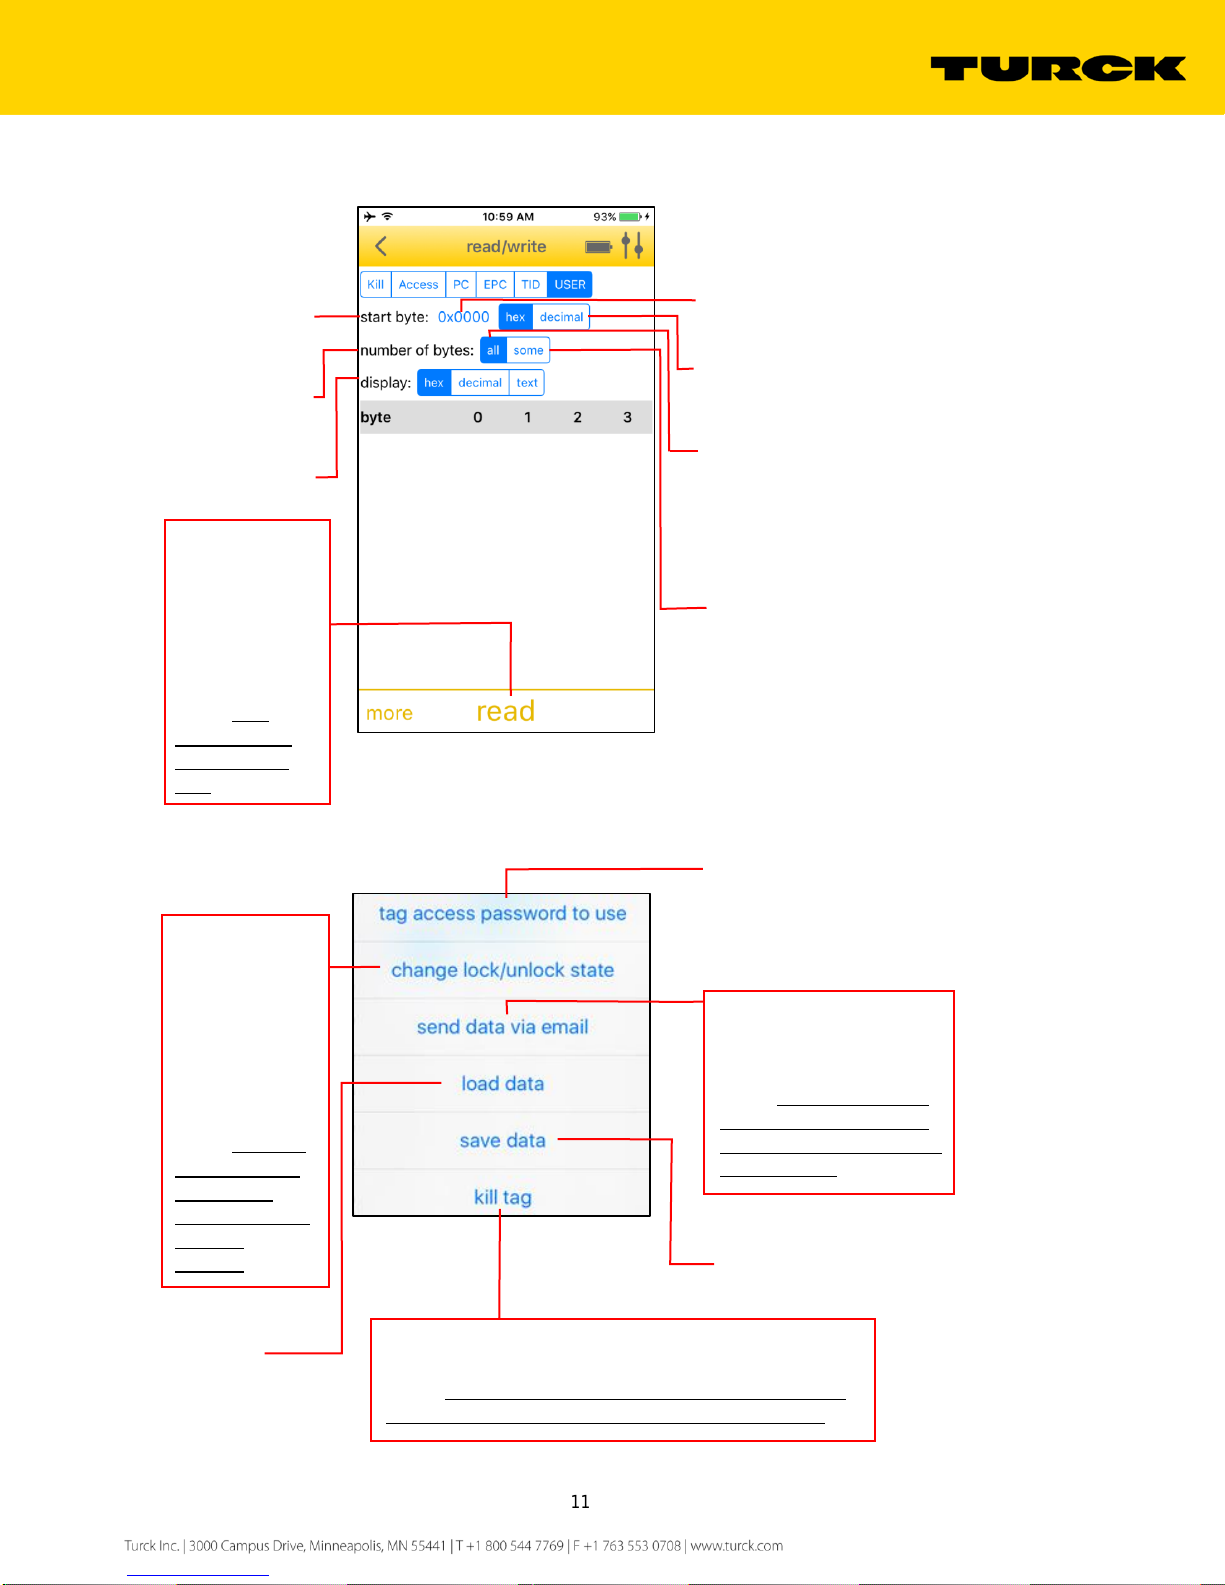
The byte offset to
start reading in
the domain.
The number of
bytes to be read.
0x0000 displays a dialog to
change the start byte
Hex/decimal changes the
format for the start byte.
All reads as many bytes as
possible.
Some reads a specific
number of bytes. If some is
selected, the number of
bytes to read is displayed.
Touching the number of
bytes value displays a dialog
to change the number of
bytes.
Displays data as
hex, decimal, or
text format
Read the RFID tag
using the settings
displayed.
Write the
displayed data to
the RFID tag.
*Note: Only
displayed after
data has been
read
Sets the password when:
1. Writing tags (any domain)
2. Changing the lock/unlock
state (any domain)
3. Reading the kill password
domain or the access
password domain
Changes the
lock/unlock
state of the RFID
tag for the
selected domain,
and displays a
list of the
possible states.
*Note: Touching
a state shows a
confirmation
dialog describing
the state
touched.
When tag data has been
read, sends the currently
displayed tag data via email.
*Note: If an email address
has not been entered, you
will be prompted to enter an
email address.
Loads
previously
saved data
Saves read
tag data.
Killing a tag renders the RFID tag permanently
inaccessible.
*Note: You will be prompted to enter a password, which
must match the kill password stored on the RFID tag.
8 Read/Write Screen
8.1 More Read/Write
Page 12

12
Displays RFID
App version, and
RFID reader
version.
Prompts for a password to
be stored in the Turck PDIDENT handheld RFID
reader.
*Note: If a password is
stored in the reader, this
password must be entered
before the reader can be
used to modify RFID tags in
any way (writing data,
changing the lock/unlock
state, or killing the RFID tag).
Set or change
the email
address to send
data to using the
“email” button on
the Scan screen
or the “send data
via email” item
on the more
menu in the
read/write page.
Set whether or not to prompt
for a note to include when
sending email.
*Note: Only displayed if an
email address is set
Sets the display format for
EPCs on the scan page.
9 Settings Screen
Page 13
13
10 Basic Troubleshooting/Tips
10.1 Issues Reading/Writing
10.1.1 Multiple tags in the environment
Reading and writing an RFID tag works much better when only no other RFID tags are visible to the
reader. Therefore it is advisable to not have other RFID tags in the vicinity when reading or writing tags.
NOTE
Putting RFID tags inside a metal box is an easy way to render the RFID tags invisible to an RFID
reader.
10.2 Issues with Android device connection
There are a number of reasons that an Android device might not properly communicate with the Turck
PD-IDENT handheld RFID reader.
1. Make sure the reader is fully charged. When the reader’s battery is low, it will not connect to any
smart device.
2. Some phone cases can block the audio jack from completely inserting. Try removing the case.
3. Sometimes a dirty audio port can be an issue, try cleaning with compressed air and/or a
toothpick.
4. Try restarting the phone.
5. If possible, verify the reader is working by using a different Android/iOS device.
6. The Turck PD-IDENT handheld RFID reader may need new firmware so it can communicate with
this Android device.
NOTE
Try updating the firmware using an iOS device, or try a different Android device, then try the
problematic Android device again.
10.3 Technical Support
For additional support, email inquiries to appsupport@turck.com, or call Application Support at 763-5537300, Monday-Friday 8AM-5PM CST.
Page 14
14
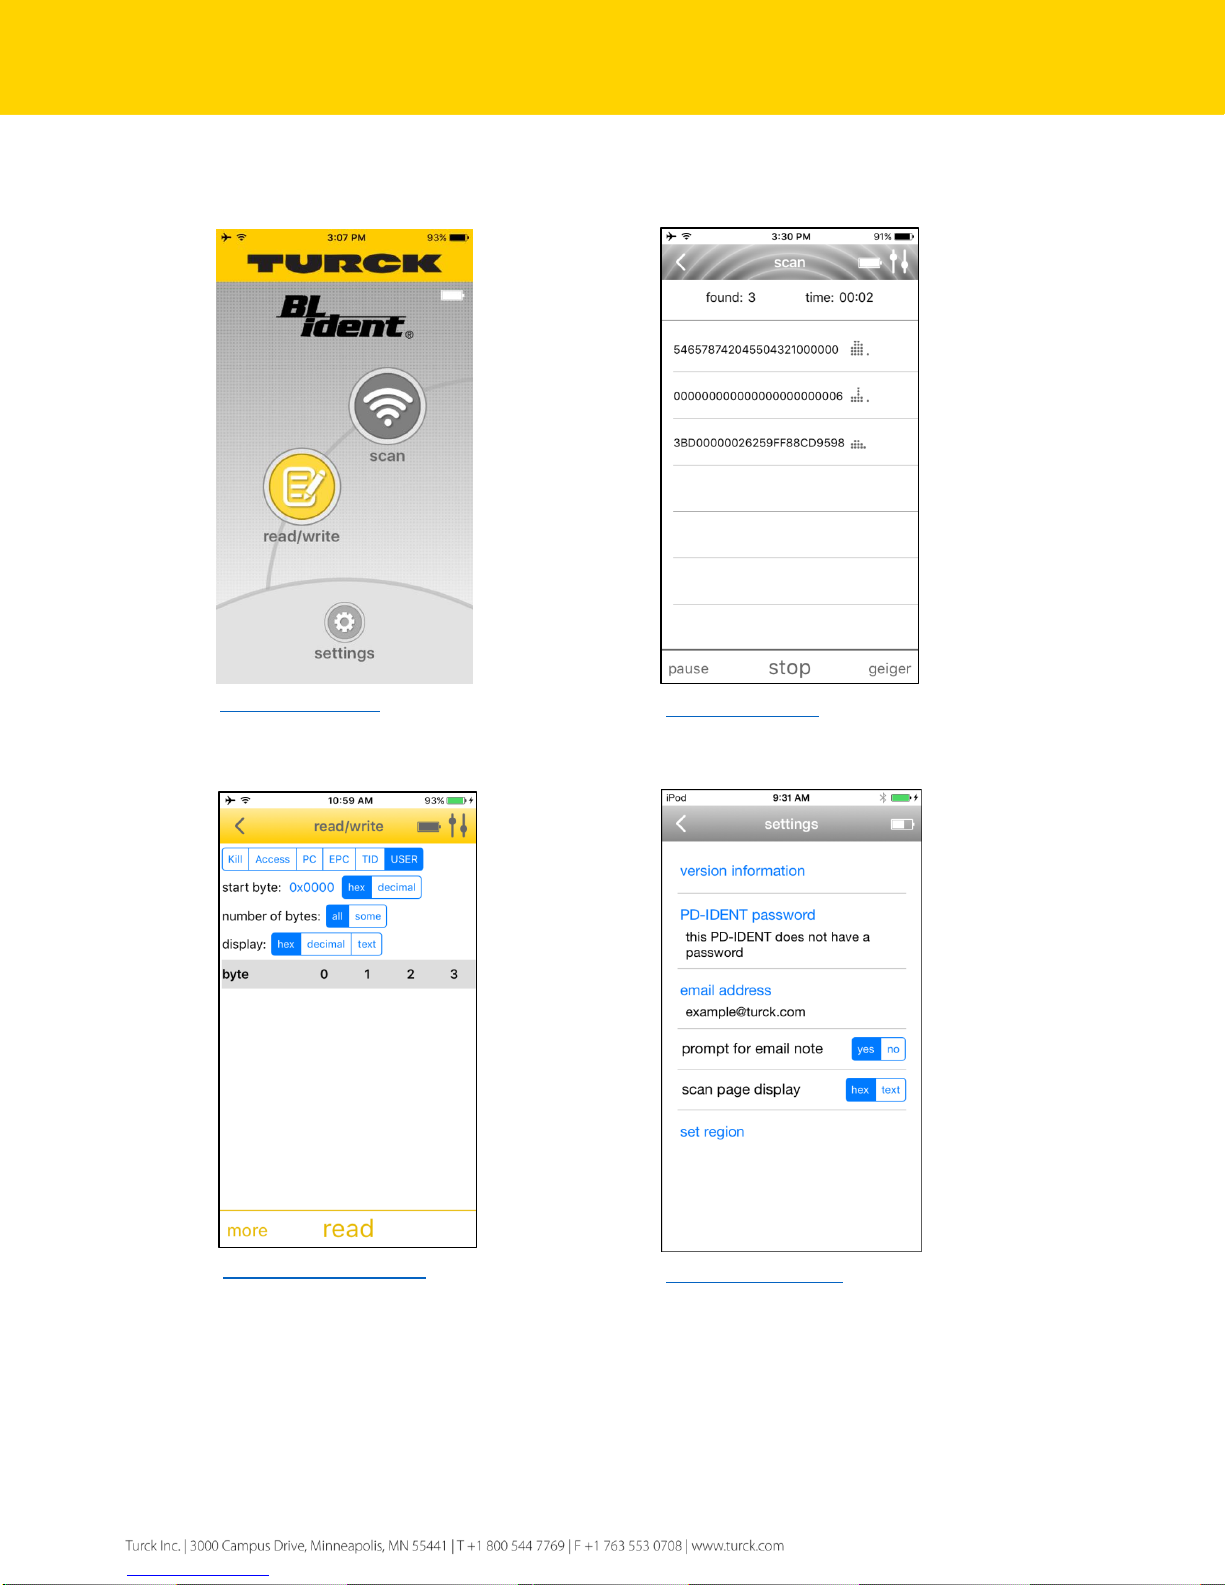
Fig 1. Home Screen
Fig 2. Scan Screen
Fig 3. Read/Write Screen
Fig 4. Settings Screen
11 Screen Appendix
 Loading...