


PROGRAMMING GUIDE
VitalBase watch - VBC3 - 67605/19
LED
Alarm Button
After removing VitalBase from its package, fully read the documentation
before performing the following steps.
Step N°1 : Exit sleep mode
1
Push the button for 3 seconds
Step N°2 : Verification of normal operation
If this step does not take place correctly start again with step N°1
1
2
The red led lights up
2
3
Immediately release the button
3
Push and release the button
The red led turns on then turns off
For optimal results, VitalBase has to be permanently worn on the wrist .
Other uses may generate false alarms.
VitalBase is ready
Release5-Jan14
1/5
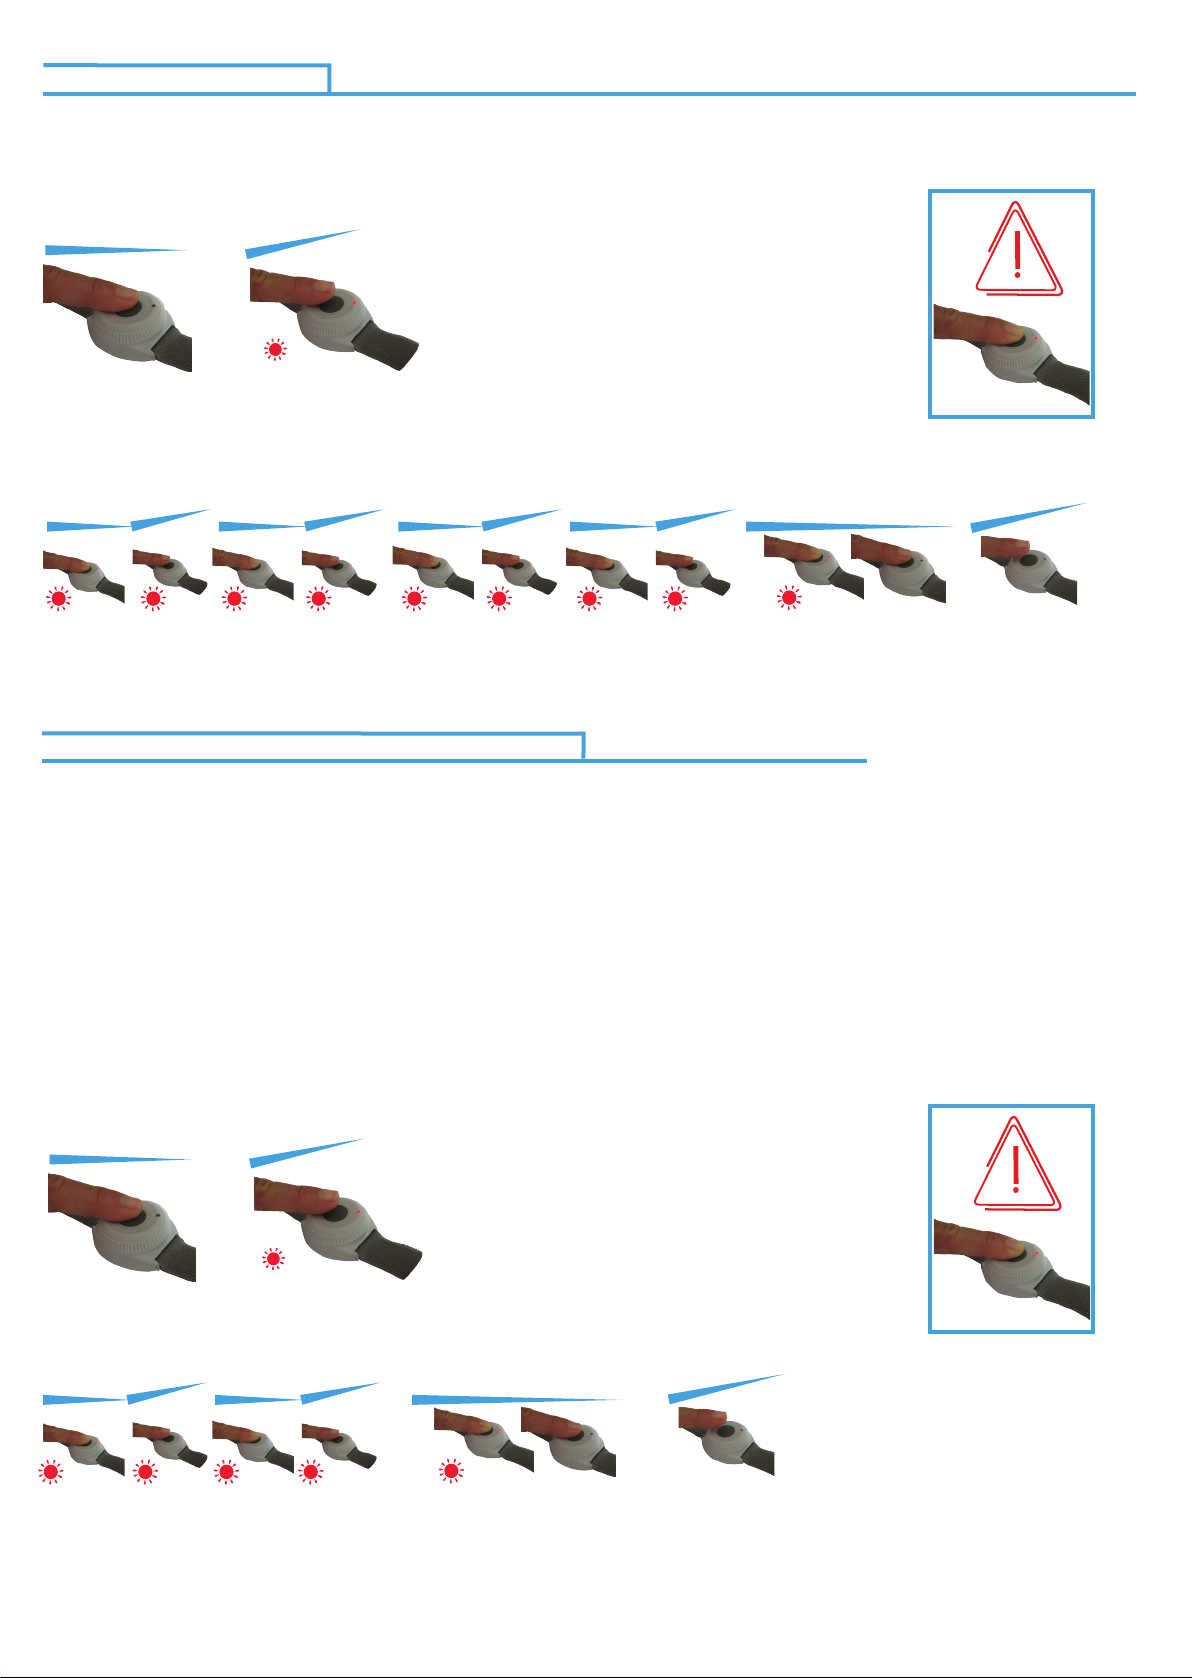
Enter sleep mode
To put the VitalBase watch back into sleep mode for transit or storage, please follow the below process !
VitalBase watch needs to be layed down on a table during this step as shown in this picture
Press and release the button just like for sending an alarm
While led is on, press and release the button 5 times quickly
Holding the last 5th press until the led turns off. Once the led turns off, release the button.
After 5 seconds, you can check that the VitalBase is back into sleep mode by pressing the button 2 times quickly.
The watch vibrates and the led flashes.
If it is not working please restart the process from the begining.
Set Vibration alert and extended cancellation period
The VitalBase watch is designed to identify a serious fall that leads to a state of immobility and/or unconsciousness of the user.
If such a fall is detected, the detector vibrates to alert the user that it is about to send a radio alarm signal to the Lifeline home
unit. Prior to the unit vibrating, in order to reduce the number of false calls, should the user continue or start to move again
within a pre-set time limit (approx. 15 secs) after the fall, a call to the monitoring centre will not be generated. The vibration
alert then gives the user a nal warning that it is about to transmit an alarm and gives a further period in which to cancel the
alarm by moving their arm/detector. The vibration alert and extended cancellation period can now be disabled in which case
once a fall has been determined the alarm will be generated without vibrating the watch. The user’s circumstances should be
considered carefully before changing the operation of the fall detector as disabling this vibration alert and extended cancellation period will result in an increase in calls to the monitoring centre. Please note: movement after an event always remains
part of the VitalBase watch algorithm therefore movement by the user after the event may result in the VitalBase determining
the event not to be a fall.
VitalBase watch needs to be layed down on a table during this step as shown in this picture
Press and release the button.
While led is on, press and release the button 3 times quickly
Holding the last (3rd) press until the led turns off. Once the led turns off, release the button.
To check the mode of the VitalBase, press the alarm button (immediately after changing the mode only).
If led stays on for 3 seconds : vibration alert and extended cancellation period is enabled (normal mode).
If led is flashes for 3 seconds : vibration alert and extended cancellation period is disabled.
2/5

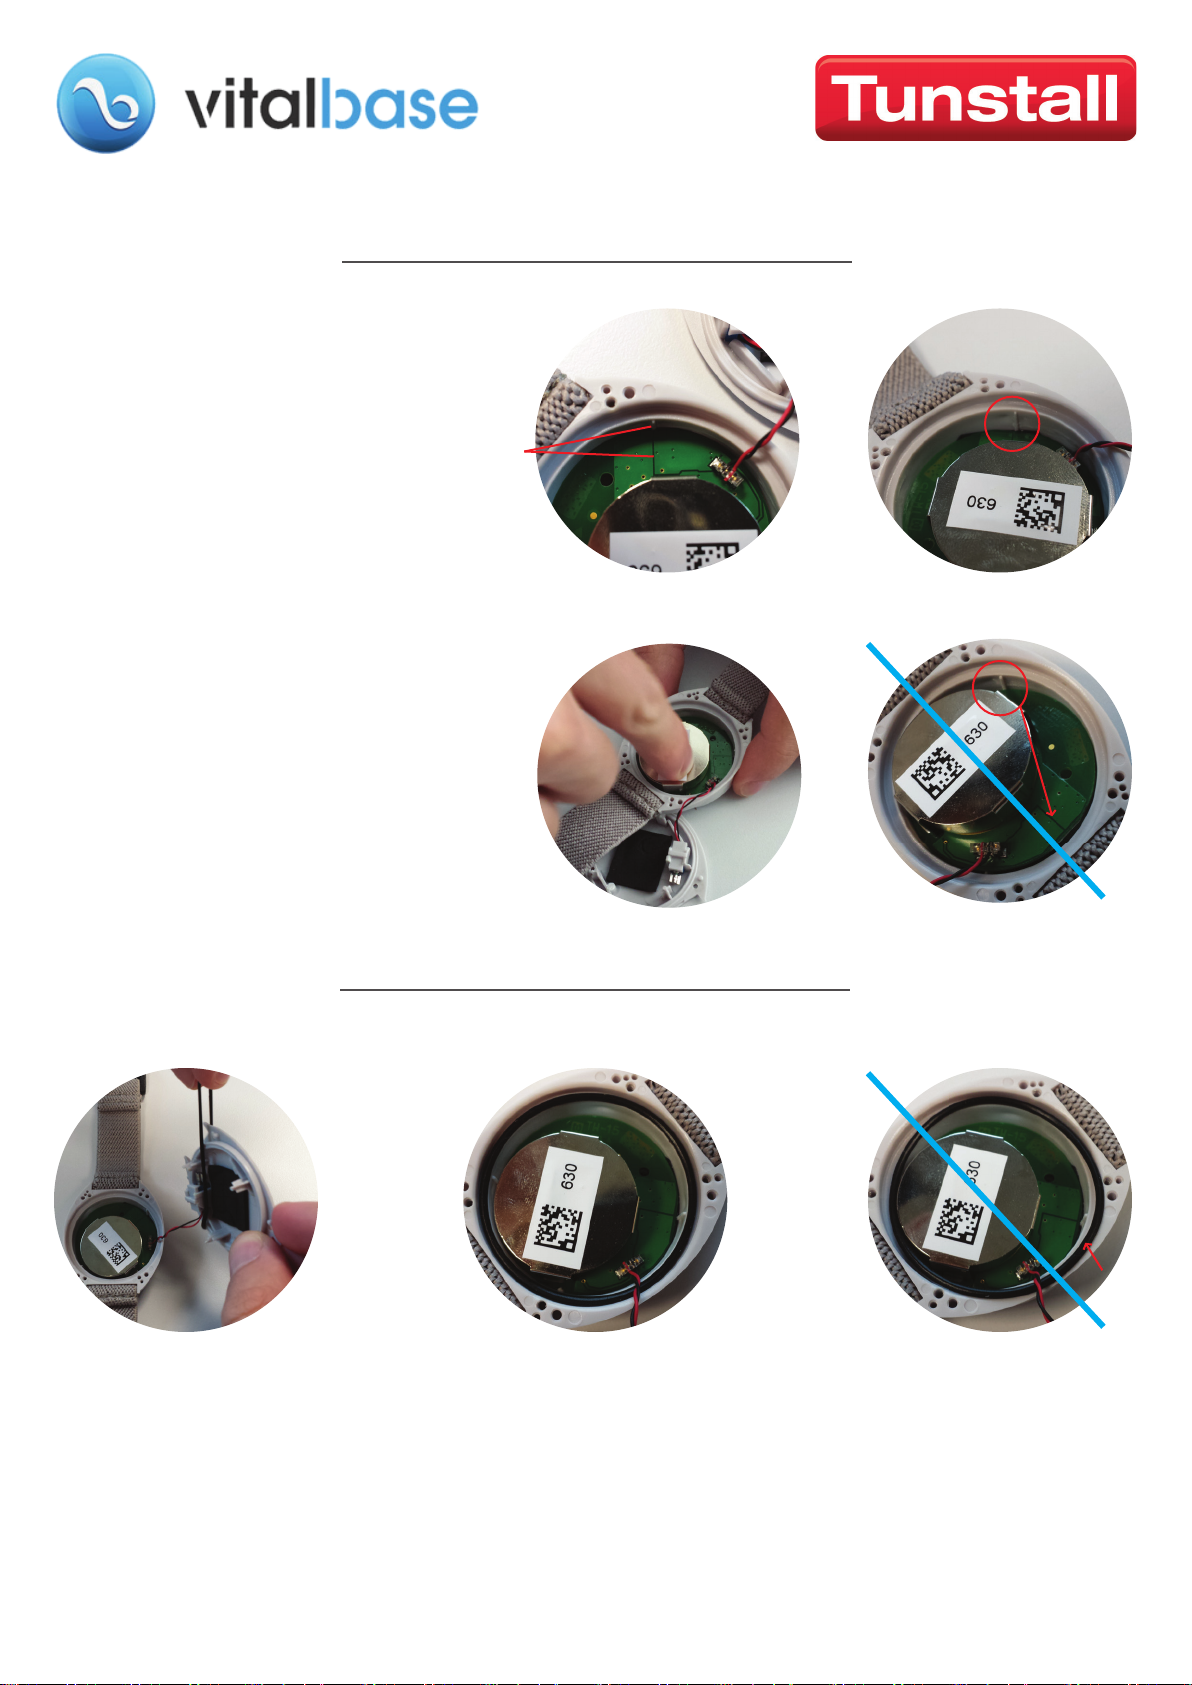
PROCEDURE FOR BATTERY CHANGE
The latest Vitalbase provides the option for changing the battery.
To change the battery please carefully follow the below steps
1) Remove the 4 screws
4) Lift the PCB by holding
the battery holder
2) Open the bottom lid being careful
not to stretch the connected wires.
5) Slide the battery out of the battery holder by pushing
it from the side using your finger. Do not use a conductive
object such as a metal screw driver.
3) Remove the O-ring
6) Slide in the new CR2477 battery
into the holder, with the "+" face up
3/5
7) Put back the PCB into the case top
aligning the small vertical mark on the
inside of the case with the dark
straight line on the PCB
9) Place a new O-ring into the case top circular groove
Contact Tunstall on 01977 660479 to obtain a new O-ring and Vitalbase case pack
4/5
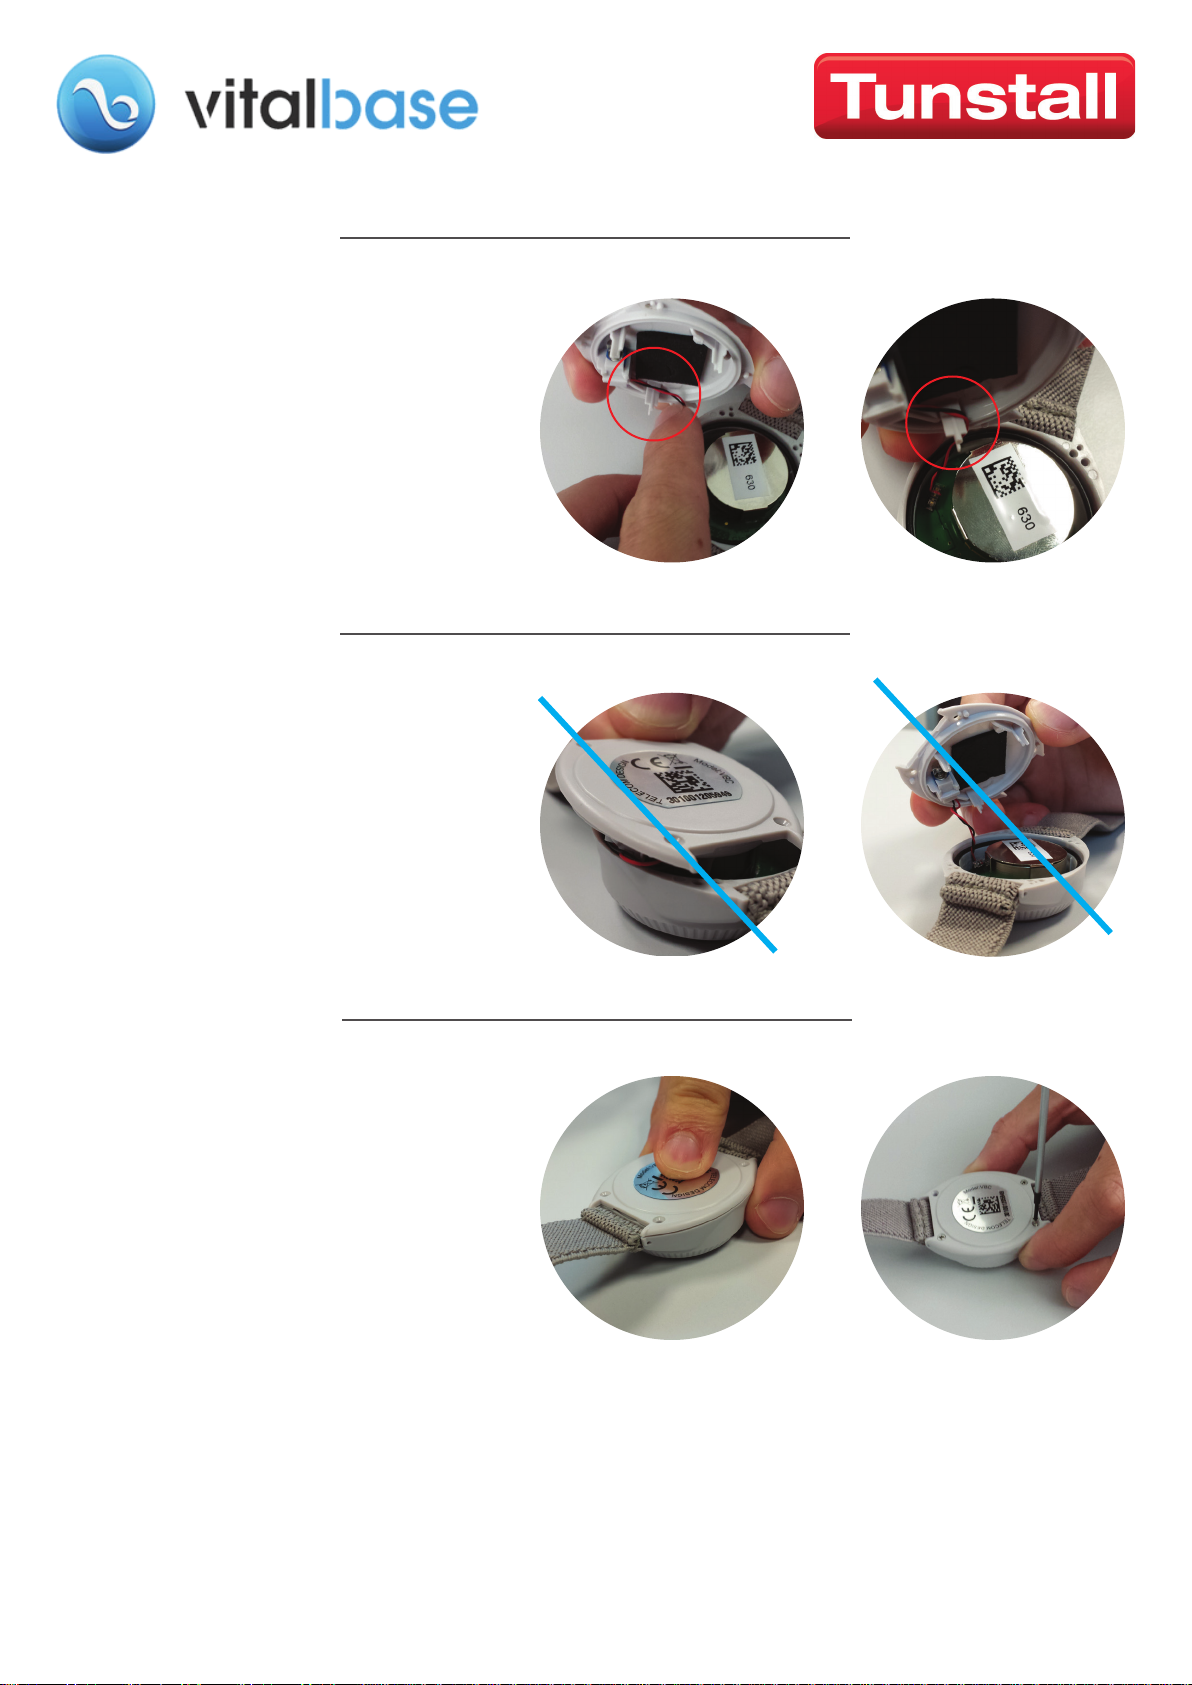
10) Put the wires behind the lid's internal
plastic leg located behind the vibration motor
11) Make sure the vibration motor wires are
not pinched when closing the bottom lid
12) Put back the 4 screws into place.
Do not over tighten the screws.
As soon as the two parts are in close
contact the screws are sufficiently tightened.
13) Test the Vitabase by pressing the help button and ensure an alarm is generated to the monitoring
centre. Tell the monitoring centre you are testing the Vitalbase following a battery change.
5/5
 Loading...