

Page 1
1.7
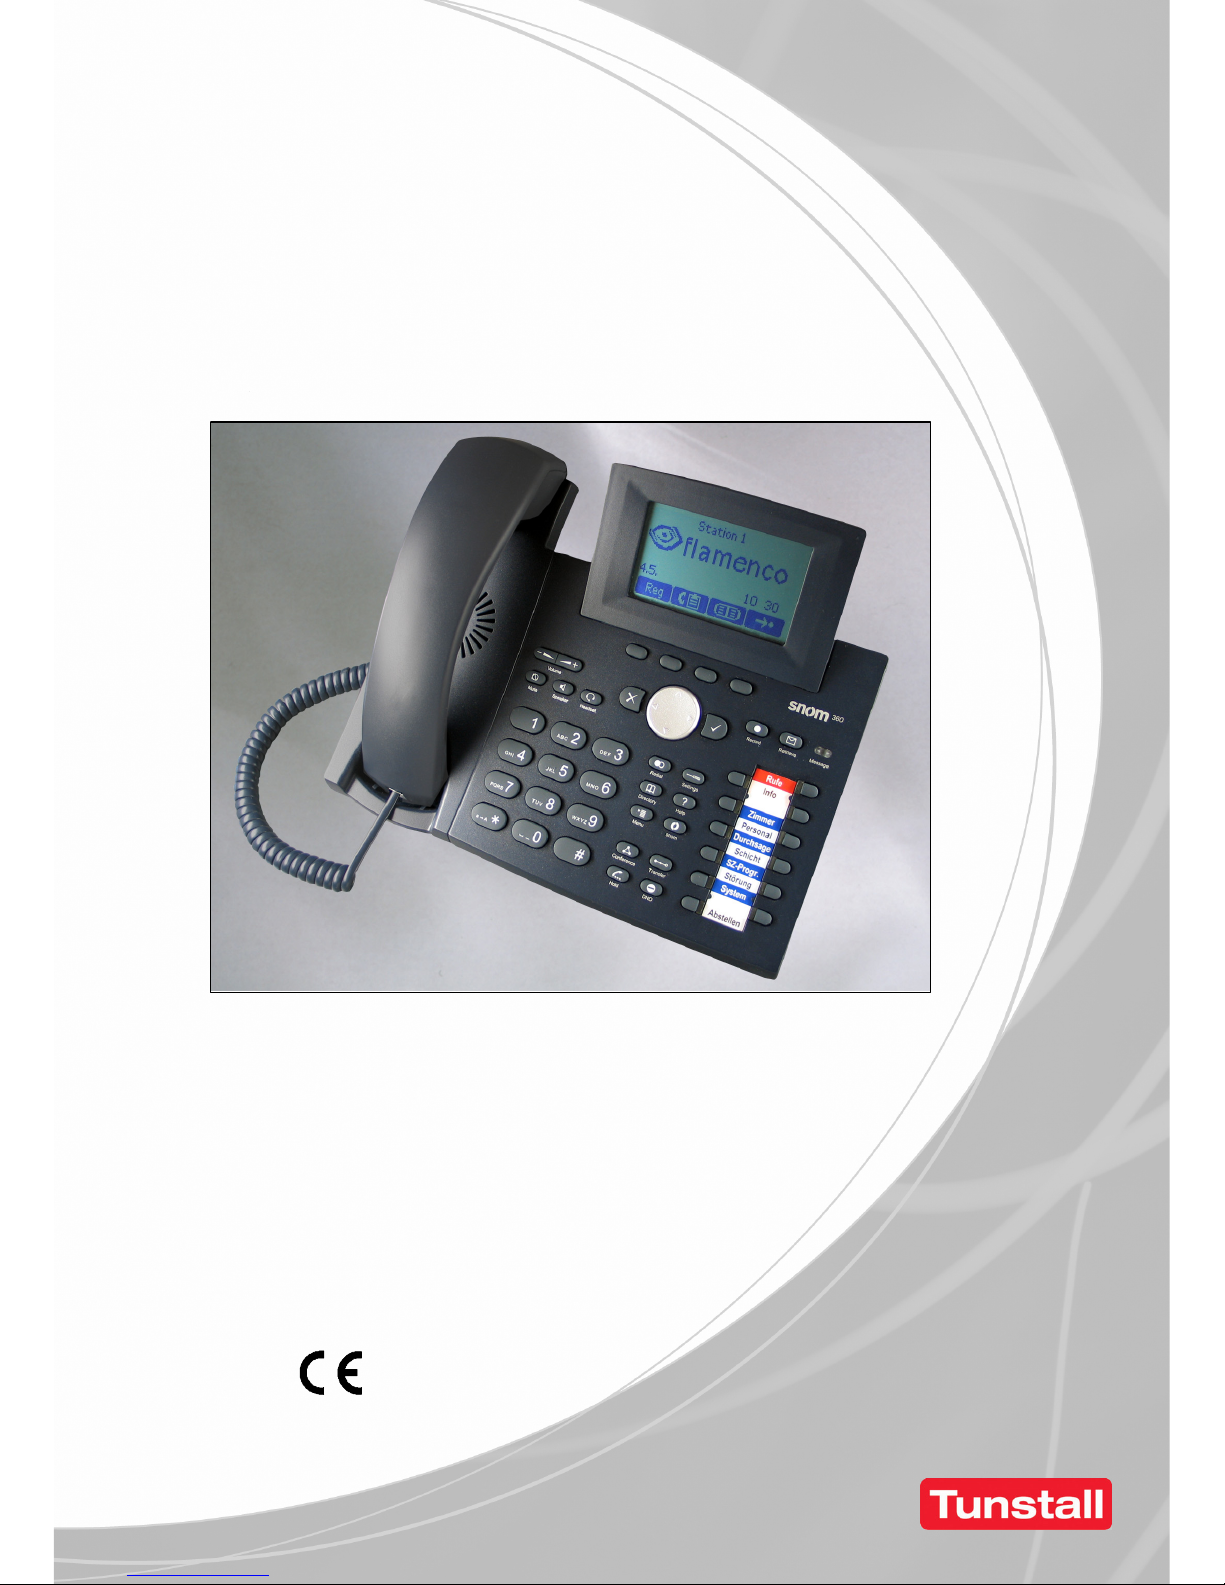
ComStation
Order no. 77 0603 00
User Guide
Order no. 00 8812 71
TEL
All the reassurance you need
Page 2

All rights to this documentation are reserved, in particular copyright and dis‐
tribution rights. No part of this documentation may be reproduced in any form
or processed, copied or distributed using electronic systems without the prior
written consent by Tunstall GmbH.
We reserve the right for implementing technical changes.
E Tunstall GmbH
ComStation
TEL
- User Guide, 00 8812 71, 09/2008 (Rev. 3.0)
Page 3

1
Table of Contents
For safety 3. . . . . . . . . . . . . . . . . . . . . . . . . . . . . . .
General 3. . . . . . . . . . . . . . . . . . . . . . . . . . . . . . . . . . . . . .
When “Fault” is displayed 5. . . . . . . . . . . . . . . . . . . . . . .
Basic knowledge 7. . . . . . . . . . . . . . . . . . . . . . . . .
Flamencoâ nurse call system 7. . . . . . . . . . . . . . . . . . .
ComStation
TEL
12. . . . . . . . . . . . . . . . . . . . . . . . . . . . . . . .
Installation 13. . . . . . . . . . . . . . . . . . . . . . . . . . . . . .
Setting up the ComStation
TEL
14. . . . . . . . . . . . . . . . . . .
Connecting ComStation
TEL
20. . . . . . . . . . . . . . . . . . . . .
Instructions for use 21. . . . . . . . . . . . . . . . . . . . . .
Speech connections 21. . . . . . . . . . . . . . . . . . . . . . . . . . .
Adjusting the volume 24. . . . . . . . . . . . . . . . . . . . . . . . . . .
Call handling 26. . . . . . . . . . . . . . . . . . . . . . . . . . . . . . . . .
Addressing a room 34. . . . . . . . . . . . . . . . . . . . . . . . . . . .
Announcements 36. . . . . . . . . . . . . . . . . . . . . . . . . . . . . . .
Ward coupling 38. . . . . . . . . . . . . . . . . . . . . . . . . . . . . . . .
Enable / disable a shift 40. . . . . . . . . . . . . . . . . . . . . . . . .
Cleaning 45. . . . . . . . . . . . . . . . . . . . . . . . . . . . . . . . . . . . .
Page 4

2
Page 5

3
For safety
General
WARNING! The following points are for the safety of staff
and patients.
ð You must have gained, via appropriate measures such
as training, sufficient knowledge about the operation
and use of the call system. These measures have to be
repeated if necessary. This handbook requires such
knowledge.
ð This handbook requires you to be familiar with the pro‐
cedures of hospital care service.
ð Use the ComStation
TEL
only for activities in the care
service. Keep conversations to a minimum. The
ComStation
TEL
is intended for the exchange of brief
messages.
ð Only use the included AC adaptor.
ð Ensure that the connection of the ComStation
TEL
is al‐
ways plugged in to the mains socket and to the PC net‐
work.
ð Never place the ComStation
TEL
in a humid environ‐
ment. Take care that is does not become wet. The
ComStation
TEL
is powered via an AC adaptor and may
therefore not come in contact with humidity.
ð Never open the enclosure of the ComStation
TEL
. In
case of a fault, return the device to the supplier.
Page 6

General
4
ð Bright sunlight can impair the readability of the display.
Place the ComStation
TEL
in a non-reflective location.
ð Do not relocate the ComStation
TEL
, i.e. do not connect
it in another room. The ComStation
TEL
was programmed
exactly for the original room. To use it at another location,
it has to be reprogrammed.
Page 7
When “Fault” is displayed
5
When “Fault” is displayed
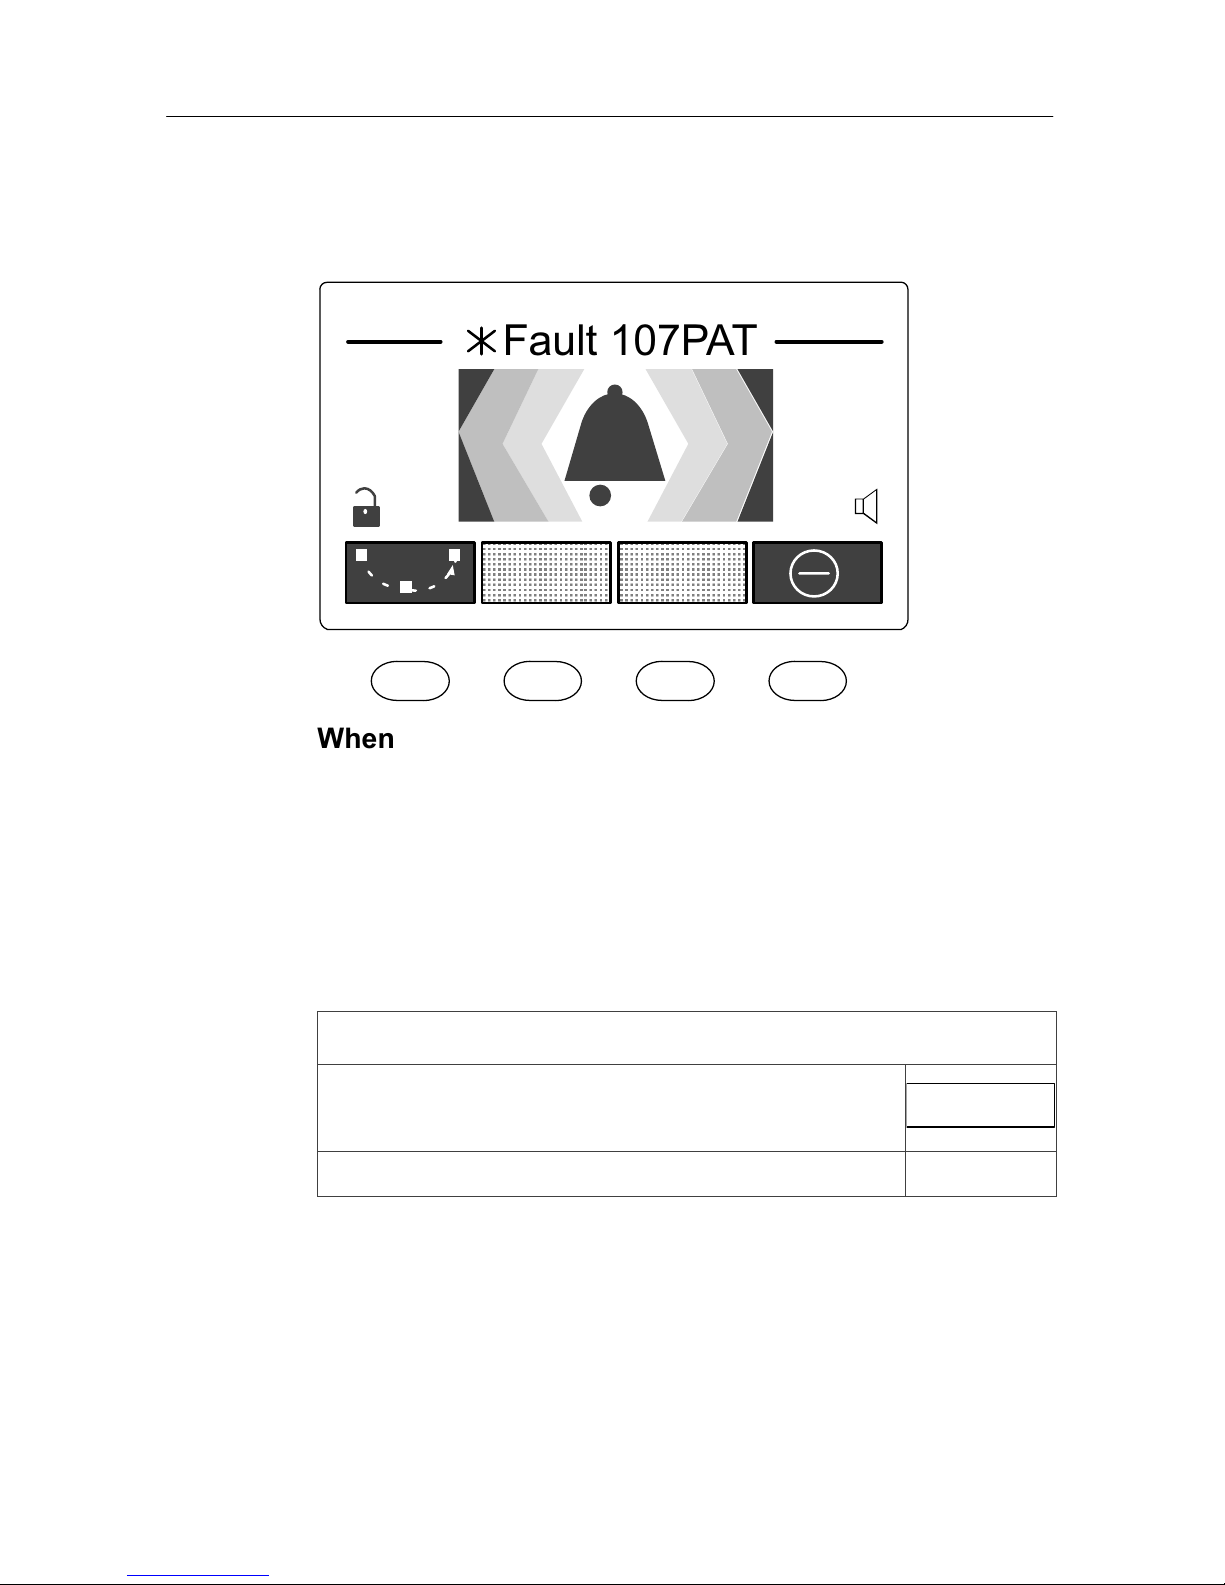
Fault 107PAT
When “fault” is displayed in the title bar, you must im‐
mediately inform a competent technician!
At least one fault situation (minimum) is present in the nurse
call system. This means that you may not be called from
every room.
Additionally, a call tone attracts your attention to the fault
situation.
How to display the fault within your ward:
l Press the “Fault” function key
(handset is hung up).
Fault
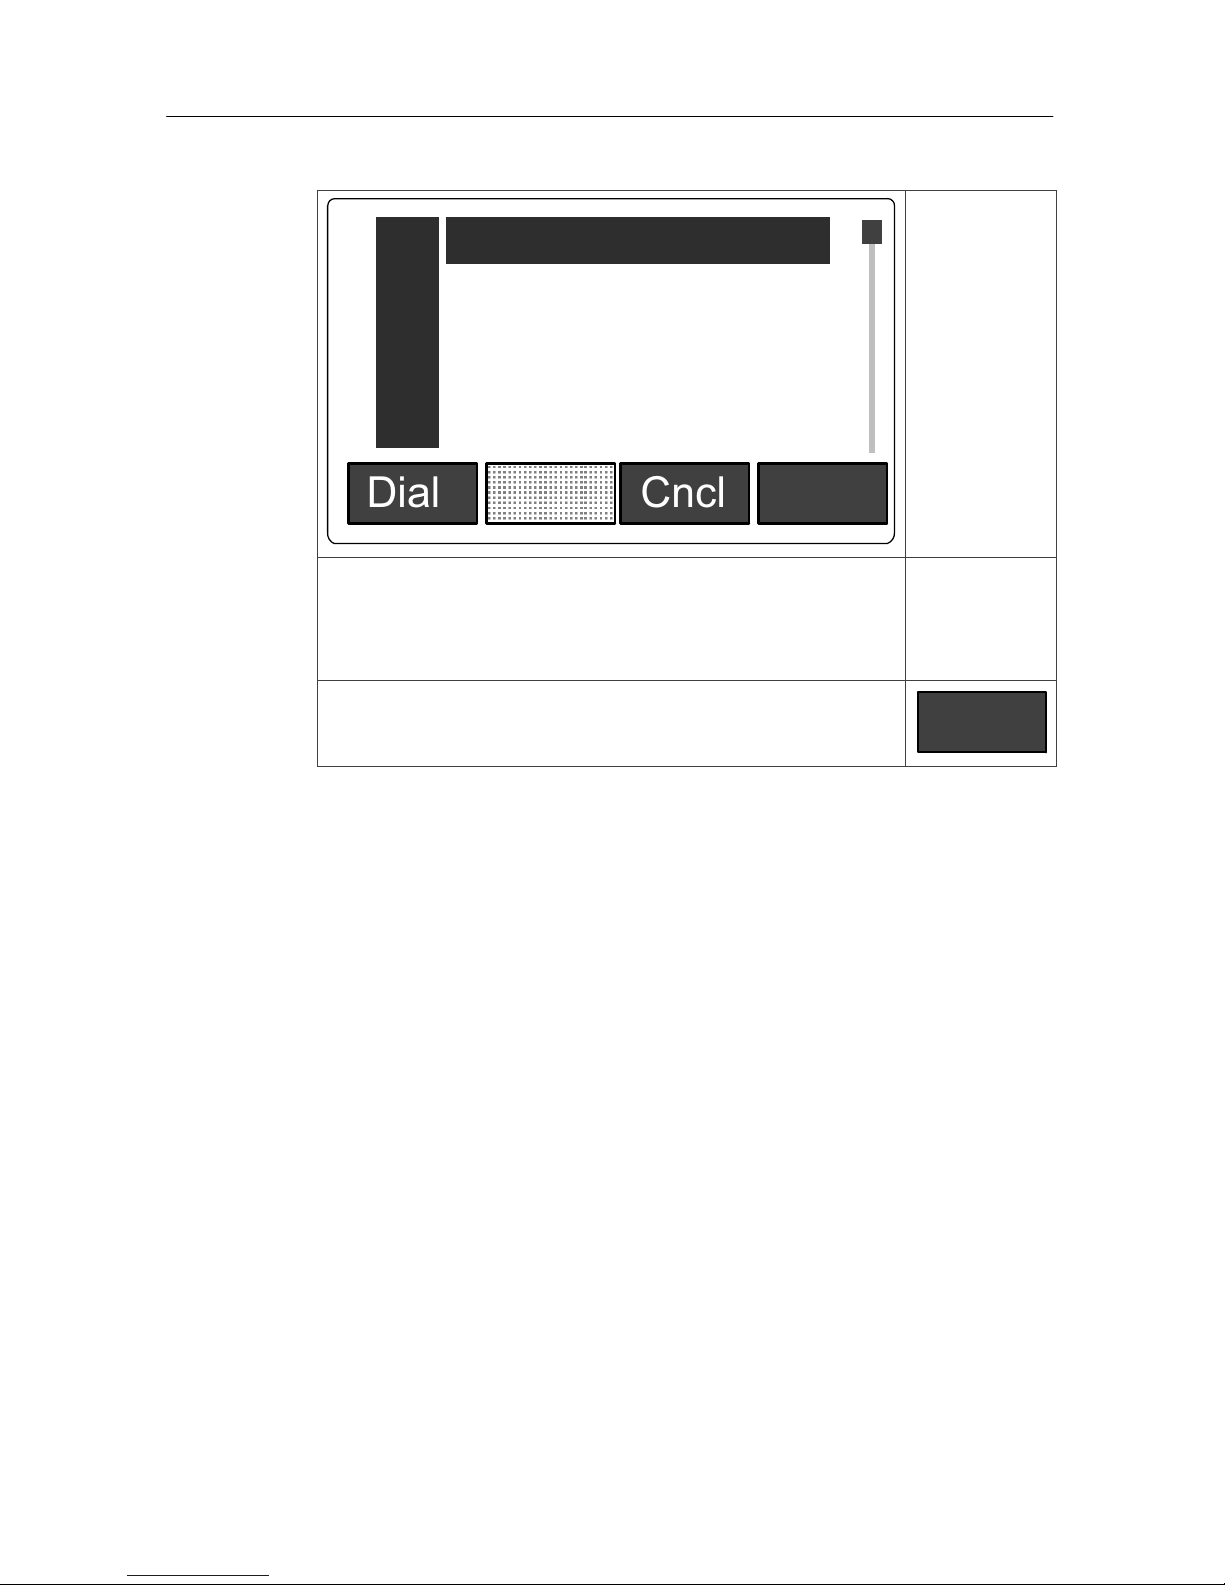
The fault list is displayed:
Page 8
When “Fault” is displayed
6
Dial Cncl Next
Fault 102PAT
Fault 107PAT
0
1
2
3
Fault 110WC
Fault 112TEA
4
Fault 104PAT
*
*
*
*
*
¢ All rooms of your ward with a fault situation
are displayed. They are shown in chrono‐
logical order. The oldest fault is on top..
l To close the fault list, press the “Cncl” soft
key.
Cncl
Page 9

7
Basic knowledge
FlamencoR nurse call system
Flamenco
®
systems are nurse call systems for hospitals
and similar establishments.
If a patient needs help, he/she presses the call button on
his/her patient handset. This call will be displayed on the
ComStation
TEL
in the ward nurse station and answered.
The staff at the ComStation
TEL
shall ask the patient about
the nature of the call and decide on appropriate action.
Maybe medical attention or assistance is required. The
ComStation
TEL
will show where staff is present in the
rooms, as they press a presence button when entering a
room. The staff at the ComStation
TEL
informs the staff in a
room, where help is required. of the call. An illuminated
room lamp above the door outside the room also identifies
the call location. After dealing with the problem or query, the
call is cancelled when presence switch is switched off upon
leaving the room. All signals displaying the call will now be
reset.
Calls to which a speech connection has not yet been estab‐
lished, i.e. those which have not yet been answered are
referred to as fresh calls. Calls which have been answered,
but have not yet been cancelled, are are referred to as ans‐
wered calls.
Page 10
FlamencoR nurse call system
8
ComStation
TEL
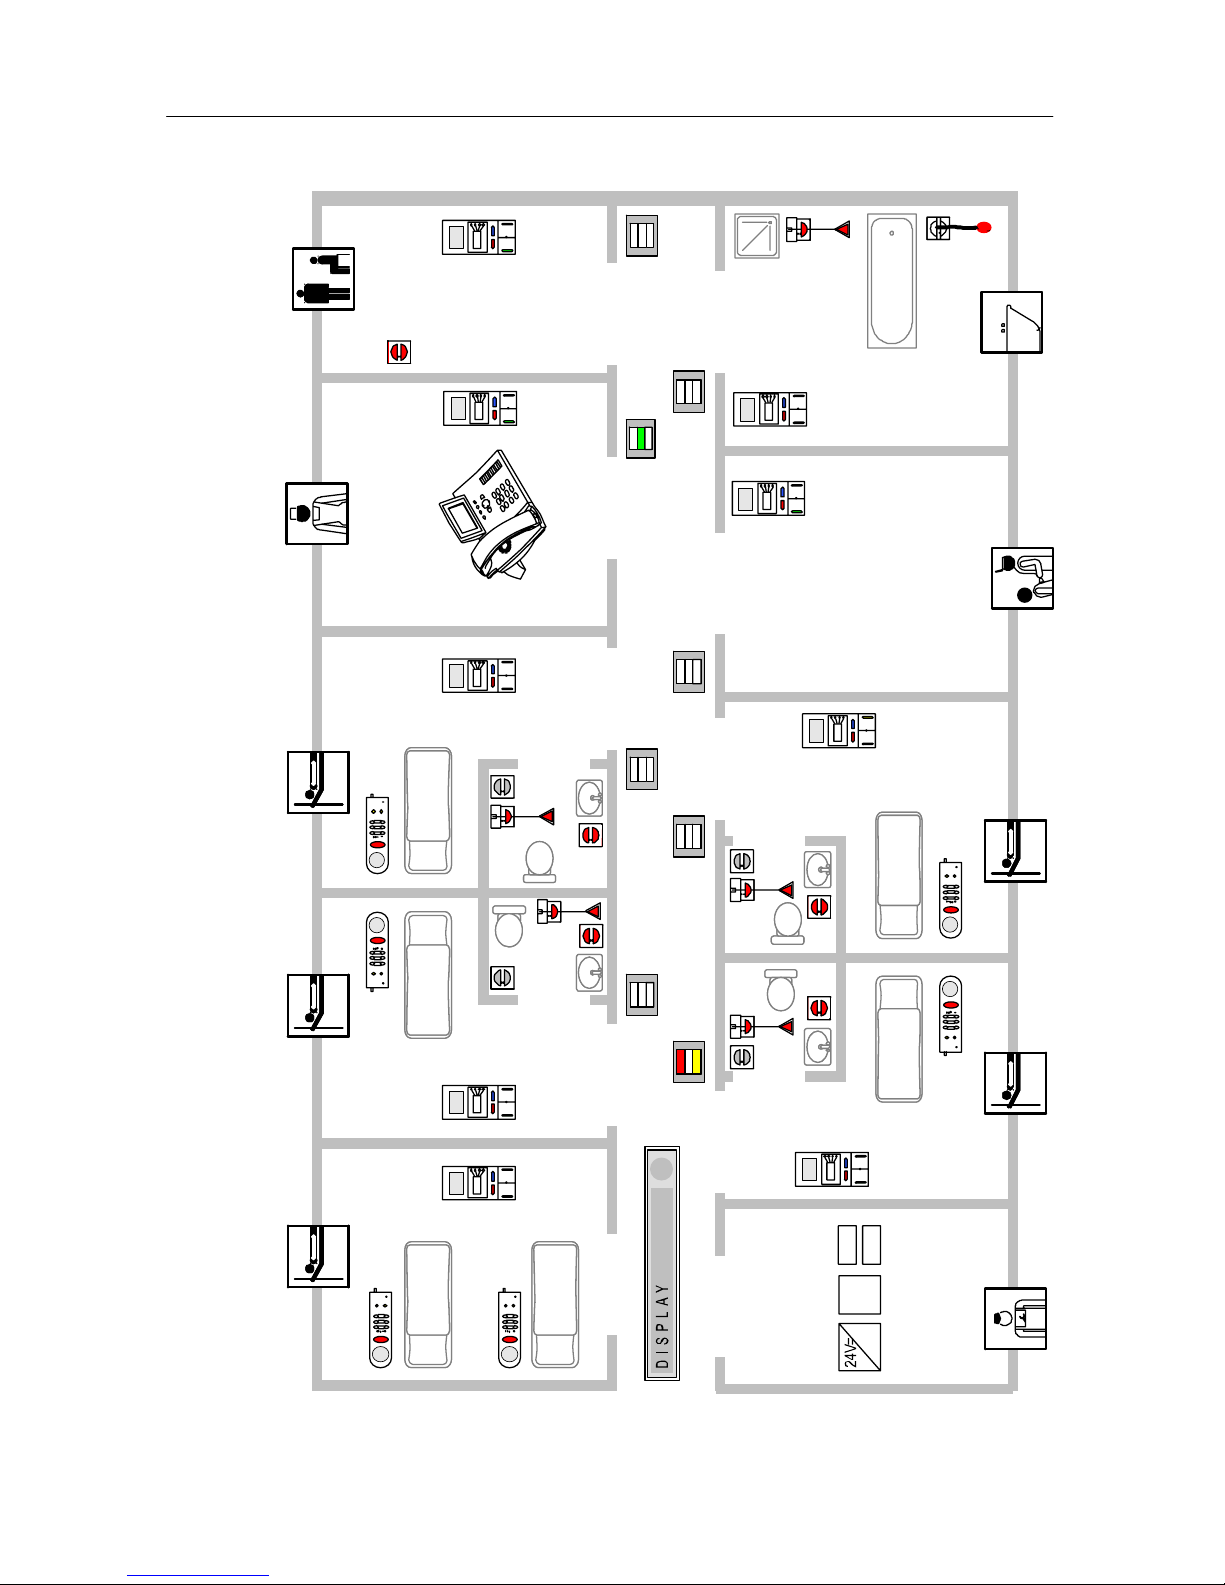
1 Sample ward
Page 11
FlamencoR nurse call system
9
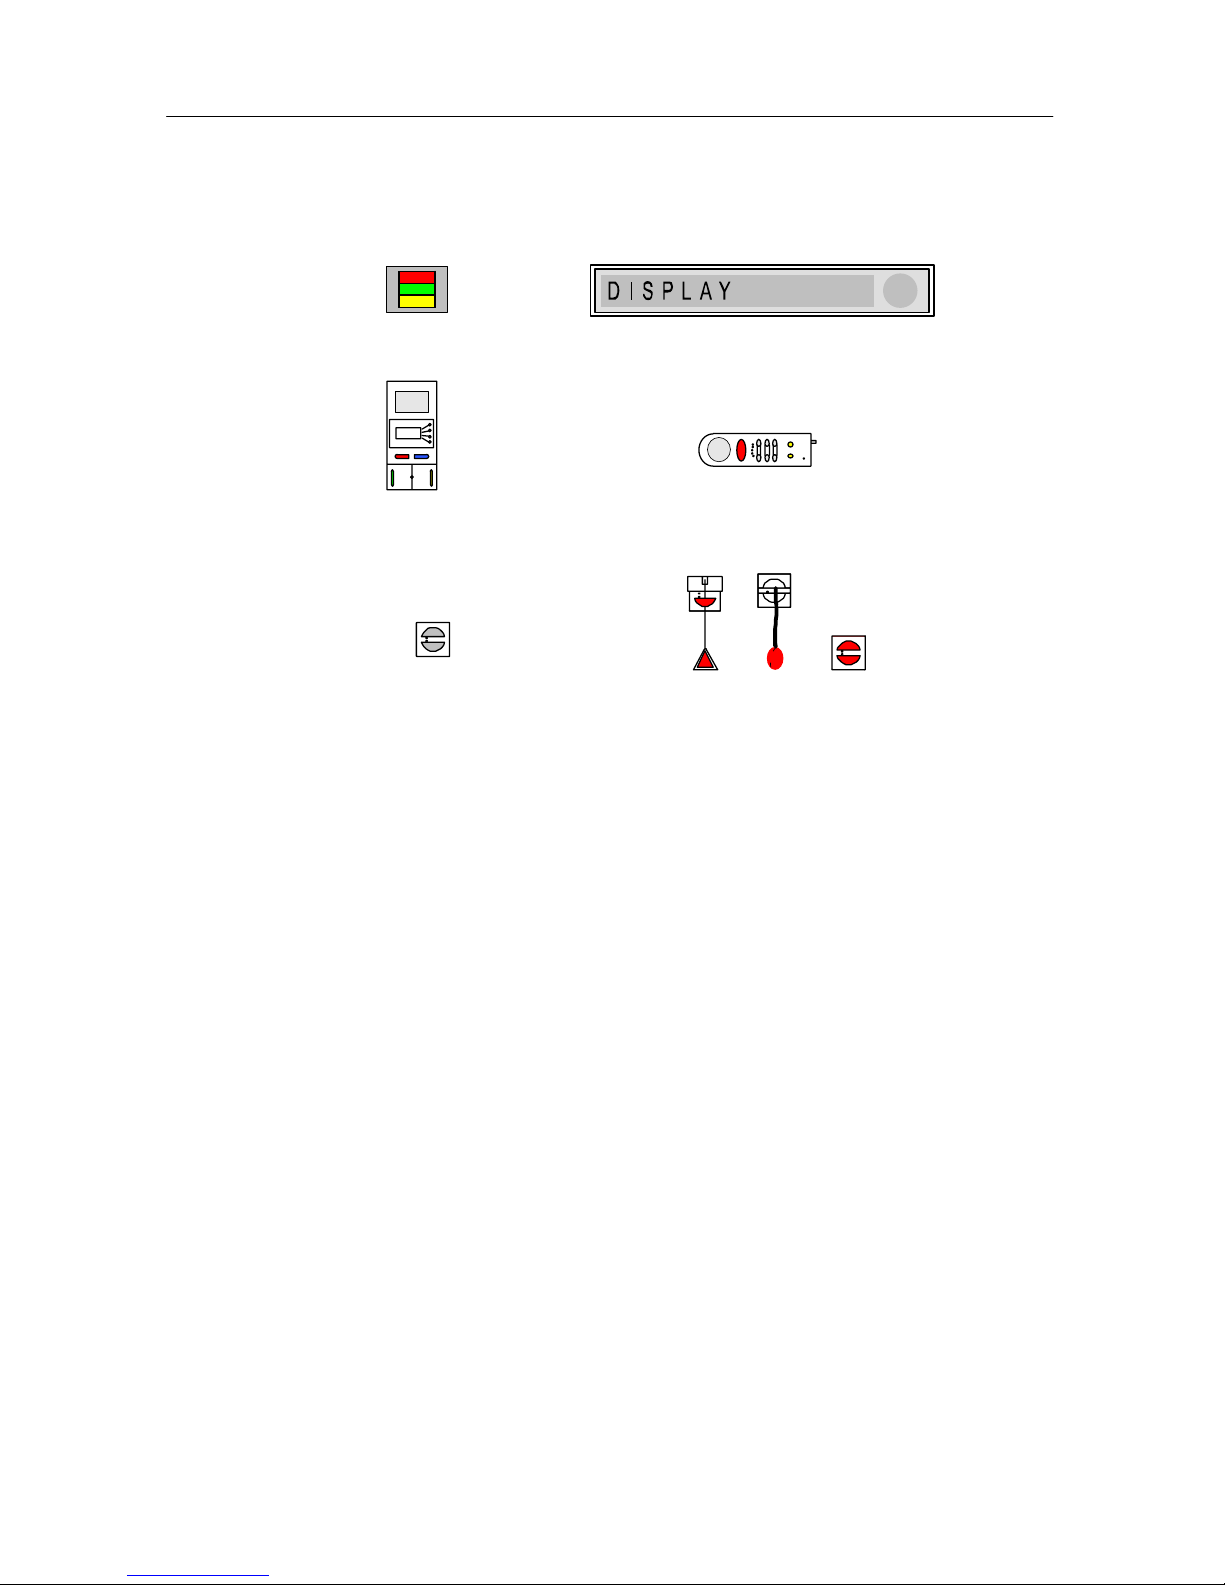
2 Icons
Different call switchesCancel switch/WC
Corridor display
Patient handset
ComTerminal
Room lamp
3 What else you need to know
4 Announcements
Aside from call handling, announcements can be made
from the ComStation
TEL
; these can be made either exclus‐
ively to staff or to all rooms in the ward.
5 Staff groups
The medical staff can be divided into two groups (e.g.
nurses and doctors). In order that the staff at the
ComStation
TEL
address the appropriate medical staff, a dis‐
tinction is made between both types. We have staff group
1 (= staff presence 1) and staff group 2 (= staff presence 2).
Each staff group has its own presence button in the room
(Staff 1 = green, Staff 2 = yellow). You have to ask your sys‐
Page 12

FlamencoR nurse call system
10
tem administrator which type of staff is allocated to the re‐
spective group.
6 Privacy
Although it is possible to converse with rooms from the
ComStation
TEL
, it is not possible to listen in on the rooms
without this being noticed. The reason is, every room has
a privacy function, a technical device which makes listening
in impossible. This will be cancelled if a call is triggered from
the room or if staff are logged as present in the room. It is
also possible to manually activate the privacy function .
Exception for children's rooms: In the Flamenco
®
nurse call
system it is possible that rooms are set as children's rooms.
In these rooms, the privacy function is always OFF. For opti‐
mum care of the patients in these rooms, you can listen in
to these rooms if needed, even if there is no call and no staff
is present in the room. Your system administrator will tell
you which rooms are set up as children's rooms.
7 Call forwarding
As a rule, calls are displayed and answered by the
ComStation
TEL
at the nurse station. Simultaneously, the
calls are automatically forwarded to the rooms where med‐
ical staff are logged as present. Therefore the calls can be
answered by the medical staff in the room via the commu‐
nication terminal (ComTerminal) as well.
8 Ward coupling
During periods of low activity, two or more wards can be or‐
ganisationally coupled. This means that in the coupled
wards, all calls from the coupled wards will be displayed and
answered.
Page 13

FlamencoR nurse call system
11
9 Zones and shifts (zone nursing)
Wards can be organisationally divided into smaller entities
(zones). Then the calls within one zone are only forwarded
within that zone. The division into zones can be changed
during the course of the day (shift operation).
For safety reasons the ComStation
TEL
is part of all zones.
That meansall calls from the ward are always displayed at
the ComStation
TEL
. The current shift is activated by the
ComStation
TEL
.
Page 14
ComStationTEL
12
ComStation
TEL
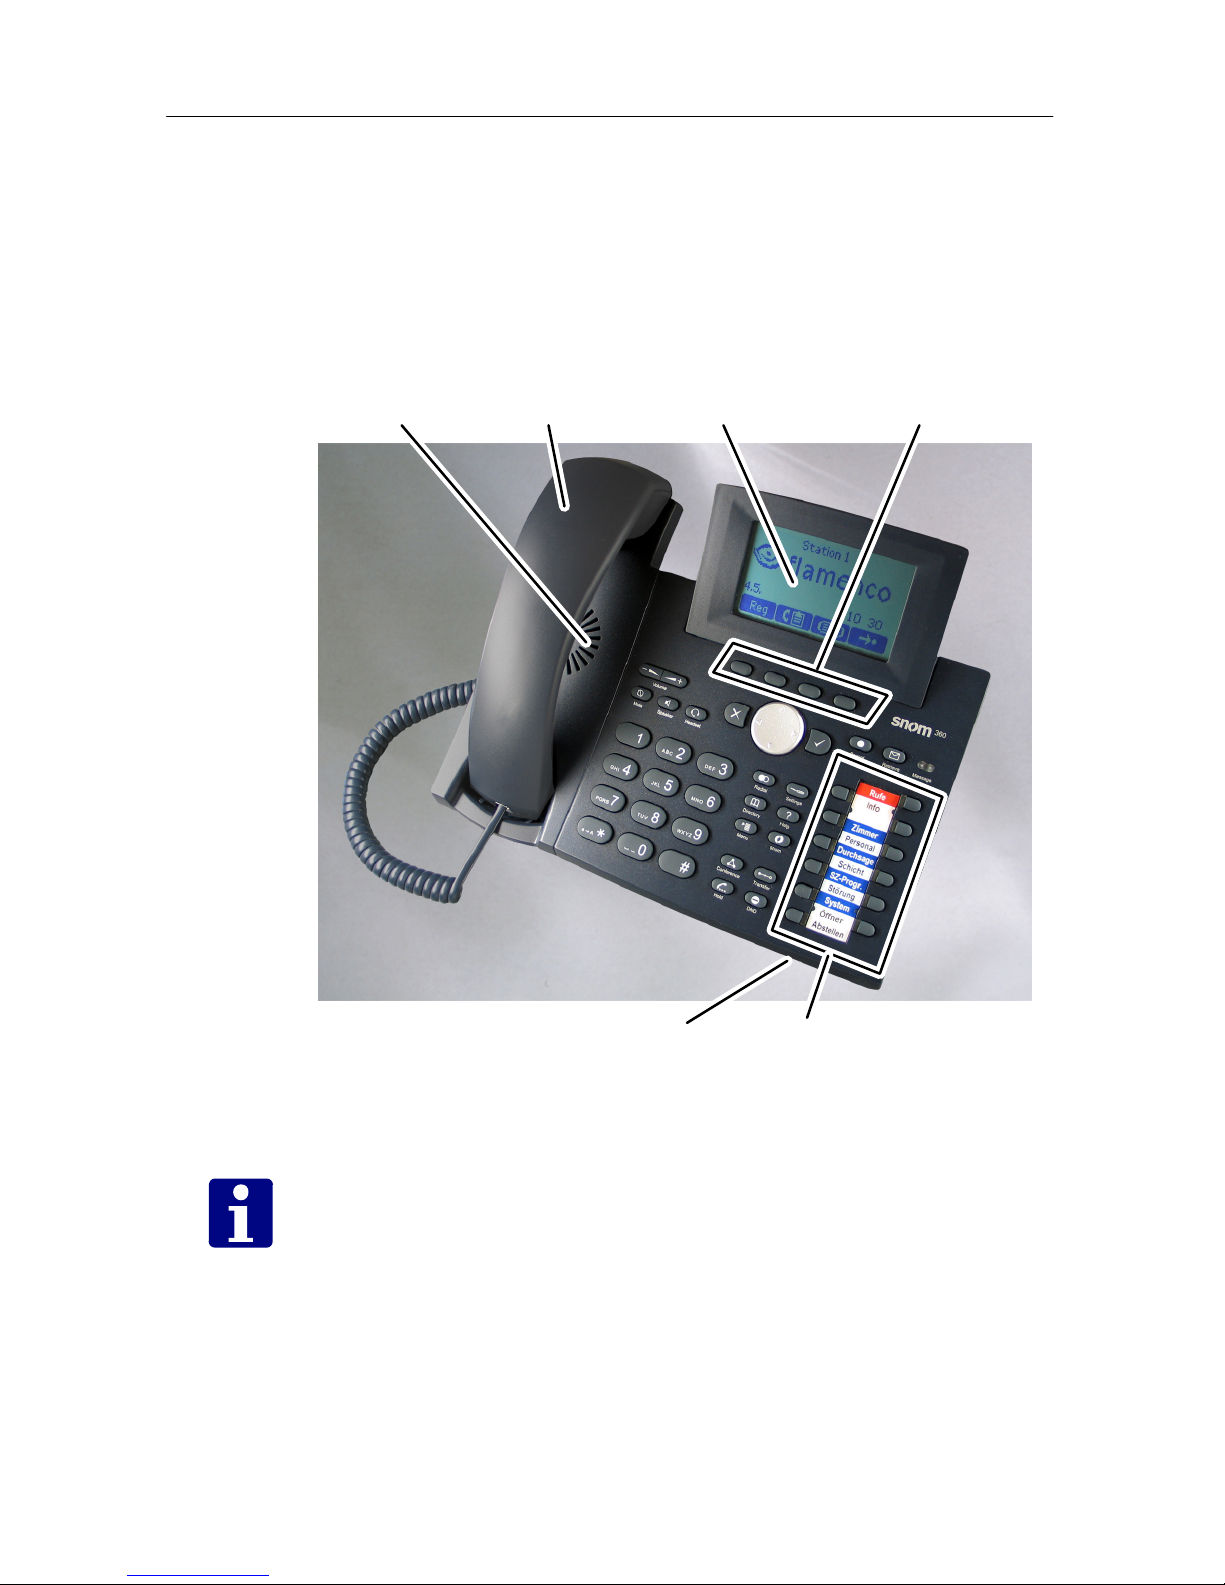
The ComStation
TEL
is a call answering console for the ward
nurse station. One ComStation
TEL
is used to manage one
ward (except for ward coupling, refer to page 38).
Display Soft keysLoudspeaker
Microphone
Handset
Function keys
Figure 1: ComStation
TEL
NOTICE! The ComStation
TEL
can also be used as a normal
telephone - if it is connected to the hospital telephone sys‐
tem. Ask you system administrator.
Page 15
13
Installation
WARNING! Before the ComStation
TEL
can be com‐
missioned, an engineer has to program it for the appropriate
workplace. Otherwise it will not work. Ask your system ad‐
ministrator.
WARNING! Install the ComStation
TEL
at the location, for
which is has been programmed. The ComStation
TEL
will
only display the calls from the ward, for which it has been
programmed.
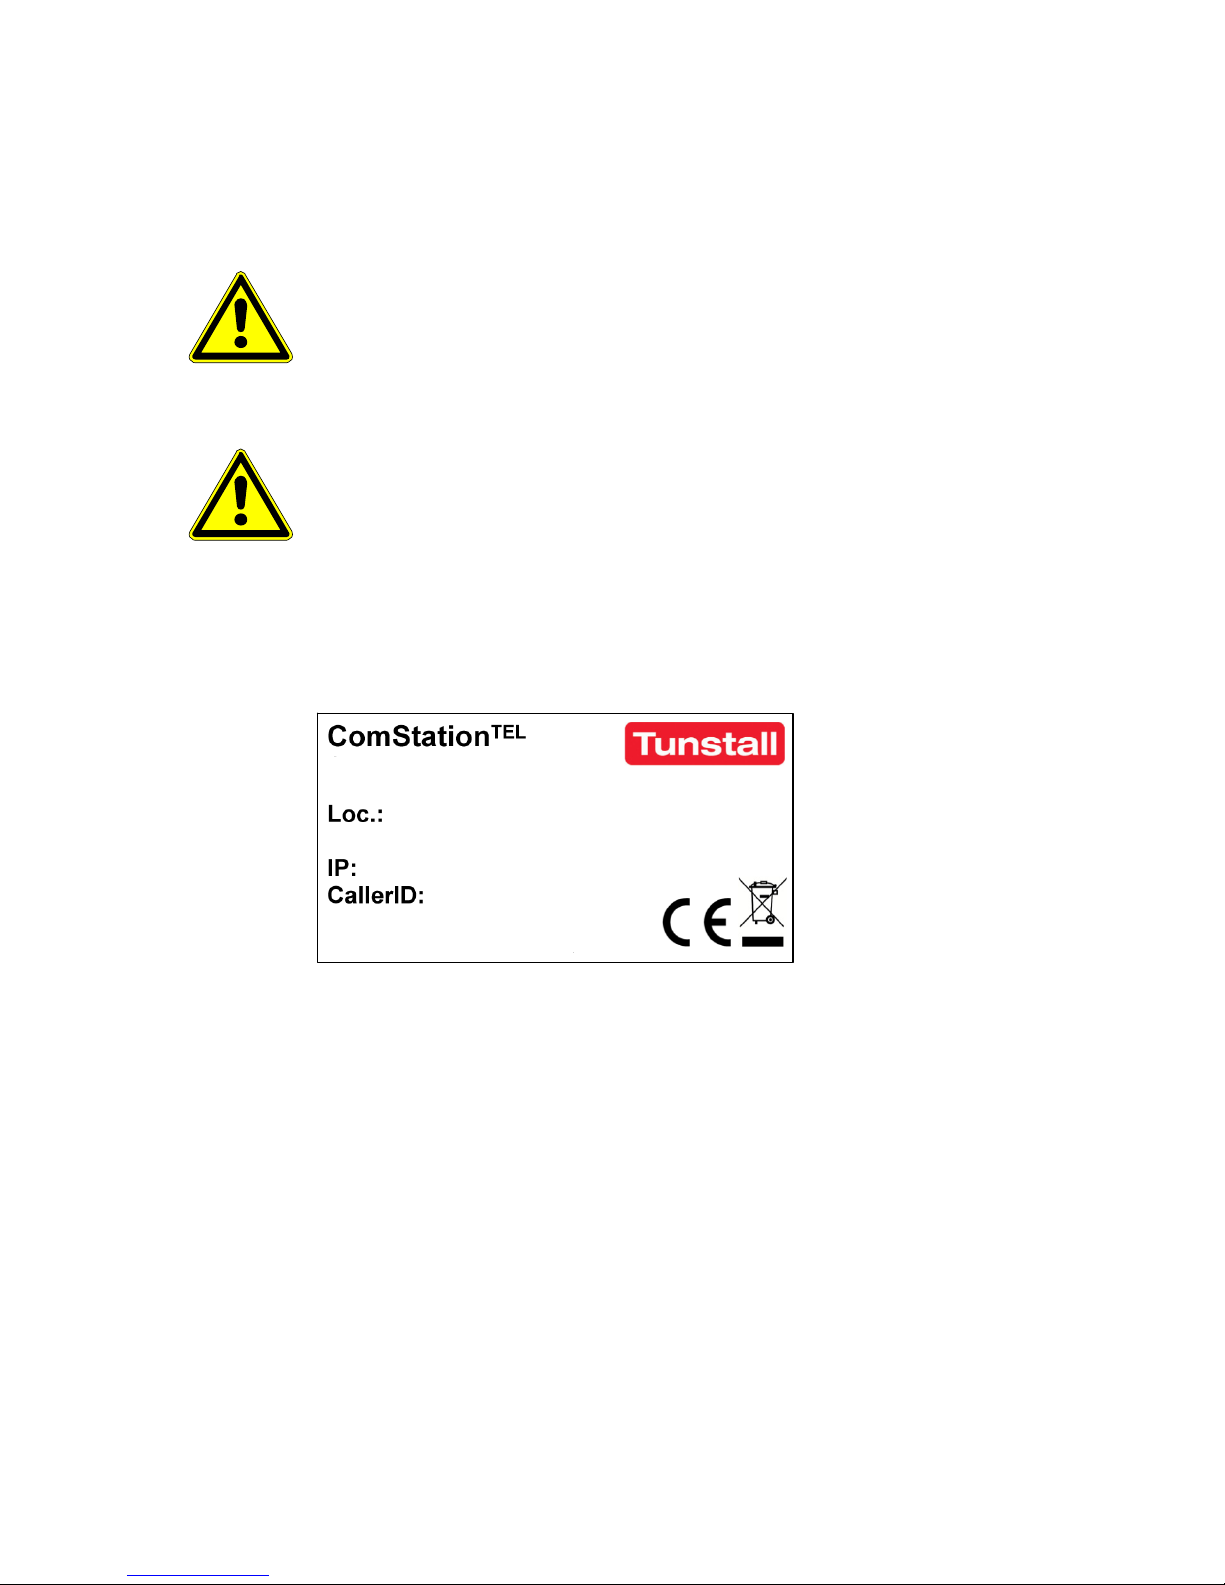
The location is written on the label on the bottom side of the
ComStation
TEL
.
St Thomas Hospital
Ward 1c
192.168.129.82
102
8 10*22
Figure 2: Unit label
10 Scope of delivery
n ComStation
TEL
n Handset
n Handset cable
n PC network cable
n AC adaptor for power supply
n Drill template
n This user guide
Page 16
Setting up the ComStation
TEL
14
Setting up the ComStation
TEL
11 Desktop installation
WARNING! Do not place ComStation
TEL
on carpets or
other materials containing fibres that could block the air
vents and cause overheating.
1. Place the ComStation
TEL
on an even, horizontal sur‐
face that gives the rubber pads a secure grip.
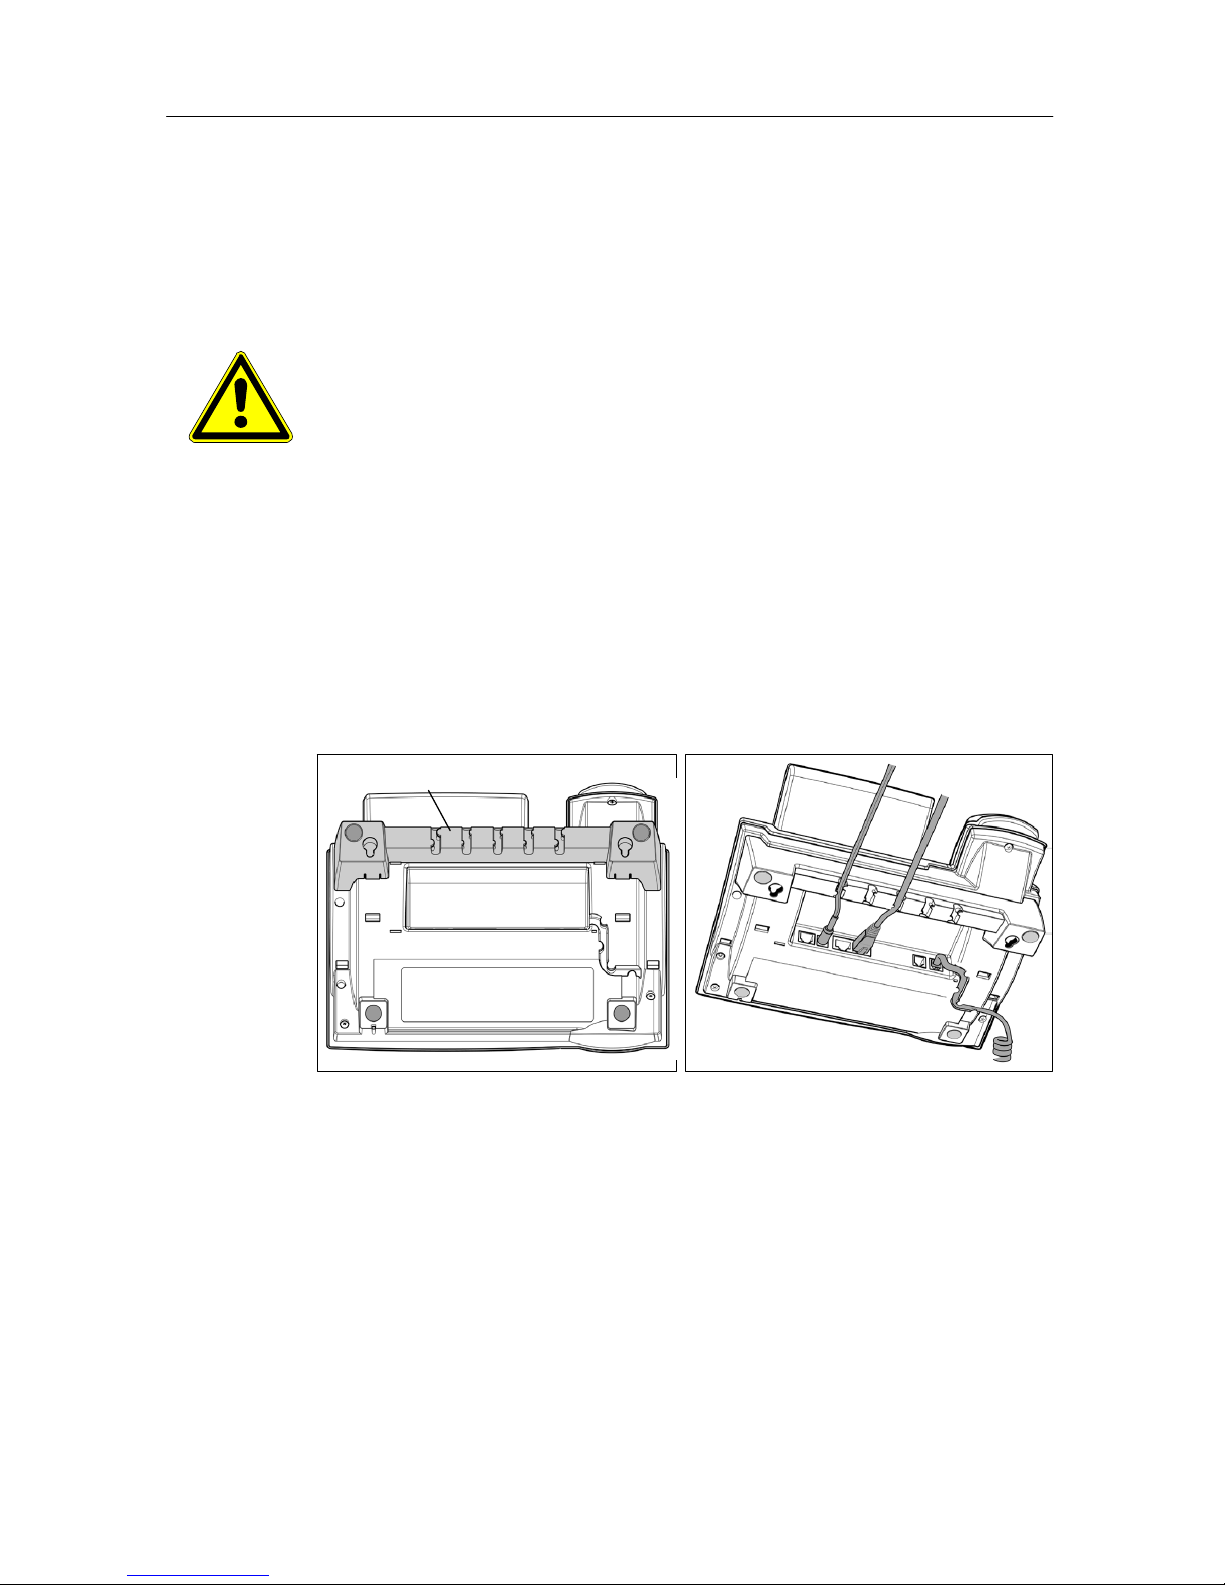
2. After connecting the ComStation
TEL
(see page 20), clip
the cables into the appropriate slots on the footstand or,
in the case of the handset cable, on the bottom shell of
the ComStation
TEL
.
Footstand
Figure 3: Desktop installation
Page 17
Setting up the ComStation
TEL
15
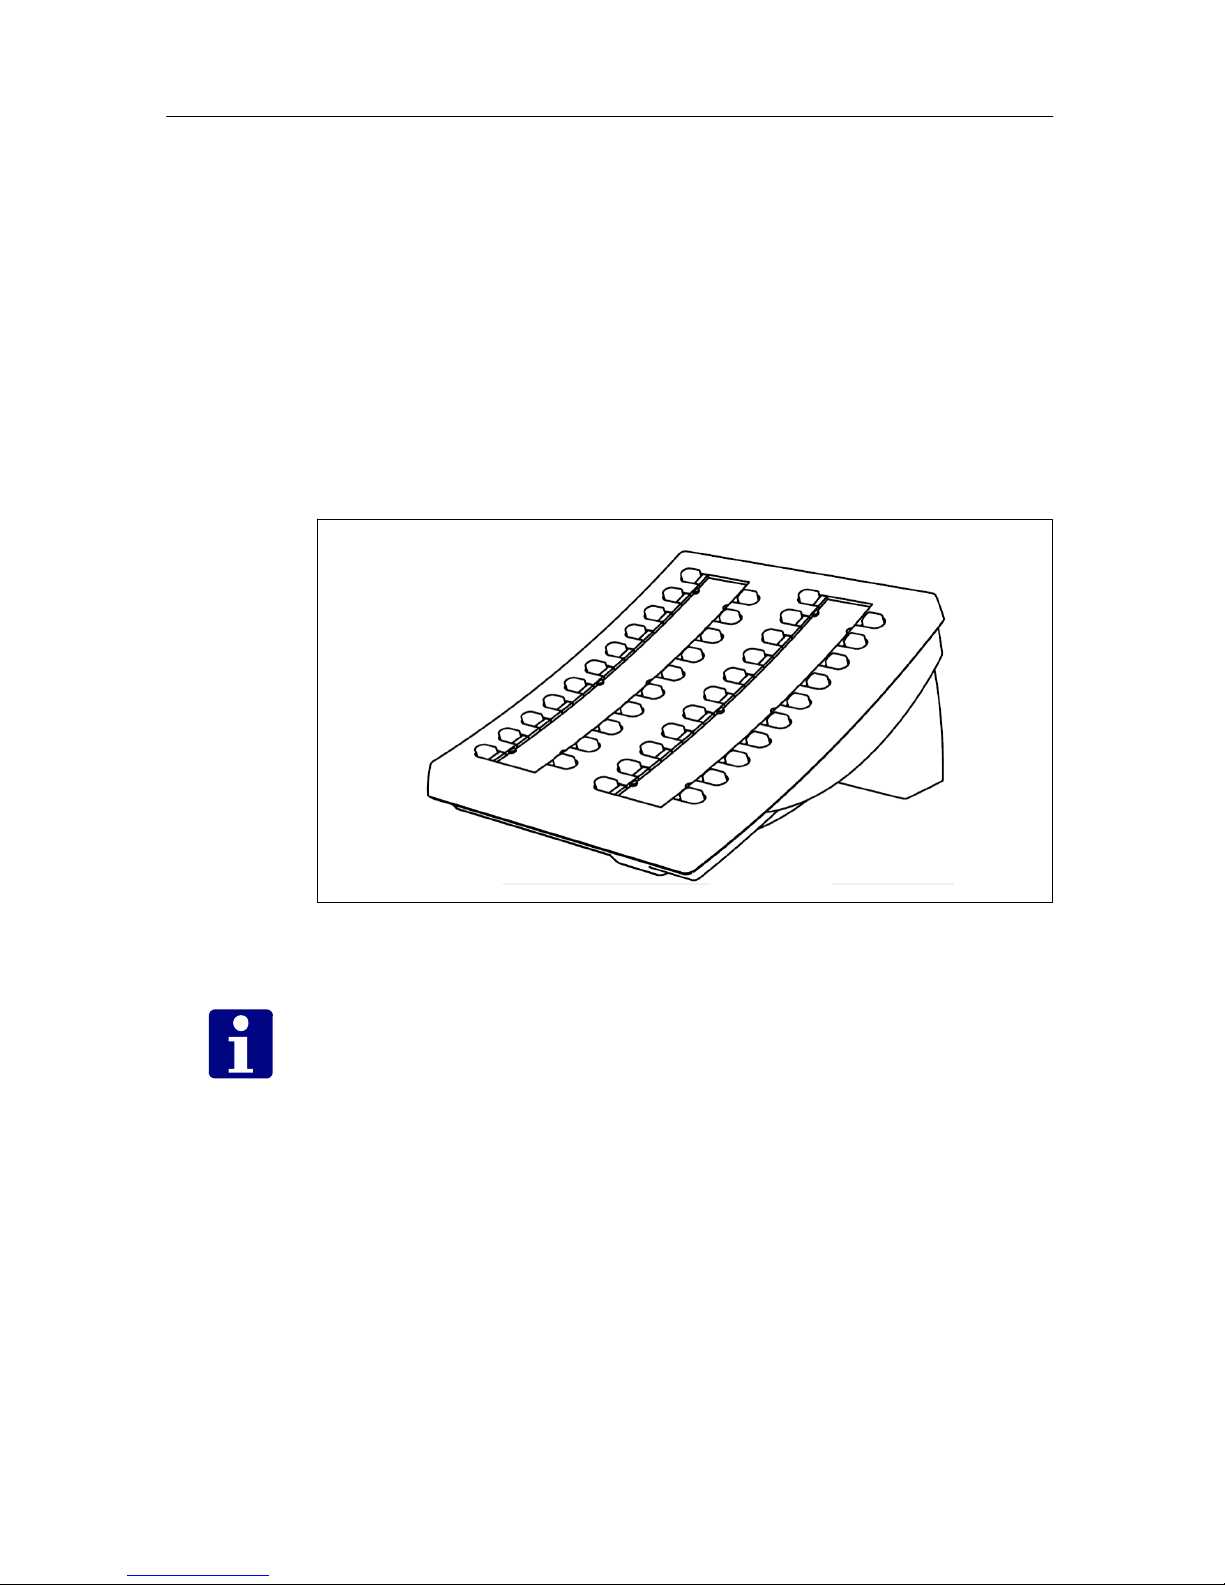
12 Connecting keypad 42
As optional accessory for the ComStation
TEL
the key‐
pad 42, order no. 770603 01, is available.
1. If a keypad 42 shall be used, please plug it into the right
side of the ComSation
TEL
housing.
2. Fix the connection by using the two screws included
with delivery.
Figure 4: Keypad 42 (order no. 77 0603 01)
NOTICE! The function of these key depends on the
configuration of your system. Please ask your system
administrator.
Page 18
Setting up the ComStation
TEL
16
13 Wall mounting
It is possible to mount the ComStation
TEL
on the wall ins‐
tead of desktop installation.
NOTICE! If a keypad 42 is connected, wall mounting is not
possible.
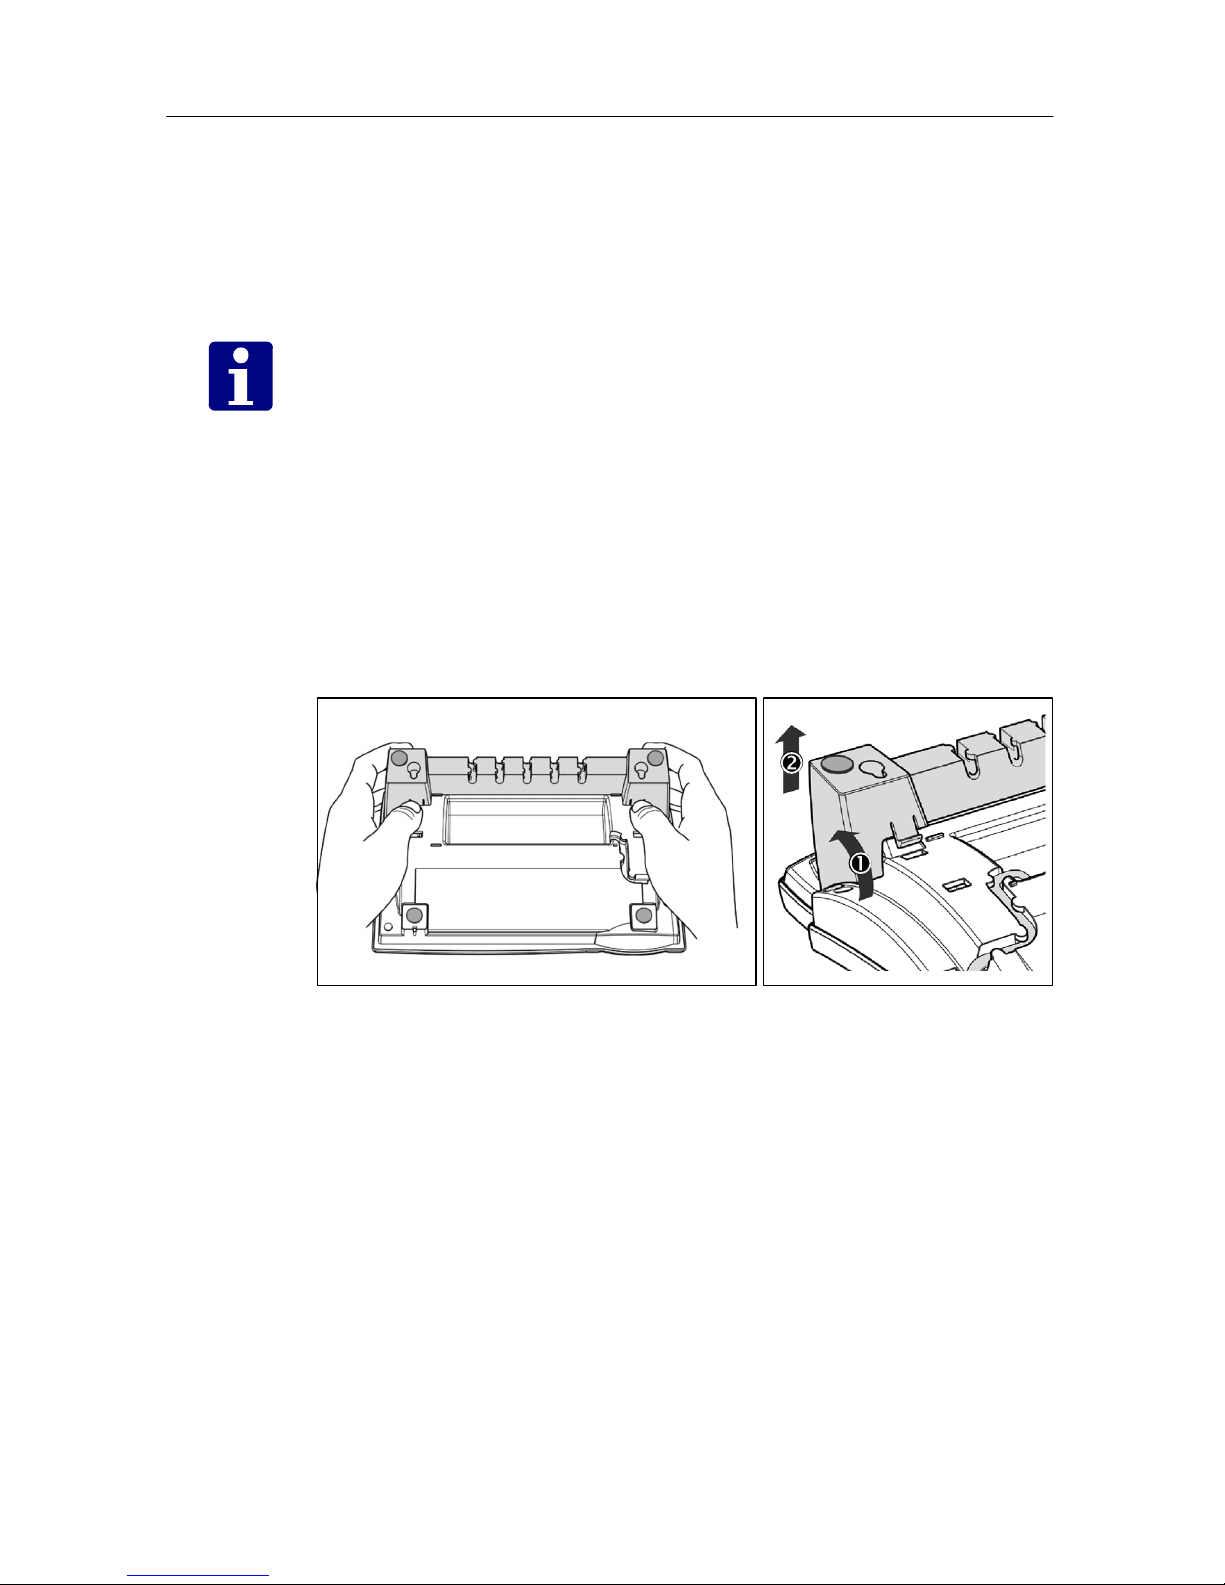
1. Turn the ComStation
TEL
upside down. Please, ensure
that you do not damage the display and/or its hinge and
that you do not drop the handset.
2. Lightly press the snap-fits of the footstand inwards and,
at the same time, tilt the footstand backwards and lift it
from its anchorage in the mounting holes.
Figure 5: Lifting the footstand
3. Rotate the footstand 180° around its vertical axis.
4. Make sure that the handset cable has been clipped cor‐
rectly into the groove on the bottom shell of the unit.
Failure to clip the cable into the groove will result in
damage to the cable when the footstand is attached in
the position for wall mounting.
Page 19
Setting up the ComStation
TEL
17
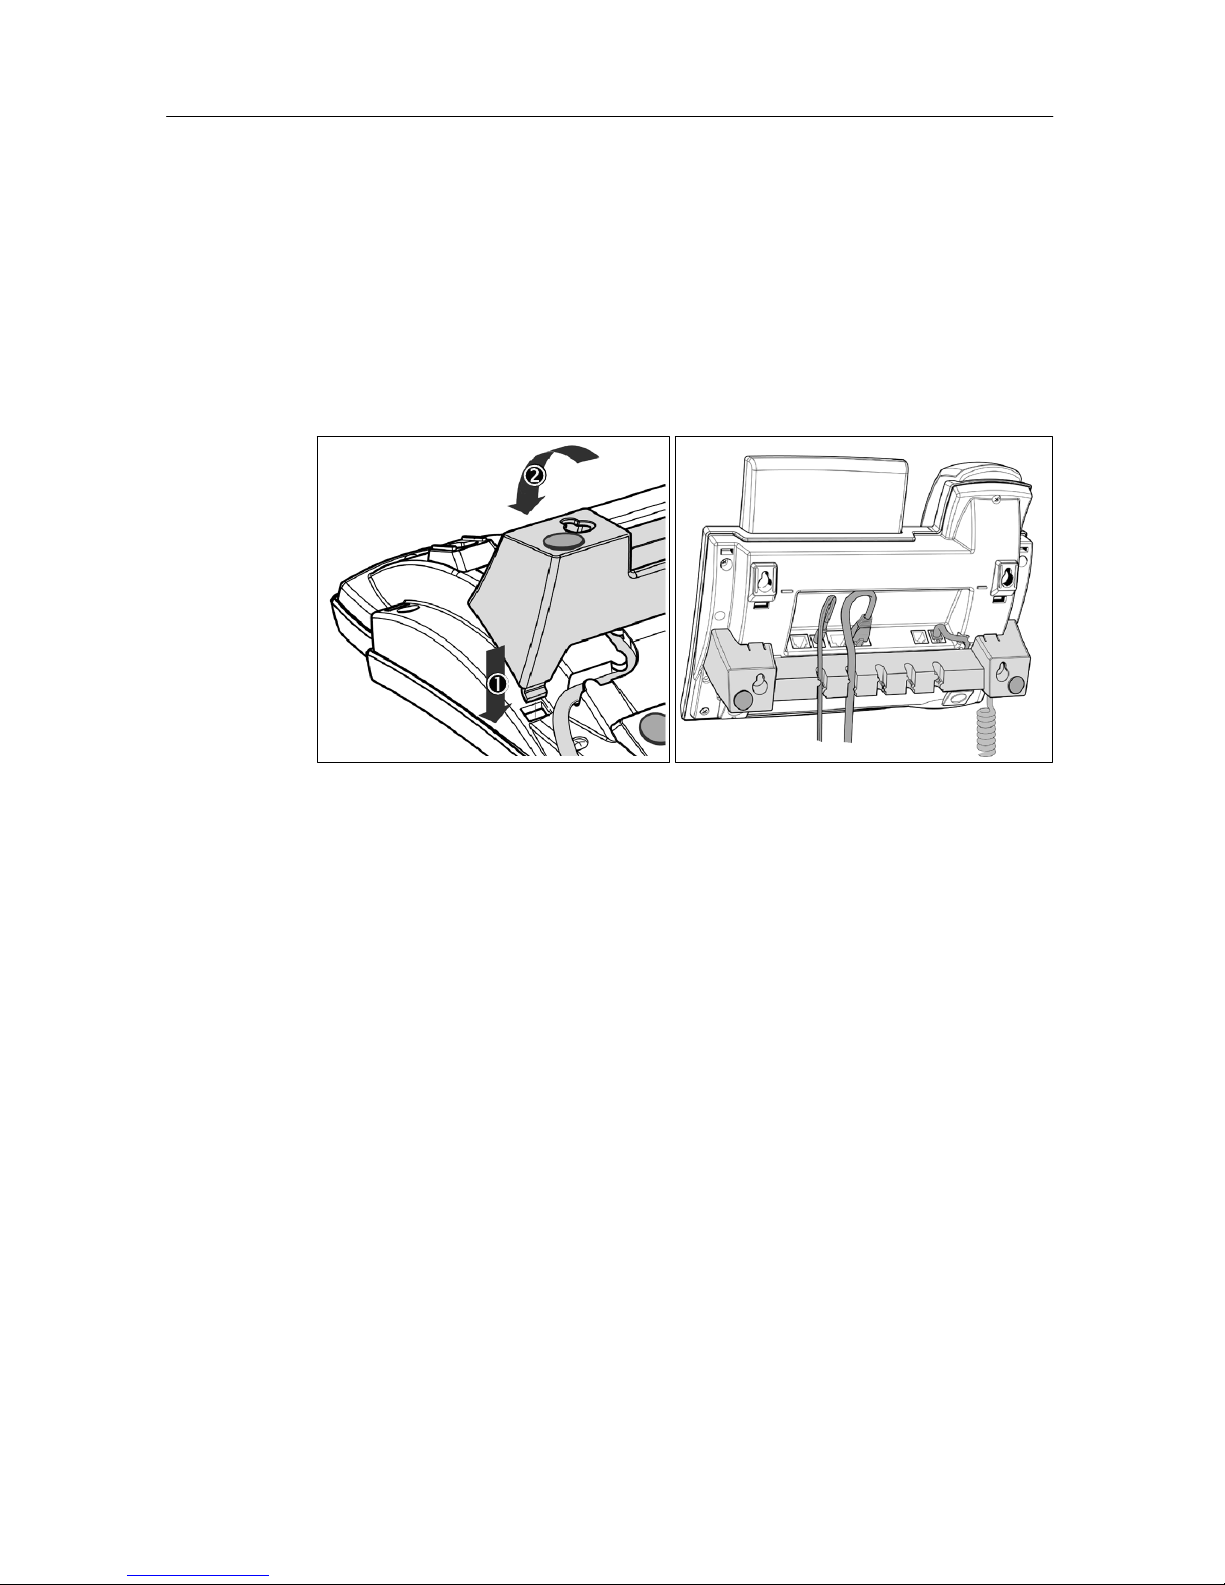
5. Insert the outside, rear snap-fits into the mounting
holes on the bottom shell. Tilt the footstand forward and
downward until the snap-fits snap into place in the
mounting holes. Please, make sure that the four snapfits have securely snapped into the holes before mount‐
ing the unit on the wall.
Figure 6: Mounting the footstand for wall mounting
6. After connecting the cables, form the cables into loops
and gently press the long ends into the slots on the foot‐
stand. The loops should not be too big, so that they will
not hamper the secure mounting of the unit on the wall,
and not too small, so that the cables will not be bent or
broken.
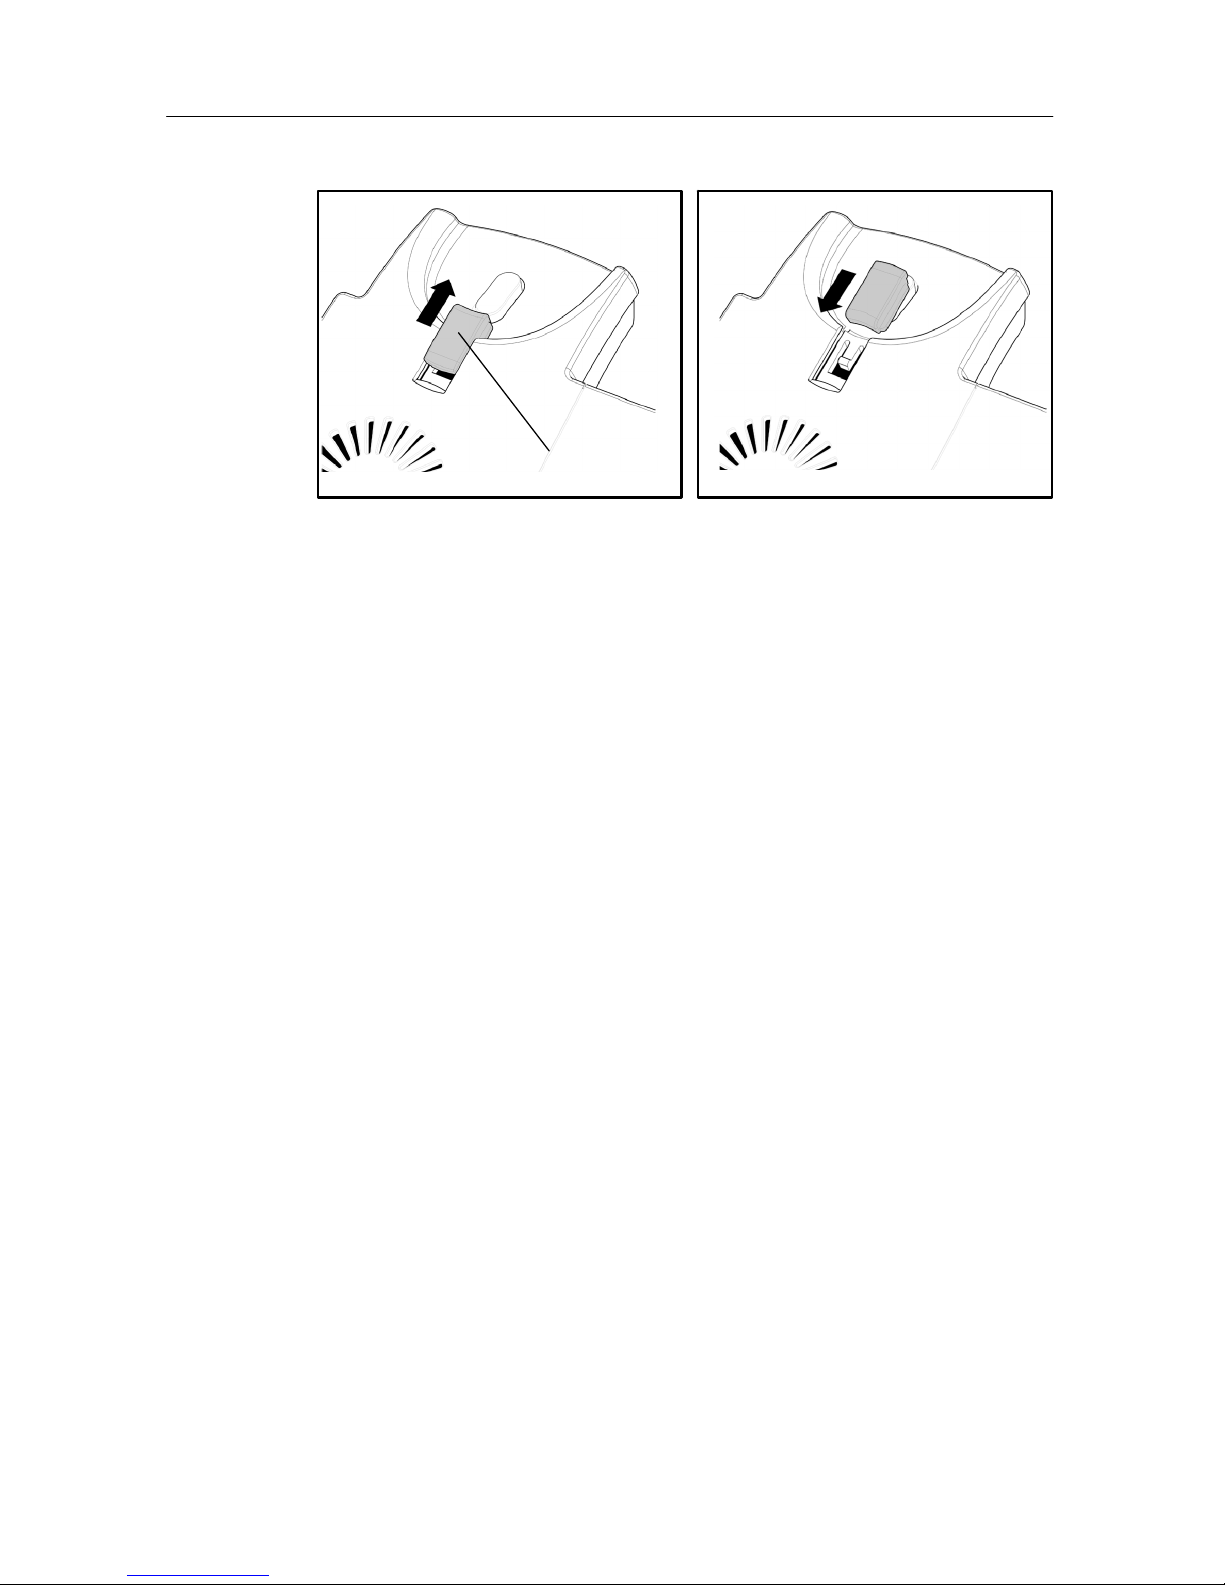
The speaker of the handset has a small, rectangular indent‐
ation that fits over the rounded end of the plastic tab inser‐
ted into a slot on the top shell of the unit. When the unit is
mounted on the wall, the handset must be placed on this
rounded end to ensure that it will not fall off.
7. Slide the tab out of the slot, rotate it 180°, and slide it
back into the slot.
Page 20
Setting up the ComStation
TEL
18
Tab
Figure 7: Rotating the tab for wall mounting
The delivery includes a template to be used for marking the
position of the holes to be drilled in the wall.
Use wall plugs, if necessary, and screws with half-round
head profiles (diameters of screws d
max
= 4.5 mm, diamet‐
ers of heads d
max
= 8.0 mm.
The screws must protrude approx. 5 mm from the wall for
easy wall mounting of the ComStation
TEL
.
Page 21
Setting up the ComStation
TEL
19
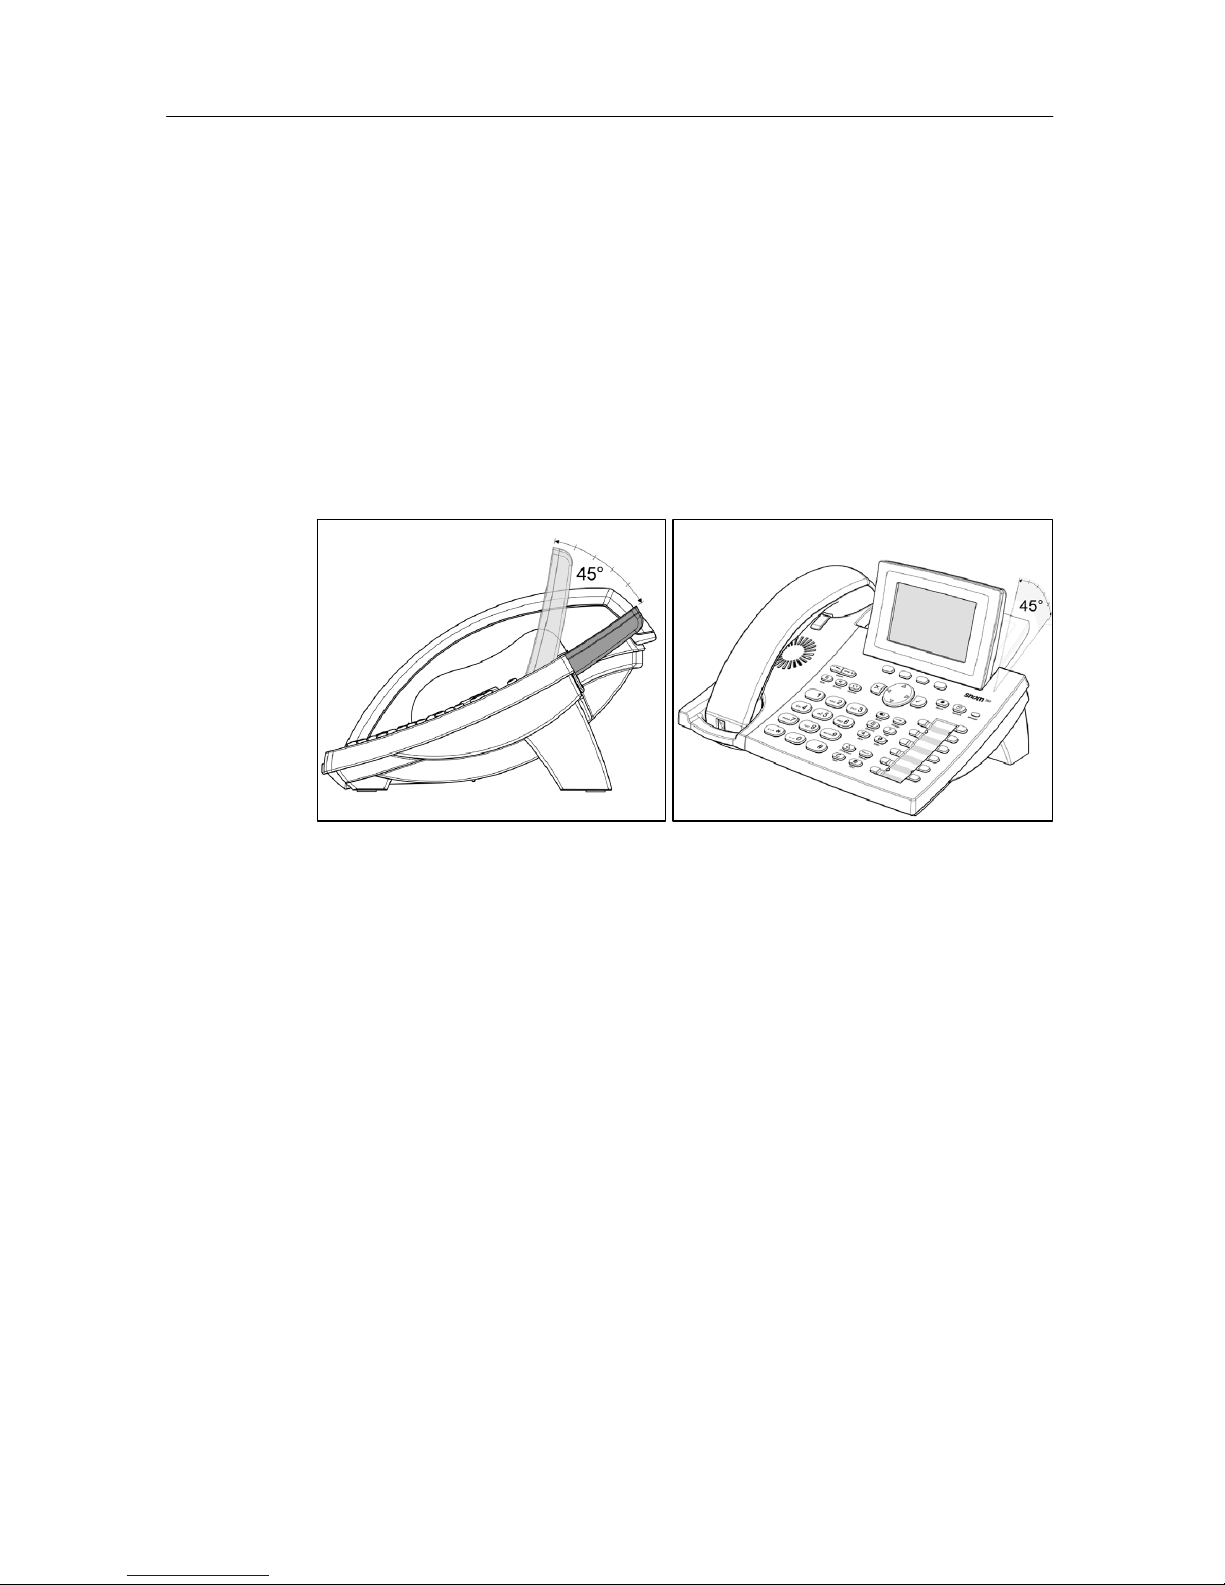
14 Adjusting the position of the display
The position of the display is adjustable up to an angle of
45°.
l Hold down the ComStation
TEL
with one hand and
adjust the display with your other hand. Do not use too
much force and do not pull, wrench, or twist the display
as this might damage or break the hinges.
Figure 8: Adjusting the position of the display
Page 22
Connecting ComStation
TEL
20
Connecting ComStation
TEL
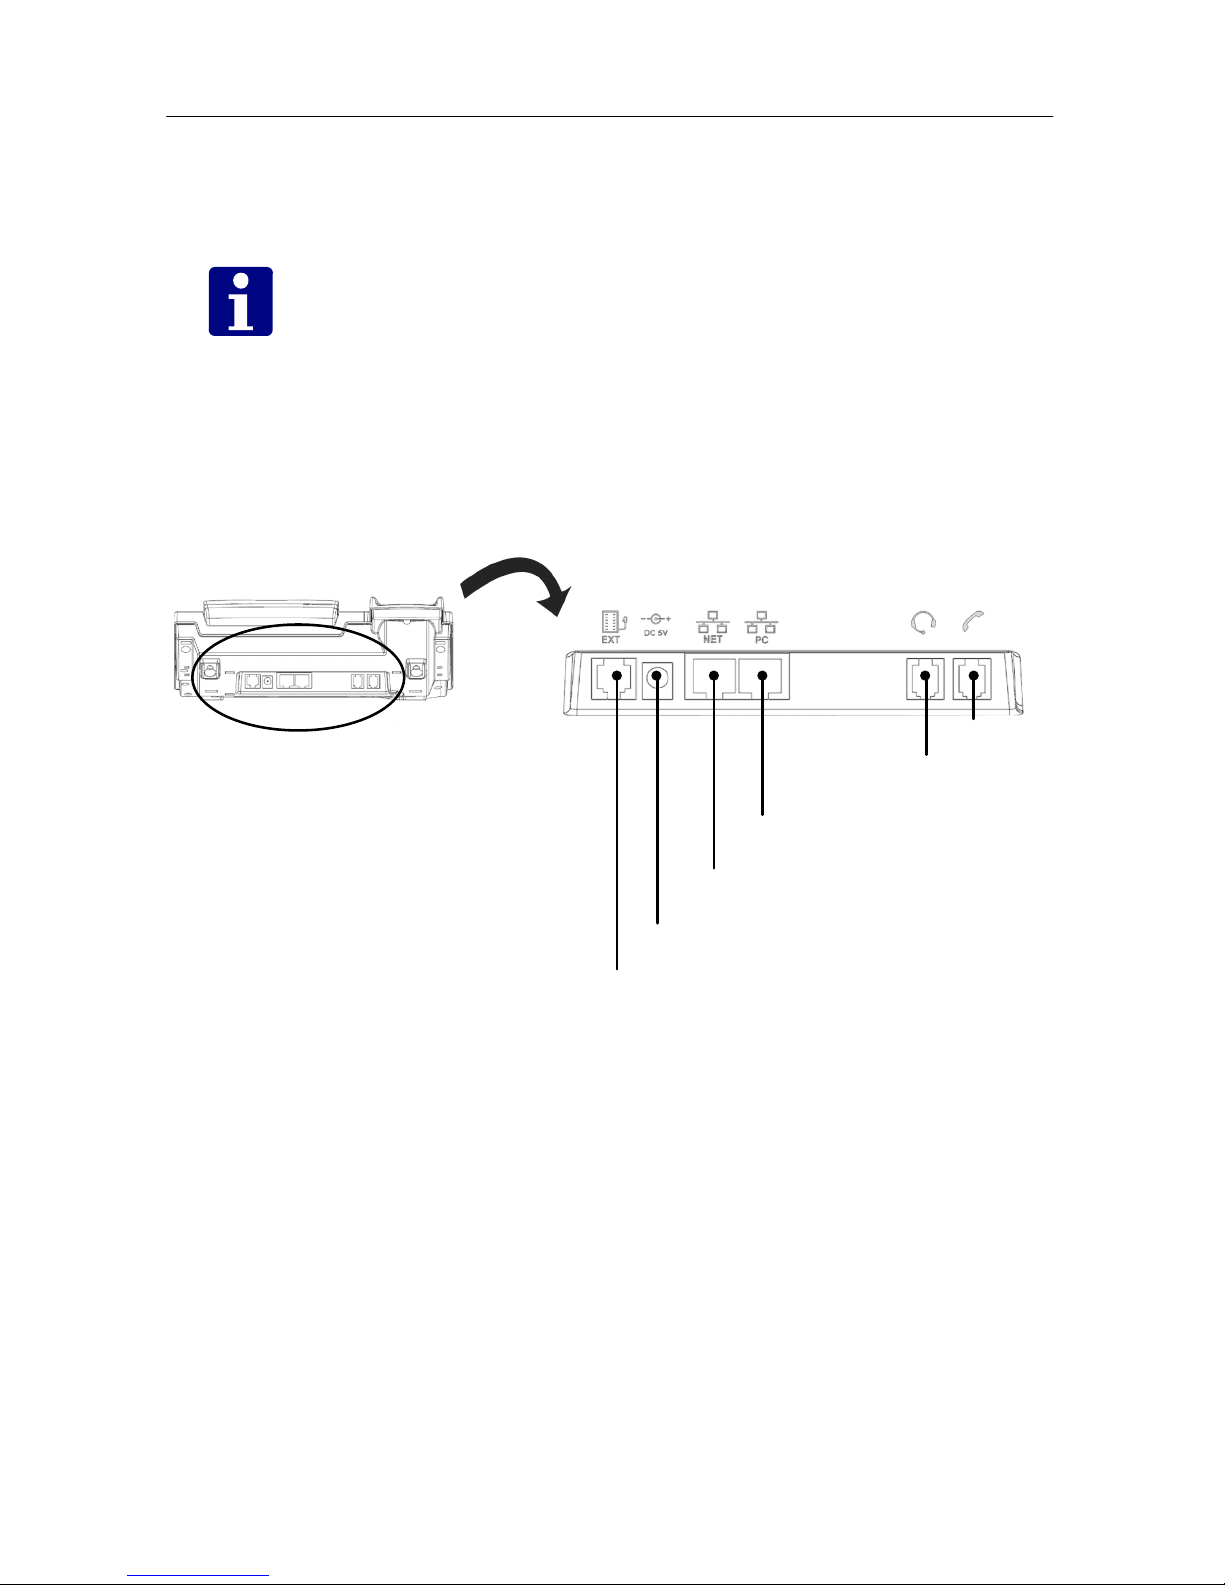
NOTICE! Connect the AC adaptor for the power supply at
the end. After you have changed a connection, disconnect
the ComStation
TEL
from the power supply and then re‐
connect it.
l Connect the ComStation
TEL
according to the following
plan:
Handset
Headset (option)
PC (do not use*)
PC network for ComStation
TEL
Keypad 42 (option, order no. 77 0603 01)
AC adaptor for power supply
*) The connection socket labelled “PC” provides a socket for
connection of other network devices in series without the
need of a second network connection. We recommend not
to use this socket.
Page 23
21
Instructions for use
Speech connections
Using the ComStation
TEL
you can speak to patients, to staff
on the ward, or to staff at other consoles. You can choose
between two speech apparatus. You can use either the
handsfree set (microphone and loudspeaker) or the
handset.
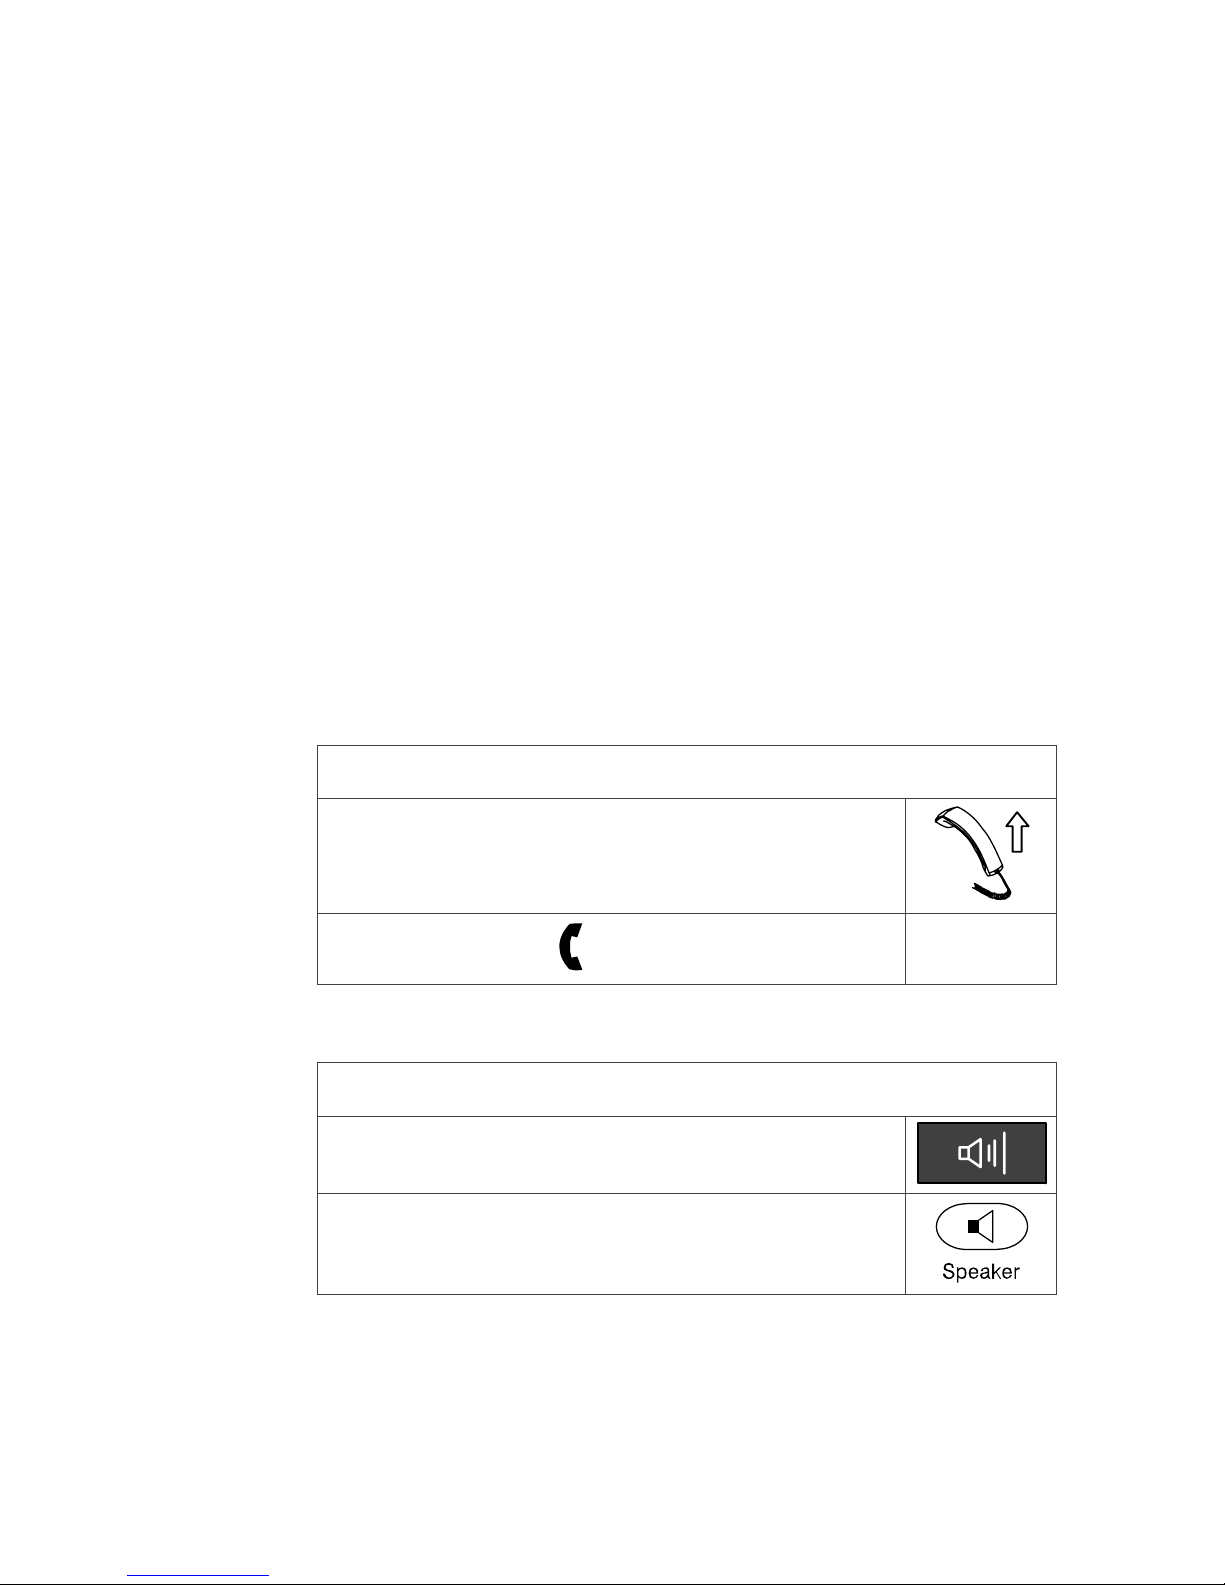
15 Switching between handsfree mode and
handset mode
16 Changing into handset mode:
l Lift the handset.
¢ Display shows for handset mode.
17 Changing into handsfree mode:
l Press the “Loudspeaker” soft key.
or press the “Speaker” soft key.
Page 24
Speech connections
22
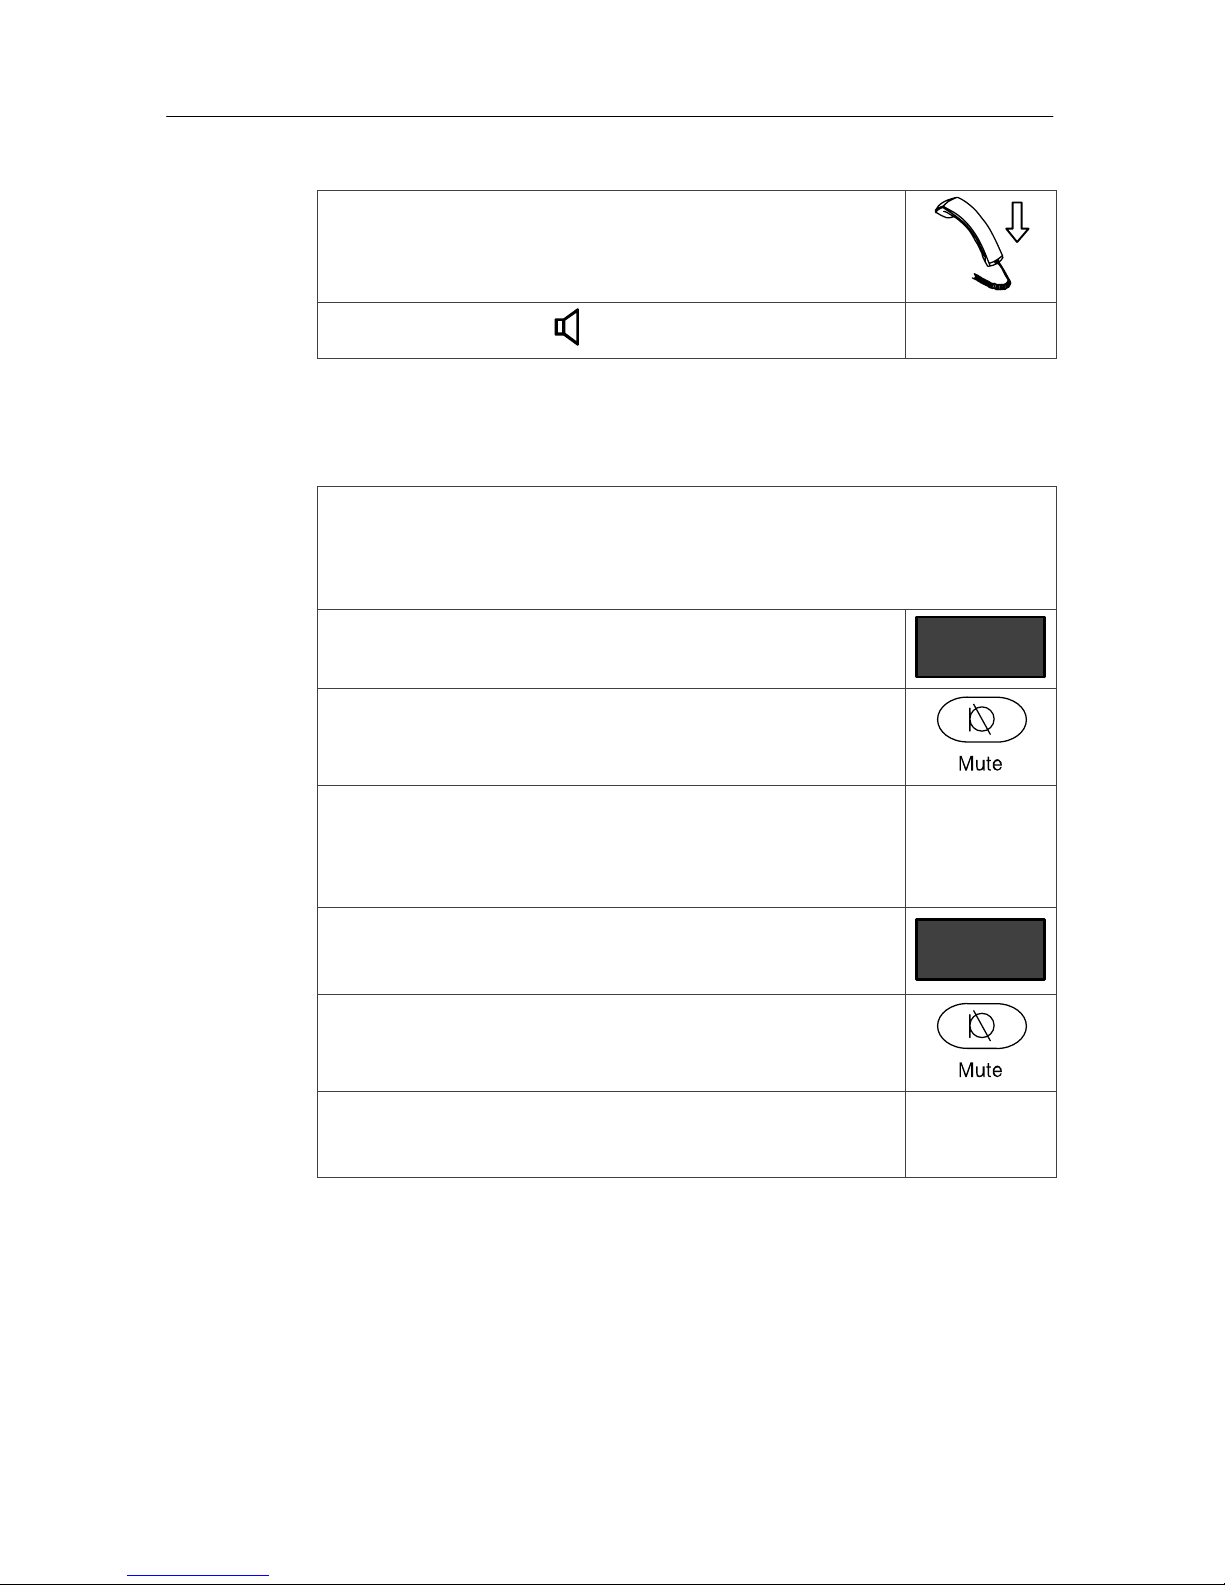
l Hang up the handset.
¢ Display shows for handsfree mode.
18 Muting during a speech connection
If you want to mute your microphone, so that the person
on the other end cannot hear you, e.g. because you'd like
to consult a colleague:
l Press the “Mute“ soft key.
Mute
or press the “Mute” key.
¢ Muting is active, i.e. the person on the
other end cannot hear you. The “Mute“ soft
key switches to “Loud”.
l When the person on the other end should
hear you again, press the “Loud“ soft key.
Loud
or press the “Mute” key.
¢ Muting is inactive, i.e. the person on the
other end can hear you again.
Page 25
Speech connections
23
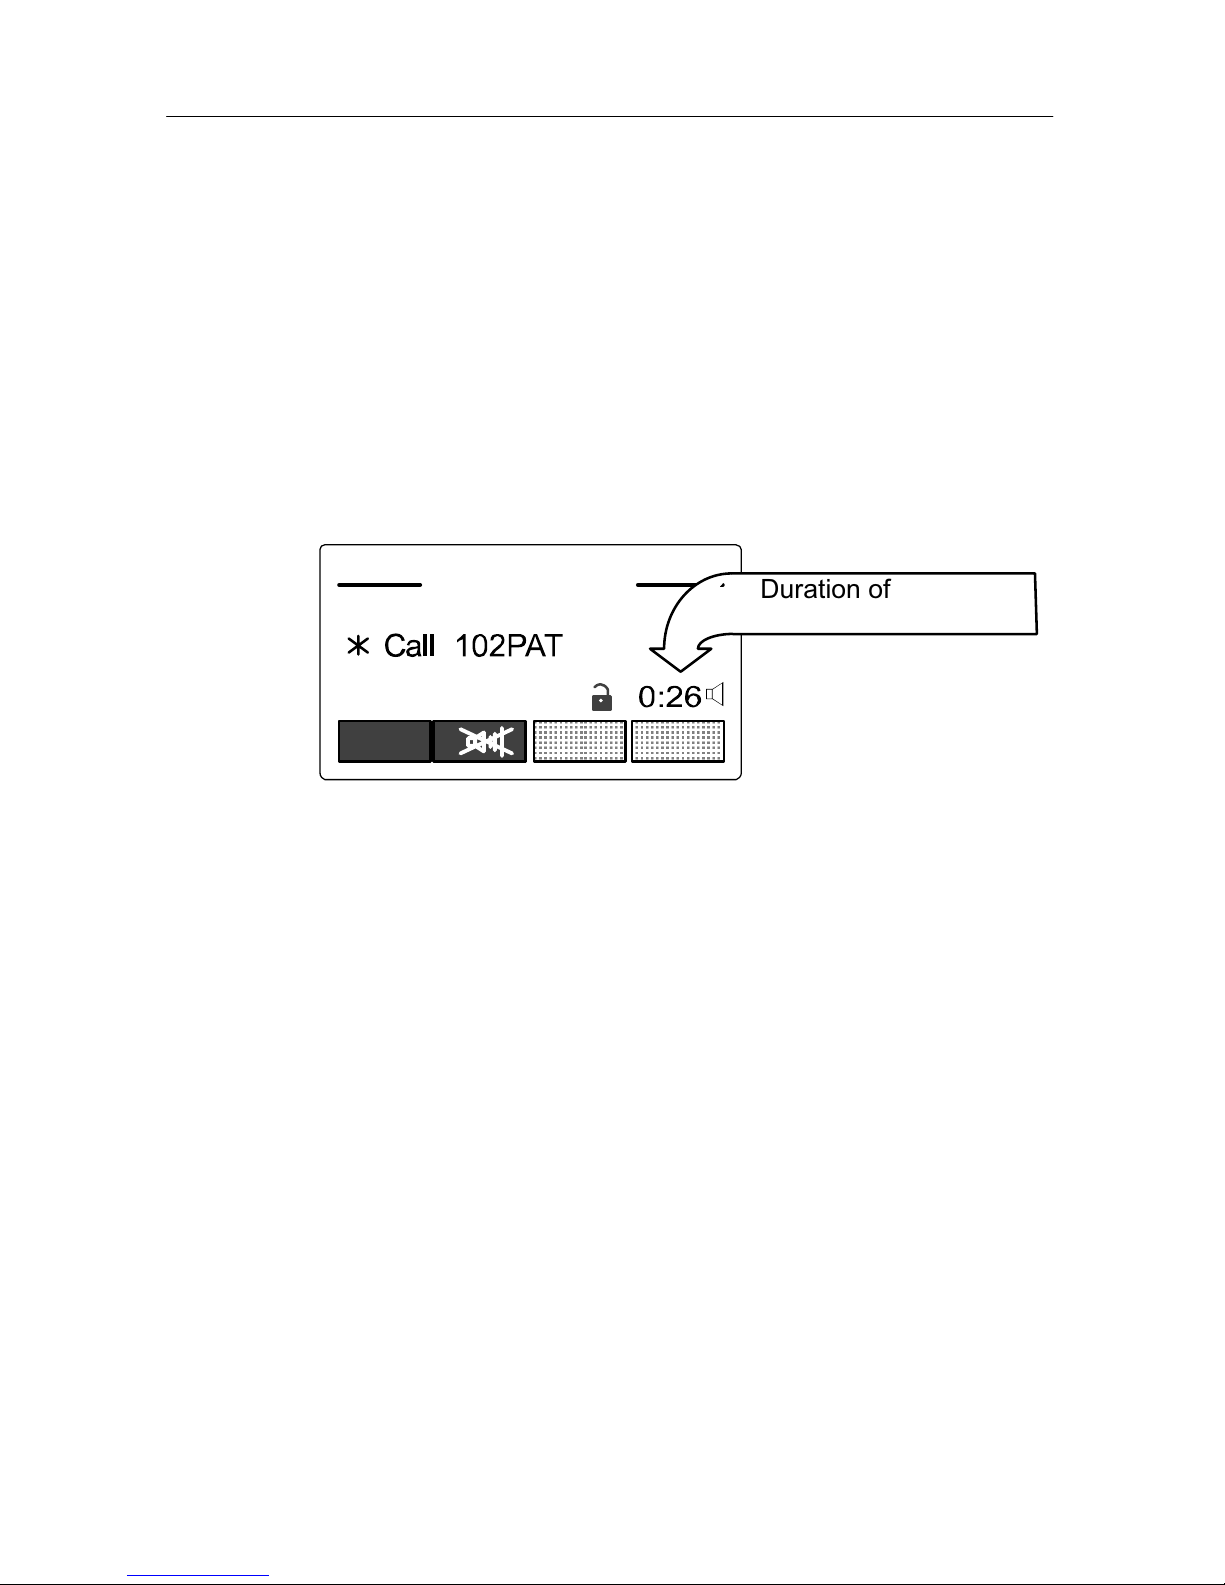
19 Duration of a speech connection
If your ComStation
TEL
is programmed accordingly, the
speech time is limited. That means, the speech connection
is automatically closed after a certain time (e.g. 1 minute).
This optional safety function shall prevent the speech line
from being unnecessarily busy.
The display shows how long the speech connection has
been established.
Duration of the
speech connection
Connected
Mute
20 Privacy function
Although it is possible to converse with rooms from the
ComStation
TEL
, it is not possible to listen in on the rooms
without this being noticed. The reason is, every room has
a privacy function, a technical feature which makes listen‐
ing in impossible. This will be deactivated if a call is raised
from the room or if staff are logged in during their presence
in the room. In so-called children's rooms the privacy func‐
tion is always switched off so that the patients in these
rooms can be monitored around the clock.
Page 26
Adjusting the volume
24
Adjusting the volume
n The handset volume can be set during an active speech
connection in handset mode.
n The volume for the speaker of the handsfree set can be
set during an active speech connection in handsfree
mode.
n The ringer volume is set when no speech connection is
active.
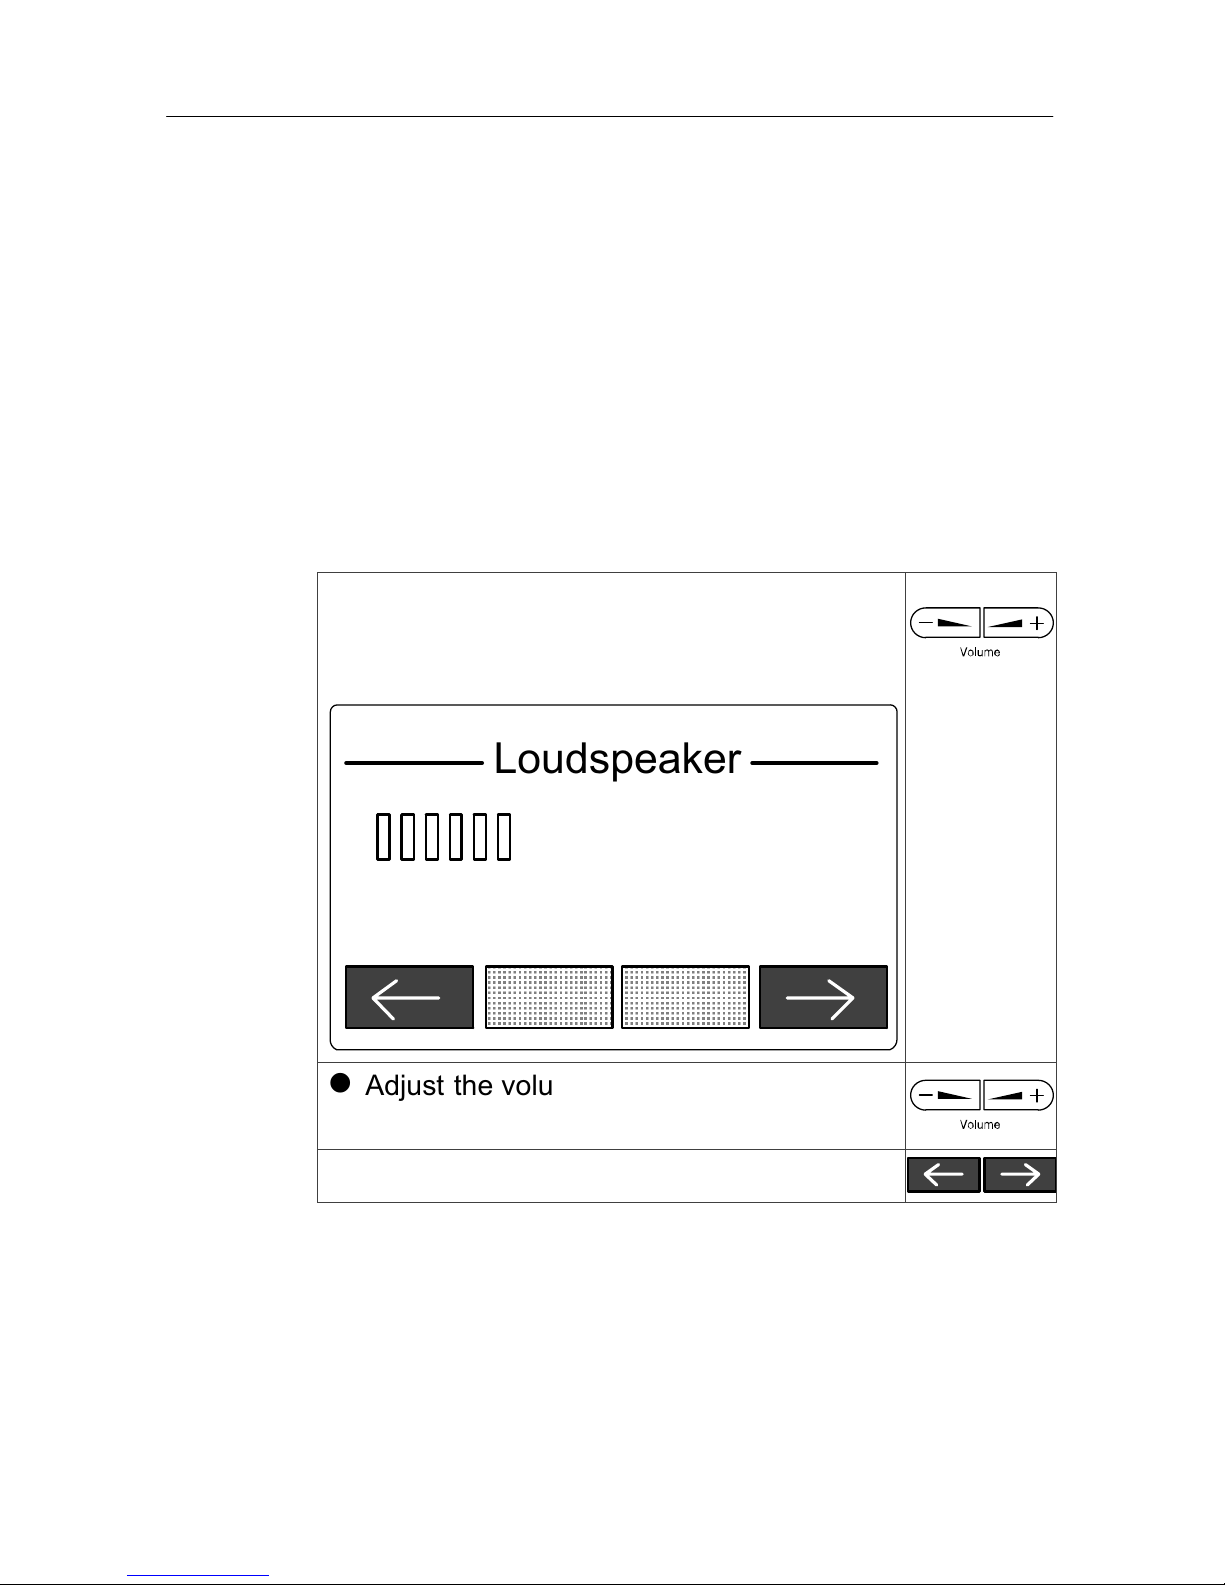
l Open the window for adjusting the volume
by pressing a
volume key:
Loudspeaker
l Adjust the volume by pressing the volume
buttons
or by pressing the arrow soft keys.
Page 27
Adjusting the volume
25
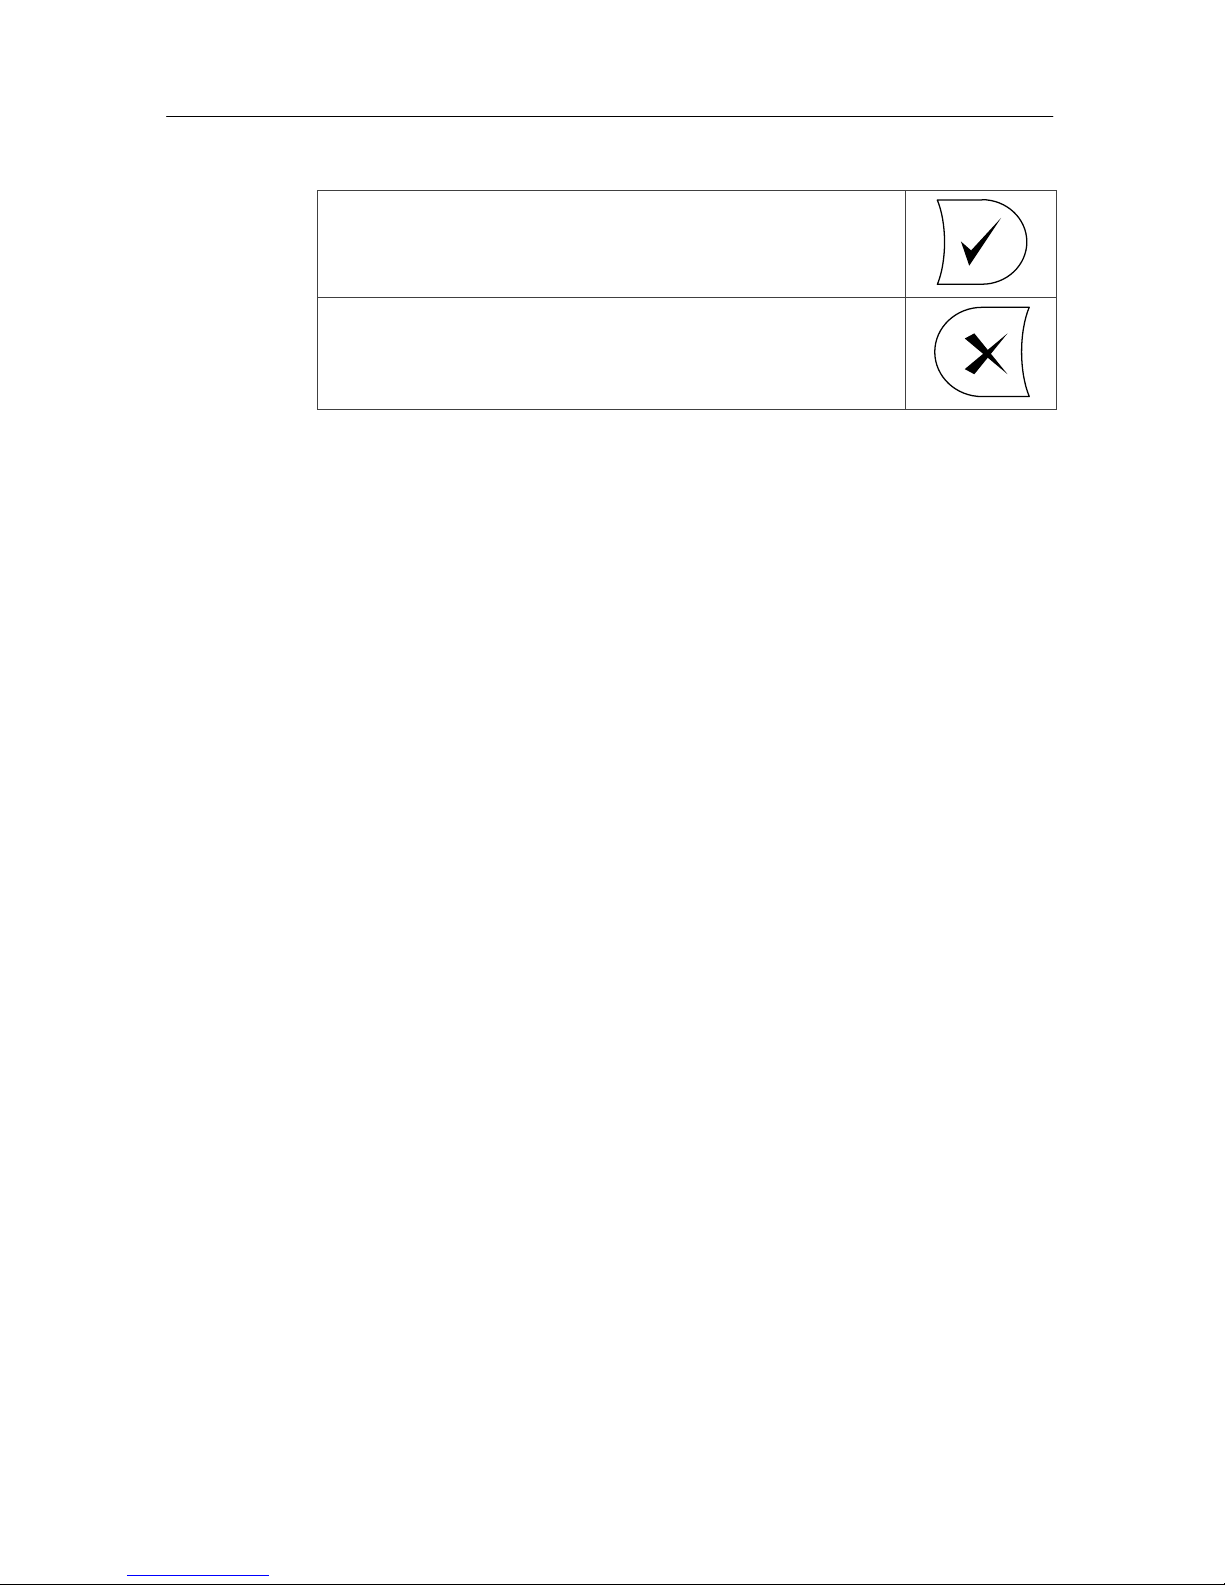
l For closing the window with the new
volume setting press the tick key.
l For closing the window with the old volume
setting press the cross key.
Page 28
Call handling
26
Call handling
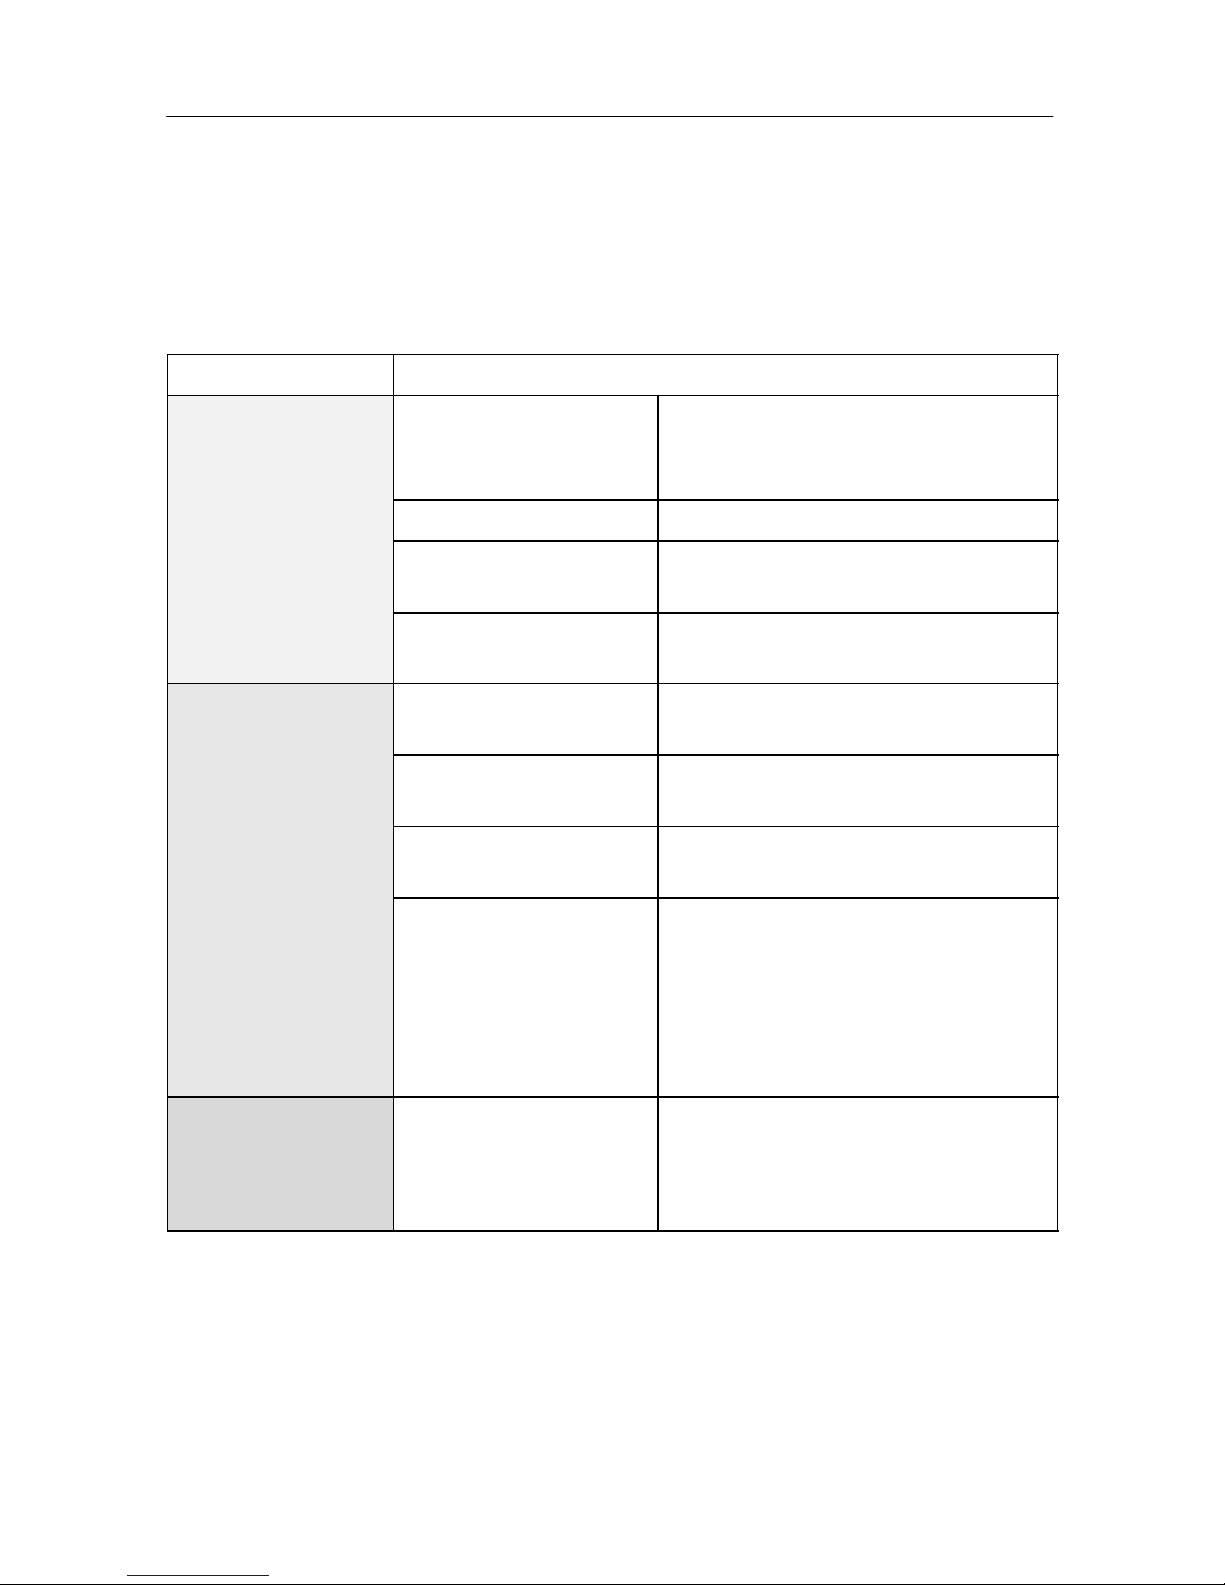
21 Call types and categories
Call category Call type
Calls
(low priority)
Call A patient has raised a call or the
plug has been disconnected from
the connection socket.
WC call A call is raised in a WC room.
Door call
(Display: Door)
Somebody raised a call at the en‐
trance door.
Telephone call
(Display: Tel.Call)
The telephone in the duty room is
ringing.
Emergency calls Emergency call 1
(Display: Emerg. 1)
Staff 1 have raised a call with
their presence logged.
(medium priority)
Emergency call 2
(Display: Emerg. 2)
Staff 2 have raised a call with
their presence logged.
WC emergency call
(Display: Emerg.WC)
Staff have raised a WC call with
their presence logged.
Diagnostic call
(Display: Dia.Call)
A medical monitoring device has
raised a call. That can be, for ex‐
ample, a monitor that has auto‐
matically raised a call when val‐
ues have exceeded specified pa‐
rameters.
Code blue /
Cardiac alarm
(high priority)
Code blue /
Cardiac alarm
(Display: Alarm)
A call is raised via a specific
code blue / cardiac alarm button.
Special staff (e.g. resuscitation
team) are required.
It is important that you know the call types as this will
provide an indication for what type of help a patient may
need.
Page 29
Call handling
27
The call types as such are subdivided in three call categor‐
ies, i.e. stages of priority: Call, Emergency call and Code
Blue / Cardiac alarm.
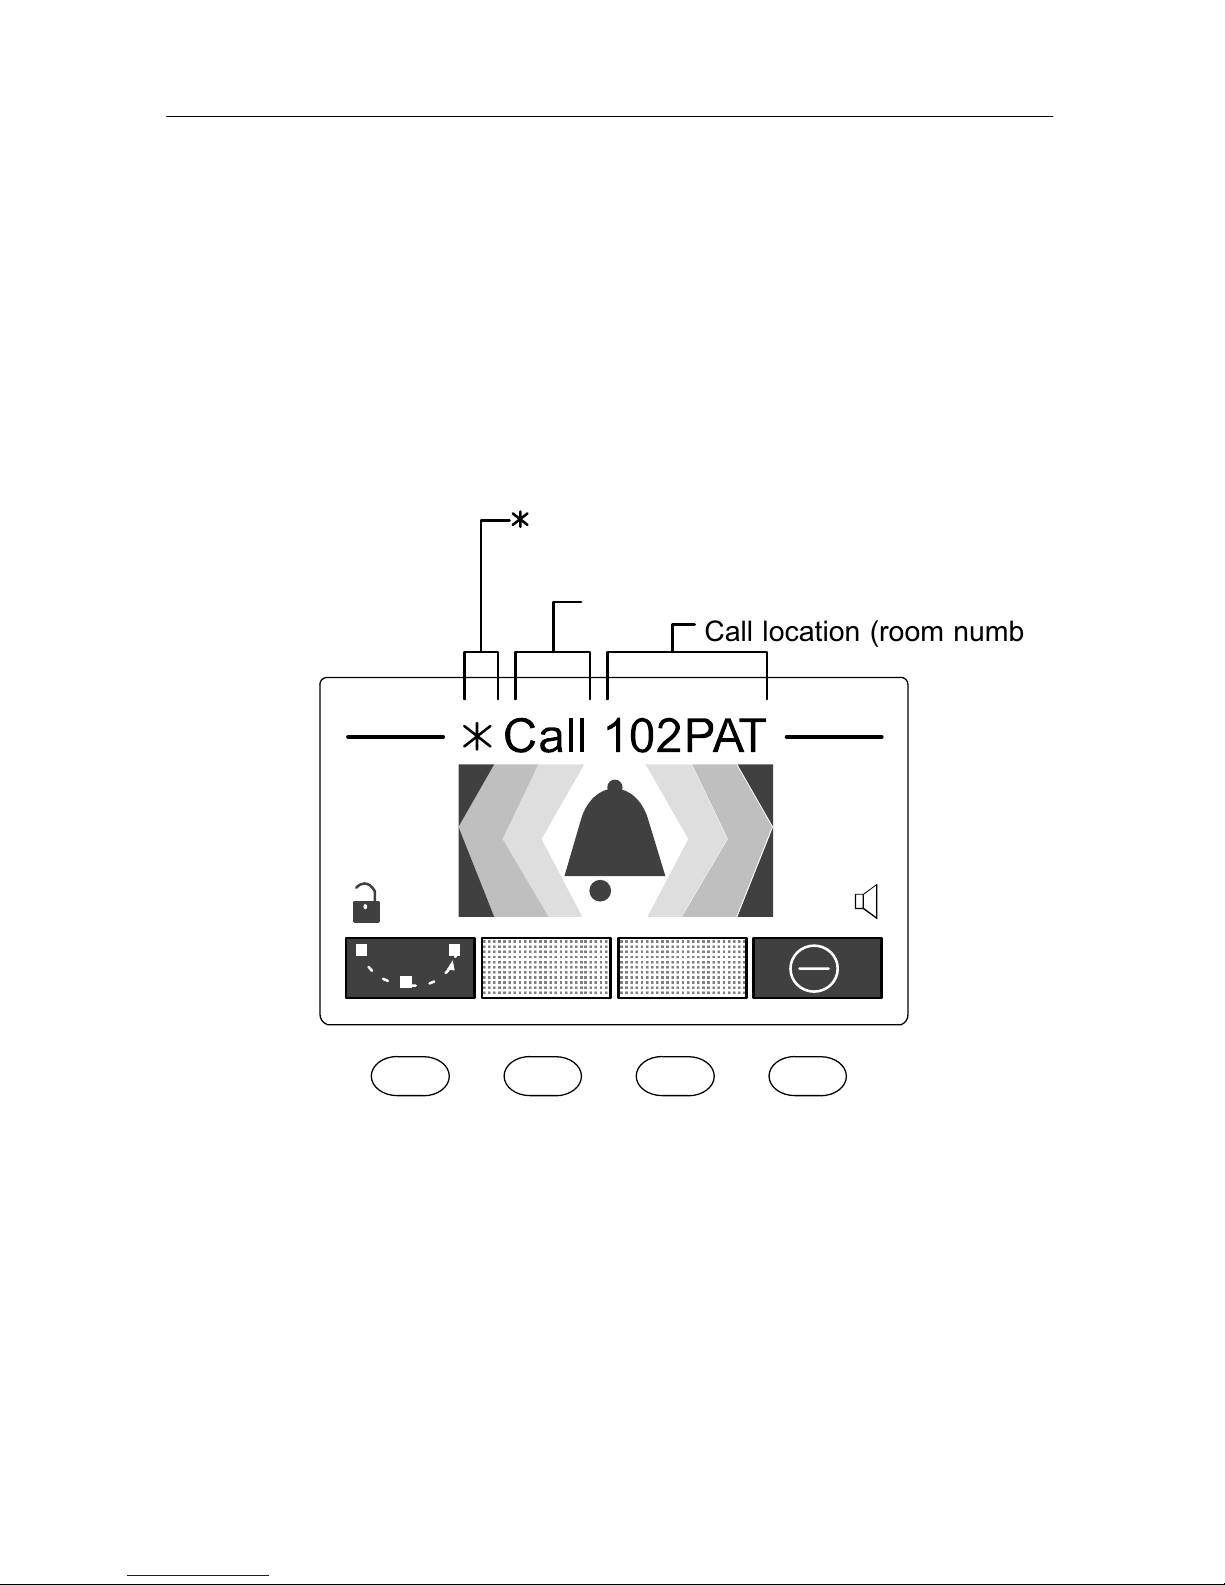
22 How fresh calls are displayed
Fresh calls are displayed at the ComStation
TEL
in the fol‐
lowing manner:
Call location (room number
)
Call type
for “fresh call”, i.e. the call has not yet
been answered
In addition to this indication in the display you hear a call
tone. Each call category has its own call tone.
Page 30
Call handling
28
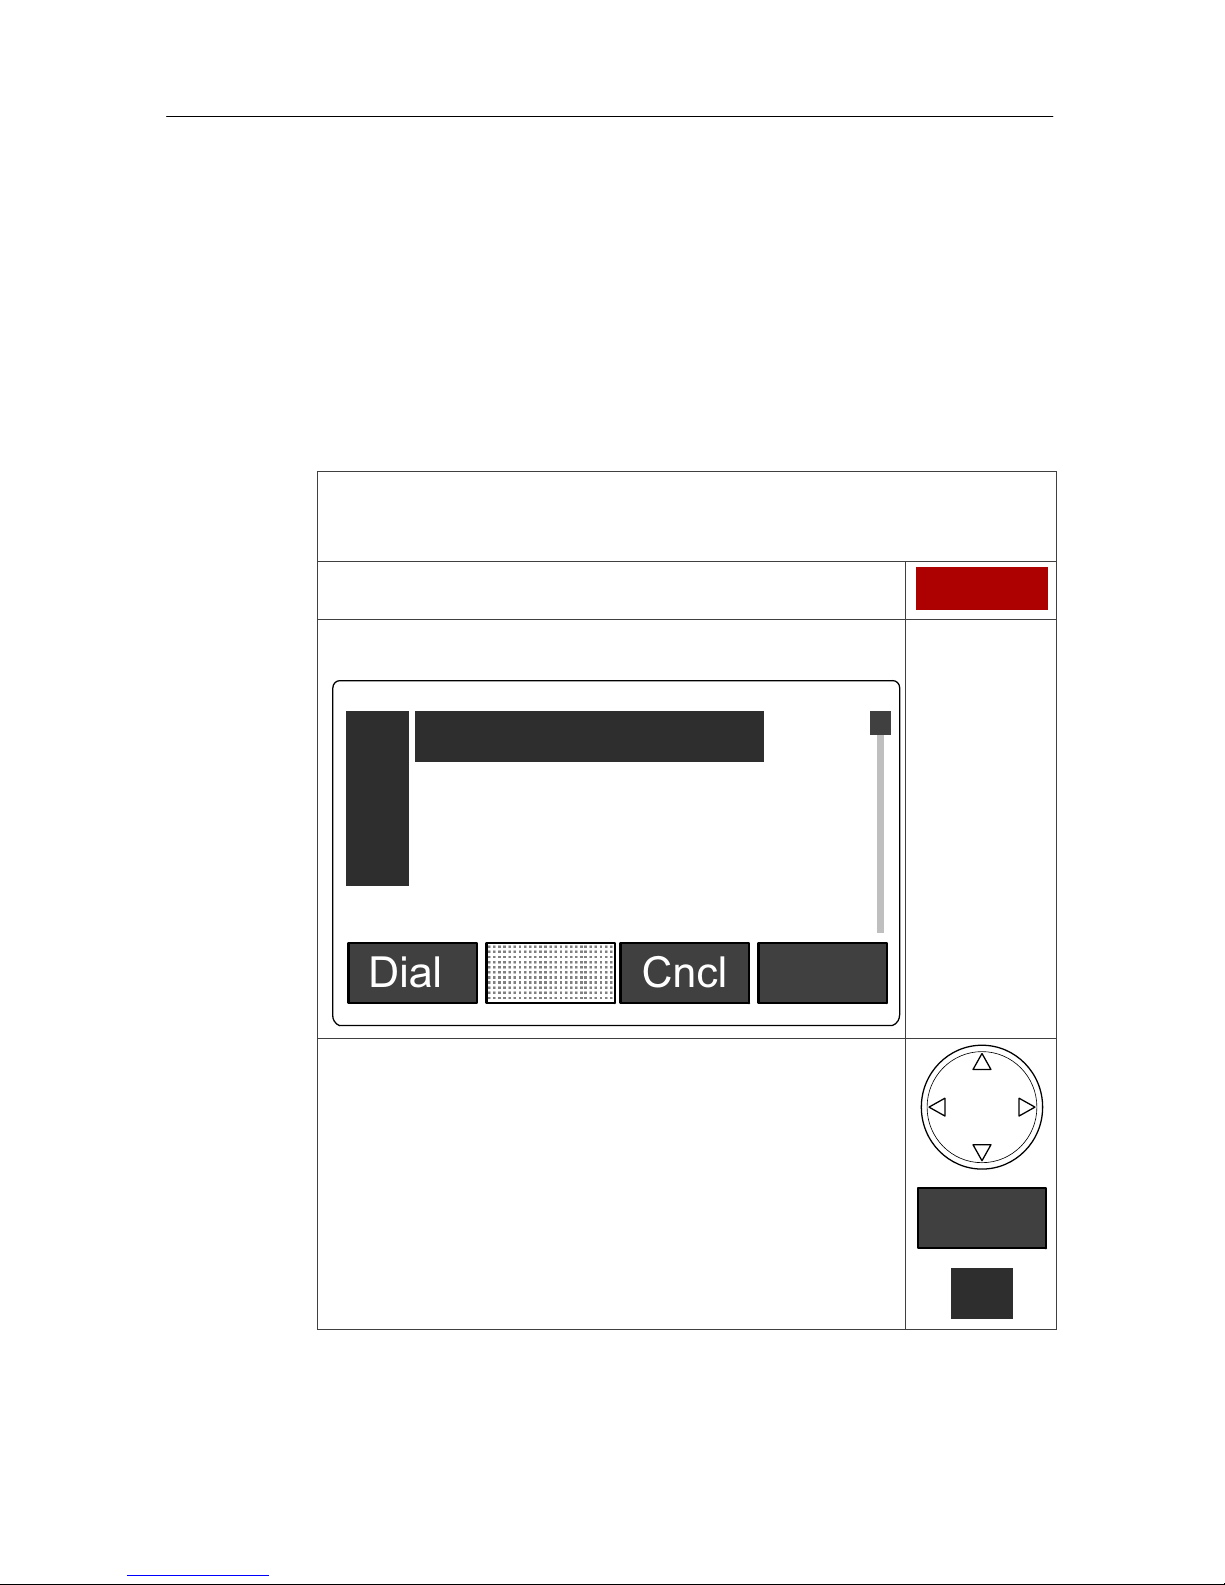
23 Call list
In the call list the following events are displayed:
n Fresh calls (marked with an asterisk*).
n Answered calls
n Staff registrations (Staff 1, staff 2)
How to establish a speech connection to an entry in the
call list:
l Press the “Calls” function key.
Calls
¢ The call list is displayed:
Dial Cncl Next
Call : 104PAT
Call 103PAT
Staff 2: 107PAT
0
1
2
*
l Mark the relevant entry in the list. For that
scroll through the entries with the naviga‐
tion key
or scroll through the entries with the “Next”
soft key
Next
or press the index number left to the entry.
1
Page 31
Call handling
29
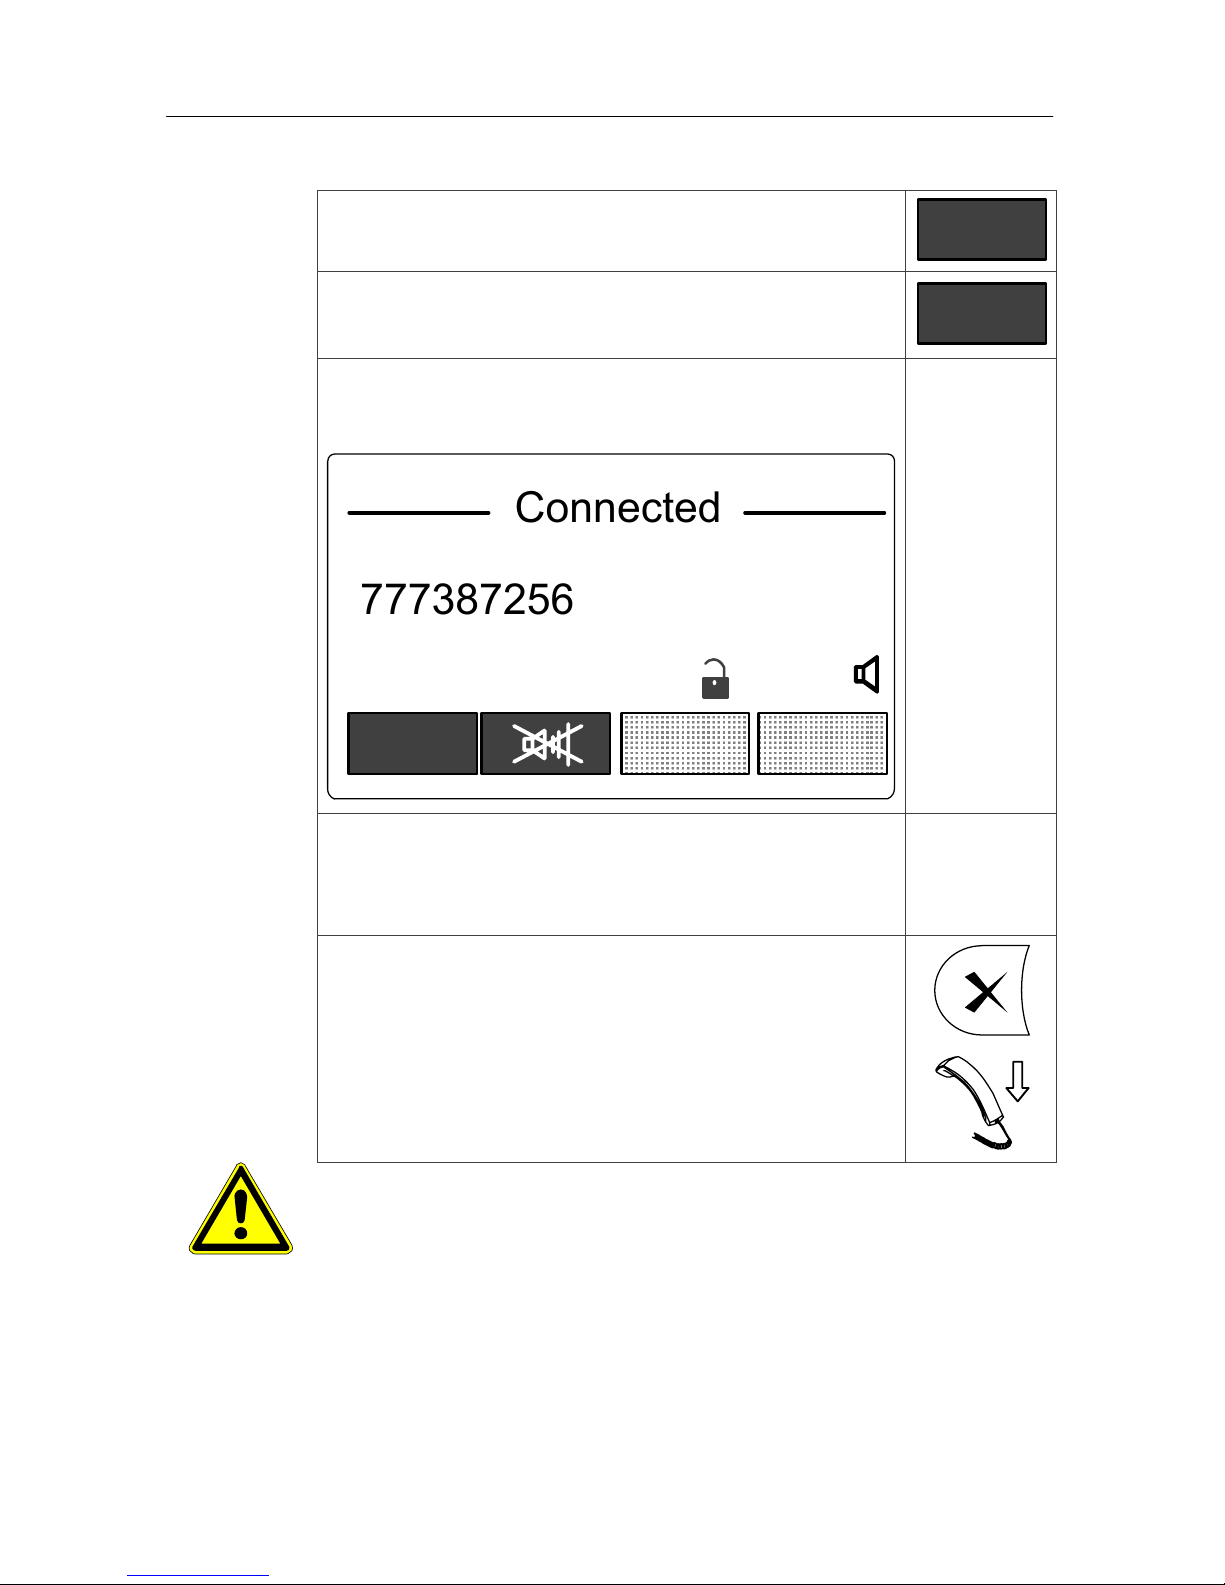
You can cancel the procedure by pressing the
“Cncl” soft key.
Cncl
l To establish the speech connection press
the “Dial” soft key.
Dial
¢ The speech connection is established in
handsfree mode. The display shows:
Connected
7773872563
Mute
0:12
l Speak to the person on the other end.
Please follow the notes in the “Speech
connections” chapter on page 21.
l To close the speech connection in
handsfree mode press the cross key.
l To close the speech connection in handset
mode hang up the handset.
Caution, safety feature! Fresh calls have priority. If you
open the call list while a fresh call is optically and acoustic‐
ally displayed (refer to page 27), you can only establish the
speech connection to this fresh call - no matter which call
you select in the call list. If you still want to contact another
Page 32
Call handling
30
entry in the call list, you have to deny the fresh call (refer to
page 33).
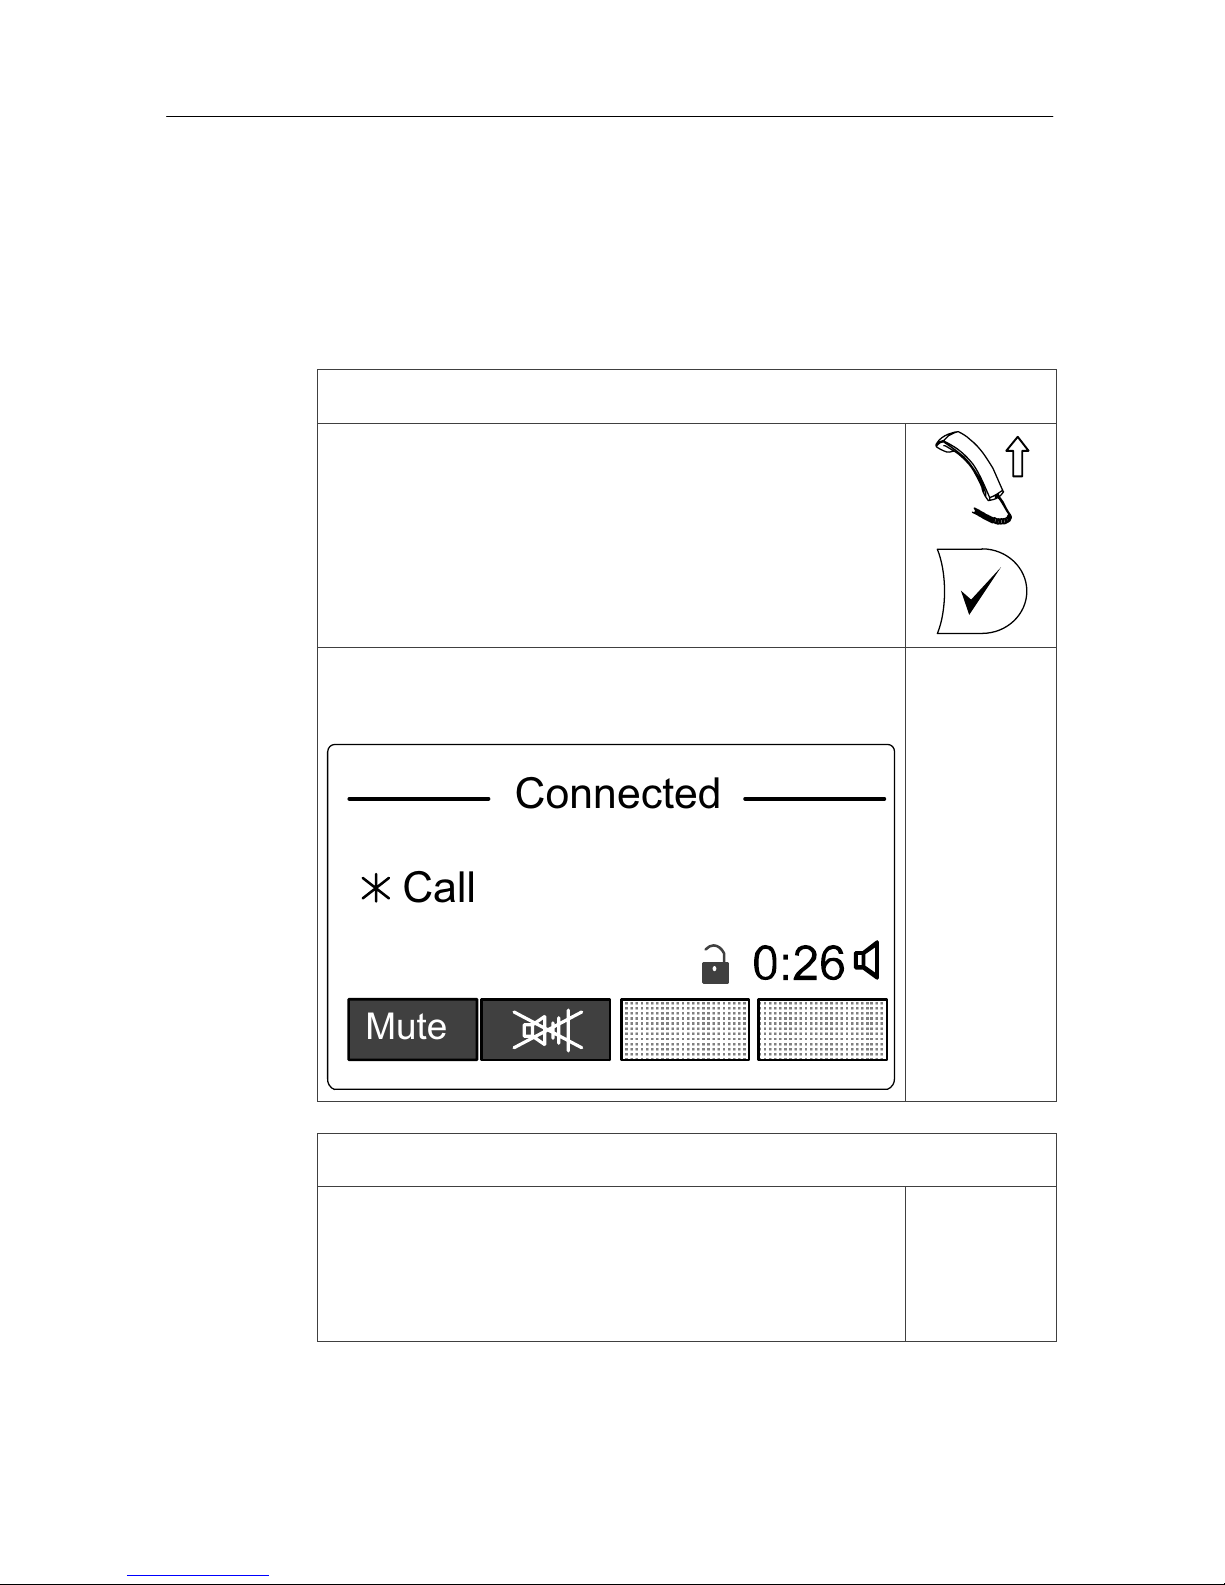
24 How to handle a call
25 1. Answering a fresh call:
l Lift the handset (handset mode)
or press the tick key (handsfree mode).
¢ The speech connection is established.
The display shows:
Connected
Mute
Call 102PAT
26 2. Speaking with the caller:
l Speak to the caller to find out which type
of assistance is required. Please follow the
notes in the chapter “Speech connections”
on page 21.
Page 33
Call handling
31
27 3a. Closing the speech connection:
l To close the speech connection without
cancelling the call hang up the handset
(handset mode)
or press the cross key (handsfree mode).
28 3b. Closing the speech connection and
cancelling the call:
Calls of call type “Call” can be cancelled remotely from the
ComStation
TEL
. All other call types have to be cancelled
at the call location.
l To cancel a call and to close the speech
connection, press the “Cancel” function
key.
Cancel
l Hang up the handset (handset mode).
29 4. Speaking to staff:
All rooms, where staff is present, are listed in the call list.
l If you want to speak to staff in the ward, for
sending him or her to the call location, es‐
tablish the speech connection via the call
list. For details about the call list refer to the
chapter “Call list” on page 28.
Calls
Page 34
Call handling
32
30 5. Re-establishing the speech connection to the
call location:
All calls which are not yet cancelled are listed in the call
list.
l If you want to speak to the call location
once again, establish the speech connec‐
tion via the call list. For details about the
call list refer to the chapter “Call list” on
page 28.
Calls
31 Note to 3b. Special case: Door call
In case of a door call you have two possibilities:
l If you want to allow the person at the door
to enter, press the “Opener” function key.
¢ The door opening mechanism is activated
and the call is cancelled.
Opener
l If you do not want the person at the door
to enter, press the “Cancel” function key.
¢ The door opening mechanism is not activ‐
ated. The door call is cancelled.
Cancel
Page 35
Call handling
33
32 Denying a fresh call
If a fresh call arrives at your ComStation
TEL
, but you don't
want to answer this call at the moment, you can deny the
call.
l To deny a fresh call press the cross key.
or press the “Deny call” soft key.
¢ The indication for the fresh call disap‐
pears. Not later than 30 seconds, the call
is displayed again.
Page 36
Addressing a room
34
Addressing a room
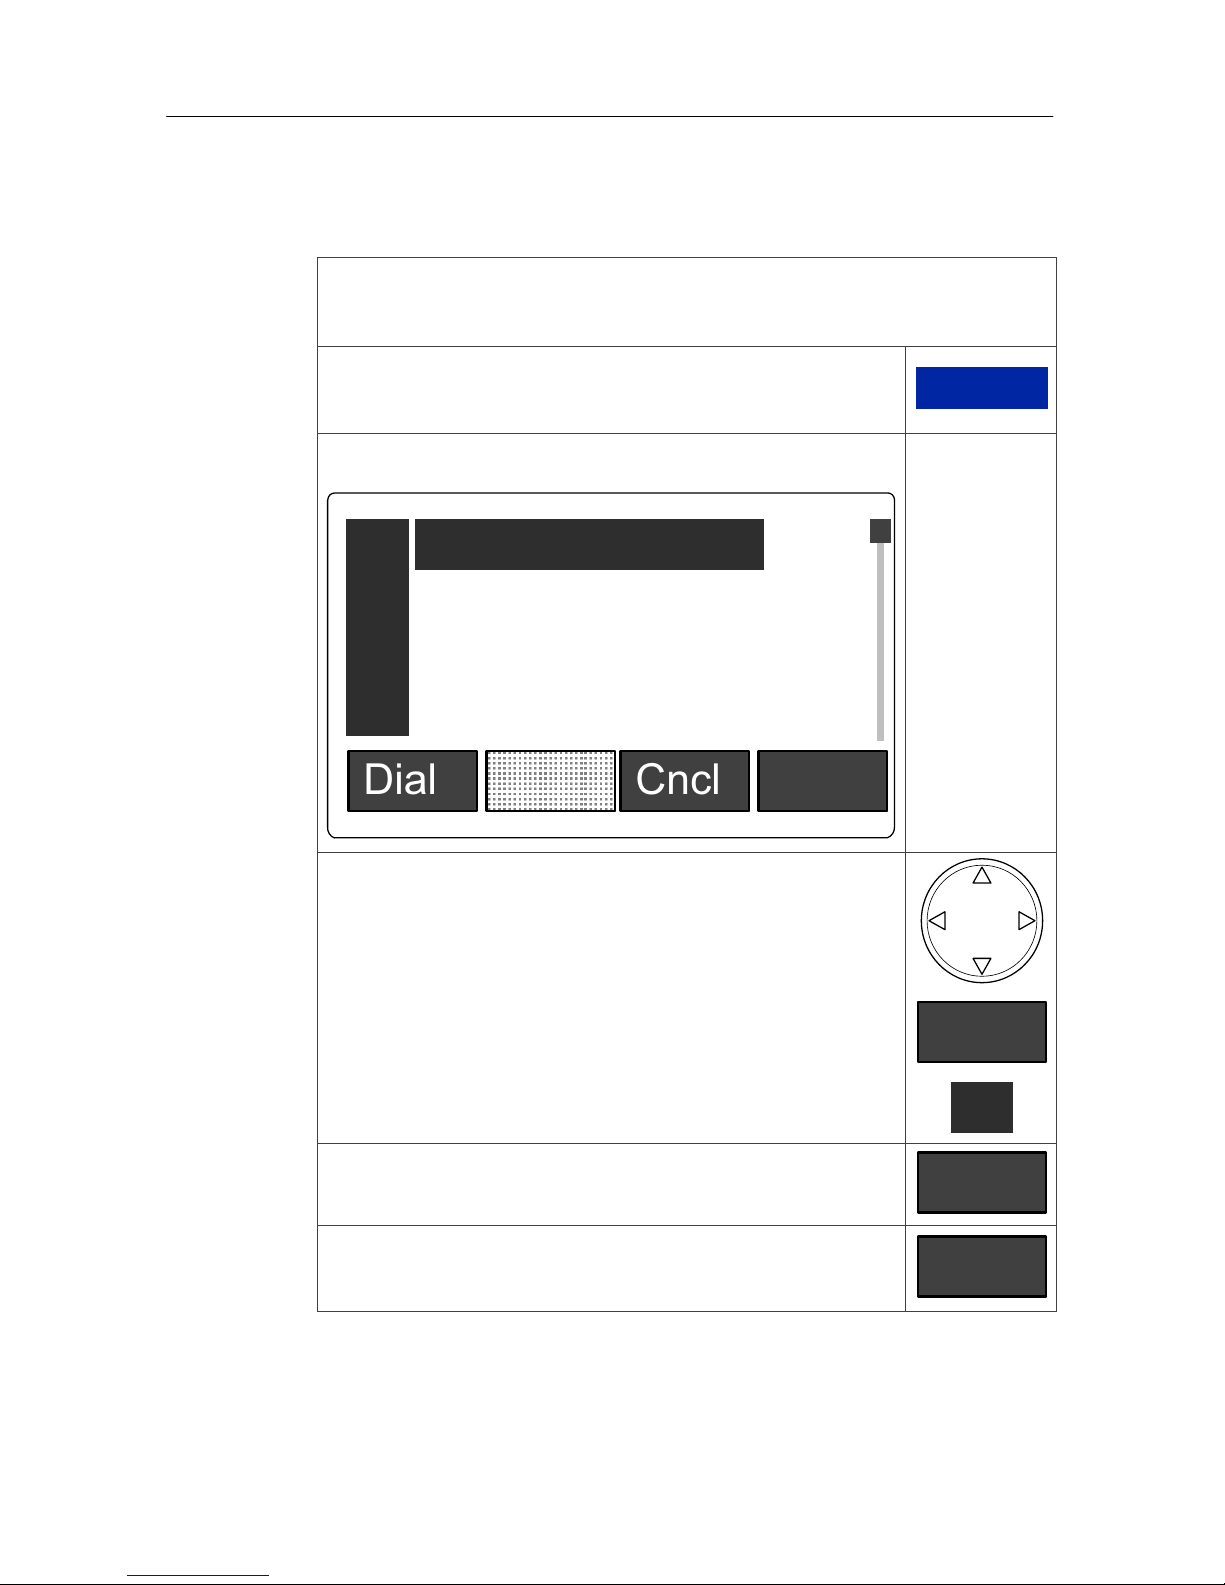
How to establish a speech connection to a room within
your ward:
l Press the “Rooms” function key.
(handset remains hung up)
Rooms
¢ The room list is displayed
Dial Cncl Next
Room 102PAT
Room 101PAT
0
1
2
3
Room 103PAT
Room 104PAT
l Mark the relevant entry in the list. Use the
navigation key to scroll through the
entries,
or scroll through the entries with the “Next”
soft key,
Next
or press the index number left to the entry.
1
You can cancel the procedure by pressing the
“Cncl” soft key.
Cncl
l To establish the speech connection, press
“Dial” soft key.
Dial
Page 37
Addressing a room
35
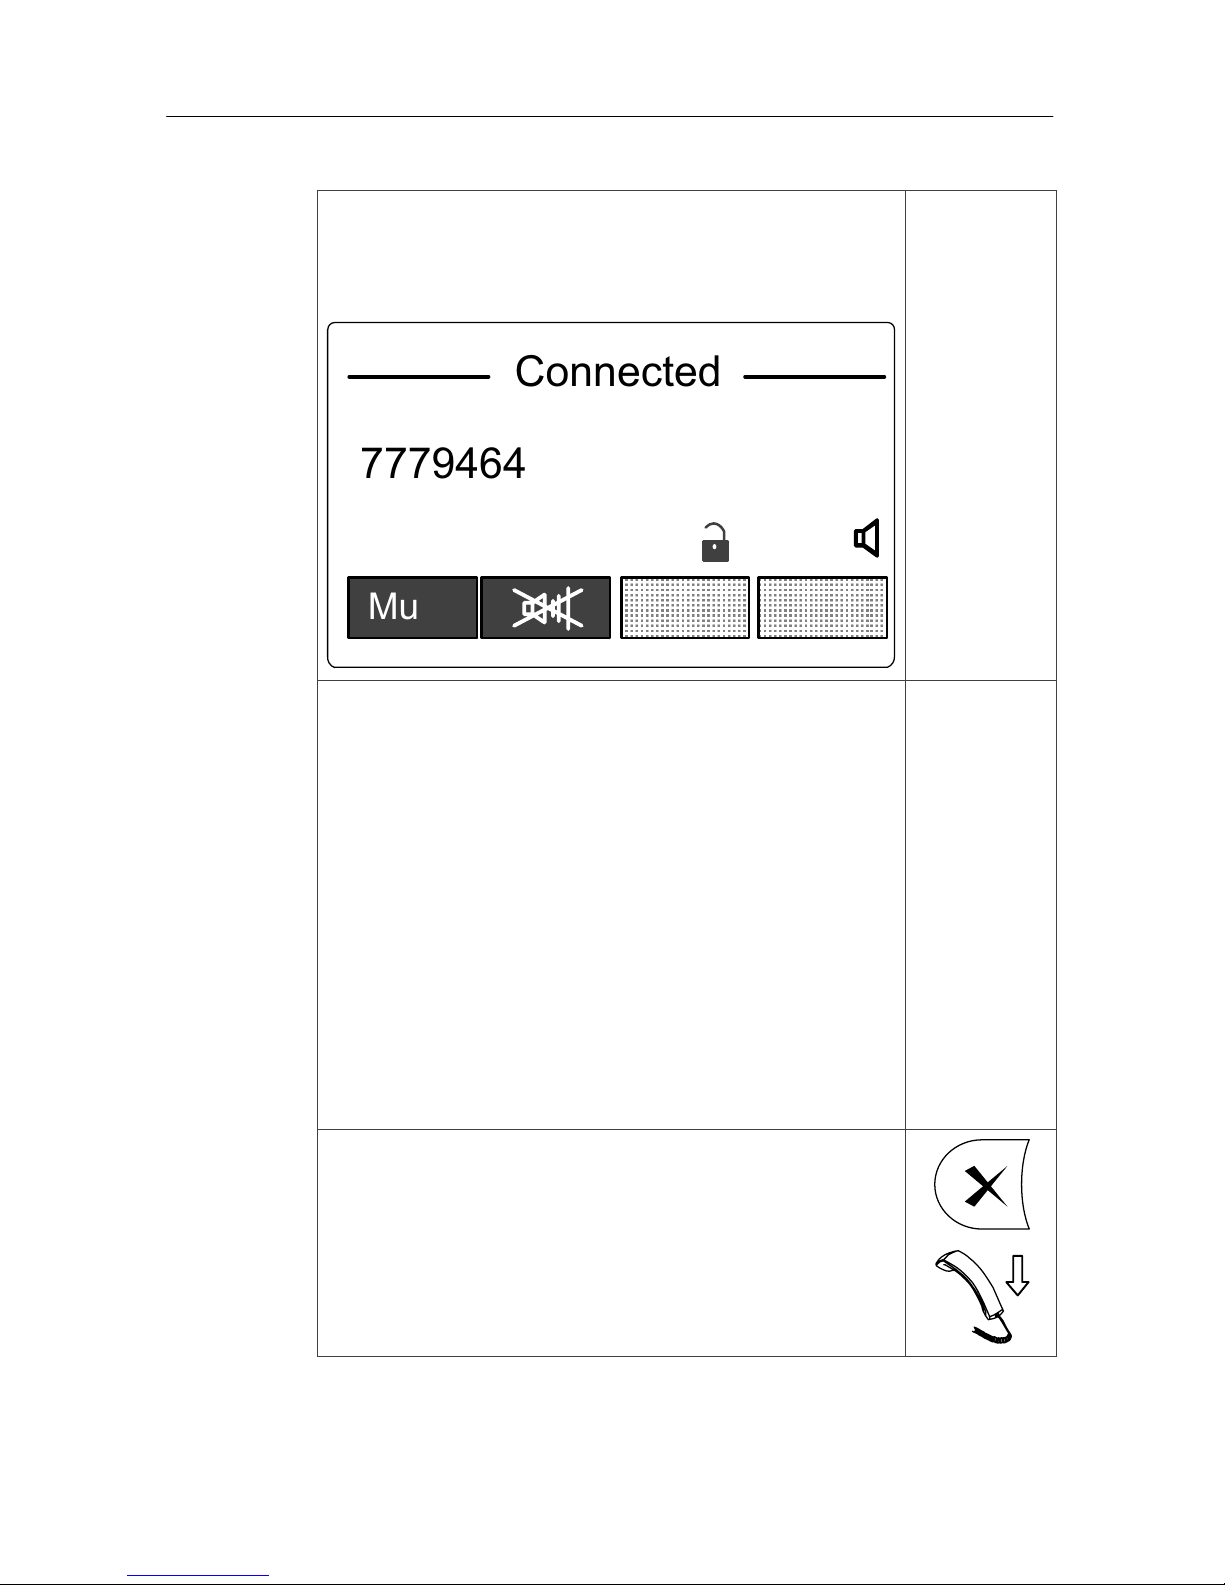
¢ The announcement connection is estab‐
lished in handsfree mode. The display
shows:
Connected
7779464
Mute
0:31
l Speak into the room. Please follow the
notes in the chapter “Speech connections”
on page 21.
Notice! While the privacy function is active in
the room, it is not possible for you to hear an
answer. Ask the patient to press a call button.
This will deactivate the privacy function and
you will be able to hear the patient. After you
have closed the speech connection, the call
will appear as an answered call in the call list.
Cancel it as described in the “Call handling”
chapter on page 30.
l To close the speech connection in
handsfree mode press the cross key.
l To close the speech connection in handset
mode hang up the handset.
Page 38
Announcements
36
Announcements
You can make announcements from the ComStation
TEL
to
the rooms in your ward. You can optionally address the
following announcement groups:
n “All rooms”: All rooms in your ward.
n “All Staff 1”: All rooms, where staff 1 is present.
n “All Staff 2”: All rooms, where staff 2 is present.
n “Any Staff”: All rooms, where staff is present.
How to make an announcement:
l Press the “Announce” function key
(handset remains hung up).
Announce
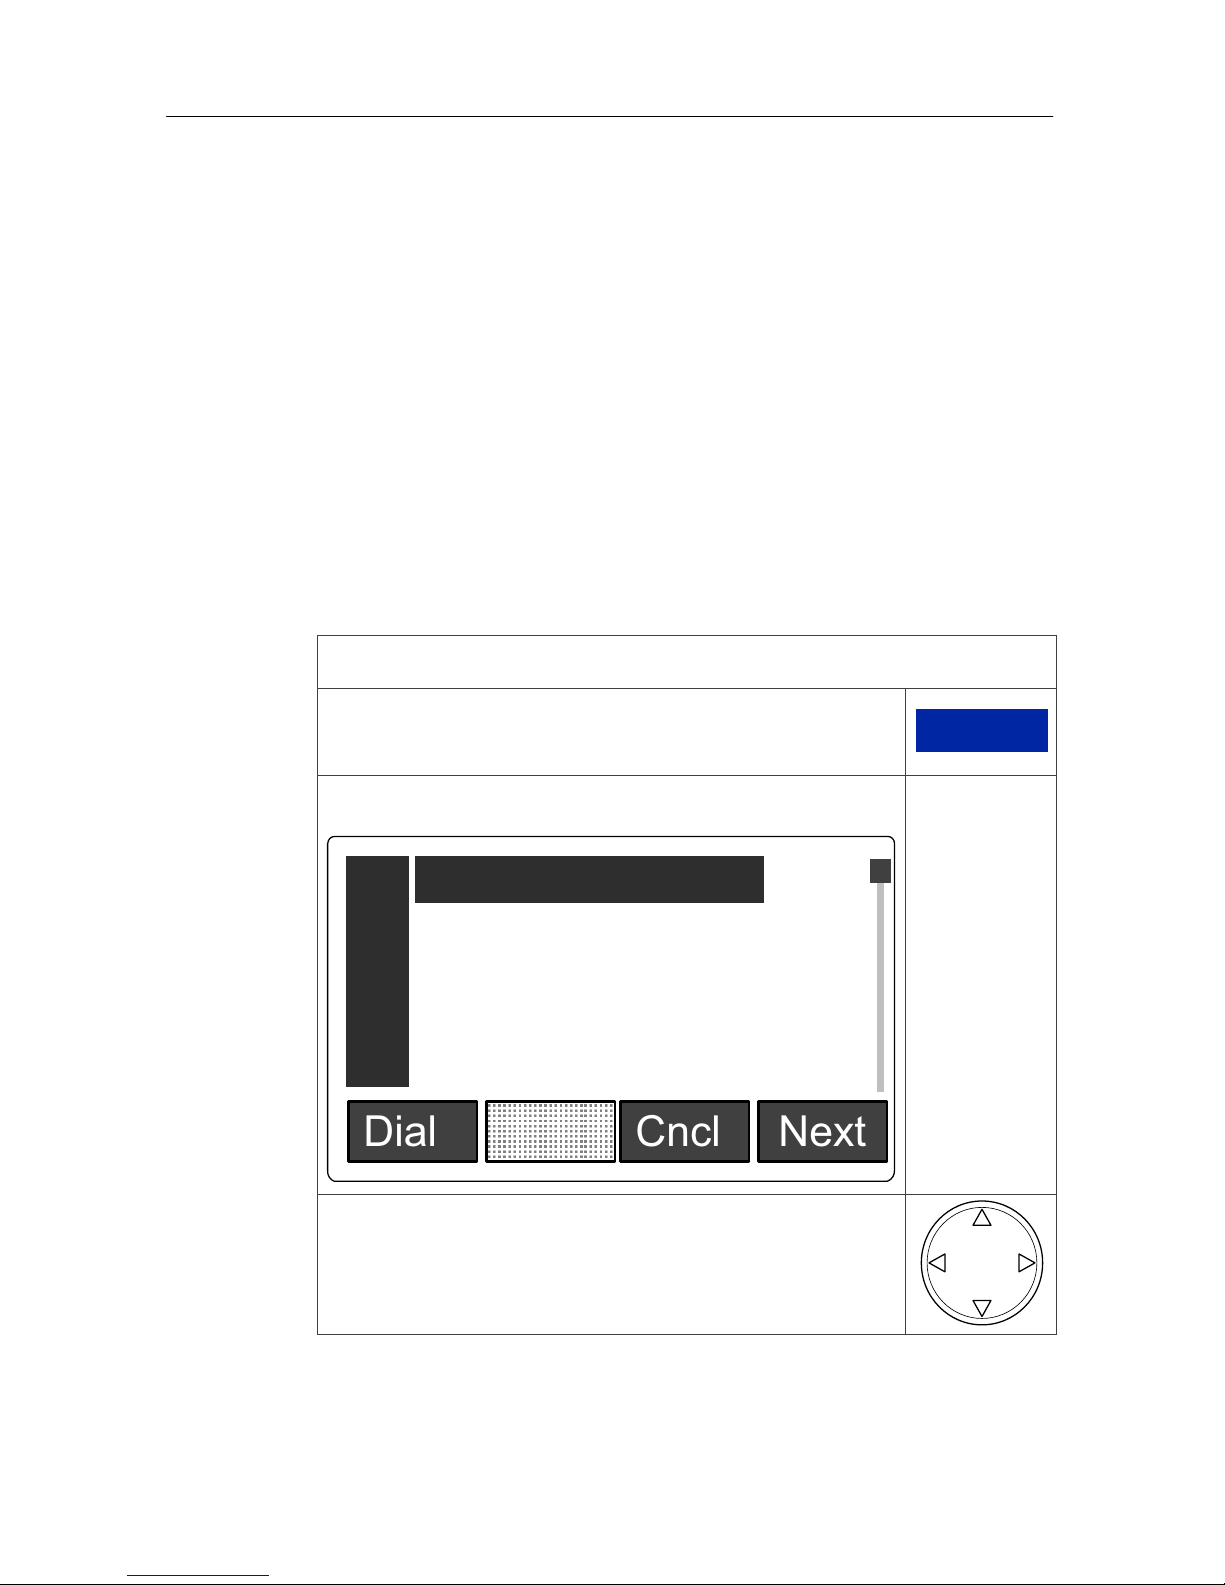
¢ The announcement list is displayed:
Dial Cncl Next
All Staff 1
All rooms
0
1
2
3
All Staff 2
Any Staff
4
l Mark the relevant entry in the list. Use the
navigation key to scroll through the
entries,
Page 39
Announcements
37
or scroll through the entries with the “Next”
soft key,
Next
or press the index number left to the entry.
1
You can cancel the procedure by pressing the
“Cncl” soft key.
Cncl
l To establish the speech connection, press
“Dial” soft key.
Dial
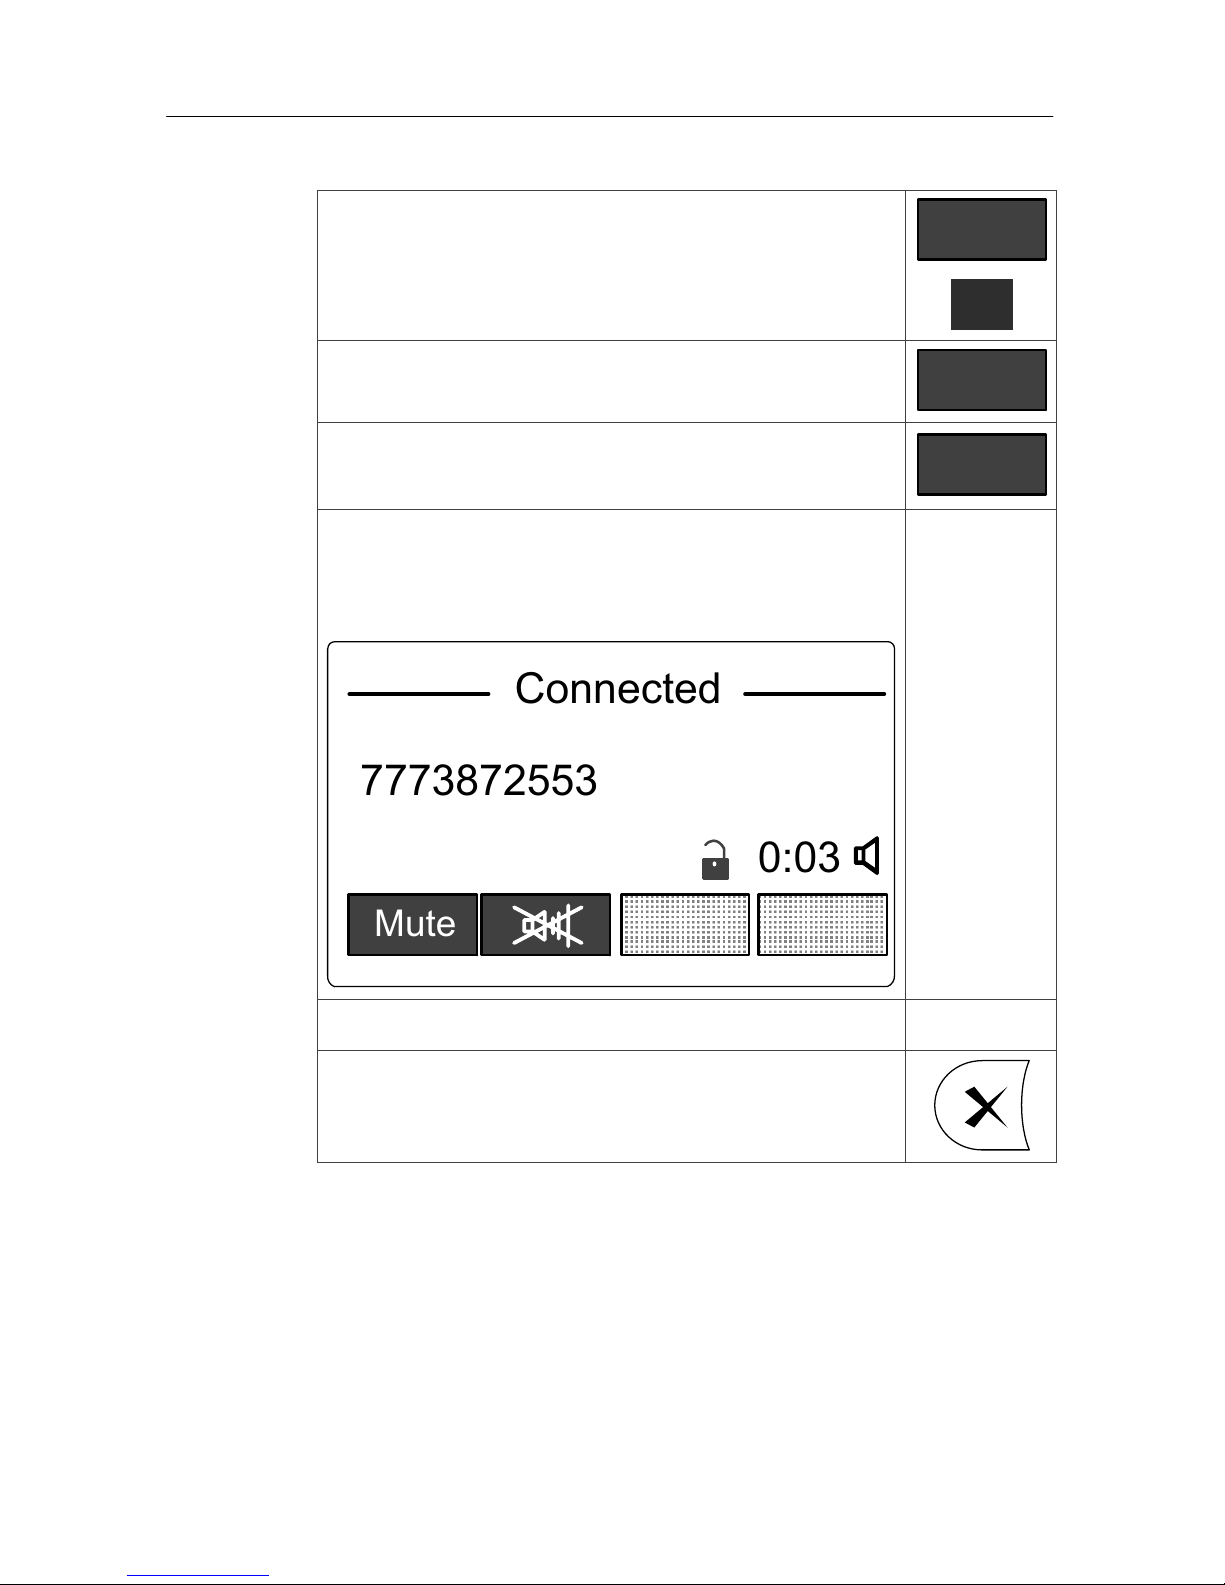
¢ The announcement connection is estab‐
lished in handsfree mode.
The display shows:
Connected
7773872553
Mute
0:03
l Read your announcement.
l To close the announcement, press the
cross key.
Page 40
Ward coupling
38
Ward coupling
At your ComStation
TEL
, you normally monitor only the
rooms in your ward. When needed - e.g. during times with
low work frequency - several wards can be coupled. All calls
and staff presences of the coupled wards are displayed at
all ComStation units of the coupled area. All calls of the
coupled area are forwarded throughout the coupled area.
Ward coupling can be enabled by yourself or from another
ComStation
TEL
.
Your system administrator will have set up several ward
coupling programmes (WCP) for you to select from. Each
ward coupling programme stands for the coupling of spe‐
cific wards. Ask your system administrator which wards are
coupled by which ward coupling programme.
You can enable and disable these programmes. There may
be other active ward coupling programmes which you can‐
not not affect. When a ward coupling programme is active,
the corresponding wards are coupled.
NOTICE! Automatic ward coupling can be initiated when a
specific call category (e.g. Code Blue / Cardiac alarm), is
raised. Ask your system administrator whether this variant
has been set up for your system.
How to enable or disable a ward coupling programme:
l Press the “Ward Coupl.” function key
(handset remains hung up).
ard Coupl
.
Page 41
Ward coupling
39
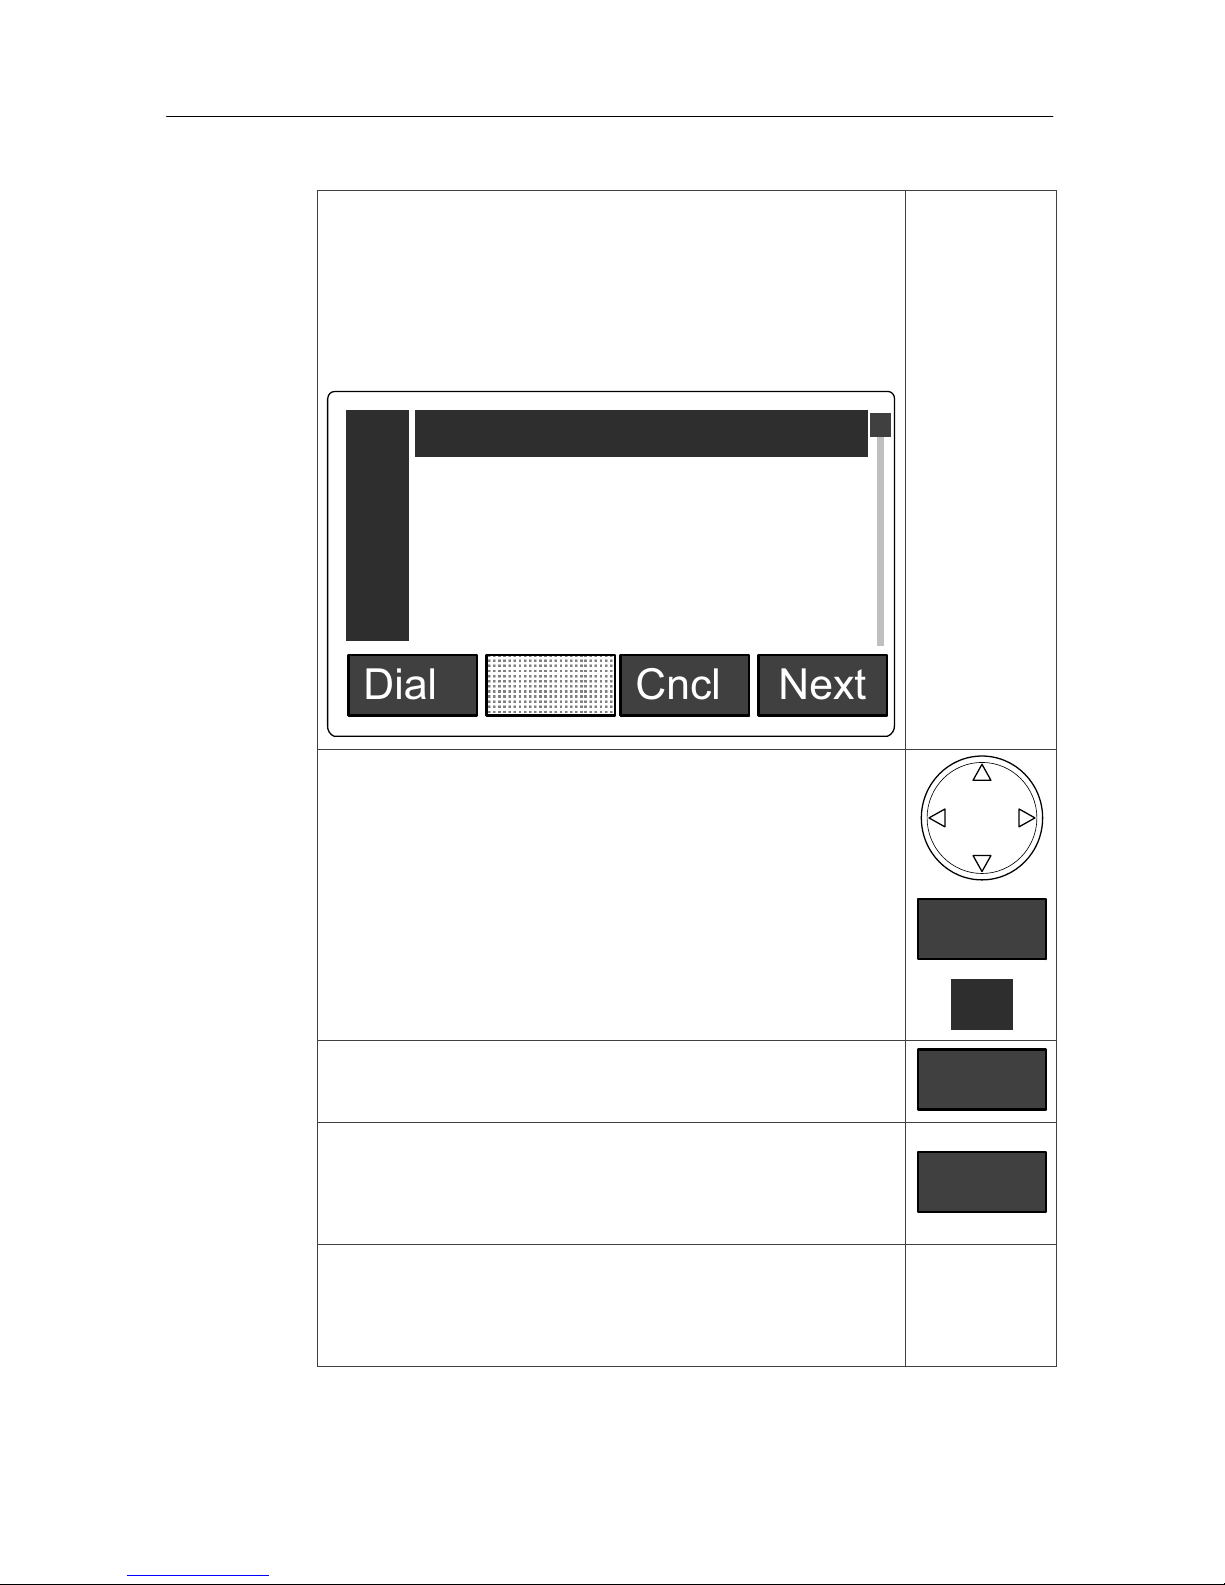
¢ The ward coupling programmes (WCP)
which can be enabled or disabled by you
are displayed. Active programmes are
marked with “Disable”. Inactive program‐
mes are marked with “Enable”.
Dial Cncl Next
WCP 2 (B) Enable
WCP 1(A) Disable
0
1
2
3
WCP 3 (C) Enable
WCP 4 (D) Enable
4
WCP 5 (E) Enable
l Mark the relevant entry in the list. Use the
navigation key to scroll through the
entries,
or scroll through the entries with the “Next”
soft key,
Next
or press the index number left to the entry.
1
You can cancel the procedure by pressing the
“Cncl” soft key.
Cncl
l To switch the selected programme
between active and inactive, press the
“Dial” soft key.
Dial
¢ The state of the selected ward coupling
programme is switched between active
and inactive. The procedure is closed.
Page 42

Enable / disable a shift
40
Enable / disable a shift
To support zone nursing Tunstall has developed the con‐
cept of zones and shifts:
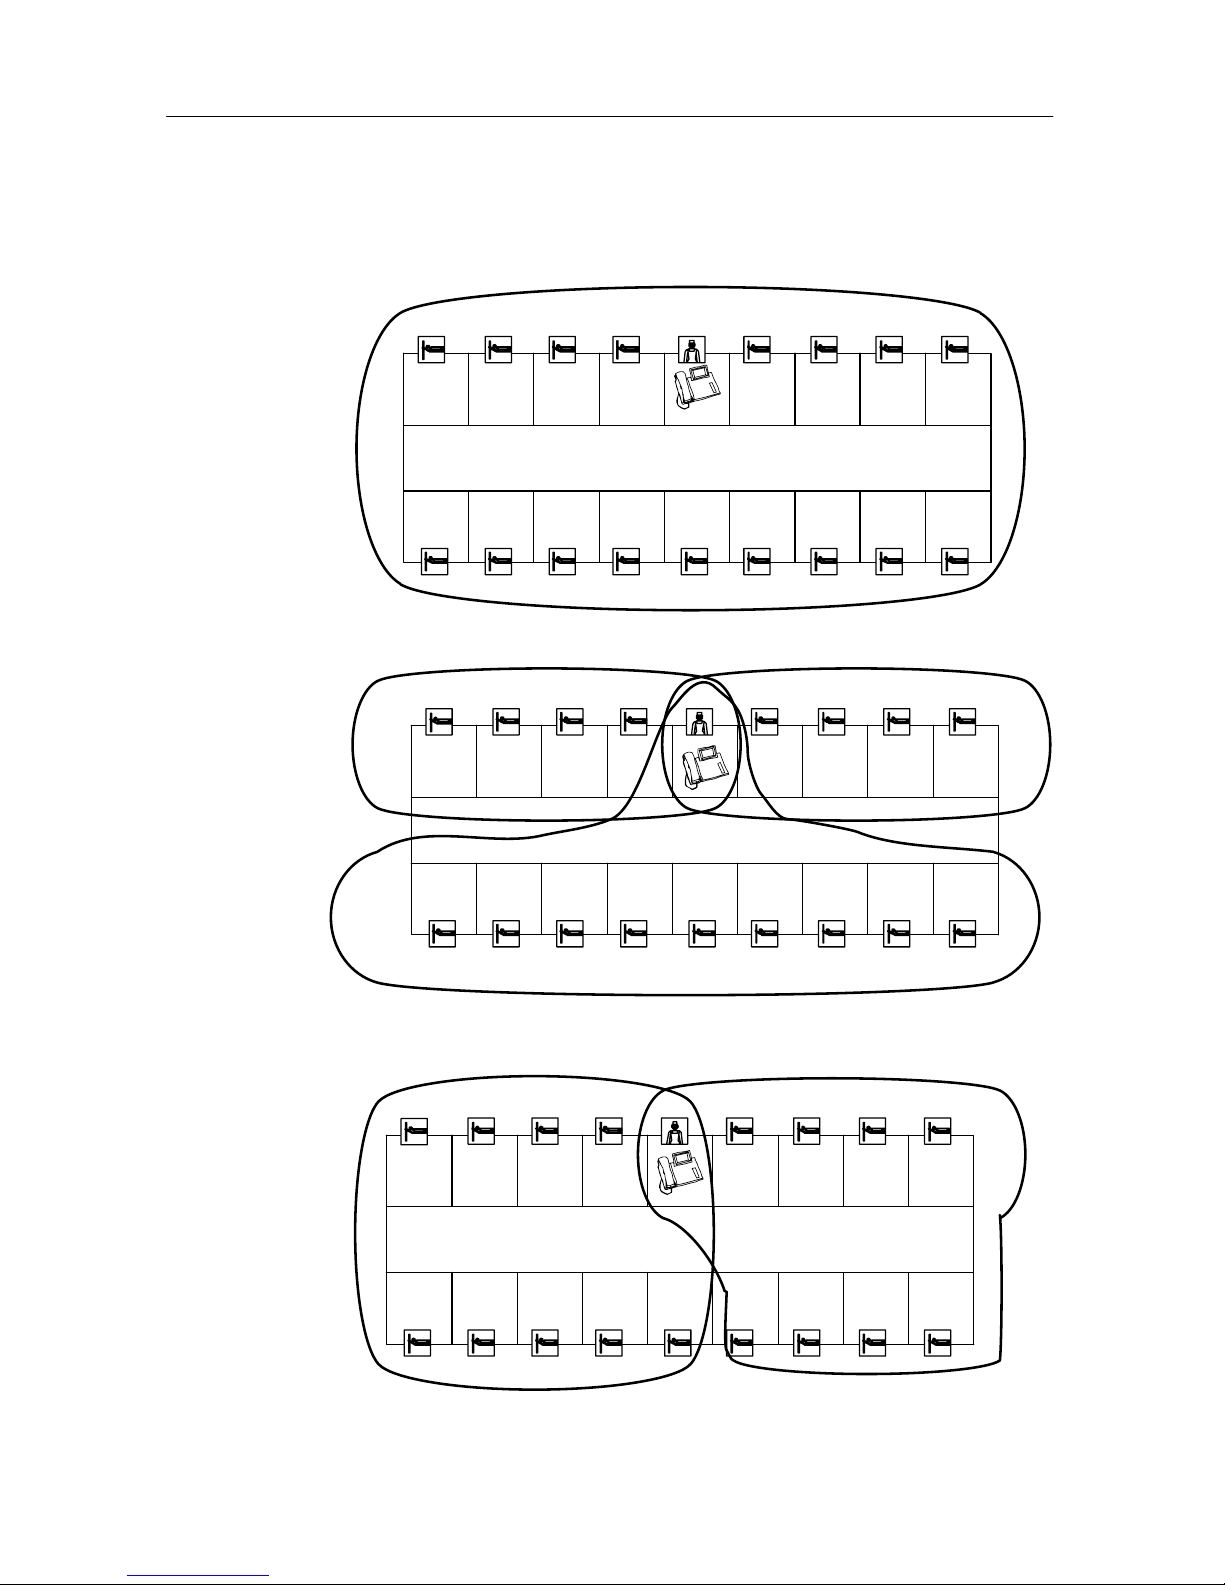
33 Zone
A zone is a part of a ward within which calls can be forwar‐
ded. Calls which are triggered within the zone are not for‐
warded to rooms in the ward which lie outside the zone.
Usually, certain nursing staff are responsible for one zone.
Notice! Call forwarding means the optical and acoustic si‐
gnalling of calls at ComTerminals in rooms where staff has
logged their presence.
34 Shift
The zones of a ward are not arranged for permanent opera‐
tion. The zone organisation may be changed. Each division
of the ward into zones is classed as a “shift”. A shift refers
to the division of a ward into a maximum of 8 zones. Thus,
the zones may overlap each other, i.e. certain rooms can
belong to several zones. A maximum of 8 different shifts is
assigned to each ward. You may choose which shift should
be active with the ComStation
TEL
. Only one active shift is
possible.
35 ComStation
TEL
For safety reasons the ComStation
TEL
is always part of all
zones. The calls of all zones are displayed at the
ComStation
TEL
. At the ComStation
TEL
the current shift is
enabled. The definition of the shifts can be changed if
requested. For this contact your system administrator.
Page 43

Enable / disable a shift
41
36 Exceptions
A call has not been answered within a preset time:
If a call has not been answered within a certain time (call ca‐
tegory call and emergency calls: 2 minutes, call category
code blue / cardiac alarm: 30 seconds), the call will be for‐
warded to all rooms of the ward with staff presence. If further
calls are raised before the first call is cancelled, these calls
are also forwarded to the whole ward. This concerns all new
calls, until all calls are cancelled. After that the calls are only
forwarded within the own zone.
Ward coupling:
As soon as ward coupling is enabled, the shifts in the wards
involved are disabled. While ward coupling is active, no shift
can be enabled in the wards involved.
Page 44
Enable / disable a shift
42
Zone 1
Shift 1
Zone 1 Zone 2
Zone 3
Shift 2
Zone 1 Zone 2
Shift 3
37 Example
Page 45
Enable / disable a shift
43
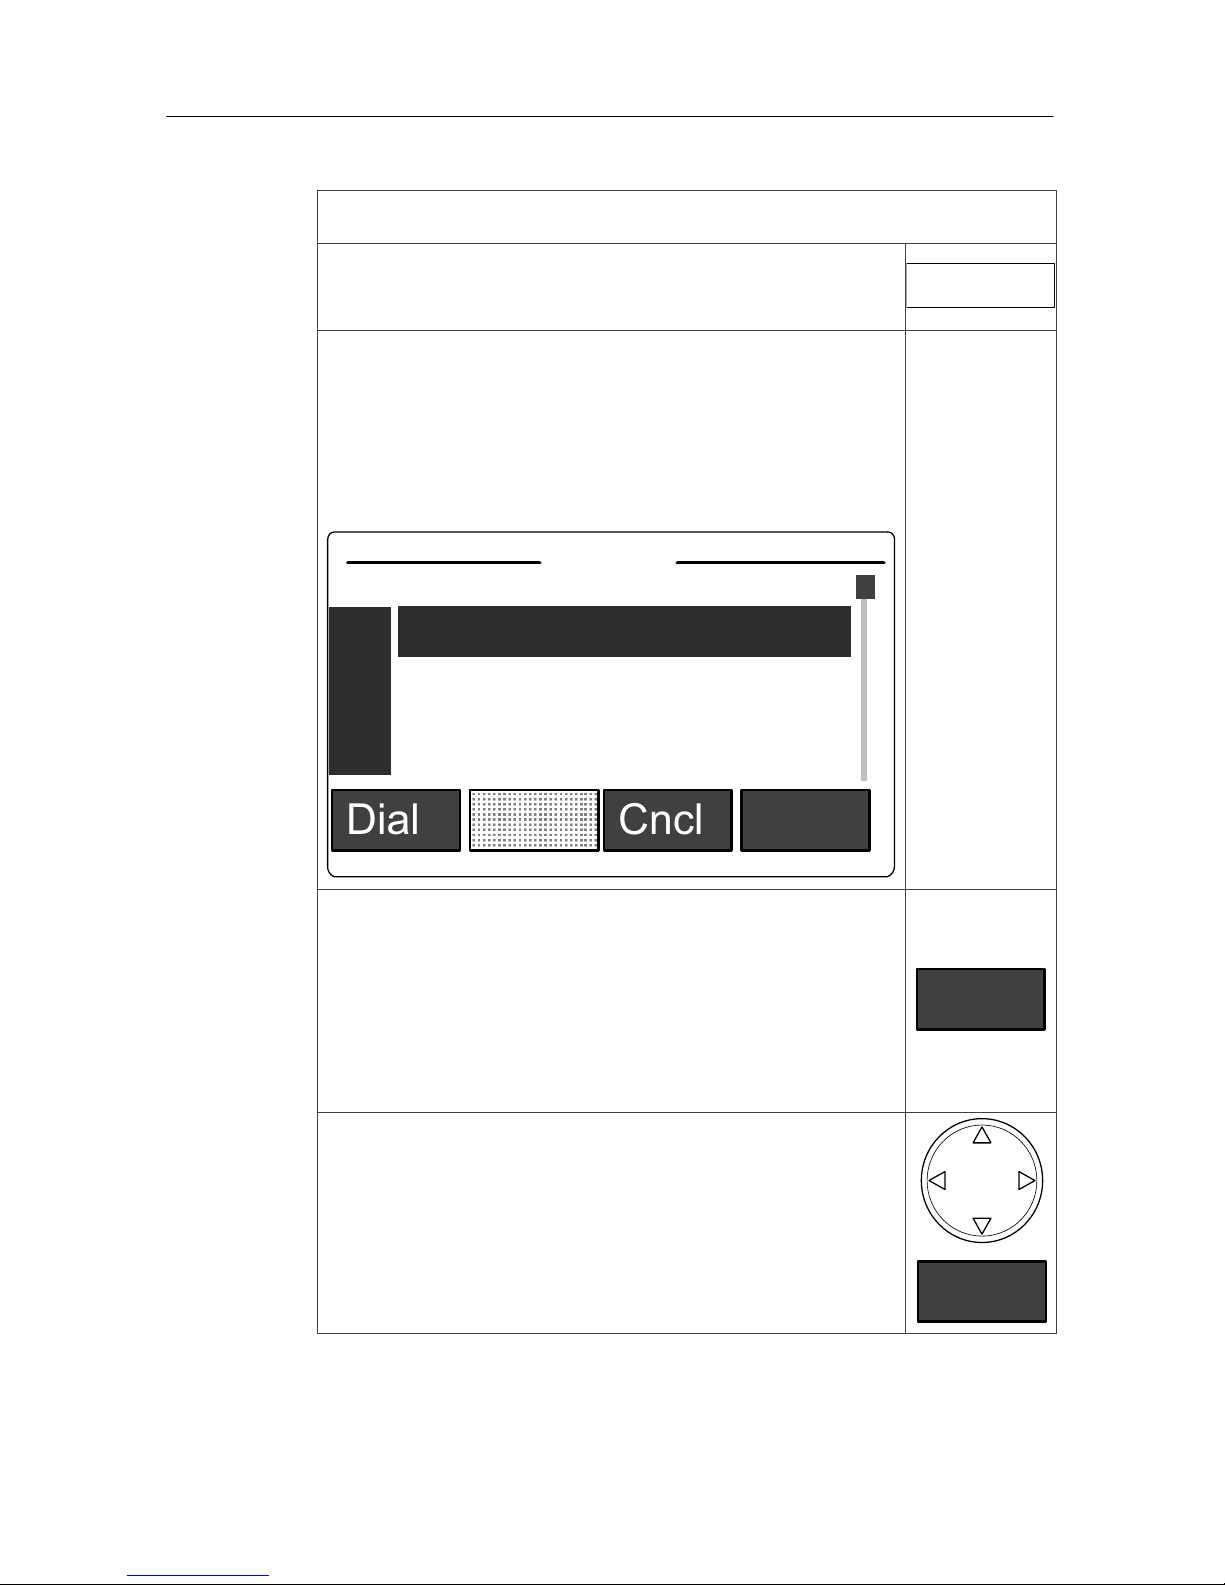
How to enable or disable a shift:
l Press the “Shift” function key (handset re‐
mains hung up).
Shift
¢ All shifts available for this ward are dis‐
played.
If currently a shift is enabled (active), this
shift is on the top of the list: “Curr. shift ...
Disable”.
Dial Cncl Next
Shift 1 Enable
Curr. Shift 4 Disable
1
2
3
Shift 2 Enable
Shifts
NOTICE! If instead of the above shown
window the window “No Shifts. Request
shifts.” is displayed, the nurse call system has
been reset. You have to press the “Dial” soft
key. After approx. 5 seconds the shifts are
displayed.
Dial
l Mark the shift in the list. Use the navigation
key to scroll through the entries,
or scroll through the entries with the “Next”
soft key,
Next
Page 46
Enable / disable a shift
44
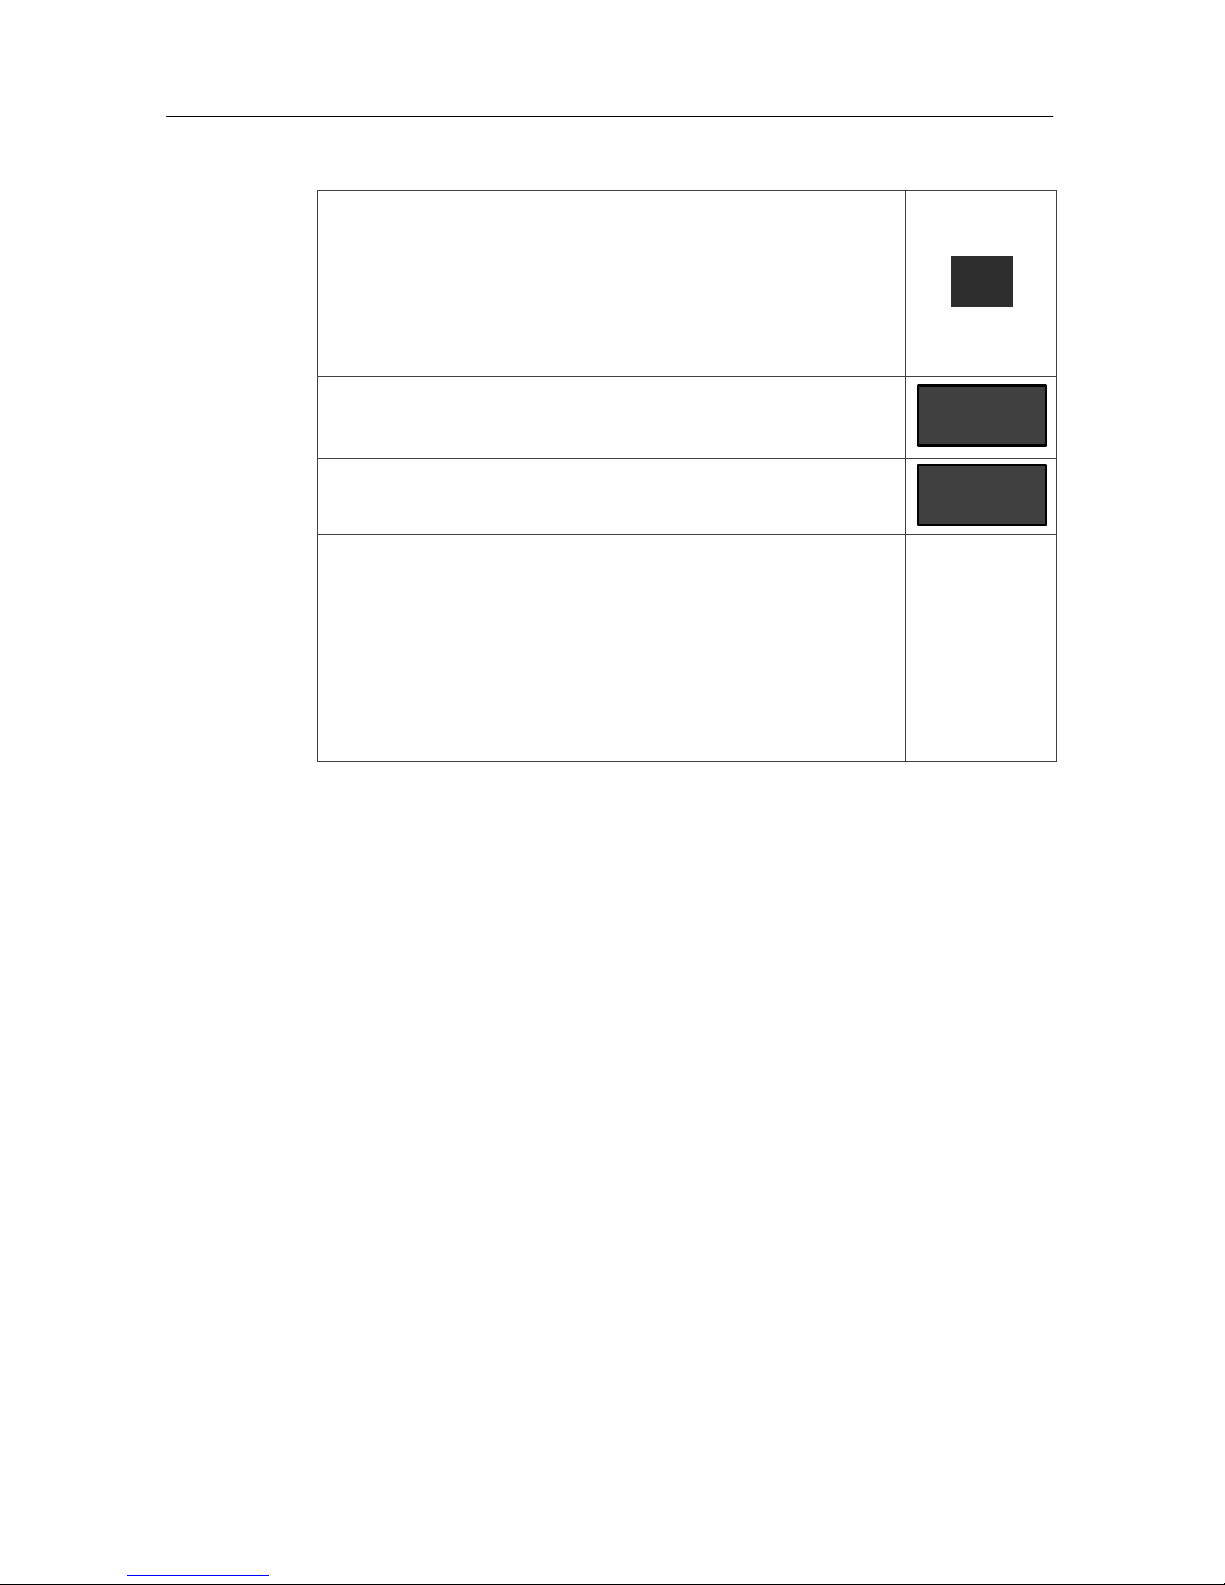
or press the index number left to the entry.
NOTICE! If you enable a shift, the current shift
is disabled at the same time. That means you
do not have to disable the current shift befo‐
rehand.
2
You can cancel the procedure by pressing the
“Cncl” soft key.
Cncl
l To switch the shift press the “Dial” soft key.
Dial
¢ After approx. 5 seconds: If you selected a
shift for enabling, it is enabled now and the
current shift is disabled. If you only selec‐
ted the current shift for disabling, the cur‐
rent shift is disabled and the shift operation
is closed.
Page 47

Cleaning
45
Cleaning
WARNING! Please avoid cleaning liquids as they might
damage the surface or internal electronics of the
ComStation
TEL
.
To clean the ComStation
TEL
, use an anti-static cloth.
Page 48

2.
Tunstall GmbH S Orkotten 66 S 48291 Telgte S Germany
Telephone: +49 25 04 / 7 01-0 S Fax: +49 25 04 / 7 01-499
www.tunstall.de S e‐mail: [email protected]
All the reassurance you need
 Loading...