

Page 1

TuneUp Utilities 2008
User Manual
Page 2
TuneUp Utilities 2008 was developed by:
Company: TuneUp Software GmbH
Address: Rheinstraße 97
64295 Darmstadt
Germany
Internet: www.tune-up.com
TuneUp Utilities 2008 is produced by:
Company: Phoenix Software UK Ltd
Address: Studio 40, Matrix Studios
91 Peterborough Road
Parsons Green
London SW6 3BU
Internet: www.phoenixsoftwareuk.co.uk
Support for this software can be obtained at the following telephone number
and address:
Phone: +49-6151-4938610 (9 AM to 7 PM CET)
Internet: www.tune-up.com/support/
Page 3

Table of Contents
Installation..........................................................3
System Requirements .......................................3
Starting the Installation ....................................4
Entering Your User Name and Serial Number ....5
Selecting the Installation Location.....................5
Introduction of TuneUp Utilities 2008..................7
Starting the software ........................................7
Using the software ...........................................7
The six categories ............................................8
Global modules and settings .......................... 10
New Features in TuneUp Utilities 2008 ...........11
Increase performance........................................13
TuneUp Drive Defrag...................................... 15
TuneUp StartUp Manager................................ 19
TuneUp System Optimizer ..............................22
TuneUp Registry Defrag..................................26
TuneUp Memory Optimizer.............................28
Free up disk space ............................................31
Unnecessary files and backups ....................... 33
iii
Page 4

Table of Contents
Maintain Windows ............................................ 47
Solve problems................................................. 55
Customize Windows ......................................... 65
Additional tools................................................ 85
Windows functions......................................... 37
TuneUp Disk Space Explorer .......................... 38
TuneUp 1-Click Maintenance ......................... 48
TuneUp Registry Cleaner................................ 49
TuneUp Disk Doctor....................................... 56
TuneUp Repair Wizard.................................... 60
TuneUp Undelete ........................................... 61
TuneUp System Control ................................. 66
TuneUp Styler ................................................ 69
TuneUp Process Manager............................... 87
iv
TuneUp Registry Editor .................................. 91
TuneUp Shredder........................................... 93
TuneUp System Information........................... 97
TuneUp Uninstall Manager ............................. 99
Global modules .............................................. 101
TuneUp Rescue Center................................. 102
TuneUp Update Wizard ................................ 105
Page 5

Preface
Windows Vista and its predecessors are installed on most of the computers in use
around the world. Windows is, after all, a great system for performing standard
tasks, using applications and managing files. But if a user wants to adjust,
optimize or trim down the system, it stops being quite so easy. Many desirable
functions are not even possible with the on-board Windows tools.
Just about anything can be adjusted in Windows. Windows decides which
applications will start automatically with your system. Windows determines
which commands are visible in the Start menu. Windows also determines how
icons on the desktop appear. But how can a user change these options?
Nearly everything
can be changed if you know where
and how.
TuneUp Utilities
2008 - your
personal Windows
expert
Ask the expert. All important settings are hidden in the Windows boot files and
the system registry. The registry is the central database for Windows, in which
settings for all applications and hardware modules are stored. Using the right
tools, you can open this special database and change its settings. The problem is
that only experienced users know how to change the right settings among the
cryptic entries in the registry. Most users don't understand a word of the
information contained in an open registry file. Even if you know the registry
entries inside and out, a small typo in the registry can still lead to serious
consequences and even complete system failure.
That's where TuneUp Utilities 2008 comes in. The software helps both beginners
and experts to make Windows meet their needs in a way that is better, easier and
safer. All important system options are explained in an easy way and can be
turned on or off at the click of your mouse. TuneUp Utilities 2008 will then
make the necessary changes in the registry or boot files automatically. We place
a high value on system stability, so that Windows won't stop working reliably.
And most changes that you make can be undone in TuneUp Rescue Center easily and safely.
The program also gives you many more options. In addition to helping you make
Windows "better looking", you can also clean up and optimize your system at the
1
Page 6

Preface
click of a mouse. TuneUp Utilities 2008 will clean up unnecessary data from
your hard disk and remove unnecessary entries from your registry. It can
defragment your hard disk and registry and optimize your system settings to
make Windows run substantially faster. Most of this maintenance is performed
automatically every week by TuneUp 1-Click Maintenance.
Automatic
adaptation to your
operating system
When making these changes, TuneUp Utilities 2008 reaches deep into the
Windows system. However, Windows has changed a great deal from version to
version. Because of this, the software automatically recognizes and adapts to
each supported version of Windows. This is done automatically so that you, the
user, won't have to re-learn the software for each operating system version.
2
Page 7
Installation
Before using TuneUp Utilities 2008 on your computer, you must first install the
software. During this process, application files will be copied to the hard drive.
You can then run the software and use it at any time without having to insert the
CD-ROM.
System Requirements
To be able to install and use TuneUp Utilities 2008 without a problem, your
system needs to meet certain requirements. The software does not require a highpowered system, however - any reasonably modern computer should meet the
necessary minimum requirements.
1
Minimum system configuration Recommended system configuration
Microsoft Windows 2000 Microsoft Windows XP or Vista
800x600 screen resolution with 256 colors 1024x768 screen resolution with 16.7 million colors
60 MB free disk space 100 MB free disk space
CD-ROM or DVD-ROM drive CD-ROM or DVD-ROM drive
Internet Explorer 6 Internet Explorer 6 or 7
Internet access
3
Page 8
Introduction
Starting the Installation
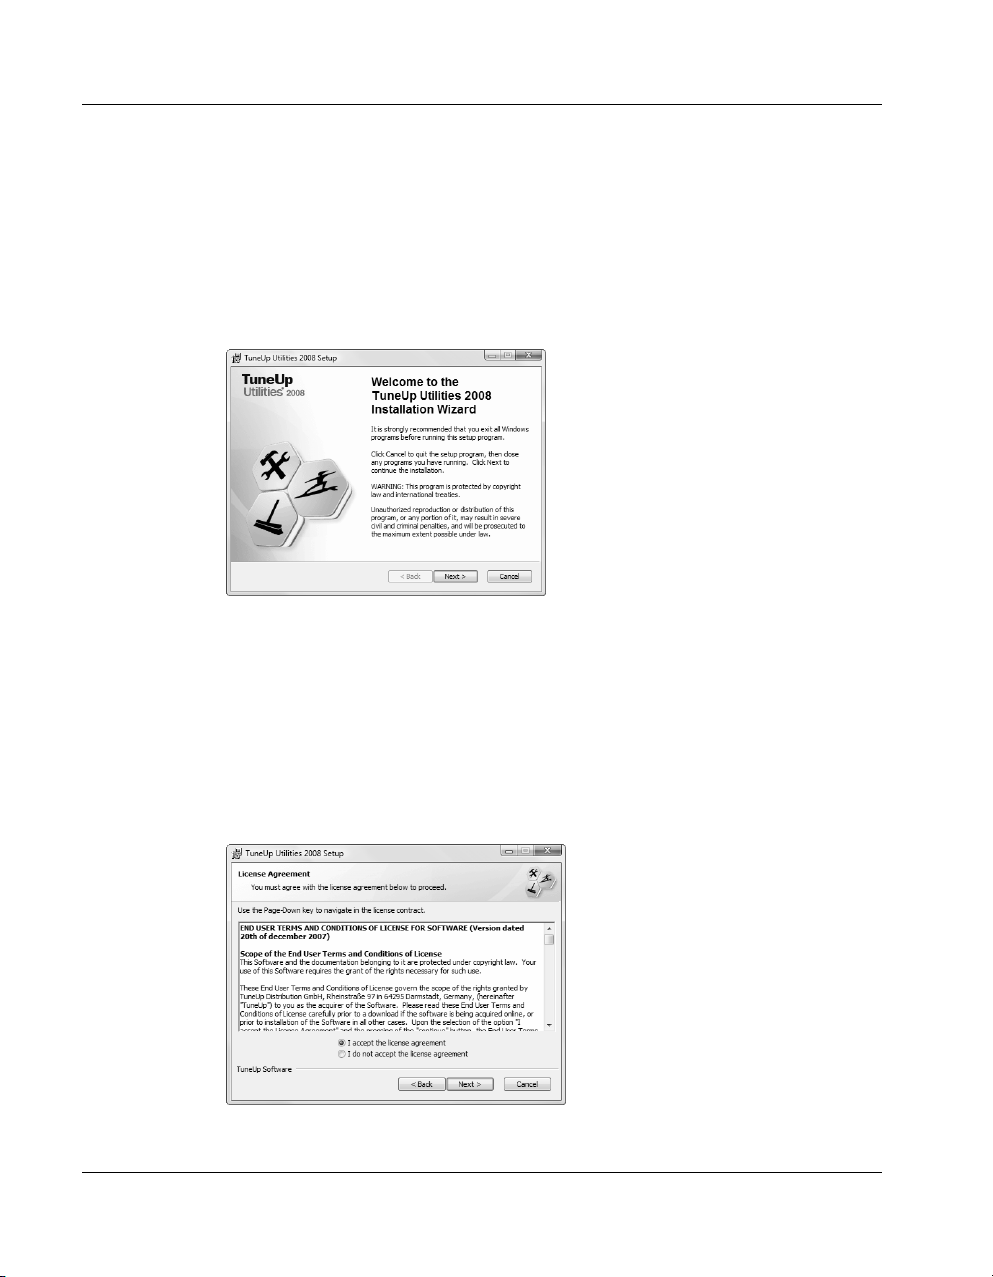
Insert the enclosed CD in your CD-ROM drive. The installation will start
automatically as soon as the drive has recognized the CD.
If nothing happens after inserting the CD, the autostart function of your drive is
deactivated. In this case, use Explorer to open the file SETUP.EXE, which is
located in the main directory of the CD. To do this, simply double-click on the
file.
Please close all
other programs.
The installation routine will welcome you. To begin with, you will be asked to
close all other open Windows programs. Use ALT+TAB to switch to any other
open applications and close them with the keystroke ALT+F4. This will help to
avoid errors or conflicts during installation. In addition, the installation wizard is
now free to update system files that might otherwise have been in use at the time.
Click Next to continue.
You must accept
the license
agreement to
continue.
4
The program will now show the license agreement. Read through the text to
learn about the conditions placed on your use of the software. After this, select
the option I accept the license agreement and click Next again.
Page 9
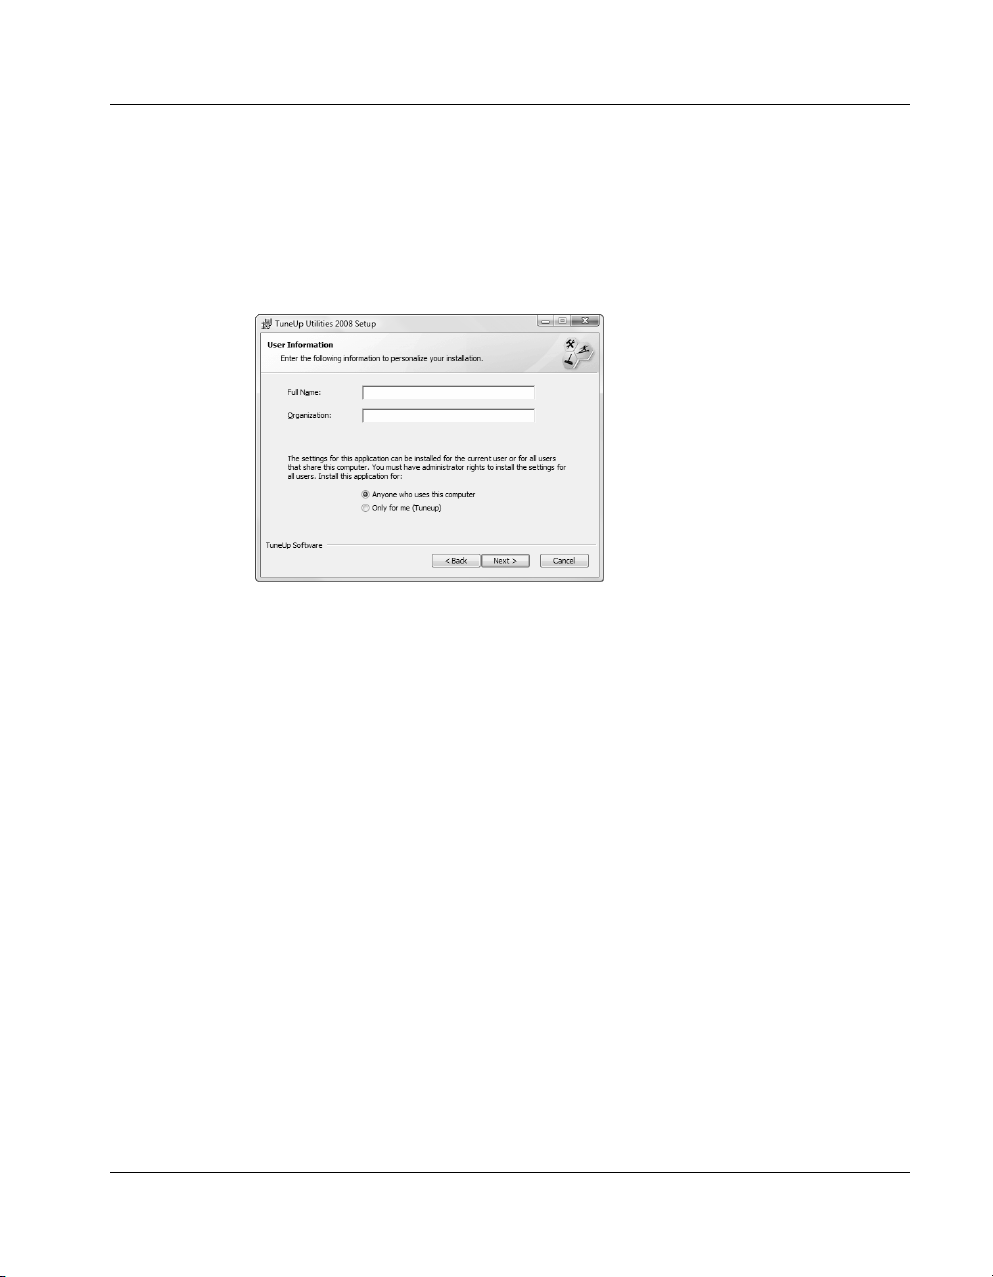
Entering Your User Name and Serial Number
In the next step, you will be asked to enter your user information. The
installation routine will ask for your name and the name of your organization or
company. Usually these fields are already correctly filled out. If not, please enter
the correct information yourself. The requested serial number can be found on
the back of this manual.
Personalize your
copy of TuneUp
Utilities
Important for Windows Vista, XP and 2000 users: During this step, you can
specify whether the application should be available to all users on the computer
or only to you.
Installation
After you have entered all necessary information, please click Next again to
continue.
Selecting the Installation Location
Now things get serious. In the next step, you need to select a target folder. This is
the folder on your hard drive in which TuneUp Utilities 2008 is to be installed.
The installation wizard will suggest the default folder C:\Program
Files\TuneUp Utilities 2008.
In most cases you can accept this suggestion. If you would like to install the
software to another folder, click Browse.
Start the
installation
process.
Then click Next to begin copying the files.
A progress bar will show the status of the tasks being completed. Please wait
until the following message appears: "TuneUp Utilities 2008 was successfully
installed.".
Then click Finish to close the installation wizard.
5
Page 10

Page 11

Introduction of
TuneUp Utilities 2008
Starting the software
There are a number of ways to open the TuneUp Utilities 2008 Start Center. The
most important ways to do so are described below.
During installation, a new icon is placed on your desktop. Double click on the
yellow TuneUp Utilities 2008 icon to start the software directly.
You can also start the software from the Windows Start menu. To do this, open
the Start menu and go to the folder Programs. The folder TuneUp Utilities
2008 is created here during software installation. Simply click on the entry
TuneUp Utilities 2008 in this folder to open the Start Center.
2
You can also open each TuneUp Utilities 2008 module individually if you are
already familiar with the software. To do this, open the Utilities subfolder in the
Start menu, which contains a list of all modules. Click on one of the names listed
in this folder to start the corresponding module.
Using the software
On the left side of the window, you will see the names of the available
categories. Click one of the category names to open it and to view the available
modules that it contains.
7
Page 12
Introduction
The modules of the currently selected category are displayed by name on the
right side of the window. You can start a module simply by clicking on its name.
You can also click the links below a module name to navigate directly to the
desired feature within the module.
When you are finished working with one of the modules, you can close the
module window by clicking on the red X in the upper right corner. This will
return you to the Start Center. From here, you can start the next module or close
TuneUp Utilities 2008.
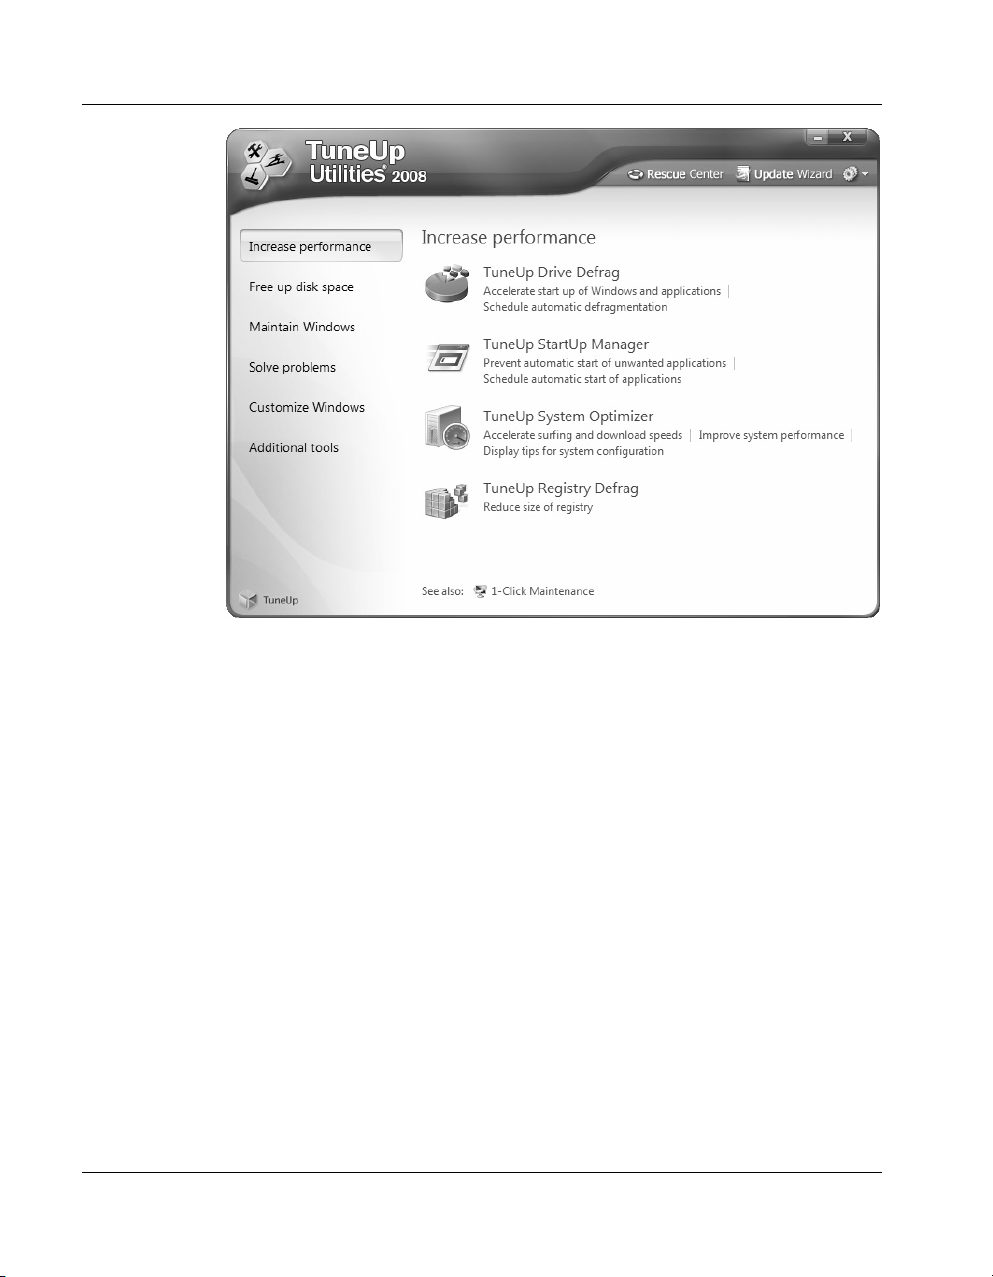
The six categories
TuneUp Utilities is made up of many useful modules that can all be accessed
from a common Start Center. This Start Center is divided into six categories to
make finding individual modules easier.
The modules of the currently selected category are displayed by name on the
right side of the window. You can start a module simply by clicking on its name.
You can also click the links below a module name to navigate directly to the
desired feature within the module. After you have finished working with a
8
Page 13

Introduction
module, simply click the red X at the top right corner of the window to close the
module and return to the Start Center.
Increase performance
No one should have to use a Windows system that keeps getting slower and
slower over time. TuneUp Utilities 2008 includes several modules to help
prevent your system from slowing down. TuneUp Drive Defrag determines the
degree of fragmentation of your hard disks and reorganizes your files in an
intelligent manner. TuneUp Registry Defrag shrinks your bloated registry so
that it takes up significantly less space. TuneUp StartUp Manager prevents
unwanted programs from starting automatically. TuneUp System Optimizer
uses various methods to improve general system performance and, most of all,
your Internet speed. For systems running Windows 2000 or XP, you can also use
TuneUp Memory Optimizer. This module lets you free up blocked system
memory immediately, without restarting your computer.
Free up disk space
Even the biggest hard disks fill up someday. TuneUp Utilities 2008 helps you
preserve disk space by searching for many types of unnecessary files that can be
deleted with the user's approval. The Start Center of TuneUp Utilities 2008 now
shows you how much space can be saved, even before you have started a
program module.
Maintain Windows
Windows is a dynamic system that requires regular attention from its users.
Because of this, regular system maintenance should be a priority. TuneUp 1-
Click Maintenance can initiate maintenance of your entire system automatically
at predefined times or with a single click of your mouse. This lets you keep your
system in top shape at all times. If you would like to perform detailed registry
maintenance, you can use TuneUp Registry Cleaner at any time.
Solve problems
If Windows is no longer working properly, the three modules in this category
can often be helpful. TuneUp Disk Doctor examines your system disks for
defects or errors in their file systems. These problems can be fixed quickly. With
TuneUp Repair Wizard, you can solve a number of general computer or
display problems. If you have accidentally deleted important files, you can use
9
Page 14

Introduction
TuneUp Undelete for another chance to recover your files. File recovery is only
possible in this case if Windows has not yet overwritten the files with other data.
Customize Windows
Windows is not as inflexible as you may think. The modules in this category will
help you to customize your Windows system at the click of a mouse. With
TuneUp System Control, for example, you can easily adjust Windows and
program settings and Internet options or change the behavior of the Start menu or
taskbar. TuneUp Styler lets you customize the appearance of Windows.
Additional tools
Five powerful modules are included in this category. TuneUp Uninstall
Manager helps you delete programs that you are no longer using. TuneUp
Process Manager manages running processes, shows a list of open files and
monitors system resource usage. TuneUp Registry Editor lets you view and
edit keys and values in the registry. With TuneUp Shredder, you can
permanently delete files and folders so that unauthorized users will never be able
to recover them. Finally, TuneUp System Information gives every user an
overview of installed hardware and software, which can be very useful before
performing repairs or modifications on your computer.
Global modules and settings
In addition to the modules within the six main categories, the Start Center also
has three general buttons in a dark gray bar to the right at the top of the window:
The TuneUp Rescue Center module runs in the background to monitor all
changes made to your system. The module allows you to restore any changes
made to your system with TuneUp Utilities to their previous states.
The TuneUp Update Wizard module helps you to update your software over the
Internet with a single click of your mouse.
The last button provides help and settings that you can use to customize the
software package to meet your needs.
10
Page 15

New Features in TuneUp Utilities 2008
Compared to TuneUp Utilities 2007, TuneUp Utilities 2008 features a number of
substantial upgrades and new features. Once again, our goal for the update was
to implement the requests of our users in a simple and easy way. The most
important changes are listed below.
New module: "TuneUp Drive Defrag"
TuneUp Utilities 2008 now includes the brand new TuneUp Drive Defrag
module, one of the most powerful modules in the Increase performance
category. TuneUp Drive Defrag performs a thorough analysis of your disks to
determine whether they are highly fragmented. Highly fragmented disks can
slow down your system performance, as the files needed by Windows must first
be reconstructed from individual pieces (fragments) before they can be opened.
TuneUp Drive Defrag puts the scattered fragments on your hard disk back
together to speed up your system substantially. The files are also reorganized in
an intelligent way so that Windows and frequently used programs or games will
launch substantially faster. Finally, the free space on your disks is consolidated
to prevent new fragments from being created for as long as possible. This
comprehensive optimization may take a while but is worth it - just give it a try!
Introduction
Improved TuneUp 1-Click Maintenance
TuneUp 1-Click Maintenance in TuneUp Utilities 2008 allows you to perform
even more maintenance functions on your system with a single click of the
mouse. You can also run this important function directly from the Start Center.
Additional information about TuneUp 1-Click Maintenance is also shown there.
In the new software version, defragmentation of your hard disks is now
included in TuneUp 1-Click Maintenance. While this is being done in the
background, you can minimize TuneUp 1-Click Maintenance and continue
working with your computer without any problems.
New Start Center - even easier to use
The TuneUp Utilities Start Center has been completely redesigned to make it
more visually appealing and modern. But that's not all. The new software version
now lets users navigate to program modules much more quickly. The completely
revised navigation system in the TuneUp Utilities 2008 Start Center has been
made even more intuitive. The left side of the window now shows potential
11
Page 16

Introduction
changes that can be made. There are now six categories to choose from: Increase
performance, Free up disk space, Maintain Windows, Solve problems,
Customize Windows and Additional tools. After a category has been selected,
the names of the corresponding modules will be displayed on the right side of the
window.
The latest version of the software now includes links to specific functions within
the modules. The program also displays links to related modules along the
bottom edge of every category page ("See also").
New area: "Free up disk space"
Even the largest hard disk fills up at some point. With today's Internet
connections and the constantly growing range of downloads, this happens more
quickly than most users would like it to. That's why TuneUp Utilities 2008 now
offers even more features to find and delete unnecessary files.
In the Free up disk space area of the Start Center, TuneUp Utilities 2008 now
gives you an overview of the amount of space that can be saved on each system
drive. This function replaces and expands upon the "TuneUp DiskCleaner"
module, which was used in earlier versions of TuneUp Utilities. In addition to
the file types that were identified by the older program versions, the program
now finds error reporting files, thumbnail files (Windows, ACDSee and Google
Picasa formats), restore points, Windows Update backups and the Google Earth
cache. The "Windows functions" category, also new, can help you to quickly
free up gigabytes of additional disk space.
12
New module: "TuneUp Repair Wizard"
The TuneUp Repair Wizard can be opened directly from the Start Center in the
new category Solve problems. This recognizes common computer or display
problems and can quickly resolve them.
TuneUp System Control with even more tweaks for
Vista
TuneUp System Control gives you more than 400 options for customizing
Windows and program settings. The new version also includes additional
functions for the brand new Windows Vista operating system.
Page 17

Increase
performance
The modules in the Increase performance category are there to accelerate your
system.
You will find
everything you
need to accelerate
your system here.
3
Many Windows default settings slow down your system performance. Expert
users know this and can adjust the system settings to achieve maximum
performance. With the TuneUp Utilities modules in this category, a few mouse
clicks are enough to optimize your system for maximum performance - and you
don't have to become a Windows guru.
13
Page 18

Increase performance
One of the most powerful tools for accelerating your system is TuneUp Drive
Defrag. The advanced defragmentation system will allow Windows and
programs to start substantially faster.
TuneUp Registry Defrag optimizes and defragments the Windows registry,
which becomes increasingly larger and slower the longer you work with
Windows.
TuneUp StartUp Manager lets you stop unnecessary applications from starting
with Windows. This often includes applications that are automatically started
with Windows - even if you don't want them running.
The category also includes TuneUp System Optimizer, another useful module.
The module checks your system for any settings that may be slowing the system
down and fixes them at the click of your mouse. You also will be given useful
tips for configuring your hardware and software. Wizards can help you adjust the
system configuration to meet your needs in a few easy steps.
The TuneUp Mem Optimizer module, available for Windows versions up to
Windows XP, monitors the system memory in Windows and automatically
optimizes it when you are not working.
14
Page 19
TuneUp Drive Defrag
There are many reasons, why your computer slows down more and more during
time. One of the most important causes is increasing fragmentation of your hard
drives.
TuneUp Drive Defrag helps you to get rid of fragmented hard disks. And set
within TuneUp 1-Click Maintenance to take care of defragmentation
automatically, your system is efficiently protected from fragmentation and slow
down.
But there is even more TuneUp Drive Defrag can do for you. Realigning the files
on your hard drive in the exact order in which they are used by Windows, you
get the maximum possible speed of your computer. The start of Windows and
programs will be noticeable faster.
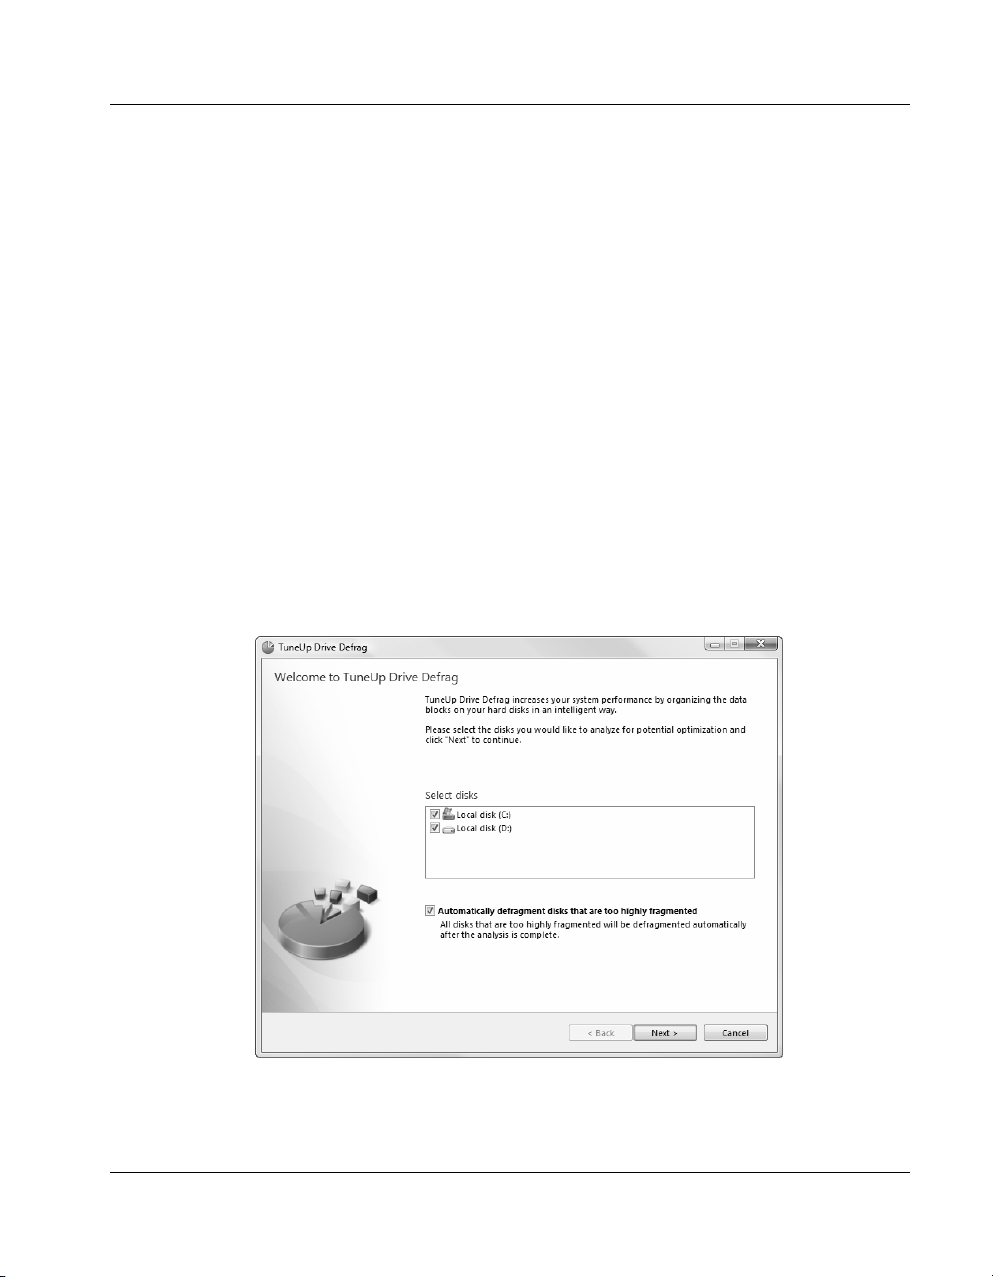
Drive analysis
The TuneUp Drive Defrag start screen shows you all available drives and their
drive letters. The program initially selects all drives for analysis. You can
deselect individual drives with the mouse.
Select the drives
you wish to
analyze.
Increase performance
If the Automatically defragment highly fragmented drives option is selected
with a checkmark, TuneUp Drive Defrag will take the initiative. If the program
15
Page 20

Increase performance
finds drives that should be defragmented, the module will automatically start
defragmentation after the analysis is complete.
If the option is not selected, defragmentation will need to be started manually. In
this case, wait to see the results of the analysis. The drives that need to be
defragmented will be selected automatically. Simply click on a drive in the list to
see the corresponding drive usage map. You can select or deselect drives for
defragmentation with a checkmark. Then, start defragmentation with Next.
The module will then analyze the drives. A yellow arrow in front of an entry
indicates that the drive in question is currently being analyzed. A green
checkmark tells you that analysis of the drive is complete. The percentage next to
the drive shows you the progress the module has made.
Colors in drive usage map
The drive usage map shows fragmented files in red and non-fragmented files in
blue. Free space is shown in white and locked (= non-movable) files are shown
in dark violet.
Drives are being defragmented
The program shows the current drive usage map for the hard disk partition in
question as long as any drive is still being defragmented. The drive usage map is
shown in real time, which allows you to watch as TuneUp Drive Defrag makes
visible progress.
16
Page 21
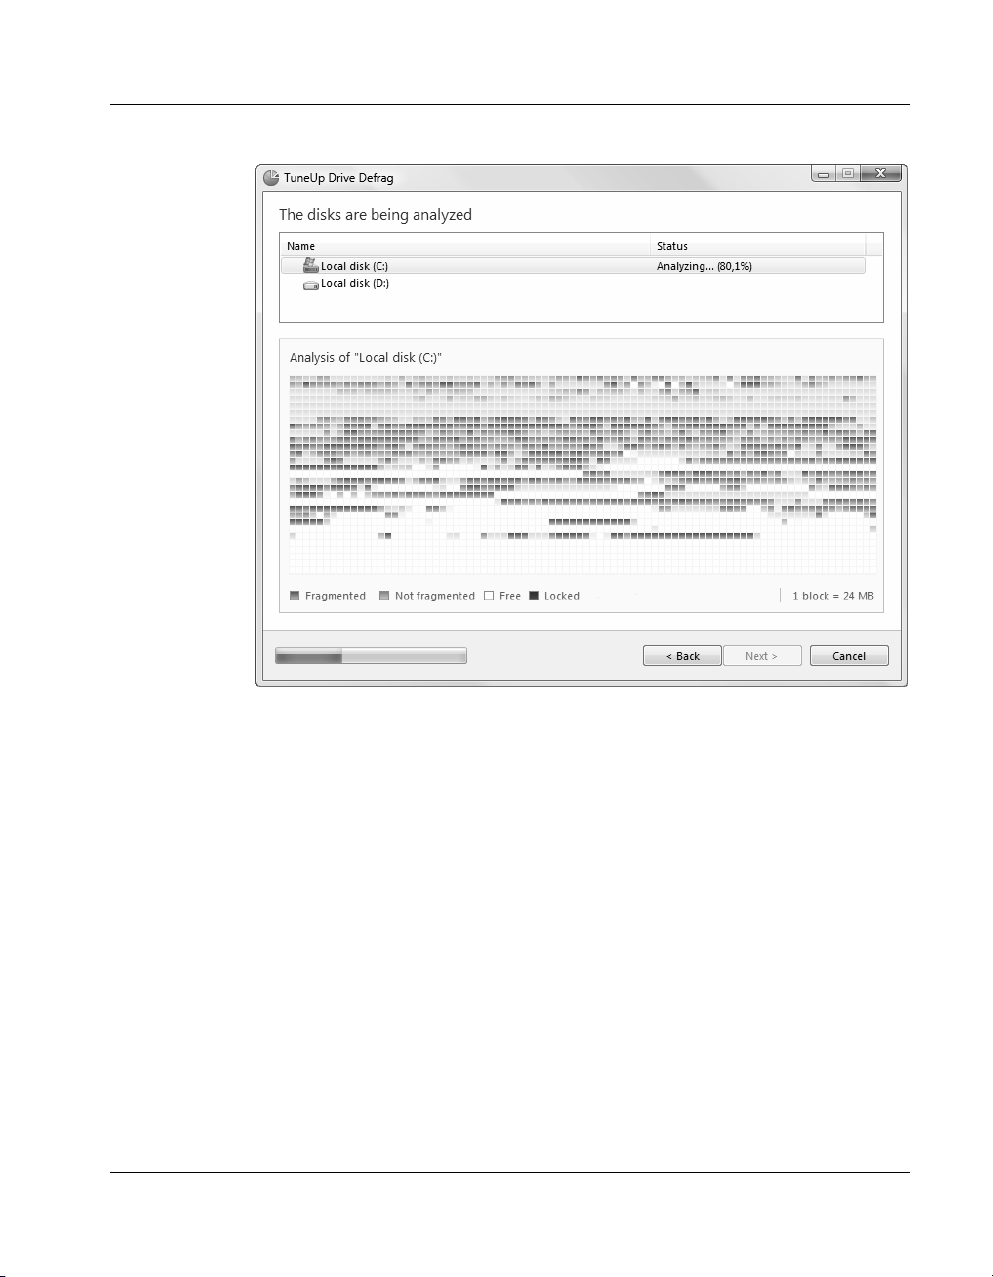
Select the drives
you wish to
analyze.
Increase performance
A progress bar at the bottom left shows the total progress for all drives. The
progress for each drive is also shown directly after the drive names in the drive
selection list. Click Cancel to stop the process at any time.
Tip: NTFS is better than FAT
Hard disks can either use the NTFS file system, as used in the most recent
versions of Windows, or the older FAT system that is supported by earlier
Windows versions. Analysis of drives before defragmentation is substantially
faster on NTFS drives. For FAT systems, the user will need to wait significantly
longer. This is just one of several reasons that the old FAT system should be
converted to the modern NTFS system.
The NTFS file system (NTFS = New Technology File System) is a file system
used from Windows NT and its successors up to Vista. It offers an intelligently
devised access protection to file levels, allows flexible management of
privileges, accommodates file sizes above 4 GB, offers automatic error
17
Page 22

Increase performance
correction of the file system and can utilize the storage space of today's standard
hard disk sizes in a considerably more efficient manner.
Conversion can be performed very easily. In Windows, click Start, open
Programs, navigate to the Accessories area and click on Command Prompt.
You can use the command CONVERT.EXE C: /FS:NTFS to start conversion.
Replace C: with another drive letter to convert a different partition. If the system
partition is changed, the computer will need to be restarted. In this case, follow
the instructions on your screen. Although conversion is considered very secure,
you should make a backup of your saved data before attempting this.
18
Page 23
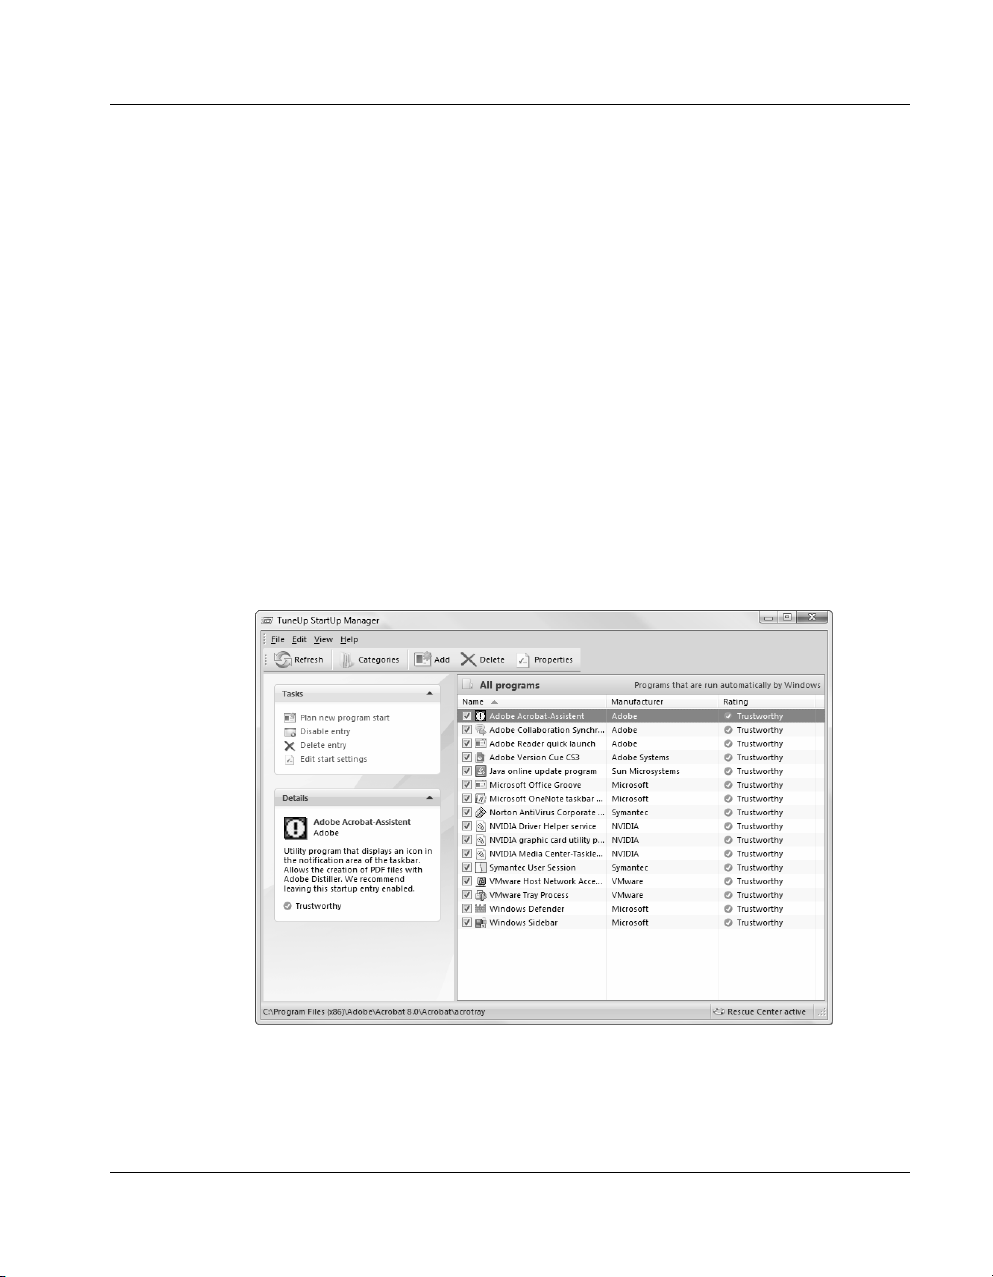
TuneUp StartUp Manager
Many applications start automatically together with Windows without asking for
your permission. There is often a good reason for this, for example to provide
you with important functions and services such as your virus scanner, an ISDN
call monitor or a text module administration system.
In addition to these sensible applications, there are often also useless or even
dangerous applications that also start together with your system. Newly installed
programs sometimes add themselves to the Startup folder without asking for
your permission, causing Windows to start more slowly. And what's
worse, some of these programs even bother you with messages and dialogs or
advertising.
Increase performance
The limits of the
Startup folder in
the Start menu.
An overview of all
automatic start
commands.
Many users know that programs that are started automatically often simply add a
shortcut to the Startup folder in the Start menu, and that these shortcuts can be
deleted there. But that's only half of the story. Some start commands are
added directly to the registry, and cannot be found in the Startup folder. TuneUp
StartUp Manager finds every application that launches itself automatically, no
matter where the start command is hidden.
19
Page 24

Increase performance
Usage
TuneUp StartUp Manager shows a list of all found startup entries in its main
window.
The navigation
bar on the left
side of the
window
How do I find out
if a program that
starts
automatically is
necessary?
Deactivating and
deleting entries
The TuneUp StartUp Manager navigation bar is located on the left side of the
window. By default, it contains a list of Tasks that give you access to frequently
used functions. Important information on the currently selected startup entry is
shown beneath this list.
You can customize this navigation bar by clicking View > Navigation Bar.
When you select the Categories option, the navigation bar will contain a list of
all locations where startup items can be saved instead of the task list. All is
selected here by default. You can limit the selection of entries shown in the right
panel of the window by clicking a specific node such as Startup folder or
Registry in the list of categories. Then, only the startup items at these locations
will be shown.
When you select a startup item in the list, TuneUp StartUp Manager shows
information on the selected entry in the navigation bar on the left side of the
screen or in the information area at the bottom of the screen (depending on the
selected view mode). You can use this information to decide whether or not the
startup entry should be removed.
When you start the program the first time, all startup entries have a check mark
in front of them and are active. Click the check box in front of an entry to clear
it, and the program will no longer be started the next time you start Windows. In
this way, you can find out for certain whether the entry is needed. If something
doesn't work properly the next time you start Windows, all you have to do
is select the check box again.
If you are certain that you no longer need an entry, you can remove it from the
list entirely by clicking Delete. If need be, you can still restore the entry with
TuneUp Rescue Center.
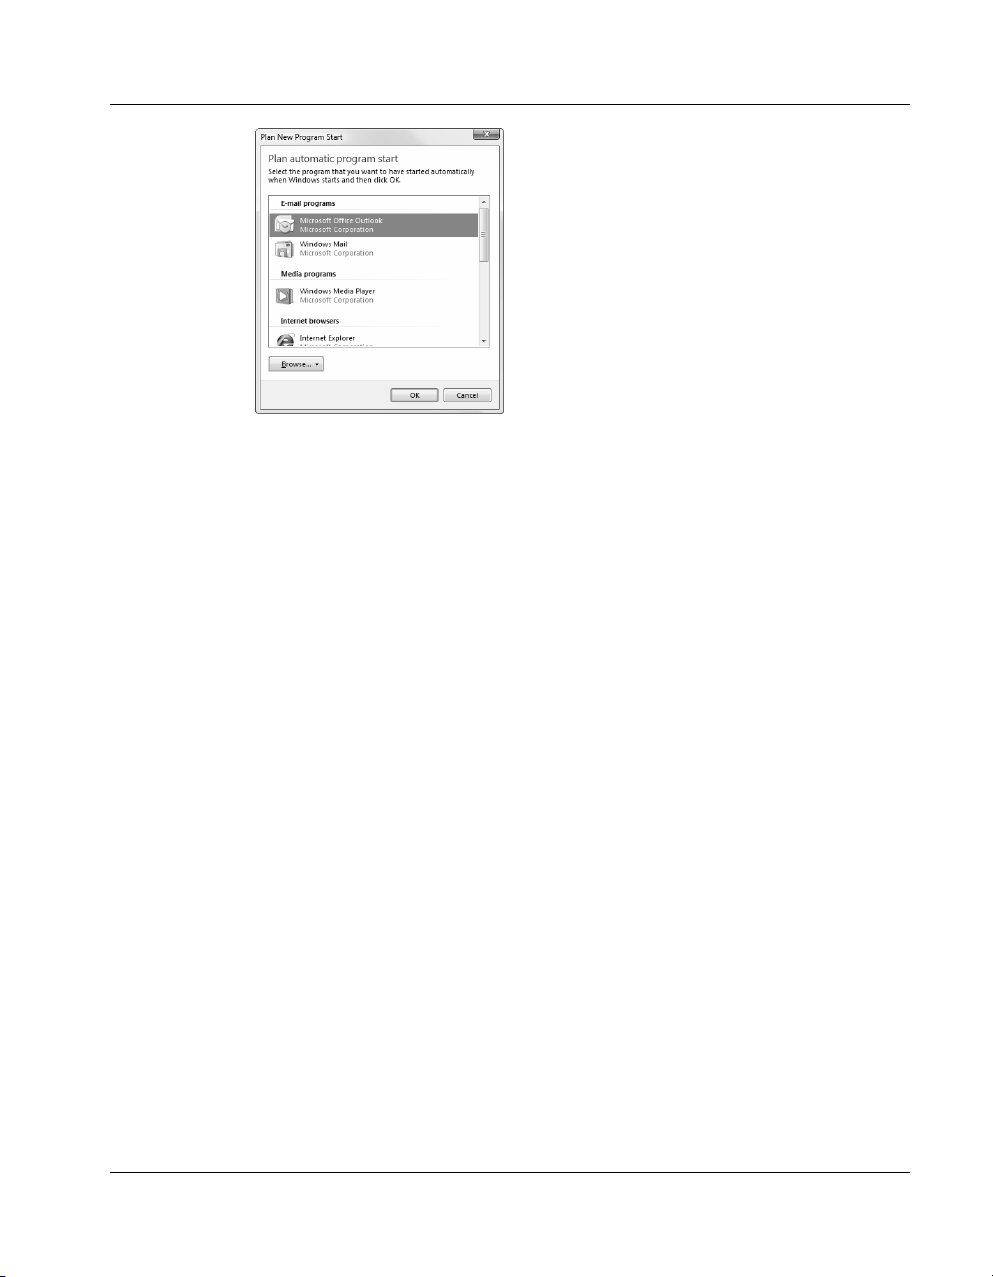
Adding a new
startup entry
20
If you wish to add a program to one of the startup folders yourself, click the Add
button. If you are using the category list (folder list) instead of the task pane,
please select the desired destination folder in the list first.
Page 25
Increase performance
Enter the directory path of the program file in the Target box. You can use the
Search button to help you find the file.
21
Page 26
Increase performance
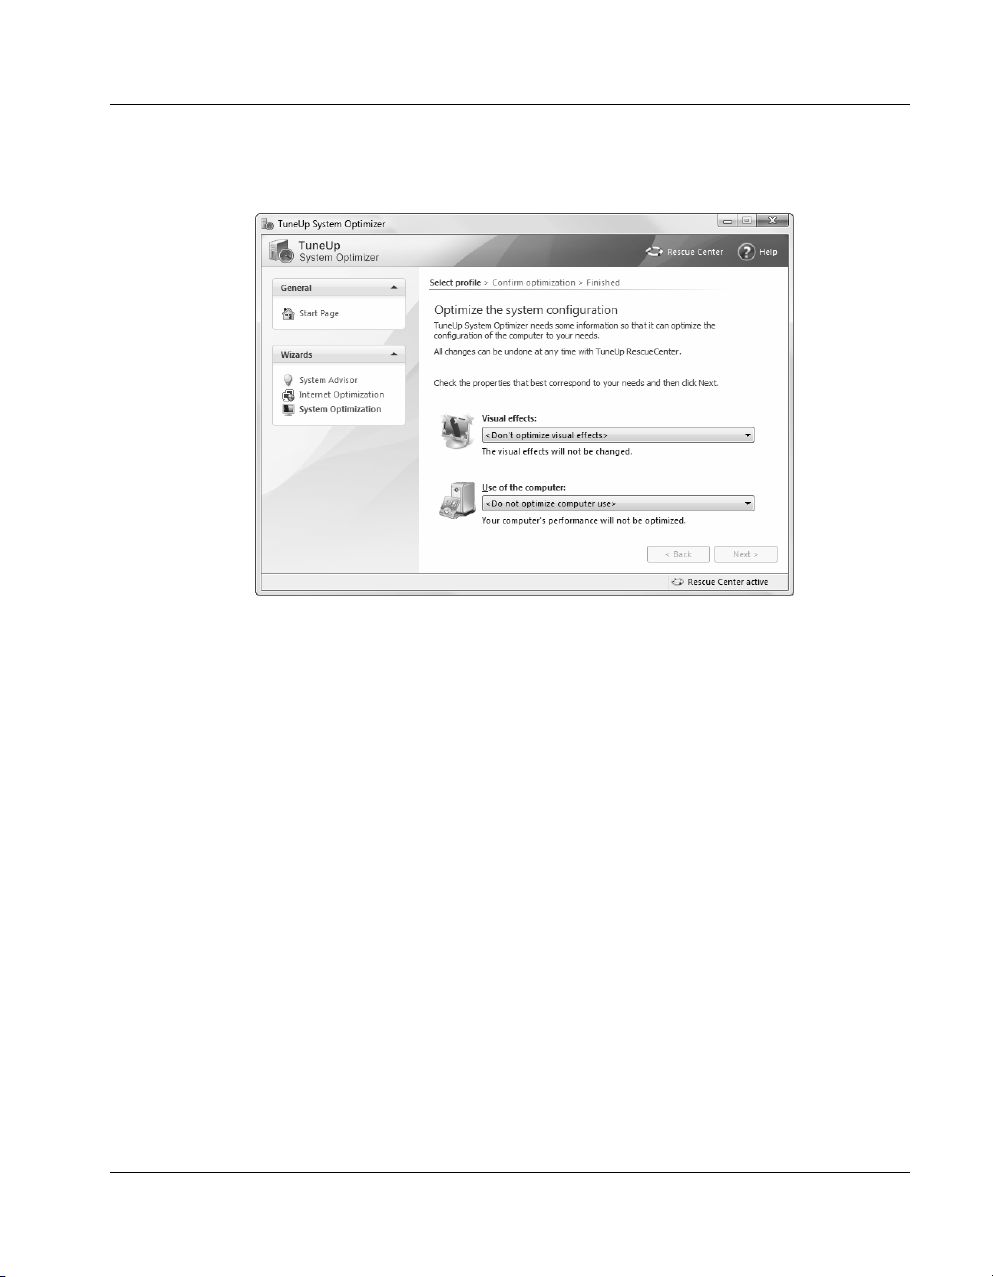
TuneUp System Optimizer
TuneUp System Optimizer helps you to find and correct misconfigured settings
and settings that are slowing your system down.
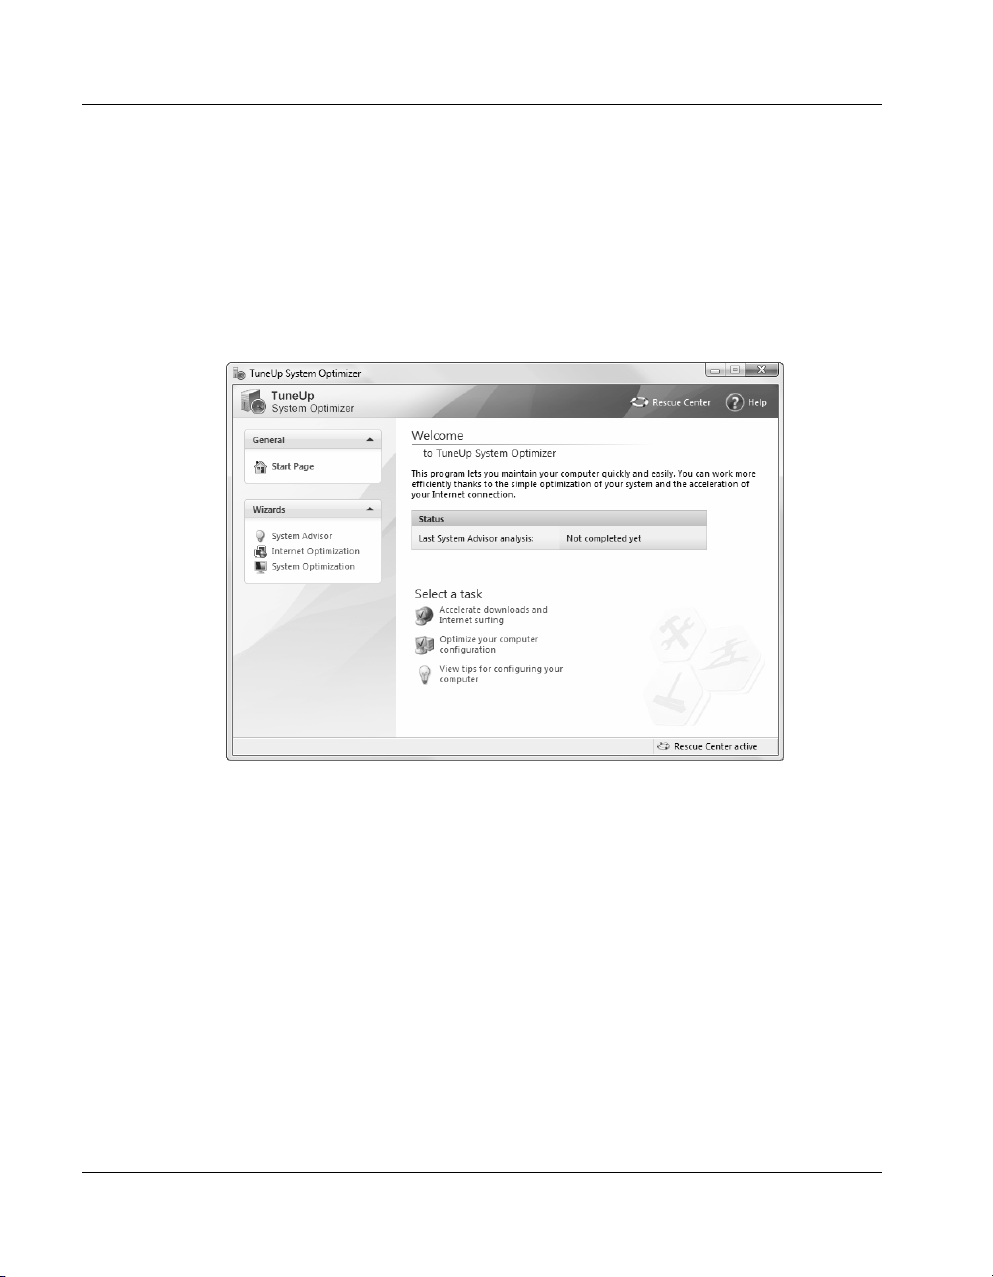
As soon as you start TuneUp System Optimizer, the module displays a welcome
screen that tells you that you have come to the right place if you want to perform
system maintenance. The module also tells you that you can undo your changes
at any time with TuneUp Rescue Center.
The TuneUp
System Optimizer
welcome window
22
You can now select a task and have it completed with a click of your mouse. The
individual optimization functions can also be accessed by means of the links on
the left side of the window.
The System Advisor
The System Advisor analyzes your hardware and software configuration and
offers important tips on how you can optimize your system. After you have
clicked on the link in the System Advisor, it will immediately start checking
your system thoroughly.
Page 27
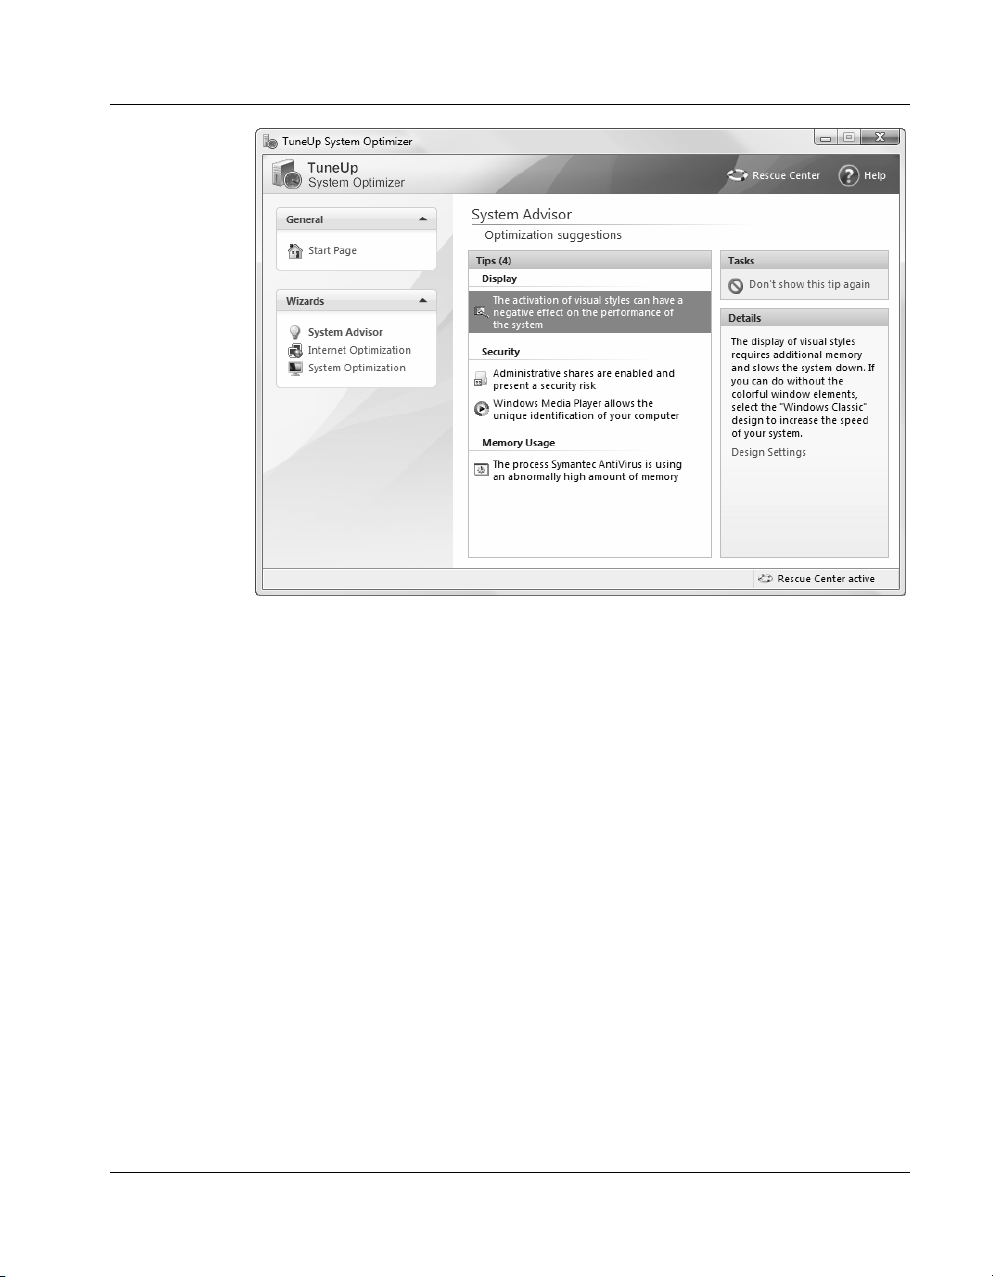
The advisor helps
you to eliminate
weaknesses in
your system.
Increase performance
After only a few seconds, the results are displayed in the program window. The
particular problems are listed in categories such as Display, System or Security.
The problem is described with brief, concise language. For example:
"Administrative shares are enabled and present a security risk". Select an entry in
the list in order to display a more extensive explanation of the problem in the
Details section.
And the System Advisor can do more than offer vague suggestions. If the setting
in question can be changed directly in Windows, the Advisor will usually offer a
link under Details. This link opens the corresponding Windows dialog, or
corrects the problem automatically.
The Internet Optimization Wizard
Whether or not a system is optimally configured also depends on what you want
to do with your computer. If surfing the Internet is important to you, it can be
very helpful to open up some bottlenecks. Because Windows is not perfectly
optimized for surfing the Internet by default.
23
Page 28
Increase performance
You may be able
to optimize your
Internet settings
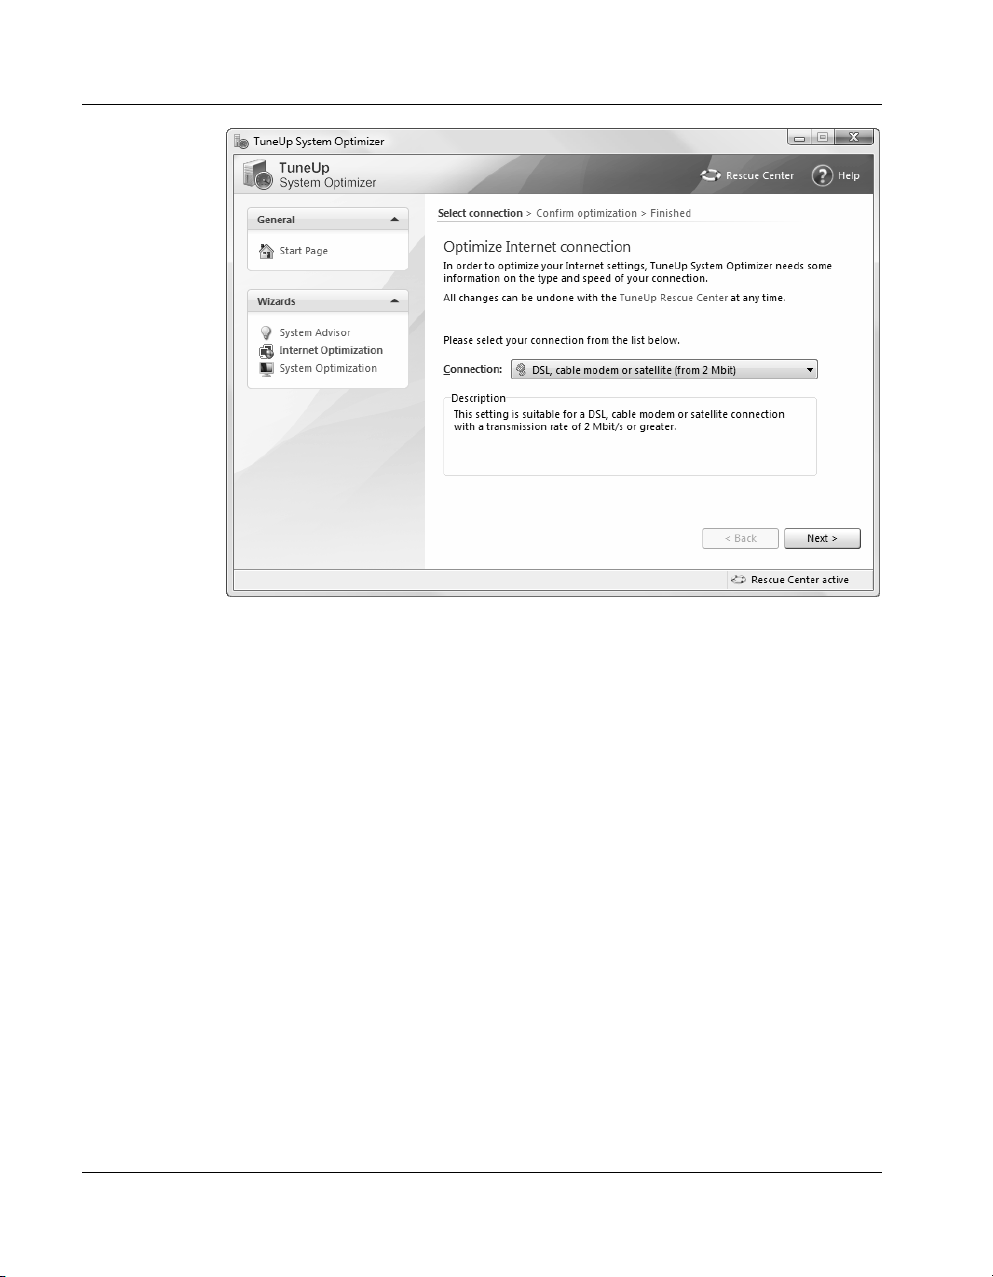
Under Wizards, select Internet Optimization. A wizard will then take you
through the necessary procedure step for step.
24
In the first screen, you must tell the wizard what kind of Internet connection you
have. Select the connection that best matches yours from the list, for example a
modem, ISDN or DSL connection. Then click Next to go to the next step.
The wizard will now analyze your system to determine whether it is optimally
configured. The most important factors here are data transmission performance
and the time required to display web pages. A green message Already
optimized means that your system is already optimally configured for this, and
that you need take no further steps. A red message Not optimal means that your
configuration must be changed.
Click one of the blue headers to view the individual settings that the Internet
optimizer wants to change. Click Next to have your configuration optimized.
The module will now make all the necessary changes and display a message
indicating that your computer has been optimized. Note the message Restart
required. Windows must normally be restarted for all of the changes in the
registry to take effect. Click Finish to close the wizard.
Page 29
Here, you can
adapt the most
important settings
to your needs.
Increase performance
The System Optimization Wizard
Use this wizard to adapt Windows to your specific needs.
As soon as the wizard is opened, a message is displayed to tell you that the
program needs some information about your system. Select the options that best
describe how you use your PC from the lists. Under Visual effect, you can
specify whether you prefer maximum performance and a simpler interface, or if
you are willing to sacrifice a certain amount of performance for a more appealing
appearance. Under Use of the computer, choose the option that best describes
your computer. One option is for example "Computer with network or Internet
connection". Then click Next to continue.
The wizard now analyzes your complete configuration and prepares a list of
optimization suggestions for Visual effects and Use of the Computer.
Click a blue header to view detailed information on the suggested changes. You
can reject individual suggestions by clearing the check box in front of them.
Then click Next to apply the selected changes.
The module now makes all of the selected changes and displays a message when
it has successfully optimized your configuration. Note the message Restart
required. Windows may have to be restarted for all of the changes in the registry
to take effect. Click Finish to close the wizard.
25
Page 30
Increase performance
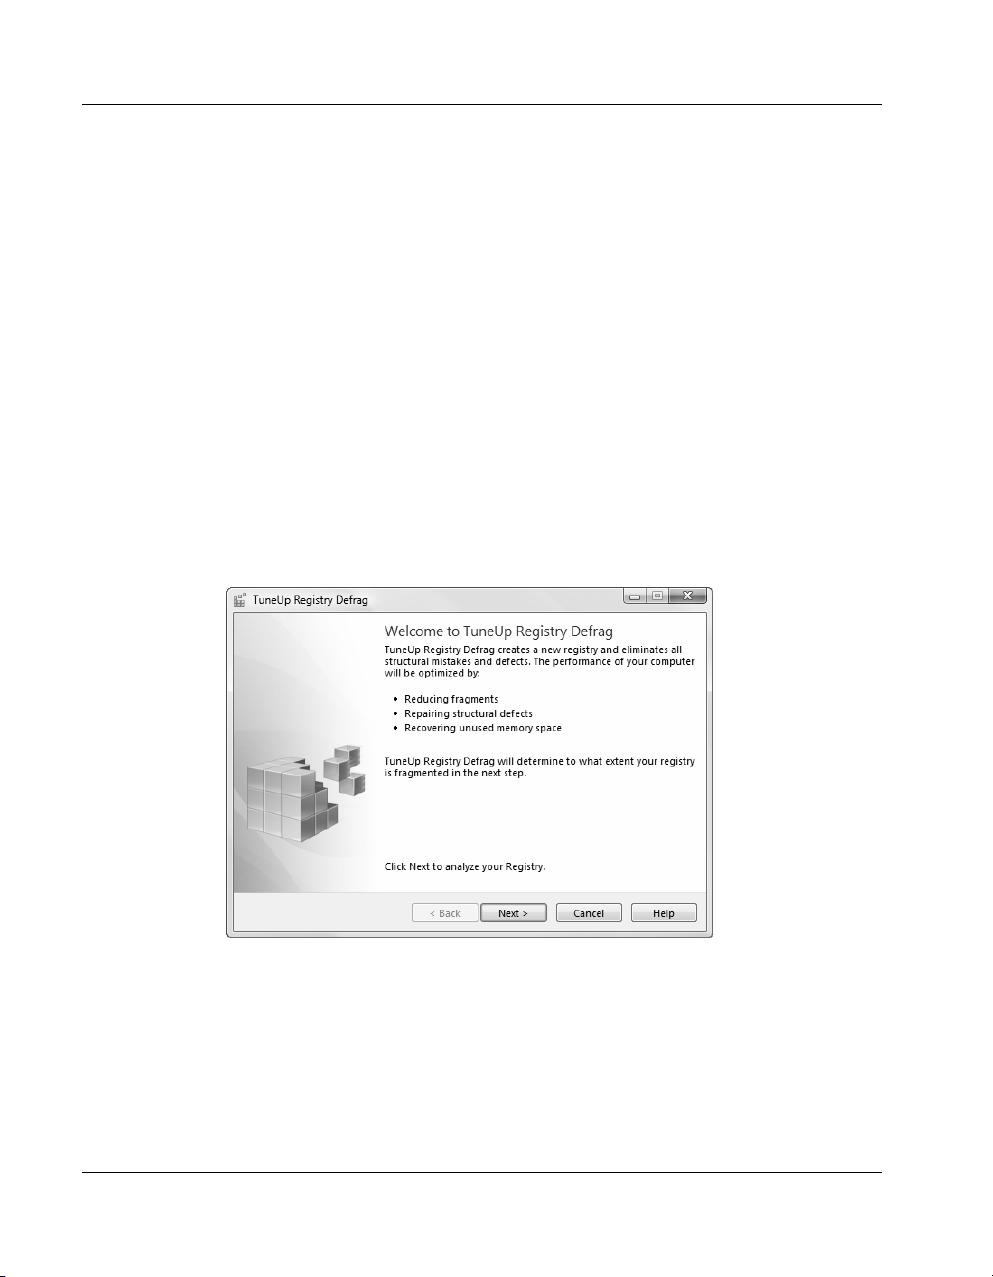
TuneUp Registry Defrag
Every new program and every new hardware component enters itself in the
registry, creating keys and values. Over time, the central Windows database gets
larger and larger. The larger the registry becomes, the longer the system needs to
find specific information, and this makes Windows slower.
Swiss cheese bogs
the system down
An introductory
screen is
displayed
When you remove the software or the hardware component, these keys and
values are usually deleted, but the registry doesn't get any smaller. Why? The
space that was occupied by a deleted key is still in the registry, even if it is no
longer used. Sooner or later, your registry looks like Swiss cheese with lots of
holes. It can be 13 MB large, but only contain 9 MB of information. This slows
your system down and wastes space, both on your hard drive and in the memory.
TuneUp Registry Defrag can consolidate your registry and make it
considerably smaller - a trick that can make your system faster again. To do this,
the module analyzes the old registry and then creates an entirely new version that
only contains the correct entries in the proper order. The old registry is then
deleted and is replaced with the new one after a restart.
26
Page 31

Increase performance
Registry Analysis
First, TuneUp Registry Defrag must determine how fragmented your registry is.
Click Next to begin.
Before the analysis starts, you will be informed that all other applications must
be closed. Please follow these instructions and close all other applications before
you continue.
Registry Analysis
What happens
during the
Registry analysis?
After you confirm this message, TuneUp Registry Defrag grays the screen and
shows a wait dialog to indicate that you cannot use the computer. During the
analysis, a small clock blinks in the upper left corner of the window to show that
the software is working. At least Windows 2000, a progress bar is also shown to
inform you of the progress of the analysis. There is no need to worry even if this
bar does not move for several minutes. On heavily used systems, it can take
some time to analyze the entire registry.
Next, the module shows the results of the analysis. If there is potential for
optimization, you will be told by how many percent and kilobytes the size of the
registry can be reduced.
Defragmenting the registry
If TuneUp Registry Defrag determines that your registry can be defragmented,
click Finish to begin defragmenting. TuneUp Registry Defrag must restart your
computer for this. While the computer is restarting, the new registry is created
and the old one deleted. As soon as Windows restarts, your new registry is
already being used. The program has done its job and does not need to be opened
again.
27
Page 32

Increase performance
TuneUp Memory Optimizer
TuneUp Memory Optimizer monitors your system in the background and frees
up memory whenever needed to increase the performance of your computer.
The use of TuneUp Memory Optimizer is beneficial up to Windows XP on any
system with up to 512 MB RAM. If the available physical memory gets too low,
TuneUp Memory Optimizer causes the system to swap old data to the paging file
to free up memory for your applications.
SmartOptimize makes sure that this automatic optimization in the background
does not interfere with your work by only optimizing your system when your
processor usage is low.
Important for Windows Vista users: Please note that TuneUp Memory
Optimizer is no longer available starting with Windows Vista. Microsoft has
substantially improved the internal memory management in Windows Vista - the
operating system automatically adapts to the behavior of installed applications
and intelligently pre-loads files that are likely to be needed soon while the
system is not working ("prefetching"). Clearing your system memory can
interfere with this mechanism, so we do not recommend that these types of
optimization tools be used in Windows Vista.
28
Usage
The main window of TuneUp Memory Optimizer consists of three tabs.
The first tab Overview contains an animated graph that shows the amount of free
physical memory over time. This graph allows you to monitor how Windows
uses your system resources. Free physical memory and Free space in paging
file show exactly how much memory your system is using.
Beneath the graph, you will find a small box that informs you whether
AutoOptimize is activated. This TuneUp Memory Optimizer function monitors
your memory and can optimize memory usage automatically when the free
physical memory falls below a specific amount.
Calling up the settings dialog
If you wish to change the automatic memory optimization settings for TuneUp
Memory Optimizer, go to Overview and click Change settings.
Page 33

Increase performance
AutoOptimize Settings
This opens the configuration window for the module. Enable AutoOptimize
should be selected so that TuneUp Memory Optimizer runs automatically in the
background. If you do not wish to have your memory usage optimized
automatically, you can disable this function here.
Under Physical memory, you can specify the free memory level that triggers
automatic optimization. This can for example be set at 50 MB. Under Increase
free memory to, you can specify how much memory you want to free up.
How
SmartOptimize
eases the burden
on your computer
Under Processor usage monitoring, you should select Monitor processor
usage so that the module knows how hard your computer is working. When
Windows Media Player or a game is currently using all of the computer's
resources, for example, TuneUp Memory Optimizer delays optimization
automatically so that the system is not slowed down unnecessarily. When Use
SmartOptimize is selected, TuneUp Memory Optimizer recognizes such
situations automatically and only frees up memory when you are not working.
If you find the default setting too conservative, you can select Use manual
settings to specify the desired processor load in percent up to which the module
can optimize your memory usage. The higher this limit, the more aggressively
TuneUp Memory Optimizer will optimize your system.
Click OK to activate your settings. If you wish to restore the module to the
recommended settings, click Recommended.
Manual Optimization
If you do not use AutoOptimize, or if you want to free up memory before you
start a program that requires a lot of memory, you can go to Manual
Optimization.
Under Clear manually, you can use the slider to specify how much memory
should be freed. Click Clear Now to free the specified amount of memory. The
module will then remove unneeded DLLs and other files from physical memory,
which may require a few seconds.
Under Clipboard, the module shows the current amount of memory occupied by
the data in your clipboard. Click Empty Clipboard to free up the memory used
by this data.
29
Page 34

Increase performance
Program Options
Under Program Options, you can select Load automatically on Windows
startup so that TuneUp Memory Optimizer can ensure optimum performance as
soon as Windows starts.
Hide TuneUp
Memory
Optimizer
Select Show icon in the notification area to have an icon that shows your
current memory usage status in the notification area next to the clock. If you do
not select this option, TuneUp Memory Optimizer will continue to work in the
background, but will be invisible. To access TuneUp Memory Optimizer, you
will have to call up the program through the Start Center or the Start menu.
You can also have your memory usage optimized by pressing a key combination.
The currently configured key combination can be seen in the Key combination
box, and is Ctrl+Alt+O by default. You can change this combination at any time.
30
Page 35

Free up disk space
Even the largest hard disk fills up at some point. With today's Internet
connections and the constantly growing range of downloads, this happens more
quickly than most users would like it to. The category Free up disk space helps
you find unnecessary files and recover this space.
Free your system
of unneeded
ballast!
4
The most important features for freeing up disk space are integrated directly into
the Start Center of TuneUp Utilities. After performing a quick analysis, the Start
Center displays an overview of how much space can be freed up on the selected
31
Page 36

Free up disk space
system disk. TuneUp Utilities goes beyond the standard approach of searching
for files only according to their file ending or size. Numerous special functions
recognize those files that truly consume large amounts of space and, until now,
went undetected by any standard "cleaner".
Particular attention has also been paid to security. As a result, in contrast to
conventional procedures that "blindly" comb through the hard disk using certain
patterns, no unpleasant surprises such as sudden error messages or nonfunctioning software occur. The items that are suggested for cleanup are clearly
identified, concisely explained and put into one of the following four categories.
Unnecessary files and backups
In this category, all files that can be deleted without a second thought are
displayed. This allows you to quickly free up disk space. These include
temporary files, the contents of the browser cache, temporary thumbnail views
and automatically generated log files. This category also displays files that are
normally used to restore your system to an earlier state. Furthermore restore
points, Windows Update backups and the contents of the Recycle Bin are
displayed. If your system is working fine and you do not want to restore recently
deleted files or folders, you can free up space by deleting these backups.
Windows functions
32
Windows installs many standard features that can quickly consume several
gigabytes of space. You can deactivate especially space-hungry features in order
to free up space. These include the power save mode "Hibernation file", which
permanently reserves the amount of disk space equivalent to your system's
memory.
Page 37

Unnecessary files and backups
In this category, all files that can be deleted without a second thought are
displayed. This allows you to quickly free up disk space. These include
temporary files, the contents of the browser cache, temporary thumbnail views
and automatically generated log files.
Free up disk space
You can recover
disk space here.
In the Start Center, click on Free up disk space
on the item Unnecessary files.
You will then see an overview of the files that were found on the selected disks.
In the overview, the files that were found are presented in several categories.
The Size column indicates how much disk space will be freed up by deleting all
files in this category.
As soon as you click on one of the categories, the yellow Show details area on
the lower edge of the window provides a detailed description of the category as
well as additional details about the elements that were found.
A detailed search is performed for numerous types of unnecessary files. These
can generally be deleted from your hard disk without causing problems.
33
Page 38

Free up disk space
Types of unnecessary files
Type Description
Backups
Google Earth
cache files
Internet Explorer
cache
Log files
Memory dump
files
Mozilla Firefox
cache
Recycle Bin All files in the Recycle Bin can be deleted.
Restore points
Saved lost
clusters
Temporary files
Temporary help
files
Many applications automatically create backups of the files they use. These can be deleted if you do
not need them.
Google Earth uses this cache to save image data.
All pictures, text and animations that you view in Internet Explorer while surfing the Internet are
saved in the cache. If you visit a website again, the text and images can be loaded from the cache
more quickly than from the Internet. However, it is advisable to empty your cache from time to time.
Many applications write log files that can be used to analyze their behavior. This can be helpful, for
example, when trying to solve problems. Any log files that you do not plan on evaluating can be
deleted.
When problems with an application occur, Windows saves the portion of your system memory used
by the application in question to a file for troubleshooting purposes. These files are unnecessary and
can be deleted.
All pictures, text and animations that you view in Mozilla Firefox while surfing the Internet are saved
in the cache. If you visit a website again, the text and images can be loaded from the cache more
quickly than from the Internet. However, it is advisable to empty your cache from time to time.
Restore points are used to save the status of system files on the computer. They are created by the
System Restore service at specified intervals and when changes are made to the computer.
Repair programs such as CHKDSK scan your hard disk for lost clusters and save them as files.
These backups are rarely used.
These are used by different programs to temporarily store data and should normally be deleted by
the program after its tasks are complete. These files can always be deleted.
These files are used to display help files more quickly.
Temporary
installation files
Thumbnails
Windows error
reporting files
Windows Update
backups
34
These are used by many Microsoft installation programs to temporarily store data and should
normally be deleted by the program after its tasks are complete. These files can always be deleted.
Thumbnails of images are used by various programs to provide a quick preview. The thumbnail
views used by Windows, ACDSee and Google Picasa are taken into consideration.
When a program crashes, Windows saves data about the program. If this service has been
deactivated or if settings do not allow for information to be sent to the manufacturer, these files can
be deleted.
When Windows is updated, backup files are created.
Page 39
Free up disk space
Exclude
categories
View files to be
deleted
individually
View files to be
deleted
individually
You can prevent individual categories from being deleted. To do this, simply
clear the check box in front of the desired category (for example "Temporary
files" or "Log files").
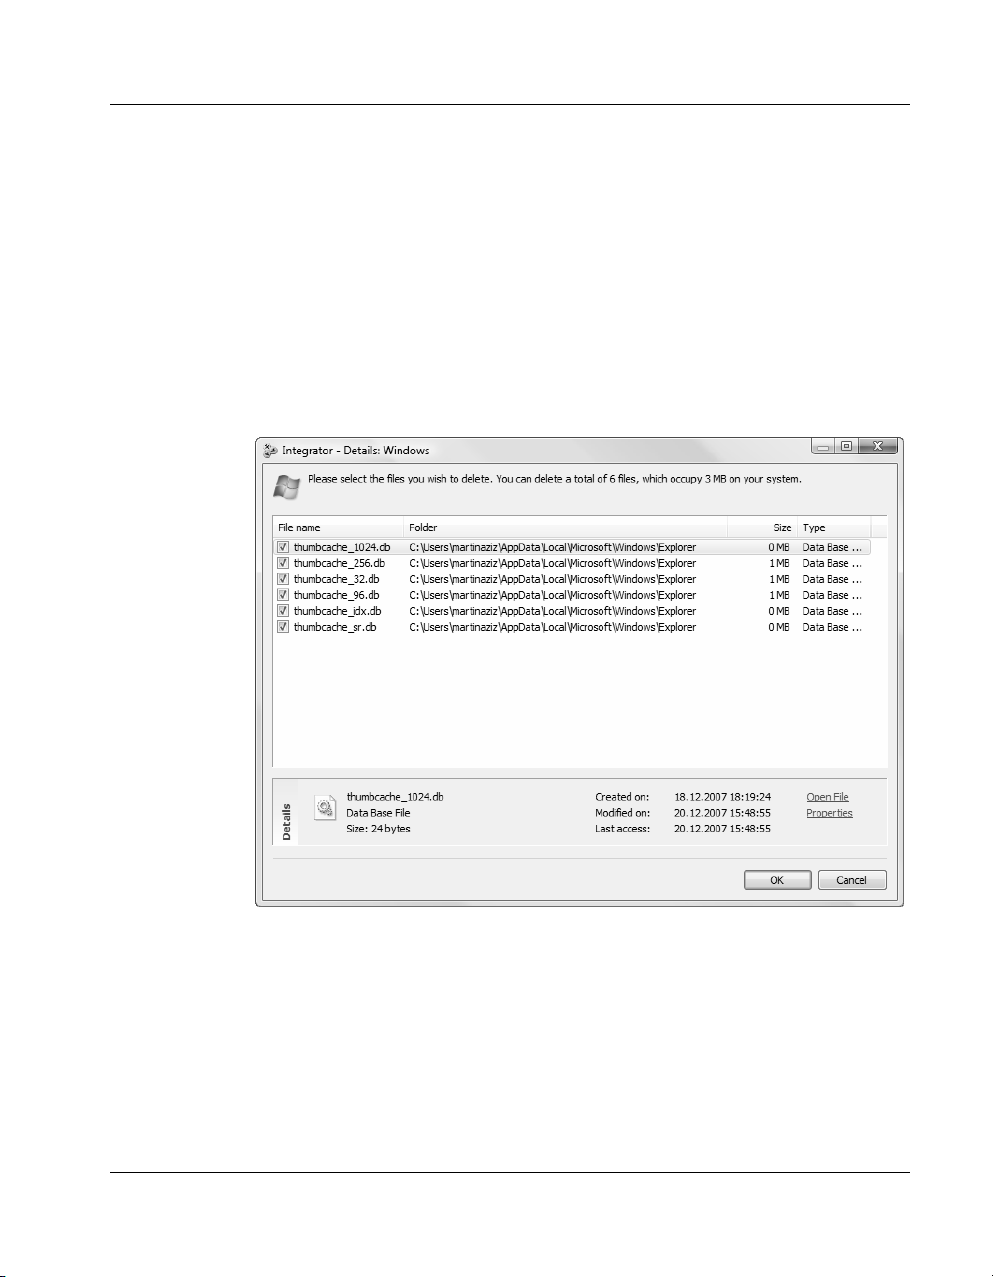
Most categories give you the option before deletion to view the individual files
that were suggested. In this case, you will see the Show details button in the
details area of the window. Clicking on it opens a new window and displays all
files from the selected category.
You can clear the check box in front of any file by clicking it, thereby excluding
it from deletion. You can also click Open file to view the contents of the file in
order to see if it can be deleted safely.
Cleanup
If you want to start deleting files, click the Clean up button. The module will
again notify you how many files you have approved for deletion and how much
disk space will be cleared.
Once you have initiated the cleanup, the software begins to delete the selected
files. Please note that this process can take several minutes, particularly when
35
Page 40

Free up disk space
emptying the browser cache. During this time it may appear that the software is
not responding. This is a normal technicality and is no cause for concern. As
soon as the cleanup is complete, operations will continue normally, and a
message indicating that the cleanup was successful is displayed.
Finished! All
unneeded files
have been
deleted.
Once the files have been deleted, click Finish to close the window.
36
Page 41
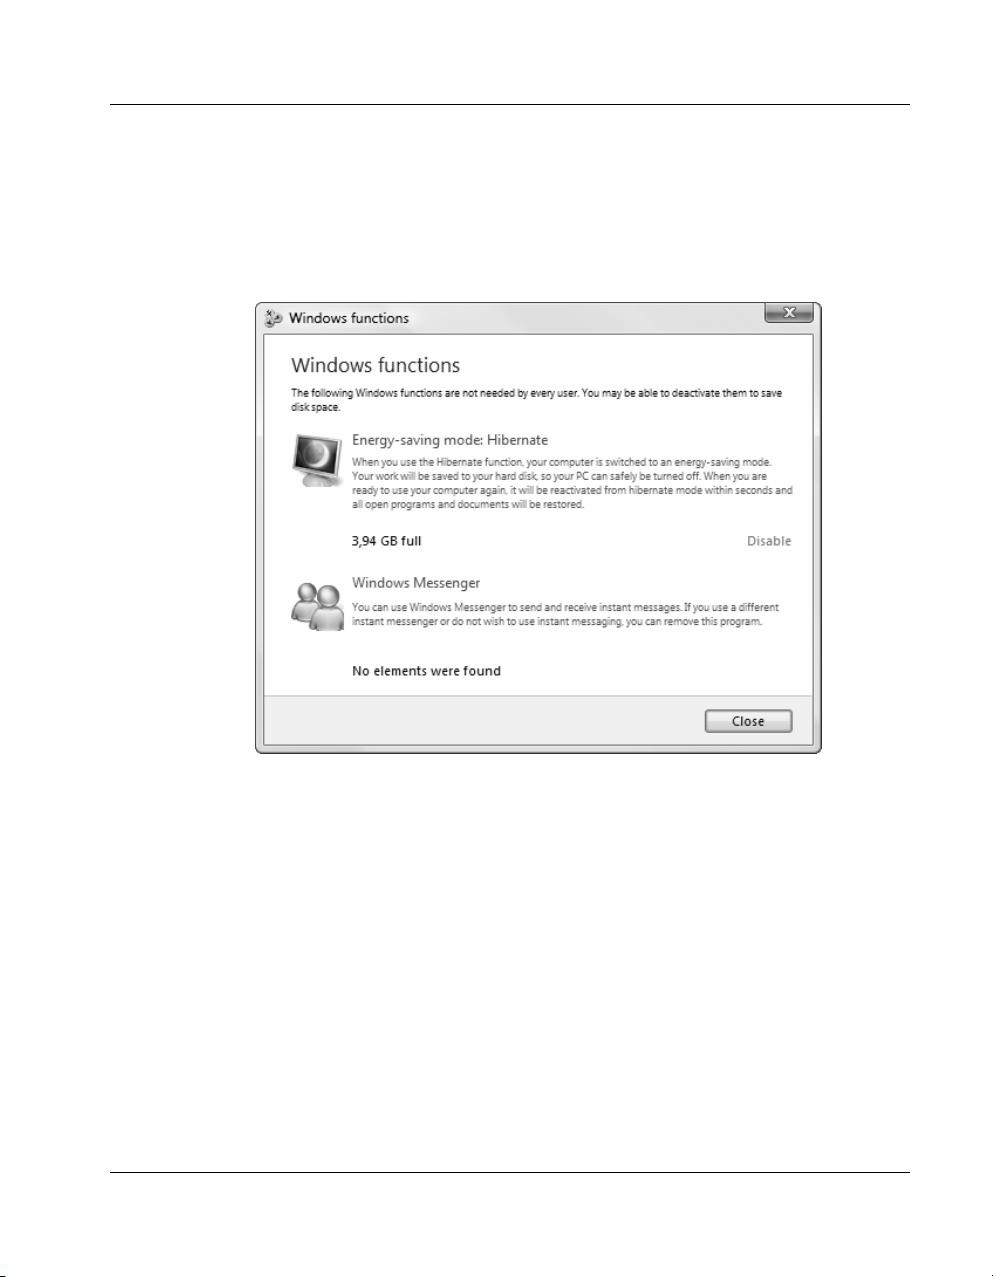
Windows functions
Certain Windows functions that are not used by every user require a great deal of
disk space. Here you can simply deactivate features that use substantial disk
space and that you do not need. This frees up additional disk space otherwise
used by the features.
Free up disk space
37
Page 42
Free up disk space
TuneUp Disk Space Explorer
Introduction
The capacity of modern data storage devices such as hard drives and memory
cards has increased tremendously over the last several years. Astonishingly, we
users somehow always manage to fill even the newer, larger drives to their
maximum capacity - in the past, no one would have dreamed of gathering 20 GB
of files. Now, even drives with capacities of 250 GB or more are quickly filled to
the brim.
Obviously, this development hasn't exactly made it easier to keep track of these
huge quantities of data. With so many files and nested folders, how is it possible
to determine where the most space is being taken up?
This is where the new TuneUp Disk Space Explorer comes into play: the
powerful module helps you to quickly find all of the files and folders that are
taking up your valuable disk space. These files can then easily be transferred to
other drives, archived to CD/DVD or simply deleted to gain free disk space.
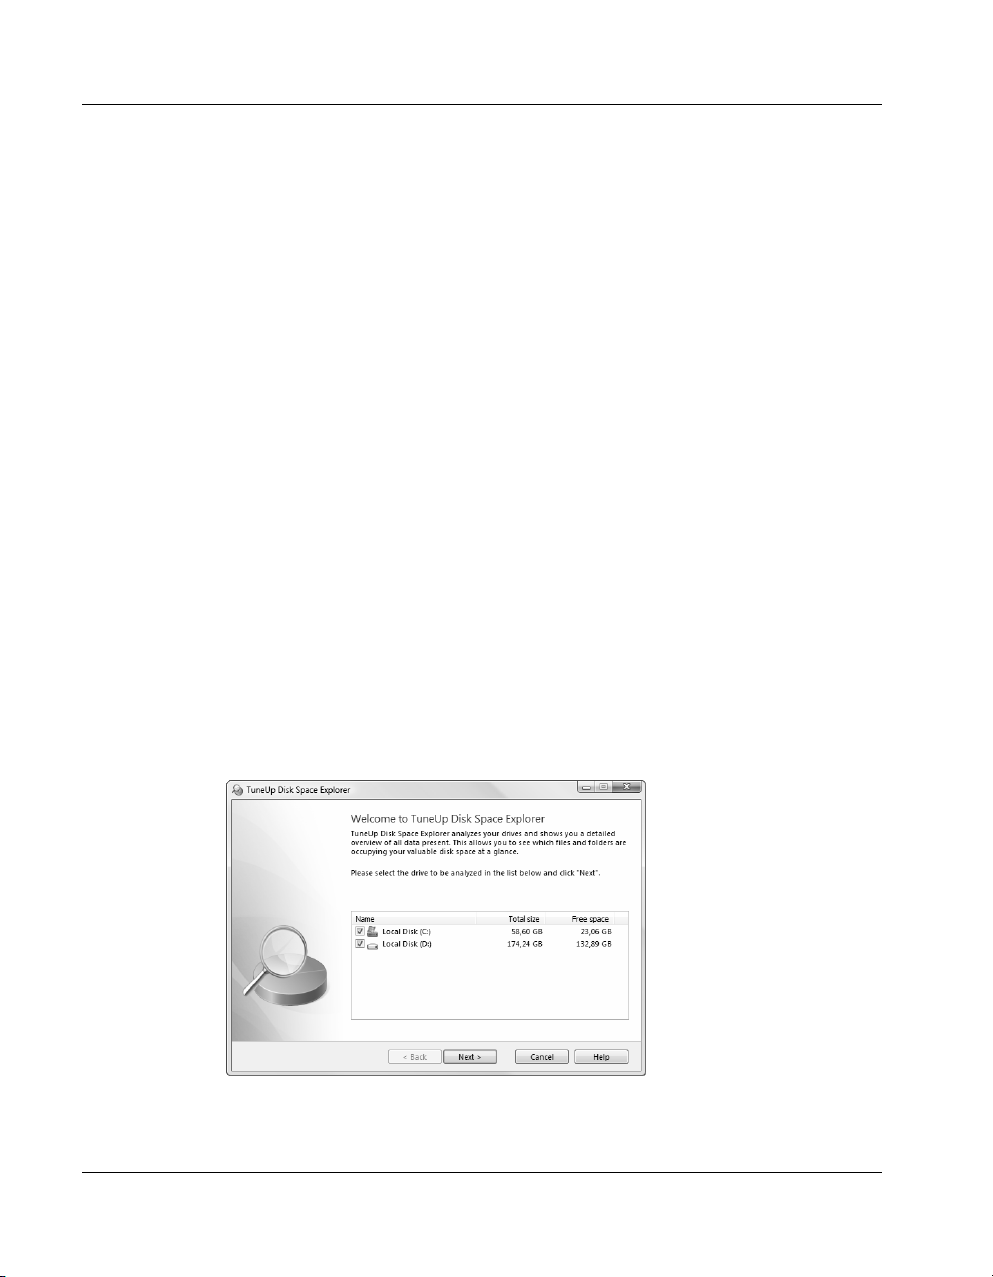
Analysis of Your Drives
TuneUp Disk
Space Explorer
will analyze the
selected drives.
38
When you start TuneUp Disk Space Explorer, a wizard appears that lets you
select the drives to be used in the search for extremely large files.
The wizard shows the total size for each drive, and the free space available. It is
especially important to analyze the drives that have little free space remaining.
Make your selection and click Next to start the analysis.
Page 43

Free up disk space
The analysis may take a moment depending on the size of the selected drives and
the amount of data they contain. As soon as the analysis is finished, click Finish
to close the wizard and display the results in the main window.
The Main Window
The TuneUp Disk Space Explorer main window is divided into two areas. A
folder tree is located along the left edge of the window, as it is in Windows
Explorer. The element selected in the folder tree determines which files are
displayed in the right side of the window.
When you start the module, the highest level folder My Computer will be
selected, which gives you a summary of all drives that were analyzed.
If you select a drive or an individual folder in the folder tree, only those files
contained in the drive or folder will be displayed. This can help with tasks such
as finding out which files in the folder My Documents and its subfolders are
taking up the most space.
You can determine how the files in the right side of the window are displayed by
selecting the options Overview, Contents, File types or Top 100 files from the
tabs along the top of the window.
"Overview" View
The default view Overview is an ideal first step when cleaning up your drives.
The most important information from all of the other views is combined to give
you a general overview.
39
Page 44

Free up disk space
You can always find information about the selected element in the folder tree at
the top of the window, in the upper area with a colorful background. If My
Computer or an individual drives is selected, the capacity and the percentage of
occupied space are displayed. If a folder is selected, you will see its size here,
including all of its files and subfolders and the percentage of space that it takes
up from the folder in which it is located.
40
An overview of the most important information from all of the other views is
located along the bottom of the window in the form of several tables.
The first table gives you an overview of the largest folders and files that are
located directly in the selected element (drive or folder). The size and percentage
of space occupied is shown here for up to 10 items. If you would like to see more
than the 10 elements that are displayed, simply click on the link Show Contents
to switch to a detail view.
If My Computer is displayed in the first table, it will instead show the occupied
space for each drive.
The second table organizes the files contained in the selected element based on
file types and shows you at a glance which types of files (documents, music
files, videos or images) are taking up the most disk space.
Please note that this view does not just include the files that are directly located
in the selected drive or folder, but also includes all files in subfolders. You can
Page 45

Free up disk space
limit the amount of information being displayed by moving a level lower in the
folder tree.
If you would like to see the individual files included in a given file type, simply
click on the name of the file type in the table. This will directly open the correct
category in the detail view.
The third table is particularly useful in acute disk space shortages. It shows a
list of the top 10 files that take up the most disk space. As with the last table, this
view does not just include the files that are directly located in the selected drive
or folder, but also includes all files in subfolders.
If you click on one of the files in the table or on the link Top 100 Files, the
corresponding detail view will open. There you can move, archive or delete files.
"Contents" View
This view shows the contents of the selected element in the folder tree on the
left. In addition to basic information such as name and type, as in Windows
Explorer, each element has a field that displays its size and the percentage of
space that it takes up. A graphical representation with bars allows you to
recognize at a glance which files and folders are taking up the most space.
Double click on a folder to move a level deeper and to show the contents of the
folder.
41
Page 46

Free up disk space
"File Types" View
This view groups your files based on their file types to show you at a glance
which types of files are taking up the most disk space on your system.
Along the top border of the window, you can select from the available file types:
Images, Documents, Compressed files, Music files, Video files or Other.
Click on one of the buttons to display the files in this category. You can obtain
an overview of the distribution of the different file types by clicking on the
button Overview.
42
Each file type category includes files with many different file extensions.
Images, for example, include the file extensions .bmp, .jpg, .gif, .tif and .png.
TuneUp Disk Space Explorer automatically recognizes which file extensions are
used by your system. The list of extensions can be viewed by clicking Advanced
along the top right border of the window.
The category Other shows you all other files that do not belong to any of the
other categories. The list of file extensions obtained by clicking Advancedt is
particularly helpful in this category. You can determine which files are to be
displayed in the list below by placing or removing a checkmark in front of each
file extension. To quickly change the status of all checkmarks, you can right
click on the list of file extensions to bring up a context menu. This contains
options such as Select all and Invert selection.
Page 47

Free up disk space
Explore your own hard drive and use the available views to look for ways that
you can gain more disk space. Sorting the list at the bottom by file size or date of
last access can also help you discover interesting files. To do this, simply use the
mouse to click on the headlines with a gray background at the top of the
columns.
Cleanup Tip
Sorting files by the date of last access in combination with limiting a view to
certain file types allows you to find objects such as older MP3 files or videos that
you may not want to listen to or watch anymore. The same is true for images and
larger documents that you haven't used for years and are currently just taking up
space.
"Top 100 Files" View
For most users, this is the most interesting view. This shows you the 100 largest
files in the selected branch of the folder tree, clearly organized by file size. As
the contents of all subfolders are included, this view allows you to clean up
hundreds of megabytes or even several gigabytes with a few clicks, depending
on the size of your system.
Cleanup Tip
Sometimes it useful to sort the Top 100 list by the date of last access. This
method allows you to quickly find large files that have not been used for several
weeks or even months and that may not be needed anymore.
43
Page 48

Free up disk space
Archiving Files
Has it ever happened to you? Have you ever looked through your drives and
found a file that makes you wonder,"Do I still need this? Not really, but I don't
really want to delete it either"?
Many users later regret having impulsively deleted files, especially personal files
such as pictures, videos or music. TuneUp Disk Space Explorer can solve this
problem for you!
Thanks to the seamless integration with Windows Explorer, you can easily
copy files to a USB stick or an external hard drive before deleting them. To do
this, click on the selected file(s) with the right mouse button and select the menu
option Copy or simply use the keyboard shortcut Ctrl+C. Then open the desired
target drive in Windows Explorer and paste the copied files there using the menu
option Paste or the keyboard shortcut Ctrl+V.
Thanks to support for all major CD burning programs, you can also easily burn
rarely used files to a CD or DVD. If you are running a burning pogram such as
Nero Burning Rom at the same time as TuneUp Disk Space Explorer, you can
move the desired files by dragging them with your mouse directly to the Nero
burning list.
After the files have been successfully archived, you can then delete them with a
clear conscience in TuneUp Disk Space Explorer to clear up valuable disk space.
44
Settings
TuneUp Disk Space Explorer lets you customize the appearance and behavior of
the software to meet your personal needs. To change the available options, click
File and then Settings.
General
The section Hidden Files and Folders allows you to determine whether hidden
files and folders should be shown in TuneUp Disk Space Explorer. The default
settings are based on the settings of Windows Explorer. If you would like to use
settings that differ from those in Windows Explorer, simply select the option Use
custom settings and adjust the options to your liking.
With default settings, TuneUp Disk Space Explorer protects all elements in
system folders to prevent you from accidentally deleting or moving important
system files. If you know your system perfectly, you can deactivate this
Page 49

Free up disk space
protection in the section Protected system elements. Place a checkmark next to
the option Permanently deactivate protection (not recommended).
Deletion method
The section Deletion method lets you decide which method TuneUp Disk Space
Explorer should use as the default when deleting files and folders.
The standard deletion method Move to Recycle Bin is particularly
recommended for beginners, as accidentally deleted files can be restored.
However, please note that the Windows Recycle Bin can only hold a limited
amount of data. If the storage limit of the Recycle Bin is exceeded or if Windows
needs more space, the oldest files in the Recycle Bin will be permanently deleted
over time.
If the deletion method Permanently delete is selected, the Windows Recycle
Bin will be bypassed and the files will be deleted directly. Restoring these files at
a later time is only possible with luck and special software such as TuneUp
Undelete.
The three other deletion methods use TuneUp Shredder to make restoring the
deleted files practically impossible. Further information regarding these deletion
methods and their settings can be found in the documentation for TuneUp
Shredder.
45
Page 50

Page 51

Maintain Windows
The modules in the Maintain Windows category help you to keep your system
running smoothly.
Keep your system
in shape!
5
This module also includes the useful TuneUp 1-Click Maintenance function,
which performs error analysis and optimizes your system with a single mouse
click.
Every installed program writes entries to the registry - entries that are not always
completely removed after deleting software. This causes the registry to grow
larger and larger, taking up more space on the hard disk. The module TuneUp
Registry Cleaner works to remove all unnecessary registry entries that could
slow down your system.
47
Page 52

Maintain Windows
TuneUp 1-Click Maintenance
TuneUp 1-Click Maintenance is a function that allows you to quickly and easily
clean up your registry and hard drive. To access this part of TuneUp System
Optimizer, click TuneUp 1-Click Maintenance under Wizards on the left side
of the screen.
TuneUp 1-Click Maintenance does justice to its name. As soon as you start the
program, it scans your registry and your hard drive automatically for unneeded
entries and files. A status window is displayed during the scan to keep you
informed of its progress. And when the scan is finished, all you have to do is
click Correct Problems to rid yourself of the unneeded ballast.
TuneUp 1-Click
Maintenance at
work.
48
And the best thing about TuneUp 1-Click Maintenance is that you can schedule
it to run regularly to keep your system clean. Once you set up a schedule,
TuneUp 1-Click Maintenance will run once each week, for example, without
interrupting your work.
You can also have a TuneUp 1-Click Maintenance icon placed on your desktop
so that you can run a complete check on your system at any time quickly and
easily.
Page 53

TuneUp Registry Cleaner
You can use TuneUp Registry Cleaner to quickly and thoroughly remove the
unneeded data left over when you install and remove programs and when you
work with your computer every day.
Cleaning up your registry database frees your system of unneeded ballast so that
it can work better and more quickly.
After the module analyzes your system for problems, you can individually view
each of the problems found and call up a detailed description. If you wish, you
can also have all problems corrected automatically.
All changes to your system are monitored by TuneUp Rescue Center and can be
undone with a few mouse clicks.
Using the Search Wizard
Once the module is started, a wizard is opened automatically in which you can
choose between two options for scanning the registry.
Decide for a
complete or
partial registry
scan here.
Maintain Windows
The option Complete scan analyzes the entire registry and all system files. If
you select Choose tests, you can specify yourself which categories should be
analyzed by TuneUp Registry Cleaner.
It is best to select the Complete scan, then click Next to begin analysing your
system.
49
Page 54

Maintain Windows
The option Complete scan analyzes the entire registry and all system files. If you
select Choose tests, you can specify yourself which categories should be
analyzed by TuneUp Registry Cleaner. It is best to select Complete scan, and
then click Next.
TuneUp Registry Cleaner will now analyze your system. The individual sections
of the registry that will be analyzed can be seen in the program window. A
yellow arrow in front of an entry means that that section is being analyzed.
Please wait until
the analysis is
finished. This may
take several
minutes.
50
A green check mark indicates that the analysis has been completed for the
section. A progress bar beneath the list shows the progress of the overall
analysis.
When the analysis is complete, the message “The search for errors has been
completed.” is displayed. Click Show errors to close the wizard and to show the
problems found in the main window.
System Analysis
TuneUp Registry Cleaner will now analyze your system. The individual
sections of the registry that will be analyzed can be seen in the program window.
A yellow arrow in front of an entry means that that section is being analyzed, a
green check mark indicates that the analysis has been completed for that section.
An animated bar at the bottom of the screen shows the progress of the overall
analysis.
Page 55
The analysis has
found a large
number of
problems –
correcting them
will bring
noticeable
benefits.
Maintain Windows
When the analysis is complete, the message "The search for errors has been
completed." is displayed. Click Show errors to close the wizard and to show the
problems found in the main window.
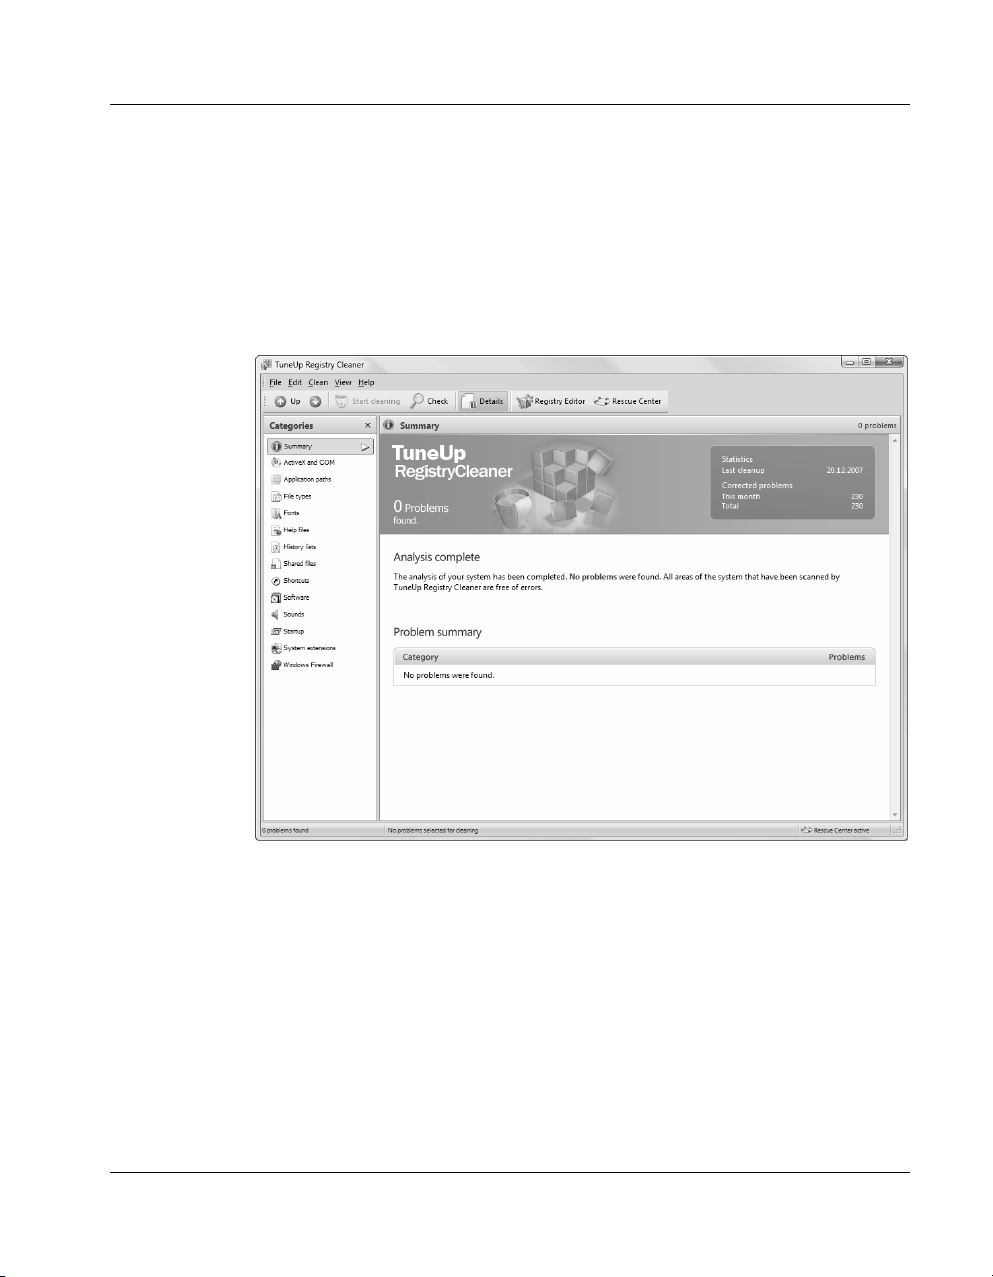
The Main Window
The TuneUp Registry Cleaner main window is divided into two areas. The
Categories bar is located along the left border of the window. This allows you to
switch between different views, which are shown in the right side of the window.
The default category Summary will open first. The module will show here that
the system analysis is complete and gives the total number of problems found.
The section below shows the distribution of the problems found in the individual
categories.
51
Page 56

Maintain Windows
The module can recognize problems in the following areas:
Type Description
ActiveX and COM
Sounds Some sounds refer to sound files that are no longer on your system.
Application path
Startup
File types Some file types refer to programs that are no longer available on your system.
Shared files
Help files
Fonts References were found to fonts that are no longer available on the system.
Software
System extensions
ActiveX/COM objects were found that are based on libraries that are no longer
available on your system.
Some of the application paths in the registry point to directories that no longer
exist.
Some programs that are supposed to run on system startup or when certain
events occur are no longer present.
The registry database contains references to files which were intended for use
by more than one application. However, these programs are no longer present.
The registry contains entries for help files that are no longer available on the
system.
Some of the programs in the "Add or Remove Programs" module in the Control
Panel are missing an uninstaller. Because of this, the entries will no longer work.
Some system extensions such as audio and video codes or Internet Explorer
Add-ons refer to targets that no longer exist.
52
Shortcuts
History lists
Windows Firewall
Some shortcuts on the Desktop, in the Quick Launch menu or in the Start menu
refer to targets that no longer exist.
Some entries in the history list for standard dialogs point to files that no longer
exist.
Several entries in the list of applications that are allowed to accept incoming
network connections point to files that no longer exist.
This illustrates the following: Deleted files can leave many "ghost entries" in the
registry. TuneUp Registry Cleaner finds the unnecessary entries and can delete
them.
Page 57

A detailed
description is
available for each
problem, a single
mouse click is all
you need.
Maintain Windows
Explanations can be provided for every single problem, if desired. For this,
simply click one of the listed problem categories under the Categories bar.
The problem will quickly provide you with brief explanations of all problems
that were found. Mark an entry in the list in order to display a more extensive
explanation along the upper border of the window. To view the problem analysis
section, the entry Details must be selected in the icon bar.
TuneUp Registry Cleaner is set to correct all problems found by default.
Because of this, the small box before every entry in the list is checked. If you do
not want a certain problem to be resolved, click on the box once to remove the
checkmark. The application will then ignore this problem when peforming scans.
Clean-up
Click Start Cleaning in the toolbar to have TuneUp Registry Cleaner do its job correcting all of the problems that were found.
A new wizard is opened that takes you through the process step by step. First, it
indicates how many problems were selected for correction. It also informs you
that all changes can be undone with TuneUp Rescue Center if necessary. Click
Next to clean up your system.
53
Page 58

Maintain Windows
A progress bar indicates how far TuneUp Registry Cleaner is with its work. The
module corrects all problems one after the other and makes sure that unneeded
entries and keys are removed. Please wait until the clean-up is finished.
Once the module is finished, a message is displayed to tell you that all problems
have been corrected.
Chain reactions in
the registry: the
Check Again
button.
All’s well that
ends well.
Sometimes, the button Check Again is displayed, and the wizard recommends
that you analyze your system again. This is always the case when the clean-up
may have made additional entries invalid. This is not an error in the module, but
a chain reaction that can occur in the categories ActiveX and COM and File
types.
A simple example: Entry A points to entry B, which in turn points to the missing
file X. In the first scan, TuneUp Registry Cleaner determines that entry B is
invalid because file X cannot be found on the system. Entry B is deleted during
clean-up. This in turn makes entry A invalid, as it points to the now missing
entry B.
TuneUp Registry Cleaner recognizes when this may happen and suggests that
you analyze the system again. In this case, click Check Again, and these two
categories will be analyzed again.
Click Finish to close the wizard. Repeat the clean-up process as often as
necessary until no new problems are found. You can now close the module, with
the confidence that you have removed a great deal of junk from your system.
54
Page 59
Solve problems
The modules in the Solve problems category do just what the name says - in a
simple way.
Let the program
help you - solving
problems has
never been this
easy!
6
If you have problems with your hard disk, TuneUp Disk Doctor can analyze
your drive and automatically repair any errors that are found.
Many common problems can be solved by TuneUp Repair Wizard in a few
simple clicks.
Did you accidentally empty the Windows Recycle Bin or permanently delete a
file? TuneUp Undelete lets you restore deleted files or folders. That is, if you
haven't deleted them securely with TuneUp Shredder.
55
Page 60

Solve problems
TuneUp Disk Doctor
Introduction
When working with your computer, many files are constantly being read and
written – regardless of whether you are editing a text document, looking at
pictures or simply starting an application. Modern operating systems place all
files in special file systems to allow quick access to all necessary information at
any time.
File systems keep track of every file and folder on a drive and save information
about these objects such as their name, size, date of last access, location and
much more.
The file systems used by Windows for hard drives, USB sticks, memory cards
(such as those used by digital cameras) and diskettes are called FAT and NTFS.
The newer of the two file systems, NTFS, allows you to save additional
information such as access authorizations and is better suited for the size of
modern disks than FAT.
Over time, errors may occur in these complicated systems - due to defects in the
drives being used, power outages or software crashes. If these errors are not
found and corrected quickly, this can lead to error messages, application
problems and, in the worst case, total loss of important files.
56
TuneUp Disk Doctor performs a thorough analysis of your disk drives and their
file systems. If errors are found during analysis, they can be automatically
repaired to prevent data loss.
Using TuneUp Disk Doctor
After starting TuneUp Disk Doctor, a wizard will appear to guide you through
the analysis and repair of your drives step-by-step. In the first step, select the
drives that you would like to analyze. To do this, you simply need to check the
box in front of the drives you wish to analyze. Then, click Next.
In the next step, you can select whether you would like to perform a normal
analysis or a thorough analysis. As the thorough analysis can take quite some
time for larger drives, a normal analysis of the selected drives is usually
sufficient. This usually only takes 1-2 minutes. However, if errors occur on your
system or Windows reports problems with reading or writing data, a thorough
analysis is recommended. Make your selection and click Next to start the
analysis.
Page 61

TuneUp Disk
Doctor will
perform a careful
analysis of the
selected drives.
Solve problems
During the analysis, TuneUp Disk Doctor will show you the current progress as
a percentage and in graphical form. The boxes displayed represent the space
usage of the drive being examined.
Normal Analysis
TuneUp Disk Doctor performs normal analysis of your drives in multiple steps.
The exact number of steps and their sequence depend on the file system of each
drive. The following table explains all possible steps.
Analysis step Explanation
Checking files and
folders
NTFS & FAT
Checking indices
Only NTFS
Checking safety
descriptions
Only NTFS
Each element in the file system is analyzed to ensure that all files and
folders are present at their indicated locations.
Indices are references to folders in the NTFS file system. If any of these
indices are damaged, the associated folders will not be displayed in the file
system.
If any or your files or folders have suddenly "disappeared", there is a good
chance that they will be recovered after repairing the file system.
Files and folders in an NTFS files system can be protected by so-called
safety descriptions, which block access by unauthorized users.
During the analysis, errors in these descriptions are found and corrected.
57
Page 62
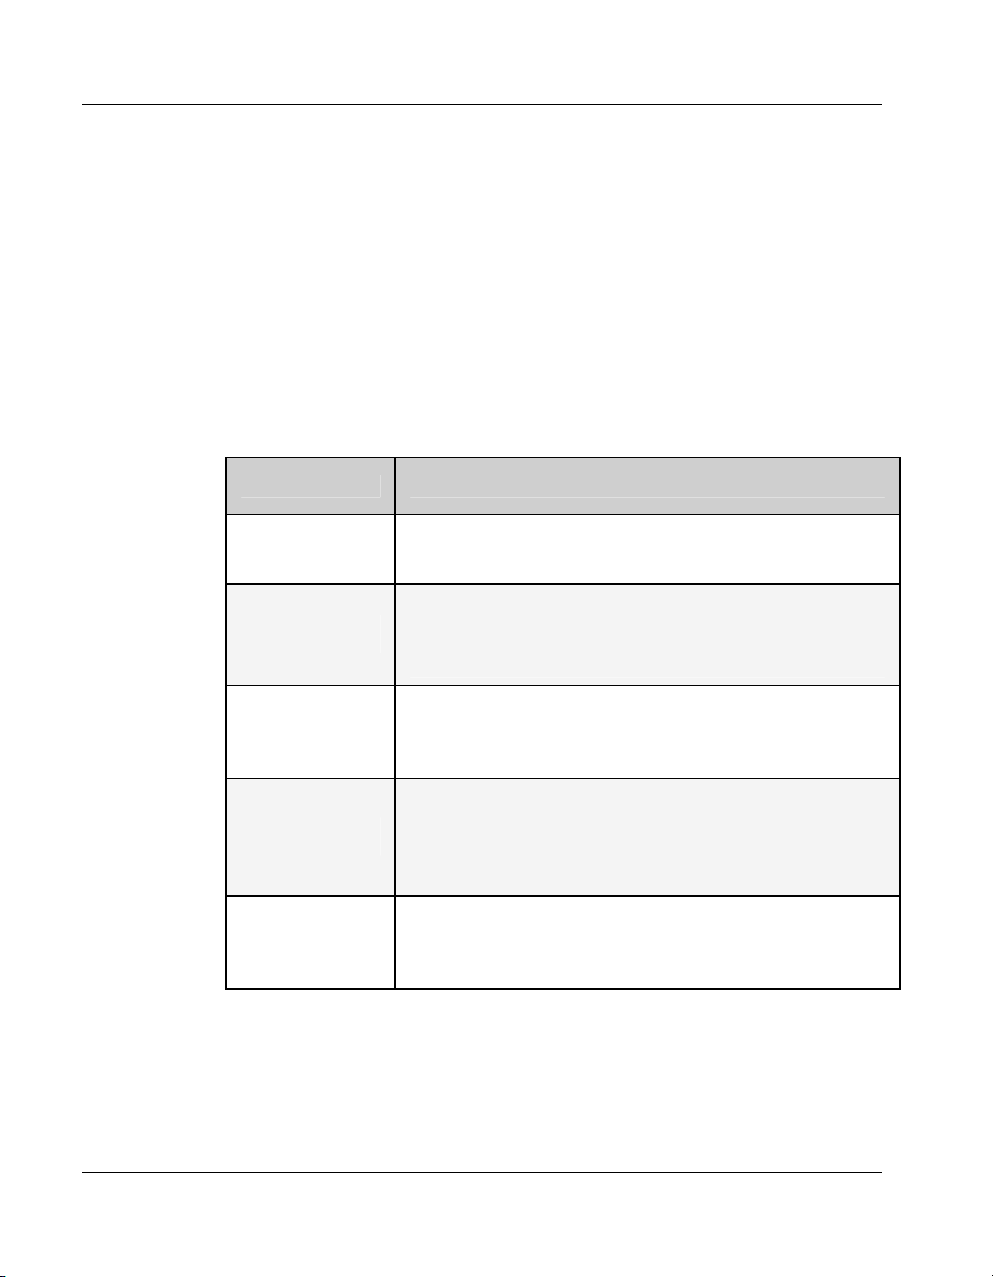
Solve problems
Thorough Analysis
A thorough analysis includes all the steps of the normal analysis. In addition,
your drives will be checked for physical defects.
Storage space on drives is divided into so-called sectors, which are usually 512
bytes in size each. In order to detect physical defects on a drive, the thorough
analysis checks each of these sectors. The length of this analysis depends on
several factors, including the size of the drive and the degree of fragmentation.
You should allow at least 5 to 20 minutes.
The exact number of steps and their sequence in the analysis depends on the file
system of each drive. The following table explains all possible steps.
Analysis step Explanation
Checking files and
folders
NTFS & FAT
Checking indices
Only NTFS
Checking safety
descriptions
Only NTFS
Checking file data
Only NTFS
Checking free disk
space
NTFS & FAT
Each element in the file system is analyzed to ensure that all files and
folders are present at their indicated locations.
Indices are references to folders in the NTFS file system. If any of these
indices are damaged, the associated folders will not be displayed in the file
system.
If any or your files or folders have suddenly "disappeared", there is a good
chance that they will be recovered after repairing the file system.
Files and folders in an NTFS files system can be protected by so-called
safety descriptions, which block access by unauthorized users.
During the analysis, errors in these descriptions are found and corrected.
All sectors of the drive that contain data will be checked. This will ensure
that no read errors take place when working with files,
If sectors are found that require multiple read attempts to successfully read
the data, the file data contained will be moved to a sector that is free of
errors. The sector will then be marked as defective in order to avoid future
problems.
All drive sectors that do not contain any files will be checked for error-free
readability.
If errors occur during this check, the sector in question will be marked as
defective to prevent files from being saved there in the future.
58
Page 63

Solve problems
Analysis Results
TuneUp Disk Doctor will notify you as soon as the analysis of the selected
drives has been completed. Click Next to display the analysis results.
In some cases it is necessary to restart your computer in order to successfully
complete the analysis or repair process. This can happen, for example, when
active applications or Windows itself are using the selected drive and thus
prevent TuneUp Disk Doctor from having exclusive access.
If a system restart is necessary, TuneUp Disk Doctor will show you a
corresponding message. You can then decide if the necessary restart should be
performed immediately or if you would like to restart the system yourself at a
later time.
Click Finish to close the wizard.
59
Page 64
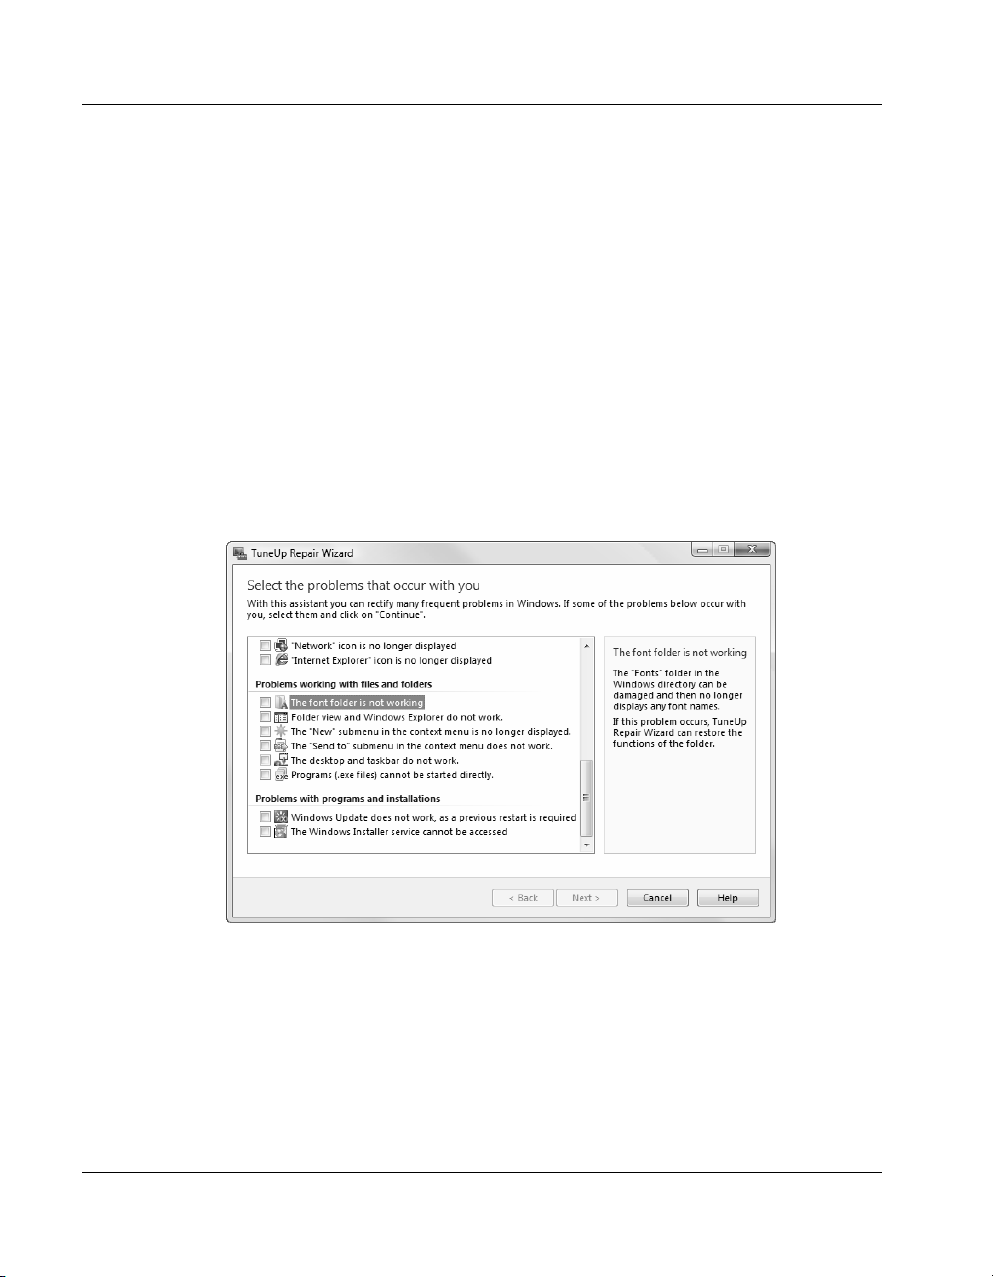
Solve problems
TuneUp Repair Wizard
TuneUp Repair Wizard handles the repair of computer and display problems
on your PC. These types of problems occur from time to time when running
Windows. Without warning, Windows suddenly shows the wrong icons,
shortcuts on the desktop disappear or the entire taskbar is no longer visible.
Finding the solutions to such problems is anything but simple, and this is where
TuneUp Repair Wizard is a great help.
How to use
After starting TuneUp Repair Wizard, several known problems are displayed.
These are displayed in easy to understand categories. Clicking on an entry with
the mouse shows a detailed explanation on the right edge of the window. If the
problem is found, you can click a checkbox next to the corresponding problem to
select it.
You select the
problem; TuneUp
Repair Wizard
fixes it.
60
After clicking on Next, TuneUp Repair Wizard shows a final list of all problems
that have been selected, giving the user the opportunity to check and correct the
selections that have been made. Clicking on Next starts the quick process of
solving the problems. Pressing Finish exits the module.
Page 65

TuneUp Undelete
It has happened to everyone. You delete a file accidentally, and you can't find it
in the Recycle Bin. And you don't have a backup, or the one you have is months
old. This means that it's time for some serious tools.
With TuneUp Undelete, it is usually possible to recover deleted files and save
your valuable work.
Solve problems
Usage
When you start TuneUp Undelete, a wizard is opened that takes you through the
recovery process step by step. First, you must select the drives you want to
search for deleted files under Drives to be scanned. The list contains all drives
that are available on your system.
Only select the drive on which the files that you wish to recover were deleted.
Click Next to go to the next step.
Enter search string
On the next screen, the module allows you to narrow the search to make sure that
you don't oversee your file in an endless list of deleted files. It is practical to
enter one or more words to search for, but this is not required.
It is practical to enter one or more words to search for, but this is not required.
61
Page 66

Solve problems
You can enter the name of the file in the Search criteria box. You do not have
to enter the complete file name here, a single word is usually enough to narrow
your search. Or if you can only remember the file extension or part of the name,
simply use a wildcard such as *.doc or Picture??.jpg. You can enter multiple
search terms in the box, but you must separate them with a semicolon.
If you can't remember the name of the file at all, or if you want to search for all
recoverable files, simply leave the search box empty.
62
There are two additional options that also let you narrow your search further:
Option Description
Don't show 0-byte files All files that contain no data whatsoever will be ignored.
Show only files in good
condition
Makes sure that only files with a good chance of being recovered are
shown.
Click Next to begin searching for deleted files.
Search results
TuneUp Undelete now scans all selected drives one after the other. The progress
of the search is shown in the empty Search results box. The search may take
some time, especially on larger hard drives.
Page 67

Which files do you
want to restore?
Solve problems
As soon as the search is completed, the module lists all available files that match
your search criteria. The table shows the file name, the original location, the file
type and the condition of the file.
Don't worry if the first letter of the file name is missing for the files on FAT
drives, Windows always deletes the first letter when deleting files on drives with
this file system.
Recovering files
If you find a file that you wish to recover in the list, click it to select it. You can
select more than one file by holding the Ctrl key while clicking. Then click
Restore, and the program will attempt to return the file to the normal Windows
environment.
Once the files have been recovered, try to open them in the corresponding
program. If the file can be opened, the recovery was successful. If not, then part
of the file was already overwritten by another file. And that can often happen
sooner than you think.
File Condition
In the Condition column, TuneUp Undelete displays a status for each file that
indicates the probability that it can be successfully restored. There are two
statuses:
63
Page 68

Solve problems
Good: The location of the file on the disk does not appear to be occupied by any
other files. The chances are good that the file can be successfully recovered.
Bad: Part of the file has already been overwritten by other files. It may be
possible to recover at least part of the file.
Please note that these are only estimates. It can never be determined with
complete certainty what has happened with any specific location on the hard disk
since the file was deleted.
Data Recovery 101
Valuable tips for
better results.
Make sure that
even Undelete
can’t recover your
sensitive files.
As deleted files have a rather short life expectancy under Windows, especially on
the system drive where the paging file and many temporary files are located, you
should normally attempt to recover an accidentally deleted file with TuneUp
Undelete right away. The sooner you try, the better the chances that you will be
able to recover the file.
Please do not install software for the recovery of deleted files on your computer
when you have already deleted the file! When you install the software, you may
overwrite the lost file forever. Even if you install the software on a different
drive, temporary installation files may be written over the files you are trying to
recover.
For this reason, data recovery software such as TuneUp Undelete should
already be installed and operational. This way you have all the tools you need
should something go wrong.
Deleting Sensitive Files the Right Way
Use TuneUp Shredder to permanently delete confidential files. This module
ensures that files that it deletes cannot be recovered with TuneUp Undelete, by
the military or professional data recovery companies.
If you have already deleted a file by “normal” means, the only way to reliably
destroy it is by using a special tool that overwrites all free space on your drives.
Tip: When you defragment a drive, any deleted files are normally overwritten in
the process and cannot be recovered afterwards.
64
Page 69

Customize
Windows
The modules in the Customize Windows category help you adapt the operating
system to meet your needs.
Here, you can
"tweak" Windows
as much as you
like.
7
TuneUp System Control and TuneUp Styler let you specify exactly how your
Windows system should look and work. You will be surprised at how many
options you can configure with TuneUp Utilities 2008.
65
Page 70

Customize Windows
TuneUp System Control
TuneUp System Control is a kind of control center that allows you to quickly
and easily adapt your Windows operating environment to your needs and tastes.
Regardless of whether you want to change the visual effects, the desktop, the
way users log in, the security of your system or memory management, TuneUp
System Control lets you configure and optimize any setting, down to the
smallest detail.
And the program even protects your privacy if desired by deactivating Internet
functions that automatically contact Microsoft or that collect information on your
surfing habits without asking permission.
All changes are monitored by TuneUp Rescue Center and can be undone at any
time.
Usage
TuneUp System Control is the most powerful module of TuneUp Utilities. You
can use it to easily and safely configure hundred of Windows settings.
Extensive but easy
to use: TuneUp
System Control
contains over 330
options,
structured and
clearly explained
for easy use.
66
Page 71

Customize Windows
As soon as the program opens, the various Categories that you can configure are
shown on the left side of the window. These categories are Appearance, Usage,
Communication, Administration and Wizards. Each of these categories contains
multiple subcategories.
As soon as you click one of the subcategories with your left mouse button, the
available options are shown on the right side of the window. Take a look at all of
the settings that can be configured with the program, you will find many
interesting and useful options.
All the settings should be self-explaining. If you nontheless wish more detailed
information for single options you can simply click on Help in the upper right
corner or press F1: you directly jump to the help for the category you're just on.
Note: TuneUp System Control adapts to the installed operating system
automatically and only offers the options that are supported by your system.
Don't be surprised when you see different options under Windows XP and
Windows Vista, for example.
Appearance Category
In this TuneUp System Control category, you specify exactly which of the
Windows visual effects you wish to use, configure how file types are handled
and specify how folder windows and the Explorer should look and act.
Usage Category
In this TuneUp System Control category, you can configure a wide range of
mouse and keyboard options, customize the items that are shown in the Start
menu and the menu opening delay, and can configure the behavior of the taskbar.
Communication Category
In this TuneUp System Control category, you can configure the network
behavior of Windows and can adapt Internet Explorer and Outlook Express or
Office Outlook to your needs. You can also speed up surfing on the Internet and
protect your privacy by preventing certain programs from automatically
contacting servers from Microsoft and other companies.
Administration Category
This category in TuneUp System Control gives you control over a large
number of internal system settings. You can customize the boot process and how
users log on, automatic CD playback, user data, the special system folders and
the default settings for the command prompt.
67
Page 72

Customize Windows
Wizards Category
In this TuneUp System Control category, you will find a Correct Problems
wizard that can fix common Windows problems with a few clicks of your
mouse, and a Copy Settings wizard, which copies your settings to other user
accounts and even to the Windows logon screen.
68
Page 73

TuneUp Styler
Windows would not be very useful without its graphical user interface. How
important an attractive interface is can be seen on the basis of Windows Vista
and how the entire system feels at once fresher and more modern.
But just as in fashion, it's easy to get tired of the new design, not to mention the
people who have always been bothered by what they consider a "candy" look.
Wouldn't it be practical to be able to change the appearance of Windows?
Customize Windows
Kann man das
Aussehen von
Windows
anpassen?
Ja, man kann - Mit
TuneUp Styler!
Take the icons for example. These little square pictures are everywhere, in the
Start menu, in file dialogs and of course on the desktop. Is there a way to lend all
of these icons a new look with a few mouse clicks?
And what about the Logon Screen? Anyone who shares a computer with others
or has a password-protected user account sees it every day: a mixture of different
blue tones. And there is no way built into Windows to change this.
Or what about the boot screen? The well-known logo that is shown on the
screen while Windows starts can't be replaced or changed without additional
tools, either.
There is also only a very limited range of options to customize the appearance of
all windows and buttons (the so-called visual style). You can either use the new
interface or the old Windows classic interface.
TuneUp Utilities has its own module dedicated entirely to letting you customize
the appearance of your system, TuneUp Styler. Use this module to give your
system a digital makeover.
Usage
The TuneUp Styler window is broken down into two sections: a blue navigation
bar on the left and a large area on the right to display the options.
The customization options in TuneUp Styler are divided into seven categories,
each of which can be selected directly in the navigation bar at the left.
69
Page 74
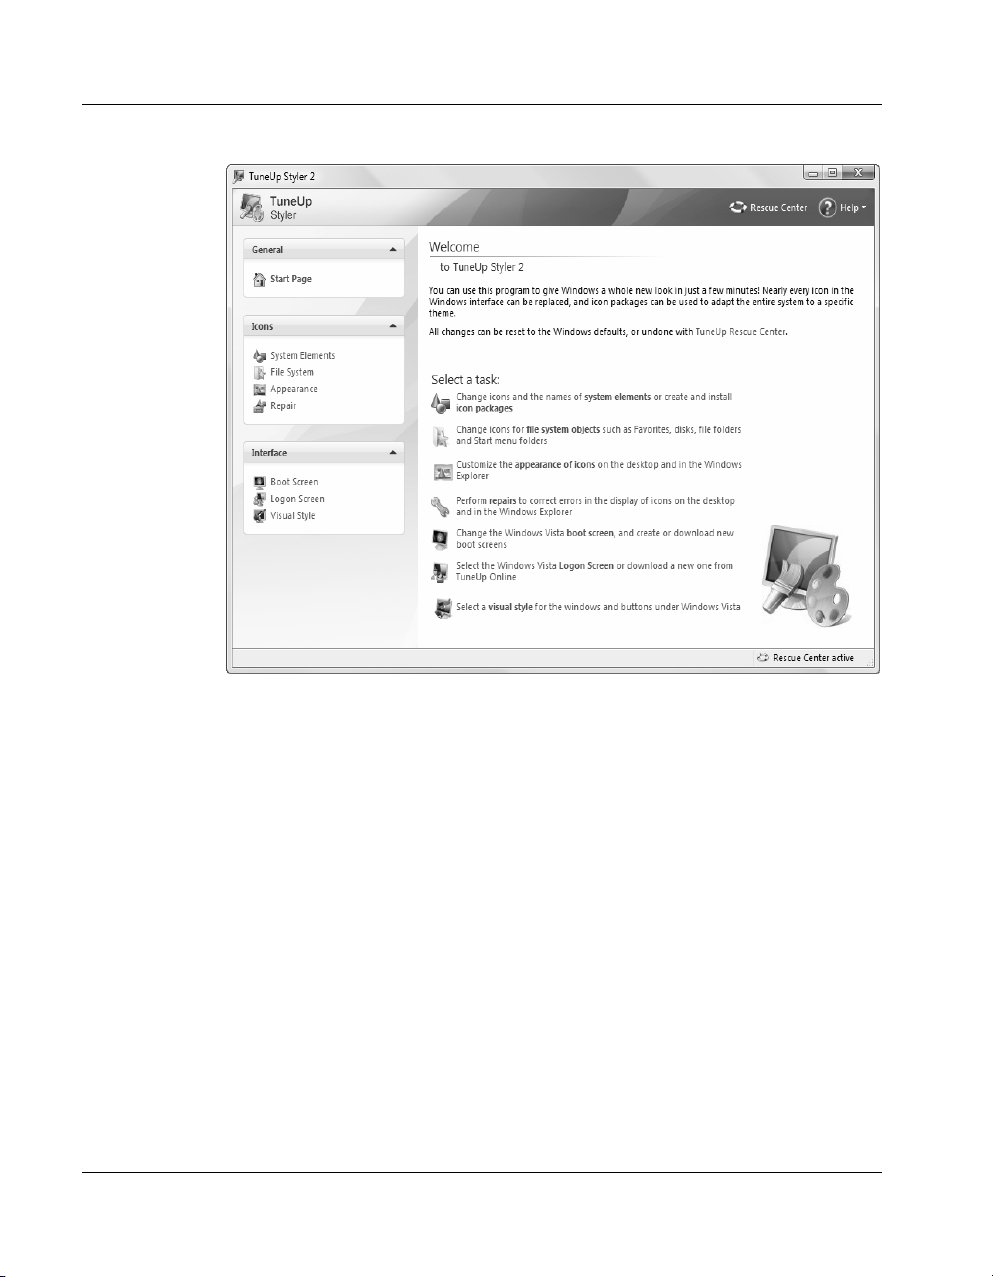
Customize Windows
TuneUp Styler lets
you change the
icons and names
of many elements.
70
System Elements
In this category, you can replace typical Windows icons with icons with a
common theme. You can also change the name of many elements, such as the
Recycle Bin, My Computer and My Network Places.
After clicking System items in the navigation bar, all system icons that can be
changed are shown in a hierarchical list on the right side of the window. The
Desktop level is selected by default, under which you can see all special desktop
items. Select one of these items to change it.
Page 75
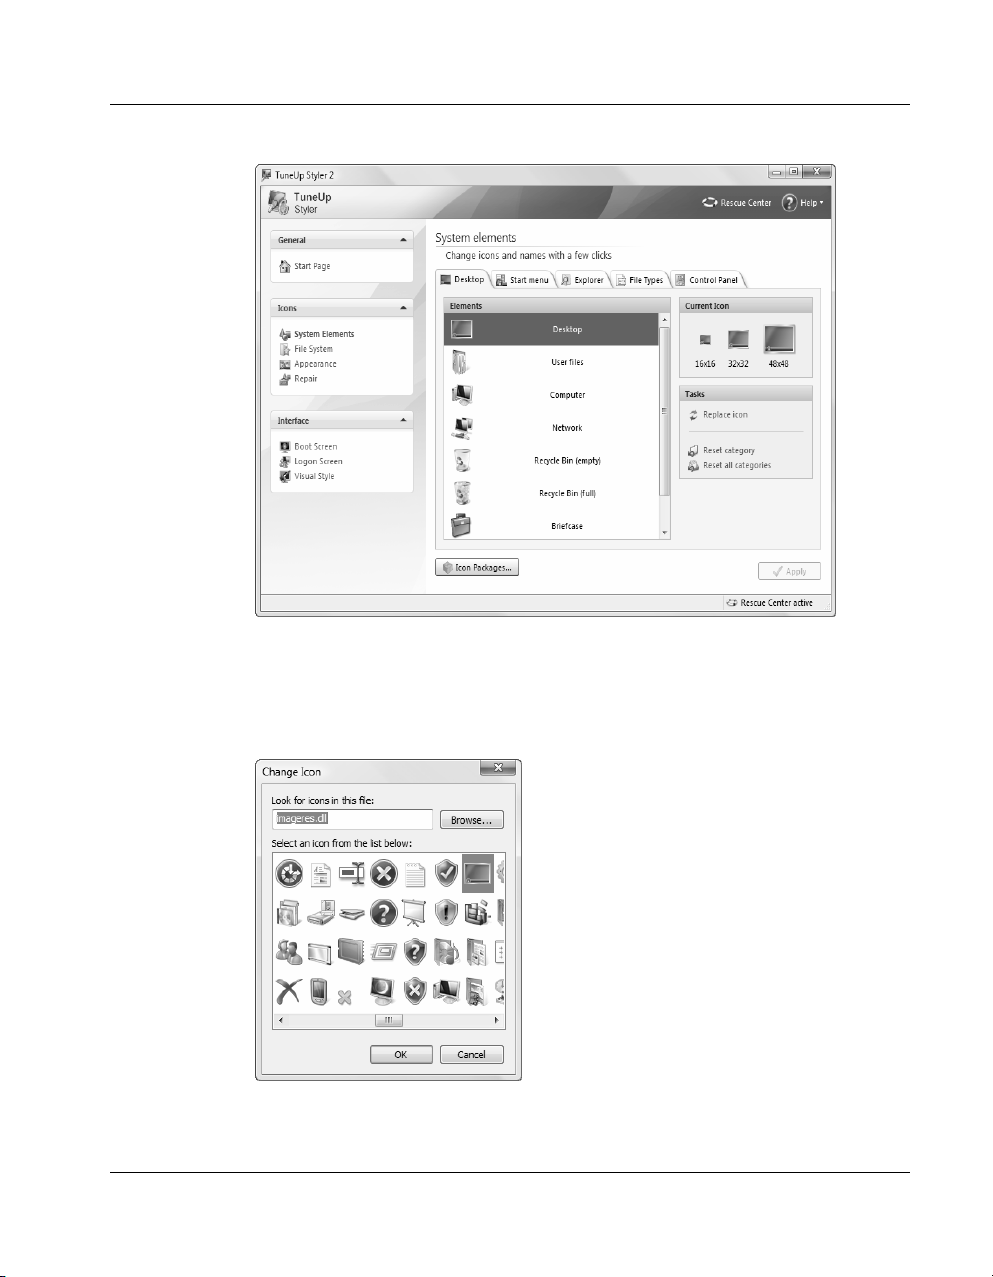
TuneUp Styler lets
you change the
icons and names
of many elements.
How to change an
icon
Customize Windows
Click Replace icon to open a dialog in which you can choose a new icon for the
selected item. The module always shows the icon library in which the current
icon for the item is contained. This is normally the library Shell32.dll, which is
included with Windows. If you have an icon library of your own, you can view
its contents by clicking Browse.
The file
shell32.dll, which
is included with
Windows, contains
a large number of
icons.
71
Page 76

Customize Windows
As soon as you have found the desired icon, select it with your mouse and click
OK to record your change.
Important: All of the changes that you make to system items are not applied
immediately. The program records your changes for the individual items, and
indicates that a change has been saved by adding a small red star next to the
respective entry in the list. Your changes are not applied until you click Apply in
the lower right corner of the window.
Undoing changes
Undoing changes
for multiple items
If you have selected a different icon for an item, you can undo this change at any
time as long as you have not yet clicked Apply. To do this, select the
corresponding item in the list and click Discard unsaved changes made to this
item.
If you have already clicked Apply, you can still undo changes to an item by
resetting it to the Windows defaults at any time. To do this, select the desired
entry in the list and click Reset element to Windows default. Please note that
this link is only shown when the selected icon is not set to the Windows defaults.
If you should want to undo changes made to multiple items, you can click Reset
category or Reset all categories.
Here, "category" refers to the five levels into which the system items are divided,
namely Desktop, Start menu, Explorer, File types and Control Panel. The
first link only resets the items in the currently active category, while the second
resets all system items that can be changed with TuneUp Styler without
exception.
After either of the links is clicked, a dialog is shown that asks you if you wish to
reset all items to the Windows defaults, or if you only wish to discard any
unsaved changes for these items. The second option is of course only available
when changes have not yet been applied.
Icon packages
Of course, it is rather tedious to change all Windows icons one at a time. For this
reason, TuneUp Styler also allows you to replace all of the icons in Windows
with a new look in one fell swoop. To do this, click Icon Packages in the lower
right corner of the window.
72
Page 77
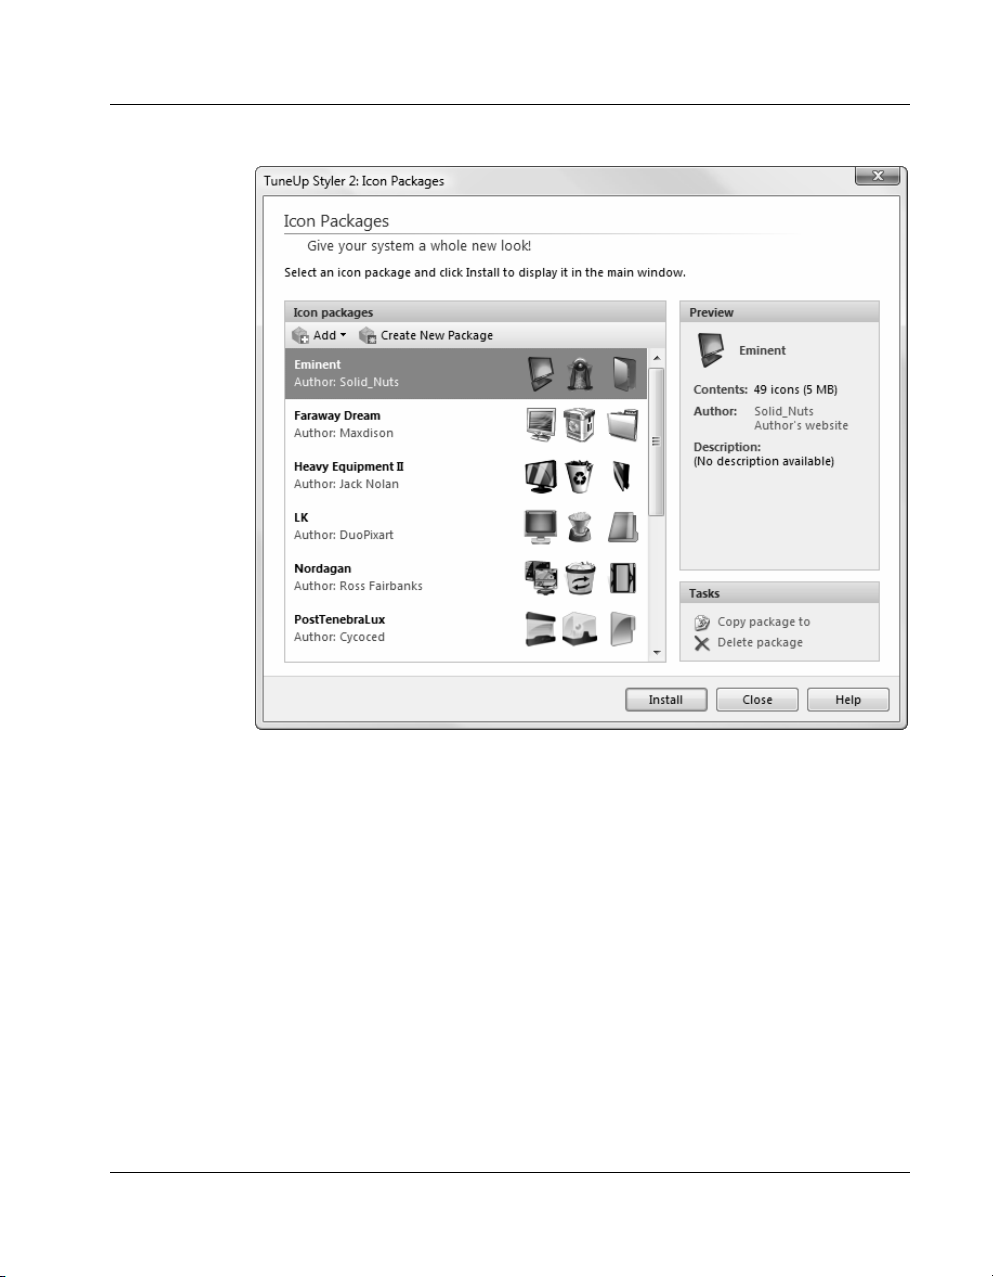
Practical: icon
packages let you
change all icons at
once.
Customize Windows
Administer and install Icon Packages
A new window opens in which you can see all available icon packages. Select
the desired package in the list and click Install to have the new icons shown in
the main window.
You can also add new icon packages to the list by clicking Add at the top of the
list. Here, you can either add an icon package from a file on your computer, or
download new icon packages from TuneUp Online, where you can select from a
large number of packages.
Creating Your Own Icon Packages
You also have the ability to prepare your own icon package from your current
icons. You can then save this package to install it again at a later time, or send it
to friends via e-mail. To do this, click Create New Package at the top of the list.
After you click this button, a wizard opens that will guide you through the
process of creating an icon package:
73
Page 78
Customize Windows
Step Description
Drives and folders
1.) Information on the
author
2.) Package name and
description
3.) Optimizing the size
of the package
4.) Creating the icon
package
5.) Finish the wizard
Here, you can add your name, e-mail address and Internet address to the
icon package.
Enter a descriptive package name here. If you wish, you can also enter
additional information on the package in the Description box.
Use the options in this step to make sure that your package is not too large
so that it can be sent via e-mail without problems.
The icons are now collected and optimized if needed, after which they are
saved together in an icon package.
The icon package has been created successfully and is added to the list of
icon packages when you click Finish. Click Open folder to go to the icon
packages folder of TuneUp Styler, after which you can copy the icon
package to a different location, or attach it to an e-mail.
File System
Windows assigns a default icon to each drive, file folder, Start menu folder and
Favorite. Click File System in the navigation bar to change any of these icons.
Under the My Computer node, you can for example assign a cool icon to the
drive where all of your games are installed, and an icon with a serious
appearance to the drive where your office applications are installed.
You can do the same with folders. A few carefully chosen icons can make it
much easier to find your way around drives that contain a great deal of data.
74
Page 79
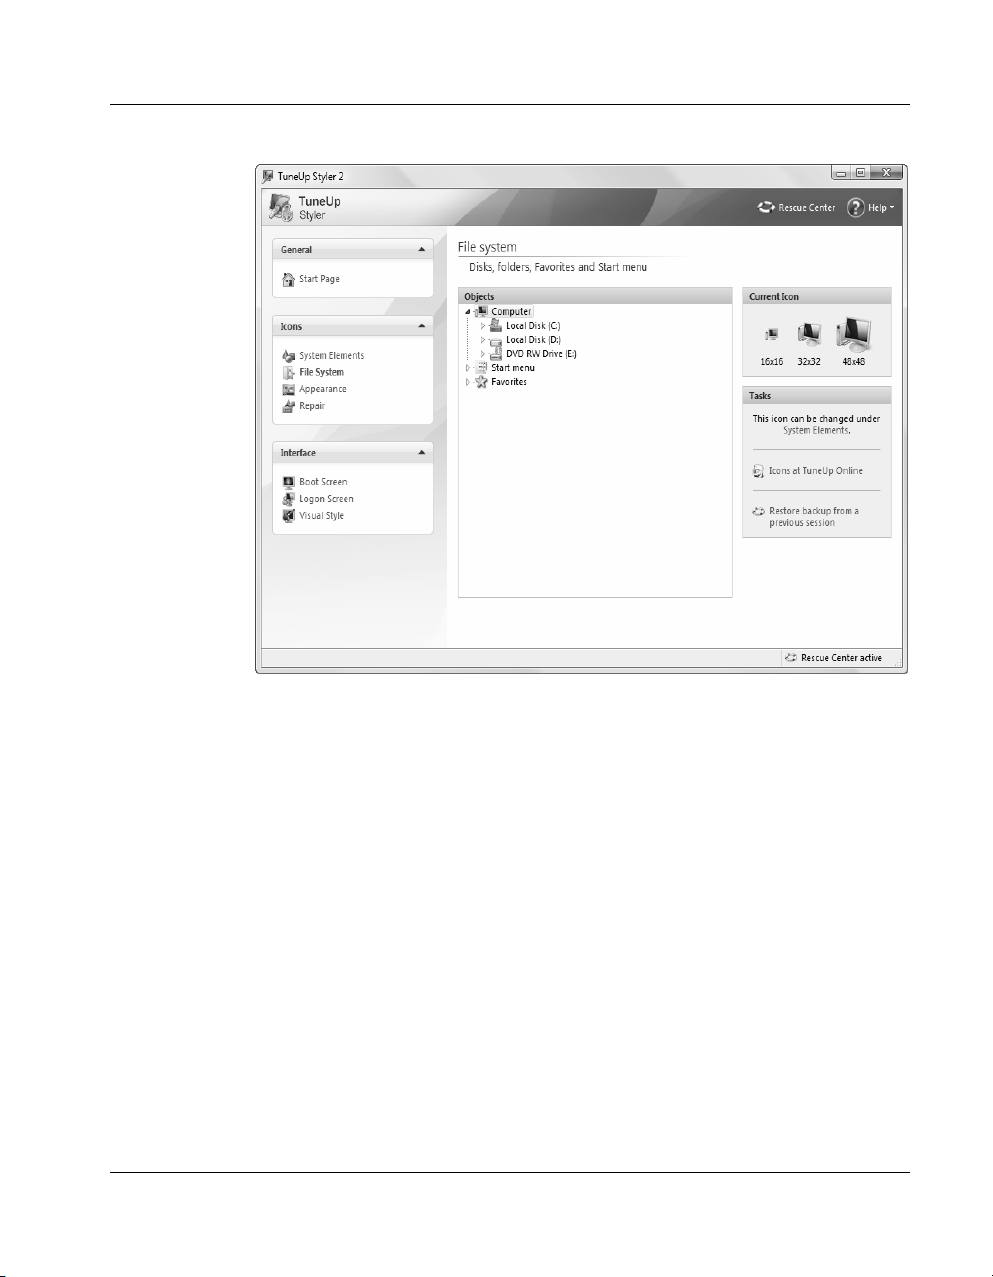
Assign new icons
to your drives!
Start menu folders
Customize Windows
You can use TuneUp Styler to replace the default folder icons in the Start menu
with more informative ones. To do this, open the Start menu node in the tree by
clicking the plus sign in front of it. This function is only available in Windows
2000 or higher.
Internet Explorer
- Favorites
How to change an
icon
Undoing Changes
You can even assign special icons to your Favorites in Internet Explorer. This
way, you can find your most frequently used Favorites in the long list more
quickly.
Select the desired item in the tree and click Replace icon to select a new icon for
the item. Please note that this cannot be done with the three main nodes My
Computer, Start menu and Favorites. You must open one of these nodes by
clicking the plus sign in front of it and then select a subnode.
A new icon is selected in the same manner as for the System items. Once you
find the desired icon, select it and click OK to apply the icon.
You can apply the default icons and undo your changes at any time by clicking
Reset element to Windows default.
75
Page 80

Customize Windows
If you would like to undo changes to muliple icons at the same time, you can use
the Restore backup link. This link opens TuneUp Rescue Center and lets you
undo the changes you have made with TuneUp Styler on a specific date.
Appearance
Here, you can change a large number of settings that govern how icons are
displayed on the desktop. The module shows a preview of your changes on the
left side of the window at all times so that you can see what effect your changes
have.
A preview of your
changes can be
seen at all times
in the left pane.
Icon color depth
Change Icon size
(only Windows XP)
76
From Windows XP, you cannot manipulate the maximum color depth of icons,
as this is always 32 bit (the highest value). If you use a different operating
system, you can increase this value here.
Using a sliding bar, you can change the size of icons on your desktop. They can
even be made twice their current size if you find them to be too small. You can
also shrink the icons to a very small size in order to gain more desktop space.
Page 81

Customize Windows
Change Icon
spacing
Get rid of Shortcut
overlay (only
Windows XP)
You can even specify how much space should be between the individual icons,
both vertically and horizontally.
The Show shortcut arrow option is very interesting. If you do not wish to have
the small arrow displayed on shortcuts, you can disable it by clearing the check
box in front of this option. Many users are bothered by this arrow.
Repair
It is of course fun to change the Windows icons and to add your personal touch
here and there. But what do you do when your changes are not applied, or when
Windows starts mixing up your icons altogether?
Reloading icons
In this case, click Repair in the navigation bar and then click Reload Icons. And
the display errors will disappear.
Repairing the icon cache
If reloading the icons doesn't help, there may be a serious problem in your icon
cache. The icon cache is a file in which Windows stores all of the icons that it
has ever displayed so that they can be shown more quickly in the future. And
when a mistake finds its way into this file, this can corrupt all of the icons.
Fortunately, this problem can be corrected directly in TuneUp Styler. All you
have to do is click Repair Icon Cache. You must restart to complete the repair.
Boot Screen Category
When Windows starts up, a black screen with an animated progress bar at the
bottom is shown by default. With Windows XP, the Windows logo is also
displayed in the center.
You can use TuneUp Styler to replace this boot screen with just a few mouse
clicks, or you can create your own personal boot screen, for example with your
favorite vacation photo.
Click Boot screen in the navigation bar to go to this part of TuneUp Styler.
The module will list all available boot screens. The first time you use the
module, the only screen in the list will be the default Windows boot screen. Add
additional pre-made screens to the list, or create your own.
77
Page 82

Customize Windows
Downloading premade boot
screens
Creating your own
boot screen
You can add additional boot screens to the list by clicking Add at the top of the
list. Here, you can import a boot screen from a file on your computer, or you can
download new boot screens from TuneUp Online. The following formats are
supported:
Type Extension Description
TuneUp
boot screen
Stardock
Bootskin*
Images
Ntoskrnl.exe
files*
.TBS The TuneUp Styler format
.BOOTSKIN
.BMP; .PNG; .GIF;
.JPG; .JPEG
.EXE
A large number of boot screens in this format can be found at
web sites like www.wincustomize.com.
When you select an image file, the Create Boot Screen dialog is
automatically opened with the selected image. Here, you can
make all of the necessary changes.
These files are Windows XP system kernels that contain a boot
screen. TuneUp Styler extracts the boot screen from this file and
saves it in Styler format.
* only Windows XP
If you want to make your own personal boot screen, click the New Screen button
above the boot screen list. This will open the Create Boot Screen wizard, which
will guide you through the necessary steps.
Installing a boot
screen
Restoring the
default screen
78
Select the desired boot screen in the list and then click Install Boot Screen in the
lower right corner of the window. A progress dialog will be shown for the
duration of the installation.
If you no longer want to use your new boot screen, you can naturally restore the
default Windows screen at any time. To do this, click Restore Defaults in the
lower right corner of the window. The default screen is then selected in the list
automatically. Click Install Boot Screen to save your changes.
Create Boot Screen
Give your imagination free reign and create your own boot screen that you can
install on your computer and share with your friends.
Page 83

With TuneUp
Styler 2 you can
easy create your
own Boot Screen.
Customize Windows
Opening the Create Boot Screen dialog
To create your own boot screen, go to the Boot screen category and click New
Screen at the top of the list. This will open a wizard that will take you through
the following four steps:
1. Select image
2. Customize
image
3. Customize
progress bar (only
Windows XP)
First, select a background image for your new boot screen. To do this, click one
of the available options, for example Search local drives if the desired image is
already on your computer. If you select Capture pictures from camera or Find
pictures with Google, save the desired picture at a location where you can find
it again quickly and then click Search local drives to load the picture.
Once you have selected a background image, you can use the Alignment and
Borders functions to optimize the appearance of your picture. Please note that
the available alignment options will only have an effect when the picture is not
the correct size for a boot screen (640 x 480 pixels). Under Background, you
can specify the color that will be used for the areas that are not covered by your
image. This will also be used for the background of the progress bar (for
technical reasons).
Here you can specify the Position of the progress bar, its Foreground color and
the Border color as desired. Position the progress bar at a location that does not
interfere with the overall impression of the picture. This option is not available in
Windows Vista because the progress bar is not shown in the alternative start
screen that is used.
79
Page 84

Customize Windows
4. Finish
So erziehlen Sie
die besten
Ergebnisse.
Click Save boot screen to assign a name to your creation and to add it to the list
of available boot screens.
Tips for attractive boot screens under Windows XP
All boot screens may only have 16 colors under Windows XP for technical
reasons, whereby some of these colors are prescribed by the operating system,
for example black. For this reason, TuneUp Styler must reduce the wealth of
colors in your composition (normally 16.7 million) to a very few when you click
Finish. TuneUp Styler uses a sophisticated algorithm for this to automatically
determine the best 16 colors for your picture. If the picture contains too many
different colors, the results of this conversion may not be satisfactory.
Experience has shown that the most attractive boot screens can be created with
pictures with only a small number of different colors. This means, for
example, that a picture that consists predominantly of different blue shades and
only a few contrasting colors will most likely result in an attractive boot screen.
Set the foreground color of the progress bar to a color that is contained in your
picture. This way, you do not use one of the precious 16 colors in the progress
bar only.
You should avoid skin tones in your boot screen if at all possible. Pictures with
skin tones normally cannot be displayed correctly with only 16 colors (ask any
graphical artist). Of course, you may be lucky. The best thing to do is try!
80
Logon Screen
If you share your computer with other users, or if you use a password to protect
your account, you are familiar with the Windows XP Welcome screen. With
Windows XP, the Logon Screen shows a list of all user accounts. A user can log
on by clicking one of these accounts and entering a password, if one is set for the
account. With Windows Vista, you need to manually enter the user name and
corresponding password.
With TuneUp Styler, you can completely change the appearance of the welcome
screen. Click Logon Screen in the navigation bar to go to this area.
Page 85

Pep up your
system with a
custom logon
screen.
Customize Windows
The module will immediately list all available Welcome screens. When you use
the module for the first time, you will only see the default Windows screen. You
can add additional welcome screens to the list by clicking Add at the top of the
list. You can select an existing Logon Screen from a file on your computer, or
you can download new screens from TuneUp Online. The TuneUp Styler
custom format (TLS) is supported in both Windows Vista and Windows XP. In
addition, all available Welcome screens can be directly installed with the file
Logonui.exe or in Stardock LogonStudio-Format (LOGONXP).
Installing a new
Logon Screen
Select the desired screen in the list and click Install Logon Screen in the lower
right corner of the window.
Most welcome screens are in English, but not all. For this reason, your system
may greet you in a different language the next time you start your computer after
installing a new screen. Then, instead of "Click your user name to log on," the
screen might read "Klicken Sie auf Ihren Benutzernamen, um sich anzumelden,"
for example
For this reason, TuneUp Styler will ask you if you want to use the texts in the
selected Logon Screen, or if you want to use the default texts for your system
81
Page 86

Customize Windows
language (or the currently installed Logon Screen). Once you confirm the dialog,
the installation will begin, and a progress bar will be displayed for the duration
of the operation.
After the new screen is installed, you can test your new screen right away. To do
this, press the Windows key and L key at the same time.
Restoring the
default screen
If you no longer want to use your new Logon Screen, you can naturally restore
the default Windows screen at any time. To do this, click Restore Defaults. The
default screen is then shown in the list automatically. Click Install Logon
Screen to save your change.
Visual Style
The new visual style of Windows makes it possible to lend a new look to all
modern applications. Click Visual style in the navigation bar to customize your
visual style.
82
When you select a visual style in the list, a preview and additional information
are shown on the right. As soon as you have chosen a visual style, click Apply
Visual Style to activate it. Your screen is grayed out briefly while the style is
Page 87

Customize Windows
applied to your system. As soon as the wait screen is closed, you can view your
interface in all of its new glory.
Downloading
visual styles from
TuneUp Online
Adding a style
from a file
You can download new visual styles at any time from the TuneUp website free
of charge. To do this, click Add and then Download Visual Styles From
TuneUp Online. This will open your Internet browser and go to the TuneUp
website, where you can select from a wide range of different styles. Click on a
style to add it to the list of visual styles in TuneUp Styler.
You can also use the option Install Visual Style From File if you have other
visual styles on your computer. This way, you can use visual styles that you
received on CD, for example.
For both options for adding new visual styles, it does not matter in which format
the styles are. TuneUp Styler recognizes nearly all standard formats and can
install them without problems. The following formats are supported:
Type Extension Description
TuneUp Visual Styles .TVS The TuneUp Styler format.
Microsoft Visual Styles .MSSTYLES
Compressed archives .RAR; .ZIP
Self-extracting archives .EXE
This Microsoft format often includes additional files that
can be found in the same folder or in subfolders.
Archives are searched for all file types in this list, and
decompressed automatically if such files are found.
These files are searched to see if they contain
compressed RAR or ZIP archives, which are then handled
as described under Compressed archives.
Resetting and
deleting a visual
style
If you should ever want to restore the standard Windows visual style, all you
have to do is click Restore defaults to select the standard Windows visual style
from the list. Then click Apply visual style to apply your change.
If you wish to remove a visual style from your computer entirely, select it in the
list and click Delete visual style.
83
Page 88

Page 89

Additional tools
The Additional tools category in TuneUp Utilities 2008 includes powerful tools
for various tasks.
8
TuneUp Uninstall Manager shows you all of the applications currently
installed in Windows. Unnecessary applications can easily be uninstalled.
TuneUp Process Manager makes it possible to view all of the applications
currently running on your system and stop them if desired. You can also see an
overview of files on your system that are currently being used by each
application as well as the resource usage of your system memory and processor.
85
Page 90

Additional tools
TuneUp Registry Editor takes a look inside the central Windows database and
allows experienced users to quickly and easily find keys and values, and to make
any necessary changes.
TuneUp Shredder makes it easy to securely delete sensitive files from your
computer. Three high-tech deletion methods can be used to delete files with such
a high level of security that even the most skilled data recovery experts will not
be able to restore them.
And TuneUp System Information provides you with a clear overview of your
hardware and software so that you know exactly what is installed on your
system.
86
Page 91
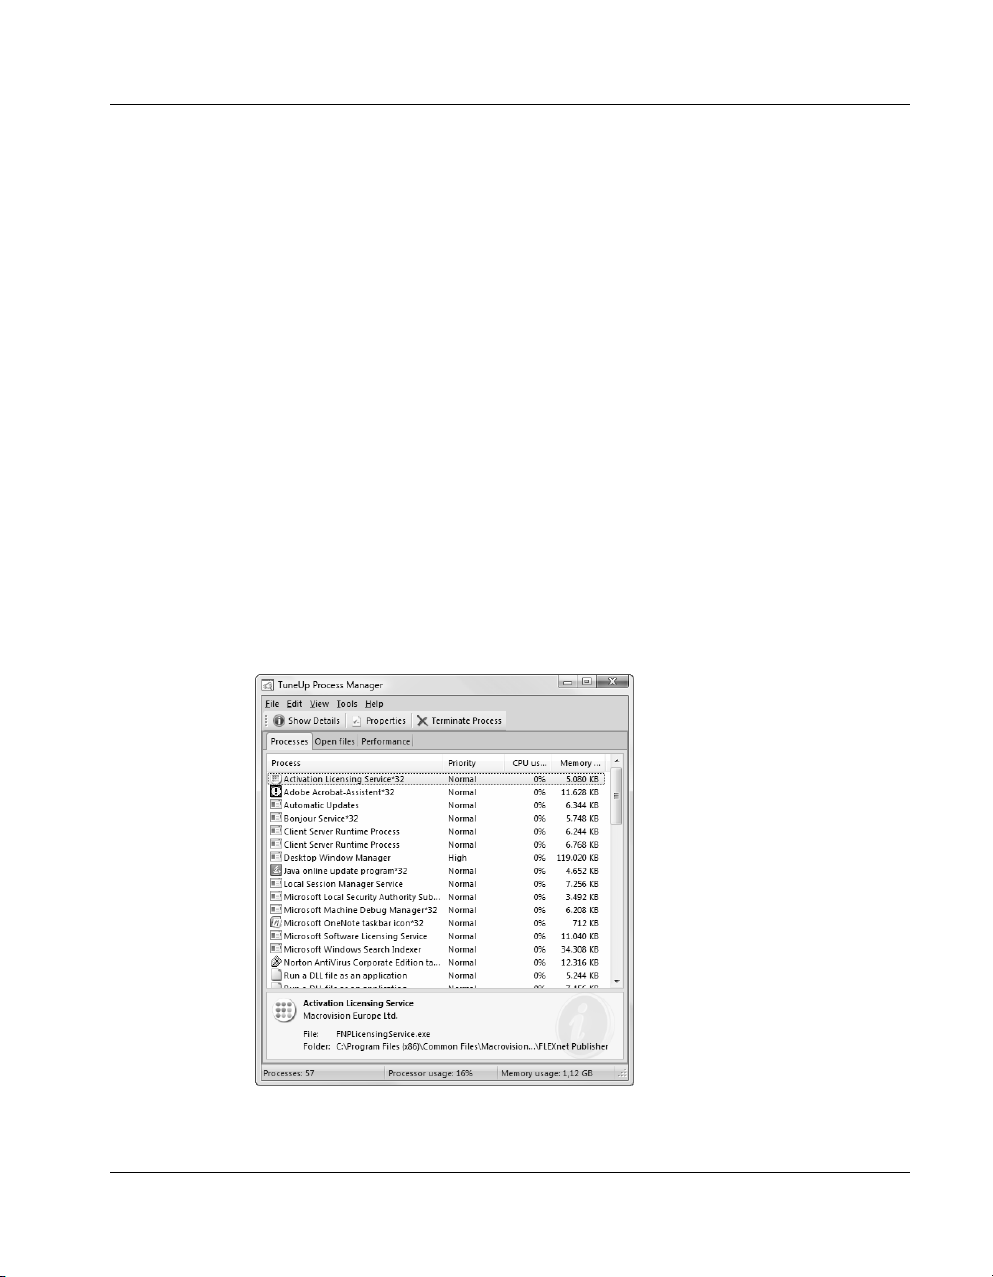
TuneUp Process Manager
TuneUp Process Manager gives you constant control over the programs and
processes that are running on your system and allows you to monitor your
system activity.
You can find out how much memory is being used by which processes, view
numerous details and terminate unwanted processes with a single mouse click.
The module also offers live graphs for processor and memory usage and
provides valuable information on what your computer is doing at any given time.
Usage
TuneUp Process Manager provides a great deal of information on the current
status of your system. This information is divided into three tabs.
Processes tab
Once the module is started, all currently running programs and processes are
shown in the Processes tab. The names of the processes can be seen in the table
together with their priority and CPU usage. The module also shows how much
memory is being used by each process.
Additional tools
It’s hard to believe
how many
processes are
running on a
freshly started
computer.
87
Page 92

Additional tools
If you wish to view more information on an application or a process, you can
select it in the list and then click Show Details. Click Terminate Process to
close a program. This is a somewhat drastic measure, but is sometimes necessary
to close a program that has hung, or if you want to stop an unwanted dialer.
If User Access Control is activated in Windows Vista, it is possible that initially
only the processes that you started are shown. To see the processes started by
other users and by the system, click on the button at the lower border of the
window entitled Show all processes.
Open files tab
The Open Files tab provides an overview of all files and folders that are
currently open on the computer, including information on the file type and
location and which process is currently using the file.
The list of open
files.
88
You should not be surprised when some files are shown in the list more than
once. Files and folders can be opened by more than one process at the same time.
Page 93
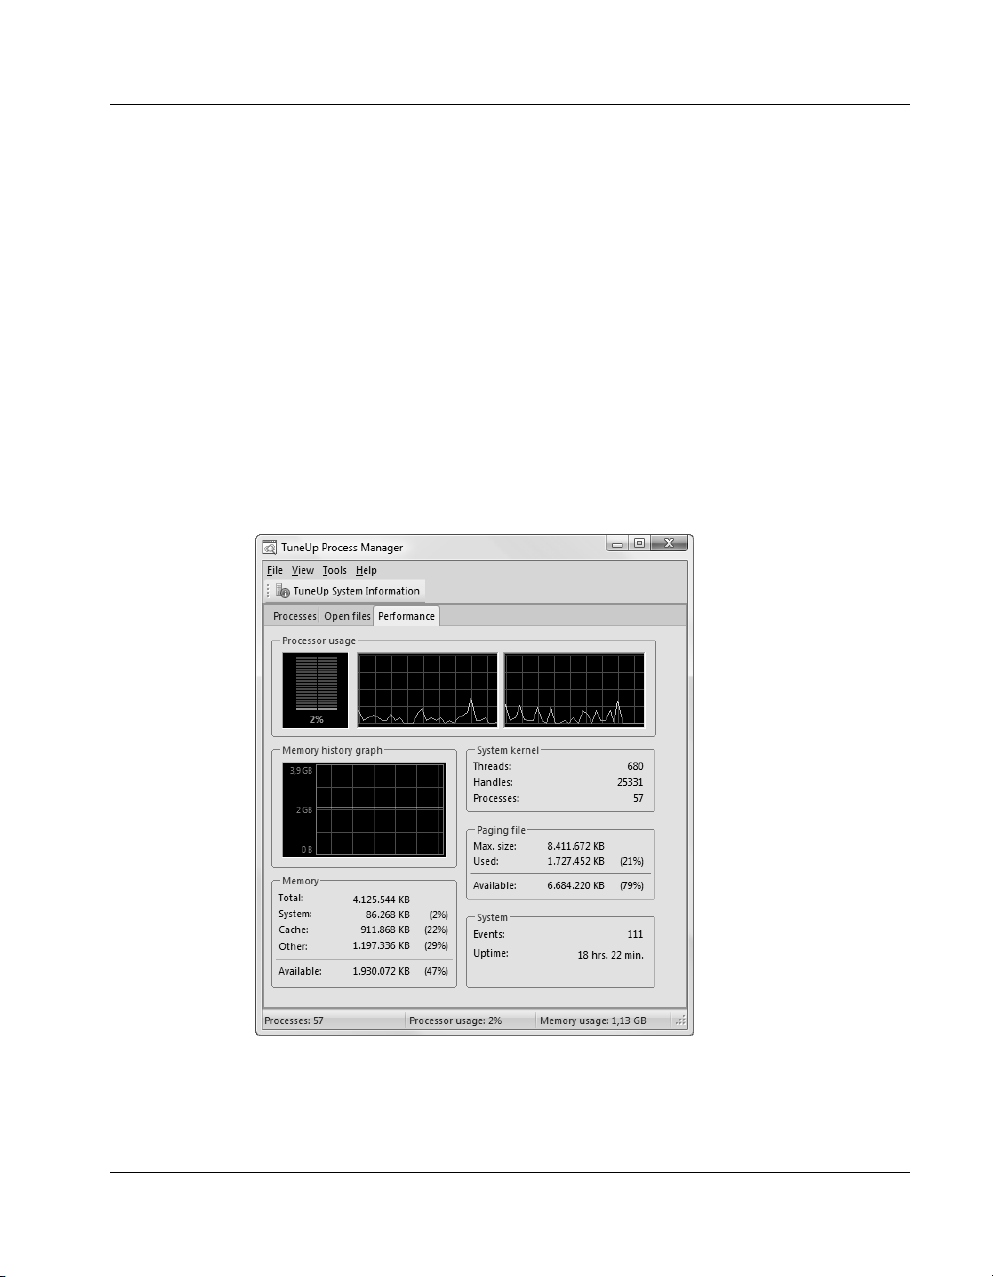
Keep an eye on
your system in the
Performance tab.
Additional tools
It is also normal when files that are obviously "open" cannot be found in the list.
Applications like Microsoft Word and the text editor Notepad only open a file
briefly to read its contents or to save it, but do not keep it open the entire time
you are working on it.
Tip: When you try to delete a file and the computer tells you that it is currently
in use, you can use this module to find out what process is using the file and
terminate it. This will let you delete the file.
Performance tab
The Performance tab provides detailed information on the current status of your
system.
You can view the current processor usage in percent, and a graph of the
processor usage for the last several seconds. A similar graph also shows memory
usage for the last several seconds. You can also view the current usage of the
paging file and the physical memory on kilobytes.
89
Page 94

Additional tools
Menu bar functions
The menu bar at the top of the TuneUp Process Manager window provides you
with additional functions.
Click File > New Application to open the Windows Run dialog, which you can
use to start a new application or open a file.
Click File > Exit Windows to shut down or restart the computer so that new
settings can take effect.
If you have selected a process in the list, you can click Edit > Set Process
Priority to specify how much processing power Windows should assign to this
process.
Replacing Task Manager
If you click File > Replace Task Manager, TuneUp Process Manager integrates
itself into your system so that you can access the module by pressing
Ctrl+Alt+Del, or by right clicking on an empty part of the taskbar and selecting
Task Manager.
If you want to use the Windows Task Manager again, simply select the same
menu item to remove the check mark in front of it.
Note: This function is only available for Windows 2000 and Windows XP.
90
Page 95
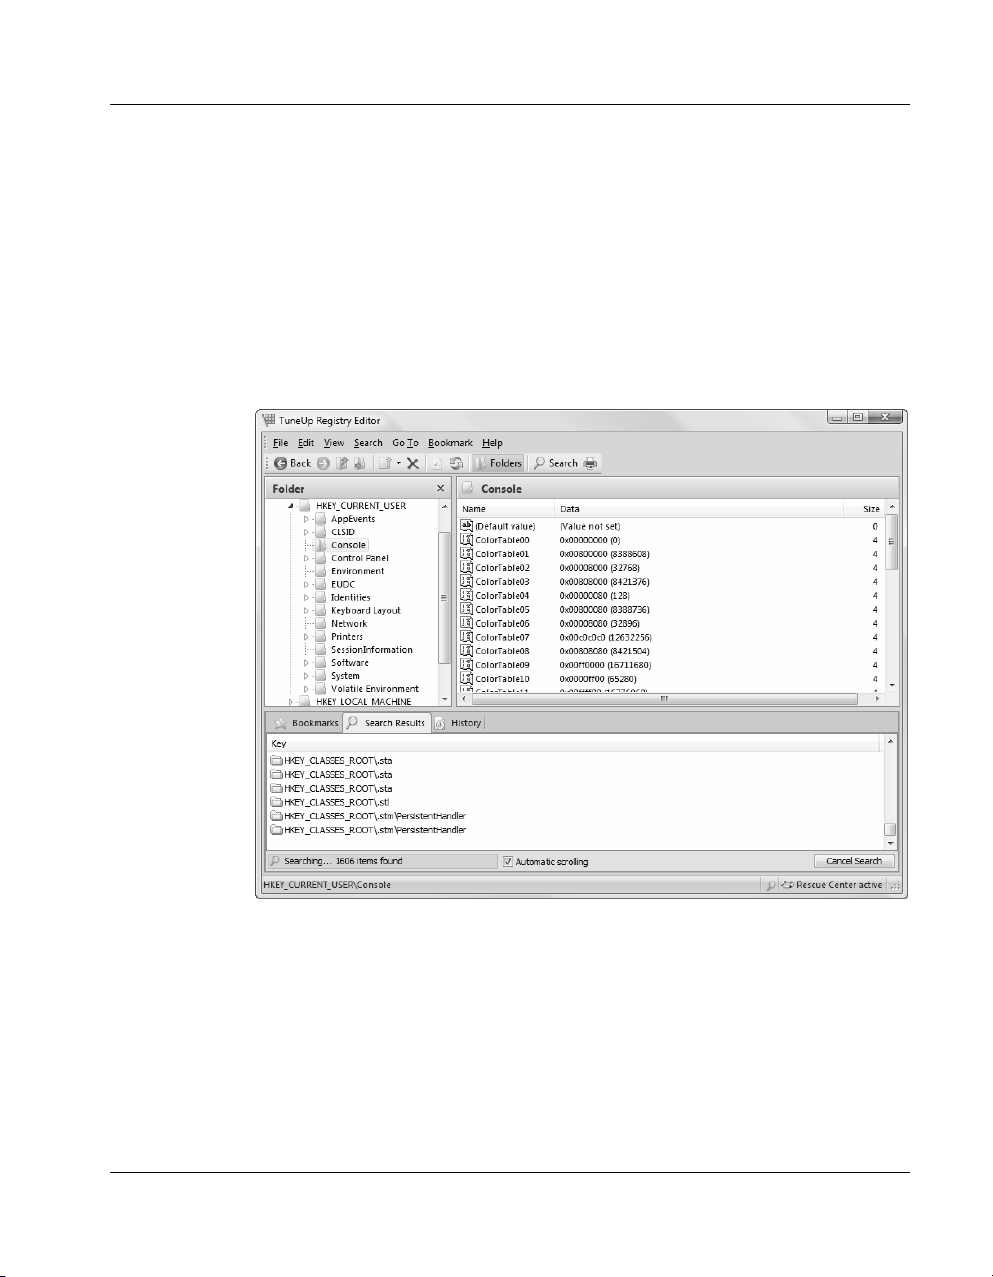
TuneUp Registry Editor
The Windows registry is nothing more than a large central database. Every
hardware component and program that is installed makes entries in this database.
With time, the registry gets increasingly larger and more chaotic.
Additional tools
The advantages of
TuneUp Registry
Editor.
The main window.
True experts who are looking for a suitable tool to delve deep into the Windows
system and to adapt their configuration manually should use TuneUp Registry
Editor. It is considerably faster and more comfortable to use than the standard
editor from Microsoft, and also offers the protection of TuneUp Rescue Center which means that you can undo your changes at any time.
Usage
The registry is opened as soon as you start the module. The registry database
consists of countless keys that are divided into different categories. The editor
displays the structure of the registry in the form of a tree, with the individual
categories on the left side of the window under Folder. Double click a category
to display its subcategories. When you reach the lowest level of the hierarchy,
91
Page 96

Additional tools
the individual keys will be displayed on the right half of the window, where you
can edit them.
When you click a key with your right mouse button, a context menu opens with a
number of different commands. Delete removes the entry from the registry.
Rename lets you assign a new name to the key, and Edit lets you change the
value of the entry.
When you right click the hierarchy on the left side of the window, the context
menu that is displayed has a much larger selection of commands. One of the
most useful commands here is Search, which allows you to look for words in the
entire registry. Set bookmark lets you place a virtual bookmark. All "dog ears"
are shown in the lower third of the window under Bookmark. The results of
your searches can be found under Search Results.
92
Page 97

TuneUp Shredder
When you delete a file in Windows, it will probably be moved to the Recycle
Bin. Anybody can get a file back out of the Recycle Bin. For this reason, many
users empty the Recycle Bin regularly, or delete their files without moving them
to the Recycle Bin.
But you should know that Windows does not really destroy a file when it deletes
it, its entire contents are still located on the hard drive. Windows simply marks
the file as "deleted" in the file system, and the disk space occupied by the file can
be used to store other data. But as long as nothing is saved in the area occupied
by the deleted file, this "lost" file can be found and recovered easily with a
program like TuneUp Undelete.
What does TuneUp Shredder do?
TuneUp Shredder makes sure that no data thief can get his hands on your
sensitive data. The tool deletes files permanently, with no chance of recovery.
And if you wish, you can even use a deletion method that was developed by the
United States Department of Defense, which overwrites files with certain
number patterns multiple times before deleting them, so that their contents are
securely destroyed.
Additional tools
What do you want
to delete?
Usage
Once you start the program, a wizard opens that asks you if you wish to delete
individual Files, entire Folders or the contents of the Recycle Bin.
Type Description
Files
Folders
Recycle Bin
When you select this option, the next window will show an empty list to which
you can add files that you wish to delete.
When you select this option, you can select the folder that you wish to have
deleted along with its entire contents in the next window.
Select this option when you want to shred the contents of your Recycle Bin.
You can review the contents of the Recycle Bin before deletion in the next
window.
93
Page 98

Additional tools
Select the desired option and click Next to continue.
Deleting Files
Drag and drop the files you wish to delete from the Explorer into the Files list, or
click Add to select the files in a file browser.
When Delete allocated free space is selected, the Shredder will also overwrite
the free space that has been assigned to the selected files.
Select the files
you want to delete
94
Click Next to confirm your selection.
Deleting a Folder
Enter the complete path of the folder you wish to delete in the Folder box, or
click Select to select the folder from a tree view.
When Delete allocated free space is selected, the Shredder will also delete the
free space that has been assigned to the files in the selected folder.
Click Next to confirm your selection.
Deleting the contents of the Recycle Bin
In this step, you can view the contents of your Recycle Bin by clicking Show
Contents. All files and folders in the Recycle Bin will be deleted.
Page 99

Additional tools
When Delete allocated free space is selected, the Shredder will also delete the
free space that has been assigned to the files in Recycle Bin.
Click Next to confirm your selection.
Selecting the deletion method
How securely do
you want to delete
your files?
This section deals with the level of security you wish to use when deleting files
or folders. Just select one of the three options in the Deletion method section.
Quick delete: Files will be overwritten with a single character The original text
of the files will be replaced with endless columns of a certain letter.
Secure delete in accordance with DoD 5220.22-M A procedure that was
developed by the United States Department of Defense (Regulation DoD
5220.22-M) will be used. The files are overwritten with special data patterns
multiple times before deletion, thereby destroying the original contents so
effectively that even expensive examinations of the magnetic structure of the
disk in a special laboratory cannot recover the data.
Secure delete, Gutmann method: This method, named after its inventor Peter
Gutmann, overwrites the files to be deleted 35 times with random values in a
special pattern and then deletes them. This method is considered the most secure
way to delete files with software, but also takes the longest time.
95
Page 100

Additional tools
How many times
should the
deletion operation
be repeated?
You can specify how many times the deletion process should be performed
under Repeat the delete operation. The more the process is repeated, the more
secure the deletion will be, and the longer the process will take.
Click Next to begin the deletion process. Please wait until this is successfully
completed. If you do not want to delete any more files, you can close the wizard
by clicking Finish.
If you wish to delete additional files or folders, simply click Back.
Shredding a File After Deletion
If you have already deleted a file by “normal” means, the only way to reliably
destroy it is by using a special tool that overwrites all free space on your drives.
Tip: When you defragment a drive, any deleted files are normally overwritten in
the process and cannot be recovered afterwards.
96
 Loading...