

Page 1
TuneUp Utilities 2003
The Manual
Page 2

TuneUp Utilities 2003 was developed by:
TuneUp Software GmbH, Donnersbergring 22, 64295 Darmstadt,
Germany
Web: www.tune-up.com
The software manual was written by:
Redaktionsbüro Typemania, Carsten Scheibe
Web: www.typemania.de
To receive software support, contact:
E-Mail: tu2003@tune-up.com
Web: www.tune-up.com/support
2
Page 3

Table of Contents
Table of Contents ____________________________________ 3
1. Dear Users ________________________________________ 6
System Requirements____________________________________8
2. Software Installation_______________________________ 10
Starting the Installation _________________________________ 10
Starting the Software ___________________________________14
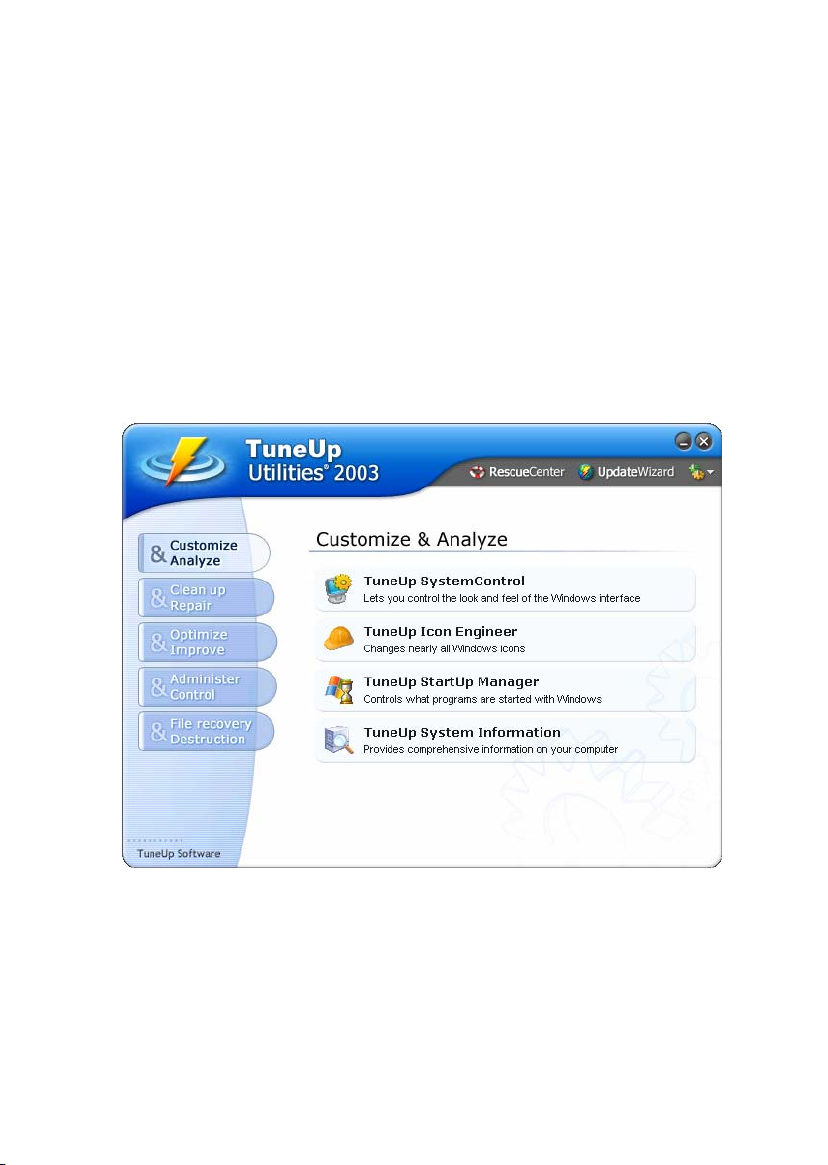
3. Customize & Analyze ______________________________ 15
TuneUp SystemControl _________________________________ 16
Viewing - Animations & Effects ______________________________ 17
Viewing - File Types _______________________________________ 21
Viewing - Folder Options ___________________________________ 24
Usage - Input options_______________________________________ 27
Usage - Start menu_________________________________________ 30
Usage - Taskbar ___________________________________________ 32
Communication - Network___________________________________ 34
Communication - Internet Explorer ____________________________ 36
Communication - Mail Programs______________________________ 38
Communication - Privacy ___________________________________ 39
Administration - User Logon _________________________________ 42
Administration - Drives _____________________________________ 45
Administration - Memory and Cache___________________________ 46
Administration - Start and Maintenance ________________________ 47
Administration - System ____________________________________ 50
3
Page 4

TuneUp Icon Engineer _________________________________ 52
System Icons _____________________________________________ 52
Drives and Folders_________________________________________ 55
Appearance ______________________________________________ 57
Repair __________________________________________________ 58
TuneUp StartUp Manager ______________________________ 59
TuneUp System Information ____________________________ 61
4. Clean & Repair ___________________________________ 64
TuneUp RegistryCleaner _______________________________ 65
The Scan ________________________________________________ 66
Evaluation _______________________________________________ 67
Cleaning_________________________________________________ 70
TuneUp DiskCleaner___________________________________ 72
The Analysis _____________________________________________ 72
Evaluation _______________________________________________ 74
Cleaning_________________________________________________ 77
5. Optimize & Improve________________________________ 78
TuneUp MemOptimizer ________________________________ 79
TuneUp System Optimizer ______________________________ 83
Quick Maintenance ________________________________________ 84
System Advisor ___________________________________________ 85
Internet Optimization Wizard ________________________________ 86
System Optimization Wizard_________________________________ 87
4
Page 5

6. Administer & Control ______________________________ 90
TuneUp Process Manager _______________________________ 91
TuneUp Registry Editor_________________________________ 94
TuneUp Uninstall Manager ______________________________ 95
7. File recovery & Destruction _________________________ 98
TuneUp Shredder ______________________________________99
TuneUp Undelete _____________________________________ 101
8. TuneUp RescueCenter ____________________________ 105
Undo changes ________________________________________106
System recovery ______________________________________ 107
9. TuneUp UpdateWizard ____________________________ 109
10. TuneUp RegistryDefrag __________________________ 111
Launching the tool ________________________________________ 112
11. Glossary _______________________________________ 115
12. Index _________________________________________ 127
5
Page 6

1. Dear Users
Most computers used worldwide run Windows XP or one of its previous
versions as an operating system. Windows is well suited to starting
programs and managing files. But if users want to adapt the system,
optimize it or slenderize it, they will soon realize that this is much more
difficult than it might sound.
Actually, however, anything is possible. Windows controls the
programs which are automatically activated during start-up. It
determines the commands that are available in the start menu. Windows
also determines the look of the icons on the desktop. But: How can a
user change these settings?
"It's all very easy", is what the professional says. All important variables
are hidden in the Windows configuration files and in the registry, after
all. The registry is the central database in Windows, which both
programs and hardware modules save their current settings to. Using the
appropriate editors, it is possible to open these specific system files and
to expertly modify the variables. The problem, however, is that only
well-informed professionals know where to look for the variables they
are interested in amongst all the cryptic entries. For most users, an
opened registry is nothing but a mystery.
TuneUp Utilities 2003 is designed to help both the novice user and the
expert in adapting Windows to their individual demands. In numerous
windows, all important system options are listed. They can subsequently
be activated and deactivated point-and-click. TuneUp Utilities then
independently attends to changing the appropriate entries in either the
registry or the configuration files.
6
Page 7

However, TuneUp Utilities does not only meet the claim to "prettify our
Windows". It is also possible to clean up and optimize the system by
simply pressing a button. The program then removes all redundant
entries from the registry and optimizes the existing settings, thus
considerably increasing system speed.
All modules of TuneUp Utilities can be accessed from a shared
graphical interface which is loaded immediately upon starting the
software and makes available the following buttons:
Customize & Analyze: With this button you can attend to all cosmetic
aspects in your cooperation with Windows, determining how the system
looks and behaves. In addition, you can change the user interface
symbols and manage the programs intended to open during windows
start-up. The section is rounded off with a system analysis option.
Clean up & Repair: Two modules clean up the Windows registry and
delete superfluous files from the hard drive. These activities
considerably speed up the system.
Optimize & Improve: The program searches the system for speed
obstacles and removes them. In addition, TuneUp MemOptimizer
constantly optimizes memory in the background.
Administer & Control: Three modules help with editing the registry,
supervising running programs and safely removing all applications that
are no longer needed.
File recovery & Destruction: Safety is feasible. The Shredder for
example is able to delete sensitive files in a way that renders them
impossible to restore. On the other hand, TuneUp Undelete can be used
to restore programs that had already been deleted from the Windows
recycle bin.
7
Page 8

The RescueCenter is available to revert changes and restore files
deleted by the Utilities. The UpdateWizard helps with keeping the
software up to date and downloads updates from the Internet point-andclick.
System Requirements
TuneUp Utilities 2003 profoundly changes the Windows system. The
operating system, however, often changes considerably from one
version to the next. Even so, TuneUp Utilities is able to adapt to
differing Windows versions and supports the following Windows
releases: Windows 95, 98, Me, 2000 and XP. TuneUp Utilities does not
support Windows NT.
From a functional range point of view, the program always adapts to the
current operating system. In Windows 95/98/Me for example, the
module TuneUp RegistryDefrag is available for defragmenting the
registry while it is not installed in Windows 2000/XP. SystemControl
also adapts its functional range to the functions offered by the respective
systems.
Minimal system configuration:
♦ Microsoft Windows 95
♦ Graphics mode 640x480 with 256 colors
♦ 30 MB free hard disk space
♦ Intel Pentium or AMD K5 processor with 133 MHz
♦ 64 MB RAM
♦ CD-ROM or DVD-ROM drive
8
Page 9

Recommended system configuration:
♦ Microsoft Windows Me/2000/XP
♦ Graphics mode 1024x768 with 16.7 m colors
♦ 50 MB free hard disk space
♦ Intel Pentium 4/5 or AMD Athlon processor with 500 MHz
♦ 128 MB RAM
♦ CD-ROM or DVD-ROM drive
♦ Internet access
9
Page 10

2. Software Installation
Before you can use TuneUp Utilities on your computer, you have to
install the software. During installation, program files are transferred to
the hard disk. You can then start and use the Utilities without inserting
the program CD into your CD-ROM drive.
Starting the Installation
If the Autoplay function is enabled for your CD-ROM drive, the
TuneUp Utilities installation routine will start automatically. In this case
Windows attends to calling the file.
If the Autoplay function is disabled on your computer, nothing happens
after inserting the program CD into the CD-ROM drive. In this case, use
Explorer or some other file management program to run the file
SETUP.EXE in the root directory of the CD-ROM. To do this, doubleclick on the file.
The installation routine will now welcome you. Right at the beginning
you are asked to close all other open Windows programs. To do this,
switch to these applications with ALT+TAB and close them with the
shortcut ALT+F4. This way, possible disturbances and interferences
during the installation are prevented. In addition, TuneUp Utilities now
can also update and overwrite system files which might otherwise have
been in use. Press the Next button to proceed.
10
Page 11
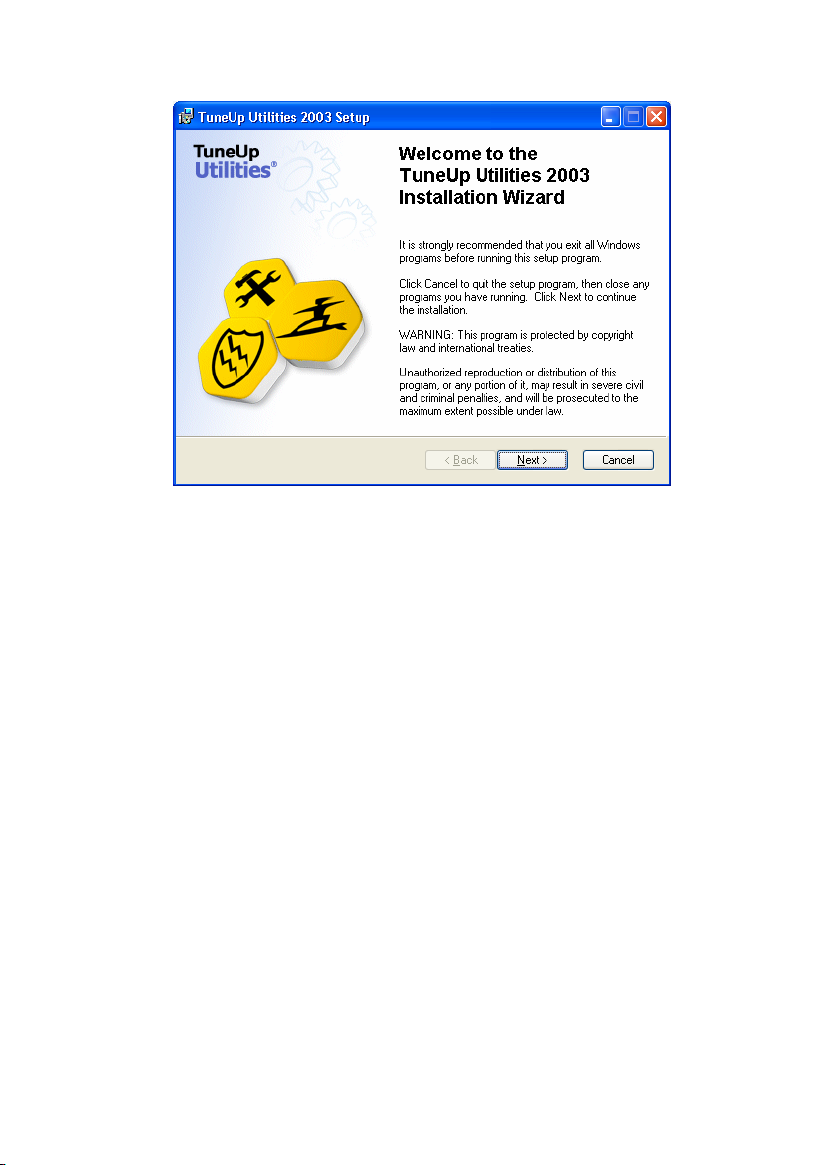
Please close all other open Windows programs.
The program now shows the license agreement. Please read the text
once to find out about the terms for using the program. Afterwards,
activate the I accept the license agreement option and proceed by
pressing Next.
11
Page 12
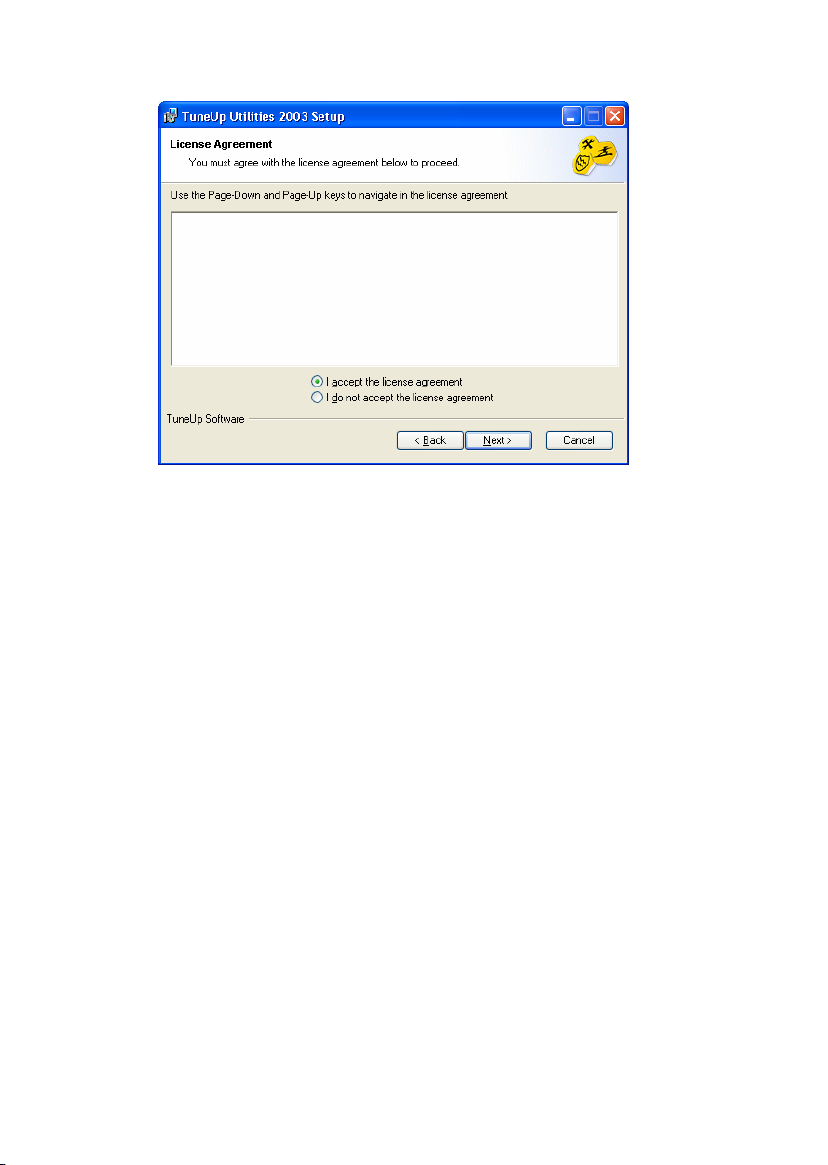
You have to accept the license agreement to proceed.
On the next screen you are asked to fill in the User information. The
program wants to know your name and the name of your
organization/company. The installation routine will attempt to
automatically fill in this information for you. The Serial number can be
found on the front cover of this manual.
For Windows XP and 2000 users: At this point it is also important
whether the application is supposed to be available to all users of the
computer or to a single user only. In order to install TuneUp Utilities
2003, you need to have administrator rights on the computer.
12
Page 13
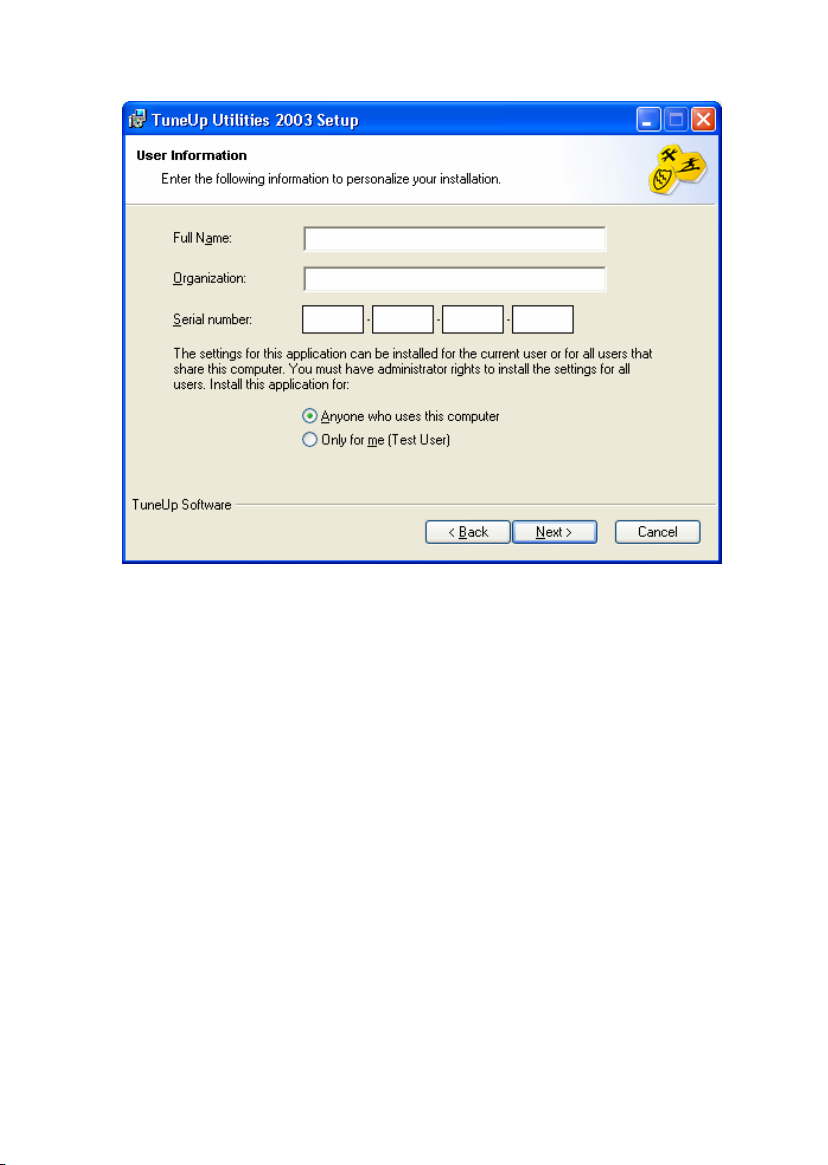
Please personalize your copy of TuneUp Utilities.
Now we get down to business. On the next screen you have to name a
Destination folder. That is the directory on the hard disk supposed to
accommodate TuneUp Utilities. As a default, the program uses the path
C:\Program Files\TuneUp Utilities\. If you want to use another target
directory, press Browse to select one from a file browser.
Press Next to begin copying the files. During this activity, a bar graph
will show you the operation's progress. Please wait until the program
reports that "TuneUp Utilities has been successfully installed". Then
press the button Finish to close the installation routine.
13
Page 14

Starting the Software
There are two different ways of starting the program.
During installation, the program creates a new icon on your Windows
Desktop. To directly start the software, double-click on the icon labeled
TuneUp Utilities.
Alternatively, it is possible to use the Windows Start menu. Open it
and go to the Programs folder. Here you will find a new group labeled
TuneUp Utilities. By clicking on the TuneUp Utilities entry, you can
load the tools' menu system. You can also start each tool separately, if
you already know which program module will be required. In this case,
Utilities opens an additional cascading menu, where all modules are
listed. Clicking on one of the names listed causes the according tool to
start.
14
Page 15
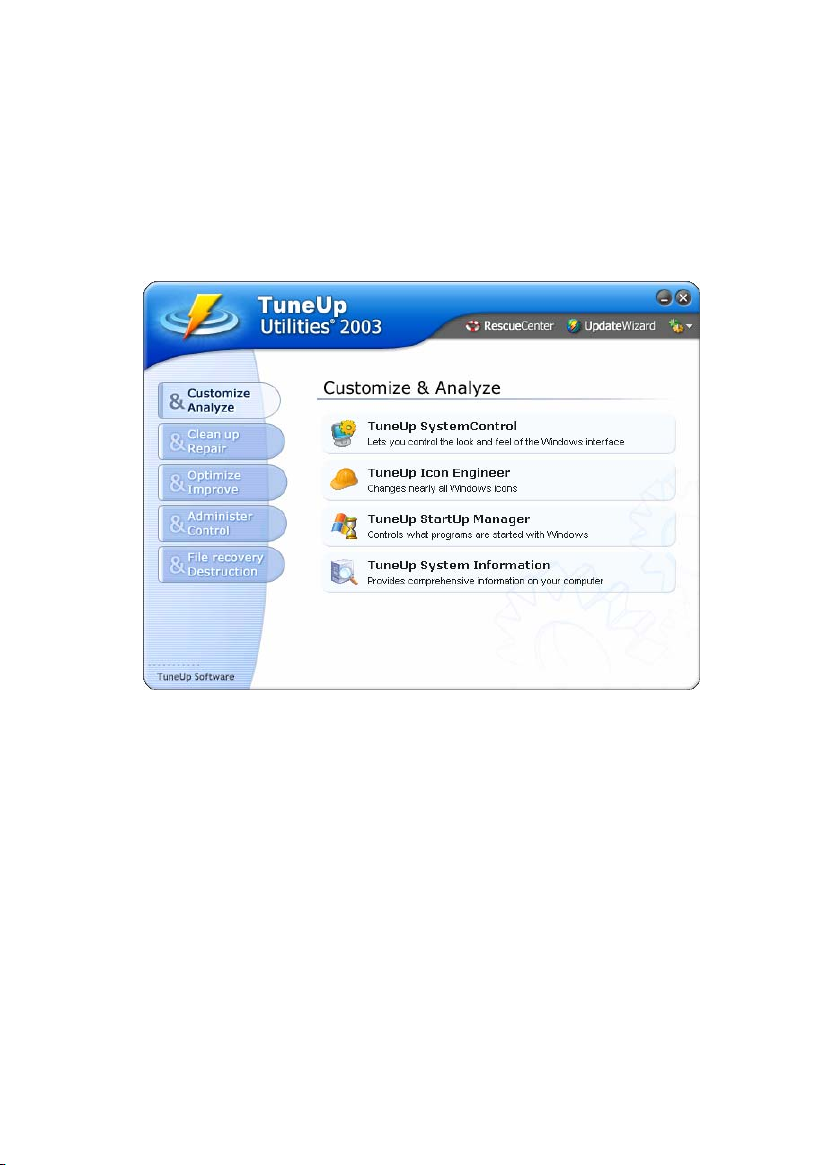
3. Customize & Analyze
The category Customize & Analyze helps you to get a grip on four
different problems at the same time.
In this section, various functions are available which help you change the
appearance and functionality of Windows.
TuneUp SystemControl undertakes cosmetic changes to Windows.
Here you determine what the Desktop looks like and how it works. You
will be surprised how many options TuneUp offers in this module. For
the most part, they are functions innately offered by the Windows
registry. So far, however, only professionals were able to activate these
options in the registry.
15
Page 16

TuneUp Icon Engineer module is responsible for the icons. It
exchanges existing symbols for new ones and simultaneously changes a
number of system settings.
TuneUp StartUp Manager disables annoying startup programs. These
are programs which are automatically started together with Windows –
often against your wishes. The module lists all startup programs and lets
you decide which ones you want to have present in the background from
now on.
To let you know which components are installed on your system, the
module TuneUp System Information endeavors to create a status
report. Point-and-click.
TuneUp SystemControl
To start the program that will help you to fundamentally change the
appearance of Windows, click on the button TuneUp SystemControl in
the selection menu.
TuneUp SystemControl is probably the most powerful module of the
software. As soon as the program window has opened, it presents its
numerous options in many different categories that are shown on the
left. These categories are labeled Viewing, Usage, Communication and
Administration. For each of these categories there are several subcategories as well.
As soon as you chose a category, the program lists the appropriate
options on the right side – mostly again in several tabs. On the next
couple of pages, we will attempt to briefly present the most important
functions.
16
Page 17

Very important: In case of doubt, the Restore Defaults button helps you
to cancel all changes made and to re-establish the old status quo.
One more information: TuneUp SystemControl always adapts to your
system and only offers the options that make sense. On the following
pages, only the settings for Windows XP will be specified, since this is
the current operating system. The context help in the program (which
can be reached by right-clicking any option) is available for every
operating system, though.
Viewing - Animations & Effects
• Tab Effects
Here you can activate settings which are used for showing and operating
Windows elements. In the Settings section, numerous options are listed.
The options marked with a check are active at the moment. If you want
to deactivate an option, simply click into the box with your mouse to
erase the checkmark.
The individual options are divided into the subject areas Visual Effects
and Usage. Here options like Show window contents while dragging,
Show color shading in the title bar or Show mouse pointer shadow
can be activated. They all show nice optical effects, but slow the system
down considerably as well. If you want to know more about an option,
select it with the mouse. In the Description field, a short explanation
will be shown immediately.
Press the Best Appearance button to select all options in a way to have
Windows show really excellent looks. If you prefer performance, press
17
Page 18
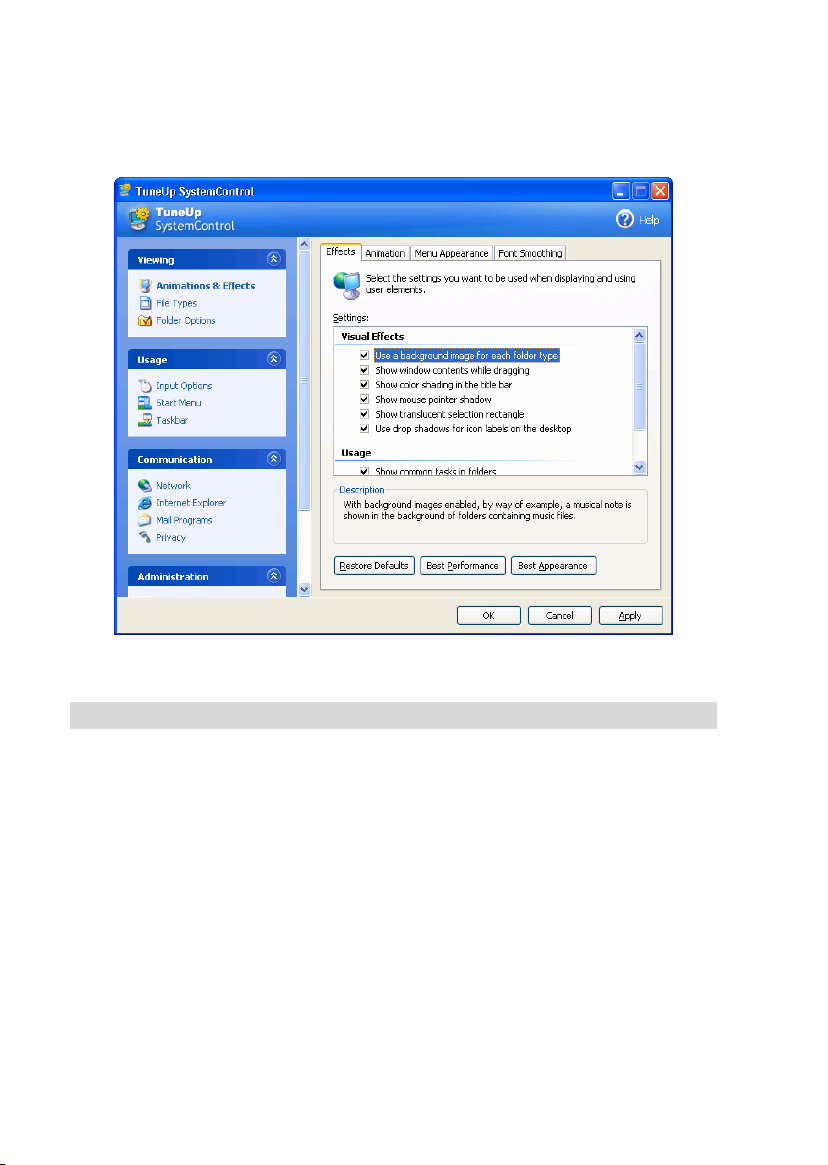
the Best Performance button. With Restore Defaults, the original
settings are reloaded.
Enabling and disabling visual effects.
• Tab Animation
When using windows and lists, animations may come into operation.
In the Window and Note Animation section you can determine
whether windows or tooltips will be animated or not. Here you can
specifically enable Animate windows when minimizing and
maximizing. If the option Use the following animation with tooltips is
activated, you can for example choose an option like Fade effect from
the Effect pull-down menu.
18
Page 19
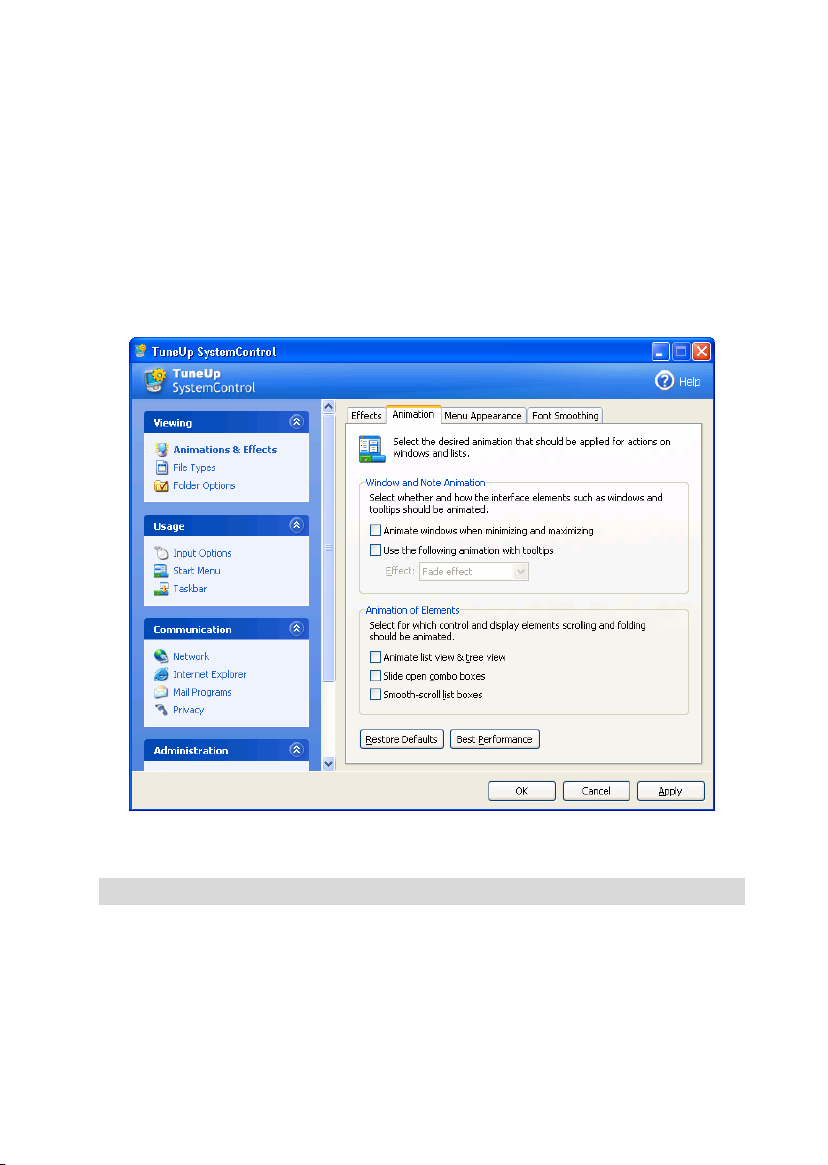
In the Animation of Elements section you can decide in which display
and control elements both scrolling and opening will be animated. You
can activate the three options Animate list view & tree view, Slide
open combo boxes and Smooth-scroll list boxes.
Click on Best Performance to disable all options that are only straining
after effects. With Restore Defaults you reactivate the predetermined
Windows status quo.
Care for some animation?
• Tab Menu Appearance
Here you determine the look and behavior of context menus and of the
application standard menus.
19
Page 20

In the Animation section you decide whether menu elements will be
hidden after being called. In addition, you can select to Use the
following display effect from the pull-down menu.
In the Effects section you choose whether Windows will use flat 2D
menus or if open menus ought to cast a small shadow on the area
underneath.
• Tab Font Smoothing
Texts on screen can actually only be read smoothly, when they have
been smoothed in the Standard mode. Otherwise they show ugly
jagged pixel edges which are particularly obvious in large headlines.
The font smoothing technique ClearType is quite modern. It smoothes
the character more precisely than usual and is particularly suited for
LCD monitors.
In this section you decide on one of the three available modes. Preview
the characteristics of an option and then determine the Smoothing in a
pull-down menu.
20
Page 21
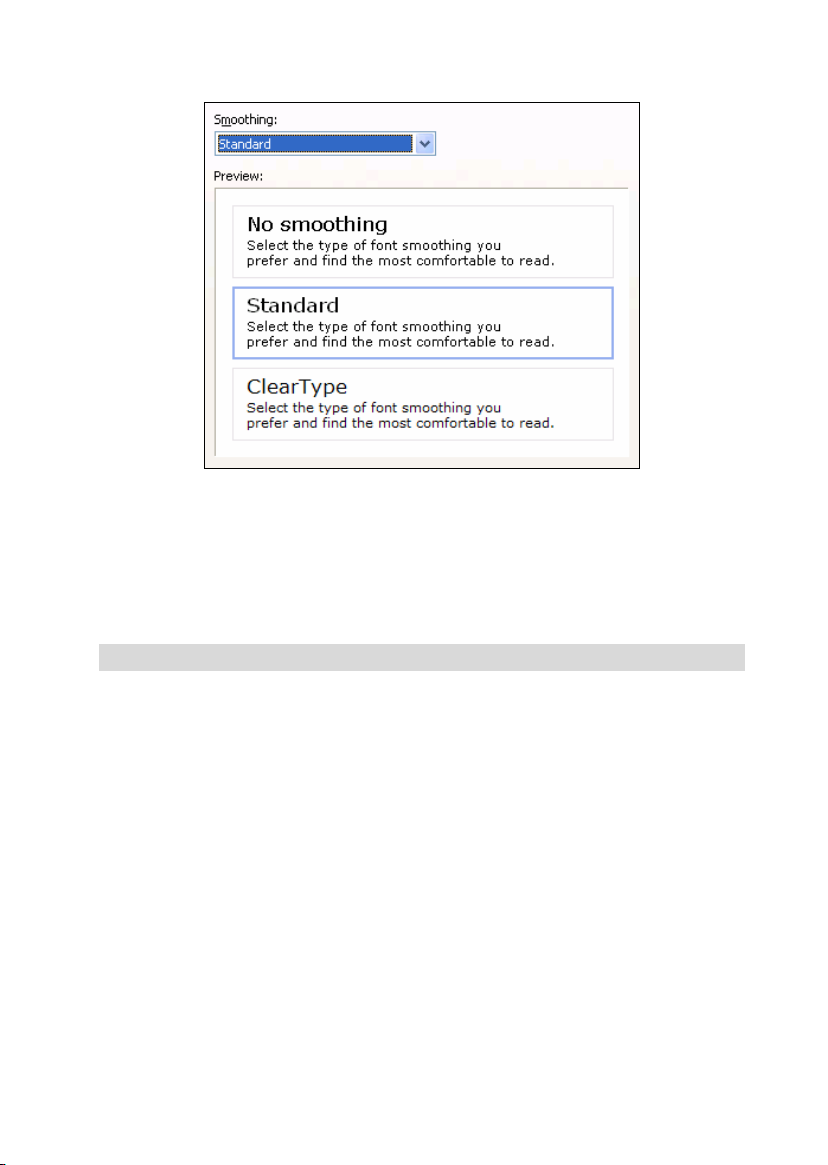
What form of Font Smoothing do you prefer?
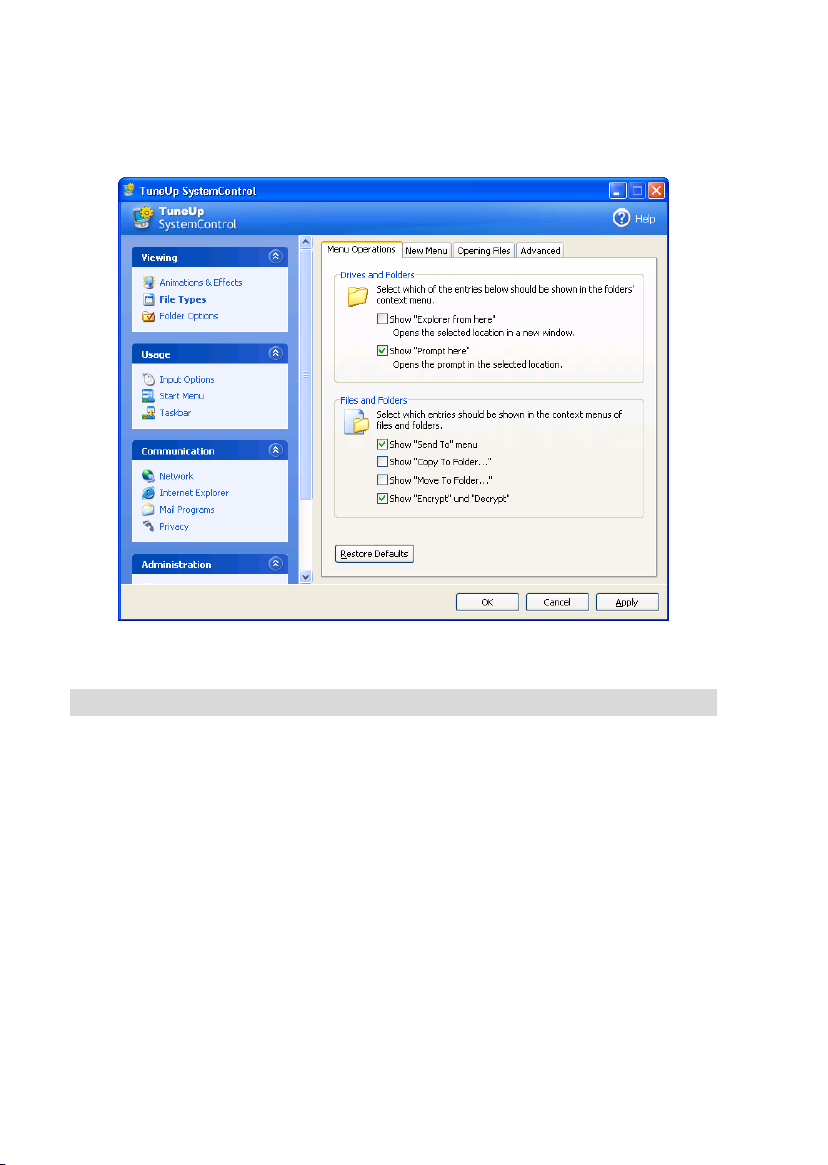
Viewing - File Types
• Tab Menu Operations
In the Drives and Folders section you chose which of the entries listed
are supposed to be shown in the folders' context menus. The Show
"Explore from here" option opens a folder in a new window. The
Show "Prompt here" option opens the prompt at the location desired.
In the Files and Folders section you determine which commands are to
be shown in the context menus of both files and folders. Here you can
upgrade the four commands Show "Send To" menu, Show "Copy To
Folder…", Show "Move To folder…" and Show "Encrypt" and
"Decrypt" (not available for XP Home Edition) if required. Commands
already active are marked with a check.
21
Page 22
And again: The Restore Defaults button will re-establish the original
Windows settings.
You can influence the context menus of both folders and files.
• Tab New Menu
In the desktop, explorer and save dialog context menus, the command
"New" can be found. It opens a cascading menu and offers various file
types which can be newly created point-and-click.
With TuneUp Utilities you can determine which Templates are to be
shown in the "New" menu. If you want to disable individual file types,
click into the according checkbox to remove the checkmark there.
Remove completely eliminates entries from the list. With Add more file
types can be added to the list.
22
Page 23
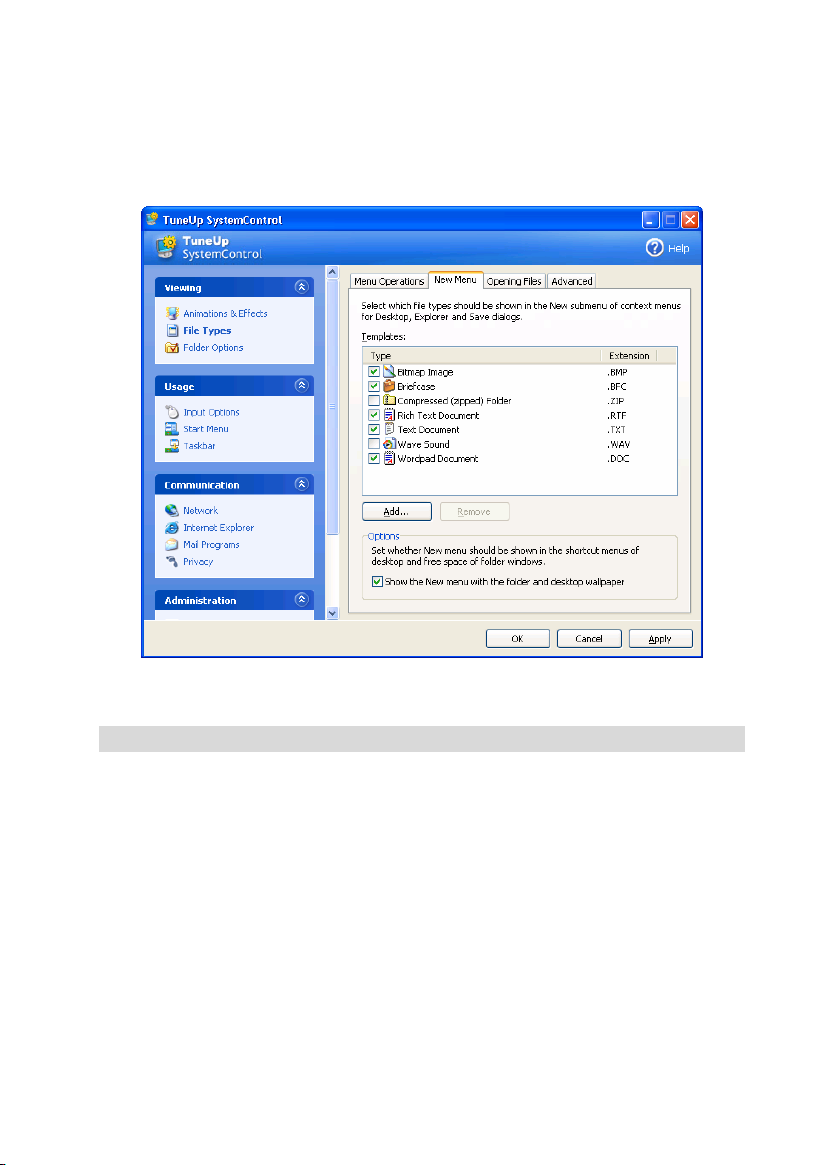
Under Options you can decide whether the "New" menu will be shown
in the context menus of both the desktop and the free space in folder
windows.
Changing predetermined settings for the "New" menu.
• Tab Opening Files
Here you decide how Windows is to react when opening unknown file
types. In the Default Application field you determine one of two
options. Either the "Open with…" dialog will be shown or a file will
automatically be opened with a predetermined program, for example
Notepad. To pick the second option, enter the application path/start
name in the Open with field.
23
Page 24
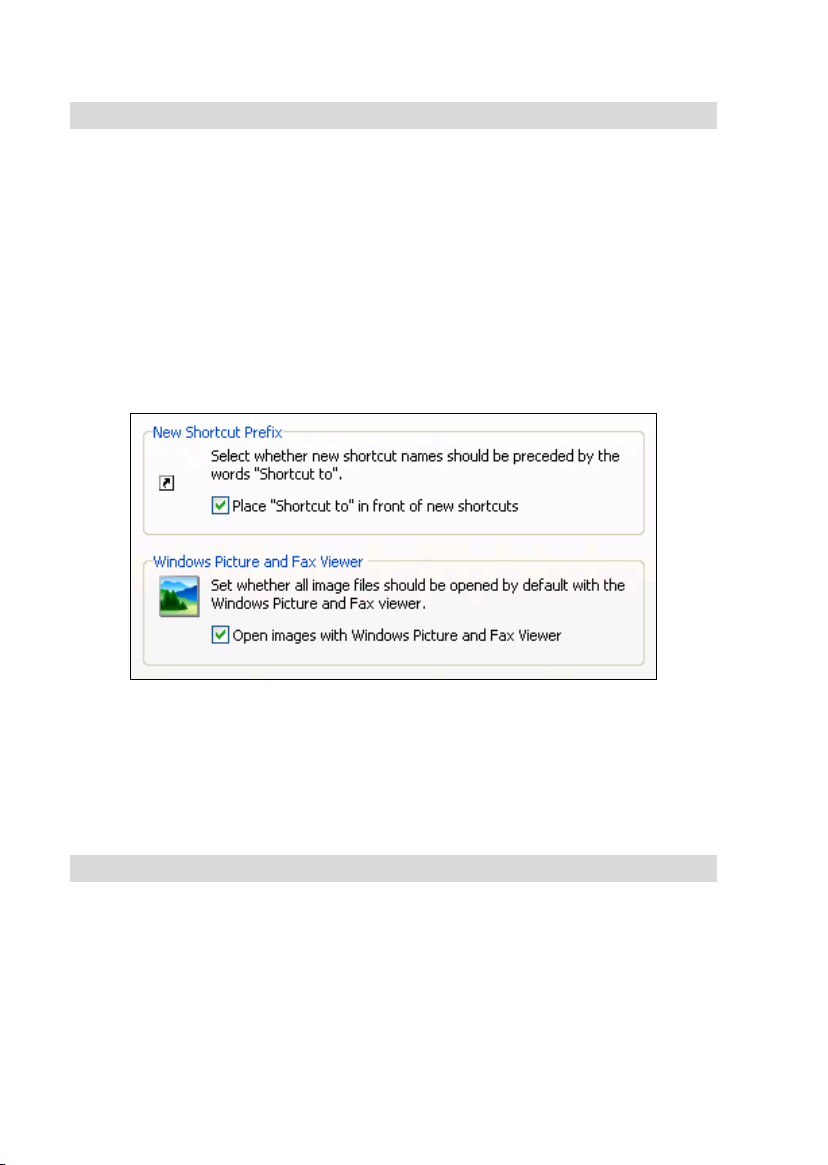
• Tab Advanced
In the New Shortcut Prefix section you can choose whether the
"Shortcut to" text will automatically precede each new link name. If you
do not want this to happen, simply disable the option offered. If the text
is to remain, leave the option enabled.
In the Windows Picture and Fax Viewer section you determine if
picture and fax files will continue to be loaded into the Windows Picture
and Fax viewer via double-click. If this is the case, leave the display
enabled.
Here you can disable the shortcut prefix.
Viewing - Folder Options
• Tab View
In this section you can decide how folder windows and the objects
contained in them will be shown.
24
Page 25

In the Save View Settings section you can determine if Windows is to
remember the position and size of windows and symbols when closing
the windows.
The Pop-up Description section deals with tooltips windows which can
show further information matched to desktop elements and folders. Here
they can be inserted for the elements mentioned.
In the File and folder Names View you either enable or disable the
option Enable capitals in file and folder names.
• Tab Navigation
Here you determine the settings for navigating folder windows and
decide how the Explorer is to react to user input.
In the Opening of Folders section you can enable the Show
compressed ZIP archives as folders option if you want a double-click
on a ZIP archive to show its compressed content – as if the archive was
a normal folder. The Always show tree view in folder windows option
can either be enabled or disabled as well.
In the section Automatic Completion on the Address Bar you decide
if and how entries into the Explorer and Internet Explorer address fields
are to be completed automatically. Originally the options Use inline
AutoComplete and Show list with suggestions (sorted by similarity)
are active. You can also determine that lists are opened upwards –
instead of downwards.
• Tab Thumbnails
In folders, Windows can show you small thumbnail previews matched
to a picture collection. Here you decide how these preview pictures will
look like.
25
Page 26

In the Thumbnail Size you determine the dimensions of the thumbnails.
The default is 96 pixels. You can, however, enter any other value.
In the Picture Quality section, use the slider to determine the quality of
the generated thumbnails. The better the picture quality, the more disk
space the previews will need.
In the Thumbnails section you decide if the thumbnails will be stored
intermediately in a file called THUMBS.DB . The file is then simply
saved with the folders and can later be read out particularly quickly.
• Tab Colors
This is another place where we deal with the look of folder windows.
You can determine the color which individual elements will be
highlighted in on mouse-over. If you are using the NTFS file system on
your partition, you can let the system show encoded and compressed
files in a very particular color as well.
• Tab Advanced
In the Desktop section you determine which typical Windows modules
with an Icon should be present on the Desktop . Press Settings to show
a selection of the possible elements in a separate window. You can, for
example, check the Recycle Bin and the Planned Tasks and thus accept
their icons for the desktop.
In the My Computer section you can scan an overview of all drives
shown from the Windows module My Computer with Settings. If you
remove a check in front of a volume entry, the according drive will no
longer be shown on My Computer.
26
Page 27

Usage - Input options
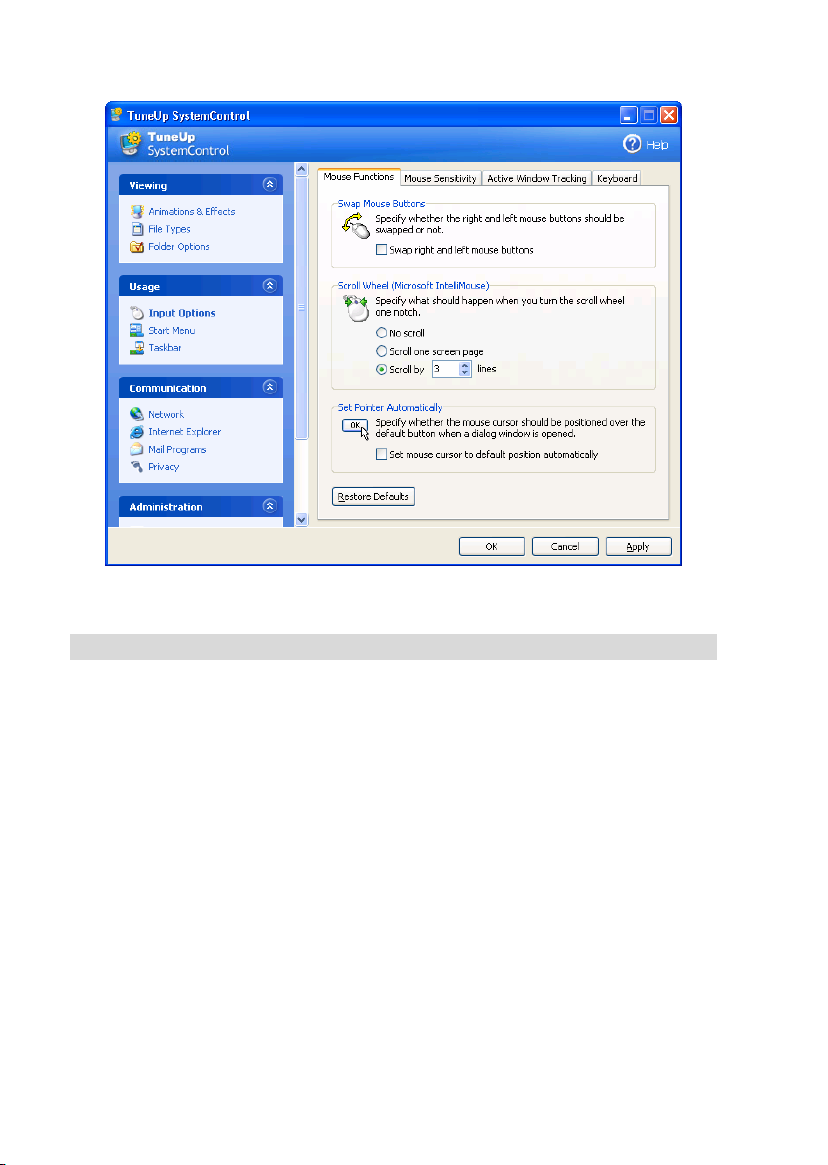
• Tab Mouse Functions
In the Swap Mouse Buttons section you can exchange the left and the
right mouse button. You then basically do mouse-clicks with the right
button and activate software context menus with the left one.
Many mice are equipped with a scroll wheel by now. Convenient for the
Microsoft Intellimouse and compatible models you can, in the Scroll
Wheel section, determine what is to happen when using the wheel. The
default is Scroll by 3 lines, whereas you can still change this number.
Alternatively you can extend to Scroll one screen page or enable the
No scroll option which deactivates scrolling completely.
A rewarding function is offered in the Set Pointer Automatically
section. If this option is active, the mouse pointer automatically moves
to the button highlighted when a dialog box if opened, enabling you to
immediately click the button.
27
Page 28
Changing mouse settings in TuneUp SystemControl.
• Tab Mouse Sensitivity
In the Mouse Sensitivity section you determine the mouse movement
tolerated in a double-click and necessary for dragging. The values are
given in pixels, the default is four pixels. Try the new settings on the
Test Icon immediately.
In the Hover Settings section you can also change the Movement
tolerance and the Hover time of the mouse pointer - based on the hover
effect. This occurs as soon as the mouse pointer rests on an icon for a
certain time span. A Test Icon is available here, too. It lights up as soon
as the mouse pointer rests on it.
28
Page 29

• Tab Active Window Tracking
In this section you can enable a function which some users value as very
helpful and others deem particularly annoying: The automatic window
activation.
If you enable the Activate active window tracking option, it from then
on suffices to simply move the mouse pointer over an inactive window
to activate it so that you can work with the program. If the function is
enabled, it is possible to enable Delay before activation. This
determines for how many milliseconds the mouse pointer has to hover
over a window for it to be activated. The option in the Foreground
section also has to be enabled. It makes sure that the activated window
is moved to the top.
• Tab Keyboard
The settings in this section refer to work with the keyboard. You can,
for example, Activate flashing cursor in the Flashing Cursor section.
In a word processing program the cursor will then blink and thus be
easier to detect. You determine the flashing frequency via a slider. The
Preview shows the changes made. If desired, the cursor width can be
adapted to individual notions by entering a new pixel value.
Enable the Activate key combinations with the Windows key in the
Windows key section to enable Windows to create hotkeys including
the Windows key.
29
Page 30
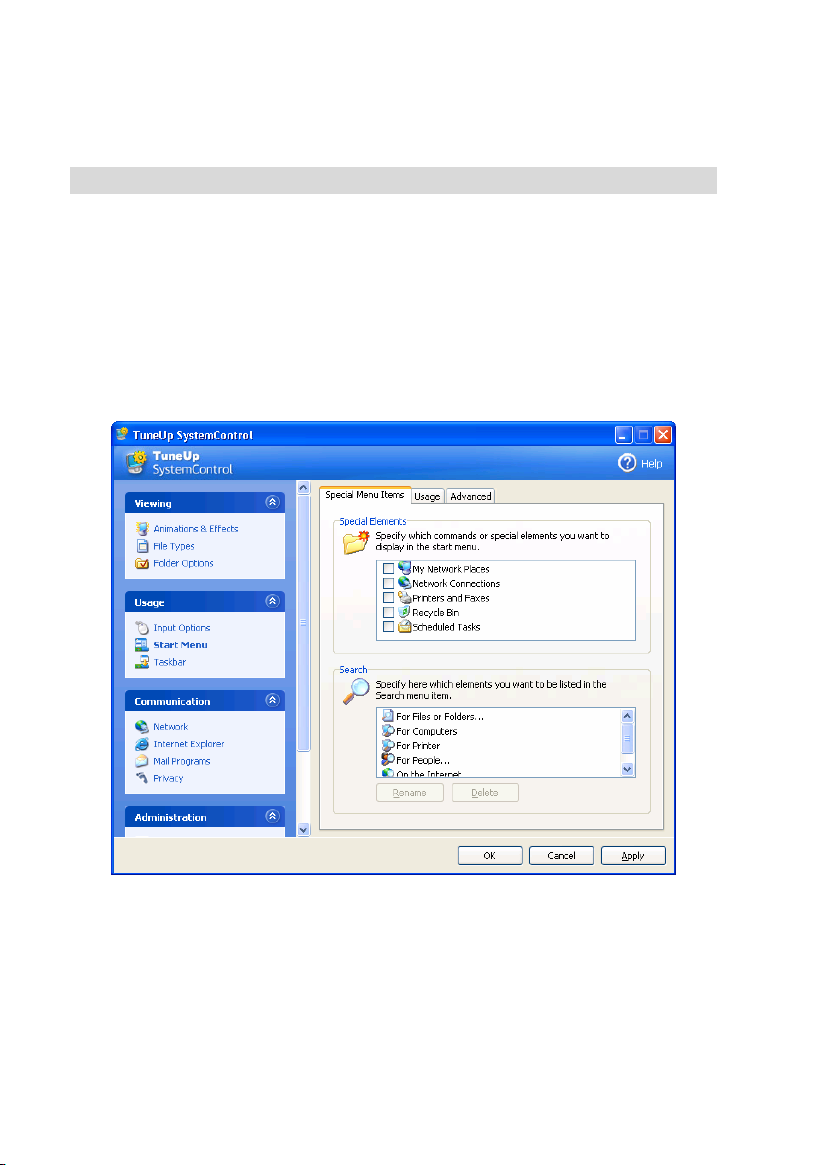
Usage - Start menu
• Tab Special Menu Items
In the Special Elements section you can specifically determine which
commands are to be shown in the Windows start menu. Simply mouseclick into a checkbox to set a check or to remove it again.
In the Search section you chose the elements which will be listed under
the start menu command "Search". You can highlight individual entries
and remove them from the overview with Delete.
Determine the commands that should be shown in the start menu.
30
Page 31

• Tab Usage
In this section you choose the look of the start menu and determine
menu behavior on mouse events.
In the Open Cascading Menus section you can, with the aid of a slider,
define the span of time passed before a menu opens after the mouse has
moved over a menu entry. Combined with this option, the Open menus
automatically after time given below option has to be enabled.
Alternatively you can enable the Open menus only via mouse-click
option.
In the Further Settings section you can either enable or disable the
Enable Drag & Drop option.
• Tab Advanced
The Documents Menu section attends to the menu command
"Documents" in the start menu. As is known, this allows you to quickly
access the documents last used. If this service is to remain, the Enable
history for the most recently used documents option has to stay
enabled. In the Number of documents in Start menu field you
determine how many documents the menu command will refer to. The
default is 13.
In the Configure Start Menu section you can press the Sort Entries by
Name button. This will sort the folders and program names in the start
menu by alphabet. If you want to delete individual entries from the
program menu, use the Customize button.
31
Page 32

Usage - Taskbar
• Tab Flashing Buttons
During the input of texts and other content the activation of other
windows is prevented. A flashing button in the taskbar draws your
attention to the fact that another software needs your attention. If this
flashing is to remain, the option Enable flashing taskbar buttons has
to stay enabled.
In the Flashing Frequency section you determine how often the button
in the taskbar is to flash. There are two options available. The first
option keeps the button of a window in the taskbar flashing until clicked
on. The second option limits the flashing to a number which can be set
by the user. The default here is 3.
In the General section you determine how much time the system will
wait before other windows can activate again.
• Tab Button View
Here you specify if and how windows are represented by buttons in the
taskbar.
If you want an open window to at the same time deposit a button on the
taskbar, the Show windows as taskbar buttons has to stay enabled.
View section: Specify the Maximum width of buttons in pixels. The
default is 154 pixels. The Show animated buttons option can be
enabled or disabled.
In the Grouping section you can determine that several windows of one
and the same application are represented by a shared button on the
taskbar. If you want this kind of grouping, enable the Group similar
32
Page 33

taskbar buttons option. Matching this setting, also enable the Group
any application with at least X windows option. By default grouping
happens as soon as two windows of one application are shown on screen
and there is no space left on the taskbar.
Several windows belonging to one application can be
grouped on the taskbar.
• Tab Minimized Window
If you size down an application, sometimes only the title bar remains
which will then automatically be moved to the lower border. In the
Position and Alignment section you determine the exact target position
of these bars. The default is Left Bottom, where several bars are shown
Side by side.
33
Page 34

In the Spacing section you specify how much pixel distance will be left
between the individual bars.
• Tab Advanced
Windows XP often shows balloons on the right side of the system tray
which notify you of important events or ask you to do various things - to
save new data to CD for example. If these memos are supposed to keep
appearing, the option Show balloons in the notification area has to
remain enabled.
Communication - Network
• Tab Sharing
In the Encrypted Password Transfer section, the Transfer only
encrypted passwords for shared resources option can be activated.
But when using Linux/Unix Samba it might be necessary to deactivate
encoding for compatibility reasons.
In the section Administrative Shares you can deactivate the option that
allows a third party to access your drives via the network.
• Tab Performance
In the section Automatically Search for Shared Resources you
activate or deactivate the option Search network for shared resources
automatically. When the option is activated the network is searched for
released folders and printers at regular intervals. But this can reduce the
performance of the computer.
34
Page 35

In the section Automatically Search for Scheduled Tasks you can
activate or deactivate the option Search computers for scheduled
tasks. When the option is activated and computers within the network
are accessed they are always browsed for planned tasks. But this can
also reduce the performance of your computer.
In the Quality of Service section you can acquire bandwidth and at the
same time you can set a limit for the bandwidth. Following the QoS
service can acquire bandwidth for important packages right away if
required. This has influence on the capacity of data transfer.
• Tab Security
This tab deals with various security aspects. The Password Storage
section deals with the Windows service that memorizes passwords that
have been put in before. This is especially useful when connections for
data communication are installed. The memorization of passwords is, of
course, a security risk. Here you can block or allow the password
storage for net services and for NT domains.
The Universal Plug and Play section deals with the Windows service
that can recognize devices newly connected to the network
automatically. This recognition is also a security risk that can be
removed by disabling the option Enable Universal Plug and Play.
• Tab Internet Time
It can be quite annoying if the system clock of the computer is always
fast or slow. In this case, it is sensible to synchronize the computer
clock with the atomic clock via the Internet. If you want to use this
function, the following option has to be activated: Synchronize with
Internet time server automatically.
35
Page 36

In the section Available Time Servers TuneUp SystemControl already
mentions two well-known standard time servers. If you know more
online addresses you can upgrade them by using Add.
• Tab Internet
Here you can configure the data transfer via the Internet protocol
TCP/IP.
In the section TCP/IP Settings press the button Settings to view the
current TCP/IP settings. They can be manually edited.
If you want the data transfer to be accelerated automatically press the
button TuneUp System Optimizer.
Communication - Internet Explorer
• Tab View
In the section Title Bar choose Text and then put in which written line
should be shown in the title bar of the Internet Explorer. The default is
"Microsoft Internet Explorer".
In the Background Image section you can decide whether you want an
image behind the tool bar of the Internet Explorer. If you wish this,
activate the Show own background image option and select your own
image by using Browse.
By using Select in the Show Source Code section, you define a
program that will be started to visualize the source code of a website.
The program used by default here is Notepad.
36
Page 37

You can influence the appearance of the Internet Explorer.
• Tab Usage
In the File Menu section you define what happens when you call the
command "New" in the menu "File". You can either have the computer
show the submenu command "New Window", which simply starts a
new browser entity, or you induce the program to show a submenu.
In the Favorites section you can activate and deactivate the file "Links"
in the Internet Explorer favorites. Therefore you have the option Show
Links in Favorites menu. Press the button Sort Favorites By Name, in
order to have the favorites arranged in alphabetical order.
37
Page 38

• Tab Security
This tab deals with settings within the Internet Explorer that are relevant
for security.
In the section Internet Explorer User Agent String you define how
the Internet Explorer identifies itself at the websites frequented by you.
In the Download Confirmation section you select whether the Internet
Explorer is allowed to accept certain downloads, such as videos or
music, without confirmation. If you want an inquiry, the following
option has to be activated: Always confirm before downloading files.
• Tab Performance
Here you define the Profile that is most suitable to the bandwidth of
your Internet connection. In the Description field you can read how
many simultaneous server connections are needed for an accelerated
website build-up.
Communication - Mail Programs
• Tab Outlook Express
If you use Outlook Express, you can change the writing in the title bar
in this tab. Furthermore you can decide if the splash screen is supposed
to be shown during the start. If you wish, the Microsoft Messenger can
be loaded parallel to the start of Outlook Express.
38
Page 39

• Tab Outlook XP Appearance
In the "Type a question for help" Field section, you define if this field
is shown in the Outlook XP tool bar. From here you have a quick access
to the help functions of the software.
In the Minimize Outlook XP section you select if Outlook XP should
be shown as an icon in the taskbar or the system tray when the window
is minimized. If you decide for the system tray, activate the option
Minimize Outlook XP to notification area.
In the section Live Scrolling in Word you can select, whether the
section of emails and documents shown in Word during the scroll is
updated immediately or not until the mouse button is released.
• Tab Outlook XP Security
When Outlook XP gets attachments within an email, the opening of
certain file types should be prohibited generally. Otherwise, script
viruses could be activated. In the section Blocked File Types you can
see all file types that by default cannot be opened with Outlook XP. You
can call off such a prohibition singly or cancel them all completely by
using the option Block None.
Communication - Privacy
• Tab Clear Traces
Activate the Delete history lists at logoff option when Windows should
empty the lists of the documents and programs last used while the
computer is shut down. That way, nobody can reconstruct what you
have done on the PC.
39
Page 40

Activate the option Empty Internet Explorer cache when exiting if
you want the web browser to delete the cache when it is finished. This
should only be the case, if you are very safety-conscious and you would
not like a third party to be able to reconstruct what you did online by
using the data in the cache.
• Tab Internet Explorer
You should activate the option Block information on surfing habits
through "Alexa" if you want to deactivate the Windows "souvenir"
Alexa. It sends information about your surf habits over the Internet to
the company that created Alexa to allow the "Show Related Links"
service.
When the option Disable integrated Windows authentication is
activated, Internet Explorer does not try anymore to log on to websites
automatically via the Windows authentication.
When the option Prevent check for updates is activated, Internet
Explorer does not frequently contact the Microsoft Server anymore to
inform you about possible updates.
• Tab Update
This tab deals with the Windows function called "Windows Update". If
the option Activate automatic Windows updates is turned on and an
Internet connection exists, Windows is allowed to connect to the
Microsoft server to check whether updates for your system are
available.
The option Activate step by step installation can be activated if you
want to be in control of your computer's actions. As a result, Windows
asks for your permission before downloading updates instead of silently
40
Page 41

downloading them in the background without asking for your
permission.
• Tab Media Player
The Windows Media Player also communicates a lot with the Internet.
On this page, you find three options that make sure that your privacy is
considered. The button Highest Security activates all three options at
once.
Do not acquire licenses automatically: The Media Player is not
allowed to acquire licenses for protected media data.
Do not allow websites to identify player: A website is not able to
uniquely identify your Media Player. If the identification is allowed, a
globally unique number identifying your Media Player will be sent to
every website that you visit to watch videos or to listen to music.
Disable automatic Codec download: The Media Player can download
a compatible play software from the Internet for music formats and
video formats that it does not know. That upgrade can be prevented if
you wish to.
• Tab Advanced
After a system crash, Windows XP sends an error report including the
user's system configuration to Microsoft. Press the Error Reporting
button to open an overview of the various reports. They can all be
activated via mouse click.
41
Page 42

Administration - User Logon
• Tab General
At the start of Windows XP a welcome screen is loaded showing your
user name, which you can click directly to log in. If you have chosen the
option Use Windows Welcome screen, this welcome screen remains.
In addition, you can define more options by using Customize.
Besides that, you can activate the option Use old logon prompt, where
you have to put in your data manually. This login method is more secure
than using the welcome screen because a possible attacker doesn't see a
list of valid user names. Again this screen can be configured with the
Customize option.
42
Page 43

How would you like to log on to Windows in the future?
• Tab Automatic Logon
You can work around this logon into your system by logging on a
certain user automatically. In that case, simply switch on the option
Enable automatic logon and write your access data into the place
holders.
Within the security option, you define whether avoiding the automatic
login by using the shift key is allowed or not. In addition, the system can
be forced to perform a login right away after a logout.
43
Page 44

• Tab Messages
In the section Notification Before Logon, a gimmick can be activated
that shows all users a predefined notification before logon, such as a
warning from the boss not to surf the Internet at the company's expense.
First of all, activate the option Show message before logon, then write
the headline and then write the actual text into the place holder.
In the Logon and Logoff Troubleshooting section, activate the offered
option if you want detailed status notifications to be shown during the
logon and the logoff process.
• Tab View
In the Screensaver section you can select a screensaver. It will be
shown when no user is logged onto the computer. Select a screensaver
from the pull-down menu. Then define the idle-time until its appearance
in minutes.
Please do not confuse the logon screensaver with the normal screensaver
that you can specify in the Display Properties dialog of Windows. The
logon screensaver that can be chosen in this tab is independent from
your normal screensaver.
• Tab Tour
Newcomers to Windows XP can go on a tour after the start of the
system. During the tour, all important modules of Windows are
introduced to the user.
Choose Settings and activate the option Show Windows Tour after
logon, if the invitation to the tour should be announced after the start of
the computer. In the Scope section you can also decide if this option is
only for the current user or for all users.
44
Page 45

Administration - Drives
• Tab General
The Enable UDMA66 Support section deals with IDE hard disks with
UDMA support. If you as an owner of such a hard disk activate the
offered option, the data transfer is accelerated.
In the NTFS File System section you can activate two options if you
use the NTFS file system on your hard disks. These options are Save
date of last file access and Save short (DOS) file names.
• Tab Disk Space
Windows raises an alarm automatically when there is almost no disk
space left on a drive. A cleanup can be started point-and-click. To
deactivate that alarm, turn off the option Show low disk space warning
– if you feel disturbed by it.
• Tab AutoPlay
In the Media Change Monitoring section, activate the option Monitor
CD drives for media change. In that case, Windows controls the CD
drives. As soon as a new data carrier is inserted, Windows reads it and
tries to start its content automatically.
In the AutoPlay section, press the button Advanced to define the play
settings for various media, such as music CDs.
• Tab Advanced
In the My Computer section, press the Settings button to define which
elements in the Windows My Computer area are shown.
45
Page 46

The Button TuneUp Icon Engineer calls up the Icon Engineer module
of TuneUp Utilities. With its help, you can replace the icons of single
drives and drive types.
If you want to defragment your drives and to arrange your files
optimally on your hard disk, so that they can be found faster, press the
button Defragment.
Administration - Memory and Cache
• Tab Memory Management
The Virtual Memory section deals with PC systems with more than
256 MB memory. Here, the performance can be increased by
deactivating both driver and core removal. They define whether the
drivers and the Windows-System core are always stored in the memory
or if a removal during idle-time is allowed.
In the Page File section, TuneUp gives the option to overwrite the
content of the Windows swap file with zeros in order to delete it when
the system is shut down. That function disables a spy to find out what
you have worked on while at the PC.
• Tab Memory Usage
In the Memory Usage section you define whether the computer should
reserve more memory for the programs or for the system cache.
If you want to optimize the memory, press the button Start TuneUp
MemOptimizer.
46
Page 47

• Tab Advanced
This tab allows you a fast point-and-click access to the three tools
TuneUp StartUp Manager, TuneUp Process Manager and TuneUp
System Optimizer. These three tools will be introduced in the manual
later on.
Administration - Start and Maintenance
• Tab System Start
The Enable boot defragmentation option results in the data needed for
booting being arranged on the hard disk in a way that lets it be found
very quickly.
If the option Do not show boot logo and error messages is not
activated, Windows does not only disable the showing of the logo, but
does not show any alarm messages during booting.
The section Delay for Disk Scan deals with the CHKDSK module. It
starts automatically when the computer has not been shut down
correctly and checks whether the data on the hard drives is intact. The
scanning process can by interrupted by the user by pressing a key. Here,
you put in how many seconds CHKDSK should wait for the user's
interruption before the scan starts.
47
Page 48

The boot defragmentation accelerates the system start.
• Tab Terminate program
What is Windows supposed to do when single applications "freeze" that means crash? In the Idle time without Feedback section, you
define the time in milliseconds that the system gives the program to
send feedback. After this, it will be closed either in the task manager or
when the computer is shut down.
In the section Close Applications Automatically you have the choice
between the two options Show the "End Program" dialog and Close
applications automatically. Please be careful with the latter option as
applications asking for user input on shutdown (i.e. "Do you want to
save the file XYZ?") will be terminated automatically after the specified
time-out period.
48
Page 49

• Tab Desktop and Taskbar
The section Desktop and Taskbar in Separate Processes deals with an
important question of stability. By default, the desktop and the taskbar
are carried out together with the Explorer. If the Explorer crashes, the
desktop and the taskbar crash with it. That is the reason why you can
provide the desktop and the taskbar with their own process. But to do
so, you will need 8 MB of additional memory.
It is best to activate the offered option in the section Restart desktop
and taskbar automatically after errors. It makes sure that after a
crash of the desktop and the taskbar both modules are restarted
automatically. As a result the system remains usable.
• Tab Error Handling
Activate the option Play acoustic signal when errors occur if you
would like the system to warn you with a sound about errors and wrong
inputs.
In the System Errors section, you define what should happen when the
system was stopped because of a critical system error. You can choose
between "Restart the system automatically" and "Show an error message
(blue screen)" in the pull-down menu.
49
Page 50

Administration - System
• Tab General
In the General section, you can change the name and the company of
the user, who has registered the present Windows version. Here you can
also find the serial number.
In the section Windows Installer – User Data, insert both the name
and the company name, which will be inserted into user information
automatically when new software is installed.
With the Settings button in the Support Information section, a
configuration window is opened. Here you can adjust the features of the
system for the information shown.
• Tab Common Dialogs
In this tab you define the appearance of the common dialogs for opening
and saving files.
In the Elements section, you decide which navigation elements for
simplified operating are shown in common dialogs. At this point, you
can activate the "Back" button and let yourself be shown an additional
selection field with the files used latest.
In the Places Bar section you decide whether a location bar is shown on
the left hand side of the standard dialogs and which locations it should
refer to. Press the Customize Places button to create references such as
"My Recent Documents", "Desktop" or "My Documents".
50
Page 51

• Tab Search
The options on this screen have influence on the optics and the
performance of the search dialog.
The Disable Indexing Service option assures that the cataloguing of
your documents, which is automatically carried out in idle time, is
prevented by the index service.
The option Use classical search in Explorer takes over the classical
search dialog style, known from Windows ME and Windows 2000,
instead of the modern style.
In the section Searched File Types you can define which text types and
file types are scanned for certain content by using the File Types button.
• Tab Special Folders
Here you can define to which physical paths special folders, such as
"My Documents" should refer to. Highlight a special folder and press
Change to adjust the path to your notions.
• Tab Repair
In this tab, TuneUp SystemControl presents numerous problems to you,
which can occur when using Windows. Select an entry from the pulldown menu Potential Problems, which applies to your system and then
press Repair Now to solve the problem. An example for such a problem
would be: "The Recycle Bin icon is missing from the desktop".
51
Page 52

TuneUp Icon Engineer
Without icons, Windows will not get far. The small square symbols can
be found everywhere – in the start menu, in the file dialogs and, of
course, on the desktop.
TuneUp Utilities dedicates an own program to the icons. Start TuneUp
Icon Engineer to give your icons a digital "fresh cell regimen".
Immediately a program window is loaded that offers you options on
four different tabs.
System Icons
In the System Icons tab, you have the opportunity to exchange the
default icons for new motifs.
After you have opened the tab, the Desktop icons are shown to you
automatically, as you will be able to see in the list on the left hand side.
Highlight one of the icons shown if you want to change it.
Press Change Icon to view a variety of potential icons. The program
reads the icon library SHELL32.DLL, which is enclosed in Windows. If
you have an own icon library, it can be read by using Browse. When
you have selected a particular icon, highlight it and then press OK to
apply it.
52
Page 53

You can exchange all of these icons.
53
Page 54

Select an appropriate icon.
When you have exchanged an icon, you can undo the change by using
Reset. After several changes, you can use the button Default Icon to get
back to the original Windows icon.
If you want to change the appearance of Windows, you do not have to
restrict your decoration to the desktop only. In the left bar Categories
you can also switch to the Start Menu or you can take a closer look at
the icons of Drives, Folder and Files.
By the way, TuneUp Icon Engineer includes complete alternative icon
packages. It is possible to exchange the old-fashioned Windows icons
with the new icons in one step. To do so, press the Icon Packages
button. A new window opens and shows you all icon packages
available. Highlight one in the list and press OK to activate it. Further
icon collections are offered to you on the TuneUp Software web page.
54
Page 55

TuneUp Utilities offers its own icon packs.
Drives and Folders
Each drive and each folder gets assigned a standard icon by Windows.
With the Icon Engineer you now have the opportunity to edit individual
icons.
You can, for example, equip your computer games section with a
particularly funky fun-icon, while the hard disk containing your office
applications keeps a rather businesslike symbol. The exchange of
particular icons is, of course, pure gimmickry.
Go to the Drives and Folders tab to view the icons activated at the
moment. Next, highlight an icon that you would like to exchange und
55
Page 56

press the Change Icon button. The program then reads the icon library
Shell32.DLL that is enclosed in Windows. If you have your own icon
library it can be read by pressing Browse. When you have found a
suitable icon, highlight it and then press OK to use it.
Whenever you press the Default Icon button, the old icon is activated
again and the exchange is undone.
Notice: You will have to log onto Windows XP again to exchange the
drive icons. Exchanging the icons of the folders is possible right away.
56
Exchanging the hard disk and folder icons.
Page 57

Appearance
Go to the Appearance tab. At this point, the program works with the
icons on the Windows desktop again. Here you can edit a variety of
features that influence the representation of the icons.
Notice: The program window shows you a preview of all modifications
that you make here on the left hand side. That way you can control
yourself.
In Windows XP it is impossible to manipulate the maximum color depth
of the icons, because it is always 32 Bit (which is the maximum). If you
are using an older operating system you can raise the value here.
The desktop icons have a size of 32 x 32 pixels. By using a slider you
can modify the size of the icon. Making the icons smaller is not a
problem, but when you make them bigger, annoying jagged pixel edges
might occur.
At the very bottom of the window you can define the spacing of the
icons on the desktop. You can set the distance in pixels - vertically and
horizontally.
57
Page 58

You can change the size and spacing of your desktop icons.
Repair
Surely it is fun to modify the Windows icons and to put in personal
settings. But what will you do if the modifications desired for the icons
are not implemented or Windows even interchanges individual icons?
In that case go to the Repair tab and press the Reload Icons button. It
makes sure that the chaos comes to an end.
58
Page 59

TuneUp StartUp Manager
Many programs start automatically with the Windows system without
further enquiry. That often happens on purpose when resident tools,
such as the virus scanner, an ISDN call monitor or a text module
administration are loaded.
But often enough, newly installed programs set themselves up as startup
programs. This is annoying when the application is not used or when the
user is harassed by tedious requests when starting the computer.
Many users know that the startup commands can be found in the Startup
folder in the start menu und can also be deleted from there. But this is
not the whole truth: Some start commands are entered directly into the
registry and cannot be reached through the Startup menu. The tool
TuneUp StartUp Manager is fortunately able to find any startup
program - no matter how well it has hidden its start command.
Right at the start, the utility lists all startup programs. On the left hand
side of the Folder Bar the entry All is highlighted. You can reduce the
list by clicking on a branch such as Startup Folder or Registry. As a
result, only the startup entries that are administered there are shown.
59
Page 60

The overview of all detected startup commands.
All startup programs are usually checked and therefore activated. If you
remove the pre-selection by clicking on the particular boxes which are
checked, the commands concerned will not be carried out anymore at
the next start. This way you can find out if an entry is as unimportant as
it seems. In case of emergency you can always check the box again via
mouse click.
Entries marked can be removed from the list completely by using
Delete. Press Refresh afterwards to re-import the list. Now you can
control whether the annoying Startup programs have really been
removed.
If you wish to add a new Startup program to the list yourself, mark the
folder in the bar and press the Add button. Insert the name of the
application into the dialog und select the path to the start file of the
software in the Target field. The Find button helps you.
60
Page 61

You can add an Startup entry of your own.
TuneUp System Information
TuneUp System Information takes a deep look into your computer and
gathers numerous facts and information about your hardware and
software in only a few seconds. This data can be important for you when
you want to upgrade the system or when you are asked by a support
technician if certain components are installed on your computer.
The particular facts are compiled within nine tabs. The most important
one is the Overview. It includes the most important information about
the most important equipment. Here you can see which processor is
installed in the computer, there is information about the memory, the
performance of the graphics card, which mouse is used and which facts
can be given about the various drives.
61
Page 62

The overview page shows the most important components of your PC.
In the other tabs you get acquainted to following information:
Windows: The program provides you with detailed information about
what Windows version is installed on your computer, when you have
started the computer the last time and which version of the Internet
Explorer is used.
Display: All essential Information and supported modes and features of
both the monitor and the graphics card are listed.
Memory: This module shows the current memory load and tells you
which programs have been loaded at the time as well as how much
memory they take up.
62
Page 63

Performance: You can read all facts concerning the physical memory,
the size of the swap file and the kernel. Three animated real-time
monitors show you the processor load, the state of the physical memory
and the usage of the swap file.
The Performance tab including three animated monitors.
Drives: Matched to every single hard disk in the computer, the module
names the hardware facts and shows the drive usage. Here you can see
how many gigabytes are still free to use on your drives.
I/O Devices: At this point all important ports, the installed printer
drivers and the audio devices are listed.
Communication: Two real-time monitors show the data received and
sent via the network during an online connection in kilobytes per
second.
System Devices: Information about the processor and about the BIOS is
given.
63
Page 64

4. Clean & Repair
The category Clean up & Repair is responsible for slenderizing your
system.
The two tools in the category Clean up & Repair can easily be accessed
through the graphical interface.
Each program that is newly installed writes entries into the registry.
These entries are often not fully removed after deleting the software. As
a result, the registry gets larger and takes more and more memory on the
hard disk. In addition, Windows accesses the registry frequently. The
larger it is, the longer it takes to find and access the data requested. That
leads to a creeping slowdown of the system. TuneUp Utilities removes
useless entries from the registry.
64
Page 65

A lot of data trash collects on the hard disk as well. This can be
temporary files, but also redundant backups, which are created by many
programs but are never removed later. TuneUp Utilities helps to detect
these useless files and deletes them.
TuneUp RegistryCleaner
To clean your registry, choose TuneUp RegistryCleaner from the main
selection list.
After the module loads it displays a welcome message explaining its
purpose: "You can use TuneUp RegistryCleaner to purge the registry of
unnecessary entries created during installation, deinstallation and
normal work with your system."
Any changes that the module makes to your system are logged and can
be undone via the RescueCenter.
The module runs in two modes: The Complete option scans the whole
registry and other configuration data. The Choose tests option allows
you to select which types of tests you would like to run. It is
recommended that you run all tests by choosing Complete and then
pressing the Next button.
65
Page 66

It is recommended that you choose "Complete" to run all tests
on the registry.
The Scan
RegistryCleaner will now scan your System. In the program's window
you can see each step of the scan process. The yellow arrow indicates
the step that is currently being run; a green tick indicates that this step
has been completed. The bar below the list shows the total progress of
the scan.
After the scan completes, the program will display a message stating
that the scan has finished. Click the Show Errors button to get a list of
the errors that RegistryCleaner has found.
66
Page 67

Please wait until the program completes its scan.
This may take a while.
Evaluation
In the evaluation window you initially see the summary page which
shows you that the scan has completed. It also displays the total number
of errors found.
TuneUp RegistryCleaner can find the following types of errors:
File types: Some file types are registered to programs that are not
installed.
67
Page 68

ActiveX and COM: ActiveX/COM objects were found that use
libraries that are not installed on your computer.
Shared files: The registry contains links to shared files which were
required by multiple applications, but these files have been removed
from your computer.
Fonts: The registry contains links to fonts which do not exist on your
computer.
Help files: The registry contains links to help files which do not exist on
your computer.
Startup: Your computer is trying to automatically start programs which
have been removed.
Application paths: Records of application paths were found for paths
which have been removed from your computer.
Software removal: The "remove software" control panel item contains
entries of programs that have been already removed.
Sounds: The "Sounds" control panel item contains links to sound files
which do not exist.
Histories: Some shortcuts in your history list point to files that have
been removed from the hard disk.
Shortcuts: These shortcuts point to files which do not exist.
As you can see, the process of deleting files and removing applications
from your computer can leave many unnecessary items in your registry.
RegistryCleaner finds these items for you and allows you to easily
delete them.
68
Page 69

RegistryCleaner has found many errors and allows you to remove
them safely and easily.
If you click on one of the Categories in the list, the main window
changes and displays a list of all errors found in that category.
To get a detailed explanation of an error, make sure the Details button is
clicked and select the error in the list. An explanation box will appear in
the lower half of the main window.
By default RegistryCleaner wants to remove all errors it finds. If there is
a specific error you don't want RegistryCleaner to fix, simply uncheck
the box next to that error. RegistryCleaner will then ignore this specific
error during the cleaning stage.
69
Page 70

So many errors on my system? TuneUp RegistryCleaner can explain every
single error to you point-and-click.
Cleaning
Press the Start Cleaning button to begin the cleaning process.
RegistryCleaner will then process all marked errors in the error list and
remove them from your Windows registry.
The wizard that launches will take you through the steps of cleaning the
registry. First it will display the number of errors to be fixed. Next it
will explain how to undo any changes using TuneUp RescueCenter.
Press Next when you're done reading the wizard's messages.
70
Page 71

The next screen shows an animated bar displaying the progress of
RegistryCleaner. Please wait until RegistryCleaner completes and
displays its "completed" message.
You can watch what RegistryCleaner is currently doing during the
cleaning process.
When RegistryCleaner completes it displays a message stating that it
has successfully cleaned your registry. Click on Finish to close the
wizard. This will take you back to the main window of TuneUp
RegistryCleaner. By choosing Quit from the File menu you can close
TuneUp RegistryCleaner.
71
Page 72

TuneUp DiskCleaner
To clean up your hard disk, select TuneUp DiskCleaner from the main
selection list.
After the module loads, it displays a welcome message explaining its
purpose: "TuneUp DiskCleaner helps you clean up your disk drives. The
files selected for deletion can be backed up in compressed format and
restored at any time with a special utility called TuneUp RescueCenter".
The Analysis
Before DiskCleaner can begin its analysis, it needs to know which
partitions you would like to scan. DiskCleaner automatically selects all
hard disk partitions. By clicking in the box next to a partition, you can
add or remove it from the list of partitions that will be scanned. Only
drives with a checkmark will be scanned.
DiskCleaner displays the available space and the total space of each
partition to aid you in the selection of which partition to clean. On most
computers, the drive C: contains many unnecessary files that can be
removed.
Press the Next button to continue.
72
Page 73

Choose the drives that DiskCleaner should analyze and clean.
DiskCleaner will now begin analyzing your drive. Please wait until it
completes its analysis. Even large partitions are scanned quickly with
DiskCleaner. However, if you have many hard disks the analysis can
take a while.
The yellow arrow marks the drive that is currently being scanned. Green
ticks indicate drives that have already been scanned. The bar at the
bottom of the window shows the total progress of the analysis.
When the analysis completes DiskCleaner displays a message stating
this. Click the Next button to display the list of errors that DiskCleaner
has found.
73
Page 74

Evaluation
In the next window TuneUp DiskCleaner displays the result of its drive
analysis. The table on the right contains a list of problems found on the
system (e.g. "0-Byte-Files") grouped into categories along with how
much hard disk space this error category is using up.
Here you recover your lost hard disk space.
The following unnecessary files are detected by DiskCleaner (these can
usually be safely removed from your system):
0-Byte files: These files do not contain any data.
Secured lost cluster: Many partition repairing programs create files
containing recovered clusters. After being recovered, these files are
rarely used.
Internet Cache: When surfing the web, your browser saves copies of
images and animations on your hard disk to speed up web page loading
74
Page 75

times. From time to time these files should be deleted to remove copies
of unnecessary files.
Recycle bin: Files in the Recycle Bin have been deleted and can be
safely removed from your hard disk.
Log files: Some applications create log files to ease the debugging of
the application. These log files are generally only useful for
programmers.
Backup files: Some applications create backups of their own files
during upgrades or installations. These backups are mostly not required
later on and can be deleted.
Temporary files: Many applications create temporary files during
installation or when running. These files should normally be deleted
after the application is closed or the installation is complete. You can
always safely delete these files.
Temporary helpfiles: These files are created to speed up the loading of
help pages that were opened already.
Important: You shouldn't let DiskCleaner delete all the files it reports
without inspecting what it finds first. DiskCleaner can find many files
that probably aren't needed on your computer. However the program
can sometimes report files as "not required" when in fact they may be
vital for the normal operation of an application. For example: A *.SAV
file could be an unnecessary backup of a file or the saved state of a
computer game. A 0-Byte file could be trash filling up your hard disk or
a copy protection system of an application. Deleting the file would
cause the application to stop.
75
Page 76

So how can you choose which files DiskCleaner will delete?
Your first option is to exclude whole categories such as "Backup files"
or "Log files" from the deletion process by removing the tick in the
check box in front of them.
By clicking on a category and selecting Backup with RescueCenter
you're always on the safe side: All files that will be deleted in that
category will be backed up with TuneUp RescueCenter. They can later
be recovered in case something stops functioning after the cleaning
process.
Click on show details to display a detailed table of all files that are to be
deleted in this category. You can exclude a file from the deletion
process by removing the tick from the check box in front of the file
name. Click on Open file to open the file and see what it contains.
76
Choose the files to delete by ticking their check boxes.
Page 77

Cleaning
When you're done selecting the files for deletion, click on the Next
button. A status window will show you the number of files that will be
deleted and how much hard disk space you will recover.
By pressing Next, the cleaning process is started. A blue bar indicates
the progress of the cleaning process. Please wait until DiskCleaner
shows a message stating that the cleaning has completed.
By clicking on Finish, you can exit DiskCleaner and return to the
TuneUp Utilities main menu.
Done! DiskCleaner has removed all unnecessary files.
77
Page 78

5. Optimize & Improve
The category Optimize & Improve is responsible for improving your
system. Many default settings in windows reduce the performance of
your computer. Normally, only experts know how to change these
settings to improve performance. You can use the two modules that
TuneUp Utilities 2003 offers in this category to do the same.
Boost the performance of your system.
TuneUp MemOptimizer monitors the system memory of Windows and
optimizes it regularly or in critical situations.
TuneUp System Optimizer checks your registry for settings that slow
down your system and improves your configuration. It also removes
unnecessary items from your registry and your hard disk.
78
Page 79

TuneUp MemOptimizer
Select TuneUp MemOptimizer from the menu to launch the tool.
The program consists of three tabs. The overview tab displays an
animated graph showing the current usage of your system's memory.
You can use it to watch how Windows is using your system resources.
The Free physical memory and Free space in page file fields display
the amount of physical and virtual memory available.
The graph displays the current memory usage vs. time.
A box below the graph informs you that the AutoOptimize module is
running. This module monitors your memory and warns you when the
79
Page 80

memory available drops below a certain value. To change the module's
settings click on Change settings.
In the configuration window the option Enable AutoOptimize should
be checked. By unchecking the check box you can deactivate this
module.
The Physical Memory box allows you select the "memory left" value at
which the module begins optimizing (e.g. at 50 Megabytes). The field
Increase free memory to specifies the amount of memory you wish to
have free after the optimization is complete.
Tick the Monitor processor usage check box to ensure that
MemOptimizer runs at times that your processor isn't being fully used
already. By choosing the Use SmartOptimize option MemOptimizer
will automatically choose settings that reduce the work load on your
computer.
Click on OK to apply your new settings. If you wish to restore the
default settings of this window, click the Recommended button.
80
Page 81

AutoOptimize monitors your system and optimizes its memory.
If you don't want to use the AutoOptimize features, you can still
optimize your memory manually by selecting the Manual
Optimization tab.
By moving the slider in the Clear Manually box you can select how
much free memory you would like to have after the optimizing process
completes. Click on Clear Now to begin the optimization process. The
program removes DLLs and other data from your memory that isn't
required anymore.
You can also purge your clipboard by clicking Empty Clipboard in the
Clipboard box. The box also displays the amount of memory your
clipboard is currently consuming.
81
Page 82

Manual memory optimization point-and-click.
The Program Options tab allows you to set up a few other options of
the program. By activating the Load automatically on Windows
startup option you can have MemOptimizer begin optimizing your
memory right after Windows starts. The Show icon in taskbar option
chooses whether you would like to have a small icon in your task bar
showing the current status of MemOptimizer.
You can also optimize your memory by pressing a key combination
when you feel your system is starting to slow down. The current hot key
setting is shown in the Key combination field: CTRL+ALT+O. You
can change the hot key at any time via this tab.
82
Page 83

TuneUp System Optimizer
You can start TuneUp System Optimizer from the main selection
menu. This tool allows you to find discrepancies in your system and
optimize your computer's performance.
When the program finishes loading, it displays some information about
itself and states that anything it does can be undone via TuneUp
RescueCenter. You can select a task to run by clicking it or by clicking
the appropriate link on the left side of the window.
TuneUp System Optimizer's start-up screen.
83
Page 84

Quick Maintenance
The Quick Maintenance task cleans your registry and hard disk. To run
this task, click on the Quick Maintenance link on the left side of the
window.
The Quick Maintenance task is designed to be just that: quick. A simple
click on Start Examination starts the scanning of your registry and
hard disk. While the tool scans your system, the status window informs
you about the program's progress. When the scan completes, click on
Fix Problems to fix the problems that have been found on your system.
By clicking Finish you can close the tool and return back to the main
screen of System Optimizer.
84
Quick Maintenance is running.
Page 85

System Advisor
The System Advisor analyzes your hardware and software settings and
suggests changes that you could make to your system to improve
performance. Click the Examine System button to begin the
examination process.
After a few seconds the results are displayed. The problems found are
grouped into categories such as display or system. A short summary
such as "High resolutions delay image display" immediately explains
the problem. Click the short summary of the problem to display a
detailed description of the problem.
The advisor finds configuration settings that are slowing down
your system and tells you how to solve them.
Not all problems can be solved directly by TuneUp System Optimizer.
If TuneUp System Optimizer can solve a problem for you, a link to the
85
Page 86

module that will help you is displayed. The solution to other
configuration problems may require your manual intervention.
Internet Optimization Wizard
What is "optimal" for your system depends on how you use it. If surfing
the Internet is important to you, a few windows settings need to be
changed. By default, Windows is not set up correctly for fast Internet
browsing.
To optimize your Internet connection, choose Internet Optimization in
the Wizards section. The wizard will now take you through the
procedure step by step.
Choose the type of Connection you have in the first window. To do
this, choose one of the options in the drop down menu (e.g. Modem,
ISDN or DSL). When you've chosen the type, click the Next button to
continue.
The wizard now checks if your Windows settings match the optimal
settings for this connection type. A green Already optimal message
appears if Windows is already configured optimally. Otherwise the
message Not optimal appears: in this case TuneUp System Optimizer
can help you to optimize your settings.
Click on the blue titles to display a detailed report of what the Internet
Optimization Wizard would like to change. Click Next to begin the
optimization process.
86
Page 87

Your Internet settings are not optimal yet.
TuneUp System Optimizer will now optimize your settings. Some
changes that the tool makes may result in a Reboot required message.
Please do so if the wizard tells you to. Click Finish to close the wizard.
System Optimization Wizard
If you want to optimize the general performance of your computer,
launch the System Optimization wizard.
The wizard asks you to state information on how you use the computer.
Select the corresponding items from the drop down menu that most
closely match the way you use your computer. In the Visual Effects
menu you can choose if you require Maximum Performance in terms
of graphics or if Windows default settings are enough. In the menu
Use of the computer you select how you use your computer (e.g.
87
Page 88

Workstation without network or Internet connection). Click Next
when you have selected all appropriate items.
System Optimizer has found items that can be optimized.
The wizard now uses your specifications to analyze your system's
settings and groups the results into the Visual effects and System
configuration categories. Click on the blue category title to view the
exact changes TuneUp System Optimizer would like to make. Within
the detailed view you can deselect a particular suggestion by removing
the tick within the checkbox in front of that suggestion. Click Next
when you're done choosing which changes you would like TuneUp
System Optimizer to make for you.
TuneUp System Optimizer now modifies your system according to what
you selected in the previous window. When it completes, you can close
the wizard by clicking on Finish.
88
Page 89

In most cases you will have to restart your computer after TuneUp
System Optimizer completes. TuneUp will inform you of this when
necessary by displaying a Reboot required message.
Select which optimizations TuneUp System Optimizer
should make.
89
Page 90

6. Administer & Control
The category Administer & Control provides three modules which
allow you to acquire more control over Windows.
Take control of your computer.
TuneUp Process Manager allows you to see which programs are
currently running and allows you to close these if necessary. TuneUp
Registry Editor is a tool with which you can modify keys in your
Windows registry directly. TuneUp Uninstall Manager shows all
programs installed on your system and can remove installed programs
when told to do so.
90
Page 91

TuneUp Process Manager
Choose TuneUp Process Manager in the Administer & Control
section to start the module.
The module displays all currently running processes in the Processes
tab. The table contains the names of all processes along with the priority
at which these are running and the amount of CPU time and memory
these are using.
To view details about a program that is running, select it in the table and
click Show Details. To force a program to quit click the End Process
button. This is useful if an application is not responding or if the
application (e.g. a dialer) doesn't allow you to quit it.
91
Page 92

The list of currently running processes.
The Performance tab provides a lot of useful information about the
current load on your computer. The graph in the top left displays the
current CPU usage. The graph next to it displays the CPU usage over
time. Below, the memory usage over time is displayed. The tab also
displays the current usage of your physical memory and page file in
kilobytes.
92
Page 93

Find out what your system does at the moment.
TuneUp Process Manager also offers a menu with which you can shut
down Windows and change the priority of any running application.
Choose File / Exit Windows to shut down or restart your computer.
Select View / Refresh Now to reload all information in the current
module. Choose Edit / Set Process Priority to change how much
priority an application gets when Windows is assigning CPU time and
memory.
93
Page 94

TuneUp Registry Editor
The registry contains information about all hardware and software
installed on your computer. As you add hardware and software to your
computer, the registry grows and over time becomes big and filled with
unnecessary entries.
If you're looking for a tool with which you can manually manipulate the
cog wheels that run Windows then TuneUp Registry Editor is the tool
for you.
The editor displays the registry: a tree structure of keys and sub keys
which are grouped according to categories. The left window named
Folder contains a directory structure. Each directory represents a single
key. Double click a key to view its sub keys. When you reach a leaf key
in the hierarchy the right window will display keys and their values
which you can then edit.
Right click a value to display a pop-up menu that contains options for
manipulating this value. Delete removes this value from the registry.
Rename renames the key. Change allows you to change the value
stored in the key.
Right clicking a directory displays a different popup menu containing
more options. Search allows you to search for directories and values in
the registry. Set bookmark adds a virtual bookmark to your bookmarks
list so that you can quickly find this directory if you ever require it
again. Bookmarks are shown in the lower third of your screen in the
Bookmark tab. The Search Results tab contains all matches found for
the search you issued.
94
Page 95

The TuneUp Registry Editor window.
TuneUp Uninstall Manager
Any software you install on your computer stores an uninstall entry in
your registry. This entry allows you to completely remove an unrequired
application from your system.
TuneUp Utilities 2003 allows you to completely remove an application
from your hard disk using TuneUp Uninstall Manager.
The program lists all applications, games and tools installed on your
computer which are represented by an uninstall entry in the registry.
95
Page 96

If you would like to remove an application from your computer, mark it
in the list and click on Uninstall. This will only work for applications in
the list marked by a green tick.
An uninstallation program is launched to remove the application. This
uninstallation program will not only remove all application files from
your system, but will also remove any icons, start menu items and keys
in the registry that the application created. Follow the instructions
provided by the uninstallation program to remove the application.
96
These programs are currently installed on your computer.
Page 97

Some users manually delete programs from their computers. This
unfortunately does not remove keys in the registry and leaves the
uninstallation entry in the list although the application has been removed
from your computer already. To remove the entry from your system
mark the application in the list and click the Delete button.
To search for an installed program choose the Search function. Enter
the name of the application you're looking for and click Search. The
tool will mark the first entry in your uninstall list matching your query.
97
Page 98

7. File recovery & Destruction
TuneUp Utilities provides two modules to allow you to recover deleted
files and to safely remove files from your computer so that they cannot
be recovered again. These modules can be found in the category
File recovery & Destruction.
Safely remove sensitive files permanently from your hard disk.
The module TuneUp Shredder removes files from your hard disk so
that even data recovery experts can't restore these files. TuneUp
Undelete does exactly the opposite; it can try to recover files that have
98
Page 99

previously been deleted from your computer. Files deleted by TuneUp
Shredder are of course unrecoverable.
TuneUp Shredder
When you delete a file on your computer, it is put into the Recycle Bin.
Even a computing beginner can recover the deleted file from the
Recycle Bin, so most users empty the recycle bin regularly or delete the
file directly, bypassing the Recycle Bin.
As you may or may not know, Windows doesn't actually delete a file
when you choose the Windows delete command. The file remains on
your hard disk and Windows only removes the entry to it from the FAT
(File Allocation Table) so that the system doesn't see the file. But with
the right tool (such as TuneUp Undelete), these files can be found and
recovered again as long as they haven't been overwritten by new data
yet.
TuneUp Shredder ensures that files you delete via Shredder can't be
recovered by hackers. The tool uses a method developed by the US
Department of Defense to ensure that files are permanently removed
from your hard disk. This is done by overwriting the files with
redundant data, destroying any previous data that was there before.
The module loads a wizard which asks you to choose if you would like
to delete Files or a whole Folder. Make your choice and click Next to
continue.
If you choose Files, Shredder will display the filenames and explain that
it will delete the contents of these files. If you tick the Delete assigned
99
Page 100

free space option, Shredder will also overwrite the so-called "slack", the
file's reserved free space.
You can add files to the destruction process by either dragging them
from your hard disk to the TuneUp Shredder Files window or by
clicking the Add button and choosing them in the emerging dialog.
After you have added all files, press Next to continue.
Choose the files you wish to shred.
Next you have to select the way Shredder should delete the files. To do
this, choose one of the following two options in the Deletion method
section.
Quick delete: Overwrites the files with a single character. After being
deleted, the files no longer contain the original data; instead they contain
a single character repeated over and over.
100
 Loading...