

Page 1

Instruction Manual
www.TuneAmp.com
A sophisticated sound amplifier for people who are not ready for a hearing aid.
™
Page 2

Contents
4 General Description
5 Models
6 Components
7 Battery Information
10 Turning On/Off
11 Preparing for Use
13 Set-Up–Basic Model
15 Set-Up–Focus Model
18 How to Reset
19 Care
22 Do’s and Don’ts
24 Troubleshooting Tips
27 Extended Storage
28 Warranty and Service
Congratulations on your TuneAmp™ purchase.
TuneAmp is not a hearing aid. It’s a personal
sound amplification product–PSAP– as
defined by the United States Food and Drug
Administration.
If you think you’re suffering from an undiagnosed
hearing loss or have a history of excessive
wax build- up, consult a hearing healthcare
professional prior to using this product.
PSAPs are not intended to amplify speech
or environmental sound for individuals with
impaired hearing or to compensate for hearing
impairment. Because PSAPs are not intended
to diagnose, treat, cure or mitigate disease
and do not alter the structure or function of the
body, they are not devices as defined in the
Food, Drug and Cosmetic Act. As such, there
is no regulatory classification, product code, or
definition for these products.
www.TuneAmp.com
Page 3
Models 54 General Description
General Description
TuneAmp comes standard with two common size thin tubes (left and
right) and two tips (sleeve and vented dome) that will fit most users.
The thin tube delivers amplified sound from TuneAmp into your ear. It is
important that the sound tube and tip fit properly in your ear. If you need
a different size, other tube lengths and dome sizes are available through
your retailer.
The rocker switch is used during initial set up to lock in your desired
amplification setting(s). Once your listening selection is made, the rocker
switch also serves as a digital volume control.
(SEE PAGE 14.)
On the Focus model, the rocker switch is also used to toggle between
programs for quiet or noisy environments.
(SEE PAGE 15.)
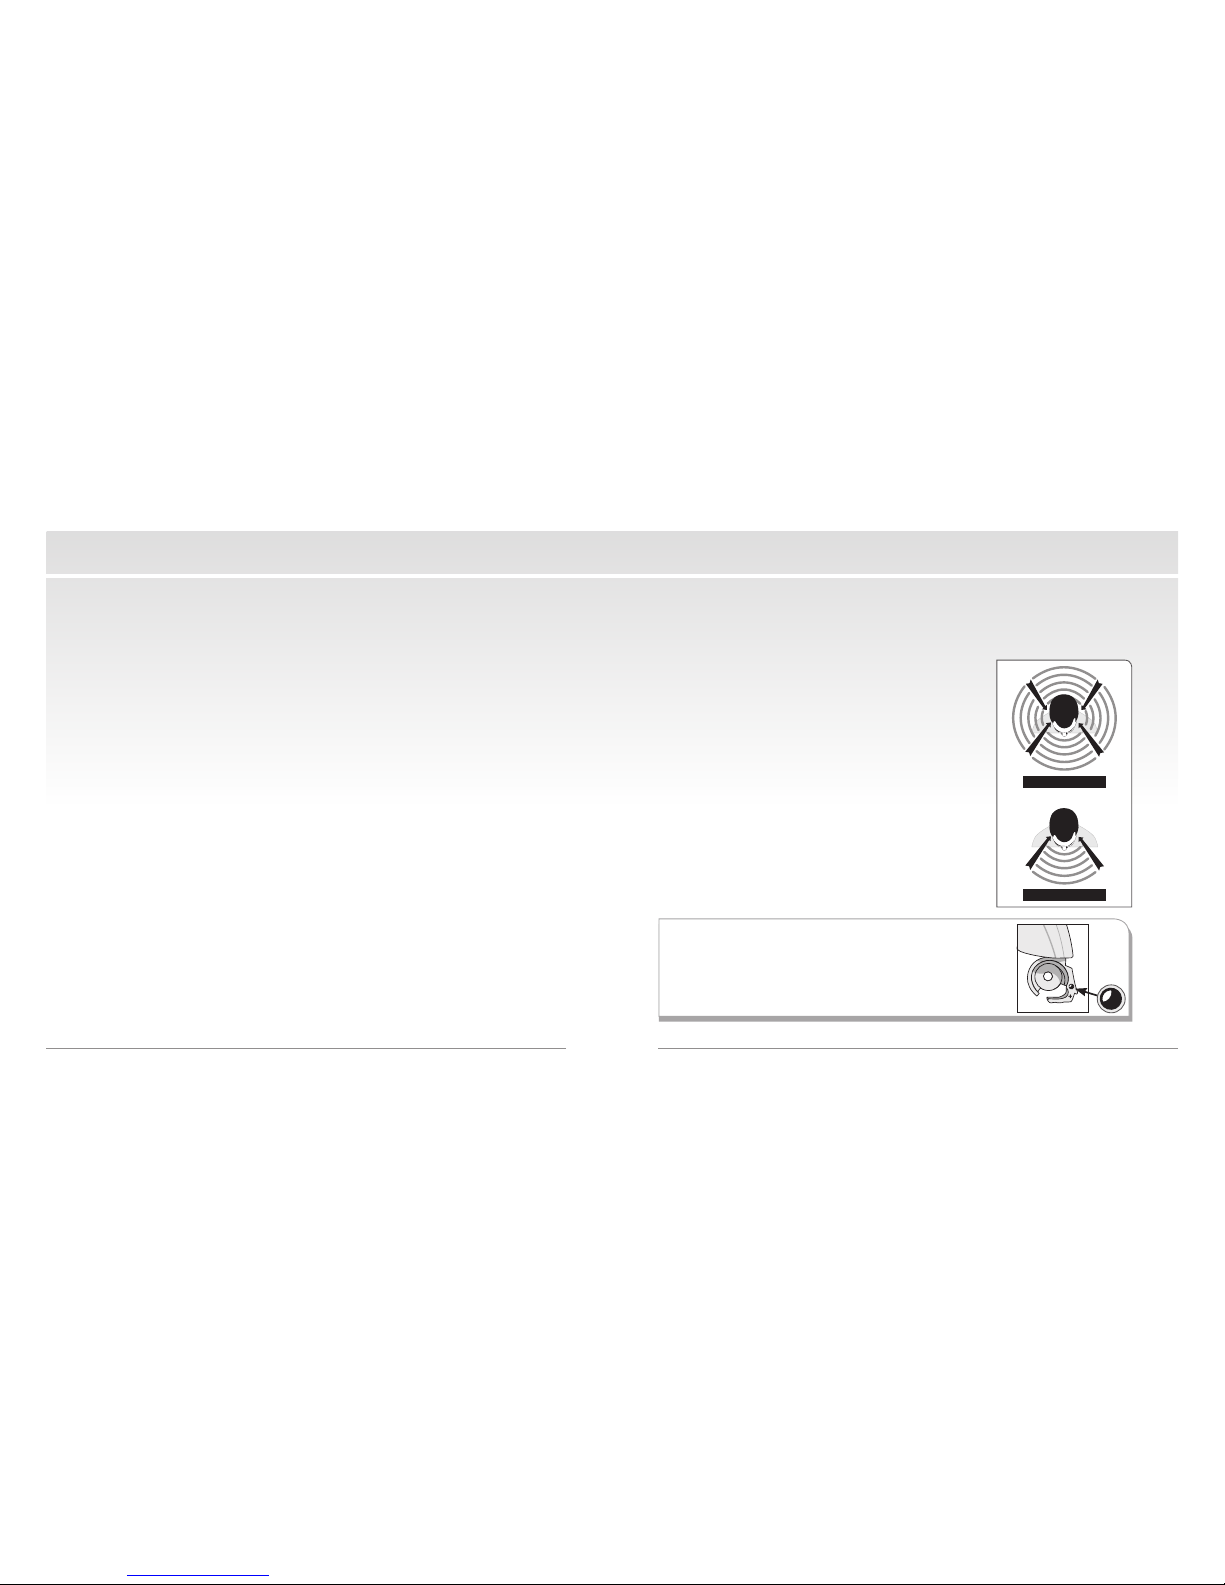
Models
TuneAmp comes in two models:
TuneAmp Basic and TuneAmp Focus.
TuneAmp Basic has a single microphone that
picks up sounds from all directions. It is ideal for
quiet listening environments.
TuneAmp
Focus has two microphones, offering
true directionality for those times that you want
to suppress background noise. The Focus model
is ideal if your lifestyle includes a variety of
environments, both quiet and noisy. Just as its
name implies, the Focus model allows you to focus
on sounds coming from a particular direction.
BASIC
FOCUS
NOTE: Both models are the same in appearance. To
determine which model you have, look at the inside of
the battery door. If you see a blue dot, you have the Basic
model. If there’s an empty space, you have the Focus model.
OMNI
FOCUS
Page 4
TIPS
Battery Information 76 Components
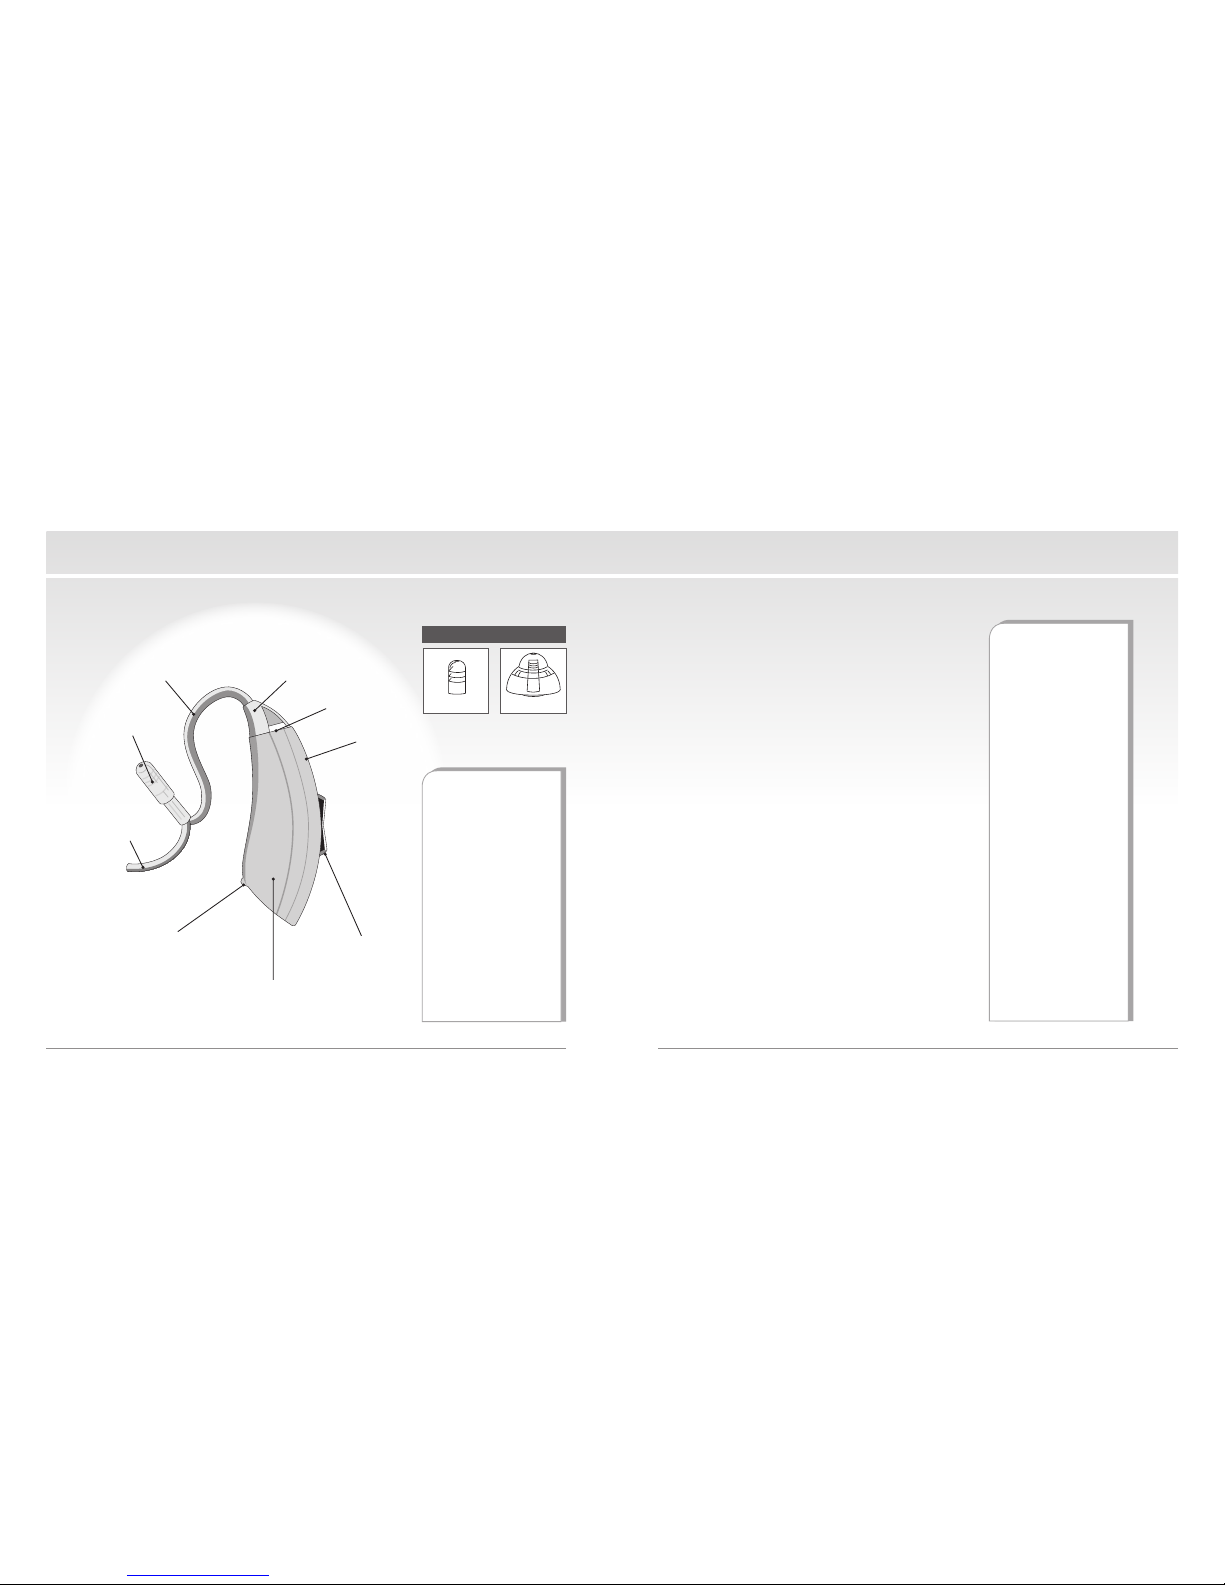
Components
Left & Right
PSAPs
If you are wearing
TuneAmp PSAPs
on both ears, it is
important to use
the correct device
in each ear. Tubes
are marked with
red lettering for
the right ear and
blue lettering for
the left ear.
Battery Information
TuneAmp uses a commonly available 312 zinc
air battery. With full-time use, the battery will last
approximately seven days.
When the battery is discharged, remove and
replace it immediately. Replacements may be
purchased through your retailer. When not in use,
be sure to turn your TuneAmp off by opening the
battery door part way.
(FIGURE 1, PG. 8)
Low Battery Warning
For your convenience, TuneAmp warns you when
the battery is almost depleted. You will hear three
sets of double beeps every 10 minutes, which
indicates it’s time to change the battery. Once the
voltage drops below 0.95V, TuneAmp emits six
sets of double beeps, then shuts down.
Important —
Always discard
used batteries.
Small batteries
can be harmful if
swallowed. Keep
batteries out of
reach of pets and
small children. In
case of ingestion,
see a physician
immediately and
call (collect, if
necessary) the
National Battery
Ingestion Hotline
at 202-625-3333.
For more
information visit
www.poison.org/
battery
THIN TUBE
(for sound)
TIP
(Sleeve or Vented Dome)
See illustrations at right
RETAINING
LOCK
TUBE CONNECTOR HEAD
MICROPHONE
2ND MICROPHONE
(Focus Model only)
ROCKER SWITCH /
VOLUME CONTROL
PSAP CASE
BATTERY COMPARTMENT DOOR
TuneAmp is turned off by opening the
battery compartment door part way.
VENTED DOMESLEEVE
Page 5

FIGURE 1
FIGURE 2
FIGURE 3
Battery Information 98 Battery Information
How to insert and remove a battery
1 Lift the notch at the edge of the battery compartment and swivel
open the door of the battery compartment.
(FIGURE 1) Remove the
battery by pushing it out.
2 Remove the brown-colored tab on a new battery (size 312).
Insert the battery
with the positive “+” side facing up.
Notice the “+” on the edge of the battery door to assist you in
finding the proper orientation.
(FIGURE 2)
3 Gently close the battery door. It should close easily; do not force
the door closed.
(FIGURE 3)
If resistance is experienced, make sure the battery is inserted properly.
When the battery door is completely closed, your TuneAmp is ready for
operation.
Page 6
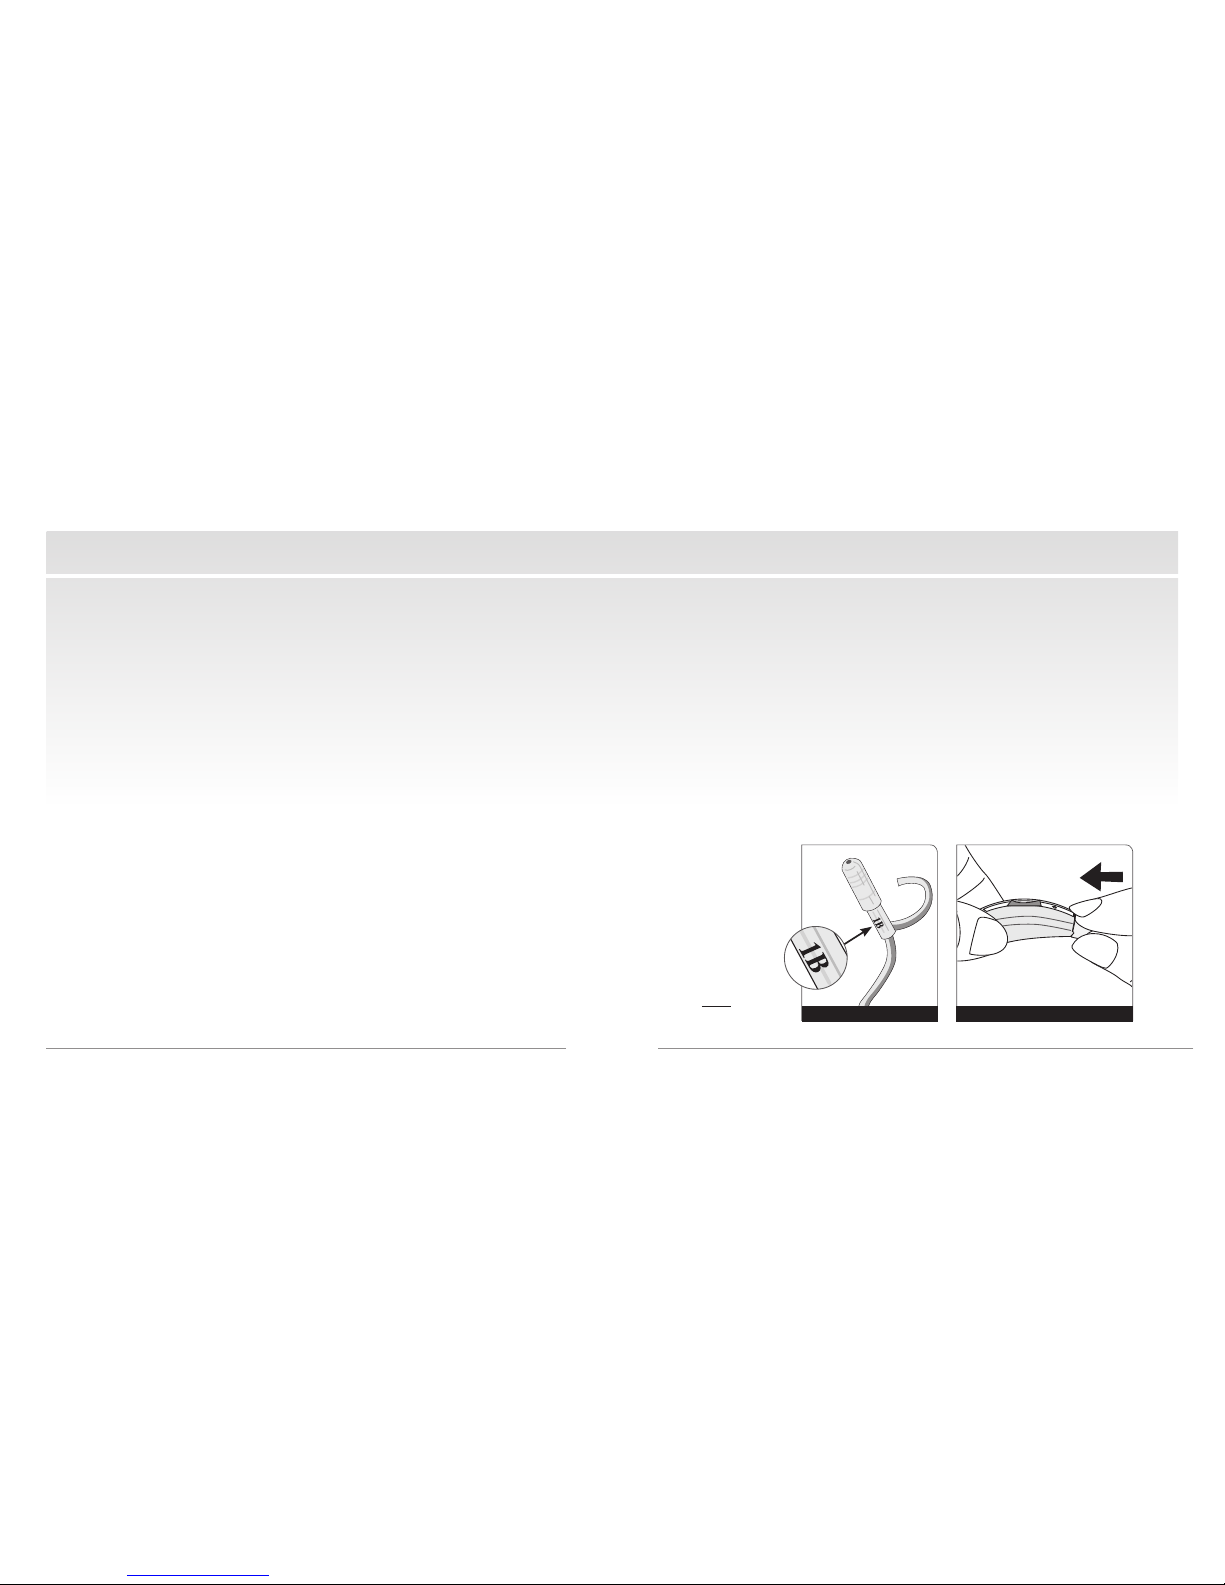
FIGURE 5FIGURE 4
Preparing for Use 1110 Turning On/Off
Turning On/Off
To operate TuneAmp, a battery must be inserted in the battery
compartment. Close the battery compartment. Your TuneAmp is now
powered on.
To turn TuneAmp off, do the opposite–open the battery door part way.
(FIGURE 1, PG. 8)
When not in use, open the battery door part way. This helps to prevent
excessive battery drain and allows for proper ventilation of the PSAP.
Preparing for Use
TuneAmp comes standard with two common size tubes (left and right)
and two tips (sleeve and vented dome) that will fit most users. However,
if you need a different size, other tube lengths and tips sizes are
available through your retailer.
Connecting A New Tube
Each tube is color-coded (FIGURE 4) to easily identify left and right (blue for
the left ear; red for the right ear.) Align the tube connector end with the
end of the PSAP case, then push the tube straight onto the sound post
until it snaps into place.
(FIGURE 5) There is no need to rotate the tube
when attaching.
Text represents size
of tube. Color of text
indicates left or right.
Page 7

FIGURE 6
FIGURE 7
Basic Model 1312 Preparing for Use
Placing TuneAmp in Your Ear
Place the TuneAmp over the ear. Grab the end of the tubing with your
thumb and index finger, and insert the tip into the ear canal with a gentle
push. With the thumb and index finger, place the retaining lock into the
bowl of the ear.
When properly inserted, the tubing
will lay close to the head around the
front of the ear and into the canal.
You can check this by moving your
finger down the tubing, into the ear.
(FIGURE 6) Using a mirror at first may be
helpful to properly position TuneAmp.
If the tip doesn’t stay in your ear, you
may need a different length thin tube.
Additional sizes are available from
your retailer, or call 1-888-815-3240
for assistance.
TuneAmp Basic (For Focus model, skip to page 15)
Selecting Your Listening Preference
With a fresh battery in your TuneAmp and wearing the TuneAmp, you
are ready to select your desired Listening Preference. The first time you
turn TuneAmp on, it will be at Listening Preference One.
In a quiet environment, place your index
finger on the upper part of the rocker switch
(FIGURE 7), press and release the switch. You
will hear two beeps, indicating you are now
in Listening Preference Two.
What you are doing is sampling the
available acoustic settings. This may be
continued for up to 4 beeps.
The rocker switch also works in reverse. By
placing your finger on the lower portion and
briefly
pressing and releasing, you will
TuneAmp BASIC SET-UP
UPPER PORTION
LOWER PORTION
ROCKER
SWITCH
Page 8

FIGURE 8
Focus Model 1514 Basic Model
decrease the number of beeps you hear. So, by pressing the upper or
lower rocker switch, you can determine which setting is your preferred
Listening Preference. You may take as long as you want to set TuneAmp.
Once you’ve determined which preference you desire,
press and
HOLD
the upper or lower switch for ten seconds, until you hear a long
beep. You have now locked in your Listening Preference.
Congratulations! Your TuneAmp Basic is now fully configured,
and the volume control is now active. From this point forward, the rocker
switch acts as a volume control.
To increase volume: tap the upper portion of the rocker switch.
To decrease volume: tap the lower portion of the rocker switch.
If you decide later that you want to reset your TuneAmp to a different
Listening Preference, see page 18.
TuneAmp Focus (For Basic model, see page 13)
Selecting Your Listening Preference
With a fresh battery in your TuneAmp and wearing the TuneAmp, you
are ready to select your desired Listening Preference. The first time you
turn TuneAmp on, it will be at Listening Preference One.
In a quiet environment, place your index
finger on the upper part of the rocker switch
(FIGURE 8), press and release the switch. You
will hear two beeps, indicating you are now
in Listening Preference Two.
What you are doing is sampling the
available acoustic settings for quiet
environments. This may be continued for
up to 4 beeps.
The rocker switch also works in reverse. By
placing your finger on the lower portion
TuneAmp FOCUS SET-UP
TuneAmp BASIC SET-UP (continued)
UPPER PORTION
LOWER PORTION
ROCKER
SWITCH
Page 9

Focus Model 1716 Focus Model
and pressing and releasing, you will decrease the number of beeps
you hear. So, by pressing the upper or lower rocker switch, you can
determine which setting is your preferred Listening Preference for quiet
environments. You may take as long as you want to set TuneAmp.
Once you’ve determined which preference you desire,
press and
HOLD
the upper or lower switch for ten seconds, until you hear a long
beep. You have now locked in your Listening Preference for quiet.
Utilizing Noise Program (Focus model only)
Once you have locked in the Quiet Listening Preference, TuneAmp Focus
automatically adds a program for noisy listening situations.
Congratulations! Your TuneAmp Focus is now fully configured,
and the volume control is now active. From this point forward, the rocker
switch provides two functions:
To increase volume: tap the upper portion of the rocker switch.
To decrease volume: tap the lower portion of the rocker switch.
To change programs: Press and hold the rocker switch for two seconds
(either upper or lower portion). Once you release the switch, you
will hear a special sound that indicates which program you have just
entered. Quiet program–you will hear a beep. Noise program– you
will hear a “shhhh” sound.
The Quiet program is the default setting every time you turn your
TuneAmp on.
The Noise program is particularly helpful in noisy situations, such as
a crowded room or restaurant. This program enables the directional
microphone feature.
If you decide later that you want to reset your TuneAmp to a different
Listening Preference, see page 18.
TuneAmp FOCUS SET-UP (continued) TuneAmp FOCUS SET-UP (continued)
QUIET BEEP
NOISE* NOISE BURST (Shhhh)
*Available in Focus model only.
Page 10

FIGURE 9
Care 1918 How to Reset
Care
The following instructions will assist in extending the life of your TuneAmp
PSAP.
Cleaning the Exterior
You should inspect and clean your TuneAmp every day. To clean, gently
wipe the surface with a soft, dry cloth or moist cleaning wipes made
especially for PSAPs. Do not allow water or liquid to enter any
openings.
Cleaning the Tip and Tube
Remove the tube from the case by
twisting the tube connector at least
45° and pulling it straight off, away
from the instrument.
(FIGURE 9)
Use a tissue to clean the exterior of
the tube and tip. Use the cleaning
line provided to clean the tube and
tip, by pushing the cleaning line
through the tube.
How to Reset (both models)
After wearing TuneAmp for a while, you may decide you want to try a
different Listening Preference than the one you initially selected.
TuneAmp may be reset by following these simple steps:
1 With a battery inserted, open the battery door.
2 Press and hold the upper or lower portion of the rocker switch.
3 While still pressing and holding the rocker switch, close the
battery door.
4 Wait at least15 seconds, then release the rocker switch.
5 Open the battery door.
6 When you close the battery door again, TuneAmp is reset.
You may now proceed to select a new Listening Preference.
See page 13 for Basic model or page 15 for Focus model.
Page 11

CLEANING LINE
FIGURE 10
Care 2120 Care
Insert the line at the connector end where the tube attaches to the PSAP
case and push out through the tip.
(FIGURE 10)
Do not rinse or submerge these parts in water. There is a risk
of damage if a water drop becomes trapped in the tube. If this should
occur, it will prevent sound from coming through the tube and may be
harmful to TuneAmp’s electronics.
Re-attach the tube by aligning the tube connector end with the end of
contact your medical professional.
Care and Storage
The tube and tip need to be changed periodically, typically 2 or 3
times per year. When the tube or tip become soft, discolored, kinked, or
damaged, obtain replacements from your TuneAmp retailer.
When you change the tip, make sure it is securely fastened to the sound
tube before inserting in your ear.
The most common causes of PSAP failure are moisture and wax. PSAPs
are exposed to moisture in the form of humidity and perspiration while
being worn. The daily use of a Dry & Store
®
appliance is recommended.
Dry & Store products may be purchased from your retailer or at
www.dryandstore.com
the PSAP case, then push the tube
straight onto the sound post until
it snaps into place. There is no
need to rotate the tube when
re-attaching.
The materials used in TuneAmp are
of the highest quality available,
and the likelihood of an allergic
reaction is slight. If the tube or the
tip irritates your ear in any way,
Page 12

Do’s and Don’ts 2322 Do’s and Don’ts
Do’s and Don’ts
DO place your TuneAmp PSAPs in a Dry & Store® appliance
every night to remove moisture and prevent corrosion.
DO always carry spare batteries.
DO safely store TuneAmp when not in use. Keep out of reach of
small children and pets. In particular, dogs may be irritated by
the feedback (“whistling”) sound and attracted by the owner’s
scent. This often results in a chewed and/or ingested device.
(Dry and Store
®
is recommended for storage whenever TuneAmp
is not being worn.)
DON’T leave TuneAmp on the radiator, near a stove, in a sunny
window, in a car or in any other hot place. Excessive heat or
cold can damage the instrument.
DON’T wear TuneAmp when using a hair dryer or when at the
beauty salon, spa or barber.
DON’T apply hair spray when wearing your TuneAmp. It can
damage the microphone or other components.
DON’T wear TuneAmp while taking a bath, shower, spa
treatment or while swimming.
DON’T store TuneAmp in the bathroom during a shower or near
a steam room, as moisture created by the steam may cause
damage.
Page 13

Troubleshooting Tips 2524 Troubleshooting Tips
Troubleshooting Tips
No Sound or Not
Loud Enough
Ensure that the battery door is closed.
Replace the battery.
Make sure the tubing is clean and that the tip is
not clogged.
Make sure the PSAP case is clean and dry.
Make sure that the PSAP case is positioned
properly behind the ear, and that the tip is
positioned properly in the ear canal.
Make sure the volume is turned up, by pressing
and releasing the upper portion of the rocker
switch.
Excessive ear wax can prevent sound from
entering the ear. Contact your physician.
Changes in your hearing can affect how you hear
with TuneAmp. Contact your hearing healthcare
professional if you suspect any change in your
hearing condition.
PSAP may need to be reset. See page 18 for
instructions.
Whistling
(“Feedback”)
Your TuneAmp has a best-in-class feedback
management system. However, when your hand is
near the device, you may hear a whistling noise,
which is called “feedback.” This may be caused
by amplified sound bouncing off your hand back
into the instrument. The noise usually quits when
you take your hand away.
If the whistling doesn’t stop once you’ve moved
your hand away, ensure that the PSAP case is
positioned properly behind the ear, and that the tip
is positioned properly in the ear canal.
Try adjusting the volume. Press and release the
lower portion of the rocker switch to decrease
volume.
PSAP may need to be reset. See page 18 for
instructions. Once reset, repeat steps on page
13 (Basic model) or page 15 (Focus model) and
choose a lower Listening Preference. (Example: If
you’re currently on Listening Preference 3, choose
Listening Preference 2.)
If the above fails to reduce feedback, contact your
retailer.
Page 14

Extended Storage 2726 Troubleshooting Tips
Extended Storage
If it is necessary to store your TuneAmp PSAPs for an extended amount of
time, follow the steps below for proper storage.
1 Remove the batteries.
2 Clean TuneAmp according to instructions in this manual. A
full cycle in a Dry & Store appliance is recommended prior to
extended storage.
3 Place TuneAmp in a plastic or glass airtight container with a
Dry-Brik
®
desiccant. Then store in a cool, dry place.
Sound is Distorted,
Unclear, Intermittent
or has Static Noise
Replace the battery.
Make sure the tubing is clean and that the tip is
not clogged.
Make sure the tubing is clean and dry. We
recommend nightly use of a Dry & Store appliance
to remove moisture and prevent corrosion.
If you are near an electromagnetic field (e.g. near
a computer screen or fluorescent lights), step away
to see if the static clears.
PSAP may need to be reset. See page 18 for
instructions. Once reset, repeat steps on page
13 (Basic model) or page 15 (Focus model) and
choose a lower Listening Preference. (Example: If
you’re currently on Listening Preference 3, choose
Listening Preference 2.)
PSAP may have a poor battery contact or may
not be set up properly. Contact the retailer or call
1-888-815-3240 for assistance.
Page 15

28 Warranty and Service Warranty and Service 29
Batteries, tips and tubes, or any problem that is caused by abuse or
misuse are not covered under this warranty.
If a defect in materials or workmanship appears in your TuneAmp during
your warranty period, call 1-888-815-3240 for assistance.
If your TuneAmp must be returned for service, you will be provided a
Return Authorization number, specific instructions and where to return.
This warranty gives you specific legal rights, and you may also have
other rights which vary from state to state.
Warranty and Service
TuneAmp™ is covered by a limited warranty against defects in material
and workmanship. This warranty applies to the original owner for 6
months from the date of the sale to customer. Coverage terminates if you
sell or otherwise transfer the device.
To be eligible for service under this warranty, you must provide the
required information within 30 days of purchase. Non-activated
warranties will begin on the date the TuneAmp with that serial number
was shipped to retailer.
A six month warranty extension is provided at no charge with the
user’s validated purchase and regular use of a Dry & Store
®
appliance.
Consult your retailer about extended warranty coverage.
Manufacturer will replace any defective or malfunctioning part at no
charge. Services provided during the warranty period are guaranteed
for the remainder of the original warranty. Repairs performed beyond the
original warranty period are warranted for 6 months from the date of
service and apply only to the components repaired.
Page 16

30
Owner information
Each TuneAmp™ has a serial number (S/N) located on the bottom of the PSAP. Please
record this serial number in the owner information section below.
Model: ______________________________________
Owner Name: _________________________________________________
TuneAmp Purchase Date: ______________________
S/N on TuneAmp:
left __________________ right ___________________
Basic o Focus o
Place of purchase:
Business Name: ________________________________________________
City: _______________________________ State: ___________________
Phone Number: ______________________________
Page 17

US Patents 7,974,716 and 8,077,890
Other patents pending
www.TuneAmp.com
TA_INS 0212
 Loading...