

Page 1
INSTALLATION INSTRUCTIONS
JEEP 2007-2010 JK 4DR. TAILGATE SECURITY ENCLOSURE #310
Call (970) 564-1762 for Technical Support
Please read and fill out the enclosed warranty registration card to activate your warranty.
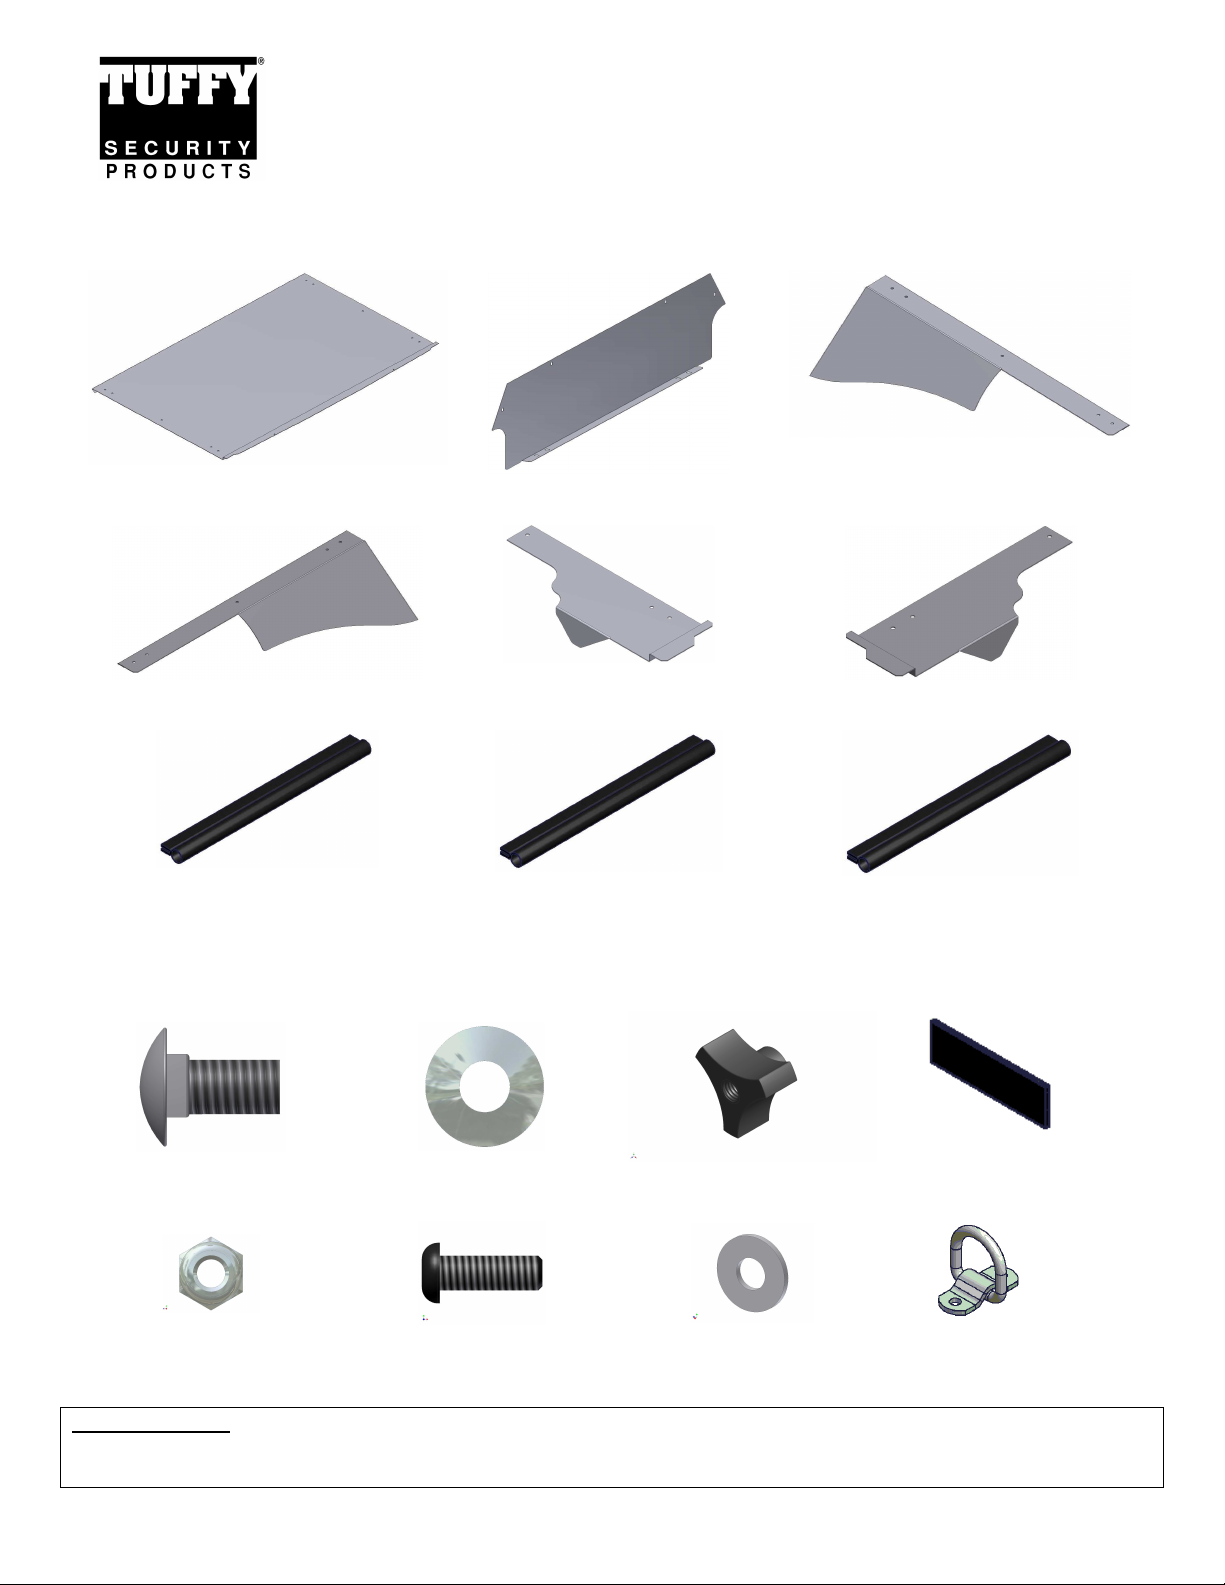
PARTS CHECKLIST
#1 Lid #2 Front Panel #3 Side Panel(Left)
#4 Side Panel(Right) #5 Lid Extension(Left) #6 Lid Extension(Right)
#7 End Bulb Trim Piece(Left)
(12” Long With Notch)
#8 End Bulb Trim Piece(Right)
(12” Long With Notch)
SHIPPING PACKAGE CHECKLIST
#10.4.1 - (4) Carriage Bolts
#10.4.3. - (4) 3/8”
Flat Washers
#10.4.2 - (4) Wing
Knob Nuts
#9 End Bulb Trim Piece
(49” Long)
#10.2.1-(4) Double
Sided Velcro
#10.6.1 – (10) ¼” Nylock
Hex Nuts
#10.6.2 – (10) 1/4”
Cap Screws
#10.6.3 – (12) ¼”
Flat Washers
#10.3 – (4) Cargo
Loops and Straps
TOOLS NEEDED
• T-30 Torx Bit/Driver
•
5/32” Hex Bit/Driver
• 7/16” Socket or Wrench
Page 1 of 4 – 12/9/2011 – Rev 12/14/11
Page 2
ATTENTION:
• THIS ENCLOSURE WAS DESIGNED FOR A STOCK OEM VEHICLE, ANY MODIFICATIONS MADE
MAY AFFECT THE FIT INCLUDING: CARPET REMOVAL/CHANGES, SEATS, ETC.
• On Jeep Wrangler JK vehicles with Manual Door Locks only, the rear tailgate lock must be locked
manually with key in order for Tuffy enclosure security to function. Vehicles with Power Door
Locks by default also feature Remote Keyless Entry and the Vehicle Security Alarm. Arming of the
Vehicle Security Alarm (by locking the doors with either the key fob or interior power door lock
switch) automatically disables the interior power door lock switches and ensures the tailgate and
Tuffy enclosure are secure, even on softtop models or with the top removed. There is a 16-second
alarm arming period during which the interior power door lock switches remain active.
•
For safety do not place any items on top of the enclosure that are not adequately secured to the
vehicle to prevent movement in the event of an accident or abrupt speed changes.
PLEASE READ ALL INSTRUCTIONS THOROUGHLY BEFORE STARTING INSTALLATION.
1. IMPORTANT! Make sure the vehicle is parked on a flat surface, placed in park, and the emergency brake is
activated.
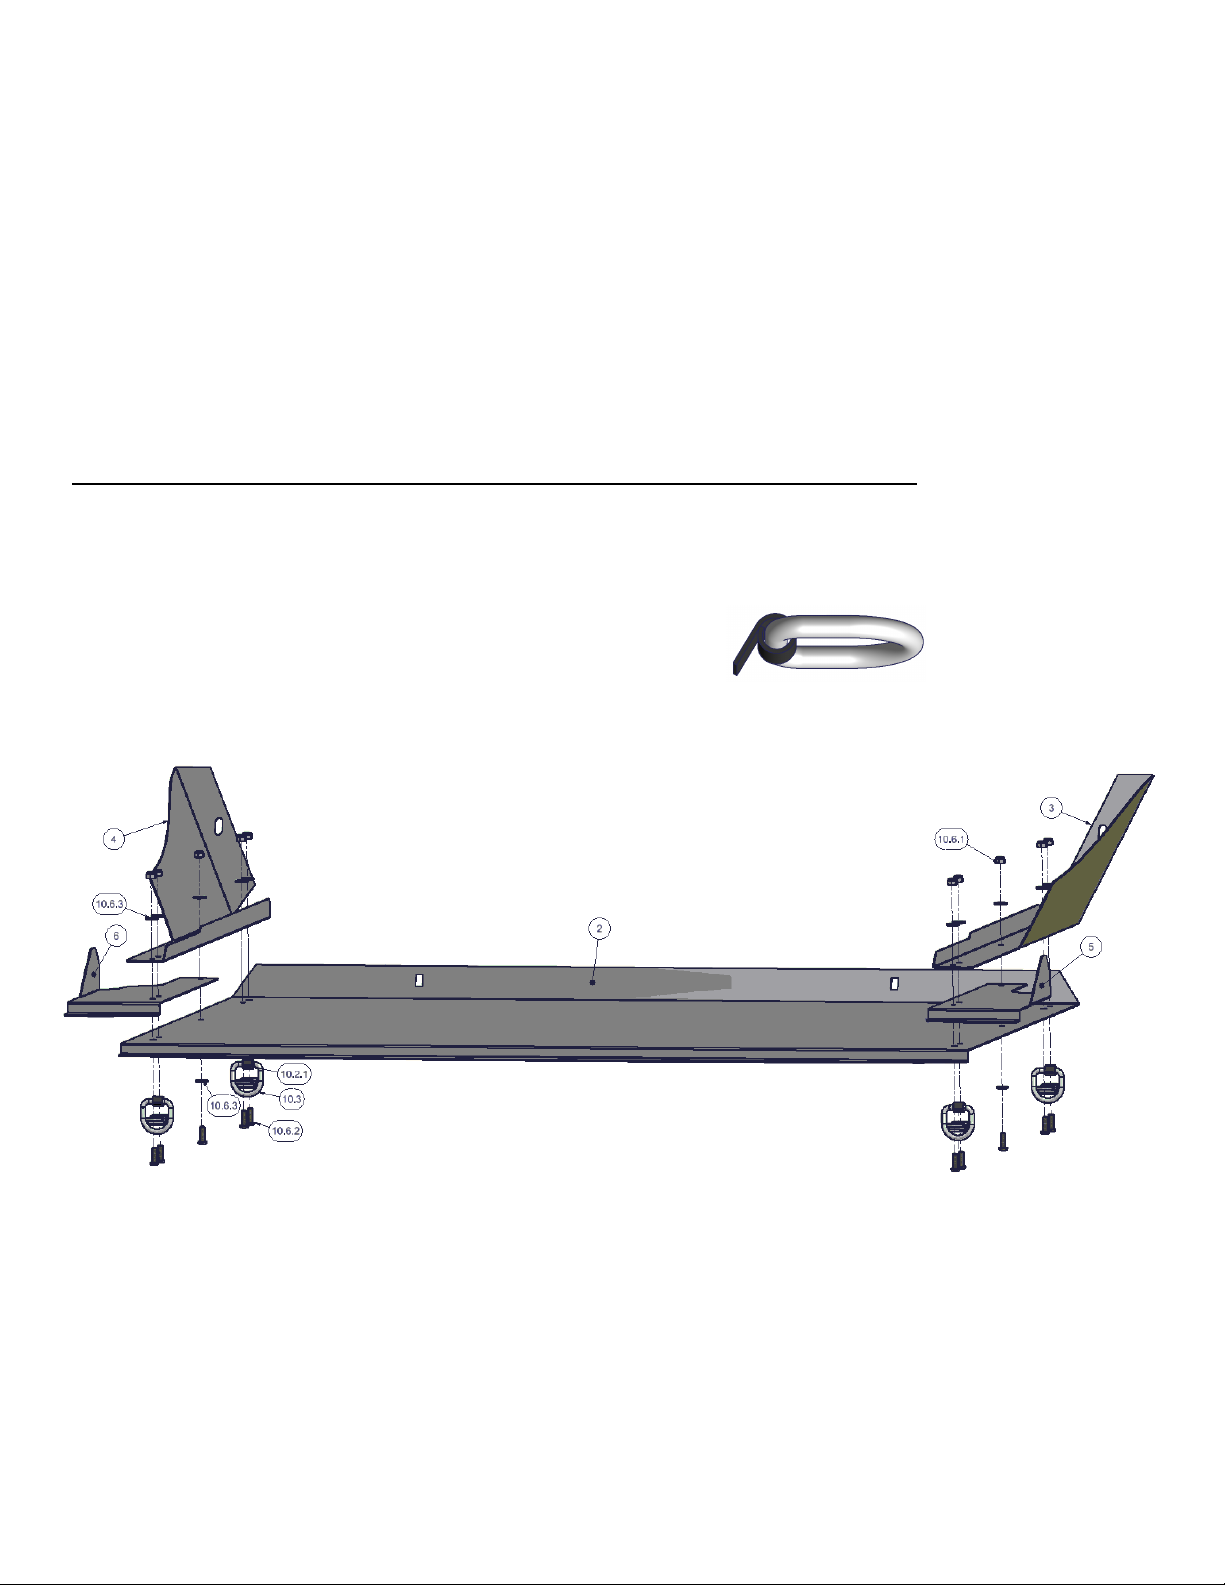
2. Remove the (4) #10.3 Cargo Loops, and the 4 #10.2.1 Velcro Strips from the shipping package, and wrap the Velcro
Strips around the flat side of the Cargo Loops(As Shown In Figure 1).
FIGURE 1
3. Assemble the #1 Lid, #3 & #4 Side Panels, the #5 & #6 Lid Extensions, and the (4) #10.3 Cargo Loops together into a
single assembly by turning the Lid upside down(large rear flange pointing up) and using (10) #10.6.2 Cap Screws,
(12) #10.6.3 Flat Washers, and (10) ¼” Nylock Hex Nuts . (See Figure 2)
FIGURE 2
4. Install the #7, #8, and #9 Trim pieces to the assembly as shown in Figure 3. NOTE: Side Trim Pieces have a notch
which faces the inside of the enclosure to make installation easier, but offers a “finished” appearance from outside the
enclosure.
Page 2 of 4 – 12/9/2011 – Rev 12/14/11
Page 3

FIGURE 3
5. Lay down the rear seats and remove the (2) Forward OEM Cargo Tie Downs(located on the floor near the rear seat
mount brackets). Place the #2 Front Panel into the vehicle so that the panel leans toward the rear of the
vehicle(similar angle as the seatbacks when up). Reinstall, but do not tighten the OEM bolts into the Cargo Floor(See
Figure 4). NOTE: It is possible to reuse the Cargo Tie Downs, but it is much easier to install the Front Panel if the
OEM Tie Down Loops are set aside(to be returned/reused if the 310 Tailgate Enclosure is removed).
FIGURE 4
6. Install the #1 Lid Assembly with trim pieces into the vehicle by positioning the rear side flanges under the hardtop
mounting lip at the rear of the vehicle body and tilting the #1 Lid Assembly downwards to meet up with the #2 Front
Panel. The #1 Lid Assembly is intended to lap over the front of the #2 Front Panel.(Figure 5) NOTE: This step is
difficult for a single person, and should be done with a second person.
***Note: If installing the #310 Tailgate Security Enclosure on a vehicle with a softtop, it will be easier to remove the (2)
softtop rear window bar clips located to either side of the tailgate. Once the #1 Lid is properly installed, the clips can
be re-installed by pressing the lid downwards and attaching the clips under the body lip.
Page 3 of 4 – 12/9/2011 – Rev 12/14/11
Page 4

FIGURE 5
7. Adjust the #2 Front Panel so that the gap between it and the forward flanges of the #1 Lid Assembly is minimized and
install (4) #10.4.1 carriage bolts from the front of the installed enclosure. Install (4) #10.4.3 washers and the (4)
#10.4.2 wing knob nuts from inside the enclosure. The two panels have slotted mounting holes to allow for the
tailoring the fit of the enclosure. NOTE: It may be necessary to raise or lower the #1 Lid to provide a better seal to the
carpet in the cargo area. (Figure 6)
FIGURE 6
8. Tighten the (4) #10.4.2 Wing Knob Nuts securing the #1 Lid Assembly and #2 Front Panel, then tighten the OEM
Cargo Tie Down Bolts to further compress the carpet in the cargo area.
Call (970)564-1762 for Technical Support
Page 4 of 4 – 12/9/2011 – Rev 12/14/11
 Loading...