

Page 1

Please read and fill out the enclosed warranty registration card to activate your warranty.
PARTS CHECKLIST
INSTALLATION INSTRUCTIONS
JEEP 2007-2010 JK TAILGATE SECURITY ENCLOSURE #286
Call (970) 564-1762 for Technical Support
#1 Lid #2 Front Panel #3 Front Panel Extension
#4 Left Mounting Bracket #5 Right Mounting Bracket
SHIPPING PACKAGE CHECKLIST
#6.1 - (10) 5/16-18 x 3/4”
CARRIAGE BOLTS
#6.2 - (10) 5/16”
WASHERS
#6.3 - (2) 5/16-18 WING
KNOB NUTS
#6.4 - (8) 5/16-18 NYLOCK
NUTS
#6.5 – (1) 49” LONG RUBBER EDGE TRIM
#6.6 – (1) 16” RUBBER EDGE TRIM #6.8 (2) 2-1/2” SMALL BULB RUBBER EDGE TRIM
TOOLS NEEDED
• 18mm socket and wrench (2-door model only)
• 15mm socket and wrench (2 or 4-door models with OEM subwoofer)
• ½” socket and wrench (All applications)
• Drill with 3/8” drill bit (Required for 4-door model, Optional for 2-door model)
ATTENTION:
• THIS ENCLOSURE WAS DESIGNED FOR A STOCK OEM VEHICLE, ANY MODIFICATIONS MADE
MAY AFFECT THE FIT INCLUDING: CARPET REMOVAL/CHANGES, SEATS, ETC.
Page 1 of 7 – 8/8/2014 – Rev A
Page 2

• On Jeep Wrangler JK vehicles with Manual Door Locks only, the rear tailgate lock must be locked
manually with key in order for Tuffy enclosure security to function. Vehicles with Power Door
Locks by default also feature Remote Keyless Entry and the Vehicle Security Alarm. Arming of the
Vehicle Security Alarm (by locking the doors with either the key fob or interior power door lock
switch) automatically disables the interior power door lock switches and ensures the tailgate and
Tuffy enclosure are secure, even on softtop models or with the top removed. There is a 16-second
alarm arming period during which the interior power door lock switches remain active.
•
For safety do not place any items on top of the enclosure that are not adequately secured to the
vehicle to prevent movement in the event of an accident or abrupt speed changes.
PLEASE READ ALL INSTRUCTIONS THOROUGHLY BEFORE STARTING INSTALLATION.
1. IMPORTANT! Make sure the vehicle is parked on a flat surface, placed in park, and the emergency brake is
activated.
2. If installing the #286 Security Enclosure in a 2-door vehicle, fold and tumble the rear seat forward temporarily to allow
plenty of access for installation. The seat can be set upright again following installation.
INSTALLATIONS IN A 2-DOOR WITHOUT OEM SUB-WOOFER
3. Remove the (2) #9.5 OEM Rear seatbelt securing nuts with an 18mm socket and wrench.
4. Loosely assembly the #2 Front Panel, #3 Front Panel Extension, #4 Left Mounting Bracket, and #5 Right Mounting
Bracket using the supplied #6.1 bolts, #6.2 washers, and #6.4 nuts, as illustrated. Leave all fasteners hand tight at
this point. Place the assembled parts in the vehicle with the #4 and #5 mounting brackets positioned on the rear
seatbelt body mounted studs. Be sure the #4 and #5 mounting brackets are installed on top of the seat belt mounting
tabs. **Note: the #3 Front Panel Extension is installed to the rear side of the #2 Front Panel. (Figure 1a)
5. Re-install the #9.5 OEM Rear seat belt nuts. Tighten fasteners hand tight at this time.
FIGURE 1a
Page 2 of 7 – 8/8/2014 – Rev A
Page 3
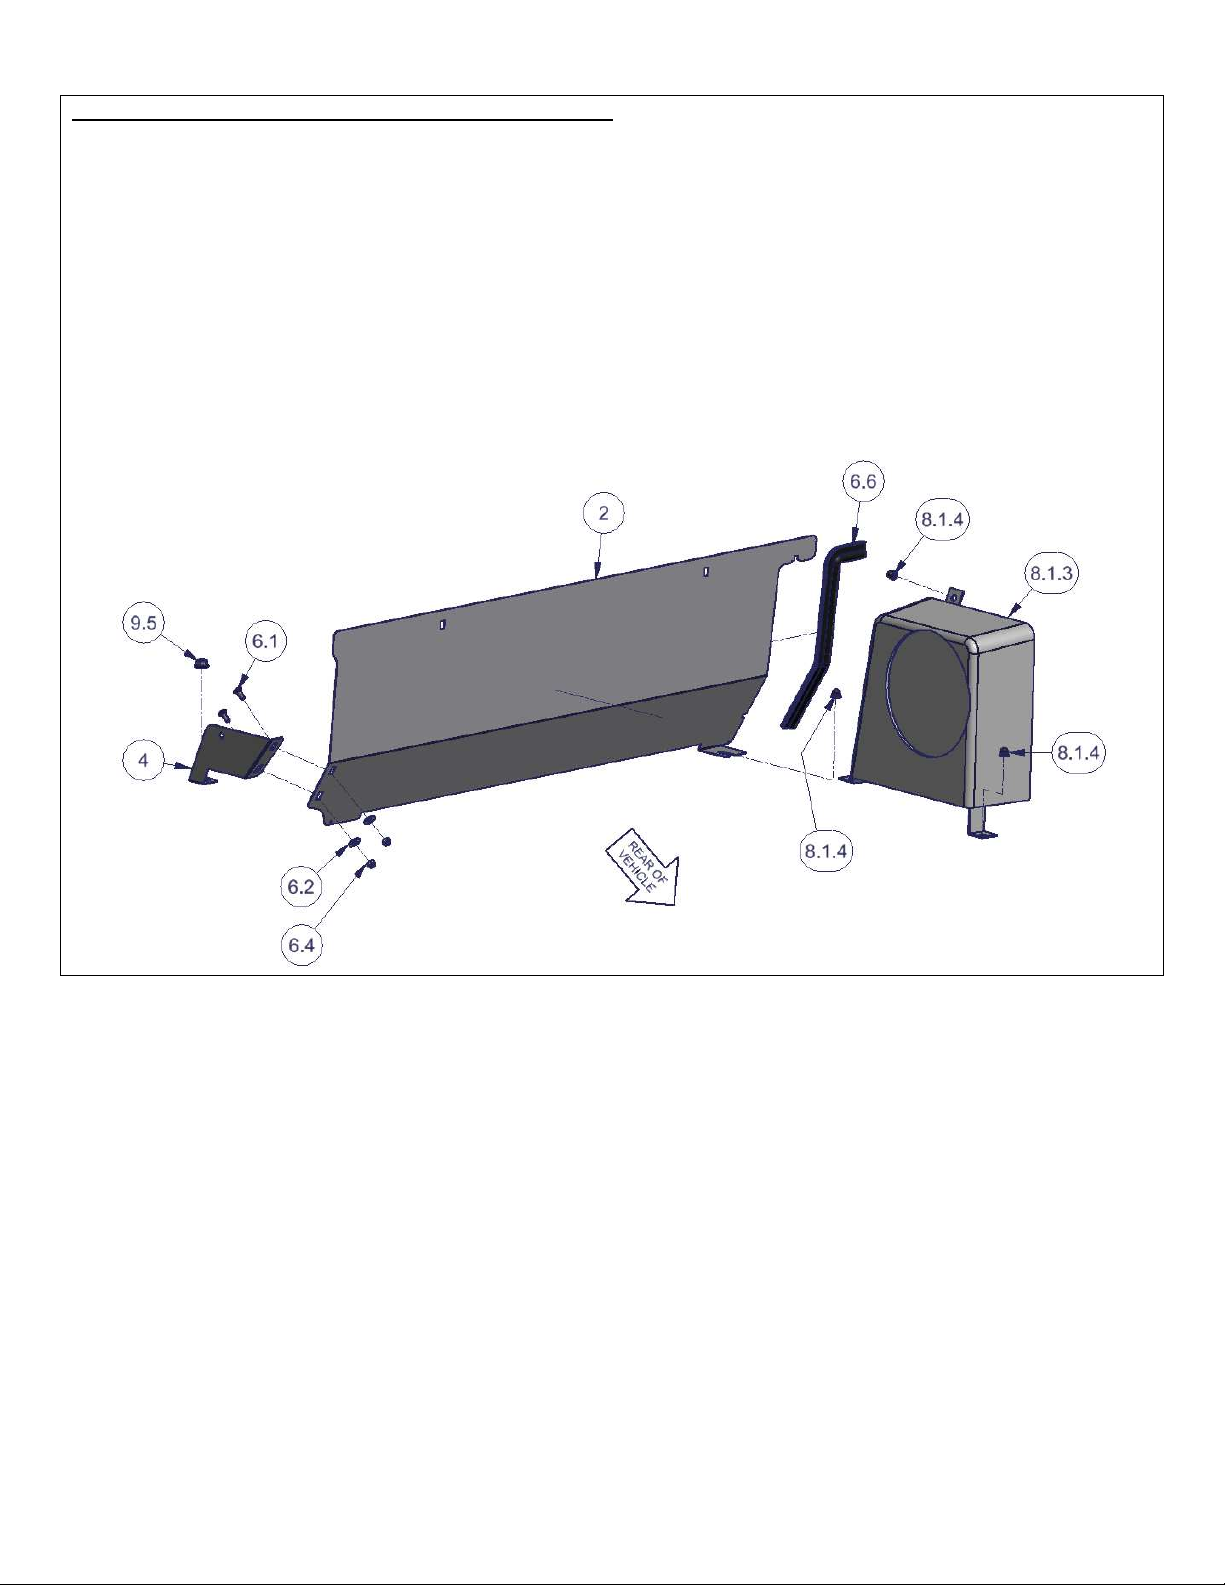
INSTALLATIONS IN A 2-DOOR WITH OEM SUB-WOOFER
6. Remove the (1) #9.5 OEM Rear seat belt securing nut ON THE DRIVER’S (LEFT) SIDE with an 18mm socket and
wrench. Remove or sufficiently loosen the (3) #8.1.4 OEM Sub-woofer mounting acorn nuts with a 15mm socket and
wrench.
7. Loosely assembly the #2 Front Panel and #4 Left Mounting Bracket using the supplied #6.1 bolts, #6.2 washers, and
#6.4 nuts, as illustrated. Leave all fasteners hand tight at the point. Install the #6.6 Rubber Edge Trim to the subwoofer notch of the #2 Front Panel. Sliding the sub-woofer mounting foot on the #2 Front Panel under the subwoofer, install the assembled parts in the vehicle with the #4 mounting bracket positioned on the rear seat belt body
mounted studs. Be sure the #4 mounting bracket is installed on top of the seat belt mounting tabs. (Figure 1b)
8. Re-install the #9.5 OEM Rear seat belt nut and the (3) #8.1.4 sub-woofer acorn nuts. Tighten fasteners hand tight at
this time.
FIGURE 1b
Page 3 of 7 – 8/8/2014 – Rev A
Page 4

INSTALLATIONS IN A 4-DOOR WITHOUT OEM SUB-WOOFER
9. Loosely assembly the #2 Front Panel, #3 Front Panel Extension, #4 Left Mounting Bracket, and #5 Right Mounting
Bracket using the supplied #6.1 bolts, #6.2 washers, and #6.4 nuts, as illustrated. Leave all fasteners hand tight at
the point. Place the assembled parts in the vehicle. Align the #2 Front Panel approximately ½” forward of the seam
in the #9.2 OEM Rear Storage Cover. **Note the bottom bolt flange on the #4 and #5 Mounting Brackets may need to
be bent inboard away from the fender wells to allow the #2 Front Panel to sit flush to the cargo floor. **Note: The #3
Front Panel Extension is installed to the rear side of the #2 Front Panel. (Figure 1c)
FIGURE 1c
Page 4 of 7 – 8/8/2014 – Rev A
Page 5

INSTALLATIONS IN A 4-DOOR WITH OEM SUB-WOOFER
10. Remove or sufficiently loosen the (3) #8.1.4 OEM Sub-woofer mounting acorn nuts with a 15mm socket and wrench.
11. Loosely assembly the #2 Front Panel and #4 Left Mounting Bracket using the supplied #6.1 bolts, #6.2 washers, and
#6.4 nuts, as illustrated. Leave all fasteners hand tight at the point. Install the #6.6 Rubber Edge Trim to the subwoofer notch of the #2 Front Panel. Sliding the sub-woofer mounting foot on the #2 Front Panel under the subwoofer, install the assembled parts in the vehicle. **Note the bottom bolt flange on the #4 Mounting Bracket may
need to be bent inboard away from the fender wells to allow the #2 Front Panel to sit flush to the cargo floor. (Figure
1d)
12. Re-install the (3) #8.1.4 sub-woofer acorn nuts. Tighten fasteners hand tight at this time.
FIGURE 1d
13. Install the #6.5 Rubber Edge Trim onto the rear edge of the #1 Lid. Install the #6.8 Small bulb Rubber Edge Trim
pieces onto the left and right side roll bar notch, as illustrated. The grip side on each trim piece mounts to the vertical
edges with the bulb center running along the horizontal edge. (Figure 2)
FIGURE 2
Page 5 of 7 – 8/8/2014 – Rev A
Page 6

14. Install the #1 Lid with trim pieces into the vehicle by positioning the rear side flanges under the hardtop mounting lip at
the rear of the vehicle body and tilting the Lid downwards to meet up with the #2 Front Panel. The #1 Lid is intended
to lap over the front of the #2 Front Panel. For a cleaner installation, be sure the #1 Lid front flange tucks inside the
#6.6 rubber edge trim pieces on the #2 Front Panel (if applicable). (Figure 3)
**Note: Be sure to keep the #6.8 rubber edge trim in position when installing the #1 Lid in order to insure a proper
seal between the Lid and the roll bar.
***Note: If installing the #286 Tailgate Security Enclosure on a vehicle with a softtop, it will be easier to remove the (2)
softtop rear window bar clips located to either side of the tailgate. Once the #1 Lid is properly installed, the clips can
be re-installed by pressing the lid downwards and clipping the clips under the body lip.
FIGURE 3
15. Install (2) #6.1 carriage bolts from the front of the installed enclosure. Install (2) #6.2 washers and the (2) #6.3 wing
knob nuts from inside the enclosure. The two panels have slotted mounting holes to allow for the tailoring of the
enclosure fit and position – it may be necessary to raise or lower the #1 Lid a small amount. (Figure 4)
FIGURE 4
Page 6 of 7 – 8/8/2014 – Rev A
Page 7

16. On vehicles without the OEM sub-woofer, press the #3 Front Panel Extension as far outboard as possible to ensure a
tight fit to the fender wells on both sides, tighten the (2) bolts securing the Front Panel and Extension together.
17. On vehicles with the OEM sub-woofer, tighten the (3) #8.1.4 OEM acorn nuts to factory torque specifications.
**Note: Be sure the #2 Front Panel is pulled as far rearward as possible before tightening the acorn nuts.
18. All applications: Tighten the (2) wing knob nuts securing the #1 Lid and #2 Front Panel. As applicable, tighten the
bolts securing the #4 and #5 Mounting Brackets to the #2 Front Panel or #3 Front Panel Extension.
19. On 2-door vehicles, tighten the (1) or (2) #9.5 OEM seat belt flange nuts to factory torque specifications.
INSTALLATIONS IN 4-DOOR VEHICLES AND/OR OPTIONAL SECURITY STEP
20. On 4-door vehicles, be sure the #2 Front Panel is aligned, centered, and positioned in the vehicle as desired. Verify
the #9.2 OEM Rear Storage Cover (or #143 Tuffy Cubby Cover, if installed) has adequate clearance for operation. Be
sure the #2 Front Panel is pushed as far downward as possible for a tight fit to the cargo floor.
21. Using a drill with 3/8” drill bit, drill through the driver and/or the passenger side fender well at the square hole in the #4
and/or #5 Mounting brackets. Be sure to pull the plastic fender liner out of the way to avoid drilling through the fender
liner.
Warning! Be sure there is nothing on the outside of the vehicle fender well which will be damaged when drilling.
Most vehicles have a plastic fender liner that should be pulled temporarily out of the way.
NOTE: Be sure to touch-up paint or apply RTV sealant to the drilled holes to prevent corrosion.
22. Install #6.1 bolts, #6.2 washers, and #6.4 nuts through the #4 and/or #5 mounting brackets and through the drilled
holes in the fender wells. The holes cut in the #4 and #5 mounting brackets are square to work with the provided #6.1
carriage bolts and aid in tightening.
FIGURE 5
Call (970)564-1762 for Technical Support
Page 7 of 7 – 8/8/2014 – Rev A
 Loading...