

Page 1
INSTALLATION INSTRUCTIONS
Please read and fill out the enclosed warranty registration card to activate your warranty.
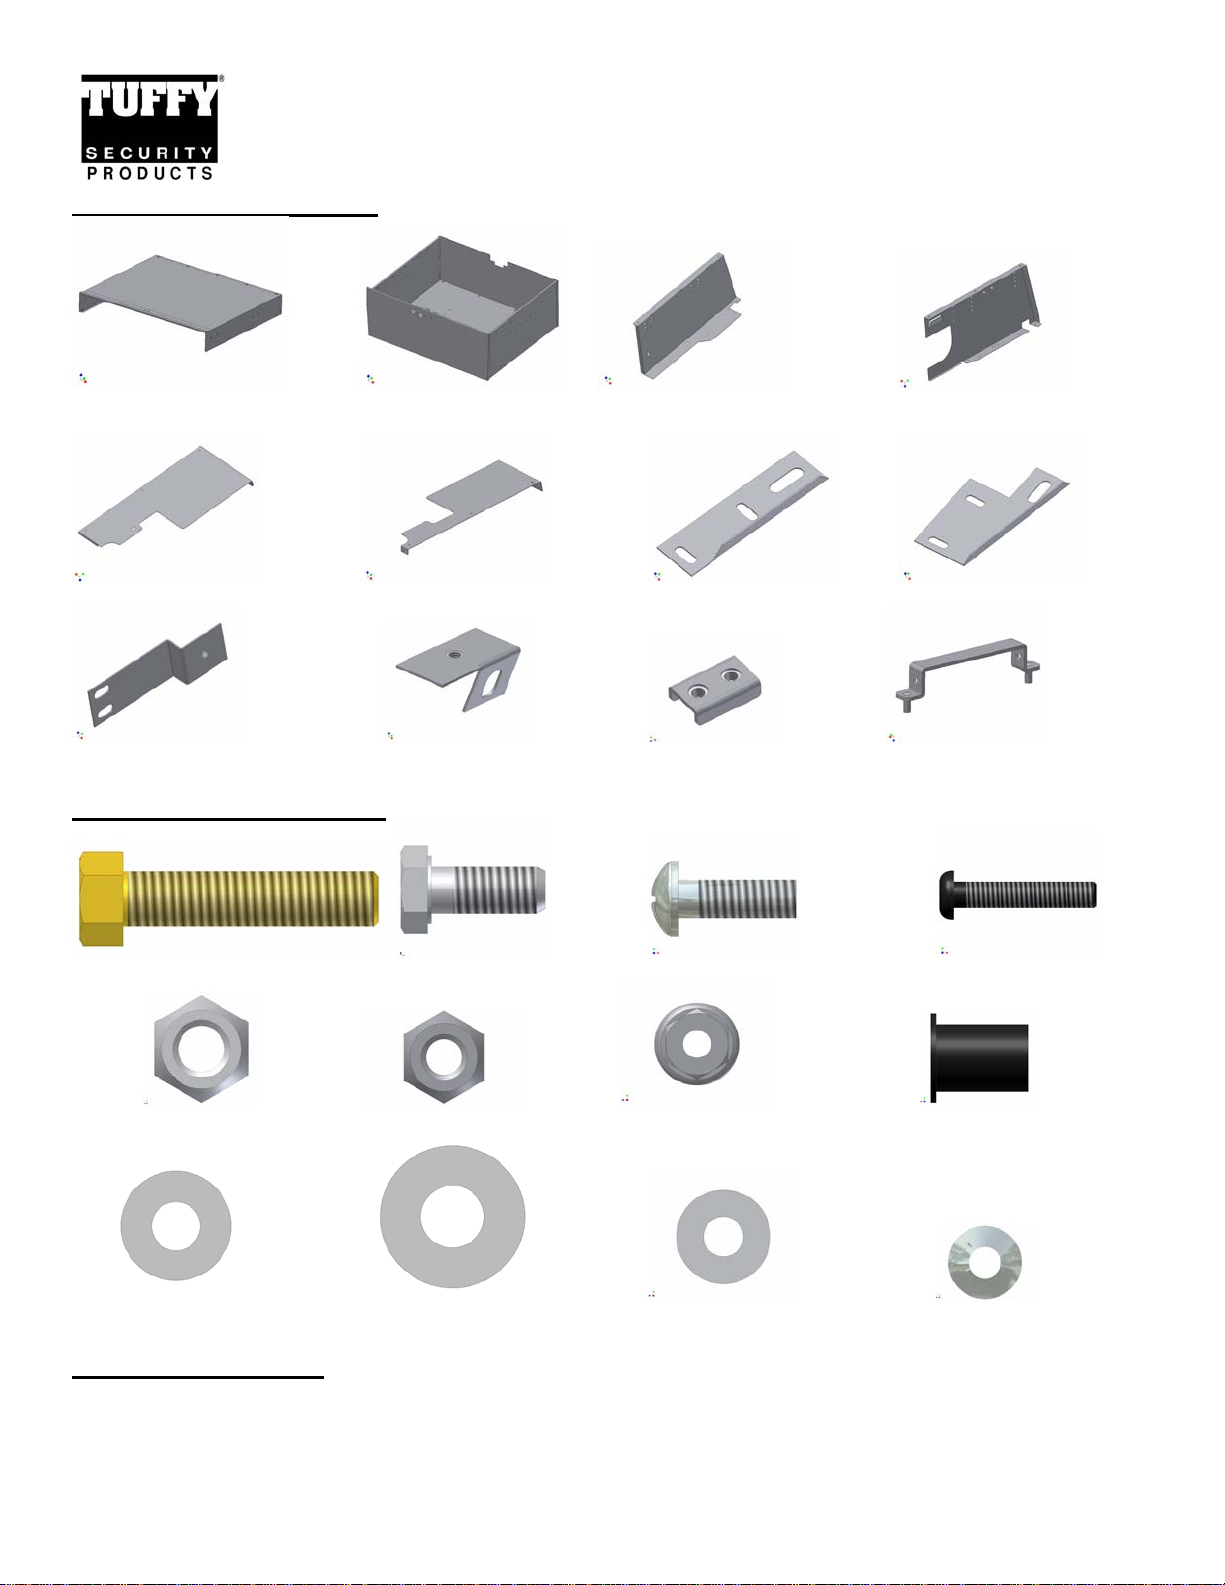
SHIPMENT CONTENTS
DRAWERS #140
Drawer Enclosure Drawer #2 Left Vertical Panel #8 Right Vertical Panel
#14 Right Cap Panel #17 Left Cap Panel #18 Front Left Bracket #16 Front Right Bracket
#19 Rear Left Bracket #15 Rear Right Bracket #23 (2) Clamp bracket Handle
HARDWARE PACKAGE
#21.11 (4) 3/8 x 1 ¾” Bolts #21.2 (12) 5/16” x ¾ Bolts #21.6 (9) ¼-20 x ¾” Screws #21.15 10-32x1” Screw
#21.3 (4) 5/16 Nylock nuts #21.5 (9) ¼-20 Nylock nuts (2) ¼-20 Flange nuts #21.14 10-32 Rubber Well Nut
#21.1 (18) 5/16” Washers #21.12 (4) 3/8” Washers #21.4 (9) ¼” Washers #21.16 (1) #10 Washe r
TOOLS REQUIRED
• All applications: 7/16” Wrench, Phillips head screwdriver, ½” Socket, 10MM Socket, Ratchet
• Vehicles with subwoofer: 15MM Socket, Without subwoofer: 1/8” Allen wrench
• 4 door model: ½” Wrench, 18 MM Socket
• 2 door model: 9/16” Socket
Page 1 of 6 - 1/28/2008 – Rev122006
Page 2

INSTALLATION
PLEASE READ ALL SAFETY WARNINGS AND INSTRUCTIONS THOROUGHLY BEFORE STARTING INSTALL
NOTICE! DRAWER WILL HAVE TO BE REMOVED FROM THE ENCLOSURE FOR
INSTALLATION
INSTRUCTIONS FOR REMOVING DRAWER
Before attempting to install your new Tuffy Drawer, it is necessary to remove the drawer from the
body. To do this, pull the drawer out as far as it can go then locate the small black plastic stops
visible on the ball bearing drawer slides. One of the black stops will need to be deactivated by
pressing down and the other one pulled up. Be careful not to break plastic stops. While deactivating
the stops pull the drawer out and the slides will separate. When you are finished installing your
drawer, line up the slides and push the drawer back in.
1. Unbolt the panels from the inside of the drawer and remove them.
2. Fasten the Left #2 and Right #8 Vertical panels to the drawer enclosure using (6) 5/16 x ¾” Bolts #21.2 & (6) 5/16”
Washers #21.1. (See Figure 1)
3. If the vehicle is equipped with the original factory subwoofer unfasten the OEM factory front mounting nut (#21.8
Figure 4) attaching it to the floor and also unfasten the top nut attaching it to the base of the roll bar. (#21.8 Figure 4)
Save this hardware you will reuse it.
4. Unfasten the two original screws #21.9 holding the factory rear door alignment guide #21.10 and spacer #21.13 which
are mounted by the Jeep rear door latch. Save this hardware you will reuse it. (Figure 3 shows the location when
reinstalling this hardware)
For 4 door mounting applications do these steps. (2 door mounting applications skip to the section)
5. Unfasten the two rear original factory nuts #21.7 on the rear seat mounting brackets. The two front nuts do not need
to be removed. Save this hardware you will reuse it. (See Figure 2 shows the location when reinstalling this
hardware)
6. Place the drawer enclosure assembly in the vehicle.
7. Fasten the Front Left #18, Front Right #16, and Rear Left #19 brackets to the Left #2 and Right #8 Vertical Panels
using (5) 5/16 x ¾” Bolts #21.2, (4) 5/16” Nylock nuts #21.3, and (9) 5/16” Washers #21.1 coming up from the bottom.
(See Figure 1) The holes in both front mounting brackets should slide over the original factory studs used to secure
the rear seat down. The left rear bracket should line up with the original factory holes where the door alignment guide
was removed. The rear hole in the Right Vertical panel should line up with the original factory hole where the rear
subwoofer mounts to the floor of the vehicle (If the vehicle is equipped with the subwoofer). Adjust the brackets to line
up with these mounting points.
8. Check and make sure the Jeep factory rear door opens and closes without interference from the drawer enclosure.
9. Fasten only the Left Cap Panel #17 to the Left Vertical Panel #2 using (5) ¼-20 x ¾” Phillip pan head screws #21.6,
(5) ¼-20 nylock nuts #21.5, and (5) ¼” washers #21.4. (See Figure 6)
10. Install the original factory seat bracket nuts #21.7 to secure the front of the drawer assembly down. (See Figure 2)
Skip past the 2 door mounting instructions to resume 4 door installation.
Page 2 of 6 - 1/28/2008 – Rev122006
Page 3

Figure 1
Figure 2
Page 3 of 6 - 1/28/2008 – Rev122006
Page 4
For 2 door mounting applications do these steps. (4 door mounting applications skip past this section)
11. Fasten the Rear Left bracket #19 to the Left Vertical Panel #2 using a 5/16 x ¾” Bolt #21.2 and 5/16” Washer #21.1.
(See Figure 1)
12. Place the enclosure assembly in the vehicle.
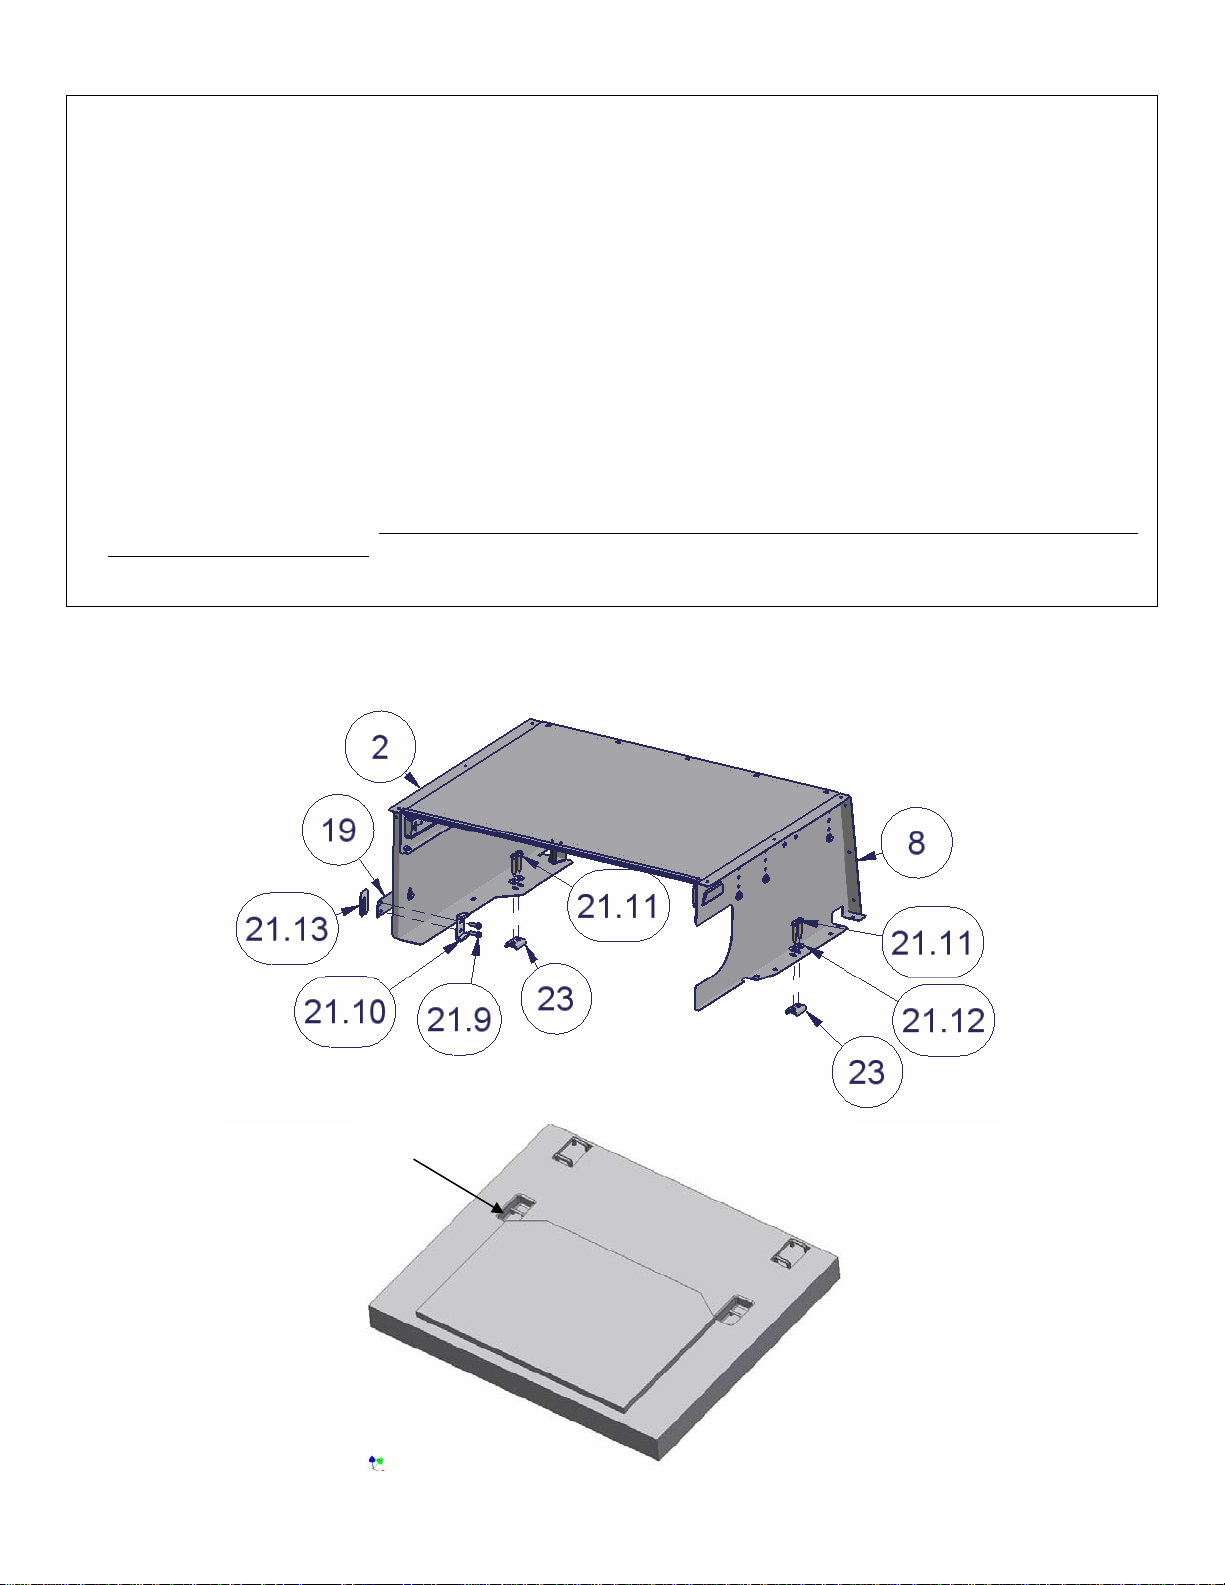
13. Slide each of the (2) Clamp brackets #23 under the (2) rear seat catch brackets inset into the floor. (See Figure 3)
14. Fasten the Left Cap Panel #17 to the Left Vertical Panel #2 using (5) ¼-20 x ¾” Phillip pan head screws #21.6, (5) ¼20 nylock nuts #21.5, and (5) ¼” washers #21.4. (See Figure 6)
15. The Left Rear Bracket #19 should line up with the original factory holes where the door alignment guide #21.10 was
removed. Adjust the enclosure so all the mounting points line up. (See Figure 3)
16. Check and make sure the Jeep factory rear door opens and closes without interference from the drawer enclosure.
17. Fasten both the Left #2 and Right #8 Vertical Panels to the (2) Clamp brackets #23 using (4) 3/8 x 1 ¾” Bolts #21.11
and (4) 3/8” Washers #21.12. Be sure to tighten each bolt a little at a time to keep the pressure on the bracket even.
Be careful not to over tighten. (See Figure 3)
2 door mounting applications go to next step.
Rear seat catch
brackets inset
into the floor of
the vehicle
Figure 3
Rear of
Vehicle
Page 4 of 6 - 1/28/2008 – Rev122006
Page 5

Figure 4 Figure 5
Figure 6
Page 5 of 6 - 1/28/2008 – Rev122006
Page 6

18. Re-secure the original factory rear door alignment guide #21.10 and spacer #21.13 using the OEM factory hardware
#21.9. The spacer should be installed behind the Rear Left Bracket #19 and the door alignment guide #21.10 in front
of it. (See Figure 3)
19. If the vehicle is equipped with the original factory subwoofer fasten the rear hole in the Right Vertical Panel #8 to the
subwoofer mounting stud located on the floor of the vehicle. Use the original factory hardware #21.8. (See Figure 2
& Figure 4)
20. If the vehicle is equipped with the original factory subwoofer fasten the Right Rear Bracket #15 to the original
mounting stud on top of the subwoofer. Use the original factory hardware #21.8. (See Figure 4)
21. If the vehicle is not
equipped with the original subwoofer fasten the Right Rear Bracket #15 to the hex shaped hole at
the base of the roll bar. You may have to cut the carpet to access this hole. As illustrated insert the 10-32 Well nut
#21.14 into the hex hole (do not push it in to far). Then place the hardware 10-32 X 1” Screw #21.15, #10 Washer
#21.16, and (2) 5/16” Washers #21.1 around #15 Rear Right bracket as illustrated then tighten down. (See Figure 5)
22. Fasten the Right Cap Panel #14 to the Right Vertical Panel #8 using (4) ¼-20 x ¾” Phillips pan head screws #21.6,
(4) ¼-20 nylock nuts #21.5, and (4) ¼” washers #21.4. (See Figure 6)
23. Fasten the right cap to the Right Rear Bracket #15 using a 5/16 x ¾” bolt #21.2 and 5/16” washer #21.1. (See Figure
6)
24. Install the drawer handle using (2) ¼-20 serrated flange nuts.
25. Insert the drawer and check sliding and lock operation. Be careful not to force the drawer although it will be stiff the
first time it is installed.
Call (970) 564-1762 for Technical Support
Page 6 of 6 - 1/28/2008 – Rev122006
 Loading...