

Page 1
Please read, complete, and return the enclosed warranty registration card to activate y our warranty.
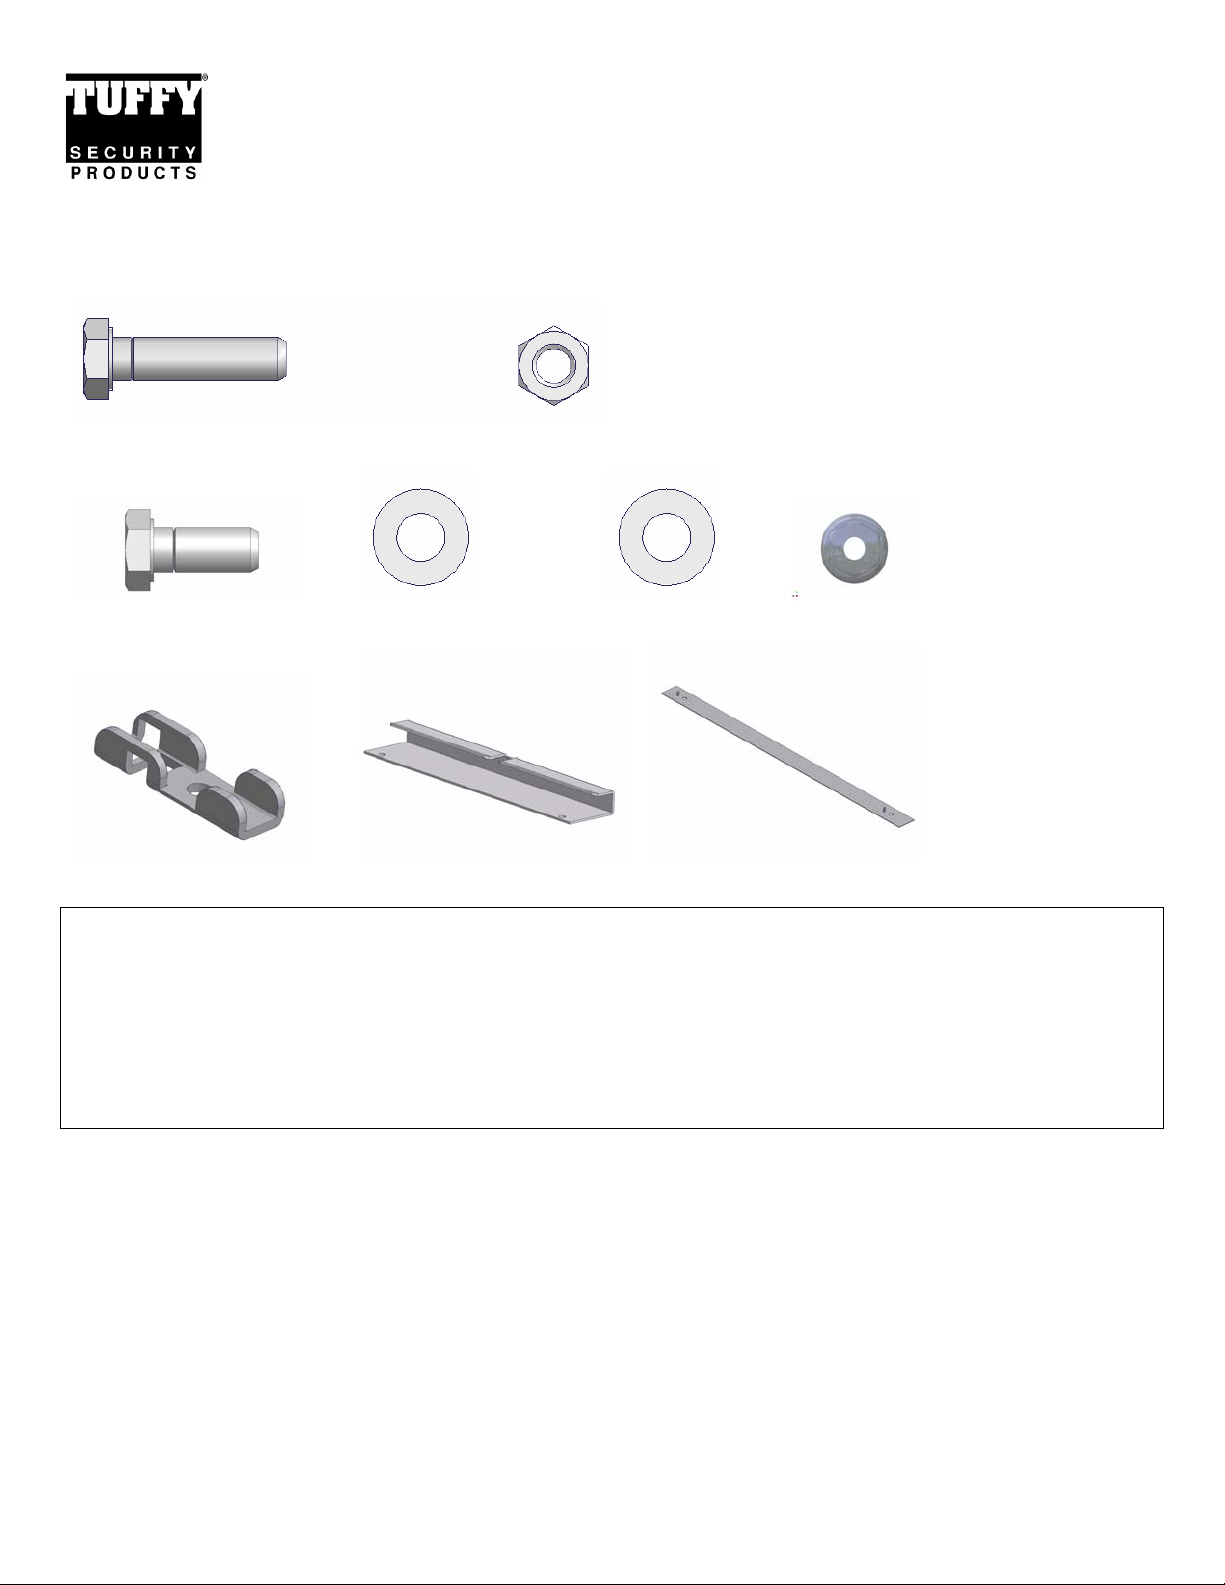
PARTS CHECKLIST
INSTALLATION INSTRUCTIONS
REAR CARGO STORAGE CAGE #073
(4) 5/16 x 11/4” BOLTS (4) 5/16 NYLOCK NUTS
(2) 5/16 x ¾” BOLTS (4) 5/16 NYLON WASHERS (6) 5/16” WASHERS (2) 10-32 NUTS
(2) T-LATCHES REAR BRACKET FRONT BRACKET
TOOLS NEEDED
• Electric drill
• 3/8” Drill bit
• Marker or pencil
• Utility knife
• ½” Socket and ratchet
• ½” Wrench
• Silicone sealant (Recommended)
PLEASE READ ALL INSTRUCTIONS THOROUGHLY BEFORE STARTING INSTALLATION.
1. Place the cage in the vehicle in the desired mounting location. Place the rear-mounting bracket around the rear
bottom tube on the storage cage. (SEE FIGURE 1)
NOTE: Make sure the tailgate will close and the soft-top will fold down. Make sure that the front of the cage,
where the front mounting bracket will be mounted, is on a surface that the bracket can be mounted to via drilling
two holes and fastening with the mounting hardware. (HOLES 1 AND 2 IN FIGURE 2)
2. Using a marker or pencil mark the (2) spots under the (2) holes on the Rear Mo unting bracket where the mounting
holes will be drilled. (HOLES 3 AND 4 IN FIGURE 2)
Page 1 of 3 - 1/28/2008 – Rev52107
Page 2

WARNING! Make sure that there is nothing under the vehicle that will be damaged by the drill
bit when drilling. IN MOST VEHICLES THERE IS A GAS TANK UNDERNEATH THE REAR OF
THE VEHICLE. THE GAS TANK MAY HAVE TO BE LOWERED TO INSTALL THE MOUNTING
BOLTS. PLEASE CONSULT VEHICLE OWNERS MANUAL FOR INSTRUCTIONS ON
LOWERING THE GAS TANK.
3. Remove the cage and Rear Mounting bracket. If applicable, cut the carpet at the (2) marked spots. Using a 3/8” drill
bit, drill out the (2) marked spots on the floor.
4. It is recommended to use silicone sealant in any holes drilled in the vehicle to prevent rusting.
5. There are two different lengths of bolts to choose from for fastening down the Rear Bracket. If the cage is being
mounted on a Tuffy drawer use the (2) 5/16 x ¾” bolts, (4) 5/16” washers and (2) 5/16” nylock nuts. For all other
applications fasten the Rear Mounting Bracket using (2) 5/16 x 1 ¼ bolts, (4) 5/16” washers, and (2) 5/16” nylock nuts.
(HOLES 3 AND 4 IN FIGURE 2)
6. Place the Cage in the vehicle by sliding it into the Rear Mounting Bracket.
7. Open the lid (The lid will be pushed open by the (2) gas springs, make sure the opening lid will not damage
the vehicle. Keep clear of the lid while it is opening to avoid injury)
8. Place the Front Mounting bracket under the cage by guiding the (2) studs on the mounting bracket into the
corresponding holes in the bottom of the cage. (SEE FIGURE 2)
9. Make sure the cage is positioned in its desired location. Using a marker or pencil, mark the spot on the floor matching up with the
(2) mounting holes in the Front Mounting Bracket. (HOLES 1 AND 2 IN FIGURE 2)
WARNING! Make sure that there is nothing under the vehicle that will be damaged by the drill
bit when drilling. IN MOST VEHICLES THERE IS A GAS TANK UNDERNEATH THE REAR OF
THE VEHICLE. THE GAS TANK MAY HAVE TO BE LOWERED TO INSTALL THE MOUNTING
BOLTS. PLEASE CONSULT VEHICLE OWNERS MANUAL FOR INSTRUCTIONS ON
LOWERING THE GAS TANK.
10. Remove the cage and Front Mounting bracket. If applicabl e, cut the carpet at the (2) marked spots. Using a 3/8” drill
bit, drill out the (2) marked spots on the floor.
11. Remove the cage and fasten the Front Mounting Bracket through the (2) holes previously drilled using the (2) TLatches, (2) 5/16 x 1 ¼” bolts, (4) 5/16” Nylon Washers, (2) 5/16” Washers, and (2) 5/16 Nylock Nuts. (HOLES 1
AND 2 IN FIGURE 2)
12. Slide the cage into the Rear Mounting Bracket an d over the Front Mounting bracket. Turn the T-L atches to secure the
cage down.
13. The T-Latches should hold the cage down tight, if they are loose, remove one of the 5/16 nylon wash ers from each TLatch fastener assembly and tighten until a snug fit is accomplished.
14. The 10-32 nuts sho uld be tightened on the studs in the Front Mounting Bracket to keep the T-Latches from opening
while driving.
15. Check the latching operation. If the lid is not clearin g the body or is misaligned slightly loosen the nuts fastening the
hinge to the body and adjust as required. Refasten the nuts when complete
Page 2 of 3 - 1/28/2008 – Rev52107
Page 3

ATTENTION:
FREQUENT LUBRICATION IS NECESSARY ON THE LOCKING SYSTEM
The pushbutton lock contains an “O” ring seal to protect the interior from dust and water. If this mechanism is not
lubricated regularly it will become difficult to operate and it may not return to its home position preventing the key from
operating the lock. If this happens simply pull up on the pushbutton to manually bring it back to its home position.
Lubricate the pushbutton with a light lubricant such as silicone spray. The pushbutton may have to be periodically
disassembled and cleaned.
Call (970) 564-1762 for Technical Support
Page 3 of 3 - 1/28/2008 – Rev52107
 Loading...