

Page 1
INSTALLATION INSTRUCTIONS
Rear Cargo Drawer – Part #058 and #063
Please read and fill out the enclosed warranty registration card to activate your warranty.
Shipping Package
• (4) 7/16 x 1 ¼ Bolts
• (4) 7/16 Nylock Nuts
• (4) 7/16 Washers
• (2) 8MM Metric Bolts
• (2) 5/16 Washers
• (2) ¼” Serrated flange nuts
• (4) ½” Hole Plugs
• (1) Drawer Handle
NOTICE! DRAWER WILL HAVE TO BE REMOVED FOR INSTALATION
INSTRUCTIONS FOR REMOVING DRAWER
Before attempting to install your new Tuffy Drawer, it is necessary to remove the drawer from the
body. To do this, pull the drawer out as far as it can go then locate the small black plastic stops
visible on the ball bearing drawer slides. One of the black stops will need to be deactivated by
pressing down and the other one pulled up. Be careful not to break plastic stops. While deactivating
the stops pull the drawer out and the slides will separate. When you are finished installing your
drawer, line up the slides and push the drawer back in.
WARNING: If you are bolting your drawer through the side holes, be sure not to overtighten the bolts
which can cause the top of the enclosure to “flex” downward. It may be necessary to install a spacer
between the side of the drawer and the vehicle sidewall to prevent this bowing.
Mounting Directions
• Insert the studs on the drawer handle
into the corresponding holes in the
drawer. Secure handle with the ¼” nuts.
• If you are not going to use the side
mounting holes, use the hole plugs
provided.
• If you have any Rear Cargo Drawer
accessories (Divider or Riser Kits), refer
to their individual instructions for
installation
• If you do not have any Rear Cargo
Drawer accessories and would like to get
some, call your nearest Tuffy Security
Products dealer or call Tuffy direct. The
divider kit allows you to neatly
compartmentalize while the riser kit
allows you to store items such as the soft
doors under the drawer.
Page 1 of 3 - 1/28/2008 – Rev122006
Page 2

CJ-7 MOUNTING INSTRUCTIONS
1. Take out rear seat by removing seat-mounting bolts on the two front seat brackets and along the back seat mounting
bracket.
2. Place cargo box in Jeep bed.
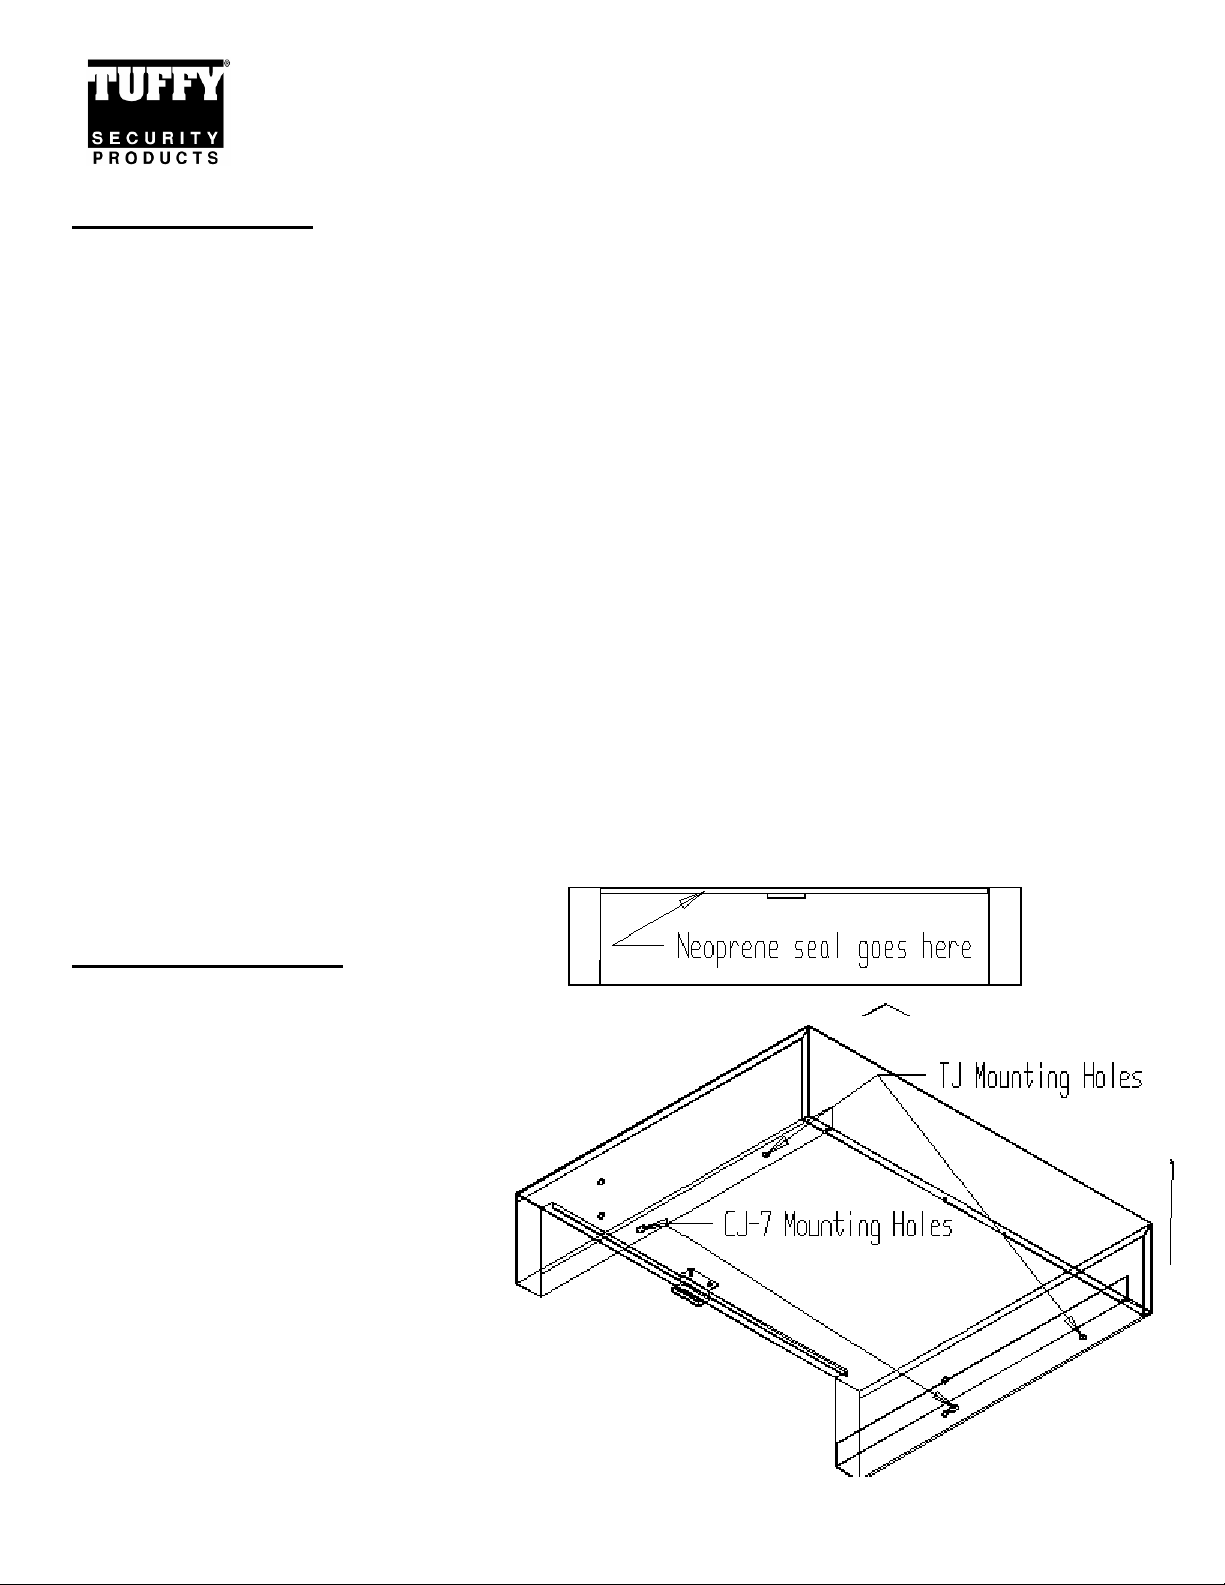
3. Using the (2) 7/16 x 1 ¼ bolts and washers secure the cargo box down through mounting holes indicate d in the
drawing
WARNING!
Make sure that there is nothing under the vehicle that will be damaged by the drill bit when drilling.
Before drilling any holes make sure the drawer placement allows the tailgate to close!
4. For additional stability, mark (2) holes on the floor corresponding with the TJ mounting holes. Remove carg o box.
Drill (2) ½” holes and secure with (2) 7/16 x 1 1/4 bolts, (2) nuts, and (4) washers.
5. Extend the drawer slides out and while lining up the slides on the outer body and the slides on the drawer, insert the
drawer.
WRANGLER YJ MOUNTING INSTRUCTIONS
1. Take out rear seat by removing seat-mounting bolts on the two front seat brackets.
2. Remove all of the seat belt hardware including hardware on the side-walls for the seat belt harn esses if applicable.
3. Remove both catches for the fold and tumble seats on the side-walls
4. Place cargo box in the Jeep bed
WARNING!
Make sure that there is nothing under the vehicle that will be damaged by the drill bit when drilling.
Before drilling any holes make sure the drawer placement allows the tailgate to close!
5. Mark any (4) of the holes. Remove the box and drill (4) ½” holes in the marked locations. Secure the cargo box down
using (4) 7/16 x 1 ¼ bolts, (4) 7/16 nuts, (4) washers.
6. Extend the drawer slides out and while lining up the slides on the outer body and the slides on the drawer, insert the
drawer.
WRANGLER TJ MOUNTING INSTRUCTIONS
1. Take out rear seat by removing seat-mounting bolts on the two front seat brackets.
2. Remove all seat belt hardware including the hardware on the side-walls for the seat belt harnesses.
3. Remove both catches for the fold and tumble seats on the side-walls
4. Place cargo box in the Jeep bed
5. Using the (2) 8mm metric bolts and 5/16 washers secu re the cargo box down through mounting holes on the floor as
indicated in the figure above.
6. Using the hardware you removed, bolt the box through the side holes into the side-walls of the Jeep.
7. Extend the drawer slides out and while lining up the slides on the outer body and the slides on the drawer, insert the
drawer.
GENERAL MOUNTING INSTRUCTIONS
1. Place cargo box in the bed.
2. Mark any (4) holes for drilling using the box mounting holes as a template. (Select the holes that will not interfere with
anything under the vehicle and will be easy to access with the wrenches.)
WARNING!
Make sure that there is nothing under the vehicle that will be damaged by the drill bit when drilling.
Before drilling any holes make sure the drawer placement allows the tailgate to close!
3. Remove cargo box and drill out the (4) marked holes with a ½” drill bit.
4. Secure the cargo box down using (4) 7/16 x 1 ¼ bolts, (4) 7/16 nuts, (4) washers.
5. Extend the drawer slides out and while lining up the slides on the outer body and the slides on the drawer, insert the
drawer.
Lock it up!
Page 2 of 3 - 1/28/2008 – Rev122006
Page 3

ATTENTION:
FREQUENT LUBRICATION IS NECESSARY ON THE LOCKING SYSTEM
The pushbutton lock contains an “O” ring seal to protect the interior from dust and water. If this mechanism is not
lubricated regularly it will become difficult to operate and it may not return to its home position preventing the key from
operating the lock. If this happens simply pull up on the pushbutton to manually bring it back to its home position.
Lubricate the pushbutton with a light lubricant such as silicone spray. The pushbutton may have to be periodically
disassembled and cleaned.
Call (970) 564-1762 for Technical Support
Page 3 of 3 - 1/28/2008 – Rev122006
 Loading...