

Page 1
A SSEMBLY INSTRUCTION MAN UAL
TABLE OF CONTENTS:
Introduction- Pg. 1
Assembly for TG-150- Fig. 1-71
Cable Mapping Diagram- Pg. 20
Cable Adjustments- Fig. 42, 65, Pg. 19
Exploded View Diagram- Pg. 22
Parts List- Pg. 23
Basic Exercise Chart- Pgs. 24-26
TG-150
Tuff Gym Series
A merica’s Premium Exercise Equipment
Revision Date 11-98
Revision Date 12-98
L 8’-0” W 6’-2” H 6’-5”
Page 2

Introduction
About the TUFF GYM SERIES
Congratulations on your new purchase of the. TG-150,
Tuff Gym Series unit.This gym is capable of a variety of
different exercises, as well as, smooth and user-friendly
adjustment features. In addition, this gym has been designed
to meet the needs and performance requirements for a
suitable home exercise machine. We hope you are
completely satisfied with this product and wish you many
years of enjoyment.
Tuff Stuff Equipment
Every Tuffstuff product has been built to precise quality
standards and has been carefully packaged to ensure that
damage will not occur during shipment. The limited lifetime
warranty and signature indicating final inspection which was
conducted by our line foreman, is an expression of our
confidence in the completeness, the materials, and
workmanship of this product.
Warranty
SEE WARRANTY REGISTRATION CARD
Registration Card
To avoid unnecessary delays in warranty parts and to
insure that a permanent record of your purchase is on file
with our factory, be sure to complete the warranty
registration card and send it to Task Industries today.
Safety Information
1) Familiarize yourself and others with the proper operation
and workout recommendations for each piece of Tuff Stuff
equipment prior to use.
2) Consult with your physician before beginning any
exercise program.
3) Use proper discretion when children are present.
4) Frayed or worn cables can be dangerous and may cause
injury. Periodically check these cables for any indication of
wear.
5) Inspect the TG-150 for any sign of parts or hardware
becoming loose.
6) Keep hands and limbs clear from weight stack and all
other moving parts.
Maintenance Information
1) Lubrication of all moving parts is essential to the longevity
and optimal performance of your TG-150. Initial lubrication
of some parts of your gym have been done at the factory, but
the weight stack guide rods must be lubricated at the time of
assembly. We recommend a clear aerosol, silicone or Teflon
spray.
Note: Do not use oil based lubricants as they will attract
dust,dirt, and grime and will eventually gum up and erode
bushings and sealed bearings.
2) All pulleys and bushings should be checked regularly for
signs of wear.
3) Check and adjust tension on cables periodically as it will
maintain proper anatomical function.
4) Periodically check all moving parts, upholstery and grips
for wear. If replacement is necessary, please contact your
local Tuff Stuff retailer or call our Customer Service
Department.
5) As needed, upholstery may be cleaned with a mild
solution of soap and water. Regular use of a vinyl treatment
will add to the life and appearance of your upholstery.
6) All chrome plated surfaces should be cleaned regularly
to prolong the life and luster of the finish. Wipe machine
down with a damp cloth and dry thoroughly each day. At
least once a week your chrome equipment should be
polished with a commercial grade or automotive type chrome
polish.
Tool Requirements
1) Two 3/4” Open-end wrenches
2) Two 9/16” Open-end wrenches
3) One rubber mallet hammer
4) One can Silicone Spray/ Teflon Spray Lubricant
5) Snap ring pliers
6) Hex Key 5/32” (Supplied)
7) Hex Key 3/16 (Supplied)
8) Windex or household glass cleaner
9) Multi-Purpose Grease
10)
Hardware Measurement Diagram
Specifications
1) Maximum Wt. Capacity
2) Total Machine Weight
3) Footprint (LWH)
Note: Due to continuing product improvements, specifications and designs are subject to change
without notice.
1
- 200 Lbs. Fixed
- 650 Lbs.
- See Front cover
TG-150 Tuff Gym Series
Page 3
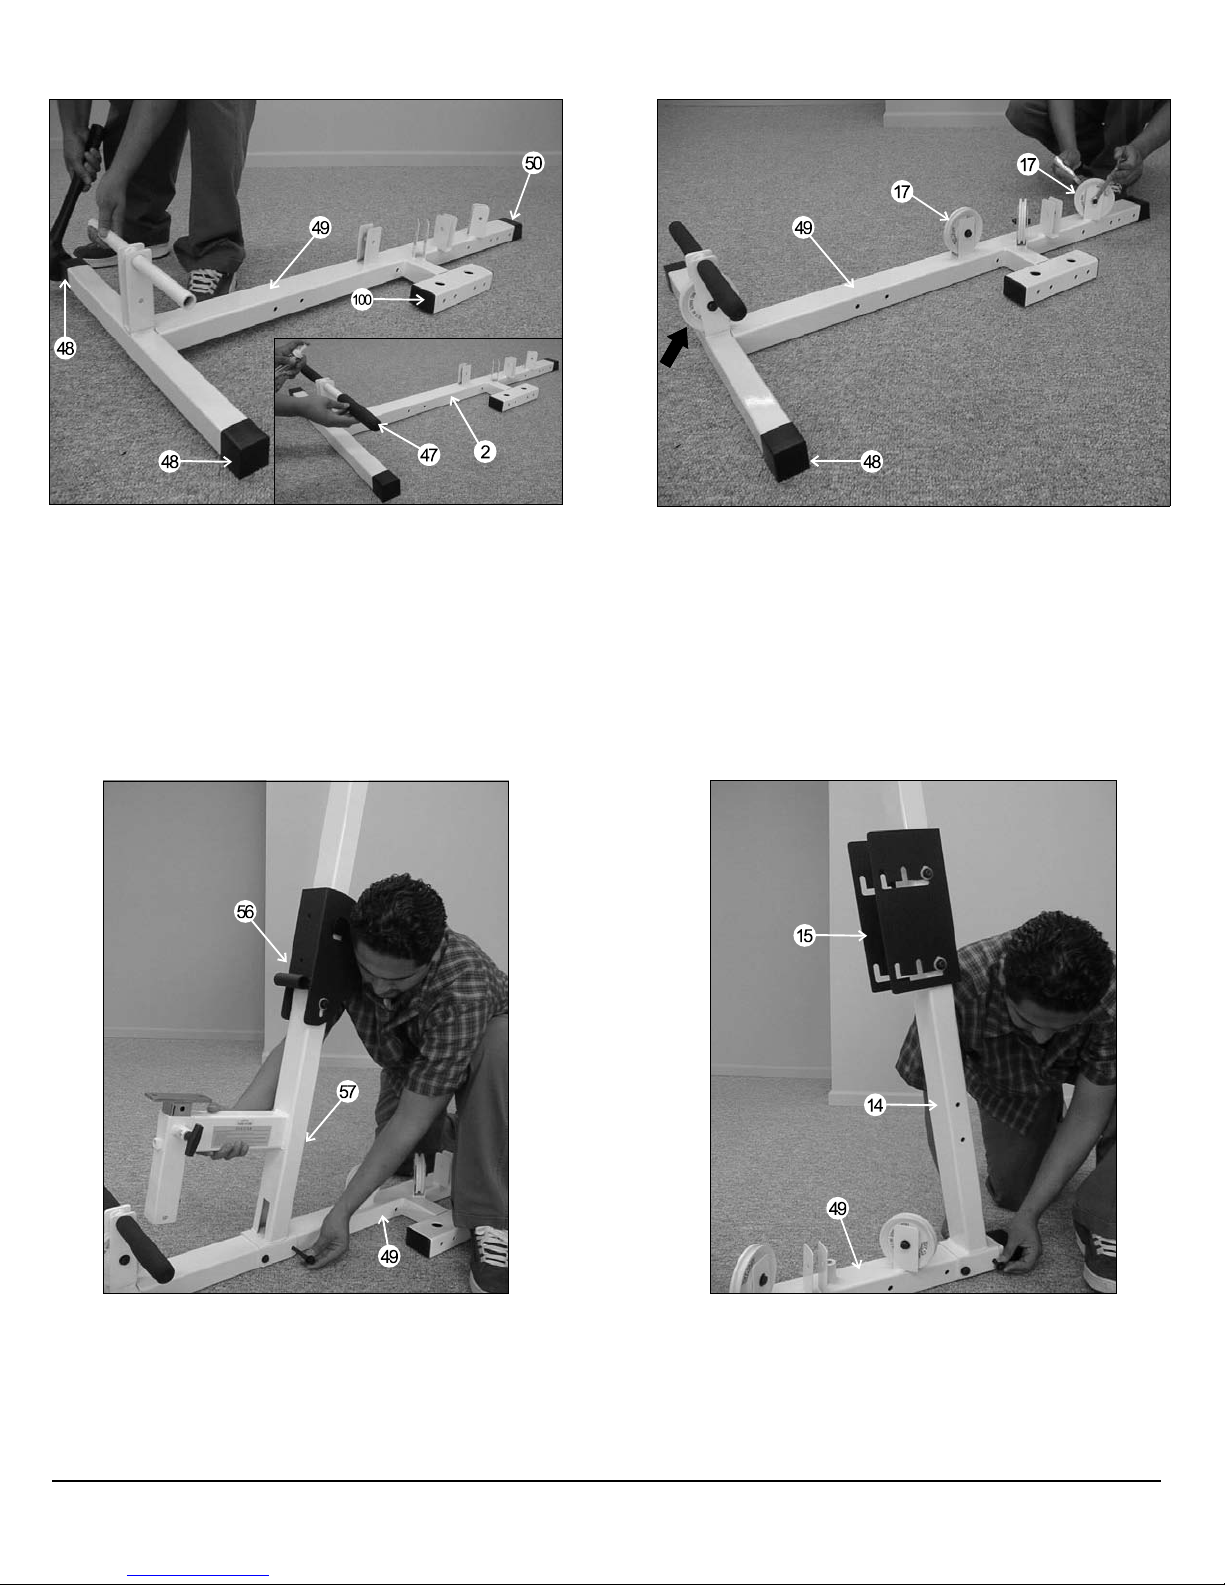
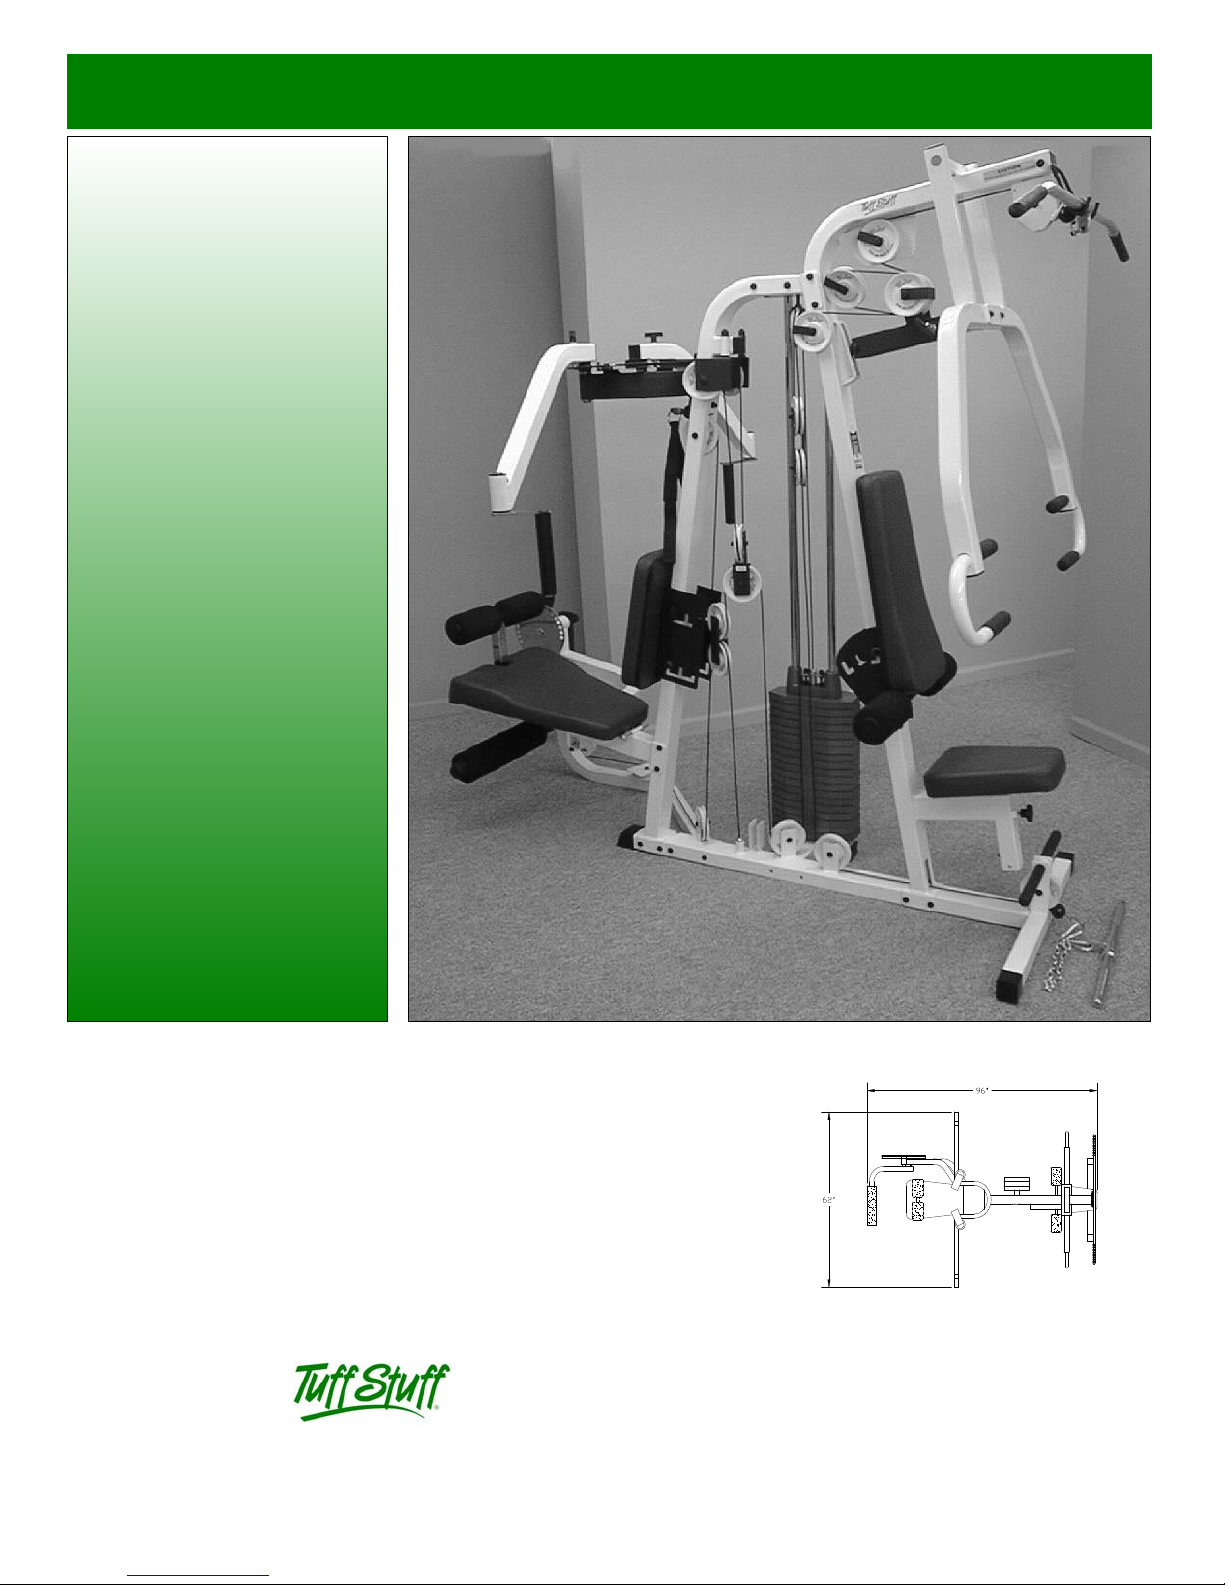
FIG. 1 On a flat surface, lay the Platform (#49) down as shown.
Note: When positioning the Platform (#49), consider the complete
area surface of the TG-150. Use the overhead view on the front page
for designing your layout before assembling. Next, insert two Plastic
End Caps w/groove Sq. 2” (#48) and one Plastic End Cap w/groove 2
X 3 (#50) onto the tube-ends of the Platform (#49), as shown above.
Next, insert two Plastic Insert Caps 2 X 3 (#100) into the Platform
(#49), as shown above. Now, insert two Hard Grips .875 X 8 (#47)
onto the tube-ends of the Platform (#49), as shown above in caption.
Note: Use windex or a household glass cleaner for easy insertion of
these grips, as shown above.
FIG. 2 Next, attach one Nylon Pulley 4 1/2 Rd. (#17-Shown with
arrow) to the Platform (#49) and secure it into place using one Hex
Head Cap Screw 3/8-16 X 2 (#67), two Flat Washer SAE 3/8 (#12) and
one Nylon Insert Jam Lock Nut 3/8-16 (#74). Next, attach three Nylon
Pulleys 4 1/2 Rd. (#17) to the Platform (#49), as shown above, and
them into place using three Hex Head Cap Screws 3/8-16 X 1 3/4
(#69), six Flat Washers SAE 3/8 (#12) and three Nylon Insert Jam
Lock Nuts 3/8-16 (#74). Note: Do not completely fasten the hardware
at this time, as it will be completely secured later in the assembly
process.
FIG. 3 Next, attach the Front Frame (#57) to the Platform (#49),
as shown above, and secure it into place using two Hex Head Cap
Screws 3/8-16 X 4 (#70), four Flat Washers SAE 3/8 (#12) and two
Nylon Insert Jam Lock Nuts 3/8-16 (#74). Note: The Bench Press
Seat Tube (#62) and the Bench Press Back Pad Bracket have been
pre-assembled by the factory. Also, do not completely fasten the
hardware at this time, as it will be completely secured later in the
assembly process.
TG-150 Tuff Gym Series
FIG. 4 Next, carefully maneuver the Back Frame (#14) onto the
Platform (#49), as shown above, and secure it into place using two
Hex Head Cap Screws 3/8-16 X 4 (#70), four Flat Washers SAE 3/8
(#12) and two Nylon Insert Jam Lock Nuts 3/8-16 (#74). Note: The
Pec Dec Back Pad Bracket (#15) has been pre-assembled by the
factory.
2
Page 4
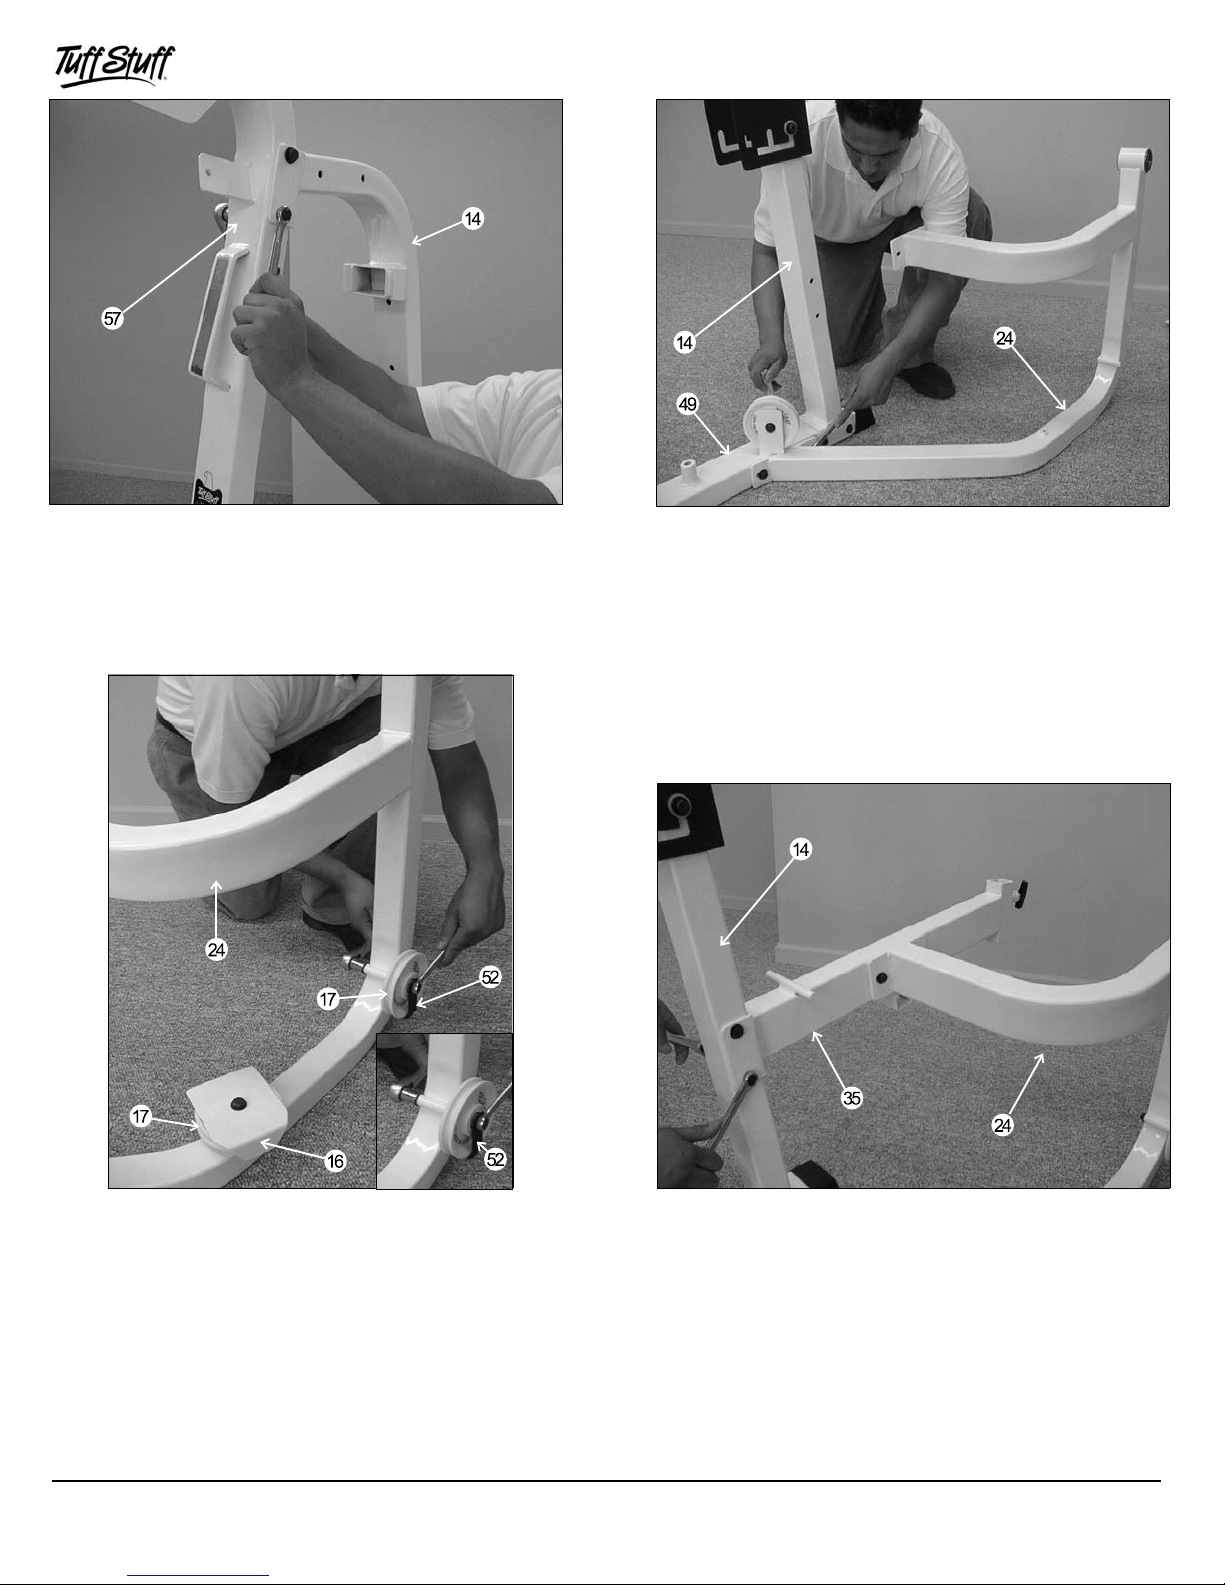
FIG. 5 Continue attaching the Back Frame (#14) to the Front
Frame (#57) and secure it into place using two Hex Head Cap Screws
3/8-16 X 4 (#70), four Flat Washers SAE 3/8 (#12) and two Nylon
Insert Jam Lock Nuts 3/8-16 (#74). Note: Do not completely fasten
the hardware at this time, as it will be completely secured later in the
assembly process.
FIG. 6 Attach the Leg Extension Main Frame (#24), as shown
above, to the Platform (#49) and secure it into place using two Hex
Head Cap Screws 3/8-16 X 3 3/4 (#108), four Flat Washers SAE 3/8
(#12) and two Nylon Insert Jam Lock Nuts 3/8-16 (#74). Note: Do not
completely fasten the hardware at this time, as it will be completely
secured later in the assembly process.
FIG. 7 Next, attach one Nylon Pulley 4 1/2 Rd. (#17), as shown
above in caption, to the Leg Extension Main Frame (#24) and
secure it into place using one Hex Head Cap Screw 3/8-16 X 4 1/4
(#71), one Cable Retainer Bracket (#52), two Flat Washers SAE 3/8
(#12) and one Nylon Insert Jam Lock Nut 3/8-16 (#74). Note: Position
the Cable Retainer Bracket (#52), as shown above in caption. Next,
attach the other Nylon Pulley 4 1/2 Rd. (#17) and the Cable Retainer
Plate (#16) and secure them into place using one Hex Head Cap
Screw 3/8-16 X 1 3/4 (#69) and one Flat Washer SAE 3/8 (#12). Note:
Position the Cable Retainer Plate (#16), as shown above.
3
FIG. 8 Affix the Pec Dec Seat Frame (#35) to the Back Frame
(#14) and secure it into place using two Hex Head Cap Screw 3/8-16
X 4 (#70), four Flat Washer SAE 3/8 (#12) and two Nylon Insert Jam
Lock Nuts 3/8-16 (#74). Next, attach the mid-section of the Pec Dec
Seat Frame (#35) to the Leg Extension Seat Frame (#24) and
secure it into place using two Hex Head Cap Screws 3/8-16 X 2 3/4
(#77), four Flat Washers SAE 3/8” (#12) and two Nylon Insert Jam
Lock Nuts 3/8-16 (#74). Note: Do not completely fasten the hardware
at this time, as it will be completely secured later in the assembly
process.
TG-150 Tuff Gym Series
Page 5
Owners’ Manual: Assembly Instructions
FIG. 9 Locate the L-Arm (#27) and insert two Plastic Insert Cap
Rd. 2” (#98) and one Plastic Insert Cap Sq. 2” (#2) into the tube-ends,
as shown above in caption. Next, affix the Circular Plate w/Axle (#26)
with a Nylon Washer 1 X 1 1/4 (#25) through the receptacle of the L-
Arm (#27), as shown above. Note: The supplied Flat Washer 1” Nylon
(#97) may be used later in the assembly of the Actuator Arm (#20) in
Fig. 12 to relieve any side-to-side movement (if needed) with the
Circular Plate w/Axle (#26) and the Actuator Arm (#20).
FIG. 10 Next, attach the assembled L-Arm (#27) and the Circular
Plate w/Axle (#26) into the receptacle of the Leg Extension Main
Frame (#24). Note: Position the Circular Plate w/Axle (#26),as
shown above in picture. Also, the Ball Bearings #W 516 (#22) have
been pre-assembled by the factory.
FIG. 11 Locate the Actuator Arm (#20) and insert one Plastic
Insert Cap 1 X 2 (#19) into the tube-end, as shown above.
TG-150 Tuff Gym Series
FIG. 12 Next, attach the Actuator Arm (#20) onto the end of
Circular Plate w/Axle (#26), as shown above. Secure it into place
using one Roll Pin 3/8 X 1 1/2 (#18). Note: Be sure Roll Pin 3/8 X 1
1/2 (#18) is completely inserted through the hole and hammed until
one side is flush with the surface.
4
Page 6
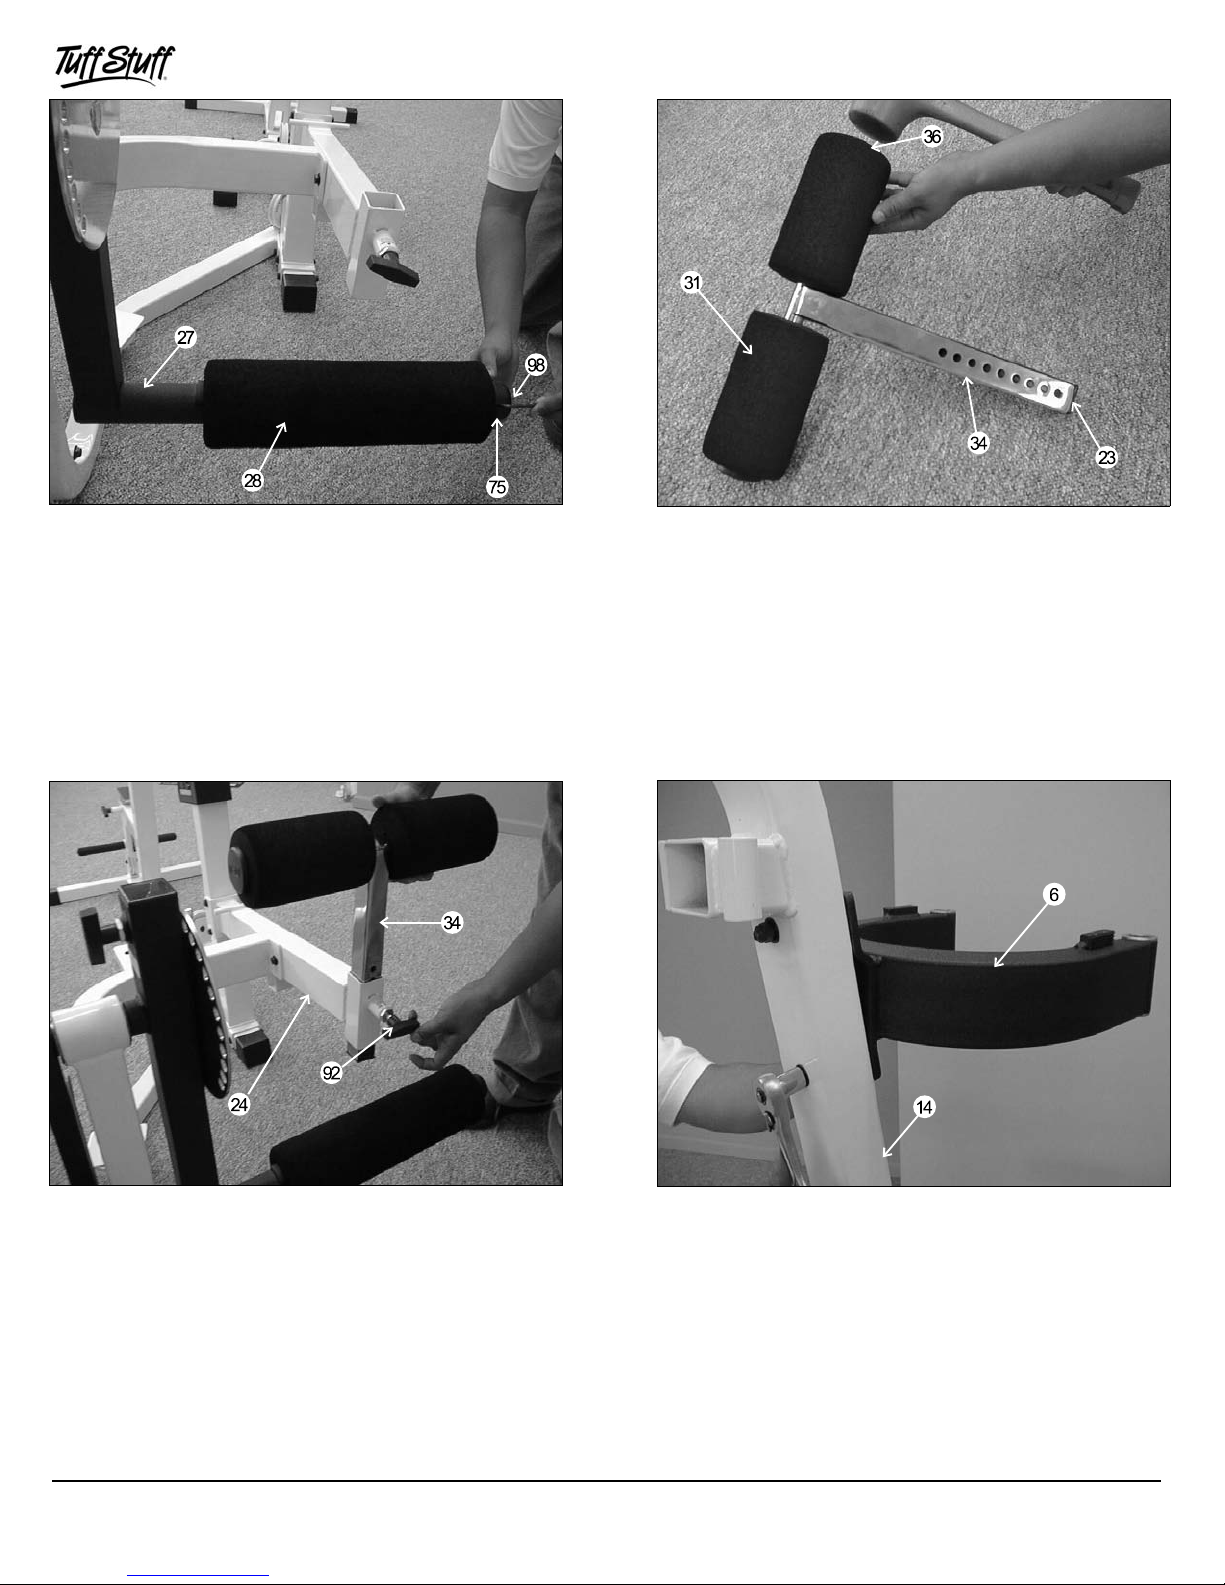
FIG. 13 Next, insert a Foam Foot Roll 1 3/4 X 4 X 16 (#28) over the
L-Arm (#27) and secure it into place using the Foot Roll Collar (#75),
as shown above. Use the supplied Hex Key 5/32” (#95) for fastening
the set screw in the Foot Roll Collar (#75). Next, insert one Plastic
Insert Cap Rd. 2” (#98-Not Shown) into the tube-end of the L-Arm
(#27).
FIG. 14 Locate the Adjustable Hold Down T-Bar (#34) and slide
two Foam Foot Rolls 1 X 4 X 7 (#31) over each end, as shown above.
Next, insert two Foot Roll Plastic End Caps 1” (#36-Not shown) into
the tube-ends of the Adjustable Hold Down T-Bar (#34). Next, insert
one Plastic Insert Cap Sq. 1 1/2 (#23) into the tube-end of the
Adjustable Hold Down T-Bar (#34), as shown above.
FIG. 15 Insert the assembled Adjustable Hold Down T-Bar (#34)
into the receptacle of the Leg Extension Main Frame (#24), as shown
above. Note: Position the Adjustable Hold Down T-Bar (#34) as
pictured above with the selector holes facing the side of the Push-Pull
Pin 3/8 (#92).
5
FIG. 16 Next, locate the Pec Dec Housing Assembly (#6) and
attach it to the Back Frame (#14), as shown above. Secure it into
place using two Hex Head Cap Screws 3/8-16 X 3 (#79), four Flat
Washers SAE 3/8 (#12) and two Nylon Insert Lock Nuts 3/8-16 (#81)
Note: Use the Exploded View Diagram on page 22 for further
illustration of this assembly.
TG-150 Tuff Gym Series
Page 7
Owners’ Manual: Assembly Instructions
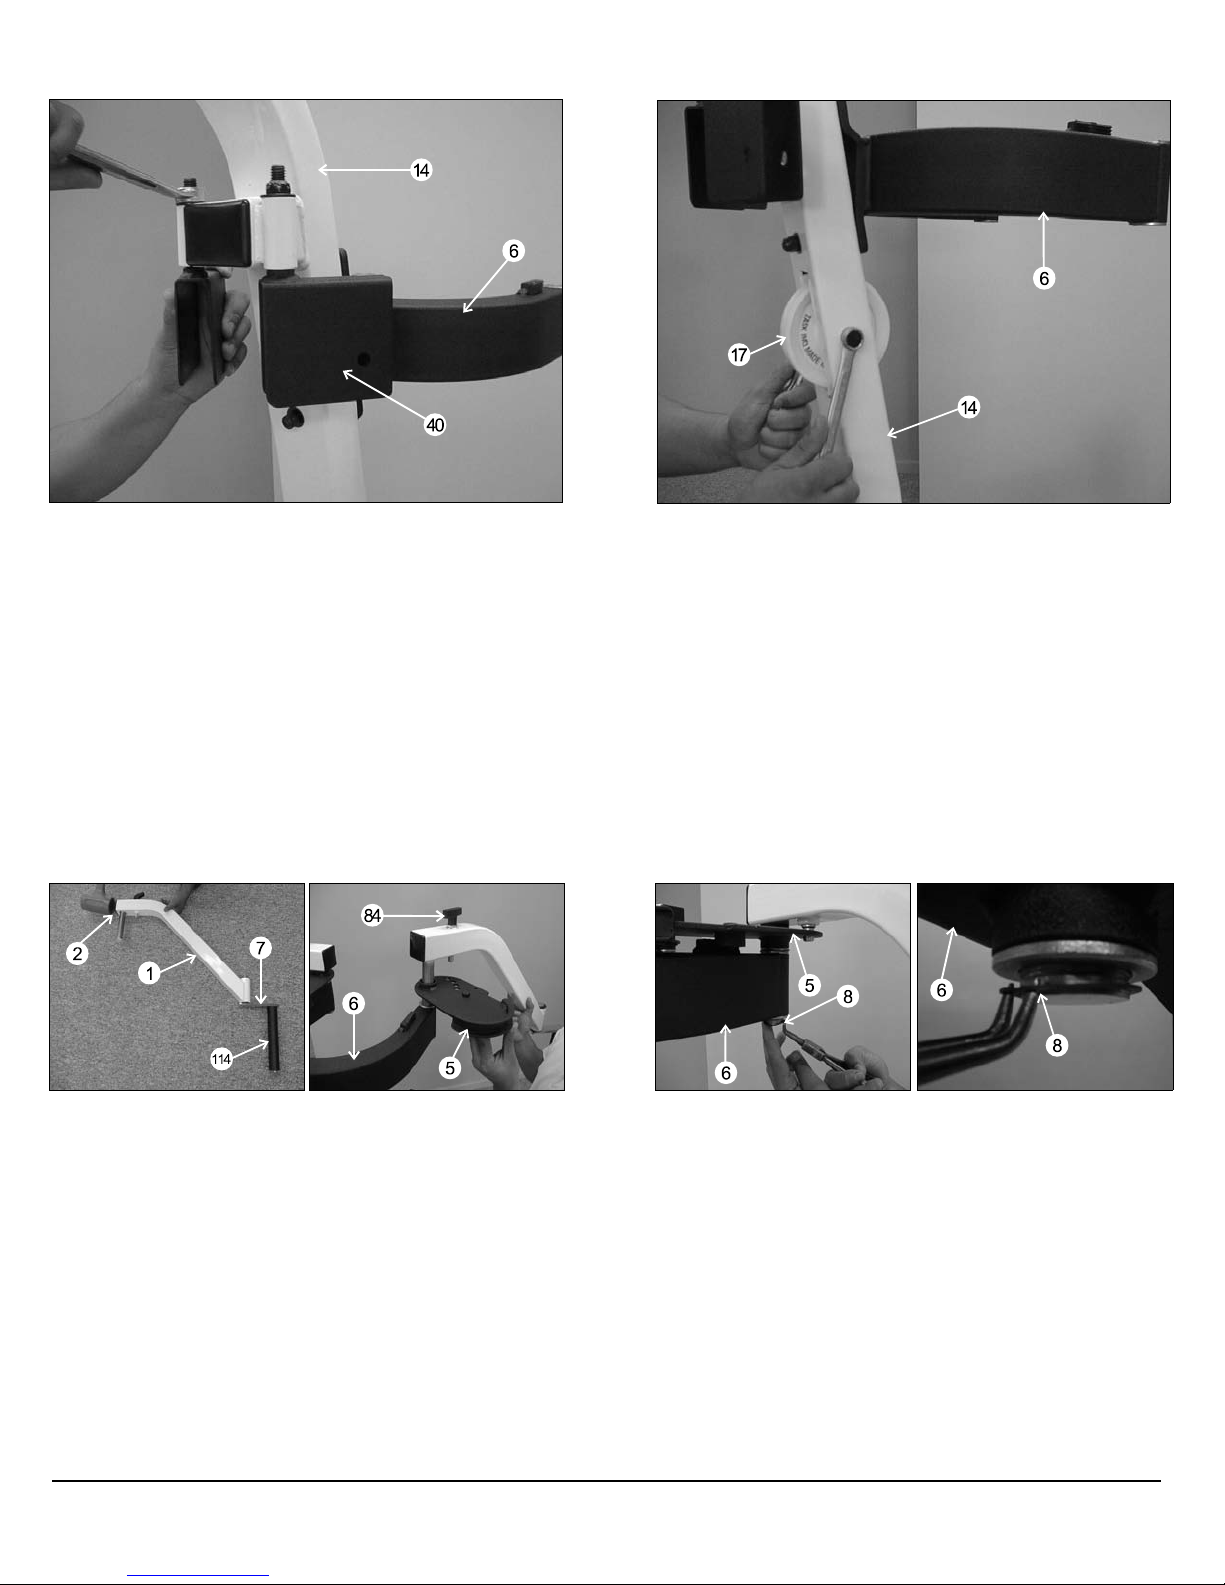
FIG. 17 Next, attach the two Pec Dec Swivel Pulley Brackets
(#40) to the Back Frame (#14), as shown above, and secure them
into place using two Nylon Insert Jam Lock Nuts 1/2-13 (#73) and two
Flat Washers SAE 1/2” (#72). Next, insert one Plastic Insert Cap 2 X 3
(#100) into the tube-end of the Back Frame (#14).
FIG. 18 Next, insert a Nylon Pulley 4 1/2 Rd. (#17) into the Back
Frame (#14) and secure it into place using one Hex Head Cap Screw
3/8-16 X 3 1/2 (#80), two Flat Washers SAE 3/8 (#12) and one Nylon
Insert Jam Lock Nut 3/8-16 (#74).
FIG. 19 Next, locate the two Pec Dec Arms (#1) and insert one
Plastic Insert Cap Sq. 2” (#2) into each tube-end, as shown above.
Note: The Chrome Swivel Handle (#7) and the PVC Handle (#114)
have been pre-assembled by the factory. Next, attach the Pec Dec
Cam Rt (#5) and the Pec Dec Arm (#1) into the receptacle of the Pec
Dec Housing Assembly (#6), as shown above. Note: Be sure to
position the Pec Dec Cam Rt (#5) as pictured above. Repeat the same
procedure for the Pec Dec Cam Lt (#4). Use the Exploded View
Diagram on page 22 for further illustration of this assembly.
TG-150 Tuff Gym Series
FIG. 20 Secure the Pec Dec Cam Rt (#5) and the Pec Dec Cam
Lt (#4) using two Retaining Snap Rings (#8), as pictured above. If
possible, use special snap ring pliers for this job, as shown above. If
not available, carefully work each Retaining Snap Ring (#8) into the
groove , then push down alternately with a screw driver working the
Retaining Snap Ring (#8) into the groove. Note: Be careful not to
distort the Retaining Snap Ring (#8) or bend it.
6
Page 8
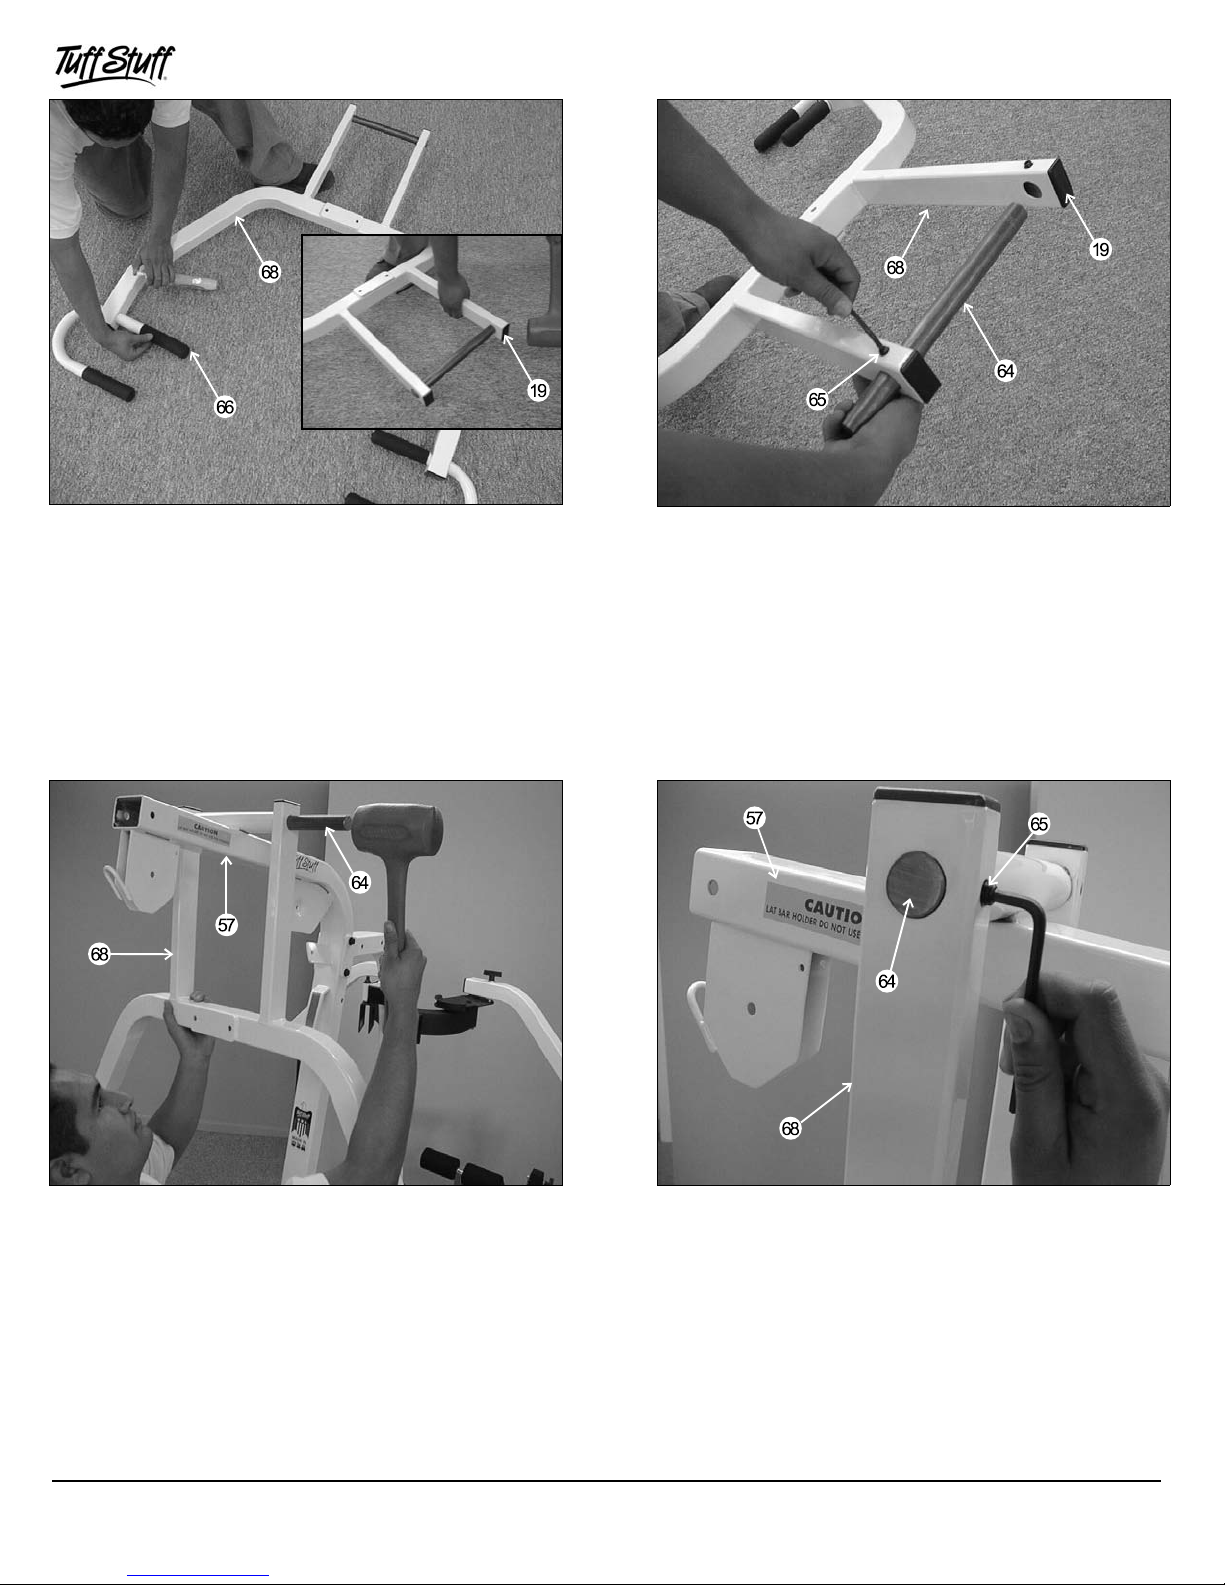
FIG. 21 Locate the Press Bar (#68) and insert four Hard Grips
1.220 X 6” (#66) onto each tube handle, as shown above. Use
Windex or a household glass cleaner for easy insertion of these grips.
Next, insert two Plastic Insert Caps 1 X 2 (#19) into the tube-ends, as
pictured above in caption.
FIG. 22 Next, remove the Pivot Axle 1 X 11 3/4 (#64) from the
Press Bar (#68). Remove the two Socket Set Screws 3/8-16 X 1/2
(#65) in the Press Bar (#68) using the supplied Hex Key 3/16” (#115).
FIG. 23 Attach the Press Bar (#68) to the top of the Front Frame
(#57) receptacle and secure it into place using the Pivot Axle 1 X 11
3/4 (#64). Be sure to position the Press Bar (#68) as pictured
above. Note: Use a rubber mallet hammer until the Pivot Axle 1 X 11
3/4 (#64) is flush with both sides , as shown in Fig. 24. Also, it is
recommended that you grease the Pivot Axle 1 X 11 3/4 (#64) prior to
assembly.
7
FIG. 24 Next, fasten the Pivot Axle 1 X 11 3/4 (#64) on the Press
Bar (#68) using the two Socket Set Screws 3/8-16 X 1/2 (#65) and the
supplied Hex Key 3/16” (#115).
TG-150 Tuff Gym Series
Page 9
Owners’ Manual: Assembly Instructions
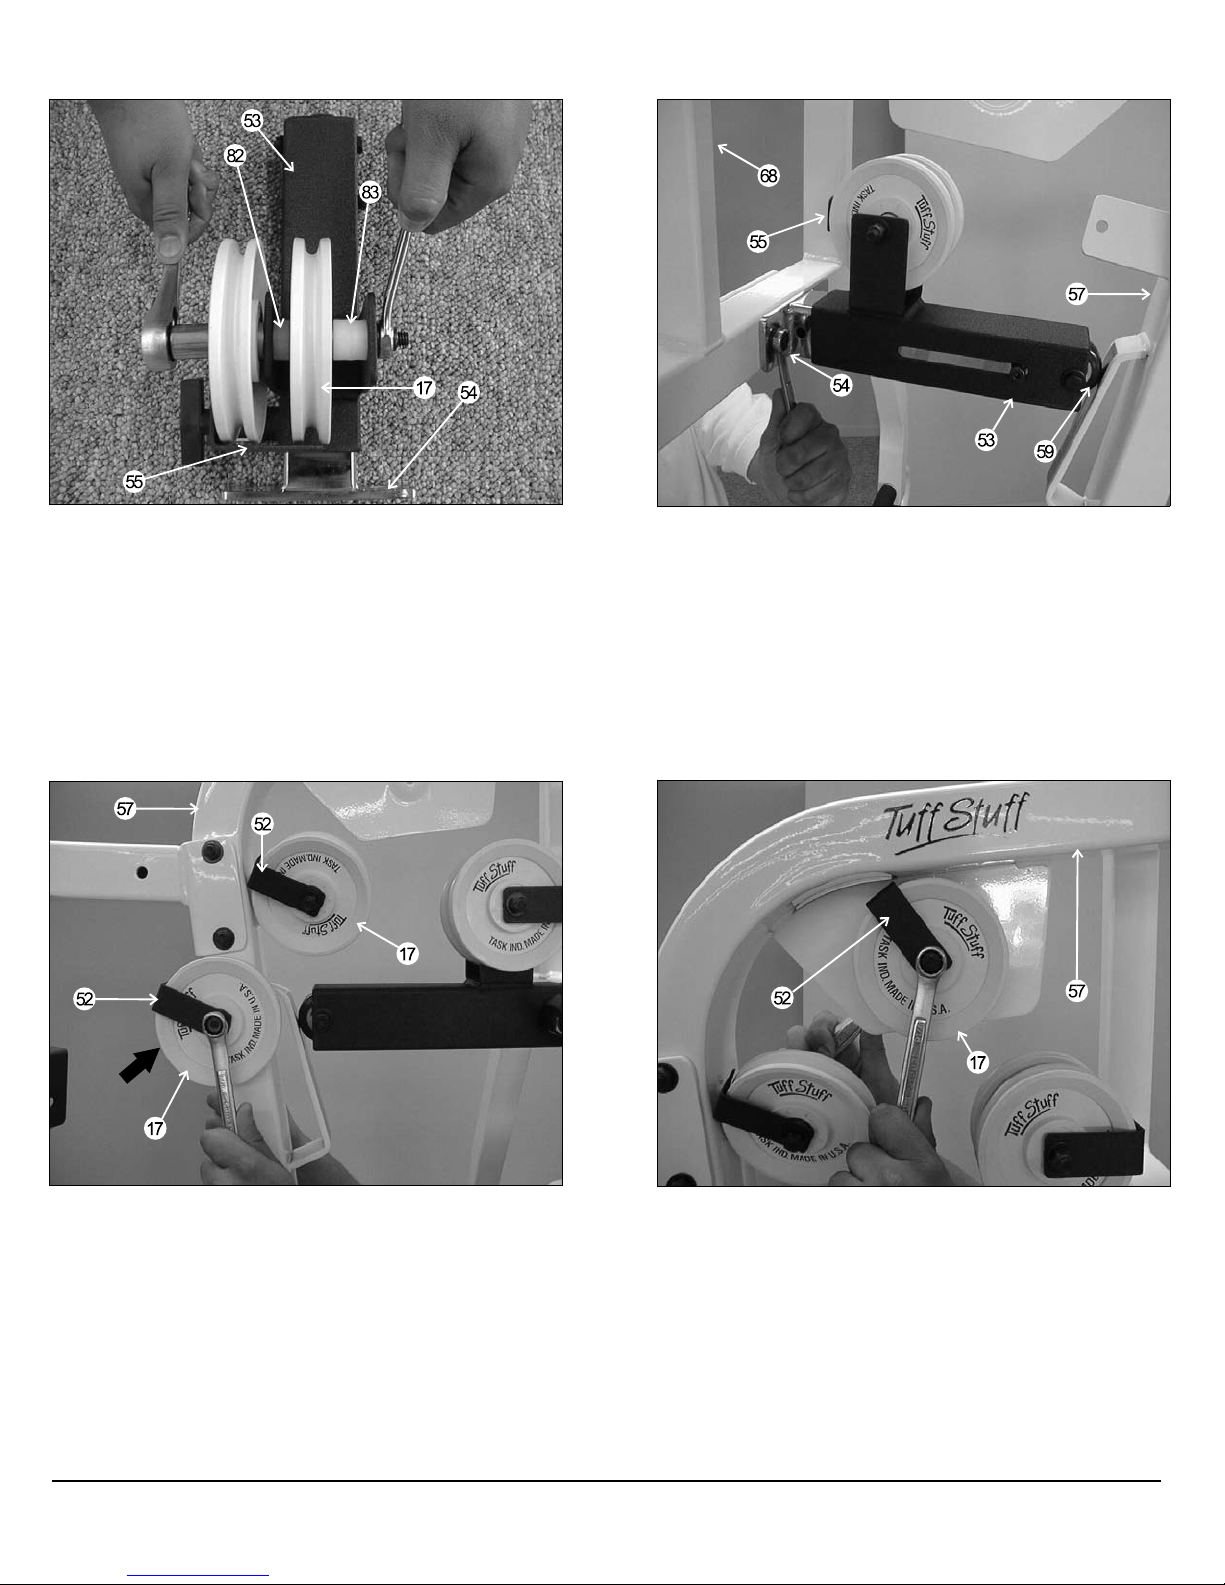
FIG. 25 Locate the Female Adjustment Housing (#53), Cable
Retainer Bracket (LG) (#55) and two Nylon Pulleys 4 1/2 Rd. (#17).
Assemble, as shown above, using one Hex Head Cap Screw 3/8-16 X
4 1/4 (#71), one Nylon Spacer 3/8 X 3/4 (#83), one Nylon Spacer 3/8
X 3/8 (#82), two Flat Washers SAE 3/8 (#12) and one Nylon Insert
Lock Nut 3/8-16 (#81). Refer to Fig. 72 on page 21 for further
clarification of this assembly. Note: Be sure to position the Cable
Retainer Bracket (LG) (#55), as pictured above and in Fig. 26. Also,
the Bench Press Selector Tube (#54) has been pre-assembled into
the Female Adjustment Housing (#53) by the factory.
FIG. 26 Next, attach the assembled Bench Press Selector Tube
(#54) and the Female Adjustment Housing (#53) to the Press Bar
(#68). Secure the Bench Press Selector Tube (#54) into place using
two Hex Head Cap Screws 3/8-16 X 3 (#79), four Flat Washers SAE
3/8” (#12) and two Nylon Insert Lock Nuts 3/8-16 (#81). Note: The
Black Caster 2 X 1 (#59), shown above, has been pre-assembled by
the factory.
FIG. 27 Next, attach a Nylon Pulley 4 1/2 Rd. (#17-Shown with
arrow) and a Cable Retainer Brackets (#52) to the Front Frame
(#57), as shown above. Secure it into place using one Hex Head Cap
Screws 3/8-16 X 4 3/4 (#63), two Flat Washers SAE 3/8” (#12) and
one Nylon Insert Jam Lock Nut 3/8-16 (#74). Next, attach the other
Nylon Pulley 4 1/2 Rd. (#17) and a Cable Retainer Brackets (#52)
to the Front Frame (#57) and secure it into place using one Hex Head
Cap Screw 3/8-16 X 1 3/4 (#69), two Flat Washer SAE 3/8” (#12) and
one Nylon Insert Jam Lock Nut 3/8-16 (#74). Note: Be sure to position
both Cable Retainer Brackets (#52), as pictured above.
TG-150 Tuff Gym Series
FIG. 28 Next, attach one Nylon Pulley 4 1/2 Rd. (#17) and a
Cable Retainer Brackets (#52) to the Front Frame (#57) and secure
it into place using one Hex Head Cap Screw 3/8-16 X 1 3/4 (#69), two
Flat Washer SAE 3/8” (#12) and one Nylon Insert Jam Lock Nut 3/8-16
(#74). Note: Be sure to position both Cable Retainer Brackets (#52),
as pictured above.
8
Page 10
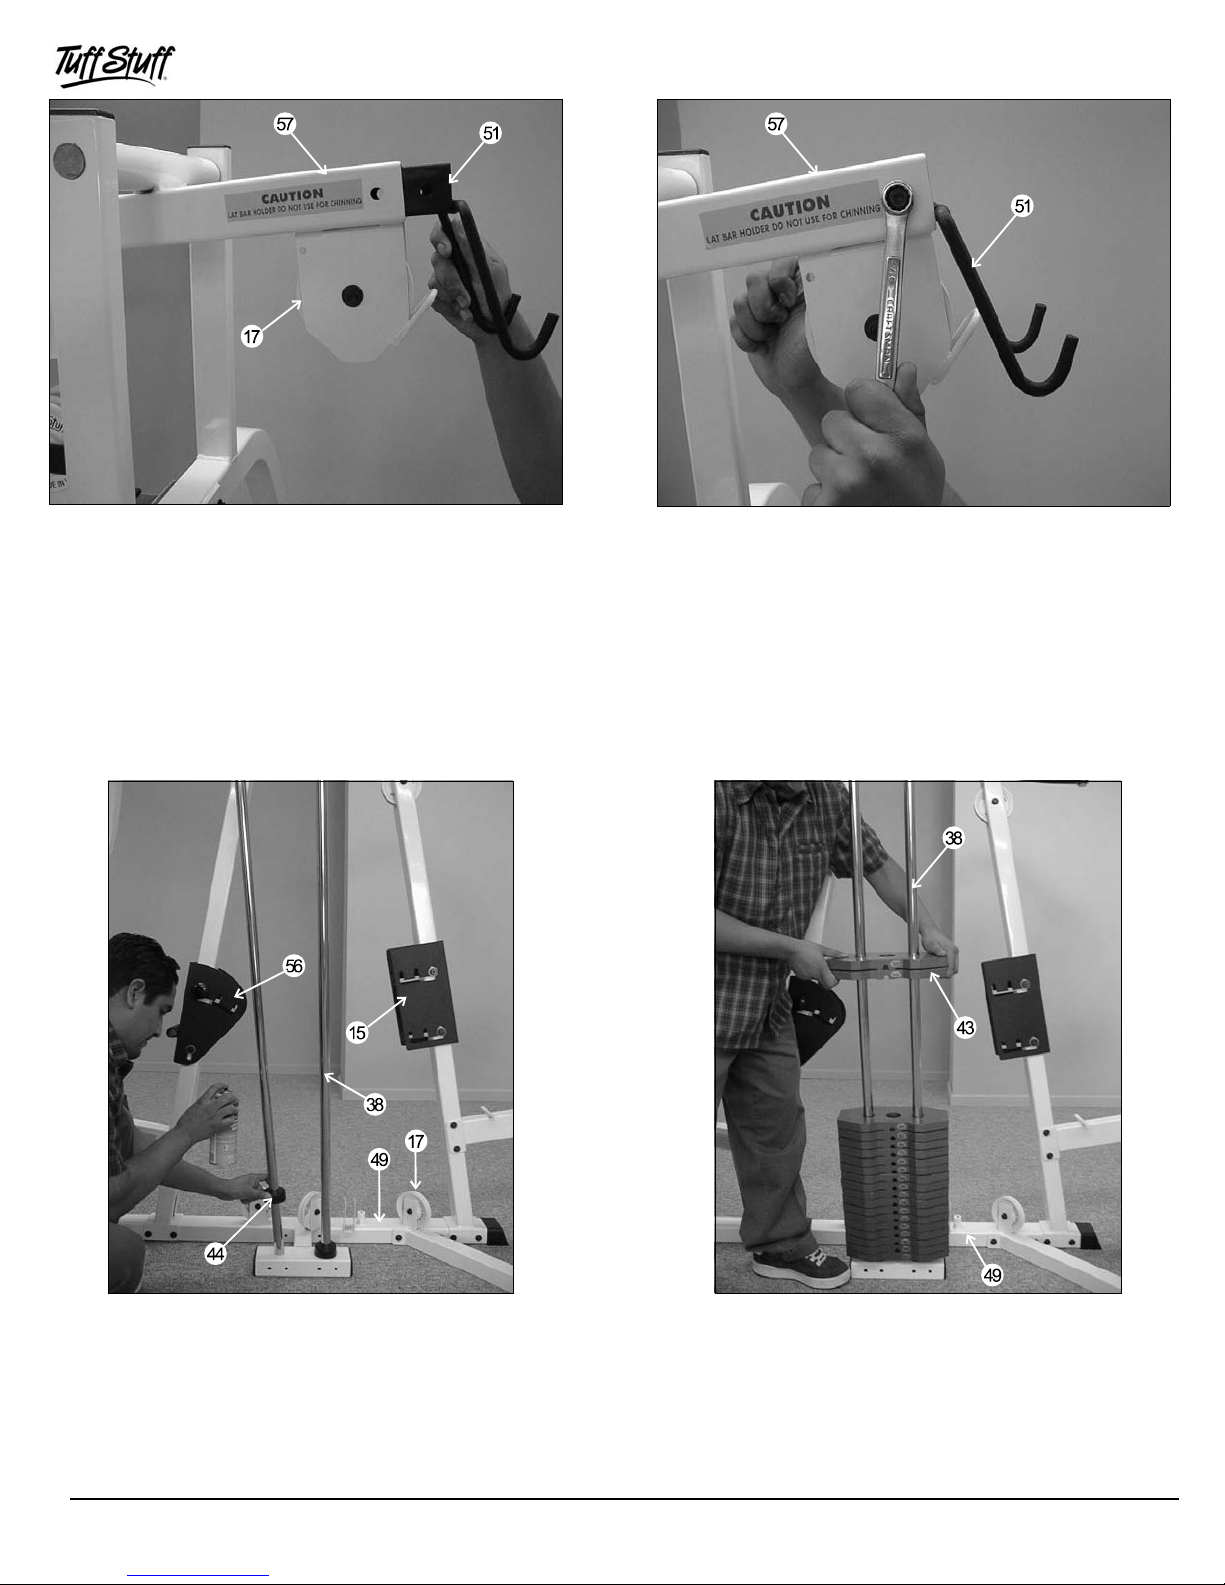
FIG. 29 Attach one Nylon Pulley 4 1/2 Rd. (#17) to the pulley
over
one or two at a time as your skill
are installed
n numerical order, beginning with
bracket on the Front Frame (#57) and secure it into place using one
Hex Head Cap Screw 3/8-16 X 1 3/4 (#69), two Flat Washers SAE
3/8” (#12) and one Nylon Insert Jam Lock Nut 3/8-16 (#74). Next,
insert the Lat Bar Holder (#51) into the tube-end of the Front Frame
(#57), as shown above. Note: Be sure to position the Lat Bar Holder
(#51) as pictured above.
FIG. 30 Secure Lat Bar Holder (#51) it into place using one Hex
Head Cap Screw 3/8-16 X 3 1/2 (#80), two Flat Washers SAE
3/8” (#12) and one Nylon Insert Jam Lock Nut 3/8-16 (#74). Note: Be
sure to position the Lat Bar Holder (#51) as pictured above.
FIG. 31 Insert the two Guide Rods 1 X 72 (#38) into the receptacle
of the Platform (#49), as shown above. Next, insert two Rubber
Donuts 1 X 2 1/2 (#44) onto each Guide Rod 1 X 72 (#38). Note:
Lubricate the Guide Rods 1 X 72 (#38) with silicone or teflon lubricant
at this time.
9
FIG. 32 Carefully begin sliding the 10 Lb Weight Plates (#43)
the Guide Rods 1 X 72 (#38),
permits. Make sure that the 10 Lb Weight Plates (#43)
onto the Guide Rods 1 X 72 (#38) i
the number 200 at the bottom, 190 next, and so on.
TG-150 Tuff Gym Series
Page 11

Owners’ Manual: Assembly Instructions
FIG. 33 Now slide the Top Plate/Selector Bar (#42) over the
Guide Rods 1 X 72 (#38) allowing it to come to rest on the completed
weight stack.
FIG. 35 Maneuver the two Guide Rods 1 X 72 (#38) into the holes
on the bottom side of the Guide Rod Retainer Housing (#37). Next,
mount the Guide Rod Retainer Housing (#37) along with the two
captive Guide Rods 1 X 72 (#38) to the side of the Back Frame (#14).
Secure this assembly using two Hex Head Cap Screws 3/8-16 X 4
(#70), four Flat Washers SAE 3/8” (#12) and two Nylon Insert Jam
Lock Nuts 3/8-16 (#74).
FIG. 34 VIEW OF COMPLETED WEIGHT STACK
FIG. 36 Next, secure the two Guide Rods 1 X 72 (#38) into place
using the four Hex Head Cap Screw 5/16-18 X 1 located on the
Guide Rod Retainer Housing (#37), as shown above. Next, insert
four Plastic Insert Caps 1 X 2 (#19) into the tube-ends of the Guide
Rod Retainer Housing (#37). Next, locate the Top Plate Swivel
Bracket (#58) and secure to the Guide Rod Retainer Housing (#37)
using two Nylon Insert Jam Lock Nuts 1/2-13 (#73) and two Flat
Washers SAE 1/2” (#72). Next, insert one Nylon Pulleys 4 1/2 Rd.
(#17) to the Top Plate Swivel Bracket (#58) and secure it into place
using one Hex Head Cap Screw 3/8-16 X 1 3/4 (#69), two Flat
Washers SAE 3/8” (#12) and one Nylon Insert Jam Lock Nuts 3/8-16
(#74). Note: Refer to Fig. 75 on page 21 for further illustration of this
hardware assembly.
TG-150 Tuff Gym Series
10
10
Page 12
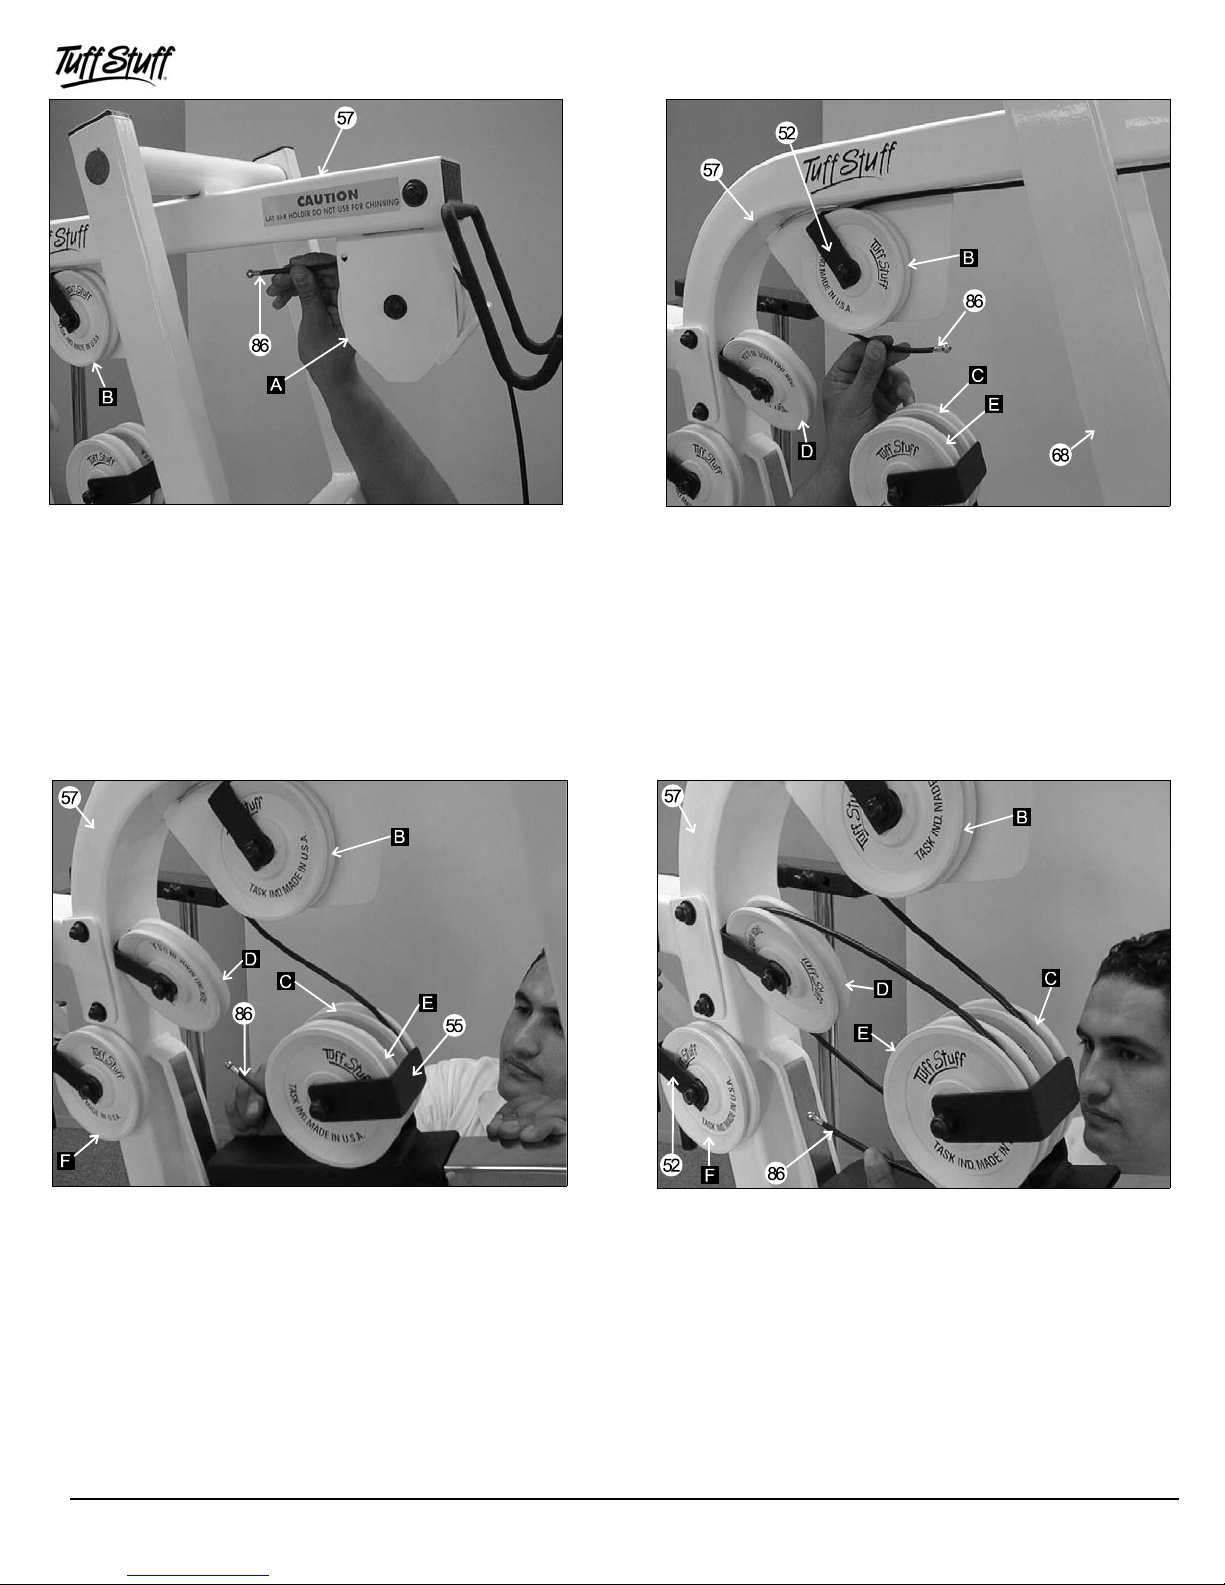
FIG. 37 Locate the Lat Cable (#86-labeled with tape A) and route
the ball-end through the Nylon Pulley 4 1/2 Rd. (#17-Labeled A)
located on the Front Frame (#57), as shown above. Refer to the
Cable Mapping Diagram on page 20 for further detailed illustration of
this routing. Note: The black boxed letters pointing to the pulleys
are used throughout this manual as reference to the cable mapping
diagram on page 20. These black boxed letters will be primarily used
for locating certain pulleys during the cable routing process beginning
with Fig. 37.
FIG. 38 Next, route the Lat Cable (#86-labeled with tape A) over
the Nylon Pulley 4 1/2 Rd. (#17-Labeled B), as shown above. Refer to
the Cable Mapping Diagram on page 20 for further detailed illustration
of this routing.
FIG. 39 Next, route the Lat Cable (#86-labeled with tape A) over
the Nylon Pulley 4 1/2 Rd. (#17-Labeled C), as shown above. Refer to
the Cable Mapping Diagram on page 20 for further detailed illustration
of this routing.
11
FIG. 40 Next, route the Lat Cable (#86-labeled with tape A) over
the Nylon Pulley 4 1/2 Rd. (#17-Labeled D) and the Nylon Pulley 4 1/2
Rd. (#17-Labeled E), as shown above. Refer to the Cable Mapping
Diagram on page 20 for further detailed illustration of this routing.
TG-150 Tuff Gym Series
Page 13
Owners’ Manual: Assembly Instructions
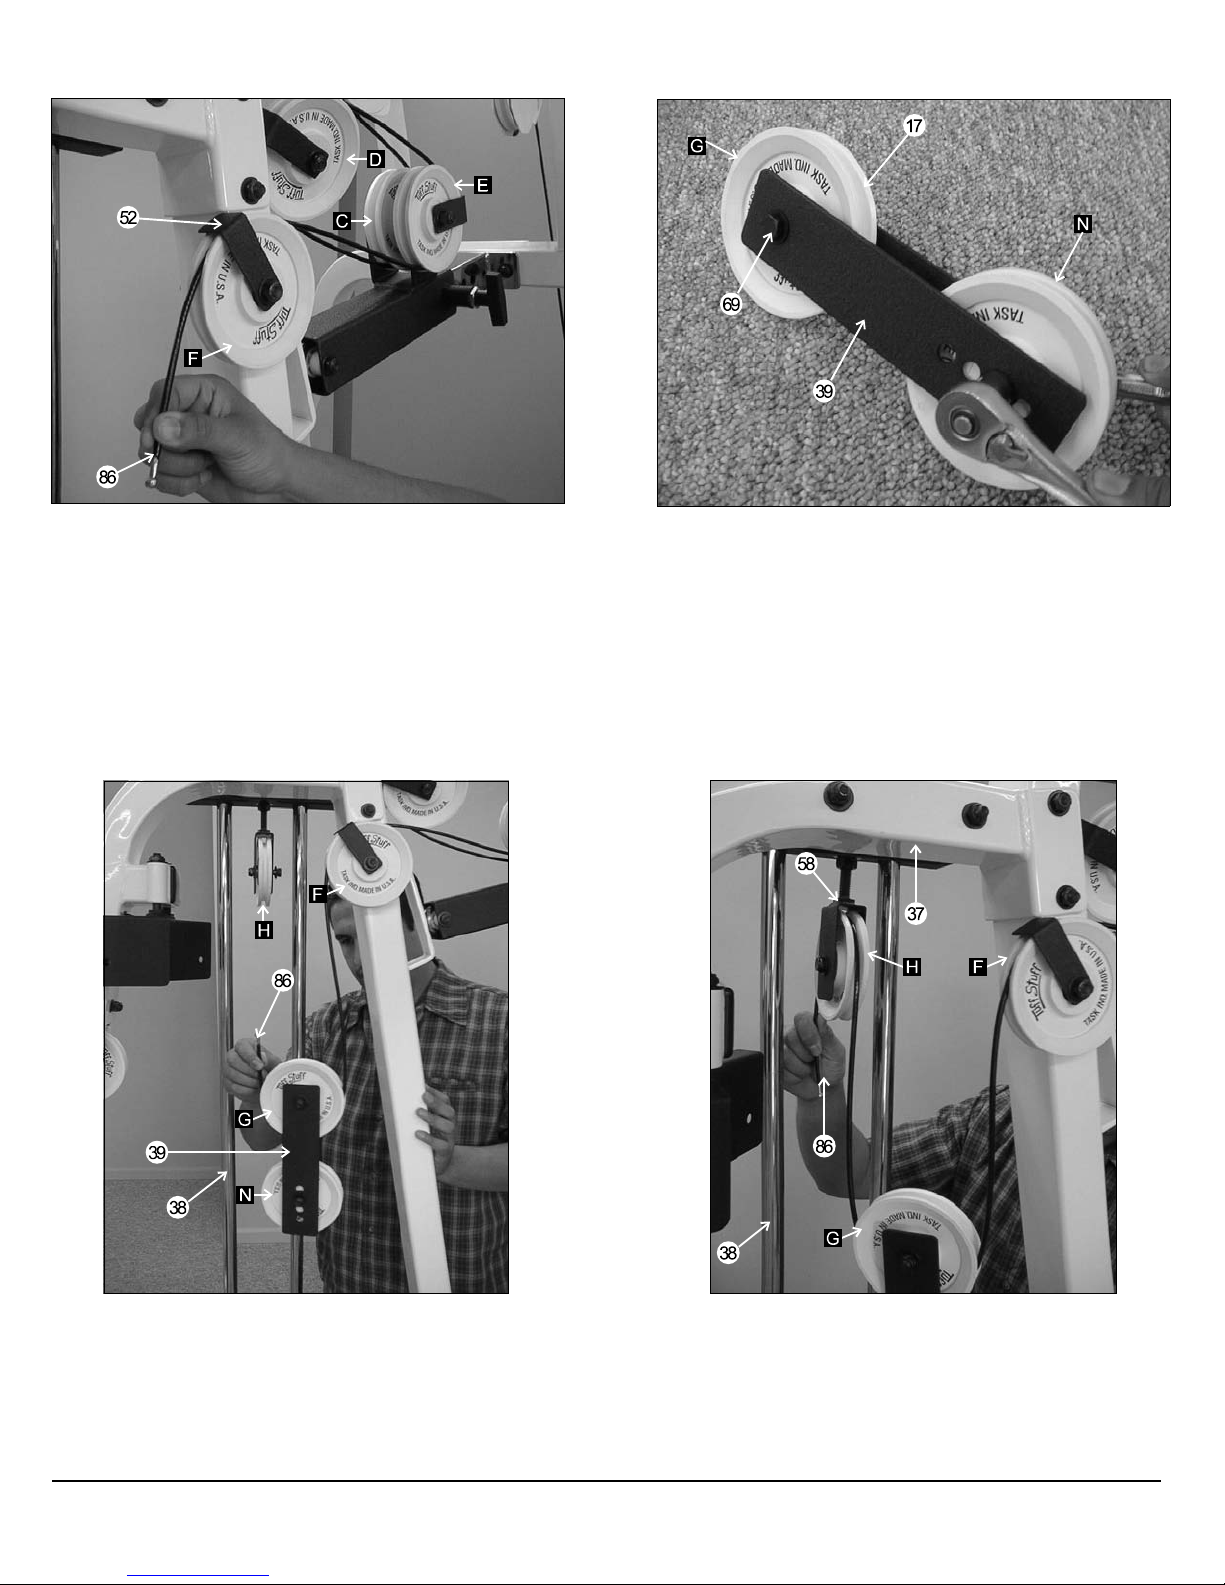
FIG. 41 Next, route the Lat Cable (#86-labeled with tape A) over
the Nylon Pulley 4 1/2 Rd. (#17-Labeled F), as shown above. Refer to
the Cable Mapping Diagram on page 20 for further detailed illustration
of this routing.
FIG. 42
FIG. 42 Assemble the Double Pulley Plates 1/8 X 2 X 9 (#39)
using two Nylon Pulleys 4 1/2 Rd. (#17-Labeled G, N), two Hex Head
Cap Screws 3/8-16 X 1 3/4 (#69), four Flat Washers SAE 3/8” (#12)
and two Nylon Insert Jam Lock Nuts 3/8-16 (#74). Note: The four
holes on the Double Pulley Plates 1/8 X 2 X 9 (#39) are used to
adjust the cable tension once the cable routing has been completed.
FIG. 11
FIG. 43 Next, route the Lat Cable (#86-labeled with tape A) over
the Nylon Pulley 4 1/2 Rd. (#17-Labeled G), as shown above. Refer to
the Cable Mapping Diagram on page 20 for further detailed illustration
of this routing.
TG-150 Tuff Gym Series
FIG. 12
FIG. 44 Next, route the Lat Cable (#86-labeled with tape A) over
the Nylon Pulley 4 1/2 Rd. (#17-Labeled H), as shown above. Refer to
the Cable Mapping Diagram on page 20 for further detailed illustration
of this routing.
12
Page 14

Owners’ Manual: Assembly Instructions
FIG. 45 Next, attach the Lat Cable (#86-labeled with tape A) to
the Top Plate/Selector Bar (#42) and secure it into place using one
Split Bolt 1/2-13 X 1 (#101) and one Split Washer 1/2” (#102), as
shown above. Refer to Fig. 73 on page 21 for further detailed
illustration of this assembly. Note: Be sure this hardware assembly is
securely fastened.
FIG. 46 Next, attach the Lat Bar Chrome 48” (#90) to the Lat
Cable (#86-labeled with tape A) and secure it into place using one
Strap Bracket #20 (#103), one Shoulder Bolt 3/8 X 3/4 (#117) and one
Nylon Insert Lock Nut 5/16-18 (#105). Refer to Cable Mapping
Diagram on page 20 and Fig. 77 on page 21 for further illustration of
this hardware assembly.
FIG. 47 Begin the cable routing for the Pec Dec Cable (#88-
labeled with tape C). Attach the Pec Dec Cable (#88) to the Pec Dec
Cam (#4), as shown above, and secure it into place using one Socket
Cap Screw 1/4-20 X 3/4 (#106) and one Nylon Insert Lock Nut 1/4-20
(#107). Refer to Fig. 76 on page 21 for further detailed illustration of
this hardware assembly.
13
FIG. 48 Next, route the Pec Dec Cable (#88-labeled with tape
C) over the Nylon Pulley 4 1/2 Rd. (#17-Labeled I) located on the Pec
Dec Swivel Pulley Bracket (#40), as shown above. Refer to the Cable
Mapping Diagram on page 20 for further detailed illustration of this
routing.
TG-150 Tuff Gym Series
Page 15

FIG. 49 Next, route the Pec Dec Cable (#88-labeled with tape C)
through the Nylon Pulley 4 1/2 Rd. (#17-Labeled J) located on the
Offset Pulley Bracket (#45), as shown above. Repeat the same
procedure for the termination of the Pec Dec Cable (#88-labeled with
tape C) to the Pec Dec Cam (Rt)(#5). Refer to the Cable Mapping
Diagram on page 20 for further detailed illustration of this routing.
FIG. 50 Next, begin routing the Low Row Cable (#87-labeled
with tape B) under the Nylon Pulley 4 1/2 Rd. (#17-Labeled L), as
shown above. Refer to the Cable Mapping Diagram on page 20 for
further detailed illustration of this routing.
FIG. 51 Next, route the Low Row Cable (#87-labeled with tape B)
under the Nylon Pulley 4 1/2 Rd. (#17-Labeled M), as shown above.
Refer to the Cable Mapping Diagram on page 20 for further detailed
illustration of this routing.
TG-150 Tuff Gym Series
FIG. 52 Next, route the Low Row Cable (#87-labeled with tape B)
under the Nylon Pulley 4 1/2 Rd. (#17-Labeled N), as shown above.
Refer to the Cable Mapping Diagram on page 20 for further detailed
illustration of this routing.
14
Page 16

FIG. 53 Next, route the Low Row Cable (#87-labeled with tape B)
under the Nylon Pulley 4 1/2 Rd. (#17-Labeled O), as shown above.
Refer to the Cable Mapping Diagram on page 20 for further detailed
illustration of this routing.
FIG. 54 Next, route the Low Row Cable (#87-labeled with
tape B) over the Nylon Pulley 4 1/2 Rd. (#17-Labeled P) located on
the Offset Pulley Bracket (#45), as shown above. Refer to the Cable
Mapping Diagram on page 20 for further detailed illustration of this
routing.
FIG. 55 Next, locate the two Double Pulley Plates (#46) and
attach two Nylon Pulleys 4 1/2 Rd. (#17), as shown above. Secure
them into place using two Hex Head Cap Screws 3/8-16 X 1 3/4 (#69),
four Flat Washers SAE 3/8: (#12) and two Nylon Insert Jam Lock Nuts
3/8-16 (#74).
15
FIG. 56 Continue to route the Low Row Cable (#87-labeled with
tape B) under the Nylon Pulley 4 1/2 Rd. (#17-Labeled Q) located on
the Double Pulley Plates (#46), as shown above. Refer to the Cable
Mapping Diagram on page 20 for further detailed illustration of this
routing.
TG-150 Tuff Gym Series
Page 17

FIG. 57 Next, route the Low Row Cable (#87-labeled with tape
B) over the Nylon Pulley 4 1/2 Rd. (#17-Labeled R) located on the
Back Frame (#14), as shown above. Next, attach the Abdominal Strap
(#116), as shown above. Note: Use Fig. 78 for completing this
hardware assembly. Refer to the Cable Mapping Diagram on page 20
for further detailed illustration of this routing.
Owners’ Manual: Assembly Instructions
FIG. 58 Abdominal Strap View
FIG. 59 Begin the cable routing for the Leg Extension Cable (#89-
labeled with tape D). Attach the looped end of the Leg Extension
Cable (#89-labeled with tape D) to the Actuator Arm (#20) and
secure it into place using one Hex Head Cap Screw 3/8-16 X 1 (#13)
and one Nylon Insert Jam Lock Nut 3/8-16 (#74). Refer to the Cable
Mapping Diagram on page 20 for further detailed illustration of this
routing.
TG-150 Tuff Gym Series
FIG. 60 Next, route the Leg Extension Cable (#89-labeled with
tape D) under the Nylon Pulley 4 1/2 Rd. (#17-Labeled L) located on
the Leg Extension Main Frame (#24), as shown above. Refer to the
Cable Mapping Diagram on page 20 for further detailed illustration of
this routing.
16
Page 18

FIG. 61 Next, route the Leg Extension Cable (#89-labeled with
tape D) under the Nylon Pulley 4 1/2 Rd. (#17-Labeled T) located on
the Leg Extension Main Frame (#24) and up- and -over the Nylon
Pulley 4 1/2 Rd. (#17-Labeled U) located on the Platform (#49), as
shown above. Refer to the Cable Mapping Diagram on page 20 for
further detailed illustration of this routing.
FIG. 62 Next, route the Leg Extension Cable (#89-labeled with
tape D) over the Nylon Pulley 4 1/2 Rd. (#17-Labeled V) located on
the Double Pulley Plates(#46), as shown above. Refer to the Cable
Mapping Diagram on page 20 for further detailed illustration of this
routing.
FIG. 63 Next, route the Leg Extension Cable (#89-labeled with
tape D) to the threaded socket on the Platform (#49), as shown
above, and secure it into place using one Split Bolt 1/2-13 X 1 (#101)
and one Split Washer 1/2” (#102). Refer to the Fig 74 on page 21 for
further detailed illustration of this hardware assembly.
17
FIG. 64 Note: This cable termination is for the TG-150 only. For
the cable routing instructions for the TG-11L (Leg Press) , please
see TG-11L Instruction Manuel. If you have a TG-11L (Leg Press),
this Leg Extension Cable (#89-labeled with tape D) will be replaced
with the Leg Press Station cable supplied with the TG-11L.
TG-150 Tuff Gym Series
Page 19

Owners’ Manual: Assembly Instructions
FIG. 65 Cable Adjustment for the Leg Extension Cable (#89-
labeled with tape D). The Top Plate Swivel Bracket (#59) has been
designed to allow adjustment for the Leg Extension Cable (#89-
labeled with tape D) or the TG-11L (Leg Press Option) cable. To
adjust this cable, simply loosen the bottom nut (Labeled B), then begin
fastening the top nut (Labeled A) until the proper tension has been
achieved with this cable. Note: Over-tightening this cable will cause
the Top Plate/Selector Bar (#42) to lift and become a alignment
problem with the weight pin for the weight stack. Refer to the Cable
Tension Picture on page 19, as it displays an example of the
recommended tension for all cables.
FIG. 66 Next, locate the Leg Ext /Leg Curl Seat Pad (#29) and
attach the Seat Elevation Bracket (#32). Secure it into place using
two Hex Head Cap Screws 3/8-16 X 1 (#13) and two Flat Washers
SAE 3/8” (#12). Next, attach one Metal Hinge (#33) to the Leg Ext /
Leg Curl Seat Pad (#29), as shown above, and secure it into place
using one Hex Head Cap Screw 3/8-16 X 1 (#13) and one Flat Washer
SAE 3/8” (#12). Note: Be sure to position the Metal Hinge (#33), as
pictured above and in Fig. 67.
FIG. 67 Next, attach the Leg Ext /Leg Curl Seat Pad (#29) with the
other Metal Hinge (#33) to the Pec Dec Seat Frame (#35) and secure
it into place using one Hex Head Cap Screw 3/8-16 X 1 (#13) and one
Flat Washer SAE 3/8” (#12).
TG-250 Tuff Gym Series
FIG. 68 Next, attach the Back Pad (#11) to the Pec Dec Back Pad
Bracket (#15) and secure it into place using two Hex head Cap
Screws 3/8-16 X 1 (#13) and two Flat Washers SAE 3/8” (#12). Note:
The Pec Dec Back Pad Bracket (#15) has been pre-assembled to the
Back Frame (#14) by the factory.
18
Page 20

FIG. 69 Next, attach the Bench Press Seat Pad (#61) to the
Bench Press Seat Tube (#62) and secure it into place using two Hex
Head Cap Screws 3/8-16 X 1 (#13) and two Flat Washers SAE
3/8” (#12). Note: The Bench Press Seat Tube (#62) has been
attached to the Front Frame (#57) by the factory. Next, fasten the
Black Knob 1/2-13 X1 (#96) to the threaded nut of the Front Frame
(#57), as shown above.
FIG. 70 Next, attach the Bench Press Back Pad (#60) to the
Bench Press Back Pad Bracket (#56) and secure it into place using
two Hex Head Cap Screws 3/8-16 X 1 (#13) and two Flat Washers
SAE 3/8” (#12). Refer to the Exploded View Diagram on page 22 for
further illustration of this hardware assembly. Note: The Bench Press
Back Pad Bracket (#56) has been pre-assembled to the Front Frame
(#57) by the factory. Next, attach the Rubber Bumper 3/8 X 1
1/2” (#99) to the Bench Press Back Pad (#60) and secure it into
place using one Hex Head Cap Screw 3/8-16 X 1 (#13) and one Flat
Washer SAE 3/8” (#12).
FIG. 71 Next, attach the Foot Roll Tube 1 X 23 3/4 (#91) and
insert it into the receptacle of the Bench Press Back Pad Bracket
(#56). Next, insert a Foam Foot Roll 1 X 4 X 7 (#31) and one Foot Roll
Plastic End Cap 1” (#36) into each tube-end of the Foot Roll Tube 1 X
23 3/4 (#91), as shown above.
19
Cable Tension Picture: This picture shown above illustrates the
proper tension to be achieved when adjusting the cable tension.
This concludes the assembly of the TG-150. It is recommended that
you check and secure all hardware assemblies and inspect all the
cable routing for proper tension and assembly.
TG-150 Tuff Gym Series
Page 21

FIG. A
COMPLETE CABLE MAPPING DIAGRAM
FIG. B
TG-150 Tuff Gym Series
20
Page 22

FIG. 72
FIG. 73
FIG. 74
FIG. 76
FIG. 77
FIG. 75
FIG. 78
21
TG-150 Tuff Gym Series
Page 23

Owners’ Manual: Assembly Instructions
TG-150 EXPLODED VIEW DIAGRAM
TG-150 Tuff Gym Series
22
Page 24

TG-150 PARTS LIST
Item No.
COLOR CHART
GRAY= SUB-ASSEMBLY PARTS
BLACK= HARDWARE
Item No. Description Part No. Qty
1 PEC DEC ARM TG150-01-00 2
2 PLASTIC INSERT CAP SQ. 2" BNH0012 5
3 BRONZE BUSHING 1 X 1 1/4 BNH0527 8
4 PEC DEC CAM (LT) TG150-04-00 1 62 BENCH PRESS SEAT TUBE TG150-62-00 1
5 PEC DEC CAM (RT) TG150-05-00 1
6 PEC DEC HOUSING ASSEMBLY TG150-06-00 1 64 PIVOT AXLE 1 X 11 3/4 UP067 1
7 CHROME SWIVAL HANDLE UP144 2
8 EXT. RETAINING SNAP RING .925 X 1" BNH00419
9 PLASTIC KNOB 5/16 -18 X 1 BNH0177 2 67 HEX HEAD CAP SCREW 3/8 -16 X 2 BNH0279 1
10 NYLON WASHER USS 3/8" BNH0248 16
11 BACK PAD UP129 1
12 FLAT WASHER SAE 3/8" BNH0239 105 70 HEX HEAD CAP SCREW 3/8 -16 X 4 BNH0285 8
13 HEX HEAD CAP SCREW 3/8 -16 X 1 BNH0275 12 71 HEX HEAD CAP SCREW 3/8 -16 X 4 1/4 BNH0317 2
14 BACK FRAME TG150-14-00 1
15 PEC DEC BACK PAD BRACKET TG150-15-00 1
16 CABLE RETAINER PLATE TG150-16-00 1
17 WHITE NYLON PULLEY 4 1/2 BNH0556 22
18 ROLL PIN 3/8 X 1 1/2 BNH0483 1 76 SHOULDER BOLT 3/8 X 3/8 BNH0422 8
19 PLASTIC INSERT CAP REQ. 1 X 2 BNH0005 5 77 HEX HEAD CAP SCREW 3/8 -16 X 2 3/4 BNH0278 4
20 ACTUATOR ARM UP159 1 78 HEX HEAD CAP SCREW 5/16 -18 X 1 BNH0290 2
21 AB CRUNCH INSERT BRACKET UP119 1
22 BALL BEARING # W 516 BNH0628 2 80 HEX HEAD CAP SCREW 3/8 -16 X 3 1/2 BNH0280 2
23 PLASTIC INSERT CAP SQ. 1 1/2" BNH0009 1 81 NYLON INSERT LOCK NUT 3/8 - 16 BNH0214 3
24 LEG EXTENSION MAIN FRAME TG150-24-00 1
25 NYLON WASHER 1 X 1 1/4 BNH0393 2 83 NYLON SPACER 3/8 X 3/4 BNH0392 1
26 CIRCULAR PLATE W / AXLE UP106 1
27 L- ARM TG150-27-00 1
28 FOAM FOOT ROLL 1 3/4 X 4 X 16 BNH0041 1
29 LEG EXT / CURL SEAT PAD UP105 1
30 L - LOCKING PIN BNH0045 1
31 FOAM FOOT ROLL 1 X 4 X 7 BNH0043 4
32 SEAT ELEVATION BRACKET 2 1/4 ID UP104 1
33 METAL HINGE BNH0046 2
34 ADJUSTABLE HOLD DOWN T- BAR UP108 1
35 PEC DEC SEAT FRAME TG150-35-00 1 93 LOW ROW BAR 16" UP094 1
36 FOOT ROLL PLASTIC END CAPS 1" BNH0397 4 94 NYLON BALL 1 3/4 X 5/16 BNH0592 3
37 GUIDE ROD RETAINER HOUSING TG150-37-00 1
38 GUIDE ROD 1 X 72 UP124 2
39 ADJUSTABLE PULLEY PLATE 1/8 X2X9 UP092 2
40 PEC DEC SWIVAL PULLEY BRACKET LG UP126 2
41 SELECTOR PIN 3/8 X 4 BNH0064 1 99 RUBBER BUMPER 3/8 X 1 1/2 BNH0514 1
42 TOP PLATE / SELECTOR BAR UP003 1
43 10 LB WEIGHT PLATE BNH0561 19
44 RUBBER DONUT 1 X 2 1/2" BNH0062 2 102 SPLIT WASHER 1/2" BNH0572 2
45 OFFSET PULLEY BRACKET UP121 1
46 DOUBLE PULLEY PLATE UP134 2
47 HARD GRIP .875 X 8 BNH0523 6 105 NYLON INSERT LOCK NUT 5/16 -18 BNH0215 2
48 PLASTIC END CAP W/GROOVE SQ. 2" BNH0051 2 106 SOCKET CAP SCREW 1/4 -20 X 3/4 BNH0718 2
49 PLATFORM TG150-49-00 1
50 PLASTIC END CAP W/GROOVE REQ. 2 X3 BNH0049 1 108 HEX HEAD CAP SCREW 3/8 -16 X 3 3/4 BNH0281 4
51 LAT BAR HOLDER TG150-51-00 1
52 CABLE RETAINER BRACKET L-SHAPED UP014 4
53 FEMALE ADJUSTMENT HOUSING TG150-53-00 1
54 BENCH PRESS SELECTOR TUBE TG150-54-00 1
55 CABLE RETAINER BRACKET (LG) UP160 1
56 BENCH PRESS BACK PAD BRACKET TG150-56-00 1
57 FRONT FRAME TG150-57-00 1
58 TOP PLATE SWIVAL BRACKET SMALL UP127 1
59 BLACK CASTER 2 X 1 BNH0633 1
60 BENCH PRESS BACK PAD UP128 1
61 BENCH PRESS SEAT PAD TG150-61-00 1
63 HEX HEAD CAP SCREW 3/8 -16 X 4 3/4 BNH0318 1
SOCKET SET SCREW 3/8-16 X 1/2 BNH0474
65
6
66 HARD GRIP 1.220 X 6" BNH0525 4
68 PRESS BAR TG150-68-00 1
69 HEX HEAD CAP SCREW 3/8 -16 X 1 3/4 BNH0274 17
72 FLAT WASHER SAE 1/2 " BNH0238 6
73 NYLON INSERT JAM LOCK NUT 1/2 - 13 BNH0366 4
74 NYLON INSERT JAM LOCK NUT 3/8 - 16 BNH0365 41
75 FOOT ROLL COLLAR UP083 1
79 HEX HEAD CAP SCREW 3/8 -16 X 3 BNH0282 4
82 NYLON SPACER 3/8 X 3/8 BNH0729 3
84 PUSH PULL PIN 1/2" SPECIAL BNH0516 3
85 PUSH PULL PIN 1/2" BNH0515 2
86 LAT CABLE ( A ) TG150-86-00 1
87 LOW ROW CABLE ( B ) TG150-87-00 1
88 PEC DEC CABLE ( C ) TG150-88-00 1
89 LEG EXTENSION CABLE ( D ) TG150-89-00 1
90 LAT BAR CHROME 48" UP093 1
91 FOOT ROLL TUBE 1 X 23 3/4 UP180 1
92 PUSH PULL PIN 3/8" BNH0517 1
95 HEX KEY 5/32" BNH0373 1
96 BLACK KNOB 1/2 -13 X 1 BNH0055 1
97 FLAT NYLON WASHER SAE 1" BNH0240 1
98 PLASTIC INSERT CAP RD. 2" BNH0004 2
100 PLASTIC INSERT CAP REQ. 2 X 3 BNH0052 3
101 SPLIT BOLT 1/2 -13 X 1 BNH0479 2
103 STRAP BRACKET # 20 BNH0562 2
104 2" ABS PIPE X 15 1/2" BNH0716 1
107 NYLON INSERT LOCK NUT 1/4 -20 BNH0213 2
109 COIL CHAIN 3/16 X 21" BNH0017 1
110 NYLON BUSHING 1 X 1 1/2 BNH0531 4
111 SNAP LINK 8 MM X 80 MM BNH0065 3
113 SOCKET SET SCREW 5/16 -18 X 3/8 BNH0478 1
114 PVC HANDLE BNH0415 2
115 HEX KEY 3/16" BNH0371 1
116 ABDOMINAL STRAP BNH0821 1
117 SHOULDER BOLT 3/8 X 3/4 BNH0718 2
Description Part No. Qty
2
23
TG-150 Tuff Gym Series
Page 25

2. Hold the abdominal strap and assume the starting
Owners’ Manual: Assembly Instructions
START
FINISH
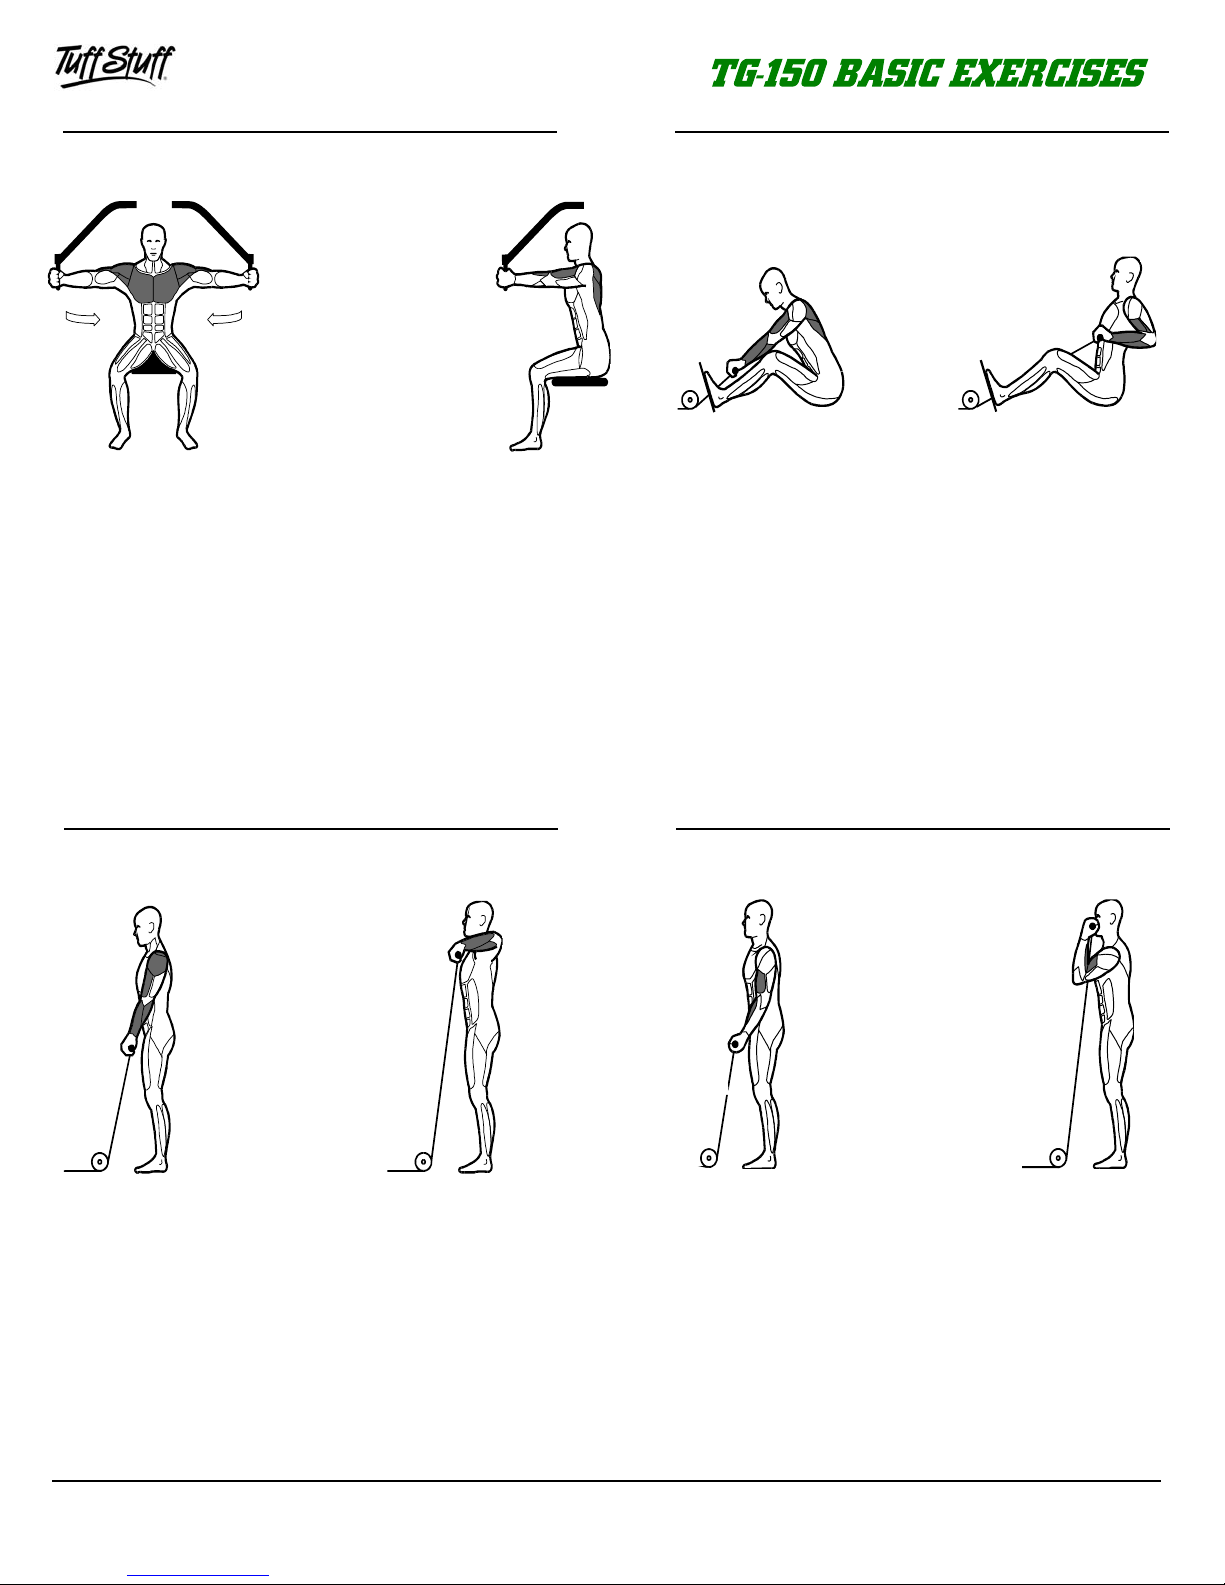
VERTICAL CHEST PRESS
1. Select the desired weight.
2. Sit with the press arm as shown.
3. Push the press arm outward.
4. Slowly return to the starting position.
Repeat for desired number of repetitions.
START
FINISH
VERTICAL INCLINE PRESS
1. Select the desired weight.
2. Sit with the press arm and the seat back
positioned as shown.
3. Push the press arm forward.
4. Slowly return arms to the starting position.
Repeat for desired number of repetitions.
START
FINISH
VERTICAL SHOULDER PRESS
1. Select the desired weight.
2. Sit with the press arm and the seat back
positioned as shown.
3. Push the press arm upward.
4. Slowly return to the starting position.
Repeat for desired number of repetitions.
START
FINISH
ABDOMINAL CRUNCH
1. Select the desired weight.
position as shown.
3. Pull the cable forward using your stomach.
4. Slowly return to the starting position.
Repeat for desired number of repetitions.
TG-150 Tuff Gym Series
24
Page 26
START
FINISH
START
FINISH
PECTORAL CONTRACTOR
1. Select the desired weight.
2. Assume the starting position as shown.
3. Push forward and rotate the arms in front of your
body simultaneously.
4. Slowly return to the starting position.
Repeat for desired number of repetitions.
START
FINISH
LOW ROW
1. Select the desired weight.
2. Assume the starting position as shown.
3. Pull the cable using your arm and upper body.
4. Slowly return arms to the starting position.
Repeat for desired number of repetitions.
START
FINISH
UPRIGHT ROW
1. Select the desired weight.
2. Assume the starting position as shown.
3. Pull the cable using your arm and shoulders.
4. Slowly return to the starting position.
Repeat for desired number of repetitions.
25
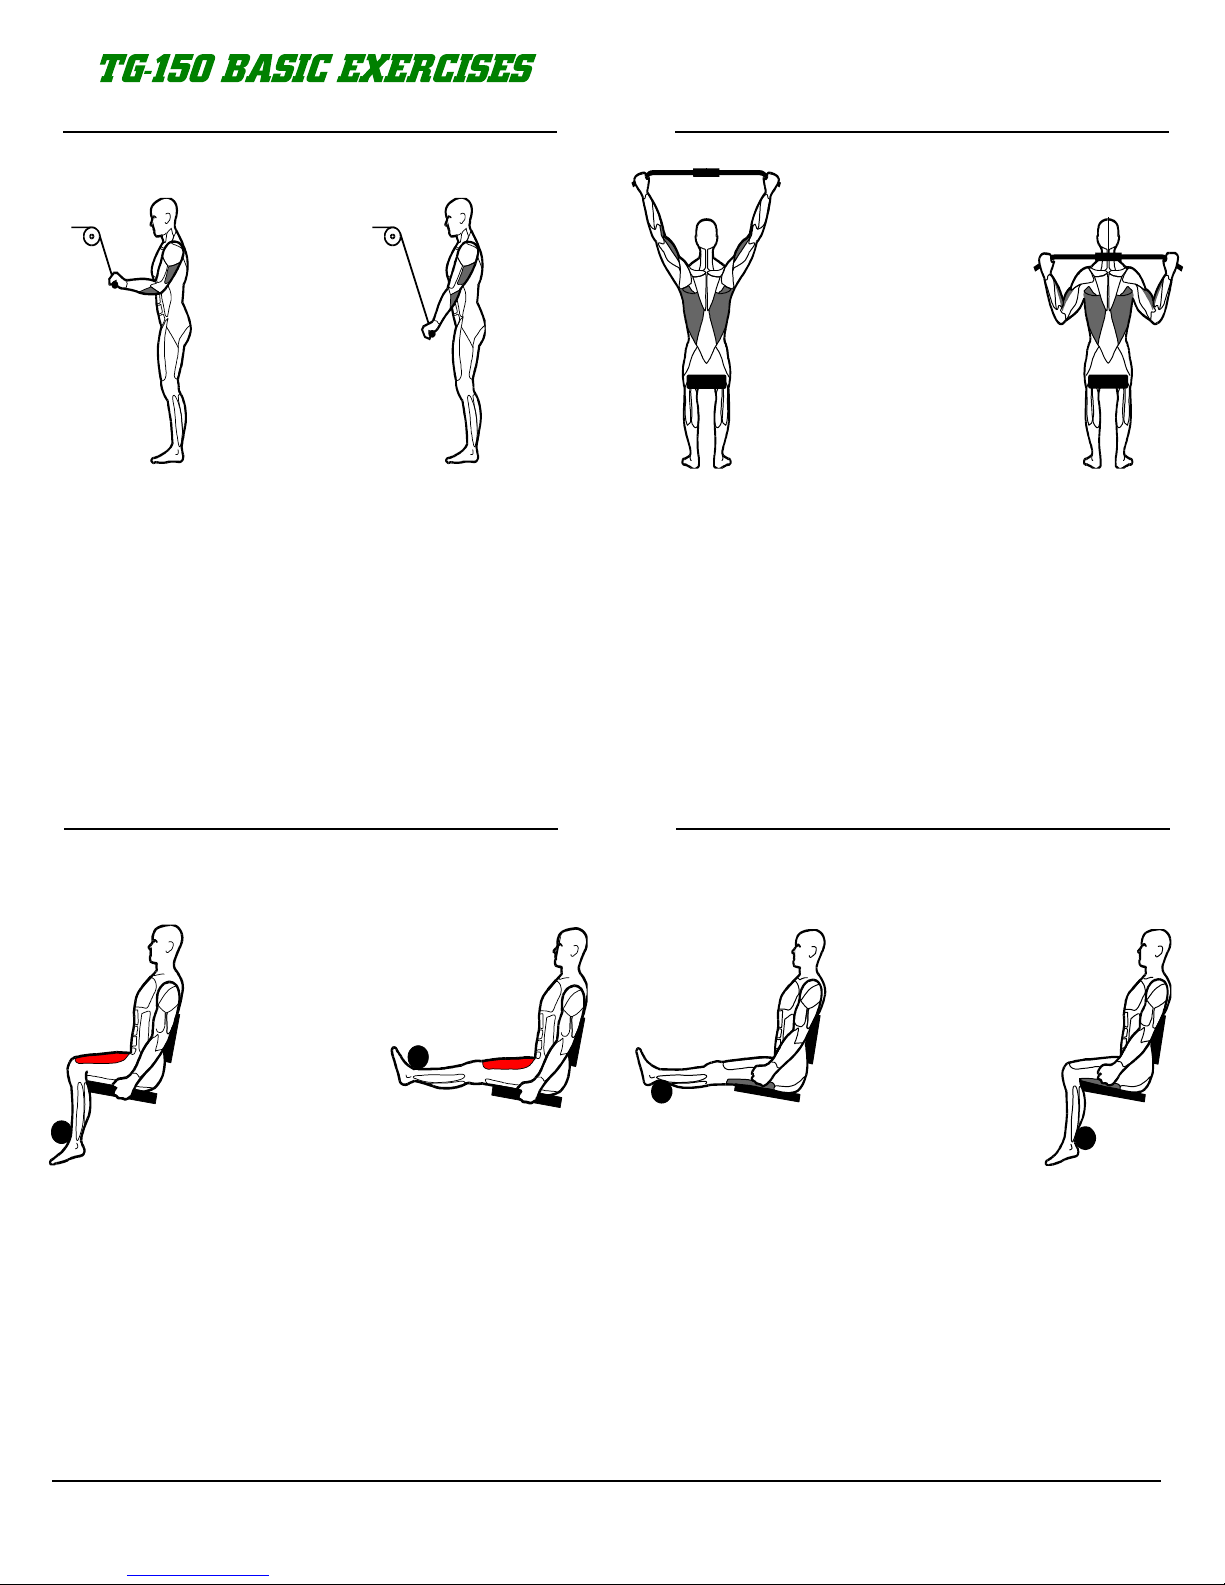
STANDING ARM CURL
1. Select the desired weight.
2. Stand and pick up bar.
3. Lift bar in front of your body as shown.
4. Slowly return to the starting position.
Repeat for desired number of repetitions.
TG-150 Tuff Gym Series
Page 27
Owners’ Manual: Assembly Instructions
START
FINISH
TRICEP PUSHDOWN
1. Select the desired weight.
2. Using the lat cable, follow diagrams for start and
end positions.
3. Slowly return to the starting position.
Repeat for desired number of repetitions.
START
FINISH
CABLE LAT PULLDOWN
1. Select the desired weight.
2. Assume the sitting position with knees under the
foam rolls.
3. Pull down the lat bar as shown.
4. Slowly return arms to the starting position.
Repeat for desired number of repetitions.
START
FINISH
LEG EXTENSION
1. Select the desired weight.
2. Position adjustable back pad for correct starting
position.
3. Position feet behind the foam pads, and extend
leg upward.
4. Slowly return to the starting position.
Repeat for desired number of repetitions.
START
FINISH
STANDING LEG CURL
1. Select the desired weight.
2. Raise the seat pad until it locks into position.
3. Assume a starting position for either leg as
shown.
4. Curl the leg upward as shown.
5. Slowly return to the starting position.
Repeat for desired number of repetitions.
TG-150 Tuff Gym Series
26
Page 28

DO NOT DISCARD THIS MANUAL
1325 E. Franklin Ave., Pomona, CA 91766
Ph: 909-629-1600 Fax: 909-629-4967
E-mail: taskind@aol.com Net: www.tuffstuff.com
 Loading...