

Page 1
OWNER’S MANUAL
TUFFSTUFF FITNESS INTERNATIONAL
OWNER’S MANUAL
Maintenance & Assembly Instructions
IMPORTANT: KEEP THIS MANUAL FOR FUTURE REFERENCE
NOTICE
It is the Purchaser’s/Owner’s obligation:
1. To disclose and post all Rules & Regulations, Danger, Warning and Caution
labels a xed on the machine to their customers/users.
2. Equipment to be installed by TFI Authorized Dealer or a service
company approved by TFI.
3. Provide trained personnel, supervision and correct usage of the equipment.
4. Provide scheduled inspection, maintenance & repairs and must be performed
by TFI Authorized Dealer or a service company approved by TFI.
5. Must use only genuine TFI replacement parts.
6. Machine must be anchored to a solid and level surface.
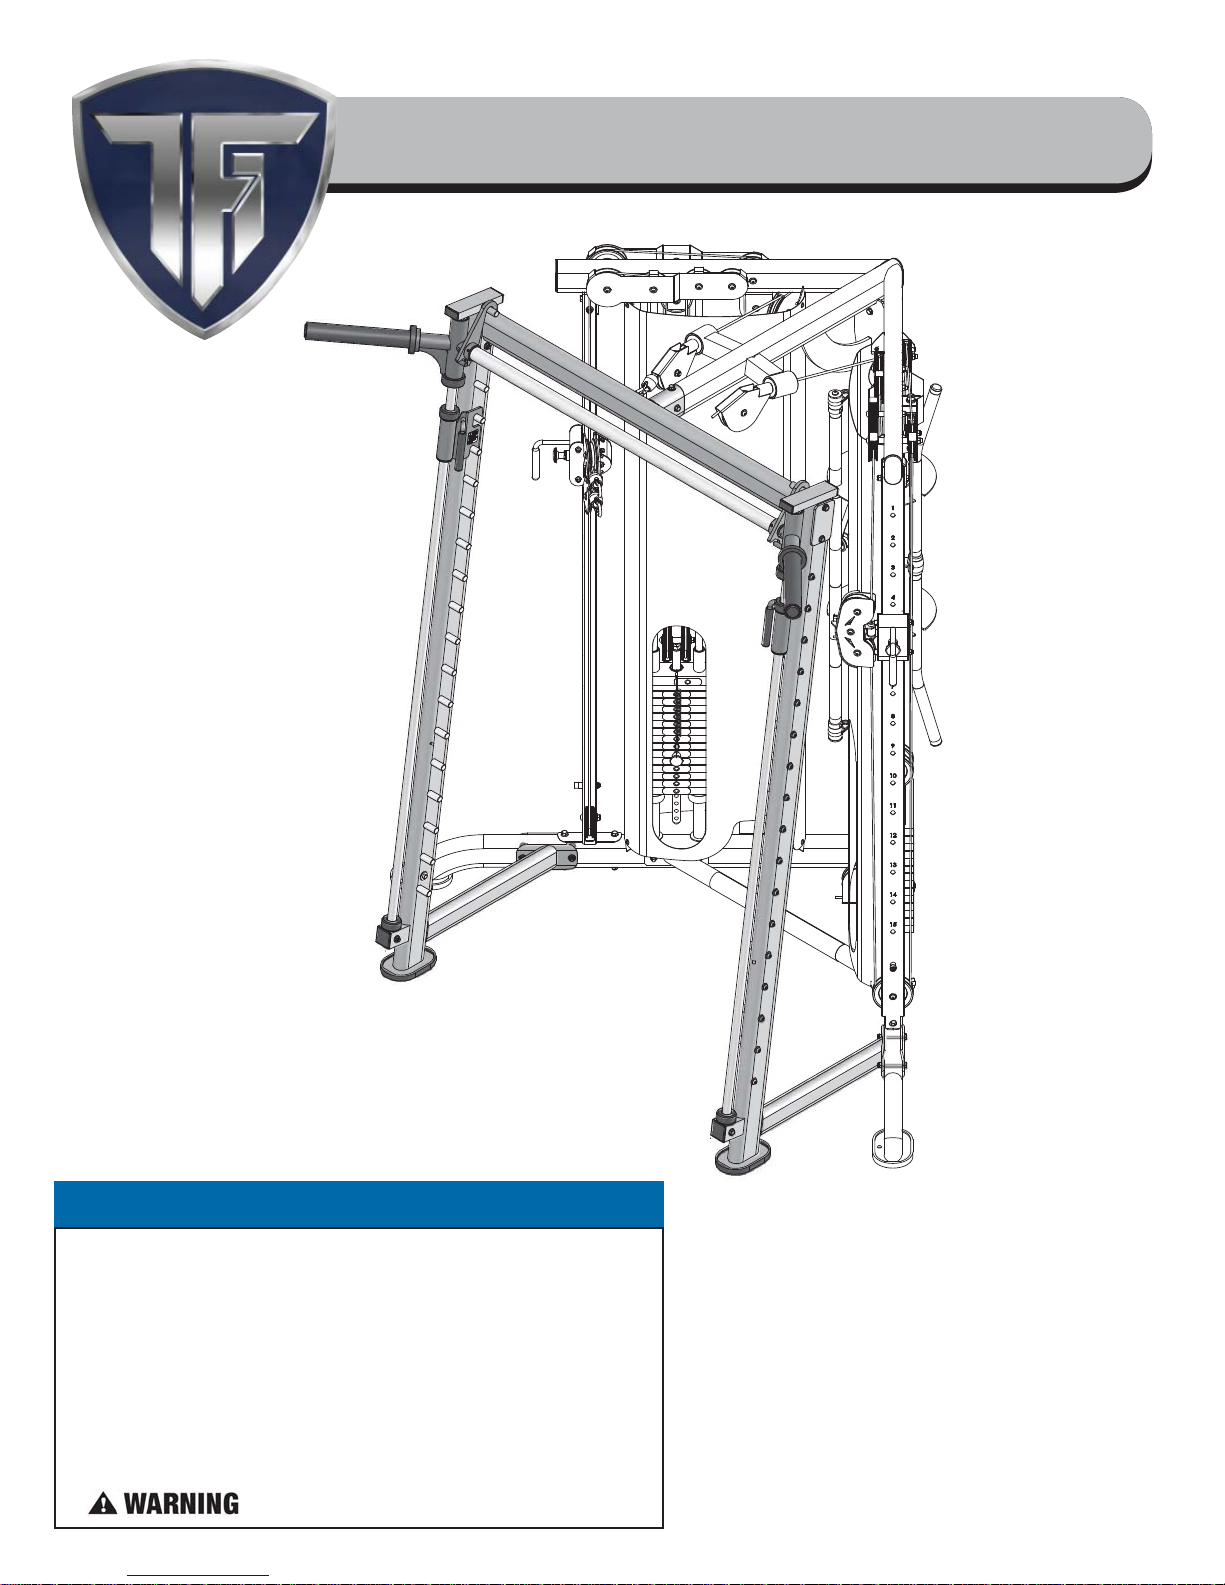
CXT-225
Smith Press Attachment
(Option for CXT-200)
CXT-225_Rev2
Revision Date 6-20-2014
Page 2
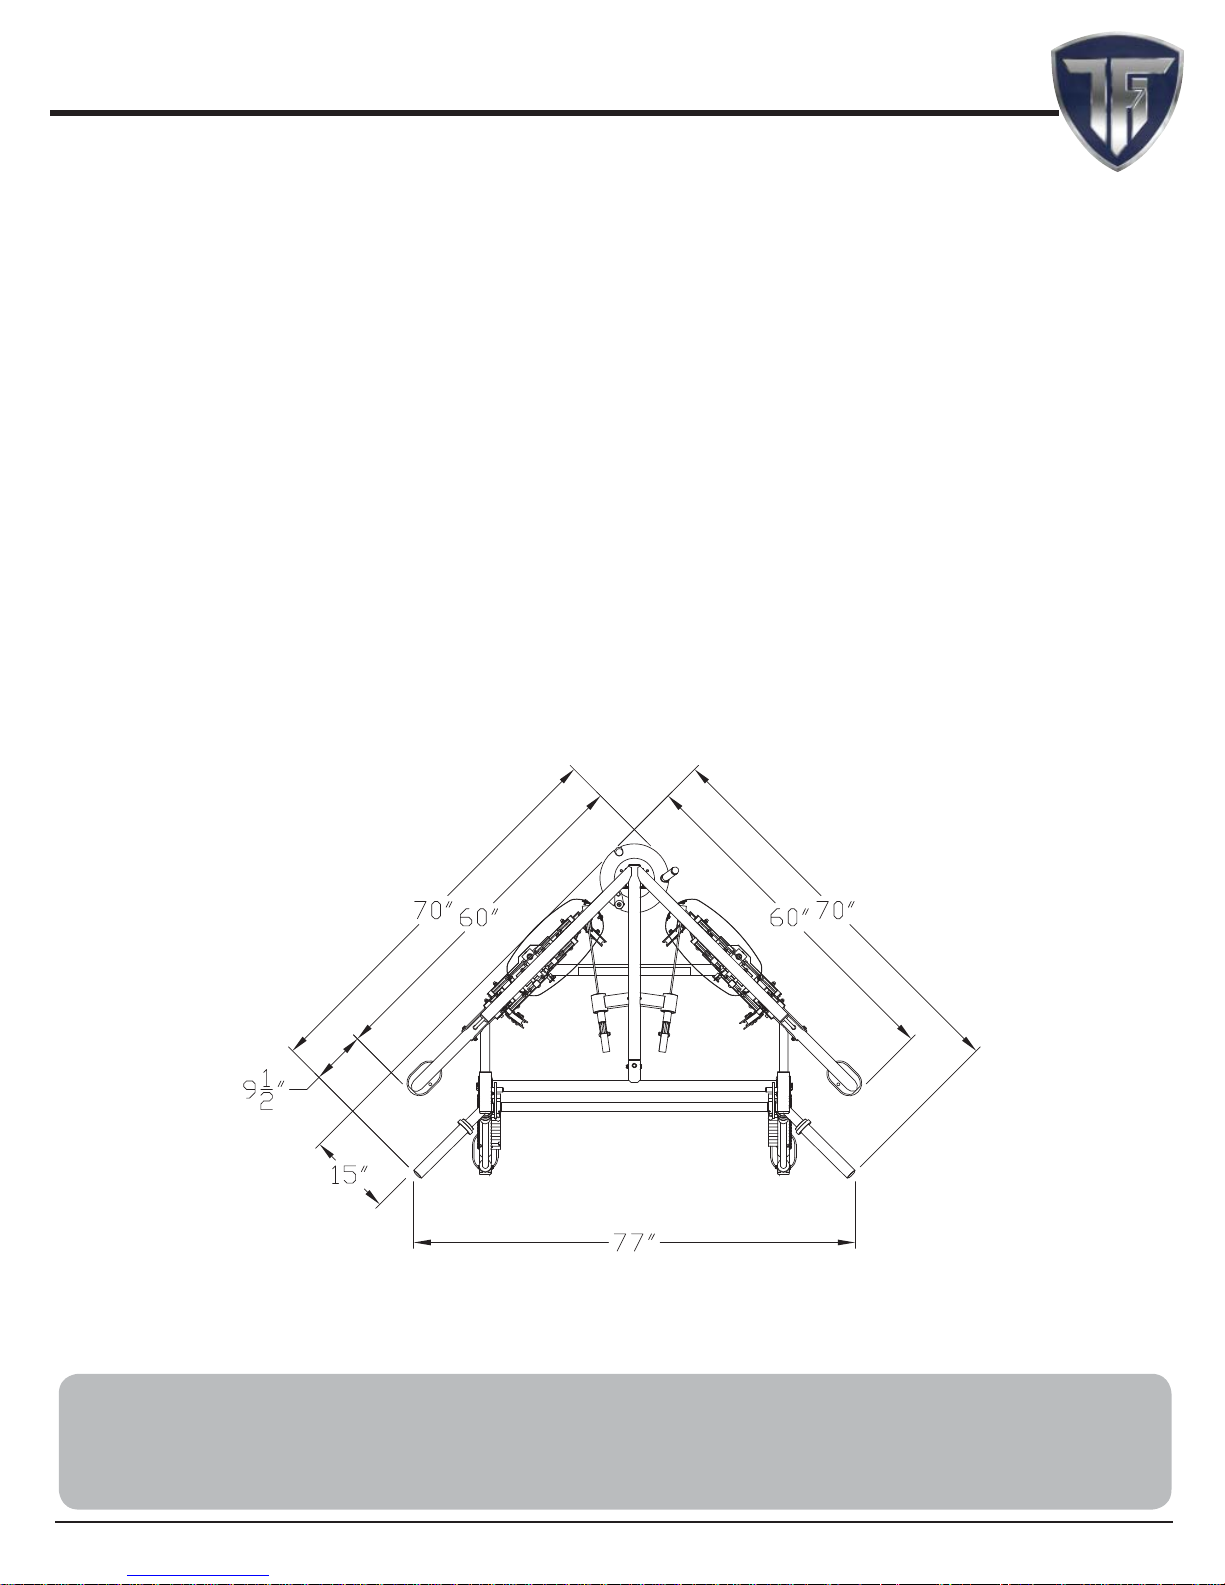
Table of Contents
SAFETY PRECAUTIONS ................................................................................Page 3-5
IMPORTANT SAFETY INSTRUCTIONS ..........................................................Page 6
REGISTRATION, SERVICE & ASSEMBLY ........................................................Page 7
INSPECTION/MAINTENANCE ......................................................................... Page 8
ANCHORING UNIT .............................................................................................Page 9
DANGER, WARNING, & CAUTION LABELS INFORMATION ..........Page 10-13
LABEL INSTRUCTIONS ................................................................................... Page 14
STEP 1 ................................................................................................................. Page 15
STEP 2 ................................................................................................................. Page 16
STEP 3 ................................................................................................................. Page 17
PARTS LIST ......................................................................................................... Page 18
EXPLODED VIEW ............................................................................................. Page 19
BASIC EXERCISE GUIDE ................................................................................. Page 20
NOTES ................................................................................................................. Page 21
WARRANTY ....................................................................................................... Page 22
Tu Stu Fitness International Inc. continually engages in research related to product improvements. Please take the time to carefully read through
this owner’s manual thoroughly. Instructions contained in this owner’s manual are not intended to cover all details or variations possible with
equipment, or to cover every contingency that may be met in conjunction with assembly, installation, operation, maintenance or troubleshooting of
the equipment. Eventhough we have prepared this owner’s manual with extreme care, neither the manufacturer nor the author can accept
responsibility for any errors in, or omission from, the information given. Should additional information be required, or should situations arise that are
not covered by this owner’s manual, the matter should be directed to Customer Service at Tu Stu Fitness International Inc. in Chino, California.
2
L 70” X W 77” X H 85”
PRODUCT WEIGHT 182 lbs
MAX-LOAD WEIGHT LIMIT - 400 lbs
CXT-225 Smith Press Attachmentwww.tu stu tness.com
Page 3
Safety Precautions
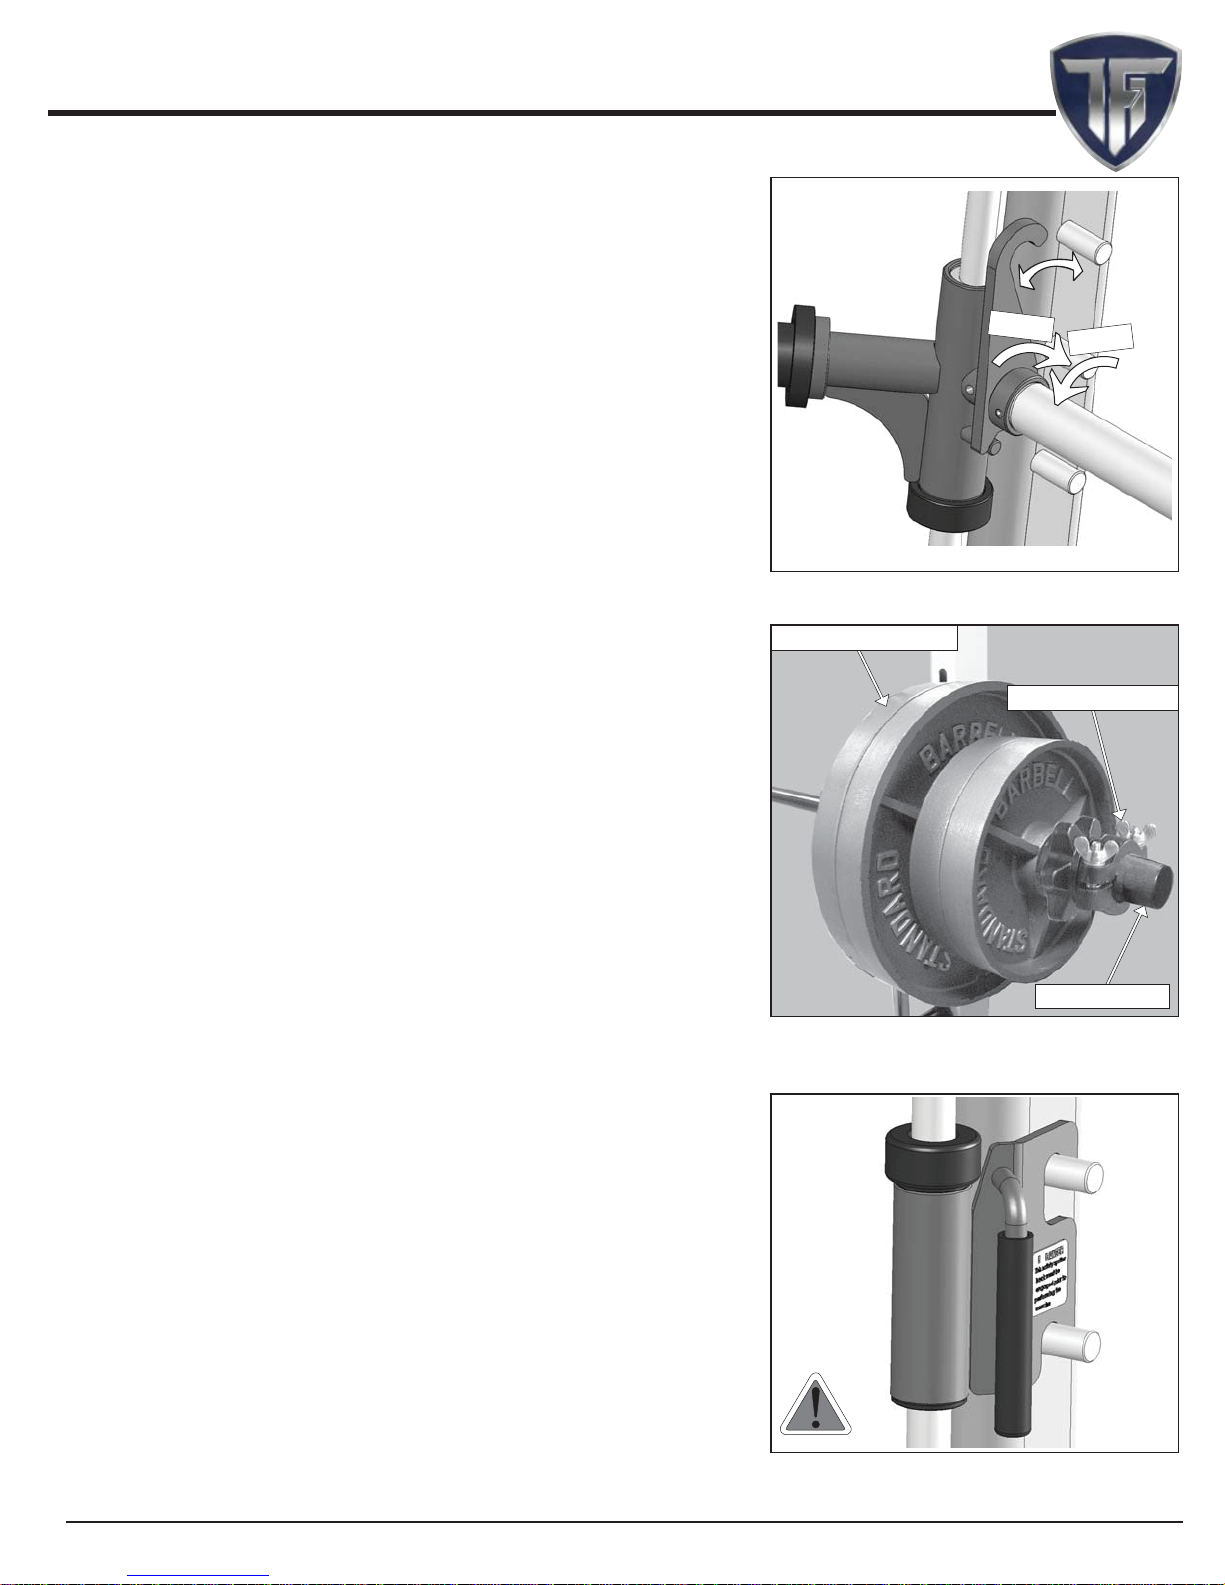
1. The Weight Lift Bar (CXT-225 Owner’s Manual part #8)
has a twist locking mechanism that
out the
at virtually
Weight Lift Bar ( CXT-225
any setting. See Fig. A
allows you to safely lock
Owner’s Manual part #8)
2. If you are adding or storing weight plates on the
(CXT-225 Owner’s Manual part #11, #12)
them. Allow enough space for weight
purchased separately) See
Fig. B
collars. (Collars must be
Weight Prongs
, do not over-load
Lock
Unlock
Fig. A Illustration above depicts the Weight Lift
Bar locking mechanism.
Barbell Weight Plates
Olympic Bar Collar
3. Pay special attention to the
Safety Stoppers (CXT-225 Owner’s
Manual part part #2,#3). Be sure they are fully engaged into the
Prongs (CXT-225 Owner’s Manual part #6) Stopper of the
Side Frames (CXT-225 Owner’s Manual part #4,#5).
to
Fig. C illustration. for further
Refer
CXT-225 Smith Press Attachment www.tu stu tness.com
Weight Prong
Fig. B Warning:Use collars to prevent the weight
plates from falling off the Weight Prongs .
Fig. C Danger: Check that all Safety Stoppers
are fully engaged into the Stopper Prongs
3
Page 4

Safety Precautions
4. DANGER: Once the unit is completely assembled take the time to ensure
that the unit is assembled correctly square and perpendicular. Pay special
attention to the Weight Lift Bar (#8) making sure both hooks engage uniformly
and completely into each Stopper Prong (#6). If both of the Weight Lift Bar
Hooks are not engaging uniformly into the Stopper Prongs (#6), it will be
necessary to
and contact your TuffStuff Retailer or Customer Service (888) 884-8275.
Press Bar
Fully Engaged
WRONG
dnaemarfehtngila-ernehterawdrahemarfemsoloosen
ehtnethgit-er hardware. If problem persists, Do Not Use the Machine
Disengaged Press Bar
During Exercise
5. The illustrations above depict the Weight Lift Bar (#8) disengaged setting
which is used during exercise.
gnikcolnUgnikcoL
1
2
6. DANGER: The Safety Stoppers (#2, #3) prevent the Weight Lift Bar (#8)
from being lowered below required point and avoid getting crushed under the
Weight Lift Bar (#8) if the weight is too heavy to control. Use the Decal
numbers on the Side Frames (#4, #5) to ensure that the Safety Stoppers
(#2, #3) are set to an equal adjustment setting (same height).
Before you add weight plates to the Weight Lift Bar (#8), you must fi rst
set-up the Safety Stoppers (#2, #3) for the required exercise. It is
recommended that you test the desired setting without weight plates on the
Weight Lift Bar (#8) to make sure the Safety Stoppers (#2, #3) are set to the
appropriate exercise setting.
2
1
4
www.tu stu tness.com
CXT-225 Smith Press Attachment
Page 5
Safety Precautions
NOTE:
WHEN NOT USING THE SMITH PRESS ATTACHMENT, FULLY ENGAGE THE WEIGHT LIFT
BAR (#8) ON HIGHEST WEIGHT PRONGS AND SAFETY STOPPERS (#2, #3) RIGHT BELOW AS
SHOWN BELOW.
3
2
CXT-225 Smith Press Attachment www.tu stu tness.com
5
Page 6

Important Safety Instructions
It is the responsibility of the facility owner and/or owner of the equipment to review the Owner’s Manual with their facility
personnel and understand all Danger, Warning and Caution labels a xed on the machine. It is the responsibility of the oor
personnel to instruct users on proper operation of the equipment and review all danger, warning and caution labels.
SERIOUS INJURY OR DEATH CAN OCCUR
IF THESE SAFETY PRECAUTIONS ARE NOT OBSERVED:
1. Obtain a medical exam before beginning any exercise program.
2. Read and understand Owner’s Manual and all Danger, Warning
and Caution labels before using this equipment. If you still need
help, seek assistance from oor personnel.
3. Inspect the equipment before each use for wear and tear, loose
ttings, worn or frayed cables and frame welds. DO NOT USE if it
appears to be inoperable or damaged.
4. Stop exercising if you feel faint or dizzy. Consult a physician if you
are experiencing pain.
5. Use this equipment only for the intended use.
6. Keep body, clothing and hair clear from all moving parts. Do not
attempt to free any jammed parts by yourself.
7. Always warm-up before and cool-down after weight training.
Warm-up for 10-15 minutes with stretching and cardiovascular
exercises. Cool-down should include light stretching exercises for
5-15 minutes.
8. Never hold your breath – will limit the ow of oxygen to your brain
and may cause dizziness. The most often used breathing pattern is
inhaling during least resistance and exhaling during maximum
resistance.
9. Do not use accessories or accessory attachments that are not
recommended by TFI.
10. Make sure selector pin is completely inserted. Use only the selector
pin provided by the manufacturer.
11. Never pin the weights in an elevated position. Do not use the
machine if found in this condition.
5. Provide an adequate safety perimeter between the machine,
walls and other equipment to ensure that the facility has proper
clearance for usage and training.
6. Post and disclose all safety, rules and regulations on a bulletin
board easily accessible to users.
7. Perform regular maintenance (see Inspection Label). Pay special
attention to areas most susceptible to wear and tear, including but
not limited to cables, pulleys and rubber grips.
8. Do not lean against or pull on the framework, weight stack or
any component at all times.
9. Children must not be allowed near the equipment. Teenager must
be supervised.
10. Replace immediately all parts at rst sign of wear or damage. If
unable to replace worn or damaged components/parts, remove
machine from service until the repair is made.
11. Use only genuine Tu Stu replacement parts. Failure to do so will
void warranty and could result in serious injury or death to the users.
12. Do not remove any decals a xed to the machine. Replace if
damaged.
13. Do not alter or modify the original manufacturer’s weight stack
with any add-on incremental weights, weight plates or
dumbbells except those with standard factory installed option.
14. Maintain a service contract with a TFI Authorized Dealer or a
Professional Service Company approved by TFI. Keep a service
log of all maintenance and repair activities. NOTICE: It is the sole
responsiblity of the owner or facility operator to ensure that regular
maintenance is performed.
Facility Safety Guidelines and Practices
1. Read and understand the Owner’s Manual before assembling,
servicing or using the equipment.
2. Equipment to be installed by TFI Authorized Dealer or
Professional Service Company approved by TFI.
3. Make sure each machine is set up and operated on a solid level
surface. Do not install equipment on an uneven surface.
4. Anchoring of equipment must be completed at time of
installation and inspected prior to use. Failure to anchor the
machine to the oor could cause the machine to tip or fall over
due to incorrect usage and misuse, and could result in serious
injury or death.
6
DANGER: indicates an imminently hazardous situation which, if not
avoided, will result in death or serious injury.
WARNING: indicates a potentially hazardous situation which, if not
avoided, will result in death or serious injury.
CAUTION: indicates a hazardous situation which, if not avoided, could
result in minor or moderate injury.
CXT-225 Smith Press Attachmentwww.tu stu tness.com
Page 7
Registration, Service & Assembly
Thank you for purchasing the CXT-225 Smith Press Attachment. Weight Stack. This machine is part of the Tu Stu line of
quality strength training equipment. To maximize your use of the equipment, please study the Owner’s Manual thoroughly.
Registration
To avoid unnecessary delays on warranty parts and to insure that a
permanent record of your purchase is on le with our company, be
sure to register online at http://www.tu stu tness.com or mail to
address shown below within 10 days of purchase.
Obtaining Service
Please use this Owner’s Manual as your guide to all parts included in
your shipment. When ordering parts, you must specify the part number
and description from this owner’s manual. Use only genuine Tu Stu
replacement parts when servicing the equipment. Failure to do
so will void warranty and could result in serious injury or death.
For information about product operation or service:
Phone: 909-629-1600 Toll Free 888-884-8275
Fax: 909-629-4967
E-mail: service@tu stu .net or service1@tu stu .net
Hours: M–F 8:00 – 4:30 PST
Or write to: Tu Stu Fitness International Inc.
Customer Service
13971 Norton Avenue, Chino, CA 91710
Retain this Owner’s Manual for future reference when ordering
service or parts. To assist you better, please be prepared to
provide the following information:
1. Model Number 2. Place of Purchase
3. Serial Number 4. Part # and Description
Required Tools
The basic tools that you will need to assemble the CXT-225 but are not
limited to:
• 9/16” , 3/4”, 1/2” combination wrenches
• Adjustable wrench
• Ratchet wrench with 9/16” , 3/4”, 1/2” sockets
• External retaining ring pliers
• Rubber mallet, measuring tape & utility knife
• Super Lube® spray lubricant and grease
• Windex or household glass cleaner
Allow ample space around the machine for safe unrestricted use and
easier access.
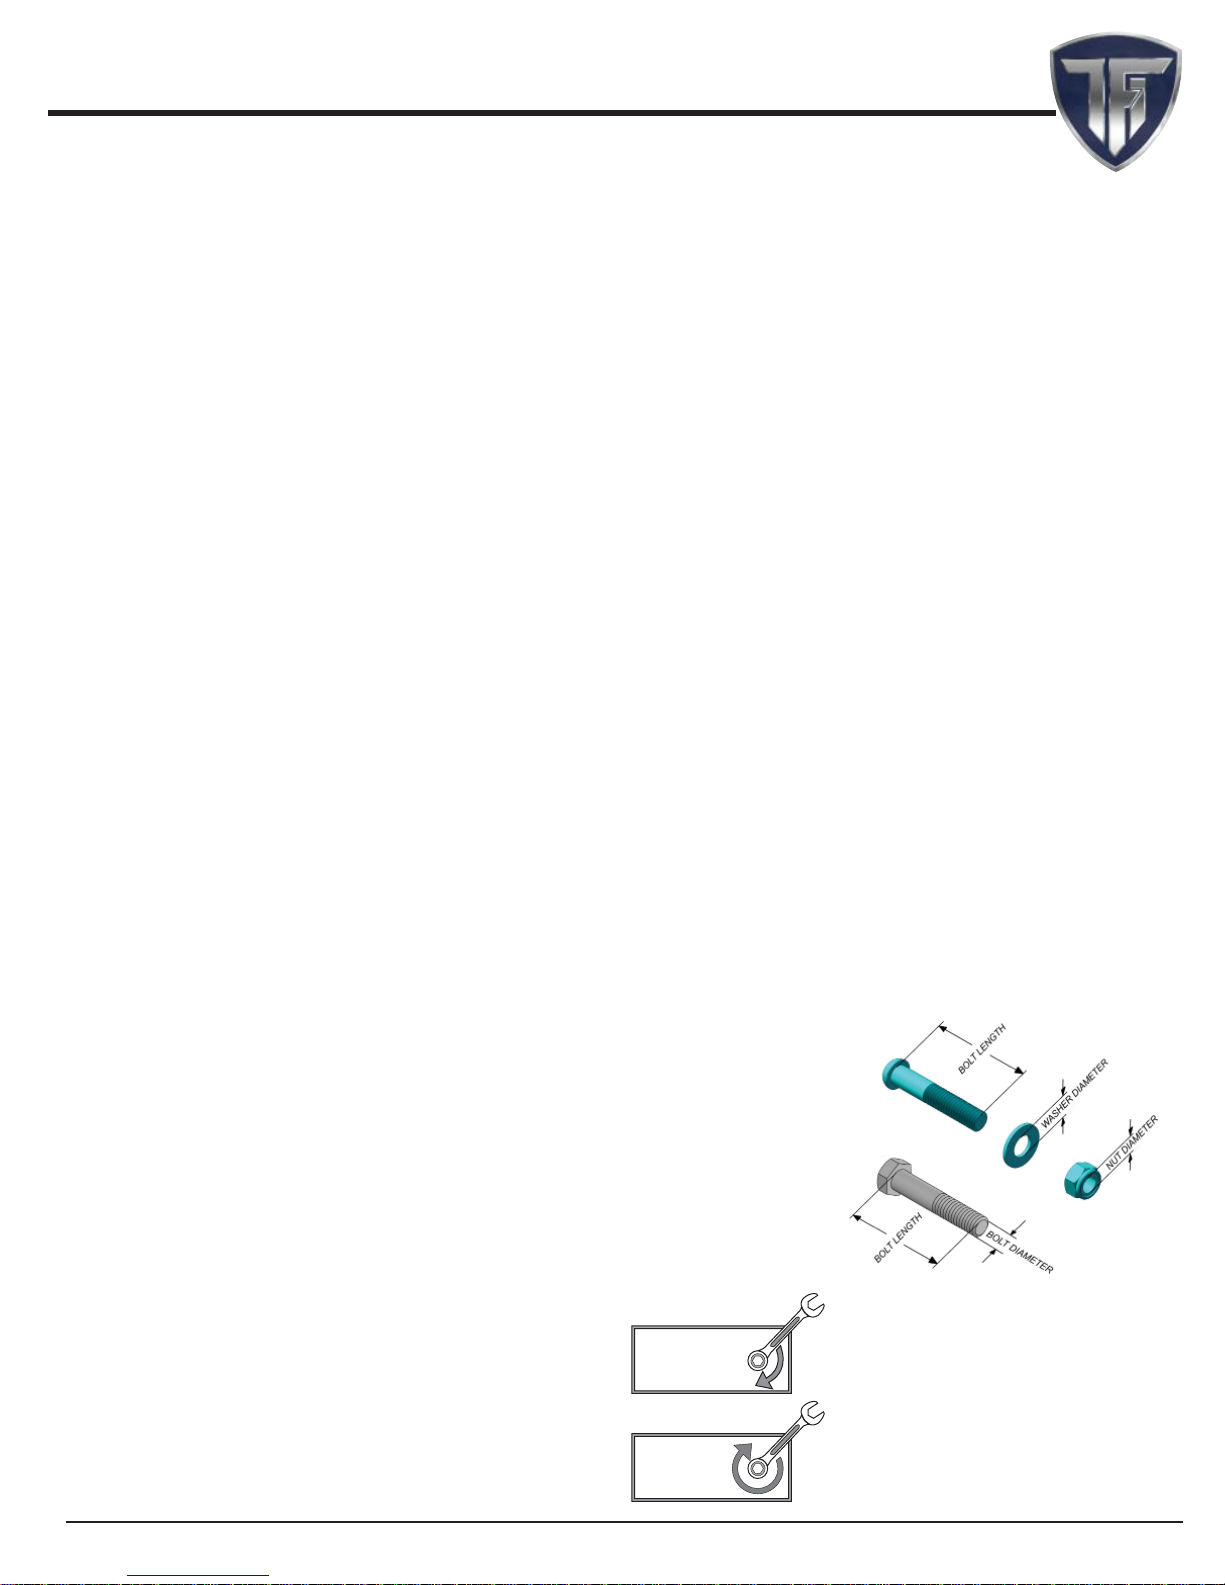
Insert all bolts in the same direction. For aesthetic appearance, insert all
bolts in the same direction unless speci ed (in text or illustration) to do
otherwise.
Leave room for adjustments. Do not fully tighten fasteners until
instructed in the assembly steps to do so (to prevent any di culty with
alignment of parts during the assembly process). When not instructed,
tighten fasteners such as bolts, nuts and screws so the unit is stable, but
leave room for adjustments.
Assembly Tips
Read all “Notes” on each page before beginning each step.
While you may be able to assemble the CXT-225 using the illustrations
only, IMPORTANT safety notes and other tips are included in the text.
Some pieces may have extra holes that you will not use. Use only those
holes indicated in the instructions and illustration.
NOTE: With so many assembled parts, proper alignment and
adjustment is critical. While tightening the nuts and bolts,
be sure to leave room for nal adjustments.
CAUTION: Obtain assistance from TFI if you have di culty
assemblying the CXT-225. Please do not attempt to
complete the assembly as this could result in equipment
failure and serious injuries to the users.
Symbols & Description
Assembly Requirements
Follow these installation requirements when assemblying the CXT-225.
Use the overhead view on the Content Page to layout your oor plan
before assemblying.
Set up the CXT-225 on a clean, solid, at surface. A smooth, at surface
under the machine helps keep it level.
Loosely Tighten
70%
Fully Tighten
100%
CXT-225 Smith Press Attachment www.tu stu tness.com
Loosely Tighten
Loosely tighten all hardware in this step. DO NOT Fully
Tighten. Some component(s) may need pre-assembly
and or alignment during the assembly process.
Fully Tighten
Wrench tighten all hardware in this step.
7
Page 8

Inspection/Maintenance
Perform regular maintenance (see Inspection Label). Pay special attention to areas most susceptible to wear and tear, including
but not limited to cables, pulleys and rubber grip. TFI recommends you maintain a service contract with a TFI Authorized Dealer or a
Professional Service Company approved by TFI. Keep a service log of all maintenance and repair activities. Extra copies can be downloaded
from our website www.tu stu tness.com
INSPECTION / MAINTENANCE RECORDS
DATE REPLACEMENT REPAIRS INSPECTED BY
8
WARRANTY REPAIRS
DATE REPLACEMENT REPAIRS INSPECTED BY
CXT-225 Smith Press Attachmentwww.tu stu tness.com
Page 9

Anchoring Unit
Holes on shoe plates are provided for anchoring the unit to the oor.
(See anchoring hole locations below)
CXT-225 Smith Press Attachment www.tu stu tness.com
9
Page 10

Carefully read ALL Danger, Warning & Caution labels posted on the machine
53
50
47
54
49
18
45
52
43
22
10
www.tu stu tness.com
51
21
CXT-225 Smith Press Attachment
Page 11

Carefully read ALL Danger, Warning & Caution labels posted on the machine
48
54
52
18
45
49
20
22
CXT-225 Smith Press Attachment www.tu stu tness.com
11
Page 12

Carefully read ALL Danger, Warning & Caution labels posted on the machine
54
18
48
20
43
50
12
www.tu stu tness.com
22
51
47
45
CXT-225 Smith Press Attachment
Page 13

Carefully read ALL Danger, Warning & Caution labels posted on the machine
21
52
53
19
49
46
It is extremely important that the Facility Sign shown to the left
be installed in plain view of the unit.
You should have received it along with this Owner’s Manual. If
you did not receive this Facility Sign with your order, you can
obtain one at no cost to you from Tu Stu Fitness by contacting
our service department at:
1 (888) 884-8275
service@tu stu .net
service1@tu stu .net
CXT-225 Smith Press Attachment www.tu stu tness.com
13
Page 14

LABEL INSTRUCTIONS
LINE UP LABELS HERE
Exercise chart label instructions
1. Wipe surface clean.
2. Peel o back sheet (adhesive side) from label #19.
3. Line up the top and side edges of the label with the bottom and side edges of the
existing (small) label on the CXT-200 weight shield.
4. Make sure label is straight and slowly press into place from top to bottom.
14
CXT-225 Smith Press Attachmentwww.tu stu tness.com
Page 15

Step 1
28
42
23
33
26
23
Remove CXT-200
Chin-up Bar
42
28
23
23
23
23
27
23
33
5
42
26
33
23
28
23
7
23
42
28
23
28
23
33
38
NOTE:
1. It is strongly remmended that two people
participate in the assembly of this unit.
Loosely Tighten
38
70%
Loosely Tighten
Loosely tighten all hardware in this step.
CXT-225 Smith Press Attachment www.tu stu tness.com
4
2333
33 23
23 28
23
28
15
Page 16

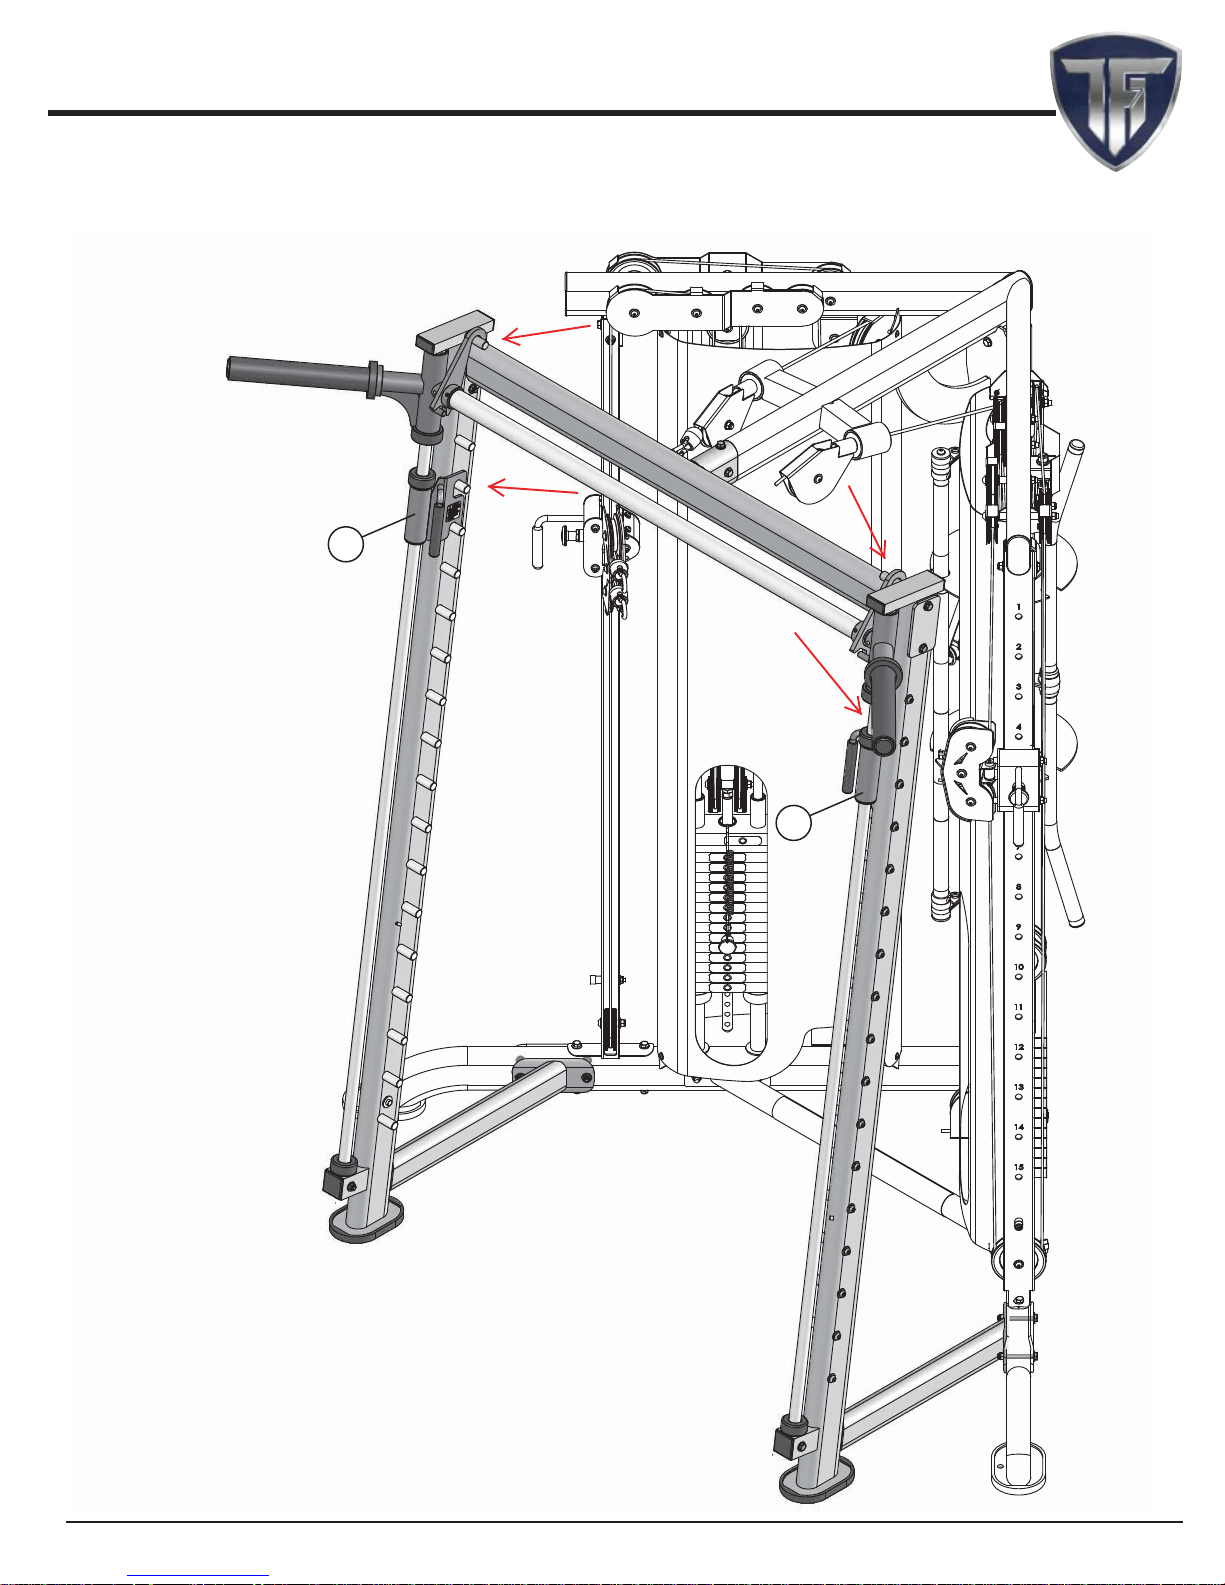
Step 2
Note:
1. Once linear shaft (#1) is in place, raise it to assemble
hardware shown below.
1
39
3
39
12
5
27
23
8
23
33
Fully Tighten
100%
Fully Tighten
Wrench tighten all hardware in this step.
16
www.tu stu tness.com
CXT-225 Smith Press Attachment
Page 17

Step 3
Note:
1. Once linear shaft (#1)is in place, raise
it to assemble hardware
shown below.
1
12
Fully Tighten
100%
Fully Tighten
Wrench tighten all hardware in this and
previous loosely tighten steps.
8
39
39
2
33
1
11
23
23
4
27
CXT-225 Smith Press Attachment www.tu stu tness.com
17
Page 18

Parts List
M
F
COLOR CHART
GRAY= SUB-ASSEMBLY PARTS
BLACK= HARDWARE
CXT-225
CXT-225 REV2
Parts List
Item No. Description Rev. Part No. Qty. Item No. Description Part No. Qty.
1 LINEARȱSHAFTȱ1ȱXȱ79ȱ1/2 0 UP3875 2 28 HEXȱHEADȱCAPȱSCREWȱGRȬ5ȱZ/Pȱ3/8Ȭ16ȱXȱ3 BNH2046 8
2 SAFETYȱSPOTTERȱLT 1 UP3868 1 29 HEXȱKEYȱALLOYȱ5/32Ȉ BNH0373 1
3 SAFETYȱSPOTTERȱRT 1 UP3867 1 30 HEXȱKEYȱALLOYȱ7/32Ȉ BNH0575 1
4 SIDEȱFRAMEȱLT 0 UP3865 1 31 INTERNALȱRETAININGȱRINGȱØ40ȱMM BNH1923 4
5 SIDEȱFRAMEȱRT 0 UP3864 1 32 LINEARȱBEARINGȱSUPERȱSMARTȱSSU16ȬRP BNH0770 4
6
STOPPERȱPRONGȱØ3/4ȱXȱ3ȱ1/2 0 UP3874 34 33 NYLONȱINSERTȱJAMȱLOCKȱNUTȱGRȬ8ȱBȬZ/Pȱ3/8Ȭ16 BNH2450 9
7 TOPȱCROSSȱBRACE 0 UP3866 1 34 PLASTICȱINSERTȱCAPȱ1ȱ5/8ȈȱRDȱ10Ȭ14ȱGA BNH1910 2
8 WEIGHTȱLIFTȱBAR 0 UP3873 1 35 PLASTICȱINSERTȱCAPȱ1ȈȱXȱ2Ȉȱ10Ȭ14ȱGA BNH0005 4
9 WEIGHTȱLIFTȱBARȱHOOKȱLT 0 UP3872 1 36 PLASTICȱINSERTȱCAPȱ2ȈȱSQ
10 WEIGHTȱLIFTȱBARȱHOOKȱRT 0 UP3871 1 37 ROLLȱPINȱØ6ȱMMȱXȱ14ȱMM BNH1924 4
11 WEIGHTȱPRONGȱLT 0 UP3870 1 38 RUBBERȱFOOTȱFORȱ6ȱXȱ4ȱ1/4ȱPLATE BNH1647 2
12 WEIGHTȱPRONGȱRT 0 UP3869 1 39 RUBBERȱSTOPPERȱØ55ȱXȱØ25ȱXȱ26ȱMM BNH3283 4
13 BNH1927 2 40 RUBBERȱWASHERȱ1ȱ7/8ȱIDȱXȱ3ȱODȱXȱ19/32ȱTK BNH1909 2
ABSȱSLEEVEȱ1ȱ5/8ȱXȱ12
14 BNH3059 2 41
YELLOWȱGRIPȱ1/2ȱXȱ4ȱ(PVC)
15 BNH1926 2 42 SPLITȱLOCKȱWASHERȱBȬZ/Pȱ3/8Ȉ BNH2520 38
BRONZEȱBUSHINGȱØ25ȱXȱØ19ȱXȱ20ȱMM
16 BNH1925 2 43 LABELȬINSPECTIONSȱRECOMMENDEDȱINSPECTION…
BRONZEȱBUSHINGȱØ31ȱXȱØ25.4ȱXȱØ19ȱXȱ20ȱMM
17 BUTTONȱHEADȱSOCKETȱCAPȱSCREWȱGRȬ8ȱBȬZ/Pȱ3/8Ȭ16ȱXȱ1 BNH2528 34 44 NYLONȱSTEMȱBUTTONȱ12.5ȱDIA.ȱXȱ25ȱDIA.ȱXȱ2.8ȱmm BNH3284 2
18 BNH2908 2 45 LABELȬIMPORTANTȱFORȱSMOOTH
LABELȬWARNINGȱKEEPȱBODY,ȱHANDS,ȱ1ȱ1/2ȱXȱ2ȱ1/4
LABELȬCXTȬ225ȱEXERCISEȱCHARTȱ6ȱXȱ13Ȭ1/2
19
LABELȬWARNING_SERIOUSȱINJURYȱORȱDEATH
20
LABELȬWARRANTYȱLIGHTȱCOMMERCIAL
21
LABELȬWARNINGȱANCHORȱBOLT
22 BNH3089 2 49 LABELȬDANGERȱSAFETYȱSTOPS...ȱ BNH2904 2
FLATȱWASHERȱSAEȱBȬZ/Pȱ3/8Ȉ
23 BNH2524 56 50 LABELȬWARNINGȱTHEȱSMITHȱPRESSȱHOOKSȱMUSTȱBEȱ
NYLONȱBUSHINGȱ1ȱXȱ1ȱ1/2ȱXȱ7/8ȱXȱ1ȱ3/4ȱXȱ1/8
24 BNH0531 4 51 LABELȬTFIȱSERIALȱNO.ȱ2.5ȱXȱ1.5 BNH3147 1
GLIDEȱSTOPPERȱØ2.559ȱXȱ.945
25 BNH1932 2 52 LABELȬDANGERȱENGAGEȱSAFETYȱSTOPPER… BNH1848 2
26 BNH2037 2 53 LABELȬDANGERȱSECUREȱBARȱCATCHȱ(SIZEȱ4ȱXȱ2) BNH3003 1
HEXȱHEADȱCAPȱSCREWȱGRȬ5ȱZ/Pȱ3/8Ȭ16ȱXȱ1
27 BNH2044 3 54 LABELȬCXTȬ225ȱUPRIGHTȱNUMBERSȱ1ȱ1/8ȈȱXȱ65Ȉ BNH3154 2
HEXȱHEADȱCAP
ȱSCREWȱGRȬ5ȱZ/Pȱ3/8Ȭ16ȱXȱ2ȱ1/2
BNH3153
BNH3134
BNH3136
1 46 FACILITYȱSIGNȱBEȱALERT!ȱTHEȱFITNESSȱEQUIPMENT...
1 47 TFIȱEMBLEMȱ1.88ȱHIGHȱXȱ1.98ȱWIDEȱBLUEȱANDȱCHRO
1 48 LABELȬWARNINGȱTHISȱMACHINEȱISȱDESIGNEDȱTOȱBEȱ BNH3037 1
SOCKETȱSETȱSCREWȱALLOYȱ5/16Ȭ18ȱXȱ5/16 BNH1453 2
ȱ10Ȭ14ȱGA BNH0012 2
BNH3137
ȱPERFORMANCE... BNH2925 2
BNH3138
BNH4304 1
BNH3039 1
1
1
18
CXT-225 Smith Press Attachmentwww.tu stu tness.com
Page 19

Notes
CXT-225 Smith Press Attachment www.tu stu tness.com
21
Page 20

Basic Exercise Guide
Use this equipment only for the exercises as shown. Know your limitations. If you are new to weight training, always start
with lighter weight, learn how to perform the exercise correctly and train at a controlled rate of speed. Warm up properly with
stretchings, calisthenics or cardiovascular exercises. Never hold your breath – general rule of thumb is to exhale when you exert.
20
www.tu stu tness.com
CXT-225 Smith Press Attachment
Page 21

Page 22

LIGHT COMMERCIAL WARRANTY
This warranty applies only in the United St
TuffStuff brand name. TFI warrants to the original purchaser that TuffStuff equipment will be free from defects in material and workmanship.
All warranty periods begin to run from the date of purchase to the original purchaser. The warranty and remedies set forth herein are conditioned
upon proper storage
not manufactured by TFI or products which are altered without the express written consent of TFI.
, installation, use and maintenance and conformance with any recommendations of TFI. This warranty does not cover products
LIGHT COMMERCIAL WARRANTY:
TEN (10) Years: Structural main frames, welds, cams and
weight plates.
FIVE (5) Years: Pivot bearings, pulleys, bushings, guide rods
and gas shocks.
ONE (1) Year: Belts, linear bearings and pull-pin components.
All other parts not mentioned elsewhere in the warranty will expire one
(1) year from the date of purchase to the original purchaser.
SIX (6) Months: Upholstery, cables
Light Commercial Use:
Light Commercial Warranty applies to facilities like hotels, apartment complexes,
personal training studios, fire & police stations, etc. where the equipment
would be used by no more than 30 people per day.
ates to the products manufactured or distributed by TuffStuff Fitness International (TFI) under the
HOME LIFETIME WARRANTY:
LIFETIME of the equipment while owned by the original
purchaser (applies only to defects from manufacturer only).
This warranty does not cover:
1. TuffStuff products sold for and used in a commercial or
institutional environment.
2. Any damage, failure or loss caused by accident, misuse, neglect,
, finish and rubber grips.
abuse, improper assembly, improper maintenance, or failure to
follow instructions or w
warning labels posted on the machines.
3. Use of the product in a manner for which it was not designed.
4. Original product that is altered, or the use of replacement parts
and components of another manufacturer other than TuffStuff.
arnings in the owner’s manual and
The obligation of TFI under this warranty is limited to repairing or replacing warranted defective parts as TFI may elect, at TFI’s facilit
California, without charge to the purchaser. Purchaser is responsible for installation of repaired or replaced parts, and all transportation and
insurance costs on returned or replaced equipment to and from TFI’s facility in Chino.
THE FOREGOING SHALL CONSTITUTE THE SOLE REMEDY OF THE PURCHASER AND THE SOLE LIABILITY OF TFI WITH REGARD TO WARRANTY. NO IMPLIED STATUTORY
WARRANTY OR IMPLIED STATUTORY WARRANTY OF MERCHANTABILITY OR FITNESS FOR A PARTICULAR PURPOSE SHALL APPLY. IN NO EVENT, WHETHER AS A
RESULT OF BREACH OF CONTRACT, WARRANTY, NEGLIGENCE OR OTHERWISE, SHALL TFI BE LIABLE FOR SPECIAL, INCIDENTAL OR CONSEQUENTIAL DAMAGES
INCLUDING, BUT NOT LIMITED TO, LOSS OF PROFITS OR REVENUE, LOSS OF USE OF EQUIPMENT, COST OF CAPITAL, COST OF SUBSTITUTION EQUIPMENT, DOWNTIME
COST, OR CLAIMS OF CUSTOMERS OR PURCHASER FROM SUCH DAMAGE.
This written warranty is the final, complete and exclusive agreement of the parties with respect to the quality or performance of the equipment
and no action for breach of this written warranty or any implied warranty shall be commenced more than one (1) year after the accrual of the cause
of action. No modification of this warranty or waiver of
sentative of the party. Contact TuffStuff Fitness International at 13971 Norton Avenue, Chino, CA 91710, before returning any defective equipment.
This warranty gives you specific legal rights and you may also have other rights, which may vary from state to state.
its terms shall be binding on either party unless approved in writing by an authorized repre-
y in Chino,
SERIAL #
Write your Serial number here for future reference
TuStu Fitness International, Inc.
13971 Norton Avenue, Chino, CA 91710, USA Phone: 909-629-1600 Fax: 909-629-4967
www.tustutness.com service@tustu.net or service1@tustu.net
Purchase Date
Page 23

CXT-225 Smith Press Attachment
www.tu stu tness.com
19
44
34 13 40
31
32
12
32
31
25
39
24
3
24
14
1
16
10
37
36
23
27
38
8
37
15
39
3716 9
15
37
23
33
23
33
5
2342
17
17 42 23
35
23
28
23
422835
26
42
23
7
23
42
26
33
23
3323
32
31
11 40
13
34
41
32
31
25
39
24
2
24
39
14
6
1
23
42
17
23
42 17
4
33
23
36
38
23
27
33
23
2333
35
35
23
6
42
23 28 23
23
28
23 28
41
23
23
27
33
28
44
Exploded View
Remove CXT-200
Chin-up Bar
 Loading...