

Page 1
OWNER’S MANUAL
Maintenance & Assembly Instructions
IMPORTANT: KEEP THIS MANUAL FOR FUTURE REFERENCE
NOTICE
It is the Purchaser’s/Owner’s obligation:
1. To disclose and post all Rules & Regulations, Alert Sign, Wall Chart, Danger,
Warning and Caution labels axed on the machine to their customers/users.
2. Equipment to be installed by TuStu Authorized Dealer or a service
company approved by TuStu.
3. Provide trained personnel, supervision and correct usage of the equipment.
4. Provide scheduled inspection, maintenance & repairs and must be performed
by TuStu Authorized Dealer or a service company approved by TuStu.
5. Must use only genuine TuStu replacement parts.
6.
surface before use.
CT-8_Rev0
Revision Date 04-18-2013
Machine must be anchored to a solid and level
www.tuffstuffitness.com
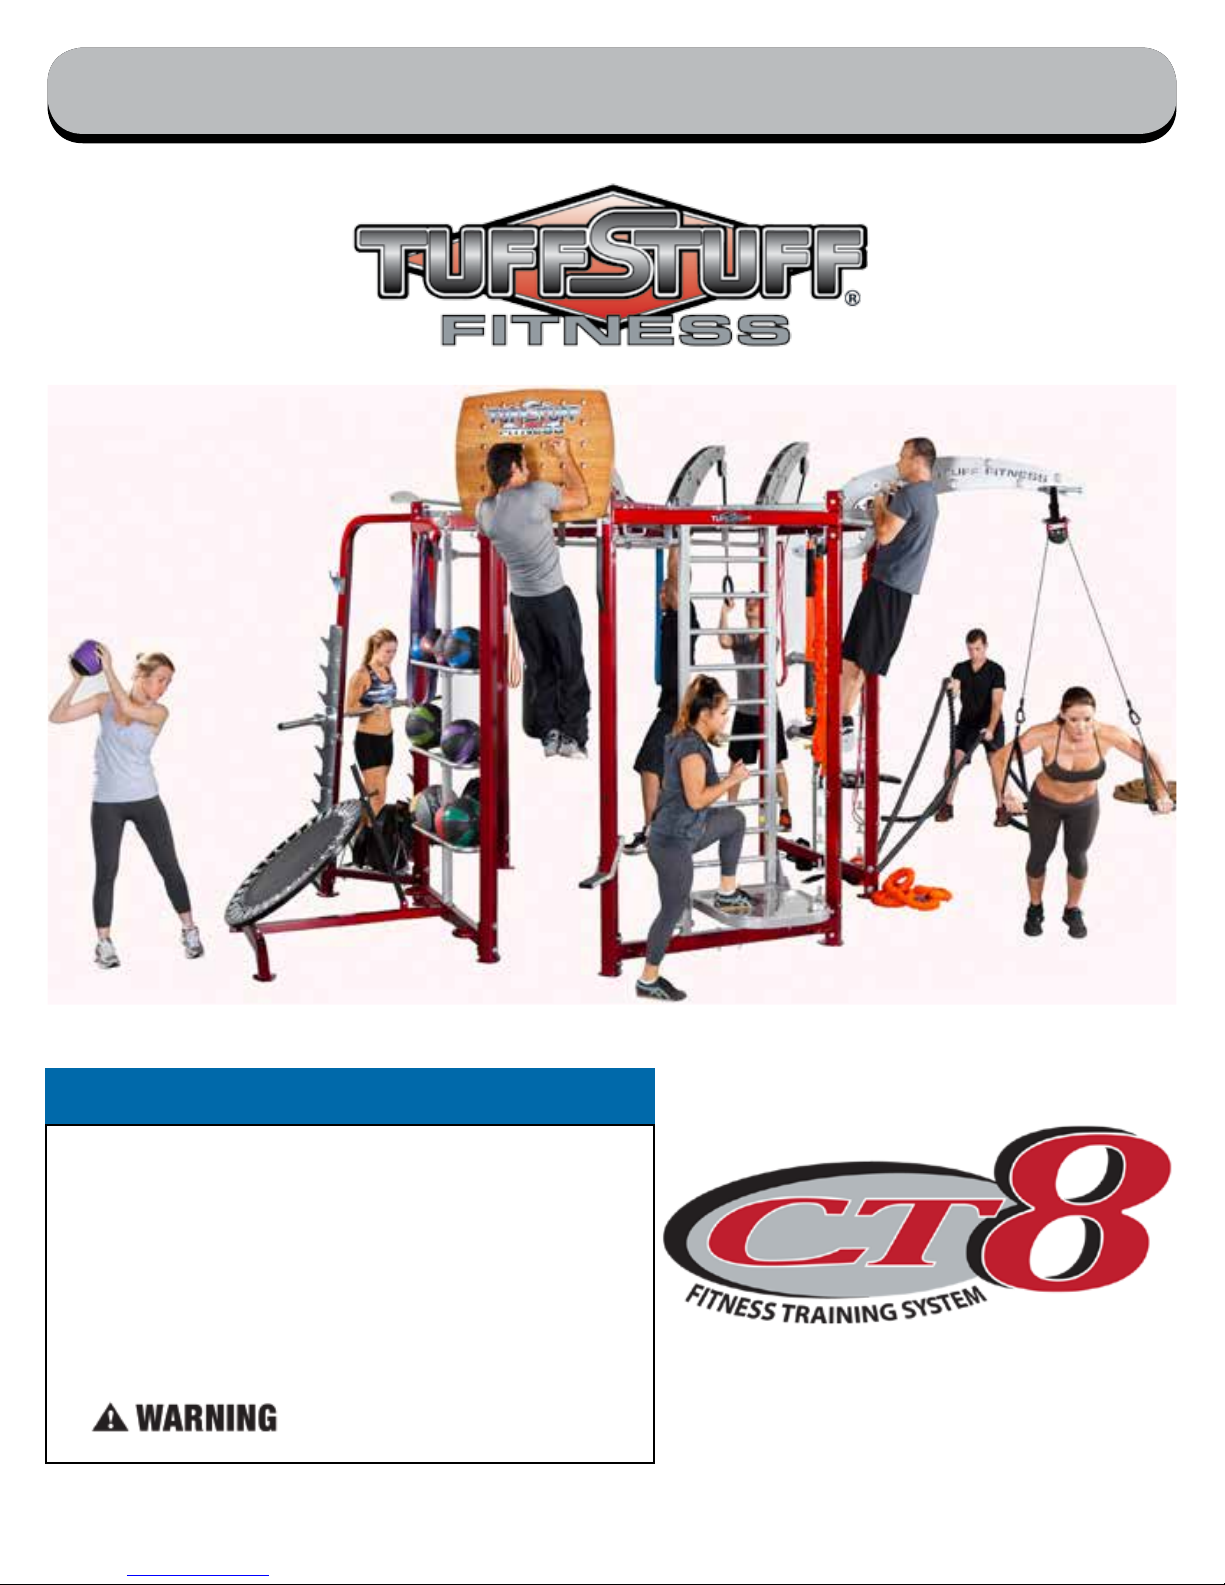
CT8
Fitness Training System
Page 2

Table of Contents
Important Safety Instructions ����������������������������������������������������������������������� Page 3
CT8 Concurrent Users and Weight Capacity����������������������������������Pages 4 - 5
CT-8000B Product Conguration Diagram ��������������������������������������������Page 6
CT-8100E Product Conguration Diagram ��������������������������������������������Page 7
Registration, Service & Assembly ����������������������������������������������������������������Page 8
Pre-Assembled Components ������������������������������������������������������������ Pages 9 - 13
Assembly Steps ������������������������������������������������������������������������������������Pages 14 - 43
CT-8000B Exploded View ����������������������������������������������������������������Pages 44 - 45
CT-8000B / CT-8100E Parts List ����������������������������������������������������� Pages 46 - 47
CT-8100E Exploded View ����������������������������������������������������������������Pages 48 - 49
CT-8210 Exploded View ����������������������������������������������������������������������������� Page 50
CT-8210 Parts List ����������������������������������������������������������������������������������������� Page 51
CT-8220 Exploded View ����������������������������������������������������������������������������� Page 52
CT-8220 Parts List ����������������������������������������������������������������������������������������� Page 53
CT-8230 Exploded View ����������������������������������������������������������������������������� Page 54
CT-8230 Parts List ����������������������������������������������������������������������������������������� Page 55
CT-8240 Exploded View ����������������������������������������������������������������������������� Page 56
CT-8240 Parts List ����������������������������������������������������������������������������������������� Page 57
CT-8250 Exploded View ����������������������������������������������������������������������������� Page 58
CT-8250 Parts List ����������������������������������������������������������������������������������������� Page 59
CT-8310 Exploded View ����������������������������������������������������������������������������� Page 60
CT-8310 Parts List ����������������������������������������������������������������������������������������� Page 61
CT-8320 Exploded View / Parts List �������������������������������������������������������� Page 62
CT-8330 Exploded View / Parts List �������������������������������������������������������� Page 63
CT-8340 Exploded View / Parts List �������������������������������������������������������� Page 64
Inspection / Maintenance ��������������������������������������������������������������������������� Page 65
DANGER, WARNING, & CAUTION Labels Information ������������� Pages 66 - 78
DVD W/Case CT8
Basic Exercise Guide
2 CT8 Fitness Training System
www.tuffstuffitness.com
CT8 Basic Exercise Manual
Page 3
Important Safety Instructions
It is the responsibility of the facility owner and/or owner of the equipment to review the Owner’s Manual, Exercise Manual/ DVD and Wall
Chart with their facility personnel and understand all Danger, Warning and Caution labels axed on the machine. It is the responsibility of
the oor personnel to instruct users on proper operation of the equipment and review all danger, warning and caution labels.
SERIOUS INJURY OR DEATH CAN OCCUR IF
THESE SAFETY PRECAUTIONS ARE NOT OBSERVED:
1. Obtain a medical exam before beginning any exercise program.
2. Read and understand Owner’s Manual, Exercise Manual/DVD, Wall
Chart and all Danger, Warning and Caution labels before using
this equipment. If you still need help, seek assistance from oor
personnel.
3. Inspect the equipment before each use for wear and tear, loose
ttings, worn or frayed cables and frame welds. DO NOT USE if it
appears to be inoperable or damaged.
4. Stop exercising if you feel faint or dizzy. Consult a physician if you are
experiencing pain.
5. Keep body, clothing and hair clear from all moving parts. Do not
attempt to free any jammed parts by yourself.
6. Always warm-up before and cool-down after weight training.
Warm-up for 10-15 minutes with stretching and cardiovascular
exercises. Cool-down should include light stretching exercises for
5-15 minutes.
7. Never hold your breath – will limit the ow of oxygen to your brain
and may cause dizziness. The most often used breathing pattern
is inhaling during least resistance and exhaling during maximum
resistance.
8. Do not use accessories or accessory attachments that are not
recommended by TuStu.
9. Do not use the Safety Spotters for racking the bar. Always use the
Bar Catches.
10. Make sure adjustment pull-pins are completely inserted and fully
engaged before each use.
Facility Safety Guidelines and Practices
1. Read and understand the Owner’s Manual before assembling,
servicing or using the equipment.
2. Equipment to be installed by TuStu Authorized Dealer or by a
Professional Service Company approved by TuStu.
3. Make sure each machine is set up and operated on a solid level
surface. Do not install equipment on an uneven surface.
4. Anchoring of equipment must be completed at time of
installation by a licensed contractor and inspected prior to use. Failure
to anchor the machine to the oor could cause the machine to tip or
fall over due to incorrect usage and misuse, and could result in serious
injury or death.
5. Provide an adequate safety perimeter between the machine, walls and
other equipment to ensure that the facility has proper clearance for
usage and training.
6. Post and disclose all safety, rules and regulations on a bulletin board
easily accessible to users.
7. Perform regular maintenance (see Inspection Label). Pay special attention to areas most susceptible to wear and tear.
8. Children must not be allowed near the equipment. Teenager must
be supervised.
9. Replace immediately all parts at rst sign of wear or damage. If unable
to replace worn or damaged components/parts, remove machine from
service until the repair is made.
10. Use only genuine TuStu replacement parts. Failure to do so will void
warranty and could result in serious injury or death to the users.
11. Do not remove any LABELs axed to the machine. Replace if
damaged.
12. Maintain a service contract with a TuStu Authorized Dealer or a
Professional Service Company approved by TuStu. Keep a service
log of all maintenance and repair activities. NOTICE: It is the sole
responsiblity of the owner or facility operator to ensure that regular
maintenance is performed.
DANGER: indicates an imminently hazardous situation which, if not
avoided, will result in death or serious injury.
WARNING: indicates a potentially hazardous situation which, if not
avoided, will result in death or serious injury.
CAUTION: indicates a hazardous situation which, if not avoided, could
result in minor or moderate injury.
www.tuffstuffitness.com
3CT8 Fitness Training System
Page 4
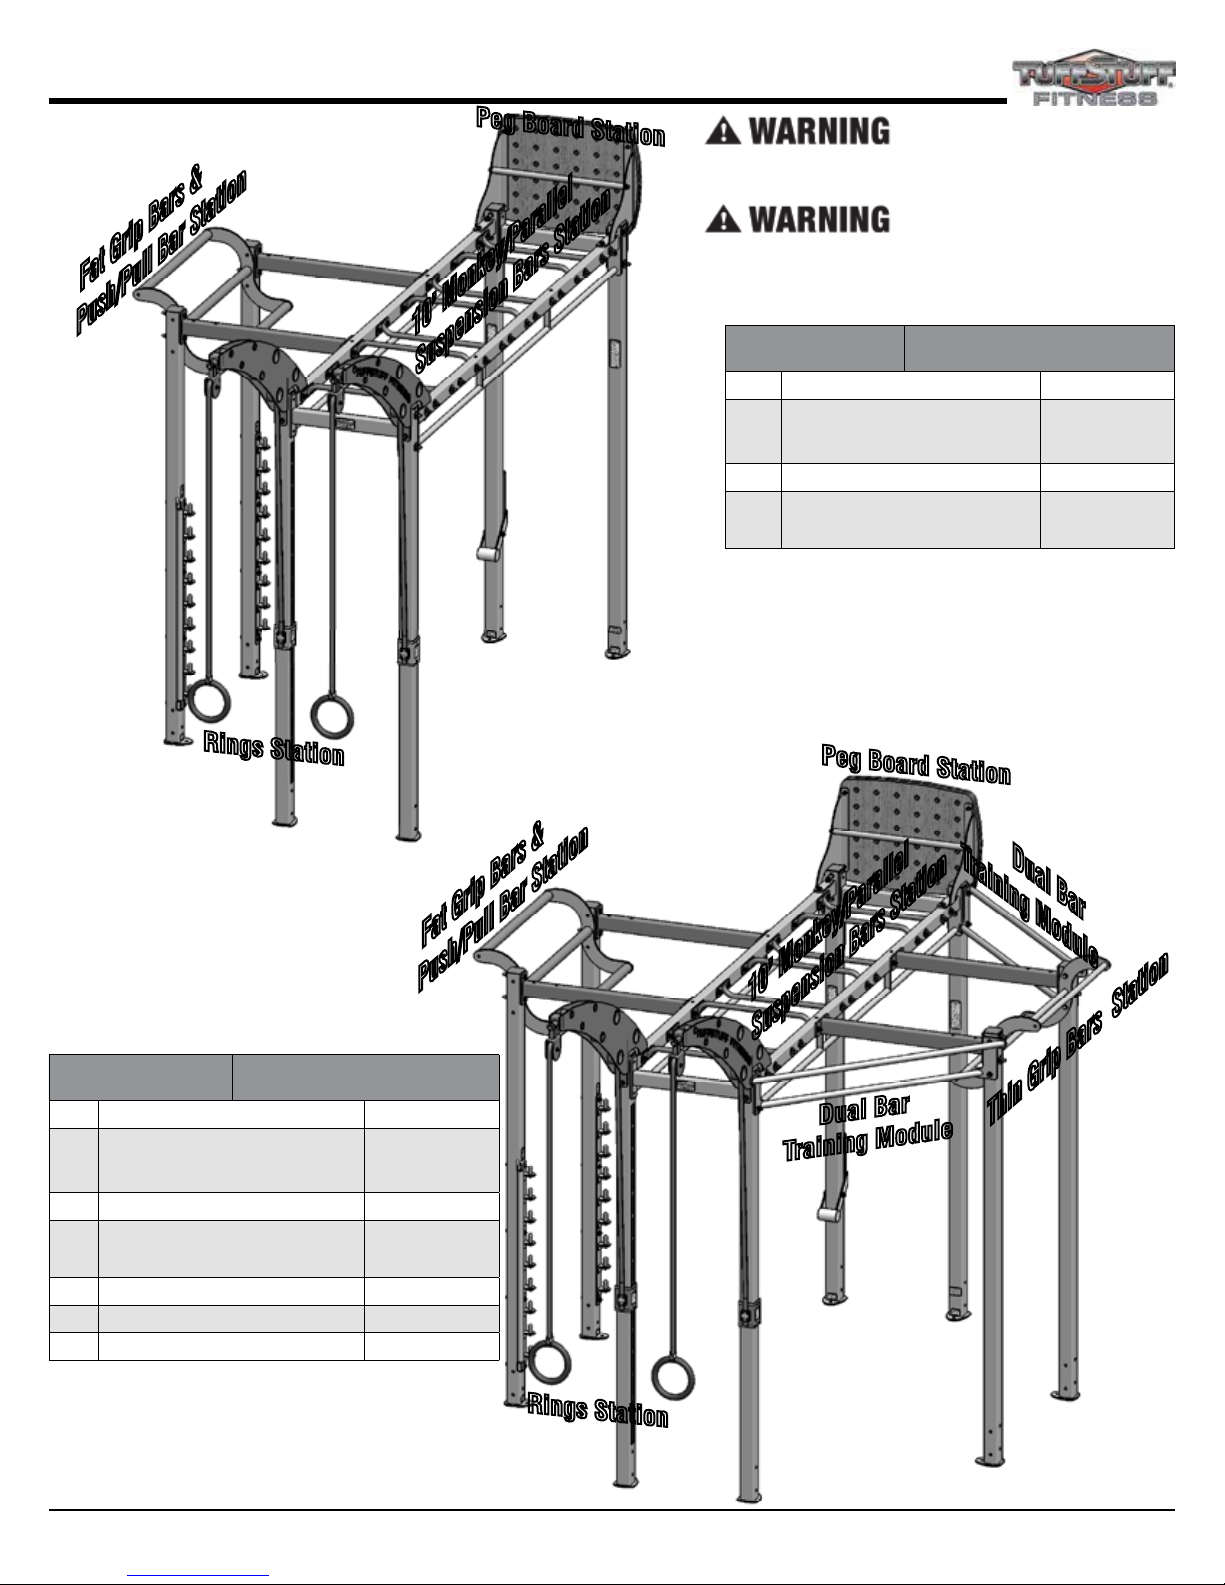
CT8 Concurrent Users and Weight Capacity
Fat Grip Bars &
Push/Pull Bar Station
Peg Board Station
to a solid and level surface before use.
Number of Concurrent Users nor the Maximum
Weight Capacity for each Module or Station.
10’ Monkey/Parallel
Concurrent Users Maximum Weight Capacity
Suspension Bars Station
Machine must be anchored
DO NOT exceed the
1 Rings Station 400 lbs
10’ Monkey/Parallel
5
Suspension Bars Station
1 Peg Board Station 300 lbs
Fat Grip Bars & Push/Pull
1
Bar Station
300 lbs /
per User
350 lbs
Rings Station
CT-8000B
Base Fitness Trainer
Fat Grip Bars &
Push/Pull Bar Station
Concurrent Users Maximum Weight Capacity
1 Rings Station 400 lbs
10’ Monkey/Parallel
5
Suspension Bars Station
1 Peg Board Station 300 lbs
Fat Grip Bars & Push/Pull
1
Bar Station
1 Thin Grip Bars Station 300 lbs
1 Dual Bar Training Module 300 lbs
1 Dual Bar Training Module 300 lbs
300 lbs /
per User
350 lbs
Peg Board Station
Dual Bar
Training Module
10’ Monkey/Parallel
Suspension Bars Station
Dual Bar
Training Module
Thin Grip Bars Station
CT-8100E
Elite Fitness Trainer
4 CT8 Fitness Training System
www.tuffstuffitness.com
Rings Station
Page 5
CT8 Concurrent Users and Weight Capacity
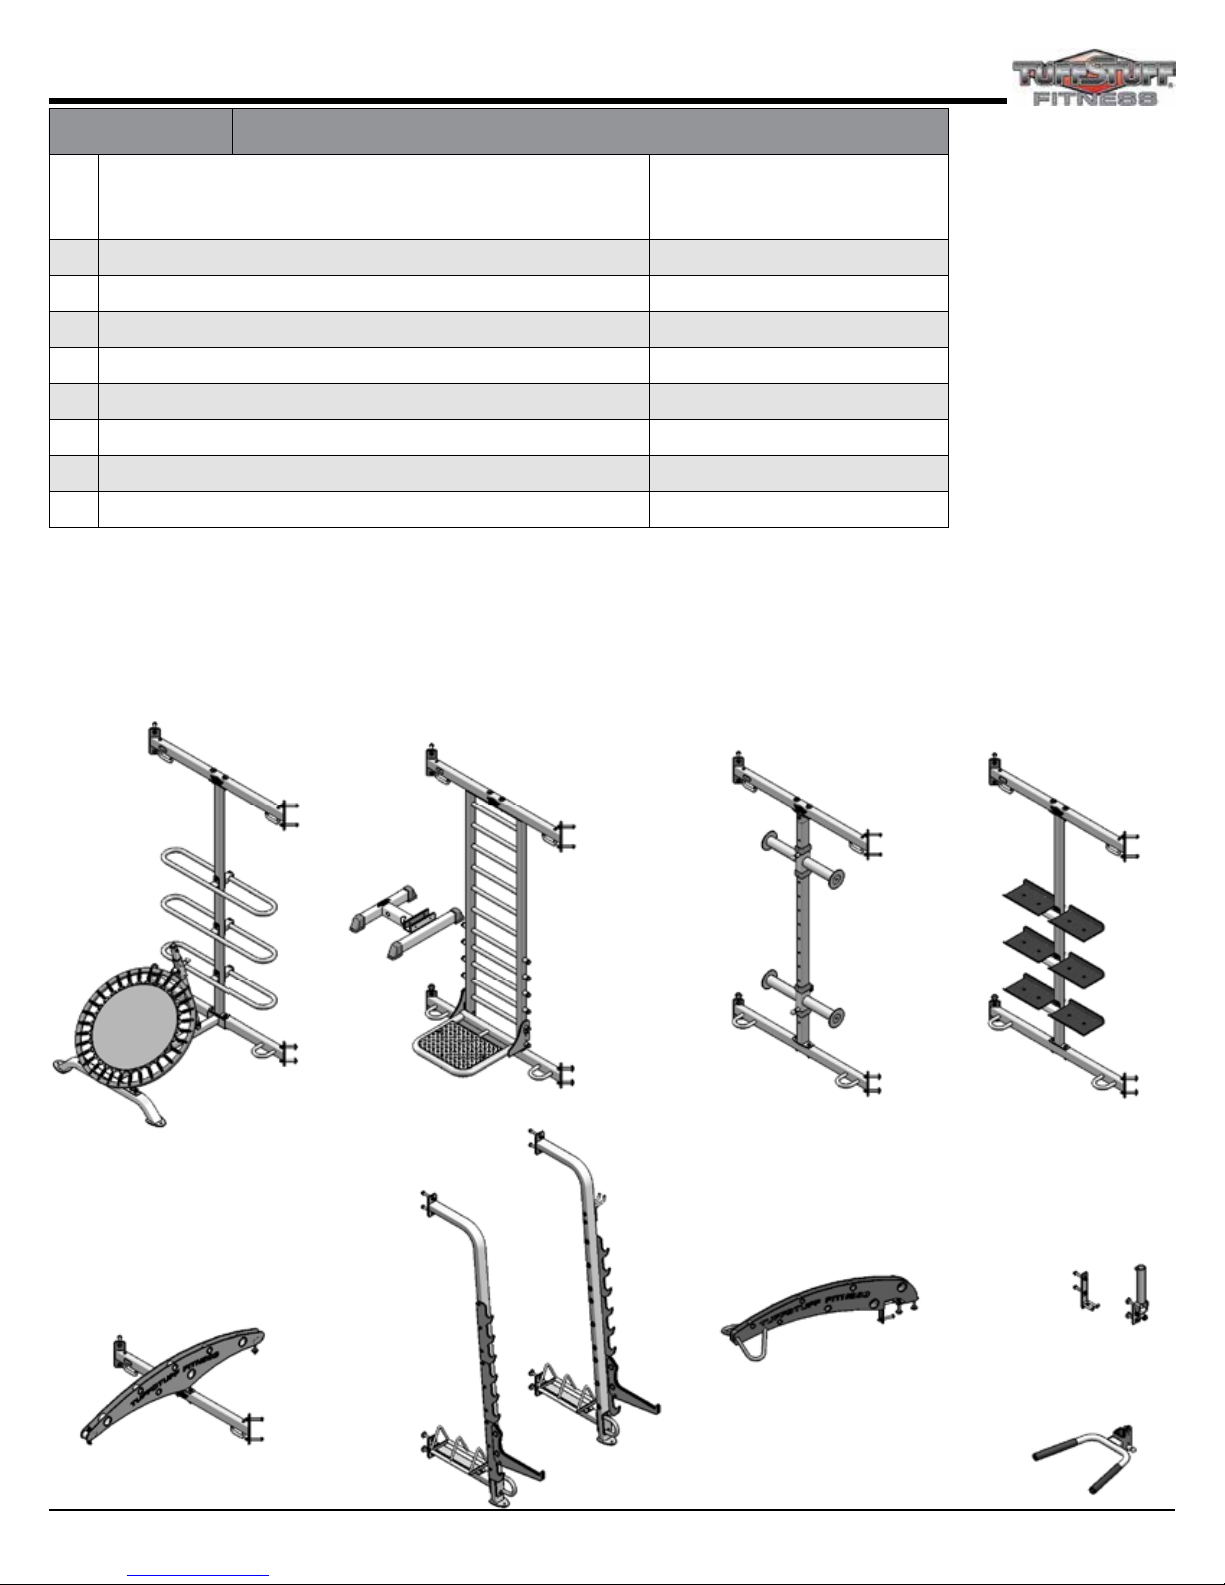
Concurrent Users Maximum Weight Capacity
1 CT-8210 Medicine Ball Rebounder Training Module
1 CT-8220 Adjustable Step-Up/Stretch Training Module 500 lbs
1 CT-8230 Battle Rope Training Module 300 lbs / per Side
1 CT-8240 Kettle Bell Training Module 80 lbs / per Saddle Plate (Tray)
1 CT-8250 Heavy Bag Training Module 200 lbs
1 CT-8310 Squat/Press Racking Station 500 lbs
2 CT-8320 Multi-Strap Training Boom 250 lbs / per User
1 CT-8330 Olympic Bar Landmine 250 lbs
1 CT-8340 Dip Handles 350 lbs
CT-8210
Medicine Ball Rebounder
Training Module
CT-8220
Adjustable Step-Up/Stretch
Training Module
10 lbs Medicine Balls
80 lbs /per Medicine Ball Rack
CT-8230
Battle Rope
Training Module
CT-8240
Kettle Bell
Training Module
CT-8310
Squat/Press
Racking Station
CT-8250
Heavy Bag
Training Module
CT-8320
Multi-Strap
Training Boom
www.tuffstuffitness.com
CT-8330
Olympic Bar Landmine
CT-8340
Dip Handles
5CT8 Fitness Training System
Page 6
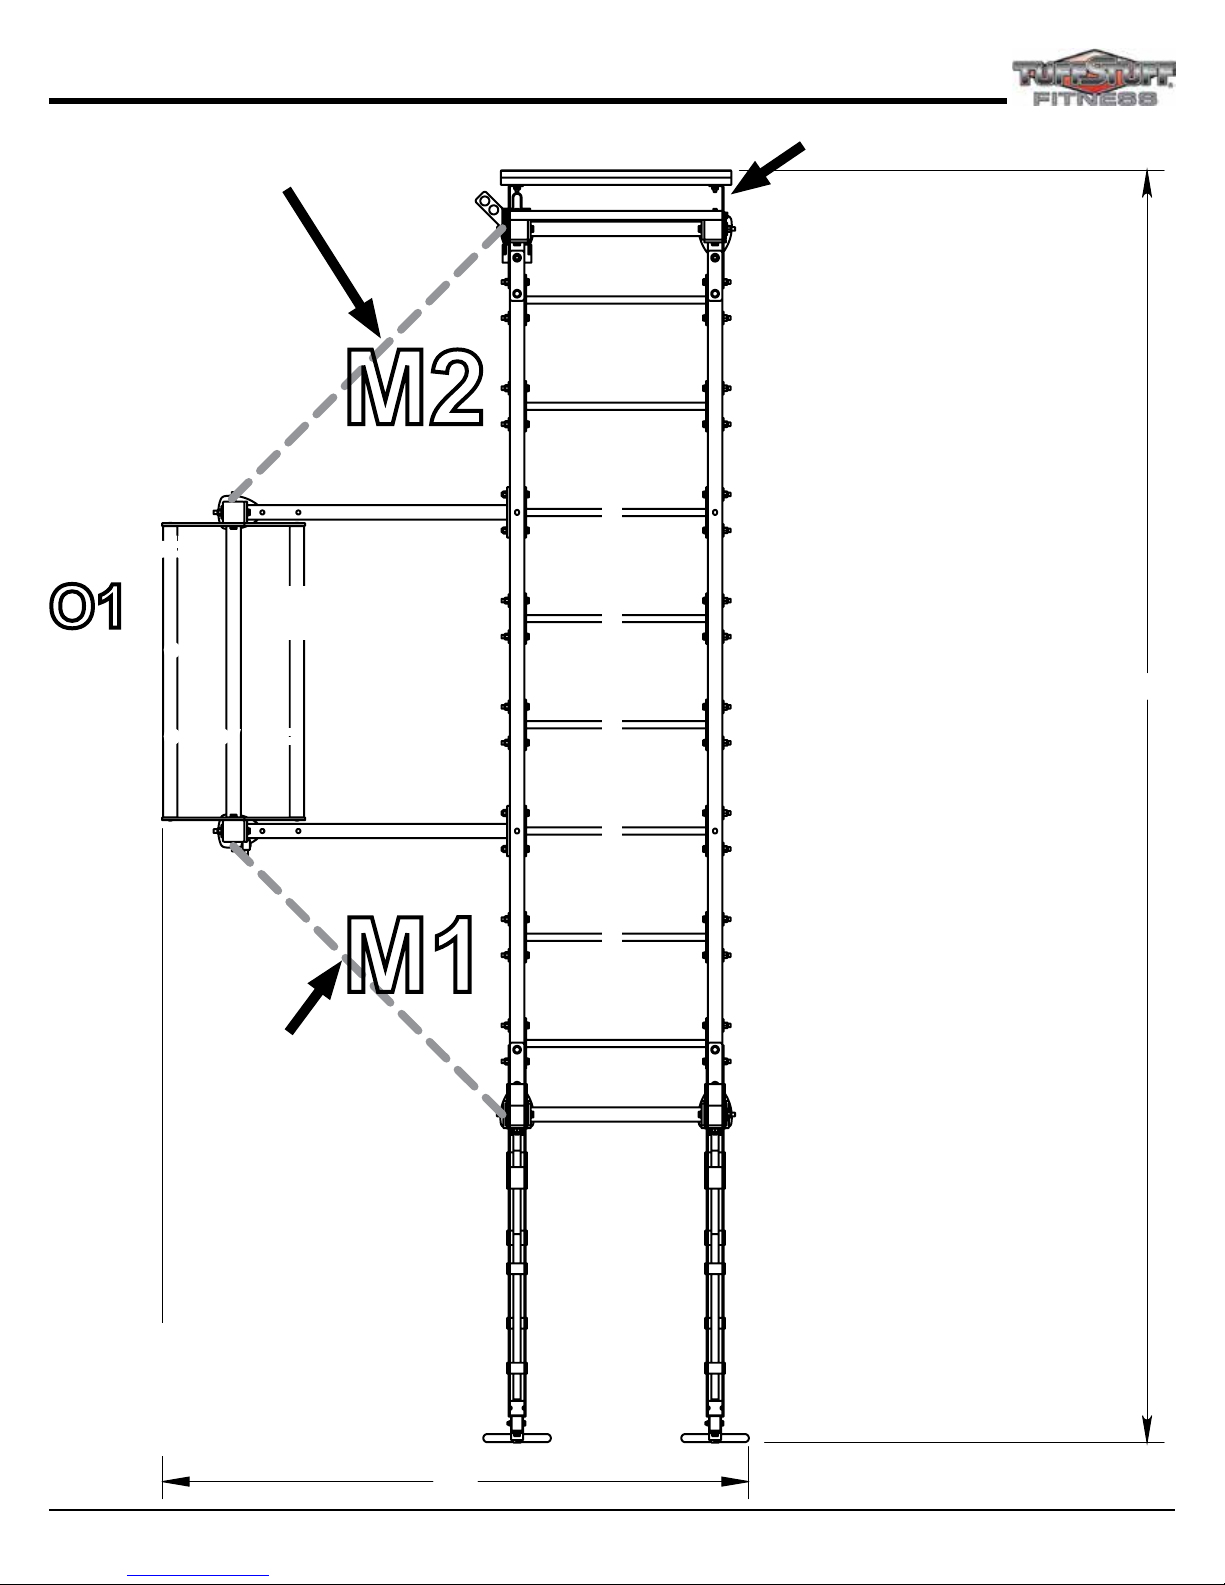
CT-8000B Product Configuration Diagram
Choice of one (1)
Required Training
Module:
• CT-8210
• CT-8220
• CT-8230
• CT-8240
• CT-8250
Option Station
Fat Grip Bars &
O1
Choice of one:
• CT-8310
or
Choice of one or two:
• CT-8320
• CT-8330
Push/Pull Bar
M2
Peg Board
CT-8340 Dip Handles
177"
10’ Monkey/Parallel Suspension Bars
M1
Choice of one (1)
Required Training
Module:
• CT-8210
• CT-8220
• CT-8230
• CT-8240
• CT-8250
Height: 117”
Weight: 1085 lbs
Space and weight will vary
depending on modules and
accessories selected
82"
6 CT8 Fitness Training System
www.tuffstuffitness.com
Rings
Page 7
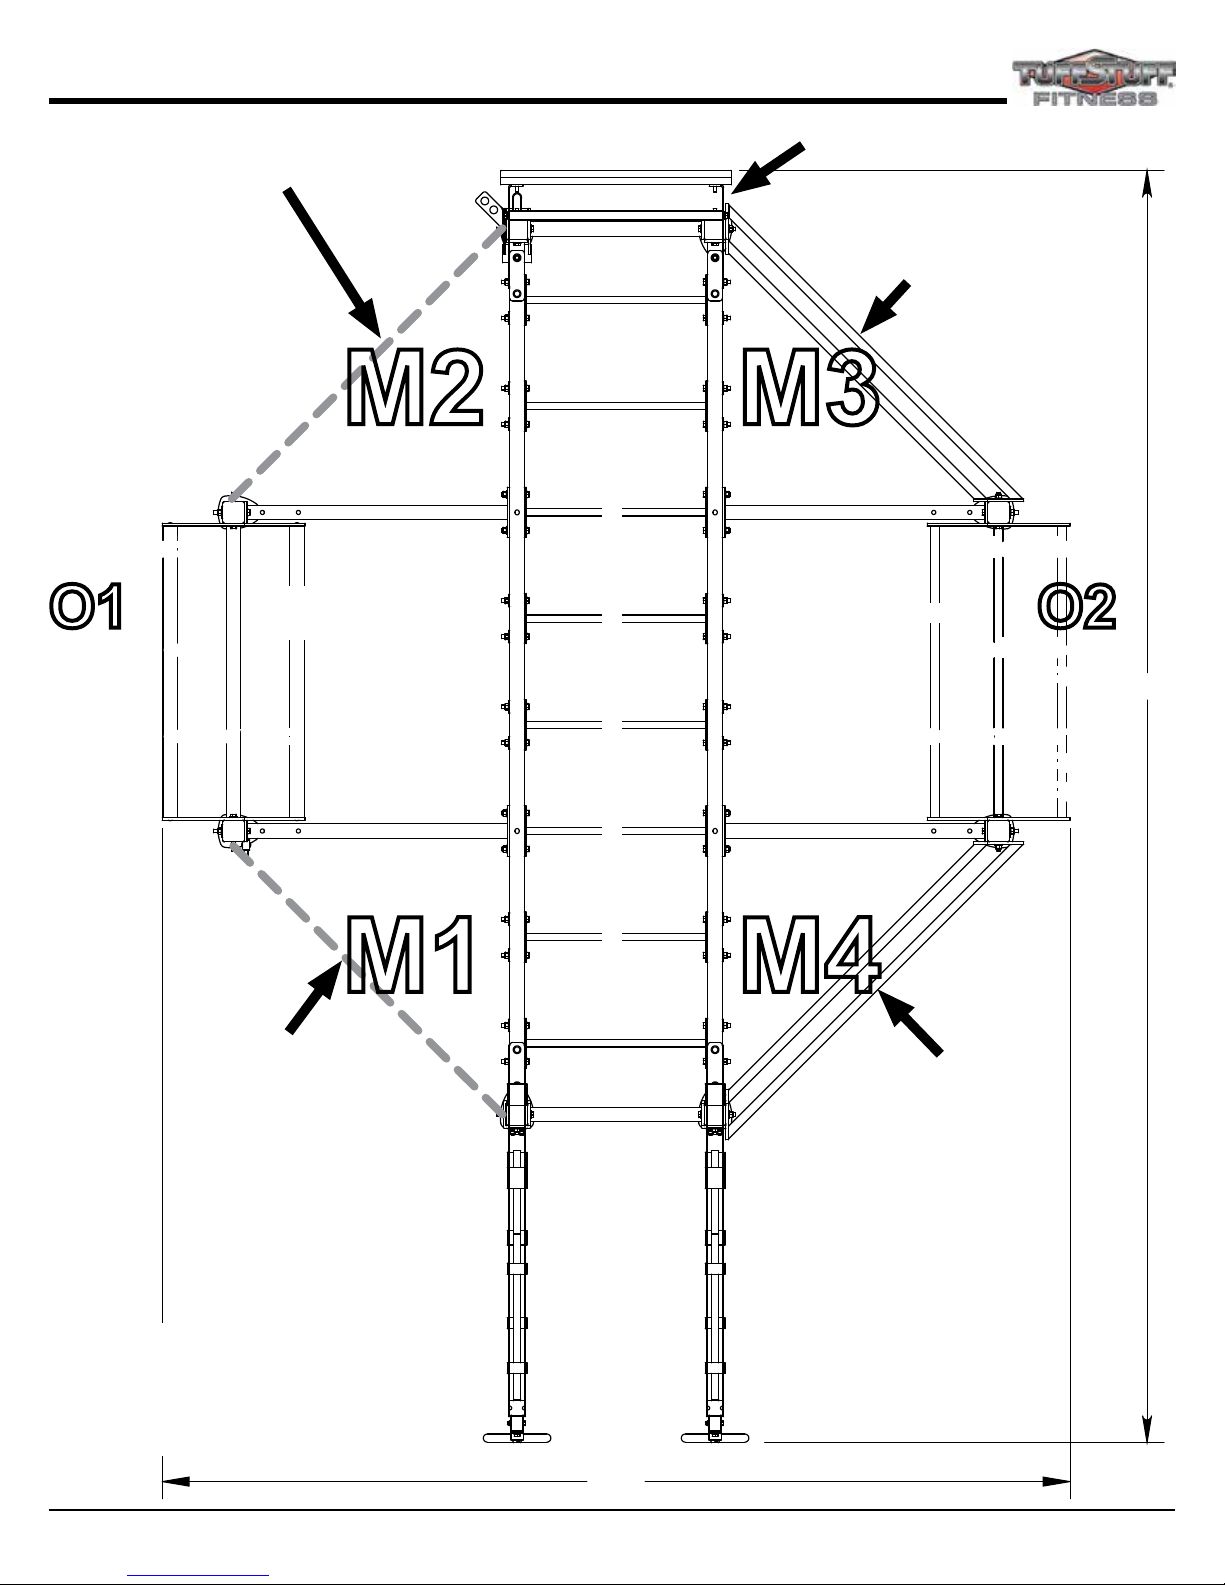
CT-8100E Product Configuration Diagram
Choice of one (1)
Required Training
Module:
• CT-8210
• CT-8220
• CT-8230
• CT-8240
• CT-8250
Option Station
Fat Grip Bars &
O1
Choice of one:
• CT-8310
or
Choice of one or two:
• CT-8320
• CT-8330
Push/Pull Bar
Peg Board
CT-8340 Dip Handles
Dual Bar Training Module
(Standard). Can be replace by
any of the following training
M3M2
Thin Grip Bars
modules as option:
• CT-8210
• CT-8220
• CT-8230
• CT-8240
• CT-8250
Option Station
O2
Choice of one:
• CT-8310
or
Choice of one or two:
• CT-8320
• CT-8330
177"
Choice of one (1)
Required Training
Module:
• CT-8210
• CT-8220
• CT-8230
• CT-8240
• CT-8250
Height: 117”
Weight: 1350 lbs
Space and weight will vary
depending on modules and
accessories selected
M1
10’ Monkey/Parallel Suspension Bars
M4
Dual Bar
Training Module
(Standard). Can
be replace by any of
the following training
modules as option:
• CT-8210
• CT-8220
• CT-8230
Rings
126"
www.tuffstuffitness.com
• CT-8240
• CT-8250
7CT8 Fitness Training System
Page 8
Loosely Tighten
Fully Tighten
Remove
Registration, Service & Assembly
Thank you for purchasing the CT8 Fitness Training System. This machine is part of the TuStu line of quality strength training equipment.
To maximize your use of the equipment, please study the Owner’s Manual thoroughly.
Registration
To avoid unnecessary delays on warranty parts and to insure that a
permanent record of your purchase is on le with our company, be
sure to register online at:
http://www.tustutness.com/productregistration.jsp
within 10 days of purchase.
Obtaining Service
Please use this Owner’s Manual as your guide to all parts included in
your shipment. When ordering parts, you must specify the part number
and description from this manual. Use only genuine TuStu
replacement parts when servicing the equipment. Failure to do
so will void warranty and could result in serious injury or death.
For information about product operation or service:
Phone: 909-629-1600 Toll Free 888-884-8275
Fax: 909-629-4967
E-mail: service@tustu.net or service1@tustu.net
Hours: M–F 8:00 – 4:30 PST
Or write to: TuStu Fitness Equipment Inc.
Customer Service
13971 Norton Avenue, Chino, CA 91710
Retain this Owner’s Manual for future reference when ordering
service or parts. To assist you better, please be prepared to
provide the following information:
1. Model Number 2. Place of Purchase
3. Serial Number 4. Part # and Description
• Allow ample space around the machine for safe unrestricted use and
easier access.
• Insert all bolts in the same direction. For aesthetic appearance, insert
all bolts in the same direction unless specied (in text or illustration) to
do otherwise.
• Leave room for adjustments. Do not fully tighten fasteners until
instructed in the assembly steps to do so (to prevent any diculty with
alignment of parts during the assembly process). When not instructed,
tighten fasteners such as bolts, nuts and screws so the unit is stable,
but leave room for adjustments.
Assembly Tips
Read all “Notes” on each page before beginning each step.
While you may be able to assemble the CT8 using the illustrations only,
IMPORTANT safety notes and other tips are included in the text.
Some pieces may have extra holes that you will not use. Use only those
holes indicated in the instructions and illustration.
NOTE: With so many assembled parts, proper alignment and adjustment
is critical. While tightening the nuts and bolts, be sure to leave room for
nal adjustments.
CAUTION: Obtain assistance from TuStu if you have diculty
assemblying the CT8. Please do not attempt to complete the assembly as
this could result in equipment failure and serious injuries to the users.
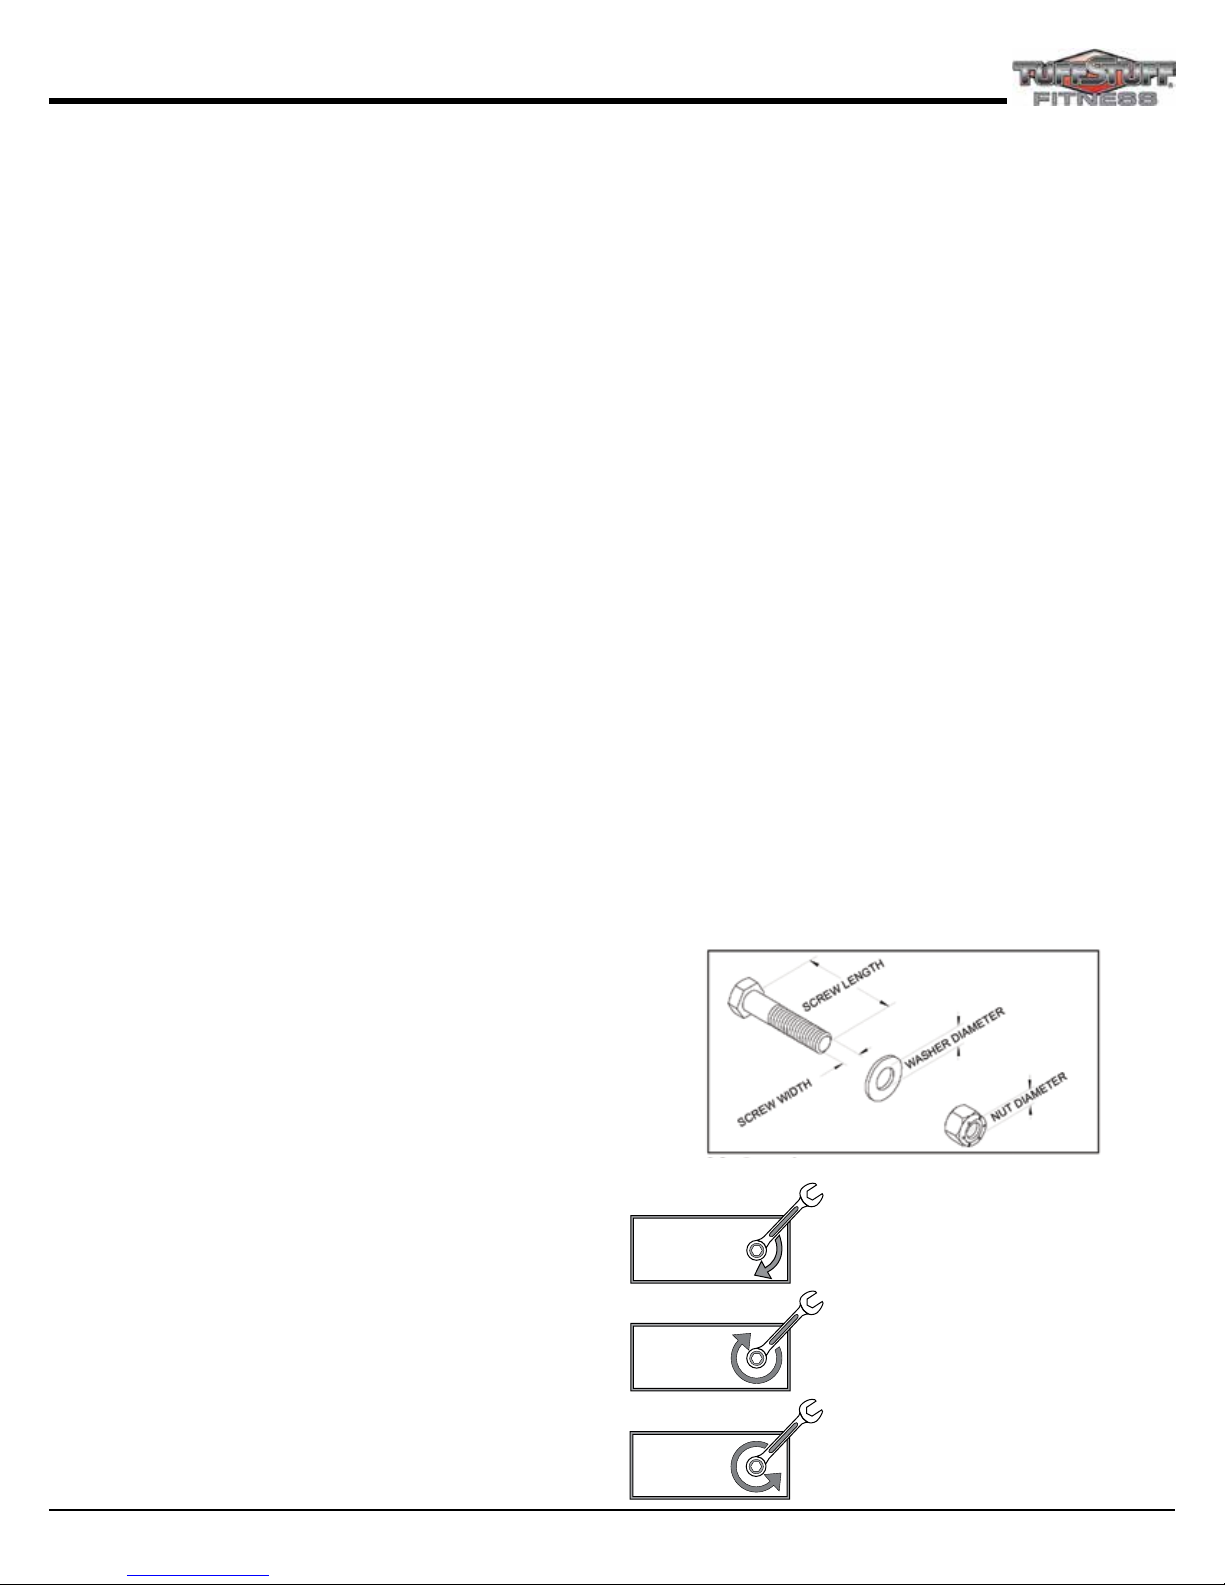
Symbols & Description
Required Tools
The basic tools that you will need to assemble the CT8 but are not limited
to:
• 7/16” ,1/2”, 9/16”, 3/4” Combination Wrenches
• Ratchet Wrench with 7/16” ,1/2”, 9/16”, 3/4” sockets
• Crescent Adjustable Wrench
• Two Strong Step Ladders
• Level
• Rubber mallet, measuring tape & utility knife
• Windex or household glass cleaner
Assembly Requirements
• A minimum of three strong persons are required for this assembly.
• Follow these installation requirements when assemblying the CT8.
• Layout your oor plan before assemblying.
• Set up the CT8 on a clean, solid, at surface. A smooth, at surface
under the machine helps keep it level.
8 CT8 Fitness Training System
www.tuffstuffitness.com
70%
100%
100%
Loosely Fasten
Loosely tighten all hardware in this step. DO NOT Fully
Tighten. Some component(s) may need pre-assembly
and or alignment during the assembly process.
Fully Tighten
Wrench tighten all hardware in this step.
Remove
Remove hardware assemblies completely to allow
nishing successive assembly steps.
Page 9
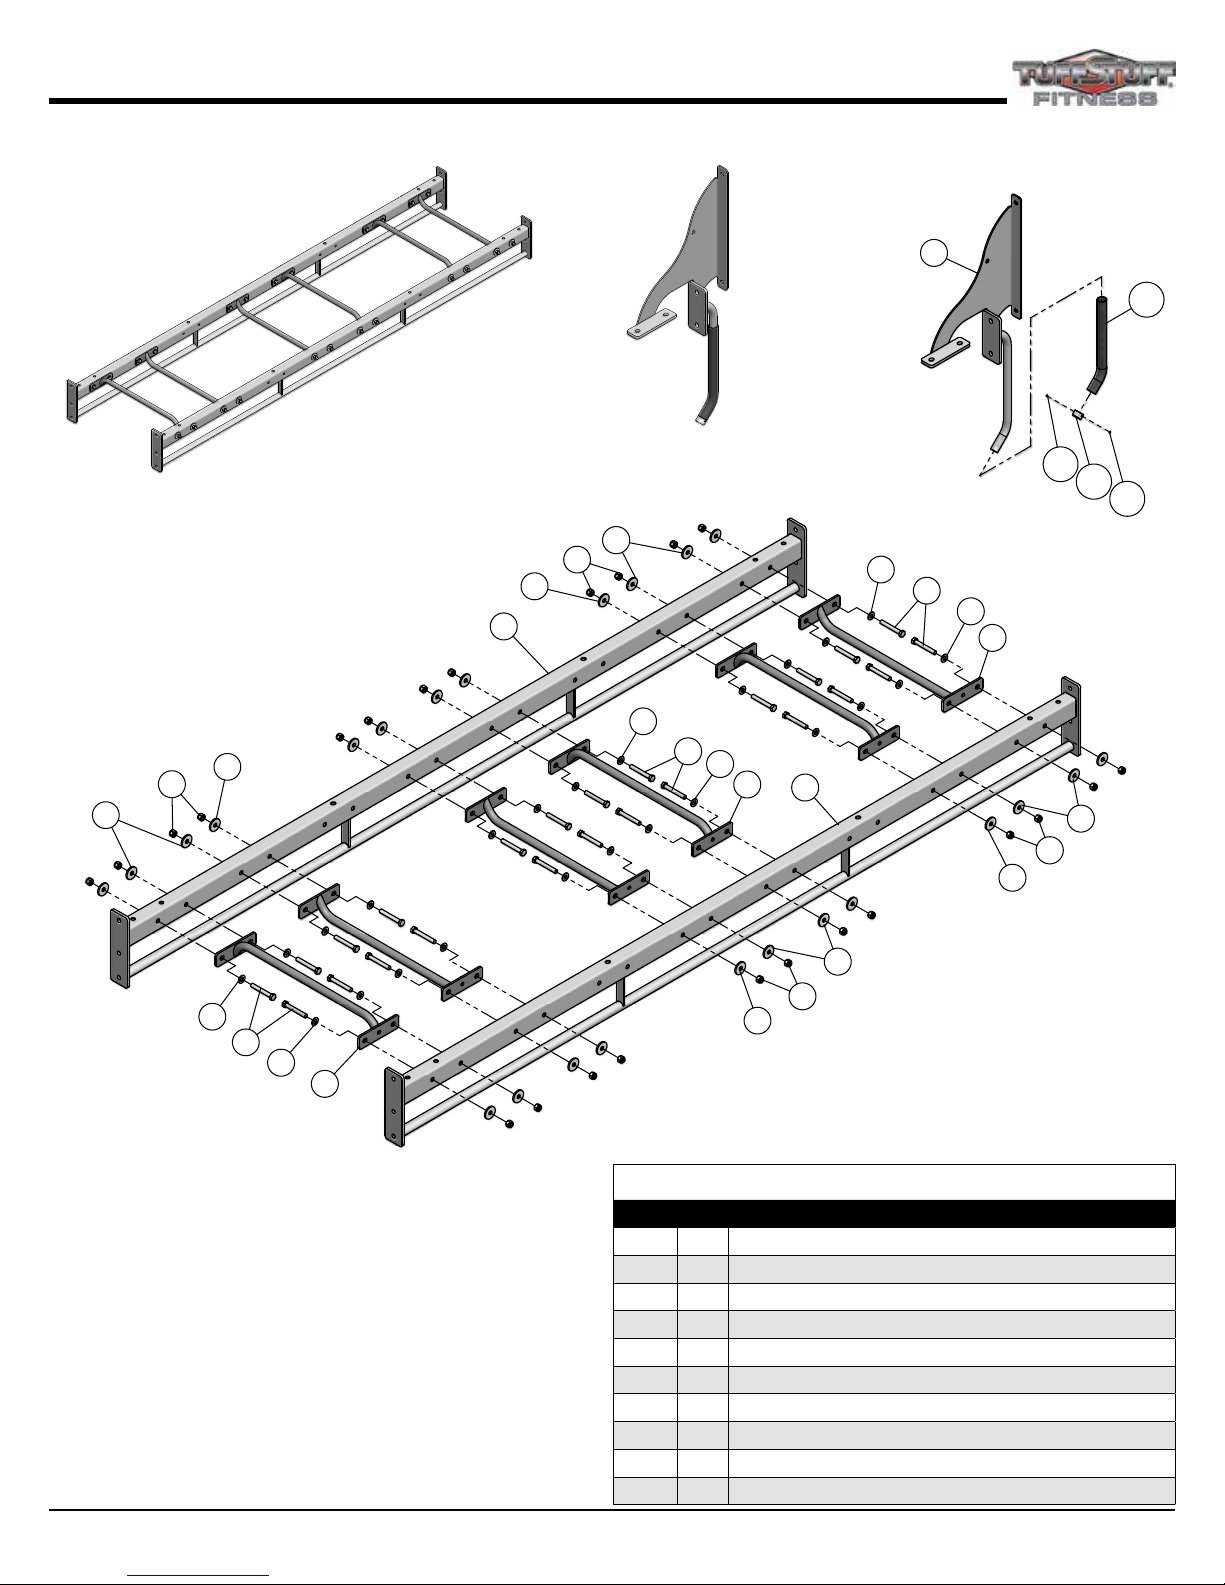
Pre-Assembled Components
Assembled View Assembled View
81
10
98
23
116
122
105
122
81
77
84
77
12
81
98
77
81
84
77
12
77
84
77
12
10
81
98
81
81
98
81
Pre-Assembled Components List
Item Qty. Description
10 2 TOP CROSS BRACE 120"
12 6 MONKEY HANDLE BAR 25 1/2"
23 1 PEG BOARD SIDE FRAME WITH HANDLE
77 24 FLAT WASHER SAE, 1/2"
81 24 FLAT WASHER, 1/2 X 1 3/4 X 3/16
84 24 HEX HEAD CAP SCREW, 1/2-13 X 3 1/2
98 24 NYLON LOCK NUT, 1/2-13
105 1 ALUMINUM CAP 1.020" RD
116 1 RUBBER FLAT TUBE .94 ID X .115 WALL X 15
122 2 SOCKET SET SCREW Z/P 10-32 X 1/8
www.tuffstuffitness.com
9CT8 Fitness Training System
Page 10
Pre-Assembled Components
Assembled View
98
77
77
2
108
136
92
75
62
110
110
77
90
77
77
15
90
77
112
122
9
108
81
98
81
110
81
98
81
Pre-Assembled Components List
Item Qty. Description
2 2 UPRIGHT POST 95 1/4", RINGS SECTION
9 1 TOP CROSS BRACE 24 1/2"
12 1 MONKEY HANDLE BAR 25 1/2"
15 15 ADJUSTABLE SLIDE CARRIAGE 5"
62 2 BELT RETAINER PLATE
75 8 FLAT WASHER SAE, #12 (1/4")
77 10 FLAT WASHER SAE, 1/2"
81 6 FLAT WASHER, 1/2 X 1 3/4 X 3/16
88 4 HEX HEAD CAP SCREW, 1/2-13 X 4 1/2
90 4 HEX HEAD CAP SCREW, 1/2-13 X 4 3/4
92 8 HEX HEAD CAP SCREW, 1/4-20 X 1
98 8 NYLON LOCK NUT, 1/2-13
108 8 PLASTIC INSERT CAP 3" SQ 10-14 GA
110 4 PLASTIC TUBE GUIDE W/LIP-TEETH 3 1/2 X 3 1/2
112 2 PULL PIN 1/2 X 2 7/8 STIFF SPRING (STEEL KNOB)
122 2 SOCKET SET SCREW Z/P 10-32 X 1/8
136 8 SPLIT LOCK WASHER B-Z/P 1/4”
12
136
92
77
75
88
122
62
77
77
112
2
15
110
88
77
81
98
81
10 CT8 Fitness Training System
www.tuffstuffitness.com
Page 11
Pre-Assembled Components
Assembled View
98
77
77
3
108
77
117
90
77
90
77
77
106
9
108
81
98
81
4
98
81
Pre-Assembled Components List
Item Qty. Description
3 1 UPRIGHT POST 95 1/4", PEGBOARD SECTION
4 1 UPRIGHT POST 95 1/4", DIP SECTION
9 1 TOP CROSS BRACE 24 1/2"
12 1 MONKEY HANDLE BAR 25 1/2"
27 1 PEG BOARD STEP UP FRAME
77 12 FLAT WASHER SAE, 1/2"
81 6 FLAT WASHER, 1/2 X 1 3/4 X 3/16
88 4 HEX HEAD CAP SCREW, 1/2-13 X 4 1/2
89 1 HEX HEAD CAP SCREW, 1/2-13 X 4 1/4
90 4 HEX HEAD CAP SCREW, 1/2-13 X 4 3/4
96 1 NYLON JAM LOCK NUT, 1/2-13
98 8 NYLON LOCK NUT, 1/2-13
106 1 PLASTIC INSERT CAP 1" X 3" _ 11 GA
108 2 PLASTIC INSERT CAP 3" SQ 10-14 GA
117 1 SAFETY TAPE ANTI-SLIP 4 X 9
127 2 URETHANE BUMPER 962
81
12
89
77
77
27
77
88
127
88
77
77
77
www.tuffstuffitness.com
127
96
81
98
81
11CT8 Fitness Training System
Page 12
Pre-Assembled Components
Assembled View
87
81
108
5
20
108
5
19
87
81
21
87
81
77
98
87
81
77
98
77
98
77
98
Pre-Assembled Components List
Item Qty. Description
5 2 UPRIGHT POST 95 1/4", REVERSE CHIN-UP
19 1 REVERSE CHIN UP SIDE RACK
20 1 REVERSE CHIN UP SIDE RACK WITH HOOK
21 1 REVERSE CHIN PULLING BAR
77 8 FLAT WASHER SAE, 1/2"
81 8 FLAT WASHER, 1/2 X 1 3/4 X 3/16
87 8 HEX HEAD CAP SCREW, 1/2-13 X 4
98 8 NYLON LOCK NUT, 1/2-13
108 2 PLASTIC INSERT CAP 3" SQ 10-14 GA
12 CT8 Fitness Training System
www.tuffstuffitness.com
Page 13

Pre-Assembled Components
Assembled View Assembled View
83
97 78
123
80
64
18
66
78
65
94
83
17
97
123
63
80
78
64
18
66
78
94
65
16
63
Pre-Assembled Components List
Item Qty. Description
16 1 RINGS SECTION BOOM ASSEMBLY, RIGHT
17 1 RINGS SECTION BOOM ASSEMBLY, LEFT
18 2 RINGS SECTION SWIVEL BRACKET
63 2 BLACK NYLON WEBBING 1"
64 2 BLACK NYLON IDLER PULLEY 3/8 X 1 1/2 X 4 1/2
65 2 BLACK NYLON RING 1 1/8 X 9 3/8
66 4 BRONZE BUSHING 1 X 1 1/4 X 3/4 X 1 1/2 X 1/8
78 4 FLAT WASHER SAE, 3/8"
80 2 FLAT WASHER, 1/2 ID X 1 1/2 OD X 3/16 THICK
83 2 HEX HEAD CAP SCREW, 1/2-13 X 1 1/4
94 2 HEX HEAD CAP SCREW, 3/8-16 X 2 1/4
97 2 NYLON JAM LOCK NUT, 3/8-16
123 2 SPLIT LOCK WASHER B-Z/P 1/2"
www.tuffstuffitness.com
13CT8 Fitness Training System
Page 14

Loosely Tighten
Loosely Tighten
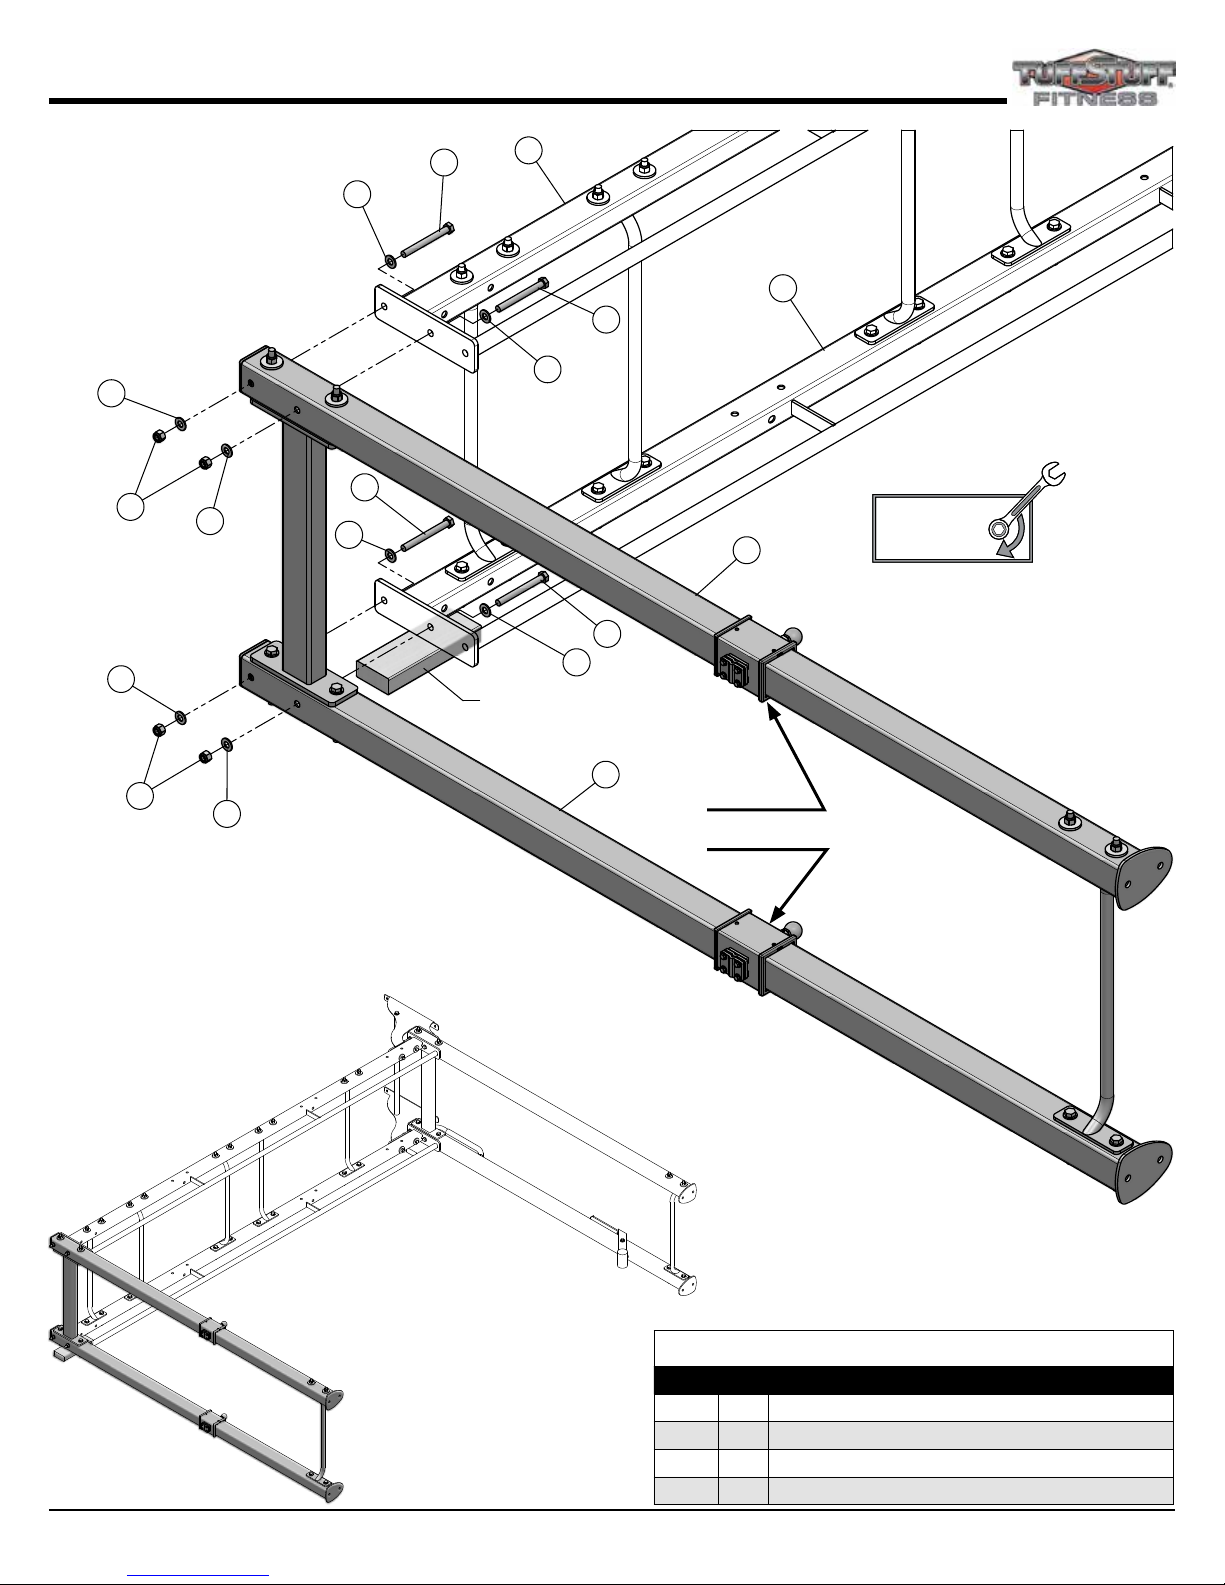
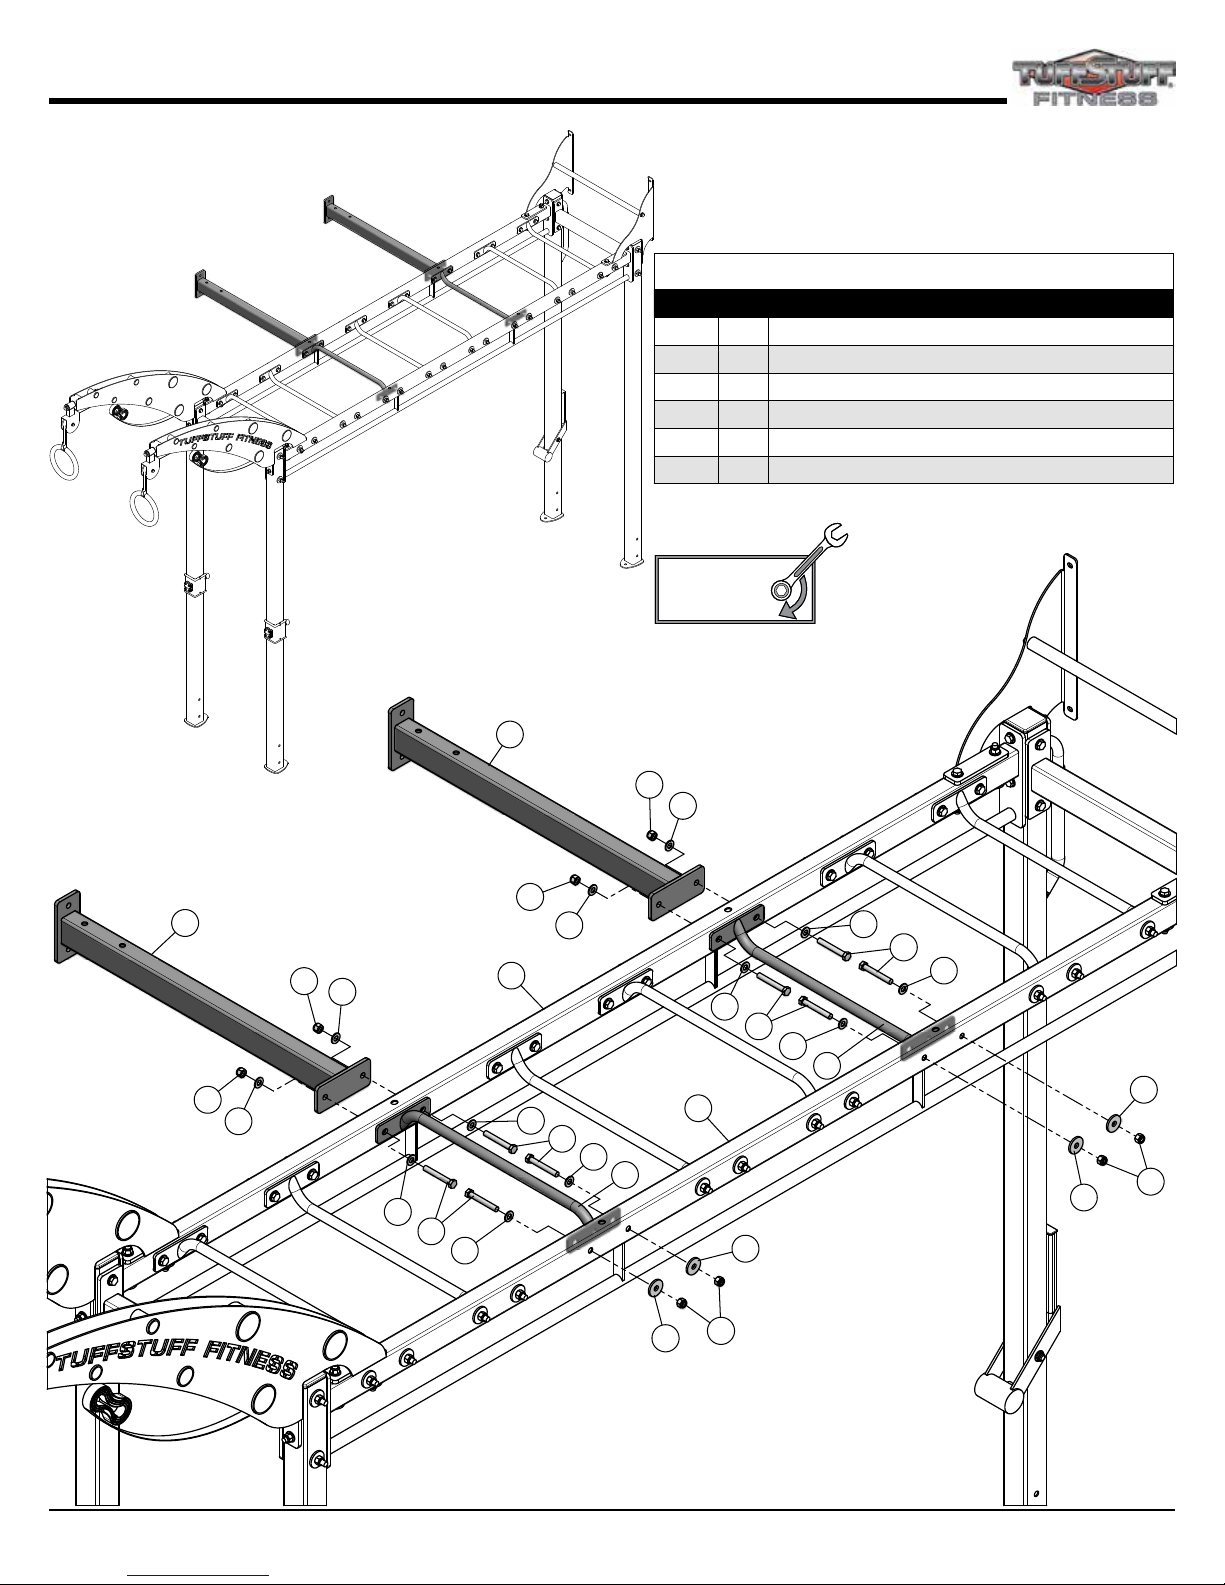
Step 1 (Assembling CT-8000B / CT-8100E)
Assembled View
23
77
98
70%
70%
98
77
Note:
To facilitate the assembly, lay the illustrated
components on the oor and use the two supplied
SPACER blocks to assist with the assembly
process.
Loosely tighten all hardware in this step.
DO NOT Fully Tighten. Some component(s)
may need pre-assembly and or alignment
during the assembly process.
SPACER
14 CT8 Fitness Training System
www.tuffstuffitness.com
88
77
77
81
SPACER
81
88
98
10
90
77
90
Step 1 Assembly List
Item Qty. Description
3 1 UPRIGHT POST 95 1/4", PEGBOARD
10 1 TOP CROSS BRACE 120"
23 1 PEG BOARD SIDE FRAME WITH HANDLE
77 6 FLAT WASHER SAE, 1/2"
81 2 FLAT WASHER, 1/2 X 1 3/4 X 3/16
88 2 HEX HEAD CAP SCREW, 1/2-13 X 4 1/2
90 2 HEX HEAD CAP SCREW, 1/2-13 X 4 3/4
98 4 NYLON LOCK NUT, 1/2-13
4
3
Note:
Assemblies position and orientation.
Page 15
Loosely Tighten
Loosely Tighten
Step 2 (Assembling CT-8000B / CT-8100E)
Assembled View
70%
70%
Loosely tighten all hardware in this step.
DO NOT Fully Tighten. Some component(s)
may need pre-assembly and or alignment
during the assembly process.
88
98
77
123
77
77
24
83
90
22
Step 2 Assembly List
Item Qty. Description
4 1 UPRIGHT POST 95 1/4", DIP SECTION
10 1 TOP CROSS BRACE 120"
22 1 PEG BOARD SIDE FRAME
24 1 PEG BOARD CROSS BAR
77 8 FLAT WASHER SAE, 1/2"
81 2 FLAT WASHER, 1/2 X 1 3/4 X 3/16
83 2 HEX HEAD CAP SCREW, 1/2-13 X 1 1/4
88 2 HEX HEAD CAP SCREW, 1/2-13 X 4 1/2
90 2 HEX HEAD CAP SCREW, 1/2-13 X 4 3/4
98 4 NYLON LOCK NUT, 1/2-13
123 2 SPLIT LOCK WASHER B-Z/P 1/2"
77
98
77
77
4
10
77
123
83
23
81
98
81
88
www.tuffstuffitness.com
15CT8 Fitness Training System
Page 16
Loosely Tighten
Loosely Tighten
Step 3 (Assembling CT-8000B / CT-8100E)
77
77
98
77
77
77
90
90
10
77
SPACER
77
90
90
2
10
70%
70%
Loosely tighten all hardware in this step.
DO NOT Fully Tighten. Some component(s)
may need pre-assembly and or alignment
during the assembly process.
98
Assembled View
16 CT8 Fitness Training System
77
www.tuffstuffitness.com
2
Note:
Assemblies position and orientation.
Step 3 Assembly List
Item Qty. Description
2 2 UPRIGHT POST 95 1/4", RINGS SECTION
77 8 FLAT WASHER SAE, 1/2"
90 4 HEX HEAD CAP SCREW, 1/2-13 X 4 3/4
98 4 NYLON LOCK NUT, 1/2-13
Page 17

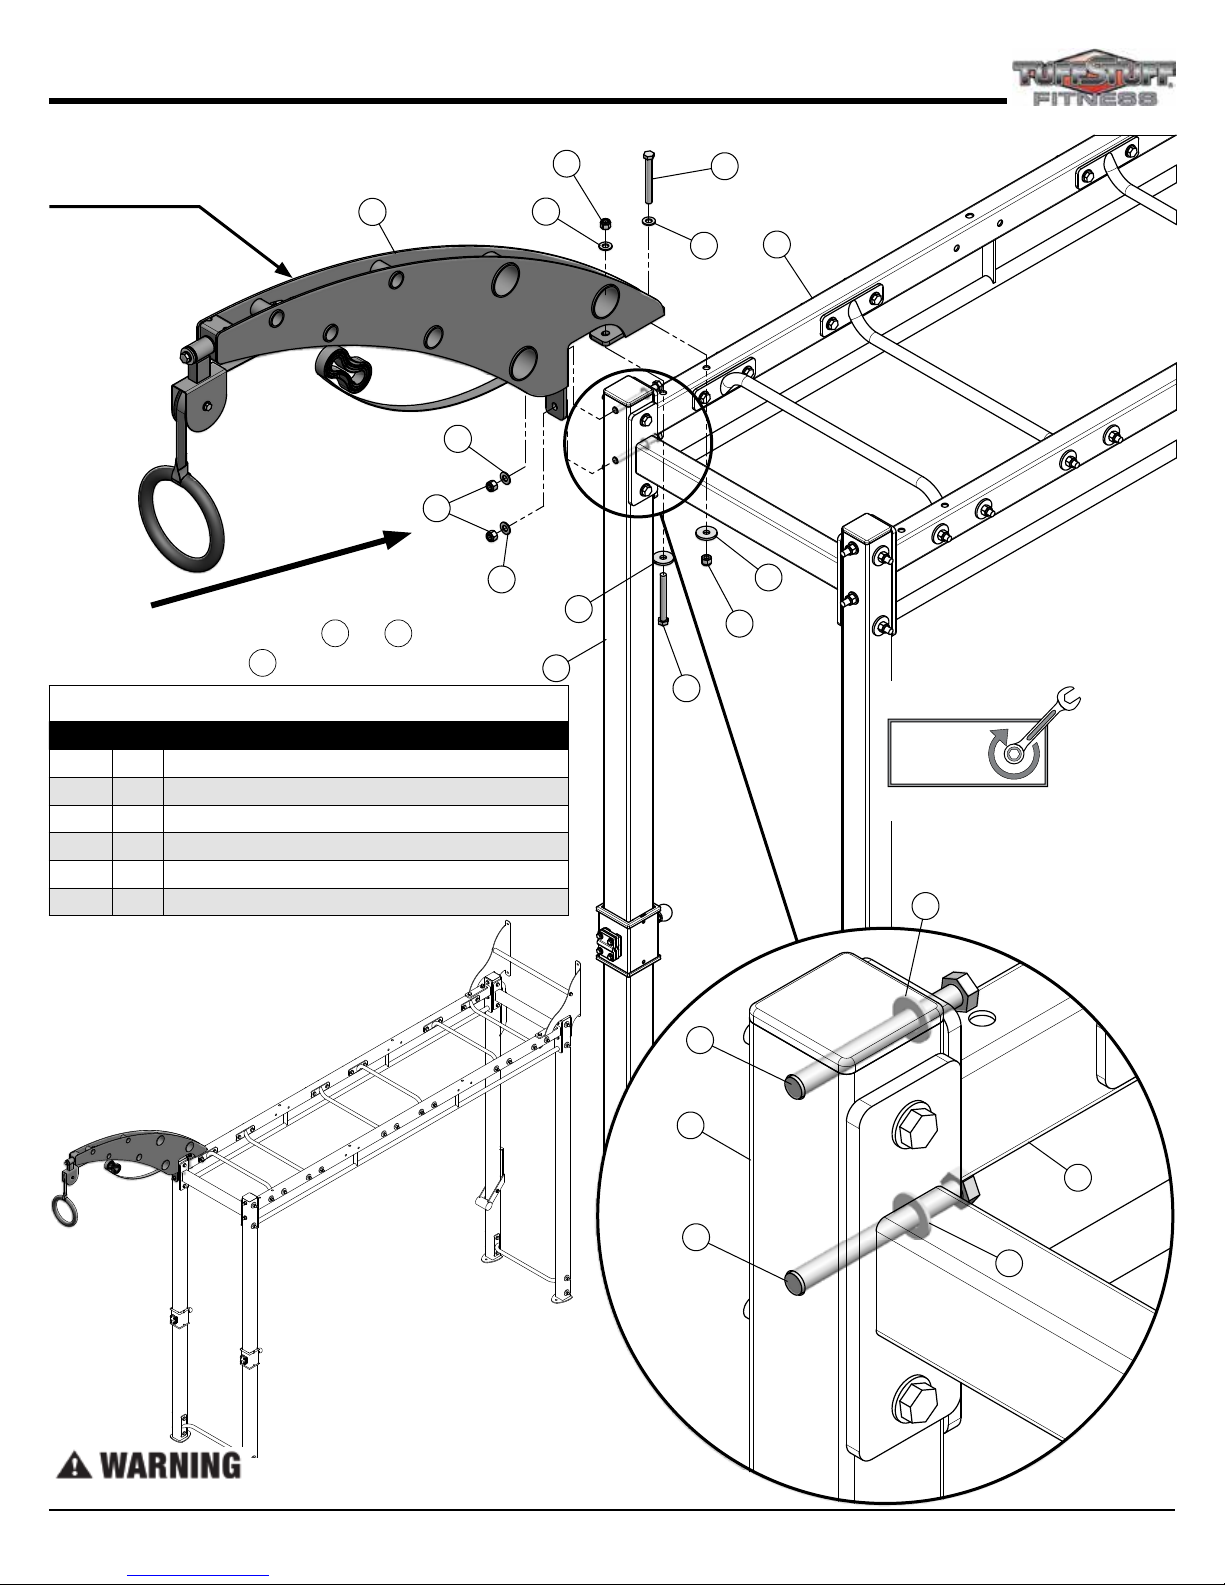
Step 4 (Assembling CT-8000B / CT-8100E)
LIFT SAFELY
Use your legs when lifting... Not your back.
Note:
Some parts have been removed for Clarity.
10 Foot Minimum Ceiling
TILT-UP
THIS ASSEMBLY ITS EXTREMELY HEAVY (about 400 lbs).
The assembly Tilt-Up must be performed by a minimum of three strong persons.
FAILURE TO FOLLOW THESE INSTRUCTIONS MAY RESULT IN SERIOUS INJURY OR DEATH.
is required for this unit.
www.tuffstuffitness.com
17CT8 Fitness Training System
Page 18
Fully Tighten
Step 5 (Assembling CT-8000B / CT-8100E)
Note:
77
98
77
88
10
TUFFSTUFF FITNESS cut out letters
facing outwards
17
77
98
Note:
Temporary remove components 98 and 77 to
allow the assembly of 17 .
Step 5 Assembly List
Item Qty. Description
17 1 RINGS SECTION BOOM ASSEMBLY, LEFT
77 6 FLAT WASHER SAE, 1/2"
81 2 FLAT WASHER, 1/2 X 1 3/4 X 3/16
88 2 HEX HEAD CAP SCREW, 1/2-13 X 4 1/2
90 2 HEX HEAD CAP SCREW, 1/2-13 X 4 3/4
98 4 NYLON LOCK NUT, 1/2-13
Assembled View
77
2
81
81
98
88
100%
Wrench tighten all hardware in this step.
77
90
2
TWO STRONG STEP LADDERS AND
TWO OR THREE PEOPLE ARE REQUIRED FOR THIS STEP.
18 CT8 Fitness Training System
www.tuffstuffitness.com
10
90
77
Page 19
Fully Tighten
Step 6 (Assembling CT-8000B / CT-8100E)
100%
Wrench tighten all hardware in this step.
Note:
TUFFSTUFF FITNESS cut out letters
facing outwards
16
77
98
77
88
77
10
Step 6 Assembly List
Item Qty. Description
16 1 RINGS SECTION BOOM ASSEMBLY, RIGHT
77 6 FLAT WASHER SAE, 1/2"
81 2 FLAT WASHER, 1/2 X 1 3/4 X 3/16
88 2 HEX HEAD CAP SCREW, 1/2-13 X 4 1/2
90 2 HEX HEAD CAP SCREW, 1/2-13 X 4 3/4
98 4 NYLON LOCK NUT, 1/2-13
Assembled View
98
77
2
Note:
Temporary remove
components 98 and 77 to
allow the assembly of 16 .
88
81
77
81
98
90
10
TWO STRONG STEP LADDERS AND
TWO OR THREE PEOPLE ARE REQUIRED FOR THIS STEP.
2
77
www.tuffstuffitness.com
90
19CT8 Fitness Training System
Page 20
Remove
Step 7 (Assembling CT-8000B / CT-8100E)
81
98
81
81
77
12
88
77
77
88
77
81
98
98
81
100%
Remove hardware assemblies completely to
allow nishing successive assembly steps.
77
12
88
77
88
77
81
77
98
81
Step 7 Disassembly List
Item Qty. Description
12 2 MONKEY HANDLE BAR 25 1/2"
77 8 FLAT WASHER SAE, 1/2"
88 8 HEX HEAD CAP SCREW, 1/2-13 X 4 1/2
81 8 FLAT WASHER, 1/2 X 1 3/4 X 3/16
98 8 NYLON LOCK NUT, 1/2-13
20 CT8 Fitness Training System
www.tuffstuffitness.com
81
Disassembled View
Page 21
Loosely Tighten
Loosely Tighten
Step 8 (Assembling CT-8000B / CT-8100E)
Assembled View
Step 8 Assembly List
Item Qty. Description
11 2 TOP CROSS BRACE 36 7/8"
12 2 MONKEY HANDLE BAR 25 1/2"
77 12 FLAT WASHER SAE, 1/2"
81 4 FLAT WASHER, 1/2 X 1 3/4 X 3/16
84 8 HEX HEAD CAP SCREW, 1/2-13 X 3 1/2
98 8 NYLON LOCK NUT, 1/2-13
70%
70%
Loosely tighten all hardware in this step.
DO NOT Fully Tighten. Some component(s)
may need pre-assembly and or alignment
during the assembly process.
11
11
98
77
98
77
77
84
77
12
98
77
84
77
77
12
98
81
77
12
98
77
81
84
77
12
77
84
77
81
81
98
www.tuffstuffitness.com
21CT8 Fitness Training System
Page 22
Loosely Tighten
Loosely Tighten
Step 9 (Assembling CT-8000B / CT-8100E)
Step 9 Assembly List
Assembled View
98
81
81
98
Item Qty. Description
5 2 UPRIGHT POST 95 1/4", REVERSE CHIN-UP
77 4 FLAT WASHER SAE, 1/2"
81 4 FLAT WASHER, 1/2 X 1 3/4 X 3/16
90 4 HEX HEAD CAP SCREW, 1/2-13 X 4 3/4
98 4 NYLON LOCK NUT, 1/2-13
81
5
77
90
77
77
90
11
90
11
70%
70%
Loosely tighten all hardware in this step.
DO NOT Fully Tighten. Some component(s)
may need pre-assembly and or alignment
during the assembly process.
81
5
21
77
90
19
20
22 CT8 Fitness Training System
www.tuffstuffitness.com
Page 23
Loosely Tighten
Loosely Tighten
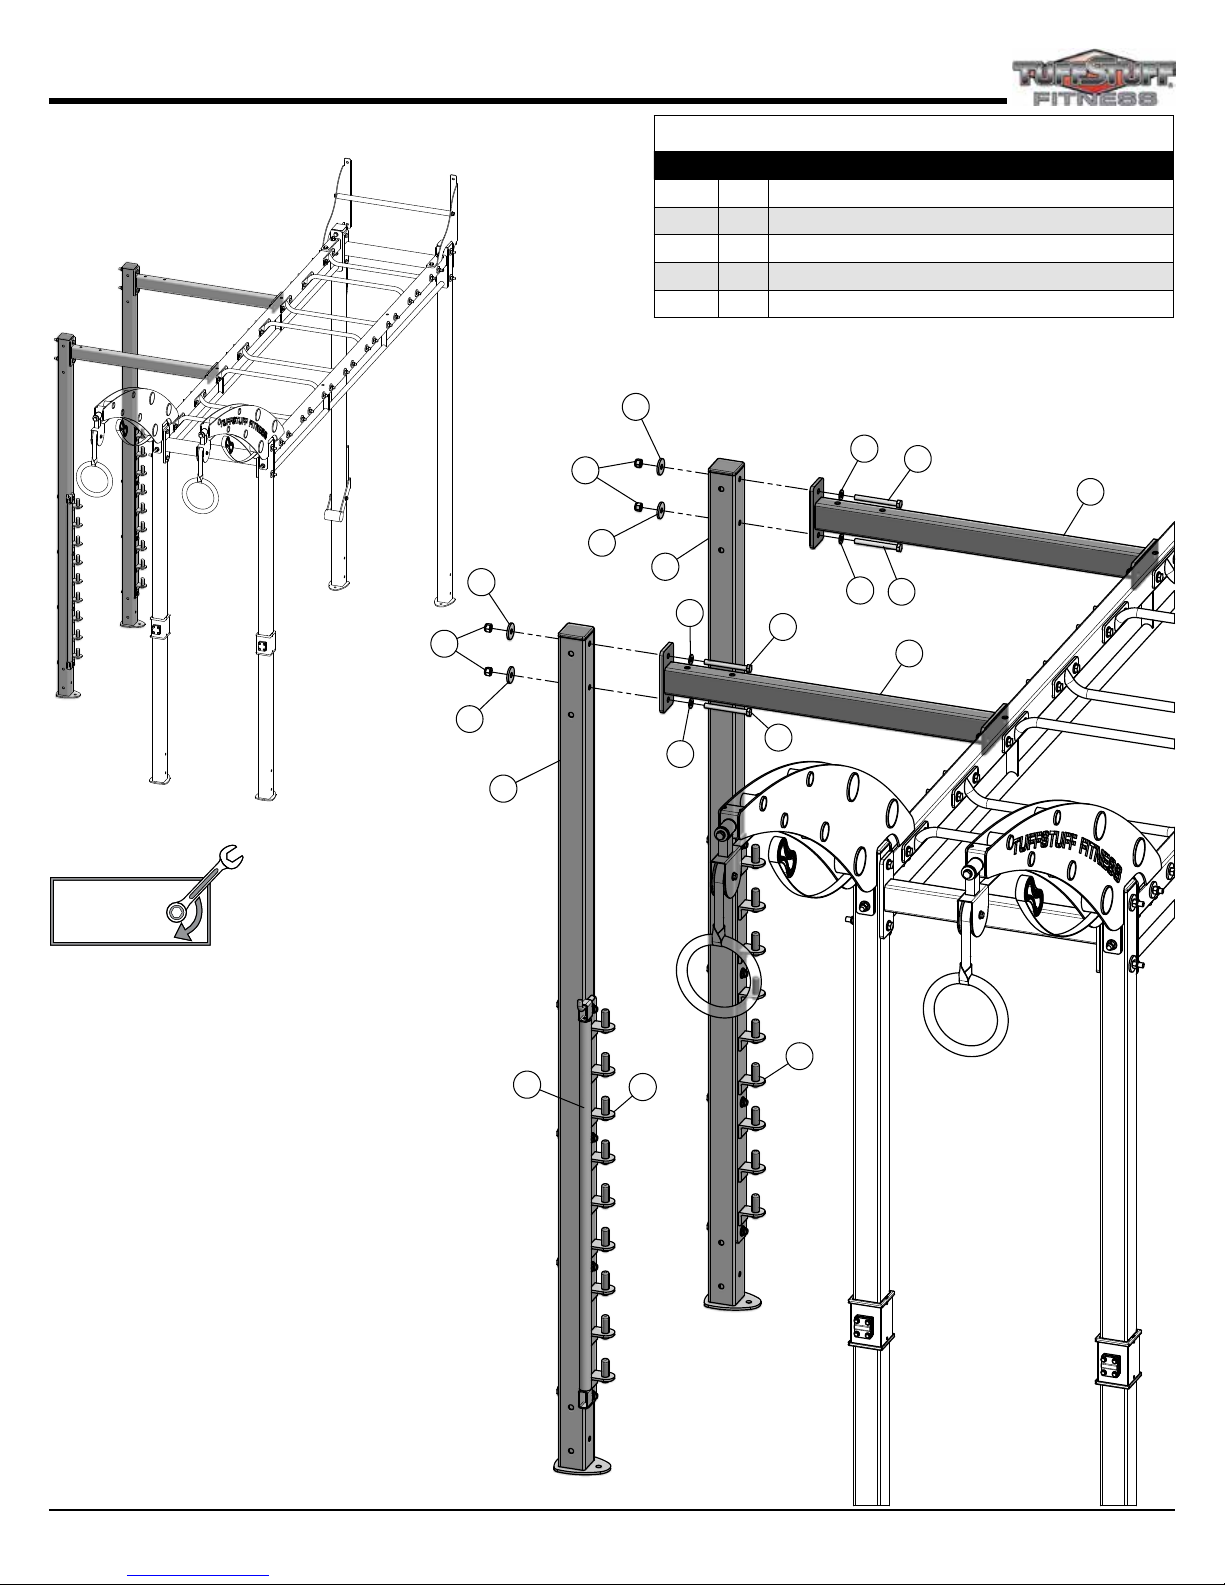
Step 10 (Assembling CT-8000B / CT-8100E)
Note:
the Intallation of Modular Top Cross Braces
for Training Modules M1 & M2.
70%
70%
Loosely tighten all hardware in this step.
DO NOT Fully Tighten. Some component(s)
may need pre-assembly and or alignment
during the assembly process.
90
8
Assembled View
8
8
M2
M1
77
98
26
98
77
98
77
M2
3
90
8
5
77
77
90
90
77
77
5
13
8
98
77
M1
90
90
77
2
Step 10 Assembly List
Item Qty. Description
8 2 MODULAR CROSS BRACE, TOP
13 1 3 TIER 2" PULL UP BAR 41 1/4"
26 1 PEG BOARD HANDLES STORAGE PLATE
77 16 FLAT WASHER SAE, 1/2"
90 8 HEX HEAD CAP SCREW, 1/2-13 X 4 3/4
98 8 NYLON LOCK NUT, 1/2-13
www.tuffstuffitness.com
23CT8 Fitness Training System
Page 24
Fully Tighten
Step 11 (Assembling CT-8000B / CT-8100E)
Assembled View
Step 11 Assembly List
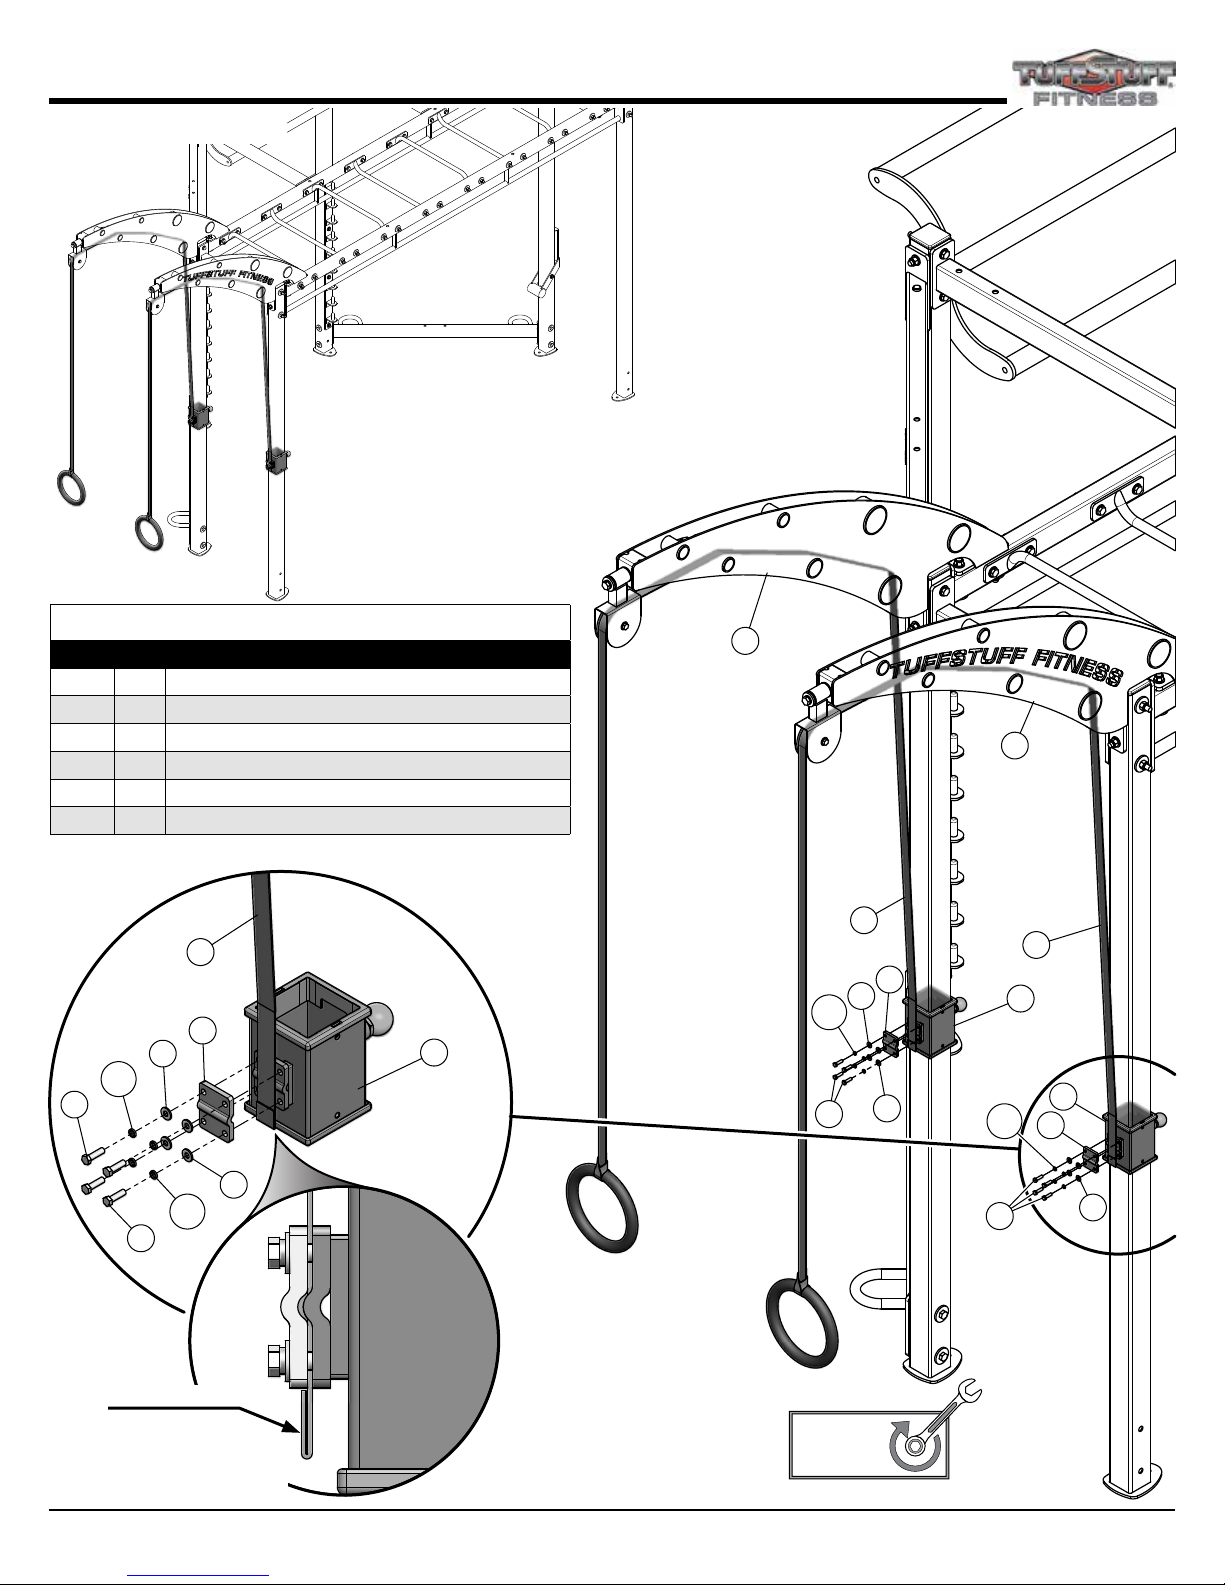
Item Qty. Description
15 2 ADJUSTABLE SLIDE CARRIAGE 5"
62 2 BELT RETAINER PLATE
63 2 BLACK NYLON WEBBING 1"
75 8 FLAT WASHER SAE, #12 (1/4")
92 8 HEX HEAD CAP SCREW, 1/4-20 X 1
136 8 SPLIT LOCK WASHER B-Z/P 1/4”
63
62
75
136
92
75
136
92
15
17
136
92
75
63
75
62
136
92
16
63
15
15
62
75
Note:
The assembled black
nylon webbing is sticking
out about an inch.
24 CT8 Fitness Training System
www.tuffstuffitness.com
100%
Wrench tighten all hardware in this step.
Page 25

Fully Tighten
Step 12 (Assembling CT-8000B / CT-8100E)
100%
Wrench tighten all hardware in this step.
99
78
74
74
1
74
22
25
99
78
23
25
26
Step 12 Assembly List
Item Qty. Description
1 1 PEG BOARD 2 X 24 X 32
25 2 PEGBOARD HANDLE
74 4 FLAT HEAD SCREW, 3/8-16 X 3
78 4 FLAT WASHER SAE, 3/8"
99 4 NYLON LOCK NUT, 3/8-16
TWO STRONG STEP LADDERS AND
TWO OR THREE PEOPLE ARE REQUIRED FOR THIS STEP.
Assembled View
www.tuffstuffitness.com
25CT8 Fitness Training System
Page 26

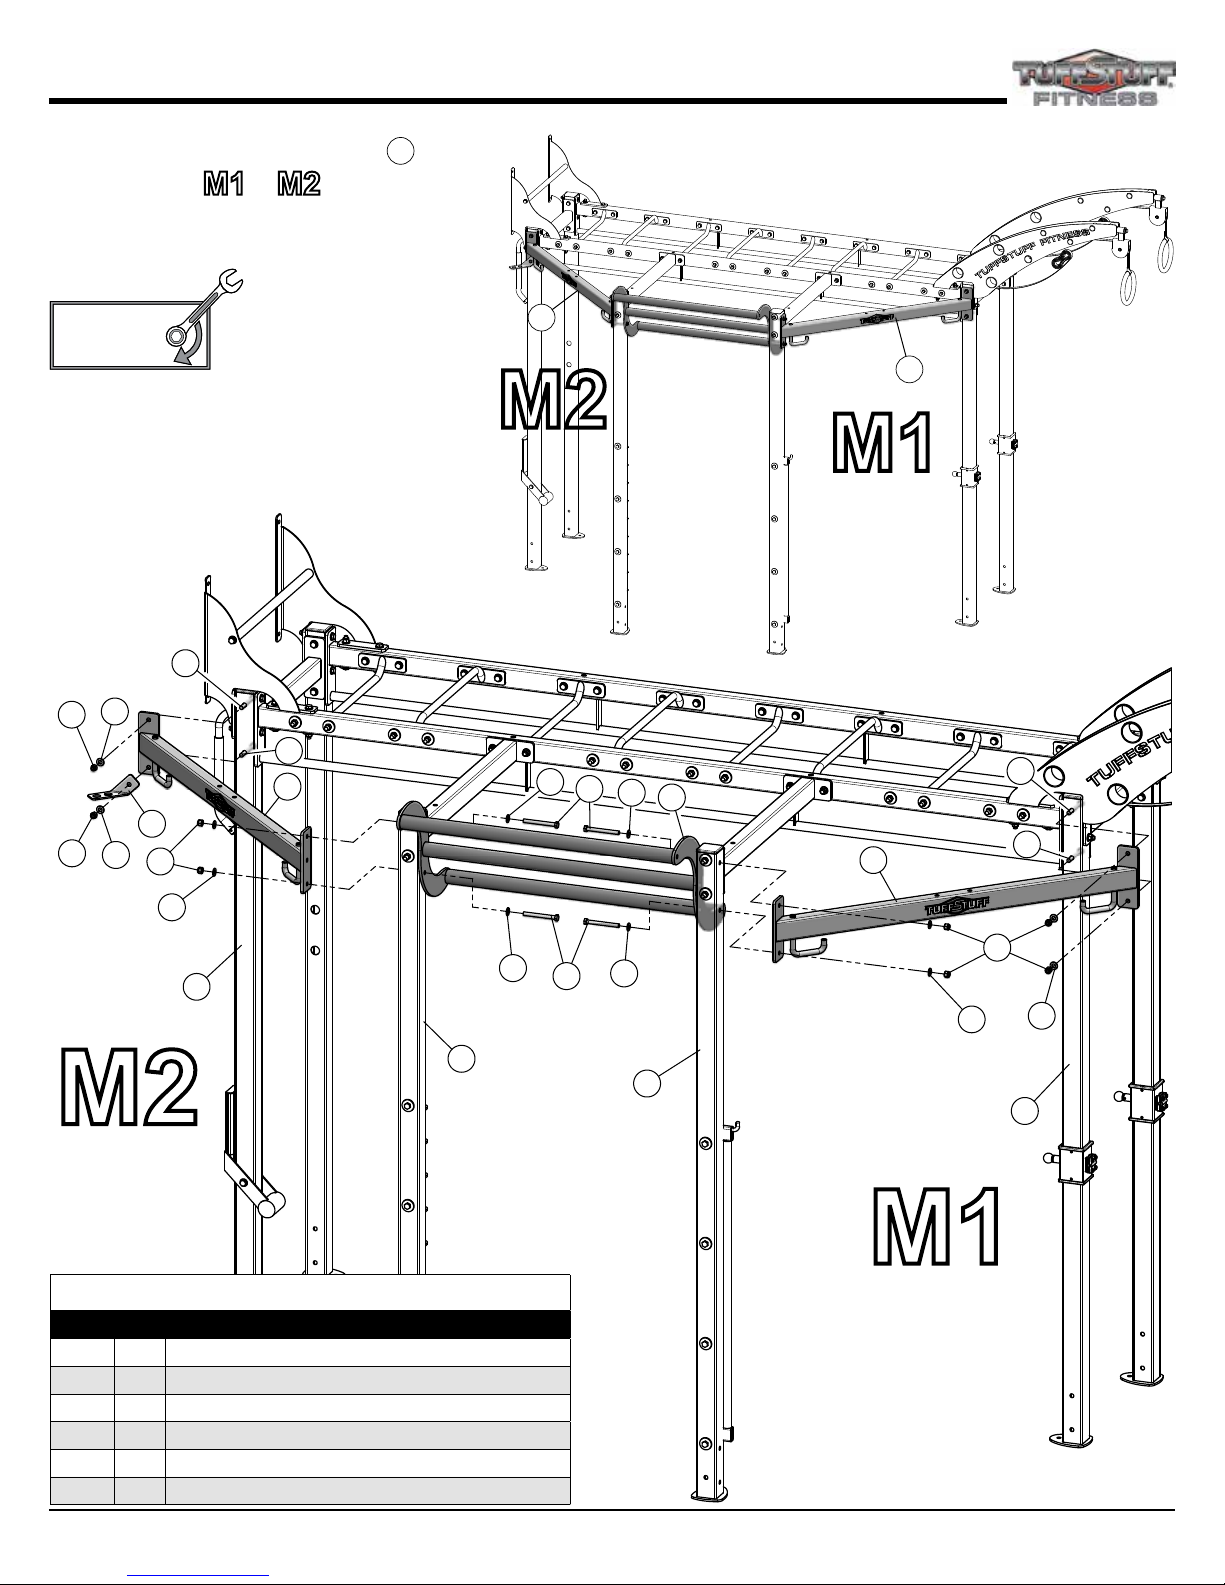
Loosely Tighten
Loosely Tighten
Step 13 (Assembling CT-8000B / CT-8100E)
M2
7
81
81
88
5
81
5
81
88
98
98
3
77
77
98
M1
7
2
81
88
81
77
Note:
The Intallation of Modular Bottom Cross Braces
If installing a CT-8250 for M1 or M2, the Modular Bottom Cross Brace
81
for Training Modules M1 & M2.
7
Assembled View
M2
M1
7
7
26 CT8 Fitness Training System
www.tuffstuffitness.com
81
98
is NOT needed.
7
98
77
70%
70%
Loosely tighten all hardware in this step.
DO NOT Fully Tighten. Some component(s)
may need pre-assembly and or alignment
during the assembly process.
Step 13 Assembly List
Item Qty. Description
7 2 MODULAR CROSS BRACE, BOTTOM
77 8 FLAT WASHER SAE, 1/2"
81 8 FLAT WASHER, 1/2 X 1 3/4 X 3/16
88 8 HEX HEAD CAP SCREW, 1/2-13 X 4 1/2
98 8 NYLON LOCK NUT, 1/2-13
77
Page 27

Loosely Tighten
Loosely Tighten
Step 14 (Assembling CT-8100E)
10
84
77
98
11
Step 14 Assembly List
Item Qty. Description
6 2 UPRIGHT POST 95 1/4", FOR CT-8100
11 2 TOP CROSS BRACE 36 7/8"
77 12 FLAT WASHER SAE, 1/2"
81 4 FLAT WASHER, 1/2 X 1 3/4 X 3/16
84 4 HEX HEAD CAP SCREW, 1/2-13 X 3 1/2
90 4 HEX HEAD CAP SCREW, 1/2-13 X 4 3/4
98 8 NYLON LOCK NUT, 1/2-13
90
77
77
98
84
90
77
77
98
77
11
81
6
90
98
90
77
81
77
98
81
81
98
6
Assembled View
70%
70%
Loosely tighten all hardware in this step.
DO NOT Fully Tighten. Some component(s)
may need pre-assembly and or alignment
during the assembly process.
www.tuffstuffitness.com
27CT8 Fitness Training System
Page 28

Fully Tighten
Step 15 (Assembling CT-8100E)
90
77
98
77
90
98
2
M4
48
98
77
77
6
77
90
77
90
77
14
6
90
4
48
77
M3
77
98
Note:
The Intallation of Top Ext Training Zone Double Bars 48
for Training Modules M3 & M4.
If installing optional Training Molules for M3 & M4,
skit to next step (Step 16).
100%
Wrench tighten all hardware in this step.
Step 15 Assembly List
Item Qty. Description
14 1 3 TIER 1 1/4" PULL UP BAR 41 1/4"
48 2 TOP EXT TRAINING ZONE DOUBLE BAR
77 16 FLAT WASHER SAE, 1/2"
90 8 HEX HEAD CAP SCREW, 1/2-13 X 4 3/4
98 8 NYLON LOCK NUT, 1/2-13
28 CT8 Fitness Training System
www.tuffstuffitness.com
Assembled View
48
48
M3
M4
Page 29

Loosely Tighten
Loosely Tighten
Step 16 (Assembling CT-8100E)
90
77
2
98
98
77
8
98
77
77
6
77
90
90
77
77
14
8
6
90
90
77
98
77
98
77
4
M3
M4
70%
70%
Loosely tighten all hardware in this step.
DO NOT Fully Tighten. Some component(s)
may need pre-assembly and or alignment
during the assembly process.
Note:
The Intallation of Modular Top Cross Braces 8.
This Assembly Step Only apply if Chosen Optional
Trainig Modules for M3 & M4.
Step 14 Assembly List
Item Qty. Description
8 2 MODULAR CROSS BRACE, TOP
14 1 3 TIER 1 1/4" PULL UP BAR 41 1/4"
77 16 FLAT WASHER SAE, 1/2"
90 8 HEX HEAD CAP SCREW, 1/2-13 X 4 3/4
98 8 NYLON LOCK NUT, 1/2-13
Assembled View
8
M4
www.tuffstuffitness.com
8
M3
29CT8 Fitness Training System
Page 30

Loosely Tighten
Loosely Tighten
Step 17 (Assembling CT-8100E)
M4
70%
70%
Loosely tighten all hardware in this step.
DO NOT Fully Tighten. Some component(s)
may need pre-assembly and or alignment
during the assembly process.
81
2
88
81
98
77
Note:
The Intallation of Modular Bottom Cross Braces 7.
7
98
77
6
81
81
88
88
81
6
81
M3
88
81
88
81
Assembled View
4
77
7
77
98
77
98
If installing a CT-8250 for M3 or M4, the Modular Bottom Cross Brace
is NOT needed.
This Assembly Step Only apply if Chosen Optional Trainig Modules for M3 & M4.
Step 17 Assembly List
Item Qty. Description
7 2 MODULAR CROSS BRACE, BOTTOM
77 8 FLAT WASHER SAE, 1/2"
81 8 FLAT WASHER, 1/2 X 1 3/4 X 3/16
88 8 HEX HEAD CAP SCREW, 1/2-13 X 4 1/2
98 8 NYLON LOCK NUT, 1/2-13
30 CT8 Fitness Training System
www.tuffstuffitness.com
7
M3
7
M4
7
Page 31

Loosely Tighten
Loosely Tighten
Step 18 (Assembling CT-8210)
88
81
77
98
31
81
8
98
77
70%
70%
Loosely tighten all hardware in this step.
DO NOT Fully Tighten. Some component(s)
may need pre-assembly and or alignment
during the assembly process.
Step 18 Assembly List
Item Qty. Description
31 1 CENTER UPRIGHT 2" SQ X 82 1/4"
77 4 FLAT WASHER SAE, 1/2"
81 2 FLAT WASHER, 1/2 X 1 3/4 X 3/16
88 4 HEX HEAD CAP SCREW, 1/2-13 X 4 1/2
98 2 NYLON LOCK NUT, 1/2-13
7
88
77
88
77
Assembled View
www.tuffstuffitness.com
31CT8 Fitness Training System
Page 32

Fully Tighten
Step 19 (Assembling CT-8210)
100%
Wrench tighten all hardware in this step.
129
79
36
79
35
100
31
7
34
Step 19 Assembly List
Item Qty. Description
33 1 REBOUNDER BASE FRAME
34 1 REBOUNDER UPRIGHT TILT FRAME
35 1 REBOUNDER ADJUSTABLE CARRIAGE
36 1 REBOUNDER RING ASSEMBLY
77 2 FLAT WASHER SAE, 1/2"
78 2 FLAT WASHER SAE, 3/8"
79 2 FLAT WASHER SAE, 5/16"
94 1 HEX HEAD CAP SCREW, 3/8-16 X 2 1/4
98 2 NYLON LOCK NUT, 1/2-13
99 1 NYLON LOCK NUT, 3/8-16
100 1 NYLON LOCK NUT, 5/16-18
129 1 HEX HEAD CAP SCREW Z/P, 5/16-18 X 2 1/2
94
78
33
77
88
78
99
77
98
Assembled View
32 CT8 Fitness Training System
www.tuffstuffitness.com
Page 33

Fully Tighten
Step 20 (Assembling CT-8220)
Assembled View
77
88
81
81
8
77
98
100%
Wrench tighten all hardware in this step.
Step 20 Assembly List
Item Qty. Description
28 1 LADDER RACK ASSEMBLY
77 4 FLAT WASHER SAE, 1/2"
81 4 FLAT WASHER, 1/2 X 1 3/4 X 3/16
88 4 HEX HEAD CAP SCREW, 1/2-13 X 4 1/2
98 4 NYLON LOCK NUT, 1/2-13
77
28
88
77
81
98
81
www.tuffstuffitness.com
7
33CT8 Fitness Training System
Page 34

Step 21 (Assembling CT-8220)
Assembled View
Note:
Storage positon for the
ADJUSTABLE PLATFORM
ASSEMBLY when NOT in use.
60
29
28
29
7
Step 21 Assembly List
Item Qty. Description
29 1 ADJUSTABLE PLATFORM ASSEMBLY
34 CT8 Fitness Training System
www.tuffstuffitness.com
Page 35

Fully Tighten
Step 22 (Assembling CT-8230)
Assembled View
77
98
88
81
81
8
38
77
98
100%
Wrench tighten all hardware in this step.
88
77
37
Step 22 Assembly List
Item Qty. Description
37 1 SELECTORIZED CENTER UPRIGHT 2 X 3 X 82
38 1 CENTER UPRIGHT 2 X 3 CONNECTOR
77 4 FLAT WASHER SAE, 1/2"
81 4 FLAT WASHER, 1/2 X 1 3/4 X 3/16
88 4 HEX HEAD CAP SCREW, 1/2-13 X 4 1/2
98 4 NYLON LOCK NUT, 1/2-13
7
81
98
www.tuffstuffitness.com
81
35CT8 Fitness Training System
Page 36

Fully Tighten
Step 23 (Assembling CT-8240)
Assembled View
77
98
31
Step 23 Assembly List
Item Qty. Description
31 1 CENTER UPRIGHT 2" SQ X 82 1/4"
77 4 FLAT WASHER SAE, 1/2"
81 4 FLAT WASHER, 1/2 X 1 3/4 X 3/16
88 4 HEX HEAD CAP SCREW, 1/2-13 X 4 1/2
98 4 NYLON LOCK NUT, 1/2-13
88
88
81
81
81
81
8
77
98
8
100%
Wrench tighten all hardware in this step.
36 CT8 Fitness Training System
www.tuffstuffitness.com
88
77
88
77
81
81
98
98
81
81
7
7
Page 37

Fully Tighten
Step 24 (Assembling CT-8250)
TWO STRONG STEP LADDERS AND
TWO OR THREE PEOPLE ARE REQUIRED FOR THIS STEP.
91
77
88
77
10
77
81
98
8
81
98
81
40
100%
Wrench tighten all hardware in this step.
Step 24 Assembly List
Item Qty. Description
40 1 PUNCHING BAG TOP ASSEMBLY
77 3 FLAT WASHER SAE, 1/2"
81 3 FLAT WASHER, 1/2 X 1 3/4 X 3/16
88 2 HEX HEAD CAP SCREW, 1/2-13 X 4 1/2
91 1 HEX HEAD CAP SCREW, 1/2-13 X 6 3/4
98 3 NYLON LOCK NUT, 1/2-13
Assembled View
www.tuffstuffitness.com
37CT8 Fitness Training System
Page 38

Fully Tighten
Step 25 (Assembling CT-8310)
100%
Wrench tighten all hardware in this step.
77
98
Assembled View
77
98
96
77
77
77
52
87
77
Step 25 Assembly List
Item Qty. Description
42 1 SQUAT-PRESS SIDE FRAME W-BARHOLER
44 1 SQUAT-PRESS BOTTOM CROSS BRACE
46 1 REINFORCEMENT PLATE WITH LOOP
52 1 OLYMPIC BAR STORAGE HOOK
77 14 FLAT WASHER SAE, 1/2"
81 2 FLAT WASHER, 1/2 X 1 3/4 X 3/16
86 2 HEX HEAD CAP SCREW, 1/2-13 X 3 3/4
87 2 HEX HEAD CAP SCREW, 1/2-13 X 4
88 2 HEX HEAD CAP SCREW, 1/2-13 X 4 1/2
90 2 HEX HEAD CAP SCREW, 1/2-13 X 4 3/4
96 2 NYLON JAM LOCK NUT, 1/2-13
98 6 NYLON LOCK NUT, 1/2-13
88
88
81
81
77
77
38 CT8 Fitness Training System
www.tuffstuffitness.com
98
98
77
77
44
42
46
77
86
77
Page 39

Fully Tighten
Step 26 (Assembling CT-8310)
77
98
Assembled View
90
77
98
Step 26 Assembly List
Item Qty. Description
43 1 SQUAT-PRESS SIDE FRAME
44 1 SQUAT-PRESS BOTTOM CROSS BRACE
46 1 REINFORCEMENT PLATE WITH LOOP
77 10 FLAT WASHER SAE, 1/2"
81 2 FLAT WASHER, 1/2 X 1 3/4 X 3/16
86 2 HEX HEAD CAP SCREW, 1/2-13 X 3 3/4
88 2 HEX HEAD CAP SCREW, 1/2-13 X 4 1/2
90 2 HEX HEAD CAP SCREW, 1/2-13 X 4 3/4
98 6 NYLON LOCK NUT, 1/2-13
77
77
88
88
81
81
98
98
77
77
44
43
46
77
77
86
100%
Wrench tighten all hardware in this step.
www.tuffstuffitness.com
39CT8 Fitness Training System
Page 40

Step 27 (Assembling CT-8310)
Assembled View
58
58
53
Make sure to use the
Safety Spotters when performing exercises.
The Safety Spotters help preventing the bar from
being lowered below desired point and avoid
getting crushed under the Press Bar if the weight
is too heavy to control.
53
40 CT8 Fitness Training System
www.tuffstuffitness.com
Step 27 Assembly List
Item Qty. Description
53 2 SAFETY SPOTTER SIDE FRAME
Page 41

Fully Tighten
Step 28 (Assembling CT-8320)
TWO STRONG STEP LADDERS AND
TWO OR THREE PEOPLE ARE REQUIRED FOR THIS STEP.
51
100%
Wrench tighten all hardware in this step.
Step 28 Assembly List
Item Qty. Description
51 1 MULTI-STRAP TRAINING BOOM ASSY
77 6 FLAT WASHER SAE, 1/2"
81 2 FLAT WASHER, 1/2 X 1 3/4 X 3/16
88 2 HEX HEAD CAP SCREW, 1/2-13 X 4 1/2
90 2 HEX HEAD CAP SCREW, 1/2-13 X 4 3/4
98 4 NYLON LOCK NUT, 1/2-13
98
77
77
77
98
77
12
90
81
81
88
Assembled View
www.tuffstuffitness.com
41CT8 Fitness Training System
Page 42

Fully Tighten
Step 29 (Assembling CT-8330)
77
98
90
77
57
Assembled View
88
81
77
100%
Wrench tighten all hardware in this step.
Step 29 Assembly List
Item Qty. Description
55 1 LANDMINE BASE FRAME
57 1 OLYMPIC BAR STORAGE HOOK PLATE
77 6 FLAT WASHER SAE, 1/2"
81 2 FLAT WASHER, 1/2 X 1 3/4 X 3/16
88 2 HEX HEAD CAP SCREW, 1/2-13 X 4 1/2
90 2 HEX HEAD CAP SCREW, 1/2-13 X 4 3/4
98 4 NYLON LOCK NUT, 1/2-13
98
Note:
Magnet position and orientation.
81
42 CT8 Fitness Training System
www.tuffstuffitness.com
55
77
98
Page 43

Fully Tighten
Step 30 Anchoring Unit
100%
Proceed to inspect; align and wrench tighten ALL hardware
assemblies specially those left loosely fasten, making sure
the unit is assembled plumb, square and level.
THIS UNIT MUST BE BOLTED SECURELY TO A
SOLID LEVEL SURFACE BY A LICENSED CONTRACTOR BEFORE USE.
FAILURE TO DO SO MAY CAUSE THE EQUIPMENT TO TIP OVER AND
COULD SERULT IN SERIOUS INJURIES OR DEATH.
Holes on FOOTPLATES are provided for anchoring the unit to
the floor. We recommend using SIMPSON STRONG-BOLT®
WEDGE ANCHORS (STB50334).
HOLES DRILLED
INTO CONCRETE
DRILLED HOLES
MUST BE CLEANED
ANCHORING
FOOTPLATES
ANCHORS DRIVEN
INTO HOLES
ANCHORING
FOOTPLATES
WRENCH TIGHTEN
NUTS
WEDGE ANCHOR
FOOTPLATE
CONCRETE SLAB
BEFORE DRILLING HOLES FOR THE ANCHOR BOLTS, IT IS CRITICAL TO MAKE SURE THAT
THE UNIT IS ASSEMBLED PLUMB, SQUARE AND LEVEL.
www.tuffstuffitness.com
43CT8 Fitness Training System
Page 44

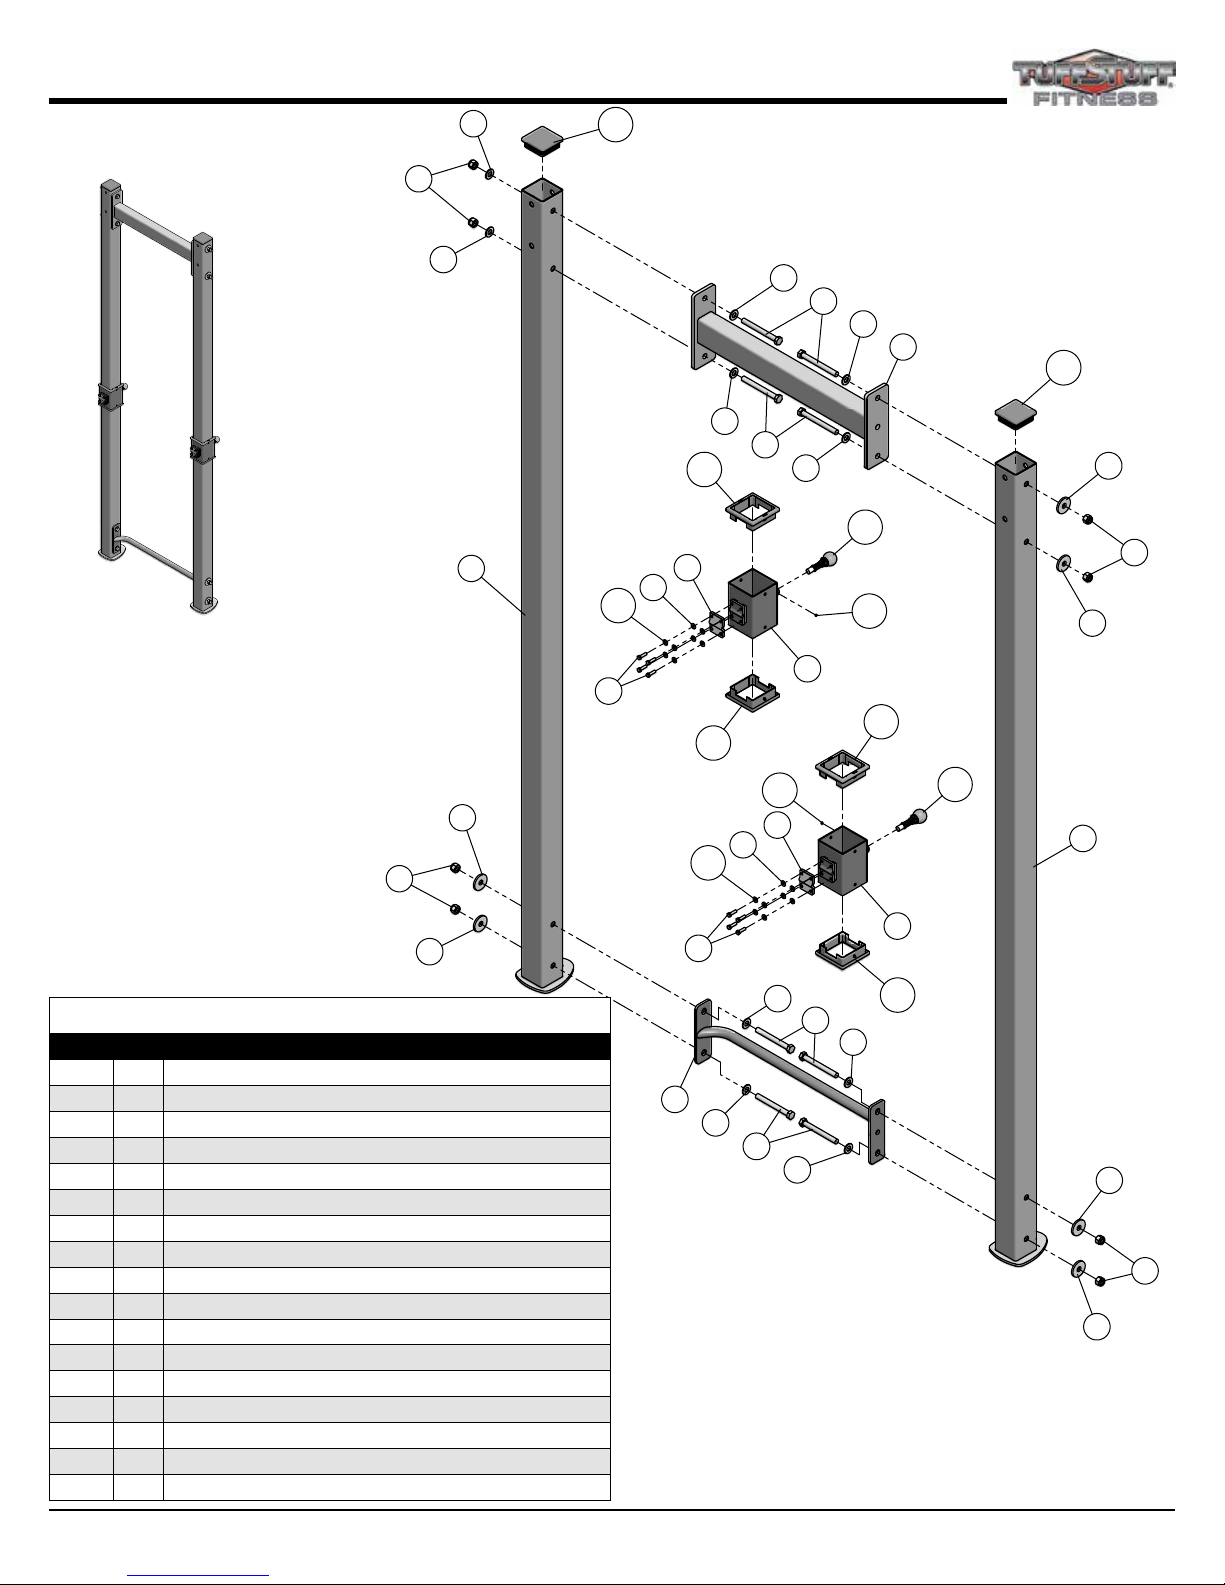
CT-8000B Exploded View
77
98
87
81
90
13
77
81
5
98
81
90
77
11
108
98
81
10
98
77
77
98
81
87
81
90
77
81
5
81
98
90
77
11
108
98
77
12
10
97
83
78
123
66
80
97
81
78
83
98
123
64
18
81
80
78
66
94
81
64
98
18
78
94
98
77
81
16
77
98
77
81
98
17
77
77
88
77
98
98
77
84
81
88
77
12
88
77
90
77
81
98
88
77
90
77
81
21
44 CT8 Fitness Training System
www.tuffstuffitness.com
77
96
20
77
19
96
65
63
63
65
Page 45

CT-8000B Exploded View
25
25
26
3
108
89
77
106
117
27
90
127
99
77
127
77
96
123
83
88
77
78
81
98
98
77
88
99
122
78
105
23
122
77
77
116
98
90
99
99
77
24
88
77
77
78
81
1
98
98
88
81
22
77
77
74
123
77
74
74
83
98
108
2
136
92
75
136
62
75
15
110
136
92
110
136
75
62
112
122
75
122
110
110
15
90
9
77
112
90
77
108
2
81
81
98
90
9
90
77
77
108
81
98
81
4
www.tuffstuffitness.com
45CT8 Fitness Training System
Page 46

CT-8000B / CT-8100E Parts List
ITEM NO. DESCRIPTION REV. PART NO. CT-8000B_QTY. CT-8100E_QTY.
1 PEG BOARD 2 X 24 X 32 0 UP7635 1 1
2 UPRIGHT POST 95 1/4", RINGS SECTION 0 UP7804 2 2
3 UPRIGHT POST 95 1/4", PEGBOARD SECTION 0 UP7805 1 1
4 UPRIGHT POST 95 1/4", DIP SECTION 0 UP7806 1 1
5 UPRIGHT POST 95 1/4", REVERSE CHIN-UP SECTION 0 UP7807 2 2
6 UPRIGHT POST 95 1/4", FOR CT-8100 0 UP7808 2
9 TOP CROSS BRACE 24 1/2" 0 UP7811 2 2
10 TOP CROSS BRACE 120" 0 UP7812 2 2
11 TOP CROSS BRACE 36 7/8" 0 UP7813 2 4
12 MONKEY HANDLE BAR 25 1/2" 0 UP7814 8 8
13 3 TIER 2" PULL UP BAR 41 1/4" 0 UP7815 1 1
14 3 TIER 1 1/4" PULL UP BAR 41 1/4" 0 UP7816 1
15 ADJUSTABLE SLIDE CARRIAGE 5" 0 UP7817 2 2
16 RINGS SECTION BOOM ASSEMBLY, RIGHT 0 UP7818 1 1
17 RINGS SECTION BOOM ASSEMBLY, LEFT 0 UP7819 1 1
18 RINGS SECTION SWIVEL BRACKET 0 UP7820 2 2
19 REVERSE CHIN UP SIDE RACK 0 UP7821 1 1
20 REVERSE CHIN UP SIDE RACK WITH HOOK 0 UP7822 1 1
21 REVERSE CHIN PULLING BAR 0 UP7823 1 1
22 PEG BOARD SIDE FRAME 0 UP7824 1 1
23 PEG BOARD SIDE FRAME WITH HANDLE 0 UP7825 1 1
24 PEG BOARD CROSS BAR 0 UP7826 1 1
25 PEGBOARD HANDLE 0 UP7827 2 2
26 PEG BOARD HANDLES STORAGE PLATE 0 UP7828 1 1
27 PEG BOARD STEP UP FRAME 0 UP7829 1 1
48 TOP EXT TRAINING ZONE DOUBLE BAR 0 UP7850 2
62 BELT RETAINER PLATE BNH3000 2 2
63 BLACK NYLON WEBBING 1" BNH2809 2 2
64 BLACK NYLON IDLER PULLEY 3/8 X 1 1/2 X 4 1/2 BNH0564 2 2
65 BLACK NYLON RING 1 1/8 X 9 3/8 BNH4202 2 2
66 BRONZE BUSHING 1 X 1 1/4 X 3/4 X 1 1/2 X 1/8 BNH0527 4 4
74 FLAT HEAD SCREW, 3/8-16 X 3 BNH4013 4 4
75 FLAT WASHER SAE, #12 (1/4") BNH2982 8 8
77 FLAT WASHER SAE, 1/2" BNH2031 80 108
78 FLAT WASHER SAE, 3/8" BNH2030 8 8
80 FLAT WASHER, 1/2 ID X 1 1/2 OD X 3/16 THICK BNH4118 2 2
81 FLAT WASHER, 1/2 X 1 3/4 X 3/16 BNH2591 52 56
83 HEX HEAD CAP SCREW, 1/2-13 X 1 1/4 BNH2167 4 4
84 HEX HEAD CAP SCREW, 1/2-13 X 3 1/2 BNH2801 32 36
87 HEX HEAD CAP SCREW, 1/2-13 X 4 BNH2113 8 8
88 HEX HEAD CAP SCREW, 1/2-13 X 4 1/2 BNH2802 8 8
89 HEX HEAD CAP SCREW, 1/2-13 X 4 1/4 BNH2101 1 1
90 HEX HEAD CAP SCREW, 1/2-13 X 4 3/4 BNH2168 16 28
92 HEX HEAD CAP SCREW, 1/4-20 X 1 BNH4224 8 8
94 HEX HEAD CAP SCREW, 3/8-16 X 2 1/4 BNH2042 2 2
96 NYLON JAM LOCK NUT, 1/2-13 BNH2027 9 9
97 NYLON JAM LOCK NUT, 3/8-16 BNH2026 2 2
98 NYLON LOCK NUT, 1/2-13 BNH2029 56 72
46 CT8 Fitness Training System
www.tuffstuffitness.com
Page 47

CT-8000B / CT-8100E Parts List
ITEM NO. DESCRIPTION REV. PART NO. CT-8000B_QTY. CT-8100E_QTY.
99 NYLON LOCK NUT, 3/8-16 BNH2028 4 4
101 NYLON SNAP-IN FINISHING PLUG 1/2" BNH4182 4 8
105 ALUMINUM CAP 1.020" RD BNH0537 1 1
106 PLASTIC INSERT CAP 1" X 3" _ 11 GA BNH0007 1 1
108 PLASTIC INSERT CAP 3" SQ 10-14 GA BNH2992 6 8
110 PLASTIC TUBE GUIDE W/LIP-TEETH 3 1/2 X 3 1/2 BNH2874 4 4
112 PULL PIN 1/2 X 2 7/8 STIFF SPRING (STEEL KNOB) BNH2830 2 2
116 RUBBER FLAT TUBE .94 ID X .115 WALL X 15 BNH1301 1 1
117 SAFETY TAPE ANTI-SLIP 4 X 9 BNH0492 1 1
122 SOCKET SET SCREW Z/P 10-32 X 1/8 BNH2088 4 4
123 SPLIT LOCK WASHER B-Z/P 1/2" BNH2519 4 4
124 SPLIT LOCK WASHER B-Z/P 3/8" BNH2032 4 4
127 URETHANE BUMPER 962 BNH0244 2 2
130 PULL PIN NUT 25/64 X 3/4-10 K-103 BNH0181 2 2
131 PULL PIN STIFF SPRING 17/32 X 1 1/2 K-105SS BNH0519 2 2
132 STEEL BALL KNOB 1 3/8 UNC 3/8-16 CHROME BNH2574 2 2
136 SPLIT LOCK WASHER B-Z/P 1/4” BNH2686 8 8
139 HEX KEY 3/32" BNH2543 1 1
140 HEX KEY 5/16" BNH0374 1 1
143 Label DANGER CHECK retaining nut... 1.5x1 BNH2902 2 2
144 Label Danger Use This Equip. Only, 1 1/2 X 2 3/8" BNH3048 1 1
148 Label Warning Inspect Ring Straps For Wear, 2 1/2 x 2 1/2" BNH3040 2 2
149 Label Warning Atention Users Do not use this Ring, 2 1/2 x 2 1/2" BNH3087 2 2
151 Label WARNING Keep body, hands, 1 1/2 x 2 1/4 BNH2908 2 2
155 Label Warning Anchor Bolt, 2 X 1 1/4" BNH3089 6 8
157 Label Warning Serious Injury or Death, 2 1/4 x 8 1/4" BNH3047 1 1
158 Label CAUTION CHECK Pull-pin is fully... 1 1/2 x 1 3/8" BNH2912 2 2
159 Warranty Commercial, 2 1/4 x 6" BNH3041 1 1
160 Label Inspections Recomended, 2 X 6" BNH3044 1 1
161 Label Schedule Replacement Parts 1 5/8 X 3 3/4 BNH3045 1 1
162 Label IMPORTANT For smooth performance... BNH2916 2 2
163 Facility Sign Be Alert! the Fitness Equipment... BNH3002 1 1
164 Label_Serial#_CT8 BNH3043 1 1
165 Label_CT8 Upright Numbers #1-14 BNH3035 2 2
166 Label Made in USA 4x2 BNH3017 2 2
170 Label Warning DO NOT USE if not anchored, 1.5x2.27 BNH3071 2 2
www.tuffstuffitness.com
47CT8 Fitness Training System
Page 48

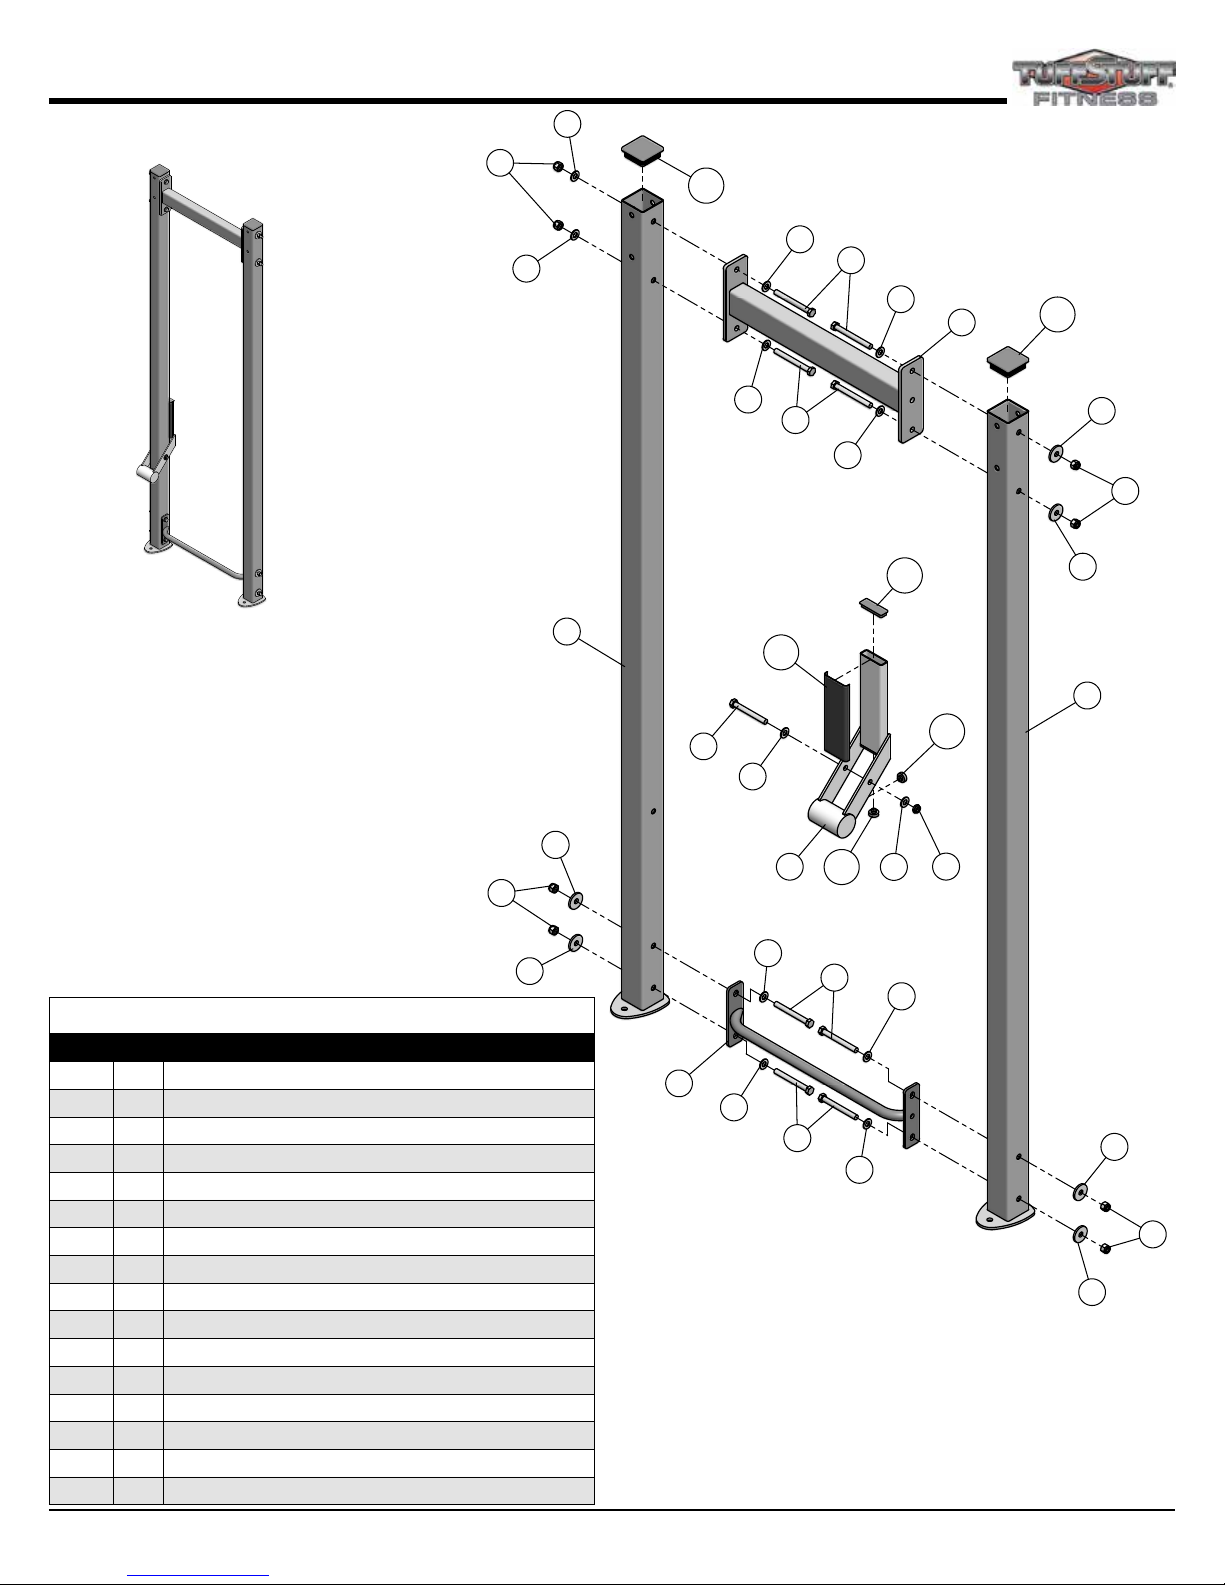
CT-8100E Exploded View
77
90
13
77
98
90
77
81
10
11
98
98
81
77
77
90
77
98
90
77
11
12
98
10
77
81
98
81
81
98
17
81
98
77
88
77
77
90
84
90
77
12
9
90
77
77
108
98
87
81
81
5
21
81
108
98
77
87
81
20
5
96
81
81
108
97
78
83
77
19
123
97
83
78
96
80
123
66
66
80
64
18
78
64
94
18
78
94
98
77
98
77
16
77
77
81
77
81
98
88
98
88
81
77
98
88
77
2
108
2
90
77
81
48 CT8 Fitness Training System
www.tuffstuffitness.com
65
63
65
63
Page 49

CT-8100E Exploded View
25
3
136
92
90
25
75
136
77
108
62
75
15
110
89
136
92
26
77
99
90
106
117
77
110
136
27
75
77
123
83
88
77
78
81
62
75
98
98
112
122
122
98
77
88
127
11
77
99
122
127
77
96
90
110
110
98
15
78
105
112
90
77
23
122
77
77
77
116
77
98
98
11
77
90
90
98
99
99
77
88
77
77
77
78
90
108
81
77
98
6
98
81
81
88
90
98
81
77
22
48
77
77
77
77
123
77
90
98
83
77
24
77
77
77
14
1
77
98
98
90
74
74
74
9
90
77
77
108
81
81
6
108
4
98
90
77
77
98
48
98
77
77
90
77
www.tuffstuffitness.com
49CT8 Fitness Training System
Page 50

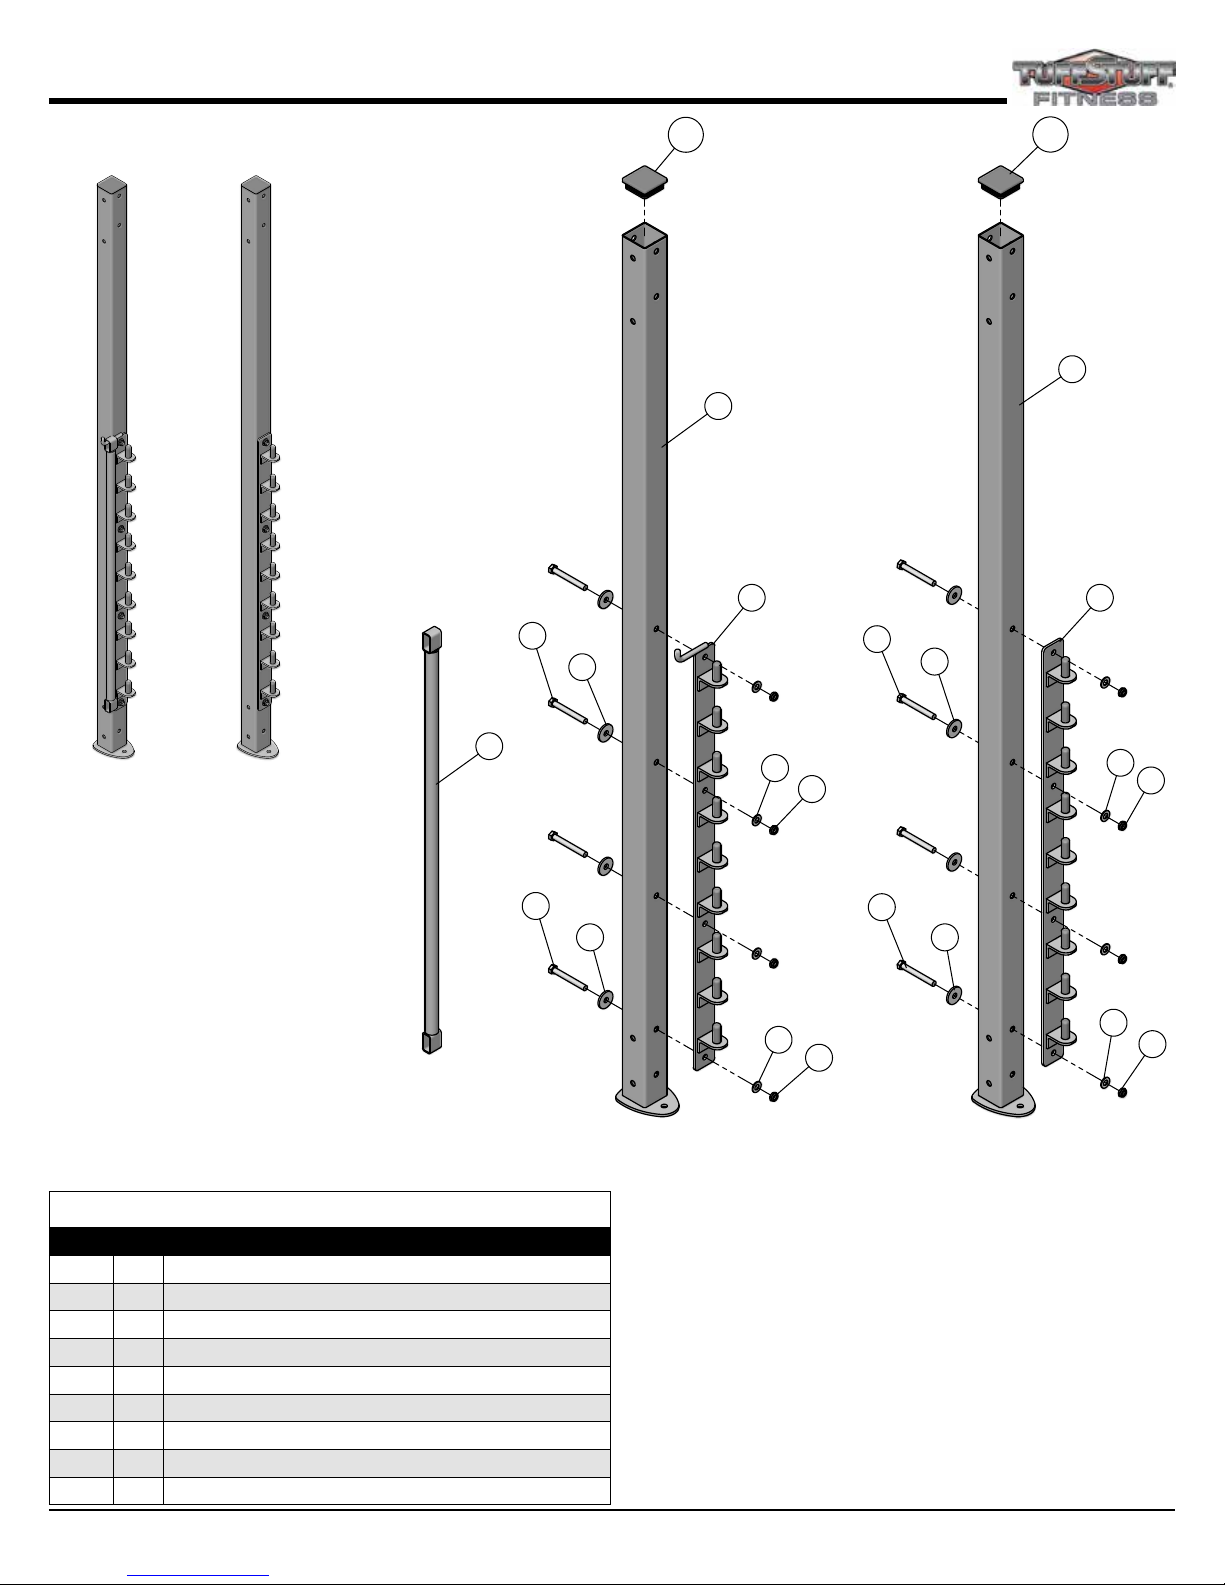
CT-8210 Exploded View
98
107
98
77
107
98
77
107
98
32
32
84
84
77
77
98
77
77
98
77
77
90
77
76
77
77
98
81
125
77
98
88
98
77
98
81
8
77
77
77
90
90
128
79
59
32
36
78
84
77
129
79
114
79
100
77
114
79
79
121
78
100
78
113
113
115
98
78
78
34
103
77
78
122
78
115
78
99
97
88
97
81
35
81
77
112
77
98
88
77
98
31
88
77
77
7
81
81
88
88
79
78
99
50 CT8 Fitness Training System
33
78
99
www.tuffstuffitness.com
128
Page 51

CT-8210 Parts List
ITEM NO. DESCRIPTION REV. PART NO. QTY.
7 MODULAR CROSS BRACE, BOTTOM 0 UP7809 1
8 MODULAR CROSS BRACE, TOP 0 UP7810 1
31 CENTER UPRIGHT 2" SQ X 82 1/4" 0 UP7833 1
32 MED BALL RACK 0 UP7834 3
33 REBOUNDER BASE FRAME 0 UP7835 1
34 REBOUNDER UPRIGHT TILT FRAME 0 UP7836 1
35 REBOUNDER ADJUSTABLE CARRIAGE 0 UP7837 1
36 REBOUNDER RING ASSEMBLY 0 UP7838 1
59 REBOUNDER MOUNTING PLATE 0 UP7861 1
76 PLASTIC TUBE GLIDE 2 X 1 X 8 BNH1874 2
77 FLAT WASHER SAE, 1/2" BNH2031 30
78 FLAT WASHER SAE, 3/8" BNH2030 10
79 FLAT WASHER SAE, 5/16" BNH2534 6
81 FLAT WASHER, 1/2 X 1 3/4 X 3/16 BNH2591 6
84 HEX HEAD CAP SCREW, 1/2-13 X 3 1/2 BNH2801 6
88 HEX HEAD CAP SCREW, 1/2-13 X 4 1/2 BNH2802 8
90 HEX HEAD CAP SCREW, 1/2-13 X 4 3/4 BNH2168 4
97 NYLON JAM LOCK NUT, 3/8-16 BNH2026 2
98 NYLON LOCK NUT, 1/2-13 BNH2029 18
99 NYLON LOCK NUT, 3/8-16 BNH2028 3
100 NYLON LOCK NUT, 5/16-18 BNH2056 3
103 PLASTIC INSERT CAP 1 1/2" SQ 10-14 GA BNH0009 1
107 PLASTIC INSERT CAP 2" SQ 10-14 GA BNH0012 3
112 PULL PIN 1/2 X 2 7/8 STIFF SPRING (STEEL KNOB) BNH2830 1
113 HEX HEAD CAP SCREW, 3/8-16 X 2 3/4 BNH2045 2
114 HEX HEAD CAP SCREW, 3/8-16 X 3 BNH2046 2
115 NYLON SPACER 3/8 X 3/4 X 3/8 BNH0392 4
121 HEX HEAD CAP SCREW, 3/8-16 X 2 1/2 BNH2044 1
122 SOCKET SET SCREW Z/P 10-32 X 1/8 BNH2088 1
125 TUFFSTUFF FITNESS PLAQUE 5 X 2 BNH4203 1
128 HEX HEAD CAP SCREW Z/P, 5/16-18 X 2 BNH4217 2
129 HEX HEAD CAP SCREW Z/P, 5/16-18 X 2 1/2 BNH4218 1
130 PULL PIN NUT 25/64 X 3/4-10 K-103 BNH0181 1
131 PULL PIN STIFF SPRING 17/32 X 1 1/2 K-105SS BNH0519 1
132 STEEL BALL KNOB 1 3/8 UNC 3/8-16 CHROME BNH2574 1
139 HEX KEY 3/32" BNH2543 1
143 Label DANGER CHECK retaining nut... 1.5x1 BNH2902 1
144 Label Danger Use This Equip. Only, 1 1/2 X 2 3/8" BNH3048 1
146 Label DANGER Do Not REMOVE... BNH2906 1
147 Label Danger For Use with Medi. Balls Only, 1 1/2 X 2 3/8" BNH3042 1
152 Label WARNING ATTENTION USERS!... BNH2910 1
154 Label Attension Users! Storage Hook Only, 2 3/4 x 1 1/4" BNH3050 1
155 Label Warning Anchor Bolt, 2 X 1 1/4" BNH3089 2
158 Label CAUTION CHECK Pull-pin is fully... 1 1/2 x 1 3/8" BNH2912 1
162 Label IMPORTANT For smooth performance... BNH2916 1
164 Label_Serial#_CT8 BNH3043 1
www.tuffstuffitness.com
51CT8 Fitness Training System
Page 52

CT-8220 Exploded View
29
72
125
73
78
99
72
126
69
90
137
71
77
30
69
78
99
71
70
77
77
126
137
125
98
98
77
81
88
98
81
8
77
77
90
77
28
137
60
70
137
71
88
81
81
171
77
77
98
88
71
81
98
171
81
98
7
171
77
81
88
81
52 CT8 Fitness Training System
www.tuffstuffitness.com
Page 53

CT-8220 Parts List
ITEM NO. DESCRIPTION REV. PART NO. QTY.
7 MODULAR CROSS BRACE, BOTTOM 0 UP7809 1
8 MODULAR CROSS BRACE, TOP 0 UP7810 1
28 LADDER RACK ASSEMBLY 0 UP7830 1
29 ADJUSTABLE PLATFORM ASSEMBLY 0 UP7831 1
30 ALUMINUM DIAMOND PLATE 1/4 X 16 X 20 1/4 0 UP7832 1
60 STEP DECK STORAGE RACK__CT-8220 0 UP7862 1
69 DELRIN 1/4 X 3 X 2 3/4 BNH2812 2
70 DELRIN 1/4 X 1 7/8 X 9 3/4 BNH2829 2
71 FLAT HEAD SCREW, 1/4-20 X 5/8 BNH1397 8
72 FLAT HEAD SCREW, 3/8-16 X 1 BNH2397 2
73 FLAT HEAD SCREW, 3/8-16 X 1 3/4 BNH0669 1
77 FLAT WASHER SAE, 1/2" BNH2031 16
78 FLAT WASHER SAE, 3/8" BNH2030 3
81 FLAT WASHER, 1/2 X 1 3/4 X 3/16 BNH2591 8
88 HEX HEAD CAP SCREW, 1/2-13 X 4 1/2 BNH2802 8
90 HEX HEAD CAP SCREW, 1/2-13 X 4 3/4 BNH2168 4
98 NYLON LOCK NUT, 1/2-13 BNH2029 12
99 NYLON LOCK NUT, 3/8-16 BNH2028 3
125 TUFFSTUFF FITNESS PLAQUE 5 X 2 BNH4203 1
126 URETHANE BUMPER 1 3/4 BNH0229 2
137 PLASTIC END CAP W/GROOVE 3 X 2 BLACK BNH1310 4
140 HEX KEY 5/16" BNH0374 1
141 HEX KEY 5/32" BNH2545 1
144 Label Danger Use This Equip. Only, 1 1/2 X 2 3/8" BNH3048 1
150 LABEL WARNING MAXIMUM WEIGHT LOAD 500 LBS BNH3024 1
153 Label WARNING ATTENTION USERS!... BNH2911 1
154 Label Attension Users! Storage Hook Only, 2 3/4 x 1 1/4" BNH3050 1
164 Label_Serial#_CT8 BNH3043 1
171 PLASTIC INSERT CAP 1 1/4” RD 11 GA BNH0573 14
www.tuffstuffitness.com
53CT8 Fitness Training System
Page 54

CT-8230 Exploded View
77
90
90
77
77
77
77
77
98
98
125
125
87
87
38
38
77
77
98
98
77
77
81
81
88
88
77
77
81
81
98
98
77
77
8
8
77
77
122
122
109
109
102
102
77
77
77
77
39
39
90
90
88
88
81
81
81
81
37
37
88
88
77
77
101
101
101
101
88
88
77
77
112
112
112
112
7
7
109
109
109
109
102
102
122
122
81
81
39
39
101
101
101
101
88
88
98
98
77
77
54 CT8 Fitness Training System
www.tuffstuffitness.com
81
81
98
98
98
98
77
77
81
81
Page 55

CT-8230 Parts List
ITEM NO. DESCRIPTION REV. PART NO. QTY.
7 MODULAR CROSS BRACE, BOTTOM 0 UP7809 1
8 MODULAR CROSS BRACE, TOP 0 UP7810 1
37 SELECTORIZED CENTER UPRIGHT 2 X 3 X 82" 0 UP7839 1
38 CENTER UPRIGHT 2 X 3 CONNECTOR 0 UP7840 1
39 PULLING ROPE ADJUSTABLE CARRIAGE 0 UP7841 2
77 FLAT WASHER SAE, 1/2" BNH2031 18
81 FLAT WASHER, 1/2 X 1 3/4 X 3/16 BNH2591 8
87 HEX HEAD CAP SCREW, 1/2-13 X 4 BNH2113 1
88 HEX HEAD CAP SCREW, 1/2-13 X 4 1/2 BNH2802 8
90 HEX HEAD CAP SCREW, 1/2-13 X 4 3/4 BNH2168 4
98 NYLON LOCK NUT, 1/2-13 BNH2029 13
101 NYLON SNAP-IN FINISHING PLUG 1/2" BNH4182 4
102 PLASTIC BLACK KNOB W/NYLON STUD 1/2-13 BNH0796 2
109 PLASTIC TUBE GUIDE W/LIP-TEETH 2 1/2 X 3 1/2 BNH0057 4
112 PULL PIN 1/2 X 2 7/8 STIFF SPRING (STEEL KNOB) BNH2830 2
122 SOCKET SET SCREW Z/P 10-32 X 1/8 BNH2088 2
125 TUFFSTUFF FITNESS PLAQUE 5 X 2 BNH4203 1
139 HEX KEY 3/32" BNH2543 1
143 Label DANGER CHECK retaining nut... 1.5x1 BNH2902 2
144 Label Danger Use This Equip. Only, 1 1/2 X 2 3/8" BNH3048 1
152 Label WARNING ATTENTION USERS!... BNH2910 1
154 Label Attension Users! Storage Hook Only, 2 3/4 x 1 1/4" BNH3050 1
158 Label CAUTION CHECK Pull-pin is fully... 1 1/2 x 1 3/8" BNH2912 2
162 Label IMPORTANT For smooth performance... BNH2916 2
164 Label_Serial#_CT8 BNH3043 1
www.tuffstuffitness.com
55CT8 Fitness Training System
Page 56

CT-8240 Exploded View
107
82
74
85
99
77
49
82
50
119
90
99
119
77
74
82
107
74
77
107
77
98
81
125
50
119
88
98
77
81
74
77
8
98
77
90
77
77
98
107
82
74
85
99
77
49
82
50
88
99
81
81
82
74
82
85
99
107
77
98
7
49
82
99
82
88
77
107
31
81
98
81
81
98
81
81
98
81
88
77
81
88
56 CT8 Fitness Training System
www.tuffstuffitness.com
77
81
98
98
81
77
Page 57

CT-8240 Parts List
ITEM NO. DESCRIPTION REV. PART NO. QTY.
7 MODULAR CROSS BRACE, BOTTOM 0 UP7809 1
8 MODULAR CROSS BRACE, TOP 0 UP7810 1
31 CENTER UPRIGHT 2" SQ X 82 1/4" 0 UP7833 1
49 KATTLE BELL SUPPORT FRAME 0 UP7851 3
50 KATTLE BELL SADDLE PLATE 0 UP7852 6
74 FLAT HEAD SCREW, 3/8-16 X 3 BNH4013 12
77 FLAT WASHER SAE, 1/2" BNH2031 22
81 FLAT WASHER, 1/2 X 1 3/4 X 3/16 BNH2591 14
82 FLAT WASHER, 3/8 X 1 1/2 X 3/16 BNH2396 12
85 HEX HEAD CAP SCREW, 1/2-13 X 3 1/4 BNH4199 6
88 HEX HEAD CAP SCREW, 1/2-13 X 4 1/2 BNH2802 8
90 HEX HEAD CAP SCREW, 1/2-13 X 4 3/4 BNH2168 4
98 NYLON LOCK NUT, 1/2-13 BNH2029 18
99 NYLON LOCK NUT, 3/8-16 BNH2028 12
107 PLASTIC INSERT CAP 2" SQ 10-14 GA BNH0012 6
119 SAFETY TAPE ANTI-SLIP 14 X 12 BNH4221 6
125 TUFFSTUFF FITNESS PLAQUE 5 X 2 BNH4203 1
140 HEX KEY 5/16" BNH0374 1
144 Label Danger Use This Equip. Only, 1 1/2 X 2 3/8" BNH3048 1
151 Label WARNING Keep body, hands, 1 1/2 x 2 1/4 BNH2908 1
154 Label Attension Users! Storage Hook Only, 2 3/4 x 1 1/4” BNH3050 1
164 Label_Serial#_CT8 BNH3043 1
www.tuffstuffitness.com
57CT8 Fitness Training System
Page 58

CT-8250 Exploded View
98
77
40
77
88
91
77
77
81
98
90
77
77
120
77
41
77
98
100
125
81
98
8
77
90
81
98
77
77
58 CT8 Fitness Training System
www.tuffstuffitness.com
Page 59

CT-8250 Parts List
ITEM NO. DESCRIPTION REV. PART NO. QTY.
8 MODULAR CROSS BRACE, TOP 0 UP7810 1
40 PUNCHING BAG TOP ASSEMBLY 0 UP7842 1
41 PUNCHING BAG SWIVEL BRACKET 0 UP7843 1
77 FLAT WASHER SAE, 1/2" BNH2031 12
81 FLAT WASHER, 1/2 X 1 3/4 X 3/16 BNH2591 3
88 HEX HEAD CAP SCREW, 1/2-13 X 4 1/2 BNH2802 2
90 HEX HEAD CAP SCREW, 1/2-13 X 4 3/4 BNH2168 4
91 HEX HEAD CAP SCREW, 1/2-13 X 6 3/4 BNH1378 1
98 NYLON LOCK NUT, 1/2-13 BNH2029 8
100 NYLON LOCK NUT, 5/16-18 BNH2056 1
120 SHOULDER BOLT ALLOY 3/8 X 3/4 BNH0718 1
125 TUFFSTUFF FITNESS PLAQUE 5 X 2 BNH4203 1
142 HEX KEY 3/16" BNH2542 1
144 Label Danger Use This Equip. Only, 1 1/2 X 2 3/8" BNH3048 1
154 Label Attension Users! Storage Hook Only, 2 3/4 x 1 1/4” BNH3050 1
164 Label_Serial#_CT8 BNH3043 1
www.tuffstuffitness.com
59CT8 Fitness Training System
Page 60

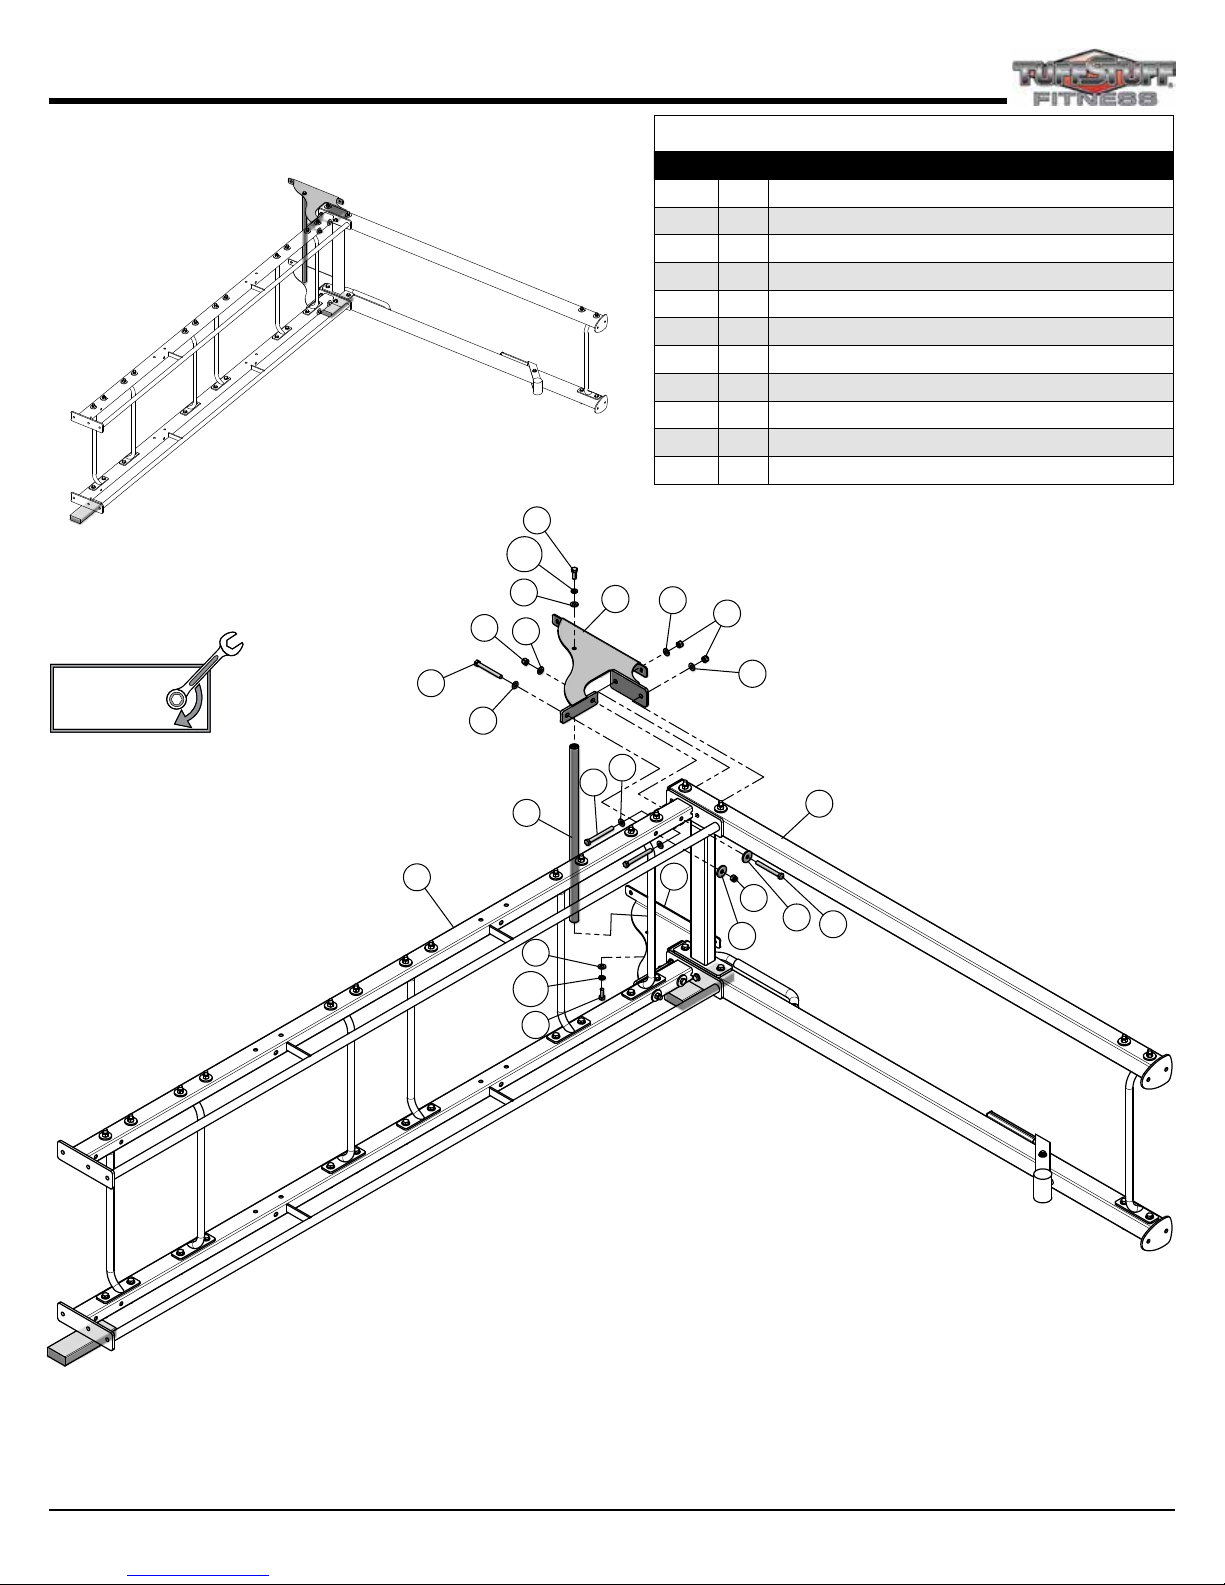
CT-8310 Exploded View
88
88
81
81
114
78
45
77
90
98
99
82
77
114
82
99
95
95
78
78
95
77
78
98
77
98
77
44
77
58
98
58
90
77
82
43
82
99
82
99
82
99
99
77
77
96
99
77
99
82
98
77
82
99
82
77
98
42
52
58
77
87
77
95
78
95
78
95
58
78
95
78
95
88
81
81
45
78
77
114
98
99
82
95
95
82
78
78
99
114
78
98
78
44
77
58
82
99
46
77
77
99
82
99
78
58
46
77
82
86
86
53
53
60 CT8 Fitness Training System
www.tuffstuffitness.com
Page 61

CT-8310 Parts List
ITEM NO. DESCRIPTION REV. PART NO. QTY.
42 SQUAT-PRESS SIDE FRAME W-BARHOLER 0 UP7844 1
43 SQUAT-PRESS SIDE FRAME 0 UP7845 1
44 SQUAT-PRESS BOTTOM CROSS BRACE 0 UP7846 2
45 WEIGHT PLATE STORAGE RACK 0 UP7847 2
46 REINFORCEMENT PLATE WITH LOOP 0 UP7848 2
52 OLYMPIC BAR STORAGE HOOK 1 UP7630 1
53 SAFETY SPOTTER SIDE FRAME 0 UP7855 2
58 BAR CATCH PLATE 3/8 X 6 3/8 X 20 1/4 0 UP7860 6
77 FLAT WASHER SAE, 1/2" BNH2031 24
78 FLAT WASHER SAE, 3/8" BNH2030 22
81 FLAT WASHER, 1/2 X 1 3/4 X 3/16 BNH2591 4
82 FLAT WASHER, 3/8 X 1 1/2 X 3/16 BNH2396 22
86 HEX HEAD CAP SCREW, 1/2-13 X 3 3/4 BNH4200 4
87 HEX HEAD CAP SCREW, 1/2-13 X 4 BNH2113 2
88 HEX HEAD CAP SCREW, 1/2-13 X 4 1/2 BNH2802 4
90 HEX HEAD CAP SCREW, 1/2-13 X 4 3/4 BNH2168 4
95 HEX HEAD CAP SCREW, 3/8-16 X 4 1/4 BNH2074 18
96 NYLON JAM LOCK NUT, 1/2-13 BNH2027 2
98 NYLON LOCK NUT, 1/2-13 BNH2029 12
99 NYLON LOCK NUT, 3/8-16 BNH2028 22
114 HEX HEAD CAP SCREW, 3/8-16 X 3 BNH2046 4
144 Label Danger Use This Equip. Only, 1 1/2 X 2 3/8" BNH3048 1
145 Label DANGER Must use SPOTTERS... BNH2905 1
150 LABEL WARNING MAXIMUM WEIGHT LOAD 500 LBS BNH3024 1
151 Label WARNING Keep body, hands, 1 1/2 x 2 1/4 BNH2908 2
155 Label Warning Anchor Bolt, 2 X 1 1/4" BNH3089 2
164 Label_Serial#_CT8 BNH3043 1
167 LABEL WARNING SAFETY SPOTTER ADJUSMENT BNH3025 1
168 LABEL-WARNING SAFETY SPOTTER ADJ RIGHT BNH3033 1
169 Label Warning Attention Users Safety Spotters BNH3019 1
www.tuffstuffitness.com
61CT8 Fitness Training System
Page 62

CT-8320 Exploded View
51
98
77
77
77
98
77
81
88
ITEM NO. DESCRIPTION REV. PART NO. QTY.
51 MULTI-STRAP TRAINING BOOM ASSY 0 UP7853 1
77 FLAT WASHER SAE, 1/2" BNH2031 6
81 FLAT WASHER, 1/2 X 1 3/4 X 3/16 BNH2591 2
88 HEX HEAD CAP SCREW, 1/2-13 X 4 1/2 BNH2802 2
90 HEX HEAD CAP SCREW, 1/2-13 X 4 3/4 BNH2168 2
98 NYLON LOCK NUT, 1/2-13 BNH2029 4
144 Label Danger Use This Equip. Only, 1 1/2 X 2 3/8" BNH3048 1
164 Label_Serial#_CT8 BNH3043 1
77
90
77
81
62 CT8 Fitness Training System
www.tuffstuffitness.com
Page 63

CT-8330 Exploded View
77
90
77
77
88
56
61
66
87
80
77
123
83
77
54
98
57
77
81
55
77
98
81
98
77
ITEM NO. DESCRIPTION REV. PART NO. QTY.
54 LANDMINE PIVOT ARM 0 UP7856 1
55 LANDMINE BASE FRAME 0 UP7857 1
56 CROSS CONNECTOR 0 UP7858 1
57 OLYMPIC BAR STORAGE HOOK PLATE 0 UP7859 1
61 PIVOT AXLE 1 X 3 (Ø33/64 ID) 0 UP7863 1
66 BRONZE BUSHING 1 X 1 1/4 X 3/4 X 1 1/2 X 1/8 BNH0527 4
77 FLAT WASHER SAE, 1/2" BNH2031 8
80 FLAT WASHER, 1/2 ID X 1 1/2 OD X 3/16 THICK BNH4118 1
81 FLAT WASHER, 1/2 X 1 3/4 X 3/16 BNH2591 2
83 HEX HEAD CAP SCREW, 1/2-13 X 1 1/4 BNH2167 1
87 HEX HEAD CAP SCREW, 1/2-13 X 4 BNH2113 1
88 HEX HEAD CAP SCREW, 1/2-13 X 4 1/2 BNH2802 2
90 HEX HEAD CAP SCREW, 1/2-13 X 4 3/4 BNH2168 2
96 NYLON JAM LOCK NUT, 1/2-13 BNH2027 1
98 NYLON LOCK NUT, 1/2-13 BNH2029 4
123 SPLIT LOCK WASHER B-Z/P 1/2" BNH2519 1
133 MAGNET Ø.710 OD X Ø.385 ID X .315 BNH4219 1
134 SOCKET SET SCREW ALLOY 1/4-20 X 1/4 BNH0790 1
135 DELRIN SPACER Ø.320 BNH2831 1
138 HEX KEY 1/8" BNH2541 1
144 Label Danger Use This Equip. Only, 1 1/2 X 2 3/8" BNH3048 1
151 Decal-WARNING Keep body, hands, 1 1/2 x 2 1/4 BNH2908 1
156 LABEL WARNING DO NOT USE HOLDER FOR... BNH3023 1
164 Label_Serial#_CT8 BNH3043 1
66
66
96
135
133
134
www.tuffstuffitness.com
63CT8 Fitness Training System
Page 64

CT-8340 Exploded View
67
67
71
71
104
118
118
104
ITEM NO. DESCRIPTION REV. PART NO. QTY.
47 DIP HANDLES WLDMT 0 UP7854 1
67 DELRIN 1/4 X 2 3/8 X 4 3/4 BNH2810 2
68 DELRIN 1/4 X 2 3/8X 7 7/8 BNH2811 1
71 FLAT HEAD SCREW, 1/4-20 X 5/8 BNH1397 6
97 NYLON JAM LOCK NUT, 3/8-16 BNH2026 1
104 PLASTIC INSERT CAP 1 3/4" RD 10-14 GA BNH0011 2
111 PULL PIN AXLE 1 1/8 X 3 1/2 BNH2808 1
118 RUBBER TUBE 1.625 ID X .125 WALL X 14 BNH1363 2
131 PULL PIN STIFF SPRING 17/32 X 1 1/2 K-105SS BNH0519 1
132 STEEL BALL KNOB 1 3/8 UNC 3/8-16 CHROME BNH2574 1
140 HEX KEY 5/16" BNH0374 1
141 HEX KEY 5/32" BNH2545 1
144 Label Danger Use This Equip. Only, 1 1/2 X 2 3/8" BNH3048 1
158 Label CAUTION CHECK Pull-pin is fully... 1 1/2 x 1 3/8" BNH2912 1
164 Label_Serial#_CT8 BNH3043 1
47
71
97
111
131
68
132
64 CT8 Fitness Training System
www.tuffstuffitness.com
Page 65

Inspection / Maintenance
Perform regular maintenance (see Inspection Label). Pay special attention to areas most susceptible to wear and tear.
TuStu recommends you maintain a service contract with a TuStu Authorized Dealer or a Professional Service Company approved by
TuStu. Keep a service log of all maintenance and repair activities. Extra copies can be downloaded from our website.
INSPECTION / MAINTENANCE RECORDS
DATE REPLACEMENT REPAIRS INSPECTED BY
WARRANTY REPAIRS
DATE REPLACEMENT REPAIRS INSPECTED BY
www.tuffstuffitness.com
65CT8 Fitness Training System
Page 66

Carefully read ALL DANGER, WARNING & CAUTION labels posted on the machine
222157 222154 222153 222150
222148
222170
!
WARNING
222155
INSPECT
Ring strap for wear
and tear. Look for loose
fittings, worn, cracked
or frayed strap.
If appears worn or damaged, DO NOT USE.
Inform floor personnel immediately.
BNH3040
222167
151
222
222152
222168
222144
222149
147
222
66 CT8 Fitness Training System
www.tuffstuffitness.com
Page 67

Carefully read ALL DANGER, WARNING & CAUTION labels posted on the machine
222146
222143
222162
222166
222165 222161 222159222160
222158
®
222163
BE ALERT!
THE FITNESS EQUIPMENT IN THIS
FACILITY PRESENTS HAZARDS
WHICH, IF NOT AVOIDED, COULD
CAUSE SERIOUS INJURY OR DEATH.
Prior to using the equipment, READ the
warning labels and instruction placards
affixed to each machine.
If you are unsure on how to use a machine,
seek the assistance of our floor personnel.
We will be happy to instruct you on how to
use the equipment properly.
Immediately report any
that is not functioning properly to our floor
personnel so that it may be evaluated and
service promptly.
DO NOT ATTEMPT to use or fix any piece of
equipment that is not functioning properly.
piece of equipment
TUFFSTUFF FITNESS EQUIPMENT INC. CHINO, CA 91710ASTM F1749-96
BNH3002
222169
222145
It is extremely important that the BE ALERT!
be installed in plain view of the unit�
You should have received it along with this Owners Manual� If you did
not receive this Sign with your order, you can obtain one at no cost to you
from TuStu Fitness by contacting our service department at:
1 (888) 884-8275
service@tustu�net
service1@tustu�net
222163
Sign shown to the left
222164
www.tuffstuffitness.com
67CT8 Fitness Training System
Page 68

CT-8000B Label Placement
222161
222151
222151
222166
222165
222149
222148
222160
222155
222159
222164
222155
222155
222155
68 CT8 Fitness Training System
www.tuffstuffitness.com
222163
BE ALERT!
THE FITNESS EQUIPMENT IN THIS
FACILITY PRESENTS HAZARDS
WHICH, IF NOT AVOIDED, COULD
CAUSE SERIOUS INJURY OR DEATH.
Prior to using the equipment, READ the
warning labels and instruction placards
affixed to each machine.
If you are unsure on how to use a machine,
seek the assistance of our floor personnel.
We will be happy to instruct you on how to
use the equipment properly.
Immediately report any
that is not functioning properly to our floor
personnel so that it may be evaluated and
service promptly.
DO NOT ATTEMPT to use or fix any piece of
equipment that is not functioning properly.
piece of equipment
TUFFSTUFF FITNESS EQUIPMENT INC. CHINO, CA 91710ASTM F1749-96
BNH3002
Page 69

CT-8000B Label Placement
222162
222166
222143
222158
222149
222162
222143
222170
222148
222157
222158
222144
222165
222170
222155
222155
www.tuffstuffitness.com
69CT8 Fitness Training System
Page 70

CT-8100E Label Placement
222161
222160
222159
222151
222151
222155
222155
222166
222165
222149
222148
222155
222163
222164
222155
70 CT8 Fitness Training System
www.tuffstuffitness.com
BE ALERT!
THE FITNESS EQUIPMENT IN THIS
FACILITY PRESENTS HAZARDS
WHICH, IF NOT AVOIDED, COULD
CAUSE SERIOUS INJURY OR DEATH.
Prior to using the equipment, READ the
warning labels and instruction placards
affixed to each machine.
If you are unsure on how to use a machine,
seek the assistance of our floor personnel.
We will be happy to instruct you on how to
use the equipment properly.
Immediately report any
that is not functioning properly to our floor
personnel so that it may be evaluated and
service promptly.
DO NOT ATTEMPT to use or fix any piece of
equipment that is not functioning properly.
piece of equipment
TUFFSTUFF FITNESS EQUIPMENT INC. CHINO, CA 91710ASTM F1749-96
BNH3002
Page 71

CT-8100E Label Placement
222155
222155
222166
222157
222162
222143
222158
222170
222155
222149
222165
222162
222143
222158
222155
222148
222170
222144
www.tuffstuffitness.com
71CT8 Fitness Training System
Page 72

CT-8210 Label Placement
Rotated
View
222146
222162
154
222
222152
222143
222144
222158
222155
72 CT8 Fitness Training System
www.tuffstuffitness.com
222164
222147
222155
Page 73

CT-8220 Label Placement
154
222
222153
222144
222164
222150
www.tuffstuffitness.com
73CT8 Fitness Training System
Page 74

CT-8230 Label Placement
222154
222143
Rotated View
222158
222144
222158
222162
222152
222143
222164
74 CT8 Fitness Training System
www.tuffstuffitness.com
222162
Page 75

CT-8240 Label Placement
222154
222144
222151
222164
www.tuffstuffitness.com
75CT8 Fitness Training System
Page 76

CT-8250 Label Placement
222154
164
222
222144
CT-8320 Label Placement
222144
222164
76 CT8 Fitness Training System
www.tuffstuffitness.com
Page 77

CT-8310 Label Placement
222145 222144
222164
222151
222151
222150
222169
222167
222168
222155
222155
www.tuffstuffitness.com
77CT8 Fitness Training System
Page 78

CT-8330 Label Placement
222151
144
222
222164
CT-8340 Label Placement
222164
222158
222144
78 CT8 Fitness Training System
www.tuffstuffitness.com
Page 79

Notes
TuffStuff Fitness Equipment Inc. continually engages in research related to product improvements. Please take the time to carefully read through this manual
thoroughly. Instructions contained in this manual are not intended to cover all details or variations possible with this equipment, or to cover every contingency
that may be met in conjunction with assembly, installation, operation, maintenance or troubleshooting of the equipment. Eventhough we have prepared
this manual with extreme care, neither the manufacturer nor the author can accept responsibility for any errors in, or omission from, the information given.
Should additional information be required, or should situations arise that are not covered by this manual, the matter should be directed to Customer Service at
TuffStuff Fitness Equipment Inc. in Chino, California.
www.tuffstuffitness.com
79CT8 Fitness Training System
Page 80

COMMERCIAL WARRANTY
This warranty applies only in the United States to the products manufactured or distributed by TuStu Fitness Equipment Inc. under the
TUFFSTUFF brand name. TuStu warrants to the original purchaser that TuStu equipment will be free from defects in material and workmanship.
All warranty periods begin to run from the date of purchase to the original purchaser. The warranty and remedies set forth herein are conditioned
upon proper storage, installation, use and maintenance and conformance with any recommendations of TuStu. This warranty does not cover
products not manufactured by TuStu or products which are altered without the express written consent of TuStu.
Commercial Warranty:
Ten (10) Years: Structural Frames (coating excluded).
One (1) Year: Peg Board (excluding nish & logo) and Pulleys.
Six (6) Months: Coating, Plastic Glides, Nylon Rings & Straps and Hardware.
Thirty (90) Days: Medicine Ball Rebounder.
Accessories not included or covered under warranty.
The obligation of TuStu under this warranty is limited to repairing or replacing warranted defective parts as TuStu may elect, at TuStu’s
facility in Chino, California without charge to the purchaser. Purchaser is responsible for installation of repaired or replaced parts, and all
transportation and insurance costs on returned or replaced equipment to and from TuStu’s facility in Chino.
THE FOREGOING SHALL CONSTITUTE THE SOLE REMEDY OF THE PURCHASER AND THE SOLE LIABILITY OF TUFFSTUFF WITH REGARD
TO WARRANTY. NO IMPLIED STATUTORY WARRANTY OR IMPLIED STATUTORY WARRANTY OF MERCHANTABILITY OR FITNESS FOR A
PARTICULAR PURPOSE SHALL APPLY. IN NO EVENT, WHETHER AS A RESULT OF BREACH OF CONTRACT, WARRANTY, NEGLIGENCE OR
OTHERWISE, SHALL TUFFSTUFF BE LIABLE FOR SPECIAL, INCIDENTAL OR CONSEQUENTIAL DAMAGES INCLUDING, BUT NOT LIMITED
TO, LOSS OF PROFITS OR REVENUE, LOSS OF USE OF EQUIPMENT, COST OF CAPITAL, COST OF SUBSTITUTION EQUIPMENT, DOWNTIME
COST, OR CLAIMS OF CUSTOMERS OR PURCHASER FROM SUCH DAMAGE.
This written warranty is the nal, complete and exclusive agreement of the parties with respect to the quality or performance of the equipment
and no action for breach of this written warranty or any implied warranty shall be commenced more than one (1) year after the accrual of the
cause of action. No modication of this warranty or waiver of its terms shall be binding on either party unless approved in writing by an
authorized representative of the party. Contact TuStu Fitness Equipment Inc. at 13971 Norton Avenue, Chino, CA 91710, before returning
any defective equipment.
This warranty gives you specic legal rights and you may also have other rights, which may vary from state to state.
SERIAL #
Write your Serial number here for future reference Purchase Date
TuStu Fitness Equipment Inc.
13971 Norton Avenue, Chino, CA 91710, USA Phone: 909-629-1600 Fax: 909-629-4967
www.tustutness.com service@tustu.net or service1@tustu.net
 Loading...