

Page 1
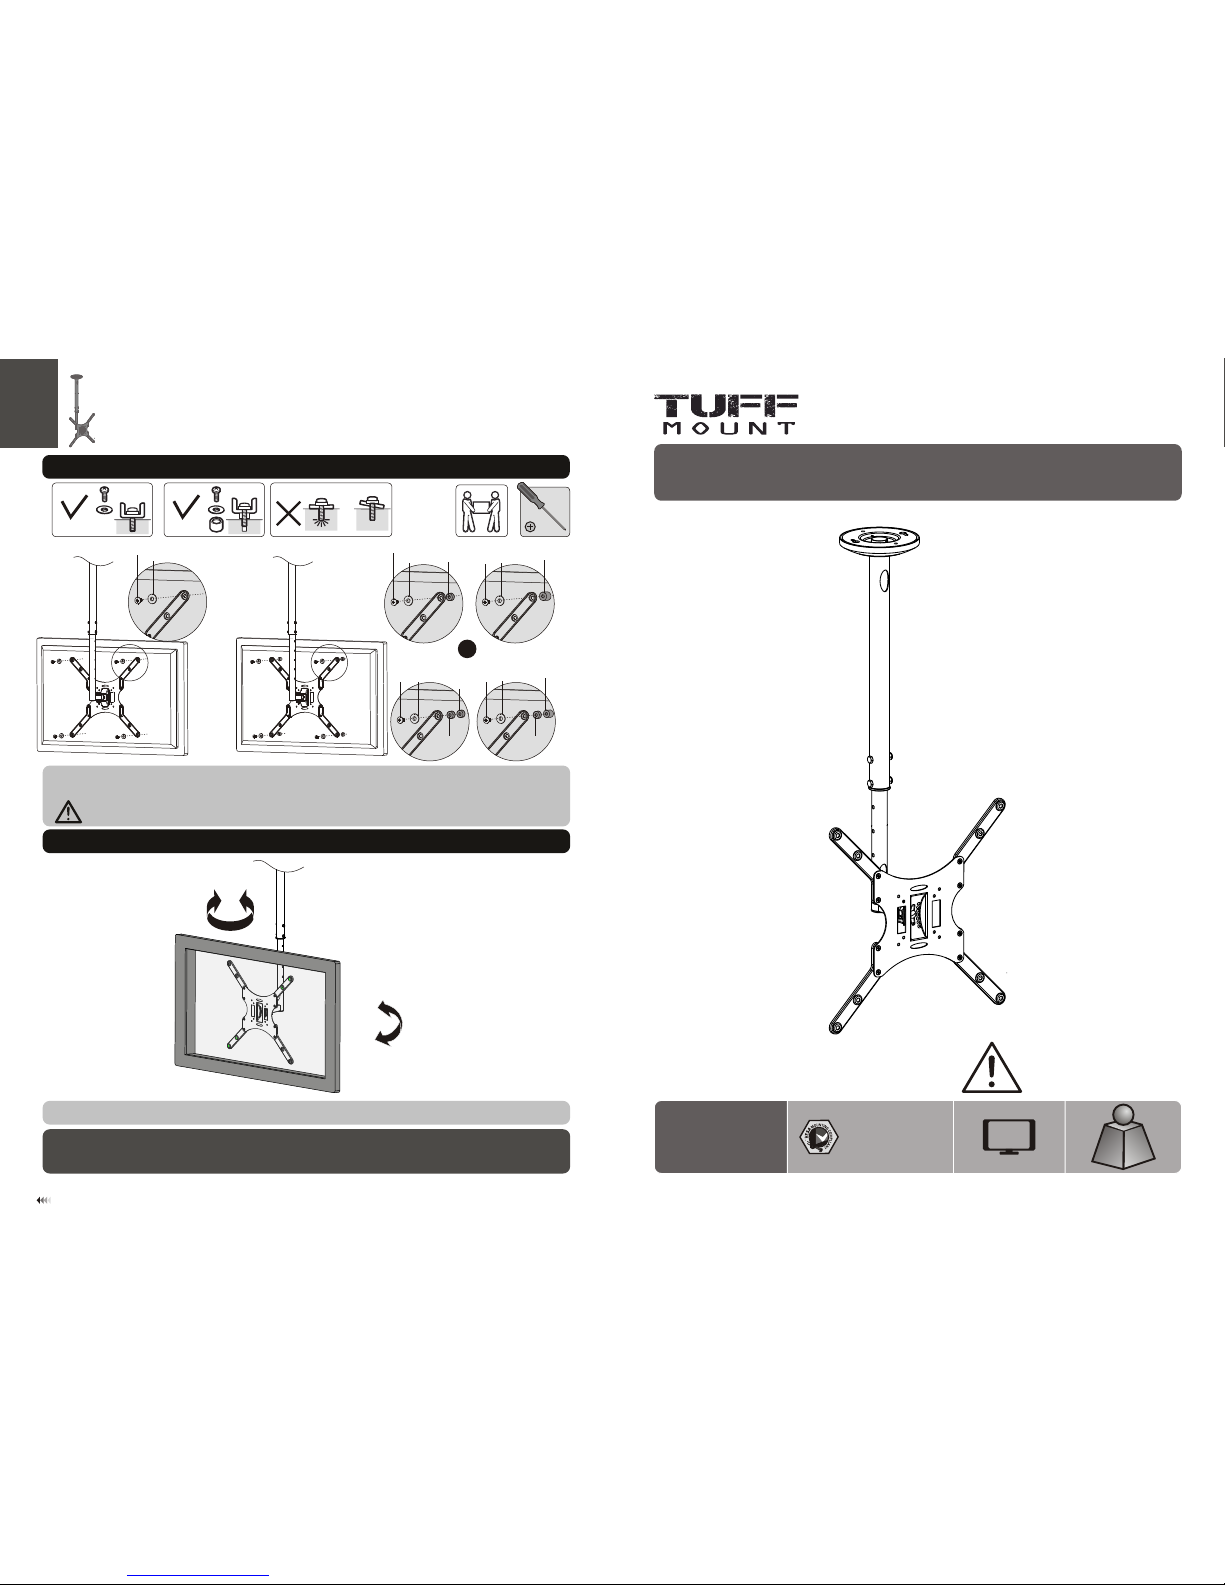
6. Installing the Display
INSTALLATIO N MA NU AL
LCD Ceiling Mount
C7 0 16
55"
MAX
75x 75 10 0x100
200 x100/ 200x2 00
300 x300/ 400x4 00
/
ISSUED: DEC. 2015
30k g
(66 lbs)
RATED
7. Adjustment
Use t he tilt a djust ing kno b to adju st your d ispla y to the de sired a ngle th en tigh ten it.
Mai ntena nce
• Che ck that t he brac ket is se cure an d safe to u se at reg ular in terva ls(at l east ev ery thr ee mont hs).
• Ple ase con tact yo ur deal er if you h ave any q uesti ons.
Tig hten al l screw s but do no t ove r tight en.
Lif t the dis play an d match t he hole s on your d ispla y with th e holes o n the VES A pl ate. Se cure yo ur
dis play to t he moun t by tigh tenin g screw s.
Note : C hoos e the app ropriat e s crew s, wash ers and spa cers (i f necessa ry) accor ding to the ty pe of screen .
TV
TV
TVTV
7
CAU TI ON : DO NO T EXCEE D
RATED L ISTED W EIGHT. SE RIOUS
INJ URY OR PRO PERTY DA MAGE
MAY OCC UR!
M-A / B/M -CM-
M-F /M-G
or
M-C
M-G
D
M-E
M-
M-G
M-H
M-I
18 0°
+2 0°
-2 0°
FOR CUS TO MER SER VI CE CALL 855-44 9- 88 33 TU FF
D
M-E
M-
M-G
M-I
M-H
M-C
M-D
M-E
M-G
M-H
M-H
Page 2
21
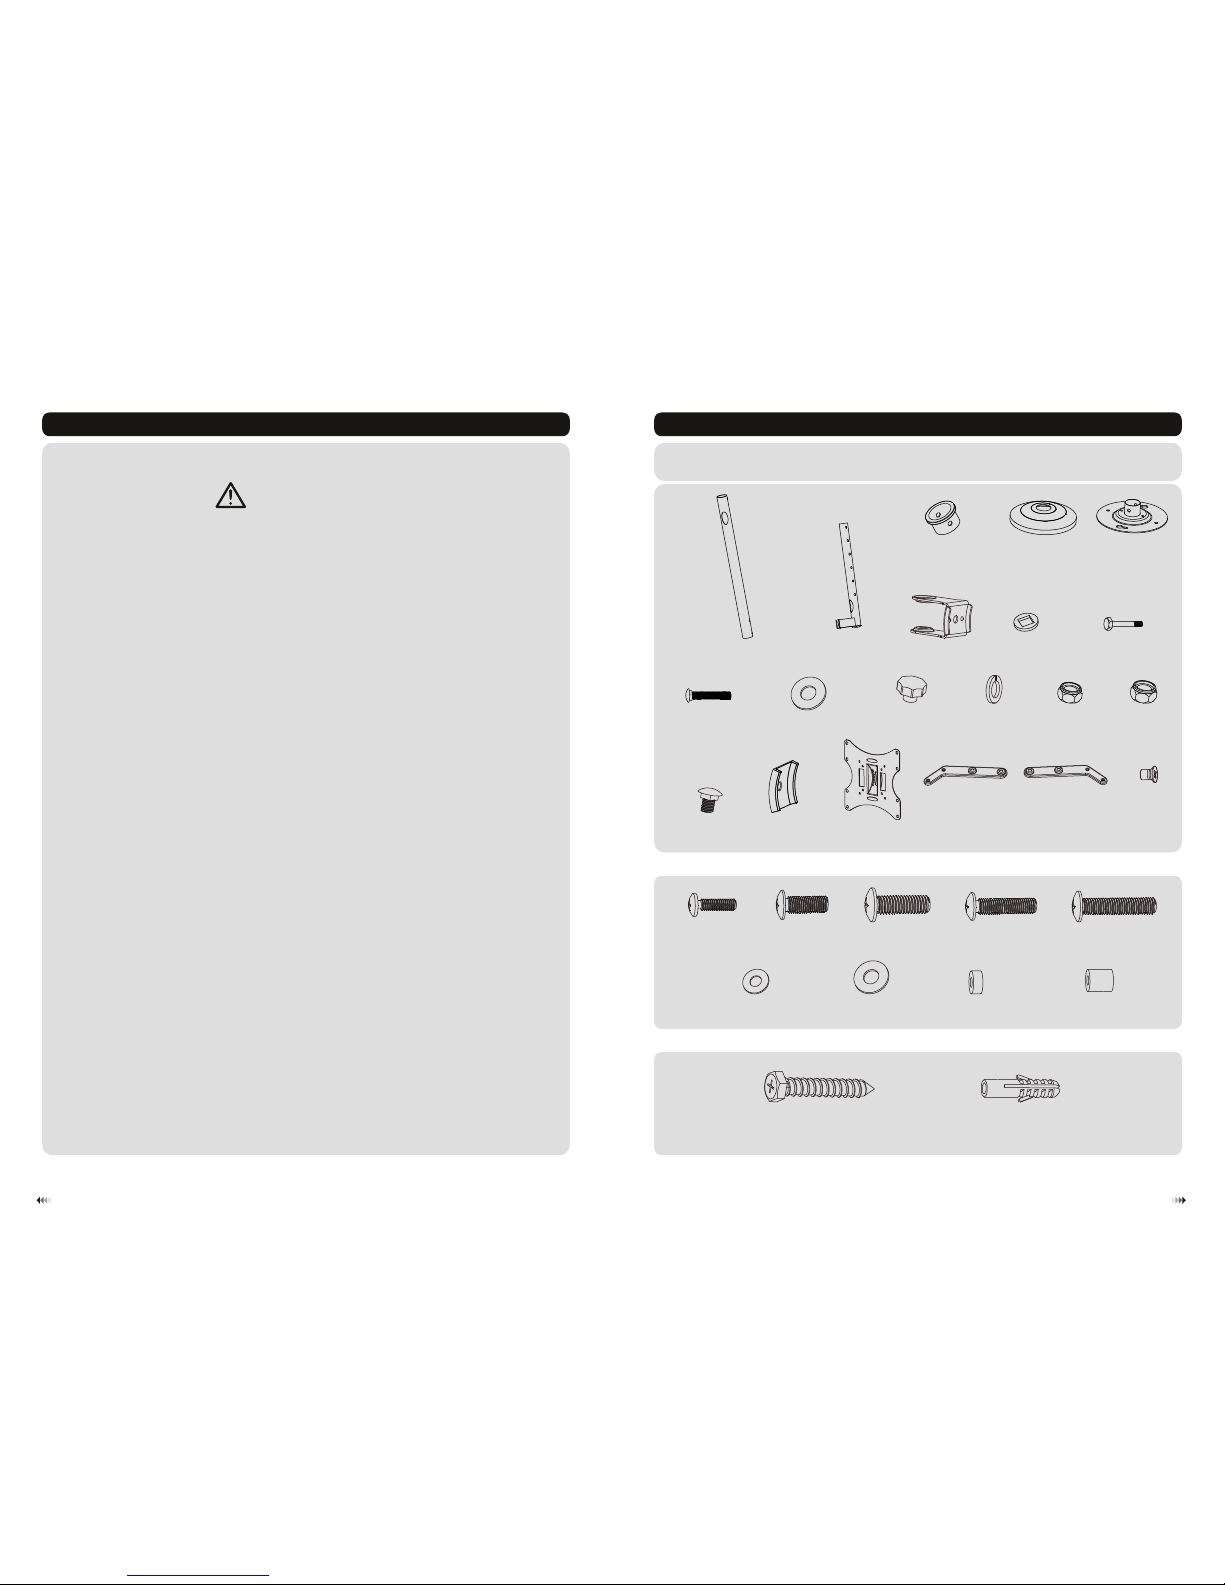
Component Checklist
IMPOR TANT: En sure th at you ha ve rece ived al l parts a ccord ing to th e compo nent ch eckli st prio r to inst allat ion.
If an y parts a re miss ing or fa ulty, tel ephon e your lo cal dis tribu tor for a r eplac ement .
Packa ge M
Packa ge W
con crete a nchor
W-B
(x4 )
ST6 .3x55 (x4 )
W-A
D8 (x4 )
M-G
was her
D (x4 )
M-F
5 was her
sma ll spac er
M-H
(x8 )
M8x 20
M-C
(x4 )
M5x 14
M-A
(x4 )
M6x 14
M-B
(x4 )
plastic cover
D
(x1)
grip holder (x1)
F
ceiling plate
E
(x1)
plastic bushing (x2)
C
outer column (x1)Ainner columnB (x1)
M8 wa sher (x 2)
G
M6x 45(x3 )
H
M8x 45(x1 )
I
kno b (x1)
K
plastic pad (x1)
P
M6 nu t (x3)MM8 nu t (x1)
N
was her (x1 )
L
M8x 20 (x1)
O
VES A pl ate Q(x1 )
D8 (x2 )
J
was her
NOTE: R ea d the e nt ire ins tr uct io n ma nua l be fore yo u st art i ns ta lla ti on and as se mbl y.
WARNING
• Do not begin the in sta llation unti l you have re ad and unde rst ood all the i nst ruc tions
and wa rni ngs contained in this ins tal lat ion sheet. If yo u have any questions
regarding an y of the i nstructions or wa rni ngs, plea se co nta ct you r loc al distributor.
• This mounting brac ket was des ign ed to be i nst all ed and util ise d ONLY as
specified in this ma nua l. Improper in sta lla tio n of thi s pro duct may ca use damage
or ser iou s injury.
• This product sh oul d only be ins tal led by some one with go od mechanical abi lit y
who ha s basic bui ldi ng experience and f ull y unde rst and s thi s manual.
• Make sure that th e sup porting surf ace w ill safel y sup por t the co mbi ned weight of
the eq uip men t and al l attached har dwa re an d comp one nts .
• If mou nti ng to wo ode n joist cei lin g, ma ke sure tha t mounting scr ews are anc hor ed
into the center of the joist . The us e of a stu d finder is highly rec omm end ed.
• Alway s use an a ssi sta nt or me cha nic al lifting equ ipm ent to safe ly lift and p osition
the eq uip men t.
• Tight en screws firm ly, but do not over tig hte n. Over tig hte nin g can cause d ama ge
to the items, This grea tly r edu ces their h old ing power.
• This product is i ntended for in doo r use on ly. Using thi s pro duc t outd oor s cou ld
lead to product fail ure and per son al in jur y.
VES A ad apter R(x2 )VE SA ada pte r (x2)S M6 sc rew T(x8 )
M8x 30 (x4)
M-E
M6x 30 (x4)
M-D
sma ll spac er (x4)
M-I
Page 3
WARNIN G
• Make su re that m ounti ng scre ws are an chored into the center of the joist. Th e use of a st ud
finde r is high ly reco mmend ed.
• Insta llers m ust ver ify tha t the sup porti ng surf ace will safely support the combin ed weig ht of the
equip ment an d all att ached h ardware and components.
4
3
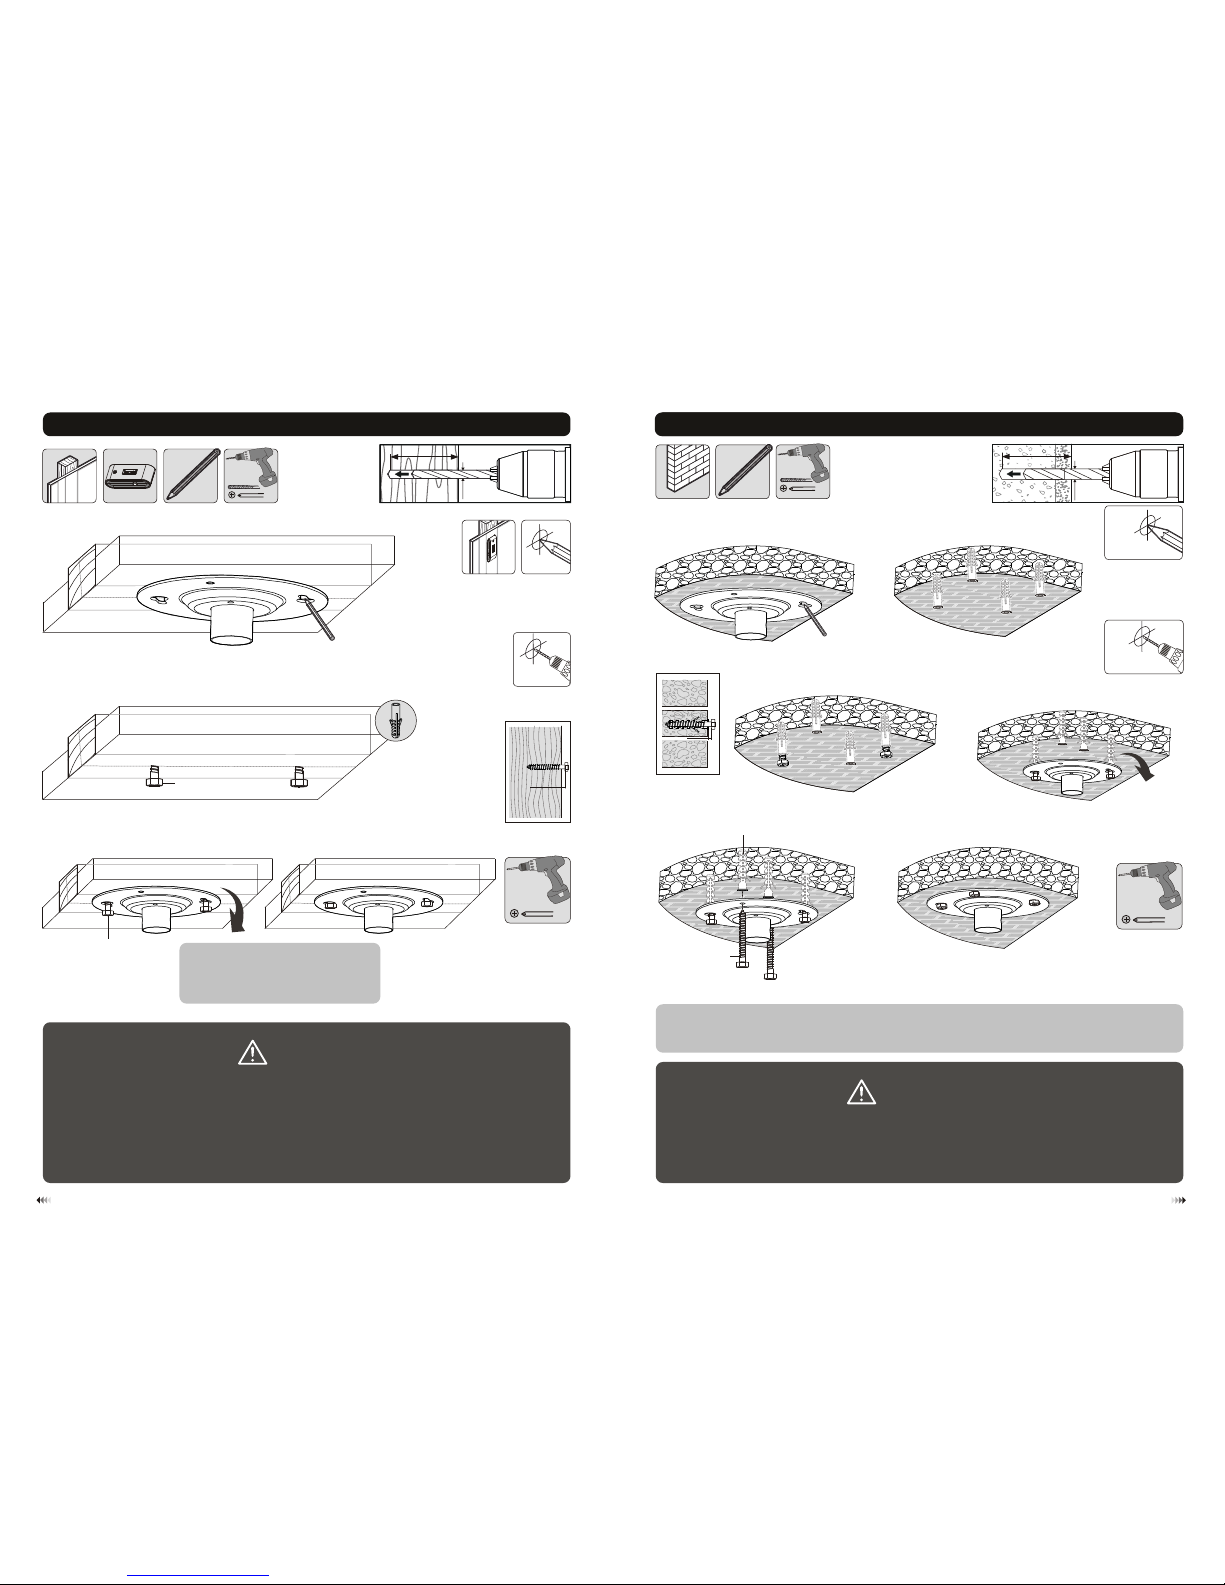
1a. For Wood en Joist Ce iling Mou nting
Drill two
pilot holes
3
Screw the
ceiling plate
onto the
ceiling
3mm
ø 4.5mm
(ø 3/16")
55mm
(2.2")
55mm
(2.2")
2
1
Find a nd mark
the ex act loca tion
of mou nting hol es
W-A
Hang th e ce iling plat e so that th e screws
fit int o th e ke yhole open ings. Tur n th e
ceil ing pla te into pl ace and then ti ghten
the scr ews.
1b. Sol id Bric k and Con cr ete Blo ck Mounti ng:
Inst all ers mus t veri fy tha t the sup port ing su rface will s afel y supp ort th e combi ned we ight o f
the eq uipm ent an d all att ache d hard ware and com pone nts.
WARNIN G
1b. For Solid Br ick and C oncrete M ounting
Drill four
pilot holes
2
Screw the
ceiling plate
onto the
ceiling
3mm
Han g the cei ling pl ate so th at the sc rews fi t into th e keyho le open ings. Tu rn the ce iling p late in to plac e .
Do no t tight en scre ws at thi s time. F ix the ce iling p late us ing the t wo othe r screw s and the n tight en all
the s crews !
60mm
(2.4")
60mm
(2.4")
ø 10mm
(ø 3/8")
1
Mark t he exact
loca tion of
moun ting
hole s
W-A
W-B
W-A
X
Tighten both screws leaving
a 3mm space from the ceiling.
Tighten both screws
leaving a 3mm space
from the ceiling.
Page 4
65
H
M
C
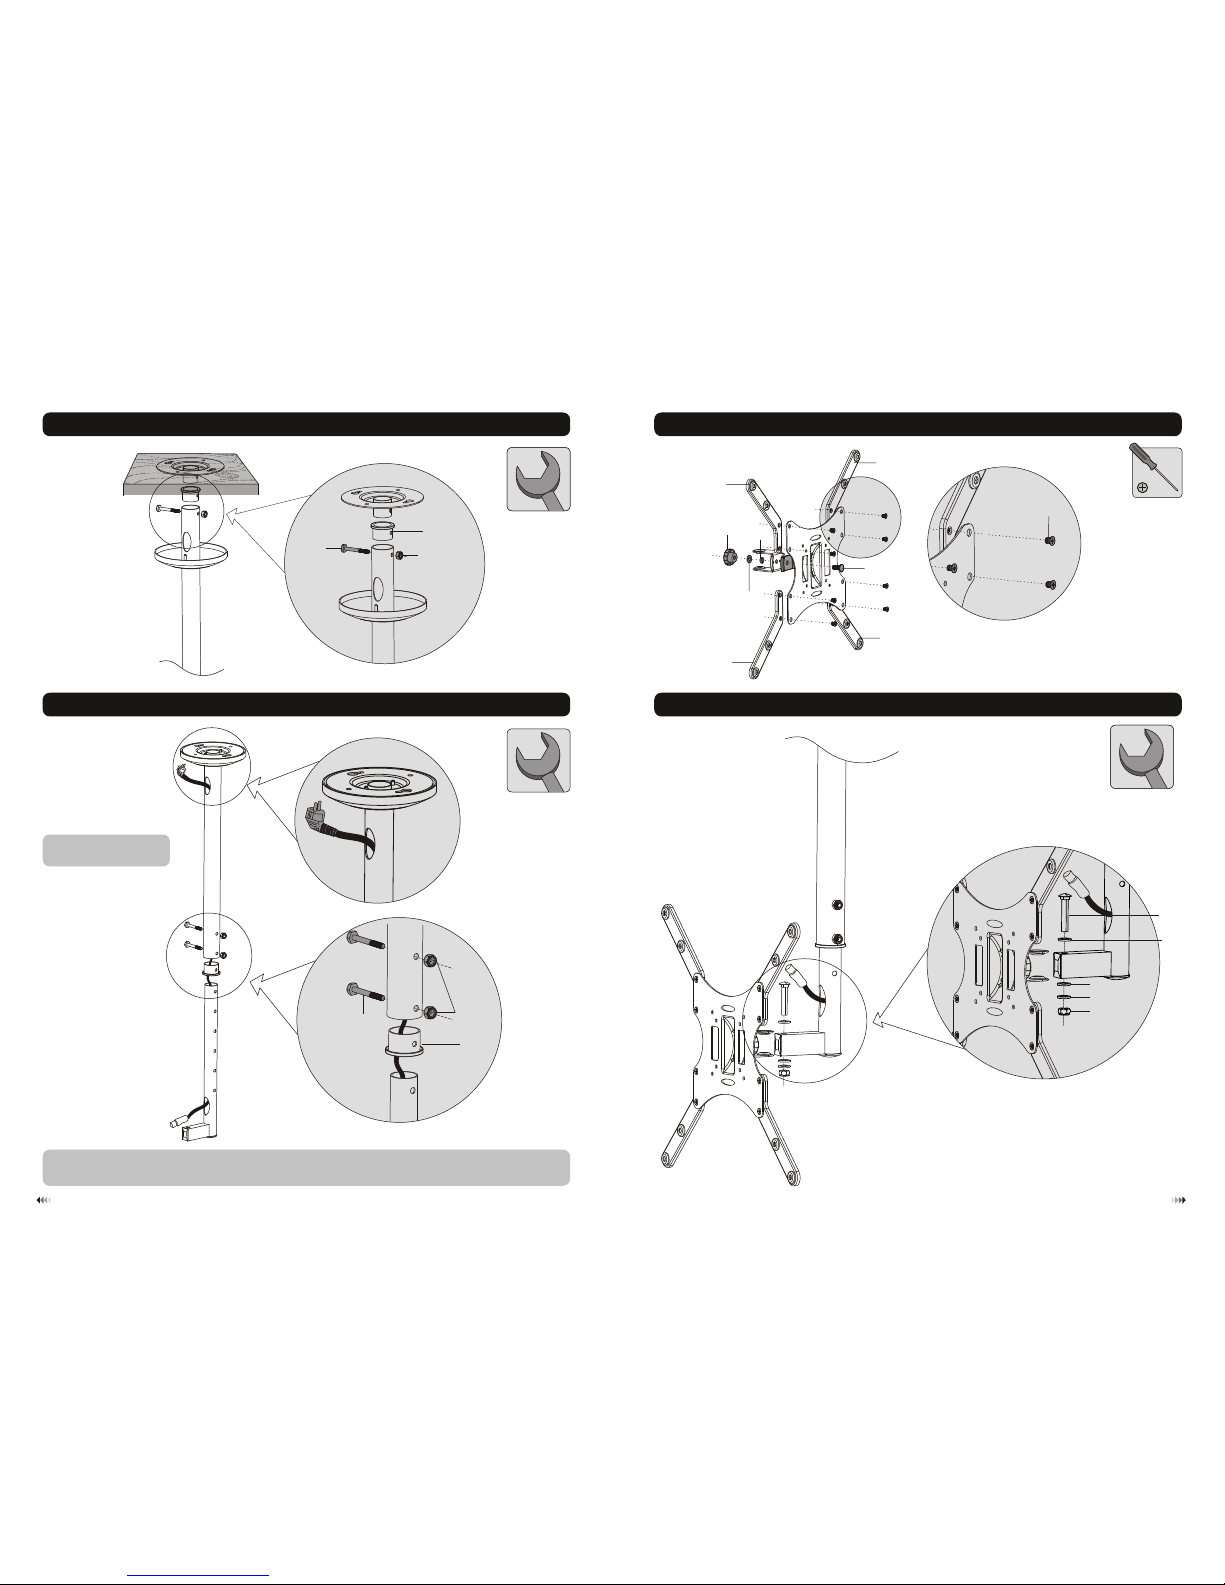
2. Installing the Outer Column to the Ceiling Plate
H
M
C
3. Installing the Inner Column and Routing Cables
Ins ert the p lasti c bushi ng and th e inner c olumn i nto the o uter co lumn an d fix the m at the de sired h eight
usi ng the co rrect c ombin ation o f screw s and nut s.
Run t he powe r cable
thr ough co lumns .
5. Installing the VESA Plate
4. Assembling the VESA Plate
N
G
I
G
J
K
J
L
O
T
S
S
R
R
 Loading...