

Page 1
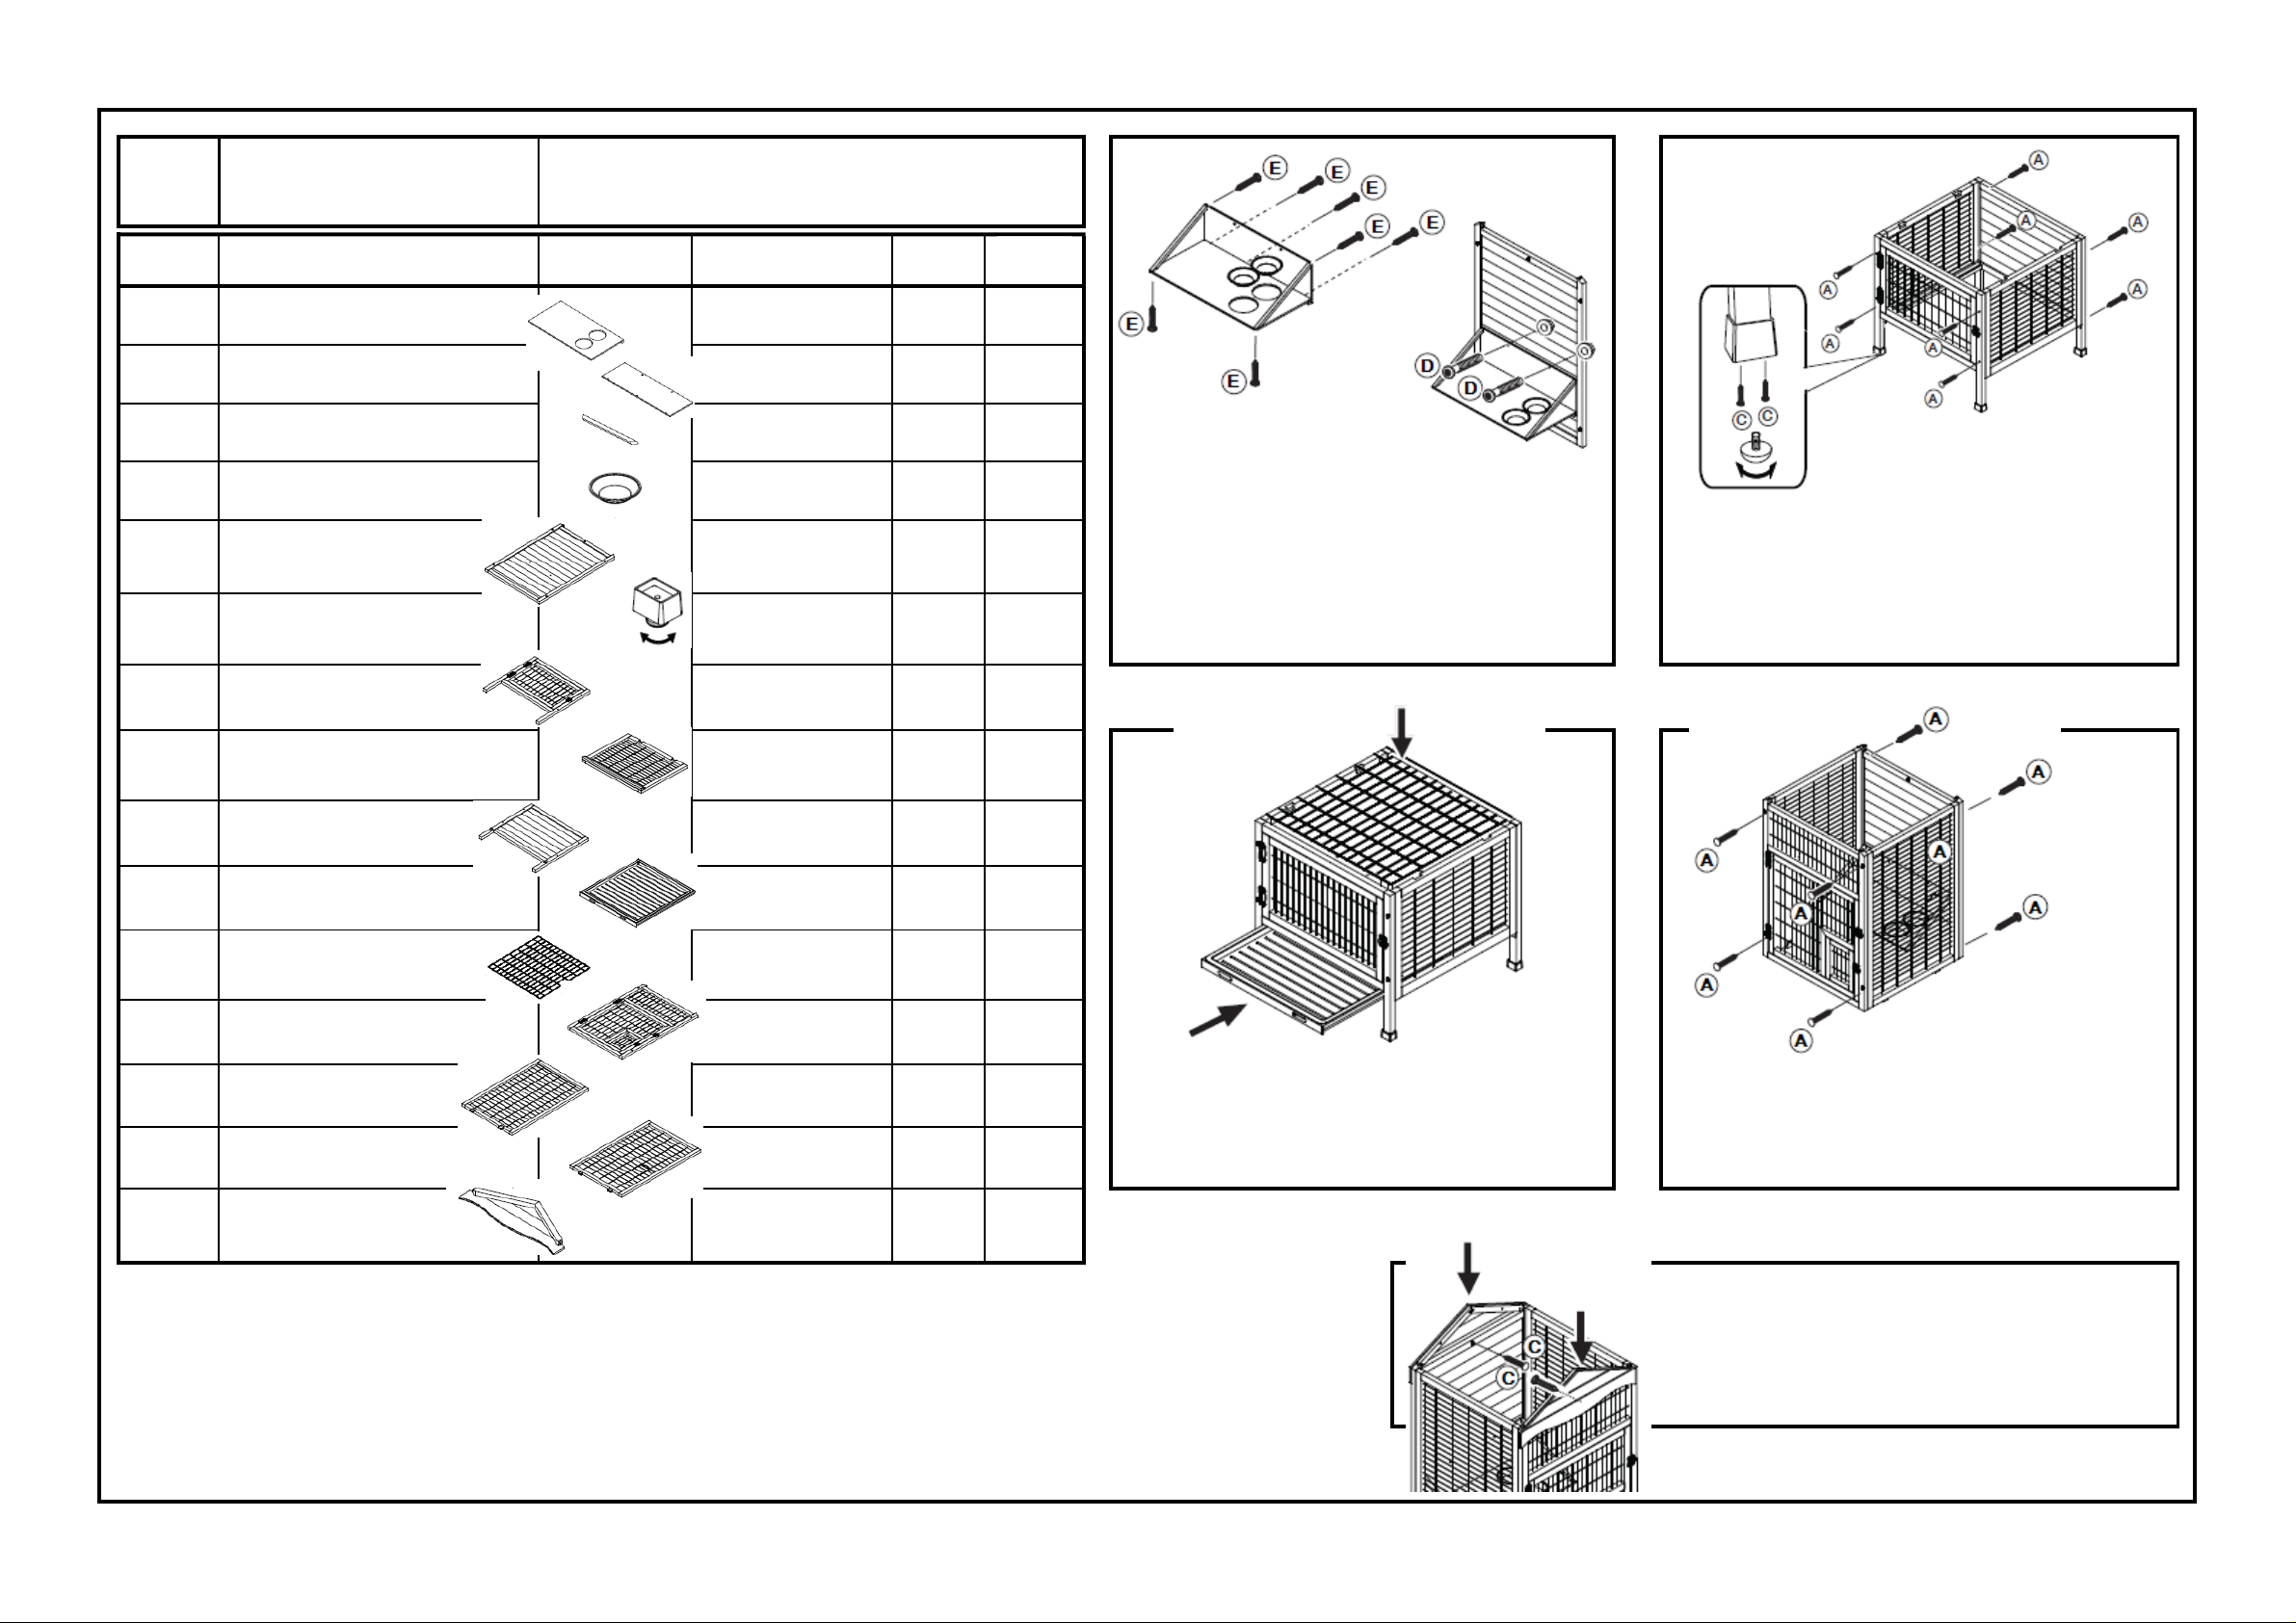
Aufbauanleitung / Assembling Instruction & Stückliste / Parts list
Schüsseln, Edelstahl
Pos. 9
Back panel, bottom
700 × 620 × 25 mm
1
Giebel
Vogelvoliere
78 × 180 × 78 cm
Pos. Nr. /
Pos. No.
Pos. 1
Pos. 2
Pos. 3
Pos. 4
Pos. 5
Pos. 6
Pos. 7
Pos. 8
Beschreibung / Description
Boden für Futtertablett
Bottom of feeder
Rückwand für Futtertablett
Back panel for feeder
Seitliche Stütze für Futtertablett
Skew support of feeder
Bowls, stainless steel
Rückwand, oben
Back panel, upper
Fuß, Kunststoff
Feet, plastic
Vorderteil, unten
Front panel, bottom
Seitenwand, unten, links/rechts
Side panel, bottom, left/right
Abmessung /
Measurement
Anzahl /
Quantity
620 × 23 × 320 mm 1
620 × 208 × 8 mm 1
15 × 15 × 370 mm 2
ø 120 mm 2
700 × 976 × 25 mm 1
40 × 30 × 30 mm 4
700 × 620 × 25 mm 1
45 × 500 × 630 mm 2
1. Schrauben Sie zuerst das Futtertablett zusammen
und setzen Sie die Schüsseln ein. Dann verbinden Sie
es mit der hinteren, oberen Rückwand.
First screw the feeder and put in the bowls. Then fix the
feeder on the back upper panel.
2. Befestigen Sie die Plastikfüße wie auf dem Bild
gezeigt. Verschrauben Sie nun das untere Vorder- und
Rückteil mit den unteren Seitenwänden.
Assemble the plastic feet as per the picture. Then screw the
front and back bottom panel with the both bottom side
panels.
Pos. 9
Pos. 10
Pos. 11
Pos. 12
Pos. 13
Pos. 14
Pos. 15
Rückwand, unten
Ausziehbare Bodenwanne
Drawer with plastic inlay
Gitterboden, Metall
Wire bottom, metal
Vorderteil,oben
Front panel, upper
Seitenteil, oben, links
Side panel, upper, left
Seitenteil, oben, rechts
Side panel, upper, right
Gable
700 × 620 × 25 mm 1
626 × 35 × 654 mm 1
627 × 5 × 647 mm 1
700 × 976 × 25 mm 1
630 × 959 × 25 mm 1
630 × 959 × 25 mm 1
700 × 245 × 35 mm 2
3. Setzen Sie nun Bodenwanne und Gitterboden ein.
Insert the drawer and the bottom metal wire.
4. Verschrauben Sie jetzt das obere Vorder- und
Rückteil mit den oberen Seitenwänden.
Then screw the front and back upper panel with the both
upper side panels.
5. Befestigen Sie anschließend die beiden Giebel an
den oberen Vorder- und Rückwänden.
Fix the gables on the front and back upper panel.
Page 2
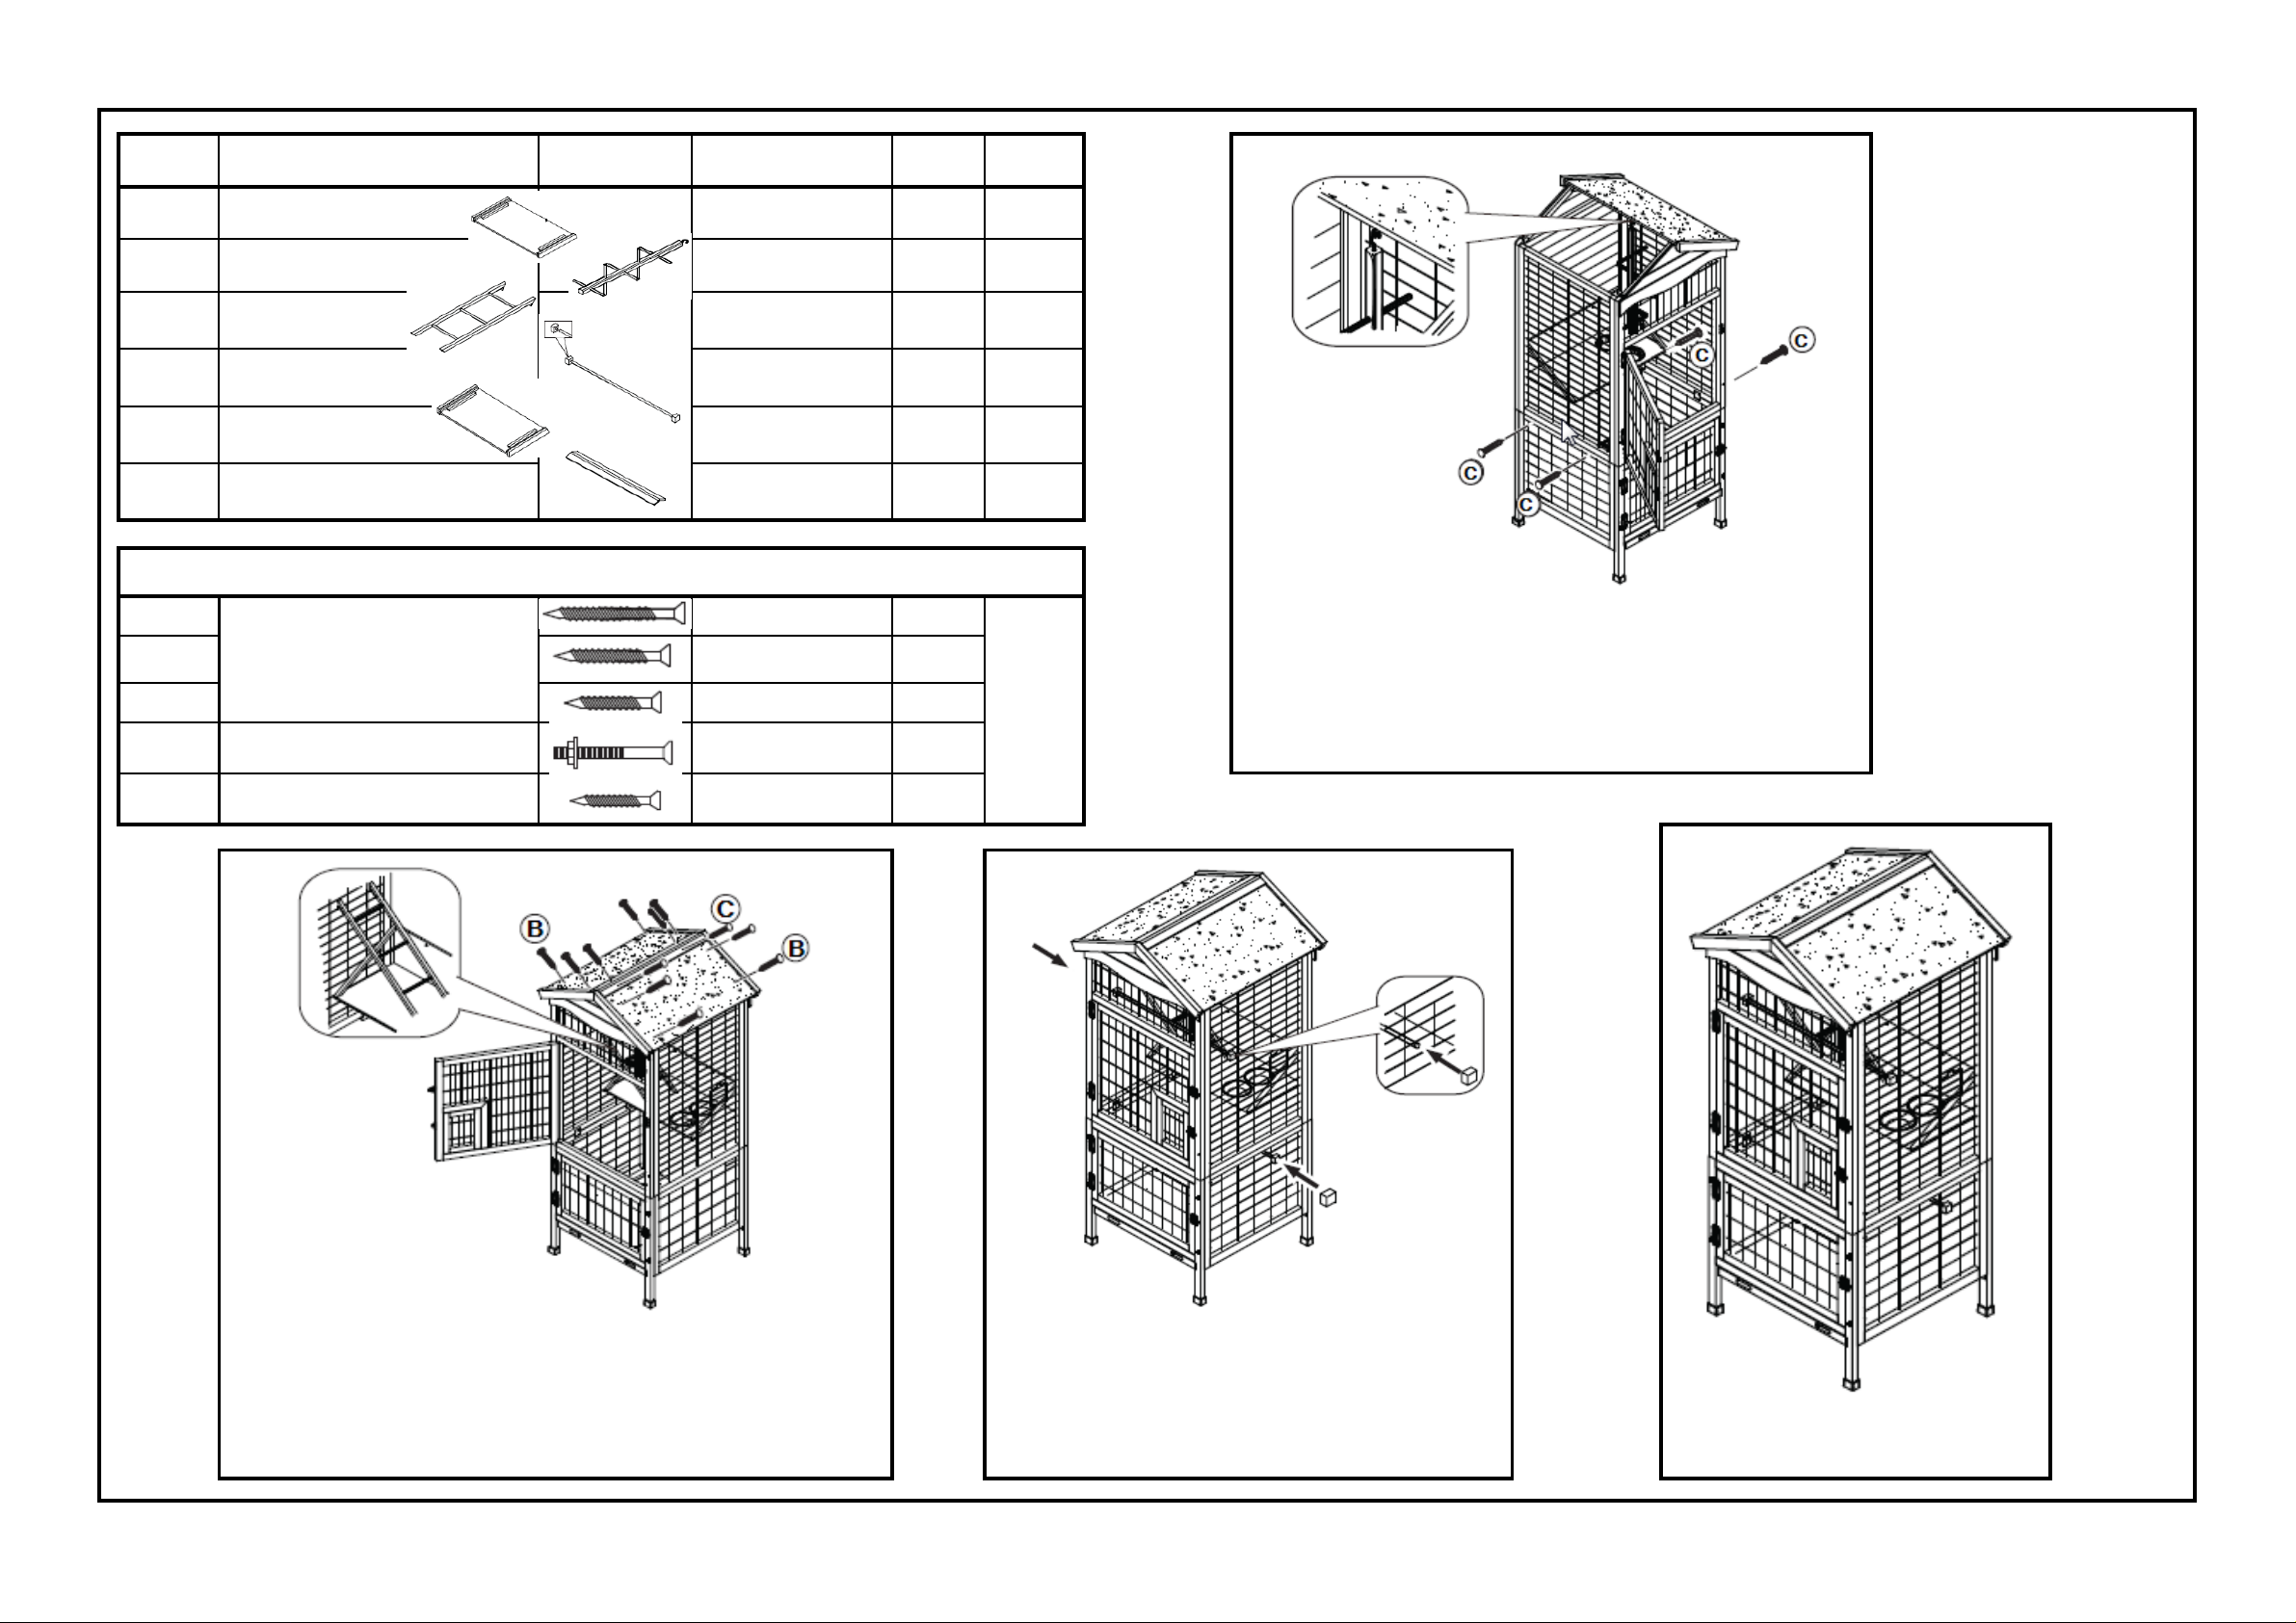
Aufbauanleitung / Assembling Instruction & Stückliste / Parts list
Dachfirst
Pos. Nr. /
Pos. No.
Pos. 16
Pos. 17
Pos. 18
Pos. 19
Pos. 20
Pos. 21
Beschreibung / Description
Dachhälfte, rechts
Roof plate, right
Sitzgerüst
Perch frame
Leiter
Ladder
Sitzstange
Perch
Dachhälfte, links
Roof plate, left
Roof ridge
Abmessung /
Measurement
430 × 45 × 780 mm 1
185 × 637 × 185 mm 1
183 × 545 × 15 mm 1
720 × 30 × 30 mm 2
430 × 45 × 780 mm 1
91 × 30 × 728 mm 1
Kleinteileset / Small parts
A 3,5 × 45 mm 17
B 3,5 × 35 mm 9
Senkkopfschraube
Countersunk screw
C 3,5 × 25 mm 19
D
E
Gewindeschraube mit Mutter
Thread screw with nut
Senkkopfschrauben
Countersunk screw
M5 × 30 mm 3
3,0 × 20 mm 8
Anzahl /
Quantity
6. Verbinden Sie das Ober- und Unterteil und legen Sie die rechte
Dachhälfte auf. Hängen Sie die Sitzstange an den Haken, der sich an
der Unterseite der Dachhälfte befindet.
Combine the upper and bottom part. Put on the right roof plate, then hang
the perch frame in the hook, on the inner side of the roof plate.
7. Setzen Sie die Leiter ein und befestigen Sie die Haken am Gitter.
Danach die linke Dachplatte auflegen und beide Platten festschrauben.
Zuletzt den First befestigen.
Put in the ladder, fix the hooks on the wire grid. Screw both roof plates and fix
the roof ridge.
8. Jetzt die Sitzstangen einschieben und von beiden
Seiten mit den hölzernen Klötzen befestigen.
Insert the perches and fix them from both sides with the
wooden blocks.
9. Fertig! /
Finish!
 Loading...