

Tubeline Nitro 275RS, Nitro 525RS Operator's Manual & Parts Manual
Operator’s Manual
& Parts Manual
40299 Rev.1-1 (18/04/2018)
Operator’s Manual
Thank you for choosing the Tubeline 275RS Manure Spreader. Our hope is that it will give you many
years of productive service. This machine is designed to spread various types of manure evenly over
a wide area.
Please read and understand this manual and the machine before operation.
Warranty and Limitation of Liability
All equipment is sold subject to mutual agreement that it is warranted by the company to be free from
defects of materials and workmanship. But the company shall not be liable for special, indirect or
consequential, damages of any kind under this contract or otherwise. The company’s liability shall be
limited exclusively to replacing or repairing without charge, at its factory or elsewhere, at its discretion.
Any material, or workmanship defects which become apparent within one year from the date on which
the equipment was purchased, and the company shall have no liability for damages of any kind. The
buyer by the acceptance of the equipment will assume all liability for any damages, which may result
from the use or misuse by his employees or others.
Nitro Apron Chain Warranty
Tubeline Manufacturing Ltd offers a limited lifetime non-transferable warranty to the original purchaser
of a Nitro manure spreader. This warranty applies to chain link breakage and covers parts only.
Should a connecting link fail, only it will be replaced. However, if a standard link breaks the complete
chain will be provided. Freight and labor to install is the responsability of the purchaser and is not
covered under the terms of the limited warranty.
Tubeline Manufacturing Ltd reserves the right to request the return of the failed chain. Warranty
coverage is null and void unless Warranty Registration form has been completely lled in and is on
le at Tubeline Manufacturing Ltd.
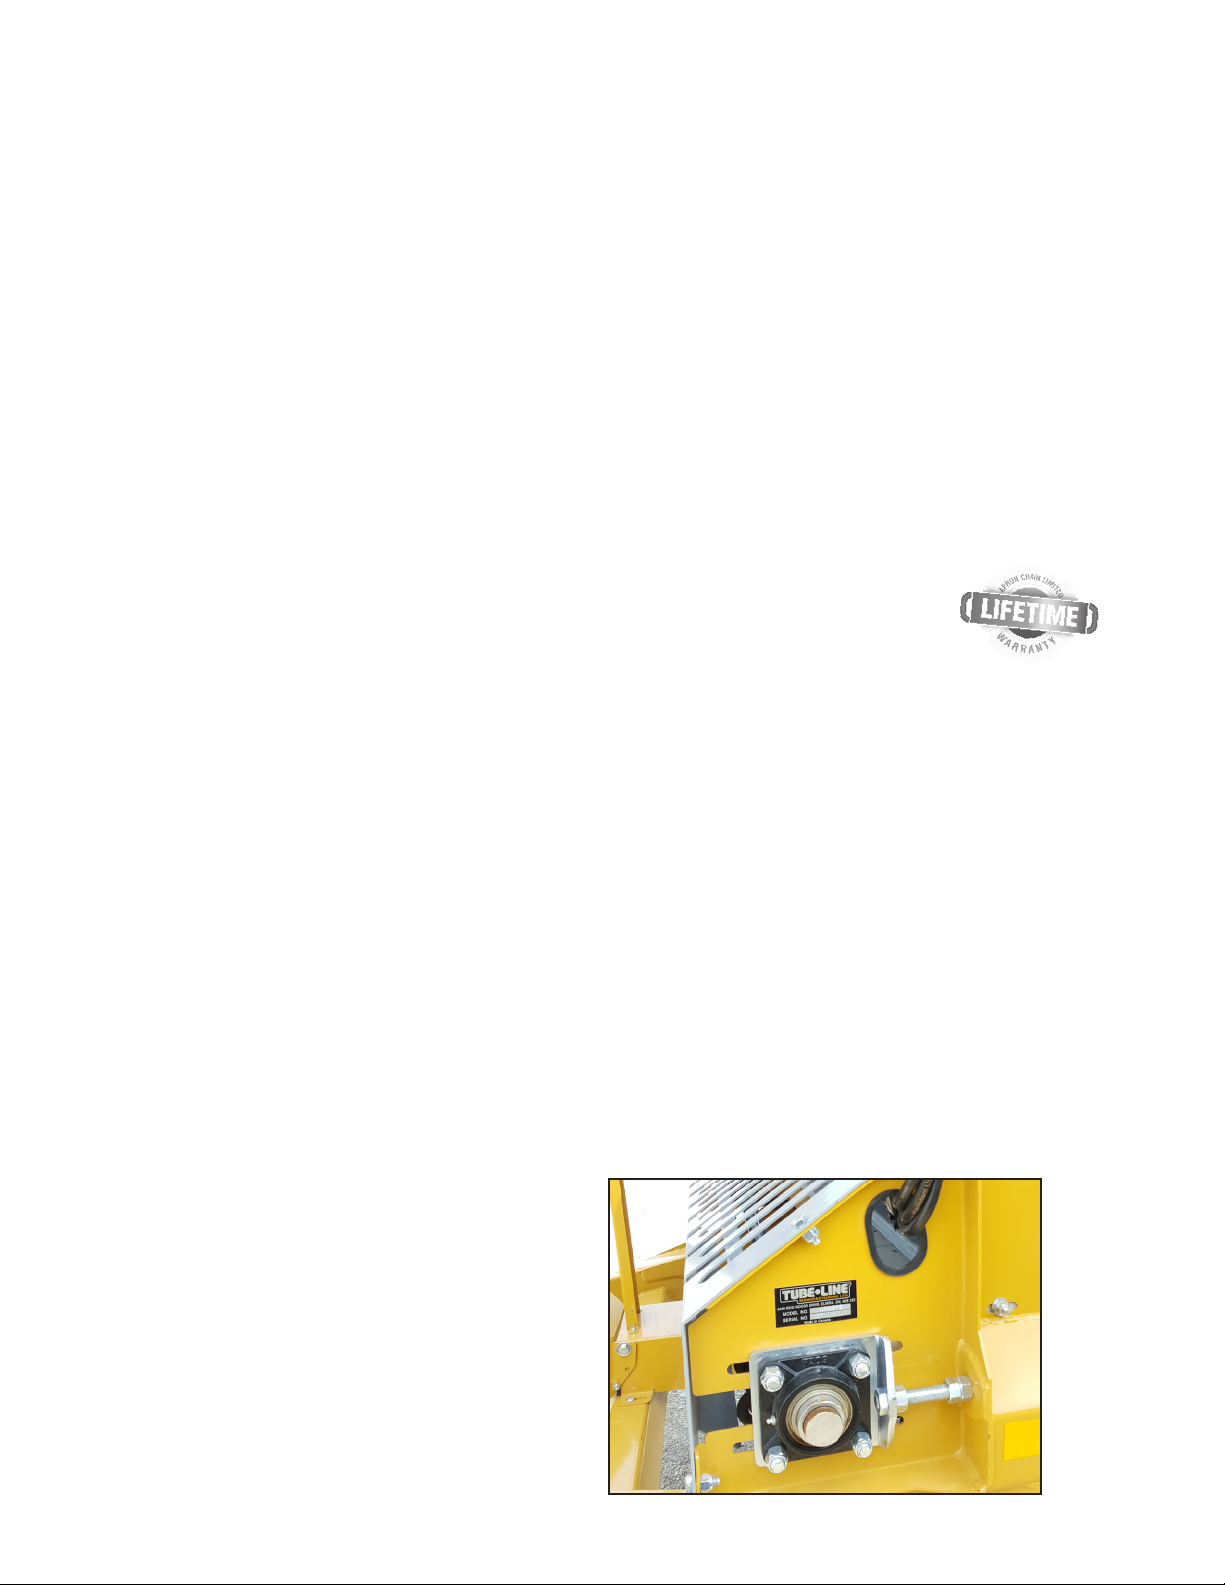
Serial Number
The implement serial number is located above the front left apron drive bearing. This number helps
us to track changes and improvements and must be mentioned when ordering parts or requesting
service. For your convenience, a space has been provided inside the front cover of this manual to
record the serial number, model number, purchase date, and dealer name.
Model # : ____________________________
Serial # : ____________________________
Date Purchased : _____________________
Dealer Name : ________________________
I
Operator’s Manual
- Nitro 275RS

Table of Contents
Operator’s Manual I
Warranty and Limitation of Liability ............................................................I
Nitro Apron Chain Warranty ..................................................................I
Serial Number ............................................................................I
Specications ...........................................................................IV
Principals of Operation ....................................................................V
Section 1 - Safety 1-1
Safety Signal Words / Safety Messages ......................................................1-1
Safety Guidelines .......................................................................1-2
Lighting & Marking .......................................................................1-2
General Safety. . . . . . . . . . . . . . . . . . . . . . . . . . . . . . . . . . . . . . . . . . . . . . . . . . . . . . . . . . . . . . . . . . . . . . . . . .1-3
A Word To The Operator ..................................................................1-3
Equipment Safety Guidelines ..............................................................1-4
Safety Training. . . . . . . . . . . . . . . . . . . . . . . . . . . . . . . . . . . . . . . . . . . . . . . . . . . . . . . . . . . . . . . . . . . . . . . . . .1-5
Safety Signs ...........................................................................1-5
How to Install Safety Signs ................................................................1-5
Safety Sign Locations ....................................................................1-6
Safety Decals ..........................................................................1-7
Section 2 - Operation 2-1
Preparation Safety .......................................................................2-1
Hydraulic Requirements ..................................................................2-1
PTO / Horsepower Requirements ...........................................................2-1
Hook-up / Unhooking .....................................................................2-1
Tractor Preparation ......................................................................2-2
Spreader Preparation ....................................................................2-2
Before Using ...........................................................................2-2
After operating for 2 hours: ................................................................2-2
After operating for 10 hours: ...............................................................2-2
Operation Safety ........................................................................2-3
Pre-operation Checklist ...................................................................2-3
Loading ...............................................................................2-4
Unloading .............................................................................2-4
Section 3 - Transportation / Storage 3-1
Transport Safety ........................................................................3-1
Storage Safety ..........................................................................3-1
Maintenance Safety ......................................................................3-1
Travel Speed ...........................................................................3-2
Unplugging ............................................................................3-2
Storage and Cleaning ....................................................................3-2
Nitro 275RS -
Table of Contents
II

Section 4 - Troubleshooting / Maintenance 4-1
Tire Safety .............................................................................4-1
Hydraulic Safety ........................................................................4-1
Fluids & Lubricants ......................................................................4-2
Adjusting Apron Chain Tension .............................................................4-2
Every 10 Hours/Daily .....................................................................4-3
Every 10 Hours/Daily .....................................................................4-4
Every 40 hrs / Weekly ....................................................................4-5
Every 400 hrs / Annually ..................................................................4-5
Section 5 - Parts Breakdowns & Lists 5-1
Hitch .................................................................................5-2
Front Shields ...........................................................................5-4
Front Apron Drive .......................................................................5-6
Driveline. . . . . . . . . . . . . . . . . . . . . . . . . . . . . . . . . . . . . . . . . . . . . . . . . . . . . . . . . . . . . . . . . . . . . . . . . . . . . . .5-8
Rear Apron Drive .......................................................................5-10
Endgate ..............................................................................5-12
Beaters ..............................................................................5-14
Floor & Side Boards ....................................................................5-16
Single Axle ............................................................................5-18
Tandem Axle (w/o Scales) ................................................................5-20
Tandem Axle (w/ Scales) .................................................................5-22
Apron Runners ........................................................................5-24
Hydraulic Layout .......................................................................5-26
Section 6 - Optional Features 6-1
Light Kit Assembly .......................................................................6-2
Light Kit Wiring Harness ..................................................................6-4
Flow Control Hydraulics. . . . . . . . . . . . . . . . . . . . . . . . . . . . . . . . . . . . . . . . . . . . . . . . . . . . . . . . . . . . . . . . . . .6-6
Electric Flow Control Wiring ...............................................................6-8
N750LC (GT400) / N750LCNT460 Scales ...................................................6-10
N750LCNT8000 Scales ..................................................................6-11
Chain Drive Hydraulics ..................................................................6-12
Reversing the Apron Chain (with Optional Flow Control) ........................................6-12
Section 7 - PTOs 7-1
39850 - PTO. 375,450,525,600,750 (V80-141P028359-028028-CV80-CLS) ..........................7-2
39852 - PTO. 600, 750 (T60-086P265011-306028-CLS(2500NM) ..................................7-4
Torque Value Chart - Imperial VII
Torque Value Chart - Metric VIII
III Table of Contents - Nitro 275RS
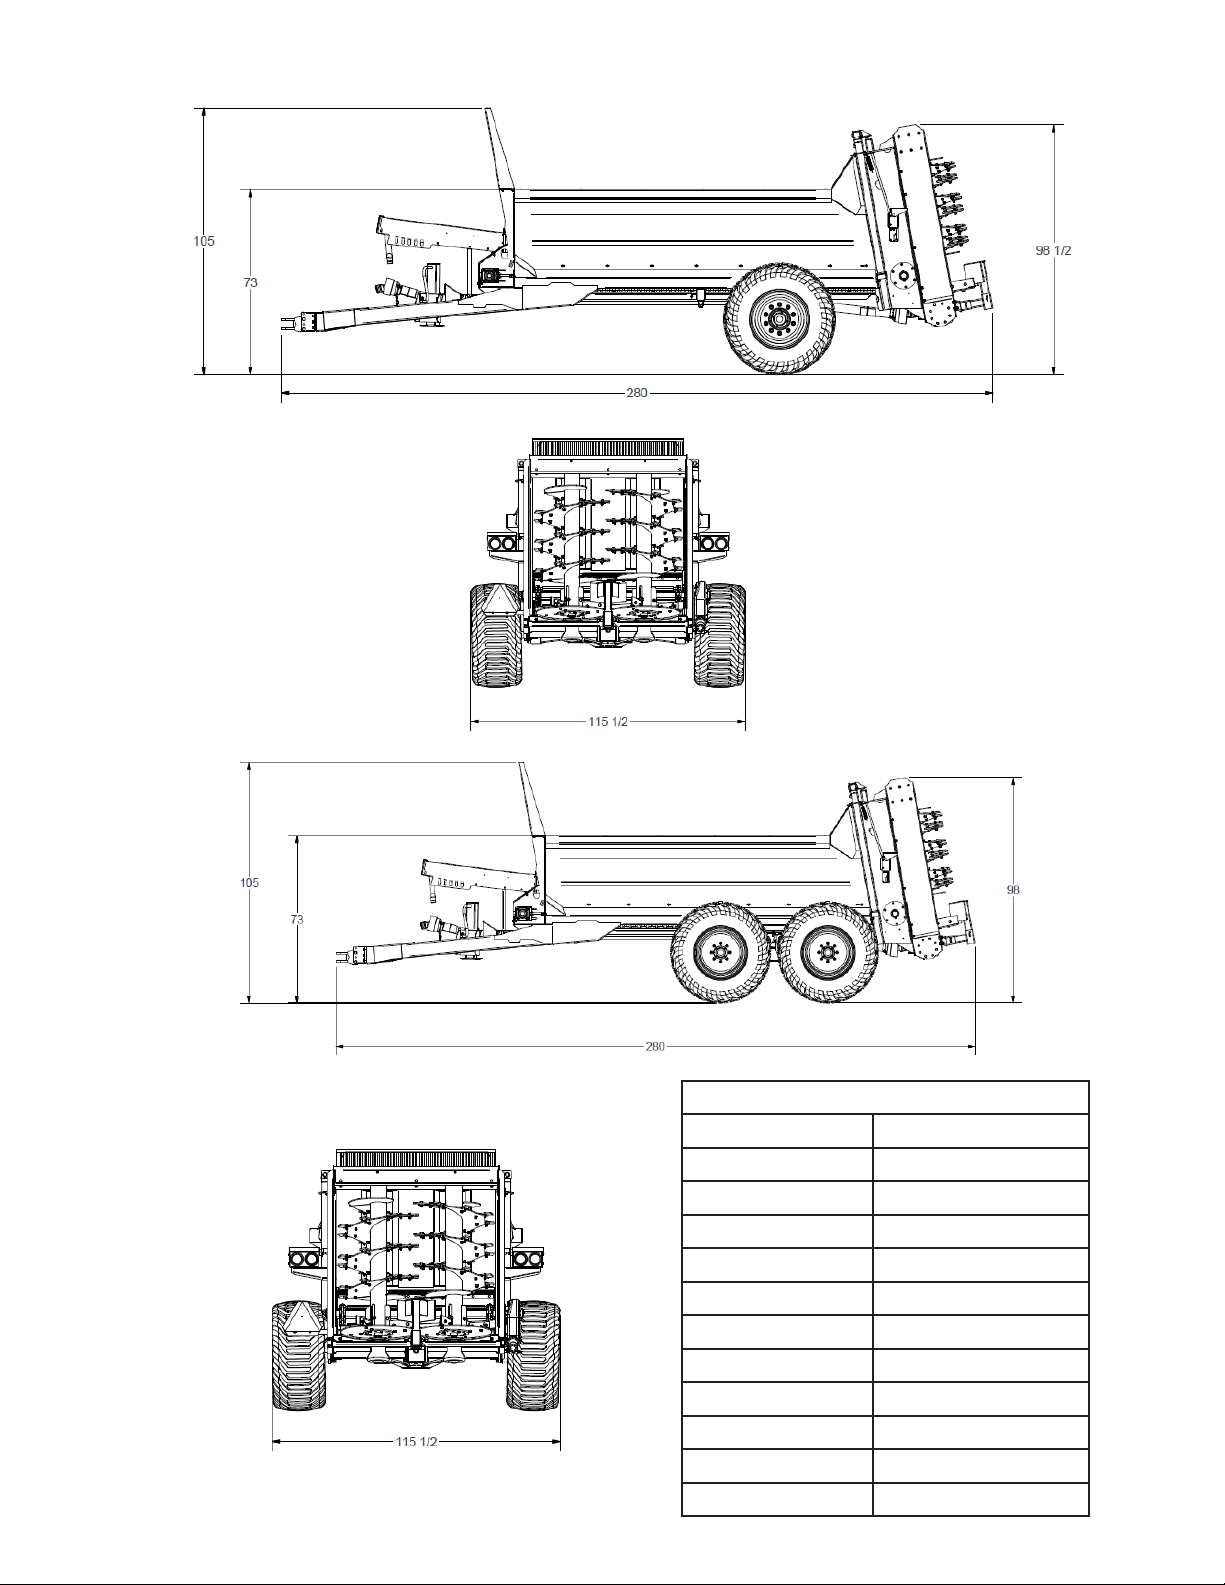
Specications
Nitro 275RS -
Operator’s Manual
Nitro 275
Cu.ft. Struck 220’
Heaped Cu.ft 290’
Inside Width 62”
Inside Depth 32”
Inside Length 160”
Loading Height 69”
Overall Length 23.5’
Beater Diameter 34”
Beater Speed 420 RPM
Axle Type Single/Tandem
Hub Capacity 16,000/12,000 lbs
PTO Speed 1000 RPM
IV

Principals of Operation
The Nitro 275RS Manure Spreader is designed to be hitched behind a tractor. The Manure Spreader
consists of a poly board oor trailer with an apron chain drag system, that pulls material to the rear
of the trailer, through a set of vertical, spinning beaters and is then spread in an even pattern on the
eld. The rear beaters are connected to the tractor’s PTO via gearboxes and PTO drivelines. The
variable speed apron chain is operated from the tractor cab, and controls the speed of materials
being fed through the beaters.
The apron chain and rear lift gate are operated using the tractor’s hydraulic power outputs. The rear
lift gate prevents material from jamming the beaters while loading, as well as preventing material from
falling onto a roadway during transport.
We recommend that you carefully read this entire manual before operating the Manure Spreader.
Please do not assume you know how to operate and maintain your machine before reading this
manual carefully. Keep this manual available for reference.
Call your authorized dealer if you need any assistance or more information.
V
Operator’s Manual
- Nitro 275RS

Section 1 - Safety
Take note! This safety alert symbol is found throughout this manual to call your attention to
instructions involving yourself and others working around the machine.
Failure to follow these instructions can result in injury or death!
This symbol means
- Attention!
Become Alert!
Your Safety is involved!
Safety Signal Words / Safety Messages
CAUTION : Indicates a potentially hazardous situation that may result in injury.
WARNING : Indicates a potentially hazardous situation that could result is serious injury or death.
DANGER : Indicates a hazardous situation that needs to be avoided. It is you the operator that needs
to be aware of these dangers.
If you have any questions not answered in this manual, please contact your dealer or Tubeline
Manufacturing Ltd.
You can also check for a newer manual version at www.tubeline.ca/support
Nitro 275RS -
6455 Reid Woods Drive,
R. R. #4 Elmira
Ontario, Canada
Section 1 - Safety
Email : sales@tubeline.ca
Fax : (519)-669-5808
Tel : (519)-669-9488
N3B 2Z3
1-1

Safety Guidelines
Safety of the operator is one of our main concerns, however we do hear of some accidents that could
have been avoided if some precautions had been taken. To avoid personal injury study the following
precautions and insist those working with you or for you, follow them.
In most cases the pictures will have the shielding in place, in some they may be removed, only to
show a view behind the shield. Keep all the shields, safety doors in place. If they become faulty and
fail to work replace them. They are for your safety, do not operate the equipment with them removed.
Replace any decals that may be missing or that are not readable. Location of the decals is indicated
in this manual.
Do not operate this machine while under the inuence of drugs or alcohol.
Review the safety instructions with all users annually.
This equipment should not be operated by children, or with those unfamiliar with the operation of the
machine. Do not allow persons to operate this machine until they have read this manual and/or were
instructed by a qualied person.
Do not paint over, remove or deface any safety signs or warning decals on your equipment. Observe
all safety signs and practice the instructions on them.
Lighting & Marking
This machine is equipped with lights and reectors as required by the most stringent government and
ASAE specications. They should work with the tractor 7-pin connector.
1-2
Section 1 - Safety
- Nitro 275RS

A Word To The Operator
It is YOUR responsibility to read and understand
the safety section in this book before operating
the Nitro Manure Spreader. You must ensure
that you and anyone else who is going to use,
maintain or work around the Nitro Manure
Spreader be familiar with the use, maintenance
procedures and related safety information
contained in this manual. Remember that YOU
are the key to safety. Good safety practices not
only protect you, but also the people around you.
Most accidents can be prevented. Do not risk
injury or death by ignoring good safety practices.
1. Study the features in this book and make
them a working part of your safety program.
Keep in mind that this safety section is written
only for the Nitro Manure Spreader.
2. Nitro Manure Spreader owners must give
operating instructions to operators or
employees before allowing them to operate
the machine, and at least annually thereafter
per OSHA (Occupational Safety and Health
Administration) regulation 1928.57
3. The most important safety device on
this equipment is a SAFE operator. It is
the operator’s responsibility to read and
understand ALL Safety and Operating
instructions in the manual and to follow these.
4. A person who has not read and understood
all directive and safety instructions is not
qualied to use the Nitro Manure Spreader.
An untrained operator exposes himself and
bystanders to possible serious injury or death.
General Safety
1. Read and understand the Operator’s Manual
and all safety signs before operating,
maintaining, adjusting or cleaning the Nitro
Manure Spreader.
2. All equipment has a limit. Make sure you
understand the speed, brakes (additional
option), stability and load characteristics of
the Nitro Manure Spreader and your tractor
before you start.
3. Make sure the tractor is in proper operating
condition as stated in the tractor Operator’s
Manual. The tractor must have enough
weight and braking capacity, especially when
operating on uneven terrain.
WARNING ! Only use a tractor with a
ROPS cab and seat belt.
4. Have a rst-aid kit available for use should the
need arise and know how to use it.
5. Have a re extinguisher available for use
should the need arise and know how to use it.
6. NEVER allow riders. Keep others away from
your work area.
7. Wear appropriate protective gear. This list
includes but is not limited to:
• Protective shoes with slip-resistant soles
• Protective glasses
• Hearing protection
5. Practice all other usual and customary safe
working precautions and above all ;
REMEMBER ! SAFETY IS YOUR
RESPONSIBILITY. YOU CAN PREVENT
SERIOUS INJURY OR DEATH.
1. This safety section is intended to point out
some of the basic safety situations that can
be encountered during the normal operation
and maintenance of the Nitro Manure
Spreader, and to suggest possible ways of
dealing with these situations. This section is
NOT a replacement for other safety practices
featured in other sections of this book.
Nitro 275RS -
Section 1 - Safety
1-3
• Respirator or lter mask
8. Install and secure all guards before starting.
9. Turn machine off, stop and disable engine,
remove ignition key and place in your pocket
and wait for all moving parts to stop before
servicing, adjusting, repairing, or unplugging.
10. Clear area of people, especially small
children, before using the unit.
11. Review safety related items annually with all
personnel who will operate or maintain the
Nitro Manure Spreader.

12. Where possible avoid operating the Nitro
Manure Spreader near roads, ditches,
embankments or holes. Reduce speed
when operating on rough, slippery, or muddy
surfaces and when turning or crossing slopes,
Stay off slopes too steep for proper operation.
13. Beware of the machine size and have enough
space to allow for operation. Never operate
the Nitro Manure Spreader at high speeds in
crowded places.
14. Do NOT use attachments unless the
attachments are approved optional
equipment.
15. Securely fasten your seat belt before
operating the machine. Always remain seated
when operating the machine.
Equipment Safety Guidelines
1. Safety of the operator and bystanders is
one of the main concerns in designing and
developing equipment. However, every year
many accidents occur which could have been
avoided by a few seconds of thought and a
more careful approach to handling equipment.
You, the operator, can avoid many accidents
by observing the following precautions in this
section. To avoid personal injury or death,
study the following precautions and insist
those working with you, or for you, follow
them.
2. In order to provide a better view, certain
photographs or illustrations in this manual
may show an assembly with a safety shield
removed. However, equipment should never
be used in this condition. Keep all shields in
place. If shield removal becomes necessary
for repairs, replace the shield prior to use.
4. Never use alcoholic beverages or drugs
which can hinder alertness or coordination
while using this equipment. Consult your
doctor about using this machine while taking
prescription medications.
5. Under no circumstances should young
children be allowed to work on this equipment.
Do not allow persons to use or assemble this
unit until they have read this manual and have
developed a thorough understanding of the
safety precautions and of how the machine
works. Review the safety instructions with all
users annually.
6. This equipment is dangerous to children and
persons unfamiliar with its operation. The
operator should be a responsible, properly
trained and physically able person, familiar
with machinery and trained in this equipment’s
operations. If an elderly person is assisting
with work, their physical limitations need to be
recognized and accommodated.
7. Never exceed the limits of a piece of
machinery. If its ability to do a job, or to do it
safely, is in question - DON’T TRY IT.
8. In addition to the design and conguration
of this implement, hazard control and
accident prevention are dependent upon the
awareness, concern, prudence and proper
training of personnel involved in the operation,
transportation, maintenance, and storage of
the machine.
THINK SAFETY! WORK SAFELY!
3. Replace any safety sign or instruction sign
that is not readable or missing. Location of
such safety signs are indicated in this manual.
1-4
Section 1 - Safety
- Nitro 275RS

Safety Training
1. Safety is the primary concern in the
design and manufacture of our products.
Unfortunately, our efforts to provide safe
equipment can be wiped out by a single
careless act of an operator or bystander.
THINK SAFETY! WORK SAFELY!
Safety Signs
2. In addition to the design and conguration
of equipment, hazard control and accident
prevention are dependent upon the
awareness, concern, prudence and proper
training of personnel involved in the operation,
transportation, maintenance and storage of
this equipment.
3. It has been said, “The best safety feature
is an informed, careful operator.” We ask
that you to be that kind of operator. It is
the operator’s responsibility to read and
understand ALL safety instructions in the
manual and follow them. Accidents can be
avoided.
4. Working with unfamiliar equipment can lead
to careless injuries. Read this manual before
assembly or use, to acquaint yourself with
the machine. If this machine is used by any
person other than yourself, or is loaned or
rented, it is the machine owner’s responsibility
to make certain that the operator, prior to
using:
• Reads & understands the operator’s manual.
• Is instructed in safe and proper use.
1. Keep safety signs clean and legible at all times.
2. Replace safety signs that are missing or have
become illegible.
3. Replaced parts that displayed a safety sign
should also display the current sign.
4. Safety signs displayed in Safety Sign Locations
each have a signicant purpose and need to
be cleaned or replaced when necessary.
5. Safety signs are available from your authorized
distributor or dealer parts department or from
the manufacturer.
How to Install Safety Signs
1. Be sure that the installation area is clean and dry.
2. Be sure the temperature is above 10C (50F).
3. Determine the exact position of the new safety
sign before removing the paper backing.
4. Align the sign over the specic area, carefully
press the sign on, slowly peeling away the
backing paper while smoothing the sign in
place.
5. Know your controls and how to stop the
engine and machine quickly in an emergency.
6. Train all new personnel and review
instructions frequently with existing workers.
Be certain only a properly trained and
physically able person will use the machinery.
A person who has not read and understood all
the safety instructions is not qualied to use
the machine. An untrained operator exposes
himself and bystanders to possible serious
injury or death. If the elderly are assisting with
the work, their physical limitations need to be
recognized and accommodated.
Nitro 275RS -
Section 1 - Safety
1-5
5. Small air pockets can be pierced with a pin and
smoothed out using a piece of sign backing
paper.
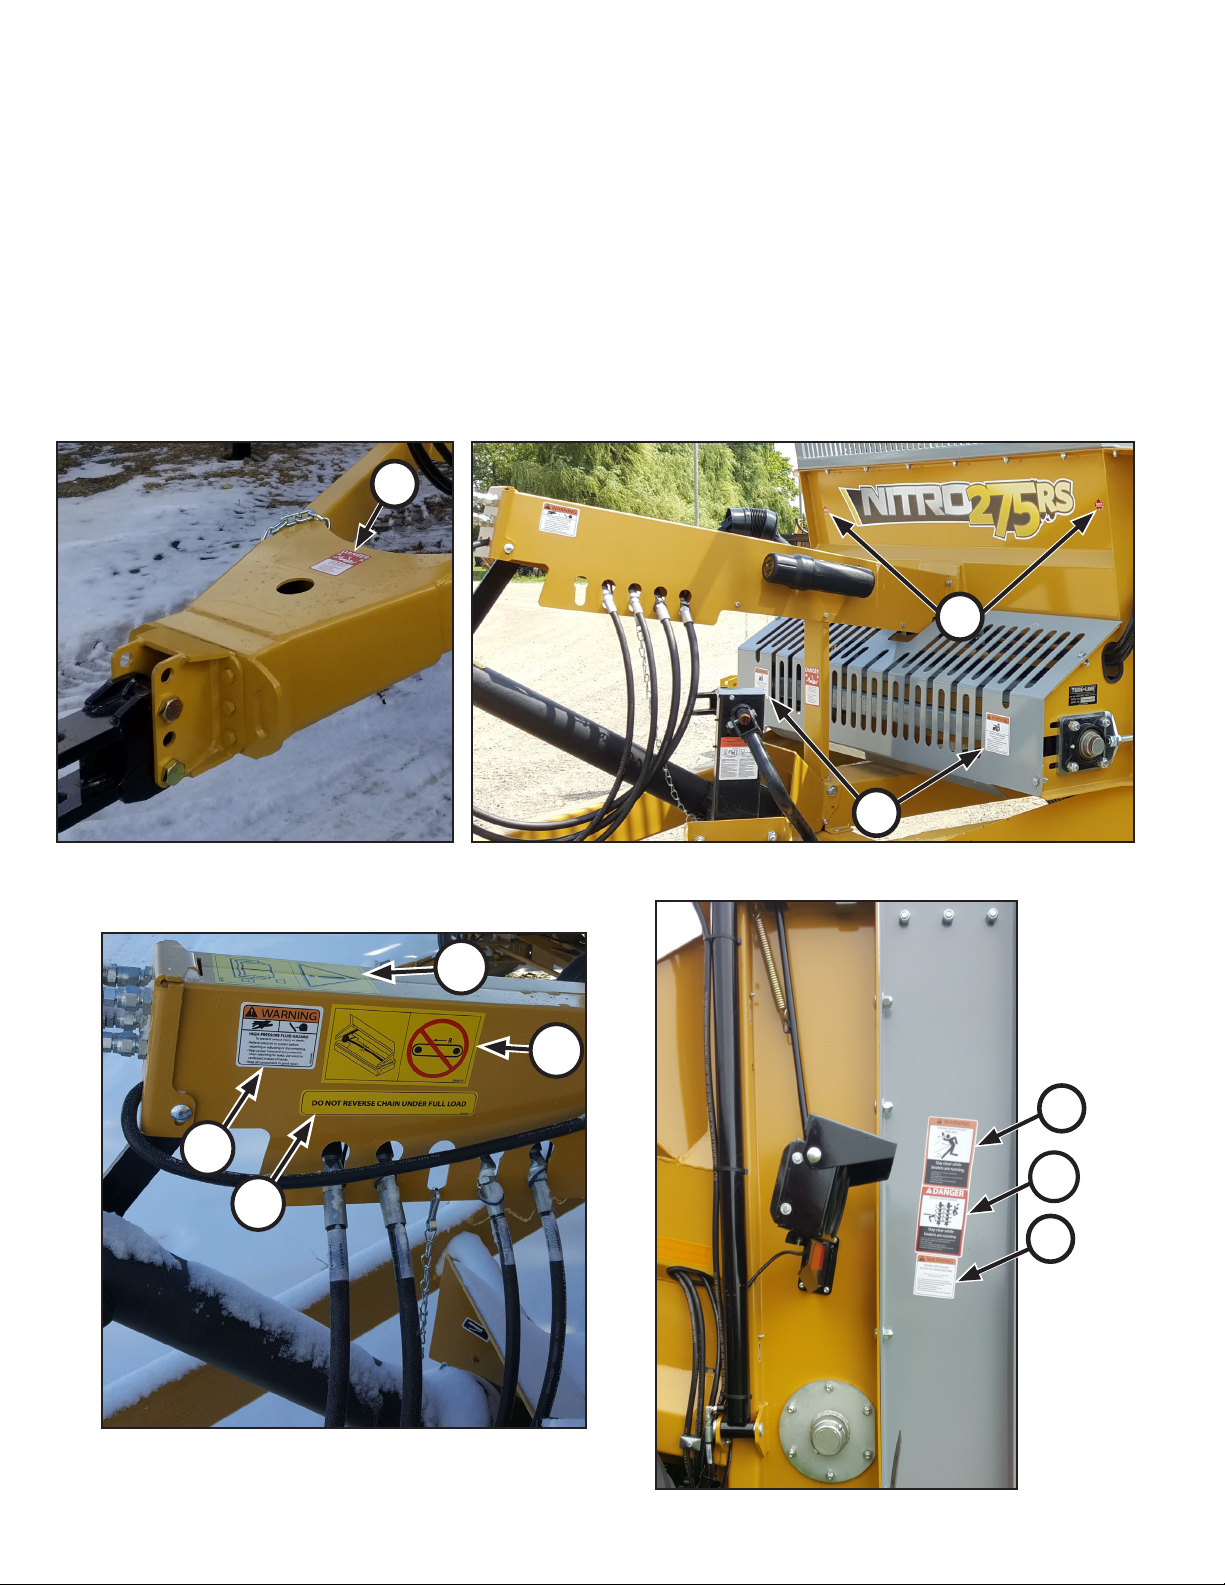
Safety Sign Locations
The types of safety signs and locations on the equipment are shown in the illustrations that follow.
Good safety requires that you familiarize yourself with the various safety signs, the types of warning,
and the area, or proper function related to that area, that requires your safety awareness.
Examples only - Actual decals may differ in text and graphic representation.
REMEMBER
If safety signs have been damaged, removed, become illegible or parts replaced without safety signs,
new safety signs must be applied. New safety signs are available from your authorized dealer.
H
J
G
E
C
B
I
A
D
F
1-6
Section 1 - Safety
- Nitro 275RS

Item - A
Part # : DE39395
Safety Decals
Item - B
Part # : DE39396
Item - C
Part # : DE42772
Reversing apron chain while spreader is fully loaded will
cause front apron shaft breakage.
Item - D
Part # : DE42782 - Reversing apron chain while spreader is fully
loaded will cause front apron shaft breakage.
Item - E Part # : DE42784
See Operators Manual for
decal explanation.
Nitro 275RS -
Section 1 - Safety
1-7
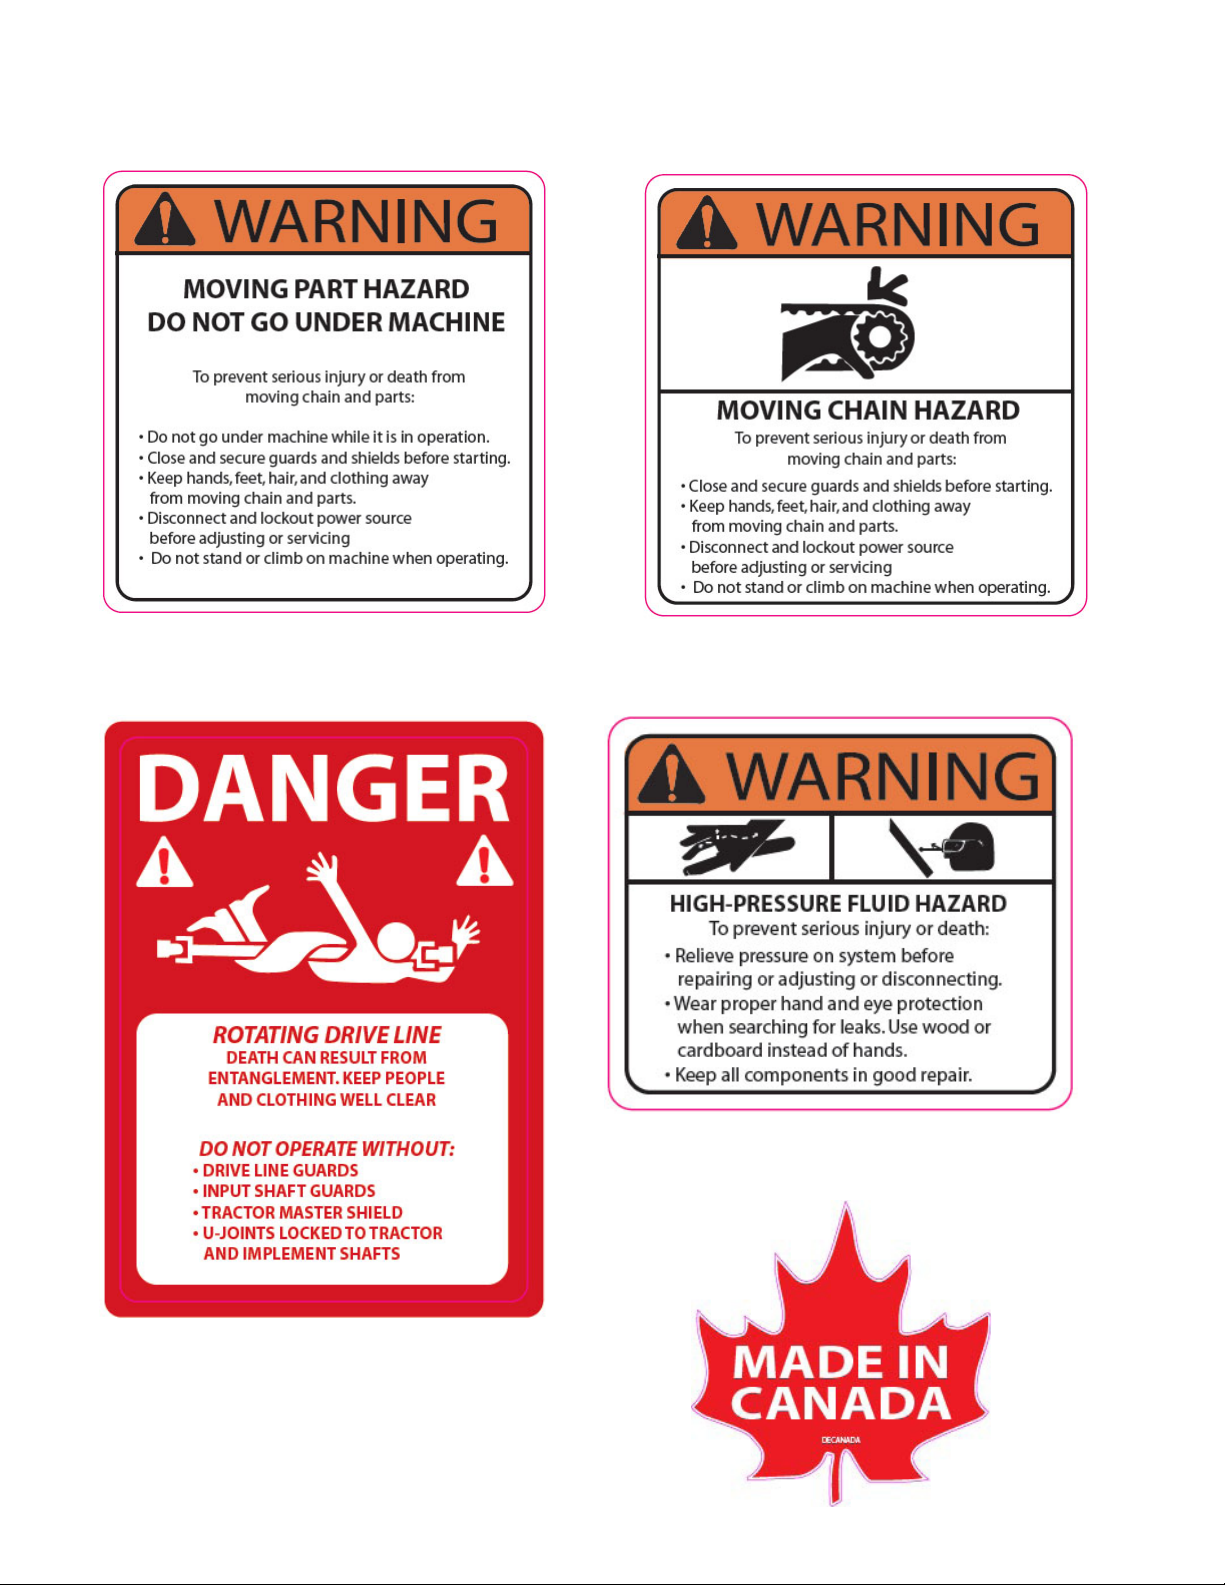
Safety Decals
Item - F
Part # : DE23845
Item - H
Part # : DE39397
Item - G
Part # : DE23836
Item - I
Part # : DE23838
1-8
Item - J
Part # : DECANADA
Section 1 - Safety
- Nitro 275RS

Section 2 - Operation
Preparation Safety
1. Never use the Nitro Manure Spreader until
you have read and completely understand
this manual and each of the safety messages
found on the safety signs on the Nitro Manure
Spreader.
2. Personal protection equipment including
safety glasses, safety shoes and gloves are
recommended during assembly, installation,
operation, adjustment, maintaining, repairing,
removal, cleaning or moving the unit. Do not
allow long hair, loose tting clothing or jewelry
to be around equipment.
3. Clear working area of obstacles that might
be hooked or snagged, causing injury or
damage.
4. Use only in daylight or good articial light.
and foreign objects. Follow this procedure when
attaching:
1. Clear the area of bystanders and remove
foreign objects from the machine and working
area.
2. Make sure there is enough room to back the
tractor up to the hitch pole.
3. Start the tractor and slowly back it up to the
hitch point.
4. Stop the tractor engine, place all controls in
neutral, set park brake and remove ignition
key before dismounting.
5. Use the hitch pole jack to raise or lower the
pole to align with the drawbar.
6. Install a drawbar pin with provisions for a
mechanical retainer. Install the retainer.
5. Be sure machine is properly maintained,
adjusted and in good operating condition.
6. Ensure that all safety shielding and safety
signs are properly installed and in good
condition.
7. Never ride anywhere on the Nitro Manure
Spreader while setting up, operating or
troubleshooting problems.
8. The upright beaters on the Nitro can maim
or kill. Always check for bystanders before
engaging the PTO.
THINK SAFETY! WORK SAFELY!
Hydraulic Requirements
The Nitro Manure Spreader requires 16 GPM
hydraulic ow for optimal performance.
PTO / Horsepower Requirements
7. Install a safety chain between the tractor
drawbar and the hitch pin.
8. Connect PTO driveline to tractor.
9. Connect the hydraulics. To connect, proceed
as follows:
• Use a clean cloth or paper towel to clean the
couplers on the ends of the hoses. Also clean
the area around the couplers on the tractor.
• Remove the plastic plugs from the couplers
and insert the male ends.
NOTICE: If the direction of motion is wrong,
reverse the couplers.
10. Raise the hitch jack.
11. When unhooking from the tractor, reverse the
above procedure. NOTICE: Occasionally air
may become trapped in the hydraulic circuit,
making it necessary to “bleed” the circuit.
The Nitro 275 Manure Spreader requires a
minimum of 80 horsepower.
Hook-up / Unhooking
The Nitro Manure Spreader should always be
parked on a level, dry area that is free of debris
Nitro 275RS -
Section 2 - Operation
2-1
To perform this operation cycle the hydraulic
several times or especially on older tractors,
temporarily loosen an easily accessible hose
tting enough to allow any trapped air to escape
while cycling the hydraulics. Retighten tting.

Tractor Preparation
Follow this procedure when selecting and
preparing a tractor for use with the machine:
1. Use only a tractor of sufcient power and
weight to adequately handle the machine.
It is recommended that the tractor have
at least 125 PTO horsepower for normal
operating conditions. (See PTO / Horsepower
Requirements on page 2-1.)
2. It is recommended to pin the drawbar in its
centre draft position.
3. Use only a drawbar pin with provisions for
a mechanical retainer. Always install the
retainer.
4. Always attach a safety chain between
the tractor and the machine to prevent
unexpected separation.
Spreader Preparation
2. Check for proper assembly and tighten all
bolts. All bolts were checked at the factory
when assembled but may need to be retorqued as vibrations in shipment may loosen
them slightly.
3. Complete all steps in “Tractor Preparation &
Spreader Preparation” sections.
4. Lubricate the machine. Refer to the Service
section of this manual. Proper maintenance
and lubrication is the user’s responsibility and
must begin before the rst use.
5. Operate the machine slowly for a period of
time to run the chains in and conrm that all
parts work freely.
After operating for 2 hours:
1. Check wheel bolts torque.
2. Check all shields and guards. Tighten as
required.
Your new Nitro spreader has a brief breakingin period that you should follow for optimal
operation, and for maximum lifetime of your
product. When using the machine for the rst
time, it is extremely important to follow all of the
procedures especially those listed in the “Before
using” section to avoid damage:
Before Using
1. Read the Nitro Operator’s Manual. Do not
operate the spreader until the safety
precautions in this manual and the decals on
the spreader have been read and understood
by the operator.
3. Visually inspect all hydraulic hoses and
couplers. See “Hydraulic Safety” in the
Service & Maintenance section of this manual.
4. Check chain tightness. See “Adjust Chain
Tension” in the Maintenance & Safety section
of this manual, page 4-2.
After operating for 10 hours:
1. Repeat the 2 hour service list.
2-2
Section 2 - Operation
- Nitro 275RS

Operation Safety
1. Please remember it is important that you read
and heed the safety signs on the Nitro Manure
Spreader. Clean or replace all safety signs if
they cannot be clearly read and understood.
They are there for your safety, as well as the
safety of others. The safe use of this machine
is strictly up to YOU, the operator.
9. Do not allow riders on the Nitro Manure
Spreader at any time. There is no safe place
for any riders even for troubleshooting issues.
10. Never allow children or unauthorized people
to operate or be around the Nitro Manure
Spreader.
11. Keep the working area clear of people and
other machines to prevent accidents.
2. All things with moving parts are potentially
hazardous. There is no substitute
for a cautious, safe-minded operator
who recognizes potential hazards and
follows reasonable safety practices. The
manufacturer has designed the Nitro Manure
Spreader to be used with all its safety
equipment properly attached, to minimize
the chance of accidents. Study this manual
to make sure you have all safety equipment
attached.
3. Close and secure all guards, deectors and
shields before starting and operating.
4. Read and understand the Owner and
Operator’s Manual before starting. Review
safety instructions annually.
5. Personal protection equipment including
safety glasses, safety shoes and gloves are
recommended during operation, adjustment,
maintaining or repairing. Do not allow long
hair, loose-tting clothing, or jewelry to be
around moving parts.
6. Never place any part of your body where it
could be in danger if movement should occur
during assembly, installation, operation,
maintenance, repairing, unplugging or
moving.
7. Turn tractor off, remove ignition key and place
in your pocket, and wait for moving parts to
stop before servicing, adjusting, repairing or
unplugging.
12. Do not exceed a safe travelling speed when
transporting.
13. Always use extra caution when turning around
corners or in tight areas.
14. The upright beaters on the Nitro can maim or kill.
Always check for bystanders before engaging
the PTO.
Pre-operation Checklist
It is important for both personal safety and
maintaining the good mechanical condition of the
machine that this pre-operational checklist be
followed. Before operating the machine and each
time thereafter, the following areas should be
checked off:
1. Lubricate the machine completely. Refer
to “Service” in the Service & Maintenance
section of this manual.
2. Use only a tractor of adequate power (see
PTO / Horsepower Requirements on pg. 3-1)
and weight to handle the spreader.
3. Ensure that the machine is properly attached
to the tractor using a drawbar pin with
provisions for a mechanical retainer. Make
sure that a retainer is installed.
4. Ensure that the safety chain on the hitch is
installed.
8. Never use alcohol or drugs which can hinder
alertness or coordination while operating
this equipment. Consult your doctor
about operating this machine while taking
prescription medications.
Nitro 275RS -
Section 2 - Operation
2-3
5. Check tires and ensure that they are inated
to the pressure specied for the spreader’s
tires.
6. Check oil level in the tractor hydraulic
reservoir. Top up as required.

WARNING : Use extreme care when working
around a high pressure hydraulic system. Make
sure all connections are tight and all components
are in good repair. Wear hand and eye protection
then searching for suspected leaks.
7. Inspect all hydraulic lines, hoses, ttings
and couplers for tightness. Tighten if there
are leaks. Use a clean cloth to wipe any
accumulated dirt from the couplers before
connecting to the
tractor’s hydraulic system.
See “Hydraulic Safety” in the Troubleshooting
/ Maintenance section of this manual.
8. Inspect all moving and rotating parts. Remove
any debris that has become entangled in the
rear beaters or the PTO drive line.
9. Make sure that all guards and shields are
installed and secured in position.
10. Check the oil level in the gearboxes. Top up
as required.
11. Ensure that the PTO driveline is securely
attached on both ends and can telescope
easily. Check that the PTO driveline shield
rotates freely.
Loading
NOTICE: It is unlawful to allow any manure
spillage to occur on public roadways. Do not
heap load such that manure is allowed to fall off
spreader during transporting on roadways.
Always check the apron chain and slats to make
sure they are not frozen to the bottom of the bed.
Operating the spreader when the slats or chain
are frozen to the bed may cause damage. Also
make sure there are no lumps of manure frozen
to the oor.
It is recommended to make sure the apron chain
is operating properly before loading the spreader.
Unloading
1. Engage the Rear Beaters.
2. Fully Open Rear Gate
Fully extend the cylinders so the gate is fully
open all the way to the top.
NOTICE : Before starting the apron chain, the
operator should get the beaters up to speed and
open the rear gate to desired height.
Turn on the tractor hydraulics used to start the
apron chain. The hydraulics adjust the speed at
which material is being pulled towards the rear
beaters. The slower the speed - the ner the
spread as the rear beaters have more time to
“process” the material.
WARNING : When parking the spreader for
loading, put the tractor in PARK or NEUTRAL and
apply the parking brake.
1. Fully Close Rear Hydraulic Gate
2. Load the Spreader
The manure consistency will determine how full
your spreader can be loaded. Solid manure can
usually be loaded level to slightly heaped. Wet
materials are heavier and may limit loading.
2-4
See Optional Flow Control pages (6-10 to 6-14),
if applicable to your Nitro Manure Spreader.
Section 2 - Operation
- Nitro 275RS
Section 3 - Transportation / Storage
Transport Safety
1. Comply with state and local laws governing
safety and transporting of machinery on public
roads.
2. Do not exceed a safe travel speed. Slow
down on rough terrain and while cornering.
3. Never allow riders on the machine.
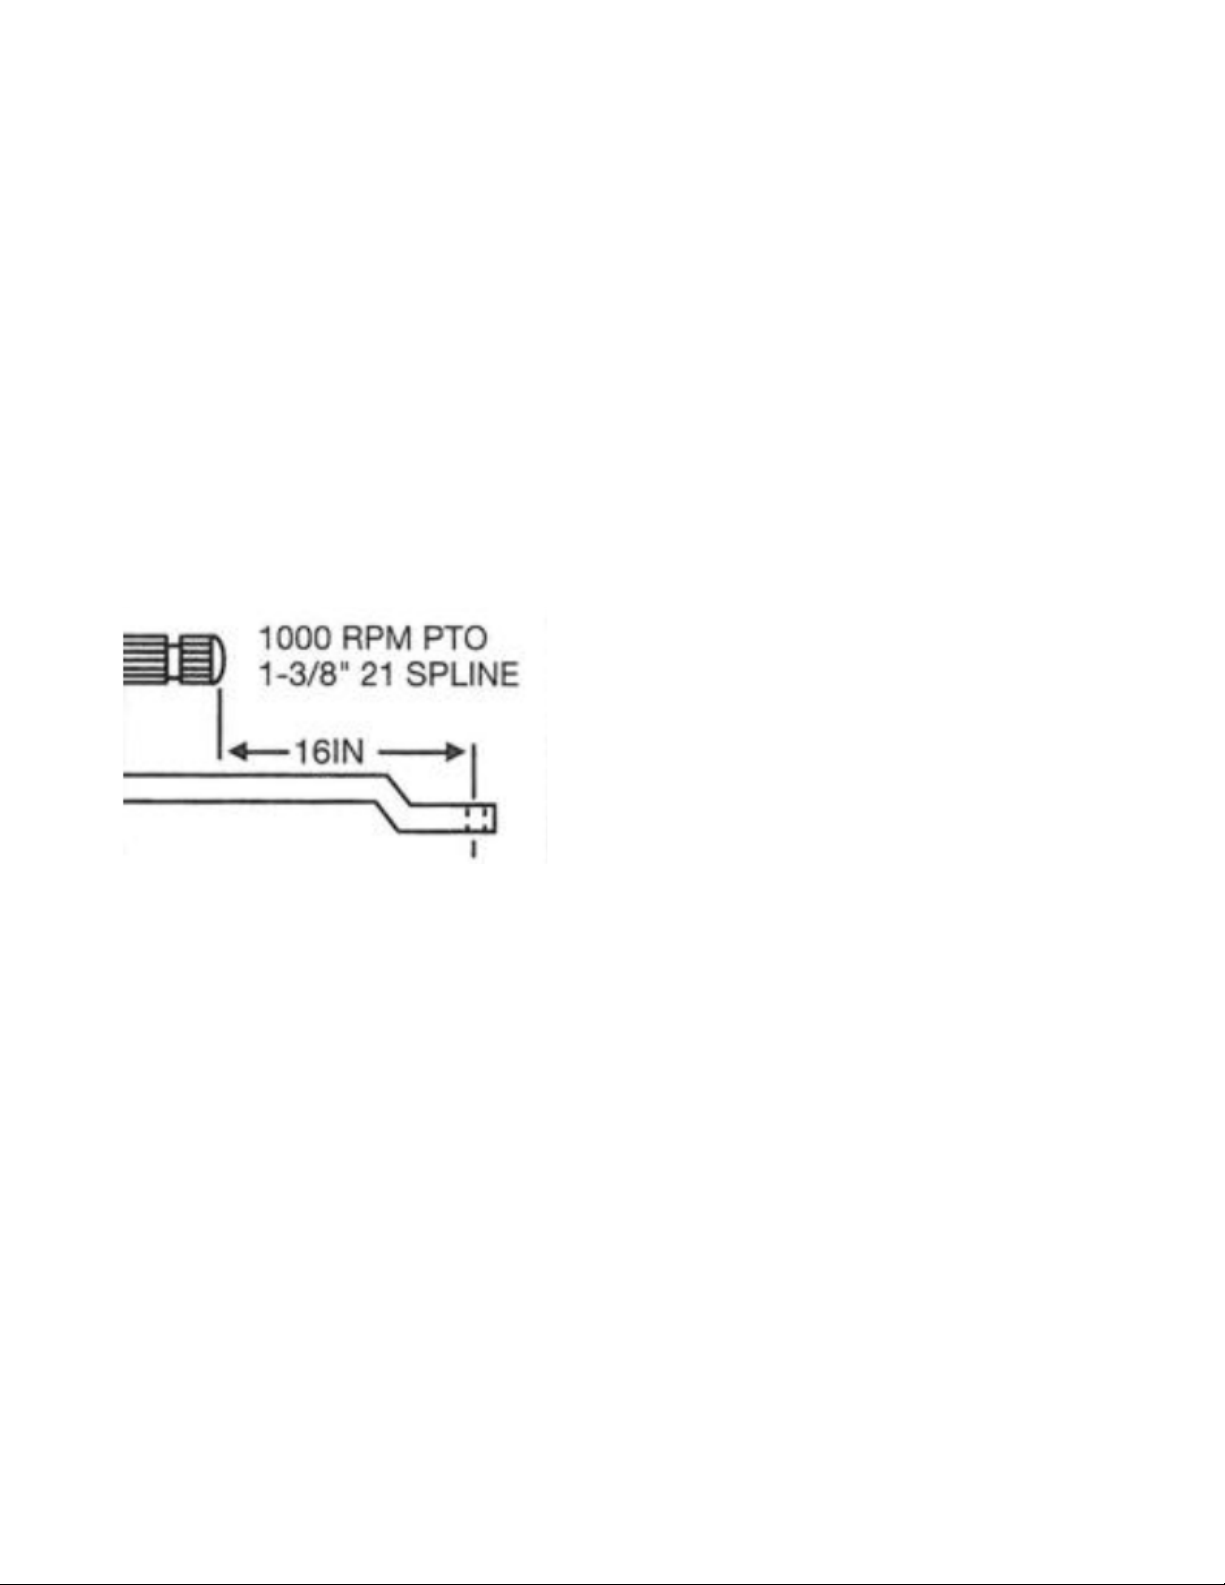
4. Keep tractor drawbar and Nitro hitch parallel.
An uneven PTO may shear off a spline shaft.
Below diagram shows standard tractor
dimensions matching the front PTO on the
Nitro spreaders.
Storage Safety
Maintenance Safety
1. Good maintenance is your responsibility. Poor
maintenance is an invitation for trouble.
2. Follow good shop practices.
• • Keep service area clean and dry
• • Be sure electrical outlets and tools are
properly grounded
• Use adequate light for the job at hand
3. Never attempt to service hydraulic
applications while pressurized or with engine
running.
4. Never work under equipment unless it is
blocked securely.
5. Always use personal protection devices such
as hand, eye and hearing protectors, when
performing any service or maintenance work.
1. Store the Nitro Manure Spreader in an area
away from human activity.
2. Do not allow children to play on or around the
Nitro Manure Spreader.
3. Store the Nitro Manure Spreader in a dry,
level area.
6. Where replacement parts are necessary for
periodic maintenance and servicing, genuine
factory replacement parts must be used to
restore your equipment to original
specications. The manufacturer will not be
responsible for injuries or damages caused
by the use of unapproved parts and/or
accessories.
7. A re extinguisher and rst aid kit should be
kept readily accessible while performing
maintenance on this equipment.
8. Periodically tighten all bolts, nuts, and screws
and check that all electrical connections are
properly secured to ensure unit is in a safe
condition.
9. When completing maintenance or service
function, make sure all safety shields and
devices are installed before placing unit into
service.
Nitro 275RS -
Section 3 - Transportation / Storage
3-1

Travel Speed
A suggested starting speed is between 4-5 mph.
This can be adjusted to operator preference.
WARNING: Stop tractor engine, place all controls
in neutral, set park brake, remove ignition key
and wait for all moving parts to stop before
servicing, adjusting, repairing or unplugging.
Storage and Cleaning
WARNING: Normally, the load itself blocks
manure and loose materials from being thrown
towards the front. As the load/pile gets reduced,
the rotation of the rear beaters can throw
some material forward, therefore it is strongly
recommended to lower the rear gate about 1/3
of the way down to prevent debris from being
projected towards the front.
Unplugging
The following is a recommended procedure
that may help if the manure spreader becomes
plugged or the PTO disengages:
1. Disengage the hydraulics that run the apron
chain.
2. Reverse the apron chain by ipping your
tractor hydraulic lever.
3. Engage the hydraulics to reverse the apron chain
in order to back material away from beaters.
Stop apron chain after material is backed
away from beaters or if pile doesn’t move.
Disconnect PTO drive shaft and hydraulic
hoses before cleaning, adjusting, lubricating, or
servicing this machine.
1. The spreader must be thoroughly cleaned
for extended storage. Manure is acidic and
will damage paint and cause rusting of metal
components.
2. Allow the spreader to completely unload.
3. To clean the spreader, raise the rear gate.
WARNING: Turn off all power during cleaning
and inspection. Do not use power to move
any components or to discharge material
while cleaning or inspecting.
4. Hose off manure from the outside and inside
of the spreader. Completely clean manure
from moving mechanisms such as the beaters
and rear gate. Remove accumulation in
conned areas or pockets that trap manure.
5. Avoid directing high pressure spray directly on
bearings, seals and ow control valve.
WARNING: Reversing chain under full load will
cause front aporn shaft to bend and/or break.
4. Engage the beaters. Bring beaters back up to
regular speed.
5. Follow the instructions in the Unloading
section (pg. 2-4) to start the apron chain in the
standard operation direction.
If this above procedure does not solve the
situation, closer inspection and possible manual
unplugging may be required. Make sure to stop
tractor and wait for all moving parts to stop before
servicing or unplugging:
3-2
6. Keep high pressure spray moving on painted
surfaces. Sustained spray on cracks or
scratches in paint can result in paint peeling.
7. Allow machine to dry.
8. Lower rear gate completely down before
storing spreader.
9. Inspect the spreader for loose connections,
damaged hydraulic hoses or connections
and for other damaged components. Repair if
necessary so the spreader is ready for future
operation. See Hydraulic Safety on page 4-1.
Section 3 - Transportation / Storage
- Nitro 275RS

Section 4 - Troubleshooting / Maintenance
Tire Safety
1. Failure to follow proper mounting procedures
when mounting a tire on a wheel or rim can
produce an explosion which may result in
serious injury or death.
2. Do not attempt to mount a tire unless you
have the proper equipment and experience to
do the job.
3. Have a qualied tire dealer or repair service
perform required tire maintenance.
4. When replacing worn tires, make sure they
meet the original tire specications.
Hydraulic Safety
1. Make sure that all components in the
hydraulic system are kept in good condition
and are clean.
2. Before applying pressure to the system, make
sure that all components are tight, and that
lines, hoses and couplings are not damaged.
3. Do not attempt any makeshift repairs to the
hydraulic lines, ttings, or hoses by using
tapes, clamps or cements. The hydraulic
system operates under extremely high
pressure. Such repairs will fail suddenly and
create a hazardous and unsafe condition.
4. Wear proper hand and eye protection when
rearching for a high pressure hydraulic
leak. Use a piece of wood or cardboard as
a backstop instead of hands to isolate and
identify a leak.
5. If injured by a concentrated high pressure
stream of hydraulic uid, seek medical
attention immediately. Serious infection or
toxic reaction can develop from hydraulic uid
piercing the skin surface.
6. Relieve pressure on the hydraulic system
before maintaining or working on the system.
Nitro 275RS -
Section 4 - Troubleshooting / Maintenance
4-1
Fluids & Lubricants
1. Grease: Use an SAE multi-purpose grease
with extreme pressure (EP) performance. Also
acceptable is an SAE multi-purpose lithium
base grease.
2. Gearbox Oil: Use an SAE 80W90 gear oil for
all operating conditions.
3. Storing Lubricants: Your machine can operate
at top efciency only if clean lubricants are
used. Use clean containers to handle all
lubricants. Store them in an area protected
from dust, moisture and other contaminants.
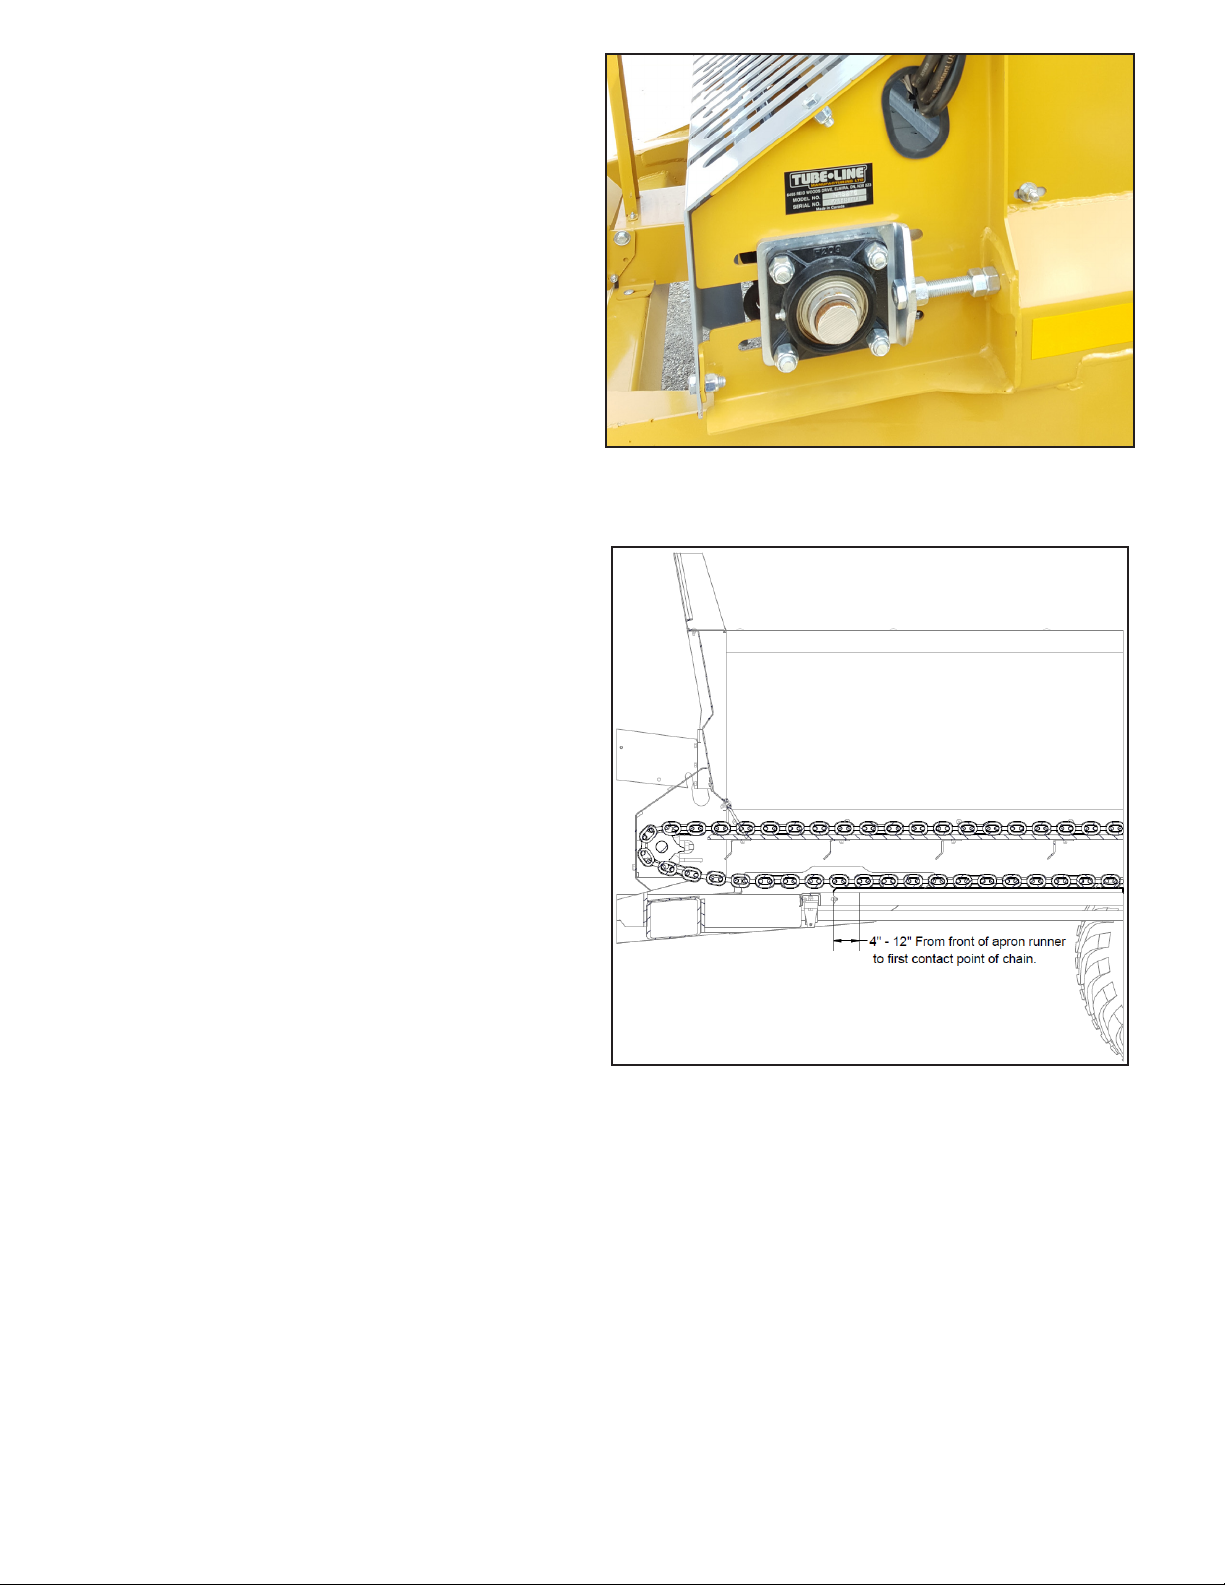
Adjusting Apron Chain Tension
1. Occasionally check the apron chain for any
bent or damaged slats. It is important to
straighten or replace any damaged slats
immediately.
2. The apron chain tension should be checked
and adjusted on occasion. If apron chain has
slack, tightening is required:
• To tighten apron chain, loosen the four bolts
on bearing and turn nut until proper tightness
is achieved (both sides) then tighten 4 bolts
on the bearing.
When adjusting the apron chain tension use the
following procedure.
1. Start on one side and tighten the nut a few
turns.
Apron chain tension adjustment
of spreader.
2. Repeat on opposite side of machine to evenly
tighten chain tension.
3. Repeat this procedure 2-3 times until
moderate chain tension is achieved.
CAUTION: It is important to ensure nuts on 4
bolts on bearing are tightened after adjusting
apron chain. In the event of the nuts not being
tightened, and the apron chain is reversed, equipment damage may occur.
4-2
Correct Apron Chain Adjustment
Section 4 - Troubleshooting / Maintenance
- Nitro 275RS
Greasing your Machine
• Use only a hand-held grease gun for all greasing.
• Wipe grease tting with a clean cloth before greasing, to avoid injecting dirt.
• Replace and repair broken ttings immediately.
• If ttings will not take grease, remove and clean thoroughly. Also clean lubricant passageway.
• Replace tting if necessary.
NITRO GREASE POINTS SERVICE RECOMMENDATION
Detail A - Three Driveline Pillow Block Bearings Every 10 hours of operation,
2-3 pumps w/ grease gun
Detail A - One Rear PTO Driveline - 2 crosses w/ zerks,
zerk in inner sleeve
Every 25 hours of operation,
2-3 pumps w/ grease gun
Detail B - Two Top Beater Flange Bearings Every 10 hours of operation,
2-3 pumps w/ grease gun
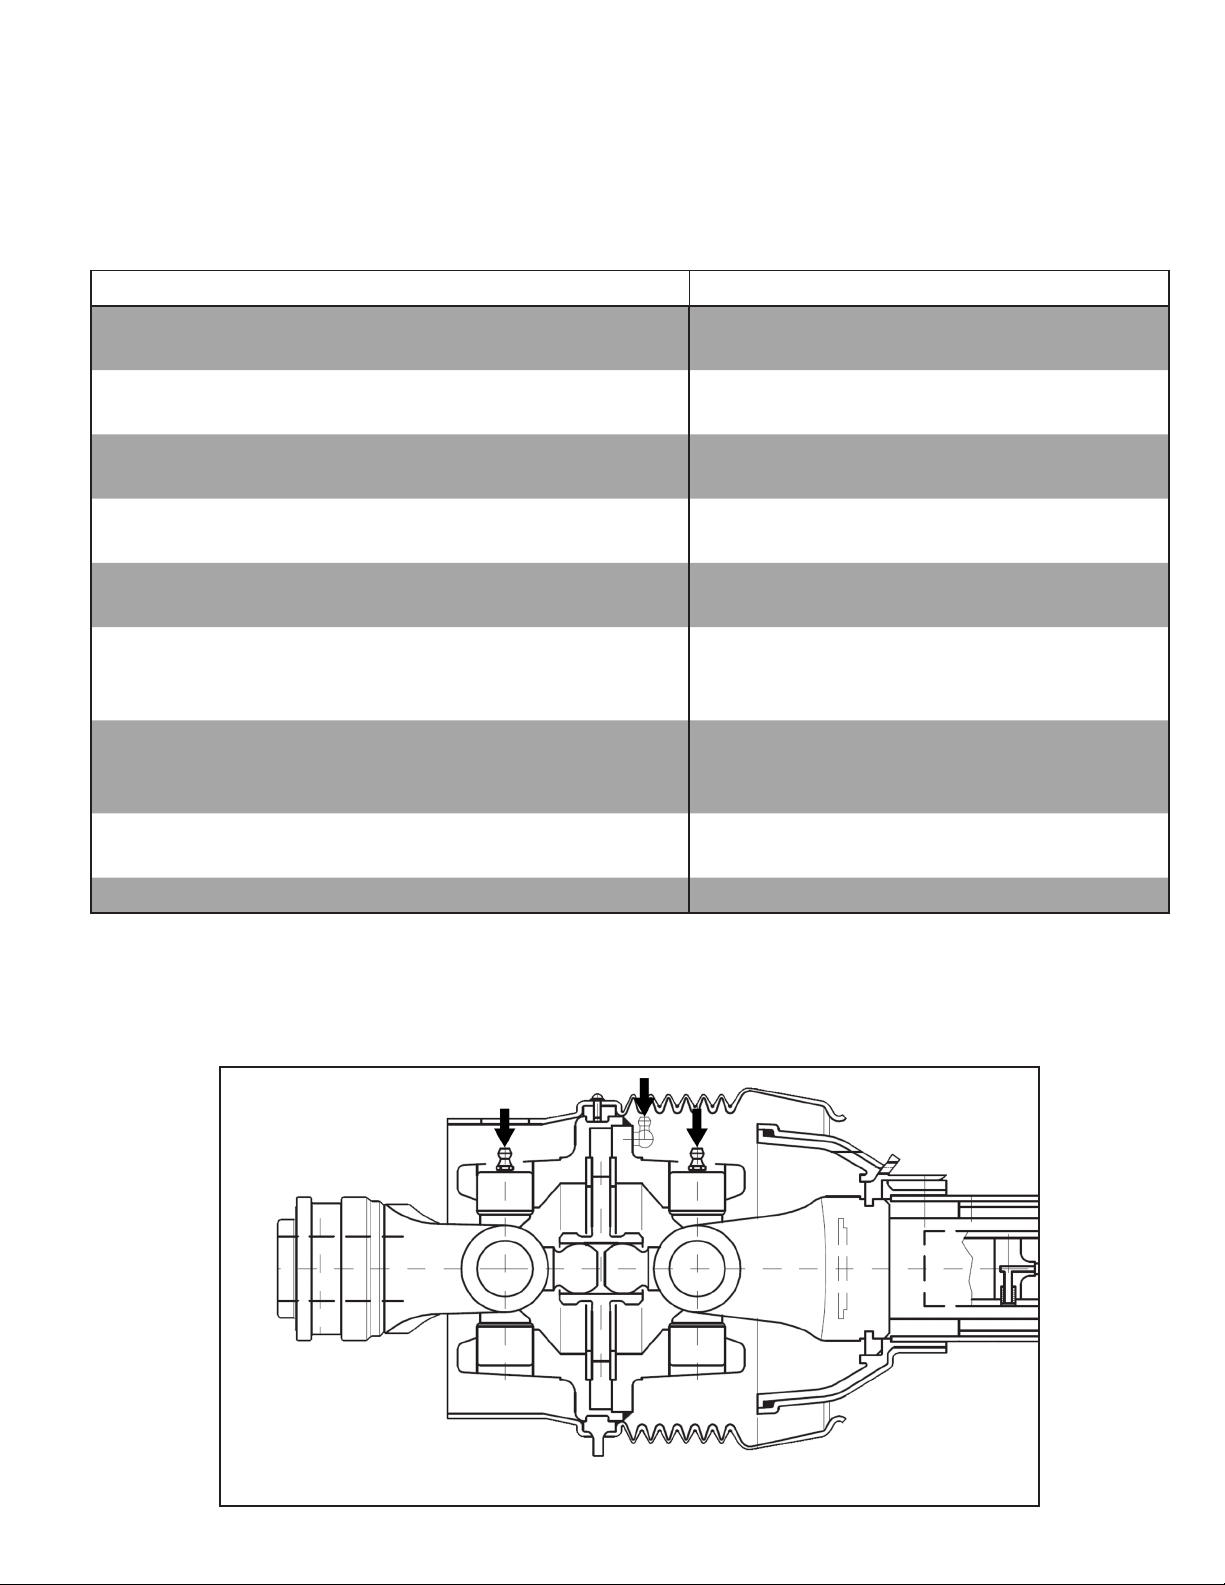
Detail C - One Front PTO Driveline - 2 crosses w/ zerks,
zerk in inner sleeve
Every 16 hours of operation,
2-3 pumps w/ grease gun
Detail D - Two Front Apron Shaft Flange Bearings Every 10 hours of operation,
2-3 pumps w/ grease gun
Detail E - Beater Gearboxs - Two double shaft (outer),
One triple shaft (center)
Change oil every 200 hours / Semi-
Annually w/ SAE 80W90 gear oil - Remove
a cap to check level, top up as needed
Detail F - One Apron Chain Gearbox Change oil every 200 hours / Semi-
Annually w/ SAE 80W90 gear oil - Check
level with sight glass, top up as needed
Detail G - Two Beater Spinner Chain Couplers Every 10 hours of operation, use aeresol
chain lubricant
Jack Follow manufacturer recommendation
Notice: Nitro spreaders equipped with grease lines still require seperate greasing and/or oil changes
on gearboxes, front driveline bearing, and PTOs.
Nitro 275RS -
Front PTO Driveline CV joint grease points.
Section 4 - Troubleshooting / Maintenance
4-3
 Loading...