

Page 1
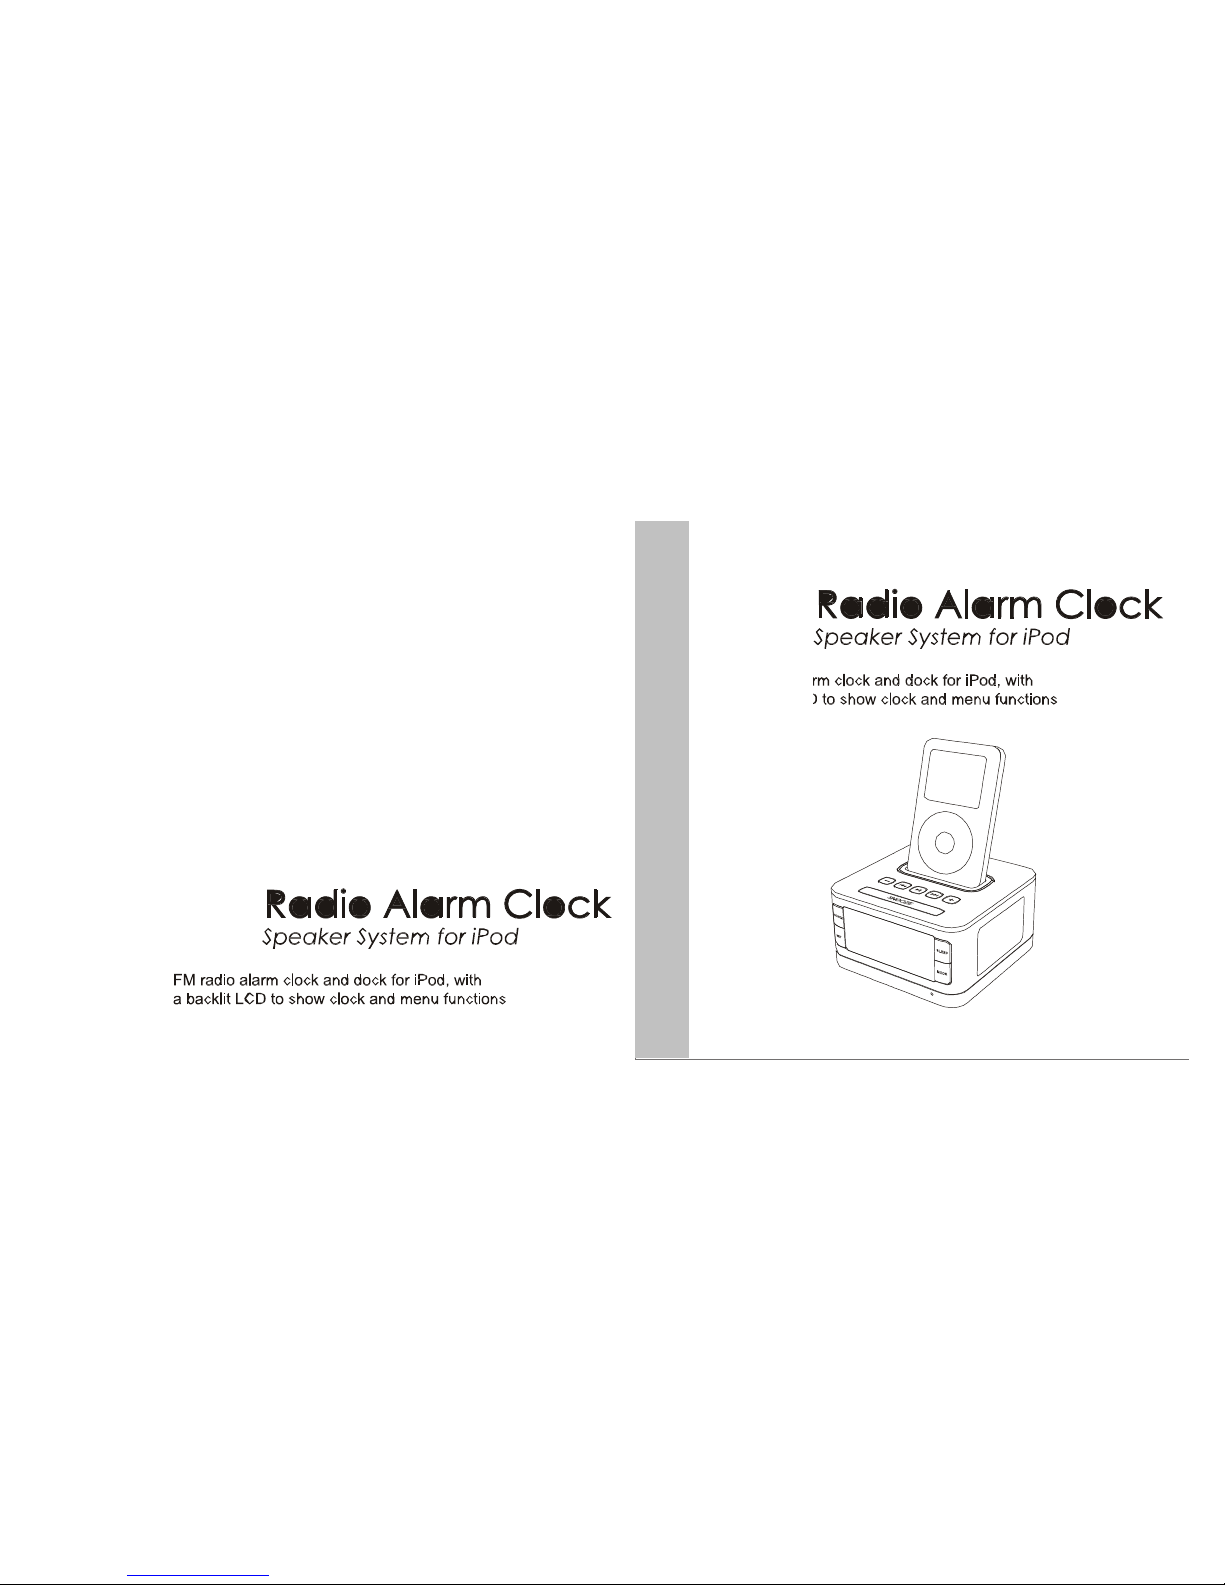
Page 2

Than
k you for
purchasin
g
Box.Box
lets you creat
e the
perfect sleeping and waking environments and enjoy
outstanding audio performance throughout the day. Wit
h
speaker's user-friendly controls you can simply set the
clock and alarm time, or customize everything from the
display brightness to the snooze timer. Keep it simple
,
this manual will show you how to do just that.
Page 3

Conten
t
Safet
y Informatio
n … … … … … … … … … … … … … … 3
What's Included … … … … … … … … … … … … … … … 5
Initial Setup … … … … … … … … … … … … … … … … … 5
Controls and Connections … … … … … … … … … … … 7
Using the Remote Control … … … … … … … … … … … 12
Display Setting … … … … … … … … … … … … … … … … 16
Time Settings … … … … … … … … … … … … … … … … 17
Alarm Settings … … … … … … … … … … … … … … … … 18
Listening to Audio … … … … … … … … … … … … … … 20
FM Radio Operation … … … … … … … … … … … … … 21
Setting the Sleep Mode Preferences … … … … … … 23
Replacing the Battery … … … … … … … … … … … … … 24
Troubleshooting … … … … … … … … … … … … … … … 26
Page 4

Safet
y
Informatio
n
IM
POR
TANT
:
Please read all safety instructions before proceeding.
The answers to most set up and performance questions
can be found in this manual. If you have any further
questions about the operation or use of this product
,
please contact our customer service team for assistance
before returning it to the place of purchase.
IMPOR
TANT
SAFET
Y INSTRUCTION
S
1. All safety and operation instructions should be read
thoroughly before attempting to operate this unit.
2. Please keep this handbook for future reference.
3. All warnings on this unit and in the operating
instructions should be adhere to.
4. All operating and use instructions should be followed.
5. To prevent the risk of electric shock, do not remove th
e
cover or back. Please refer all serving to qualified
service personnel.
-
3 -
Page 5

6
. Do not
expos
e the
unit to liquid or solvent
.
7. Do not expose the unit to temperature or humidity
extremes, direct sunlight, excessive dust, or
vibrations.
8. Place the unit on a stable surface. Do not drop,
apply excessive force to the controls, or put heavy
objects on top of it.
9. If cleaning is required, use a soft dry cloth. If
necessary, please use a damp cloth without solvent.
10. Please do not place the unit near a fluorescent or
neon light.
11. Although the unit are magnetically shielded, please
keep the magnetic memory medium (eg: disks or
tapes) at least four inches away from the unit to avoi
d
data loss.
12. WARNING: To reduce the risk of fire or electric
shock, do not expose the unit to rain or moisture.
13. Use only this approved power supply, otherwise it
may cause danger.
14. Only use attachments/accessories specified by the
manufacture
r.
What'
s
include
d
Open box, and you will find:
- speaker Main Unit
- Remote Control
- Power Adaptor
- Universal Dock Cradles
- 3.5mm Stereo Aux-in Cable
- Button Cell
- User Manual
Initial Setup
1. Open the box and place
speaker on a level
surface following the
precautions listed in the
safety warnings.
2. Install batteries for time and alarm backup:
Speaker uses a backup battery system to
-
4 - - 5 -
Page 6

alarm/cloc
k
settin
g in the
even
t of a
powe
r
failure
.
1. Open battery compartment cover located on the
bottom of the unit.
2. Insert button cell.
3. Close the compartment cover.
3. Install the Universal Dock Well
Please refer to the table
below to choose the
Universal Dock Adapter that
fits your iPod. Install it in the
Universal Dock Well on the
top of box.
4. Connec
t the
Powe
r
Adapter
Connect the power
adapter into the jack on
the back box labeled
“DC”, then plug the
power adapter into the wall outlet.
Now you're ready to enjoy box.
Controls and Connections
Please review these controls and connections as they ar
e
referred to throughout the manual. Note that the items
Adaptor Cradle Number
3
4
5
7
10
iPhone
iPod Model
iPod Mini
4G iPod
4G iPod
iPod Photo
5G iPod
iPhone
-
6 -
Capacity
4GB & 8GB
20GB
40GB
40GB & 60GB
60GB & 80GB
8GB
are labele
d
with the user facin
g the
unit.
1.
·
Press to volume down when playing.
·
Clock setting mode: Press to adjust time.
·
Alarm setting mode: Press to adjust alarm t
one
and volume.
- 7 -
Page 7
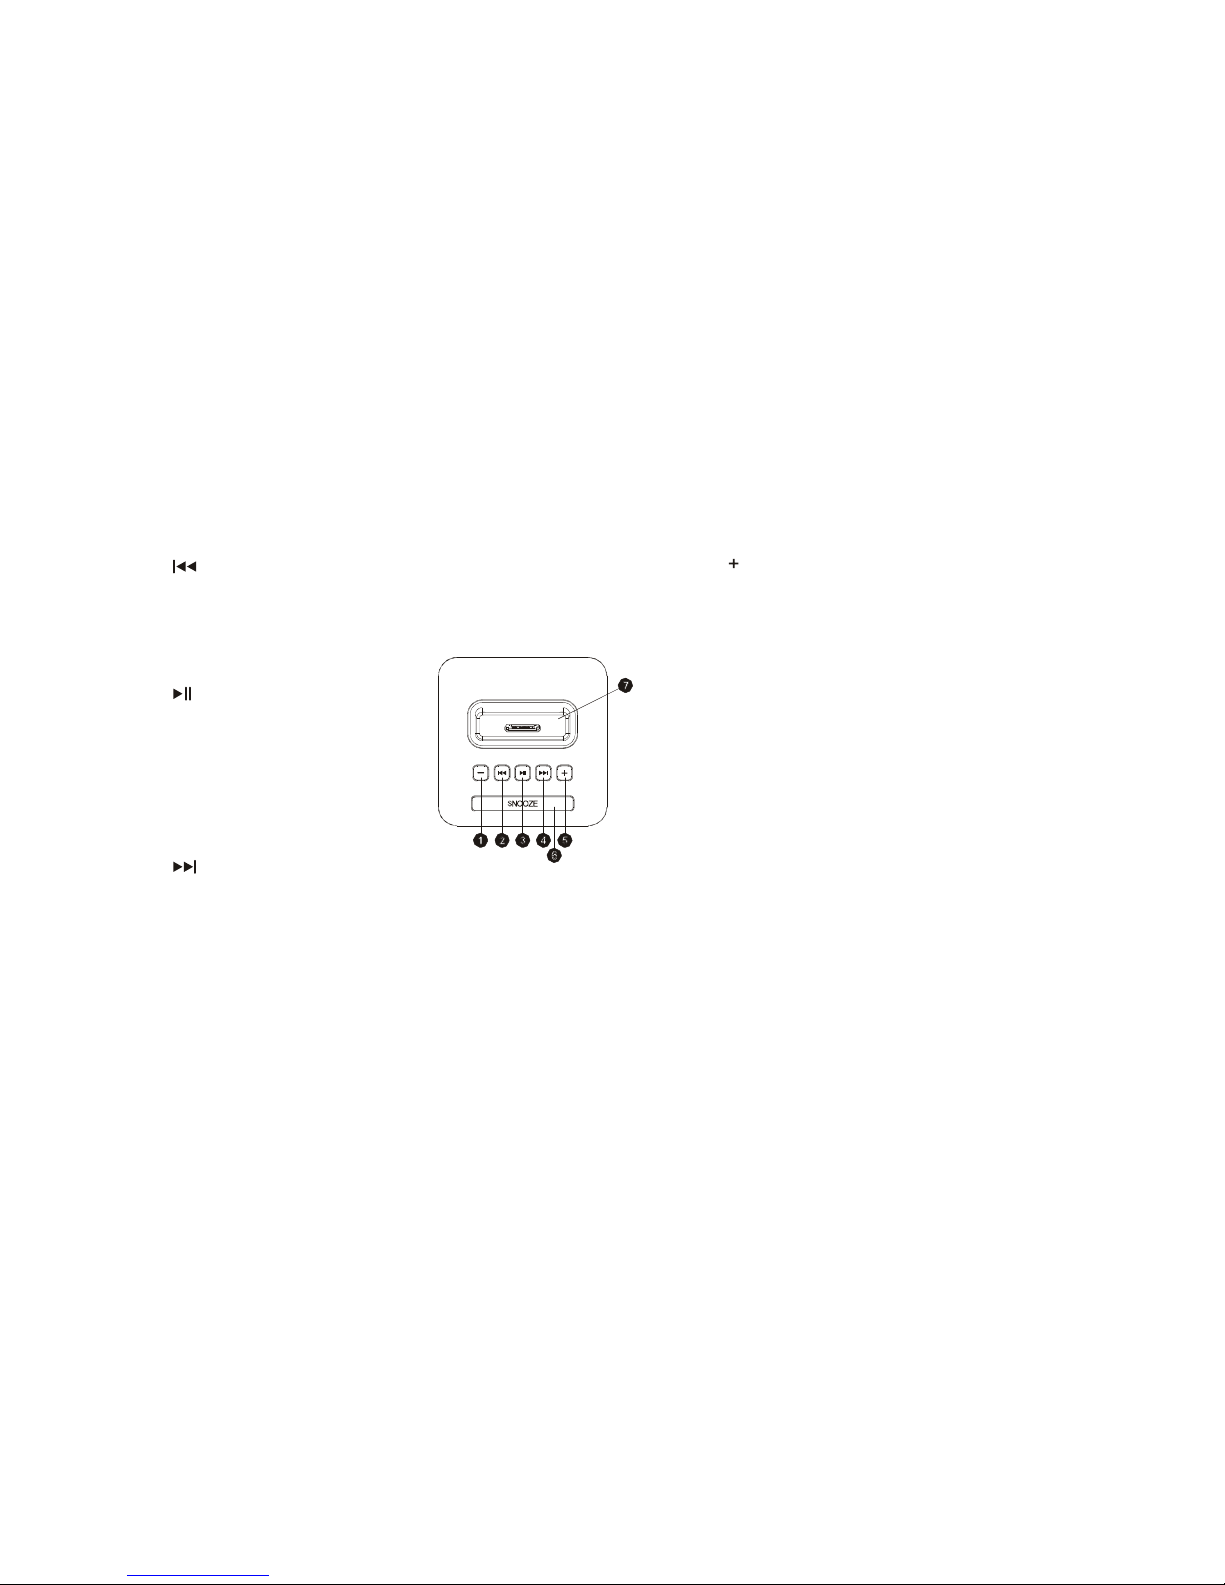
2.
·
Press to skip backwards last song or iPod tracks.
·
FM mode: Press to skip backwards last tune.
·
Manual-scanning radio station mode: Press to
adjus
the frequency backwards.
5.
·
Press to volume up when playing.
·
Clock setting mode: Press to adjust time.
·
Alarm setting mode: Press to adjust alarm
time
tone and volume.
3.
·
Press once to play or
pause playing.
·
FM mode: Press once to
mute or play FM radio, and
press and hold to enter FM
station auto-scanning.
4.
·
Press to skip forwards next song or iPod tracks.
·
FM mode: Press to skip forwards next tune.
·
Manual-scanning radio station mode: Press to
adjus
the frequency forwards.
·
Clock setting mode: Press to switch AM/PM/24-hou
r
mode
.
6. Snooz
e
·
Alarm mode: Press once to stop alarm for 10-minute
snooze.
·
Press to adjust the brightness of the backlit LCD.
7. Universal Dock Well
·
Accommodates iPod models with dock connector.
Insert the appropriate dock well for your iPod before
docking it.
( iPod is a registered trademark of Apple, Inc. and iPo
d
is not included)
8.Mode
·
Under the condition of being not connected with
iPod or iPhone, press once to turn on the unit(with the
connection of iPod or iPhone, the unit will turn on by
itself.) Press and hold for 3 seconds to turn off the unit.
·
Press to switch the audio source between iPod, FM
and AUX.
-
8 - - 9 -
Page 8
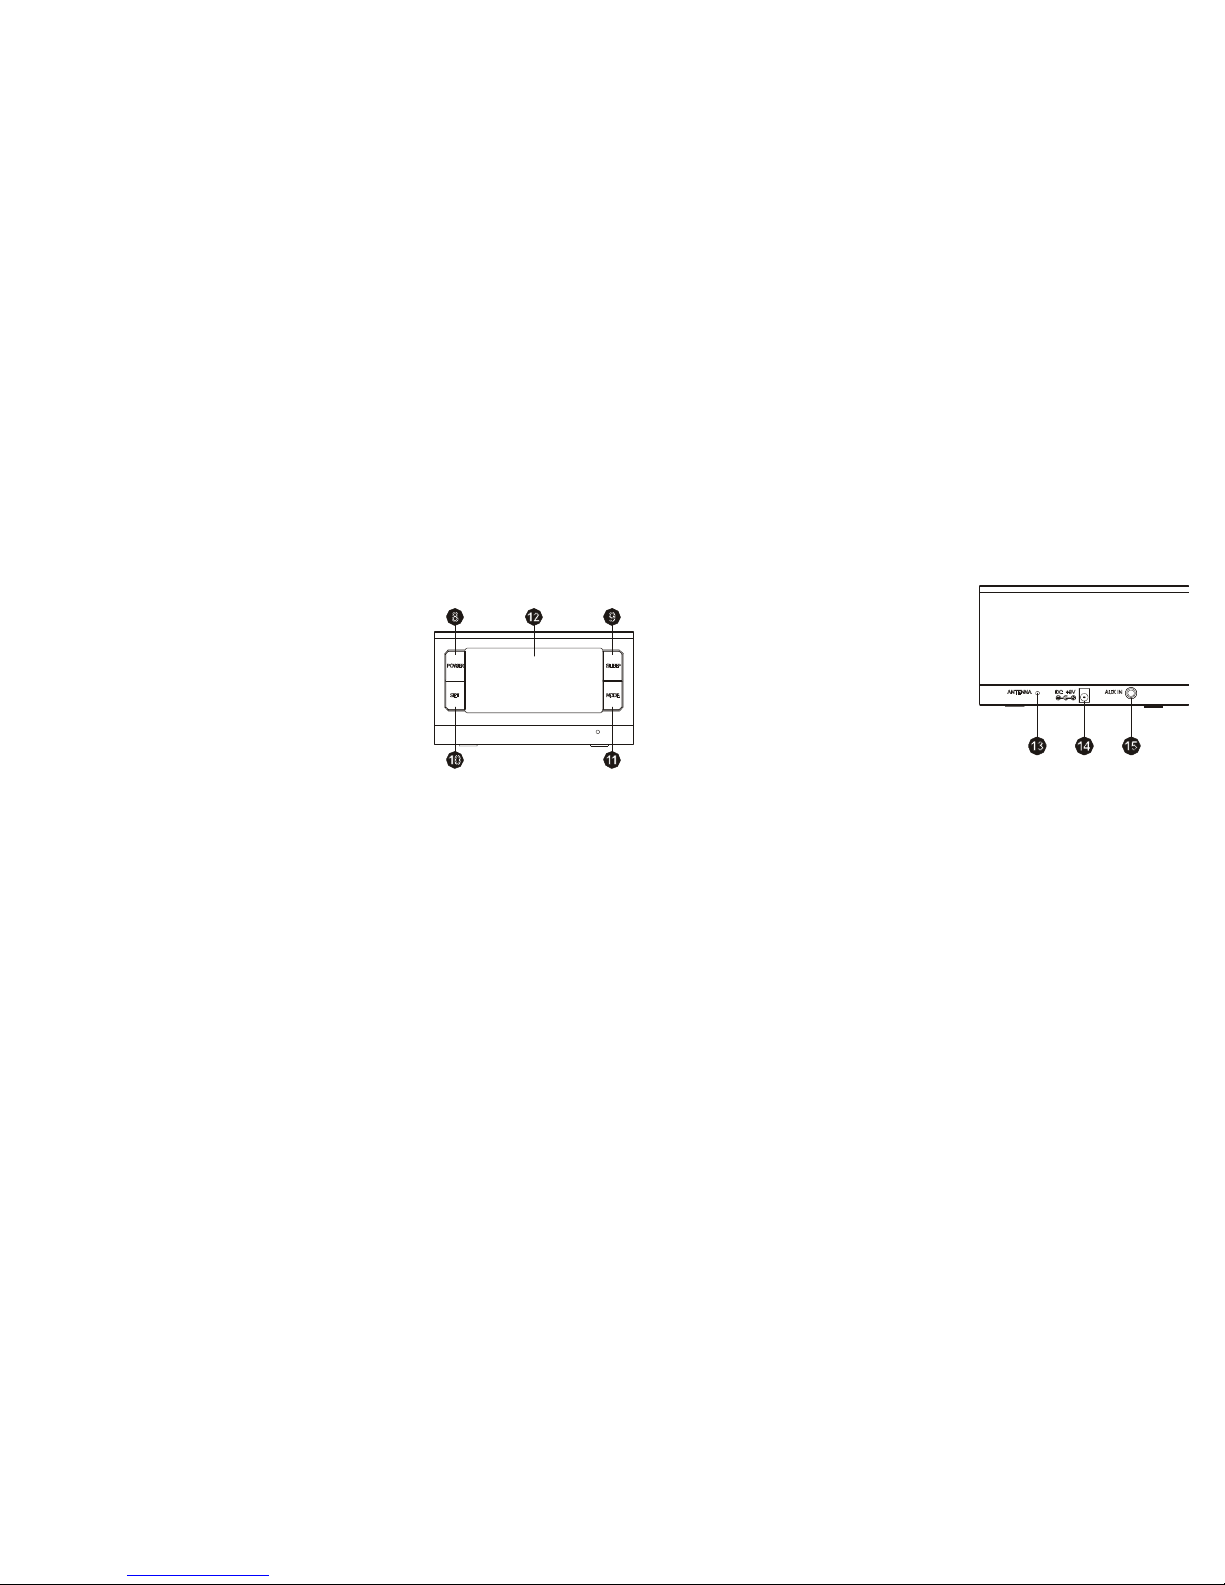
9.
Sleep13. FM
Antenn
a
Jac
k
·
Press to activat
e the
sleep function
.
For FM
receptio
n
10. ALM ON
·
When the unit is on,
quickly press once to enter
alarm 1 setting; quickly
press it twice to enter alar
m
2 setting;
·
Manual-scanning radio
station mode: Press to store
14. DC IN
Connect the power
adapter into this jack an
d
then plug the power
adapter into the wall
outlet.
15. AUX / LINE IN Jack
T
he current
tunes
.
- When setting alarm time and alarm mode, press to
confirm the setting and switch to the setting of alarm
audio source and alarm ring tone.
- After finishing setting alarm audio source and alarm,
.
To listen to iPod model
s
withou
t a
dock connecto
r or
an alternative audio device, connect an auxiliary
3.5mm stereo audio cable to this jack and the other
end to the device
.
12. Multifunctio
n
Displa
y
Variable brightness display with time, audio source
,
FM radio
, and
alarm times show
n on
main screen
.
- 10 - - 11 -
Page 9
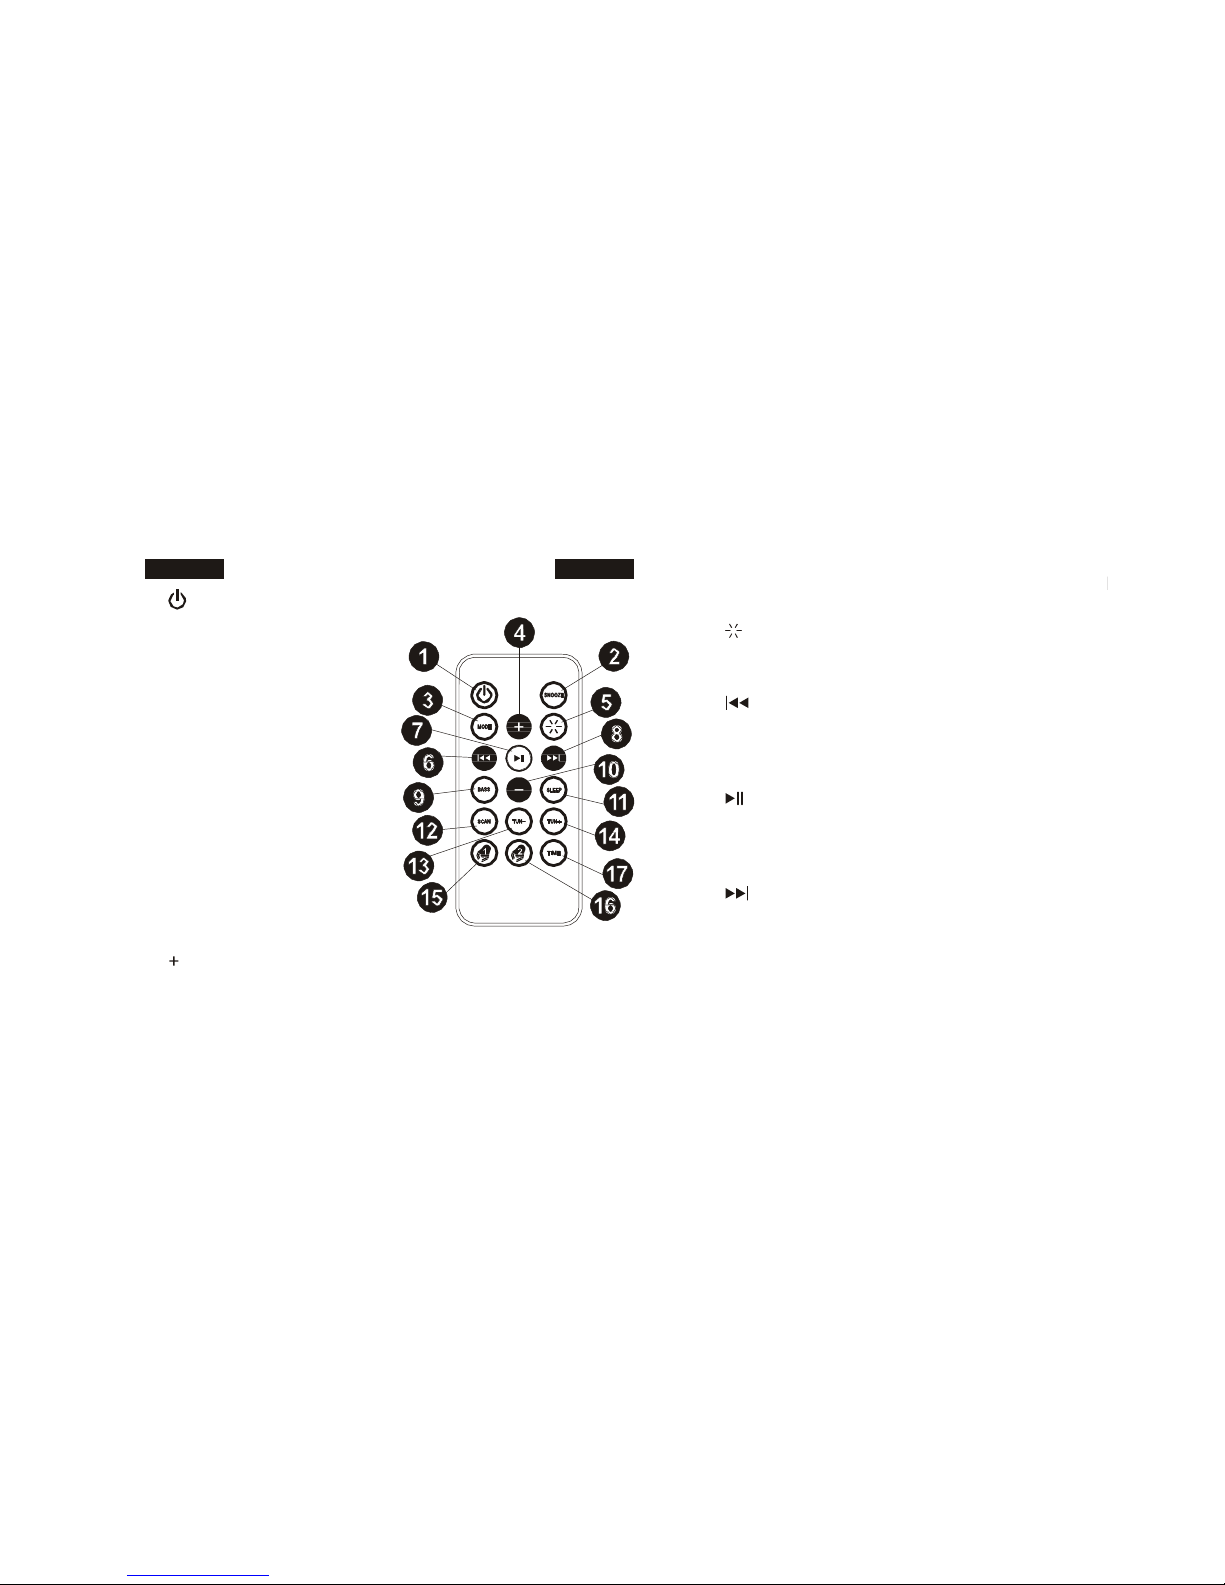
1
.
Usin
g the
Remot
e
Contro
l
volum
e and
On/O
ff statu
s
·
Clock setting condition: Press to adjust cloc
k
·
Press once to powe
r on
or power off the unit
·
Alarm condition:
Press once to stop
alarm
2. SNOOZE
·
Press once to stop
alarm for 10-minute
snooze interval
3. MODE
Press to switch among
the modes of iPod, FM
and AUX
4.+
·
Press to volume up when playing
·
Alarm setting mode: Press to adjust alarm
time
- 12 -
5.
·
Press to adjust the brightness of the backlit LCD
6.
·
Press to skip backwards last song or iPod tracks
·
FM mode: Press to skip backwards last tune
7.
·
iPod mode: Press once to play or pause iPod playin
g
·
FM or AUX: Press once to mute or play
8.
·
Press to skip forwards next song or iPod tracks
·
FM mode: Press to skip forwards next tune
·
Clock setting: Press to switch AM/ PM/ 24-hour
mode
- 13 -
Page 10

9. BASS
·
Press to adjust the bass at the circulation of 0~
514. TUN+
·
Press to adjust manually forwards frequenc
y10.
·
Press to volume down when playing
·
Alarm setting mode: Press to adjust alarm
time
volume and On/Off status
·
Clock setting condition: Press to adjust clock
15. Alar
m 1
·
Press to enter alarm 1
setting
16. Alarm 2
11.
SLEE
P
·
Press to activate the sleep function.
12. SCAN
·
FM mode: Long press to auto-scan tunes
·
FM manual-scan mode: Press quickly to store th
e
station
17. Time
·
Press and hold for three seconds to enter
clock setting
13.
TUN-
·
Press to adjust manually backwards frequenc
y
- 14 - - 15 -
Page 11

Displa
y
Setting
s Time
Setting
s
1
.
Unde
r
“OFF
”
statu
s
with connectio
n to
wall powe
r, the
backlit LCD displays clock and alarm status in
brightest level for 5 seconds.
1. When the unit is on, press and hold “ALARM
ON” for 6 seconds to enter time setting.
2
.
Press <<MODE>>
to
turn on the unit, the backli
t LCD
begins to display not only clock, alarm status, also th
e
icon letter “iPod”.
2
.
Enter clock setting
, the
“AM” begin
s to flash
, and
press << >> to choose between “AM” / “PM”/ 24hour mode, then press <<SET>> to confirm. In 24hour mode, the clock area begins to flash while “AM
”
and “PM” disappea
r.
3.
There ar
e 6
brightnes
s
level of the backli
t
LCD. Pres
s
<<SNOOZE>> to adjust the brightness under “ON”
status.
3
.
Once confirme
d 12 or 24
hours mode
, the
HOU
R
figure in the clock area begins to flash. Press <<+>
>
or <<->> to adjust the HOUR, then press <<
ALARM
ON>> to confirm; then the MINUTE figure begins t
o
flash an
d
- 16 -
4. To
exit clock setting
,
press <<SET>
> to
confir
m
you
setting.
- 17 -
Page 12

Alarm
s Settings
press << >> to
switc
h
amon
g
iPod, FM and buzze
r,
then press <<SET>> to confirm.
1
.
Press <<SET>
>
quickl
y to set the
alar
m 1 or
press
twice to set alarm 2. The “ON” or “OFF” under “Alarm
1” begins to flash, press <<+>> to switch between
“ON” and “OFF”, then press <<SET>> to confirm.
2. When setting the alarm time, if the clock mode is
unde
24-hour mode, then the alarm time mode is defaulted
as 24-hour mode;
And if under 12-hour mode, the “AM” begins to flash
,
then press << >> to switch between “AM” and
“PM”, then press <<SET>> to confirm.
3. Setting the alarm time is in the same way as setting
the clock
.
If choosin
g to
wake up to FM, the defaulte
d
channe
l
for the alarm ring tone is the channel tuned last time.
Once the alarm ring tone is settled, the volume begins
to flash, then press <<+>> or <<->> to adjust the alar
m
ring tone volume, then press <<SET>> to confirm.
Remark:
If choosing to wake up to buzzer, then no volume setting is
required.
When alarm is on, press <<POWER>> to stop the alarm. And
it will last for one hour if no button is pressed
.
4. To
choos
e
alarm ring tone and volum
e
Once the alarm time is settled, iPod begins to flash
,
- 18 - - 19 -
Page 13

Listenin
g to Audi
o
3
.
Press << Play >> on the device
Listenin
g to Your iPod
:
1. Select the correct insert and dock your
iPod4.
Press the << >> or << >> to increas
e
or decrease the volume.
2
.
Press <<MODE>
> to
enter iPod mode
.
Unde
r
iPod
mode, the iPod icon appears on the display.
3. Press <<Play>> on your iPod.
4. Press the << >> or << >> to increase
or decrease the volume.
Listening to an Auxiliary Source:
1. Connect the device to “AUX/LINE IN” jack on the bac
k
of the unit with an auxiliary 3.5mm stereo audio cable.
2. Press <<MODE>> to enter AUX mode. Under AUX
mode, the AUX icon appears on the display.
- 20 -
FM Radi
o
Operatio
n
Auto-scan Radio Station:
1. Under FM mode, press and hold << >> on the unit
to auto-scan radio station and store the scanned
stations accordingly.
2. The frequency starts from 76MHz to 108MHz and skip
s
at every 0.1MHz in scanning process. Once catchin
g a
station, it stops for a second and displays the current
frequency, then continues the auto-scanning.
3. When auto-scanning is finished, it goes back to play
the 1
st
station stored. Press << >> or << >> to
select the station.
- 21 -
Page 14

Manual
-
scan Radi
o
Statio
n
1. Under FM mode, press and hold <<SNOOZE>> to
enter FM manual-scan radio station.
2. Once selected, the “FM” begins to flash, then pres
s
<< >> or << >> to adjust frequencies at
0.1MHz intervals. For quick adjustment, press and
hold << >> or << >>.
Settin
g the
Slee
p
Mod
e
1. Press <<SLEEP>> to activate the sleep function.
2. Press continually to adjust the sleep time intervals at
15, 30, 45 and 60 minutes. It will automatically exit
and set the sleep time as displayed last time when yo
u
leave the button alone for 5 seconds.
3. To
store the curren
t
frequenc
y, press <<
ALM ON
>> o
n
the unit or <<SCAN>> on the remote. (No operation on
any keys in 5 seconds, it exits manual-scanning, and
starts to play the last station stored.)
Remark:30 radio stations could be preset.
3. To
shut off
sleep function
,
choos
e
sleep time interval
s
at zero.
4. To see the remaining sleep time, quickly press
<<SLEEP>> . The screen will display the remaining
sleep time for 5 seconds.
- 22 - - 23 -
Page 15

Replacing the Battery
2. Take out the curren
t
batter
y and
replac
e it
wit
h a
“CR2025” 3-volt Lithium Cell battery.
The remot
e
contro
l
batter
y is
alread
y
installe
d at the
factory. Before using, make sure to pull out the “Remove”
tab that is protecting the battery. A backup battery can
last for one month if the adaptor is not used. When the
remote control stops operating or its range seems
reduced, it is time to replace the battery.
To Replace the Battery:
1. The battery door is located on the
bottom of the remote control. To
open, hold the remote with the back
facing up and pull out the battery
door.
3. Replac
e the
batter
y
with the “+” of the batter
y
facin
g
up.
To Replace the Main Unit Battery:
Replacing the battery on the main unit is in the same wa
y
as replacing the remote battery.
Note
:
Please dispose of batteries properly.
- 24 - - 25 -
Page 16

No
T
roubleshootin
g
No soun
d
from speaker
s
Possible Problem Solution
Possibl
e Problem
Solutio
n
Audio source is not selected
Press “MODE” to select the
audio source
Power
Adapter is not
connected to a wall outlet
Connect
the power
adaptor into the jack in the
back of box labeled “DC”
Volume is set too low
Increase the volume
Remove your iPod from the
dock well and re
-
dock to
and/or the power supply
connector is not plugged
into supply jack on the back
of
box
and then
plug the power
adapter into the wall
outlet
iPod is no
t docked correctly
make sure it is properly
connected
Unit gets warm after extende
d
play at high volum
e Possibl
e
Proble
m Solutio
n
W
all outlet is not functioning
Plug another device into the
same outlet to confirm the
outlet is working
As with other d
evices, this is
normal when the unit is
played at loud volumes for
an extended period of time
Lower the volume or turn
the unit of
f for a short period
of time
- 26 - - 27 -
Page 17

iPod did not charg
e
Possibl
e
Proble
m Solutio
n
iPod is not docked properly
Remove your iPod from the
universal dock well and redock to make sure it is
properly connected
iPod is frozen or the iPod
battery has a problem
Make sure your iPod is
working properly before
docking into box. Refer to
your iPod manual for
details and make sure you
are using the latest
software on your iPod o
r for
instructions on resetting
your iPod
- 28 -
 Loading...