

Page 1
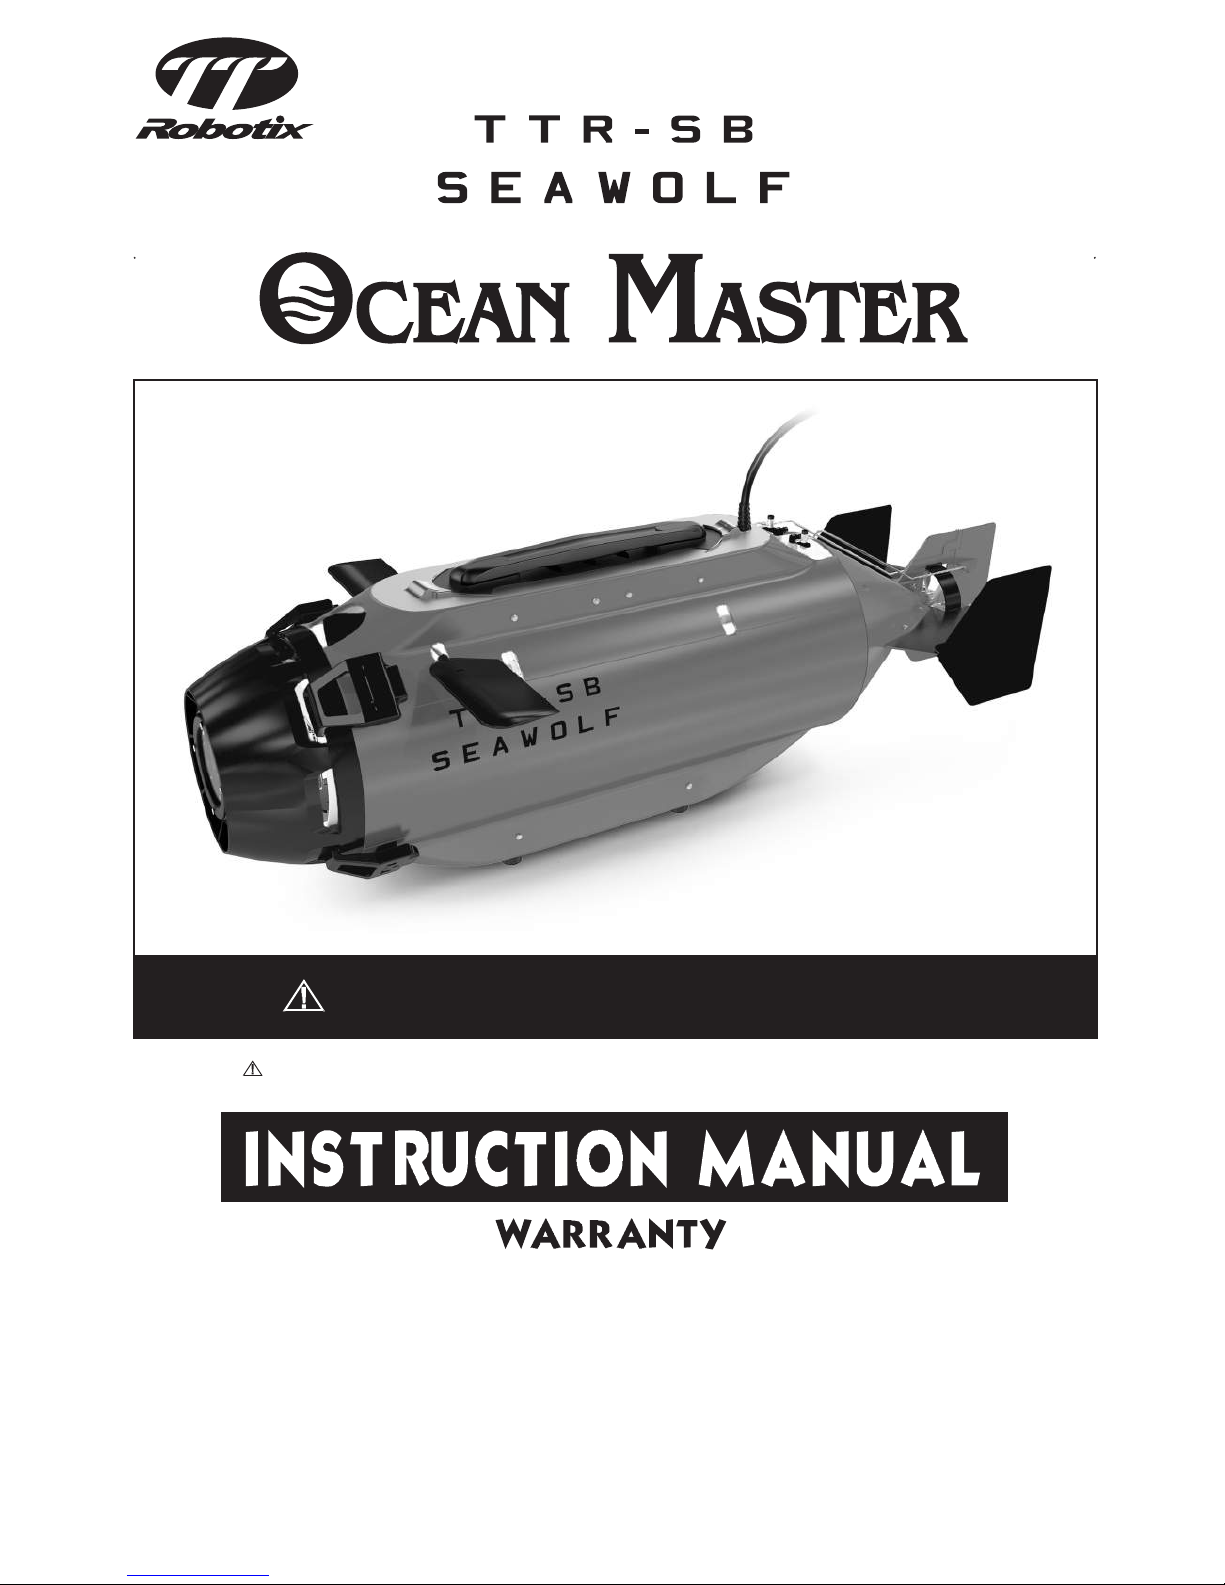
Please read all instructions thoroughly before operation.
No.5224-F15A
Thunder Tiger Corporation guarantees this model sub to be free from defects in both material and workmanship.
The total monetary value under warranty will in no case exceed the cost of the original sub purchased. This
warranty does not cover any components damaged by use or modication. Part or parts missing from this sub must
be reported within 60 days of purchase. No part or parts will be sent under warranty without proof of purchase.
To receive part or parts under warranty, the service center must receive a proof of purchase and/or the defective
part or parts. Should you nd a defective or missing part, contact the authorized Thunder Tiger Service/Distributor
nearest you. Under no circumstances can a dealer or distributor accept return if the operation has started.
The contents are subject to change without prior notice due to product improvements and specication changes.
Page 2
INTRODUCTION
CONTENT
CONFIGURATION
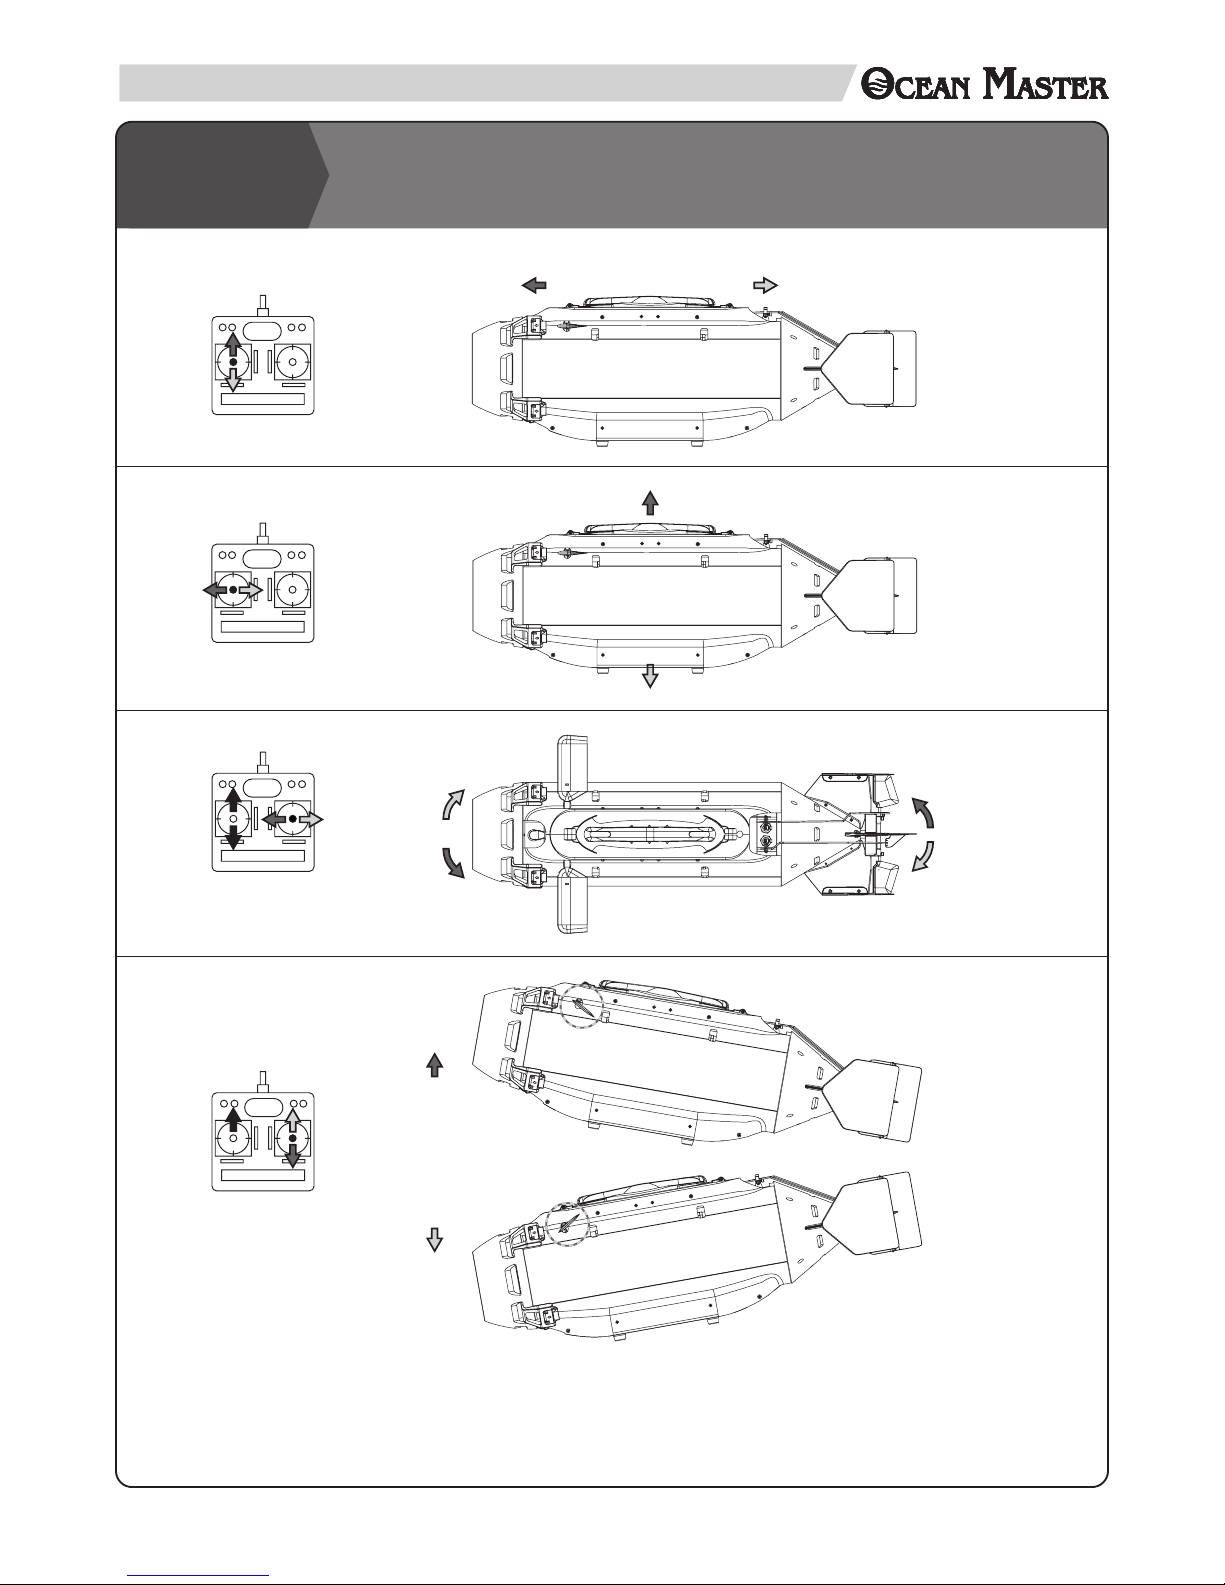
RADIO CONTROL VS OCEAN MASTER MOVEMENT
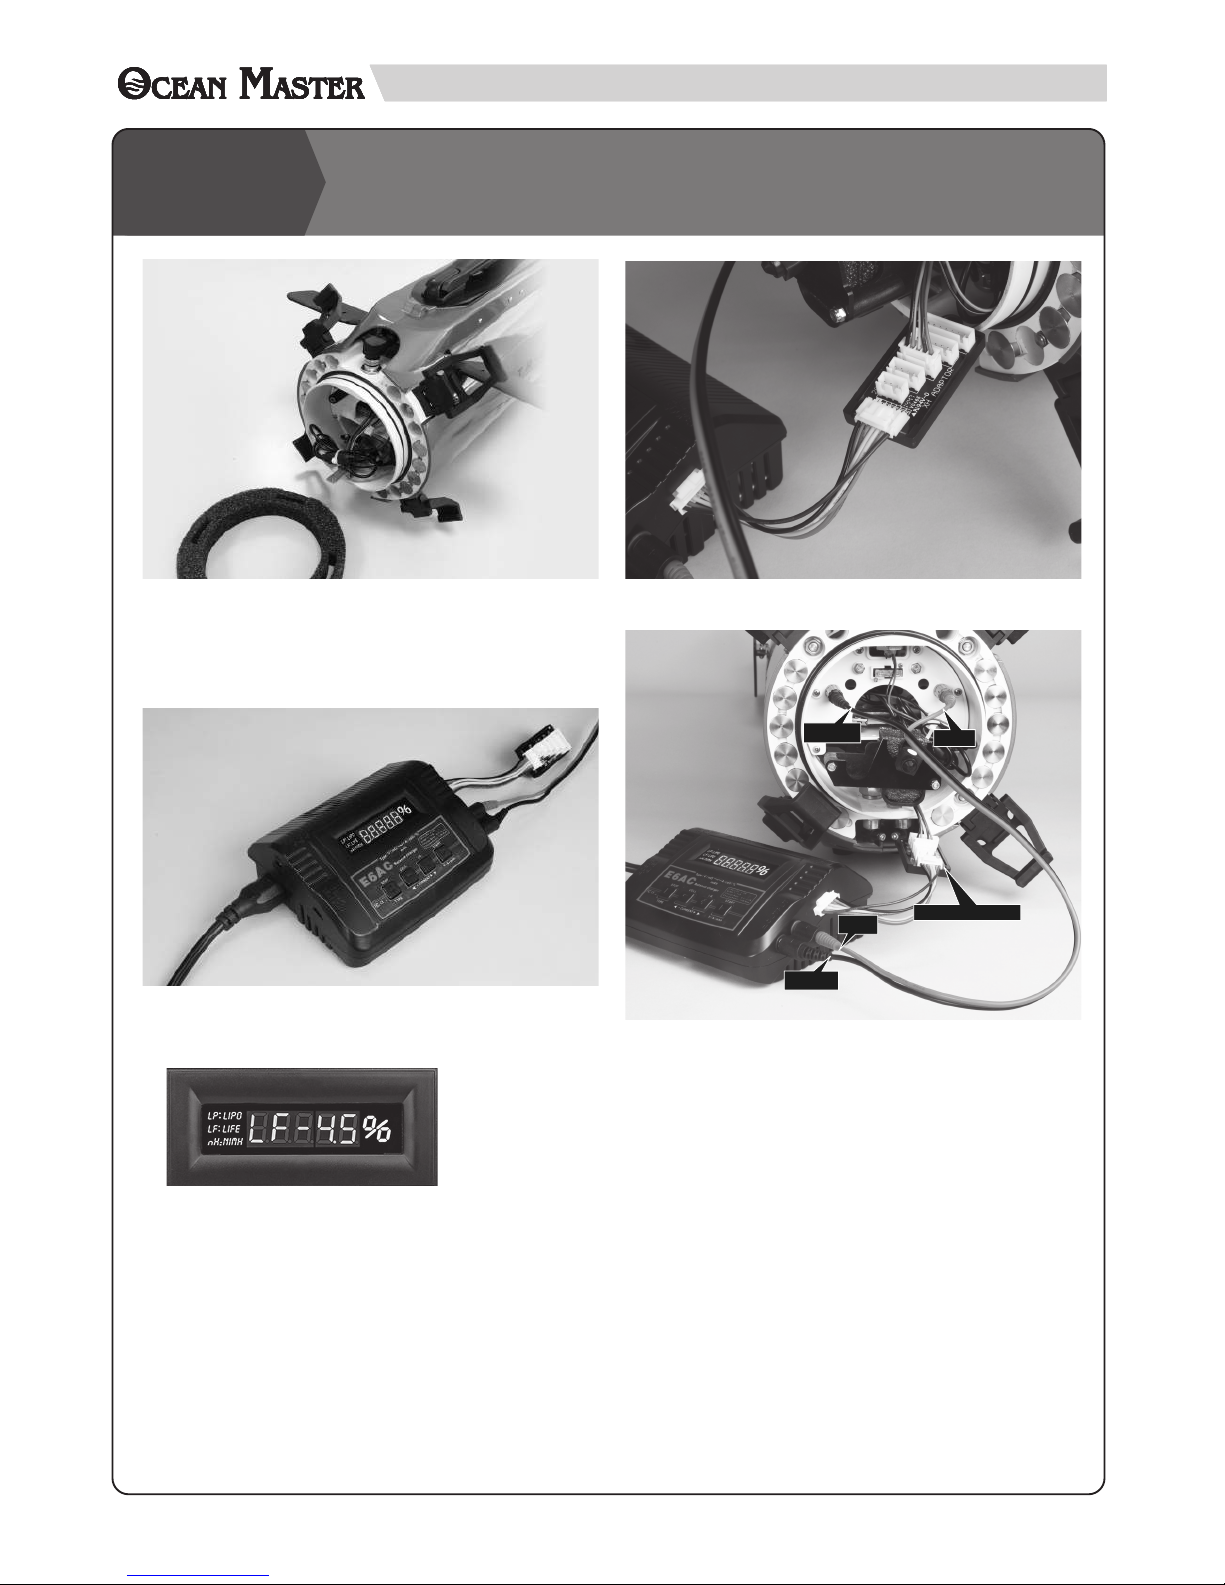
CHARGE
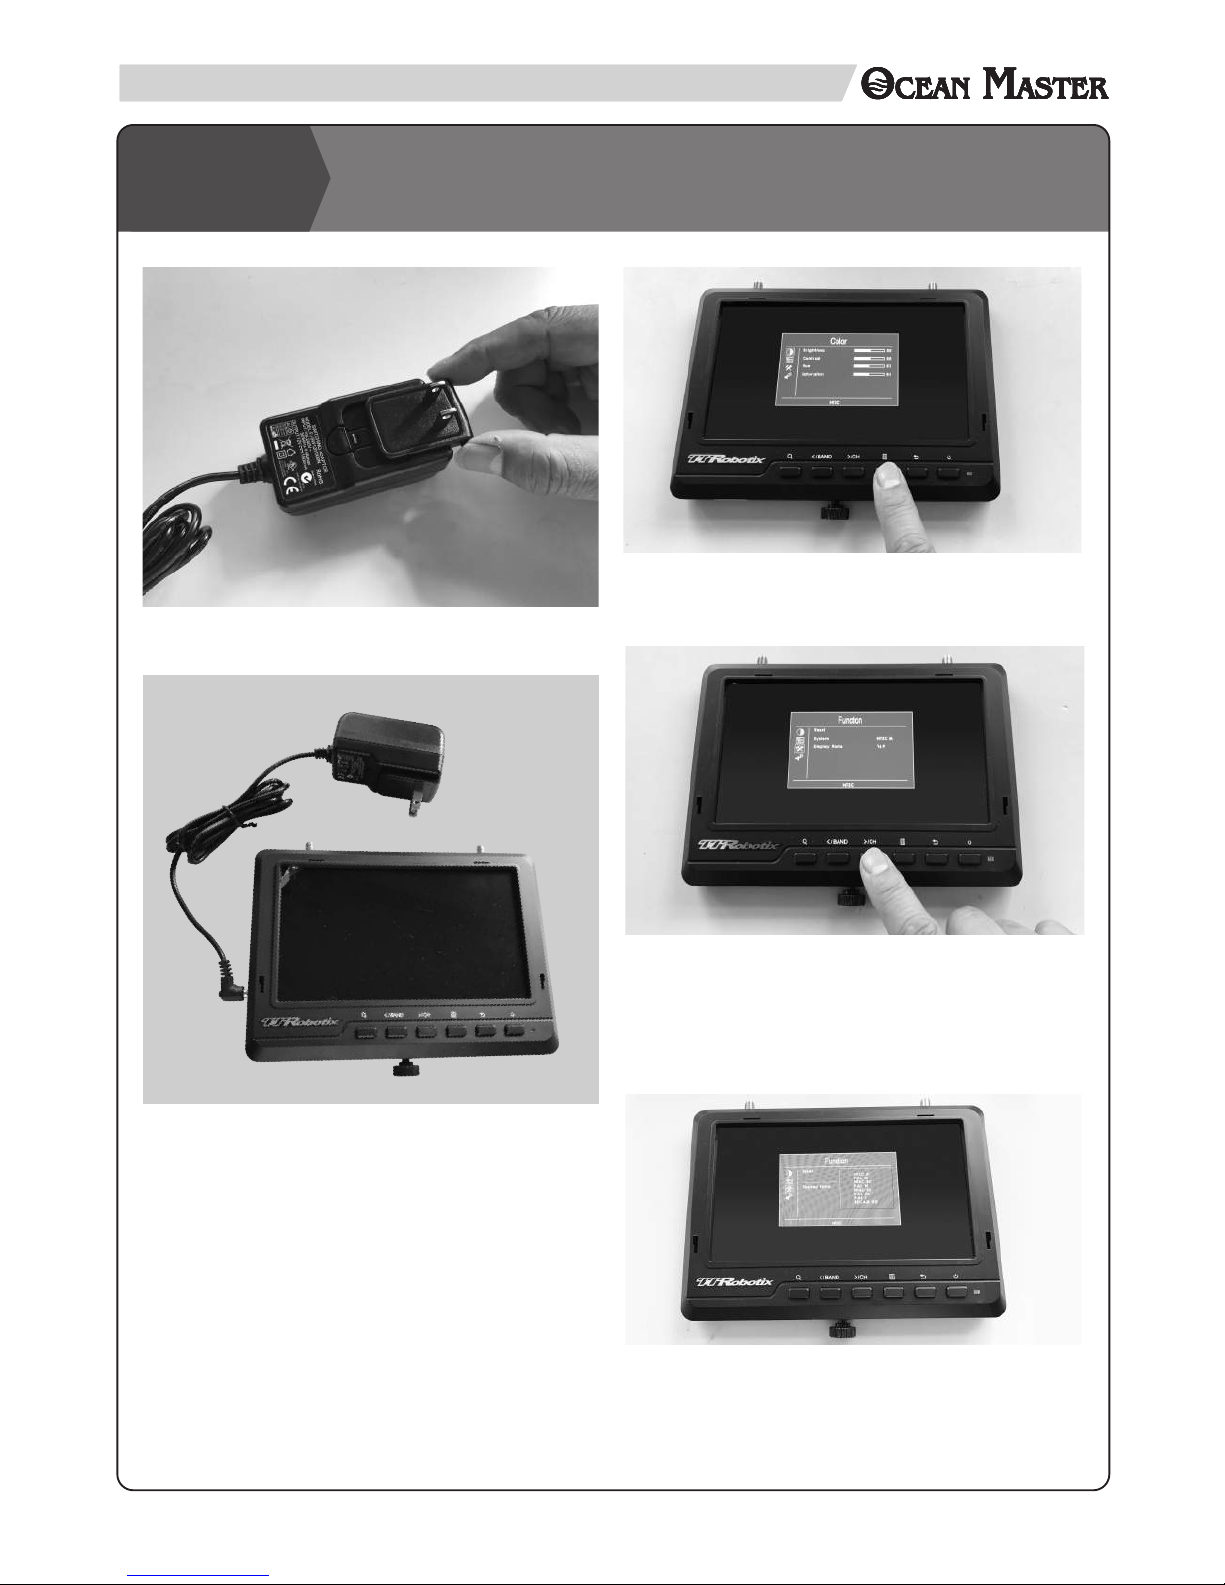
MONITOR
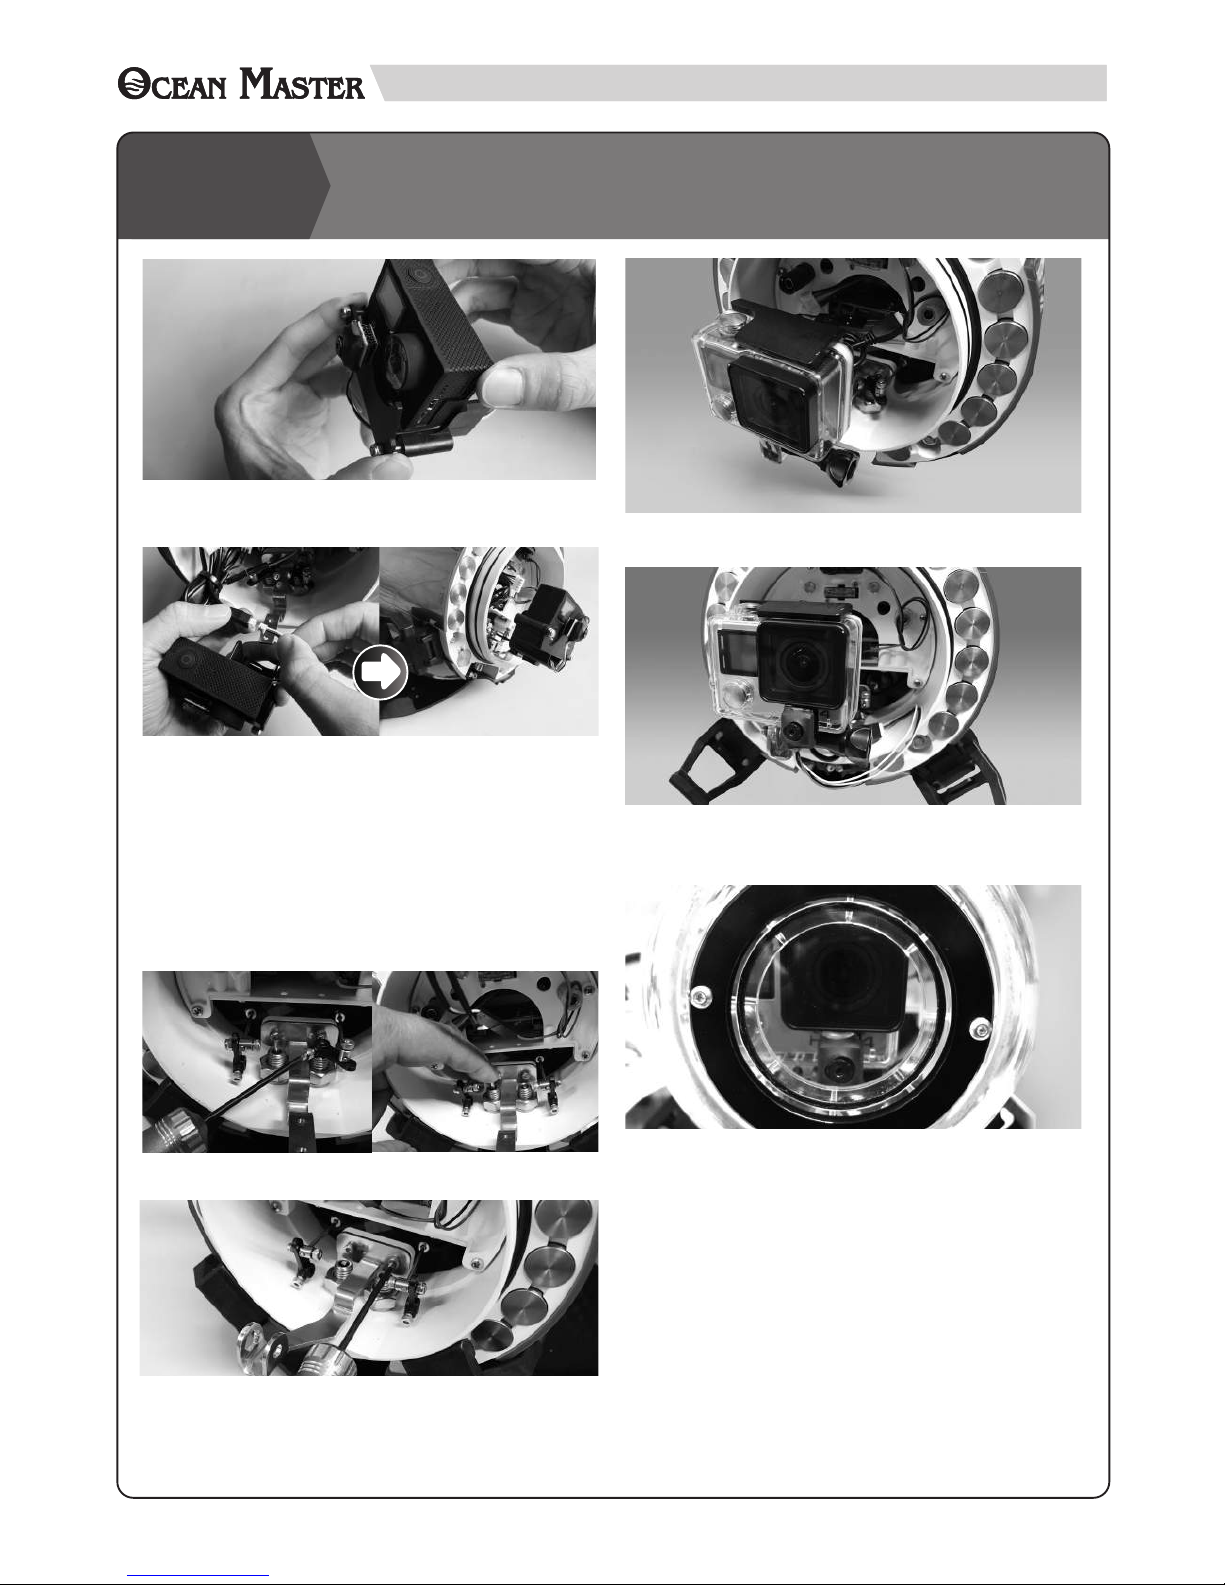
CAMERA INSTALLATION
HOOD/FRONT CAP INSTALLATION
CONNECTION
BUOYANCY CHECK & WEIGHT ADJUSTMENT
PRE-LAUNCH CHECK
OPERATION
CAUTIONS
MAINTENANCE
SPARE PARTS LIST
1
Thank you for choosing TTRobotix Ocean Master, the underwater ROV that could carry sport camera into the
water with the patented static diving system
With static diving system, the Ocean Master dives like a real submarine. The ship has equipped with ballast and
pump. As the pump lls the ballast with water, the Ocean Master could dive without anyway assistant from sails
planes and the power unit. This gives the Ocean Master an advantage to stay in water static for long hours. The
powerful propulsion system and large surface planes allows the Ocean Master glide through water gracefully.
A uniquely integrated fail safe system is also onboard with the Ocean Master. In the event of lost signal, low
battery or hull leakage, this system will drain ballast automatically and the Ocean Master will resurface to
retrieve.
TTRobotix Ocean Master has ability to carry most of the sports camera in the market and allows you to capture
the amazing underwater world.
1. Always turn on the radio controller rst and submarine last.
2. Always turn off the submarine rst and radio controller last.
3. Always set the “Trim” dial button in the neutral position before turning on the radio controller to avoid
malfunction of the controller.
4. Do not operate the submarine if you encounter any following situations.
Recharge the submarine immediately otherwise the battery may damage permanently.
a. Sub oats up to the surface automatically
b. Pump can not work / Sub can not dive
c. Power or speed is getting less
d. Propeller can not rotate continuously
5. Always submerge the whole sub in clean fresh water and clean after each use.
6. Turn the Sub on then full throttle to dry the motor after cleaning by fresh water.
7. Always release the water from ballast(water bag inside the sub).
8. Make sure Sub is dry before putting it in the carry box.
INDEX
WARNING
< MUST READ BEFORE USE >
INTRODUCTION
01
02
03
04
05
06
07
08
09
10
11
12
13
14
15-17
Page 3
2
4321
6
5
8
7
CONTENT
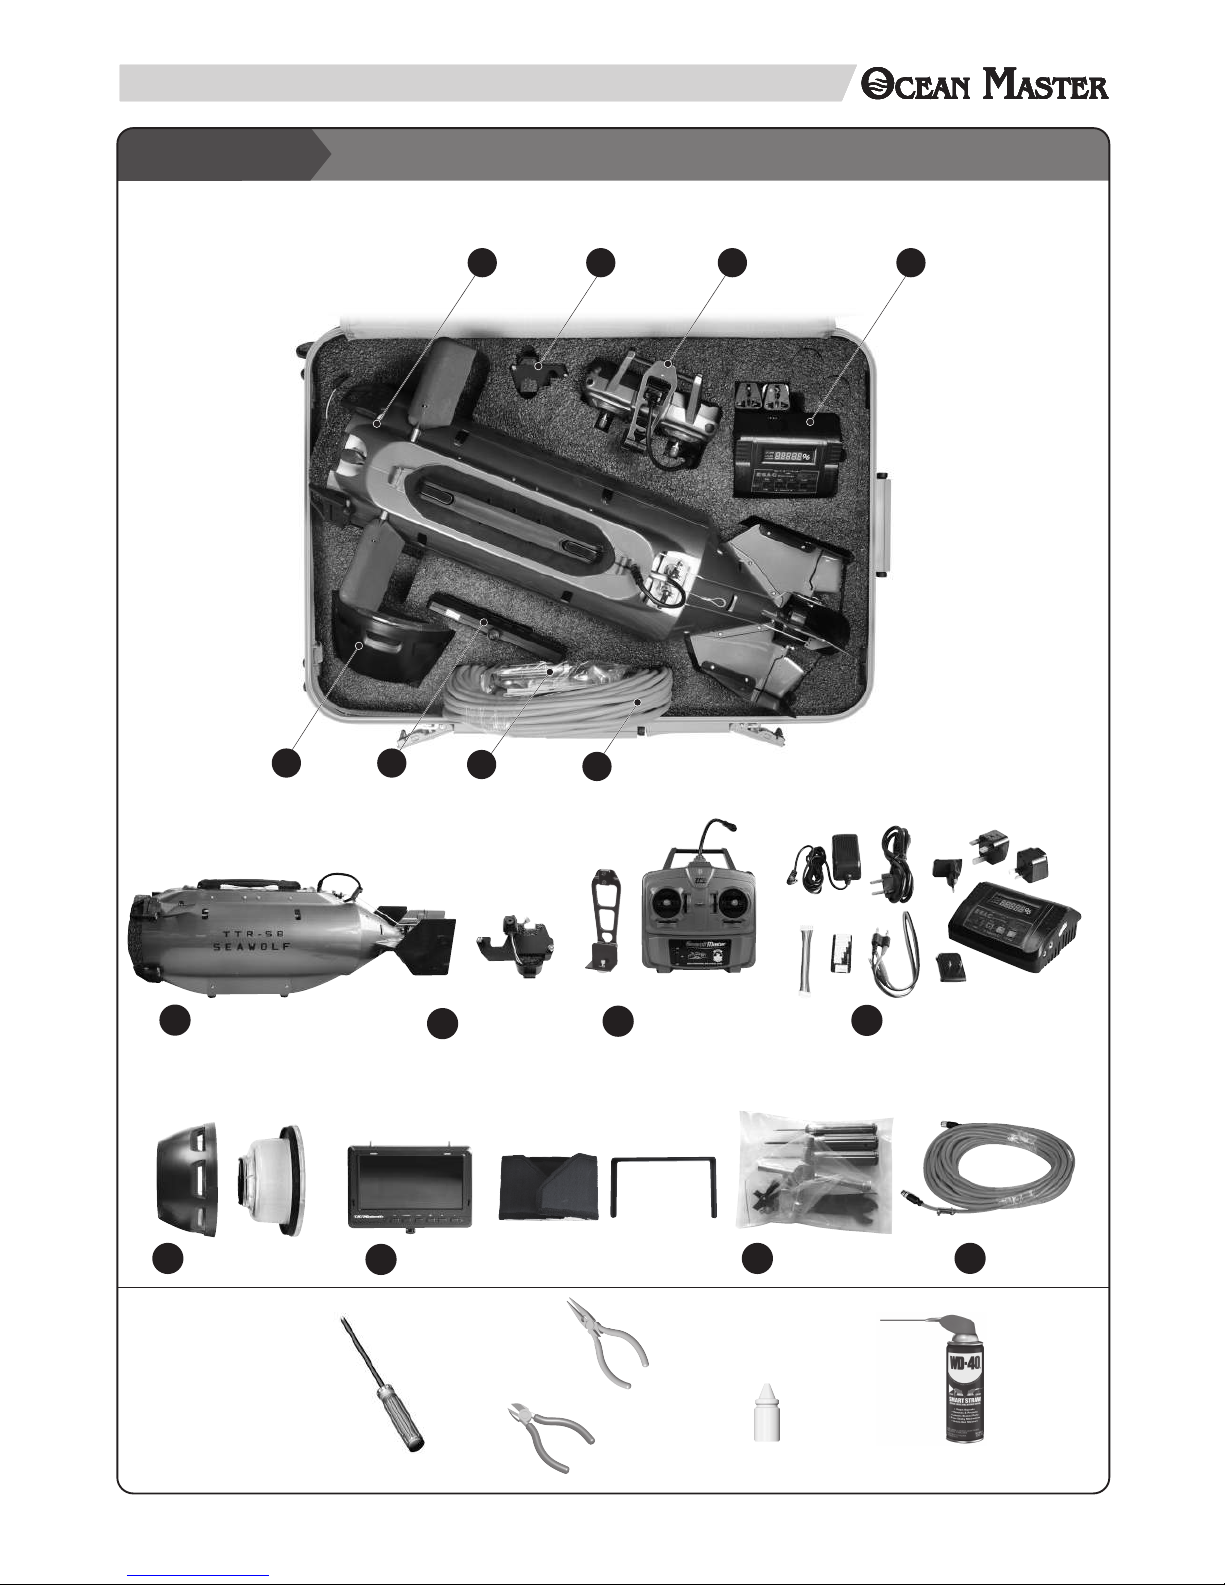
Check all contents as the list below, contact authorized dealer if there is any part missing.
4
8
1
3
2
6
5
7
Submarine
Action Camera
Mount w/CCD
Controller &
Monitor Holder
Charger & Cable
Front Cap & Hood
Monitor
Tool Bag
20M Cable
TOOLS
MAY NEED FOR
MAINTENANCE
Phillips Type Screw Driver
Wire Cutter
Needle Nose Pliers
Thread Locking Glue
Spray Lubricant oil
Page 4
3
1011
CONFIGURATION
10
11
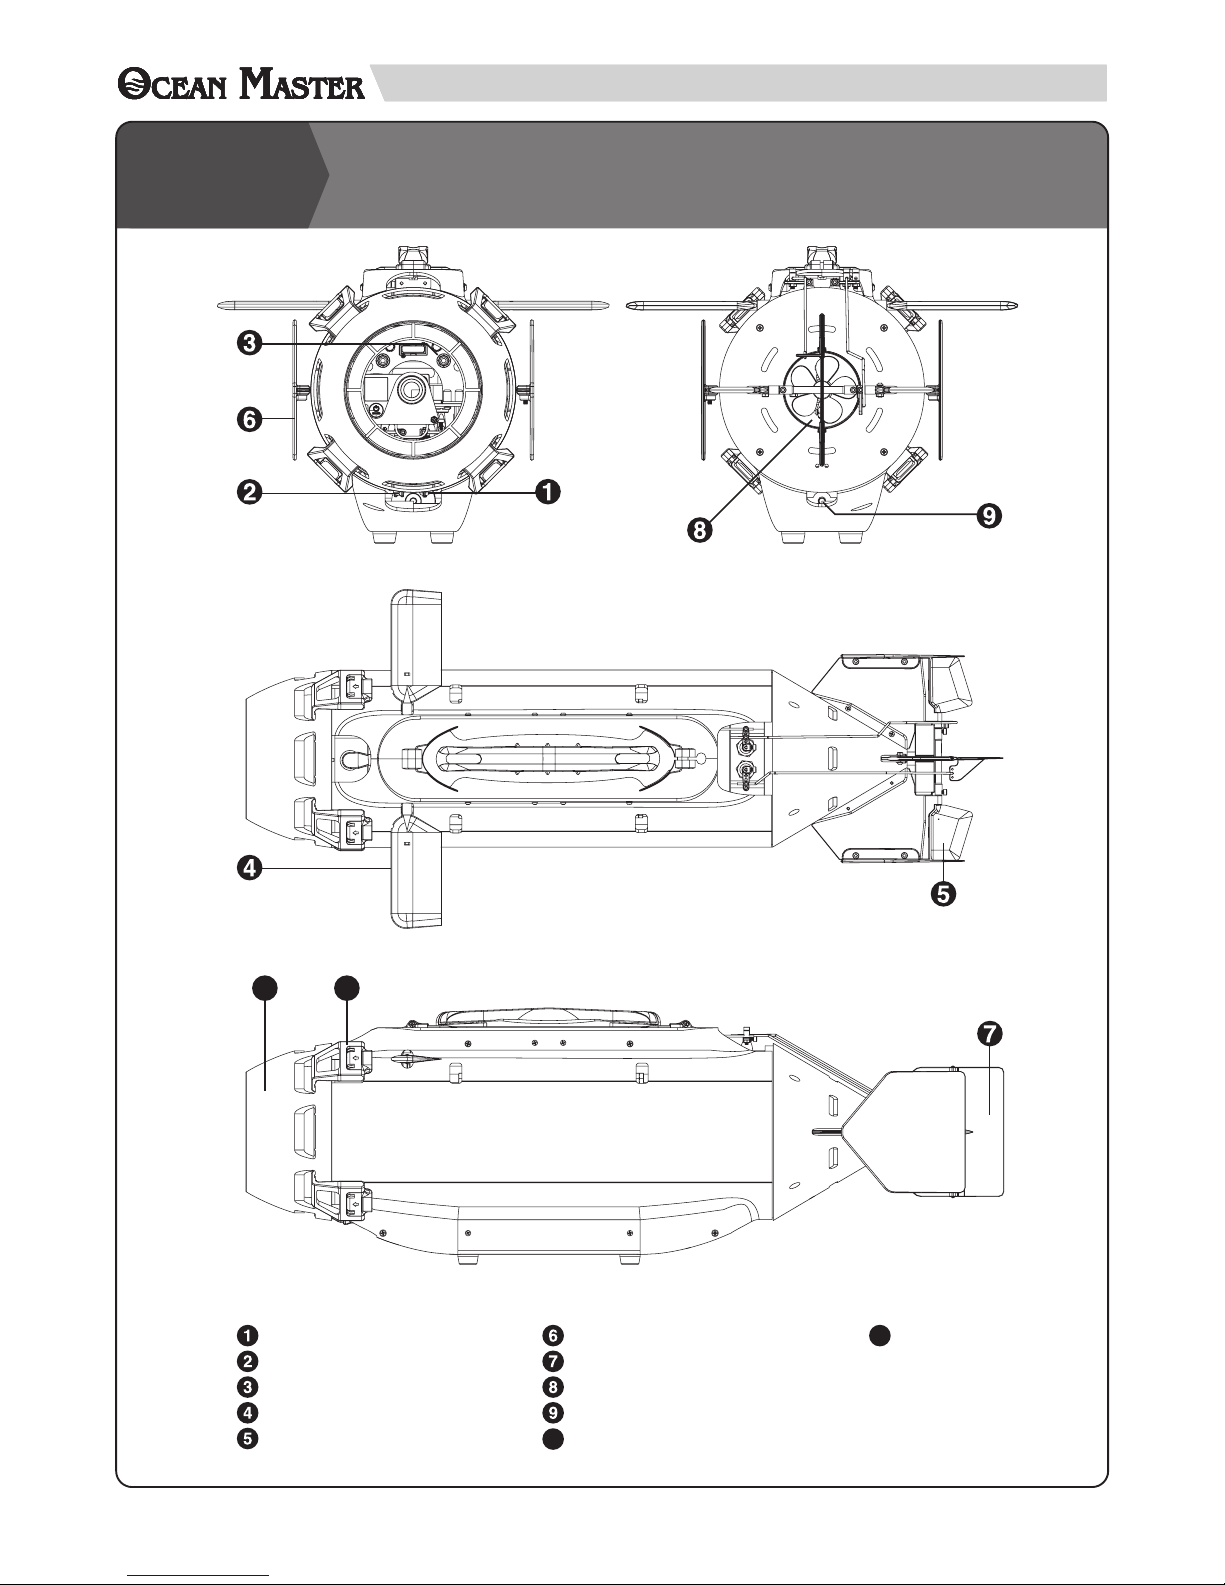
Switch-Power On
Switch-Not in Used
Charging Plug
Front Elevator
Rear Elevator
Verticle Stabilizer
Rudder
Propeller
Water Inlet/Outlet hole
Clips
Front Cap & Hood
Page 5
4
RADIO CONTROL vs OCEAN MASTER
MOVEMENT
NOTE:
The control of the Seawolf is similar to Mode 2 of RC airplanes: throttle is at the left stick and elevator is at the
right one.
Pump Operation:
Dive: Pump water into the ballast
Surface: Drain water out from the ballast
Throttle
Floating / Diving
Steering
(Forward)
Elevator
(Forward)
Forward
Backward
Right turn
Left turn
Nose up
Nose down
Page 6
5
1. Take the Seawolf Ocean Master out from the carry box.
Remove the front protection foam and keep the foam in a
safe place. The bullet weight will come off if submarine is
nose down. Always keep the sub horizontally and put the
foam on the collar if the front cap is not installed.
5. Connect the charge leads to the Seawolf Ocean Master.
RED wire to RED port, BLACK wire to BLACK port.
6. Check all the leads are connected correctly.
7. Press "Start" to charge the Seawolf Ocean Master.
8. Battery should be charging now. DO NOT let the charging
process of Seawolf Ocean Master unattended.
9. When charging is done, the Charger will sing and stop
charging automatically."LF-FU" will ash on the screen.
10. Disconnect the Seawolf Ocean Master from the charger.
2. Connect the power cord and charge leads as shown.
Use wall plug converter (included) if necessary.
3. Seawolf Ocean Master is powered by a 4S "LiFe"battery.
Set your charger to "LiFe" mode by press "Type" button.
The screen will indicate "LF".
Press "-current+" to change the charge current (A).
4. Connect the balance lead as shown.
BLACK
RED
BLACK
RED
BALANCE PORT
CHARGE
※
User may check the enclosed charger manual for more details.
BLACK
RED
Page 7
6
Charge
Function
1. Press "Power" for 5 seconds to turn on the monitor.
2. Th e mon itor screen should pick u p the signal from
Seawolf Ocean Master immediately. If not, check all the
connections are connected correctly and rmly as page-9
shown, then perform the following setting.
3. Press "return" to make sure in video mode.
MONITOR
1. Install the proper power plug on the switching adaptor in
place. Make sure the plug is all the way in.
2. Connect the charging plug to the charging jack of the
monitor at left.
3. Start to charge the monitor, the LED indicator will be in
Red. Once it full charged the LED light will turn off.
4. Press "Manual" (The third button from the right) to enter
manual setting.
5. Use "<" and ">" button (The second and third bottom from
the left) to select manual's category.
6. Select "Function" category from the manual list. Which is
the third category from the top.
7. Press "Enter" (The third button from the right) to enter the
category.
8. Press "< "or ">" to choose the sub-category. Choose
"System" sub-category by press "Enter" (The third button
from the right).
9. Use "<" and ">" button to select "NTSC M". Press "Enter"
(The third button from the right) to select it.
10. You should able to see the live video stream from the
Seawolf Ocean Master now.
11. Press "return" (The second button from the right) twice to
exit the categories.
Page 8
7
Note:
Action Camera is recommended as follows
1. Gopro Hero 4 or compatible action camera in spec
2. Sony Action CAM AS-100 series, however user may need to
add space to keep it in the camera mount.
3. For Gopro Hero 5 or action camera using the water proof
case, user will have to change the different holder
< optional parts >
1. Install your Action Camera in place, as it is tight fit so user
may pul l the front plate of the camera mou nt f or easier
installation. Make sure the camera is all the way in.
2. Connect the CCD wire as photo shown, note the orientation
of the connector.
Insert the whole camera mount to the holder.
a. Remo ve the h orn s f irs t, next lower th e s hafts then
unscrew the two socket screws.
b. Replace the new holder and secure the holder in place with
the two socket screws.
c. Push the shafts back and install the two horns in place. Do
not over tighten the screw or the plastic horn will be stripped
or broken.
d. Install the camera with its waterproof case and secure with
the its hand screw.
e. User will have to remove the CCD from camera mount and
attach to the waterproof case. Use double side foam tape to
attach the CCD under the lens.
f. Adjust the camera and CCD location if necessary. Make sure
less O-ring area in the viewnder the better.
Warning:
The enclosed CCD is required for real-time video. User’s
camera is taking video only. User has to check everything
properly before diving.
Action Camera takes video at high resolution for example 4K,
the camera will get hot easily specially in a closed container.
We recommended that you will need to make sure your action
camera will work ne in the Submarine and dive underwater for
a long time.
Either use lower resolution to keep temperature lower or run
shorter time will help.
Please note that user’s camera is not under the manufacturer’s
warranty.
CAMERA INSTALLATION
Page 9
8
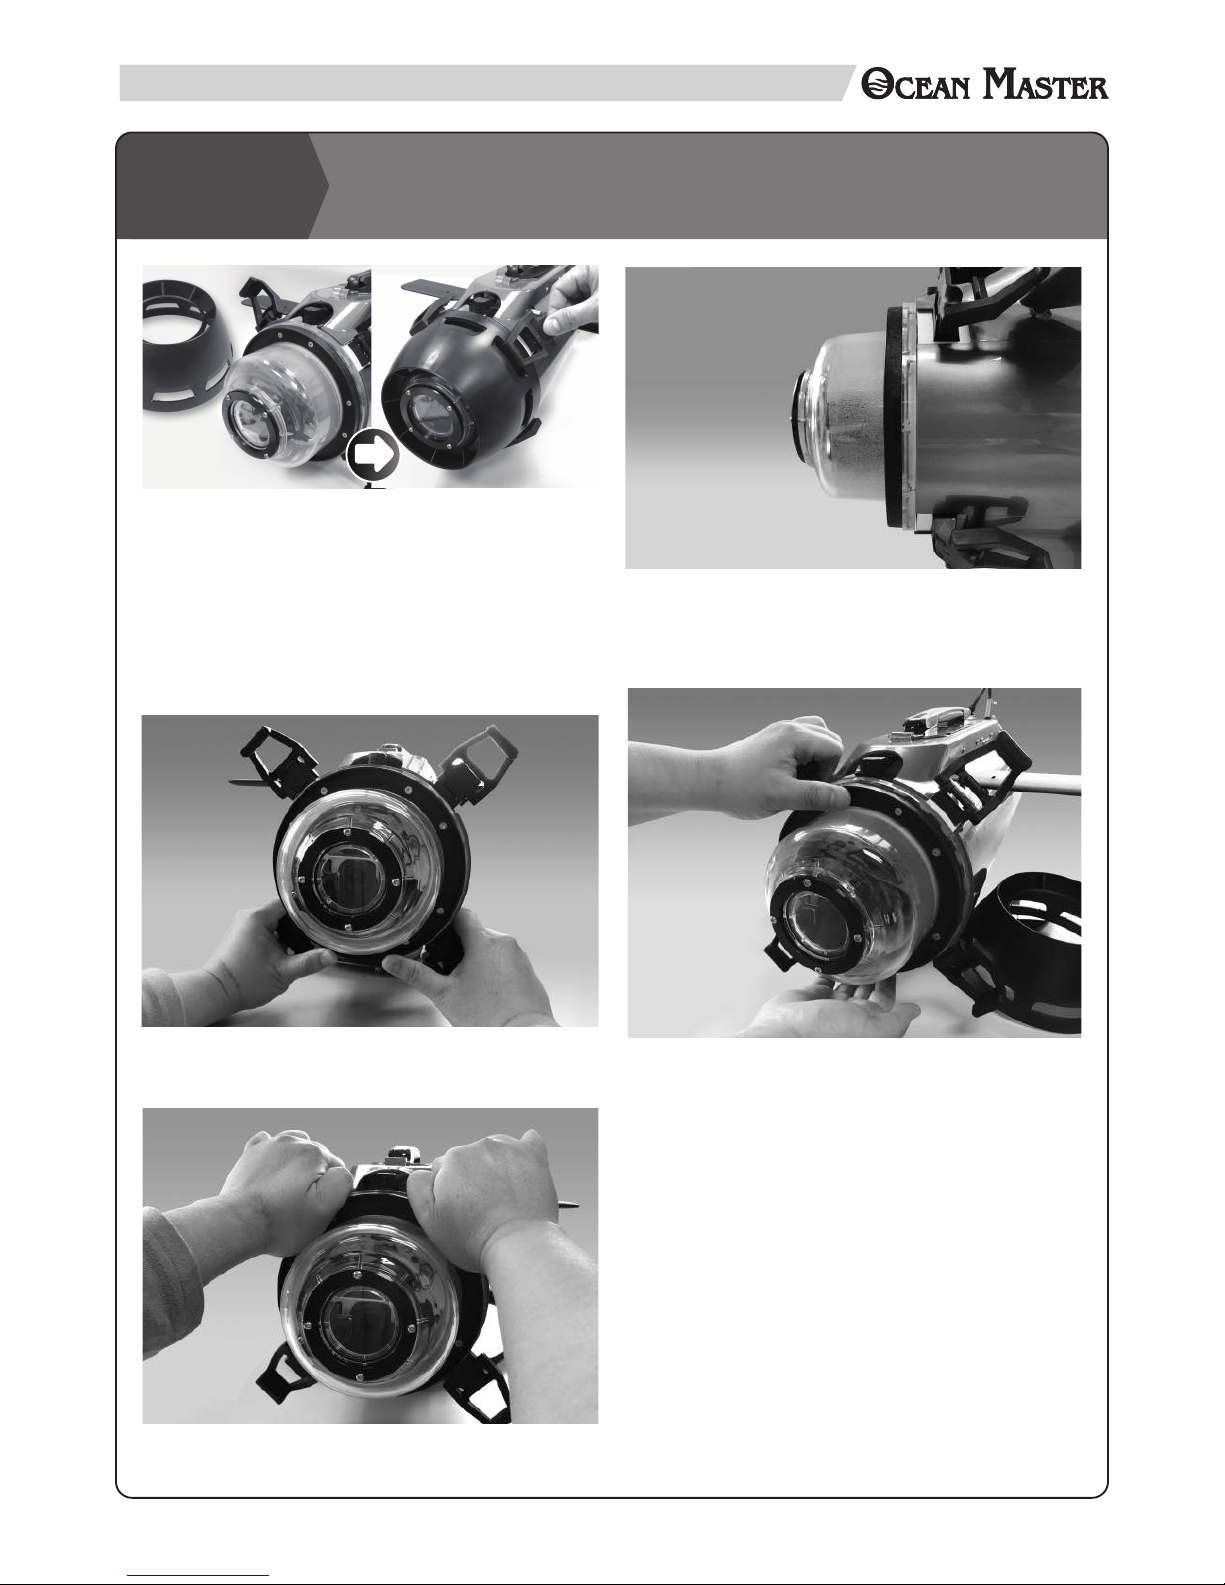
HOOD / FRONT CAP INSTALLATION
1. Lock the front cap and hood to place. Make sure that the
notch on the hood is lined up with the clips and locked rmly.
2. As the cap needs to be tight fit to the collar for deep
waterproof, it is a little bit hard to install at this step. We
recommend that user follows the steps as below for easier
installation and removal of the front cap.
3. Turn on the sport camera before closing the front cap.
Installation
a. Attach the front cap to the white collar and stop by the O-ring.
b. Next use two thumbs to push in the bottom of the cap as
photo shown.
c. Refer to the photo and push in the top portion of cap, it may
require power to push in.
d. Back and forth to push on top and bottom and make sure the
cap is all the way in and close to the collar.
Removal
a. The thumb of one hand to push at top of cap, the index and
middle nger of the other hand pull the cap at the bottom.
b. It requires the power to push and pull. Apply some Vaseline at
the O-ring area will help the installation and removal of cap.
Page 10
9
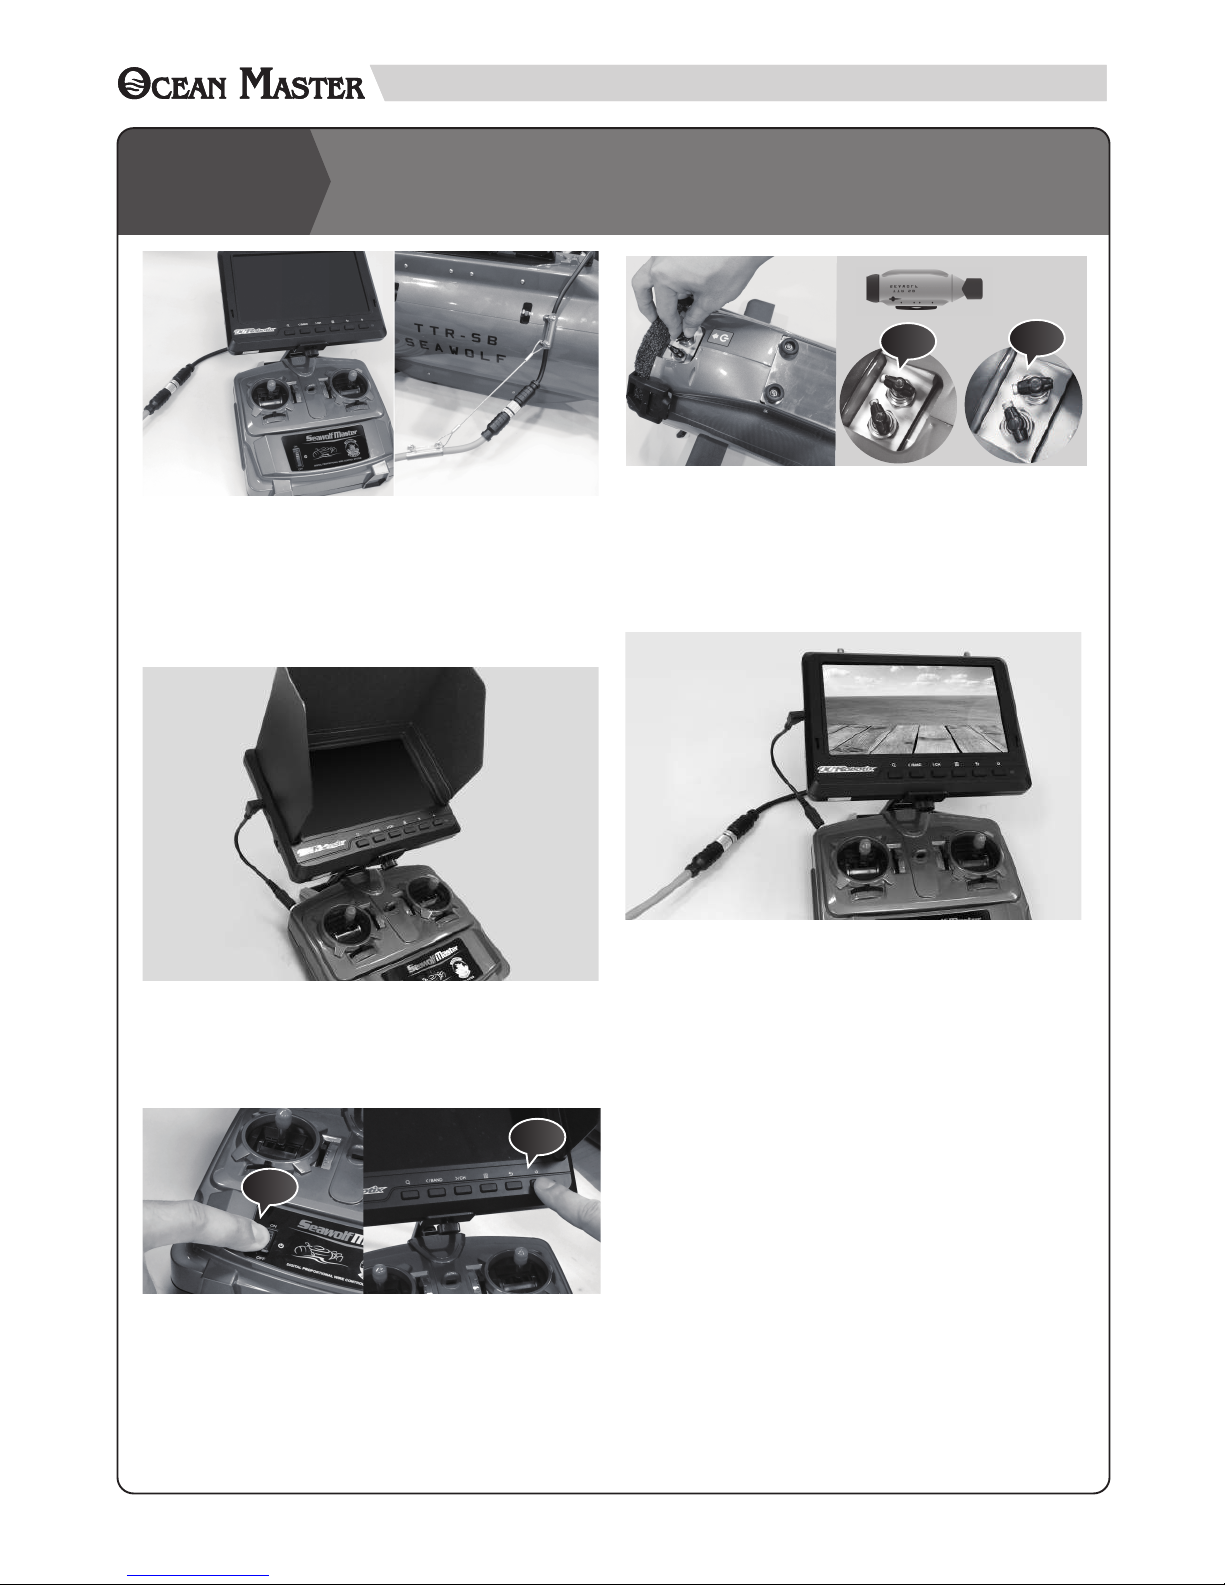
Switch on by turning clockwise.
Switch off by turning counterclockwise.
User may refer to page 4 of the radio control and movement. It
is recommended to familiar with the controls once it dives then
you can only see the monitor to control your Sub. Image you
are sitting in the cabin and control the sub. Check all control
surfaces and propeller are in neural position and functions
correctly without any interruption.
1. Connect the Seawolf Ocean Master and controller with
the cable (Included). Makes sure that all the trims on the
controller are in neutral positions.Hand screws the cable
connectors rmly and creates a proper seal.
Reinforce the connector portion at sub end with the steel
wire. Secure the wire properly, make sure the connector
portion looks like a " Bow " style.
2. Lock the FPV monitor rmly on the mount with a hand screw.
Screen shade is available when operate the Seawolf Ocean
Master under the sun. Con ne ct the FPV monitor to the
controller with the cable included.
3. Turn the controller power ON. / Turn the FPV monitor ON.
Make sure the sports camera power is on.
ON
ON
Finally turn on the Ocean Master. The main power switch is
located at the bottom of the front ange. From the bottom view,
the right switch controls the main power while the left switch is
unused.
5. Make sure that the monitor is receiving AV signals. The
live video feed from the camera should appear on the FPV
monitor.
CONNECTION
ON
OFF
UPSIDE DOWN
Page 11
10
BUOYANCY CHECK & WEIGHT
ADJUSTMENT
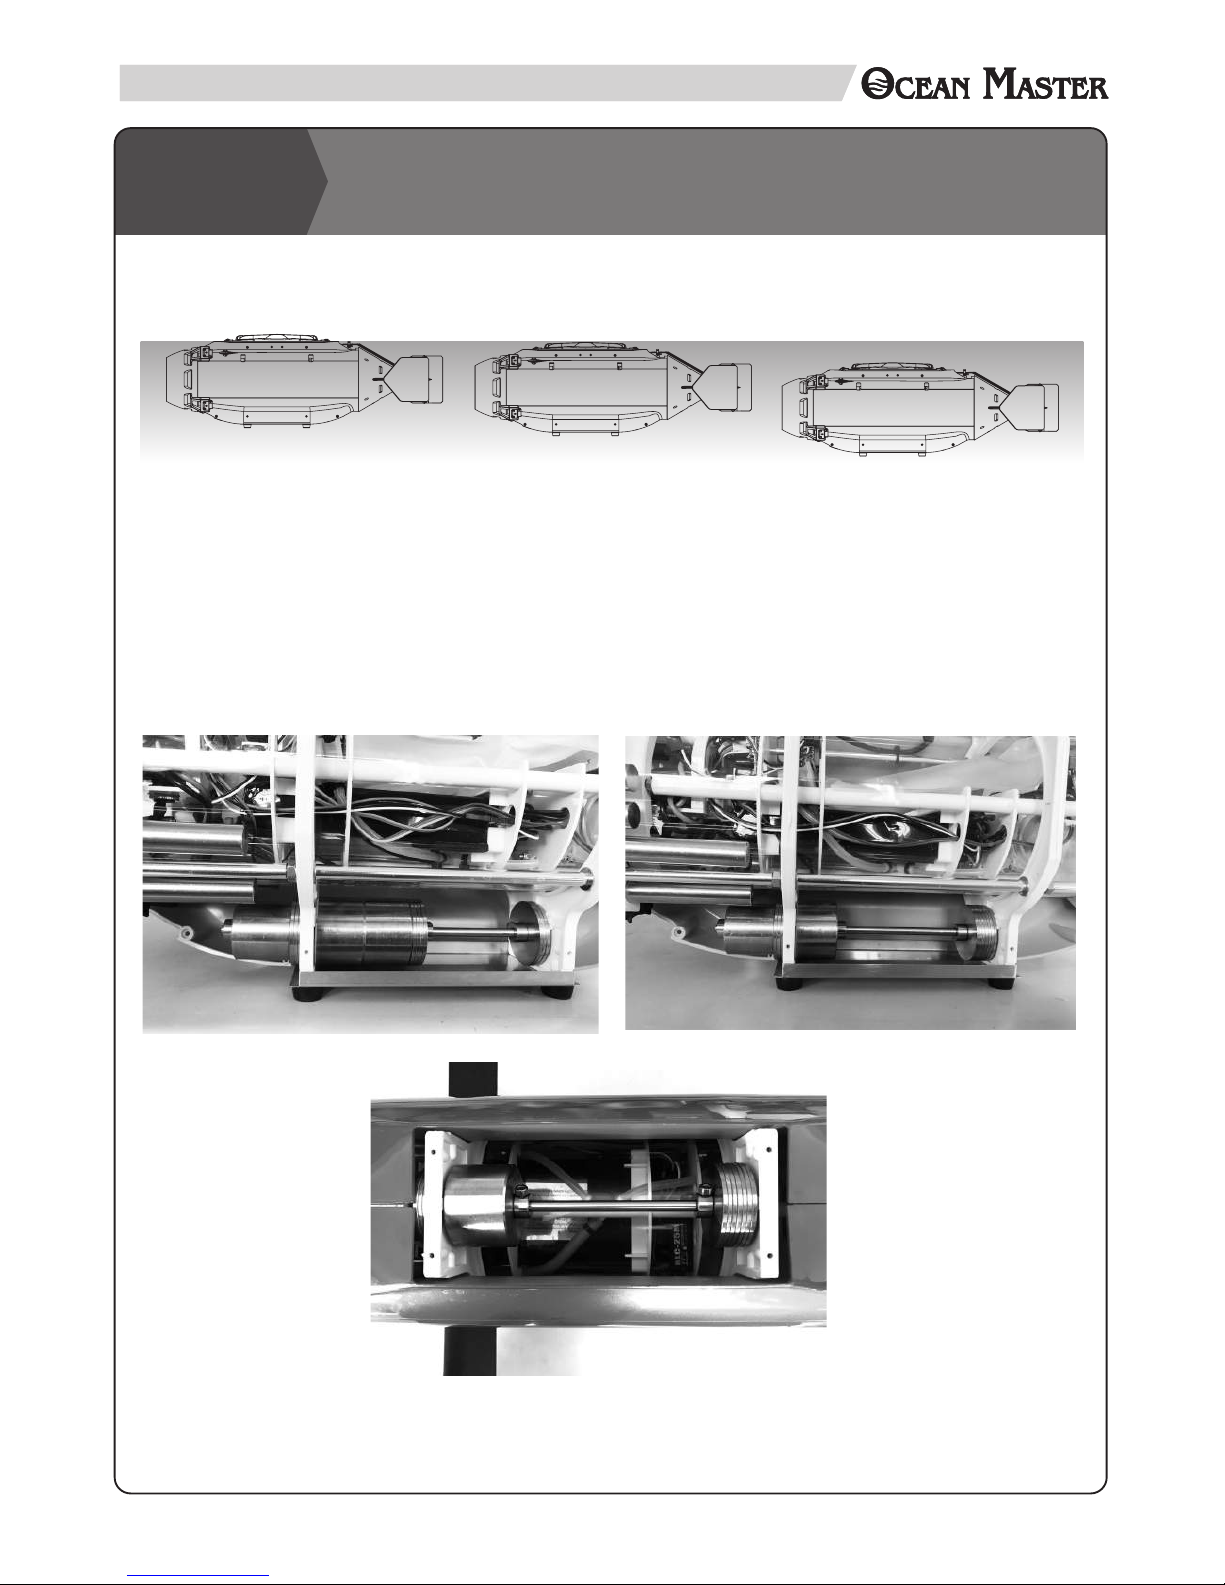
Seawolf Ocean Master performs the best when it is balanced properly with correct water line. Check the balance and waterline of
the Seawolf Ocean Master before operation. Use the bullet–style steel weight to trim the balance of the Seawolf Ocean Master. The
waterline should be near the deck of the Seawolf Ocean Master.
Seawater V.S. Freshwater
The Ocean Master is factory balanced for seawater with cameras weight calculated. < Action Camera is not included>
User may need to do weight adjustment for freshwater.
Weight Distribution
Seawater
Freshwater
Remove the bottom case then unscrew the collars. You will need to move the shaft forward to get more space to release the weight.
Firmly secure the collars when the weights relocated.
Ballast empty
30% Ballast full
50%-100% Ballast full
Please remember that different water conditions have an inuence on the trim due to different water density. Perform a
buoyancy check if use the Seawolf in new places.
Page 12
11
PRE-LAUNCH CHECK
● Switch on the controller. Check battery status.
● Switch on the receiver (main switch). Check all the controls works properly.
● If the Seawolf doesn’t switch on, check the fuse and replace if necessary.
NOTE: If the fuse is burnt again, there should be a short circuit inside. Don’t use the model.
Open it and search for any electrical problem)
● Check that the front cap and hood is perfectly installed.
● Start the pump and empty the bag (left stick to right), until the bag is totally emptied.
LAUNCH
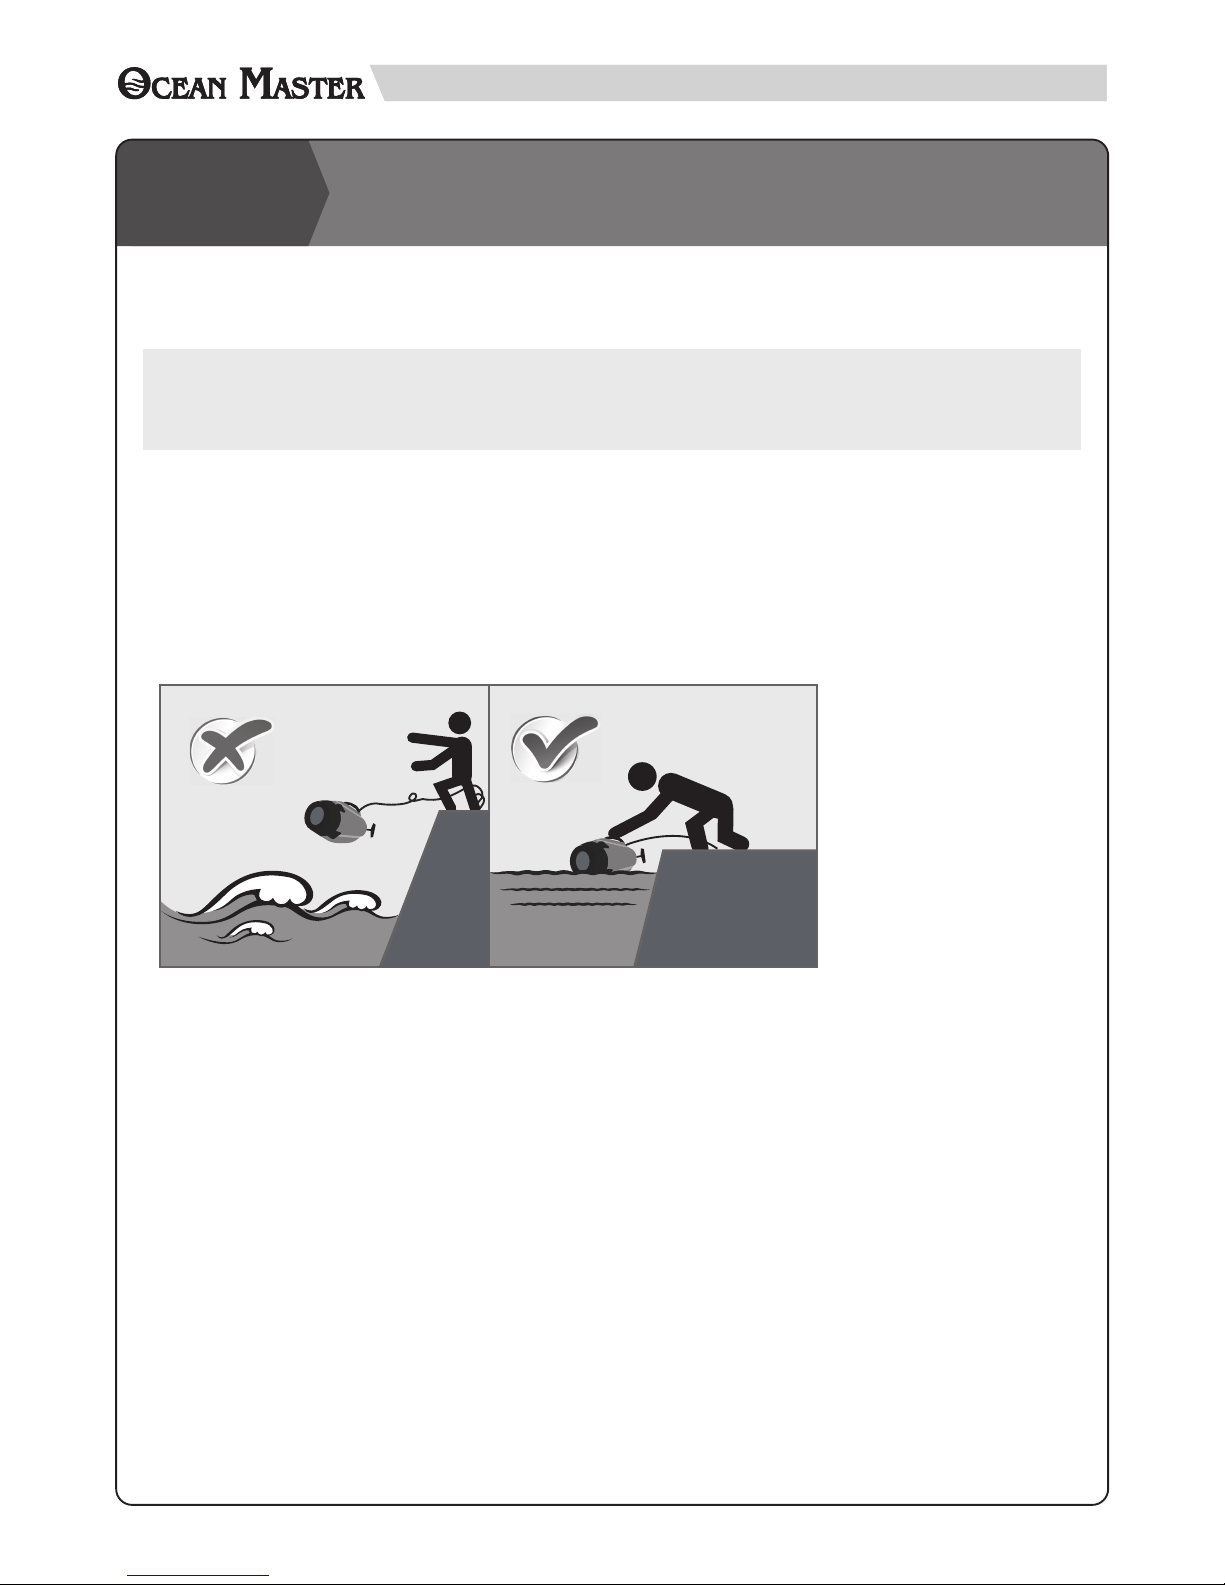
● Find a good launch location, with the possibility to stand stable with no risk of falling into the water. The water
surface should be easily reachable and must not be too low. Be careful with tide.
● Lift the Seawolf and gently place it into the water. NEVER DROP Seawolf Ocean Master into water as it might
cause structural damage.
● Wait until the rear cone are totally full of water. These are free-flood compartments and it’s normal they
become totally full of water, no large air bubble should remain inside them.
● At this point, disconnect the handle.
● Start piloting your Seawolf.
● Manage your cable properly before launch the Seawolf Ocean Master. DO NOT drop the entire length of the
cable into water at once. Release the cable slowly from the shore during operation. Avoid cable tangled up or
twisted.
RECOVERY
● Start the pump in order to have the ballast bag completely empty.
● Pilot the sub along the side of the pier or boat, in a reachable position.
● Gently lift the Seawolf out of the water. During this phase, it will be signicantly heavier, because of the water
trapped between inner and outer hulls. Then, this water will be discarded and the operation will be simpler.
Place the sub on a horizontal surface.
● Switch the Seawolf off rst then the transmitter and monitor.
● Have a quick inspection of the hull and check no part has been damaged or lost.
Page 13

OPERATION
12
1. Operate the Seawolf Ocean Master in calm environment is strongly recommended. NEVER launch the Seawolf Ocean
Master in strong water current. Over 1 Nautical mile of stream is prohibited to operate the Sub as generally the divers and
marine works in such condition will be restricted too.
2. For a full static dive, keep the motor idle and start the pump to flood the ballast. You will see the waterline at the deck
become higher and higher until the entire Seawolf submerged. The opposite command will let the pump to empty the ballast
and the Seawolf will raise to the surface.
3. Seawolf Ocean Master will begin to dive in 10 seconds after the pump activate. The water ballast will be full in 20 to 30
seconds.
4. The water ballast will be emptied in same time. The Seawolf Ocean Master will be surfaced once the ballast is empty. This
might take seconds, even minutes if the Seawolf Ocean Master is returning from the deep water. It is recommended to assist
Seawolf Ocean Master back to surface with less time by FULL throttle AND upward elevator as Figure in Page 4. The static
diving will be good for adjusting the depth during long time surveillance. Once Seawolf Ocean Master submerged, user may
use submaine's power for quick diving or surfacing .
5. Dynamic dive is possible thanks to the speed of the Seawolf and the action of the dive planes. The ideal situation is reached
when only the top ring of the turret is out of the water: at this point, start the motor full forward and set the dive planes to the
“down” position: the Ocean Master will dive and you will have dynamic control of the depth by operating the dive planes.
6. Pay attention to any collision. If the Ocean Master is running in any place with hard vertical walls, avoid any hit with these
hard structures. The front elevator and hood might be damaged or broken.
7. Avoid algae, leafs or any other object that may jam the propeller. If leafs or other objects are tangled around the propeller
shaft, the prop efciency will be greatly reduced and the stress on the motor will be much higher. This situation should be
avoided in order not to have critical damages on the propulsion system.
8. If the Seawolf raises to the surface on its own, it’s possible that some safety function has switched on. Take the Seawolf out
of water and check the alarm code from the LED indicator on the PCB.
9. If the Seawolf raises to surface because of low battery, you will discover much lower motor power and no capability of diving.
At this point, recover the Seawolf immediately before the battery is completely discharged (Please remember that the
receiver is BEC-equipped and the power source is the same for the electronics!).
10. To remove the Seawolf Ocean Master from water, lift the rear part first. This helps drain the water out from the rear
compartment. Specially when get the Seawolf out of water, make sure to reach the handle and get it off the water.
11. If any problem happens during operation, it is possible to retrieve the Seawolf Ocean Master back to surface by pulling the
cable gently.
12. To turn off the Seawolf Ocean Master, turn the FPV monitor off rst, then the Controller. Turn the controller off will activate
the safety system of the Seawolf Ocean Master. The system will force the remaining water out from the ballast. Turn off the
Seawolf Ocean Master when you hear quick "pop pop pop " sound from the water ballast intake.
13. Open the front hood and cap. Turn off the sports camera. Check if there is any leak. To store the Seawolf Ocean Master,
keep the front cap open to avoid moist air trapped inside the hull of the Seawolf Ocean Master.
14.The water ballast should be emptied when the operation is done. Do not store the Seawolf Ocean Master with water inside
the ballast.
Page 14
13
CAUTION
● Always make sure that the Seawolf Ocean Master, controller, FPV Monitor and sports camera are fully charged
b
efore launch.
● Always use new 6 x AA batteries for the controller.
● Check all control surface, control throws, all screws and pumps if they are working correctly before the Seawolf goes into
the water.
● Place the Seawolf in the water, check any bubbles released from the Seawolf. When the water bubbles observed, retrieve
the Seawolf Ocean Master IMMEDIATELY.
● The water ballast should be full in less than 1 minute. If the Seawolf Ocean Master failed for static diving, please retrieve
the Seawolf Ocean Master and inspect the problem at once.
● If Seawolf Ocean Master slows down, DO NOT activate pump or dive into water. Please recharge the Seawolf Ocean
Master.
● DO NOT DROP the Seawolf Ocean Master from height.
● DO NOT operate the Seawolf Ocean Master in the hot water< Hot Spring> ! The water temperature should not exceed
room temperature.
● The operation depth limitation for Seawolf Ocean Master is 60 meters for the structure and 40 meters for the system. DO
NOT connect the cable for more than 40 meters.
● During operation, the cable should be loose and free from tension at all times for the best result. Avoid cable twisted itself
as well.
● Please be cautious and aware the underwater objects such as rocks or sh lines. Avoid tangling with other objects.
● ALWAYS operate Seawolf Ocean Master in clean water for better view experience. Avoid murky water environment.
● Seawolf Ocean Master is delicate equipment. Be gentle when transport with carrying case.
● When using carrying case, please make sure the suitcase is closed properly and completely.
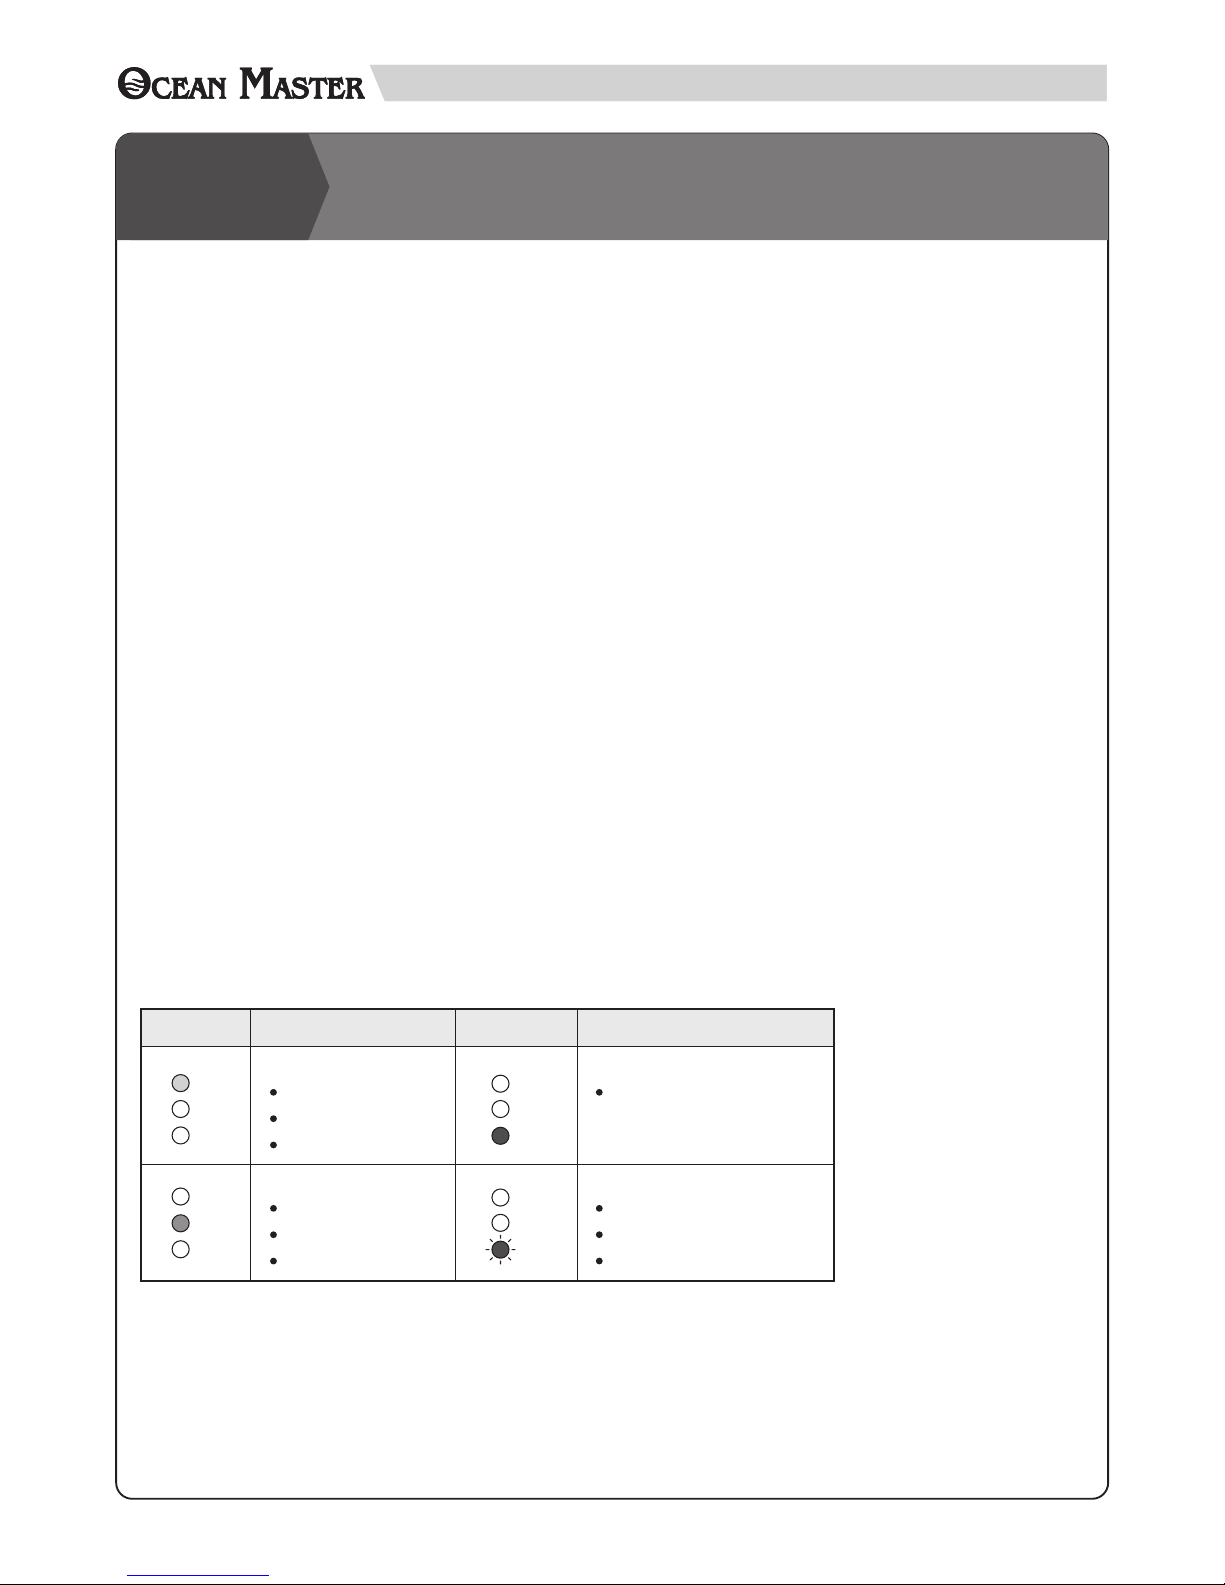
On the main control PCB unit, there are 3 LED lights are designed to show the current status of the Seawolf submarine. You can
observe the light and refer to the following chart to get the light information.
LED INDICATION LIGHT
The auto protecting system is integrated on the main PCB. When the system detects signal lost, low battery or hull leak (water
in the inner hull), the pump will drain water out from the ballast continuously & automatically.
AUTO PROTECTING SYSTEM
Red Light On (Continuous)
Normal Operating
Light SignLight SignSeawolf StatusSeawolf Status
Low Battery
Tx Signal Lost
Water Inside Hull
Red Light Flash
(Y)
(G)
(R)
(Y)
(G)
(R)
(Y)
(G)
(R)
(Y)
(G)
(R)
Water Pump On
Ballast Bag Filling
Diving
Water Pump On
Ballast Bag Emptied
Surface
Yellow Light On--
Green Light On--
Page 15

MAINTENANCE
14
After Use
1.Always clean the Seawolf Ocean Master thoroughly with freshwater after each use. It is recommended to operate the
pump and motor in freshwater for couple seconds.
2.Remove the Seawolf Ocean Master from freshwater and let motor rotate at high speed to dry the motor.
Periodical Check
1. Please check pump and water tubes regularly and make sure that they clean & exible without any cracks or holes
Recommend to change all Tubes and O-rings every 6-month for best performance.
Contact authorized dealer for after service.
2. Make sure the pump operates smoothly and nothing blocks the inlet.
3. Remove the outer hull panels and clean every part.
4. Before storing the Ocean Master for a long time keep the inner hull open and disconnect the fuse.
5. Check the fail safe system (switch off the controller and see if the protection system activates).
6. Check the low battery safety system.
7. Check the integrity of inner hull. No cracks on inner tube.
8. Check there is no leakage from the inner linkages and tubing.
9. Check the dive planes and rudder operating angles. Adjust control rods and trims if necessary.
10. Check the O-Ring status with correct tightening.
11. Check operation of the switches and of all the other water proof exits.
Page 16
15
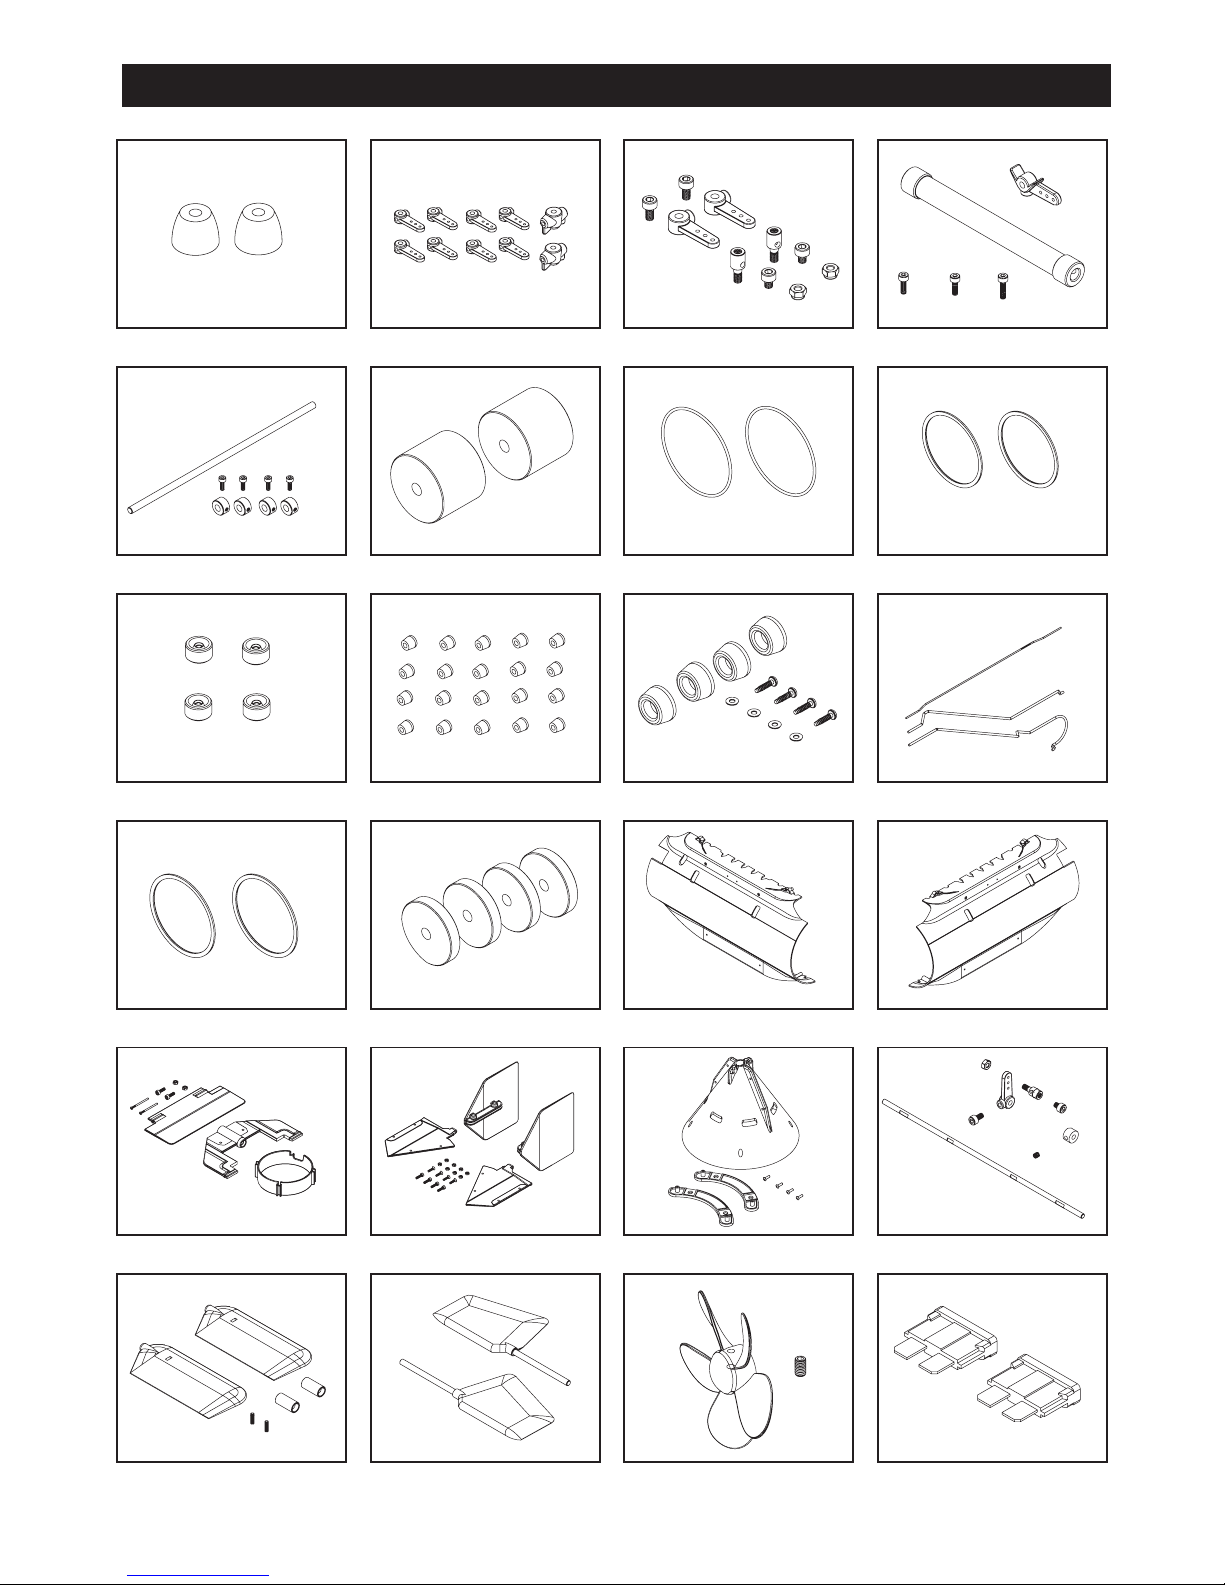
PJ6102 CONE PJ6140 CONTROL ARM SET PJ6141-1 SERVO HORN & ROD PJ6155 RR ELEV. MOUNT TUBE
PJ6157 WEIGHT MOUNT ROD PJ6160 WEIGHT/B(2),WT740G PJ6161 O-RING(2),Ø124MM PJ6162 O-RING(2),Ø120MM
PJ6164 SEALED RUBBER/S(4) PJ6165 CONE RUBBER(20) PJ6168-1 RUBBER FEET PJ6169 LINKAGE ROD SET
PJ6180 O-RING(2),Ø119MM PJ6183 WEIGHT(4),WT120G PJ6408-1 OUTER HULL-L PJ6409-1 OUTER HULL-R
PJ6411-1 RR RUDDER BRACKET
PJ6412-1 TAIL FIN SET PJ6413-1 RR CONE FRAME PJ6414-1 FR ELEVATOR SHAFT
PJ6415-1 FR ELEVATOR SET PJ6416-1 RR ELEVATOR SET(B)
PJ6417-1 5-BLADE PROP.,D62X40
PJ6418-1 FUSE
SPARE PARTS
Page 17
16
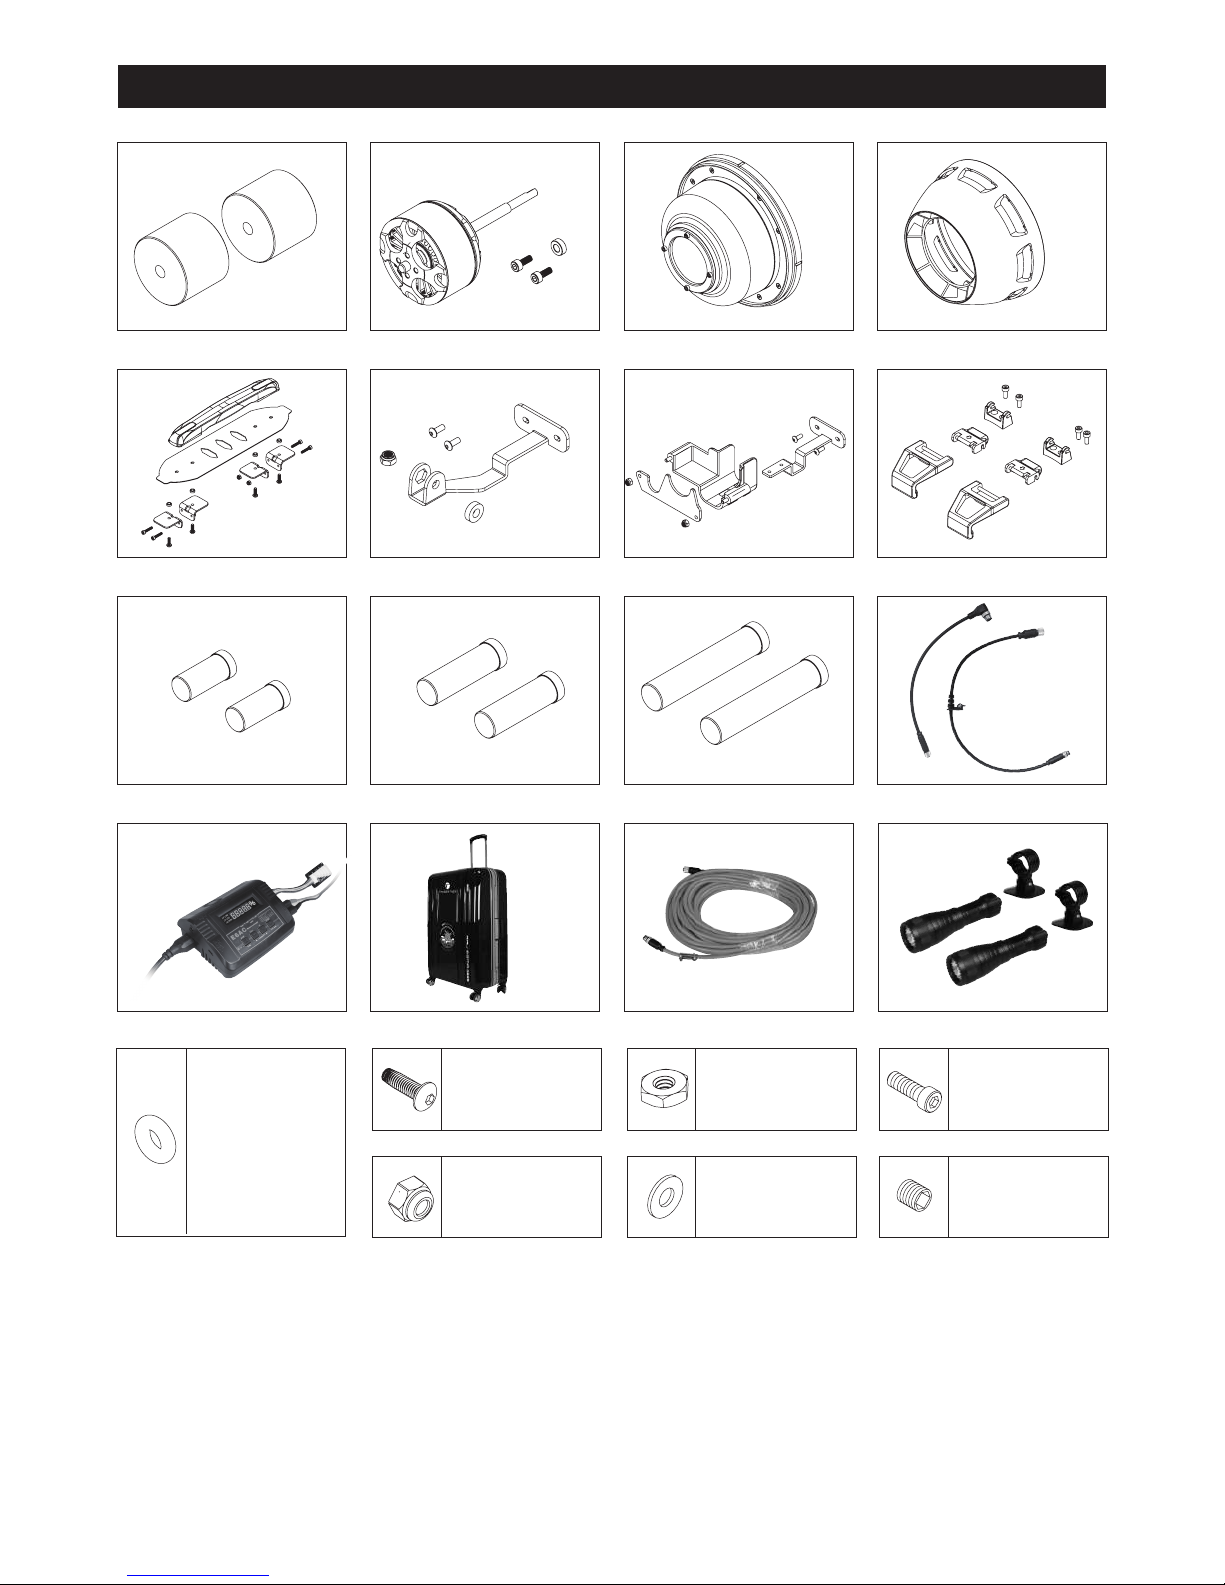
PD0975 Ø3 (20)
PD7478 Ø6 (20)
PD7819 Ø4 (20)
PD7820 Ø9.5 (20)
PD7821 Ø15 (20)
O-RING
PD7887 M3X10(20)
PD7888 M3X12(20)
S.B.H SELF TAPPING SCREW
PD7816-S M3S (20)
LOCK NUT
PD7814-S M6S (20)
NUT
PD7817 Ø3S (20)
PD7818 Ø6S (20)
WASHER
PD7803 M3X4S (20)
PD7804 M3X6S (20)
PD7805 M3X8S (20)
PD7806 M3X5S (20)
S.H SCREW
PD7807 M3X3S(20)
PD7808 M3X4S(20)
PD7889 M3X10S(20)
SET SCREW
PJ6421 WEIGHT/C(2),WT540G PJ6427 PROPULSION MOTOR PJ6428 FRONT CAP PJ6429 HOOD
PJ6430 HANDLE SET PJ6431 GOPRO HOLDER
PJ6431-1 ACTION CAMERA HOLDER
PJ6432 CLIP
PJ6433 BULLET WEIGHT-SHORT
PJ6433-1 BULLET WEIGHT-MEDIUM
PJ6433-2 BULLET WEIGHT-LONG PJ6434 CONNETING CABLE
2540S-1 E6AC CHARGER<US>
2540S-2 E6AC CHARGER<EU>
5002 CARRY BOX
5003 20M CABLE
5004 FLASHLIGHT
SPARE PARTS
Page 18

17
SPARE PARTS LIST
PART# DESCRIPTION NOTE
PJ6102
PJ6140
PJ6141-1
PJ6155
PJ6157
PJ6160
PJ6161
PJ6162
PJ6164
PJ6165
PJ6168-1
PJ6169
PJ6180
PJ6183
PJ6408-1
PJ6409-1
PJ6411-1
PJ6412-1
PJ6413-1
PJ6414-1
PJ6415-1
PJ6416-1
PJ6417-1
PJ6418-1
PJ6421
PJ6427
PJ6428
PJ6429
PJ6430
PJ6431
PJ6431-1
PJ6432
PJ6433
PJ6433-1
PJ6433-2
PJ6434
2540S-1
2540S-2
5002
5003
5004
PD7887
PD7888
PD7816-S
PD7814-S
PD7817
PD7818
PD7807
PD7808
PD7889
PD7803
PD7804
PD7805
PD7806
PD0975
PD7478
PD7819
PD7820
PD7821
CONE
CONTROL ARM SET
SERVO HORN & ROD
RR ELEV. MOUNT TUBE
WEIGHT MOUNT ROD
WEIGHT/B(2),WT740G
O-RING(2),Ø124MM
O-RING(2),Ø120MM
SEALED RUBBER/S(4)
CONE RUBBER(20)
RUBBER FEET
LINKAGE ROD SET
O-RING(2),Ø119MM
WEIGHT(4),WT120G
OUTER HULL-L
OUTER HULL-R
RR RUDDER BRACKET
TAIL FIN SET
RR CONE FRAME
FR ELEVATOR SHAFT
FR ELEVATOR SET
RR ELEVATOR SET(B)
5-BLADE PROP.,D62X40
FUSE
WEIGHT/C(2),WT540G
PROPULSION MOTOR
FRONT CAP
HOOD
HANDLE SET
GOPRO HOLDER
ACTION CAMERA HOLDER
CLIP
BULLET WEIGHT-SHORT
BULLET WEIGHT-MEDIUM
BULLET WEIGHT-LONG
CONNETING CABLE
E6AC CHARGER<US>
2540S-2 E6AC CHARGER<EU>
CARRY BOX
20M CABLE
FLASHLIGHT
S.B.H SELF TAPPING SCREW M3X10(20)
S.B.H SELF TAPPING SCREW M3X12(20)
LOCK NUT M3S (20)
NUT M6S(20)
WASHER Ø3S (20)
WASHER Ø6S (20)
SET SCREW M3X3S(20)
SET SCREW M3X4S(20)
SET SCREW M3X10S(20)
SOCKET HEAD MACH. SCREW M3X4S (20)
SOCKET HEAD MACH. SCREW M3X6S (20)
SOCKET HEAD MACH. SCREW M3X8S (20)
SOCKET HEAD MACH. SCREW M3X5S (20)
O-RING Ø3 (20)
O-RING Ø6 (20)
O-RING Ø4 (20)
O-RING Ø9.5 (20)
O-RING Ø15 (20)
※
Spare parts shown above are the level 1 replacement for end user. User may order these parts and replace by himself.
If there is any replacement for inner hull required, please contact the authorized dealer for after service.
Page 19
18
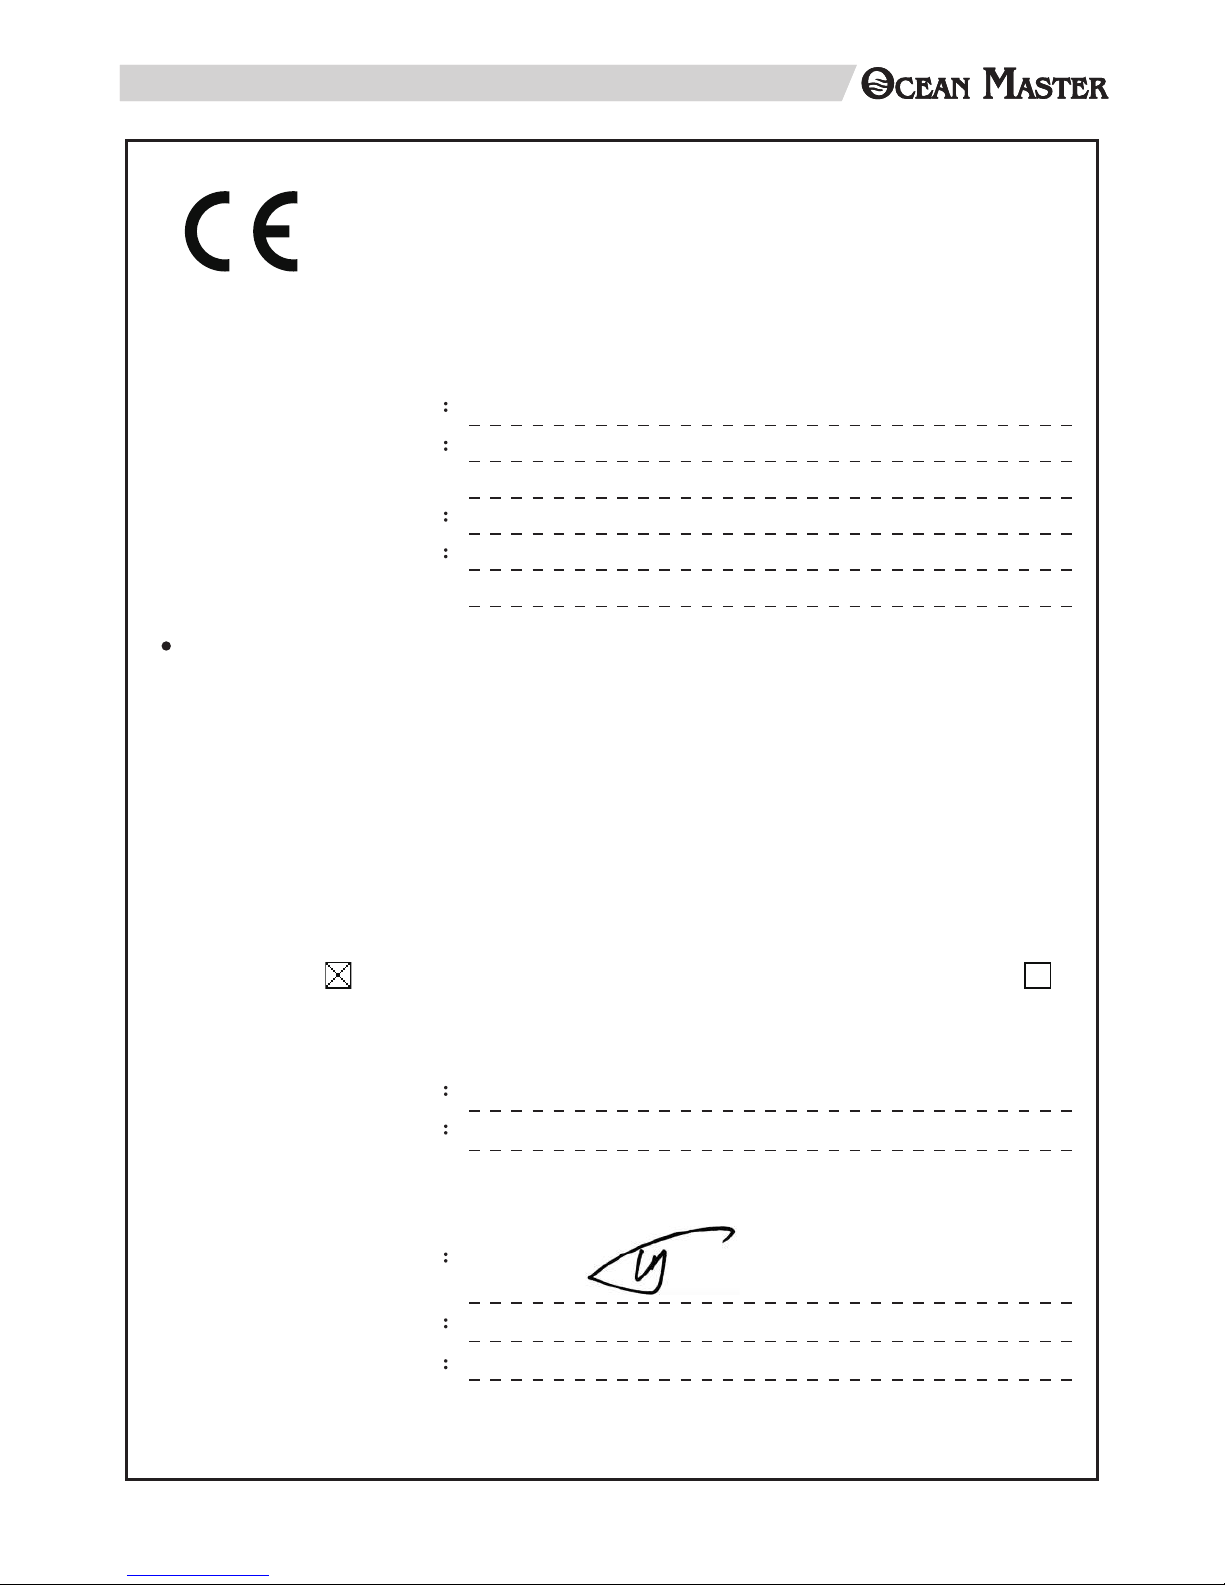
EN 61000-6-1 : 2007
IEC 61000-4-2 : 2008
IEC 61000-4-3 : 2006+A1: 2007+A2 : 2010
IEC 61000-4-4 : 2012
IEC 61000-4-5 : 2005
IEC 61000-4-6 : 2013
IEC 61000-4-8 : 2009
IEC 61000-4-11 : 2004
EN 61000-6-3:2007/A1:2011
EN 61000-3-2:2014
EN 61000-3-3:2013
EUROPEAN COUNCIL Directive 2014/30/EU and the technical standards
For the evaluation of the compliance with this Directives, the following standards were applied :
For the following equipment:
P r o d u c t
Type Designation/Trademark
Manufacturer’s Name
M a n u f a c t u r e r ’ s A d d r e s s
Declaration of Conformity
according to 2014/30/EU
Responsible for making this declaration is the :
Manufacturer
Authorized representative established within the EU
EC Distribution
Company Name
Company Address
Person responsible for making this declaration
Name, Surname
Position/Title
Dat e
Product Manager
Nov. 2016
Terry Hsu
Graupner/SJ GmbH
Henriettenstr. 96, 73230 Kirchheim / Teck, Deutschland Germany
Thunder Tiger Corp.
No.7, 6th Road, Industry Park,
Taichung, Taiwan 40755
Ocean Master
5224-F / TTRobotix
Page 20
This product is not a toy. Before you assemble and use this product,
please read this manual thoroughly.
This product and its contents may different from the graphics shown
on this manual and are subject to change without prior notice due to
product improvements and specication changes.
More information can view the tutorial videos on our
TTR ofcial website (www.ttrobotix.com) or YouTube channel
(https://www.youtube.com/user/ThunderTigerVideo)
thundertiger.com
JJ6224
 Loading...