

Page 1

PMR 446 TRANSCEIVER
INSTRUCTION MANUAL
www.ttikorea.co.kr
TXL-446
Page 2

Thank you for purchasing this radio.
All our products are built to offer excellent
value by combining advanced features, great
design and manufacturing quality.
To ensure you are familiar with the operation
and features of your radio, and in order to
obtain the best performance, please read this
manual carefully before operation.
ENGLISH
Page 3

ENGLISH
Caution.......................................................................... 4
1. Radio Controls............................................................ 5
2. Equipment and Accessories Supplied............... 6
3. Powering the Radio ................................................. 6
4. Battery Charging........................................................8
5. Radio Controls............................................................ 9
6. LCD Display................................................................10
7. Basic Radio Operation...........................................10
8. Function Mode ........................................................11
9. Radio Features Explained.....................................13
Volume level......................................................13
Channels........................................................... ..13
Privacy Codes....................................................13
Handsfree (VOX)Mode .................................13
Dual Watch.........................................................13
Squelch Level ..................................................14
Roger Beep........................................................ 14
Key Beep............................................................ 14
Compander....................................................... 14
Call Alert............................................................. 15
Monitor............................................................... 15
Display & Keypad Backlight......................... 15
Channel Scan.................................................... 15
Privacy Code Scan/Decode.......................... 16
Keypad Lock....................................................... 16
Battery Level...................................................... 16
Scan Meomry.................................................... 16
10. Troubleshooting...................................................... 17
11. CE Declaraion............................................................17
12. Safety Requirements..............................................18
13. Technical Specifications........................................18
CONTENTS
Page 4

4
TXL-446
Caution
ENGLISH
IMPORTANT - READ ALL INSTRUCTIONS carefully and completely
before operating your radio and retain this manual for future reference.
NEVER charge Alkaline batteries.
NEVER connect the radio to a power source other than the supplied
battery. This may damage your product.
NEVER operate your radio with the antenna less than 5cm from
exposed parts of the body.
NEVER use the radio in or near a mining facility or other area which
uses remotely triggered explosives or an area labelled "Blasting Area".
NEVER carry the radio in the pocket with metallic or inflammable
objects such as coin or gas lighter etc.
NEVER use or charge your radio in a potentially explosive atmosphere.
DO NOT place your radio in front of a vehicle airbag.
DO NOT operate your radio on board an aircraft.
DO NOT use your radio with a damaged antenna.
DO NOT attempt to modify your radio in any way.
ALWAYS charge your radio at normal room temperature.
ALWAYS switch off your radio where notices restrict the use of two-way
radio or mobile telephones.
ALWAYS replace the accessory jack cover (if applicable) when the jack is
not in use.
ONLY use TTI approved rechargeable batteries with the supplied
charger.
AVOID exposing your radio to water. It can widthstand spray water and
some rain, but has no higher waterproof class.
AVOID storing or charging your radio in direct sunlight.
AVOID storing or using your radio where temperatures are below -20ºC
or above +60ºC.
Page 5
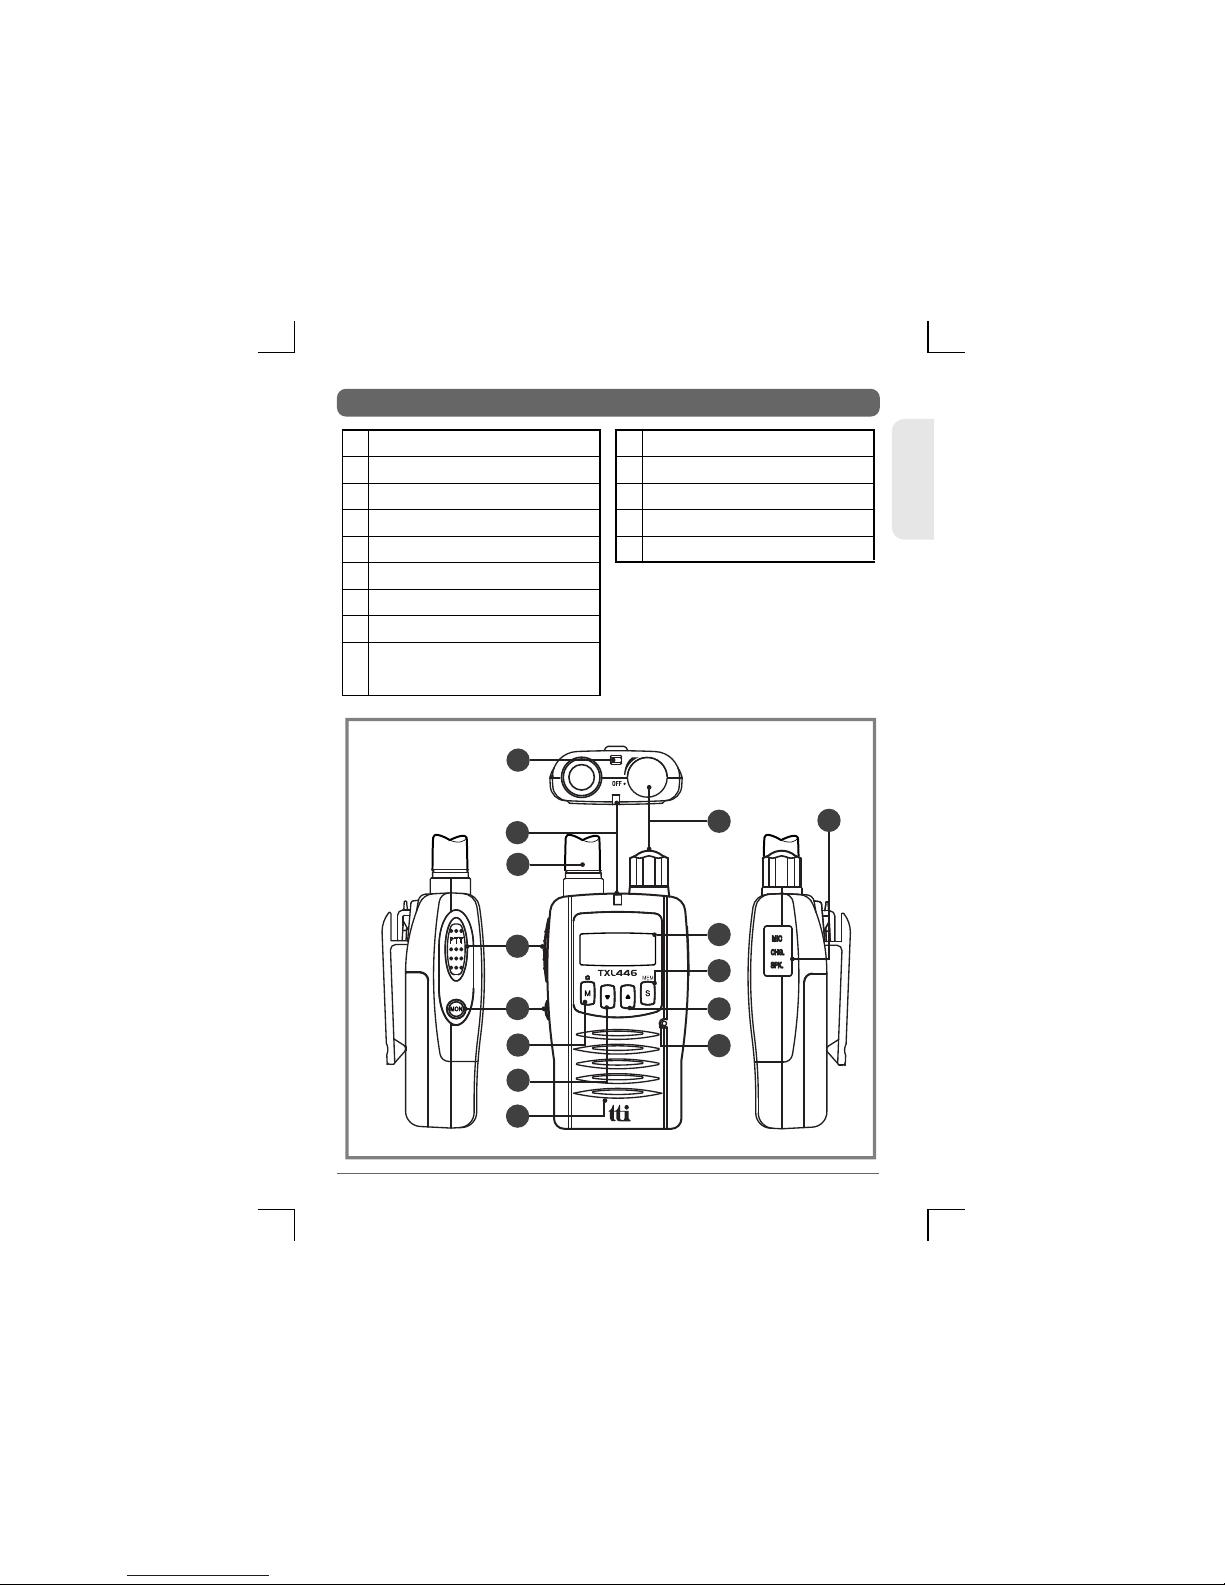
4
10
1
3
2
9
5
TXL-446
1
2
3
4
5
6
7
8
9
Strap Hole
TX/RX Indicator
Antenna
PTT Button
Monitor Button
Mode & Key lock Button
Down Button
Speaker
Power On/Off &
Volume Control Knob
10
11
12
13
14
LCD Dislpay
Scan & Scan Memory Button
Up Button
Microphone
Accessory / Hanger Jack
ENGLISH
1. Radio Controls
MEM
5
6
7
11
12
13
14
8
Page 6

6
TXL-446
1. TXL-446 radio (with fixed antenna)
2. Ni-MH Battery pack (1500mAh)
3. Charging Cradle
4. Power Adaptor
5. Instruction Manual
1 unit
1 unit
1 unit
1 unit
1 unit
ENGLISH
2. Equipment and Accessories Supplied
3. Powering the Radio
Your TXL-446 is powered by three AA batteries (Ni-MH). If left
unused, the batteries will discharge within a few months. If you
have not used your TXL-446 for sometimes, you will nee to
recharge your batteries before use.
Battery installation is more convenient when the belt clip is
removed. To do this, release the spring clip and slide the belt clip
downward and away from the radio body.
Installing the Batteries
Press the center
top area of the
battery cover and
slide downwards.
Install the three
r e c h a r g e a b l e
ba t teries as
indicated on the
battery housing,
slide cover back
into position until
it 'clicks' into
place.
Spring Clip
Positive
Terminals
Negative
Terminals
Belt Clip
Battery
Cover
1.
2.
Page 7

7
TXL-446
ENGLISH
Battery Low Alert
When the battery icon blinks on the display, the battery level is low and
the batteries should be recharged or replaced. If the batteries are not
charged, an audio tone will then sound to warn the user that the batteries
are almost discharged.
Battery Usage
The time taken to discharge the batteries will depend on how you use the
TXL-446. The 1500mAh batteries supplied are powerful enough for a full
days use under average conditions.
Conserving Battery Power
The TXL-446 has built-in power saving features to help you get the
maximum amount of time between charges. If you need to operatre your
TXL-446 in a situation where you require maximum battery life (e.g. a
remote site where three us no convenient recharging facility nearby) the
following hints can greatly reduse the amount of the power drawn from
the batteries.
Standby Mode
The TXL-446 will automatically enter the ' Standby' mode when it is
inactive (i.e. not transmitting or receiving signals) While in Standby mode
it will still check for incoming signals but it will draw considerably less
power form the batteries. As soon as a signal is heard or the keys are
pressed the TXL-446 will 'wake up' again. This Standby mode is automatic
and by itself can extend the battery life by many hours.
Using CTCSS
If you are expecting to receive signals on a busy channel, you can program
that channel for CTCSS operation and get the other person to call you
using the same CTCSS tone. Your radio will then remain in Standby and
ignore all other signals until your selected CTCSS tone is received.
Scanning
The TXL-446 draws more power from the batteries when scanning than
when monitoring a single channel.This is bacause it must 'wake up' more
Page 8

8
TXL-446
ENGLISH
often to monitor each channel for activity. You can lengthen the battery
life by avoiding any unnecessary scanning. In addition, scanning increases
the chance of finding a signal thereby keeping the receiver 'awake' and
the Squelch open more often.
4. Battery Charging
Connect the power adaptor to the mains power supply and connect the
adaptor power plug to the charging cradle.
Disconnect any radio accessries and ensure the radio is switched off.
Insert the radio into the charging cradle until it 'Cilcks' home.
The charger LED will blinks red and green or the charger LED does not
light, re-insert the radio into the charging cradle.
The battery charging time is typically 4 to 5 hours. When the battery is
fully charged the charger LED will turn green.
1.
2.
3.
4.
To charge your radio, carefully follow these instruction :
MEM
MEM
Adaptor Power Plug
Power Adaptor
- Input : 230VAC
- Output : 9VDC
Charge Cradle
LED
Page 9

9
TXL-446
ENGLISH
5. Radio Controls
1. Power On/Off/Volume control
Turn the knob clockwise to switch on and increase the
volume and counter-clockwise to decrease the volume and
switch off the radio. The radio will emit a confirmation tone
when it switches on.
2. Push-To-Talk (PTT) button
Press and hold this button to speak (transmit) and release
the button to hear (receive) messages. You can only
communicate with other PMR446 radios when the channel
and privacy code settings are the same as yours.
3. DOWN button
Pressing this button will increase the channel number. In
some modes this button is used to adjust the function
setting.
4. UP button
Pressing this button will decrease the channel number. In
some modes this button is used to adjust the function
setting.
5. Menu (Function Mode) and Keypad Lock button
Press this button briefly to activate the function mode. Press
the button again (repeatedly) to step through the function
menu. Press and hold this button to activate or de-activate
the Keypad Lock function.
6. Monitor button
Press and hold this button to activate or de-activate the
MONITOR function.
7. Scan/Scan Memory button
Press this button briefly to activate or de-activate the scan
mode. Press and hold this button to memorize the
displayed channel into the scan memory list or erase the
displayed channel from the scan memory list.
Page 10

ENGLISH
10
TXL-446
1
2
3
4
5
6
7
8
Receiver Busy Icon
Transmit Icon
Scan Memory Icon
Scan Icon
Keytone Icon
Roger Beep Icon
Battery Icon
Dual Watch Icon
9
10
11
12
13
14
15
Power Save Icon
Key Lock Icon
Monitor Icon
VOX Icon
Channel Display
CTCSS Icon /
Display
DCS Icon /
Display
1
14
13
2 3 4 5 6 7
8
9
10
11
12
6. LCD Display
7. Basic Radio Operation
15
The PMR446 service which this radio uses shares channels on a 'take
turns' basis. This means that other users and groups may be using any
channel and privacy code combination.
To communicate with other PMR446 radios, all units must be switched
to the same channel (8 choices) and privacy code (38 CTCSS and 104
DCS choices). If the combination you have chosen is already in use
please make an alternative selection.
Page 11

11
TXL-446
ENGLISH
1. Switch on your radio.
2. Check and if necessary change the channel and privacy code
settings (see Function Mode).
3. To speak, hold the radio upright, about 10cm from your mouth
and press the PTT. Speak slowly and clearly towards the radio.
Release the PTT when you finish speaking.
You will hear messages from other radios that are within range
and have the same channel and privacy code setting.
The appropriate icon will appear in the radio display when you
receive or transmit a message.
8. Fuction Mode
The user mode allows you to set-up and edit the basic functions (see
Radio Features Explained).
To access the consumer mode, press the MODE button briefly.
Each press of the MODE button steps the radio sequentially through
the different functions. The radio display indicates the current
function. The present setting and associated icon flash.
Use the UP or DOWN button to change the setting. Press the PTT or
MODE button or wait for 5 seconds to store your choice. If your do not
press any key for 5 seconds your radio will return to standby mode
automatically.
to ,
to ,
to ,
Display SettingsFunctions
Select Hands Free Mode (VOX)
Change Privacy Tone Code
(CTCSS)
Change Digital Privacy Tone Code
(DCS)
to ,
Select Dual Watch Mode
Page 12

12
TXL-446
ENGLISH
to ,
to
,
,
Activate Roger Beep
Activate Key Beep
,
Activate Compander Circuit
Change Call Alert Tone
Change Squelch Level
Volume Level
To adjust the volume level, use the POWER On/Off/VOLUME control. To
increase the volume turn this control clockwise, to decrease the
volume turn this control counter-clockwise.
Channels
This radio operates on any one of the 8 PMR446 licence free channels.
To communicate with other PMR446 radios, all units must be switched
to the same channel and privacy code. To change the radio channel,
press the UP or DOWN button when the radio is in stand-by mode.
9. Radio Features Explained
Privacy Codes (CTCSS and DCS Tone Codes)
This radio is fitted with 38 Analogue Privacy codes (also known as CTCSS,
sub-codes or sub-channels) and 104 Digital Privacy codes (also known as
DCS codes).
Only one type of Privacy code can be used on each channel. Selecting a
Digital Privacy code will override any Analogue Privacy code settings. If
the other unit(s) do not have privacy codes ensure your units privacy
codes (analogue and digital) are set to 'Off'.
Please note that privacy codes do not prevent other radio users from
hearing your conversation. They simply allow you to ignore messages that
are using a different privacy code.
Page 13

13
TXL-446
ENGLISH
Selecting an Analogue Privacy Code
To change the Analogue Privacy Code, press the MODE button until
the CTCSS icon and privacy code number flash. Use the UP or DOWN
button to select the desired code. Press the PTT or MODE button or
wait for 5 seconds to store your choice. The CTCSS icon will appear
when an Analogue Privacy Code is selected.
Selecting a Digital Privacy Code
To change the Digital Privacy Code, press the MODE button until the
DCS icon and privacy code number flash. Use the UP or DOWN button
to select the desired code. Press the PTT or MODE button or wait for 5
seconds to store your choice. The DCS icon will appear when a Digital
Privacy Code is selected.
Hands Free (VOX) Mode
When Hands Free (VOX) Mode is selected the radio will automatically
transmit when the microphone detects your voice (or other noise). It
can be used with the internal microphone or a suitable audio
accessory (available separately). To avoid accidental operation and
reduce the effect of background noise, there are 3 microphone
sensitivity settings.
To select the VOX sensitivity level, press the MODE button until the
VOX icon and current setting flashes. Use the UP or DOWN button to
change the sensitivity level (3 is the most sensitive). Press the PTT or
MODE button or wait for 5 seconds to store your choice.
Dual Watch Mode
Dual Watch mode allows you to monitor two channels; a primary
channel and the dual watch channel. When a signal is received on
either channel the unit will pause for 5 seconds before resuming the
dual watch.
To activate the dual watch mode, first select a radio channel (see
Channels) as the primary channel. To select the dual watch channel
press the MODE button until the Dual Watch Icon and current setting
flashes. Use the UP or DOWN button to select the desired dual watch
channel. Press the PTT or MODE button or wait for 5 seconds to store
your choice and activate the dual watch.
Page 14

ENGLISH
14
TXL-446
The radio display will alternate between the primary and dual watch
channels and the dual watch icon will appear.
To deactivate the dual watch press the SCAN button.
If you press the PTT button whilst receiving a signal in Dual Watch Mode
the radio will transmit on the currently displayed channel. If you press the
PTT button when no signal is present the radio will transmit on the
primary channel.
Roger Beep
The Roger Beep is a short tone that is automatically added to the end of
your transmissions to tell other users that you have finished speaking. You
can activate or deactivate the Roger Beep as required.
To change the Roger Beep setting, press the MODE button until the Roger
Beep icon and current setting flashes. Use the UP or DOWN button to
change the setting. Press the PTT or FUNCTION button or wait for 5
seconds to store your choice.
The Roger Beep icon will appear when Roger Beep is active.
Squelch Level Adjustment
This function allows you to adjust the squelch level of your radio.
To change the squelch level. Press the MODE button until the squelch icon
and current setting flashes. Use the Up or Down button to change the
sensitivity level (1 is the most sensitive). Press the PTT or MODE button or
wait for 5 seconds to store your choice.
There are 3 squelch levels. Level 1 is the most sensitive (open) and level 3
is the least sensitive (closed). The factory presetting is Level3.
Key Beep
If the Key Beep is activated, your radio will emit a confirmation tone
whenever you use the keypad. You can activate or deactivate the Key Beep
as required.
To change the Key Beep setting, press the MODE button until the Key Beep
icon appears. Use the UP or DOWN button to change the setting. Press the PTT
or FUNCTION button or wait for 5 seconds to store your choice.
The Key Beep icon will appear when Key Beep is active.
Page 15

15
TXL-446
ENGLISH
Call Alert
To alert other users to your message and gain their attention you can send
a Call Alert melody by pressing the PTT button twice in quick succession.
There are five different call alert tones and off.
To change the Call Alert melody, press the FUNCTION button until 'CA'
appears. Use the UP or DOWN button to change the setting. Press the PTT
or FUNCTION button or wait for 5 seconds to store your choice.
Compander
If the compander is activated, your radio will eliminate the background
noise and generate clearer sound by cutting off the high and low
frequencies. The users who prefer the unrefined sound are recommended
to use the radio with this compander unactivated.
Monitor
The Monitor function is used to briefly check for activity on the current
channel, regardless of privacy code settings. It is the same as setting the
squelch level to 'Off'.
To activate or deactivate the Monitor press the Monitor button for about 2
seconds. The Monitor icon will appear when the Monitor is active. It is
normal to hear background static noise.
Display & Keypad Backlight
The display and keypad backlight will illuminate for 5 seconds whenever
any buttons (except for the PTT button) are pressed.
Channel Scan
The Channel Scan can be used to find or detect users on other radio
channels.
To activate/deactivate the channel scan, press the SCAN button briefly. The
Scan icon will appear when the channel scan is active. Scanning will only
stop when you deactivate the scan function.
The radio will scan through the 8 channels. If your radio detects a valid
signal the scan will pause and stay on the channel for about 5 seconds
before resuming the scan.
Page 16

ENGLISH
16
TXL-446
Privacy Code (CTCSS/DCS) Scan and Decode
Privacy Code Scan is used to determine which Privacy Code is in use
on the current channel.
To activate the privacy code scan press the MODE button until the
privacy code number flashes, then press the SCAN button briefly. The
Scan icon will blink when the privacy code scan is active.
The radio will scan through the 38 CTCSS and 104 DCS codes. If your
radio detects a valid signal the scan will pause for 5 seconds.
If you press the PTT button when your radio detects a signal, the radio
will transmit on the same privacy code and the privacy code will be
automatically selected.
If you press the PTT button during scanning, the radio will return to
your original privacy code. Scanning will resume when the PTT button
is released.
To stop scanning, press the SCAN button again.
To increase battery life use the scan modes sparingly.
Battery Level
The Battery icon indicates what the current battery level is and when
the battery needs recharging. If necessary, refer to the instructions to
recharge the battery.
Scan Memory
To memorized and erase the displayed channel in the scan memory
list, press and hold this button. For user convenience, all the channels
are memorized upon shipment from the factory.
Keypad Lock
To toggle the key lock, press and hold the KEYPAD LOCK button. The key
lock icon appears when the lock is activated. All the buttons and keys are
locked and diactivated except for the PTT, power on/off and Volume.
If you press the PTT button when your radio detects a signal, the radio
will transmit on the same channel. Scanning will resume after
approximately 15 seconds. Press the UP or DOWN button to resume
scanning immediately.
If you press the PTT button during scanning, the radio will return to
your original channel. Scanning will resume after approximately 15
seconds.
Page 17

ENGLISH
17
TXL-446
If you experience problems with your TXL-446 first check the battery
power level as low batteries can cause problems such as poor
transmission, weak reception and reduced sound quality.
Then check the manual and radio display to ensure that a function (such
as VOX or Lock) has not been activated by accident.
This will reset the radio to the factory settings and should resolve most
problems.
In case of further difficulty please consult your dealer or visit our websites
at www.ttikorea.co.kr.
1. Switch off the radio.
2. Press Monitor button and PTT button together, and switch on the radio.
10. Troubleshooting
This warning symbol indicates that this equipment operates in
non-harmonized frequency bands and/or may be subject to
licensing conditions in the country of use.
Be sure to check that you have the correct version of this radio
or the correct programming of this radio, to comply with your
national licensing requirements.
CE version of the TXL-446 which displays the CE
symbol on the product label, complies with the
essential requirements of the European Radio and
Telecommunications Terminal Directive 1999/5/CE.
11. CE Declaration
This radio can be used without license and charges in ;
Austria, Belgium, cyprus, Czech, Denmark, Estonia, Finland, France, Germany,
Greece, Huangary, Iceland, Ireland, Italy, Latvia, Lithuania, Luxembourg,
Malta, Netherlands, Norway, Poland, Portugal, Slovakia, Slovenia, Spain,
Sweden, Switzerland and U.K.
Page 18

ENGLISH
18
TXL-446
Ch Freq. Ch Freq.
67.0
71.9
74.4
77.0
79.7
82.5
85.4
88.5
91.5
94.8
1
2
3
4
5
6
7
8
9
10
11
12
13
14
15
16
17
18
19
20
97.4
100.0
103.5
107.2
110.9
114.8
118.8
123.0
127.3
131.8
Ch Freq.
136.5
141.3
146.2
151.4
156.7
162.2
167.9
173.8
179.9
186.2
21
22
23
24
25
26
27
28
29
30
Ch Freq.
192.8
203.5
210.7
218.1
225.7
233.6
241.8
250.3
31
32
33
34
35
36
37
38
Channel
1
2
3
4
Frequency
446.00625
446.01875
446.03125
446.04375
Channel
5
6
7
8
Frequency
446.05625
446.06875
446.08125
446.09375
For charging the rechargeable batteries, only a CE approved AC
adaptor complying with the following specifications must be used :
INPUT : 230VAC 50Hz
OUTPUT : 9VDC 500mA
2) Channel Spacing: 12.5kHz
3) Power Source: 3 x AA Ni-MH battery
4) Privacy Codes (CTCSS Tone Codes) Table (in Hz):
1) Operating Frequencies (frequency shown in MHz):
12. Safety Requirements
13. Technical Specifications
Page 19

ENGLISH
19
TXL-446
No Code No Code
023
025
026
031
032
036
043
047
051
053
054
065
071
072
073
074
114
115
116
122
125
1
2
3
4
5
6
7
8
9
10
11
12
13
14
15
16
17
18
19
20
21
22
23
24
25
26
27
28
29
30
31
32
33
34
35
36
37
38
39
40
41
42
131
132
134
143
145
152
155
156
162
165
172
174
205
212
223
225
226
243
244
245
246
No Code
251
252
255
261
263
265
266
271
274
306
311
315
325
331
332
343
346
351
356
364
365
43
44
45
46
47
48
49
50
51
52
53
54
55
56
57
58
59
60
61
62
63
No Code
371
411
412
413
423
431
432
445
446
452
454
455
462
464
465
466
503
506
516
523
526
64
65
66
67
68
69
70
71
72
73
74
75
76
77
78
79
80
81
82
83
84
No Code
532
546
565
606
612
624
627
631
632
654
662
664
703
712
723
731
732
734
743
754
85
86
87
88
89
90
91
92
93
94
95
96
97
98
99
100
101
102
103
104
5) Digital Privacy Codes Table (DCS Tone Codes):
TTI products are manufactured by TTI Tech Co., Ltd.
Tel: 82-2-5170043, Website: www.ttikorea.co.kr
REV.00
Page 20

COMMAX PL
46 Koniecznego Str.32-040 Swiatniki Gorne
Poland
T. +48 12 256 50 25 F. +48 12 270 56 96
Authorized Representative
Declaration of Conformity
Model : TXL-446PM
Type : 2-Way Portable Handheld Radio
(Name of product, type or model, batch or serial number)
Radio : EN 300 296-2 V1.1.1
EMC : EN 301 489-1 V1.6.1, EN 301 489-5 V1.3.1
Safety : EN 60950-1:2001+A11:2004
(Title(s) of regulations, standards, etc.)
All essential radio test suites have been carried out.
NOTIFIED BODY:
PHOENIX TESTLAB GmbH
Address:
Address:
Konigswinkel 10
D-32825 Blomberg, Germany
Identification Number: 0700
MANUFACTURER or AUTHORISED REPRESENTATIVE:
TTI TECH CO., LTD.
TTI House, 163-4, Poi-dong, Kangnam-ku, Seoul,
Korea 135-260
Point of contact:
TTI TECH CO., LTD. Tel.82-2-517-0043 Fax.82-2-518-2419
(Name, telephone and fax number)
Seoul , Korea / July 3, 2008
(Place, date of issue)
(Signature)
Hun-Joo Lee / Director
This declaration is issued under the sole responsibility of the manufacturer
and, if applicable, his authorised representative.
satisfies all the technical regulations applicable to the product within the
scope of Council Directives 2006/95/EC, 2004/108/EC and 99/5/EC:
 Loading...