

Page 1

Operational Efficient Effective
SpotPro
220
Operational Efficient Effective
SpotPro
220
400
www.tti.com.au
Call 1800 816 277
Call our friendly team today to discuss our product range and complete sales catalogue.
www.tti.com.au
Call 1800 816 277
Call our friendly team today to discuss our product range and complete sales catalogue.
www.tti.com.au
Call 1800 816 277
OPERATORS HANDBOOK
Page 2

CONTENT
OPERATORS HANDBOOK 2
Introduction
Your Safety
Risk Assessment
Operating Instruction
Mixing and Filling
Calibration
Calibration Procedures
Diagram
Sprayer Maintenance
Sprayer Decontamination
Warranty
Warranty Registration Card
.....................
.....................
.....................
.....................
.....................
.....................
.....................
.....................
.....................
.....................
.....................
.....................
3
3
5
6
7
7
8
9
11
12
13
15
www.tti.com.au
Call 1800 816 277
Page 3

OPERATORS HANDBOOK 3
INTRODUCTION
Please read your operators handbook carefully before mounting and using
your SpotPro eld sprayer. Keep your handbook in a safe place.
Congratulations on your purchase of a SpotPro Field Sprayer which is complete and ready for use.
The unit is ideally suited to farmers or spray contractors for weed spraying, fence line spraying,
spraying of drainage channels and around buildings etc.
WARNING
1. When mounting to any vehicle ensure that you have read the Vehicle Owner’s Manual and that
you comply with all the weight restrictions as specied by the vehicle manufacturer, as overloading
can cause injury or death. Remember that 1 litre of water weighs 1 kilogram.
2. To ensure your own safety and that of your employees (if applicable) you must comply with all
relevant environmental, work place health and safety legislation and codes of practice.
3. Turn off the engine before lling the chemical tank. Spray during the morning r evening when it
is cool. Intense sunlight will condense chemicals and may cause damage. Care should be taken
when spraying in windy conditions as spray drift may contaminate the air and may affect the
operator or damage adjacent non-target vegetation.
4. Before spraying, check the electrical and fuel systems for damage or deterioration. Replace
parts as necessary. Do not modify equipment or use any attachments other than those specied
by the manufacturer.
5. Select and wear appropriate Personal Protection Equipment in accordance with the label of
the product you intend using and your own safe work practices. Personal Protection Equipment
must still be worn while decontaminating your sprayer. Any accidental spills on the skin must
immediately be washed with clean water and soap.
6. Improper or careless use of this sprayer can cause serious injury. Minors should never be
allowed to use this sprayer. This sprayer should not be used when bystanders or animals are in
the area. This sprayer should never be used while children are in the area.
www.tti.com.au
Call 1800 816 277
Page 4

OPERATORS HANDBOOK 4
INTRODUCTION
7. You must be in good mental health to operate this sprayer and not be under the inuence of
alcohol or any drugs that could impair your vision, physical strength, dexterity, judgment, or other
mental capacity
8. Spray only in well-ventilated areas away from ames or cigarettes. Keep all hoses and
equipment away from the hot engine to avoid re hazards.
9. Do not eat, drink or smoke while spraying to avoid ingestion of chemicals. Do not carry or store
lunch boxes or other food and drink with spraying equipment.
10. Once the spraying operation has been completed, decontaminate the spray tank and spray
accessories. Sore any remaining chemicals in a safe place in a sealed container. Dispose of tank
rinsings in compliance with current environmental, work place health and safety regulations.
11.Never leave the sprayer unattended without turning off the engine and relieving the line
pressure, and ushing the sprayer of any harmful chemicals.
www.tti.com.au
Call 1800 816 277
Page 5

OPERATORS HANDBOOK 5
RISK ASSESSMENT
PRODUCT INFORMATION RISK ASSESSMENT SHEET TTI SPOT PRO
TASK HAZARDS RISK
CONTROL MEASURES
1. Partially ll the tank with water,
start the motor & test the spray unit
Manual handling; slips, trips
or falls; petrol; fumes; ngers
jammed; electric shock or
Electricity.
Concentrate on task; follow safe
manual handling techniques:-don’t lift
on your own if > 20kg, bend knees
& keep back straight; keep ngers
clear; keep unit at least 8m away
from overhead powerlines; ensure
AS 3760: 2001 Testing Electrical
Equipment applies; water away from
electrical sources.
Med
2. Check weather conditions &
select the appropriate PPE to suit
the chemicals to be used
Manual handling; slips, trips
or falls
Put on PPE as per the chemical
requirements in the Material Safety
Data Sheet-coveralls, gloves, safety
footwear, glasses & respirator; follow
safe manual handling techniques:don’t lift on your own if >20kg, bend
knees & keep back straight.
Low
3. Mix chemicals (if applicable) &
ll spray tank
As above; spray drift,
chemical spillage, emission
of vapors or ammability;
weather; untrained visitors
As above; user trained in the state’s
chemical mixing & administration
course eg Chem. Cert; follow the
relevant Environment Protection
Authority requirements; re
extinguisher present; keep visitors
away from the job unless wearing full
PPE.
Med
4. Use spray unit.
5. Clean up, maintenance &
storage
As above; loss of load;
heat & cold; noise; exceed
load limit of vehicle; hose
A As above; loss of load;
heat & cold; noise; exceed
load limit of vehicle; hose
entanglement; exhaust
fumes; terrain & slopes; run
over by unit; exhaust fumes;
terrain & slopes;
As above
As above; wear clothes to suit heat &
cold; wear hearing protection if noise
> 85 dBa; follow the manufacturer’s
safe operation instruction for the
vehicle and the spray unit; don’t
overload - water weighs 1kg for every
1 litre; secure load to vehicle; keep
hose tidy; put unit brakes on.
As above; continue to wear PPE
for clean up: store unit in a dry, well
ventilated area.
High
Low
www.tti.com.au
Call 1800 816 277
Page 6

OPERATORS HANDBOOK 6
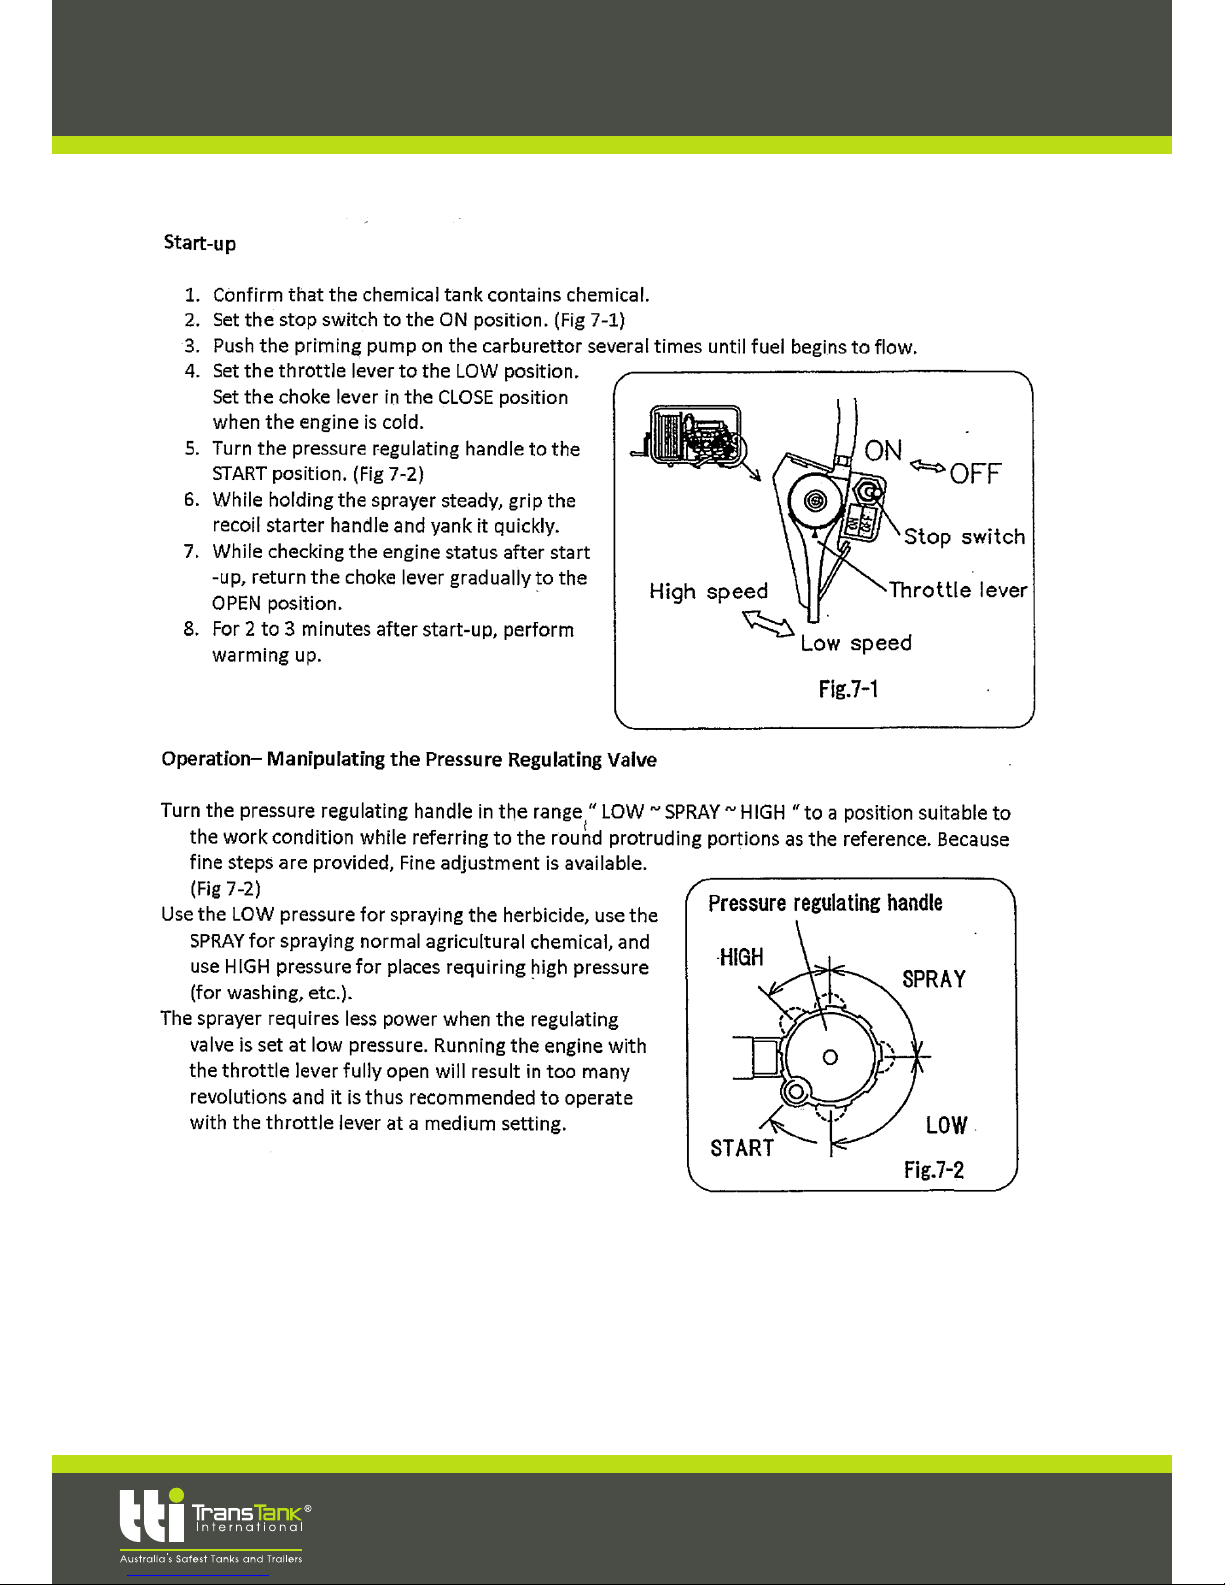
OPERATING INSTRUCTIONS
START UP PROCEDURE
BEFORE USE
1. Check all hoses, connections and hose clamps to ensure that the unit has been delivered to you without
transportation loss or damage.
2. Before attempting any spraying with your new unit, operate it with water only to familiarize yourself with
its features and capabilities and to ensure that your sprayer has arrived in a safe working condition. Please
contact your dealer immediately should anything appear to have been damaged.
3. Load the Field Spray unit onto the back of a vehicle and fasten the unit securely to the vehicle by
strapping or bolting it down. Ensure that the straps do not interfere with any hoses or connections. Do not
place the straps over the pump or engine. Keep hoses and straps away from hot engine, exhaust and
exhaust fumes.
4. Prepare the engine for use as per the engine manual supplies with your sprayer. Ensure that the correct
quantity and type of oil is used when lling the engine.
5. Before spraying, check that the lter screen is clear and free from foreign particles and chemical
residues. This can be done when the tank is full or empty. Unscrew the black lter retaining ring and
remove lter and clean as necessary. A clean lter will maintain pump performance and extend pump life.
Prepare the engine for start up as per the engine manual and pump manual.
Add the spray solution to the tank (See “Mixing and Filling”).
Ensure that the pressure regulator lever is in the ‘BY PASS’ position and the pressure adjusting knob is
screwed out (anti-clockwise). Failure to do so will invalidate pump warranty.
Start the engine and allow it to warm up. Run the pump with the regulator lever in the BY PASS position in
order to discharge entrapped air from the system for at least two minutes before changing the regulator to
the PRESSURE position.
To set the correct spraying pressure, open the ow through the hand gun (discharge solution back to tank)
and turn the pressure regulator knob in a clockwise direction until the required pressure is achieved. Spray
nozzle pressure will vary according to hose length, nozzle size, etc. When the hand gun is released the
increased pressure in the system will be automatically adjusted by the pressure regulator valve and excess
ow will be returned to the spray tank.
www.tti.com.au
Call 1800 816 277
Page 7

OPERATORS HANDBOOK 7
MIXING AND FILLING
CALIBRATION
The following steps are given as a guide for mixing and lling the sprayer:
1. Read the product label and follow the instructions carefully, taking special note with regard to
the order in which the products are added to the tank.
2. Half-ll the spray tank with water only and commence agitation by following these steps:
• Pressure control lever must be in the “by-pass position”. Turn regulator valve knob in anti-clock
wise direction to reduce pressure to “O” bar.
• Measure the correct quantity of pesticides, using clean measuring jugs used only for this purpose
and add to the spray tank while still agitating.
• Rinse out the measuring jugs and empty containers and pour all rinsings into the spray tank.
• Top up the spray tank with clean water to the required level.
• Your spray tank has now been correctly lled and the product thoroughly mixed. Spraying can
now commence.
3. To commence spraying, move the pressure control lever clockwise to the “press” position, close
the spray gun or boom and turn the adjustment knob in a clock-wise direction until your desired
pressure has been reached. Open the spray gun or boom and start spraying.
Accurate calibration is an essential element of any spraying function as it ensures that the
pesticide is applied at the rate on the product label. Application in excess of the recommended rate
is prohibited, can damage crops and is uneconomical.
Calibration must always be carried out:
• When spraying for the rst time with new spray equipment
• At the beginning of each season
• After changes of nozzle tips, spraying pressure or speed
• After every 100 hectares of spraying
When calibrating a sprayer, a minimum of coverall, gloves and boots must be worn. A face shield
and PVC apron may be included depending on the task and the cleanliness of the sprayer.
www.tti.com.au
Call 1800 816 277
Page 8

OPERATORS HANDBOOK 8
CALIBRATION PROCEDURES
The following steps set out a method of sprayer calibration:
Read the label on the Container for the Application rate & recommended spray nozzle type.
To apply a specied rate of chemical to the target surface, you need to know the total sprayer
output, the travel speed and the swath width. Then calculate the application rate.
Measure Total sprayer output [L/min]
Set the pressure at the correct level for spraying determined by the type of nozzles.
All nozzles used for spraying should be left on. For initial trials set pressure at ~ 2 bar
and adjust as needed.
1. Fill the spray tank with clean water. Run the sprayer at the correct pressure with all nozzles operating.
2. Place a measuring jug under rst nozzle for one minute. Measure how much water is in the jug.
3. Repeat for all nozzles. Nozzle output should not vary by more than 10%. If it does, the nozzle could
be worn or damaged and should be replaced. All nozzles on the boom should have a similar output.
4. Add all the jug measurements to nd the total sprayer output in litres per minute.
Measure the travel speed [km/h]
The normal speed for spraying with small boom sprayers is 4–10 km/h. The slower you travel
the higher the application rate. Adjust travel speed to suit ground conditions.
1. Measure how many seconds it takes to travel 100 metres with the sprayer attached and half full.
2. Calculate your travel speed by inserting the time in seconds into the following formula:
Travel speed (km/h) =distance travelled in meters (say 100m) x3.6 / Time taken (in seconds)
Calculate spray application rate [L/Ha]
First, measure your swath width (in metres). For general broadcast spraying, the swath width is equal
to the number of nozzles multiplied by the nozzle spacing. For band spraying the swath width is
equal to the total of all the band widths. Calculate the application rate using the following formula :-
Application rate (L/ha) = 600 x total sprayer output (L/min)
swath width (m) x travel speed (km/h)
Example: If total sprayer output is 5 L/min, speed is 8 km/h, and swath width is 6m,
Application rate = 600 x 5 = 62.5 L/ha
6 x 8
If the application rate is less than specied, increase the pressure and repeat calibration to
achieve correct rate.
Nozzle Fitted
Type (Drop Size
Application Rate
Spray Pressure
www.tti.com.au
Call 1800 816 277
Page 9
OPERATORS HANDBOOK 9
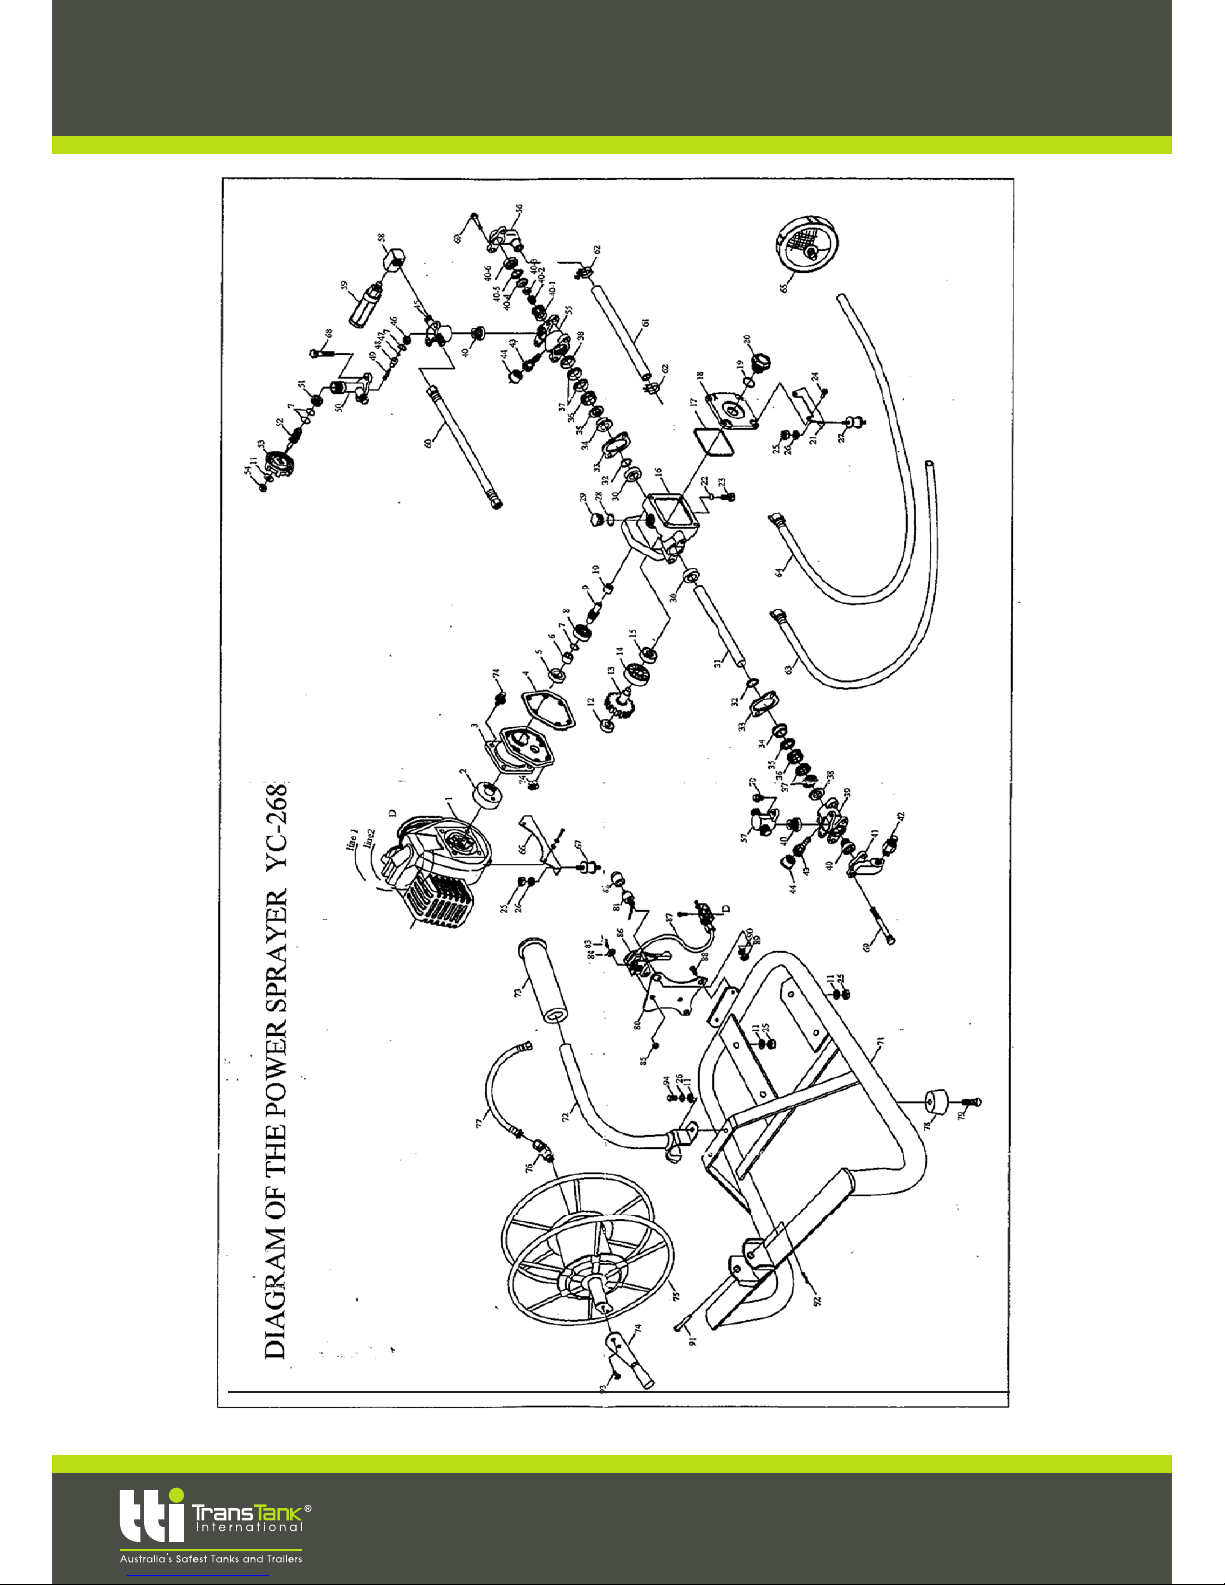
DIAGRAM - MOTOR PARTS
Exploded Diagram – Motor Parts
OPERATOR HANDBOOK 8
www.tti.com.au
Call 1800 816 277
Page 10
OPERATORS HANDBOOK 10
DIAGRAM - MOTOR PARTS
Operation Procedure
www.tti.com.au
Call 1800 816 277
Page 11

OPERATORS HANDBOOK 11
SPRAYER MAINTENANCE
Maintenance should be carried out once a year.
Pump Maintenance
• Check to make sure that all screws are tightened and that no parts are missing.
• Check to make sure there are no loose connections on hoses, nozzle, lance or cock. Also check
that no packing has been cut or torn.
• Thoroughly clean the nozzle and lter (for suction) is easily removable. Occasionally inspect and
clean the lter.
Inspect the Engine
• Check to make sure there are no loose or missing screws in any part of the engine.
• Clean the air cleaner.
• Clean and adjust the spark plug
• Clean the cooling fan, air intake opening and parts around the mufer.
• Check the engine oil and change it. Check for oil leaks.
• Inspect the fuel line. Also check if there are any fuel leaks.
• Inspect the fuel lter. Clean the fuel tank.
Cleaning and Storing
When storing the sprayer ensure that it is clean and dry and kept in a ventilated place where there
is no chance of freezing.
• Completely remove any water from the pump.
• Pull the recoil starter handle on the engine until there is resistance.
• After removing fuel from the tank, push the priming pump until fuel in the gas line runs out.
Remove fuel from the tank once more.
• Check the engine oil and change it. Check for oil leaks.
• Set the throttle lever in the low speed position.
• Wipe away any dirt or dust.
www.tti.com.au
Call 1800 816 277
Page 12

OPERATORS HANDBOOK 12
SPRAYER DECONTAMINATION
After use, the sprayer must be thoroughly decontaminated, inside and outside – including
pump, hoses, boom and hand lance – to avoid damage to crops from harmful spray residues.
Decontamination prevents sprayer corrosion and abrasion. As a guide follow the decontamination
procedure below.
• After spraying, rinse out the tank with several changes of water plus a recommended
cleaning uid, brushing the inside of the tank.
•
• The suction lter mounted on the sprayer frame must be cleaned regularly. Unscrew the lter
cover and remove the lter screen and remove the lter screen and gasket. Soak in clean
water, brushing with a nozzle brush.
• Ensure gasket is in position when re-assembling.
•
• The lter basket strainer is removed by lifting it out of the lter ring. Clean the basket strainer
the same way as the suction lter. Replace the basket strainer by exerting a quick downward
push ensuring the strainer has seated correctly.
•
• Nozzles, nozzle lters, nozzle caps and gaskets should be cleaned by soaking in water,
brushing with a nozzle brush and allowed to dry. Never blow through the nozzles with your
mouth nor use wire or pins to clear any blockages.
• When re-assembling ensure that the nozzle cap gasket is correctly positioned.
www.tti.com.au
Call 1800 816 277
Page 13

OPERATORS HANDBOOK 13
WARRANTY
1. WARRANTY POLICY:
TTI will, at its option, repair or replace, without charge, any part covered by this warranty which is
found to be defective in material and/or workmanship within one (1) year* after date of sale to the
original retail purchaser unless the product is used for rental purposes, in which case this warranty
is limited to ninety (90) days. Upon request, the customer will make the defective part available
for inspection and/or return the defective part to TTI, transportation charges prepaid. All parts and
components are covered by this warranty except the following, which are warranted separately by
their respective manufacturers: - engines, gearboxes, pumps & regulators. TTi does not assume
any warranty obligation, liability or modication for these items, which are covered exclusively by
the stated warranty of the respective manufacturers.
2. WHAT THIS WARRANTY DOES NOT COVER:
A. This warranty does not cover defects caused by depreciation or damage caused by incorrect
mounting, normal wear, accidents, improper maintenance, improper use or abuse of the product,
alterations or failure to follow the instructions and warnings provided.
B. The customer shall pay any charges for making service calls, clean up time and transport
charges.
C. The use of non-genuine parts on equipment supplied by TTi will automatically negate any warranty.
3. HOW TO OBTAIN SERVICE UNDER THIS WARRANTY:
Warranty service can be arranged by contacting your dealer or by contacting Trans Tank International, Call 03 5866 3266 or P O Box 137, Nathalia VIC, 3638. Proof of warranty registration and
date of purchase may be required to verify warranty coverage. Any defective parts returned to us
must be accompanied by a Return Goods Note. This form can be obtained by contacting Product
support on 1800 816 277 or email ProductSupport@tti.com.au
www.tti.com.au
Call 1800 816 277
Page 14

OPERATORS HANDBOOK 14
WARRANTY
Whilst every care has been taken in the preparation of these instructions, no liabilities can be ac-
cepted with regard to errors or omissions. Product specications are subject to change in line with
our commitment to continuous improvement.
Manufactured by: Trans Tank International
Murray Valley Highway
Nathalia 3638
Australia
FREECALL 1800 816 277
4. WARRANTY LIMITATION:
A. There is no other express warranty. Any warranty that may be implied from this purchase
including merchantibility and ness for a particular purpose is hereby limited to the duration of this
warranty and to the extent permitted by law. Any and all implied warranties are excluded.
B. TTI will not be liable for any incidental, consequential or special damages and/or expenses in
connection with the purchase or use of this equipment, to the extent permitted by law.
C. Only the warranty expressed in this limited warranty shall apply and no dealer, distributor, or
individual is authorized to amend, modify, or extend this warranty in any way. Accordingly, additional statements, whether oral or written, do not constitute warranties by TTi, and should not be relied
upon.
www.tti.com.au
Call 1800 816 277
Page 15

OPERATORS HANDBOOK 15
WARRANTY REGISTRATION CARD
To validate your warranty, please complete registration on-line at
http://www.tti.com.au/index.php/warranty
Alternatively if you are unable to register on-line ll in all the details below, copy and email
to warranty@tti.com.au or post to the address on the back cover.
I have read and understood the instructions in this booklet.
Model ________________________ Date purchased ____/ _____/_______
Serial Number__________________________ [located on side of tank]
Purchased from ________________________________________________________________
(Dealer Name and Town)
Purchaser’s Name ______________________________________________________________
Purchaser’s Address _____________________________________________________________
____________________________________________________
Post Code ___________________________________________
Phone # _____________________ Mobile # _____________________
Purchaser’s Signature ________________________
www.tti.com.au
Call 1800 816 277
Page 16

Trans Tank International
Murray Valley Hwy, Nathalia VIC 3638
PO Box 137, Nathalia VIC 3638
FREECALL: 1800 816 277
FAX: 03 5866 3019
www.tti.com.au
warranty@tti.com.au
 Loading...