

TTI PMR-506TX Instruction Manual
PMR 446 TRANSCEIVER
INSTRUCTION MANUAL
www.ttikorea.co.kr
PMR-506TX
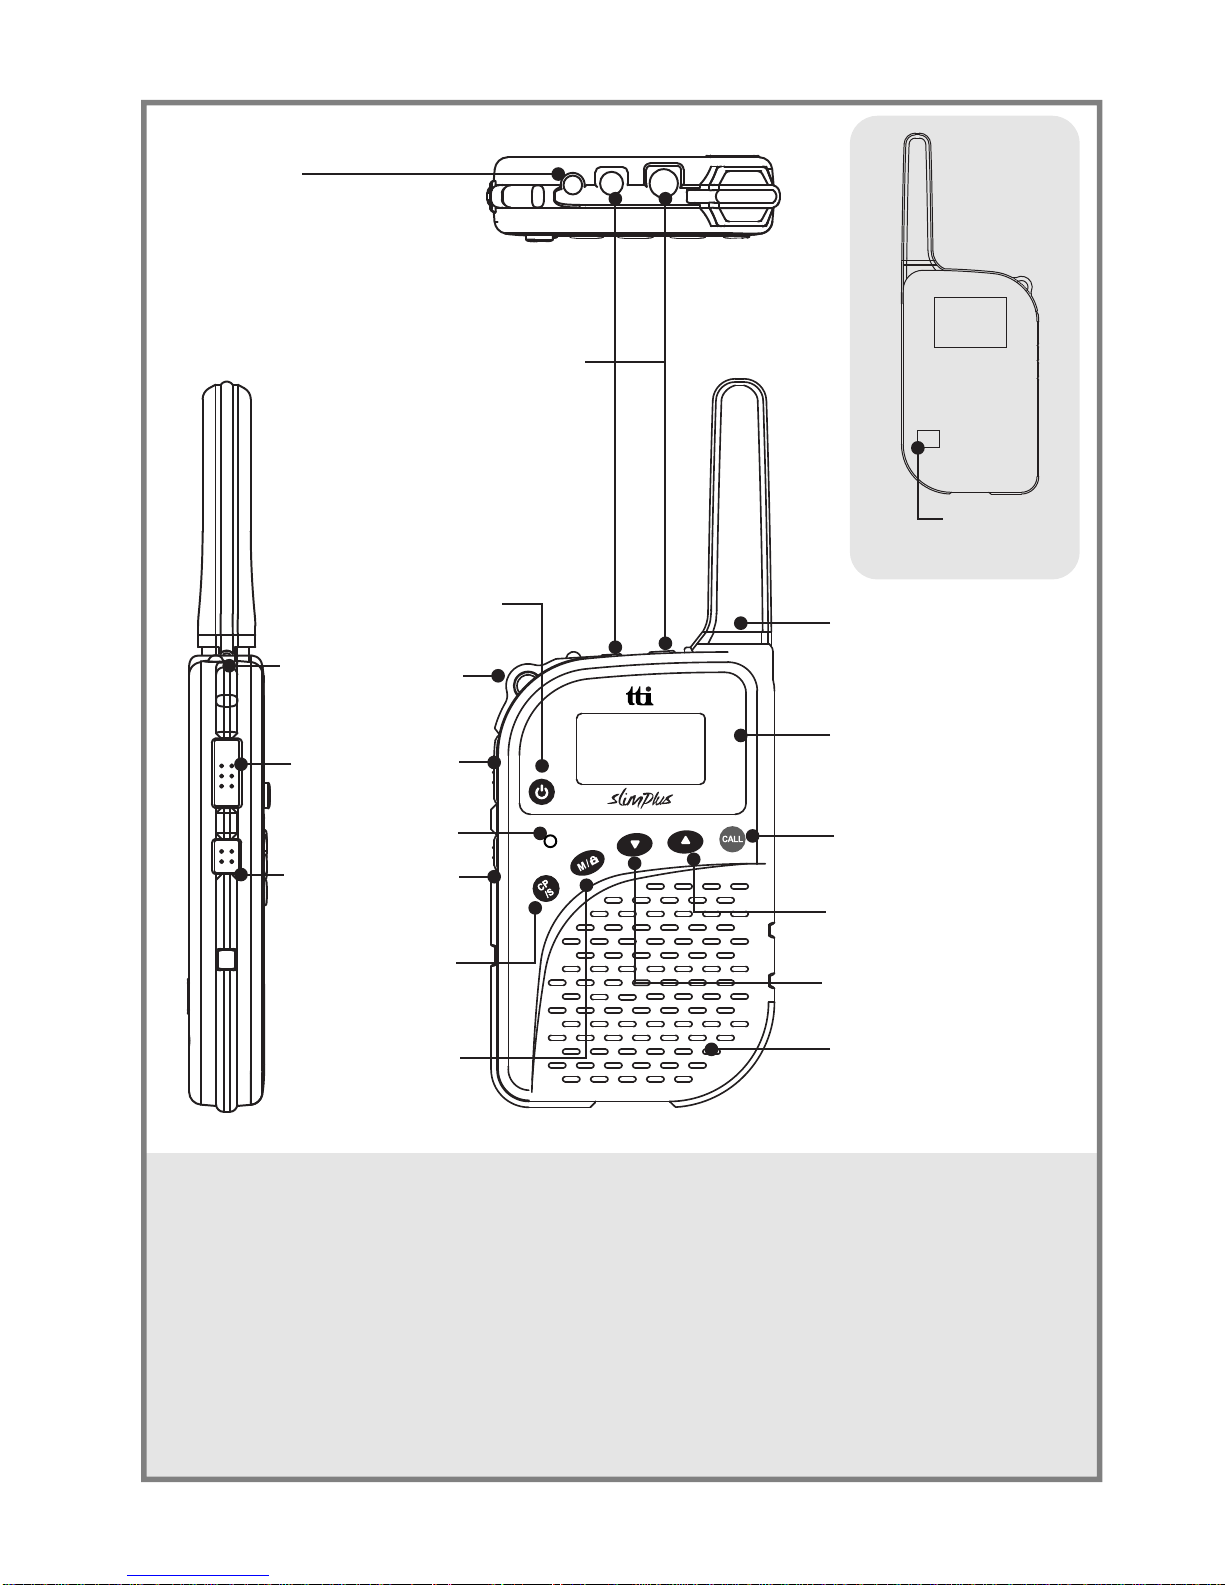
Neck Strap
Ring
Speaker
Antenna
LCD Display
CALL Button
Up Button
Down Button
Charging
Terminal
Accessory Jack
Lamp
PTT Button
Microphone
Lamp/Monitor
Button
Compander/
Scan Button
Mode/Lock
Button
Power Button
Thank you for purchasing TTI radio.
All our products are built to offer excellent value by combining
advanced features, great design and manufacturing quality.
To ensure you are familiar with the operation and features of your
radio and in order to obtain the best performance, please read this
manual carefully before operation.

CONTENTS
4
5
5
5
6
7
7
8
9
1.
2.
3.
4.
5.
Caution
Equipment and Accessories Supplied
Fitting the Batteries
Battery Charging
Radio Control
1)
2)
3)
4)
5)
6)
7)
8)
9)
10)
11)
12)
13)
14)
15)
16)
17)
18)
19)
20)
Volume Level
Channels
Privacy Codes (CTCSS)
Dual Watch
Hands Free (VOX) mode
Roger Beep
Key Beep
Room Monitor
Intercom
Scrambler
Call Alert
Flash Light
Monitor
Compander
Channel Scan
Privacy Code Scan/Decode
Key Lock
Display Backlight
Battery Warning
Power Save
6.
7.
8.
9.
1)
2)
3)
4)
5)
6)
7)
8)
6
6
6
6
6
6
6
7
9
9
9
9
10
10
11
11
11
12
12
12
12
13
13
13
14
14
14
14
LCD Display
Basic Radio Operation
Function Mode
Radio Features Explained
POWER Button
PTT Button
UP Button
DOWN Button
MODE Button
LAMP / MONITOR Button
CALL Button
SCAN / LOCK Button
10.
11.
12.
13.
14
15
15
16
Troubleshooting
CE Declaration
Safety Requirements
Technical Specifications
ENGLISH

IMPORTANT - READ ALL INSTRUCTIONS carefully
and completely before operating your radio and retain
this manual for future reference.
NEVER connect the radio to a power source other than
the supplied battery. This may damage your product.
NEVER operate your radio with the antenna less than
5cm from exposed parts of the body.
NEVER use the radio in or near a mining facility or
other area which uses remotely triggered explosives
or an area labelled "Blasting Area".
NEVER use or charge your radio in a potentially
explosive atmosphere.
DO NOT place your radio in front of a vehicle airbag.
DO NOT operate your radio on board an aircraft.
DO NOT use your radio with a damaged antenna.
DO NOT attempt to modify your radio in any way.
ALWAYS charge your radio at normal room
temperature.
ALWAYS switch off your radio where notices restrict
the use of two-way radio or mobile telephones.
ALWAYS replace the accessory jack cover
(if applicable) when the jack is not in use.
ONLY use TTI approved rechargeable batteries with
the supplied charger.
AVOID exposing your radio to water. It is not
waterproof.
AVOID storing or charging your radio in direct sunlight.
AVOID storing or using your radio where temperatures
are below -20ºC or above +60ºC.
1. Caution
4
ENGLISH
1) PMR-506TX radio (with internal battery)
2) Smart Charger with Adaptor
3) Instruction Manual
1 unit
1 unit
1 unit
2. Equipment and Accessories Supplied
3. Fitting the Batteries
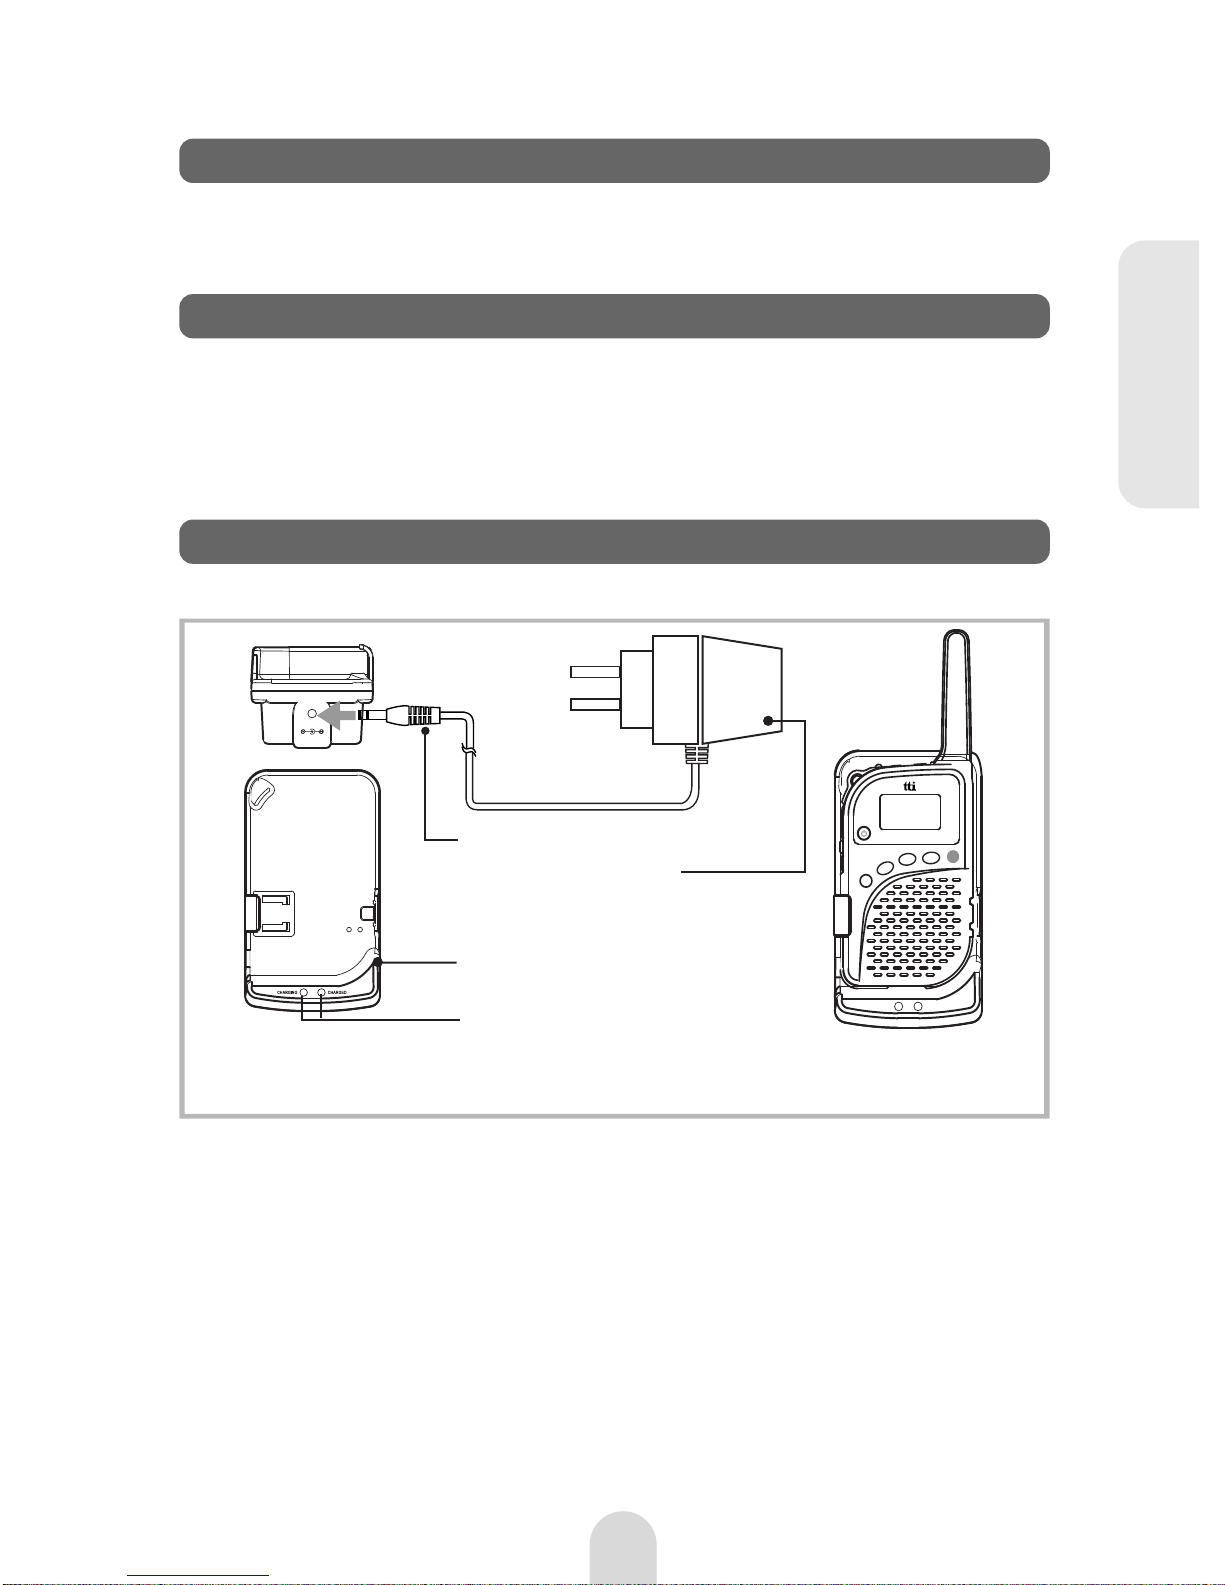
To charge your radios, carefully follow these instructions.
4. Battery Charging
Power Adaptor
- Input: 100~240VAC 50KHz
- Output: 9V 500mA
Adaptor Power Plug
1) Charger Installation
Connect the power adaptor to the mains power supply and
connect the adaptor power plug to the charger cradle.
When the battery being charged the LED lights red.
2) Radio Cradling & Charging
Remove all radio accessories and insert your radios in the
charging compartment until you hear locking sound. The radio will
start charging and the LED will light red during charging.
3) Charging Completed
The battery charging time is typically 6~7 hours. When the battery
is fully charged the LED will change to green.
5
ENGLISH
The PMR-506TX uses an internal Lithium Ion or Lithium Ion
Polymer battery which has been pre-installed.
For removal or replacement please contact your local dealer.
Unauthorised attempts to remove or replace the battery will void
your warranty and may damage your product.
LED
Charging Cradle
Note: This unit should not be used during being mounted and
charged on the charging cradle.

1) POWER Button
Press and hold the POWER button for about
2 seconds. You will hear a confirmation tone to indicate
the radio is on. To turn the radio off, press and hold the
POWER button for about 2 seconds.
5. Radio Controls
2) Push-To-Talk (PTT) Button
Press and hold this button to speak (transmit). Release
the button to listen to (receive) messages.
You can only communicate with other PMR446 radios
when the channel and privacy code settings are the
same as yours.
4) DOWN Button
Pressing this button will decrease the volume. In some
modes this button is used to adjust the function setting.
5) FUNCTION(MODE)/LOCK Button
Press this button briefly to enter the function mode.
Press again (repeatedly) to step through the function
menu. Press and hold this button for 2 seconds to
activate or deactivate the keypad lock.
6) LAMP / MONITOR Button
3) UP Button
Pressing this button will increase the volume. In some
modes this button is used to adjust the function setting.
6
7) CALL Button
Press this button to transmit a call melody and alert
other parties to your call.
ENGLISH
Press this button briefly to switch the flash light lamp
on or off. This flash light lamp is working only while
the radio is turned on.
Press and hold this button for about 2 seconds to
activate or deactivate the monitor function.
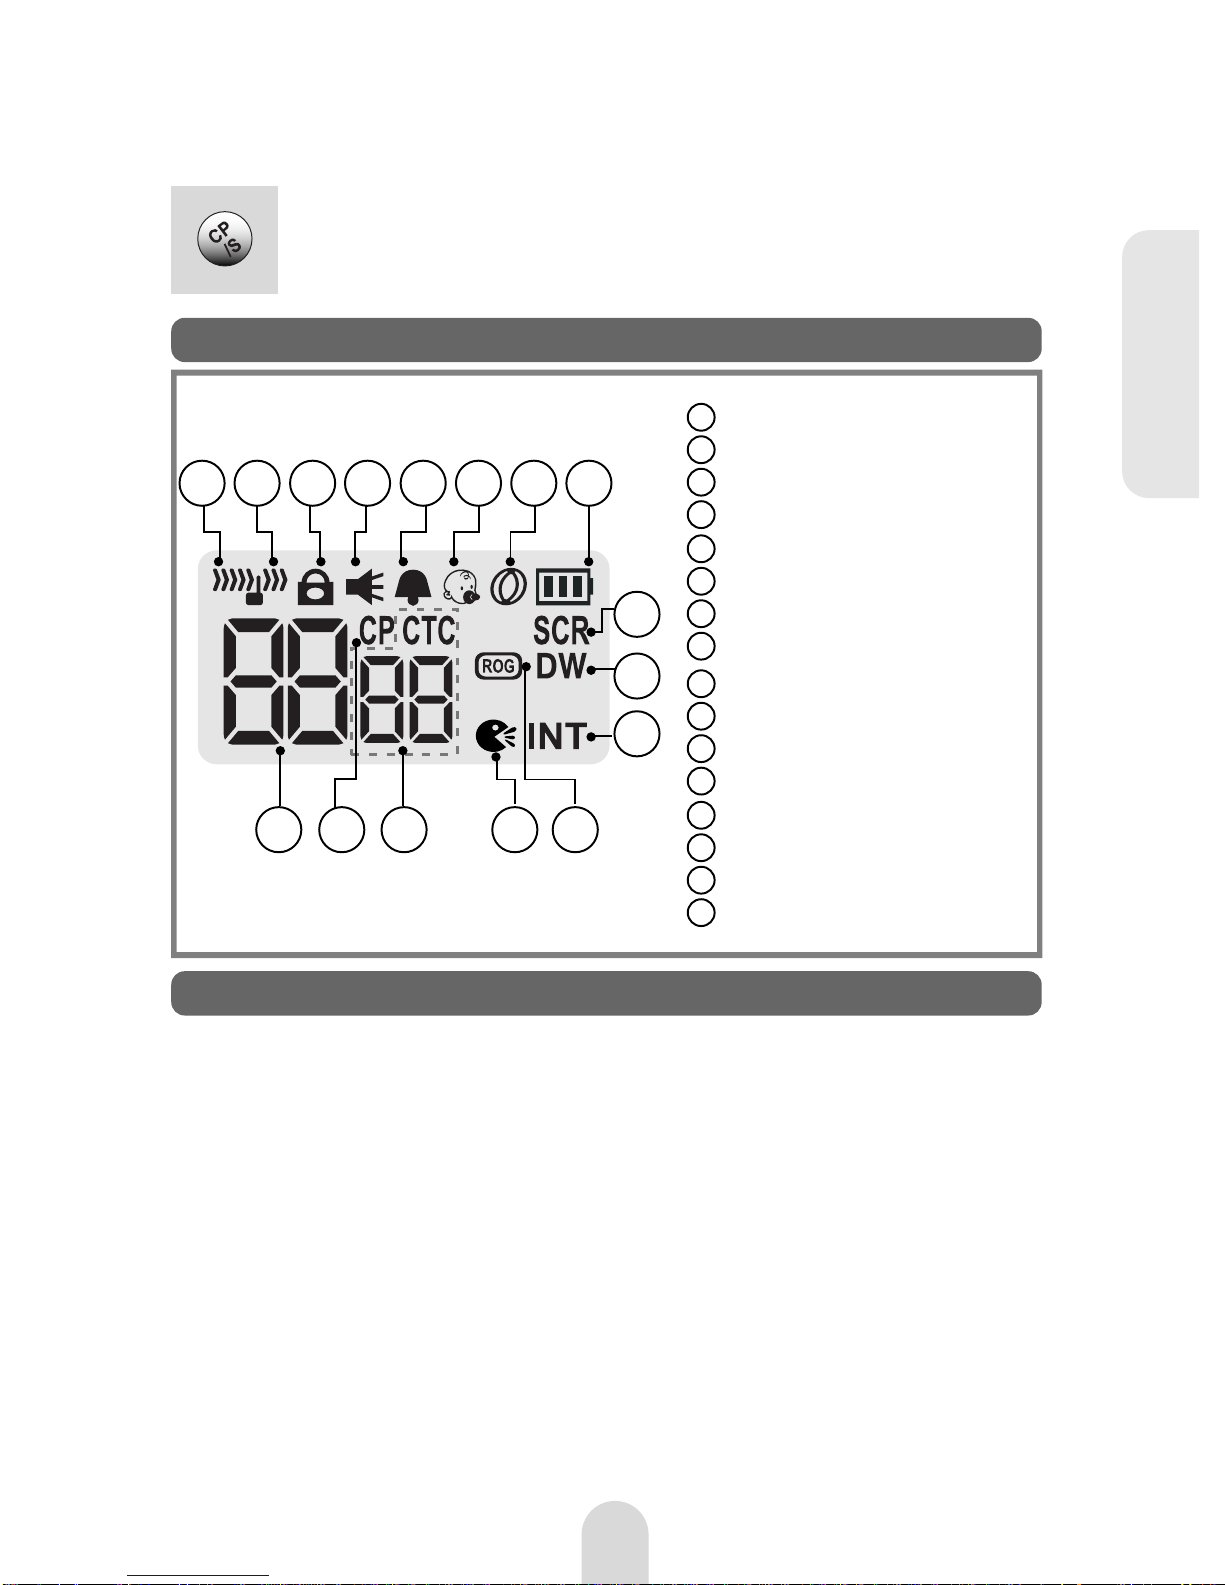
6. LCD Display
Receiving/Busy Icon
Transmit Icon
Keypad Lock Icon
Monitor Icon
Keytone Icon
Room Monitor Icon
Scan Icon
Battery Level Indicator
Scrambler Icon
Dual Watch Icon
Intercom Icon
Roger Beep Icon
VOX Icon
CTCSS Code Icon/Display
Compander Icon
Channel Display
The PMR446 service which this radio uses shares channels on
a 'take turns' basis. This means that other users and groups
may be using any channel and privacy code combination.
To communicate with other PMR446 radios, all units must be
switched to the same channel (8 choices) and privacy code
(38 choices).
7. Basic Radio Operation
1314
8) Compander/ SCAN Button
Press this button briefly to activate or deactivate the
compander function.
Press and hold this button for 2 seconds to activate or
deactivate the scanning where appropriate.
7
If the combination you have selected is already in use please
make an alternative selection.
1) Switch on your radio by pressing the Power button for 2
seconds.
2) Check and if necessary change the channel and privacy code
settings (see Function Mode and Radio Features Explained).
3) To speak, hold the radio upright, about 10cm from your
ENGLISH
1
1
2
3
4
5
6
7
8
9
10
11
12
13
14
15
16
32 4 5 6 87
12
9
10
11
1516
The Function Mode allows you to program user preferences,
activate features and use advanced functions (see Radio
Features Explained).
To access the Function Mode press the MODE button briefly.
Each press of the MODE button steps the radio sequentially
through the different functions.
The radio display indicates the current function. The present
setting and associated icon flash. Use the up or down button to
change the setting.
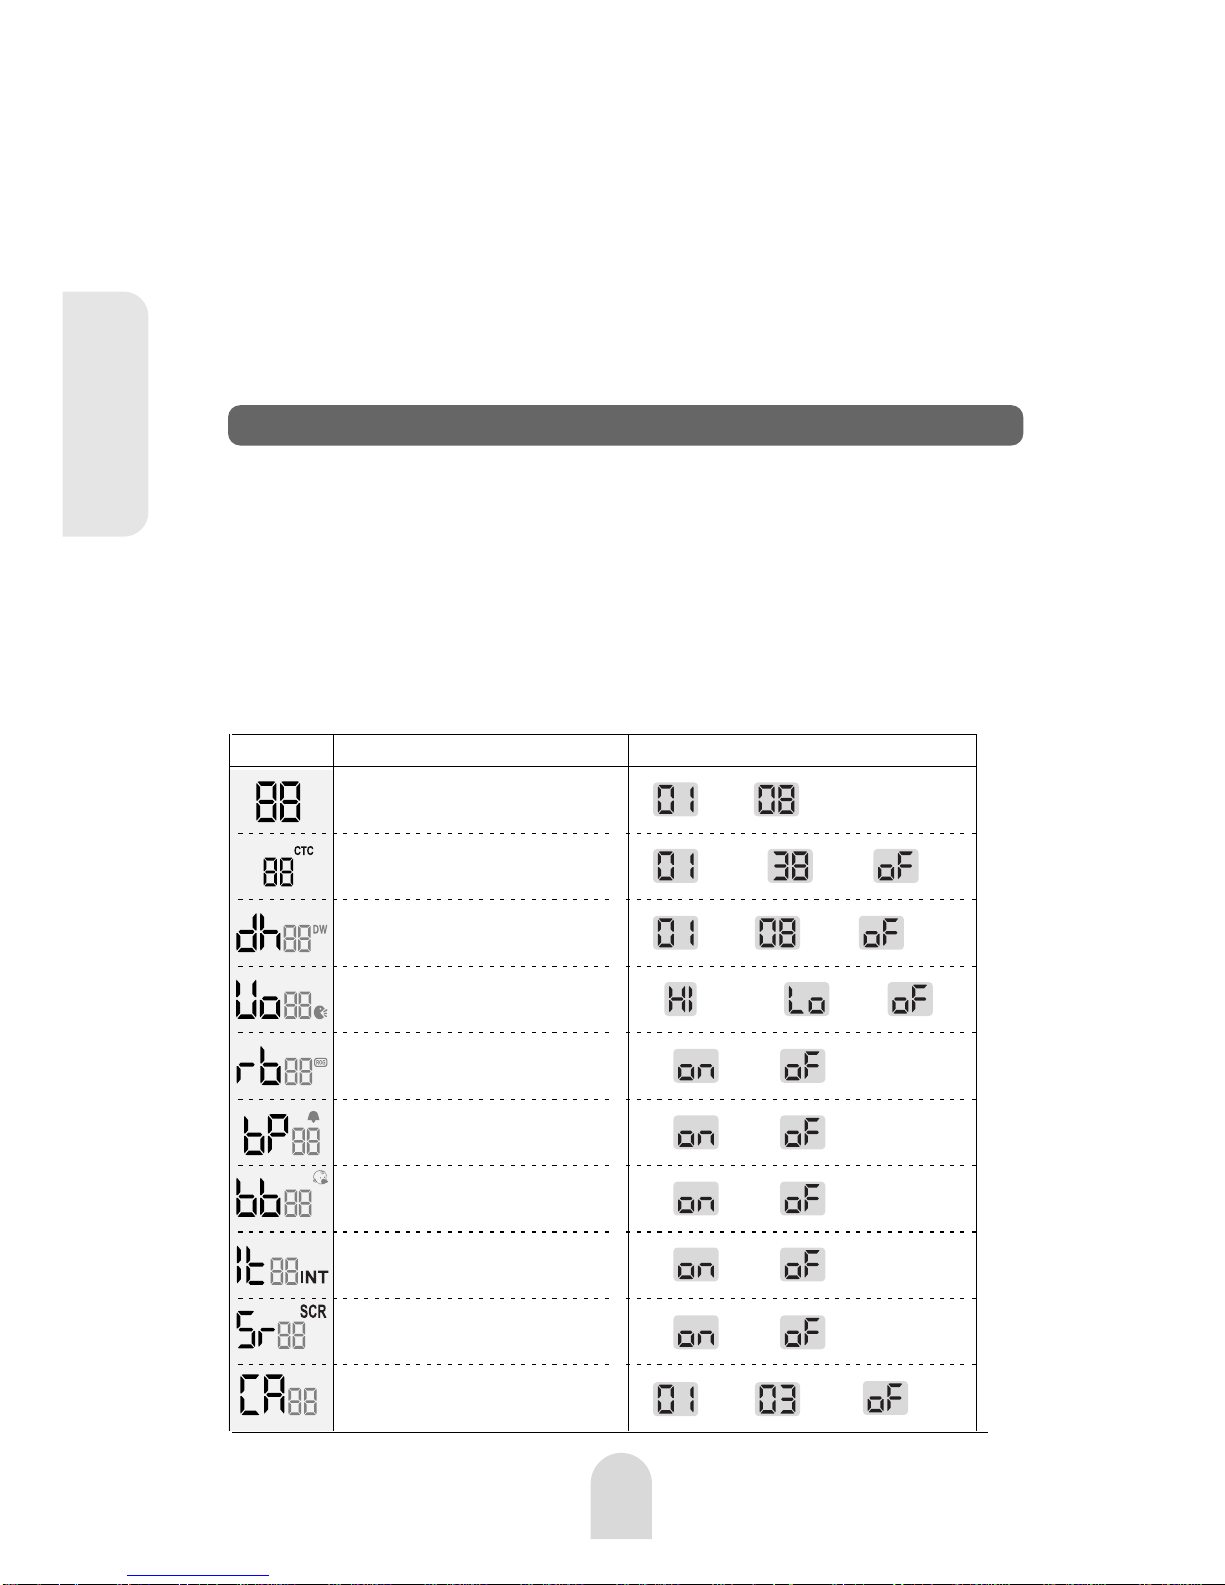
8. Function Mode
Display SettingsFunctions
change Channel
change Privacy Code
select Dual Watch mode
activate Roger Beep
activate Key Beep
activate Room Monitor
Activate Intercom
Activate Scrambler
change Call Tone
select Hands Free
(VOX) mode
1 to 8
1 to 38 , Off
1 to 8 , Off
Hi to Low , Off
On / Off
On / Off
On / Off
On / Off
On / Off
1 to 3 , Off
mouth and press the PTT. Speak slowly and clearly towards
the radio. Release the PTT when you have finished speaking.
You will hear messages from other radios within range,
with the same channel and privacy code setting.
The appropriate icon will appear in the radio display when you
receive or transmit a message.
8
ENGLISH

1) Volume Level
There are 7 volume levels to suit your personal preference.
To adjust the volume level, press the Up or Down button.
and the current volume level are shown in the radio display.
9. Radio Features Explained
2) Channels
This radio operates on any one of the 8 PMR446 licence free
channels. To communicate with other PMR446 radios, all units
must be switched to the same channel and privacy code.
To change the radio channel, press the FUNCTION button until
the channel number flashes. Use the UP or DOWN button to
select the desired channel. Press the PTT or FUNCTION
button or wait for 5 seconds to store your choice.
3) Privacy Codes (CTCSS)
This radio is fitted with 38 different privacy codes (also known
as CTCSS, sub-codes or sub-channels). You can select or
change the current privacy code via the Function Menu.
If the other units do not have privacy codes set your units
privacy code to Off.
Privacy codes do not prevent other radio users from hearing
your conversation. They allow you to ignore messages that are
using a different privacy code. There are 304 channel/privacy
code combinations to help avoid interference from other users.
To change the privacy code, press the FUNCTION button until
the privacy code number flashes. Use the UP or DOWN button
to select the desired code. Press the PTT or FUNCTION button
or wait for 5 seconds to store your choice. The privacy code
icon will appear when a privacy code is selected.
4) Dual Watch
Dual Watch mode allows you to monitor two channels, a primary
and dual watch channel. When a signal is received on either
9
Press the PTT or FUNCTION button or wait for 5 seconds to
store your choice.
If you do not press any key for 5 seconds your radio will return
to standby automatically.
ENGLISH

channel the unit will pause for 5 seconds before resuming the
dual watch.
To activate the dual watch mode, first select a radio channel
(see Channels) as the primary channel. To select the dual watch
channel press the FUNCTION button until appears. Use
the UP or DOWN button to select the desired dual watch
channel.
Press the PTT or FUNCTION button or wait for 5 seconds to
store your choice and activate the dual watch.
The radio display will alternate between the primary and dual
watch channels and the dual watch icon will appear.
To deactivate the dual watch press the SCAN button.
If you press the PTT button whilst receiving a signal in dual
watch mode the radio will transmit on the currently displayed
channel. If you press the PTT button when no signal is present
the radio will transmit on the primary channel.
5) Hands Free (VOX) mode
When Hands Free (VOX) mode is selected the radio will
automatically transmit when the microphone detects your voice
(or other noise). It can be used with the internal microphone or
an appropriate audio accessory (available separately).
To avoid accidental operation and reduce the effect of
background noise there are 2 microphone sensitivity settings.
(high and low)
To activate the Hands Free (VOX) mode, press the FUNCTION
button until appears. Use the UP or DOWN button to
change the sensitivity level. Press the PTT or FUNCTION button
or wait for 5 seconds to store your choice and activate the VOX
mode. The VOX icon will appear when VOX mode is active.
Repeat this process and change the sensitivity setting to to
deactivate the Hands Free (VOX) mode.
6) Roger Beep
The Roger Beep is a short tone that is automatically added to
the end of your transmissions to tell other users that you have
finished speaking. You can activate or deactivate the Roger
Beep as required.
To change the Roger Beep setting, press the FUNCTION button
until appears. Use the UP or DOWN button to change the
10
ENGLISH

8) Room Monitor
The Room Monitor is similar to Hands Free (VOX) mode,
but it ignores short, brief noises and uses only the highest
microphone sensitivity level. When Room Monitor mode is
activated, the radio will transmit for 15 seconds when it detects
a continuous noise for 5 seconds or more. If the noise persists
the radio will transmit for another 15 seconds.
To activate the Room Monitor mode, press the FUNCTION
button until appears. Use the UP or DOWN button to
change the setting. Press the PTT or FUNCTION button or wait
for 5 seconds to store your choice and activate the Room
Monitor. The Room Monitor icon will appear when the Room
Monitor is active.
NB The Room Monitor function is not a replacement for
regularly checking the safety and security of children. If you
move out of communication range you will not hear
transmissions.
7) Key Beep
If the Key Beep is activated, your radio will emit a confirmation
tone whenever you use the keypad. You can activate or
deactivate the Key Beep as required.
To change the Key Beep setting, press the FUNCTION button
until appears. Use the UP or DOWN button to change the
setting. Press the PTT or FUNCTION button or wait for 5
seconds to store your choice. The Key Beep icon will appear
when Key Beep is active.
9) Intercom
11
setting.
Press the PTT or FUNCTION button or wait for 5 seconds to
store your choice. The Roger Beep icon will appear when Roger
Beep is active.
ENGLISH
This radio has intercom capability that allows you and your partner
to communicate with each other using the intercom connector,
which is optionally available.
To change the intercom setting, press the FUNCTION button until
appears. Use the UP or DOWN button to change the setting.
Press the PTT or FUNCTION button or wait for 5 seconds to store
your choice. The intercom icon will appear when intercom is active.
Please contact your dealer to get the optional intercom
accessories.

11) Call Alert
12) Flash Light
13) Monitor
14) Compander
12
10) Scrambler
ENGLISH
Scrambler distorts your voice upon transmit and this makes it
difficult for others to listen to your communications who do not
have the same scrambler decoders. To get clear voice upon
receiving the scrambled voice, the receiving radio should be also
in this scrambler (Descrambler) mode.
To change the scrambler setting, press the FUNCTION button
until appears. Use the UP or DOWN button to change the
setting. Press the PTT or FUNCTION button or wait for 5 seconds
to store your choice. The scramble icon will appear when
scrambler is active.
To alert other users to your message and gain their attention
you can send a Call Alert melody by pressing the CALL button.
There are three different call alert tones.
To change the Call Alert melody, press the FUNCTION button
until appears. Use the UP or DOWN button to change the
setting. Press the PTT or FUNCTION button or wait for 5
seconds to store your choice.
To activate or deactivate the flash light lamp, momentarily press
the Lamp/Monitor button. This flash light can be used only while
the radio is turned on.
The Monitor function is used to check for activity on the current
channel regardless of privacy code settings. It also sets the
squelch to minimum and will detect weaker signals.
To activate the Monitor press and hold the LAMP/ MONITOR
button. The Monitor icon will appear when the Monitor is active.
When activated it is normal to hear background static noise.
The monitor works only while button is being pressed.
This compander is to minimize the background noise while
receiving. To activate or deactivate the compander, momentarily
press the Compander/Scan button. The compander icon will
appear when the compander is active.

13
15) Channel Scan
16) Privacy Code Scan/Decode
ENGLISH
The Channel Scan can be used to find or detect users on other
radio channels.
To activate/deactivate the channel scan, press and hold the
COMPANDER/ SCAN button.The Scan icon will appear when
the channel scan is active. Scanning will only stop when you
deactivate the scan function.
The radio will scan through the 8 channels. If your radio detects
a valid signal the scan will pause for 5 seconds.
If you press the PTT or CALL button when your radio detects a
signal, the radio will transmit on the same channel. Scanning
will resume after approximately 15 seconds. Press the UP or
DOWN button to resume scanning immediately.
If you press the PTT or CALL button during scanning, the radio
will return to your original channel. Scanning will resume after
approximately 15 seconds.
The Function Menu, Monitor and Volume Up/Down are disabled
whilst scanning. To increase battery life, use the scan mode
sparingly.
This radio has Privacy code scan to determine which Privacy
Code (CTCSS) is in use on the current channel.
To activate the privacy code scan press the FUNCTION button
until the privacy code number flashes, then press and hold the
Compander/Scan button. The Scan icon will appear when the
privacy code scan is active.
The radio will scan through the 38 privacy codes (CTCSS).
If your radio detects a valid signal the scan will pause for 5
seconds.
If you press the PTT or CALL button when your radio detects a
signal, the radio will transmit on the same privacy code.
Scanning will resume after approximately 15 seconds. Press
the UP or DOWN button to resume scanning immediately.
If you press the PTT or CALL button during scanning, the radio
will return to your original privacy code. Scanning will resume
after approximately 15 seconds.
The Function Menu and Volume up/down are disabled whilst
scanning. To increase battery life, use the scan mode sparingly.

10. Troubleshooting
If you experience problems with your PMR-506TX first check
the battery power level as low batteries can cause problems
such as no transmission, weak reception and poor sound quality.
Check the manual and radio display to ensure that a function
(such as VOX) has not been activated by accident.
If this does not solve the problem reset your unit as follows:
This will reset the radio to the factory settings and should fix
most problems.
In case of further difficulty please consult your dealer or visit our
website at www.ttikorea.co.kr.
1) Switch off the radio.
2) Press and hold the Up button and PTT button together.
3) Switch on the radio.
14
ENGLISH
19) Battery Warning
The Battery Level Indicator will blink when the battery level is
low and the battery needs recharging. If necessary, refer to the
instructions to recharge the battery. Operating the radio with a
low battery will reduce performance.
17) Key Lock
20) Power Save
To conserve battery power the radio will automatically enter
Power Save mode after a short period of inactivity. The Save
icon will appear to indicate that Power Save is active. There is
no user setting for Power Save.
To avoid changing the channel or function settings accidentally this
radio has a lock function.
To activate or deactivate the lock press and hold the FUNCTION/
LOCK button for about 2 seconds. The Key Lock icon will appear
when the Key Lock is active. The Power, PTT, Lamp/ Monitor, Call
and Volume adjustment are unaffected by the Lock.
18) Display Backlight
This display backlight will illuminate for approximately 5 seconds
whenever anykey is pressed. The call key, PTT key and lamp key
do not work for activating this backlight.

12. Safety Requirements
For charging the rechargeable batteries, only a CE approved
AC adaptor complying with the following specifications must be
used :
* INPUT : AC 100-240V / 50Hz
* OUTPUT : DC 9V 500mA
15
ENGLISH
This unit can be used without license and charges in; Austria,
Belgium, Bulgaria,Cyprus, Czech, Denmark, Estonia, Finland,
France, Germany, Greece, Hungary, Iceland, Ireland, Italy,
Latvia, Lithuania, Luxembourg, Malta, Netherlands, Norway,
Poland, Portugal, Romania, Slovakia, Slovenia, Spain, Sweden,
Switzerland, and U.K.
11. CE Declaration
CE versions of the PMR-506TX which
display the CE symbol on the Product
label, comply with the essential
requirements of the European Radio and
Telecommunication Terminal Directive
1999/5/CE.
16
ENGLISH
Frequency products are Supplied by
TTI Tech. Co. Ltd, Korea.
Tel: 82-2-5743055, Website: www.ttikorea.co.kr
NO Frequency Ch Frequency
67.0
71.9
74.4
77.0
79.7
82.5
85.4
88.5
91.5
94.8
97.4
100.0
103.5
1
2
3
4
5
6
7
8
9
10
11
12
13
14
15
16
17
18
19
20
21
22
23
24
25
26
107.2
110.9
114.8
118.8
123.0
127.3
131.8
136.5
141.3
146.2
151.4
156.7
162.2
Ch Frequency
167.9
173.8
179.9
186.2
192.8
203.5
210.7
218.1
225.7
233.6
241.8
250.3
0
27
28
29
30
31
32
33
34
35
36
37
38
OF
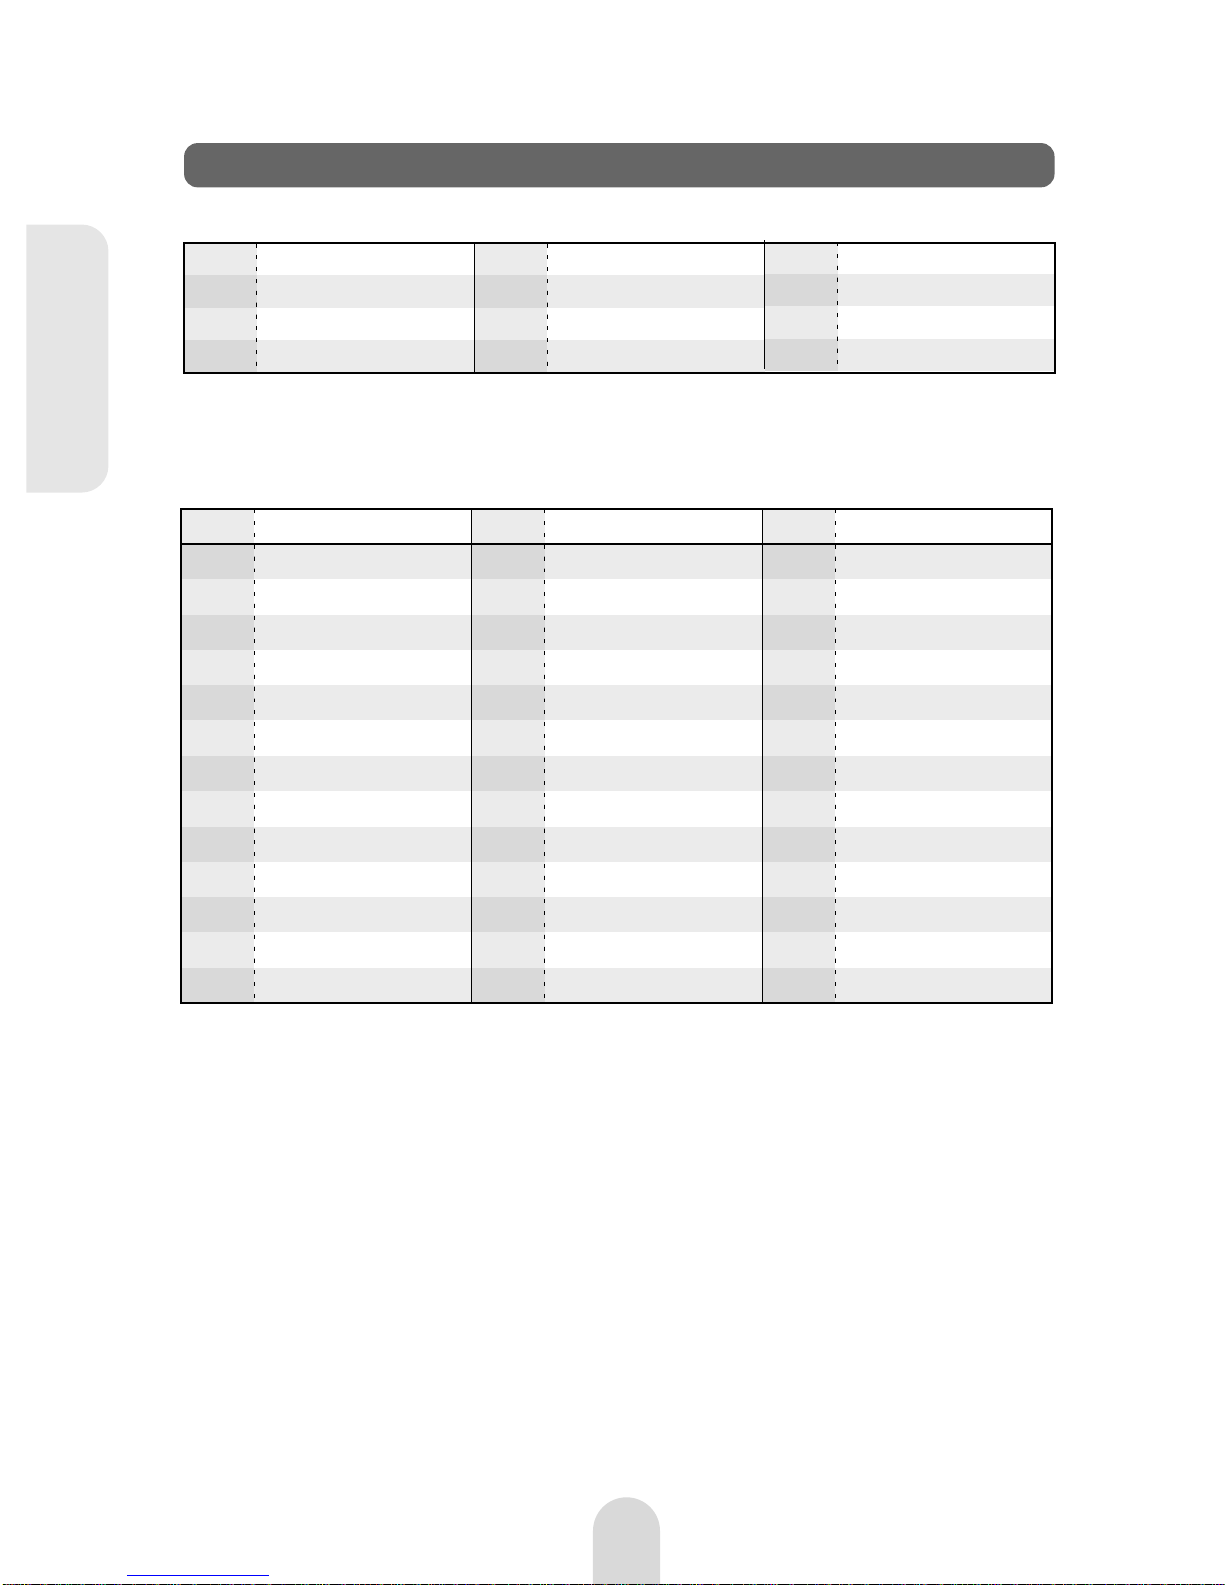
13. Technical Specifications
1. Operating Frequencies (frequency shown in MHz) :
2. Channel Spacing: 12.5kHz
3. Power Source: 1 x Li-ion battery
4. Privacy Code/Tone Table (CTCSS frequency shown in Hz):
Ch
1
2
3
Frequency
446.00625
446.01875
446.03125
Ch
4
5
6
Frequency
446.04375
446.05625
446.06875
Ch
7
8
Frequency
446.08125
446.09375
 Loading...