

Page 1

3www.ttfone.com
Thank you for choosing our mobile phone!
Please read this manual before use.
Check out our website for video
guides of how to use your phone
www.ttfone.com
We reserve the right to upgrade the software and
product and/or to make changes to this user
manual without prior notice.
The icons in this user manual may slightly dier from
your phone, depending on the phone you
purchased. All rights reserved.
Page 2

4 www.ttfone.com
Contents
1.Safety Instructions ........................................................................... 6
2. Getting Started ................................................................................9
Install the SIM card and battery ...............................................9
Charging the Battery .................................................................. 11
Battery Level Indication ............................................................11
3. Your Phone ......................................................................................12
Key Functions ................................................................................13
4. Making and Receiving Phone Calls ..................................... 15
To Make Calls:.................................................................................15
To Answer Calls: ............................................................................15
To End a Call: ..................................................................................15
To Redial a Number: ....................................................................15
Making International Calls: ......................................................16
Volume Adjustment ...................................................................16
5. Main Menu ......................................................................................16
Phonebook .....................................................................................16
Messaging ....................................................................................... 18
Voicemail Server - change voicemail settings ............... 19
Call Center .......................................................................................19
Multimedia......................................................................................20
Settings .............................................................................................25
Alarm Clock.....................................................................................31
Organiser .........................................................................................32
Page 3

5www.ttfone.com
This user manual includes important safety information. Please
read below instructions carefully. It may be dangerous or illegal
if you do not follow these instructions. Remember to follow
any special regulations in force in any area and always switch
o your device when its use is prohibited or when it may cause
interference or danger.
Attention!
The factory default password: 1122
This password can be used to change the settings,
however it is advised that you change this to your own
personal password.
Torch ..................................................................................................32
FM Radio ..........................................................................................32
6. Troubleshooting ...........................................................................33
7. Radio Frequency (RF) Exposure and SAR ..........................36
Page 4

6 www.ttfone.com
1.Safety Instructions
Pay attention to Trac Safety
Obey local trac laws and do not use the phone while
driving. Using a cell phone while driving is dangerous
and it is illegal in some areas. Radio frequency (RF) signals
may aect improperly installed or inadequately shielded
electronic systems in motor vehicles such as electronic
fuel injection systems, electronic antiskid (antilock)
braking systems, electronic speed control systems, air
bag systems. For more information, check with the
manufacturer of your vehicle for any equipment that has
been added. Do not place objects, including installed or
portable wireless equipment in the area over the air bag
or in the air bag deployment area.
Pacemaker Interference
Pacemaker manufacturers recommend that a
minimum separation of 15.3 centimeters (6
inches) be maintained between a wireless phone
and a pacemaker in order to avoid potential interference
with the pacemaker.
Page 5

7www.ttfone.com
Turn O Your Cell Phone in Medical and Health Care
Facilities.
Switch o your device in health care facilities when any
regulations posted in these areas
instruct you to do so. Hospitals or health care
facilities may be using equipment
that could be sensitive to external RF energy.
Switch O on Airplanes
Using your device while ying in aircraft is prohibited.
Switch o your device before boarding an aircraft. The
use of wireless devices in an aircraft may be dangerous
to the operation of the aircraft, disrupt the wireless
telephone network, and may be illegal.
Accessories and Batteries
Use only the approved accessories and batteries.
Please do not try to use with any product that was not
manufactured for use with this phone. Please be sure the
phone has been switched o before taking out battery.
Please dispose of scrap batteries properly according to
the local regulations.
Page 6

8 www.ttfone.com
Cell Phone Should Be Turned O Near Sites of
Explosion.
Potentially explosive atmospheres include areas
where you would normally be advised to turn o your
vehicle engine. Sparks in such areas could cause an
explosion or re resulting in bodily injury or even death.
Switch o the device at refueling points such as near
gas pumps at service stations and in any area with a
potentially explosive atmosphere and obey all signs and
instructions. Observe restrictions on the use of radio
equipment in fuel depots, storage, chemical plants or
where blasting operations are in progress.
Using the Phone Correctly
Please use this phone in its normal intended position. Do
not let children use the phone without supervision.Your
phone contains small parts such as SIM card, which can
be accidentally swallowed by a child.
Your Phone is Not Waterproof
This phone is not waterproof. Please do not expose your
phone to wet weather or environ-ment (such as rain,
snow, seawater, etc.).
Page 7
9www.ttfone.com
2. Getting Started
Install the SIM card and battery
Always switch the device o and disconnect the
charger before removing the battery. Keep all SIM cards
out of the reach of small children. For availability and
information about using SIM card services, contact
your SIM card vendor. This may be the service provider,
network operator, or other vendor. The SIM card and its
contacts are easily damaged by scratches or bending, so
please be careful when handling, inserting, or removing
the card.
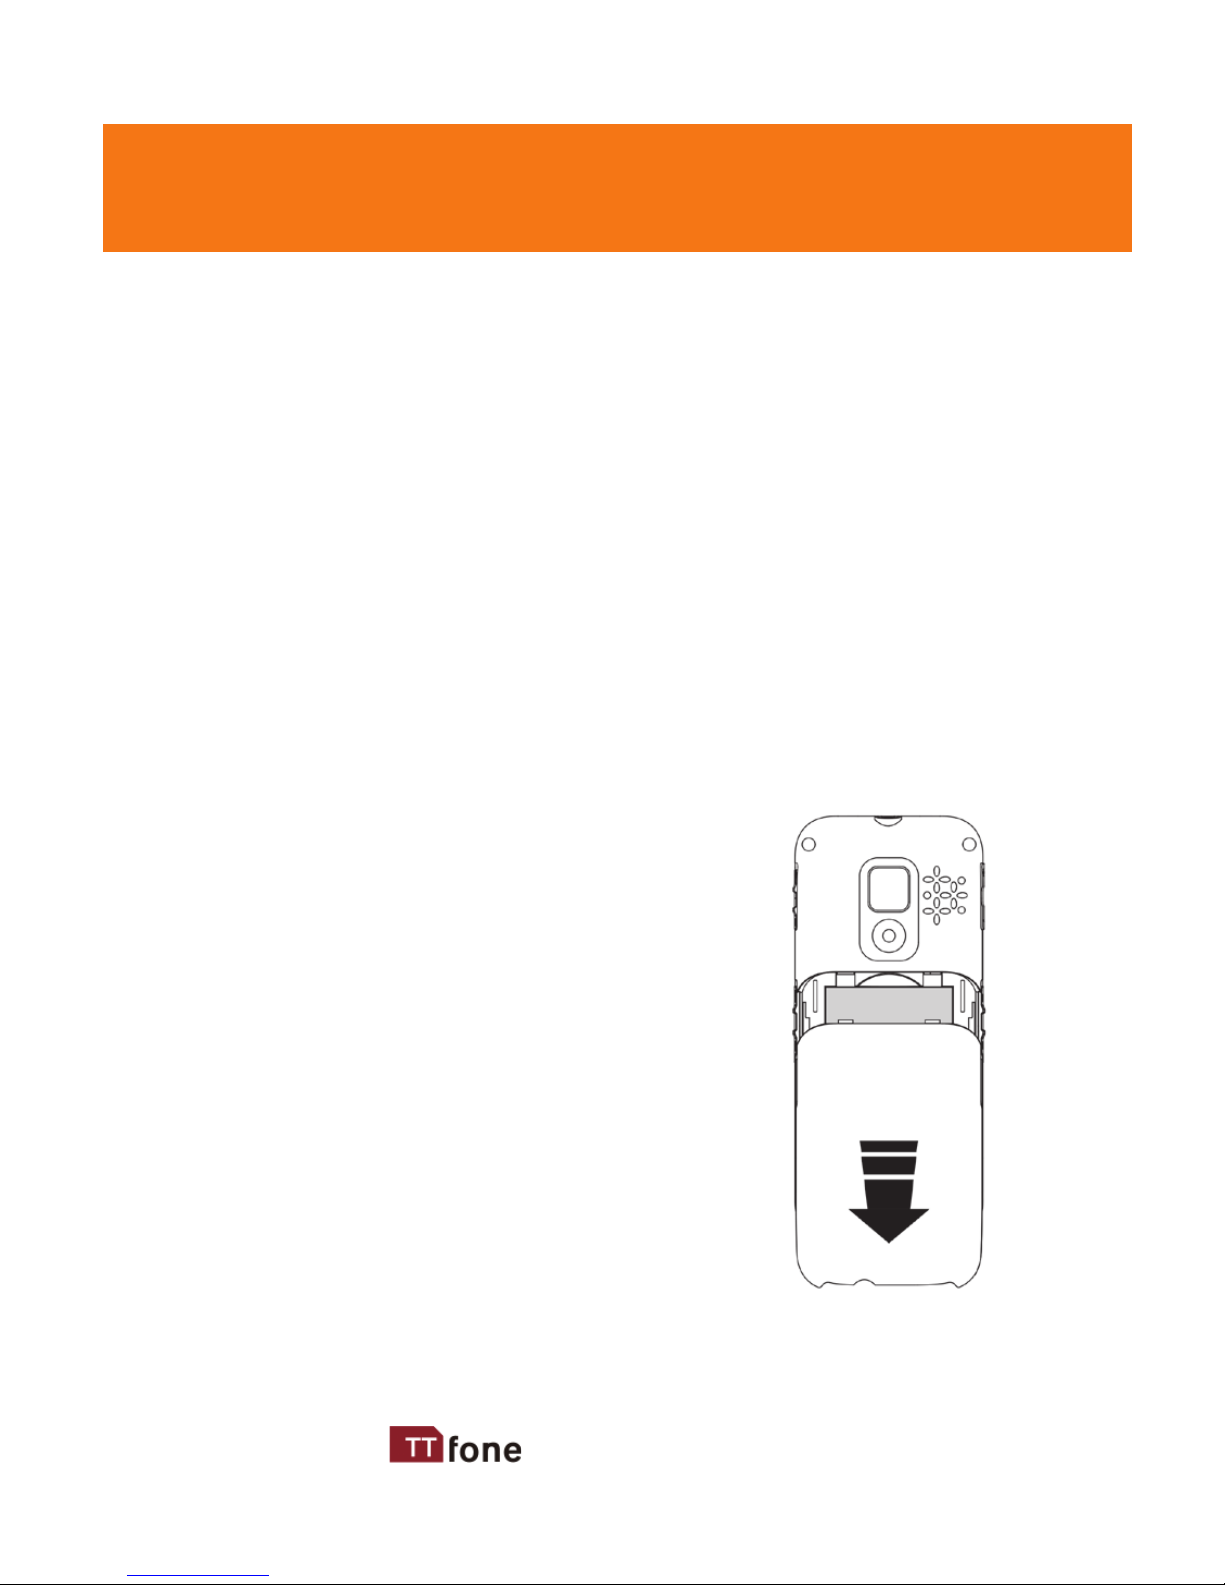
1. Open the battery cover by
lightly pressing on the back of
the phone and sliding the cover
panel down.
Page 8
10 www.ttfone.com
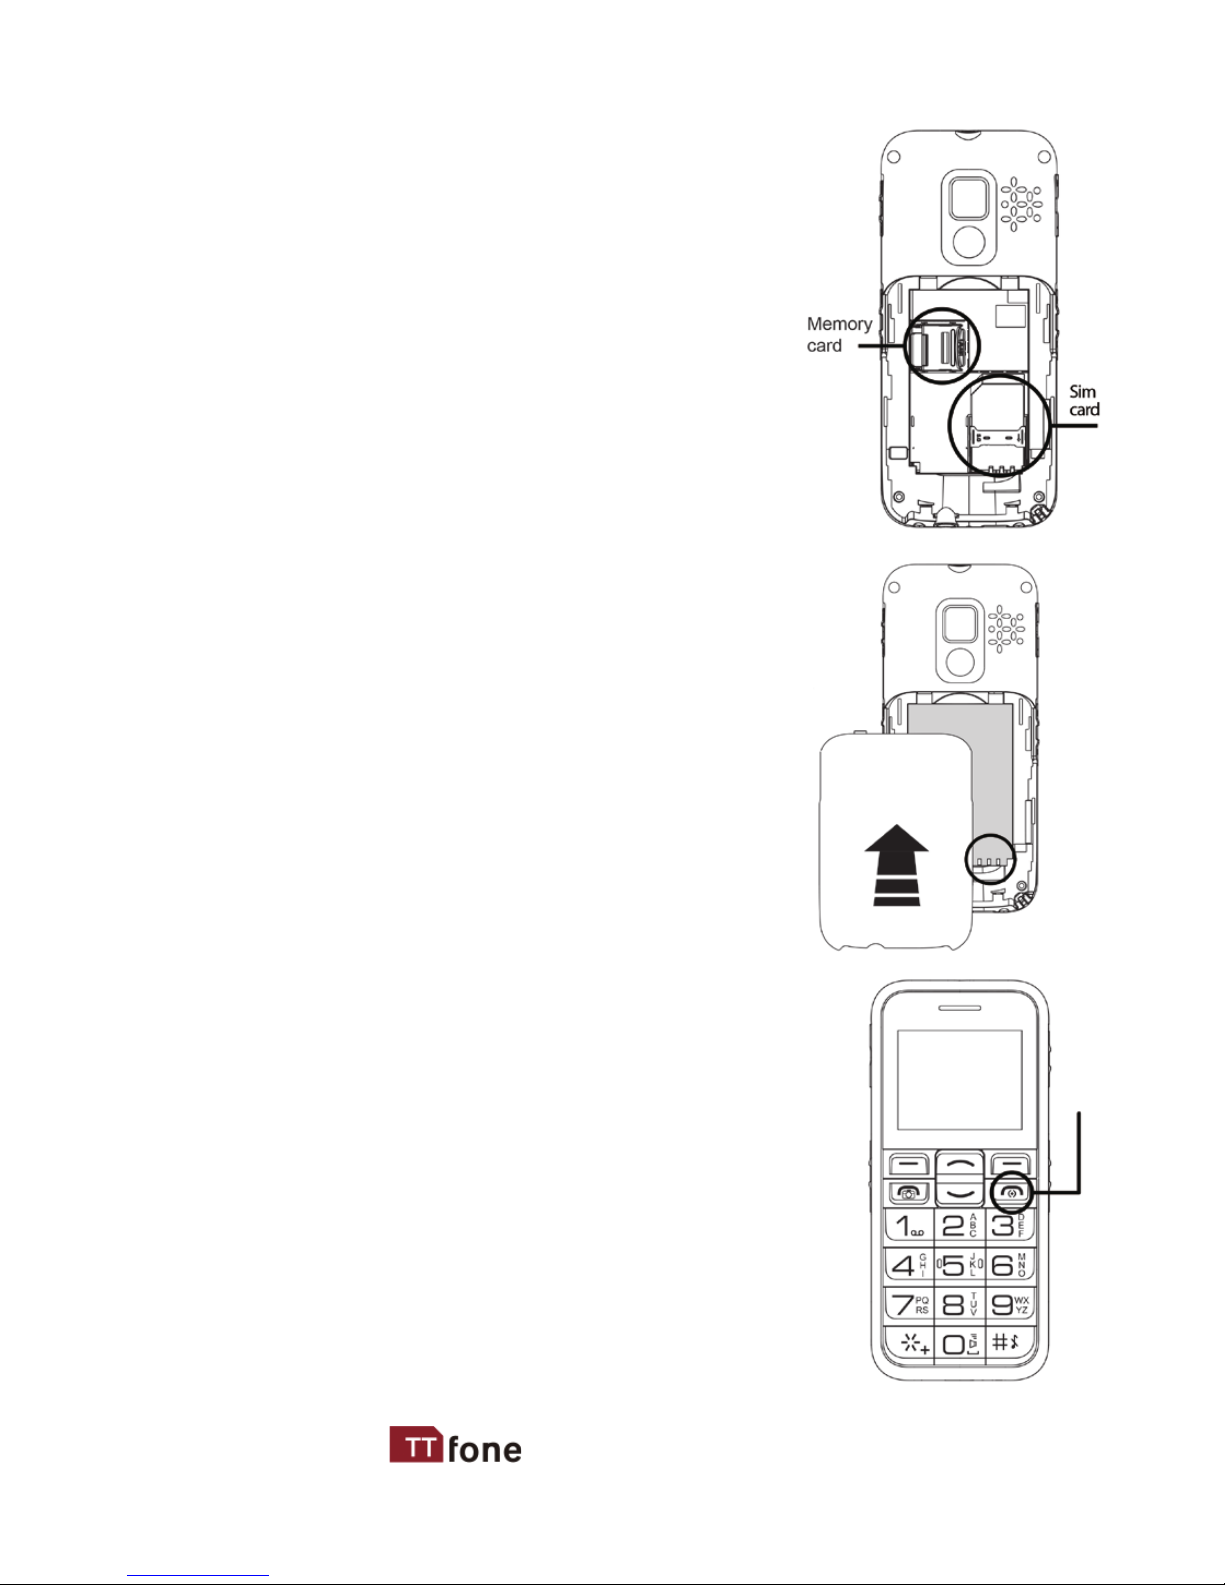
2. Install SIM card by sliding
it into its nest and under
the metal holding plate. (To
remove the SIM card, gently
press on it and slide it out of
its nest.)
3. Install the battery into the
battery slot, making sure
that the three metallic stripes
on the battery align with the
three metallic prongs in the
battery slot.
4. Put on the battery cover.
Make sure the cover is
completely matched and a
click sound can be heard.
5. To turn the phone on
press and hold the red key
until the screen lights up. To
turn it o press and hold the
same key until the phone
powers o.
Page 9
11www.ttfone.com
Charging the Battery
Battery can be charged when the
phone is either on or o. Please
make sure that the battery is
inserted into the phone before
charging.
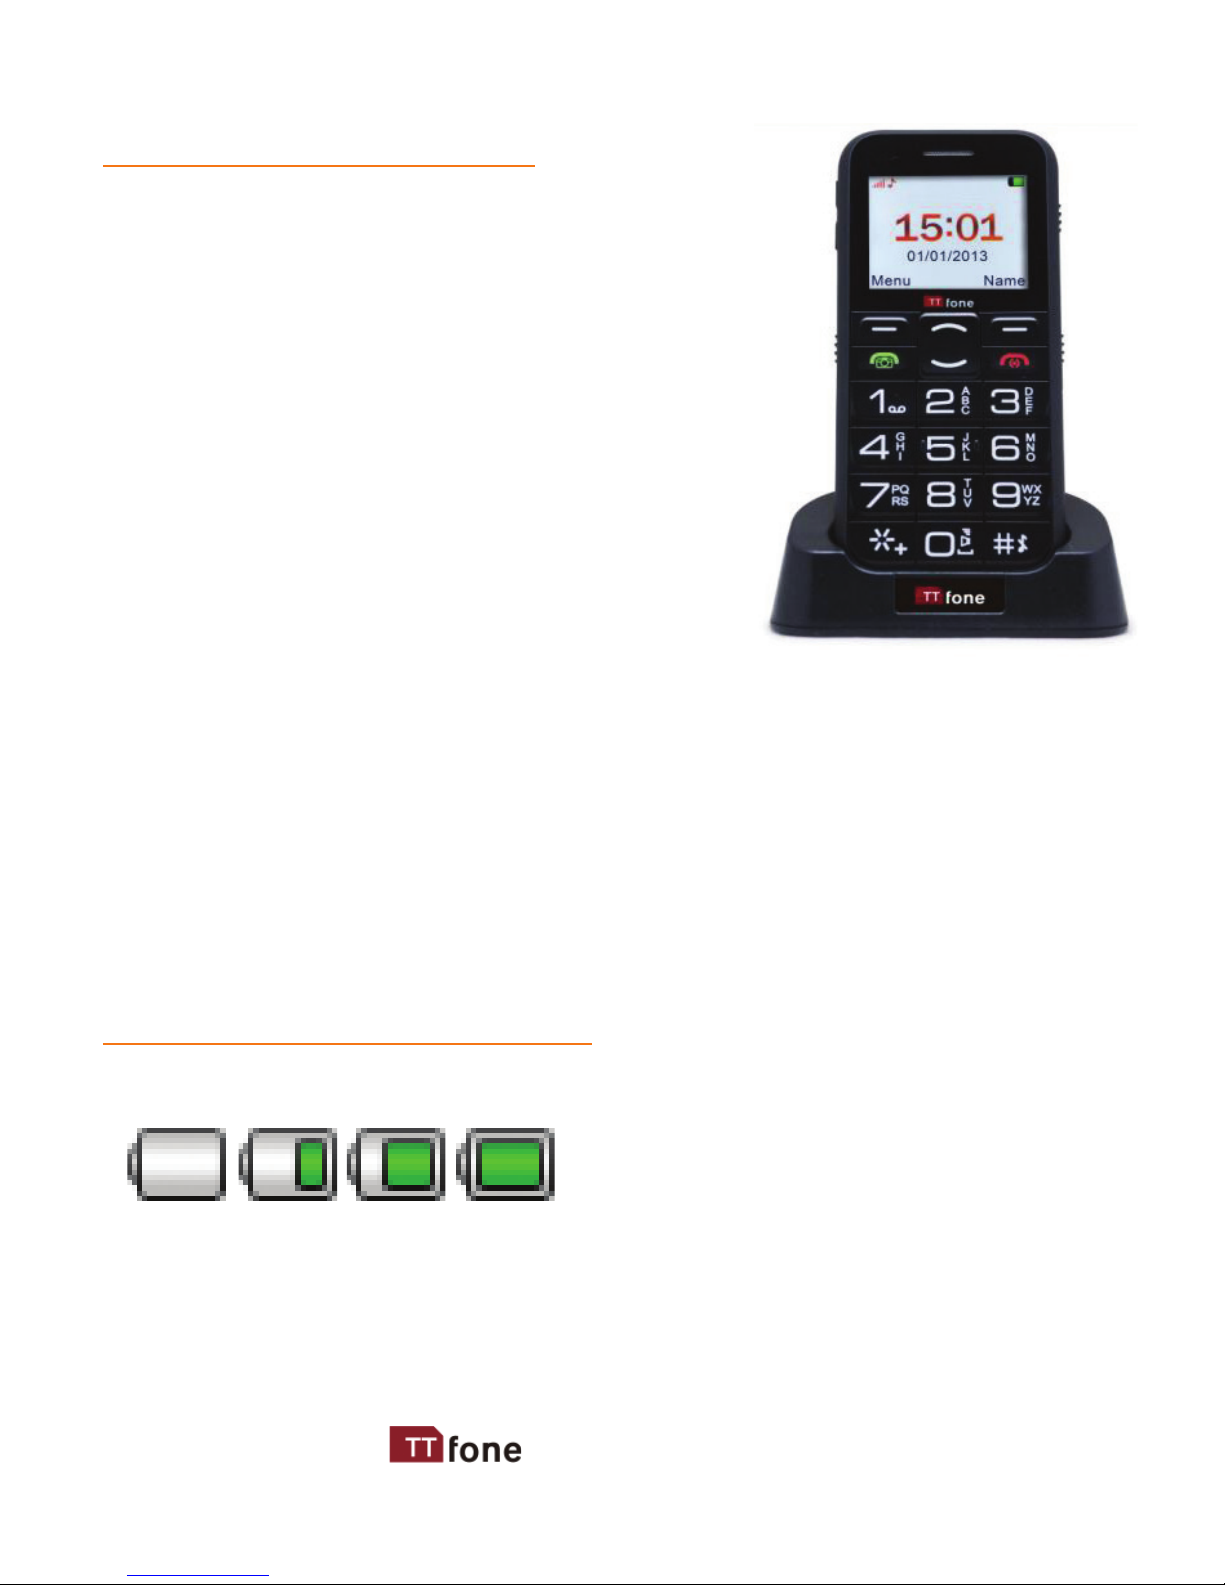
The TT900 also comes with a
desktop docking charger, to use it
simply plug the charger into the
slot on the back of the dock and
whenever you want to charge the
phone place it into the cradle.
Connect the charger to its port on the bottom panel
of the phone, and then plug it into the 240V electrical
outlet. To disconnect, rst unplug the charger from the
electrical outlet and then disconnect it from the phone.
Battery Level Indication
Charging Charged
The phone will sound an alert when the battery is low and
display a message of low battery on the screen.
Page 10

12 www.ttfone.com
3. Your Phone
Your phone is in Stand By mode when it is on but no
operation is chosen.
Page 11
13www.ttfone.com
Key Functions
Green Key - When in home screen use this key to enter your call logs,
use it to make calls once a number is highlighted also use this button to answer calls when the phone is ringing and to take a picture
when in camera mode.
Red Key - Hold down this button to turn on and o the phone, use this
button to end your call and reject calls that are incoming. Press this
key to return to the home screen at anytime.
Navigation Up Key - When in home screen use this key as a shortcut to
SMS messaging, use it to scroll up in the menu
Navigation Down Key - When in home screen use this key as a short-
cut to Alarm, use it to scroll down in the menu
Menu Left Key - This key will do what is written above it on the bottom
left of the screen, when in home screen press to access the menu
Page 12
14 www.ttfone.com
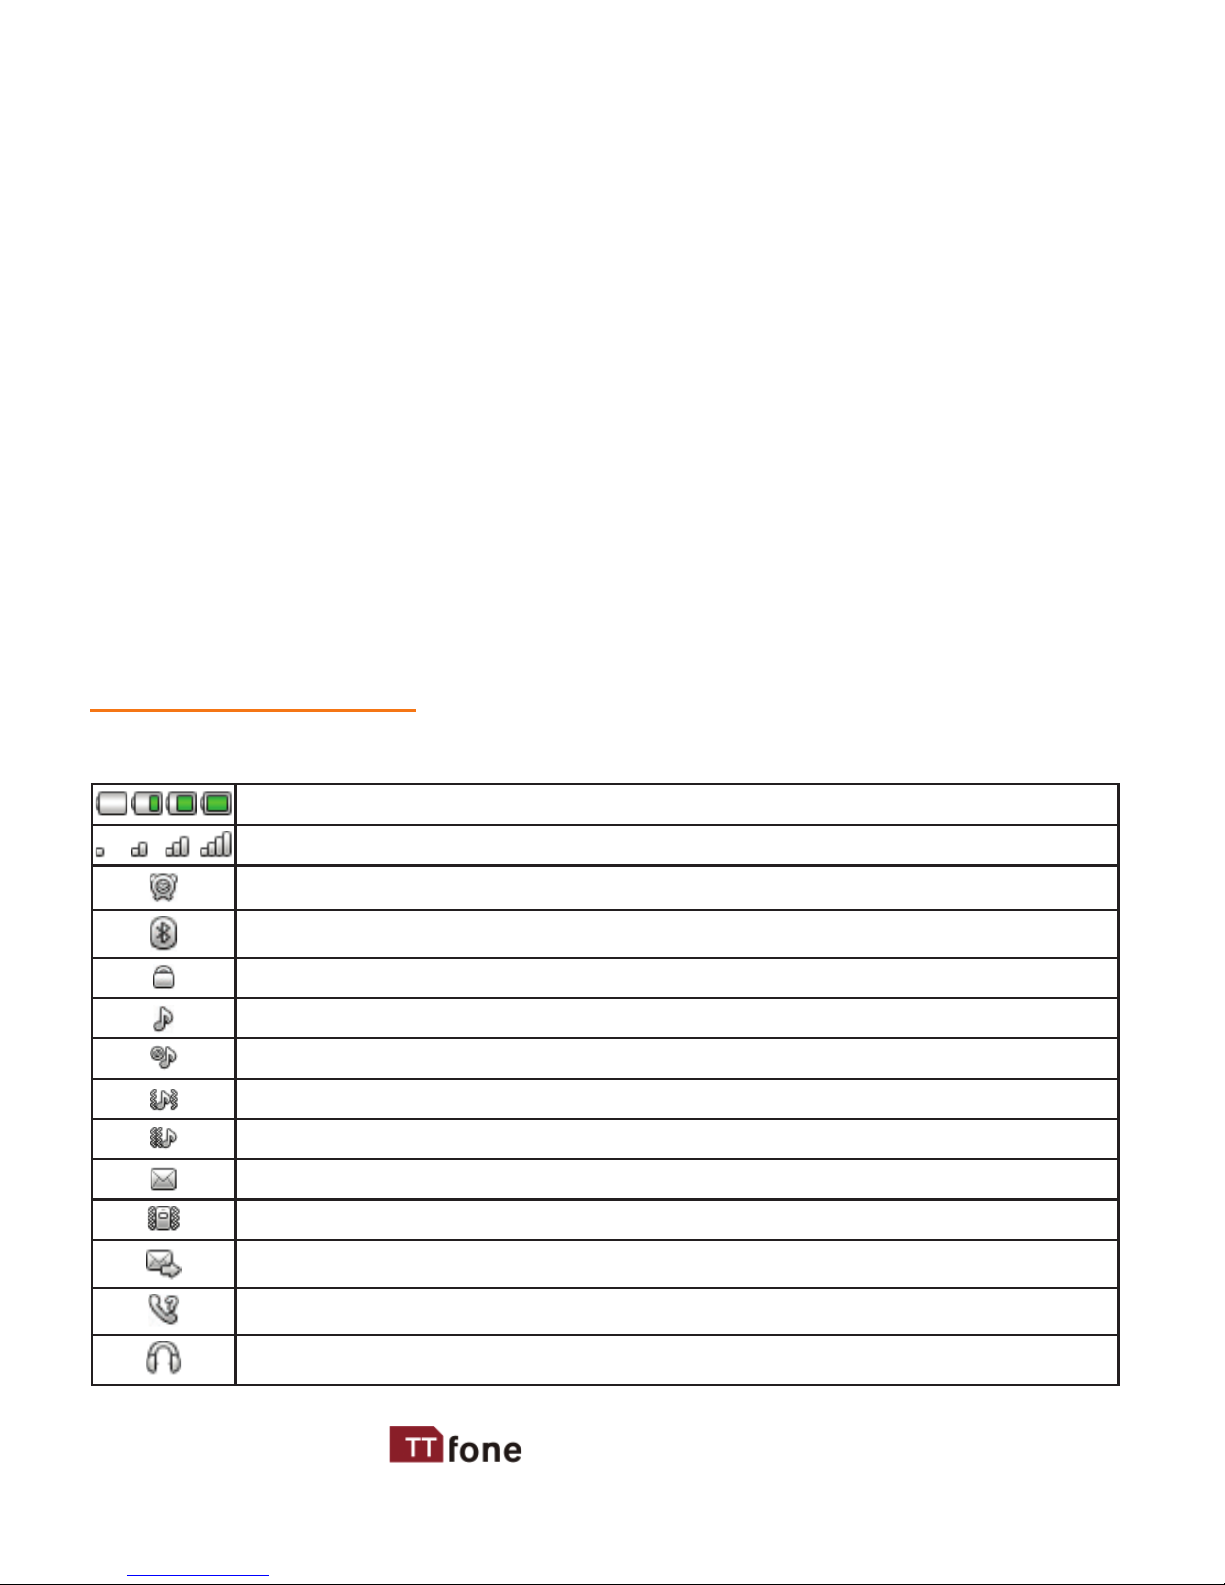
Icons on Screen
Following icons may be displayed on the screen:
Battery Status
Network Signal Status
Alarm
Bluetooth
Keypad locked
The phone in ring-down status
Silent mode is activated
The phone in Vib and ring status
The phone in vib rst and then ring status
New message
The phone in Vib status
Sending message
Missed call
Headset is Connected
Menu Right Key - This key will do what is written above it on the
bottom right of the screen, when in home screen press to access
the phonebook
# Key - Press and hold this key to activate silent mode press and hold
again to go back to General mode
* Key - Press and hold to access the international calling symbol + and
the pause P
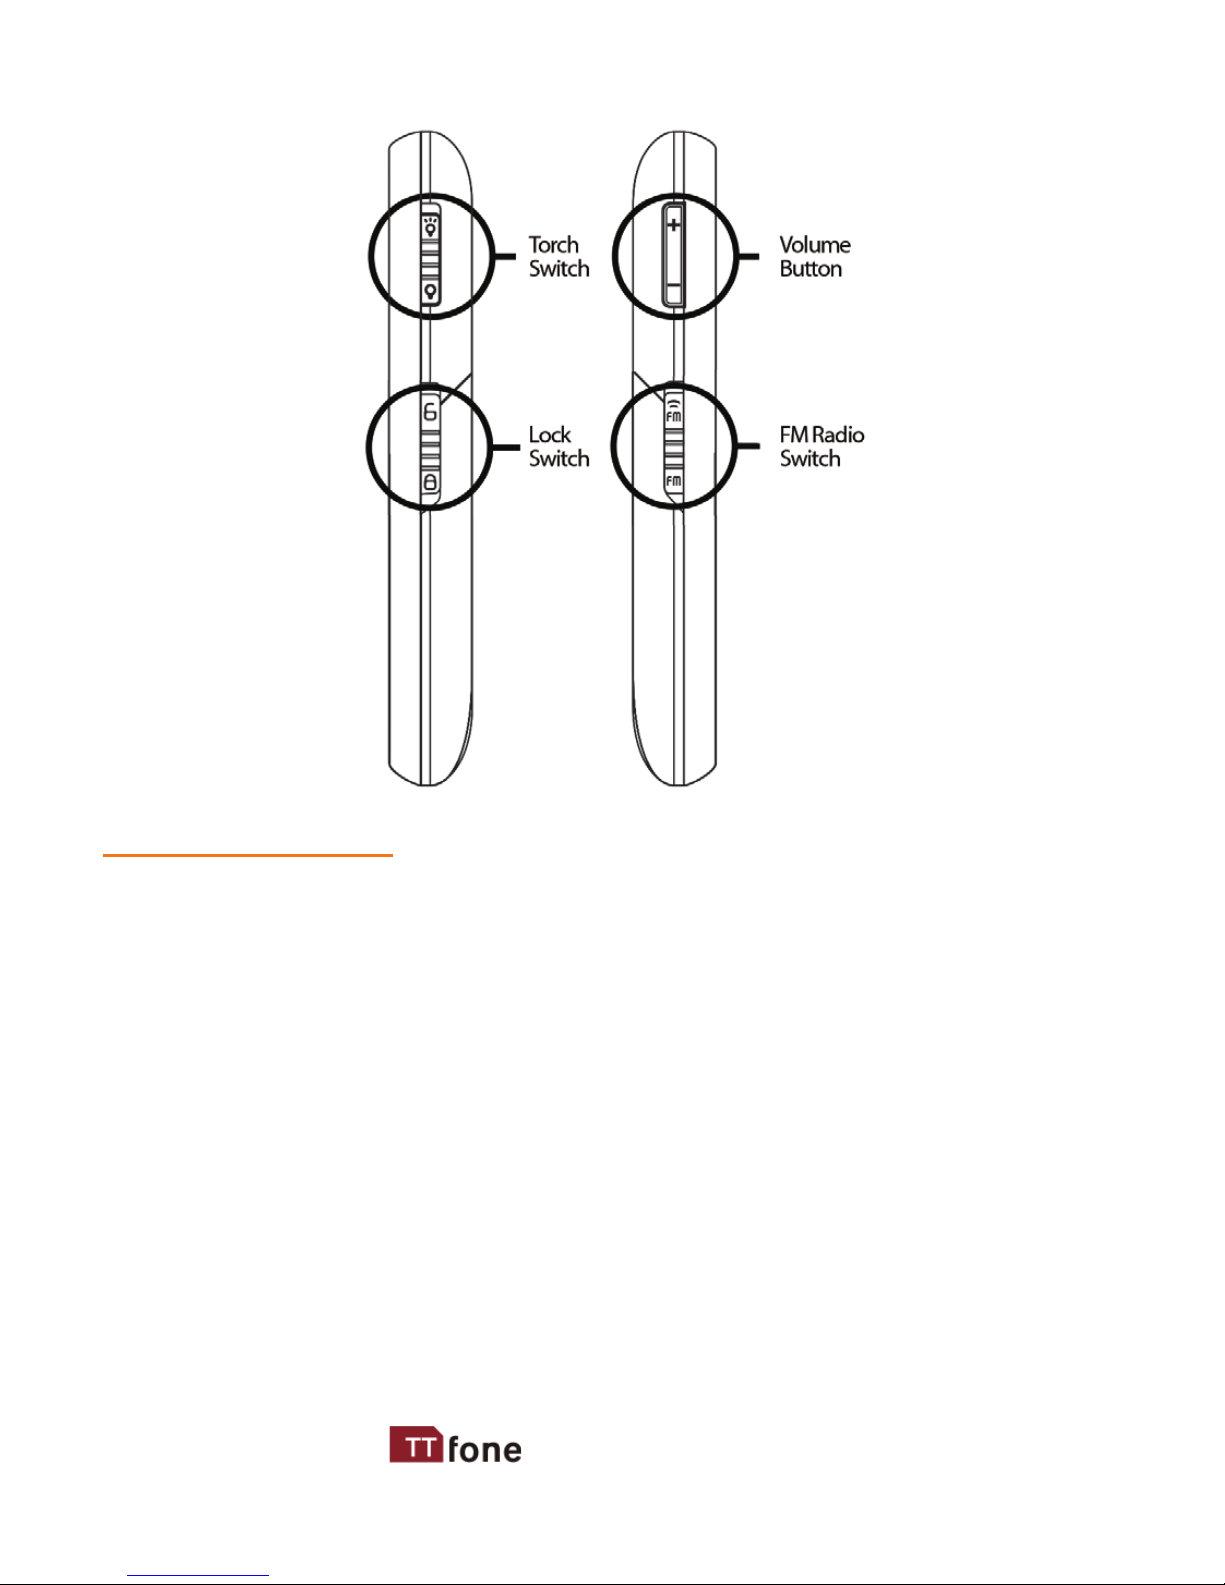
Volume Button - + for up and - for down
FM Radio Switch - Slide this up to switch on the radio
Torch Switch - Slide up to switch on the torch
Lock Switch - Up to unlock and down to lock the keypad
SOS Button - Press and hold to activate the Emergency feature, press
and hold again to cancel
Page 13

15www.ttfone.com
To Make Calls:
When the phone is in a standby, the number pad can be
used to insert the desired telephone number. To modify
the number you can use the up/down navigation keys,
the right menu key can be used to delete numbers. Press
the green key to dial the inputted telephone number; the
green key is also used to answer incoming phone calls.
To Answer Calls:
When your phone rings or vibrates, press the green key.
To End a Call:
The red end key is used to hang-up after a phone call, it
can also be used to reject an incoming phone call.
To Redial a Number:
From the home screen, press the green key to see a list of
call logs, scroll down to desired number by using the up
and down keys and once you nd the entry you want to
call press the green key.
4. Making and Receiving Phone Calls
Page 14

16 www.ttfone.com
Making International Calls:
- Hold down the Star “ * ” key a “+” character will appear
on the screen. Enter country code, area code and phone
number as instructed by your long distance network
service carrier. Press the green key.
- To display “P” or "W" symbols press and hold the “ * ” key
then when the + sign appears press “ * ” again
Volume Adjustment
During a normal or hands-free call connection, press and
hold the side Volume Control key to increase the volume.
Whilst in a phone call to reach max volume you can press
the Menu Right Key labelled H-Free, this is an aid for
users with a hearing aid.
5. Main Menu
To enter the main menu, press the left menu key. The up/
down navigation keys can then be used to scroll through
the menu use the left menu key to select.
Phonebook
Here you can view all your phonebook entries, use the
up/down navigation keys to scroll through or you can
use the search box.
Page 15

17www.ttfone.com
To add a new contact press the left menu key when the
words add new contact is highlighted on screen, this will
take you to the add contact options menu, choose the
rst option "select" choose to save on sim or phone, then
enter the name select "done" to save. Use the navigation
down button to enter the phone number in the same
manner. You can also assign a ringtone to the contact
here when nished select save to save the contact to
your phone book.
When a number is highlighted press the left menu key
to see the options menu for this number, here you can
choose:
1. View
2. Send Text Message
3. Call
4. Edit
5. Delete
6. Copy
7. Send Business Card
8. Mark Several
9. Groups
10. Phonebook settings
Page 16

18 www.ttfone.com
Phonebook settings
1. Preferred Storage - You can choose the storage path
for the current number.
2. Speed dial - Set up speed dial for fast and easy calling
3. Extra Numbers - Fixed Dial allows you to restrict your
outgoing calls to the limited set of phone numbers
that are included in the Fixed Dialing Number list.
4. Human Voice Prompt - When viewing your phone
book the phone can speak the phone number to you
5. Memory Status - You can view the current use status
of the phonebook, including SIM card and phone
memory. The display format is “Used/Total”.
6. Copy Contacts - Copy contacts from phone to sim and
vice versa
7. Move Contacts - Move contacts from phone to sim
and vice versa
8. Delete all contacts - You have two modes regarding
deletion: from the sim card or from the phone
Messaging
1. Write message - Here you can choose to write a Text or
Multimedia message, use the number keypad to enter the
corresponding letters. Use the Hash # button to toggle
between capital letters. When you have written your
message press the left menu key to go to the options
1. Send to - Enter the number or choose a contact from
your phonebook
Page 17

19www.ttfone.com
2. Insert Symbol - insert a symbol into your text message
3. Input Method - choose here the preferred default
input method
4. Input Method options – change the written language
5. Insert Template - pre-written messages consisting of
commonly used phases
6. Advanced - you can insert the number and name from
phonebook during editing the text message.
7. Save - save your message to send at another time
2. Inbox - where you can view, forward, delete your
received messages. Messages can also be moved/
copied to dierent memory stores using the
advanced menu
3. Drafts - this is where your draft messages can be
viewed.
4. Outbox - this is where not yet sent messages can be
viewed
5. Sent messages - this is where your sent messages can
be viewed
6. Service messages - messages related to your sim card
can be viewed
7. SMS Templates - pre-written messages consisting of
commonly used phases
8. SMS settings - change the network settings of
messaging options
9. Voicemail Server - change voicemail settings
Page 18

20 www.ttfone.com
Call Center
Acts as a history for all the phone calls you have missed,
received or dialled out. You can also check the duration
of your incoming and outgoing calls.
1. Missed Calls - shows the recent calls that you have
missed or failed to answer. From here you can view the
time/date of the phone call and redial the number.
2. Dialled Calls - allows access to the recent outgoing
phone calls history. From here you can view the call
duration, time/date of the phone call and redial the
number.
3. Received Calls - shows the incoming call history. From
here you can view the call duration, time/date of the
phone call and redial the number.
4. Delete call logs - allows you to delete the call history,
either separately or all the call logs at once.
5. Call timers - this menu allows you to view the
duration of dialled, received calls and the last call.
From within the menu you can also reset the timers
Multimedia
Please Note
A Micro SD memory card will need to be inserted in order
to use some of these functions, this is not included and
can be purchased separately. We recommend no larger
than 8MB card should be used for optimum performance.
Page 19
21www.ttfone.com
1. File Manager - From here you can manage your multi-
media and other les that you may have stored within
your memory card or in the phone. The le manager
also shows the total space within your memory card
and also the amount of free space available for use.
2. Camera - Use the green key to take pictures, the left
menu key will take you to the camera options and the
right menu key to exit. With this function, you can use
the inbuilt camera to take photos. The lens of the camera is located on the back of the phone and the screen is
used as the viewing window. All photos taken are in JPG
form. After downloading the photos onto PC, you need
some software to view them. If the storage space of the
mobile phone is insucient to store the taken photos, it
is necessary to delete some old photos or other les in
“File Management” function list to release more space.
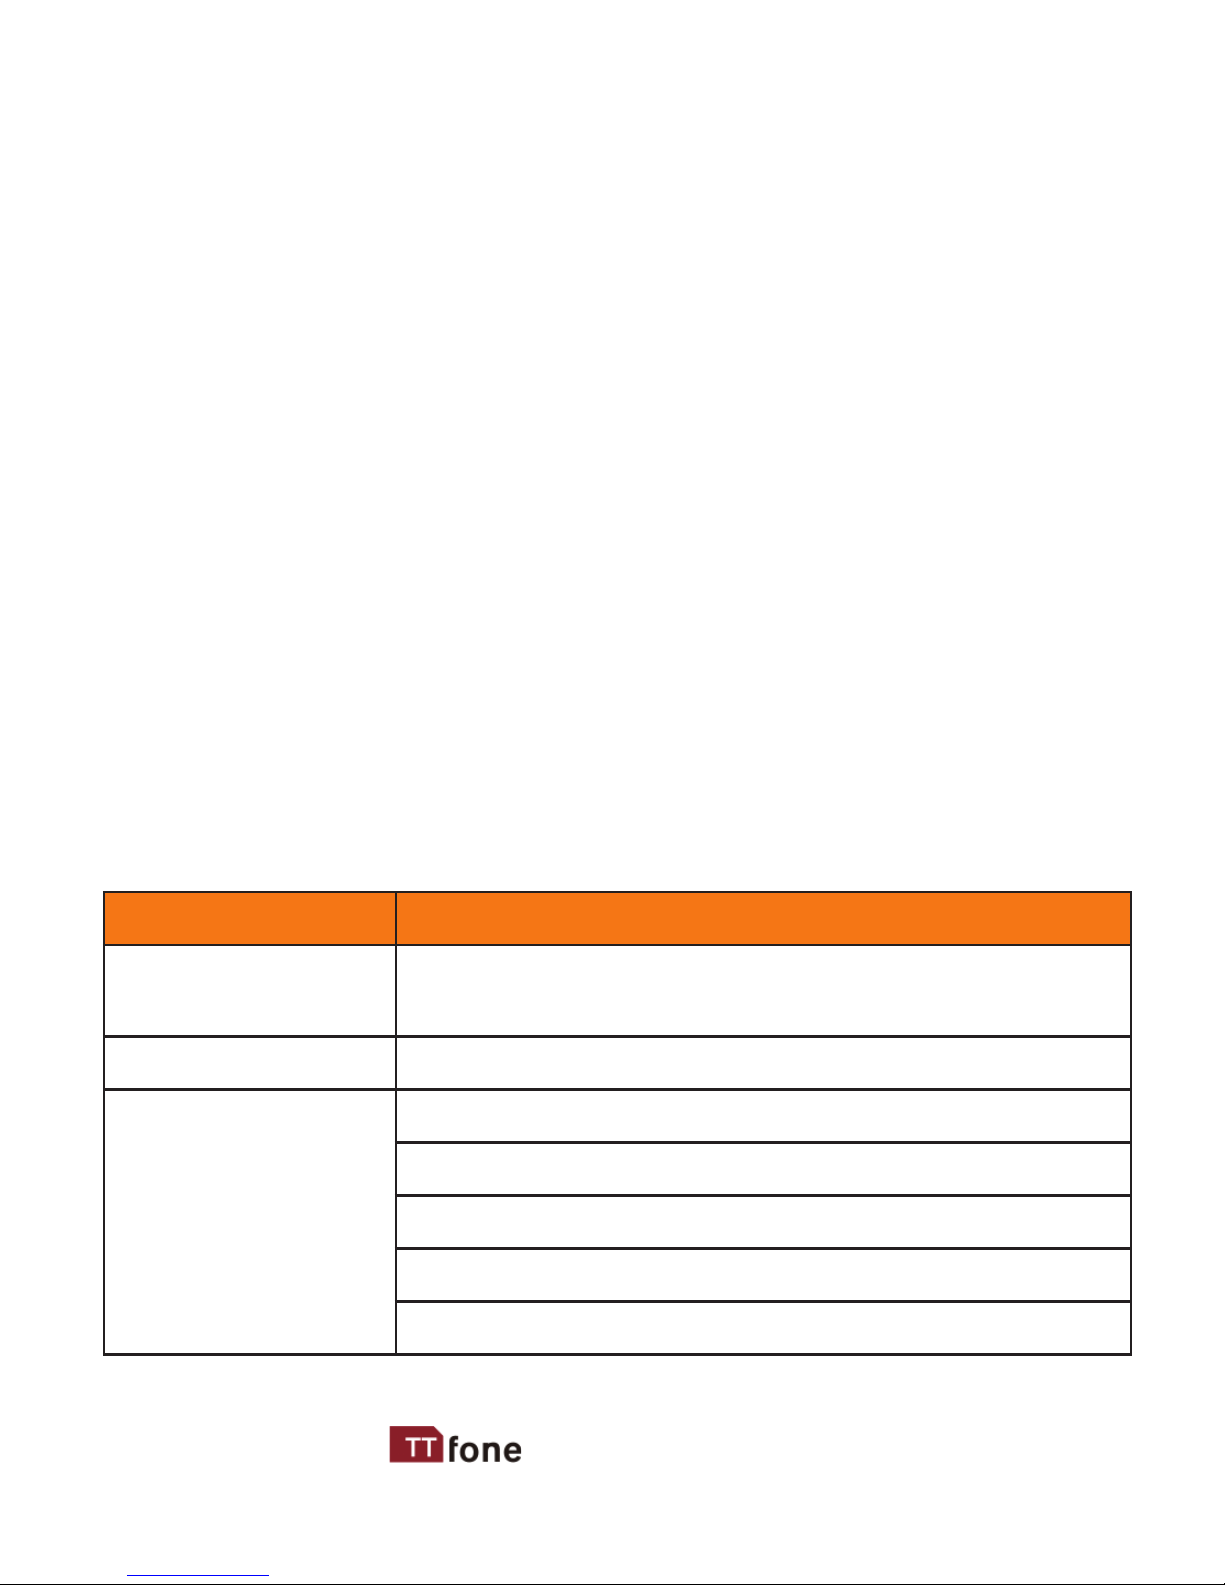
Options Description
Switch to video
recorder
To switch to video recorder.
Photos To view the saved photos.
Camera Settings
Shutter Sound: sound 1, sound 2, sound 3 & o
EV: EV-2——EV+2.
Anti-icker: 50Hz (default), 60Hz.
Contrast: High, Medium & Low
Delay Timer: 5s, 10s, 15s or O.
Page 20
22 www.ttfone.com
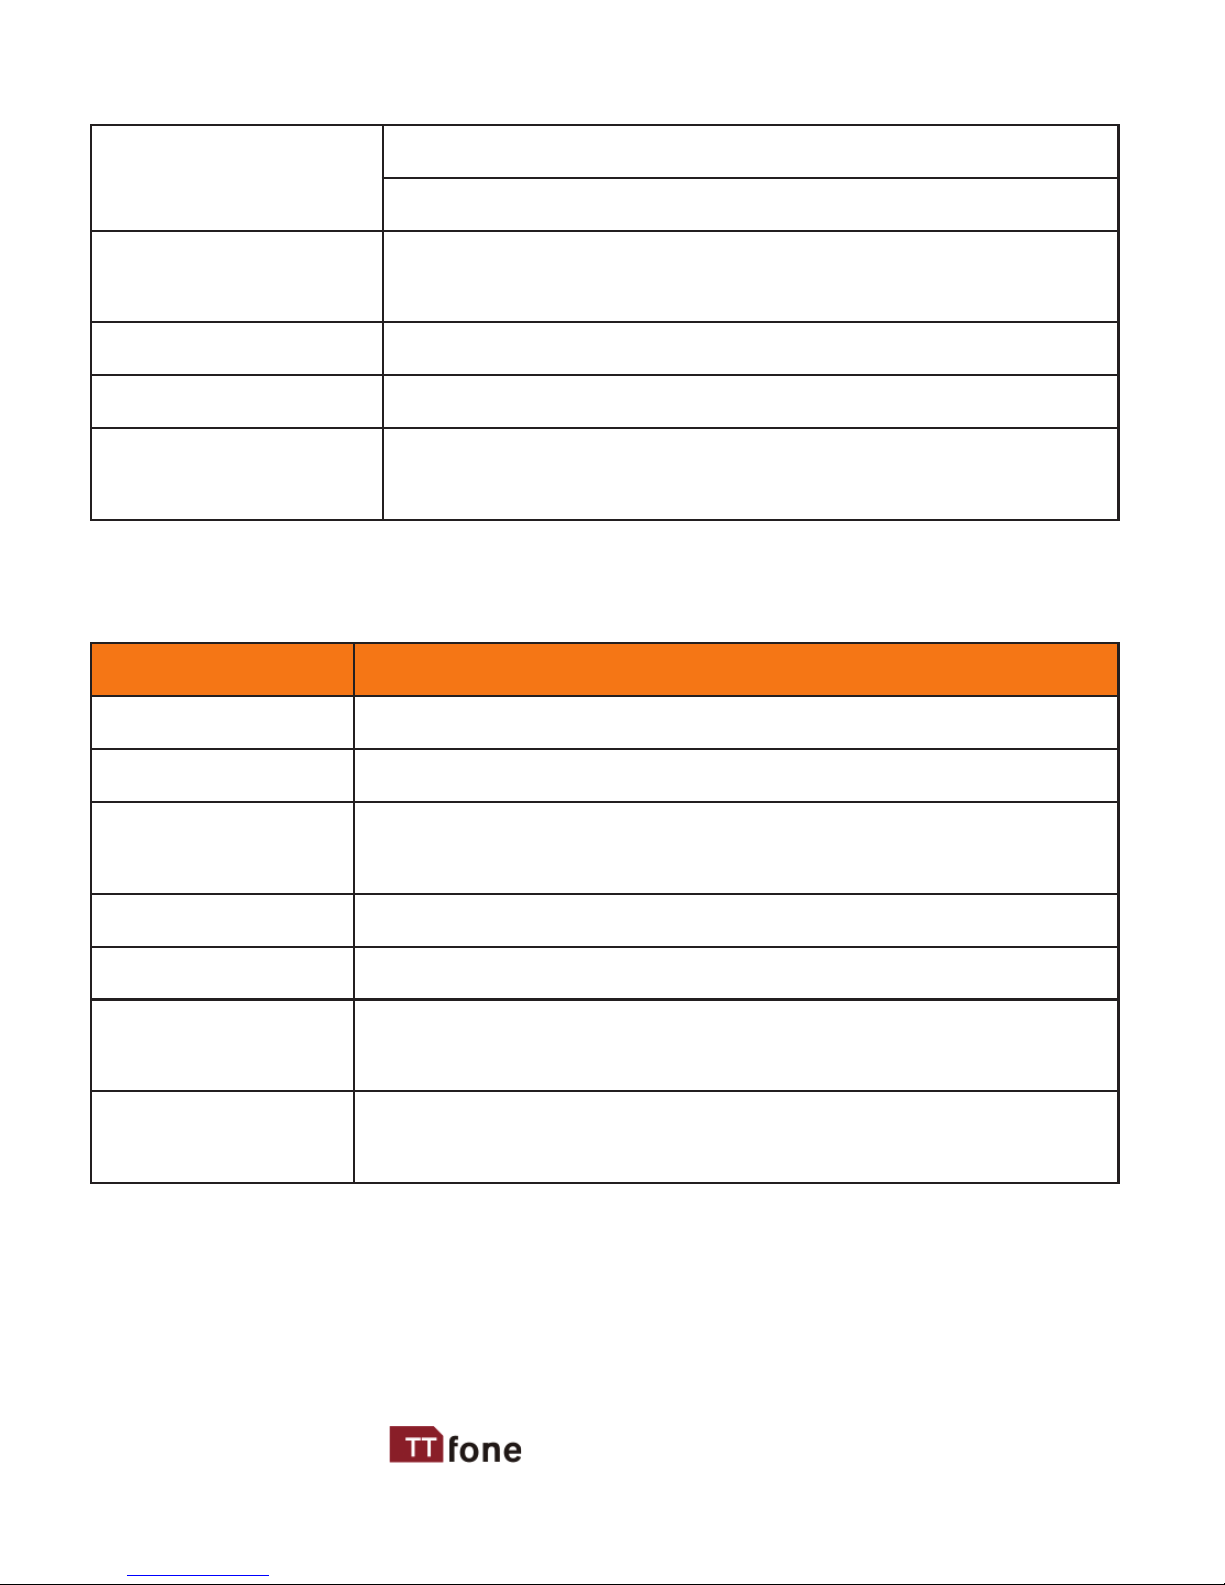
Image Settings
Size: 80*60, 160*120, 320*240, 640*480
Quality: Good, Normal, Low.
White Balance
Auto, Daylight, Tungsten, Fluorescent, Cloudy,
Incandescence.
Scene Mode Auto, Night.
Storage Phone, Memory Card.
Restore Default
You can restore the recorder to factory
settings.
3. Image viewer - View all the photos taken and stored
on your handset and on the Micro SD card.
Options Description
View You can view the selected photos
Send As multimedia message; via Bluetooth
Use as
You can send photo to wallpaper, Screen saver,
power on display, power o display, call picture
Rename You can rename the selected photo
Delete You can delete the selected photo
Storage
You can choose photos storage path (to phone
or memory card)
Image
information
You can look up the image info
4. Video recorder - press the green key to start/stop
recording use the navigation up/down keys for zoom
option and press the right menu key to exit. The duration
of recording depends on the time limit set and le
Page 21
23www.ttfone.com
management capacity. Entering the options, you can
have the following settings:
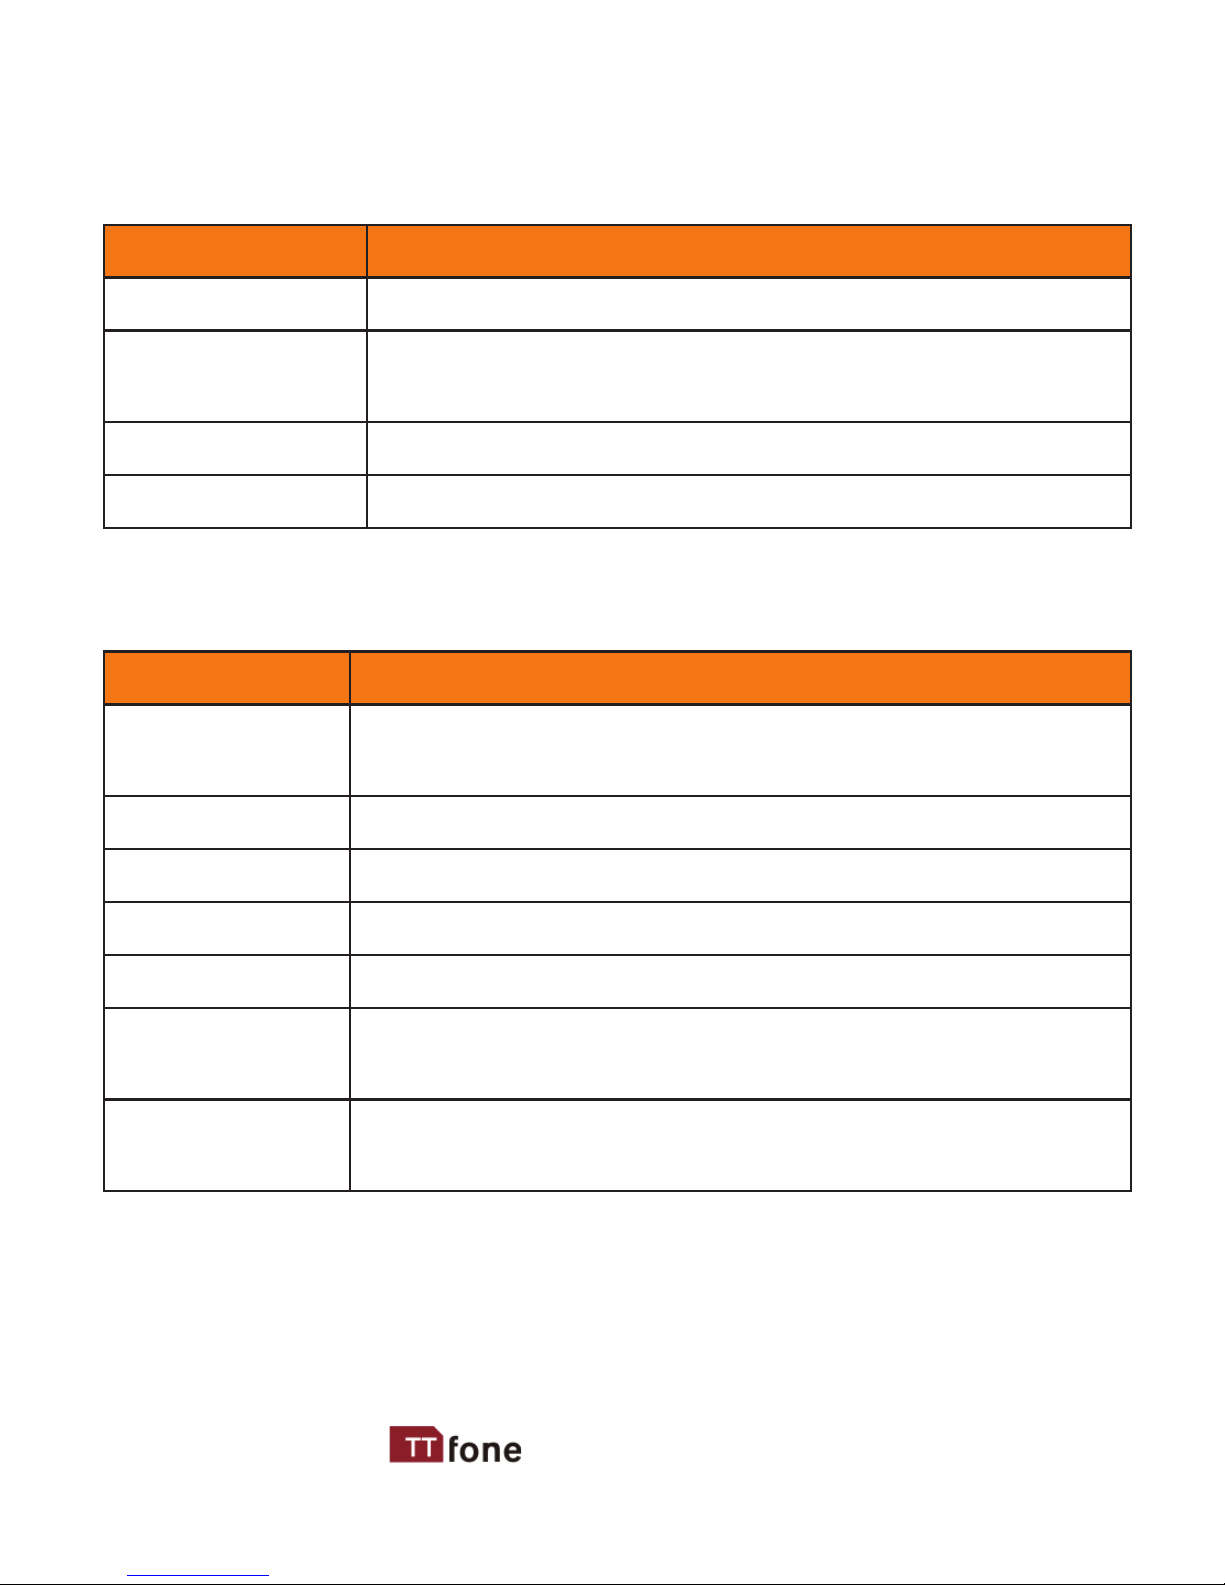
Options Description
Switch to camera
To switch to camera mode
Camcorder
Settings
You can set Anti-icker
Video Settings You can set Video Quality
Storage Choose to store in Phone or Memory card
Video player - View all the videos taken and stored on
your handset and on the Micro SD card.
Options Description
Play
It supports the videos in AVI and will not be
limited by le size. Click the play interface to play
Send As multimedia message; via Bluetooth
Rename You can rename the specied video
Delete You can delete the specied videos
Delete All les You can delete all les
Sort by
For convenience of search, you can rank them as
per name, type, time and size or choose “None”
Storage
You can choose video storage path (to phone or
memory card).
Page 22
24 www.ttfone.com
6. Audio player - here you can play your music les, use
the left menu key to list your music.
Options Description
Add Add tracks to the playlist
Settings
Play Settings: Tracklist path, automatic tracklist,
repeat, shue, background play
To download music, you must insert the Micro SD memory
card into the mobile phone, switch o the mobile phone,
connect the mobile phone and PC with USB cable, then the
PC will detect the new hardware and create a new mobile
hard drive. Download the chosen MP3 le to under “My
Music” of the mobile disk drive rather than in such folders
as Audio, Images and Photos; otherwise, the le cannot be
played. (Only music in MP3, AMR and MIDI are supported).
7. Sound recorder - press the up navigation key to start
recording, press it again to pause and press the right
menu key to nish and save.
- New record: You can record new les.
- List: You can view all les.
- Settings: You can set the storage position for record
les, including phone and memory card. Also you can set
the format of the record le, including AMR and WAV. As
followings, you can set audio quality either Low or High.
Page 23
25www.ttfone.com
Options Description
New record To start a new recording
List List recordings
Settings You can choose the storage
Play Play the current recording
Please Note
A Micro SD memory card will need to be inserted in
order to use some of these functions, this is not included
and can be purchased separately. We recommend no
larger than 8MB card should be used for optimum
performance.
Settings
The individual phone settings can be changed from
within this menu.
1. Proles
You can use proles to set and customise the ringing
tones, message alert tones and other tones for dierent
situations. To change a prole press the left menu key
to enter the menu then scroll to “Settings” and select
“Proles” here you can activate or customise each prole
Customise Menu
Once you have selected the prole you will have the
option to customise it with these options
Alert type - choose ring and vibrate options
Page 24

26 www.ttfone.com
Ring type - repeat, ascending or beep once
Ringtone - choose your ring tone for an incoming call
Ringtone volume - the volume level for incoming calls
Message - choose your tone for an incoming message
Message volume - the volume level for incoming
message
Keypad - choose between tone, click, silent or human
voice tone (speaking numbers)
Keypad volume - the volume level for the keypad
System alert - once have abnormaly operation on the
phone with warning sound while you set it "On"
Intelligent call alert - switch on the option for a human
voice to read out the number that is calling you.
2. Time and date
From this menu you can change/set the time and date
also the format (12hour/24hour clock) of the time display.
3. Phone Settings
Schedule power on/o - schedule the phone to switch
on or o
Language - change the language the phone displays
Writing language - change the language for writing text
messages
Dedicated key - change the shortcut options for the up/
down navigation key
Flight mode - use this to switch o GSM signals
Font size - change the size of the font on screen
Page 25

27www.ttfone.com
Misc settings - LCD Backlight - choose the brightness
and the time it stays lit without pressing any buttons
- note the brighter and longer you set this the more
battery power it will consume
4. Emergency Settings
Emergency Button - switch on or o the emergency
button feature
Emergency contacts - here you can set the ve
emergency numbers either by manual input or you
can choose from your phonebook.
SOS Volume - set the volume of the emergency sound
made when the button is pressed
User Information - here you can type your name
Important Notice: Wireless phones, including this device,
operate using radio signals, wireless networks, landline
networks, and user-programmed functions. Because of
this, connections in all conditions and/or locations cannot
be guaranteed. You should never rely solely on any
wireless device for medical emergency communication.
You can set the emergency numbers in the phone
according to your requirement, you can set a total of up
to 5 emergency numbers.
In case of an emergency, when the SOS button is pushed
down the phone will automatically send a text message
to the emergency numbers set up on the phone. The
mobile phone will then make the emergency call . If
Page 26

28 www.ttfone.com
the rst call fails, the phone will proceed to dialling the
second emergency number. In this manner the phone
will circulate the emergency contact numbers 3 times in
order to receive an answer. The phone will also sound an
alarm when an emergency call or message is sent.
To cancel the SOS emergency call hold down the SOS
button again for a few seconds till you see SOS End on
the screen
Attention!
Emergency SOS button will only make calls if a SIM
card has been inserted into the mobile.
5. Call Settings
Call waiting - from here you can activate/deactivate call
waiting, this service allows for people to be put on
hold when you receive a call while you are already
using the phone in a call
Call divert - set your call divert status from this menu.
Calls that you receive while your line is busy will be
diverted, you can also set when a phone call should
be diverted.
Call Barring - outgoing/incoming calls can be barred. A
password is required to activate this option. This you
will need to get from your network provider.
Advanced Settings - here you can access the blacklist
menu, auto redial, set call time reminders, reject by
SMS and change the answer mode.
Page 27

29www.ttfone.com
5. Display
Wallpapers - change the home screen background display
Auto keypad lock - choose how long to wait till auto
keypad lock is activated
Show date and time - choose to show the date and time
on the home screen
7. Connectivity
The mobile phone supports Bluetooth function. You
can use Bluetooth wireless technology to set wireless
connection with other compatible devices, including
mobile phones, computers, headsets, in-car accessories
etc. With Bluetooth function, you can send photos, video
segments, audio segments, personal business card and
memos. You can also establish wireless connection with
the a compatible PC to transmit les.
Try to keep the two devices you are connecting through
Bluetooth close together while they are in use. Most Bluetooth headsets have a range of 10 meters. If possible, try to
keep your phone on a chair beside you or nearby while talking on your headset to ensure the best connection. When
using your computer, try putting your phone on the desk
beside your monitor to ensure the best connection possible.
Power: Before using Bluetooth function, you need to
activate this option, allowing this function to operate
in the background will consume more power. It is
recommended to close this function when it is idle.
Page 28

30 www.ttfone.com
Visibility: After this option is activated, other peripheral
devices supporting Bluetooth wireless technology can
see your device and its name via search.
My Device: After entering this option, you will see the
Bluetooth devices compatible with the mobile phone.
Entering options, you can have necessary operations
on the desired Bluetooth device or search incompatible
Bluetooth devices.
My name: Edit the name of the device here.
Pair Devices
Have one of the devices “search for new devices” to nd the
other. Typically you want a phone to search for your headset or audio speaker rather than the other way around. The
Search function is located within the Bluetooth menu in the
connection settings option in your phone. Go to “My Devices”
and locate your other device. Once your phone nds the other
device enter the “pairing code” for the device to link the two
together. The pairing code is typically located on a sticker on
the back of a headset or in the instruction book for a device.
8. Network settings
In this menu you can select and change networks.
9. Security settings
Sim Security - activate/change your sim card pin code
Phone security - activate/change your phone secuirty
code (default password is 1122).
Page 29

31www.ttfone.com
10. Restore settings
This option allows you to restore all the settings on the
phone back to the original manufacturer’s settings. The
phone will change the settings back to those which the
phone came with. A password is required to activate this
option. (default password is 1122).
Alarm Clock
The time format for the alarm clock is identical to that of
clock. When the mobile phone is o, the alarm clock can
still work provided the battery is sucient. The system has
5 alarm clock options, you can activate one option or all
options according to the actual demand. Every alarm clock
option can set independent time and date. When the time
is reached, the mobile phone will give out alert tone and
icker the current time and date on the screen. Press Stop
to stop alarm clock; press Sleep, then the mobile phone
will pause ringing and continue after 4min.
If alarm time is reached but the mobile phone is switched
o, then the mobile phone will be switch on automatically
and ring. If Stop is pressed, then the mobile phone will ask
you whether to switch on the mobile phone. Press “No”
to switch o the mobile phone and “Yes” to register at the
network and switch on the mobile phone.
Page 30

32 www.ttfone.com
Organiser
Calendar - view your calendar and add/edit events
Calculator - enter the numbers and use the up/down
navigation keys to select an equation, press the left
menu key for the answer
To do list - a handy task list with alarms and priority
status.
Torch
The switch on the top right side of the phone is to
activate the Torch function
FM Radio
The switch on the left side of the phone is to activate the
FM radio function, use the up/down navigation keys to
scan through stations
Listen to the radio on the speaker phone or connect the
headset into the headset jack.
*The quality of radio sound depends on signal quality at
your particular location. The headphones act as an aerial so
you will get better reception when they are plugged in.
Page 31
33www.ttfone.com
6. Troubleshooting
Problems Solutions
Phone does not
turn on
1. Ensure you have held the power button
down for more than 5 seconds.
2. Re-insert the battery and retry phone boot.
3. Plug charger into the phone and make sure
the battery is charged.
Cannot connect
to a network
1. Signal strength may be weak, try move
location and try again.
2. It may be possible that you are using the
phone beyond the network service coverage
area.
3. Check to make sure your SIM card is insert-
ed correctly and is valid. (contact network
provider)
No information
displayed when
phone is on
1. Check SIM card is correctly installed.
2. You may need to unlock your key-pad
using the button on the side of the phone or
your keypad (password maybe required).
3. You may have permanently locked your
phone by entering the pin code incorrectly
3 times, obtain your PUK code from your
network provider.
4. Increase the screen brightness in settings.
Page 32
34 www.ttfone.com
Phone call
quality poor
1. Increase the call volume use (+ -) key on
the side of the phone.
2. It may be that the network reception is
poor in your location. Try moving to another
area to achieve a better connection.
Shorter
Standby Time
1. Standby time is related to system settings,
in poor areas of reception the phone will use
more battery to try and nd a base station, in
this event the standby time will be reduced
to save battery power.
2. It could also be the case that the battery of
the phone has become exhausted, you may
need to consider changing the battery.
SIM card Error
1. Reinstall the SIM card into the phone, ensure
the metal contact is clean, wipe gently with a
clean cloth before inserting into the phone.
2. SIM card may not be correctly installed.
3. If the SIM card is damaged contact your
service provider.
Some feature
do not operate
or cannot be
set
1. This could be due to an operation error
on the phone, switch mobile phone o and
restart after 30 seconds.
2. The network provider may not support the
feature you are trying to use and this may
prevent its use.
Page 33
35www.ttfone.com
Cannot receive
incoming calls
1. Ensure your mobile phone is switched on
and connected to a network.
2. Make sure your SIM card is correctly installed.
3. Call restrictions may be prohibiting incoming phone calls, so these settings must be
checked.
4. Poor areas of network coverage can prevent
incoming calls so check the network status of
your phone
Phone not
charging
1. Bad connections can hinder the phone
charging; make sure all contacts are correctly
connected.
2. Check to see whether the phone charging
slot or the charge itself is damaged. If so dis-
continue use. Replace battery or charger.
3. The phone cannot be charged in tempera-
ture below 10˚C or above 55˚C.
Does not dial
numbers
1. Conrm that once the number is inputted
using the keypad the green call button must
be pressed to dial the phone number.
2. Check the phone number entered is
correct.
3. Check reception coverage status of your
mobile phone.
4. Make sure the call restriction settings are
correct in order for you to dial outgoing calls.
Page 34

36 www.ttfone.com
This device meets international guidelines for exposure to radio
waves your mobile device is a radio transmitter and receiver. It is
designed and manufactured not to exceed the limits for exposure
to radio frequency (rf ) recommended by international guidelines
(icnirp). These limits are part of comprehensive guidelines and
establish permitted levels of rf energy for the general population. The
guidelines were developed by independent scientic organizations
through periodic and thorough evaluation of scientic studies. The
exposure standard for mobile devices employs a unit of measurement
known as the specic absorption rate, or sar. Although the sar is
determined at the highest certied power level, the actual sar of the
device while operating can be well below the maximum value. This
is because the device is designed to operate at multiple power levels
so as to use only the power required to reach the network. In general,
the closer you are to a base station, the lower is the power output of
the device. Sar values may vary depending on national reporting and
testing requirements and the network band. Use of device accessories
and enhancements may result in dierent sar values.
The sar limit for mobile devices used by the public is 2.0 W/
kg (watts per kilogram) averaged over 10 grams of body tissue.
The guidelines incorporate a substantial margin of safety to give
additional protection for the public and to account for any variations
in measurements. The highest sar value this model phone tested for
while in use is:
Gsm 900:0.622W/kg(10g), dcs 1800: 0.42W/kg(10g)
Check out our other fantastic range
Of products at www.ttfone.com
7. Radio Frequency (RF) Exposure and SAR
 Loading...