

Page 1

www.ttfone.com www.ttfone.com
Thank you for choosing our mobile phone!
Please read this manual before use.
We reserve the right to upgrade the software and
product and/or to make changes to this user
manual without prior notice.
The icons in this user manual may slightly dier
from your phone, depending on the phone you
purchased. All rights reserved.
2
Contents
1. Safety Instructions.................................................... 5
2. Getting Started .......................................................... 8
Install the SIM Card and Battery ...................... 8/9
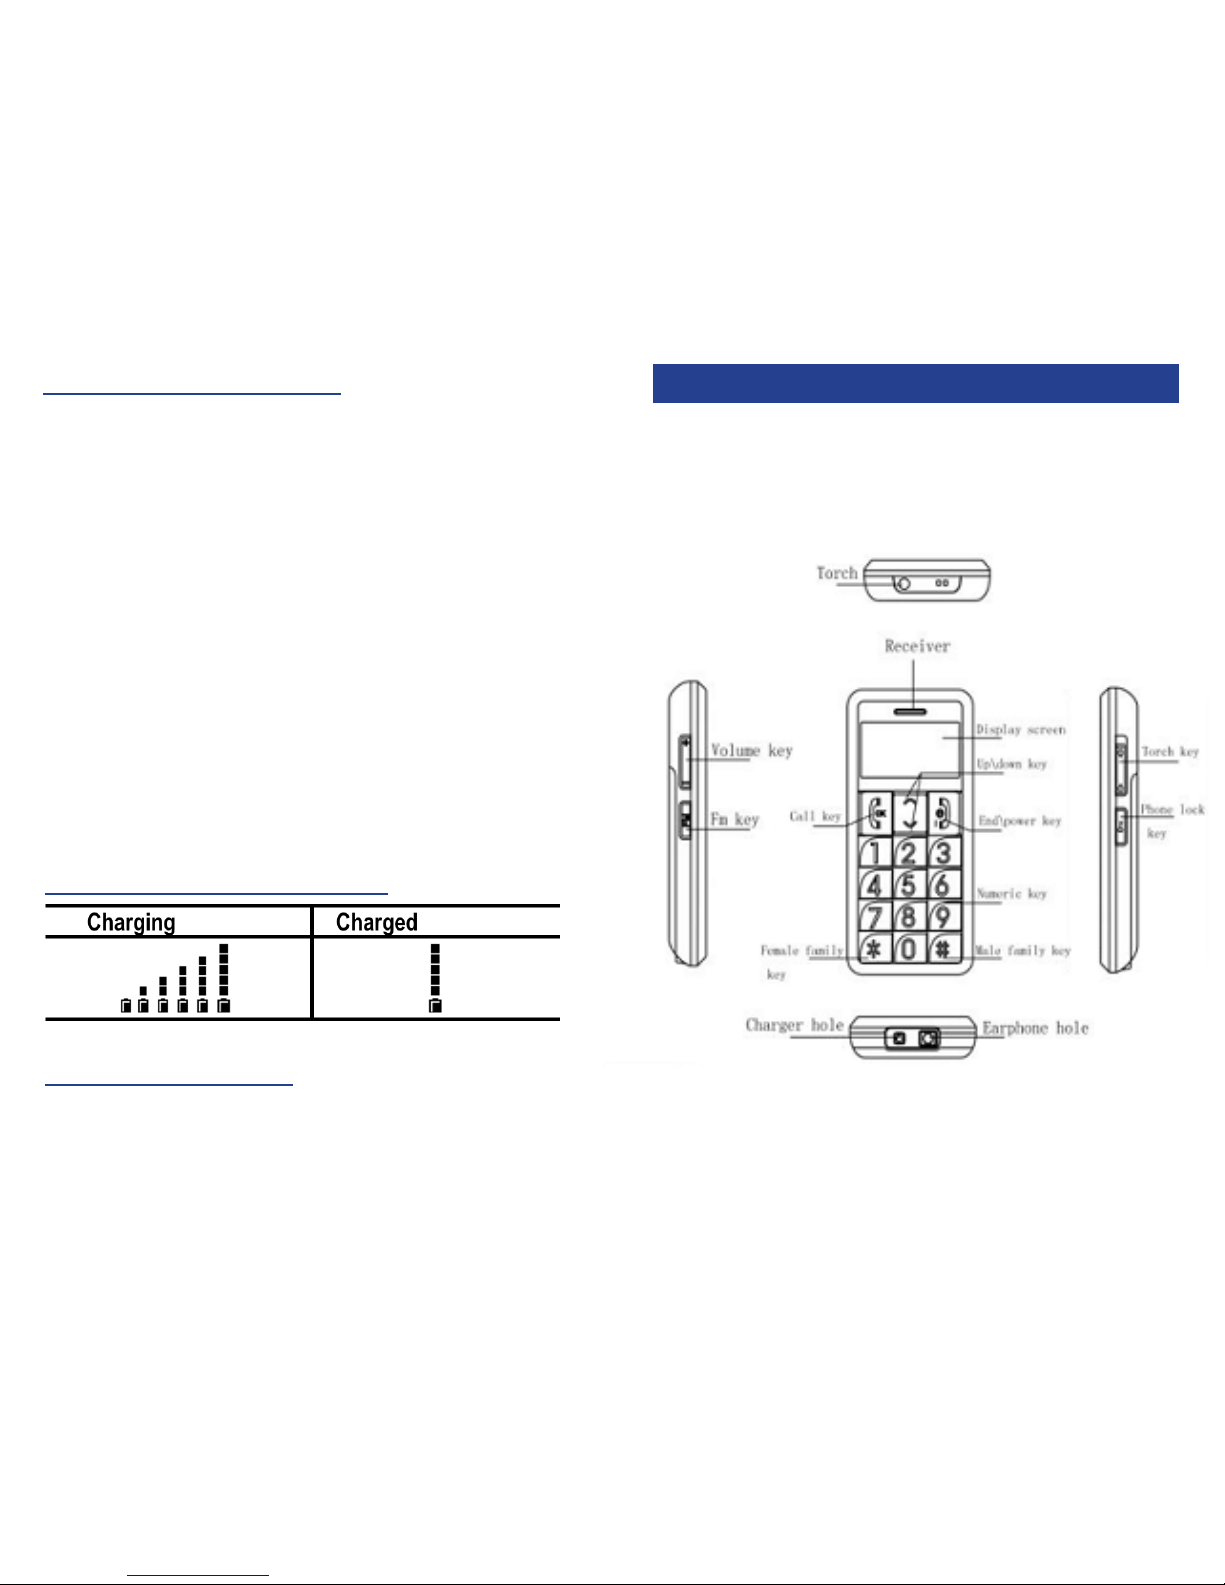
Charging the Battery .............................................10
Battery Level Indication Bar ................................10
Low Battery Alert ....................................................10
3. Your Phone ................................................................11
Key Functions ...........................................................12
Display Screen Map ...............................................13
Icons on Screen .......................................................13
4. Making and Receiving Phone Calls ........... 14/15
To Make Calls ............................................................14
To Answer Calls ........................................................14
To End a Call..............................................................14
To Redial a Number ................................................14
Making International Calls ..................................15
Volume Adustment ................................................15
5. Main Menu ................................................................15
Phone Book ........................................................16/17
Messages ............................................................17/18
Call Center .......................................................... 19/20
Settings ........................................................ 21/22/23
3
Check out our website for video
guides of how to use your phone
www.ttfone.com
Page 2

www.ttfone.com www.ttfone.com4
Multimedia
.................................................................23
File Manager ..................................................................
User Proles ..............................................................24
Organizer ...................................................................24
Speed Dial .................................................................25
6. SOS Emergency Button ................................. 25/26
7. Letters and Numbers Input .................................27
8. Flashlight ...................................................................28
9. FM Radio ....................................................................28
10. Troubleshooting ....................................... 29/30/31
11. Radio Frequency (RF) Exposure
and SAR ............................................................... 32/33
This user manual includes important safety information. Please
read below instructions carefully. It may be dangerous or illegal
if you do not follow these instructions. Remember to follow any
special regulations in force in any area and always switch
o your device when its use is prohibited or when it may cause
interference or danger.
Attention!
The factory default password: 1122
This password can be used to change the settings,
however it is advised that you change this to your
own personal password.
5
Pay Attention to Trac Safety
Obey local trac laws and do not use the
phone while driving. Using a cell phone while
driving is dangerous and it is illegal in some
areas. Radio frequency (RF) signals may
aect improperly installed or inadequately
shielded electronic systems in motor vehicles such as electronic fuel injection systems,
electronic antiskid (antilock) braking systems,
electronic speed control systems, air bag
systems. For more information, check with the
manufacturer of your vehicle for any equipment that has been added. Do not place
objects, including installed or portable wireless
equipment in the area over the air bag or in
the air bag deployment area.
Pacemaker Interference
Pacemaker manufacturers recommend that a
minimum separation of 15.3 centimeters (6
inches) be maintained between a wireless phone
and a pacemaker in order to avoid potential interference with the pacemaker.
1.Safety Instructions
Page 3

www.ttfone.com www.ttfone.com
Turn O Your Cell Phone in Medical
and Health Care Facilities.
Switch o your device in health care facilities
when any regulations posted in these areas
instruct you to do so. Hospitals or health care
facilities may be using equipment
that could be sensitive to external RF energy.
Switch O on Airplanes
Using your device while ying in aircraft is
prohibited. Switch o your device before
boarding an aircraft. The use of wireless
devices in an aircraft may be dangerous to the
operation of the aircraft, disrupt the wireless
telephone network, and may be illegal.
Accessories and Batteries
Use only the approved accessories and
batteries. Please do not try to use with any
product that was not manufactured for use
with this phone. Please be sure the phone has
been switched o before taking out battery.
Please dispose of scrap batteries properly according to the local regulations.
Cell Phone Should Be Turned O Near Sites
7
of Explosion. Potentially explosive atmospheres
include areas where you would normally be
advised to turn o your vehicle engine. Sparks
in such areas could cause an explosion or re
resulting in bodily injury or even death. Switch
o the device at refueling points such as near gas
pumps at service stations and in any area with
a potentially explosive atmosphere and obey
all signs and instructions. Observe restrictions
on the use of radio equipment in fuel depots,
storage, chemical plants or where blasting operations are in progress.
Using the Phone Correctly
Please use this phone in its normal intended
position. Do not let children use the phone
without supervision.
Your phone contains small parts such as SIM
card, which can be accidentally swallowed
by a child.
Your Phone is Not Waterproof
This phone is not waterproof. Please do not
expose your phone to wet weather or environment (such as rain, snow, seawater, etc.).
6
Page 4

www.ttfone.com www.ttfone.com
Always switch the device o and disconnect
the charger before removing the battery. Keep
all SIM cards out of the reach of small children. For availability and information about
using SIM card services, contact your SIM
card vendor. This may be the service provider,
network operator, or other vendor. The SIM
card and its contacts are easily damaged by
scratches or bending, so please be careful
when handling, inserting, or removing the card.
2. Getting Started
Install the SIM card and battery
1. Open the battery cover
by lightly pressing on the
back of the phone and
sliding the cover panel down.
9
2. Install SIM card by
sliding it into its nest and
under the metal holding
plate. (To remove the SIM
card, gently press on it and
slide it out of its nest.)
3. Install the battery into
the battery slot, making
sure that the three metallic stripes on the battery
align with the three metallic
prongs in the battery slot.
4. Put on the battery cover.
Make sure the cover is
completely matched and
the matching sound could
be heard.
5. To turn the phone on
press and hold the red key until
the screen lights up. To turn it
o press and hold the same key
until the phone powers o.
8
Page 5
www.ttfone.com www.ttfone.com10
Connect the charger to
its port on the bottom
panel of the phone, and
then plug it into the
240V electrical outlet. To
disconnect, rst unplug
the charger from the
electrical outlet and then disconnect it from the
phone.
Low Battery Alert
The phone will sound an alert when the battery is
low and display a message of low battery on the
screen.
Battery Level Indication
11
3. Your Phone
Your phone is in Stand By mode when it is on
but no operation is chosen
Charging the Battery
Battery can be charged when the phone is
either on or o. Please make sure that the
battery is inserted into the phone before
charging.
Page 6
www.ttfone.com www.ttfone.com
Making Phone Calls: Press to make a call
or Press to pick up an incoming call
Standby Mode: Press to enter call logs
Operating: Press to conrm the function
Turn the Phone O: Press and hold
Turn the Phone On: Press and hold
Operating: Press to cancel last action
Standby Mode: Press for main menu
Operating: Press to scroll up
Standby Mode: Press for phonebook
Operating: Press to scroll down
Standby Mode: Press and hold to call set
phone number directly or press once to
type in “#” symbol
Edit Mode: Press to switch typing method
Standby Mode: Press and hold to call the
set number directly or press once to type
in “*” symbol, twice to type in “+” symbol
and three times to type in “P” Editing mode:
Press to access punctuation symbols list
Press to add volume during connection
Press “+” to increase and press “–“ to decrease the sound volume for phone or radio
Turns the ashlight on and o
Locks and unlocks the keypad
Press the SOS key to call emergency
number
To turn the radio on/o press the FM button
key
Answer Key
(Green Key)
End Key
(Red Key)
Navigation
Up Key
Navigation
Down Key
# Key
* Key
Volume
Control
and Switch
Flashlight
Lock
SOS
Button
Radio Key
Key Functions
Key Functions
12 13
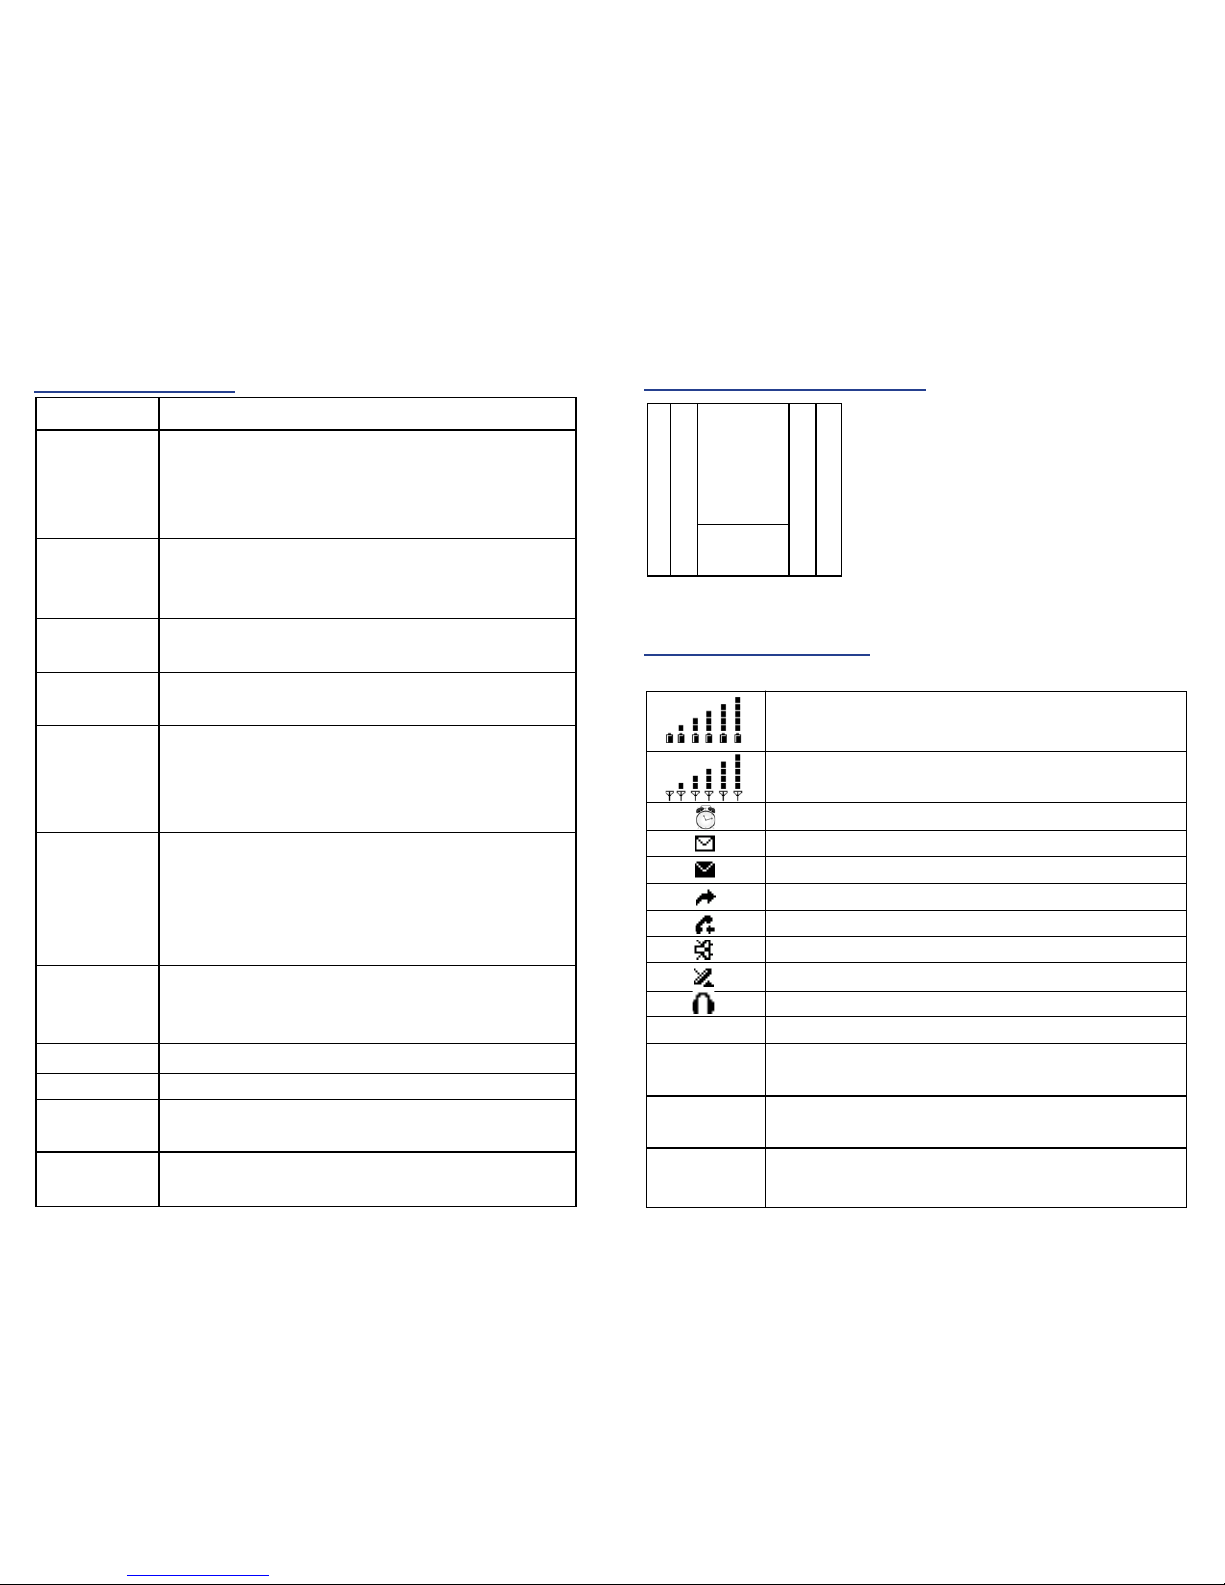
Display Screen Map
Icons on Screen
1. Network Signal
2. Battery Level Indication
3. Icons shows related functions
4. Icons shows related functions
5. Time
6. Date
1 3 4 2
5
6
Battery Status
Network Signal Status
Alarm
Unread Message
Message Memory Full
Call Transfer (For ward)
Missed Call
Silent Mode
Roaming
Headset is Connected
Keypad is Locked
New Message Indication in Locked Keypad
Mode
Missed Call Indication in Locked Keypad
Mode
New Message and Missed Call Indication
in Locked Keypad Mode
Following icons may be displayed on the screen:
Page 7

www.ttfone.com www.ttfone.com14
To Make Calls:
When the phone is in a standby, the number pad
can be used to insert the desired telephone number. To modify the number you can use the cursor
keys up/down, the red end key can be used to
delete numbers.
Press the green key to dial the inputted telephone
number; the green key is also used to answer
incoming phone calls.
To Answer Calls:
When your phone rings or vibrates, press the green
key
To End a Call:
The red end key is used to hang-up after a phone
call, it can also be used to reject an incoming
phone call.
To Redial a Number:
From the home screen, press the green key to see
a list of call logs, scroll down to desired number by
using the up and down keys and once you nd the
entry you want to call press the green key
4. Making and Receiving Phone Calls
15
Making International Calls:
• Press the “ * ” key twice, a “+” character will ap-
pear on the screen. Enter country code, area code
and phone number as instructed by your long distance network service carrier. Press the green key.
• To display “P” symbol for international calling,
press the “ * ” key three times.
Volume Adjustment
During a normal or hands-free call connection,
press and hold Volume Control key to increase the
volume.
Whilst in a phone call to reach max volume you
can press and hold the ‘0’ key, this is an aid for users
with a hearing aid. This feature can be switched on/
o via ‘phone set-up’ in the menu
5. Main Menu
To enter the main menu, press up on the phones
cursor button. The cursors can then be used to
scroll through the menuthe Green Key = accept
and the Red key = Back.
Page 8

www.ttfone.com www.ttfone.com16
PhoneBook:
[Quick search] shows all the numbers that are
saved within the phones internal memory or SIM
card. From within the list any number can be
selected to either; view, call, modify and/or send a
message to that contact.
[Search Contact] within your phonebook by entering the name of the person you are looking for
using the letters on the keypad.
[Add New Contact] allows you to add an entry into
your phonebook.
[Copy All] feature can be used to move contacts
from one memory store to the other, internal
Phone memory or SIM card.
[Delete] using this feature you can delete the contacts from your SIM card or Phone memory.
[Caller Groups] using this feature you can save your
contacts in groups. For ex. Friends, family, business
etc.
[Settings] There are three option under settings
these are:
17
- Human voice prompt - To turn on/o human
voice prompt when open phone book.
- Memory Status - To check the storage space left
in the phone or SIM card memory select within the
phonebook menu.
- Preferred storage - Where you can select preferred
storage from SIM or PHONE.
Messages:
[Write Message] from here you can write and send
a message by using the number keypad to enter
the corresponding letters. Pressing the Green Key
then allows you to send the message by entering
a phone number or choosing from the contacts
in your phonebook. You can also use a template,
from this menu or insert an object. Messages can
be modied while creating using the up/down cursor keys and the Red end key to delete unwanted
letters.
[Inbox] where you can view/delete your received
messages and a reply can also be sent from within
the selected message using the green key. Messages can also be moved to dierent memory stores
from the inbox.
Page 9

www.ttfone.com www.ttfone.com18
[Outbox] this is where your saved messages can be
viewed and the messages that you send and save.
[Templates] are pre-written messages consisting of
commonly used phrases. These are already stored
in the phone, and can be used to send quick messages to contacts. These can be edited from within
the same menu.
[SMS Settings] from this menu you can change
your prole settings and check the memory status
of your SIM card or internal phone memory. The
messages stored in your inbox, outbox and drafts
use memory.
[Voice Mail Server] this is where you can check
any voicemails that have been left for you on your
phones answering machine. Also you can set the
Voice Mail number given by your network provider
[Broadcast Message] in this menu you can turn
broadcasting on/o and also select, add/delete or
edit the broadcasting channels.
Call Centre:
[Call History] act as a history for all the phone calls
you have missed, received or dialled out. You can
also check the duration of your incoming and
outgoing calls.
- Missed Calls - shows the recent calls that you
have missed or failed to answer. From here you can
view the time/date of the phone call and redial the
number.
- Dialled Calls - allows access to the recent outgoing phone calls history. From here you can view the
call duration, time/date of the phone call and redial
the number.
- Received Calls - shows the incoming call history.
From here you can view the call duration, time/
date of the phone call and redial the number.
- Delete call Logs - allows you to delete the call history, either separately or all the call logs at once.
- Call Timers - this menu allows you to view the
duration of dialled, received calls and the last call.
From within the menu you can also reset the timers.
19
Page 10

www.ttfone.com www.ttfone.com20 21
- Speed Dial - set your speed dial numbers from
this menu. Allows for quicker calls to frequently
used numbers
- IP Dial - enter and edit your IP number(s)
- More - here you can edit the call time display, call
time reminder, auto quick end, line switching and
closed user group settings
Settings:
The individual phone settings can be changed
from within this menu.
[Phone Setup]
- Time alert - this menu allows you to activate or
customize time alert type to ring tone or human
voice.
- SOS number - Select this option and insert number then press green (ok) button twice to save SOS
number. You can save 4 numbers for SOS calling.
(When you press SOS button on the back of the
phone, it will rst send txt to saved numbers and
then dial a saved number until the call answered )
- SMS Counter - allows you to see how many SMS text
essages have been sent/receied.
[General Call Settings]
- Caller ID - choose whether to send out your caller
ID when making a phone call. An option for ‘set by
network’ is also available.
- Call Waiting - from here you can activate/deactivate
call waiting, this service allows for people to be put
on hold when you receive a call while you are already
using the phone in a call
- Call Divert - set your call divert status from this
menu. Calls that you receive while your line is busy
will be diverted, you can also set when a phone call
should be diverted.
- Call Barring - outgoing/incoming calls can be
barred, a password maybe required to set this option,
from this menu the default password can also be
changed.
- Auto Redial - turn auto redial on/o according to
your requirements.
Page 11

- Family number - where you can save one male
number (# button) and one female number
(*button) for easy speed dial
- Time and Date - from this menu you can
change/set the time and date also the format
(12hour/24hour clock) of the time display can
also be modied.
- Schedule Power on/o - here you can schedule
your phone to switch on and o at certain times
in the day
- Language - you can select from a range of dierent languages already set within the phone.
- Pref. Input Method - you can select from either
multi tap abc or numeric input. The language of
the multi tap can also be set.
- Flight Mode - Here you can set your phone to
ight mode
- LCD backlight - the screen brightness can be set
from this menu. Brightness varies from, low 1 – 7
high.
[Network Setup] select a network or change your
preferred network from this option.
[Security Setup] input passwords and lock to your
phone and SIM card from this menu. You can also
select the keypad to auto lock from here. This
helps to prevent your phone from being illegally
used in the event it falls into the wrong hands.
[Restore Factory Settings] this option allows you
to restore all the settings on the phone back to
the original manufacturer’s settings. The phone
will change the settings back to those which
the phone came with. A password is required to
activate this option. (1122)
Multimedia:
This menu allows you to access the multimedia
les you may have stored in the memory card via
Audio player. Sound recorder allows you to record
the sound. FM radio option allows you to start the
radio and search for radio frequencies.
22 23
www.ttfone.com www.ttfone.com
Page 12

File Manager:
From here you can manage your multimedia and
other les that you may have stored within your
memory card or in the phone. The le manager
also shows the total space within your memory
card and also the amount of free space available
for use.
User Prole:
From here you can customise and select the user
prole. Select “General” and then “Customize” here
you can chage the ring tone, the volume of the
ringer, the alert type as well as the warning tones
Organizer:
[Hearing Aids} here you can test the hearing quality of the headphone
[Calendar] open to view calendar
[Alarm] To set the alarm go to Menu - Organizer
- then the Third option Alarm.You can set 5 separate
alarms here,select one of them by pressing
[Calculator] use the keypad to enter numbers to
calculate and the cursor keys to select dierent
mathematical tools.
Speed Dial:
This menu will allow turning Speed dial function
ON/OFF as well as you can set the desired numbers to save for number key 2 to 9.
10. Lett
10. Letters and Numbers Input
Important Notice: Wireless phones, including this
device, operate using radio signals, wireless networks, landline networks, and user-programmed
functions. Because of this, connections in all
conditions and/or locations cannot be guaranteed. You should never rely solely on any wireless
device for medical emergency communication.
You can set the emergency numbers in the
phone book according to your requirement; you
can set a total of up to 4 emergency numbers.
6. SOS Emergency Button
24
25
www.ttfone.com www.ttfone.com
the green key.
Here you can choose to switch on or off your alarm
set the time, choose if you would like the alarm to
repeat,, choose the alarm tone, snooze settings and
and the number keys to choose you settings.
set the alert type. Simply scroll through the options
and use the volume buttons on the side of the phone
Repeat for the other 4 alarms if you wish.
Page 13

www.ttfone.com www.ttfone.com
26
9. Call Logs
27
10. Radio
set up on the phone. The mobile phone will then
make the emergency call. If the rst call fails, the
phone will proceed to dialling the second emergency number. In this manner the phone will
circulate the emergency contact numbers 3 times
in order to receive an answer.
The phone will also sound an alarm when an emergency call or message is sent.
Press the up key up to access the menu. Select
option “Settings” by pressing the green key then
“Phone Setup” Press up or down keys until “SOS
Number” option is displayed. Select this option and
insert number then press green (ok) button twice to
save SOS number. You can save 4 numbers for SOS
calling.
Attention!
Emergency SOS button will only make calls if a SIM
card has been inserted into the mobile.
English letters are set on number keys from “2” to
“9”. You can input numbers, upper or lower case
letters and punctuation symbols. Pressing “#” key
while typing lets you switch between the dierent
types of input modes.
• Each number key is set for three or four letters.
Press the number key one time to display the rst
letter, two times to display the second letter, etc.
• To enter punctuation, press the “ * ” key to display
the list of punctuation symbols and then use number keys “2”, “8”, “4” and “6” to navigate between the
symbols. Press number key “5” to select and enter a
symbol into your message.
• To enter a number instead of a letter, press “#” key
to switch input mode from letter to numerical
and then use number keys from 1 to 0 to enter
numbers. Press “#” again to switch back to letter
input mode.
• To enter a space, press “0” key when in letter
mode.
•
Icon on the screen means that your message
box is full. Please delete some messages to clear
the memory.
7. Letters and Numbers Input
In case of an emergency, when the SOS button
is pushed down the phone will automatically
send a text message to the emergency numbers
Page 14
www.ttfone.com www.ttfone.com
2928
10. Troubleshooting
1. Ensure you have held the power button
down for more than 5 seconds.
2. Re-insert the battery and retry phone
boot.
3. Plug charger into the phone and make
sure the battery is charged.
1. Signal strength may be weak, try move
location and try again.
2. It may be possible that you are using
the phone beyond the network service
coverage area.
3. Check to make sure your SIM card is
inserted correctly and is valid. (contact
network provider)
1. Check SIM card is correctly installed.
2. You may need to unlock your keypad using the button on the side of the
phone or your keypad (password maybe
required).
3. You may have permanently locked your
phone by entering the pin code incorrectly
3 times, obtain your PUK code from your
network provider.
4. Increase the screen brightness in
settings.
Phone
does not
turn on.
Cannot
connect to
a network.
No
information
displayed
when
phone is
on.
Problems Solutions
Use the switch indicated by light bulb icons on
the right side of the phone to turn the built in
ashlight on or o.
8. Flashlight
“FM” (a switch on the left side of the phone)
Listen to the radio on the speaker phone or connect the headset into the headset jack.
• Press and hold the “FM” button to turn the radio
on (you can also switch on by going to “FM Radio”
in the “Multimedia” menu)
• To switch o the Radio press the same button
then press the red end key to exit the radio
• To scan for stations press the up and down keys.
• To adjust volume, press the “+” or “-“ keys
on the left side of the phone.
*The quality of radio sound depends on signal
quality at your particular location.
The headphones act as an aerial so you will get
better reception when they are plugged in
9.FM Radio
Page 15
www.ttfone.com www.ttfone.comwww.ttfone.com
30 31
1. Ensure your mobile phone is switched
on and connected to a network.
2. Make sure your SIM card is correctly
installed.
3. Call restrictions may be prohibiting
incoming phone calls, so these settings
must be checked.
4. Poor areas of network coverage can
prevent incoming calls so check the
network status of your phone.
1. Bad connections can hinder the
phone charging; make sure all contacts
are correctly connected.
2. Check to see whether the phone
charging slot or the charge itself is
damaged. If so discontinue use. Replace
battery or charger.
3. The phone cannot be charged in
temperature below 10˚C or above 55˚C.
1. Conrm that once the number is
inputted using the keypad the green call
button must be pressed to dial the phone
number.
2. Check the phone number entered
is correct.
3. Check reception coverage status
of your mobile phone.
4. Make sure the call restriction settings
are correct in order for you to dial
outgoing calls.
Cannot
receive
incoming
calls
Phone not
charging
Does not
dial
numbers
1. Increase the call volume use (+ -) key
on the side of the phone.
2. It may be that the network reception
is poor in your location. Try moving to
another area to achieve a better
connection.
1. Standby time is related to system
settings, in poor areas of reception the
phone will use more battery to try and
nd a base station, in this event the
standby time will be reduced to save
battery power.
2. It could also be the case that the
battery of the phone has become
exhausted, you may need to consider
changing the battery.
1. Reinstall the SIM card into the phone,
ensure the metal contact is clean, wipe
gently with a clean cloth before inserting
into the phone.
2. SIM card may not be correctly installed.
3. If the SIM card is damaged contact
your service provider.
1. This could be due to an operation error
on the phone, switch mobile phone o
and restart after 30 seconds.
2. The network provider may not support
the feature you are trying to use and this
may prevent its use.
Phone call
quality poor
Shorter
Standby
Time
SIM card
Error
Some
feature do
not operate
or cannot
be set
Page 16

www.ttfone.com www.ttfone.com
32 33
www.ttfone.com
Network. In General, The Closer You Are To A
Base Station, The Lower Is The Power Output
Of The Device.
Sar Values May Vary Depending On National
Reporting And Testing Requirements And The
Network Band. Use Of Device Accessories
And Enhancements May Result In Dierent
Sar Values.
The SAR Limit For Mobile Devices Used By
The Public Is 2.0 W/Kg (Watts Per Kilogram)
Averaged Over
10 Grams Of Body Tissue. The Guidelines
Incorporate A Substantial Margin Of Safety
To Give Additional Protection For The Public
And To Account For Any Variations In Measurements. The Highest Sar Value This Model
Phone Tested For While In Use Is 0.873 W/Kg.
www.ttfone.com
This Device Meets International Guidelines For
Exposure To Radio Waves
Your Mobile Device Is A Radio Transmitter
And Receiver. It Is Designed And Manufactured Not To Exceed The Limits For Exposure
To Radio Frequency (Rf) Recommended By
International Guidelines (Icnirp). These Limits
Are Part Of Comprehensive Guidelines And
Establish Permitted Levels Of Rf Energy For
The General Population. The Guidelines
Were Developed By Independent Scientic
Organizations Through Periodic And Thorough
Evaluation Of Scientic Studies.
The Exposure Standard For Mobile Devices
Employs A Unit Of Measurement Known As
The Specic
Absorption Rate, Or Sar. Although The Sar Is
Determined At The Highest Certied Power
Level, The Actual Sar Of The Device While
Operating Can Be Well Below The Maximum
Value. This Is Because The Device Is Designed
To Operate At Multiple Power Levels So As To
Use Only The Power Required To Reach The
11.Radio Frequency (RF)
Exposure and SAR
Check out our
other fantastic
range of products
at www.ttfone.com
 Loading...