

Page 1
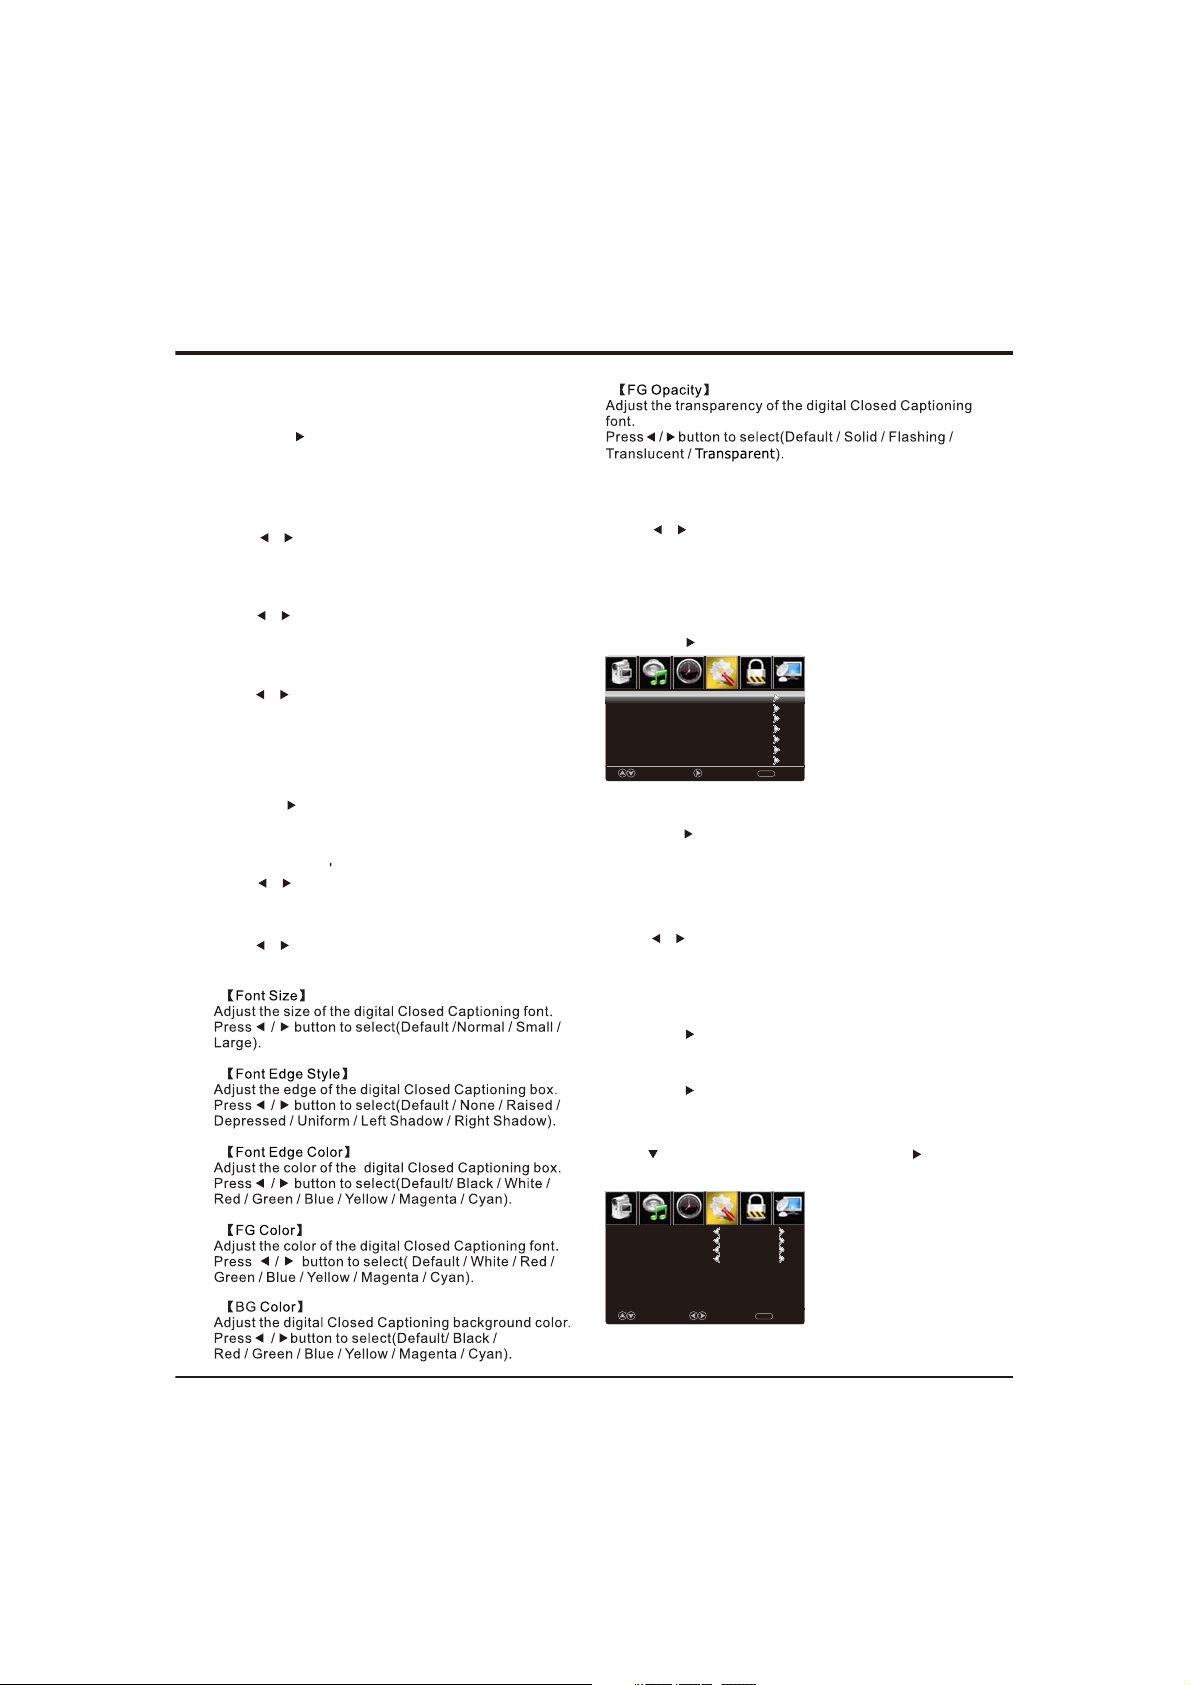
【Closed Caption】
Adjust Clos ed Captioning settings. only av ailable und er
TV and AV source.
Press / bu tton to enter. O K
Advanced Functions
Close Caption
【】CC Mode
Turn Closed Captioning on/off.
Press button to select(CC Off / CC On / CC /
On Mute).
【】Analog CC
Set Closed Captioning for standard(analog) program.
Press button to select(CC1 / CC2 / CC3 / /
CC4 / Text1 / Text2 / Te
【】Dig ital CC
Set Closed Captioning for digital progra m.
Press button to select(O ff / Service1 / Service2 / /
Servi ce3 / Se rvice 4 / Service5 / Service6).
xt3 / Text4).
Close Caption
【 ption】O
Adjust the di gital Closed Captioning setting.
Press OK / button to enter.
【】Mod e
Set the M ode of digital Closed Captioning. Automatic
uses broadcaster s style.
Press button to select(Def ault / Custom). /
【】Font Style
Select f rom 8 font styles.
Press button to select(Def ault / F ont 0 / Font 1 / /
Font 2 / Font 3 / F ont 4 / Font 5 / Font 6 / Font 7).
【BG 】Opacity
Adjust the digital Closed Captioning ba ckgrou nd
transparency.
Press bu tton to select(Default / Solid / /
Flashing / Translucent / ). Transparent
*Note: All the opt io ns can be adjus t while the
is Custom.
mode
【 Label】Input
Press / button to enter. O K
/
Time
button to enter. OK
Setup
Lock
Default
Default
Default
Default
Default
Default
Default
MENU
io Only status.
Channel
button
Picture
Sound
TV
AV
Component
HDMI1
HDMI2
PC
Media
Move Next Return
【Other Settings】
Set the para meter of audio only.
OK
Press / button to enter.
【Audio Only】
Play the audio with the pic ture turned off. When you
turn the Aud io Only on , the panel will be dark; and
except VOL+, VOL-, POWER and MUT E buttons, pr ess
any key to exit the Aud
Press button to select(On / Off).
Note:In Audio Only state, press POWER, TV will be on
standby mode.
【Restore De fau lt】
Restore the settings of user interface to the d efa ult.
Press / button to enter. OK
【Setup Wizard】
Set the f irst time installation.
Press /
For detail please refer to page 8.
【CEC】
Press button to sel ect CEC, then press OK /
to enter CEC men u.
Picture
CEC Control
Device Auto Power Off
TV Auto Power On
Audio Receiver
Device Lists
Connect
Root Menu
Time
Sound
Select Move Clear
【CEC Co ntr ol】
11
Setup
Lock
Channel
on
on
on
on
MENU
Page 2
Advanced Functions
On/Off can be selected(default: Off) to turn on or turn
off CEC function.
Press button to select On in CEC Co ntrol, the
following f unc tions can work.
【Device Auto Power O ff 】
On/Off can be selected(default: On) to decide CEC
device goes to standby mode when TV is on standby .
【TV Auto Power O N】
On/Off can be selected(default: On) to decide TV can
be opened with the opening of outer CEC devic
e.
【Audio Rec eiver 】
On/Off can be sele
whether support ARC function or not.
cted(default: On) to decide
【Device li st 】
Display linked TV CEC d
evices
【Connect 】
Link to corresponding device and open signal output.
【Root menu 】
Press it, it can swit
source, the function is the same as Connect. But when
DVD is play, press it, it can go to DVD menu.
ch to corresponding CEC device
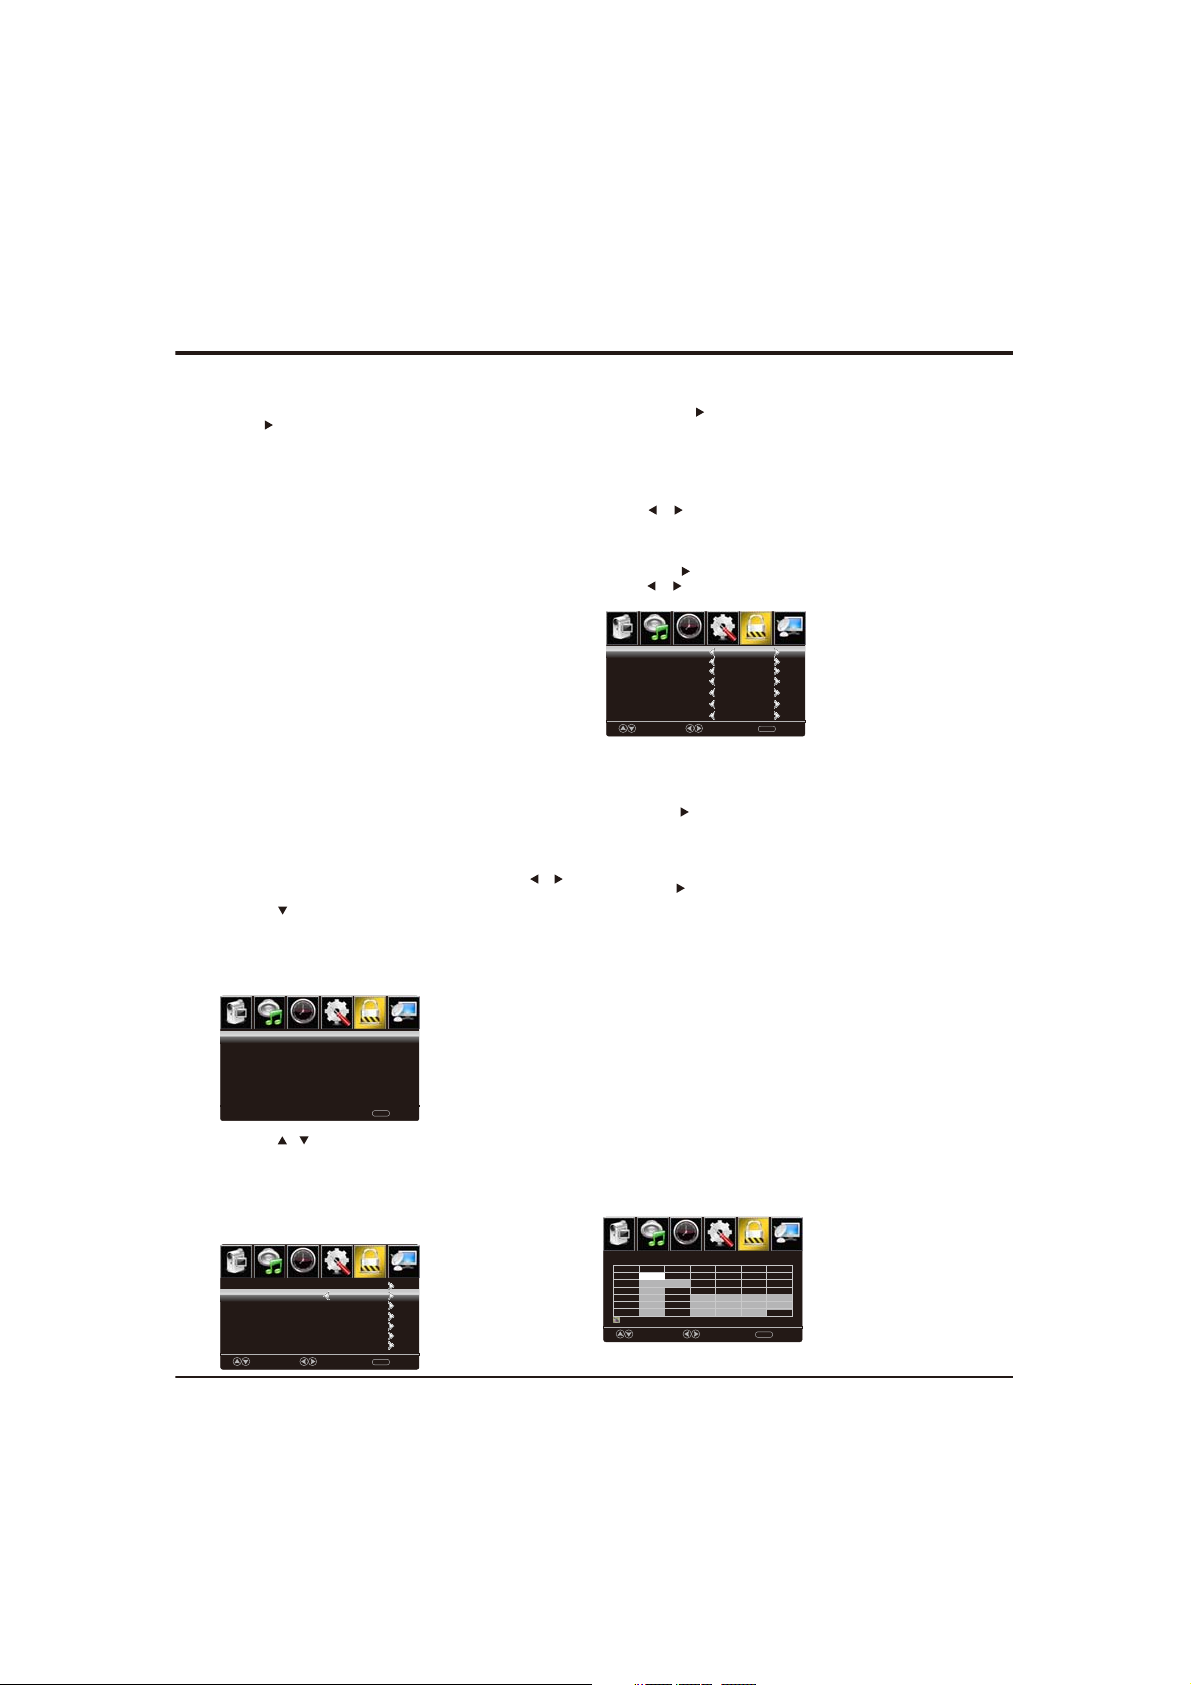
Lock
1.Press ENU to enter the main menu , Pr ess M /
button to select.
2.Press to enter.
3.Enter your 4-digital password. D ef au lt password is
0000.
Note: If yo u fo rg et the pass wo rd , en ter 0432 to
overrid e an y ex isting co de s.
Picture
Sound
Enter Password
4.Press / button to select among Change
Password / System Lock / Input Block / US Rat ing /
Canada Rat ing / RRT Setting / Reset RRT.
Press E NU again to exit or b ack to parent menu.M
5.
Setup
Time
-----
0-9 To Enter Return
Lock
Channel
MENU
Lock
Picture
Sound
Change Password
System Lock
Input Block
US Rating
Canada Rating
RRT Setting
Reset RRT
Move Select Return
Setup
Time
Lock
Channel
On
MENU
【Change Password】
1.Press OK/ button to enter.
2.Enter a new 4-digital password then re -enter it to
confirm.
【System Lock】
Lock or unlock the buttons on the T V.
Press bu tton to select(Off / On). /
【Input Block】
Block or unblock the input sources.
Press OK / bu tton to enter.
Press bu tton to select(Unblock / Block).
Picture
TV
AV
Component
HDMI 1
HDMI 2
PC
Media
【US Rating】
Restrict mov ie and TV programs by US Rating s.
Only available when "System Lock" is "on".
Press OK / button to enter.
/
Setup
Time
Sound
Move Select Return
UnBlock
UnBlock
UnBlock
UnBlock
UnBlock
UnBlock
UnBlock
Lock
Channel
MENU
【Canada Rating】
Only available when "System Lock" is "on".
PressOK/ button to enter.
Restrict mov ie and TV programs by Canadian Ratings ..
For detail please refer to page 12.
RRT Setting】【
Display an advance V-Chip rat ing ta bl e for digit al
channels.
The item is available only Wh en c ur rent stre am h as
downloada bl e ra ting data.
Reset RRT】
【
Reset the RRT to defaul t.
The item is availab le only Whe n curre nt st re am has
downloa dable r ating data.
US Rating
For the United Sta tes, the ra ting setting b asically
include the follow ing optio ns: TV, MPAA.
TV
The TV rating co mpose o f two aspect s: age-based
and con tent-based.
Picture
Sound
ALL
TV-Y
TV-Y7
TV-G
TV-PG
TV-14
TV-MA
: Block
Move Next Return
Setup
Time
TV Rating
FV V S L D
Lock
Press OK to Lock or Unlock
MENU
Channel
12
Page 3
Advanced Functions
Age
TV-Y
TV-Y7
TV-G
TV-PG
TV-14
TV-MA
Note: The content ratings will incr
the level of the age-based rating.
For example, a pr ogram with a TV-PG V(violence)
rating ma y contain moder ate violence , while a TV-1 4 V
(violence) rating may contain intense violence.
So locking a
cause locking the options that has more sensitiv e level.
MPAA
This system de fines the r ating control which come f rom
MPAA rules.
Rating
Off
G
PG
PG-13
R
NC-17
X
Canada
For Canada, the rating setting include the following options:
Canada English, Canada .
Canada English
These ratings are for programs which are using
English rating system.
Rating
O
ff
C
C8+
G
PG
14+
18+
Canada
The ratings are for p ro gram s which are using
French rating system.
Rating
Off
G
8 ans+
13 ans+
16 ans+
18 ans+
Define
General audience
Parental guidanc e suggested
Parents strongly ca utioned
Retricted
No one 17 and under admitted
Adult audience only
ease depending on
higher level option will automatically
Define as
Close
General audience. All ages admitted.
Parental guid ance suggested. Some
material ma y not be suitable for children.
Parents strongly cautioned. Some
material ma y be inappr
under 13.
Restricted. Children unde r 17 require
accompanying parent or adult guardian.
No one 17 and under admitted.
Adult audience only.
opriate for children
Rating
French
Defined as
Close
Children
Children 8 years and older
General programming
Parental guidanc e
Viewe rs 1 4 and olde r
Adult programming
French
Define
d as
Close
General
Not recommended f or c hildren
under age 8
Not recommended f or c hildren
under age 1 3
Not recommended f or c hildren
under age 1 6
This program is restricted
to adults
Channel
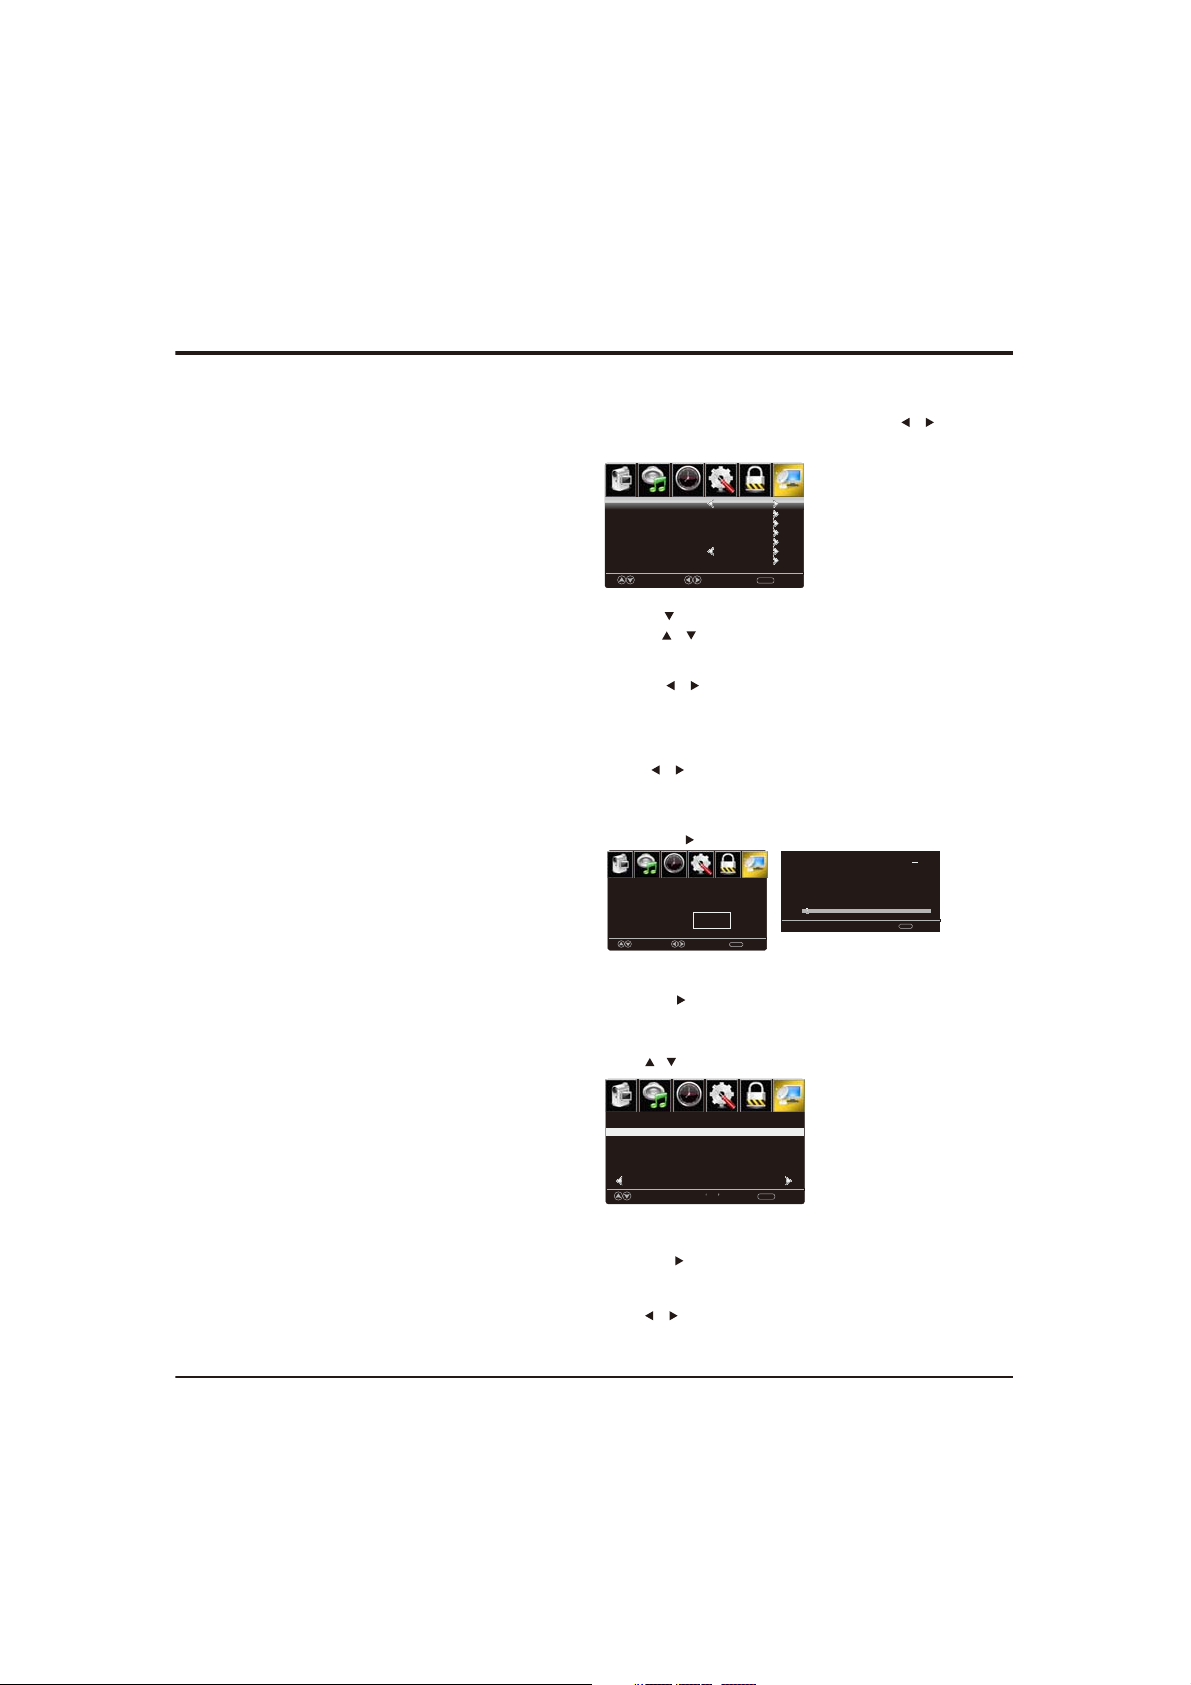
Press ENU to enter the main menu , Pr ess M /
button to select.
Picture
Sound
Air/Cable
Auto Scan
Favorite
Channel List
Show/Hide
Channel Number
Channel Label
Move Select Clear
1.Press
2.Press / button to select among Air/Cable、 Auto
Scan 、Favorite 、Channel List、Show/Hide、C hannel
Number、 Channel Label.
3.Press bu tton to adjust. /
4.Press ENU again to exit or b ack to parent menu. M
【Air/Cable】
Select signal type.
Press bu tton to select(Air/Cable). /
【Auto Scan】
Automatically search for c hannels.
Press / button to enter. O K
Picture
Sound
Are you sure to Auto
No
Move Select Return
【Favorite】
Add channels to create a favorite list.
Press button to enter.OK /
【Channel List】
Press button to adjust. /
Picture
Sound
Channel Channel Label
3-0
Prev Next
MOVE Return
【Show/Hide】
Show or hide the channels in your program list.
Press OK / button to enter.
【Channel Number】
Show the channel number.
Press button to adjust. /
【Channel Label】
Create labels for channels, up to 7 characters.
13
Time
to enter.
Time
Scan?
Time
Press OK change
Setup
Lock
Channel
Air
3-0
MENU
Setup
Lock
Yes
MENU
Setup
1/1
Analog
Channel
Digital
RF CH
Total Found
Lock
Channel
MENU
:
:
1
:
4
:
1
MENU
Return
Page 4
Advanced Functions
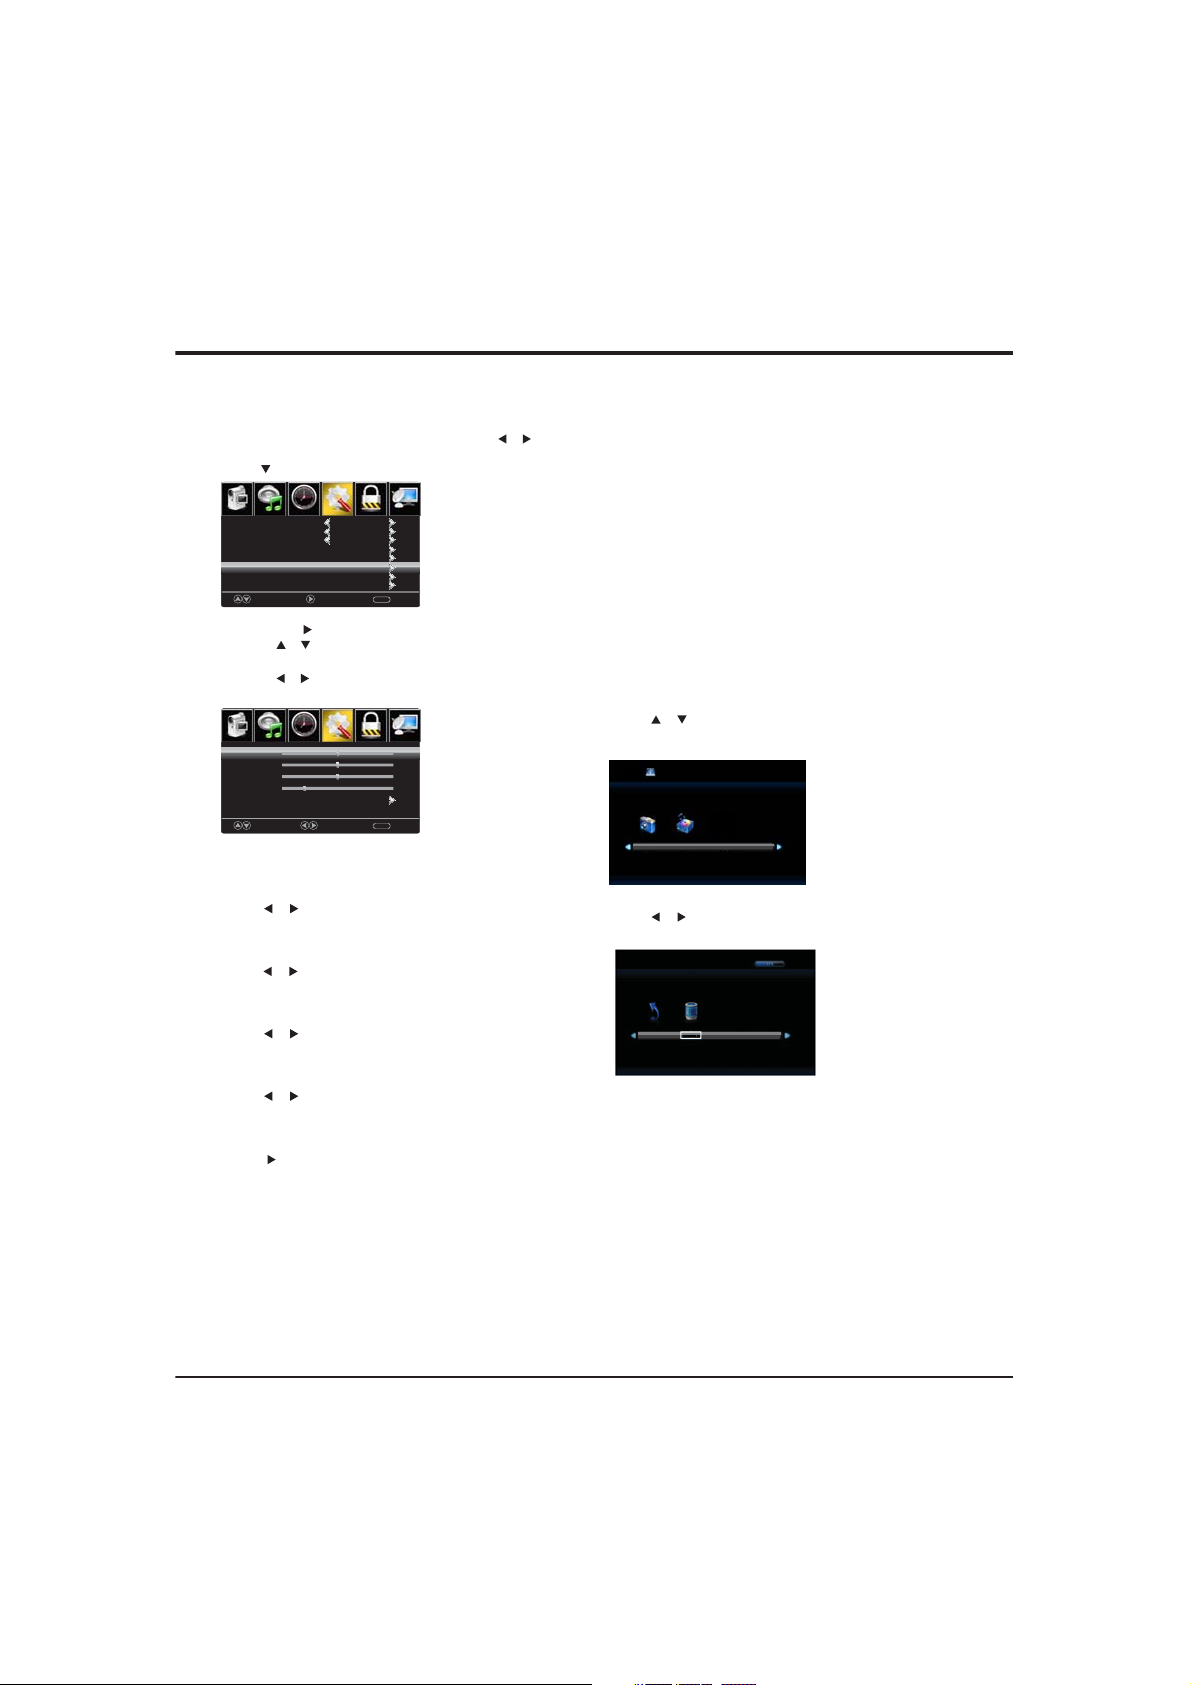
PC
Press to select PC source.INPUT
Press ENU to enter the main menu, Press buttonM /
to select Setup menu.
Press to select PC Settings.
Picture
Sound
Menu Language
Transparent
OSD Timeout
Closed Caption
Input Label
Pc Settings
Other Settings
Restore Default
Move Next Return
1.Press OK / to enter.
2.Press / button to select among H-Pos / V-P
Clock / Phase / Auto .
3.Press button to adjust. /
4.Press ENU again to exit or back to parent menu. M
Picture
Sound
H-Pos
V-Pos
Clock
Phase
Auto
Move Adjust Return
【H-Pos】
Adjust the horizontal position of th e pict ure.
Press bu tton to adjust. /
【V-Pos】
Adjust the vertical position of the pic ture .
Press bu tton to adjust. /
【Clock】
Minimize vertical
Press bu tton to adjust. /
【Phase】
Minimize horizontal distortion.
Press bu tton to adjust. /
【Auto】
Adjust to the PC signal timing autom atically.
Press button to
Notes:
1.Advanced settings in Pict ure menu i s di ffer ent,
other descriptions ar e th e sa me as that for TV
mode. Select A dv anced s ettings in Pi ct ure menu,
As
pect Ratio can select Full 100 % or P oint to Point.
Noise Reduction and Dynamic Contr as t is inv alid.
2.TIME menu and description ar e th e sa me as that
for mod e.TV
3.Close Caption in SETUP men
4.US, Canada, RRT S etting and Reset RRT in LOCK
menu is invalid.
5. mode ha s no CHANNEL menu.PC
Setup
TimeLock
Setup
Time
English
25%
15 Sec.
Channel
MENU
Lock
Channel
50
50
50
25
MENU
stripes in the screen image.
enter. / OK
os /
u is invalid.
AV / COMPONENT / HDMI
1. PICTURE menu and d es cription are t he same as
that for mo de.TV
2. TIME m enu and de scription ar e the same as that fo r
mod e.TV
3.The function of Close Caption is av aila
AV/TV m od e.
4.US Rating, Canada Rating is available only in AV
/TV mode. R RT Setting and Res et RRT in LOCK
ble only in
menu is invalid.
5. mode has no CHANNEL AV / COMPONENT / H DM I
menu.
Media
Note: Before operating
then press INPUT button to set the Input Source to Media.
Press / button to select Media in the Source menu,
then press OK button to enter.
USB 2.0
Photo
Music
Press / button to select the option you want to adjust
in the main Media menu, then press OK button to enter.
C
Return
14
Media menu,Plug in USB device,
1/1
Page 5
Advanced Functions
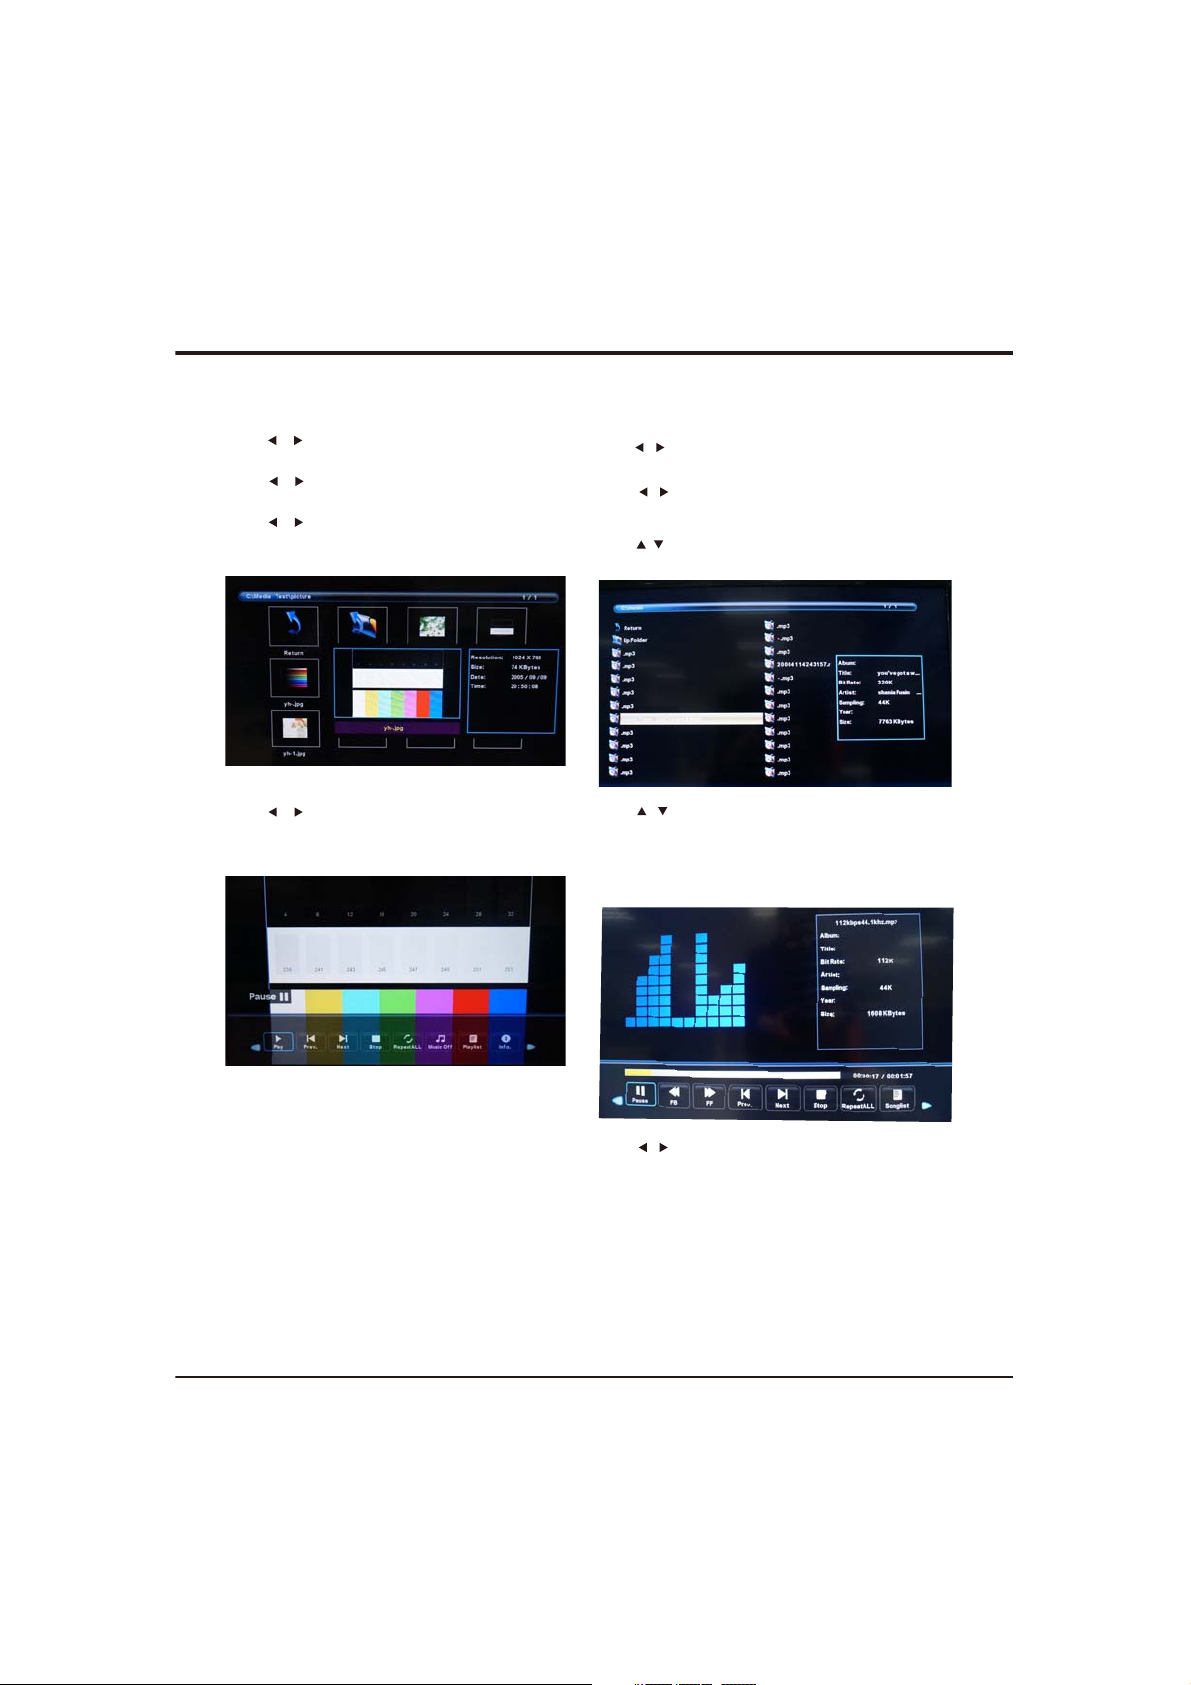
Photo
Press / button to select PHOTO in the main menu,
then press OK button to enter.
Press / button to select drive disk you want to watch,
then press OK button to enter.
Press / button to select return option to back to the
previous menu.
Press / button to select the file you want to watch in
the file selecting menu, then press OK button to display
picture.
Music
Press / button to select MUSIC in the main menu, then
press OK button to enter.
Press / button to select drive disk you want to watch,
then press OK button to enter.
Press / button to select ret
previous menu.
Press / button to select the file you want to watch in
the file selecting menu, then press OK button to play.
Press OK button again to display and operate file details.
When highlighting the
will appear on the right.
urn option to back to the
option you select, the file information
Note: Only support JPG format
ON
Press / button to select menu in the bottom you
want to run, then press OK button to operate.
Note: Only support MP3 format
15
Page 6
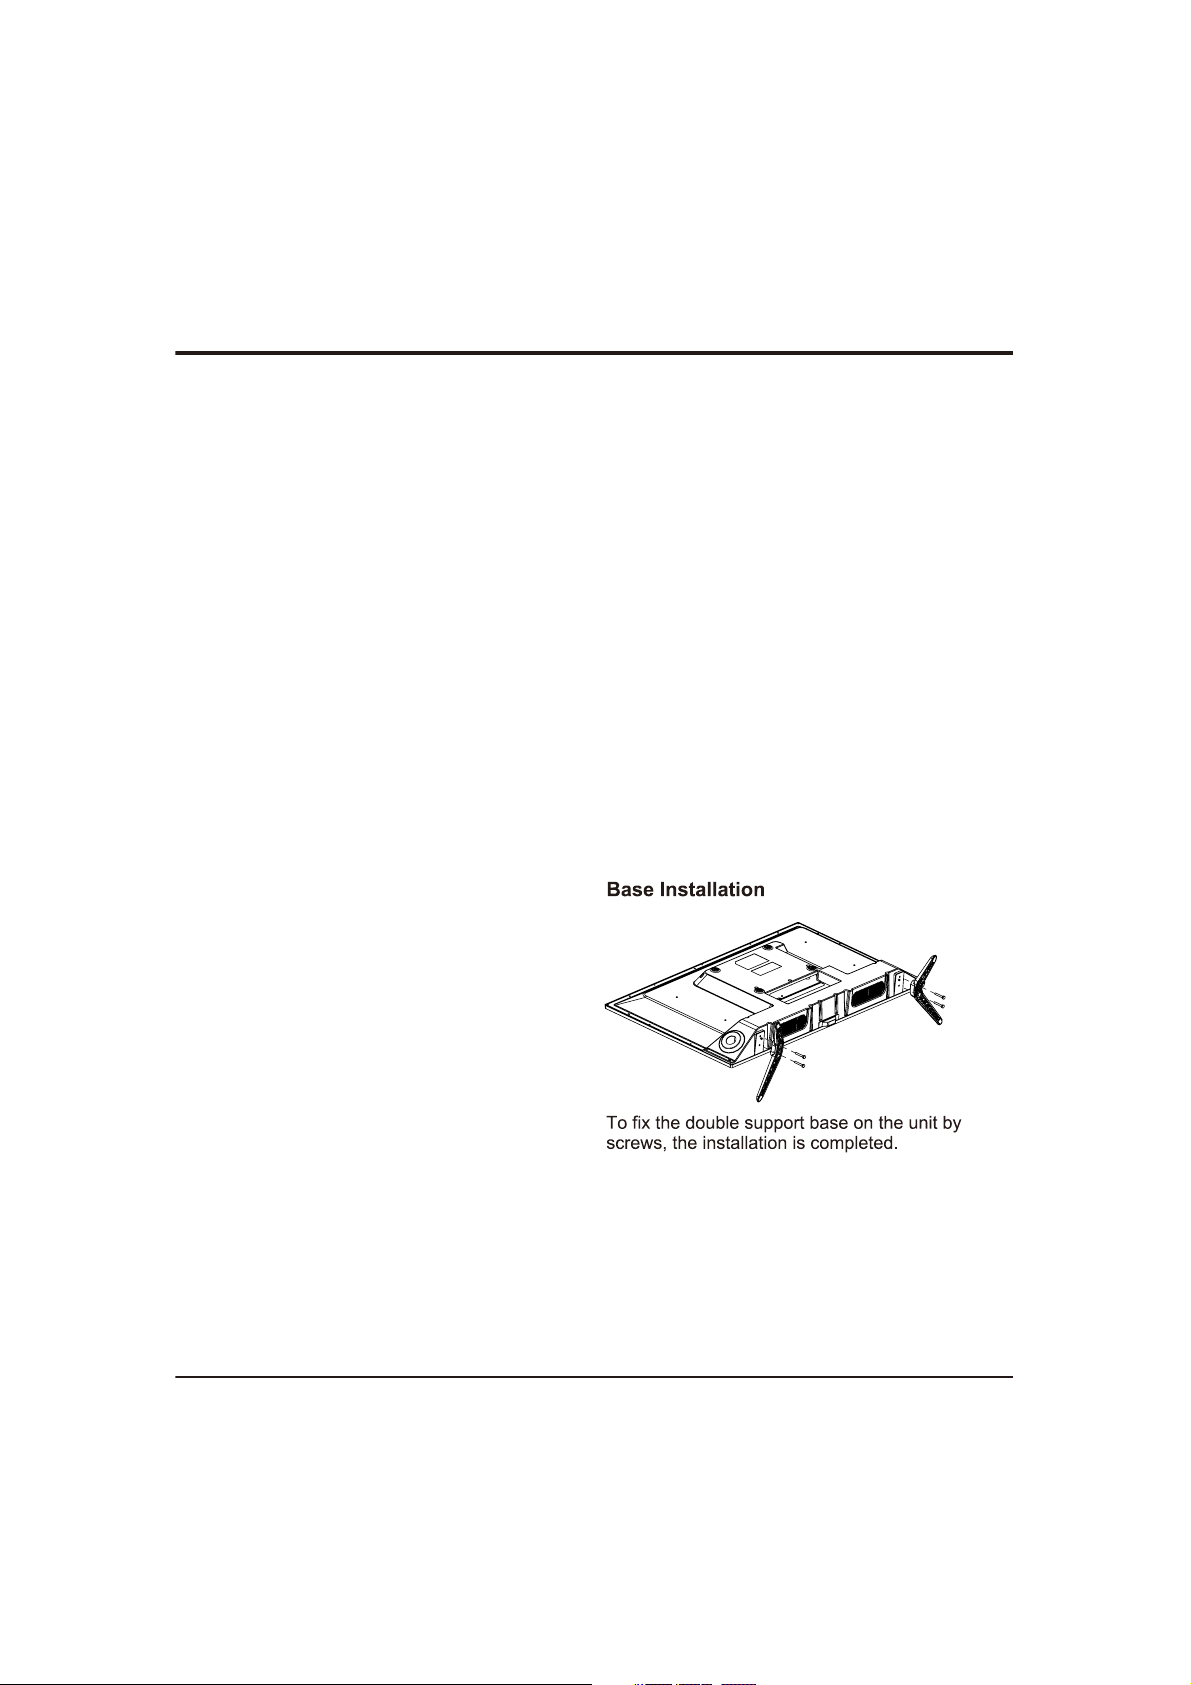
Chapter 4
Troubleshooting
Most problems you encounter with your TV can be
corrected by consulting the following troubleshooting list.
No picture, no sound
1. Check if the fuse or circuit breaker is wo
2. Plug another electrical device into the outlet to make
sure it is working or turned on.
3. Power plug is in a bad contact with the outlet.
4. Check the
No color
1. Change the color system.
2. Adjust the saturation.
3. Try another channel. Black-white program may be
received.
Remote control does not work
1. Change the batterie
2. Batteries are not installed correctly.
3. Main power is not connected.
No picture, normal sound
1. Adjust the brightness and contrast.
2. Broadcasting failure may happen.
Normal picture, no soun
1. Press the Vol+ button to increase volume.
2. Volume is set to mute, press the mute button to restore
sound.
3. Change the sound system.
4. Broadcasting failure m
Unorderly ripples on the picture
It is usually caused by local interference, such as cars,
daylight lamps and hair driers. Adjust the antenna to
minimize the interferenc
Blank screen in VGA mode
Perhaps the TV can not recognize the resolution set by
the PC. Suggest to change to the best resolution or other
standard resolutions of th
Snowy dots and interference
If the antenna is located in the fringe area of a television
signal where the signal is weak, the picture may be marred
by dots. When the signal is extremely weak, it may be
necessary to install a special antenna to improve the
reception.
signal source.
s.
d
ay happen.
e.
e Windows system.
rking.
Other Information
1. Adjust the position and orientation of t
antenna.
2. Check the connection of antenna.
3. Fine tune the channel.
4. Try another channel. Broadcasting failure may happen.
Ignition
Black spots or horizontal streaks appear, or the pict
flutters or drifts. This is usually caused by interference
from car ignition system, neon lamps, electric drills, or
other electrical appliance.
Ghost
Ghosts are ca
paths. One is the direct path, the other is reflected from
tall buildings, hills, or other objects. Changing the d
or position of the antenna may improve the reception.
Radio frequency interference
This interference produces moving ripples or diagonal
streaks, and in some case, loss of contrast in the picture.
Find out and remove the radio interference source.
used by the television signal following two
he indoor/outdoor
ure
irection
16
Page 7
Chapter 4
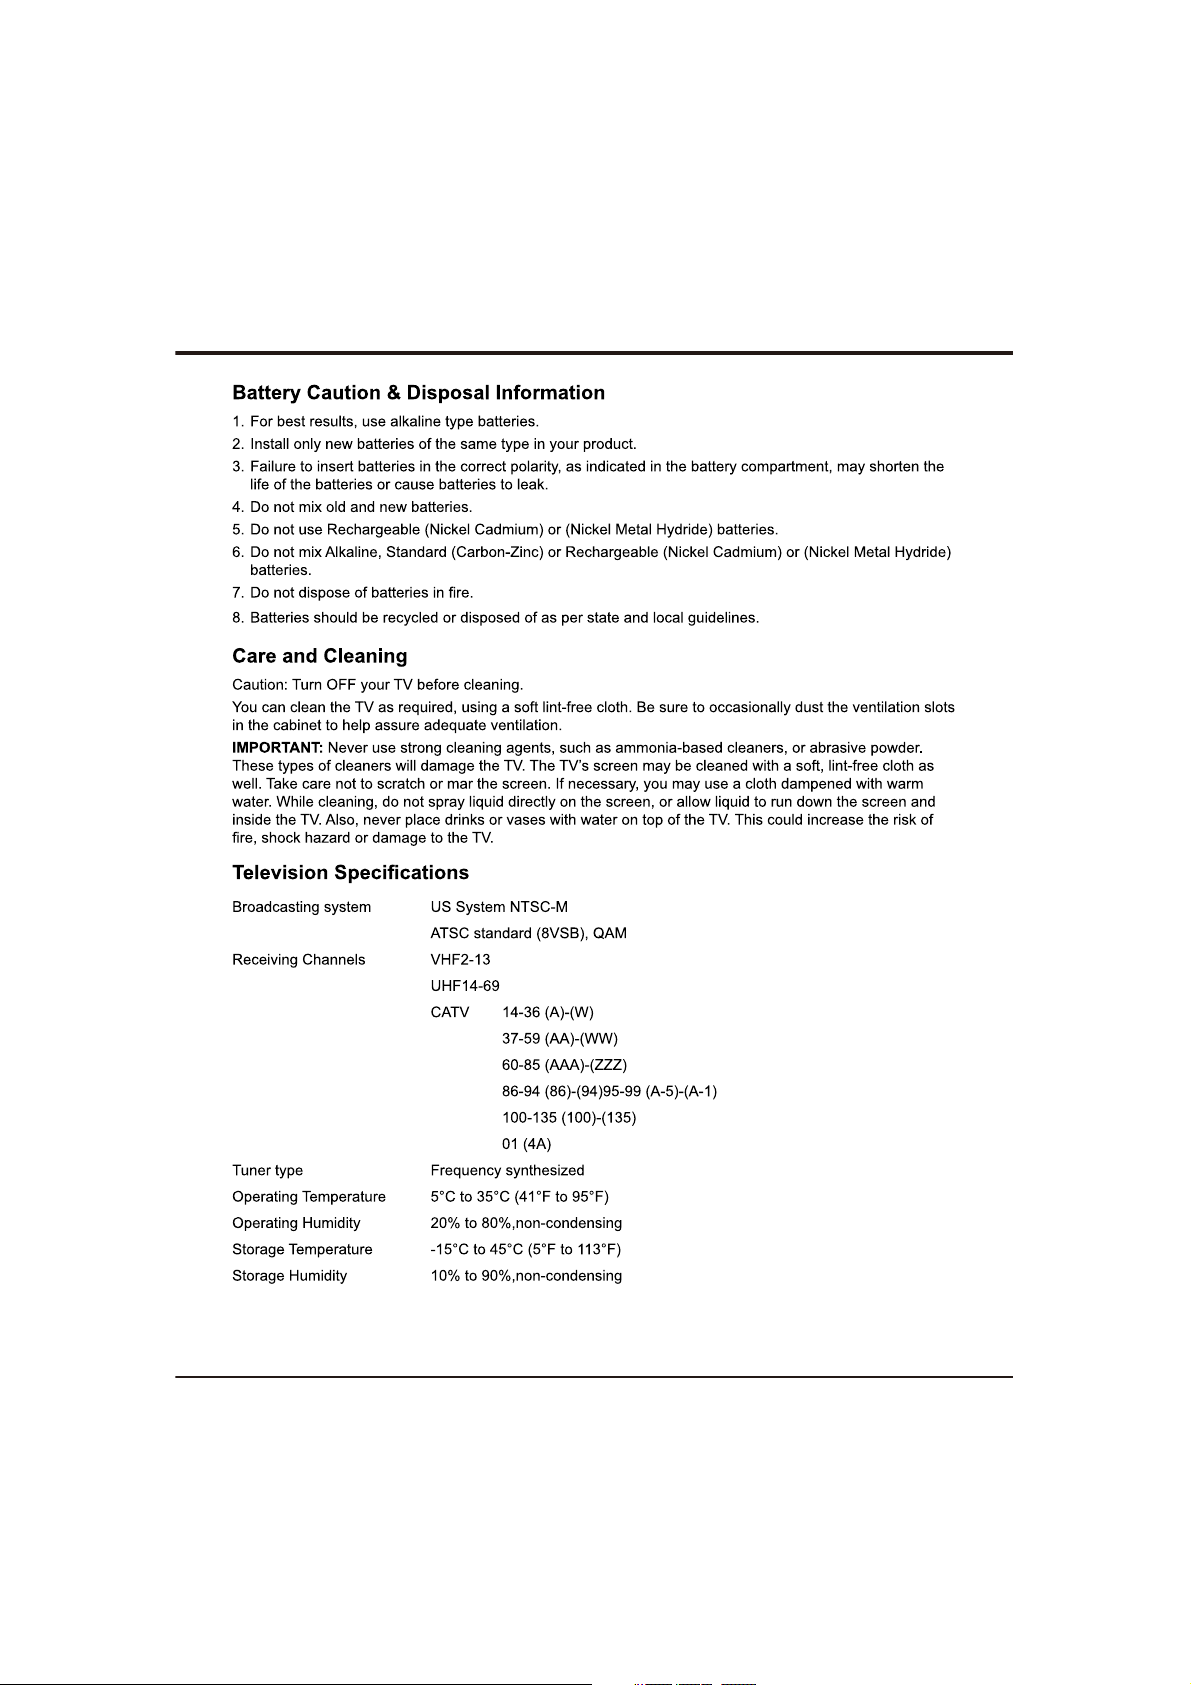
Other Information
171819
Page 8
Page 9
Page 10
20
Page 11
TTE Technology, Inc.
2455 Anselmo Drive, Suite 101,Corona, CA 92879
Part No.: 72-28D270-E399A
 Loading...