

Page 1

Page 2
INSTALL TTELD ELD IN YOUR VEHICLE
1
2
3
4
5
INSTALL TTELD ELD IN YOUR VEHICLE
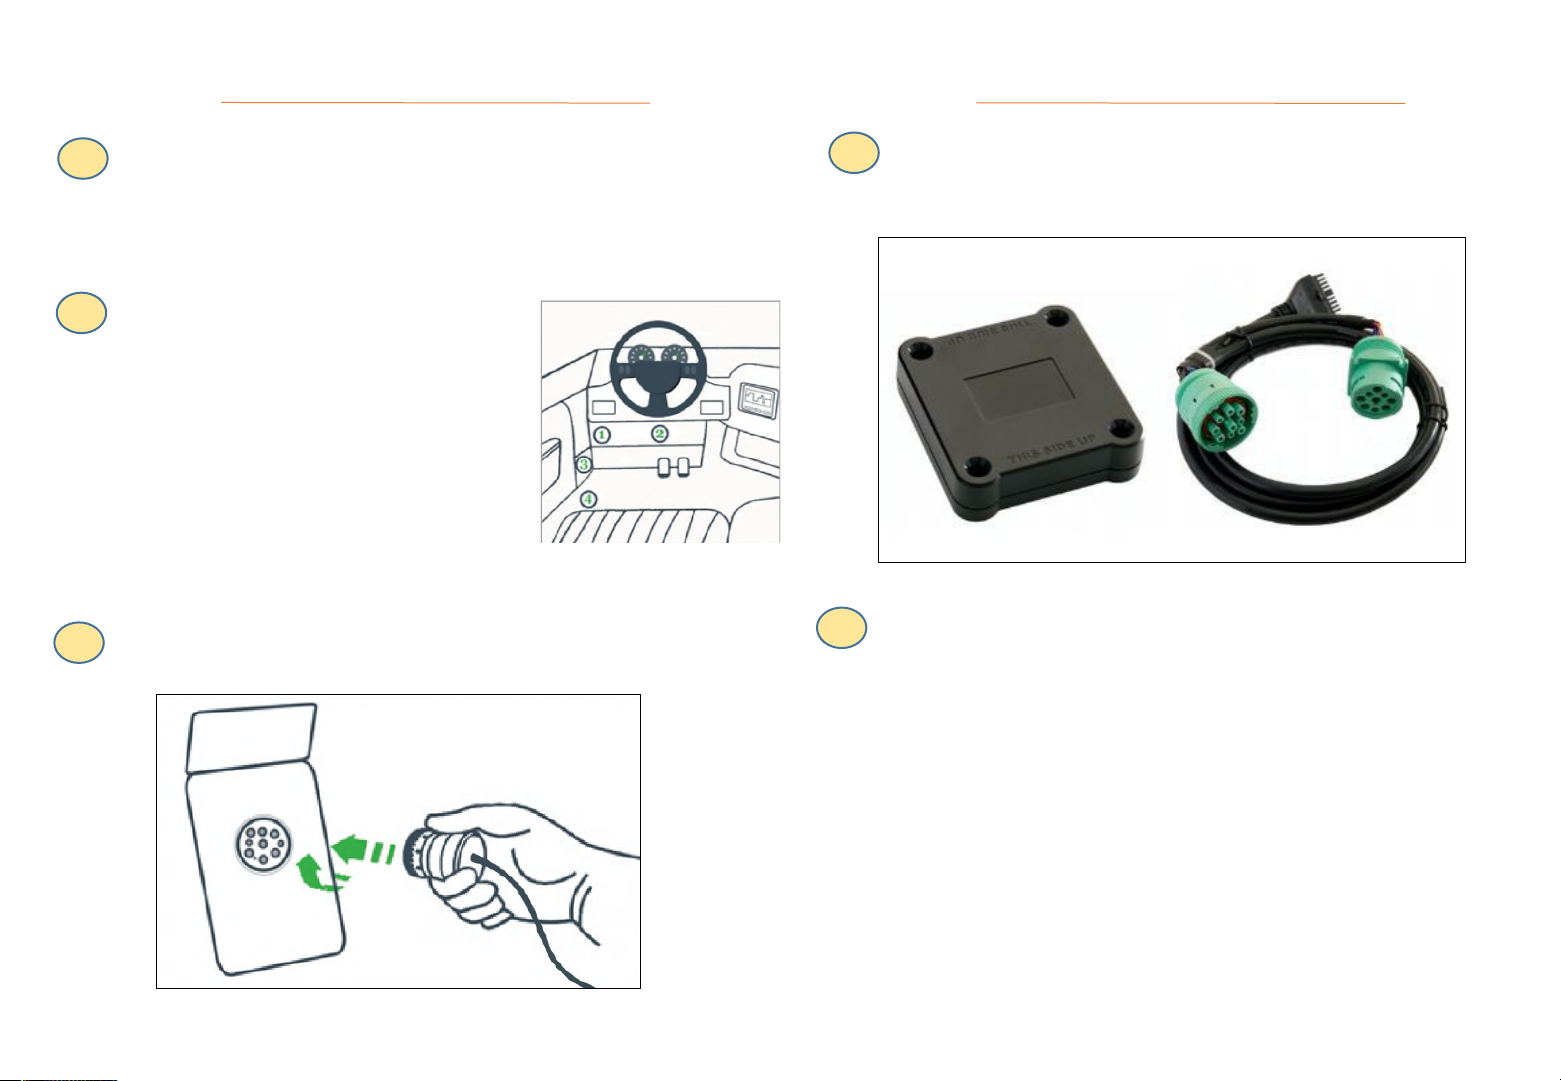
Make sure your vehicle engine is turned off. If the engine is
on, please turn it off and turn the key to the “Off” position
before connecting ELD device
Locate the diagnostic part inside your
vehicle’s cabin. The diagnostic part is
typically located in one of the
following places (picture 1):
1. Under the l e f t side o f the
dashboard;
2. Under the steering wheel;
3. Near the driver’s seat;
4. Under the driver’s seat.
Attach the TTELD ELD plug into the diagnostic part of
the vehicle. Twist the plug base until it locks into place.
Picture 1
Once plugged in, the device will start syncing with the
engine control module [ECM] and TTELD ELD
application on the tablet.
Picture 3
Then get the tablet provided by fleet and turn it on. Tablet
should automatically start application.
Picture 2
1
2
Page 3
1
2
3
4
APPLICATION GUIDE
APPLICATION GUIDE
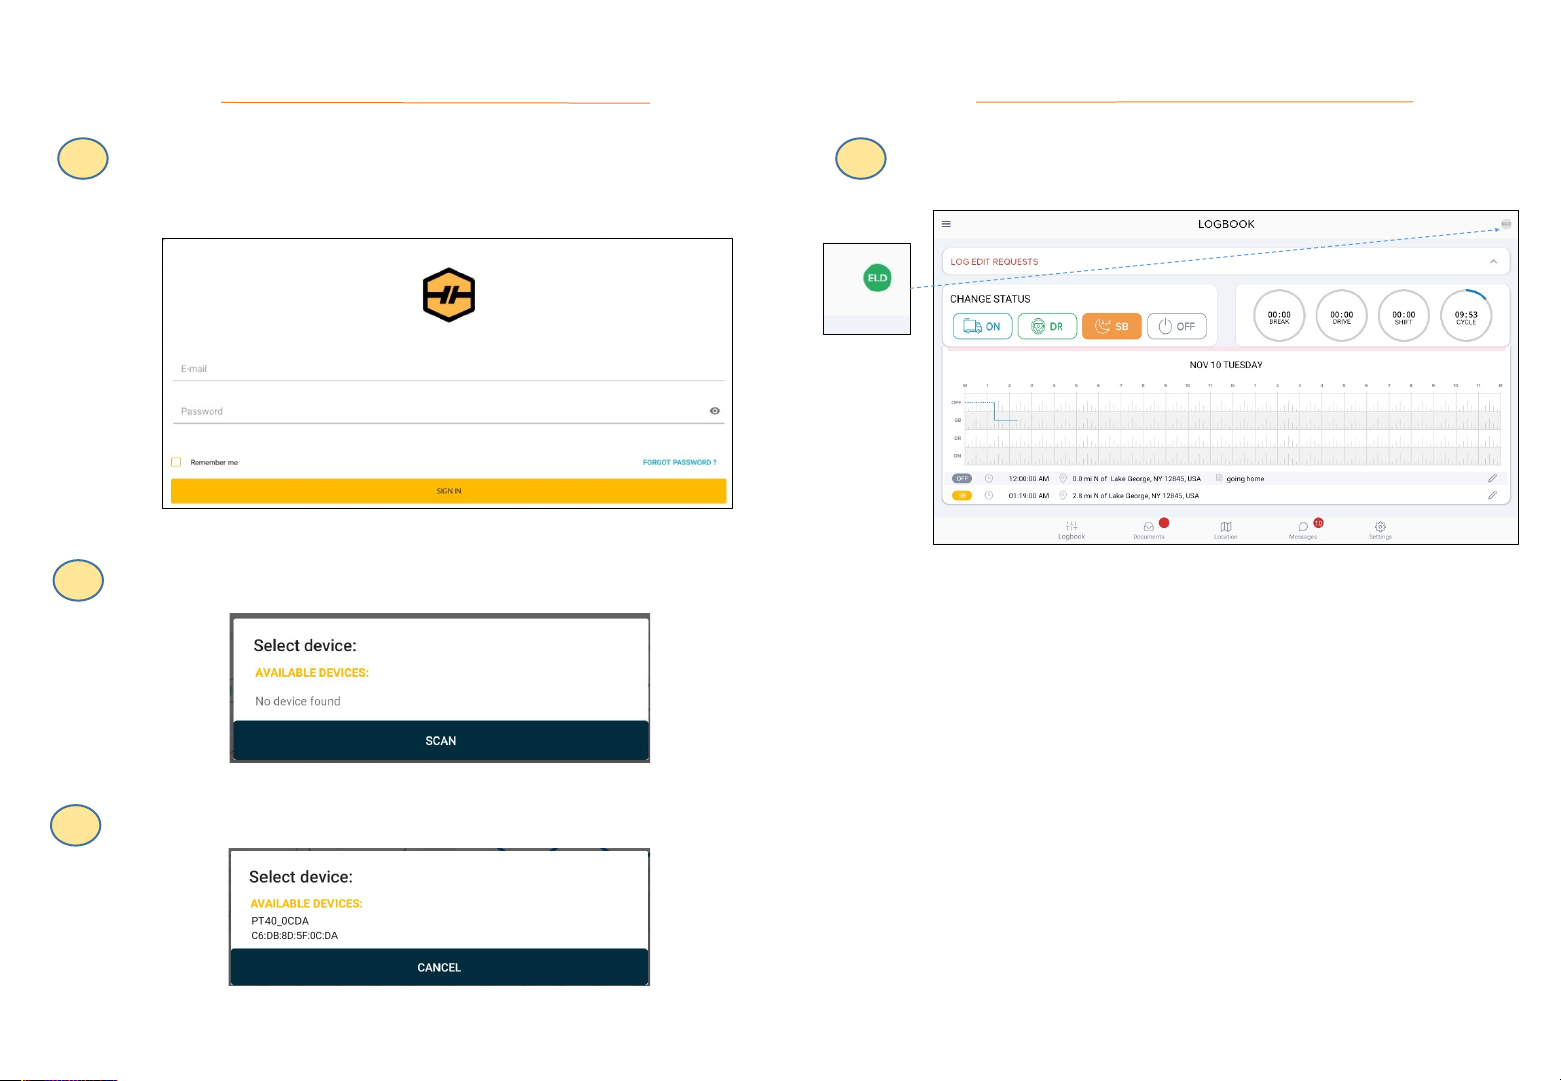
Log into application using your User Name and Password
(picture 4). If you do not have TTELD ELD account, please
contact your fleet manager.
Picture 4
Your cellular device will automatically scan ELD (picture 5)
If the ELD is connected to vehicle driver can see green
icon on top right side of dashboard (picture 7).
Picture 7
Picture 5
Driver should choose ELD (picture 6).
3
Picture 6
4
Page 4
USING TTELD ELD ON THE ROAD
1
2
3
4
USING TTELD ELD ON THE ROAD
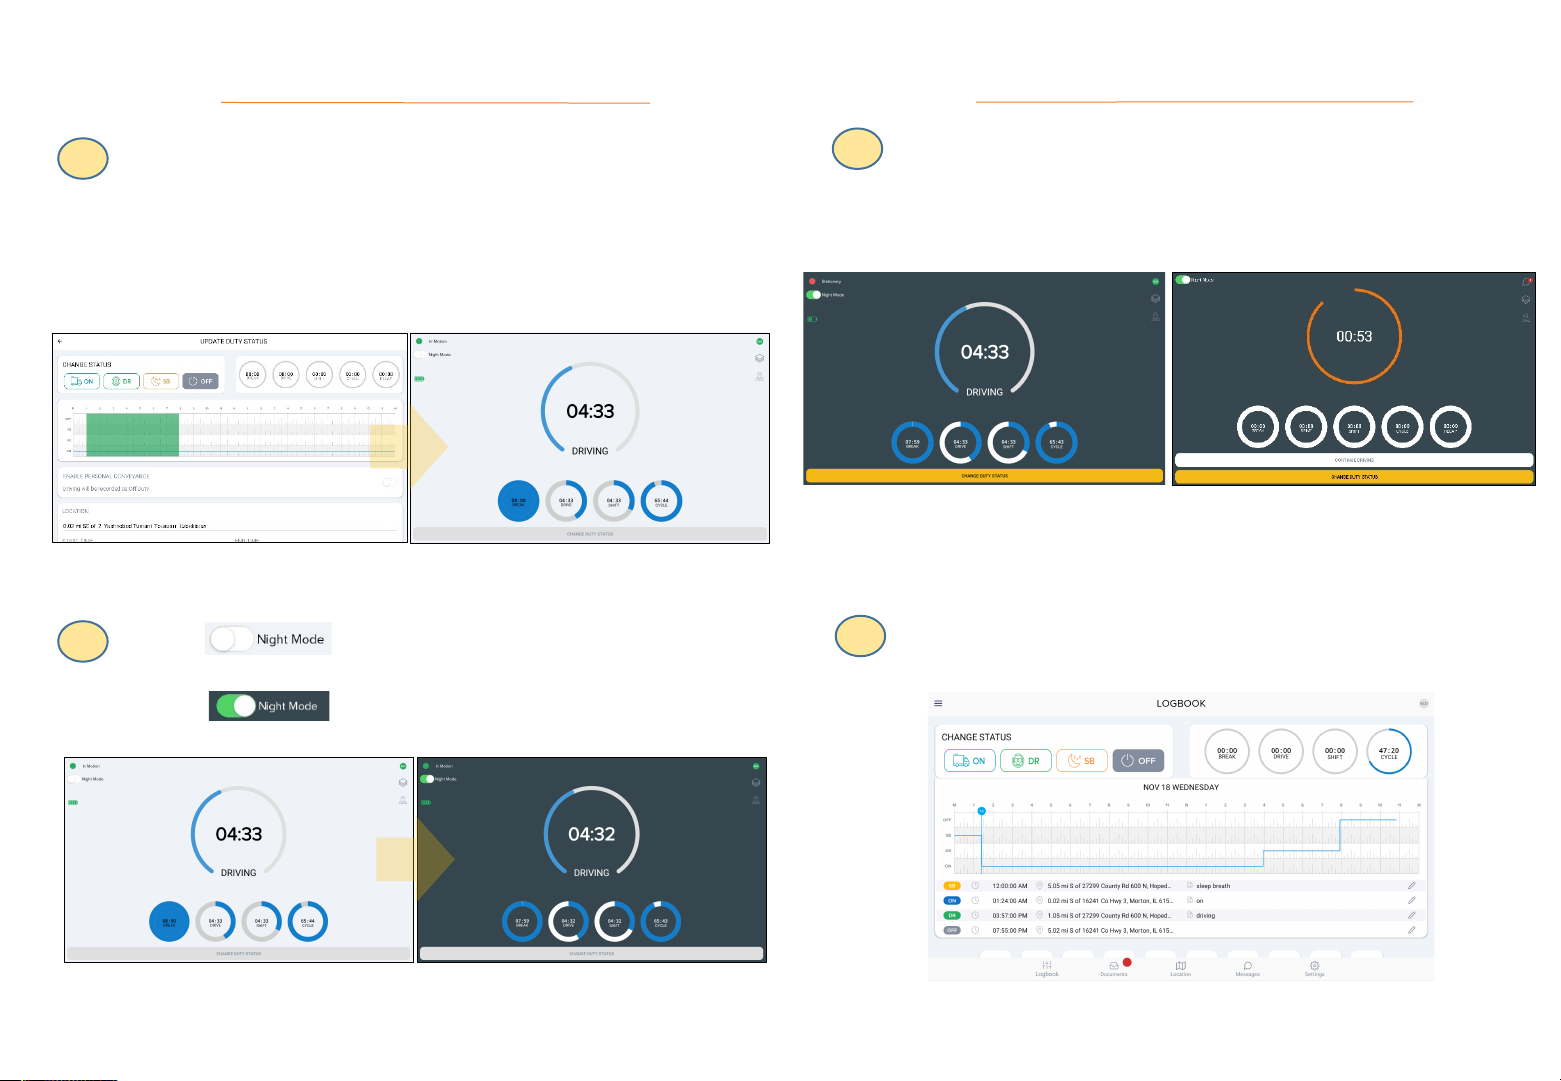
Once you have connected your mobile device to TTELD
ELD, your driving time automatically recorded.
When your vehicle begins moving, your duty status will
automatically be set to “Driving”.
At 5 mph (or more) the vehicle is considered to “Drive”
and “On Duty” (picture 8).
Picture 8
Swipe sign (top left corner of the app) to
switch to “Night Mode”.
Swipe sign to switch back to the “Day Mode”
(picture 9).
When driver stops status on top left changes from “In motion”
to “Stationary” and “Change duty status” will appear. If driver
not takes an action after 80 sec, another button “CONTINUE
DRIVING” and countdown circle will appear (picture 10).
Picture 10
If no action taken app will change status to “Off mode”
(Picture 11).
Picture 9
5
Picture 11
6
Page 5
USING TTELD ELD OFF ROAD
1
2
3
4
USING TTELD ELD OFF ROAD
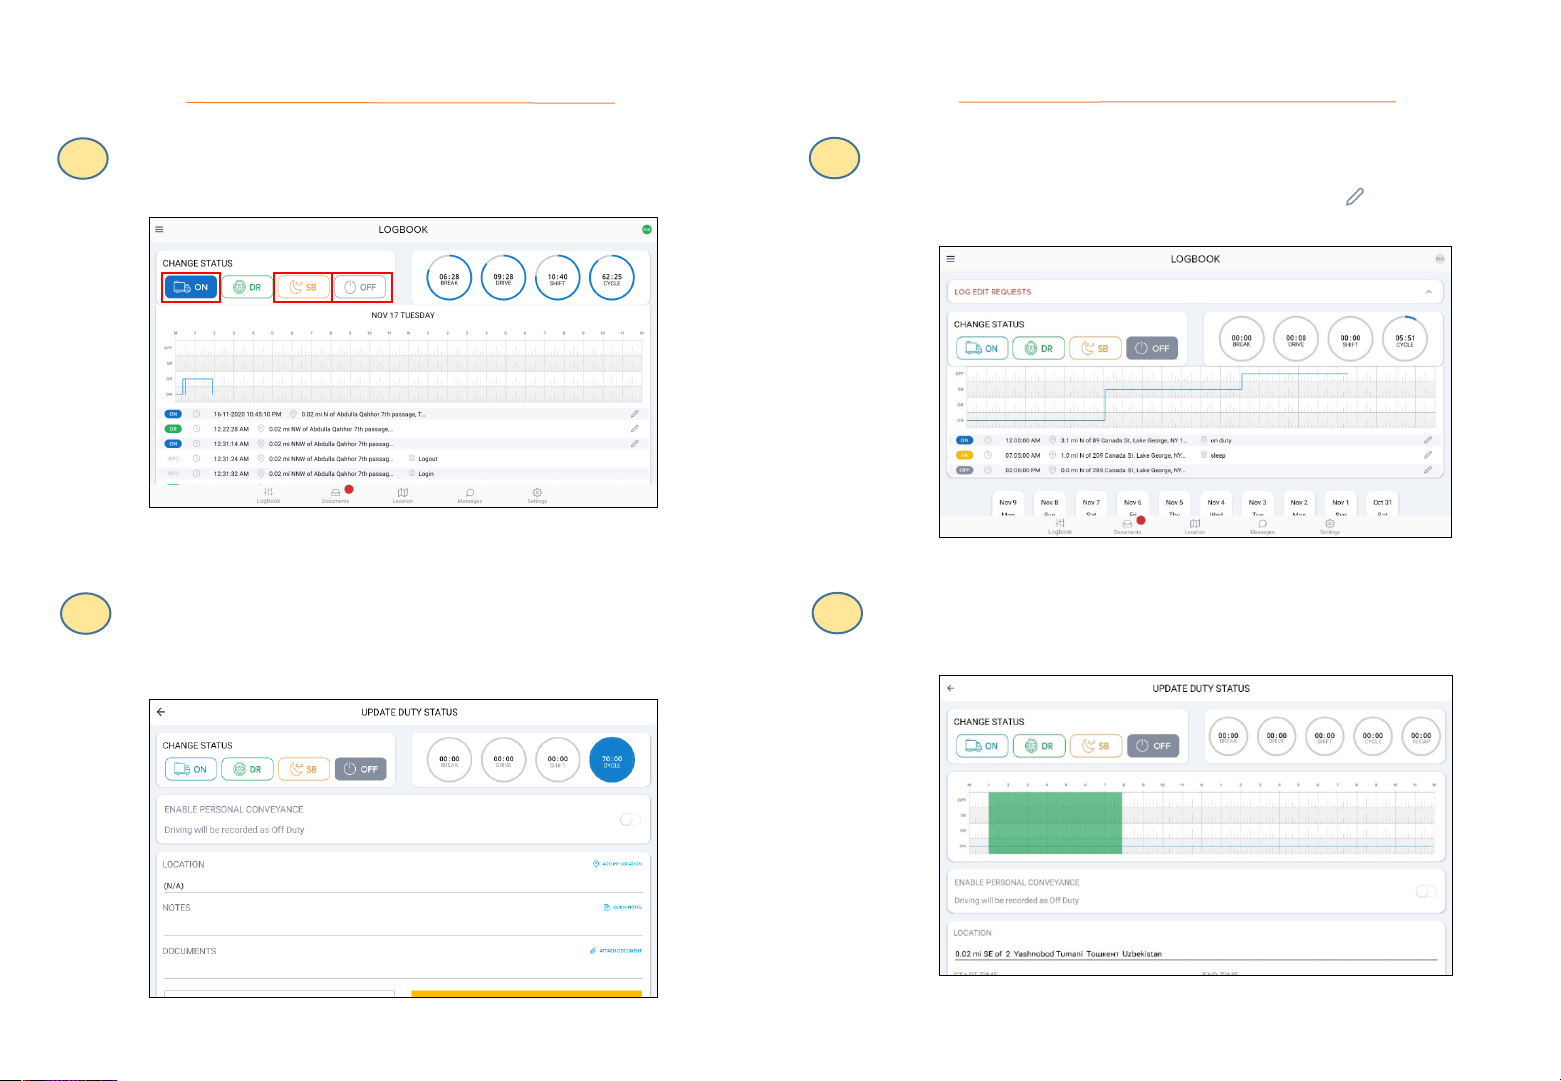
Select the status “Off Duty”, “Sleeper”, “On Duty” (picture
12).
Picture 12
Fill out location field and put remarks, such as “Pre-trip
inspection” or “Coffee break” (if the location field is left
empty, it will be automatically set) (picture 13).
Insert missing status (“On Duty”, “Sleeper” or “Off Duty”)
by tapping or edit existing status by tapping if any
corrections are needed (picture 14).
Picture 14
Choose the status you want to change and set the time frame
(picture 15).
7
Picture 13
Picture 15
8
Page 6
OTHER OPTIONS
1
2
3
4
OTHER OPTIONS
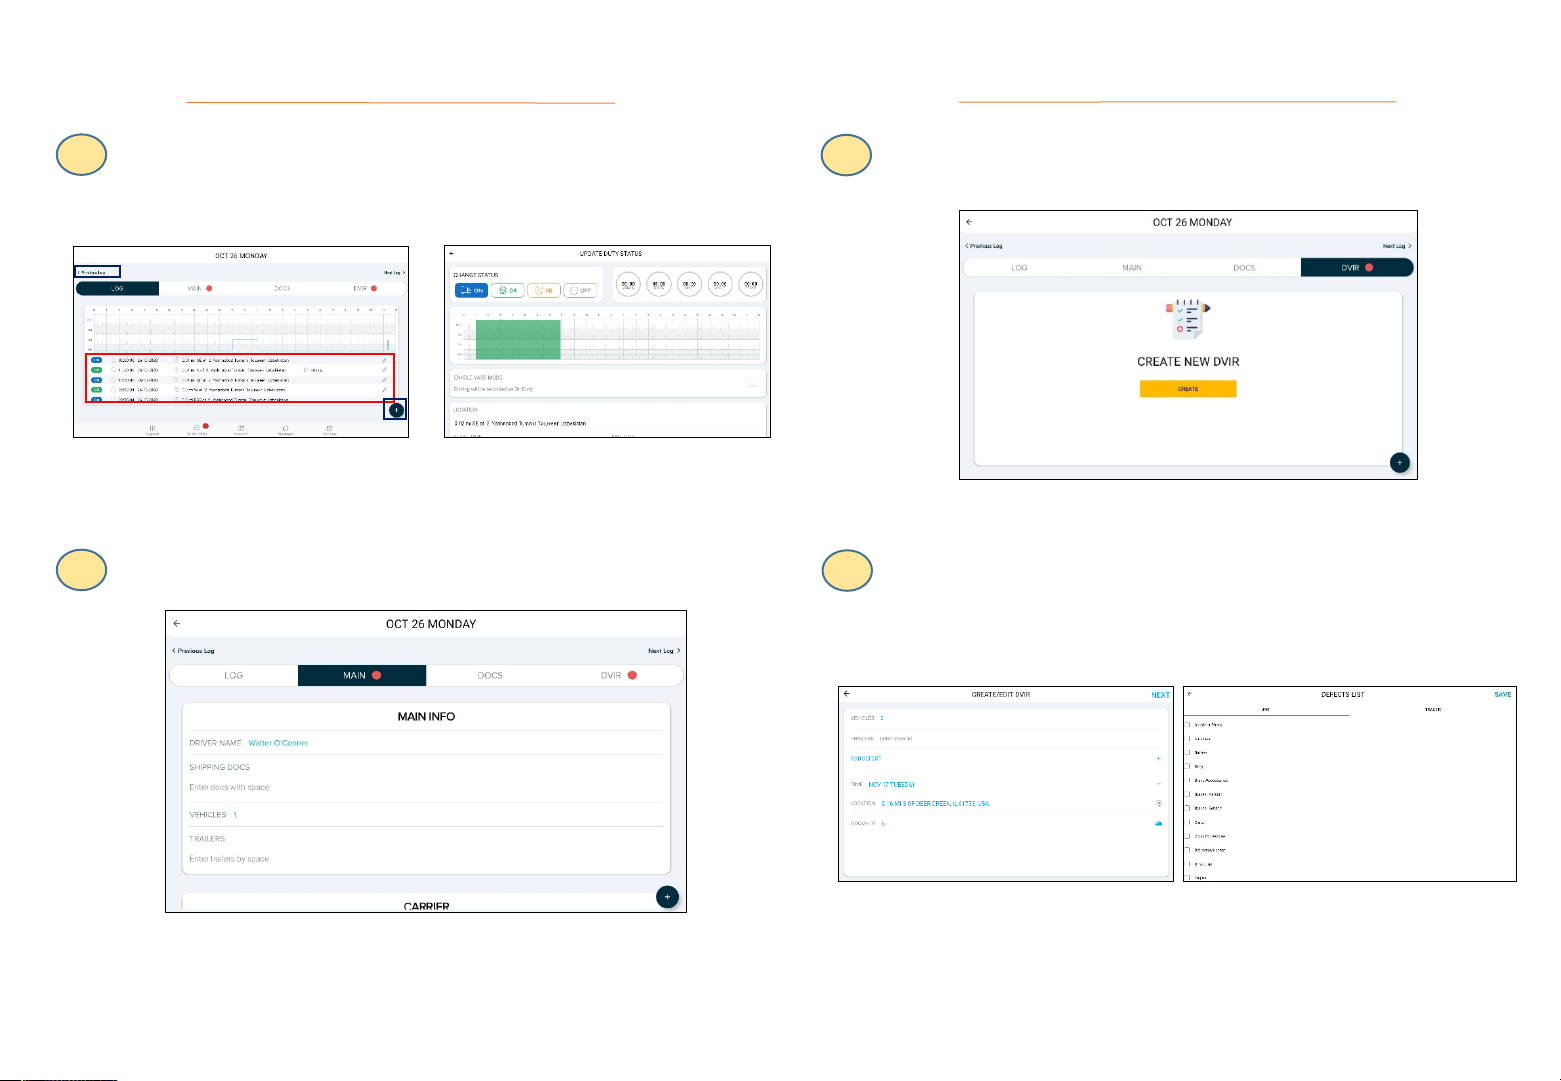
Go to “Documents” options available from the main screen:
Choose status to change or add new status (Driver can go to
previous time frame to make changes (picture 16).
Picture 16
Put your recording and save to system at “MAIN” (picture 17).
Make a Driver Vehicle inspection report [DVIR] go to
“DVIR” (picture 18).
Picture 18
Insert the status of the vehicle, if defect is detected tap
“ADD DEFECT” (picture 19).
And choose defect from list “unit” and “trailer”
Picture 19
Picture 17
9
10
Page 7
OTHER OPTIONS
1
1
2
OFFICER INSPECTION
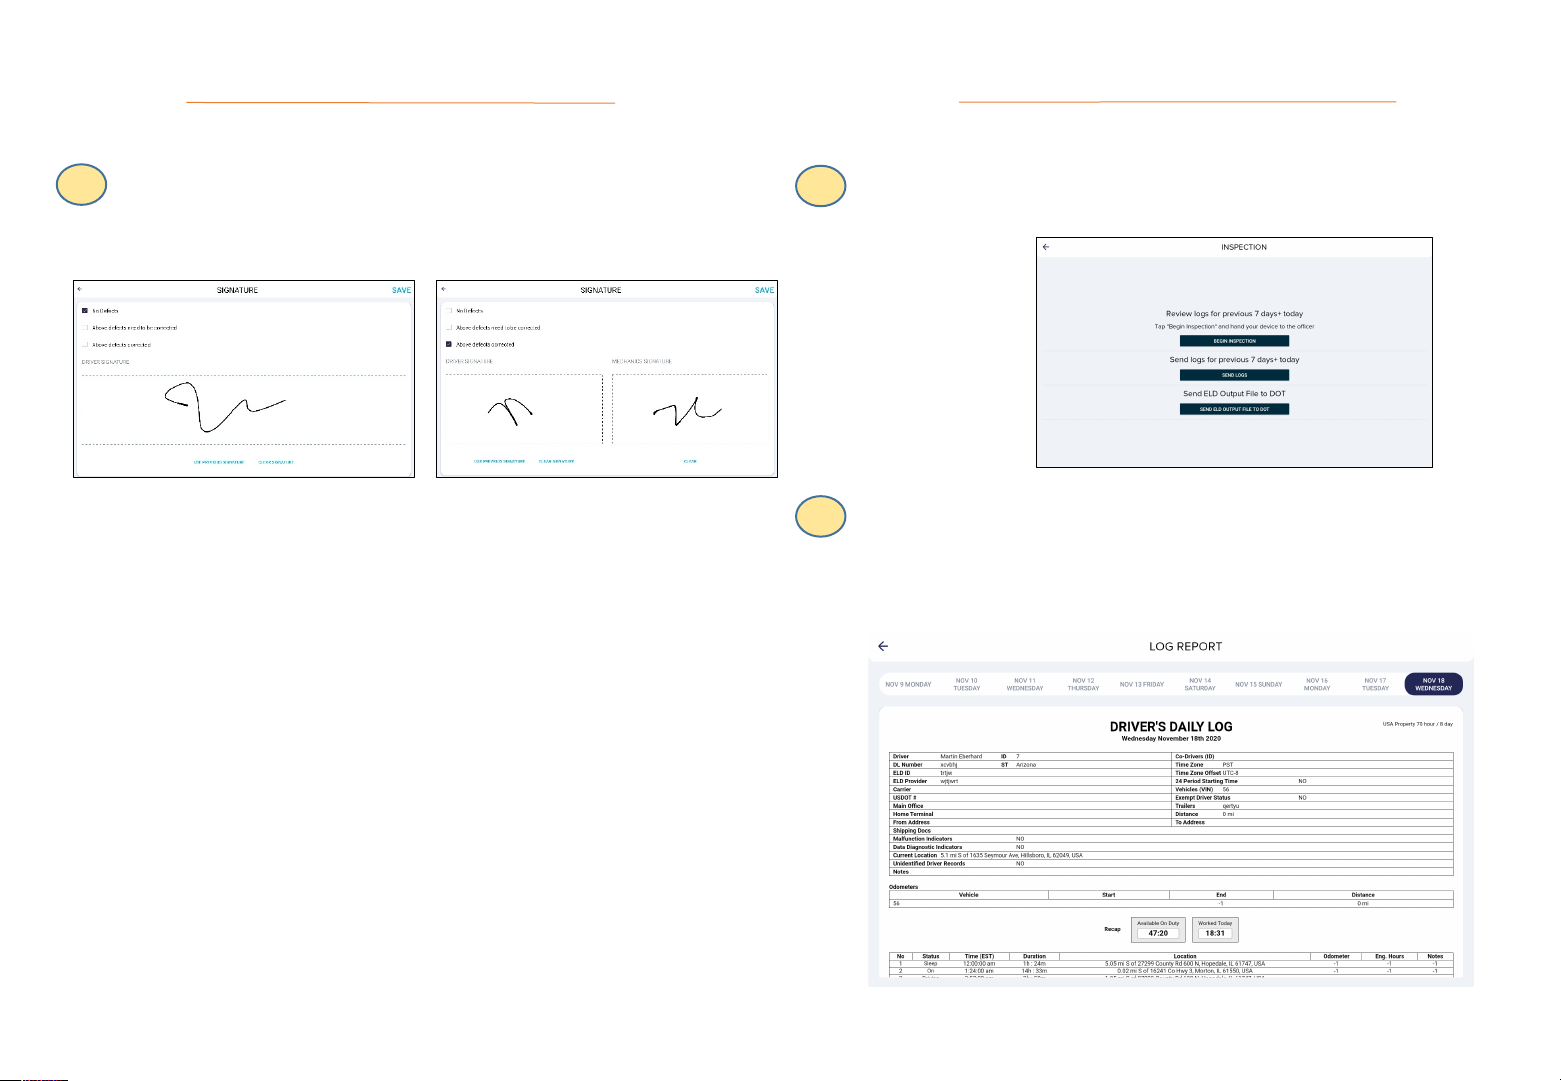
It’s easy to provide on officer with your driving information.
Tap “NEXT” and put your signature to verify. If defects
are corrected mechanics signature required (picture
20).
2
Picture 20
Tap “Menu” bar icon on the top left corner and select
“INSPECTIONS” (picture 21).
Picture 21
Tap “Begin inspection” and show your electronic logbook 8day summary to the officer (picture 22).
The application will generate the report for the officer
11
Picture 22
12
Page 8
TRANSFER ELD RECORDS TO AUTHORIZED
1
2
3
4
SAFETY OFFICER INSPECTION
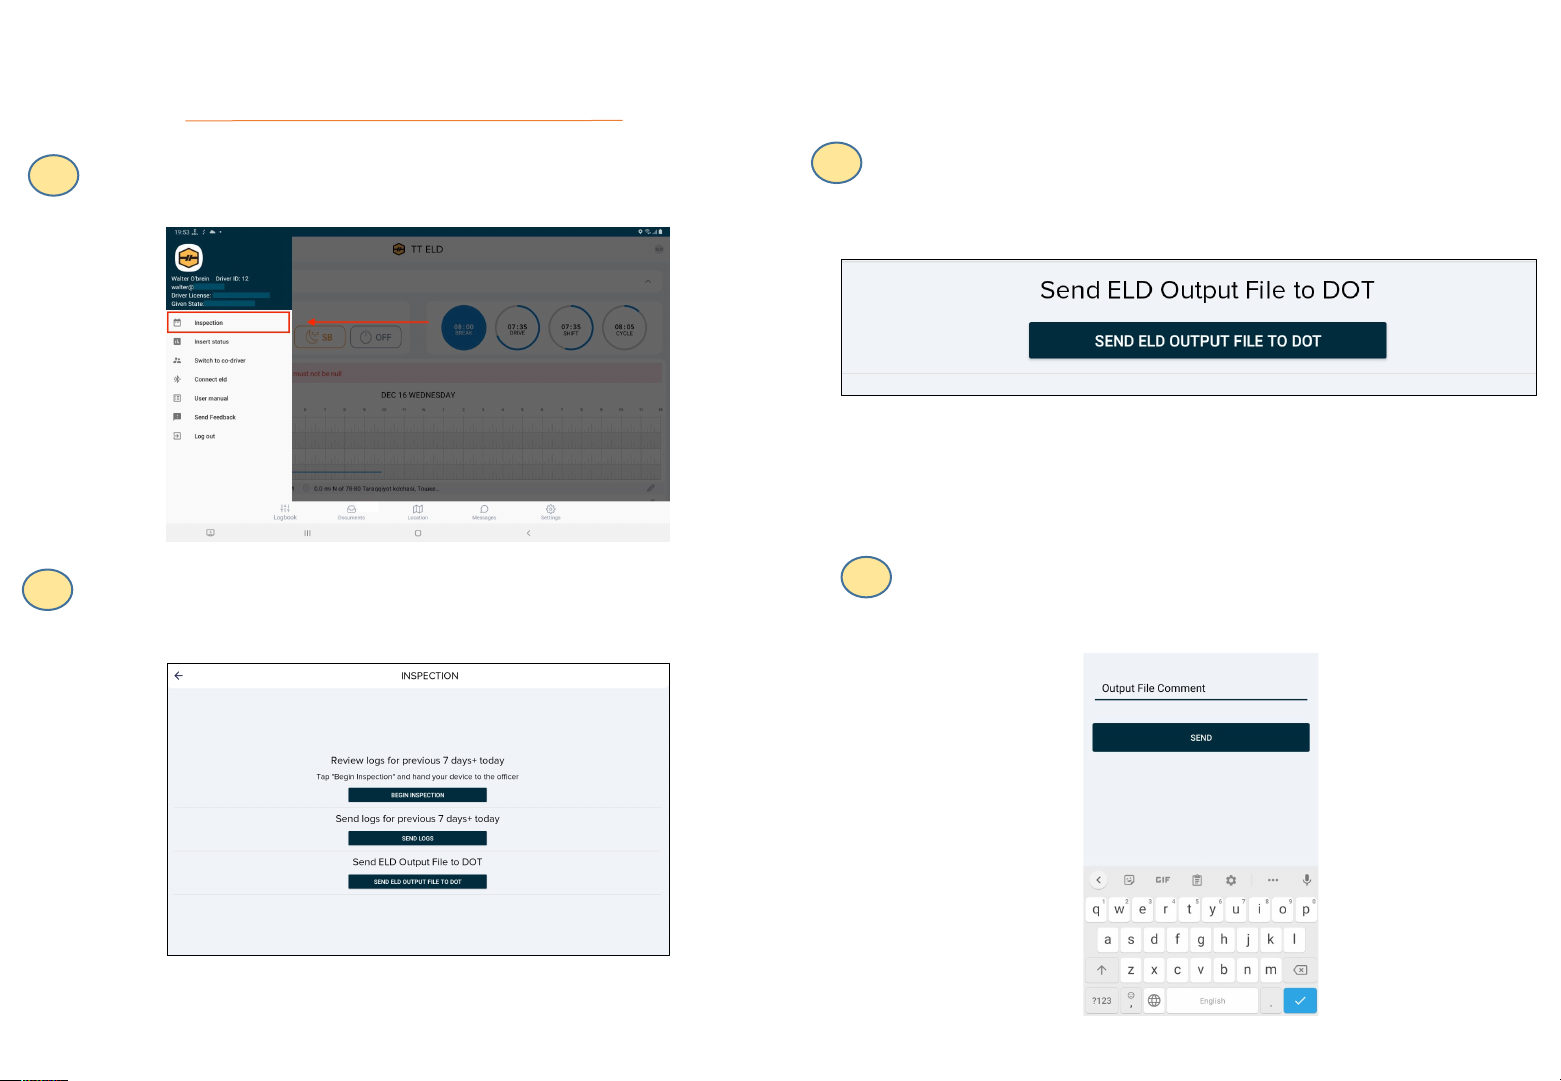
Tap “Menu” bar icon on the top left corner and select
“INSPECTIONS” (picture 21).
Picture 21
Tap “Send electronic log book to DOT” and show your
electronic logbook 8-day summary to the officer (picture 22).
Select “Send electronic log book to DOT” (picture 23).
Picture 23
Type Output File Comment and tab “Send” (picture 24).
13
Picture 22
Picture 24
14
Page 9
SETTINGS
1
1
ELD MALFUNCTIONS
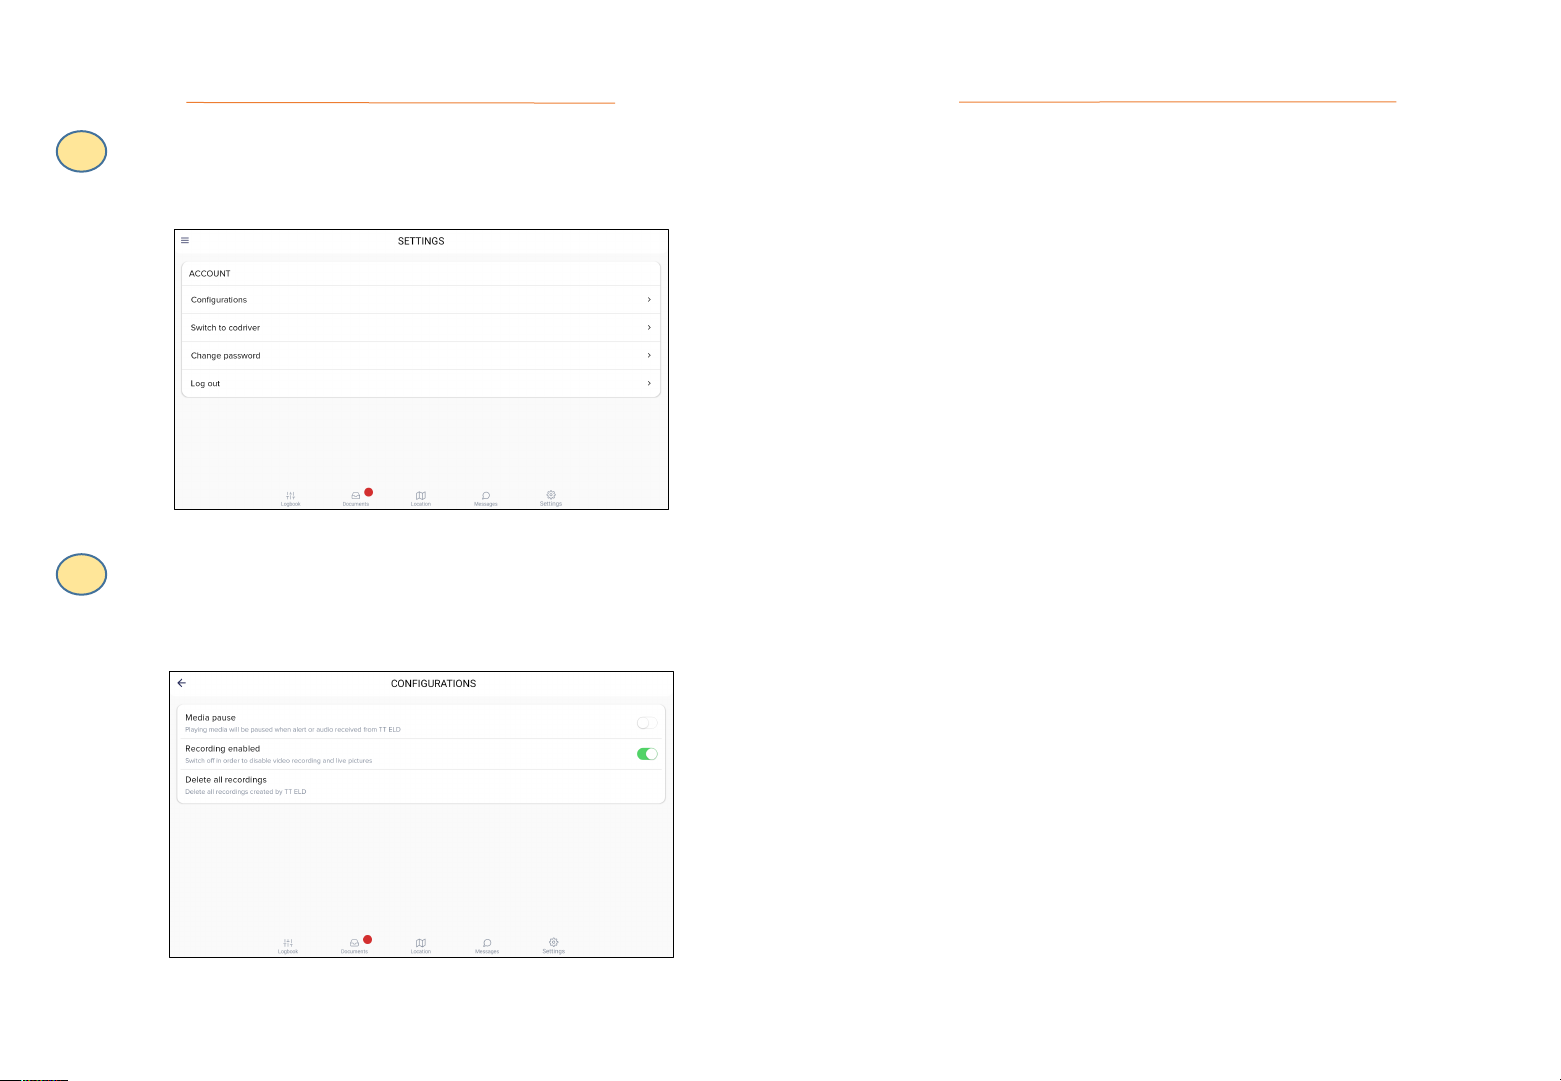
Choose “Settings” from the bottom, where driver change
general settings from “Configurations”, “switch to codriver” or “Change password” (picture 25).
Picture 25
From menu list choose “Configurations” to change
sound settings, violations visibility, to change password
(picture 26).
395.22 Motor carrier Responsibilities
A motor carrier must ensure that its drivers possess
onboard a commercial motor vehicle and ELD information
packet containing the following items:
An instruction sheet for the driver describing ELD
malfunction reporting requirements and recordkeeping
procedures during ELD malfunctions.
The following instructions are in accordance with the
guidelines set forth in 395-34
GPSTab ELD will monitor and report malfunction data base on
section 4.6 ELD’s Self-Monitoring of Required Functions table 4:
P – “Power compliance” malfunction,
E – “Engine synchronization compliance” malfunction,
T – “Timing compliance” malfunction,
15
L – “Positioning compliance” malfunction,
R – “Data recording compliance” malfunction,
S – “Data transfer compliance” malfunction,
O – “Other” ELD detected malfunction.
Picture 26
16
 Loading...