

Page 1

1
Version: 09-08-07
© TS-Market
Operation manual
EDIC-mini Plus
Digital Voice Recorder
Page 2

2
Contents
The Edic-mini Plus Digital Recorder ................. 3
Overlook .................................................... 3
Outlook of the Recorder ................................. 4
Main Technical Characteristics and Functionality 5
Technical Characteristics .................................. 5
Functionality ................................................. 6
Operating with the Recorder ........................... 7
Stand-by Mode .............................................. 7
Prole Select ................................................ 7
Recording Mode ............................................ 8
Playing Recordings Back ................................. 9
Navigation ................................................... 9
Deleting Recording ....................................... 10
Checking the Battery’s Charge and the Free memory
Capacity .................................................... 10
Connecting to a Computer and Charging the Re-
chargeable Battery...................................... 11
System Requirements ...................................11
Charging the Recorder ...................................11
Data Exchange ............................................ 12
Updating the Recorder’s Firmware .................... 13
Access Levels ............................................. 14
Box Contents ............................................ 16
Page 3

3
The Edic-mini Plus Digital Recorder
Thank you for buying the digital recorder of the
EDIC-Mini Plus family. When buying, please check
the box contents. Before using, read this instruction
carefully.
Overlook
The recorders of the EDIC-Mini Plus family are
professional devices that provide high quality
recording on a built-in Flash memory. Recorded
messages can be played back with headphones
and saved as standard audio les on to a computer
hard drive. The recorders have a small size
and weight, a long recording duration, reliable
operating autonomy, a wide frequency band, and
a big microphone operation distance. The USB 2.0
interface allows high speed data exchange between
the recorder and the computer (5.5 Mb/sec). The
supplied software allows to save messages as
standard audio les, set the recorder’s parameters,
and administrate the recorder’s operations. The
recorder can be used for audio recording and as
a ash drive for saving les of any formats. The
recorder has control buttons and 2 layer OLED
indicator that shows the recorder’s modes.
Page 4
4
The recorder has a Voice Activation System that
increases recording duration by compressing
pauses. After the recorded les are uploaded on to
a computer, the pauses can be restored.
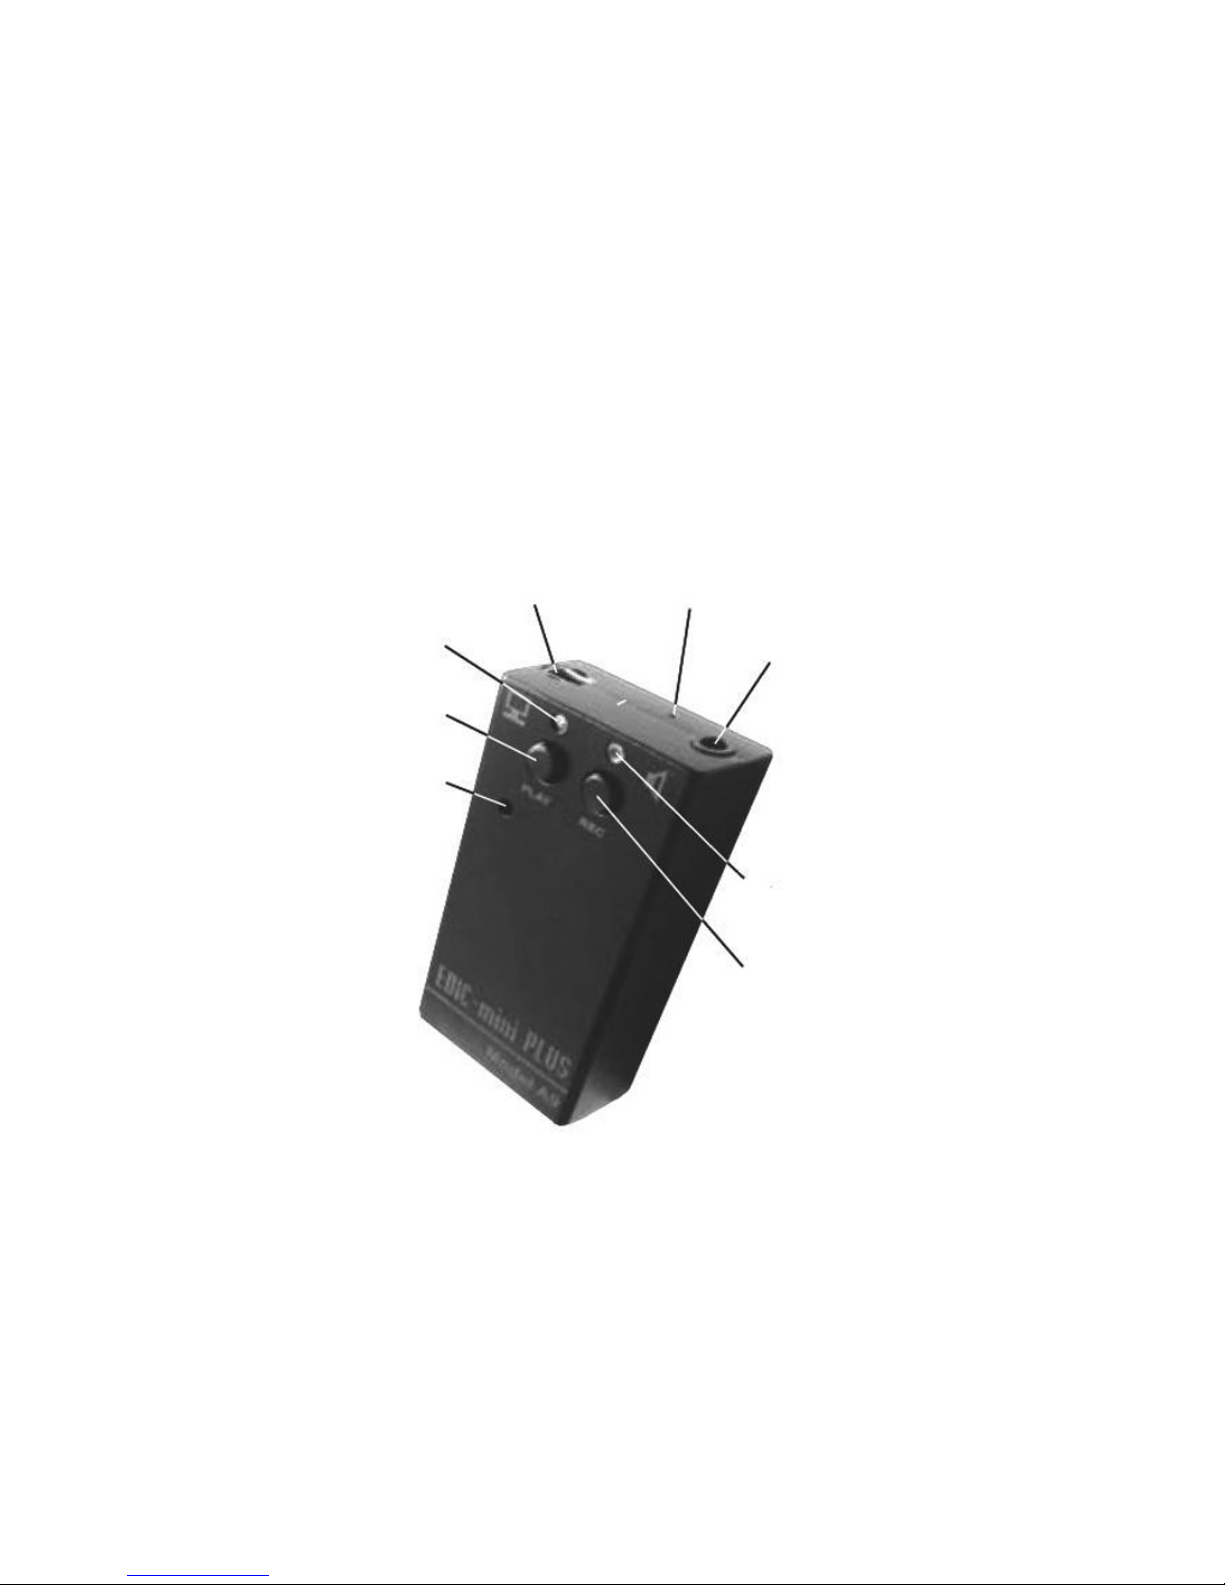
Outlook of the Recorder
Red and
blue LEDs
Play button
Reset button
USB Connector
Headphones’
connector
Microphone
Rec. button
Green and
yellow LEDs
Page 5

5
Main Technical Characteristics and
Functionality
Technical Characteristics
Recording duration in the mode: 2 bit ADPCM, and sampling rate of 8 k Hz, 16 K bit/sec
Model’s
code
Recording
duration
(hours)
Memory
capacity
(Gb)
150h 150 1
300h 300 2
600h 600 4
1200h 1200 8
2400h 2400 16
Table 1.
The recorder has a mode – modicated 2 bit
ADPCCM, sampling rate of 4 k Hz, 8 kb/sec,
when the recording duration is twice as long in
comparison to the data from the Table 1.
Page 6

6
• Input voltage: 3.3-4.2 V;
• Operating temperature: 0-50 °C;
• Frequency band on computer: 100-6,000
Hz; in headphones: 100-3,800 Hz;
• Sampling rates: 16,000; 8,000; 4,000 Hz;
• Codec: 16 bit;
• Sound/noise ratio: -72 Db;
• Built-in microphone operating distance:
7-9 m;
• Amount of recording’s proles: 8;
• Data exchange rate (USB 2.0 interface):
5.5 Mb/sec;
• Flash memory’s shelf life: 10 years;
• Rechargeable battery: Li-Ion;
• Charging time: 3 hours;
Functionality
• Real time clock;
• Voice Activation System;
• Linear and circular modes (memory size
is set in percent according to the whole
memory amount);
• Indication of a charge level;
• The possibility to delete any recording;
Page 7

7
Operating with the Recorder
Stand-by Mode
When turned on, the recorder is in the stand-by
mode and its LEDs are off.
Notes
To press the recorder’ button “twice” means to
press the button two times within one second, to
press three times- to press within 1.5 second.
Prole Select
The shipped Rec Manager program allows to set
8 custom recording proles. These proles differ
by compression algorithms and frequency bands.
You can set on/off Voice Activation System (the
pause compression during recording that can be
restored after downloading on a computer) and
select a linear or circular mode for every prole.
To select a recording prole, keep the Play button
pressed for 4 seconds until the red and green LED
ashes simultaneously. If the LEDs ash once, the
rst prole is selected; twice – the second prole is
selected and etc. If you press the Play button once,
Page 8

8
you will select the next prole (the second one – if
the rst was selected).
If the Rec button was pressed once or if there is no
any button activity within 14 seconds, the recorder
will switch into the stand-by mode and the selected
prole will be saved.
Recording Mode
In the stand-by mode, press the Rec button twice
– after a short LED’s ash, the recorder will start
recording. The red LED will ash with a 3 second
period. The recorder will continue to record until
the Rec button is pressed twice.
To stop recording for a while, press the Rec button
once and the red LED will start ashing more
frequently. Then to continue recording, press the
Rec button and the recorder will start recording
and the red LED will be ashing with a 3 second
period again.
Attention!
If while recording, the recorder’s free memory is
over or the rechargeable battery is discharged,
the recorder will switch into the stand-by mode
automatically. The recorder can’t switch into the
Rec mode until its Flash memory does not have a
free space or its battery is not charged.
Page 9

9
Playing Recordings Back
Connect the shipped headphones to the special
recorder’s connector. When the recorder is in the
stand-by mode, press the Rec button twice and
after short LED’sp15 ashes the recorder will play
back the last recording. The green LED will ash
with a 3 second interval. To accelerate playing
back forward (within the recording), keep the Rec
button pressed, to go to the beginning of the
recording – keep the “Play” button pressed.
If there is the end of the recording (playing back
forward) or the beginning (if the recorder was
playing back from the end to the beginning), the
recorder will switch into the stand – by mode (if
there is not any button activity within 14 seconds).
To stop playing back, press the Rec and Play
button simultaneously and the recorder will switch
into the stand –by mode.
Navigation
• To the end of the current recording – press
the Rec button once.
• To the beginning of the current recording
– press the Play button once.
• To the beginning of the next recording
– press the Rec button twice.
Page 10

• To the beginning of the preceding recording
– press the Play button twice.
• To the beginning of the last recording
– press the Rec button three times.
• To the beginning of the rst recording
– press the Play button three times.
Deleting Recording
You can delete the recording while playing the
recording back. Press the Play button twice – the
recorder will start playing back the last recording
(the green LED will ash). Switch to the needed
recording (see Navigation). Keep the both
button pressed until the blue LED starts ashing
frequently. Then in a second, press the Play button
– the recorder will start deleting the recording
and the blue LED will light continuously. After the
recording is deleted, the blue LED will turn off and
the recorder will switch into the stand-by mode.
Repeat the previous steps to delete the different
recording.
Checking the Battery’s Charge and the Free
memory Capacity
You can evaluate the recorder’s battery charge and
the free memory capacity. For that, in the stand-by
Page 11

11
mode press the both button simultaneously until
the yellow and blue LED turn on. The yellow LED
shows the battery charge: the longer the ashes,
the lower the charge. The blue LED shows the
free memory capacity: the shorter the ashes, the
bigger the free memory capacity.
Press any button to switch off this mode.
Connecting to a Computer and Charging
the Rechargeable Battery
System Requirements
1. Windows 9x/Me/NT/2000/XP/Vista OS;
2. Audio Card;
3. USB interface (2.0 is preferable).
Charging the Recorder
Connect the recorder to the computer USB port
using the supplied USB cable to charge the
rechargeable battery. The yellow LED will start
ashing. The duration of the LED’s ashes is
reversely proportional to the rechargeable battery’s
charge (the longer the duration, the lower the
charge).
Page 12

12
Attention!
It is necessary to charge the rechargeable battery
fully at least once every three months to keep it in
working condition when you don’t use it for a long
period of time. Otherwise the battery cannot be
covered by the warranty.
Attention!
When the battery is fully discharged, the recorder
does not answer to button activity, but if it is
connected to a computer, the rechargeable battery
will start charging.
Data Exchange
Connect the shipped USB cable to the recorder’s
special connector and to the computer USB port
(see Figure 1). The software has a convenient user
interface so you don’t need special skills to connect
the recorder. To switch to the charging mode, press
the any button on the connected recorder until the
blue LED starts ashing. After this, a removable
drive will appear in the computer system. The
instruction and the RecManager program are on
this drive. Run the RecManager program from the
removable drive. After the data exchange is over,
switch the recorder into a charging mode (press
Page 13

13
any button and keep it pressed until the LED turns
off or starts ashing) or disconnect the recorder
from the computer.
Attention!
The removable drive is protected from recording
and formatting.
Updating the Recorder’s Firmware
All the recorder’s functionalities are dened by
the recorder’s rmware. When you update the
recorder’s rmware, it brings new possibilities to
the recorder and xes old bugs. You can download
new rmware from: http://www.ts-market.com.
Follow the next steps to renew the rmware:
1. Load the le with the new rmware;
2. Fully charge the recorder’s rechargeable
battery;
3. Unpack an archive with les into the same
folder;
4. Install the driver;
5. Connect the recorder to the computer USB
port;
6. Press and hold any button on the recorder
Page 14

14
7. While the button is pressed, run the .exe
le;
8. Follow all the steps that are in the program
window until the renewing process is over.
Attention!
• For successful updating process, make
sure that the recorder’s battery is fully
charged.
• Hold the button until the updating process
is over.
• If for any reason (discharged battery
or disconnecting from the computer or
adapter) the updating process failed and
when you released the button the recorder
did not turn on, repeat the process.
Access Levels
You can set the access levels using the Rec
Manager program. See table 2.
Page 15

15
Recording Pause
Stop
recording
Charge
indication
Memory
indication
Playing
back
Prole
settings
Deletion
low
+ + + + +
mid
+ + + + + + +
high
+ + + + + + +
+
Table 2.
Page 16

16
Box Contents
• Recorder;
• USB cable;
• Flash memory or CD with software and
instructions;
• Short user manual;
• Warranty coupon.
 Loading...